Search
Home
Bookmarks
Brands
Articles
About us
Home
Miele
Miele KFNF9955IDE User Manual
Page 18
User Manual - Page 18
For KFNF9955IDE.
Page 18/108
Page 1
Page 2
Page 3
Page 4
Page 5
Page 6
Page 7
Page 8
Page 9
Page 10
Page 11
Page 12
Page 13
Page 14
Page 15
Page 16
Page 17
Page 18
Page 19
Page 20
Page 21
Page 22
Page 23
Page 24
Page 25
Page 26
Page 27
Page 28
Page 29
Page 30
Page 31
Page 32
Page 33
Page 34
Page 35
Page 36
Page 37
Page 38
Page 39
Page 40
Page 41
Page 42
Page 43
Page 44
Page 45
Page 46
Page 47
Page 48
Page 49
Page 50
Page 51
Page 52
Page 53
Page 54
Page 55
Page 56
Page 57
Page 58
Page 59
Page 60
Page 61
Page 62
Page 63
Page 64
Page 65
Page 66
Page 67
Page 68
Page 69
Page 70
Page 71
Page 72
Page 73
Page 74
Page 75
Page 76
Page 77
Page 78
Page 79
Page 80
Page 81
Page 82
Page 83
Page 84
Page 85
Page 86
Page 87
Page 88
Page 89
Page 90
Page 91
Page 92
Page 93
Page 94
Page 95
Page 96
Page 97
Page 98
Page 99
Page 100
Page 101
Page 102
Page 103
Page 104
Page 105
Page 106
Page 107
Page 108
Contents
Table of Contents
Search
Previous
Next
Bookmarks
Loading ...
Loading ...
Loading ...
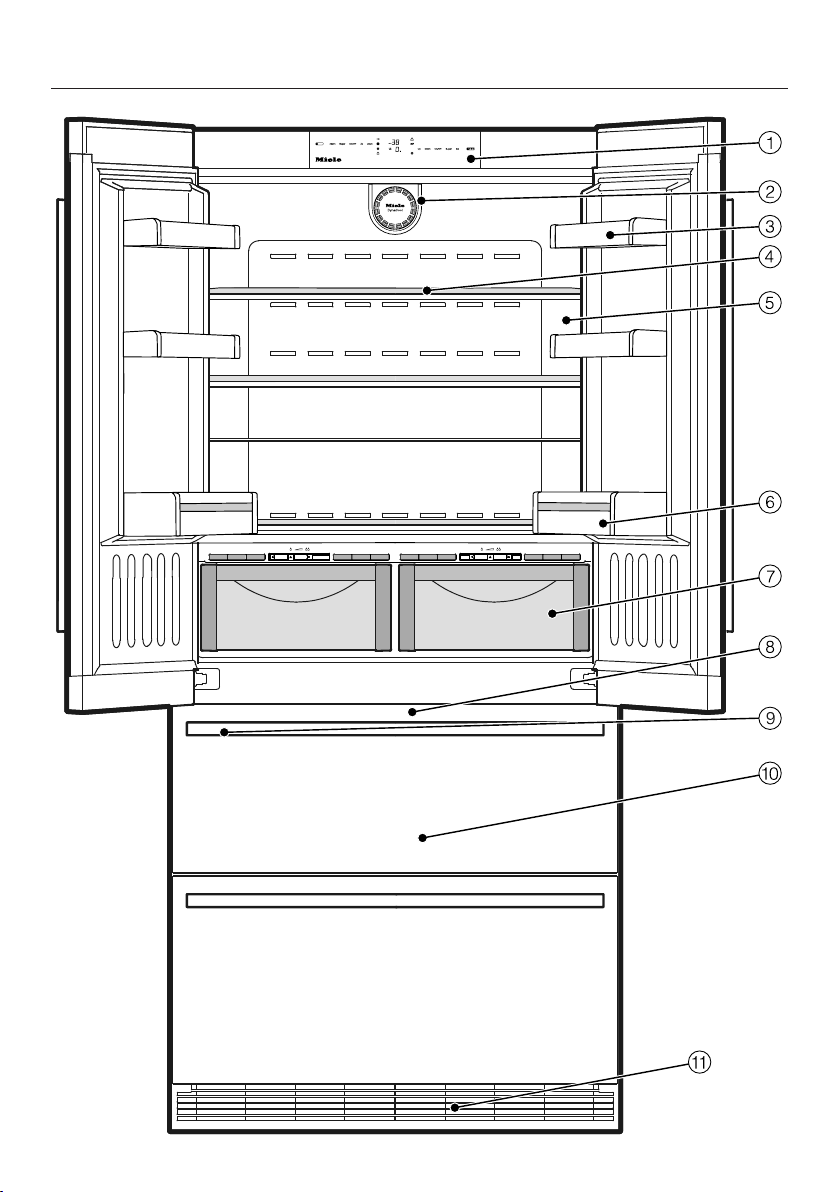
Guide to the appliance
18
Loading ...
Loading ...
Loading ...
<
15
16
17
18
19
20
>
File type: PDF
File name: 74544333_kfnf9955ide.pdf
File size: 3.89 MB
File Language: English
Pages: 108
Author: Miele
Published: 2020-09-26
Updated: 2023-09-06
Download File
Table of Contents
×
Contents
2
IMPORTANT SAFETY INSTRUCTIONS
5
Use
5
Children
6
Technical safety
6
Proper use
9
Cleaning and care
11
Californian statement No. 65
12
Transport
12
Disposal of your old appliance
12
Symbol on the compressor (depending on model)
13
Caring for the environment
14
Disposal of packaging material
14
Disposal of your old appliance
14
How to save energy
15
Guide to the appliance
17
Control panel
17
Accessories supplied
20
Egg tray
20
Air filter
20
Ice cube scoop
20
Door opening angle limiter
20
Optional accessories
20
Stainless steel maintenance
20
All-purpose microfiber cloth
20
20
Switching on and off
21
Before first use
21
Packaging material
21
Cleaning and care
21
21
Operating the appliance
21
Switching the appliance on
21
Switching the appliance off
22
Turning off for longer periods of time - Vacation mode
22
If you are going to be away for longer than a month, please also:
22
The correct temperature
23
. . . in the fridge section and in the PerfectFresh zone
23
Automatic cold air circulation (DynamicCooling)
23
. . . in the freezer section
23
Temperature display
24
Setting the temperature for the refrigerator and freezer
24
Adjusting the temperature in the PerfectFresh zone
25
Temperature range
26
Using Automatic SuperCool and SuperFreeze
27
SuperCool function
27
Turning on SuperCool
27
Turning off SuperCool
27
SuperFreeze function
28
Exceptions:
28
Turning on SuperFreeze
28
Turning off SuperFreeze
28
Selecting additional settings
29
Available settings
29
Sabbath mode
29
Turning on Sabbath mode
30
Turning off Sabbath mode
30
Safety lock
31
Activating and deactivating the safety lock
31
Changing the temperature unit (Celsius / Fahrenheit)
32
Changing the brightness of the temperature display
33
Changing the door seal heater setting
34
Temperature and door alarm
36
Temperature alarm
36
Switching the temperature alarm off early
36
Door alarm
37
Turning the door alarm off early
37
Storing food in the refrigerator section
38
Various cooling zones
38
Warmest area
39
Coldest area
39
Food which is not suitable for storage in the refrigerator section
39
What to be aware of when shopping for food
40
Storing food correctly
40
Storing food in the PerfectFresh zone
41
Regulating the humidity level in the compartments
41
Using a compartment as a dry compartment
42
Using a compartment as a humid compartment
42
Adjusting the interior fittings (refrigerator section)
44
Adjusting the door shelf / bottle shelf
44
Moving the shelves
44
44
Removing the glass plate above the PerfectFresh Pro zone
44
PerfectFresh zone compartments
45
45
Adjusting the interior fittings (freezer section)
46
Freezer drawers
46
Moving the dividing grille in the lower freezer drawer
46
Removing the freezer drawer containers
47
Freezing and storing food
48
Maximum freezing capacity
48
What happens when you freeze fresh food?
48
Storing frozen food
48
Home freezing
49
Tips for home freezing
49
Packaging
49
Before placing food in the freezer
50
Placing food in the freezer
50
Defrosting
50
Cooling drinks quickly
51
Making ice cubes
52
Turning on the ice cube maker
52
Turning off the ice cube maker
53
If the ice cube maker is going to be switched off for a long period of time
53
Changing the size of the ice cubes
53
Automatic defrosting
55
Refrigerator section and PerfectFresh zone
55
Freezer section
55
Cleaning and care
56
Cleaning agents
56
Preparing the appliance for cleaning
57
Interior and accessories
57
Aluminum frames
57
Cleaning the door seal
58
Cleaning the ventilation grilles
58
Changing the air filter
58
Confirm cleaning of air filter
59
After cleaning
60
Frequently asked questions
61
Messages in the display
65
Messages in the display
67
Problems with the ice cube maker
68
Problems with the ice cube maker
69
Problems with the ice cube maker
70
The interior lighting is not working.
71
Causes of noises
72
Technical Service
73
Technical service
73
Warranty
73
Plumbing
74
Information on the fresh water connection
74
The appliance is only suitable for connection to a cold water supply, which
74
Connecting the water supply
75
For water lines with a 1/4" thread:
76
For water lines with a 7/16" 24-UNS thread:
76
Electrical connection
78
Installation information
80
Installation and appliance dimensions
83
Installation dimensions
83
Appliance dimensions
84
Opening angle of the appliance doors
85
Flush installation
86
Frameless installation
86
Limiting the opening angle of the doors
87
Repositioning electrical cabling and the pipework for the fresh water supply
88
Electrical connection
88
Plumbing
89
Dimensions and weight of cabinet doors
90
Flush installation
90
Frameless installation
91
Building in the appliance
92
Before installing the appliance
92
Load-bearing capacity of the niche floor
93
Checking the installation space
93
Preparing the niche
93
Fitting the anti-tip device
93
Fitting the anti-tip device on a concrete floor.
94
Fitting the anti-tip device on a wooden floor
94
Fitting the anti-tip device in a building-in niche deeper than 24" (610 mm)
95
For sideways sloping floors
95
Securing the covers
96
Pushing the appliance into the niche
96
Aligning the appliance
97
Aligning the freezer drawer fronts
97
Securing the appliance in the niche
98
Remove the fixing bracket
98
Fixing the fixing brackets to the cabinet doors
99
Securing the cabinet fronts to the freezer drawers
100
Securing the cabinet door to the refrigerator door
100
Fitting the air filter and ventilation grille
103
Search:
×
Search