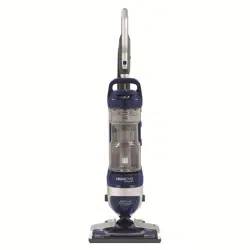
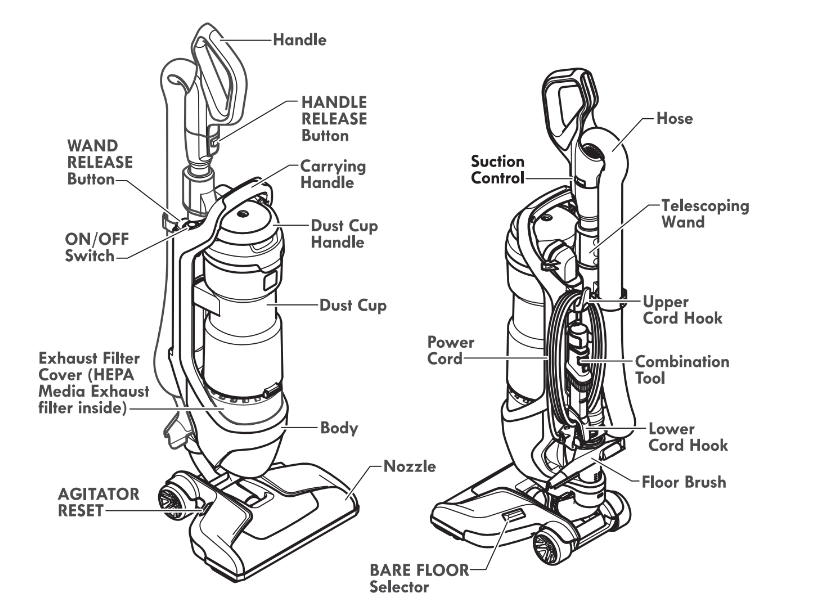
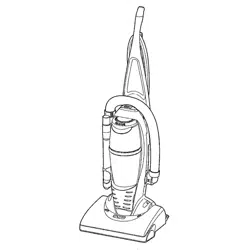
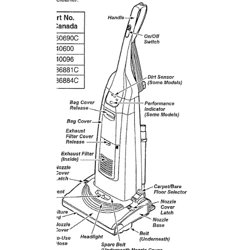
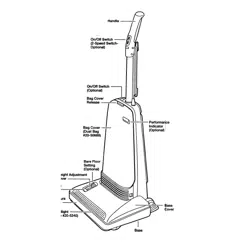
It is important to know your vacuum cleaner’s parts and features to assure its proper and safe use. Review these before using your vacuum cleaner.
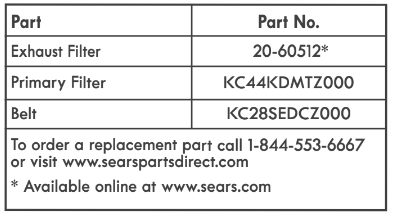
REPLACEMENT PARTS
ASSEMBLY INSTRUCTIONS
Before assembling the vacuum cleaner, check the PACKING LIST (page 2+9 list to verify that you have received all the components of your new Kenmore vacuum cleaner.
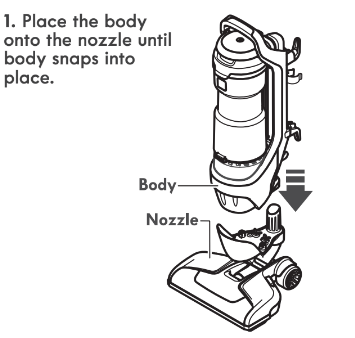
1. Place the body onto the nozzle until body snaps into place.
2. Insert the hose into body until the hose snaps into place.
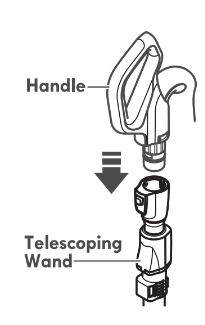
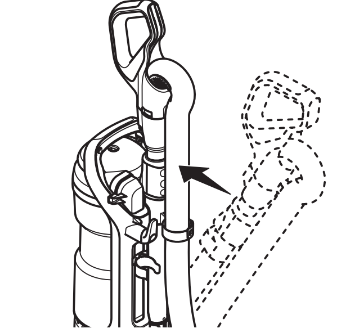
3. Insert the handle into wand until the handle snaps into place.
4. Insert the telescoping wand brush until the wand snaps into place.
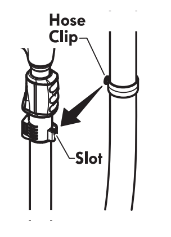
5. Insert hose clip into the slot on the telescoping wand.
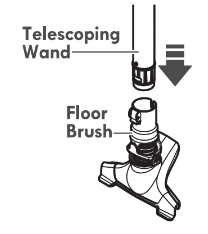
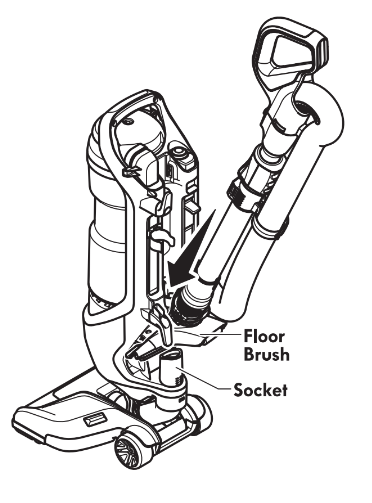
6. Place the floor brush onto the socket
7. Push wand forward until the telescoping wand snaps in place.
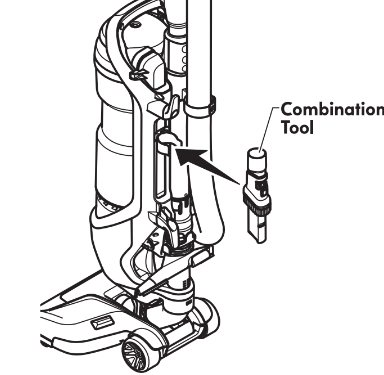
ATTACHMENTS
Insert the combination tool into the holder on the back of the vacuum cleaner as shown.
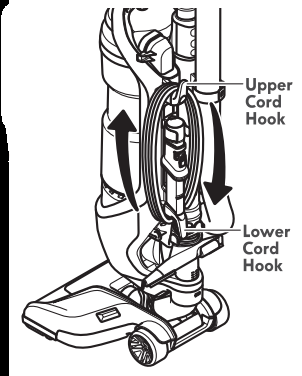
POWER CORD - WRAPPING
WARNING
Electrical Shock and Personal Injury Hazard
Wrapping the cord too tightly puts stress on the cord and can cause cord damage. A damaged cord is an electrical shock hazard and could cause personal injury or damage.
1. Make sure that upper cord hook is in upright position as shown.
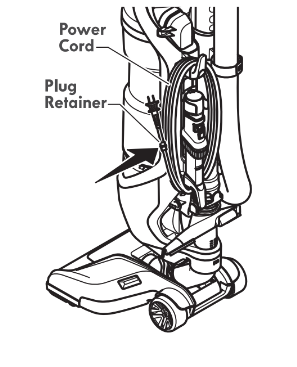
2. Wrap power cord loosely around cord hooks.
3. Lock plug retainer onto the power cord.
OPERATING INSTRUCTIONS
CAUTION
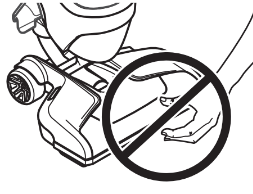
Moving parts! To reduce the risk of personal injury, DO NOT touch the agitator when vacuum cleaner is on. Contacting the agitator while it is rotating can cut, bruise or cause other injuries. Always turn and unplug from electrical outlet before servicing. Use caution when operating near children.
POWER CORD - RELEASE & USE
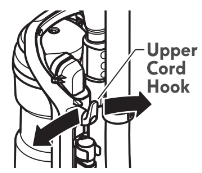
1. Turn the upper cord hook to either side and down to release the power cord.
WARNING
To reduce the risk of electric shock, this vacuum cleaner has a polarized plug (one blade is wider than the other).
The plug will fit in a polarized outlet only one way. If the plug does not fit fully in the outlet, reverse the plug. If it still does not fit, contact a qualiffied technician to install the proper outlet. Do not change the plug in any way.
2. Detach the power cord plug from the power cord and pull the cor upper cord hook.
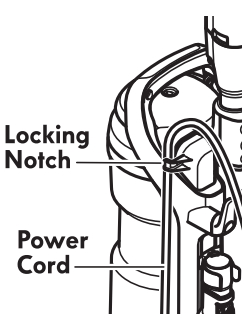
3. Be sure the power cord is locked into the locking notch as shown. This will help manage the cord when operating vacuum cleaner.
4. Plug the polarized power cord into a 120 Volt outlet located ne
WARNING
Personal Injury and Product Damage Hazard
When any abnormality/failure occurs, stop using the product immediately and disconnect the power plug.
DO NOT use outlets above counters. Damage from cord to items in surrounding area could occur.
5. To restore cord after use turn upper cord hook to the up position, then wrap cord loosely around cord hooks.
WARNING
Electrical Shock And Personal Injury Hazard
Wrapping the cord too tightly puts stress on the cord and can cause cord damage. A damaged cord is an electrical shock hazard and could cause personal injury or damage.
OPERATION MODES
UPRIGHT MODE
1. Release the handle by placing foot on the nozzle and pull back to change handle position.
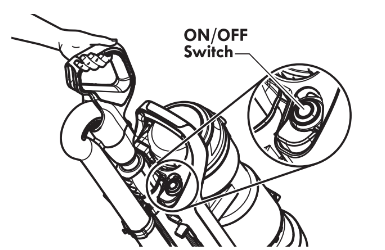
2. Press the ON/OFF button to turn the vacuum cleaner on or o.
NOTE: The agitator does not rotate when the vacuum cleaner is in the upright position.
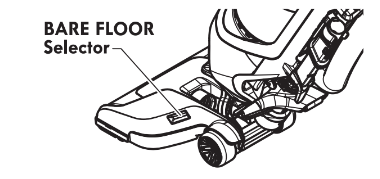
When using the vacuum cleaner on bare s, press the BARE FLOOR selector to
Pressing the BARE FLOOR selector again will turn the agitator on.
CROSSOVER MODE
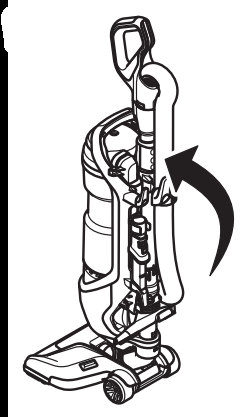
1. Place vacuum cleaner in the upright position.
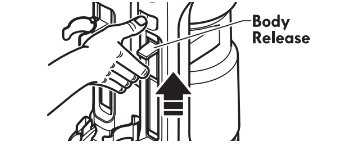
2. Press and hold body release.
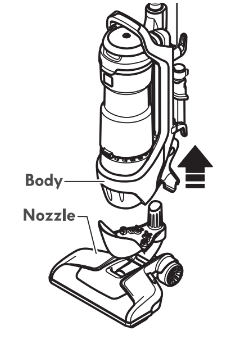
3. Lift body off of nozzle.
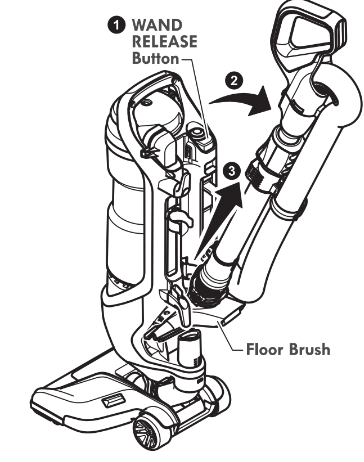
FLOOR BRUSH MODE
1. Press WAND RELEASE button.
2. Pull back to release w> brush.
3. Lift ward and floor brush vacuum cleaner
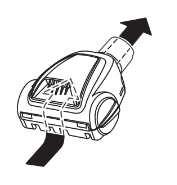
ABOVE FLOOR MODE
1. Press WAND RELEASE button.
2. Pull up to release wand for abov cleaning.
3. Slide attachment collar over open end of wand. Use attachments ad needed. See ATTACHMENT USE TABLE (page 11).
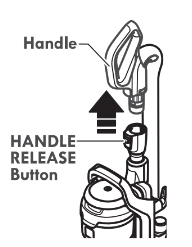
USING ATTACHMENTS ON HANDLE
1. Place the vacuum cleaner in the upright locked position.
2. Remove the handle from the wand by pressing the HANDLE RELEASE button.
3. Slide attachment collar over open end of handle. Use attachments as needed. See ATTACHMENT USE TABLE (page 11).
CAUTION
When using attachments, be careful not to overextend the stretch hose when reaching. Trying to reach beyond the hose stretch capability could cause the vacuum cleaner to tip over.
CAUTION
DO NOT pull the vacuum cleaner around the room by the hose. Property damage or personal injury could result.
ATTACHMENTS
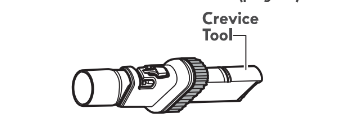
COMBINATION TOOL
The combination tool can be attached to either the handle or the telescoping wand. Slide the collar of the tool over the open end of the handle or wand.
Use the combitation tool in revice tool mode for cleaning in tight spaces such as furniture, between cushions, and stairs. See ATTACHMENT USE TABLE (page 11).
Set the combination tool in dusting brush mode by pressing the release button and sliding the dusting brush to the end of the mode for cleaning loose surfaces such as drapes. See ATTACHMENT USE TABLE (page 11).
To return the combination tool to crevice tool mode press the release button and slide the dusting brush down the combination tool.
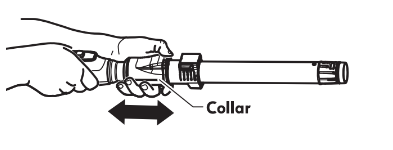
TELESCOPING WAND
The wand length is adjustable and requires no assembly. To adjust, grip collar and slide to desired position.
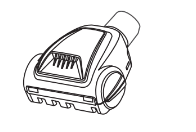
PET HANDIMATE®
The Pet HandiMate® can be attached to either the handle or the telescoping wand.
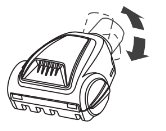
Pet HandiMate® pivots for more convenient cleaning.
PERFORMANCE/SAFETY FEATURES
MOTOR PROTECTION SYSTEM
THERMAL PROTECTOR
This vacuum cleaner has a thermal protector which automatically trips to protect the vacuum cleaner suction motor. rev ow of air to the motor, the thermal protector turns y. This allows the motor to cool in order to prevent possible damage to the vacuum cleaner.
To reset thermal protector: Turn the vacuum cleaner off and unplug the power cord from the outlet to allow the vacuum cleaner to cool and the thermal protectors to reset.
CAUTION: Always return the vacuum cleaner to the upright position before using the hose and attachments. Failure to do so may result in overheating of the agitator motors and can cause the thermal protectors to trip.
Check for and remove clogs, and empty dust cup if necessary. Also check and replace any clogged filters. Wait approximately 50 minutes before restarting vacuum cleaner.
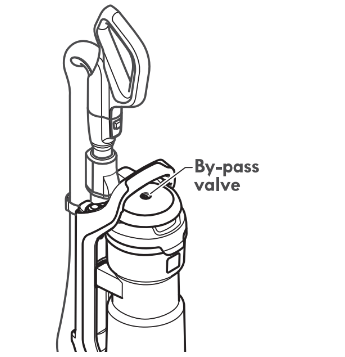
BY-PASS VALVE
This vacuum cleaner has a By-Pass Valve which prevents motor overheating and damage. The valve opens to provide cooling air when a clog prevents normal ow to the vacuum cleaner suction motor. You will notice a change of sound as air rushes through the valve opening. To correct problem, empty the dust cup and clean the primary filter and pre-filter. If using attachments, adjust suction control to allow for gre8ow.
NOTE: The By-Pass Valve may open when using attachments or when cleaning new carpet due to reduce airflow caused by the attachments themselves or by new carpet lint filling the dust cup quickly
NOTE: Do not block By-Pass Valve.
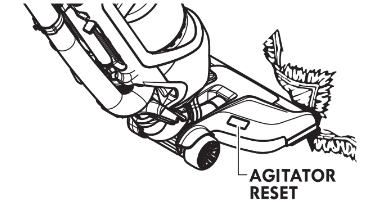
AGITATOR RESET
The agitator has built-in protection against motor damage should the ows down or stops, the agitator overload protector r. The vacuum cleaner suction motor will continue to run.
To correct problem: Turn off and unplug vacuum cleaner, remove obstruction, then press the A\TATOR RESET button.
NOTE: Once the agitator motor shuts down, clear jam from agitator and wait a minimum of 20 seconds before resetting.
If the problem persists, have the vacuum cleaner serviced qualifiled technician.
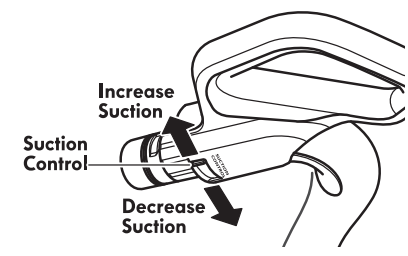
SUCTION CONTROL
The suction control allows you to change vacuum cleaner suction for dierent fabric and carpet weight.
Opening control decreases suction for draperies and lightweight rugs.
Closing control increases suction for upholstery and carpets.
VACUUM CLEANER CARE
Always follow all safety precautions when performing maintenance to the vacuum cleaner.
WARNING
Electrical Shock And Personal Injury Hazard
Disconnect electrical supply before servicing or cleaning the vacuum cleaner. Failure to do so could result in electrical shock or personal injury from vacuum cleaner suddenly starting.
CLEANING EXTERIOR AND ATTACHMENTS
1. Turn off and unplug vacuum cleaner. DO NOT drip water on vacuum cleaner.
2. To clean exterior, or to reduce static elec- tricity and dust build-up, wipe outer surface with a clean, soft cloth that has been dipped in a solution of mild liquid detergent and water, then wrung dry. Wipe dry after cleaning.
Wash crevice tool and dusting brush in warm soapy water, rinse and air dry. Do not clean in dishwasher.
CAUTION : Do not use attachments if they are wet. Attachments used in dirty areas, such as under a refrigerator, should not be used on other surfaces until they are washed. They could leave marks.
VACUUM CLEANER STORAGE
Replace hose and wand in storage position if necessary
Gather the cord and wrap it loosely around the upper and lower cord hooks. Lock plug retainer onto the power cord.
Store the vacuum cleaner in a dry, indoor are ked in the upright position.
WARNING
Electrical Shock And Personal Injury Hazard
Wrapping the cord too tightly puts stress on the cord and can cause cord damage. A damaged cord is an electrical shock hazard and could cause personal injury or damage.
EMPTYING DUST CUP
WARNING
Always unplug power cord from electrical outlet before performing any service on vacuum cleaner.
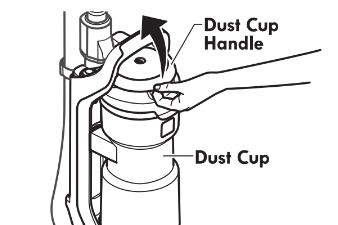
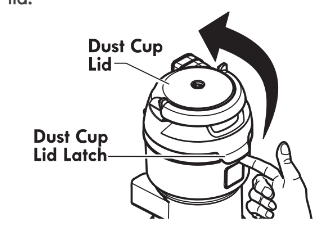
TO REMOVE DUST CUP
1. Lift dust cup handle located at the top of the dust cup.
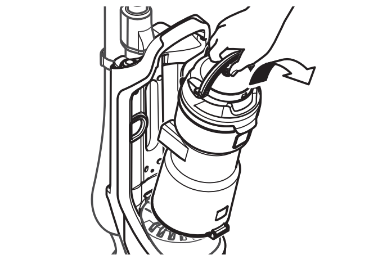
2. Pull the dust cup handle up and lift dust cup up and out of the vacuum cleaner.
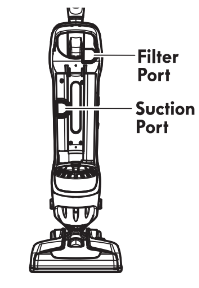
3. Remove any clogs that might be located in the suction port or filter part area
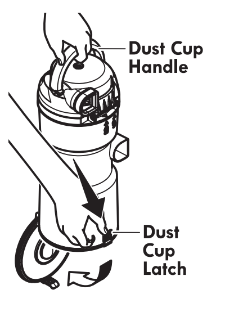
TO EMPTY DUST CUP
1. Raise dust cup handle to the vertical position.
2. Hold dust cup over a trash container.
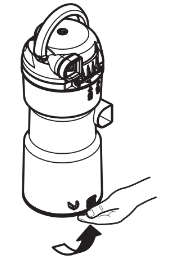
3. Press the dust cup latch downward to release the door.
The door will swing open and the debris will fall into the trash container.
4. Shake the dust cup to release any debris that might hang in the pre-filter
5. After the dust cup is empty of debris, firmly, close the door. Make sure you hear a “click” sound to indicate that the door is fully latched.
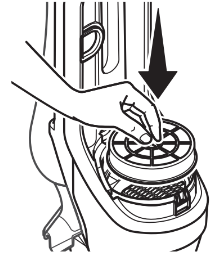
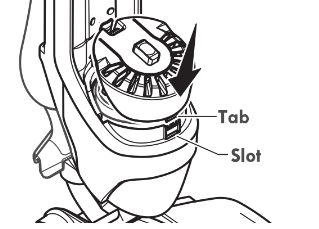
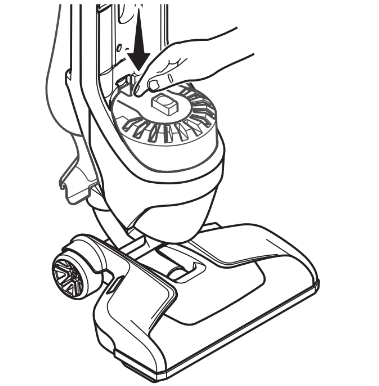
TO REINSTALL DUST CUP
1. Place dust cup back into vacuum cleaner by inserting tilting back with the dust cup handle raised.
2. Lower the dust cup handle to lock dust cup in place. A noticeable click” should be heard.
PRE-FILTER CLEANING
The pre - filter inside the dust cup. Check the pre - filter requently and clean when dirty.
1. Remove the dust cup as outlined in the EMPTYING DUST CUP (page 15).
NOTE: Make sure dust cup is free of debris before opening.
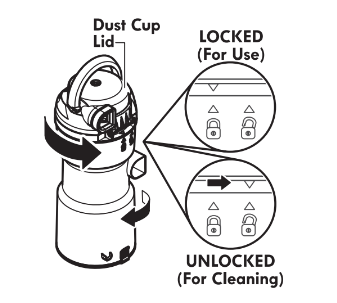
2. Rotate dust cup lid assembly counterclockwise as indicated on the lid and lift off.
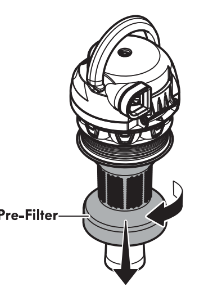
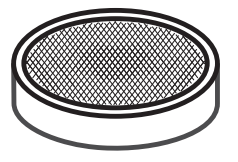
3. Grasp pre - filter and rotate as shown to remove.
4. Clean pre - filter by gently tapping over a trash container. Tap on several sides to ensure best cleaning.
If ecessary, rinse with cold water only, DO NOT use detergent or soap. Allow parts to dry 24 hours before putting back into vacuum cleaner.
DO NOT wash in the dishwasher.
DO NOT install damp.
To Reinstall:
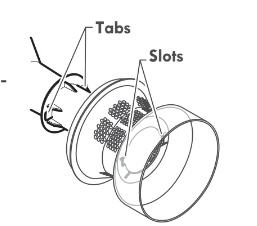
1. Align the slots on the pre- alignment tabs inside dust cup lid assembly.
2. Rotate prr-filter as shown to lock in place.
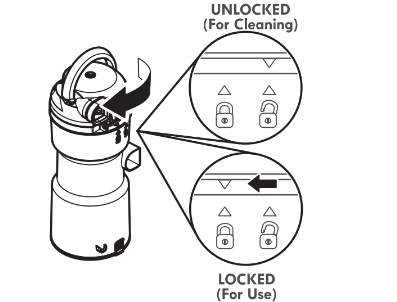
3. Replace the lower portion of the dust cup by aligning marks as shown, UNLOCKED (For Cleaning).
4. Rotate while pressing downward until marks align as shown above in LOCKED (for use)
5. Reinstall the dust cup. See EMPTYING DUST CUP
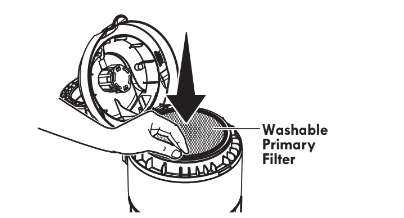
PRIMARY FILTER CLEANING
The primary located inside the dust cup lid.
It is recommended to clean the primary water at least once a month. Check the primary filter frequently and clean when dirty.
NOTE: When the cleaning of the filter no longer restores vacuum cleaner suction to full power, replace the filter.
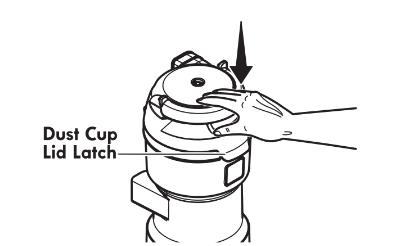
1. Remove the dust cup as outlined in the EMPTYING DUST CUP (page 15).
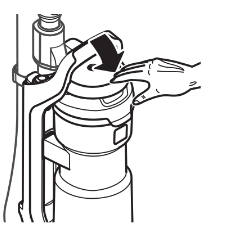
2. Pull the dust cup lid latch and filter
3. Remove the primary filter
4. Wash with cold water only, DO NOT use detergent or soap. squeeze by hand and allow to air dry. Allow parts to dry 24 hours before putting back into vacuum cleaner. DO NOT operate without primar+ installed. DO NOT wash in the dishwasher. DO NOT install primary filter if damp
To Reinstall:
1. Place the primary filter into the dust cup lid.
2. Close the dust cup lid. Be sure the lid snaps in place. A noticeable click” should be heard.
3. Reinstall the dust cup. EMPTYING DUST CUP (page 15).
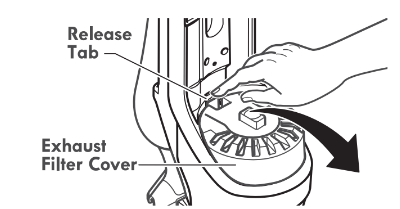
HEPA MEDIA EXHAUST FILTER
EXHAUST FILTER
The exhaust filter must be replaced when it becomes dirty. The timing between replacement intervals will depend on the use conditions the vacuum cleaner is exposed to. The filter should be checked when emptying the dust cup. The filter should be checked CANNOT be washed as it will lose its dust trapping ability.
1. Remove exhaust filter over by pulling the release tab on the cover and rotating out from vacuum cleaner.
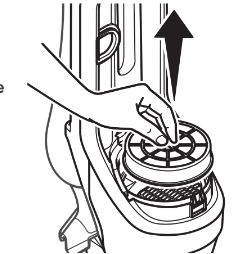
2. Remove the HEPA Media exhaust from vacuum cleaner.
3. Place new rtridge into vacuum cleaner as shown.
4. Replace the exhaust filter over by placing bottom tab into the slot.
5. Rotate filter cover onto vacuum cleaner, and press down as shown, until cover snaps into place.
BELT CHANGING
WARNING
Always unplug power cord from electrical outlet before performing maintenance to the vacuum cleaner.
Replace belt whenever a burning rubber smell caused by excessive slippage occurs.
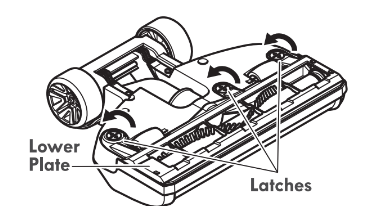
1. Lay vacuum cleaner on the floor with the bottom up and nozzle flat.
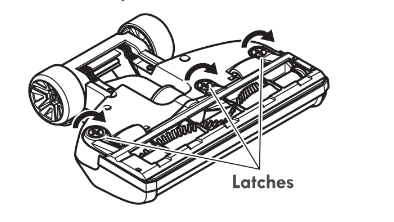
2. Release lower plate by rotating the lower plate latches to the UNLOCK ower plate.
CAUTION: Motor shaft may be hot.
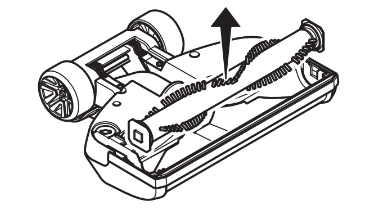
3. Remove agitator by carefully lifting out.
4. Remove worn or broken belt.
5. Clean agitator. See AGITATOR CLEANING (page 21).
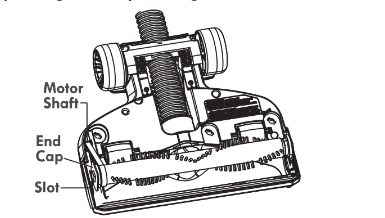
6. Loop new belt around motor shaft and agitator.
7. Reinstall agitator back into nozzle by placing end caps into grooves.
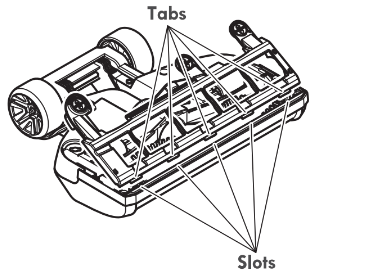
8. Reinstall lower plate by aligning tabs on front edge of lower plate with slots in the nozzle and rotating to installed position.
9. Press lower plate onto nozzle and secure by rotating the lower plate latches to the LOCK position.
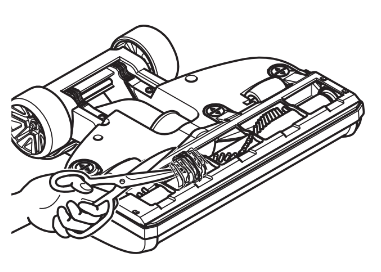
AGITATOR CLEANING
NOZZLE
To maintain efficient cleaning, the agitator must be kept free of carpet r, string, or hair build-up. After every 7 to 10 uses, unplug and turn vacuum cleaner over and check agitator for and hair build-up. scissors to remove any build-up entangled around the agitator.
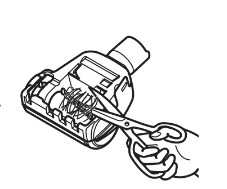
PET HANDIMATE®
Cut any carpet pile and lint entangled around agitator with a pair of scissors.
CAUTION: To reduce the risk of injury from moving parts, remove Pet HandiMate® from vacuum hose or wand before servicing.
REMOVING CLOGS
TO REMOVE CLOG FROM HOSE
Frequently check air path to make sure it is free of obstructions.
1. Press WAND RELEASE button.
2. Pull back to release w> brush.
3. Lift wand and floor brush from vacuum cleaner.
4. To remove hose, press tab on hose own.
5. Remove any clogs or residue in hose.
6. Reinstall hose and wand onto vacuum cleaner. See ASSEMBLY
TO REMOVE CLOG FROM PET HANDIMATE®
CAUTION: To reduce the risk of injury from moving parts, remove Pet HandiMate® from vacuum hose or wand before servicing.
Frequently check air path to make sure it is free of obstructions.
TROUBLESHOOTING
Review this table to find do it yourself solutions for minor performance problems. Any service needed, other than maintenance describe in this Use & Care Guide, should be performed by ed service agent.
WARNING: Disconnect electrical supply before performing maintenance to the vacuum cleaner. Failure to do so could result in electrical shock or personal injury.
PROBLEM
POSSIBLE CAUSE
POSSIBLE SOLUTION
Vacuum cleaner won't run
1. Unplugged at wall outlet.
Plug in firmly press the ON/OFF switch.
2. Tripped circuit breaker or blown fuse
2. Reset circuit breaker or replace fuse.
3. Thermal protector tripped.
3. Allow vacuum cleaner to cool 50 minutes (page 12).
4. Defective wall outlet.
4. Check with a good appliance or lamp. Have outlet properly serviced.
Poor job of dirt pick-up.
1. Full or clogged dust cup.
2. Wrong floor setting
3. Warm agitator
4/ Warm or broken Belt
5. Clogged nozzle, hose, or wand
6. Hole in hose.
7. Hose not inserted fully.
8. Motor protection system activated.
9. Dirty filter
1. Empty dust cup (page 15).
2. Adjut setting (page 9)
3. Replace agitator.
4. Replace belt (page 20).
5. Check for and remove any clogs in nozzle, hose, and wand.
6. Replace hose.
7. Insert hose fully (page 6)
8. Check for clogs in hose.
9.Clean pre-filter (page 17), primary filter (page 18) or replace HEPA Media Exhaust filter (Page 19)
Agitator does not turn
1. Handle in full upright position
2. Agitator overload protector tripped
3. Thermal protector tripped
4. Nozzle switch in BARE FLOOR
1. Move handle from upright position
2. Press AGITATOR RESET button (page 13)
3. Allow Vacuum cleaner to cool 50 minutes (page 12)
4. Press nozzle switch to change to carpet position (page 9)
Airflow restricted with attchment use; sound changes
1. Attachment use restricts ir flow
2. New carpet fuzz clogged air path
1. Check attachments for fuzz, lint, pet hairor orther debris
2. Check for and remove any clogs and clean hose
Pet HandiMate® will not run when attached.
1. Carpet pile entangled around agitator.
2. Worn or broken belt.
1. Clean agitator.
2. Not a serviceable item, replace Pet HandiMate®.
Pet HandiMate®: Poor job of dirt pick-up.
1. Carpet pile entangled around agitator.
2. Worn or broken belt.
3. Problem with vacuum cleaner
4. Open suction control.
5. Hole in vacuum hose.
1. Clean agitator.
2. Not a serviceable item, replace Pet HandiMate
3. Check vacuum cleaner troubleshooting tips
4. Close suction control (Page 13)
5. Replace hose. Refer to the Repair Parts List for hose purchasing information.