

Portuguese
1. Ligue o cabo da tomada de 3,5 verde ao conector “Front in”
2. Ligue o cabo da tomada de 3,5 preto ao conector “Surround in”
3. Ligue o cabo de tomada de 3,5 laranja ao conector “Centre/Sub in”
4. Ligue o cabo branco ao conector da tomada “Front out” de 3,5 branco
5. Ligue o cabo laranja ao conector “Surround out” de 3,5 laranja
6. Ligue o conector mini Din preto à entrada Din “Control in”
7. Ligue o(s) cabo(s) Line in à fonte de som
8. Ligue a fonte de alimentaç ã o à entrada “Power in”
9. Ligue o cabo de alimentaçã o à corrente elé ctrica
10. Ligue/desligue o sistema utilizando o botã o “Power” no painel central de
saté lite
11. Regule o sistema, utilizando a placa de som do PC ou outra fonte de som.
12. Regule o volume, utilizando “+/-“ no painel central de saté lite
13. O nível de subwoofer pode ser regulado com o botã o “Bass control”.
Nota:
1. Introduza apenas a ficha na tomada de CA depois de efectuar todas as
ligaç õ es.
2. As entradas estã o de acordo com os códigos de cor do PC 2002 (verde,
preto, laranja)
Slowaskia
Hungary
1. Csatlakoztassa a zö ld 3,5 mm-es csatlakozó ká belt a „Front in”
csatlakozó ba.
2. Csatlakoztassa a fekete 3,5 mm-es csatlakozó ká belt a „Surround
in” csatlakozó ba.
3. Csatlakoztassa a narancsszínû 3,5 mm-es csatlakozó ká belt a
„Centre/Sub in” csatlakozó ba.
4. Csatlakoztassa a fehé r jelö lé ssel ellá tott ká bel t a fehé r 3,5 mm-es
„Front out” csatlakozó ba.
5. Cs at lak oz ta ssa a narancs színû jelö lé s se l ellá to tt ká bel t a
narancssá rga 3,5 mm-es „Surround out” csatlakozó ba.
6. Cs at lak oz ta ss a a mini D IN-c sa tlako zó t a „Contr ol in ” DIN
bemenetbe.
7. Csatlakoztassa a vonalbementi ká bel(eke)t a hangforrá sba.
8. Csatlakoztassa a há ló zati tá pfeszü ltsé gká belt a „Power input”
bemenetbe.
9. Illessze a tá pfeszü ltsé g-dugaszt a dugaszoló -aljzatba.
10. A kö zé psõ egysé gen talá lható „Power” gomb segítsé gé vel kapcsolja
be / ki a rendszert.
11. Vé gezze el a rendszer hang olá sá t PC-hangká rtya vagy egyé b
hangforrá s segítsé gé vel.
12. Á llítsa be a hangerõ t a kö zé psõ egysé gen talá lható „+/-” gomb
segítsé gé vel.
13. A mé lysugá rzó t a „Bass control” gomb segítsé gé vel á llíthatja be.
Megjegyzé s:
1. Ne illessze a tá pfeszü ltsé g dugó t a vá ltozó á ramú (AC) dugaszoló -
alj za tb a addig, amí g ne m vé gezte el a sz ü ks é ges
csatlakoztatá sokat.
2. A bemenetek jelö lé se a PC 2002 színkó dolá snak (zö ld, fekete,
narancssá rga) megfelelõ en tö rté nt.
Czech
IMPORTANT SAFETY INSTRUCTIONS - Read before operating equipment
For US/Canada only
This product was designed and manufactured to meet strict quality and
safety standards. There are, however, some installation and operation
precautions which you should be particularly aware of.
1. Read these instructions - All the safety and operating instructions
should be read before the appliance is operated.
2. Keep these instructions - The safety and operating instructions
should be retained for future reference.
3. Heed all warning s - All warnings on the appliance and in the
operating instructions should be adhered to.
4. Follow all instructions - All operating and use instructions should
be followed.
5. Do not use this apparatus near water - for example, near a bathtub,
washbowl, kitchen sink, laundry tub, in a wet basement or near a
swimming pool, etc.
6. Clean only with a damp cloth. The appliance should be cleaned
only as recommended by the manufacturer.
7. Install in accordance with the manufacturers Instructions. Do
not block any o f the ventilation openings. For example, the
appliance should not be situated on a bed, sofa, rug, or similar surface
or placed in a built-in installation, such as a bookcase or cabinet that
may impede the flow of air through the ventilation openings.
8. Do not Install near any heat sources such as radiators, heat
registers, stoves, or other apparatus (including amplifiers) that
produce heat.
9. Do not defeat the safety purpose of the polarized or
grounding-type plug. A polarized plug has two blades with
one wider than the other. Match wide blade of Plug to
wide slot, fully insert. A grounding type plug has two blades
and a third grounding prong. The wide blade or the third prong are provided
for your safety. When the provided plug does not fit into your outlet, consult
an electrician for replacement of the obsolete outlet.
10. Protect the power cord from being walked on or pinched particulary
at plugs, convenience receptacles, and the point where they exit
from the apparatus.
11. Only use attachments/accessories specified by the manufacturer.
12. Use only with a cart, stand, tripod, bracket, or table specified
by the manufacturer, or sold with the apparatus. When a cart is
used, use caution when moving the cart/apparatus combination
to avoid injury from tip-over.
13. Unplug this apparatus during lightning storms or when unused for
long periods of time.
14. Refer all servicing to qualified service personnel. Servicing is
required when the apparatus has been damaged in any way, such
as power-supply cord or plug is damaged, liquid has been spilled or
objects have fallen into the apparatus, the apparatus has been
exposed to rain or moisture, does not operate normally, or has been
dropped.
15. Warning! To reduce the risk of fire or electric shock, do not expose
this appliance to rain or moisture.
EL 4562-E004: 99/3
http://www.philips.com/pcstuff
AC
Polarized Plug
R
OTARY
V
OLUME
C
ONTROL
T
O
ADJUST
THE
VOLUME
HIGHER
OR
LOWER
P
OWER
O
N
/O
FF
T
O
SWITCH
ON
OR
OFF
POWER
(B
LUE
LED
INDICATES
THAT
THE
POWER
IS
O
N
)
P
OWER
I
N
T
O
CONNECT
THE
ADAPTER
B
ASS
C
ONTROL
T
O
ADJUST
BASS
LEVEL
TO
DESIRED
VOLUME
C
ENTER
O
UTPUT
T
O
CONNECT
THE
CENTER
SPEAKER
F
RONT
I
N
T
O
CONNECT
THE
F
RONT
I
N
CABLE
FOR
THE
FRONT
SPEAKERS
FROM
THE
SOUNDCARD
S
URROUND
I
N
T
O
CONNECT
THE
S
URROUND
I
N
CABLE
FOR
THE
FRONT
SPEAKERS
FROM
THE
SOUNDCARD
C
ENTER
/ S
UB
. I
N
T
O
CONNECT
THE
C
ENTER
/ S
UB
. I
N
CABLE
FOR
THE
SURROUND
SPEAKERS
FROM
THE
SOUNDCARD
F
RONT
O
UT
T
O
CONNECT
BOTH
FRONT
LEFT
AND
RIGHT
SATELLITE
SPEAKERS
S
URROUND
O
UT
T
O
CONNECT
BOTH
SURROUND
LEFT
AND
RIGHT
SATELLITE
SPEAKERS
Installation
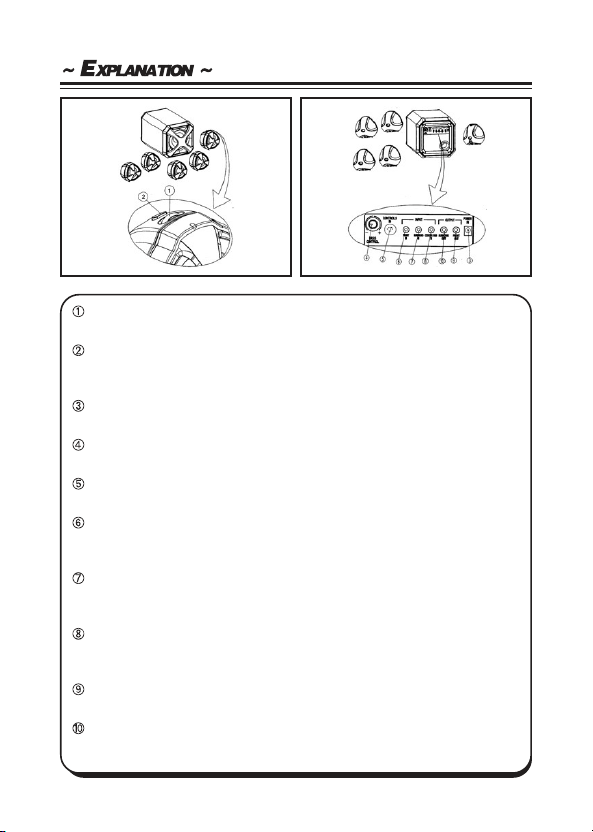
English
1. Connect green 3.5 jack cable to F
RONT
I
N
connector.
2. Connect black 3.5 j ack cable to S
URROUND
I
N
connector.
3. Connect Orange 3.5 jack cable to C
ENTE R
/ S
UB
I
N
connector.
4. Connect white marked cable to white F
RONT
O
UT
3.5 jack connector.
5. Connect yellow marked cable to Yellow Surround Out 3.5 connector.
6. Connect black mini Din connector to C
ONTROLS
I
N
Din input.
7. Connect line In cable(s) to sound source.
8. Connect Power supply to P
OWER
I
N
input.
9. Plug power supply into mains plug.
10. Switch On/Off the system by using the Power button on the centre
satellite panel.
11. Tune system, using PC sound card or other sound source.
12. Tune volume, using +/- on the center satellite panel.
13. Subwoofer level can be tuned on B
ASS
C
ONTROL
knob.
Not e:
1. Do not insert the power plug into AC outlet until all connections are
made.
2. Inputs are following PC 2002 colour coding (green, black, orange).
Swedish
1. Anslut kabeln med den grö na 3,5 mm-kontakten till Front in-anslutningen
2. Anslut kabeln med den svarta 3,5 mm-kontakten til l Surround in-
anslutningen
3. Anslut kabeln med den orangefä rgade 3,5 mm-kontakten till Centre/
Sub in-anslutningen
4. Anslut den vitmä rkta kabeln till den vita 3,5-anslutningen Front out
5. Anslut de n or angemä rkta kabeln till den ora ngef ä rgade 3,5-
anslutningen Surround out
6. Anslut den svarta mini-DIN-kontakten till DIN-ingå ngen Control i n
7. Anslut Line in-kabeln/kablarna till ljudkä llan
8. Anslut nä tenheten till ingå ngen Power in
9. Anslut nä tenheten till nä tkontakten
10. Slå på /av systemet med Power-knappen på mittsatellitpanelen
11. Justera systemet genom att anvä nda PC-ljudkort eller anna n
ljudkä lla
12. Justera volymen genom att anvä nda +/- på mittsatellitpanelen
13. Nivå n på subwoofern kan justeras med ratten Bass control
Obs:
1. An slut inte nä t kont akten ti ll vä x elströ msu ttaget fö rrä n all a
anslutningar har gjorts.
Ingå ng har fö ljande PC 2002-fä rgmä rkning (grö n, svart, orange)
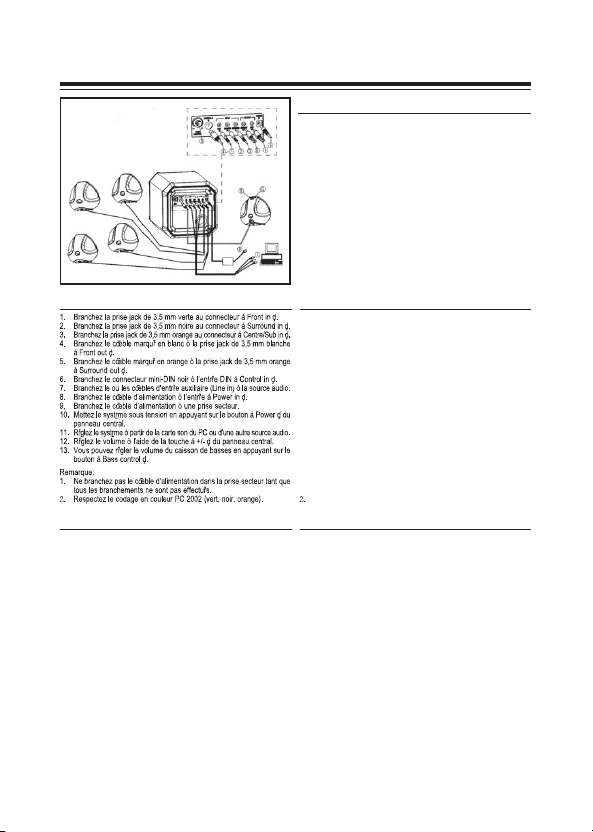
Franç ais
Deutsch
1. Verbinden Sie das grü ne Kabel mit 3,5-mm-Klinkenstecker mit dem Anschluss
„Front in”.
2. Verbinden Sie das schwarze Kabel mit 3,5-mm-Klinkenstecker mit dem
Anschluss „Surround in”.
3. Verbinden Sie das orangefarbene Kabel mit 3,5-mm-Klinkenstecker mit dem
Anschluss „Centre/Sub in”.
4. Verbinden Sie das weiß markierte Kabel mit dem weißen 3,5-mm-
Klinkensteckeranschluss “Front out”.
5. Verbinden Sie das orange markierte Kabel mit dem orangefarbenen 3,5-mm-
Klinkensteckeranschluss “Surround out“.
6. Verbinden Sie den schwarzen Mini-DIN-Steckverbinder mit dem DIN-Eingang
“Control in“.
7. Verbinden Sie das (die) Line-in-Kabel mit der Tonsignalquelle.
8. Verbinden Sie den Eingang “Power in” mit der Stromversorgung.
9. Stecken Sie den Netzstecker in die Steckdose.
10. Schalten Sie das System mit der Taste “Power” auf dem mittleren Satellitenfeld
ein bzw. aus.
11. Stimmen Sie das System mit Hilfe der PC-Soundkarte oder einer anderen
Tonsignalquelle ab.
12. Stellen Sie die Lautstä rke mit Hilfe der Tasten “+/-“ auf dem mittleren Satellitenfeld
ein.
13. Der Subwoofer-Pegel kann mit dem Knopf “Bass control” eingestellt werden.
Hinweis:
1. Schließen Sie das Gerät erst dann an die Stromversorgung an, wenn alle
anderen Verbindungen hergestellt wurden.
2. Die Eingä nge entsprechen der folgenden PC 2002 Farbcodierung (grü n,
schwarz, orange).
Nederlands
1. Sluit de kabel met een groen plugje van 3,5 mm aan op de connector
“Front in”.
2. Sluit de kabel met een zwart plugje van 3,5 mm aan op de connector
“Surround in”.
3. Sluit de kabel met een oranje plugje van 3,5 mm aan op de connector
“Centre/Sub in”.
4. Sluit de wit gemarkeerde kabel aan op de het witte busje van 3,5 mm,
“Front out”
5. Sluit de oranje gemarkeerde kabel aan op het oranje busje van 3,5 mm,
“Surround out”.
6. Sluit de zwarte mini-DIN-plug aan op de mini-DIN-bus “Control in”.
7. Verbind de lijningangskabel(s) met de geluidsbron.
8. Sluit de voedingsadapter aan op de ingang “Power in”.
9. Steek de netstekker in een stopcontact.
10. Schakel het systeem in of uit met de Power-knop op de centrale
satellietluidspreker.
11. Stel het systeem in met behulp van de geluidskaart of een andere
geluidsbron.
12. Stel het volume in met “+/-” op de centrale satellietluidspreker.
13. Het volume van de subwoofer is instelbaar met de knop “Bass control”.
Opmerking:
1. Verbind de netkabel pas met een stopcontact nada t u all e
verbindingskabeltjes hebt aangesloten.
2. De kleurcodering van connectors voldoet aan de norm PC 2002 (groen,
zwart, oranje).
1. Collegate il cavo jack da 3,5 verde al connettore “Front in”
2. Collegate il cavo jack da 3,5 nero al connettore “Surround in”
3. Collegate il cavo jack da 3,5 arancione al connettore “Centre/Sub in”
4. Collegate il cavo bianco al connettore jack da 3,5 “Front out” bianco
5. Collegate il cavo arancione al connettore da 3,5 “Surround out”
arancione
6. Collegate il connettore mini Din nero all’ingresso Din “Control in “
7. Collegate il/i cavo/i Line in alla sorgente audio
8. Collegate l’alimentatore all’ingresso “Power in”
9. Collegate l’alimentatore ad una presa elettrica
10. Accendete/spegnete il sistema tramite il pulsante di alimentazione
“Power” sul pannello satellite centrale
11. Sintonizzate il sistema, con la scheda audio del PC od un’altra
sorgente audio.
12. Regolate il volume, con “ +/-“ sul pannello satellite centrale
13. Il livello Subwoofer può essere regolato con la manopola per il
controllo dei bassi “Bass control”.
No ta:
1. Non collegate la spina d’alimentazione alla presa CA prima di aver
realizzato tutte le connessioni.
2. Gli ingressi seguono la codifica colore PC 2002 (verde, nero,
arancione)
Españ ol
1. Conecte el cable con clavija verde de 3,5 mm al conector “Front in”.
2. Conecte el cable con clavija negra de 3,5 mm al conector “Surround in”.
3. Conecte el cable con clavija naranja de 3,5 mm al conector “Centre/
Sub in”.
4. Conecte el cable marcado en blanco al conector de clavija blanca de 3,5
mm “Front out”.
5. Conecte el cable marcado en naranja al conector de clavija naranja de
3,5 mm “Surround out”.
6. Conecte el conector mini DIN negro a la entrada DIN “Control in”.
7. Conecte los cables de entrada de línea a la fuente de sonido.
8. Conecte la fuente de alimentació n a la entrada “Power in”.
9. Conecte la fuente de alimentació n a la red elé ctrica.
10. Encienda/apague el sistema con el botó n “Power” del panel saté lite central.
11. Ajuste el sistema mediante la tarjeta de sonido del PC u otra fuente de
sonido.
12. Ajuste el volumen mediante “+/-” del panel saté lite central.
13. El nivel del subwoofer se puede ajustar con el mando de control de graves
“Bass control”.
Nota:
1. No conecte el cable de alimentació n a un enchufe de CA hasta que se
hayan realizado todas las conexiones.
Las entradas siguen los có digos de color PC 2002 (verde, negro, naranja).
Norwegian
1. Koble grønn 3,5-pluggkabel til “Front in”-kontakt
2. Koble svart 3,5-pluggkabel til “Surround in”-kontakt
3. Koble oransje 3,5-pluggkabel til “Centre/Sub in”-kontakt
4. Koble hvitmerket kabel til hvit “Front out” 3,5-pluggkontakt
5. Koble oransjemerket kabel til oransje “Surround out“ 3,5-kontakt
6. Koble svart MiniDin-kontakt til “Control in“ Din-inngang
7. Koble Line in-kabel/kabler til lydkilde
8. Koble strømforsyning til “Power in”-inngang
9. Plugg strømforsyning inn i strømuttaket
10. Slå systemet på /av med “Power”-knappen på midtre satellittpanel
11. Finjuster systemet ved bruk av PC-lydkort eller annen lydkilde.
12. Finjuster volum v ed bruk av “+/-“ på midtre satellittpanel
13. Basshøyttalernivå kan finjusteres med knotten “Bass control”.
Merk:
1. Sett ikke strømstøpselet inn i vekselstrømuttaket før alle tilkoblinger
er utført.
2. Innganger følger PC 2002 fargemerking (grønn, svart, oransje)
Finnish
1. Kytke vihreä 3,5 mm:n liitin Front in -liitä ntä ä n.
2. Kytke musta 3,5 mm:n liitin Surround in -liitä ntä ä n.
3. Kytke oranssi 3,5 mm:n liitin Centre/Sub in -liitä ntä ä n.
4. Kytke valkoisella merkitty kaapeli valkoiseen 3,5 mm:n Front out -liitä ntä ä n.
5. Kytke oranssilla merkitty kaapeli oranssiin 3,5 mm:n Surround out -liitä ntä ä n.
6. Kytke musta Mini Din -liitin Control in -tuloliitä ntä ä n.
7. Kytke linjatulokaapeli(t) ä ä nilä hteeseen.
8. Kytke virtalä hde Power in -liitä ntä ä n.
9. Kytke virtalä hde pistorasiaan.
10. Voit kytke ä jä rjest elmä n pä ä lle ta i poi s pä ä ltä pa inamalla
keskisatelliittipaneelin Power-painiketta.
11. Sä ä dä jä rjestelmä kä yttä mä llä tietokoneen ä ä nikorttia tai muuta
ä ä nilä hdettä .
12. Voit sä ä tä ä ä ä nenvoimakkuutta keskisatelliittipaneelin +/—sä ä timellä
13. Voit sä ä tä ä subwooferin tasoa Bass control -sä ä timellä .
Huomautus:
1. Ä lä kytke virtalä hdettä pistorasiaan, ennen kuin kaikki kytkennä t on tehty.
2. Tuloliitä nnä t on merkitty PC 2002 -vä rikoodijä rjestelmä n mukaisesti
(vihreä , musta, oranssi).
R
OTARY
V
OLUME
C
ONTROL
T
O
ADJUST
THE
VOLUME
HIGHER
OR
LOWER
P
OWER
O
N
/O
FF
T
O
SWITCH
ON
OR
OFF
POWER
(B
LUE
LED
INDICATES
THAT
THE
POWER
IS
O
N
)
P
OWER
I
N
T
O
CONNECT
THE
ADAPTER
B
ASS
C
ONTROL
T
O
ADJUST
BASS
LEVEL
TO
DESIRED
VOLUME
C
ENTER
O
UTPUT
T
O
CONNECT
THE
CENTER
SPEAKER
F
RONT
I
N
T
O
CONNECT
THE
F
RONT
I
N
CABLE
FOR
THE
FRONT
SPEAKERS
FROM
THE
SOUNDCARD
S
URROUND
I
N
T
O
CONNECT
THE
S
URROUND
I
N
CABLE
FOR
THE
FRONT
SPEAKERS
FROM
THE
SOUNDCARD
C
ENTER
/ S
UB
. I
N
T
O
CONNECT
THE
C
ENTER
/ S
UB
. I
N
CABLE
FOR
THE
SURROUND
SPEAKERS
FROM
THE
SOUNDCARD
F
RONT
O
UT
T
O
CONNECT
BOTH
FRONT
LEFT
AND
RIGHT
SATELLITE
SPEAKERS
S
URROUND
O
UT
T
O
CONNECT
BOTH
SURROUND
LEFT
AND
RIGHT
SATELLITE
SPEAKERS
Installation
English
1. Connect green 3.5 jack cable to F
RONT
I
N
connector.
2. Connect black 3.5 j ack cable to S
URROUND
I
N
connector.
3. Connect Orange 3.5 jack cable to C
ENTE R
/ S
UB
I
N
connector.
4. Connect white marked cable to white F
RONT
O
UT
3.5 jack connector.
5. Connect yellow marked cable to Yellow Surround Out 3.5 connector.
6. Connect black mini Din connector to C
ONTROLS
I
N
Din input.
7. Connect line In cable(s) to sound source.
8. Connect Power supply to P
OWER
I
N
input.
9. Plug power supply into mains plug.
10. Switch On/Off the system by using the Power button on the centre
satellite panel.
11. Tune system, using PC sound card or other sound source.
12. Tune volume, using +/- on the center satellite panel.
13. Subwoofer level can be tuned on B
ASS
C
ONTROL
knob.
Not e:
1. Do not insert the power plug into AC outlet until all connections are
made.
2. Inputs are following PC 2002 colour coding (green, black, orange).
Swedish
1. Anslut kabeln med den grö na 3,5 mm-kontakten till Front in-anslutningen
2. Anslut kabeln med den svarta 3,5 mm-kontakten til l Surround in-
anslutningen
3. Anslut kabeln med den orangefä rgade 3,5 mm-kontakten till Centre/
Sub in-anslutningen
4. Anslut den vitmä rkta kabeln till den vita 3,5-anslutningen Front out
5. Anslut de n or angemä rkta kabeln till den ora ngef ä rgade 3,5-
anslutningen Surround out
6. Anslut den svarta mini-DIN-kontakten till DIN-ingå ngen Control i n
7. Anslut Line in-kabeln/kablarna till ljudkä llan
8. Anslut nä tenheten till ingå ngen Power in
9. Anslut nä tenheten till nä tkontakten
10. Slå på /av systemet med Power-knappen på mittsatellitpanelen
11. Justera systemet genom att anvä nda PC-ljudkort eller anna n
ljudkä lla
12. Justera volymen genom att anvä nda +/- på mittsatellitpanelen
13. Nivå n på subwoofern kan justeras med ratten Bass control
Obs:
1. An slut inte nä t kont akten ti ll vä x elströ msu ttaget fö rrä n all a
anslutningar har gjorts.
Ingå ng har fö ljande PC 2002-fä rgmä rkning (grö n, svart, orange)
Franç ais
Deutsch
1. Verbinden Sie das grü ne Kabel mit 3,5-mm-Klinkenstecker mit dem Anschluss
„Front in”.
2. Verbinden Sie das schwarze Kabel mit 3,5-mm-Klinkenstecker mit dem
Anschluss „Surround in”.
3. Verbinden Sie das orangefarbene Kabel mit 3,5-mm-Klinkenstecker mit dem
Anschluss „Centre/Sub in”.
4. Verbinden Sie das weiß markierte Kabel mit dem weißen 3,5-mm-
Klinkensteckeranschluss “Front out”.
5. Verbinden Sie das orange markierte Kabel mit dem orangefarbenen 3,5-mm-
Klinkensteckeranschluss “Surround out“.
6. Verbinden Sie den schwarzen Mini-DIN-Steckverbinder mit dem DIN-Eingang
“Control in“.
7. Verbinden Sie das (die) Line-in-Kabel mit der Tonsignalquelle.
8. Verbinden Sie den Eingang “Power in” mit der Stromversorgung.
9. Stecken Sie den Netzstecker in die Steckdose.
10. Schalten Sie das System mit der Taste “Power” auf dem mittleren Satellitenfeld
ein bzw. aus.
11. Stimmen Sie das System mit Hilfe der PC-Soundkarte oder einer anderen
Tonsignalquelle ab.
12. Stellen Sie die Lautstä rke mit Hilfe der Tasten “+/-“ auf dem mittleren Satellitenfeld
ein.
13. Der Subwoofer-Pegel kann mit dem Knopf “Bass control” eingestellt werden.
Hinweis:
1. Schließen Sie das Gerät erst dann an die Stromversorgung an, wenn alle
anderen Verbindungen hergestellt wurden.
2. Die Eingä nge entsprechen der folgenden PC 2002 Farbcodierung (grü n,
schwarz, orange).
Nederlands
1. Sluit de kabel met een groen plugje van 3,5 mm aan op de connector
“Front in”.
2. Sluit de kabel met een zwart plugje van 3,5 mm aan op de connector
“Surround in”.
3. Sluit de kabel met een oranje plugje van 3,5 mm aan op de connector
“Centre/Sub in”.
4. Sluit de wit gemarkeerde kabel aan op de het witte busje van 3,5 mm,
“Front out”
5. Sluit de oranje gemarkeerde kabel aan op het oranje busje van 3,5 mm,
“Surround out”.
6. Sluit de zwarte mini-DIN-plug aan op de mini-DIN-bus “Control in”.
7. Verbind de lijningangskabel(s) met de geluidsbron.
8. Sluit de voedingsadapter aan op de ingang “Power in”.
9. Steek de netstekker in een stopcontact.
10. Schakel het systeem in of uit met de Power-knop op de centrale
satellietluidspreker.
11. Stel het systeem in met behulp van de geluidskaart of een andere
geluidsbron.
12. Stel het volume in met “+/-” op de centrale satellietluidspreker.
13. Het volume van de subwoofer is instelbaar met de knop “Bass control”.
Opmerking:
1. Verbind de netkabel pas met een stopcontact nada t u all e
verbindingskabeltjes hebt aangesloten.
2. De kleurcodering van connectors voldoet aan de norm PC 2002 (groen,
zwart, oranje).
1. Collegate il cavo jack da 3,5 verde al connettore “Front in”
2. Collegate il cavo jack da 3,5 nero al connettore “Surround in”
3. Collegate il cavo jack da 3,5 arancione al connettore “Centre/Sub in”
4. Collegate il cavo bianco al connettore jack da 3,5 “Front out” bianco
5. Collegate il cavo arancione al connettore da 3,5 “Surround out”
arancione
6. Collegate il connettore mini Din nero all’ingresso Din “Control in “
7. Collegate il/i cavo/i Line in alla sorgente audio
8. Collegate l’alimentatore all’ingresso “Power in”
9. Collegate l’alimentatore ad una presa elettrica
10. Accendete/spegnete il sistema tramite il pulsante di alimentazione
“Power” sul pannello satellite centrale
11. Sintonizzate il sistema, con la scheda audio del PC od un’altra
sorgente audio.
12. Regolate il volume, con “ +/-“ sul pannello satellite centrale
13. Il livello Subwoofer può essere regolato con la manopola per il
controllo dei bassi “Bass control”.
No ta:
1. Non collegate la spina d’alimentazione alla presa CA prima di aver
realizzato tutte le connessioni.
2. Gli ingressi seguono la codifica colore PC 2002 (verde, nero,
arancione)
Españ ol
1. Conecte el cable con clavija verde de 3,5 mm al conector “Front in”.
2. Conecte el cable con clavija negra de 3,5 mm al conector “Surround in”.
3. Conecte el cable con clavija naranja de 3,5 mm al conector “Centre/
Sub in”.
4. Conecte el cable marcado en blanco al conector de clavija blanca de 3,5
mm “Front out”.
5. Conecte el cable marcado en naranja al conector de clavija naranja de
3,5 mm “Surround out”.
6. Conecte el conector mini DIN negro a la entrada DIN “Control in”.
7. Conecte los cables de entrada de línea a la fuente de sonido.
8. Conecte la fuente de alimentació n a la entrada “Power in”.
9. Conecte la fuente de alimentació n a la red elé ctrica.
10. Encienda/apague el sistema con el botó n “Power” del panel saté lite central.
11. Ajuste el sistema mediante la tarjeta de sonido del PC u otra fuente de
sonido.
12. Ajuste el volumen mediante “+/-” del panel saté lite central.
13. El nivel del subwoofer se puede ajustar con el mando de control de graves
“Bass control”.
Nota:
1. No conecte el cable de alimentació n a un enchufe de CA hasta que se
hayan realizado todas las conexiones.
Las entradas siguen los có digos de color PC 2002 (verde, negro, naranja).
Norwegian
1. Koble grønn 3,5-pluggkabel til “Front in”-kontakt
2. Koble svart 3,5-pluggkabel til “Surround in”-kontakt
3. Koble oransje 3,5-pluggkabel til “Centre/Sub in”-kontakt
4. Koble hvitmerket kabel til hvit “Front out” 3,5-pluggkontakt
5. Koble oransjemerket kabel til oransje “Surround out“ 3,5-kontakt
6. Koble svart MiniDin-kontakt til “Control in“ Din-inngang
7. Koble Line in-kabel/kabler til lydkilde
8. Koble strømforsyning til “Power in”-inngang
9. Plugg strømforsyning inn i strømuttaket
10. Slå systemet på /av med “Power”-knappen på midtre satellittpanel
11. Finjuster systemet ved bruk av PC-lydkort eller annen lydkilde.
12. Finjuster volum v ed bruk av “+/-“ på midtre satellittpanel
13. Basshøyttalernivå kan finjusteres med knotten “Bass control”.
Merk:
1. Sett ikke strømstøpselet inn i vekselstrømuttaket før alle tilkoblinger
er utført.
2. Innganger følger PC 2002 fargemerking (grønn, svart, oransje)
Finnish
1. Kytke vihreä 3,5 mm:n liitin Front in -liitä ntä ä n.
2. Kytke musta 3,5 mm:n liitin Surround in -liitä ntä ä n.
3. Kytke oranssi 3,5 mm:n liitin Centre/Sub in -liitä ntä ä n.
4. Kytke valkoisella merkitty kaapeli valkoiseen 3,5 mm:n Front out -liitä ntä ä n.
5. Kytke oranssilla merkitty kaapeli oranssiin 3,5 mm:n Surround out -liitä ntä ä n.
6. Kytke musta Mini Din -liitin Control in -tuloliitä ntä ä n.
7. Kytke linjatulokaapeli(t) ä ä nilä hteeseen.
8. Kytke virtalä hde Power in -liitä ntä ä n.
9. Kytke virtalä hde pistorasiaan.
10. Voit kytke ä jä rjest elmä n pä ä lle ta i poi s pä ä ltä pa inamalla
keskisatelliittipaneelin Power-painiketta.
11. Sä ä dä jä rjestelmä kä yttä mä llä tietokoneen ä ä nikorttia tai muuta
ä ä nilä hdettä .
12. Voit sä ä tä ä ä ä nenvoimakkuutta keskisatelliittipaneelin +/—sä ä timellä
13. Voit sä ä tä ä subwooferin tasoa Bass control -sä ä timellä .
Huomautus:
1. Ä lä kytke virtalä hdettä pistorasiaan, ennen kuin kaikki kytkennä t on tehty.
2. Tuloliitä nnä t on merkitty PC 2002 -vä rikoodijä rjestelmä n mukaisesti
(vihreä , musta, oranssi).
Portuguese
1. Ligue o cabo da tomada de 3,5 verde ao conector “Front in”
2. Ligue o cabo da tomada de 3,5 preto ao conector “Surround in”
3. Ligue o cabo de tomada de 3,5 laranja ao conector “Centre/Sub in”
4. Ligue o cabo branco ao conector da tomada “Front out” de 3,5 branco
5. Ligue o cabo laranja ao conector “Surround out” de 3,5 laranja
6. Ligue o conector mini Din preto à entrada Din “Control in”
7. Ligue o(s) cabo(s) Line in à fonte de som
8. Ligue a fonte de alimentaç ã o à entrada “Power in”
9. Ligue o cabo de alimentaçã o à corrente elé ctrica
10. Ligue/desligue o sistema utilizando o botã o “Power” no painel central de
saté lite
11. Regule o sistema, utilizando a placa de som do PC ou outra fonte de som.
12. Regule o volume, utilizando “+/-“ no painel central de saté lite
13. O nível de subwoofer pode ser regulado com o botã o “Bass control”.
Nota:
1. Introduza apenas a ficha na tomada de CA depois de efectuar todas as
ligaç õ es.
2. As entradas estã o de acordo com os códigos de cor do PC 2002 (verde,
preto, laranja)
Slowaskia
Hungary
1. Csatlakoztassa a zö ld 3,5 mm-es csatlakozó ká belt a „Front in”
csatlakozó ba.
2. Csatlakoztassa a fekete 3,5 mm-es csatlakozó ká belt a „Surround
in” csatlakozó ba.
3. Csatlakoztassa a narancsszínû 3,5 mm-es csatlakozó ká belt a
„Centre/Sub in” csatlakozó ba.
4. Csatlakoztassa a fehé r jelö lé ssel ellá tott ká bel t a fehé r 3,5 mm-es
„Front out” csatlakozó ba.
5. Cs at lak oz ta ssa a narancs színû jelö lé s se l ellá to tt ká bel t a
narancssá rga 3,5 mm-es „Surround out” csatlakozó ba.
6. Cs at lak oz ta ss a a mini D IN-c sa tlako zó t a „Contr ol in ” DIN
bemenetbe.
7. Csatlakoztassa a vonalbementi ká bel(eke)t a hangforrá sba.
8. Csatlakoztassa a há ló zati tá pfeszü ltsé gká belt a „Power input”
bemenetbe.
9. Illessze a tá pfeszü ltsé g-dugaszt a dugaszoló -aljzatba.
10. A kö zé psõ egysé gen talá lható „Power” gomb segítsé gé vel kapcsolja
be / ki a rendszert.
11. Vé gezze el a rendszer hang olá sá t PC-hangká rtya vagy egyé b
hangforrá s segítsé gé vel.
12. Á llítsa be a hangerõ t a kö zé psõ egysé gen talá lható „+/-” gomb
segítsé gé vel.
13. A mé lysugá rzó t a „Bass control” gomb segítsé gé vel á llíthatja be.
Megjegyzé s:
1. Ne illessze a tá pfeszü ltsé g dugó t a vá ltozó á ramú (AC) dugaszoló -
alj za tb a addig, amí g nem vé g ez te el a szü ks é ges
csatlakoztatá sokat.
2. A bemenetek jelö lé se a PC 2002 színkó dolá snak (zö ld, fekete,
narancssá rga) megfelelõ en tö rté nt.
Czech
IMPORTANT SAFETY INSTRUCTIONS - Read before operating equipment
For US/Canada only
This product was designed and manufactured to meet strict quality and
safety standards. There are, however, some installation and operation
precautions which you should be particularly aware of.
1. Read these instructions - All the safety and operating instructions
should be read before the appliance is operated.
2. Keep these instructions - The safety and operating instructions
should be retained for future reference.
3. Heed all warning s - All warnings on the appliance and in the
operating instructions should be adhered to.
4. Follow all instructions - All operating and use instructions should
be followed.
5. Do not use this apparatus near water - for example, near a bathtub,
washbowl, kitchen sink, laundry tub, in a wet basement or near a
swimming pool, etc.
6. Clean only with a damp cloth. The appliance should be cleaned
only as recommended by the manufacturer.
7. Install in accordance with the manufacturers Instructions. Do
not block any o f the ventilation openings. For example, the
appliance should not be situated on a bed, sofa, rug, or similar surface
or placed in a built-in installation, such as a bookcase or cabinet that
may impede the flow of air through the ventilation openings.
8. Do not Install near any heat sources such as radiators, heat
registers, stoves, or other apparatus (including amplifiers) that
produce heat.
9. Do not defeat the safety purpose of the polarized or
grounding-type plug. A polarized plug has two blades with
one wider than the other. Match wide blade of Plug to
wide slot, fully insert. A grounding type plug has two blades
and a third grounding prong. The wide blade or the third prong are provided
for your safety. When the provided plug does not fit into your outlet, consult
an electrician for replacement of the obsolete outlet.
10. Protect the power cord from being walked on or pinched particulary
at plugs, convenience receptacles, and the point where they exit
from the apparatus.
11. Only use attachments/accessories specified by the manufacturer.
12. Use only with a cart, stand, tripod, bracket, or table specified
by the manufacturer, or sold with the apparatus. When a cart is
used, use caution when moving the cart/apparatus combination
to avoid injury from tip-over.
13. Unplug this apparatus during lightning storms or when unused for
long periods of time.
14. Refer all servicing to qualified service personnel. Servicing is
required when the apparatus has been damaged in any way, such
as power-supply cord or plug is damaged, liquid has been spilled or
objects have fallen into the apparatus, the apparatus has been
exposed to rain or moisture, does not operate normally, or has been
dropped.
15. Warning! To reduce the risk of fire or electric shock, do not expose
this appliance to rain or moisture.
EL 4562-E004: 99/3
http://www.philips.com/pcstuff
AC
Polarized Plug