IMPORTANT – Save these instructions for local electrical inspector’s use.
IMPORTANT – Observe all governing codes and ordinances.
Note to Installer – Be sure to leave these instructions with the Consumer.
Note to Consumer – Keep these instructions for future reference.
Installation must be performed by a qualified installer.
Proper installation is the responsibility of the installer.
Stack dryer only on washer. Do not stack washer on dryer, washer on washer or dryer on dryer.
Do not modify this installation kit. Any modification will void the product Warranty.
WARNING Disconnect power before installing. Failure to do so could result in serious injury or death.
WARNING - Excessive Weight Hazard
Use two or more people to install dryer.
Avoid tipping and rupture of utility services.
Dryer must be securely attached to the washer.
DO NOT place the washer on top of the dryer.
Failure to do so may result in serious injury, death, or property damage.
Mobile Home or Manufactured Home Installation – Stacking of a gas dryer is not permitted in a mobile home or manufactured home.
INSTALLATION PREPARATION
Remove the packaging.
Flatten the product carton to use as a pad to lay the dryer down on its back or side. Continue using the carton to protect the finished floor in front of the installation location.
REQUIREMENTS FOR ALCOVE OR CLOSET INSTALLATION
WARNING - Explosion Hazard
Keep flammable materials and vapors, such as gasoline, away from dryer.
Place dryer at least 18” (46 cm) above the floor for a garage installation.
Failure to do so can result in death, explosion, or fire.
The dryer MUST be vented to the outdoors.
Minimum clearance between dryer cabinet and adjacent walls or other surfaces is:
0" either side*
0" front
0" rear
0" top
The rear of the dryer should face a wall.
Consideration must be given to provide adequate clearance for installation and service.
Closet doors must be louvered or otherwise ventilated and have at least 60 square inches of open area. If the closet contains both a washer and a dryer, doors must contain a minimum of 120 square inches of open area.
NOTE: WHEN THE EXHAUST DUCT IS LOCATED AT THE REAR OF THE DRYER, THE CONFIGURATION OF THE DUCTING MAY REQUIRE GREATER CLEARANCE.
Gas Dryers Only:
No other fuel burning appliance shall be installed in the same closet as a gas dryer.
The dryer must be disconnected from the gas supply piping during pressure testing at pressures greater than 1/2 psi (3.5 kPa).
A 1/8 inch NPT minimum plugged tapping, accessible for test gauge connection, must be installed immediately upstream of the gas supply connection to the dryer.
MINIMUM CLEARANCE OTHER THAN ALCOVE OR CLOSET INSTALLATION
Minimum clearance to combustible surfaces and for air opening are: 0” both sides*, 0” rear and 0” top.
The rear of the dryer should face a wall.
Consideration must be given to provide adequate clearance for installation and service.
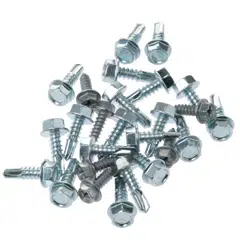
TOOLS YOU WILL NEED
CONTENTS
INSTALLATION INSTRUCTIONS
1. REMOVE THE DRYER LEVELING LEGS
A. Carefully lay the dryer on its back or side. Use the packing material so you don’t scratch the finish on the dryer.
B. Use an open-end wrench or pliers to remove the dryer leveling legs. NOTE: Retain the leveling legs
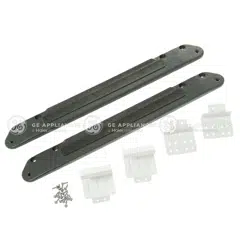
2. INSTALL SPACERS TO THE DRYER BOTTOM
Locate a spacer on the bottom side with its holes over the leveling leg holes. Attach spacer using 2 screws. Attach the second spacer on the other bottom side using 2 screws. NOTE: The arrows on the spacers should point to the outside.
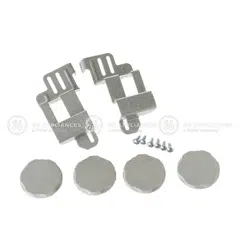
3. INSTALL THE APPROPRIATE BRACKETS TO THE WASHER
Select the appropriate brackets for your model sizes. Using the outside holes in the bracket, attach it to the top left corner of the washer back using 4 screws. Repeat on the top right corner of the washer back. 3 Washer Depth Dryer Depth Bracket Number 32" 32" 32 34" 32" 34
32 Brackets for 32" Washer & Dryer Combinations:
OR
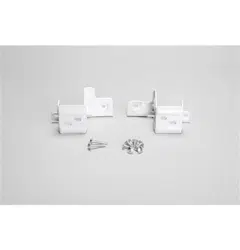
34 Brackets for 34" Washer & 32" Dryer Combinations:
4. PREPARE THE WASHER AND DRYER
A. Place the washer in the approximate final installation location.
B. Make sure the washer is level. Refer to the washer
Installation Instructions for details.
C. Upright the dryer.
D. Reverse the washer and dryer door swings, if desired, before stacking the dryer on the washer. See the washer and dryer Installation Instructions for details.
5. INSTALL THE DRYER AND THE BRACKET ON THE WASHER
WARNING - Excessive Weight Hazard
Use two or more people to install dryer.
Avoid tipping and rupture of utility services.
Dryer must be securely attached to the washer.
DO NOT place the washer on top of the dryer.
Failure to do so may result in serious injury, death, or property damage.
A. Lift the dryer onto the top of the washer.
Be sure to lift the dryer high enough to clear the washer control panel.
Be careful not to scratch the top of the washer with the spacers. Protect the washer control panel with cardboard or other protection.
B. Align the holes in the back of the dryer with the holes in the bracket sticking up from the washer.
Attach both brackets to the dryer with 2 screws on each side.
32 Brackets for 32" Washer & Dryer Combinations:
OR
6. FINALIZE THE INSTALLATION
CAUTION Do not push on the dryer once installed to top of the washer. Pushing on the dryer may result in pinched fingers.
A. Refer to the washer Installation Instructions to complete the washer installation.
B. Refer to the dryer Installation Instructions to complete the dryer installation.
C. Carefully slide or walk the stacked washer and dryer into place. Use felt pads or other sliding device to assist moving and to protect flooring.
D. Verify the units are level. Make adjustments to the washer feet if necessary to level. It is always best to set the washer feet to the minimum height necessary to level the washer and dryer properly.