Mitsubishi Outlander Sport 2020
Product's Documents
Below are documents related to this product, you can read online or download:
- Owner's manual - (English) Read Online | Download pdf
Owner's Guide Cars


NOTE
|
Warning lights |
Do this | Ref. Page |
|---|---|---|
|
Charging system warning light |
|
P. 5-145 |
|
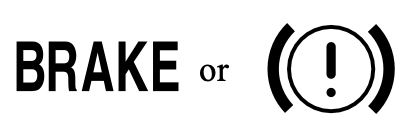
Brake warning light |
|
P. 5-144 |
|
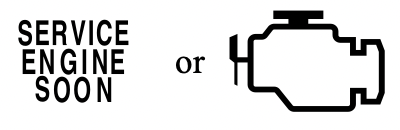
Engine malfunction indicator (“SERVICE ENGINE SOON” or “Check engine light”) |
|
P. 5-144 |
|
Anti-lock braking system warning light |
|
P. 5-69 |
|
SRS warning light |
|
P. 4-31 |
|
Tire pressure monitoring system warning light |
|
P. 5-99 |
|
Do this |
Do this | Ref. Page |
|---|---|---|
|
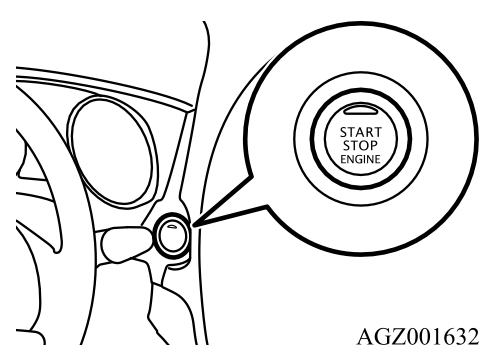
The engine does not start and the operation mode cannot be changed to OFF.
|
|
P. 5-19 |
|
The F.A.S.T.-key does not operate.
|
Use the emergency key to lock and unlock the door. |
P. 5-25 |
|
Cannot shift the selector lever from the “P” (PARK) position. |
Shift the selector lever while pressing the brake pedal. |
P. 5-53 |
|
The windows are fogged up.
|
|
P. 7-8, 7-14 |
|
The engine does not start. |
Have the battery checked. Recharge or replace as needed. | P. 8-2, 9-10 |
|
The engine coolant temperature display “
|
The engine is overheated. |
P. 8-4 |
|
If your vehicle becomes stuck in sand, mud or snow |
|
P. 8-13 |
WARNING
| Problem | Do this | Ref. Page |
|---|---|---|
| The brakes are not functioning properly after crossing a puddle or stream. | Dry out the brakes by driving slowly while lightly pressing the brake pedal. |
P. 5-64, 6-5 |
|
The continuously variable transmission (CVT) makes no shift change when accelerating. The initial movement of the vehicle is slow when the vehicle starts moving. |
There may be a problem in the CVT. If the |
P.5-56 |
|
A tire is punctured.
|
|
P. 8-6 |
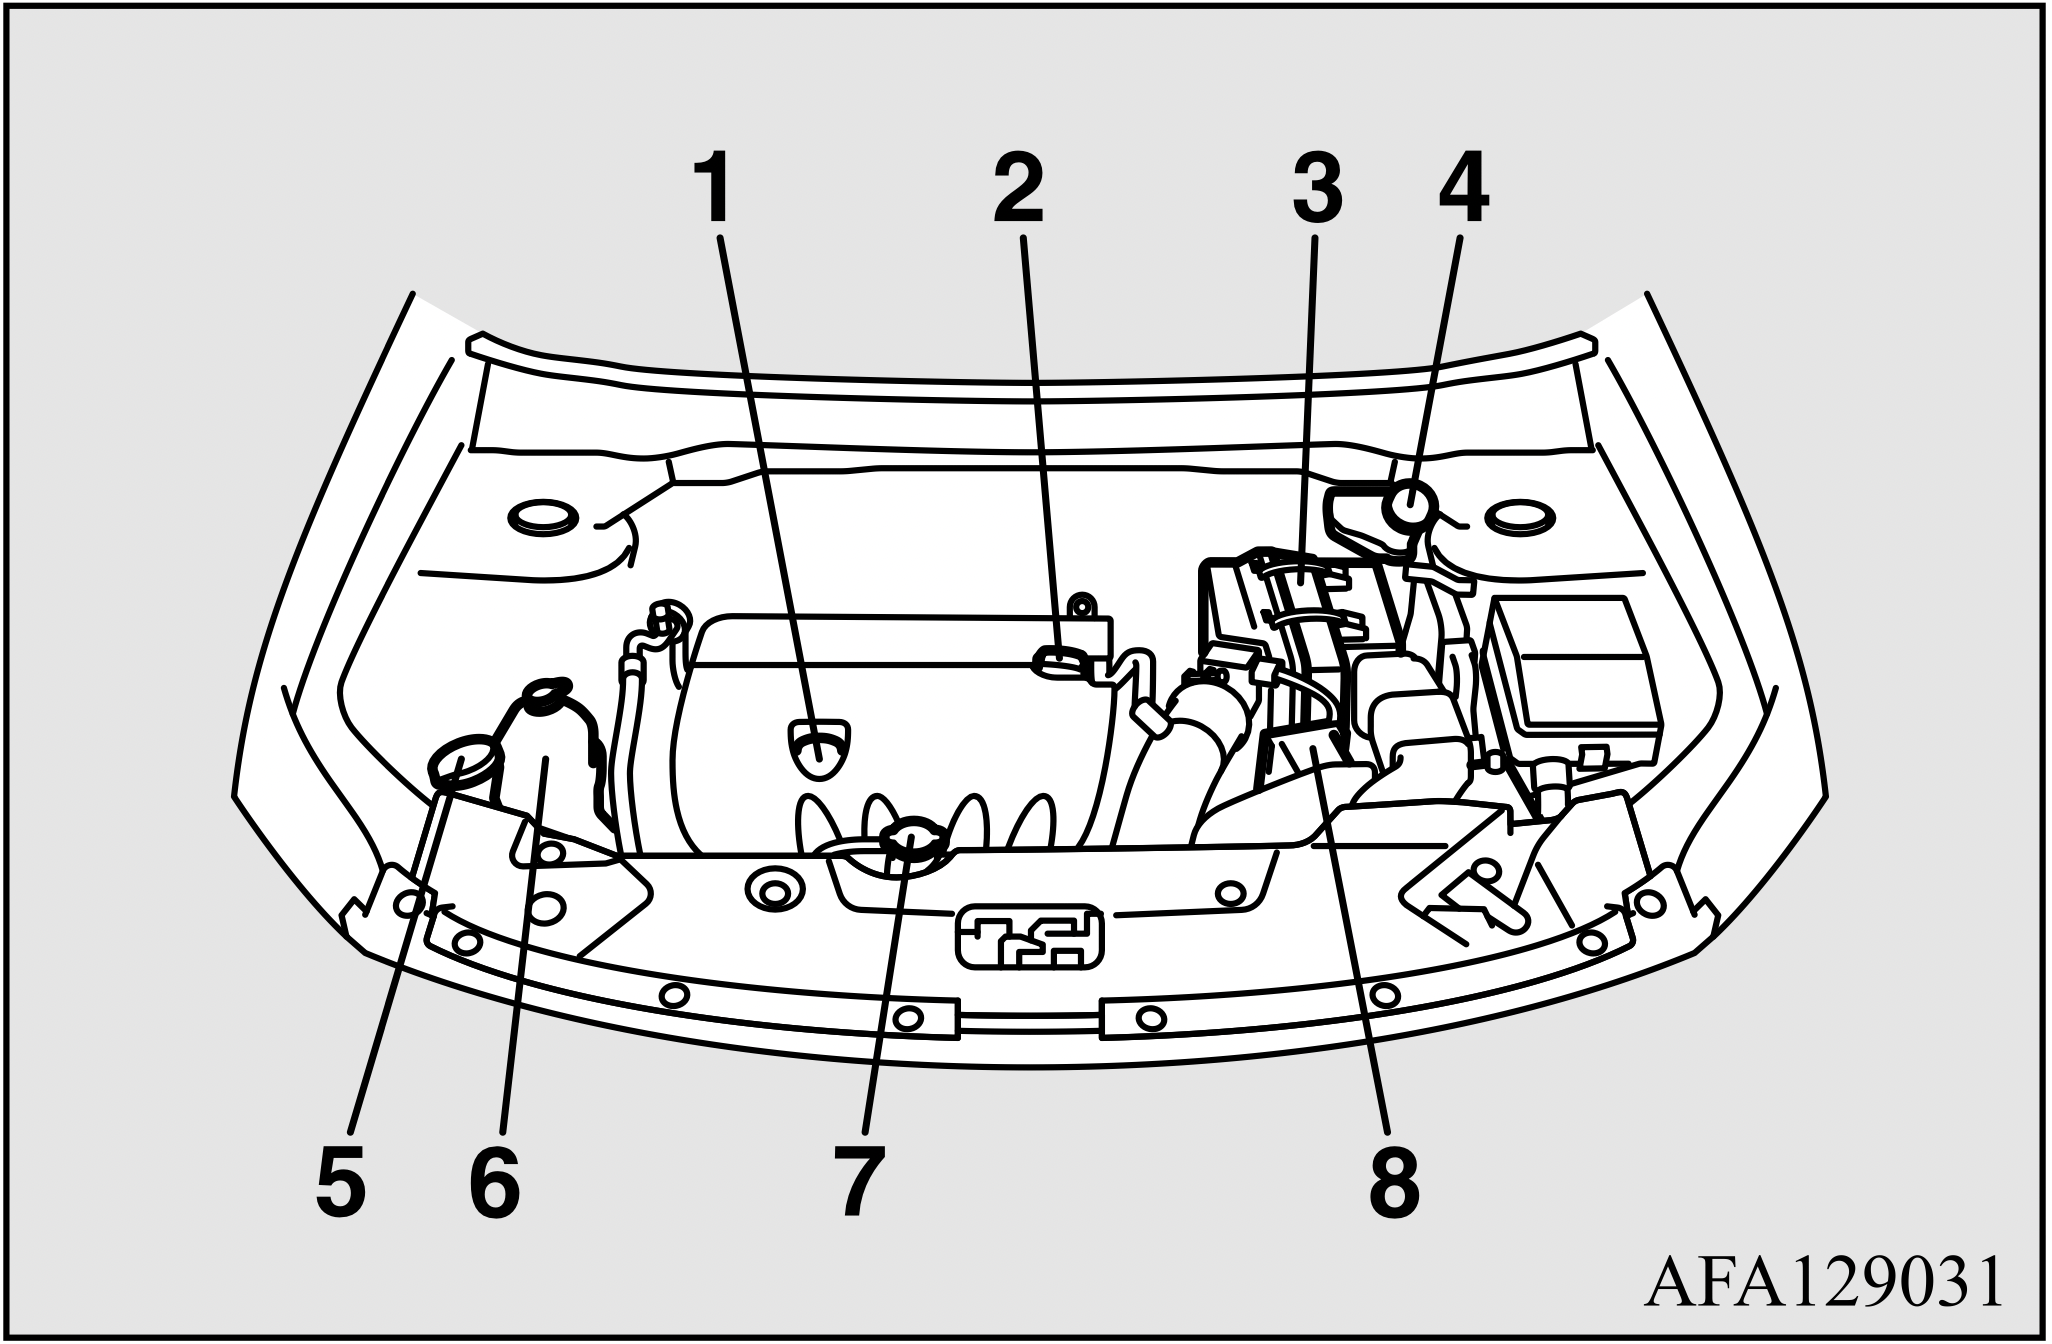
To check and refill engine oil
It is normal for an engine to use oil. You may need to add oil between the recommended oil change intervals. Before starting the engine, check the engine oil level. Refill if necessary.
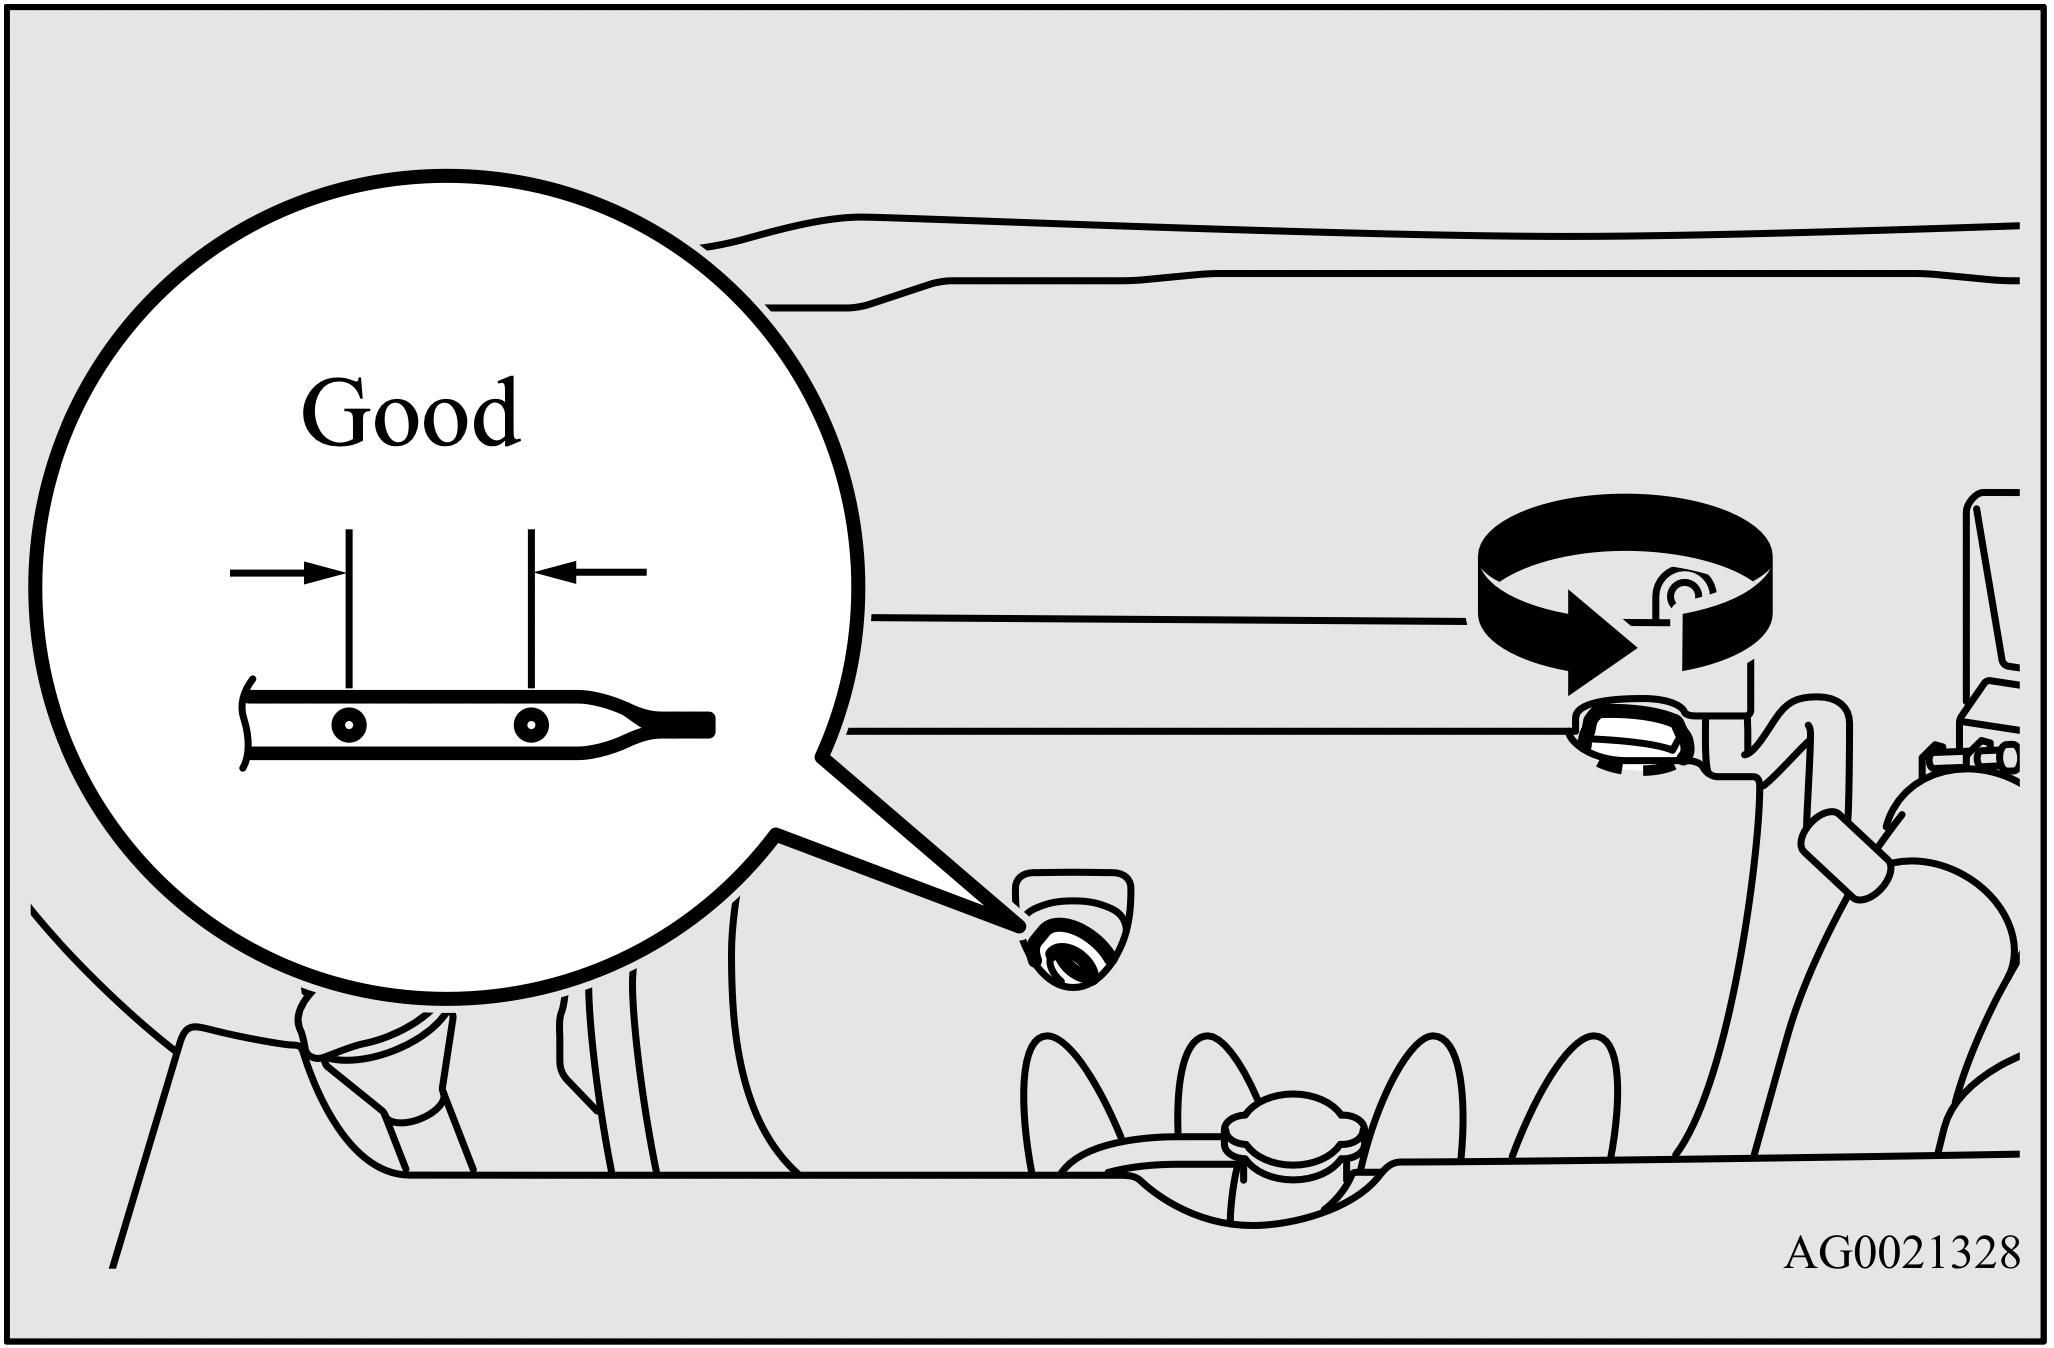
To check the oil level, remove the dipstick, wipe it off, and gently reinsert it all the way. Slowly pull the dipstick straight out and check the oil level by checking the upper surface of the dipstick. The oil level must not go above the line on the dipstick.
NOTE: If it is difficult to verify the oil level, wipe off the dipstick and reinsert it. Wait a moment and then recheck the oil level by checking the upper surface of the dipstick.
If the level does not reach the line which shows the smallest amount of oil required, remove the oil filler cap on the engine valve cover, and fill to within the “Good” range.
CAUTION: Overfilling will cause oil aeration and loss of oil pressure, which could damage the engine.
WARNING:
NOTE: Engine oil consumption is greatly influenced by payload, engine speed, etc.
NOTE: The engine oil will deteriorate rapidly if the vehicle is subjected to severe conditions (for example, repeated operation on rough roads, in mountainous regions, on roads with many uphill and downhill gradients, or over short distances). Consequently, the oil will require earlier replacement in accordance with the schedule in the “WARRANTY AND MAINTENANCE MANUAL”.
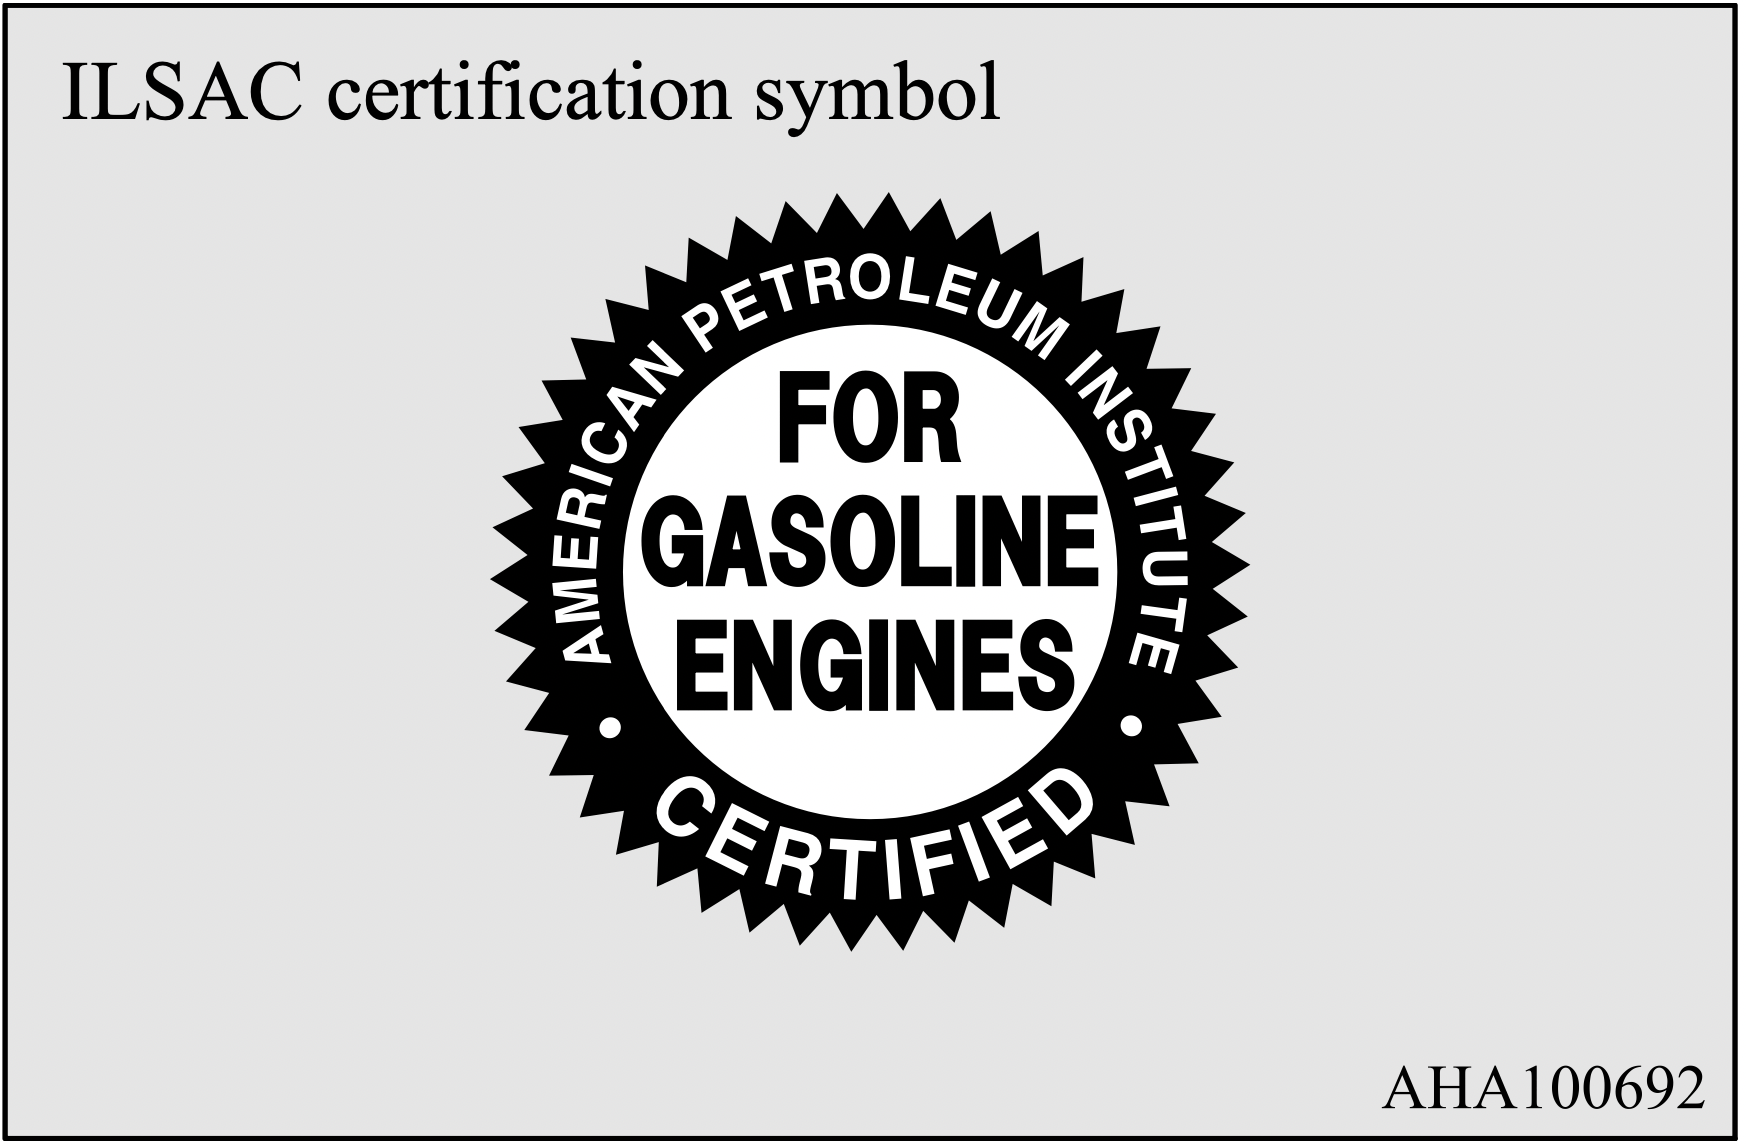
Engine oil identification mark
Mitsubishi Motors recommends using only engine oils with the ILSAC certification symbol on the front of the container.
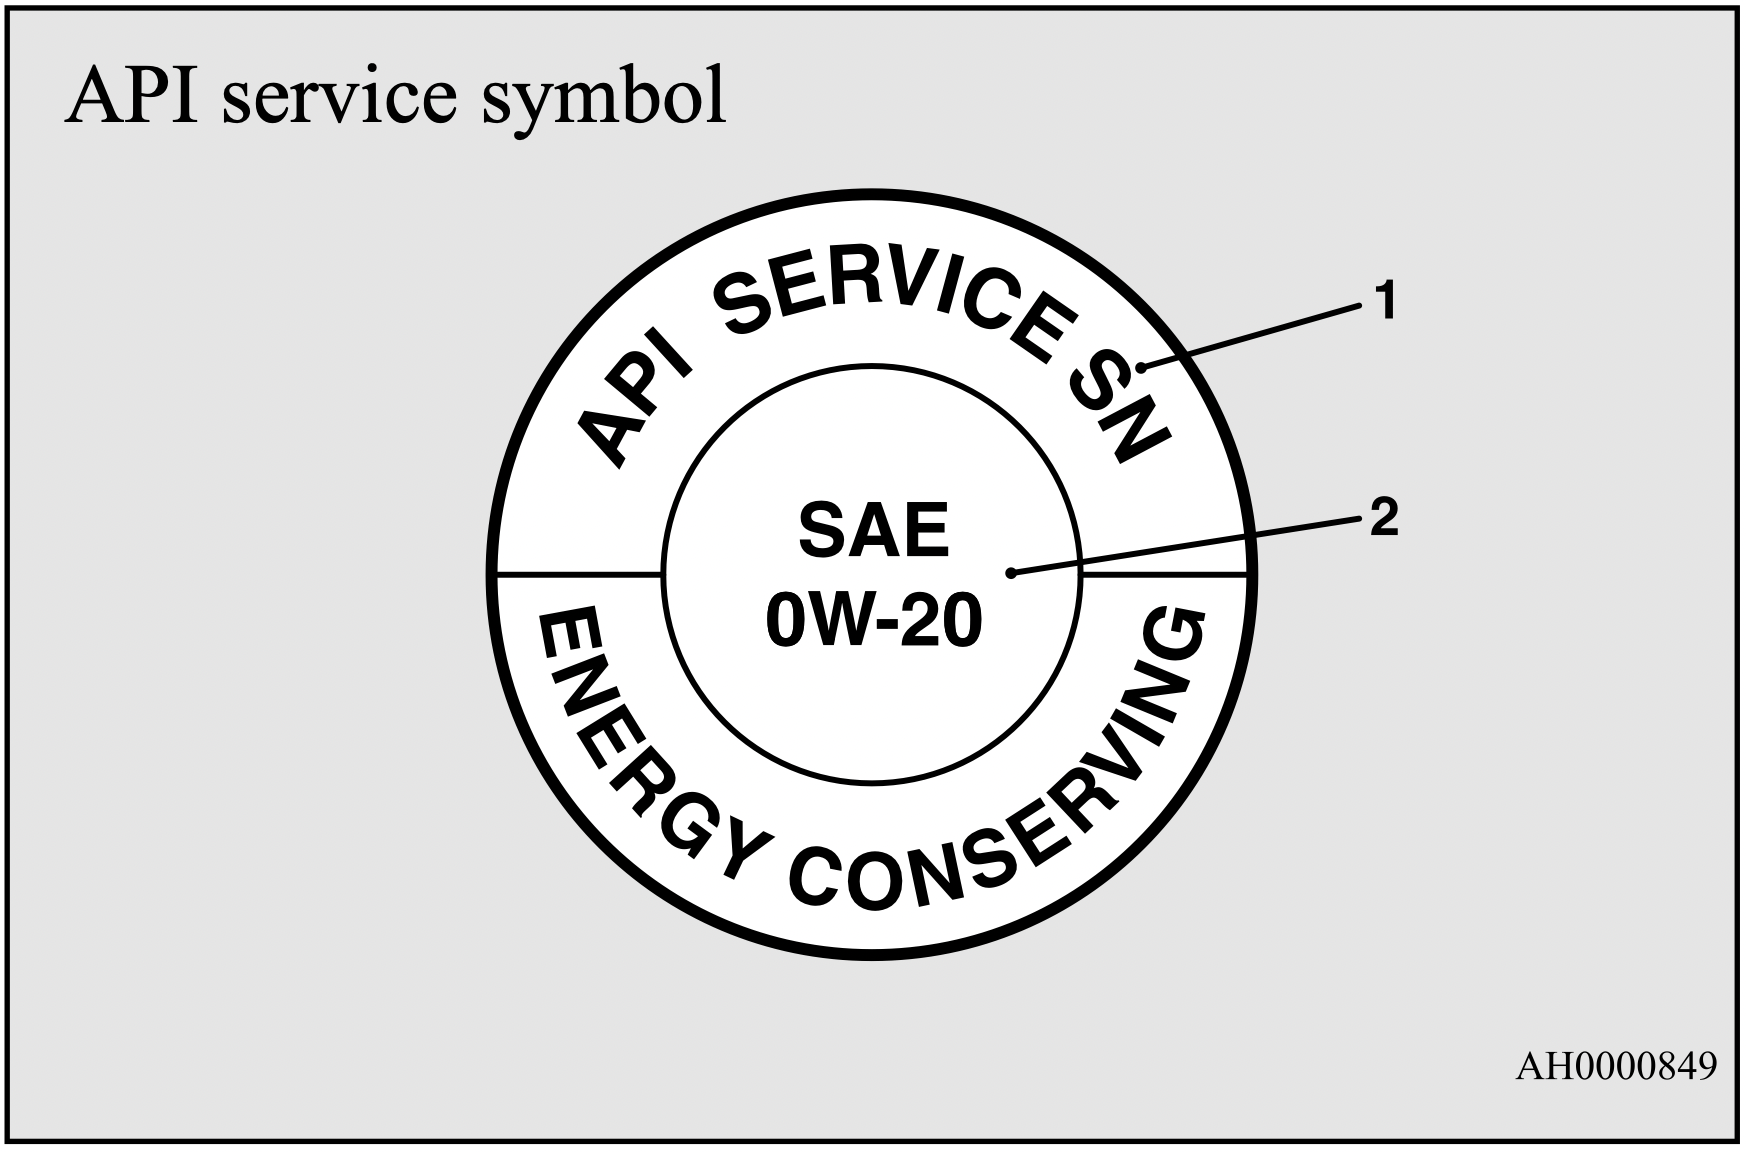
If you cannot find oils with the ILSAC certification symbol, use an API classification SN or higher oil with the following label.
This mark appears on the top of the oil container and tells you two important things about the oil.
Recommended engine oil viscosity
Use engine oil with the proper thickness for the outdoor temperatures where you will be driving.
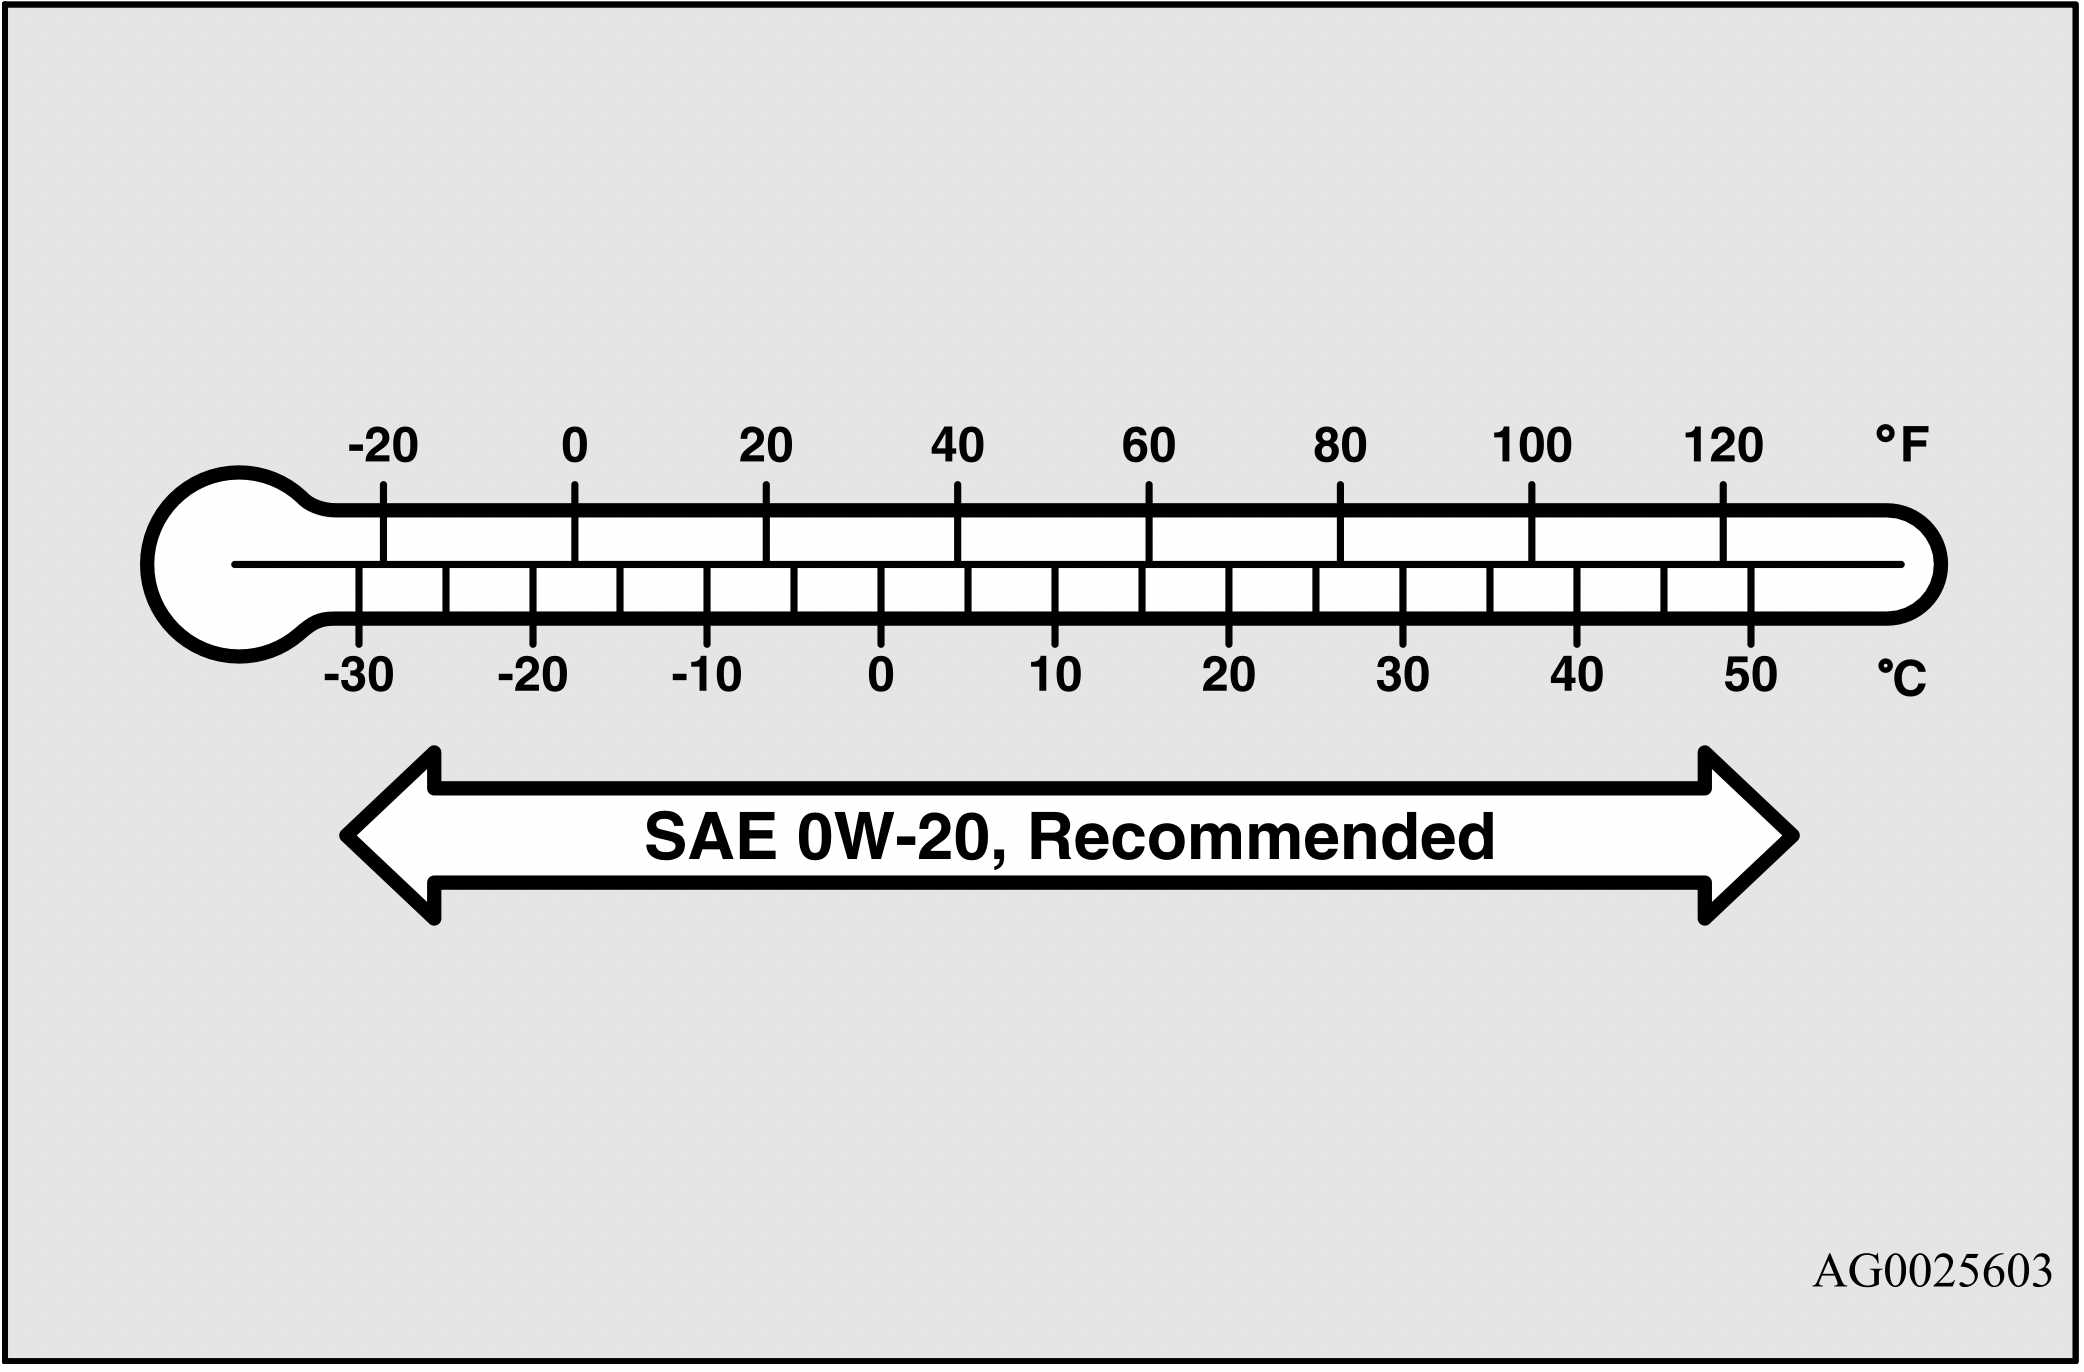
Mitsubishi Motors Genuine 0W-20 Synthetic Engine Oil is recommended for optimum fuel economy and cold weather starting.
If Mitsubishi Motors Genuine 0W-20 Synthetic Engine Oil is not available, 5W-20 grade oils displaying the ILSAC certification can be used. However, Mitsubishi Motors Genuine 0W-20 Synthetic Engine Oil should be used at the next oil change to maintain optimum fuel economy and cold weather starting.
To replace the oil filter
The oil filter should be replaced at the time or mileage specified in the “WARRANTY AND MAINTENANCE MANUAL”.
Only use high quality replacement filters on this vehicle. The manufacturer’s specifications for Genuine Mitsubishi oil filters require that the filter can withstand a pressure of 256 psi (1.8 MPa). A Genuine Mitsubishi oil filter is the best replacement filter. Follow the installation instructions printed on the filter.
The air cleaner filter will get dirty and dusty from use and not filter properly. Replace it with a new filter using the schedule in the “WARRANTY AND MAINTENANCE MANUAL”.
The condition of the battery is very important for quick starting and to keep the vehicle’s electrical system working properly. Check the battery regularly.
If battery performance is suspect, have the battery and charging system tested by an authorized Mitsubishi Motors dealer or a repair facility of your choice.
NOTE: After replacing the battery, the electronic control system data for the automatic transaxle, etc., will be erased. As a result, shifting may be rough. Shifting will become smoother after several changes in speed.
Checking battery electrolyte level
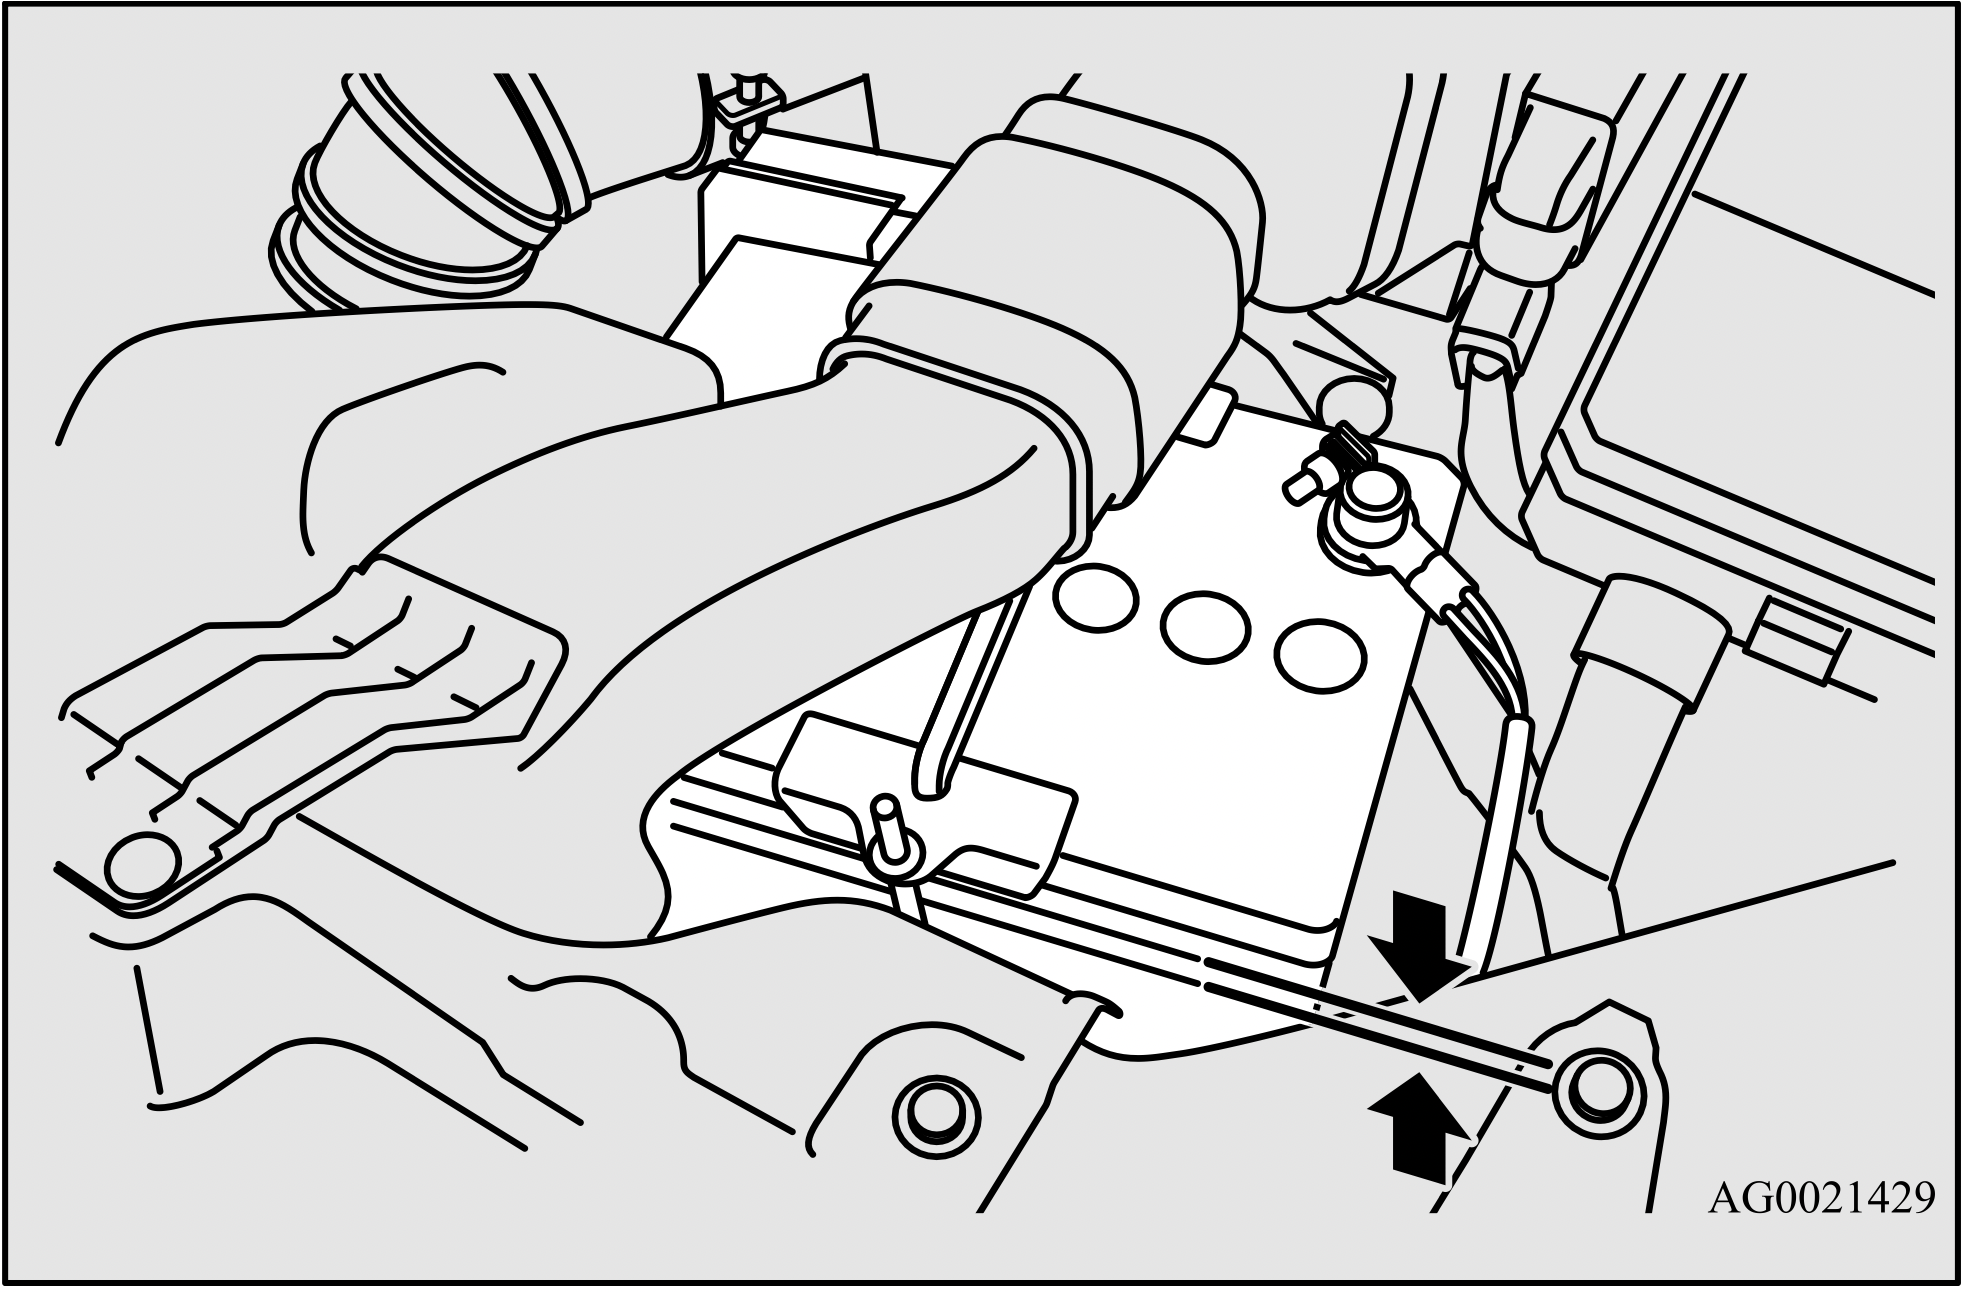
The electrolyte level must be between the limits shown on the outside of the battery. Fill it with distilled water as needed. The inside of the battery is divided into several compartments. Take the cap off of each compartment and fill to the mark.
Do not fill above the top line because a spill during driving could cause damage.
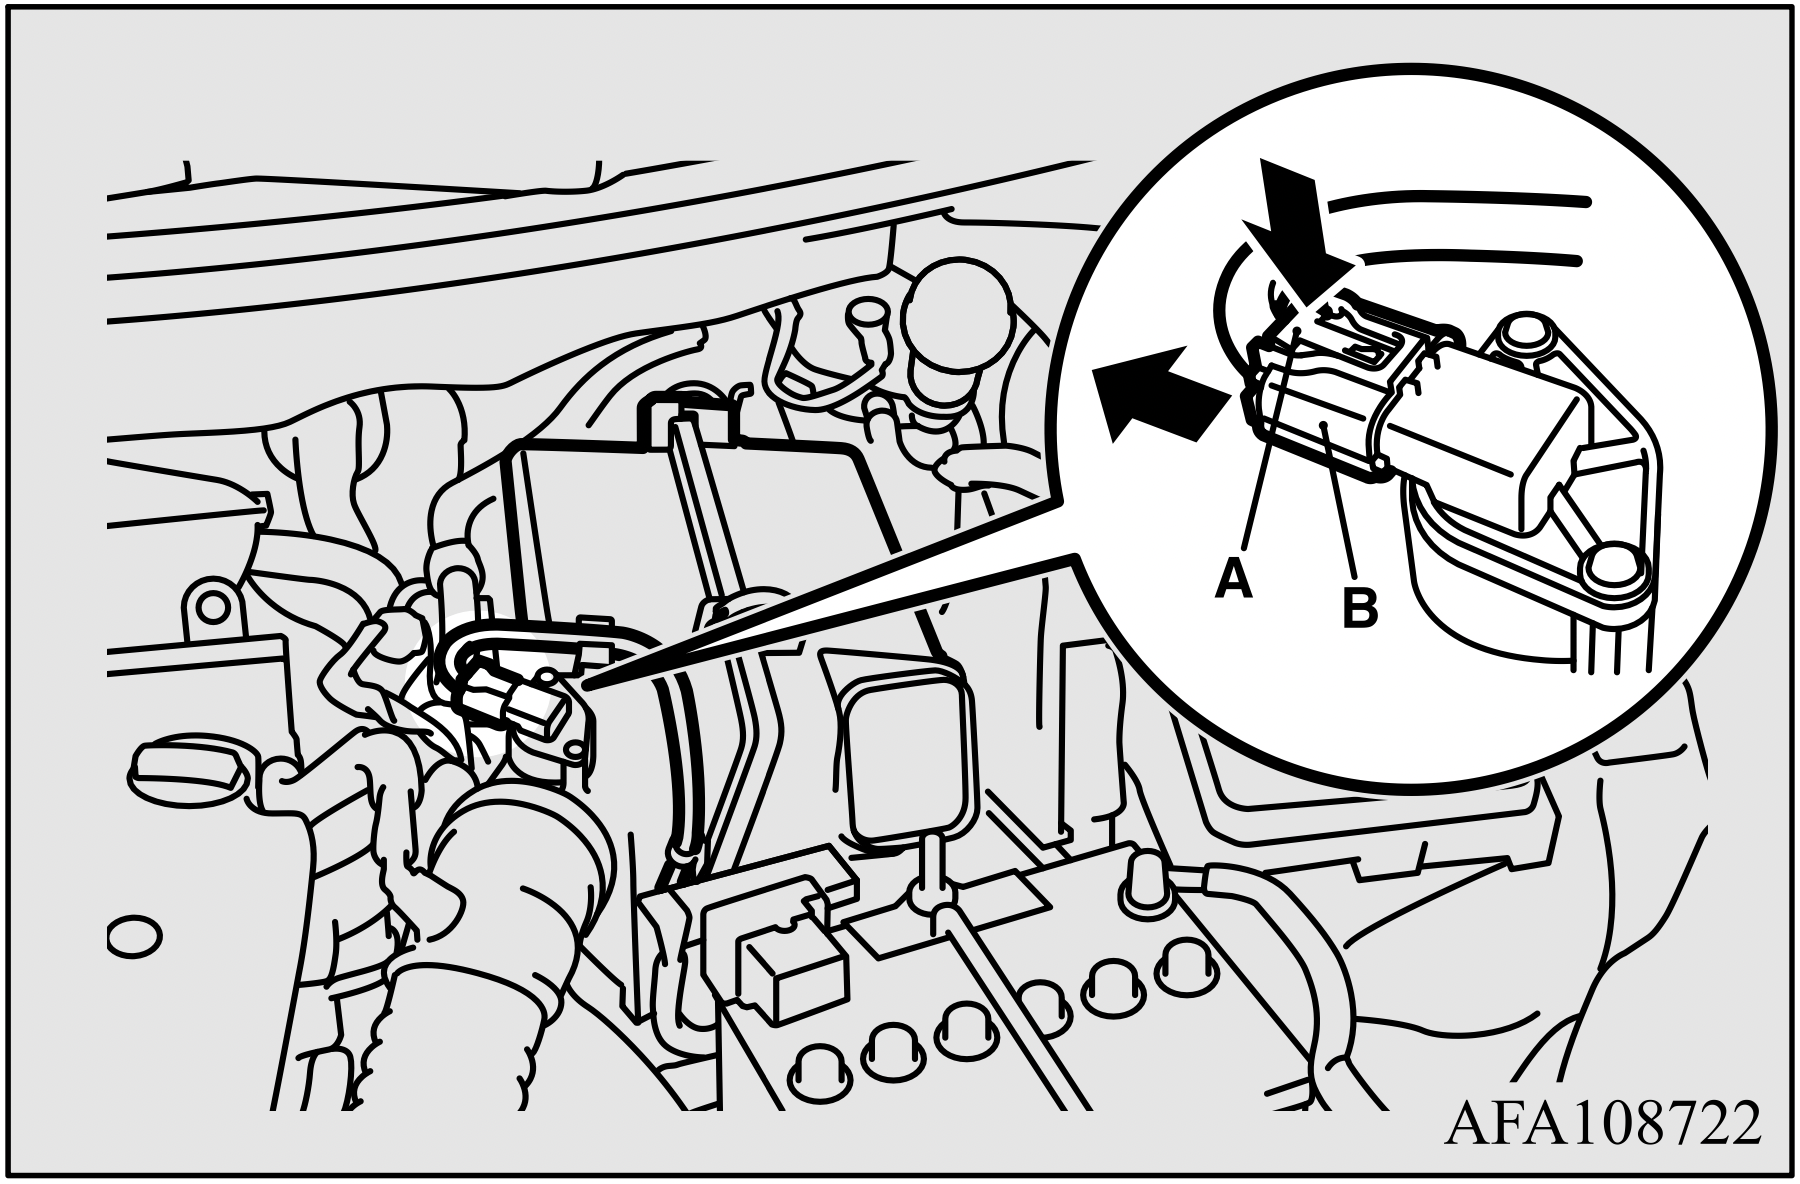
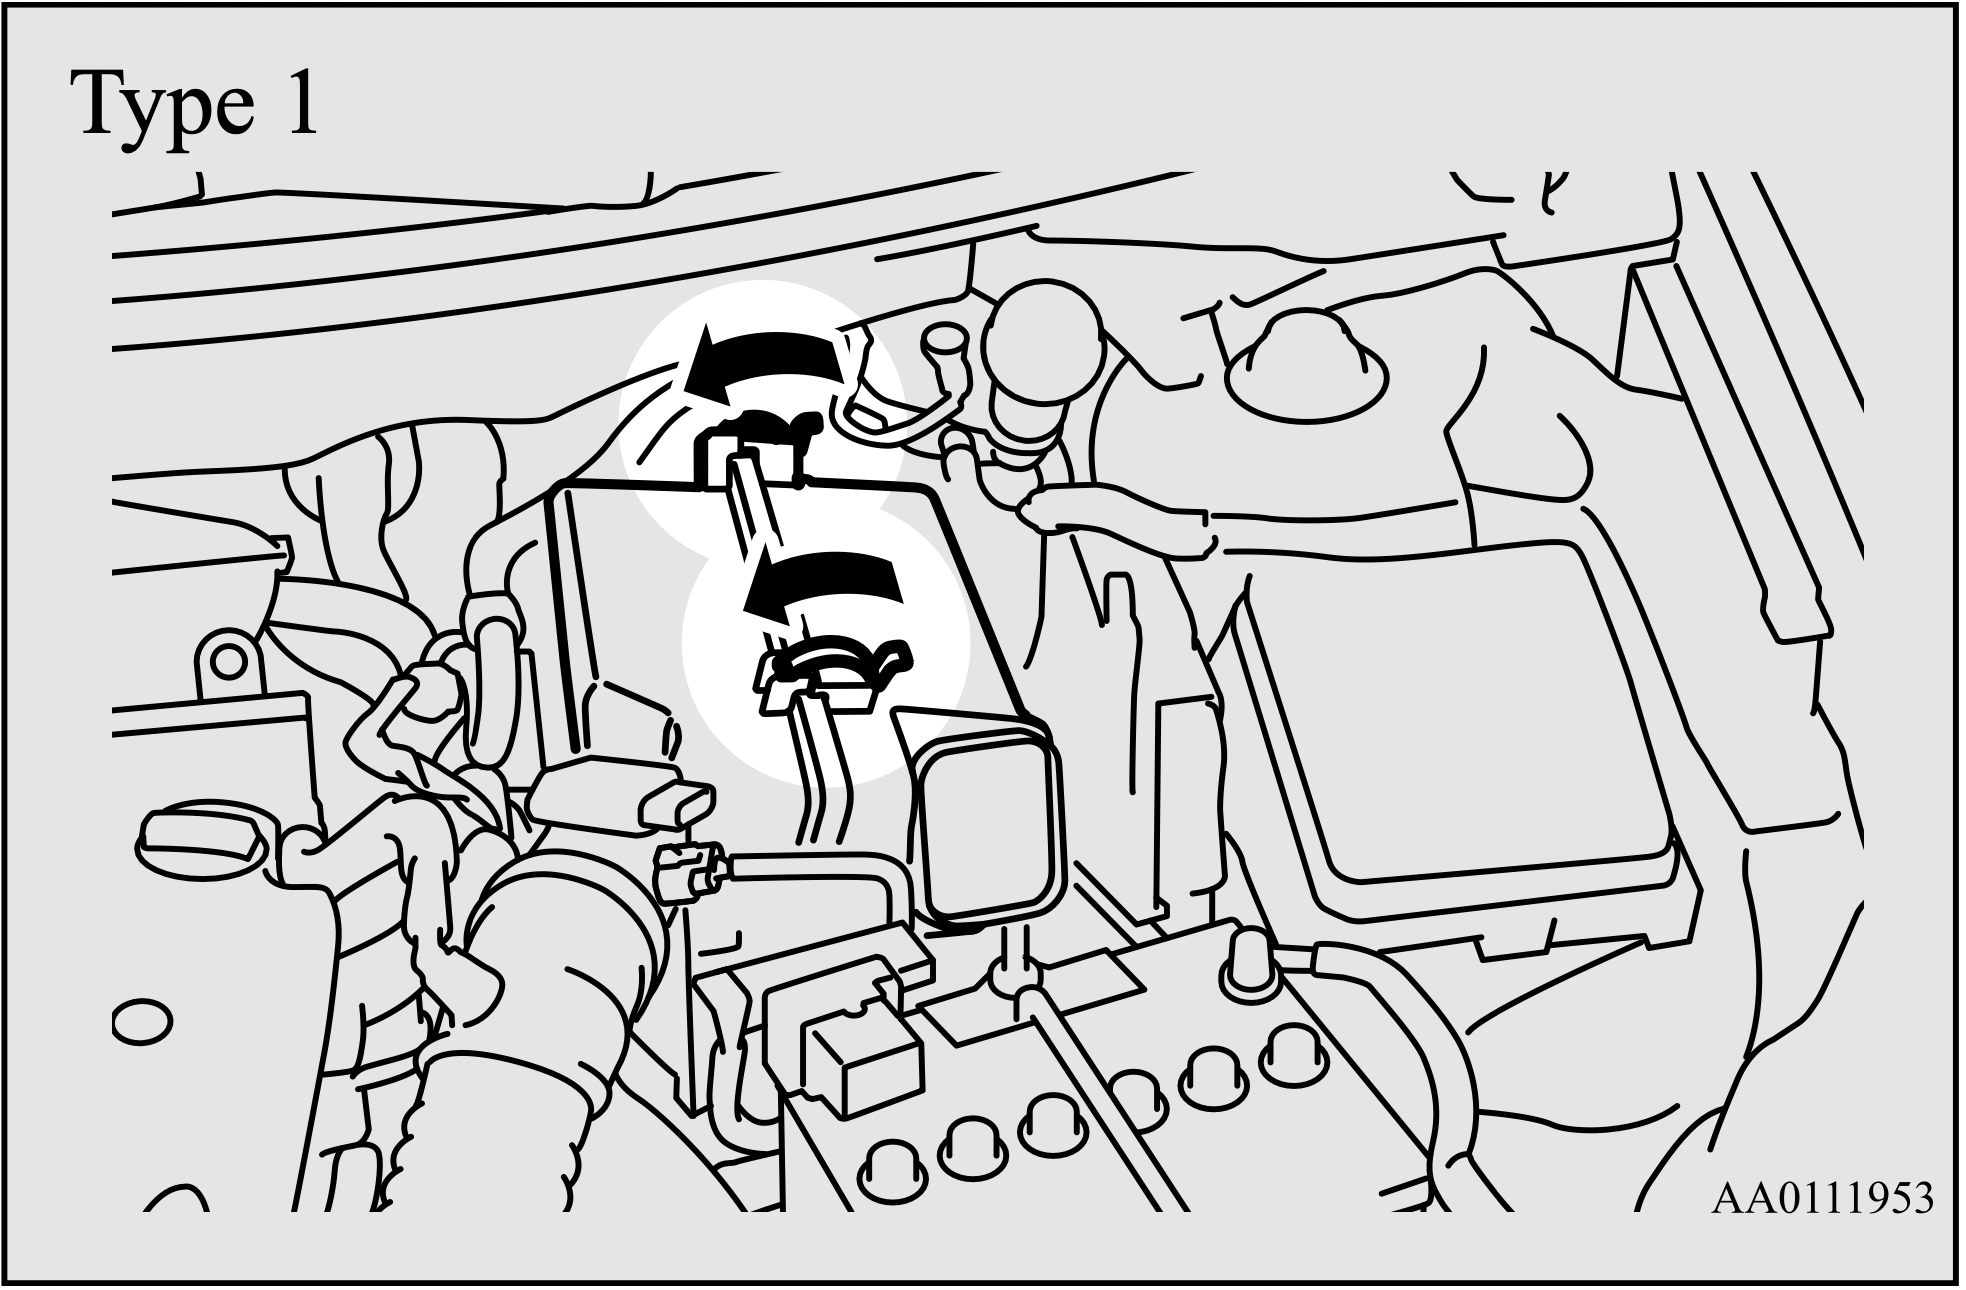
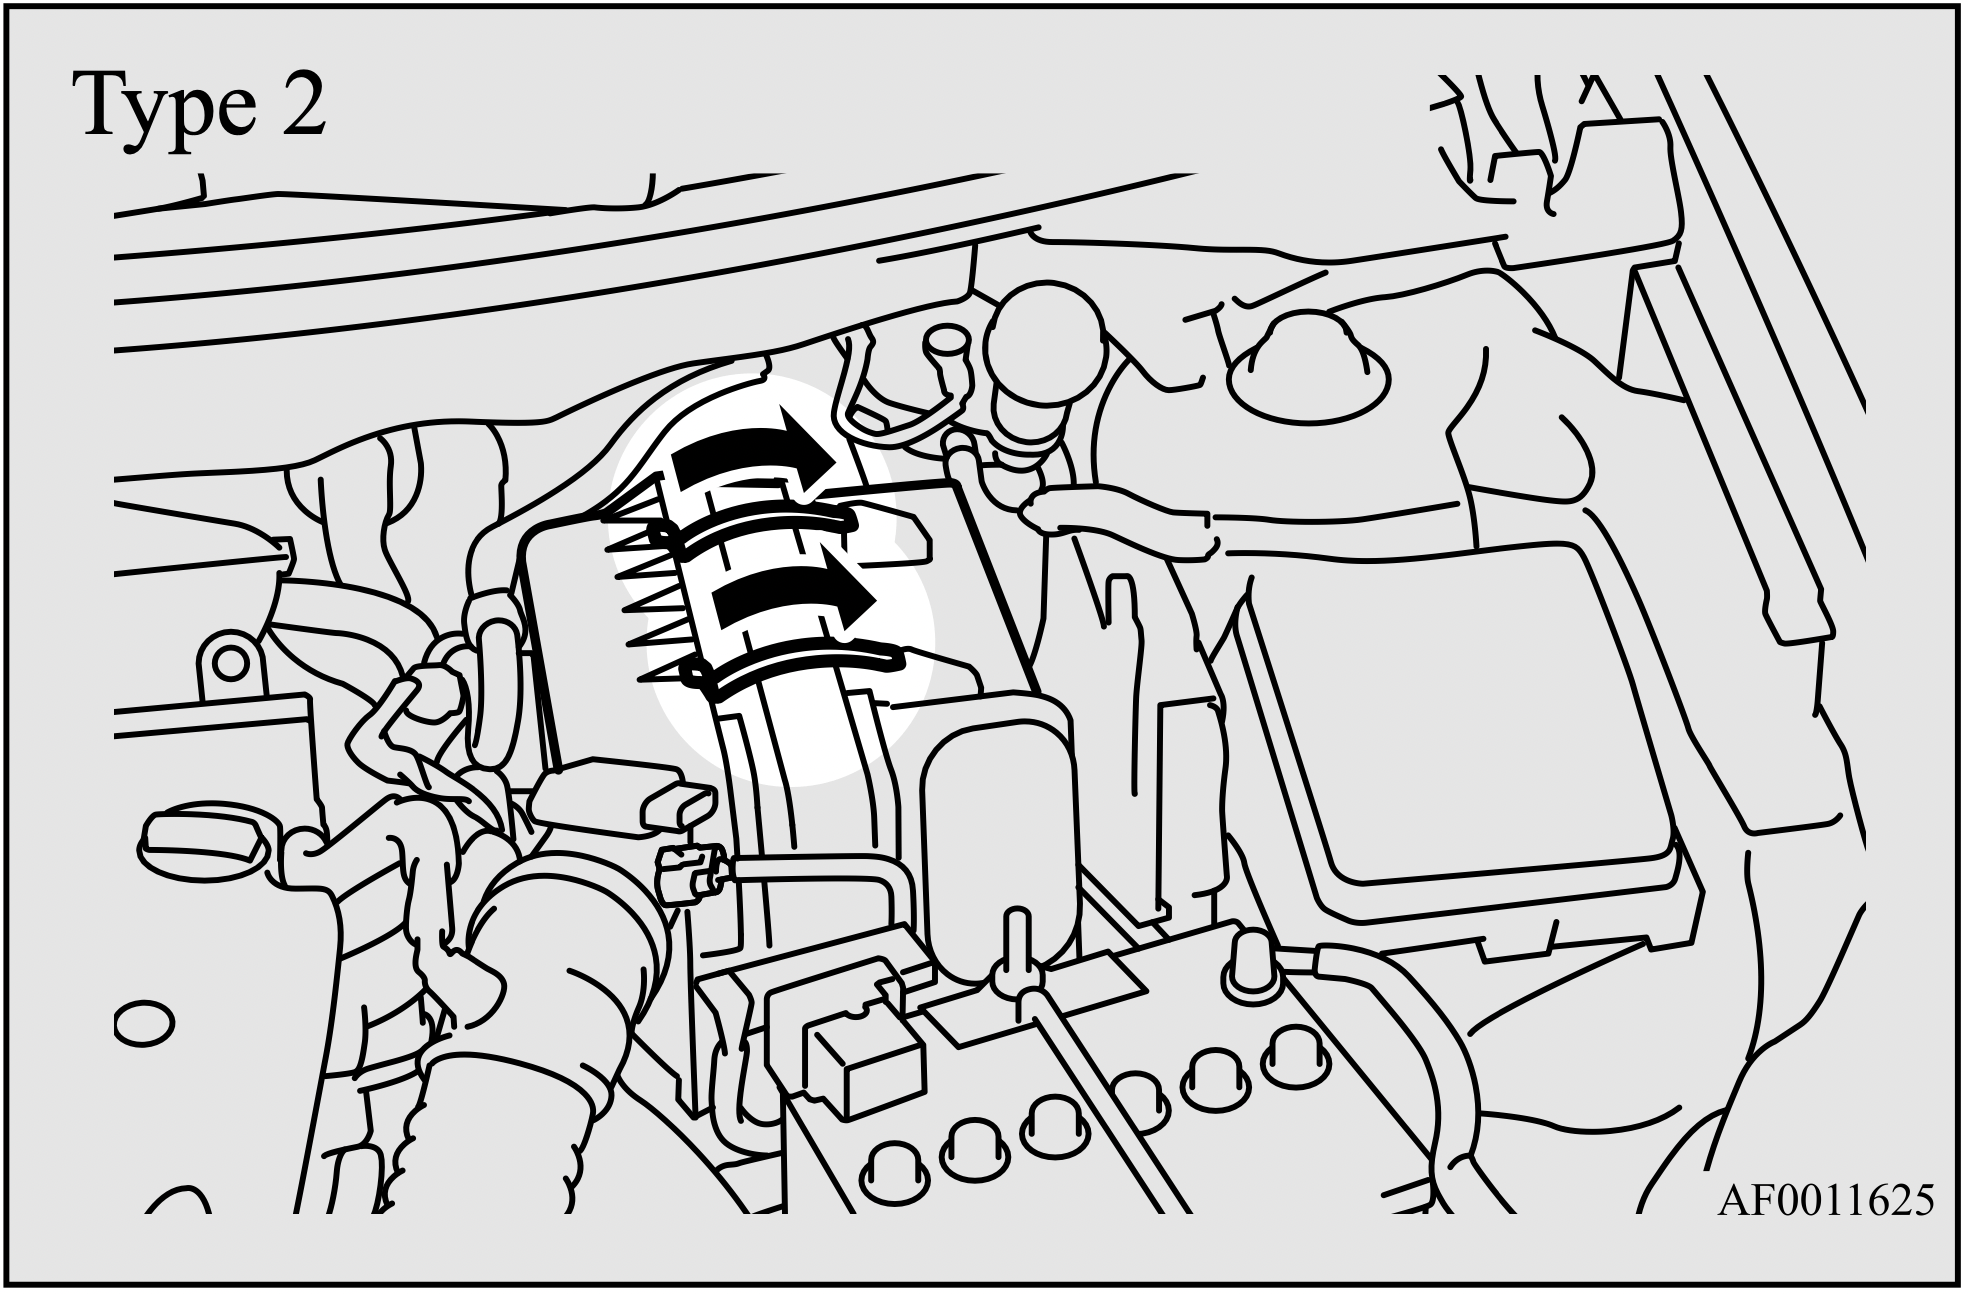
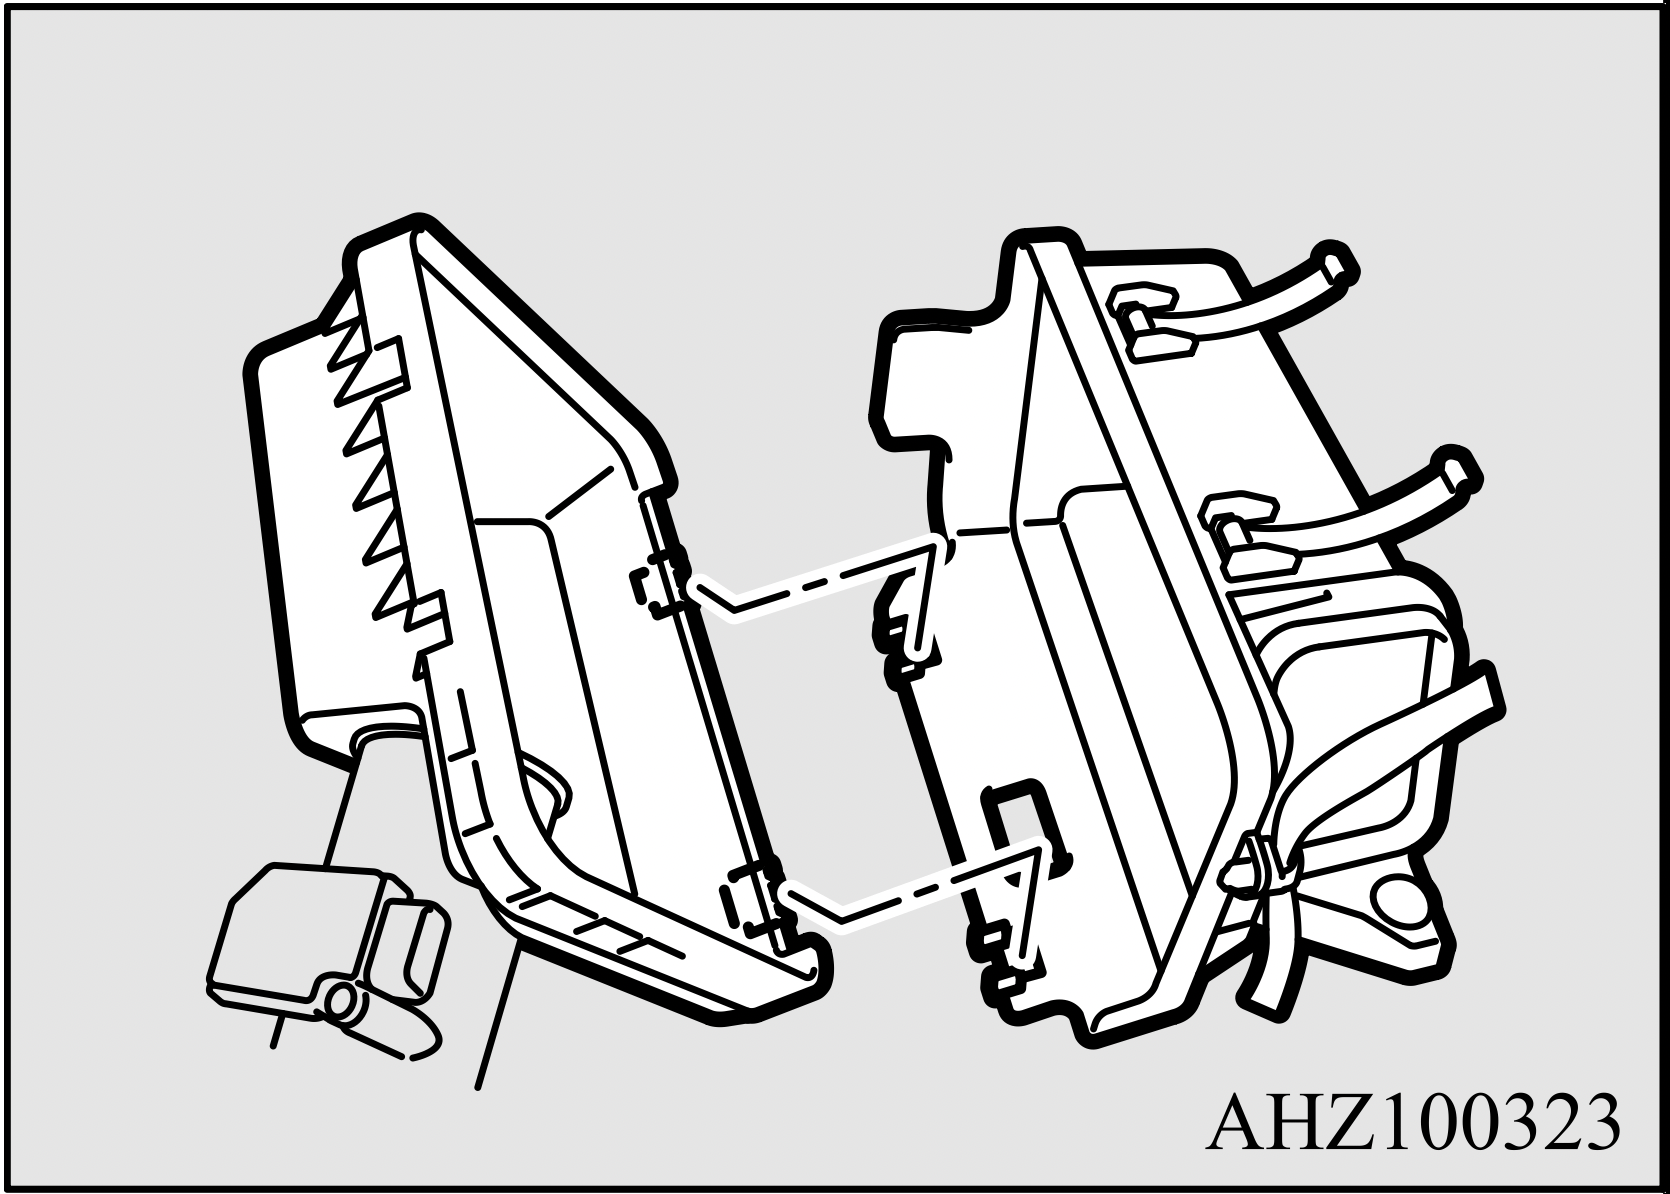
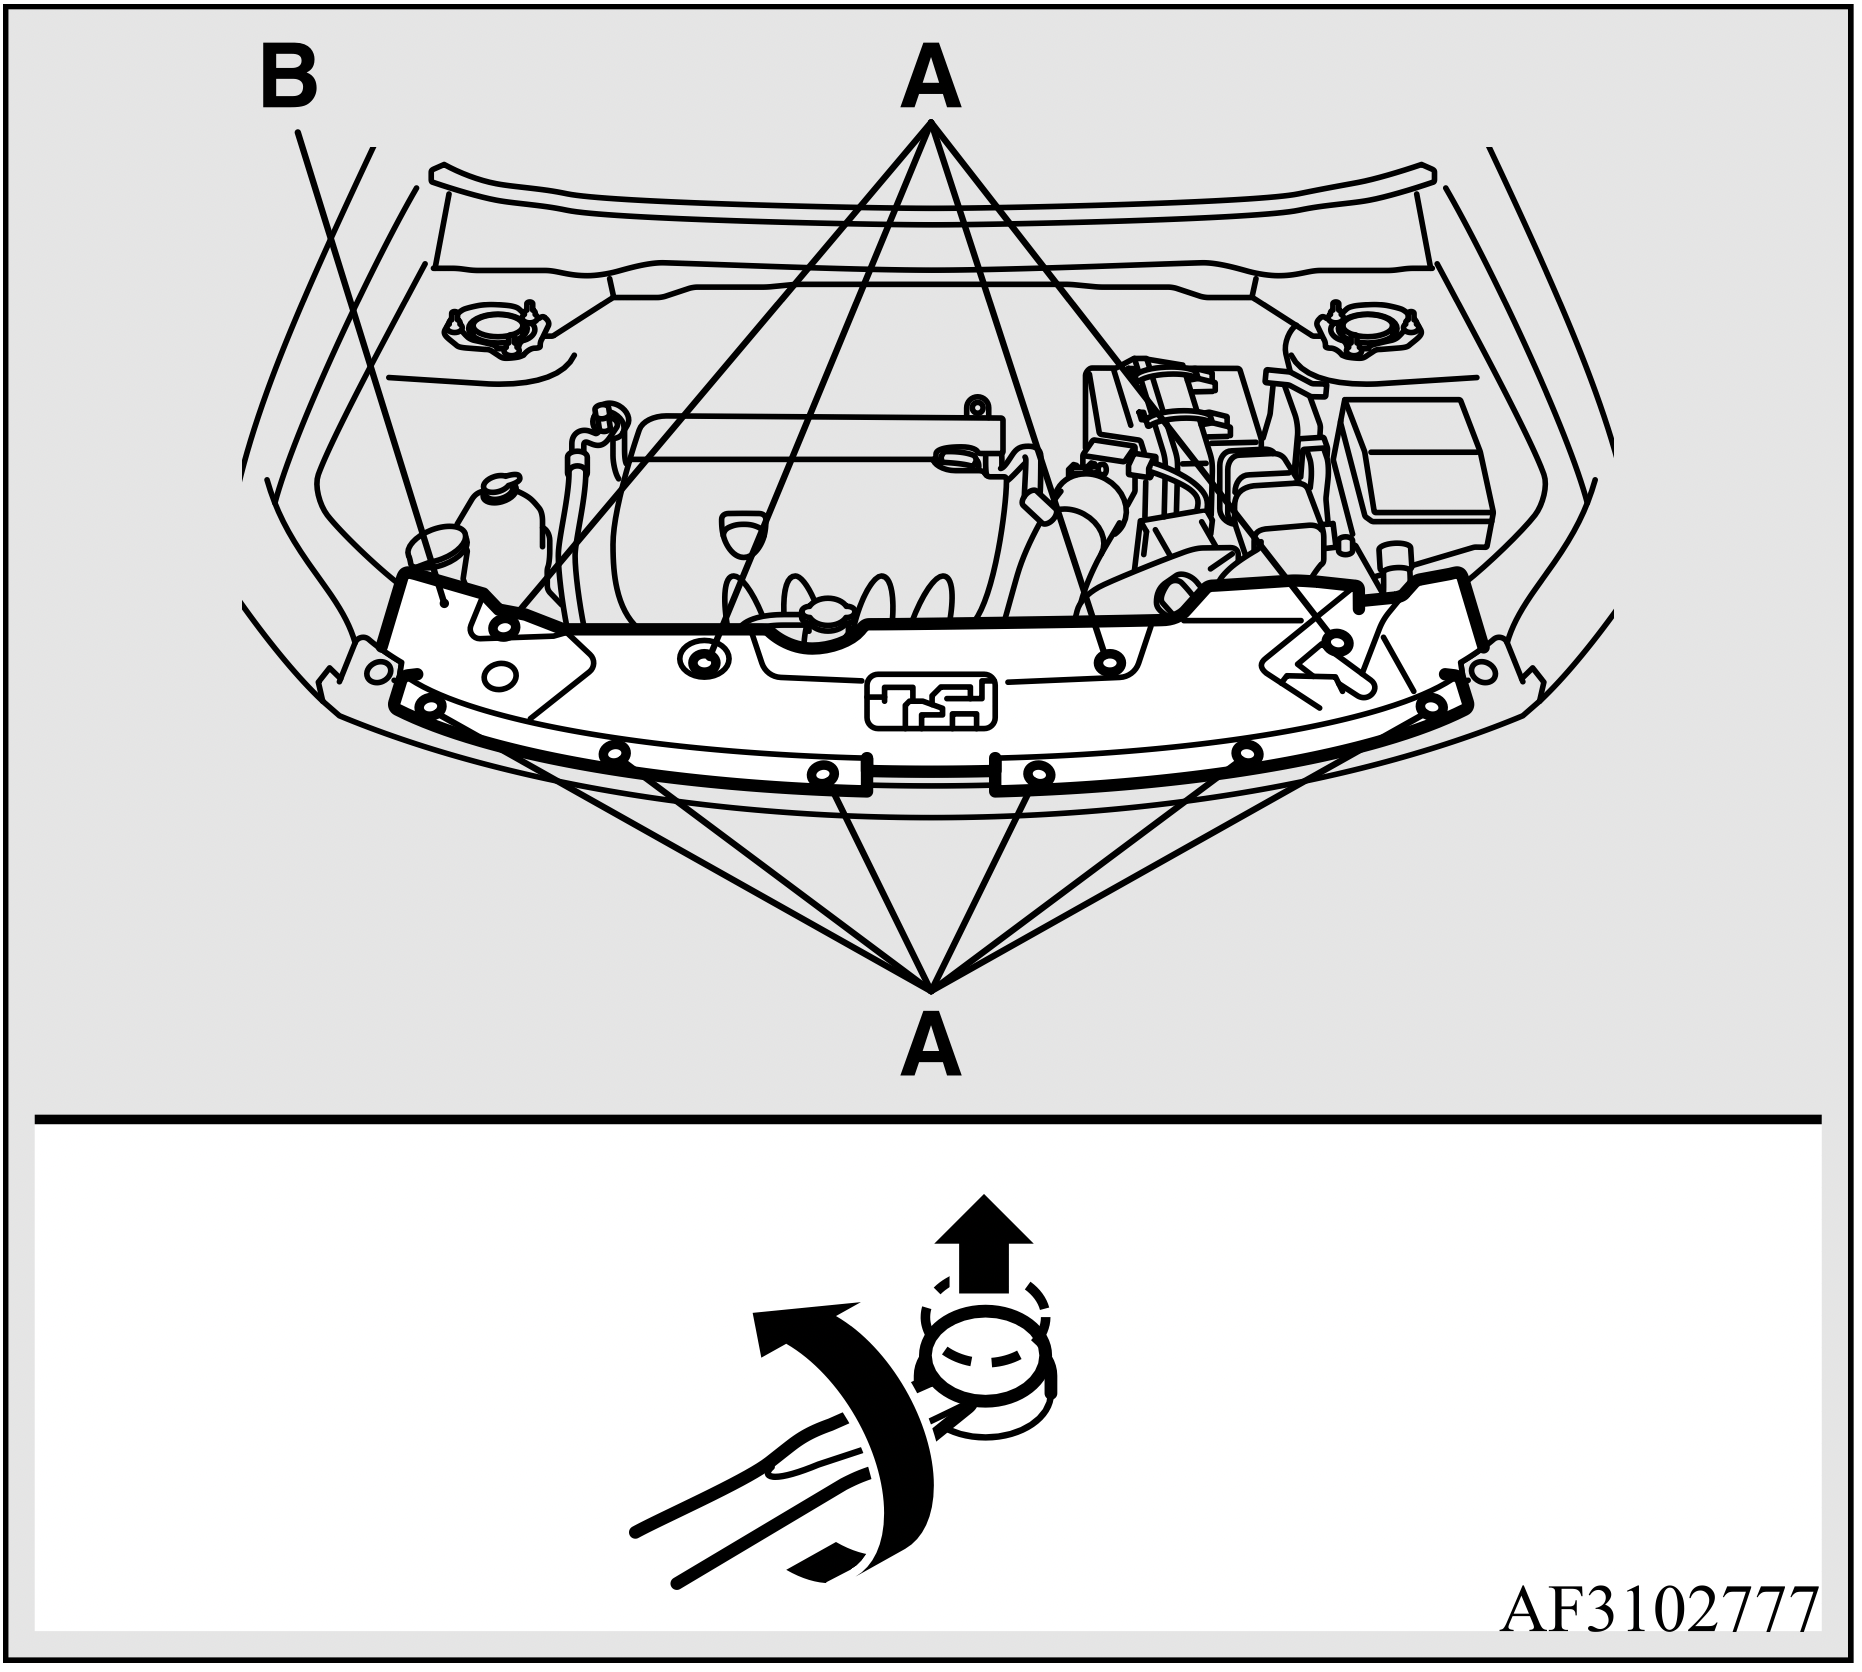
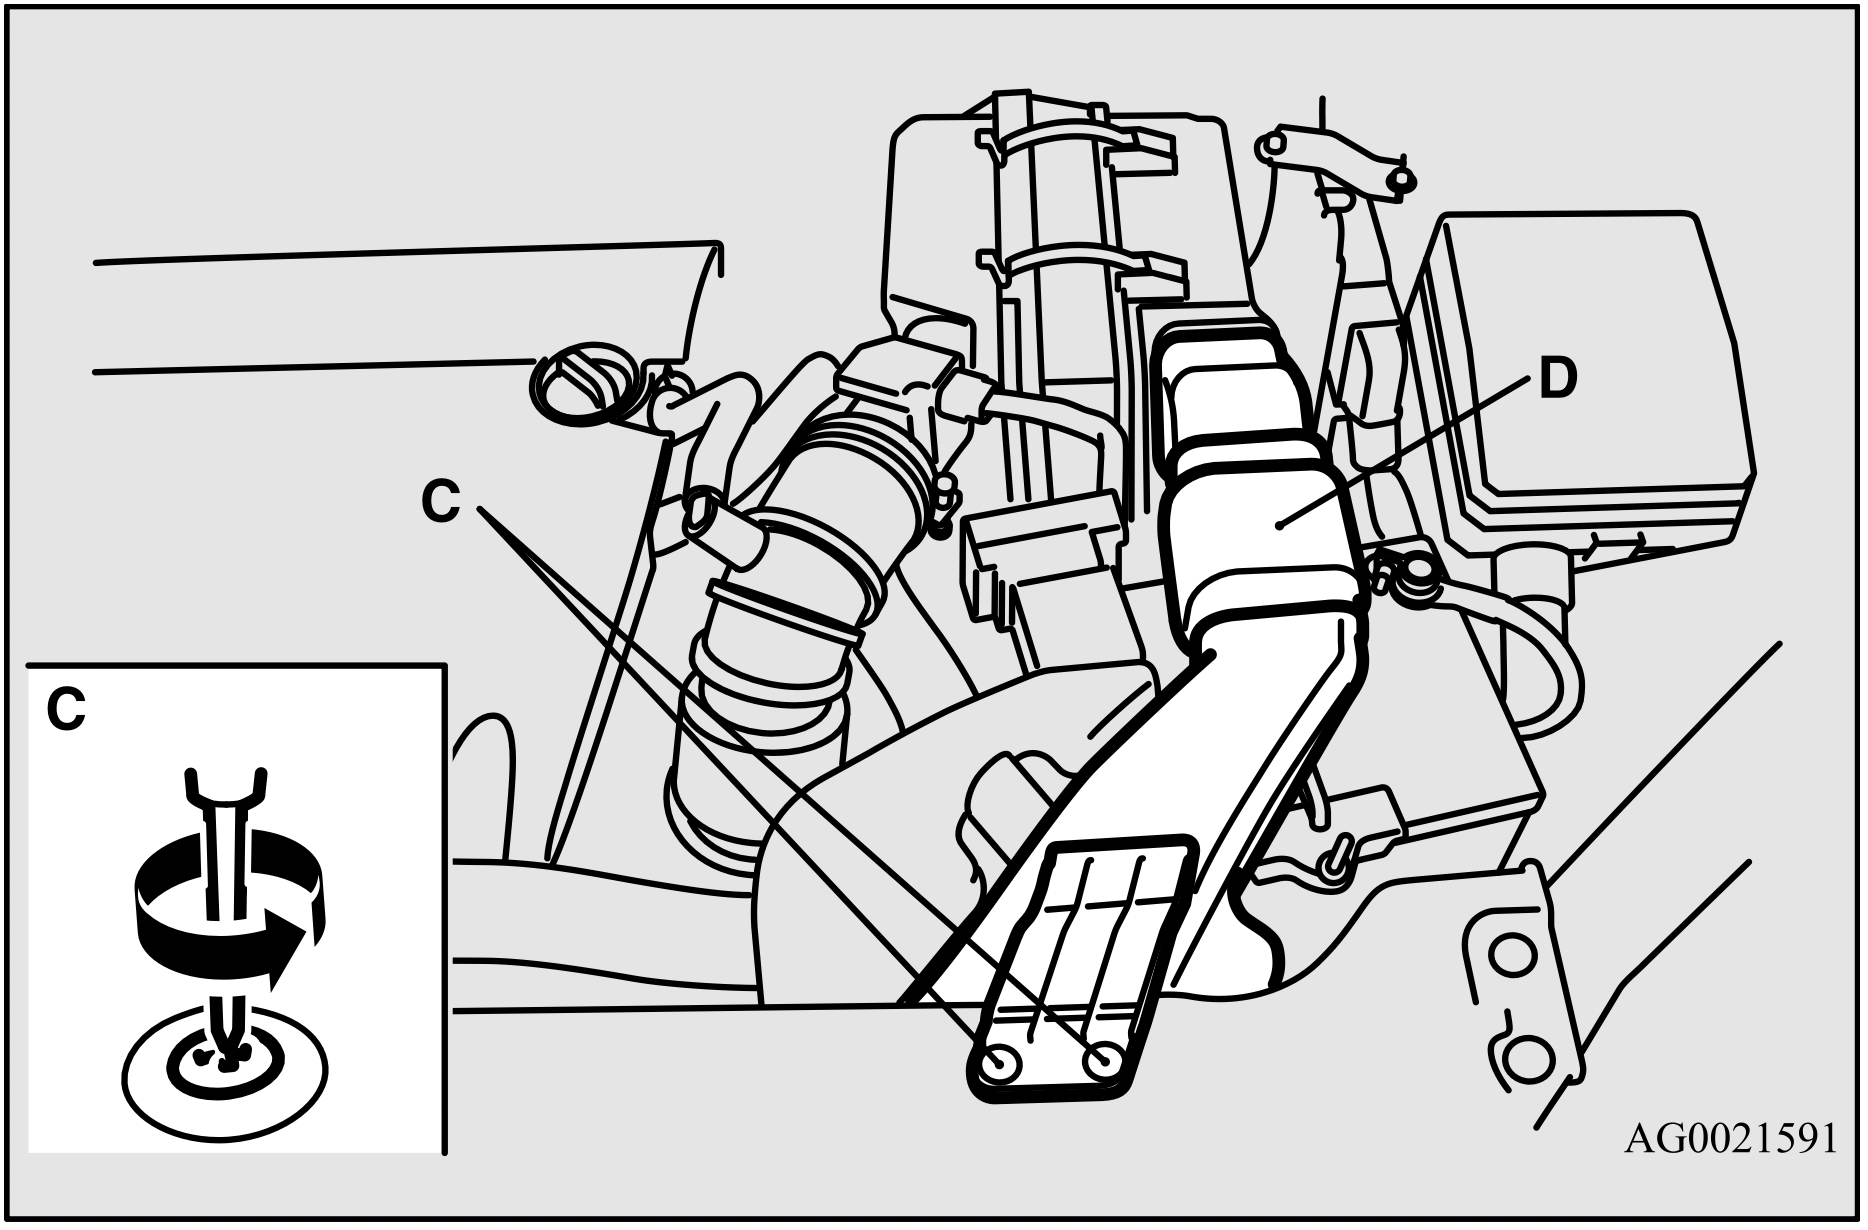
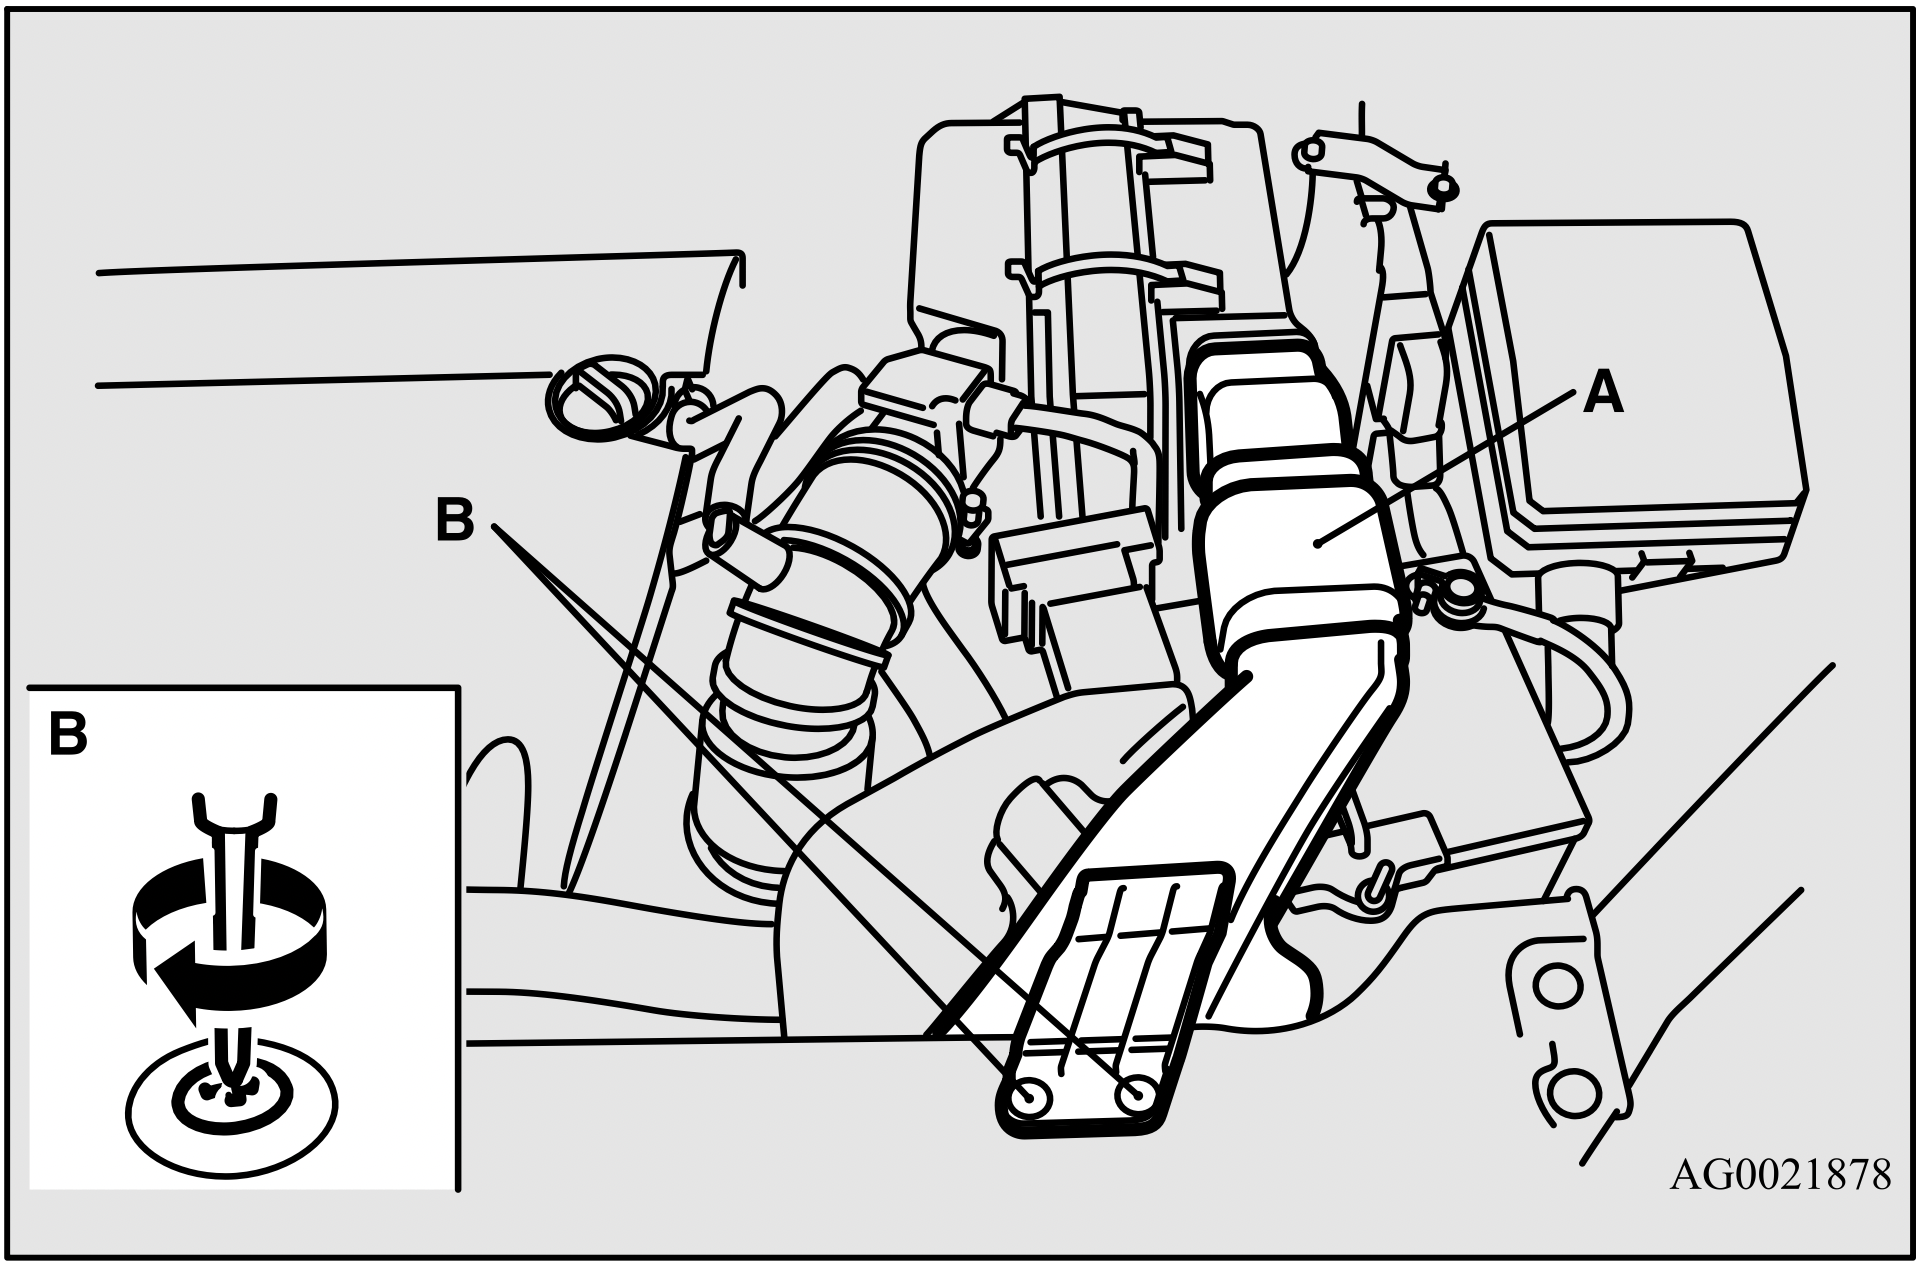
Removing and installing the upper cover and duct
To replenish with the distilled water, remove the upper cover and duct.
WARNING: Turn the ignition switch to the “OFF” position or put the operation mode in OFF. Make sure that your clothes cannot be caught by the fan or drive belt. Personal injury could result.
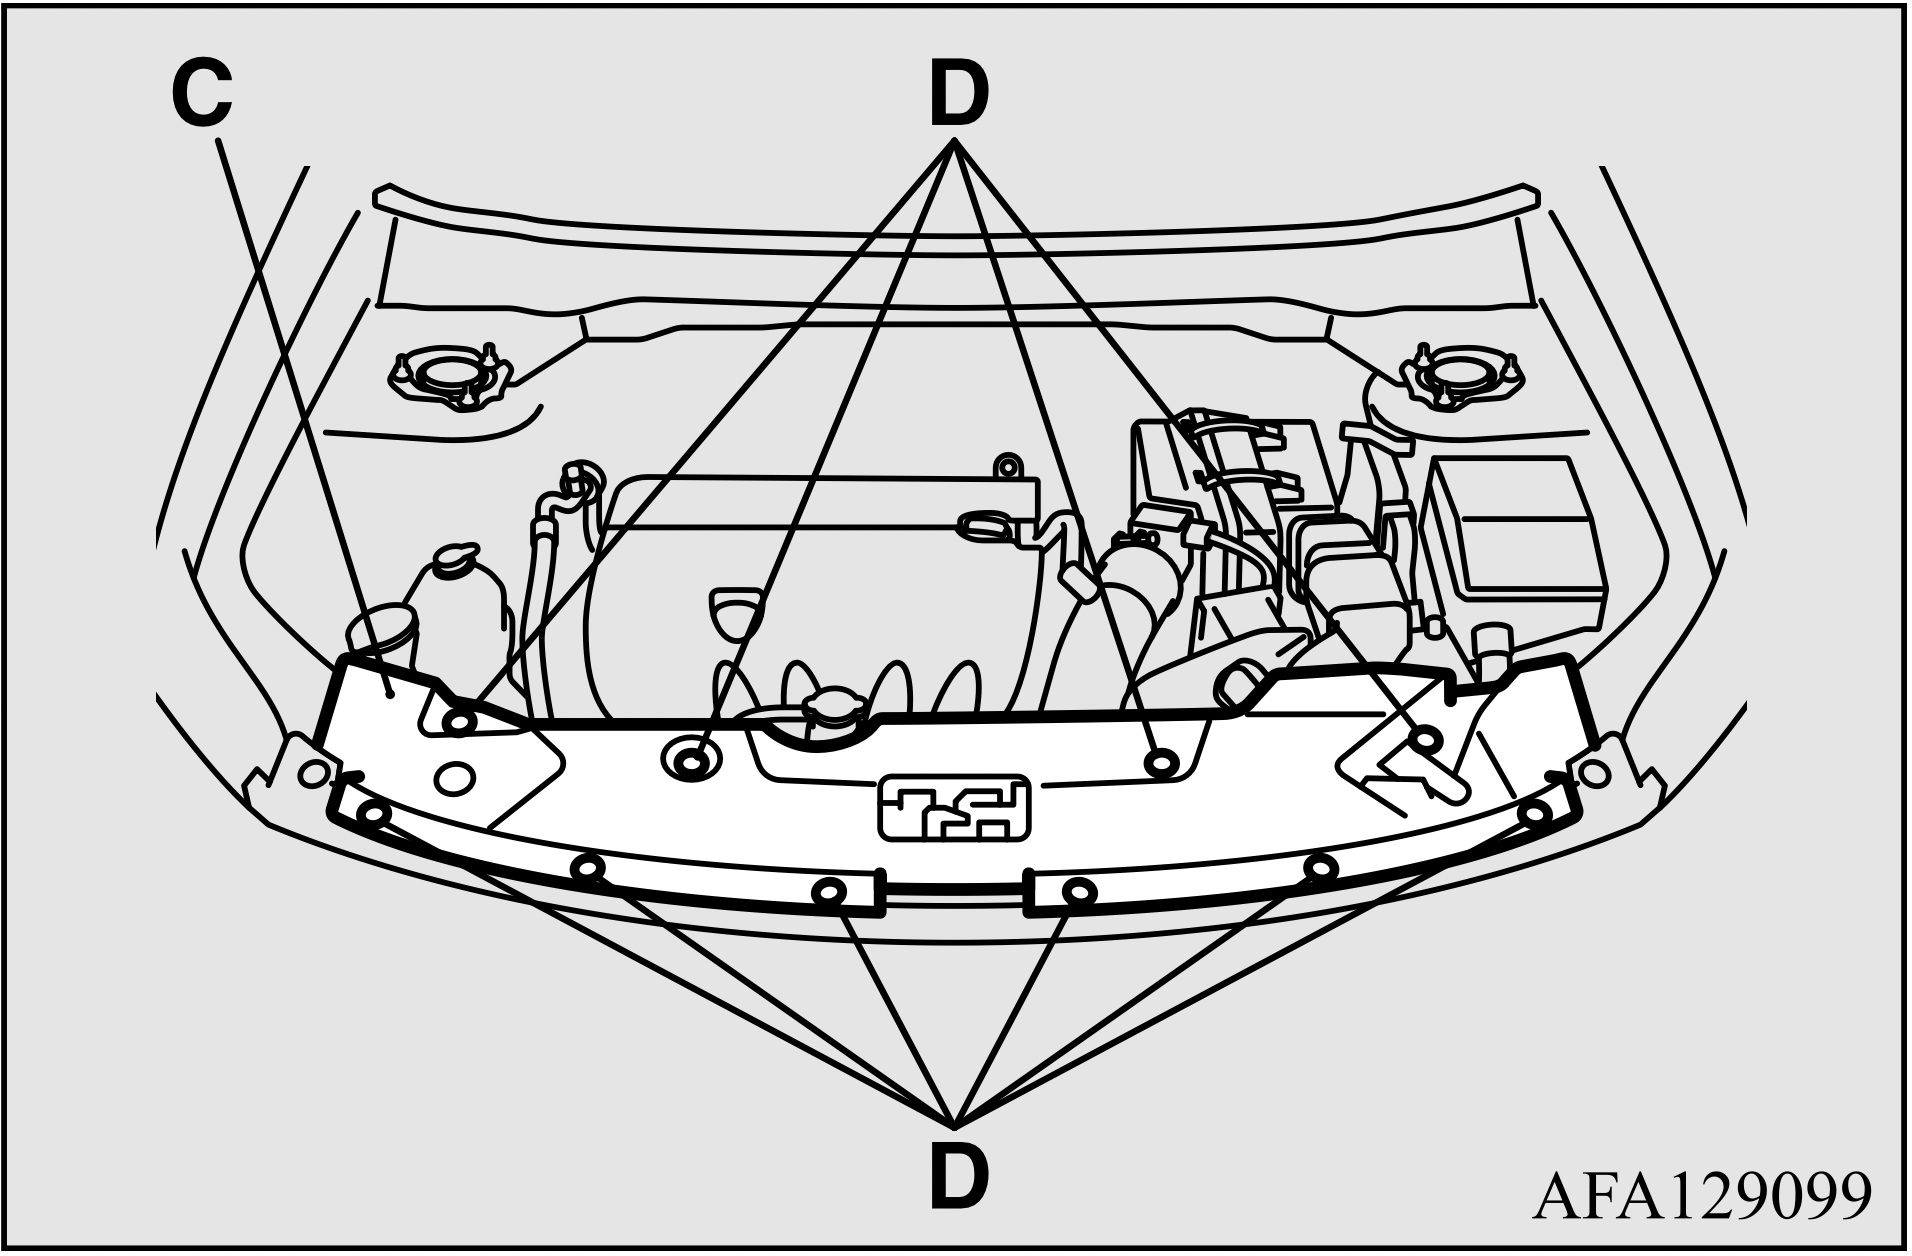
To remove
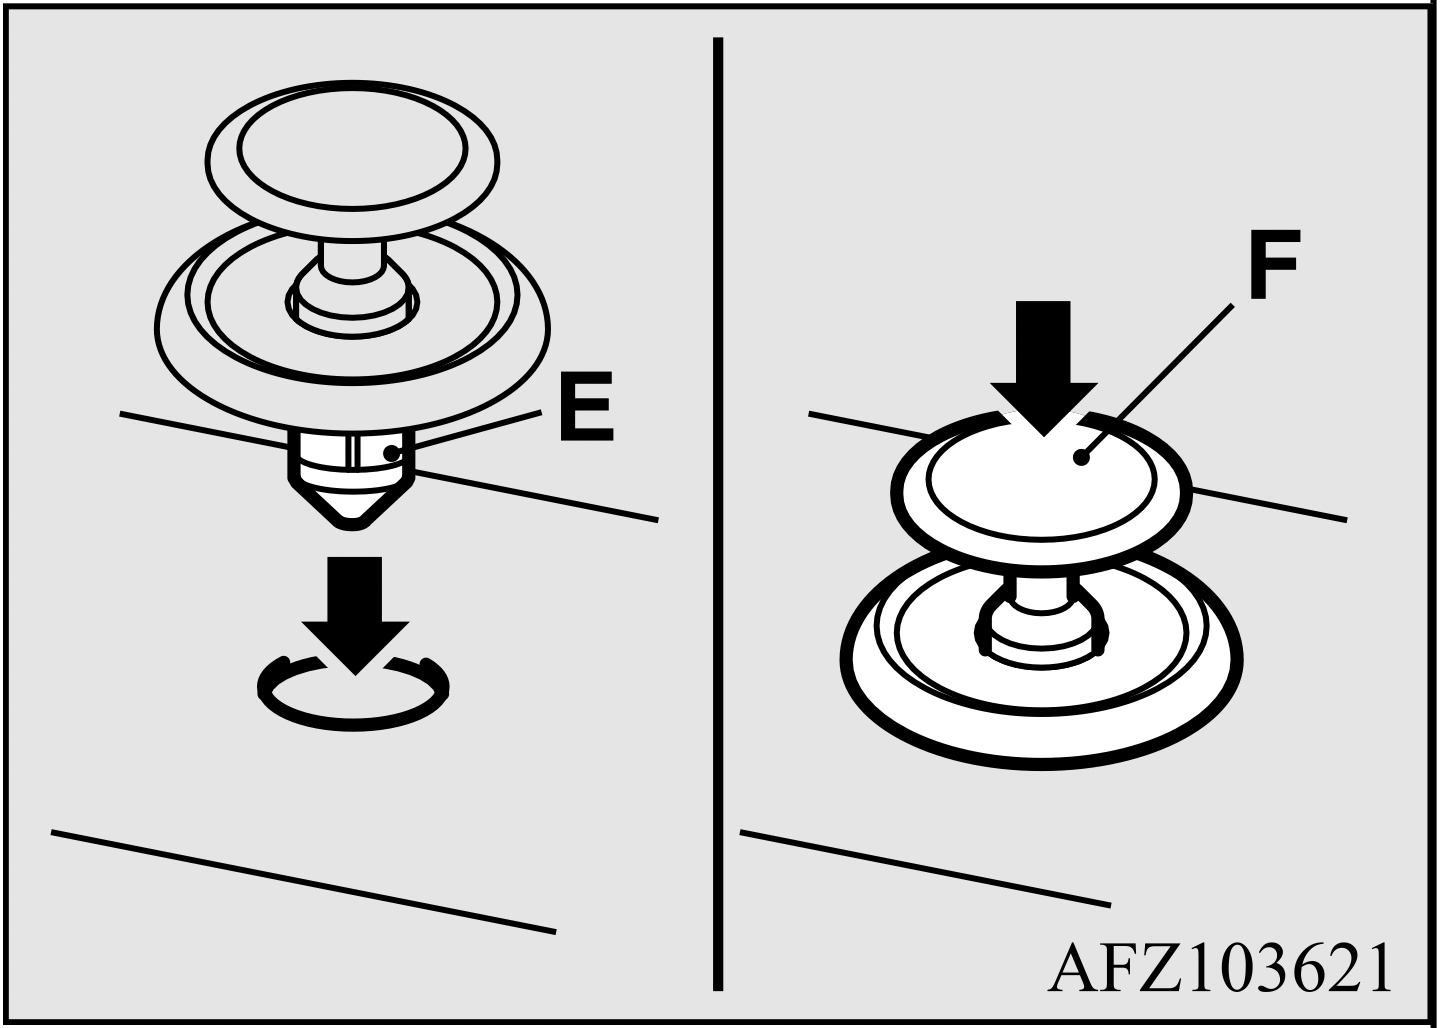
To install
NOTE: When refitting the clip, first insert part (E) of the clip into the hole and then press part (F) into it.
During cold weather
The battery is weaker in cold temperatures. This has to do with its chemical and physical properties and is why a very cold battery, especially one with a low charge, will have a hard time starting your vehicle.
It is recommended that you have your battery and charging system checked by an authorized Mitsubishi Motors dealer or a repair facility of your choice before the start of cold weather. If necessary, have it charged. This will guarantee more reliable starting, and longer battery life.
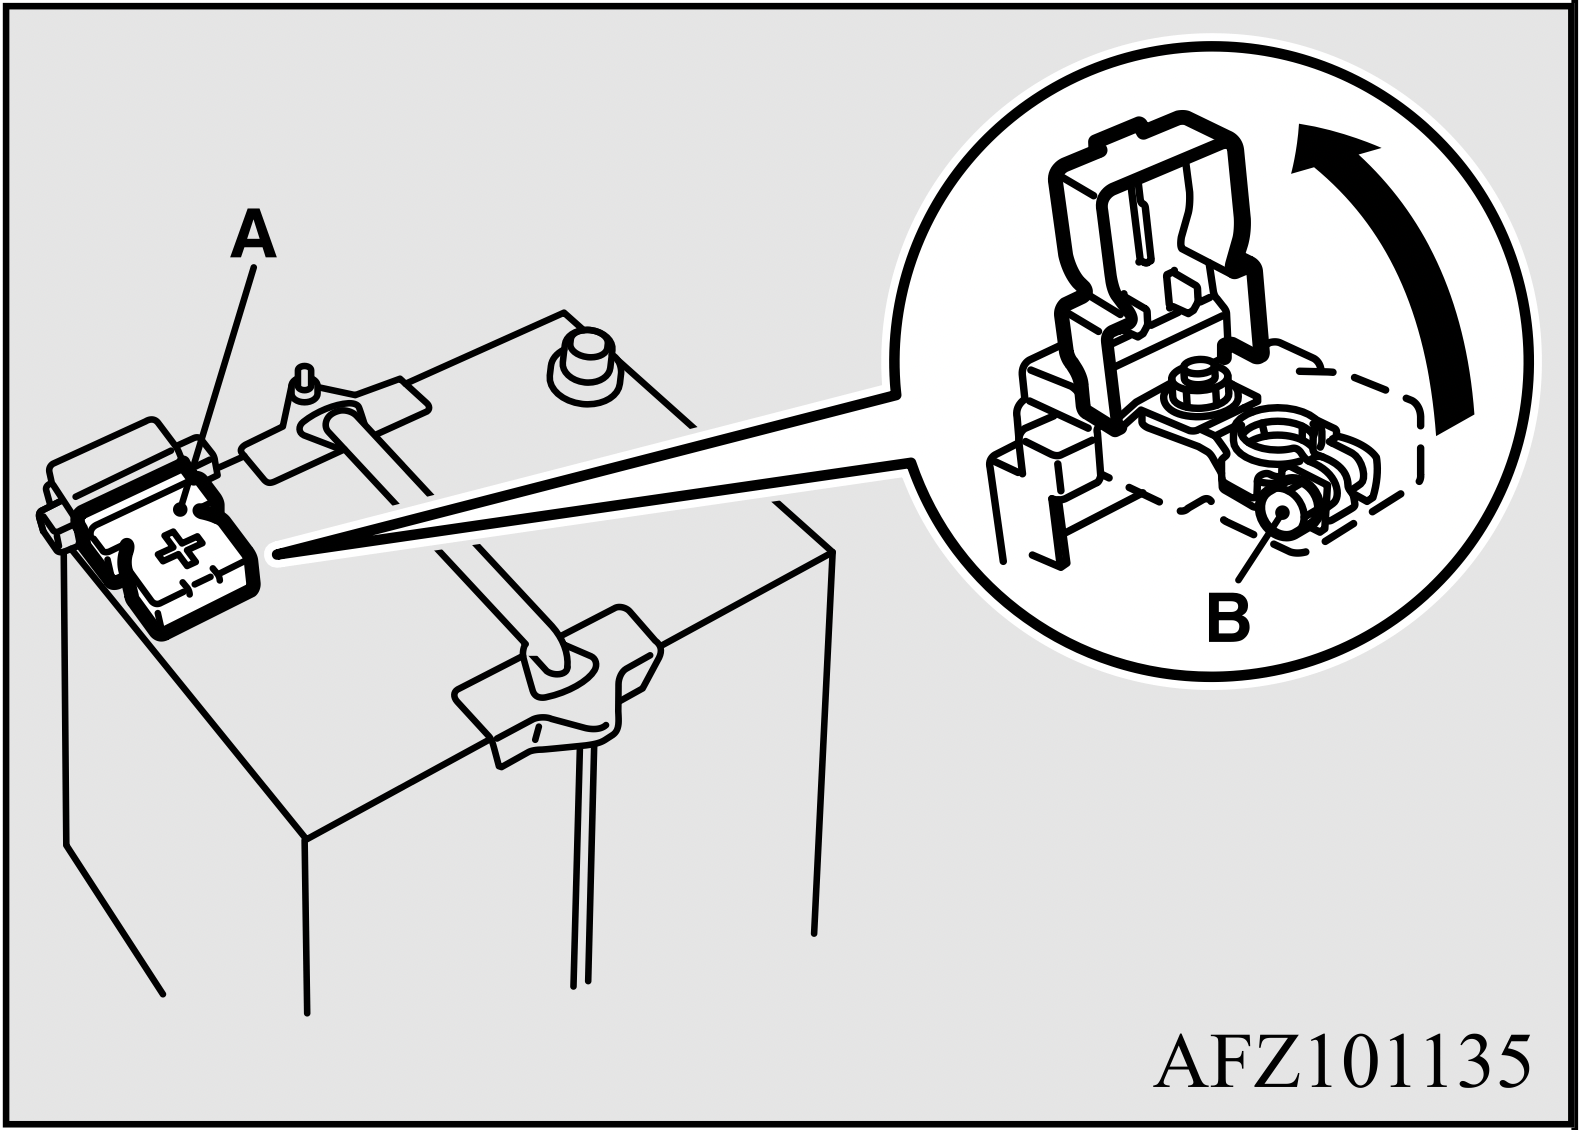
Disconnection and connection
To disconnect the battery cable, stop the engine. Disconnect the negative (-) terminal first, then the positive (+) terminal. To reconnect the battery, first connect the positive (+) terminal and then the negative (-) terminal, before starting the vehicle.
NOTE
WARNING
WARNING
WARNING
NOTE
Your vehicle is equipped with an emissioncontrol system that meets all the requirements of the U.S. Environmental Protection Agency and Environment Canada. The emission-control system is made of:
To be sure the emission-control system works properly, have your vehicle inspected and maintained by an authorized Mitsubishi Motors dealer or a repair facility of your choice. This should be done at the time or mileage specified in the “WARRANTY AND MAINTENANCE MANUAL”.
These, and all the other “general” maintenance services listed in this manual, need to be performed to keep your vehicle running properly and reliably.
You should also have an inspection and service any time you suspect a malfunction.
NOTE: To meet government regulations and promote cleaner air, your vehicle is equipped with an onboard diagnostic system (OBD). The engine electronic control module that controls OBD functions stores various data (especially about the exhaust emissions). This data will be erased if the battery cable is disconnected, which could make a rapid diagnosis difficult. Do not disconnect the battery cable when the engine malfunction indicator (“SERVICE ENGINE SOON” or “Check engine light”) is ON.
Spark plugs
Spark plugs must fire properly for good engine performance and emission-control. Do not reuse them by cleaning or regapping. Change them at the mileage listed in the “WARRANTY AND MAINTENANCE MANUAL”.
NOTE: Use the spark plugs listed under “Engine specifications” on page 11-4 or plugs that are exactly the same. Other plugs could cause engine damage, performance problems or radio noise.
Fuel hoses
Check the hose surfaces for any heat and mechanical damage, hard and brittle rubber, cracking, tears, cuts and abrasions. Pay special attention to the hoses closest to high heat sources such as the exhaust manifold. Check all the hose connections, such as clamps and couplings, to make sure they are secure and that there are no leaks. If you see any wear or damage, replace the hoses immediately.
Intake valve clearance
Have the valve clearance checked at an authorized Mitsubishi Motors dealer at the mileage specified in the “WARRANTY AND MAINTENANCE MANUAL”.
If the engine sounds abnormally loud, have adjustments made by an authorized Mitsubishi Motors dealer.
Fuel system (tank, pipe line and connection, and fuel tank filler cap)
Check these regularly for damage or leaks in the fuel lines and connections. Check the fuel tank filler cap for damage or looseness. Pay special attention to the fuel lines closest to high heat sources such as the exhaust manifold.
WARNING: If you see a fuel leak or if you smell fuel, do not run the engine. Any spark (including from the ignition), flame or smoking material could cause an explosion or fire. Call an authorized Mitsubishi Motors dealer or a repair facility of your choice for assistance.
Evaporative emission control system (except evaporative emission canister)
If the fuel-vapor vent line is clogged or damaged, the fuel-vapor mixture will escape, polluting the air.
Have the system checked at an authorized Mitsubishi Motors dealer at the mileage specified in the “WARRANTY AND MAINTENANCE MANUAL”.
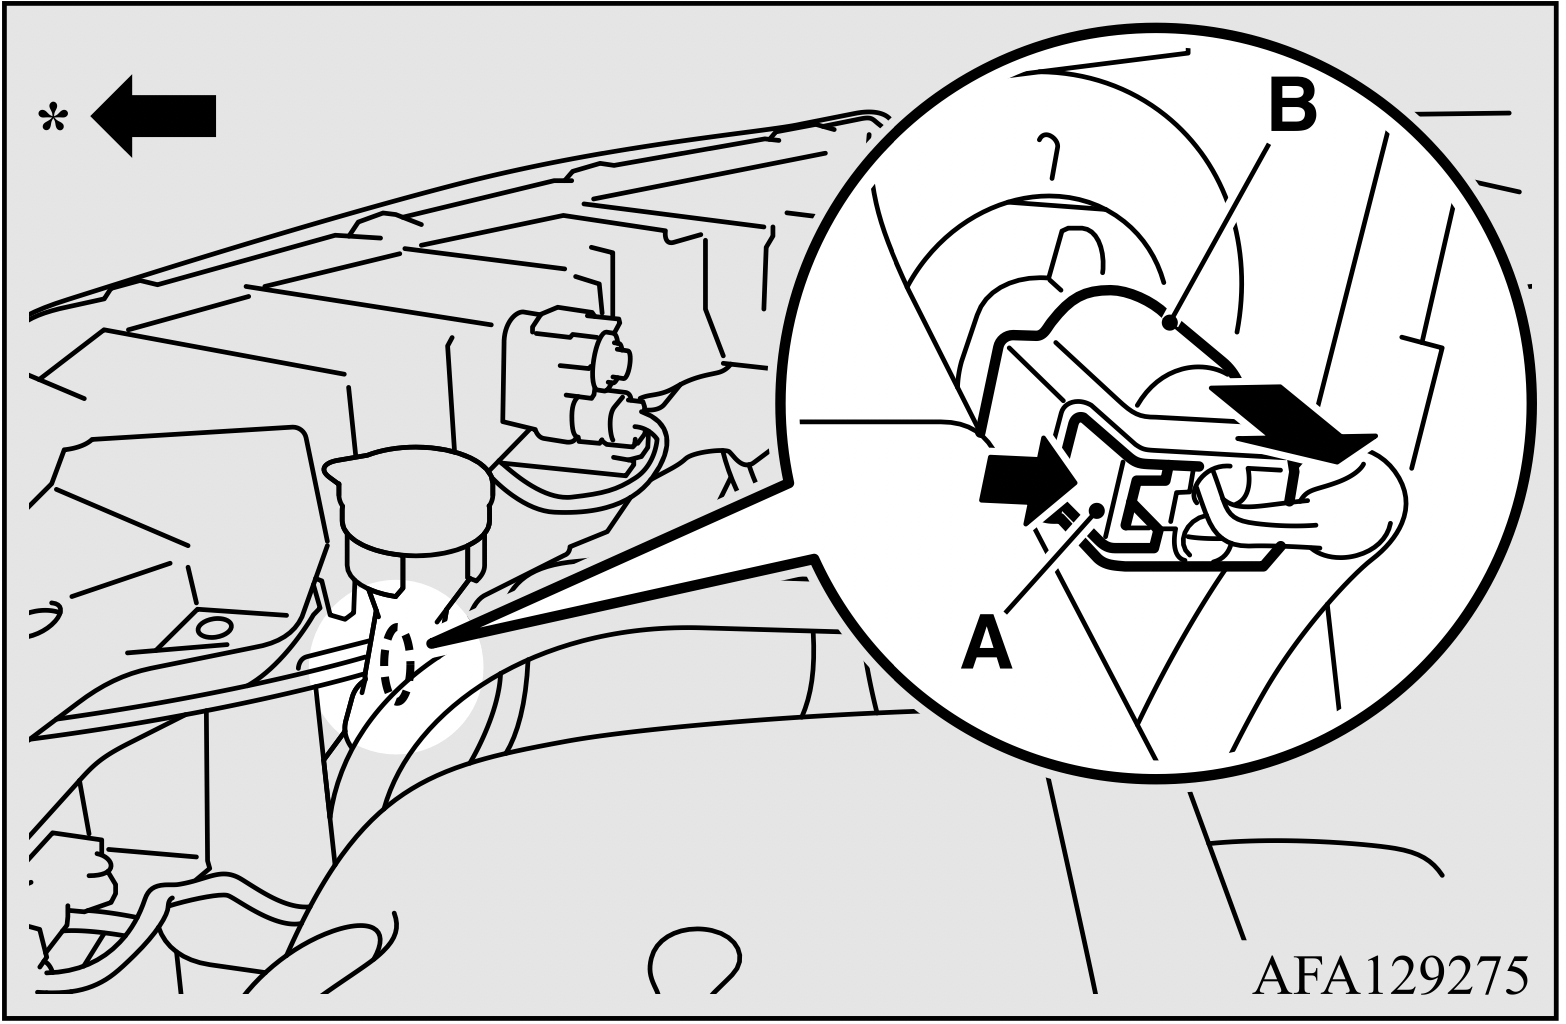
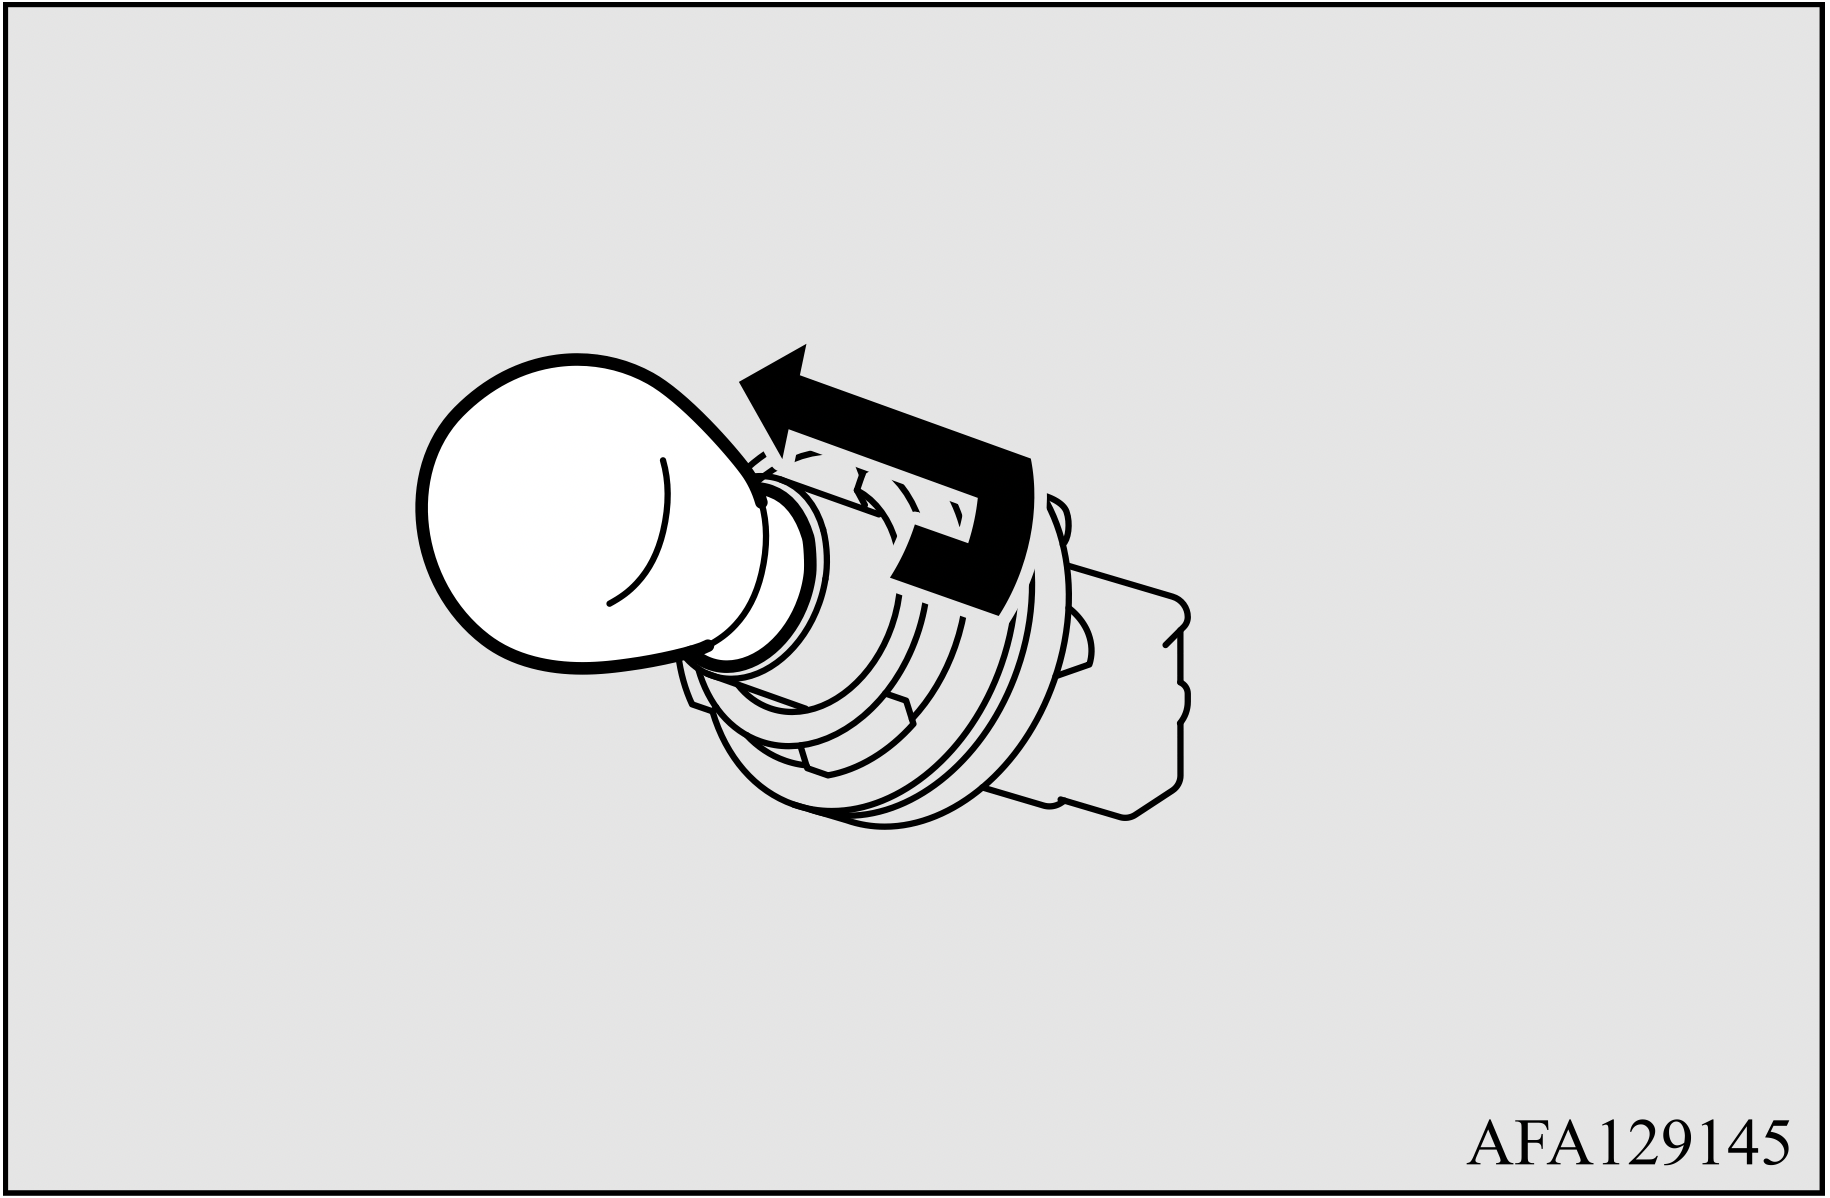
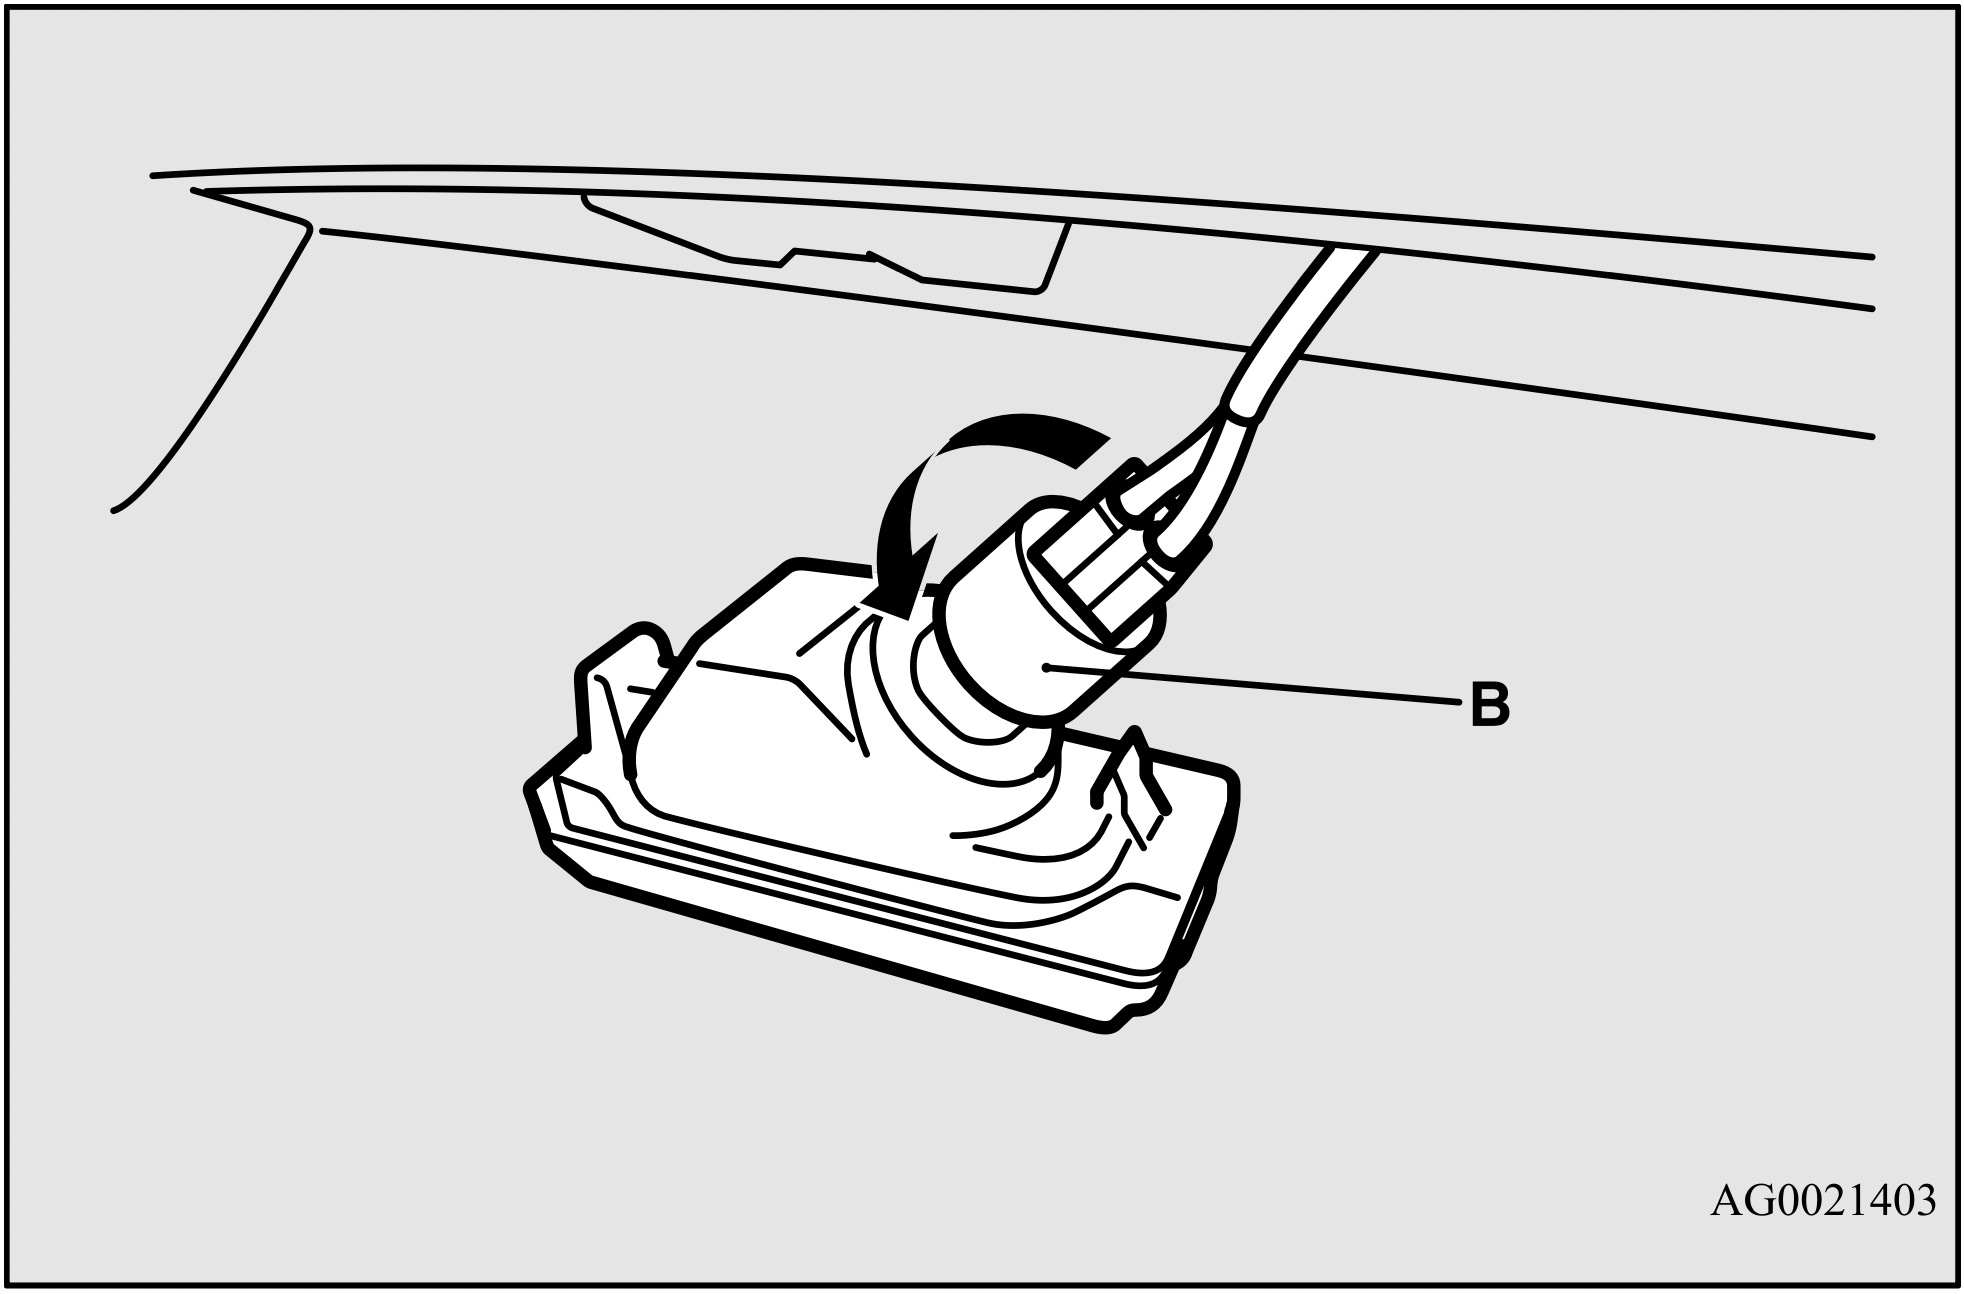
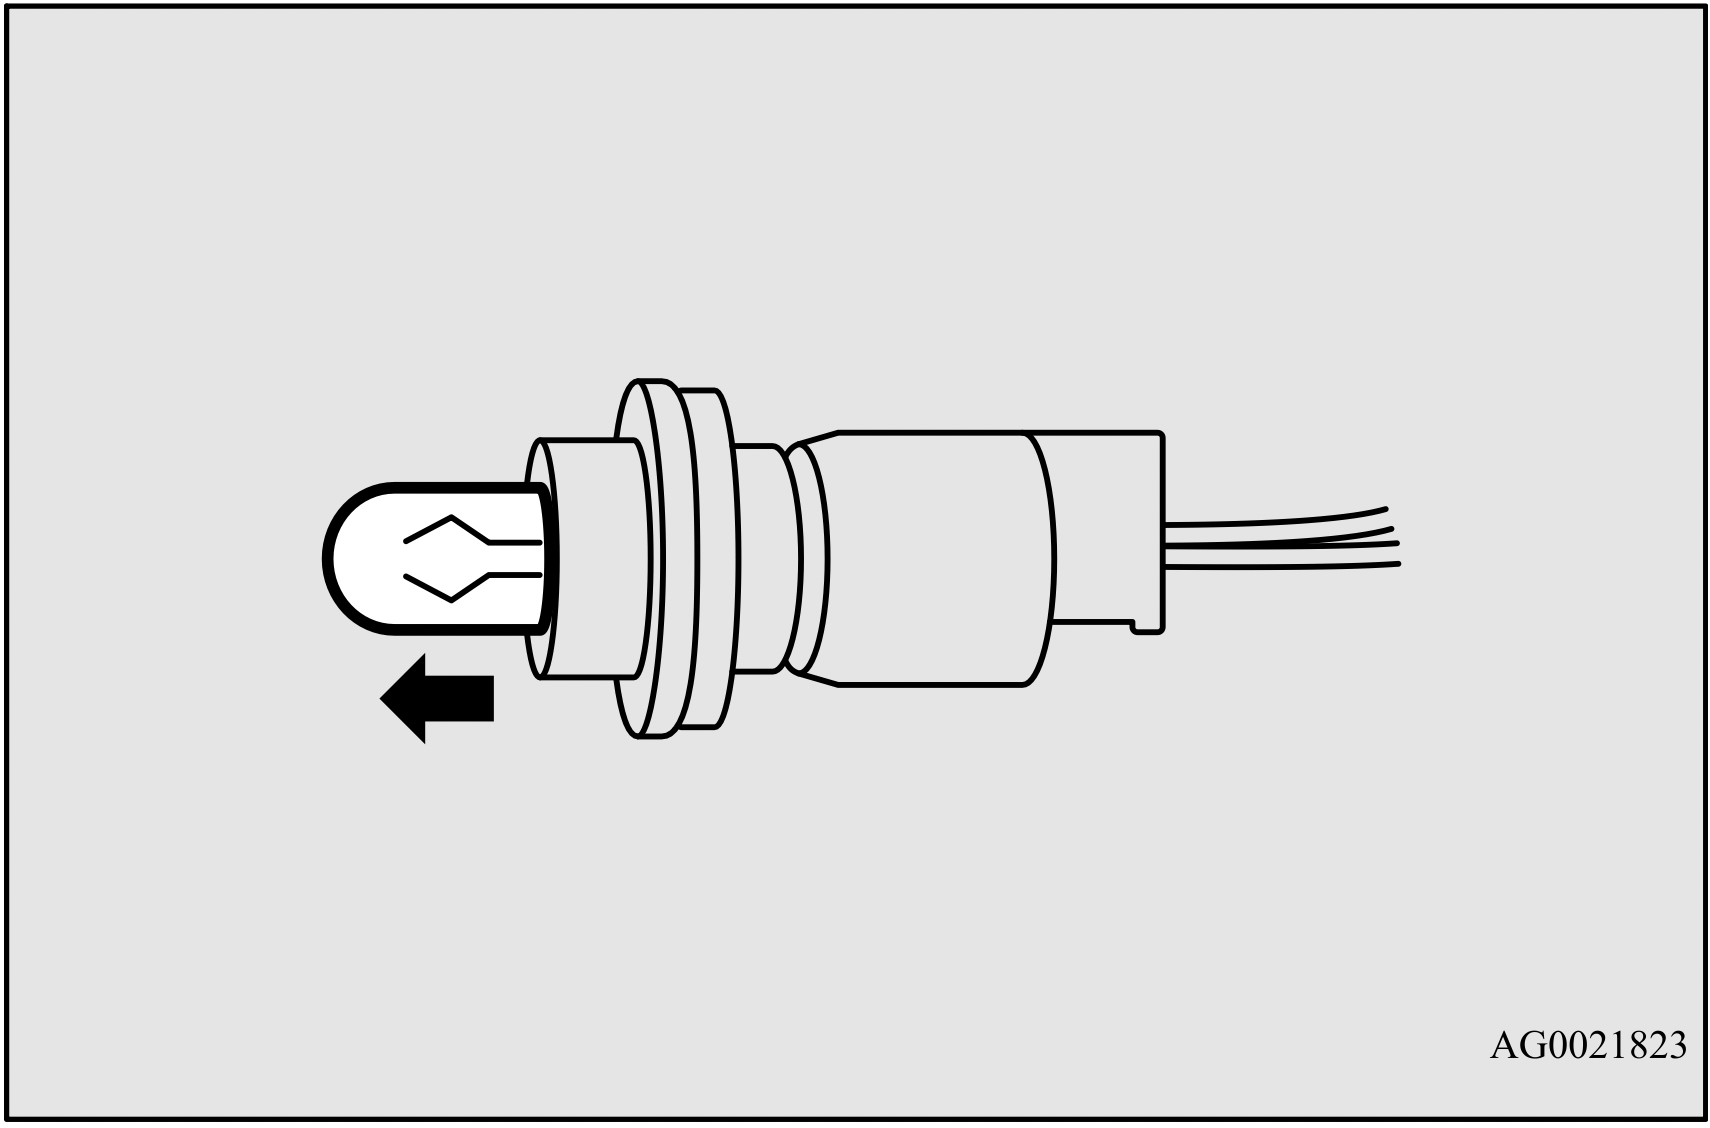
Before replacing the bulb, be sure the light is off. Do not touch the glass part of the new bulb with your bare fingers; the oil from your skin will stay on the glass and dim or destroy the bulb when it gets hot.
CAUTION:
NOTE
NOTE: When it rains, or when the vehicle has been washed, the inside of the lens sometimes becomes temporarily foggy. This is the same phenomenon as when window glass mists up on a humid day, and does not indicate a functional problem. When the light is switched on, the heat will remove the fog. However, if water gathers inside the light, please have it checked by an authorized Mitsubishi Motors dealer or a repair facility of your choice.
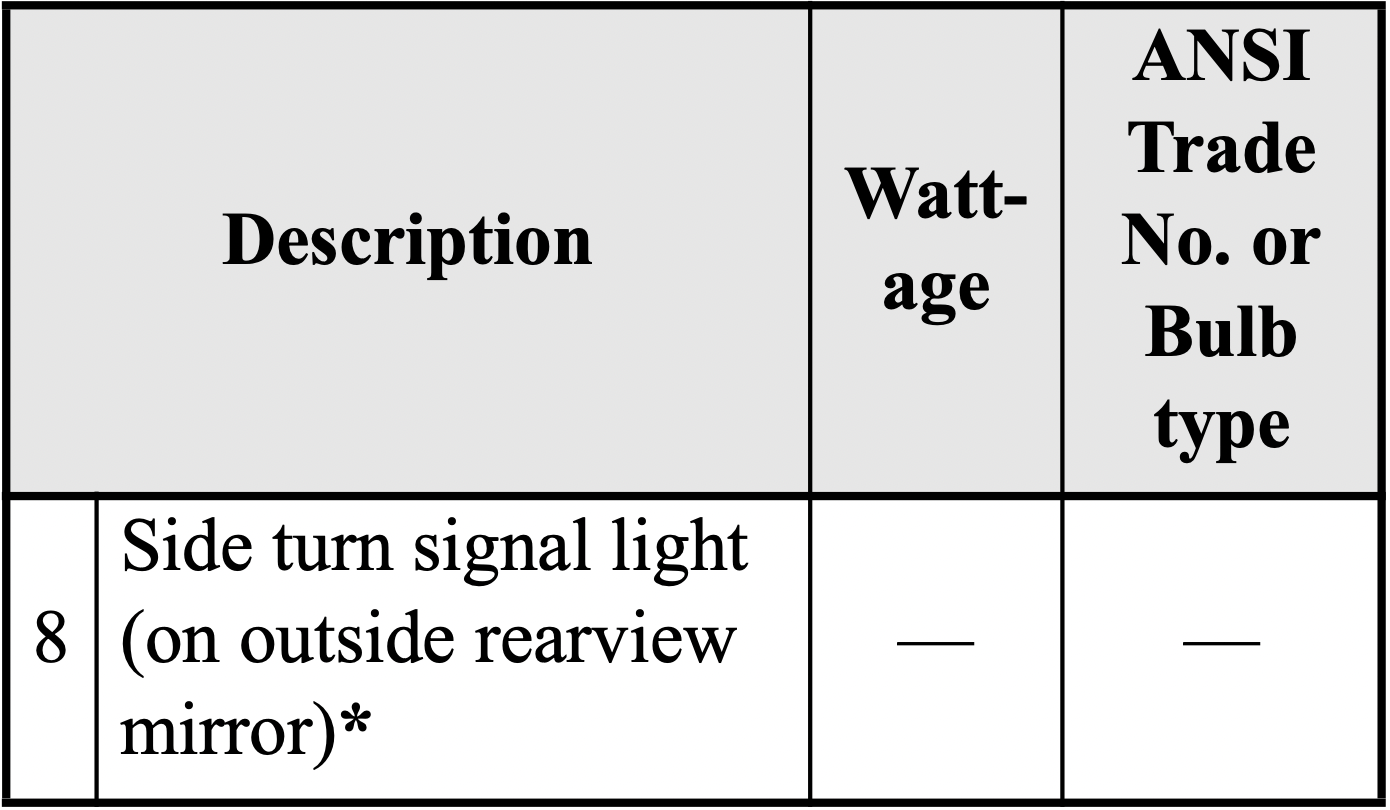
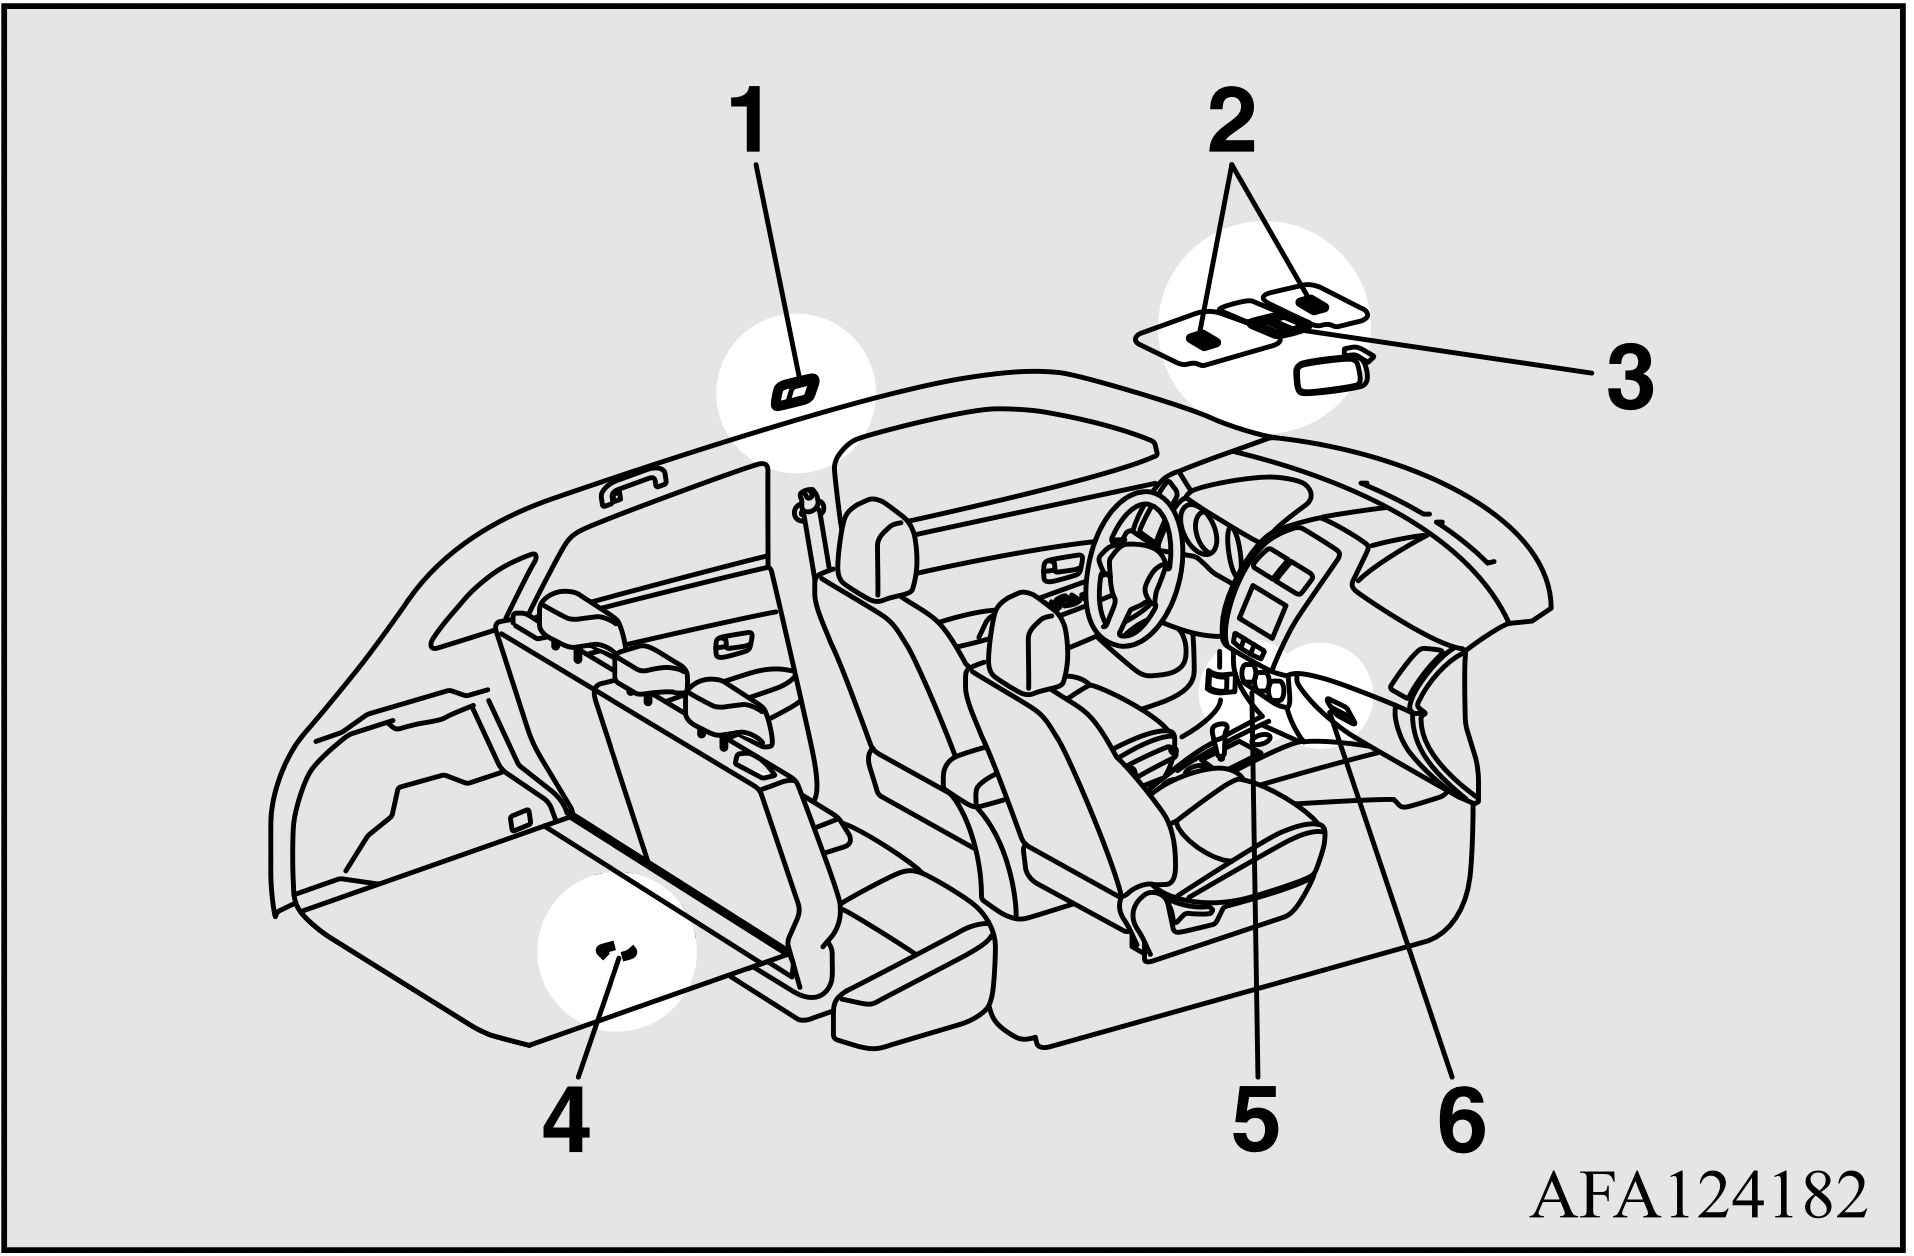
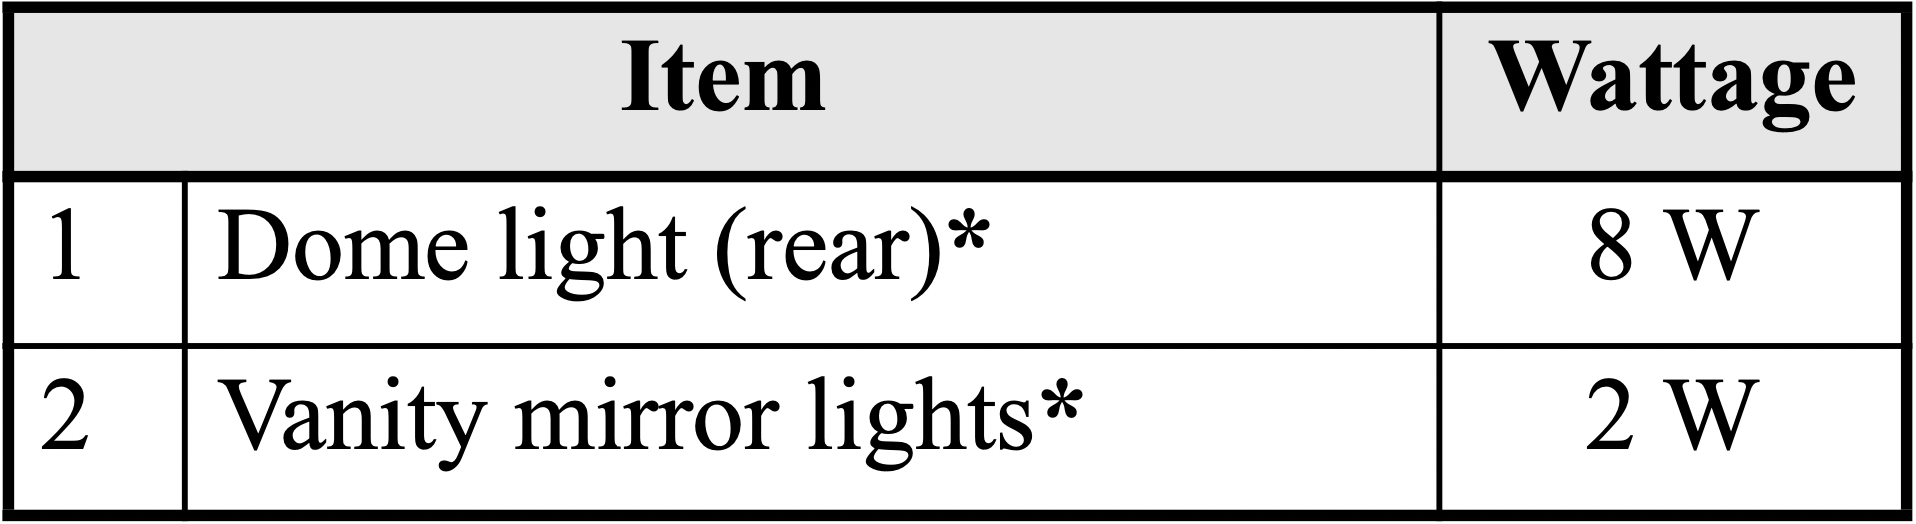
Bulb location and capacity
CAUTION: When replacing a bulb, be sure to use a new bulb of the same type, wattage, and color. If you install a different bulb, the bulb could malfunction or fail to come on and could lead to a vehicle fire.
Outside
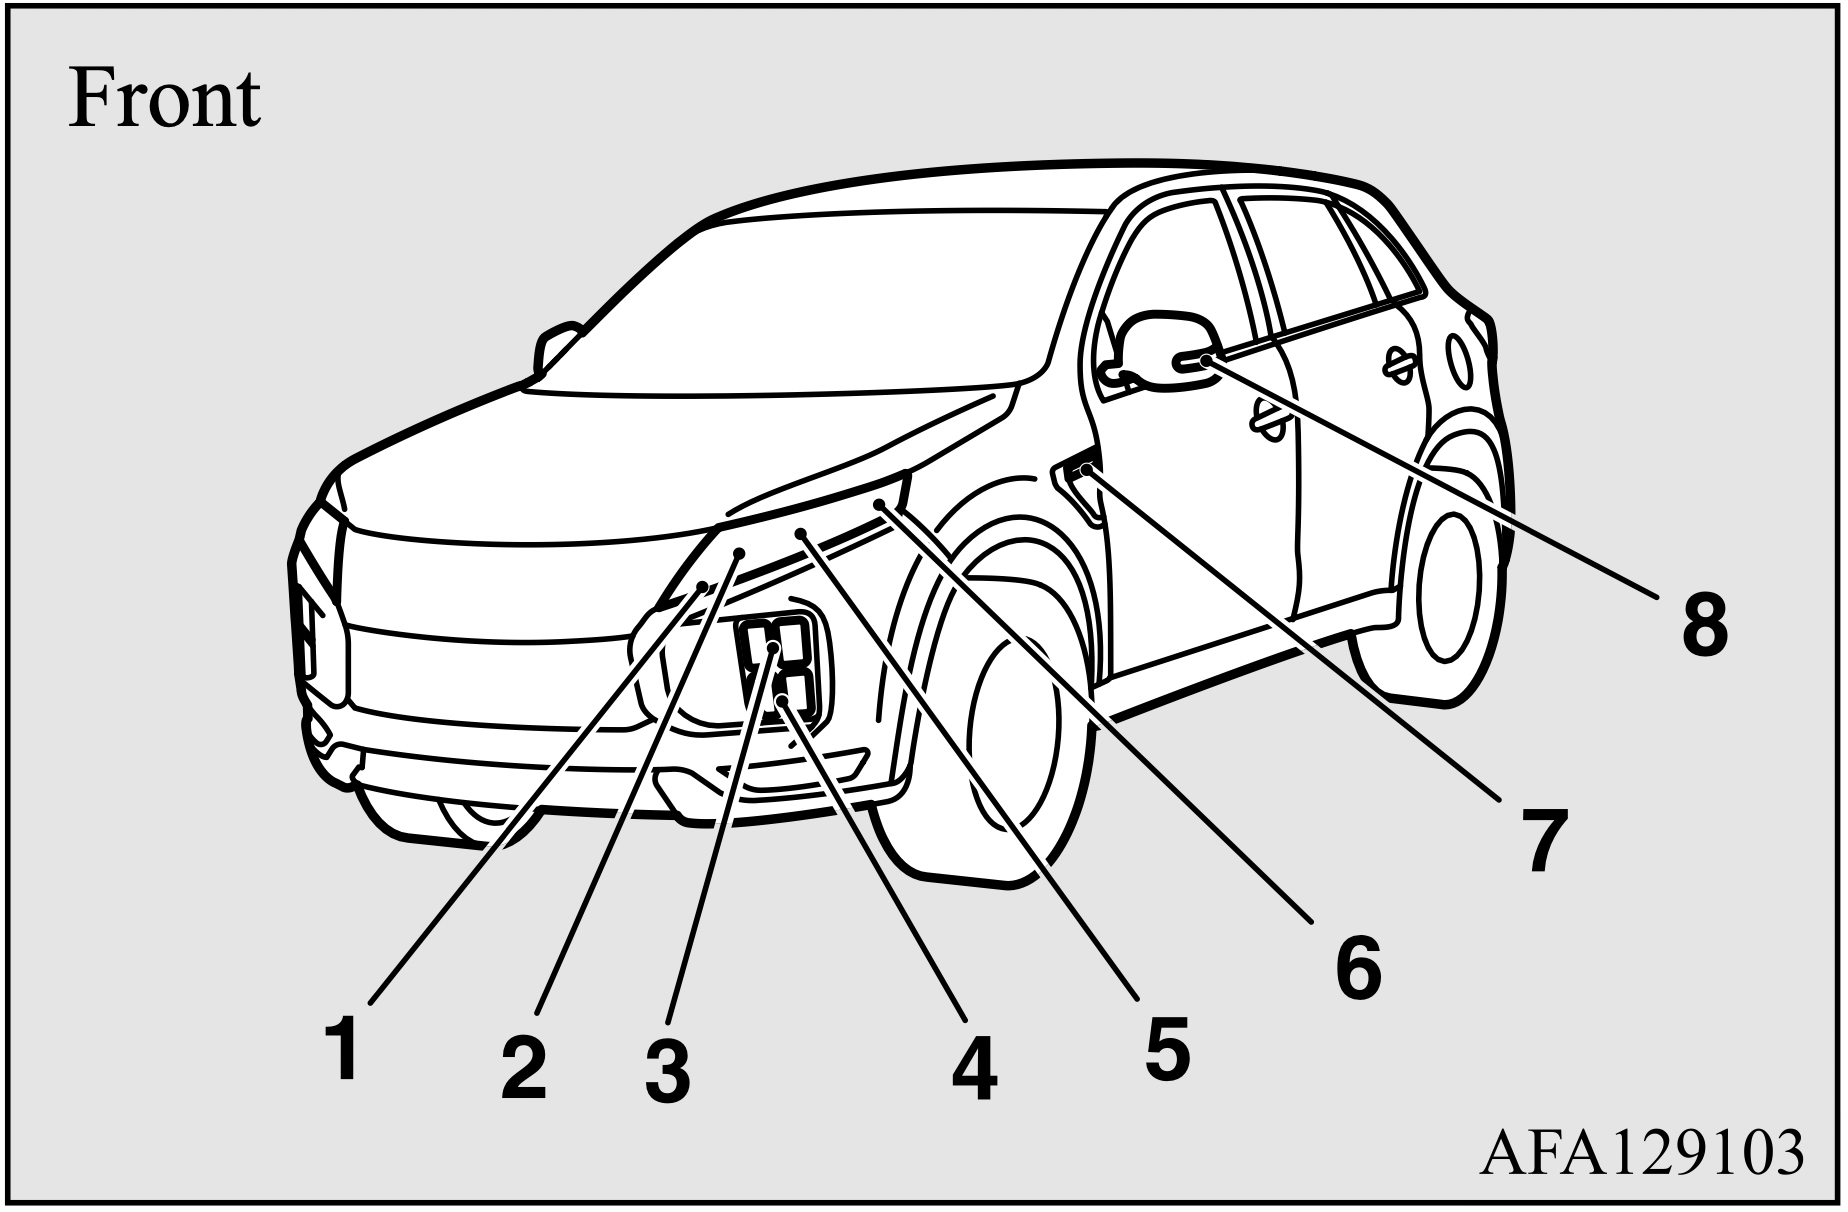
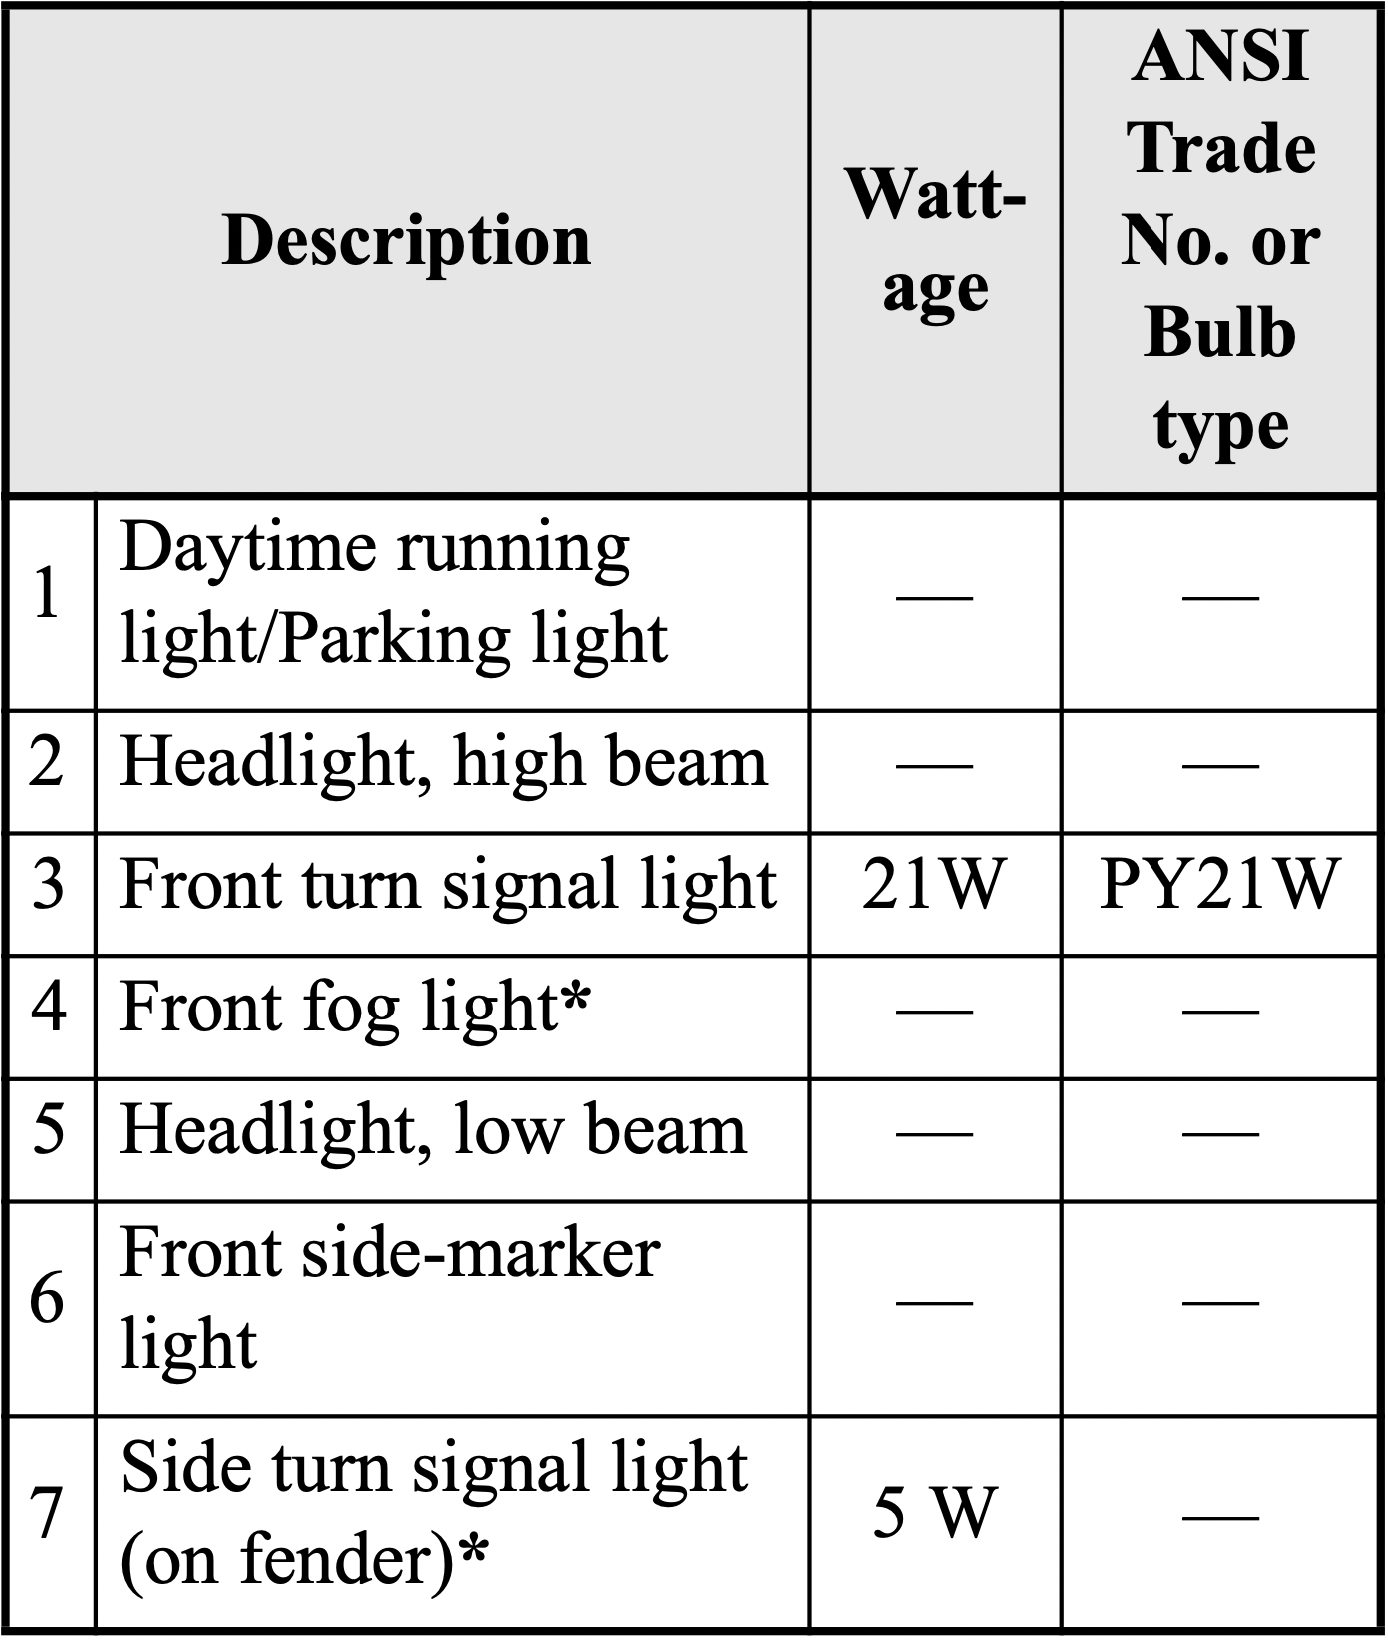
*: If so equipped
NOTE:

NOTE
Compartment
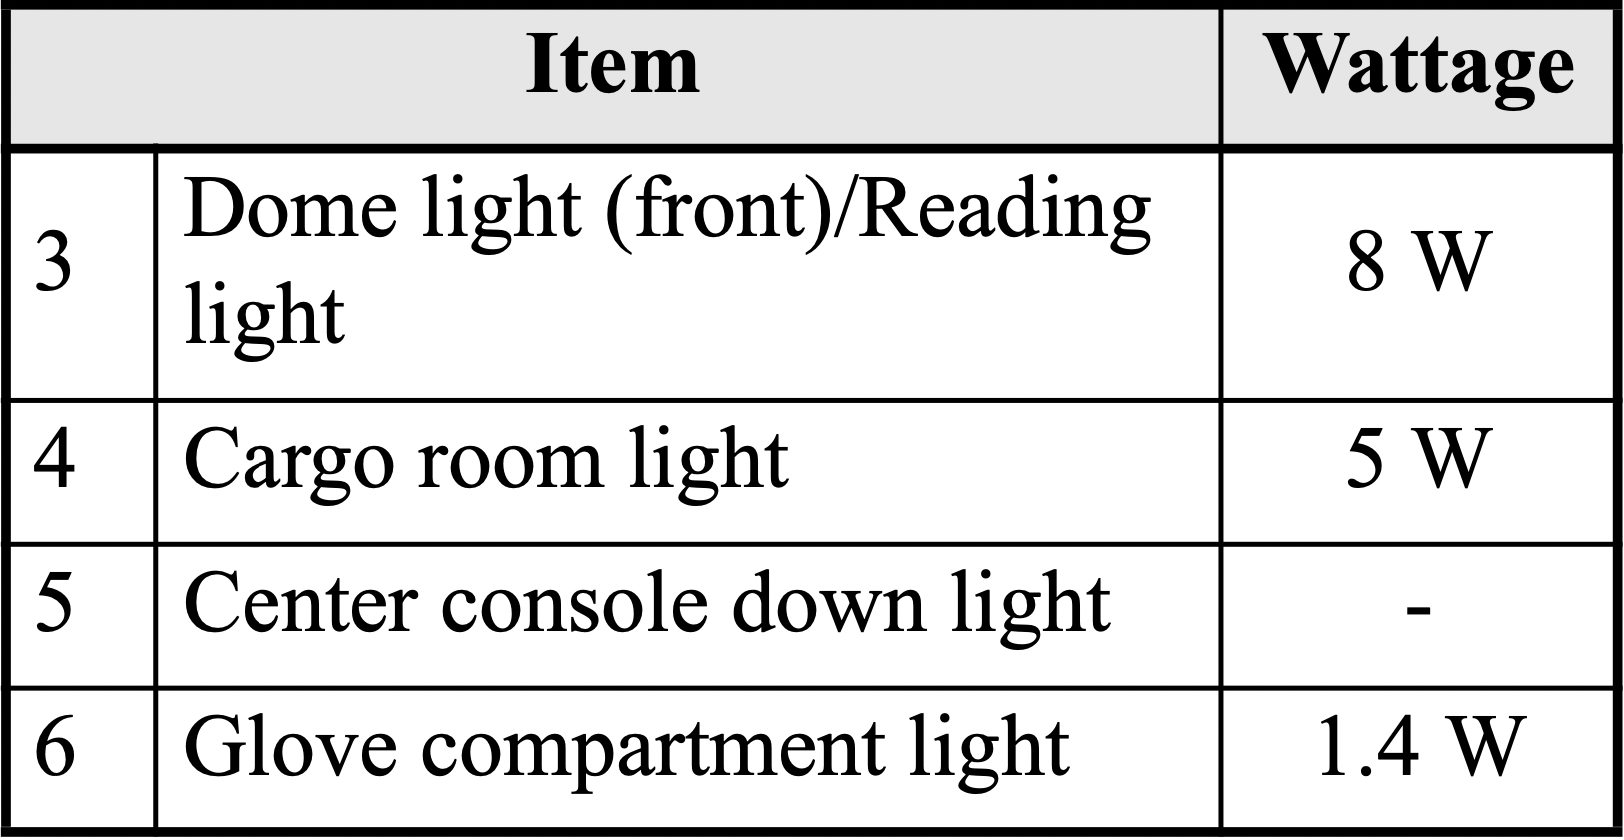
*: If so equipped
NOTE: The center console down light uses an LED. Check with an authorized Mitsubishi Motors dealer or a repair facility of your choice when the light needs to be repaired or replaced.
Headlights
NOTE: The headlights use an LED.
Check with an authorized Mitsubishi Motors dealer or a repair facility of your choice when the light needs to be repaired or replaced.
Adjustment of headlight aim
The alignment of the headlights should be checked by an authorized Mitsubishi Motors dealer or a repair facility of your choice.
Daytime running lights/parking lights
NOTE: The daytime running lights/parking lights use an LED. Check with an authorized Mitsubishi Motors dealer or a repair facility of your choice when the light needs to be repaired or replaced.
Front side-marker lights
NOTE: The front side-marker lights use an LED.
Check with an authorized Mitsubishi Motors dealer or a repair facility of your choice when the light needs to be repaired or replaced.
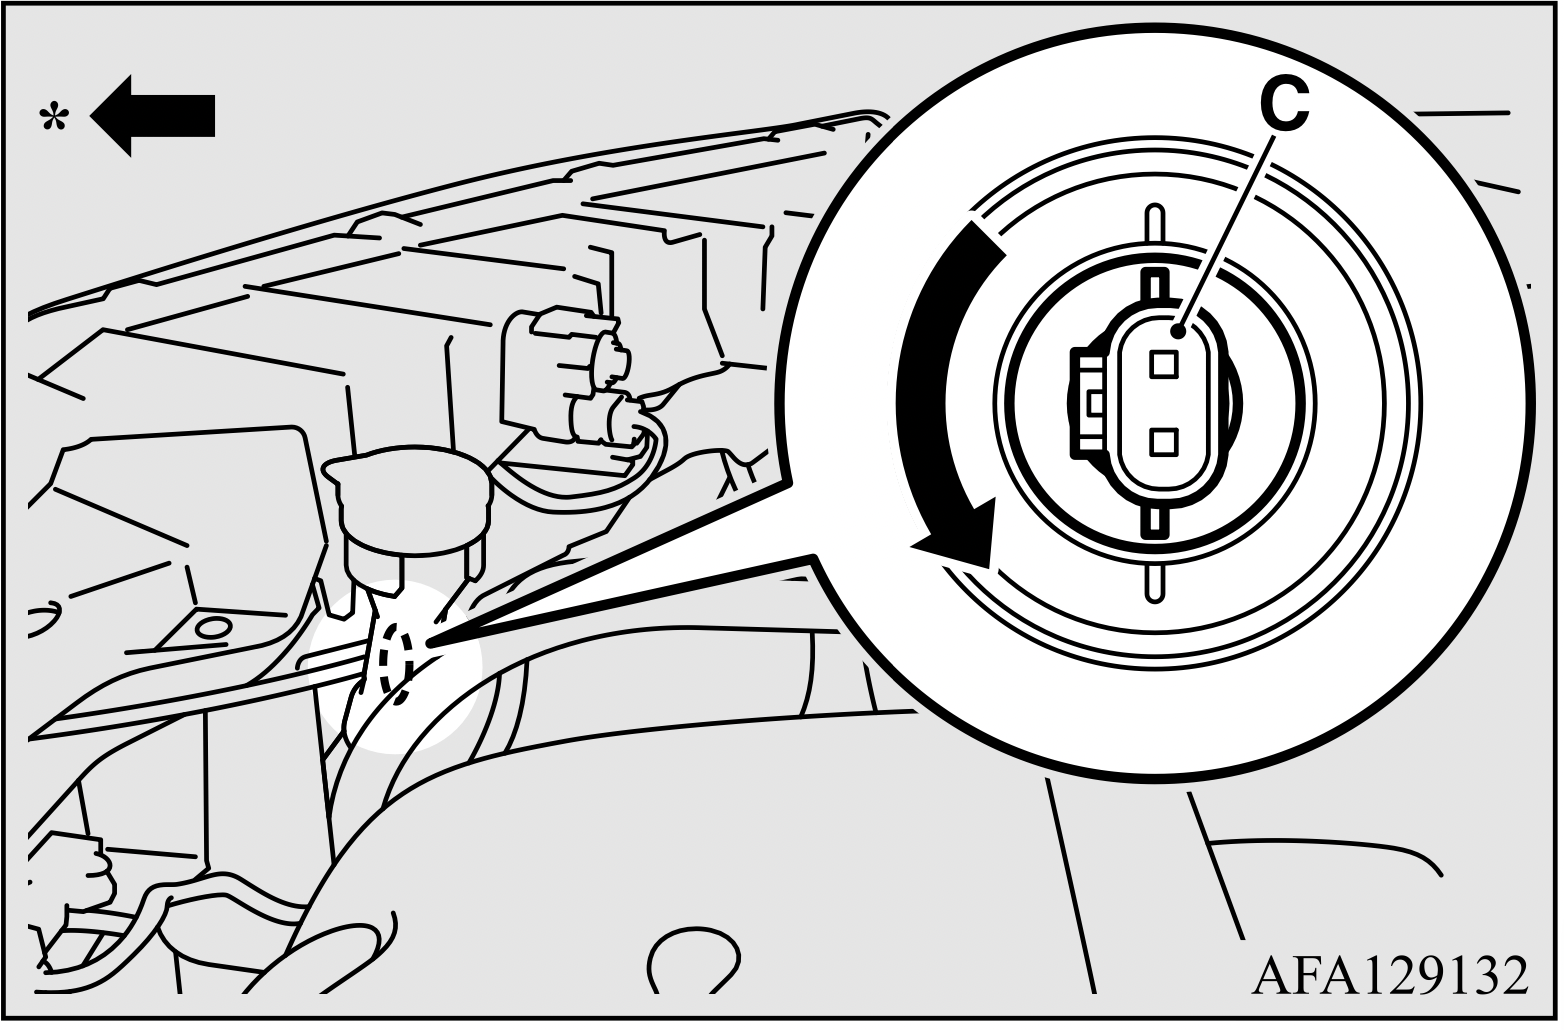
Front turn signal lights
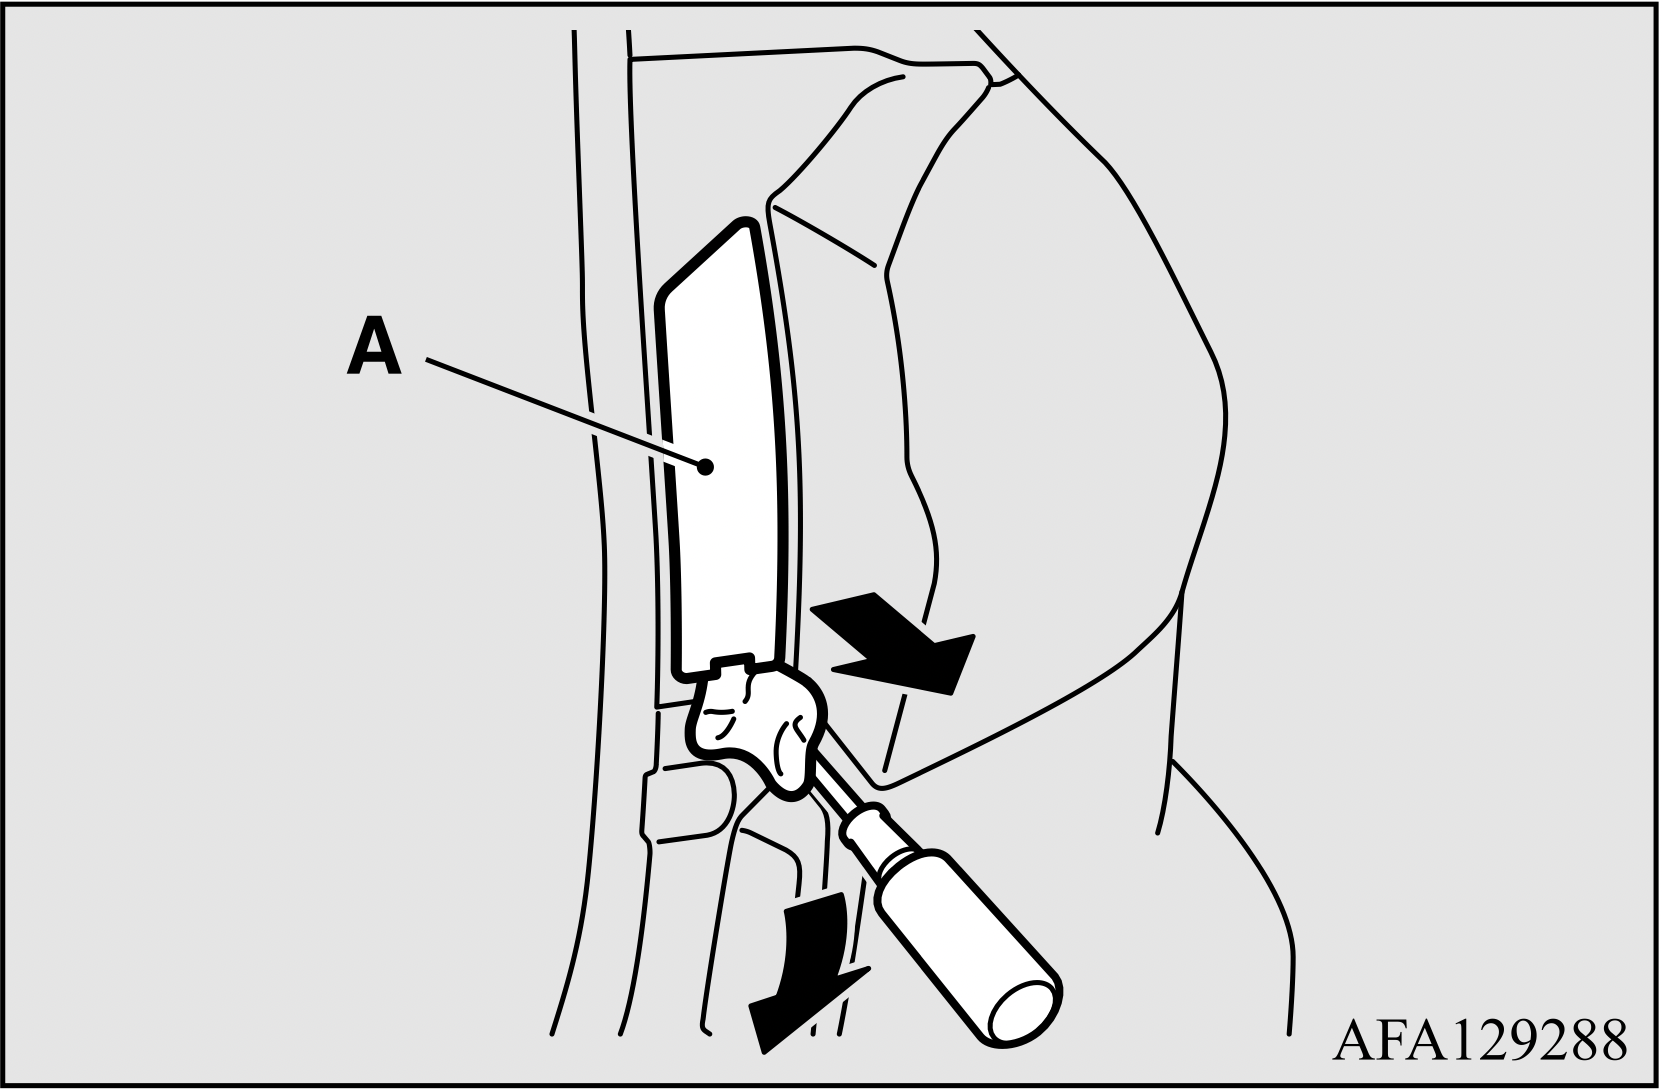
Side turn signal lights (on fender) (if so equipped)
NOTE: It is not possible to repair or replace only the bulb for the side turn signal light. Check with an authorized Mitsubishi Motors dealer or a repair facility of your choice when the light needs to be repaired or replaced.
Side turn signal lights (on outside rearview mirror) (if so equipped)
NOTE: The side turn signal lights (on outside rear-view mirror) use an LED. Check with an authorized Mitsubishi Motors dealer or a repair facility of your choice when the light needs to be repaired or replaced.
Front fog lights (if so equipped)
NOTE: The front fog lights use an LED.
Check with an authorized Mitsubishi Motors dealer or a repair facility of your choice when the light needs to be repaired or replaced.
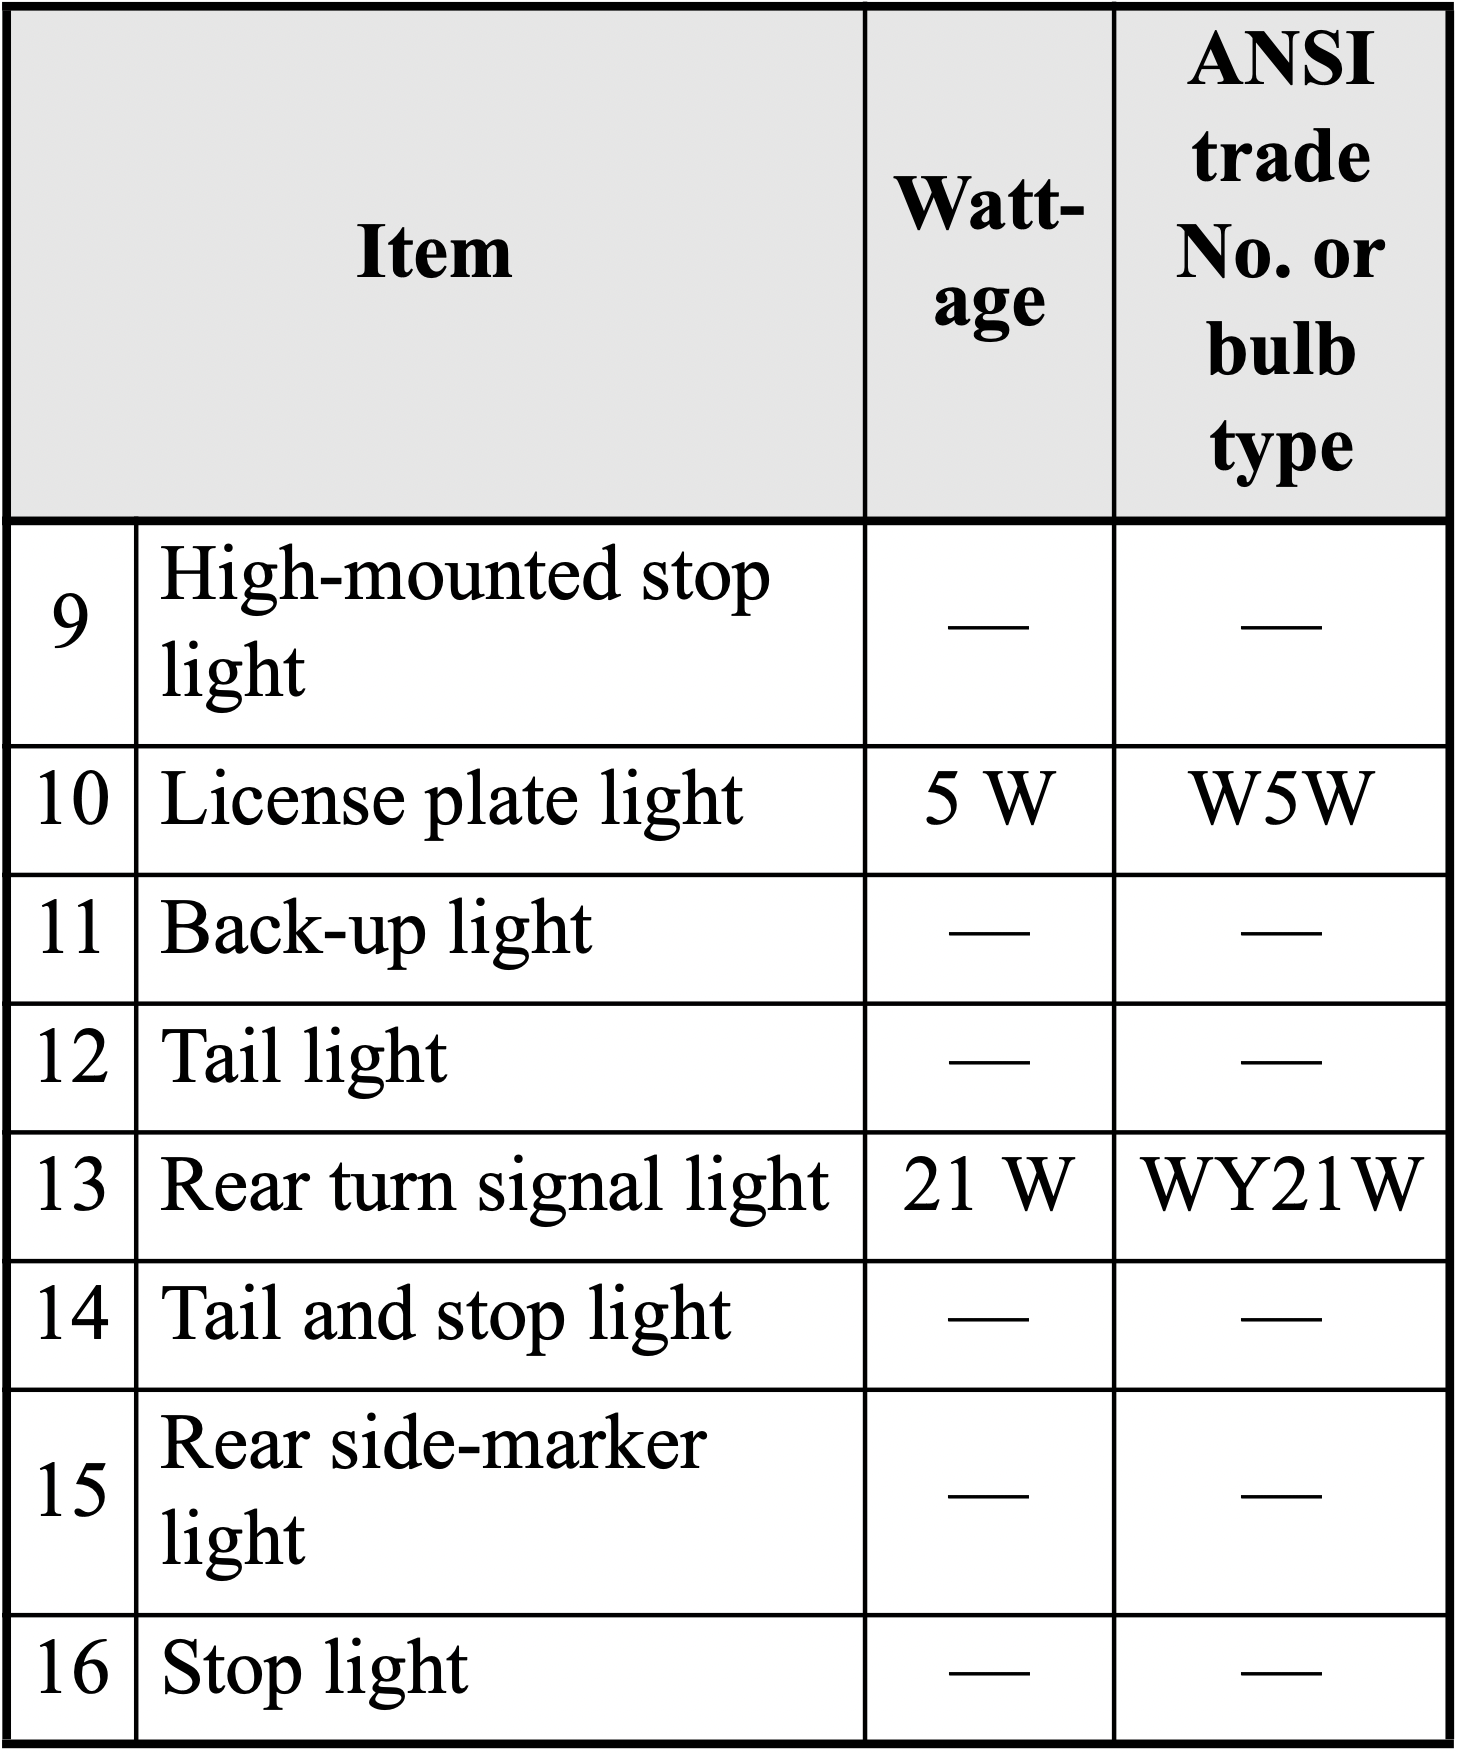
Rear combination lights
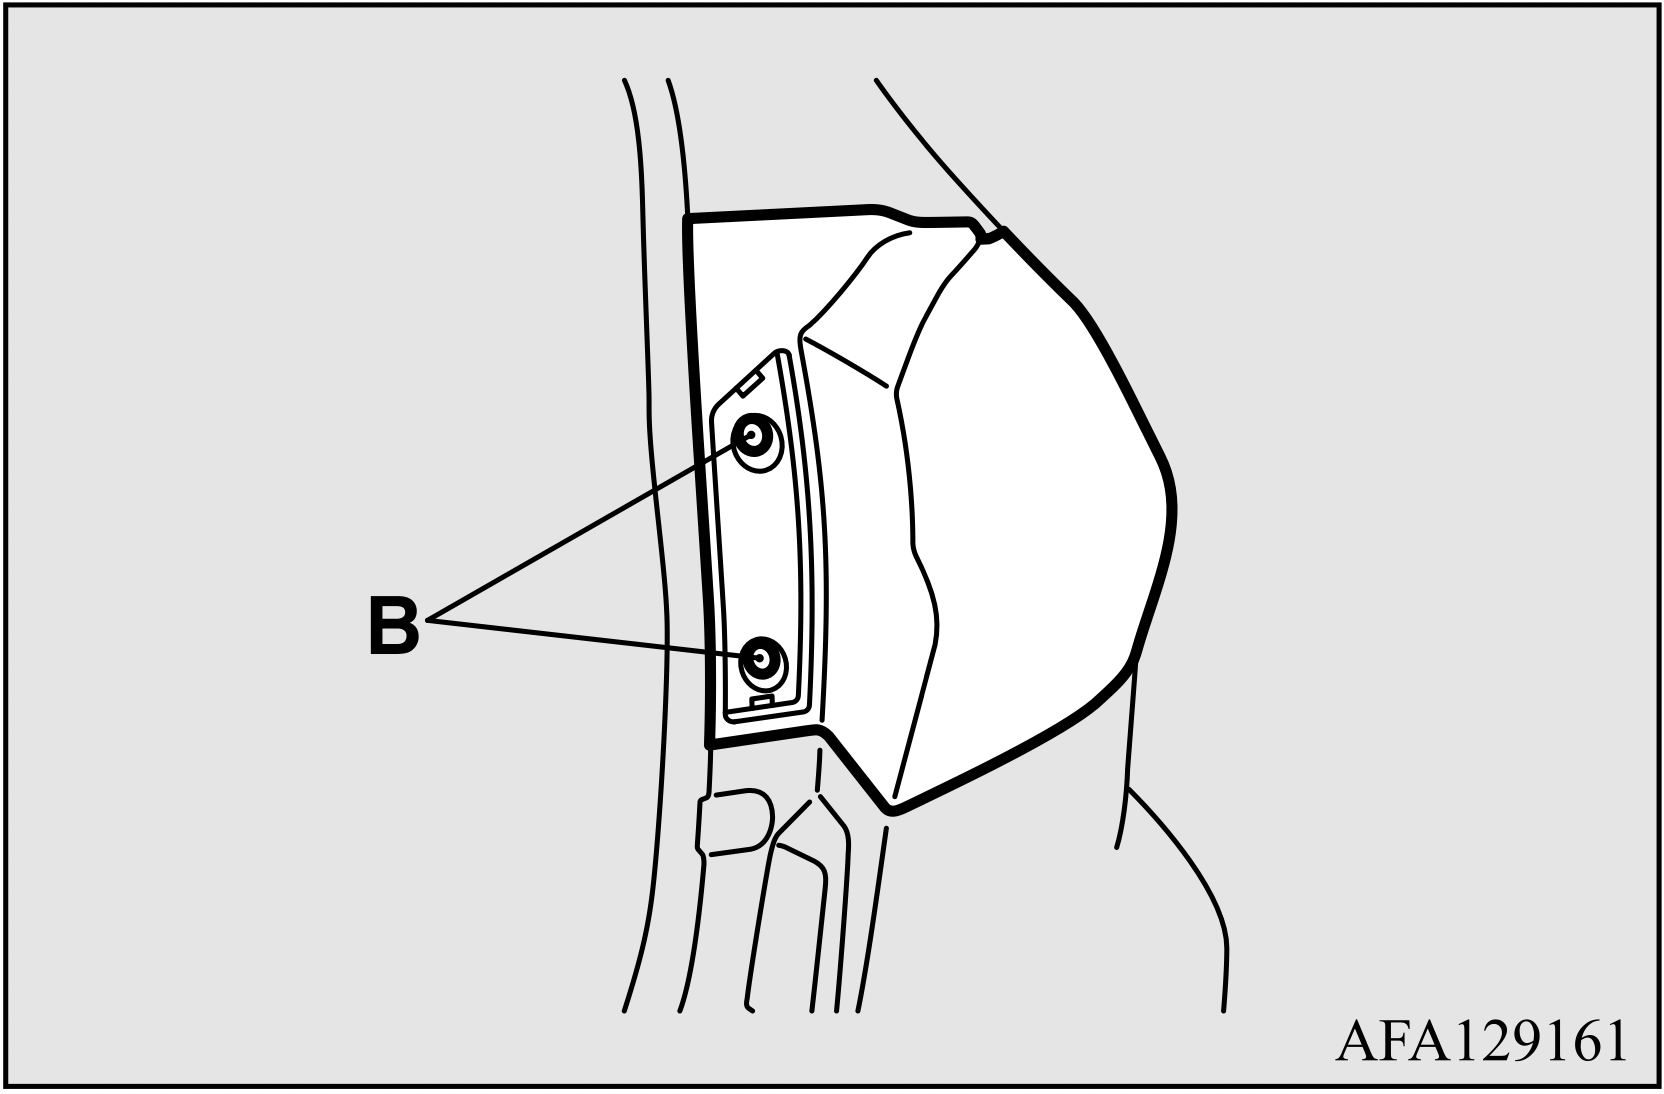
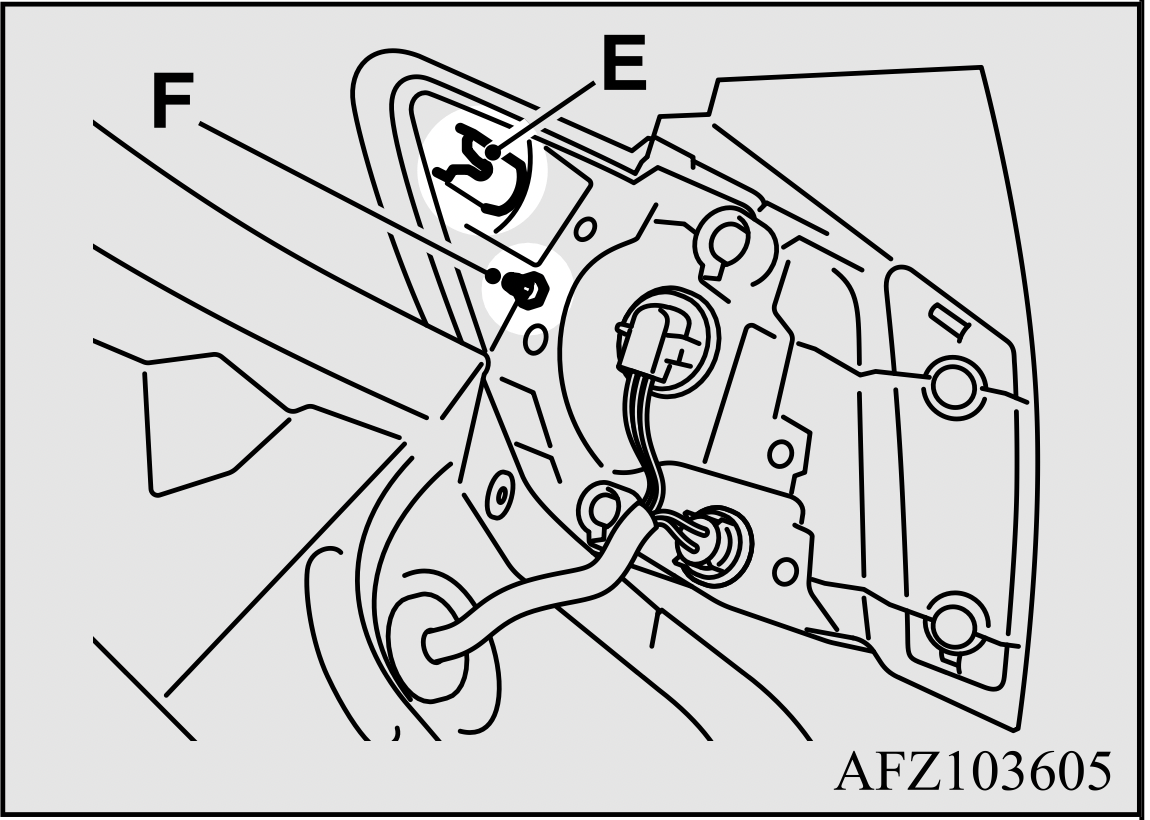
NOTE: When mounting the light unit, align the groove (E) on the light unit with the clip on the body and the pin (F) on the unit with the hole in the body.
Tail lights
NOTE: The tail lights use an LED.
Check with an authorized Mitsubishi Motors dealer or a repair facility of your choice when the light needs to be repaired or replaced.
Back-up lights
NOTE: The back-up lights use an LED.
Check with an authorized Mitsubishi Motors dealer or a repair facility of your choice when the light needs to be repaired or replaced.
License plate lights
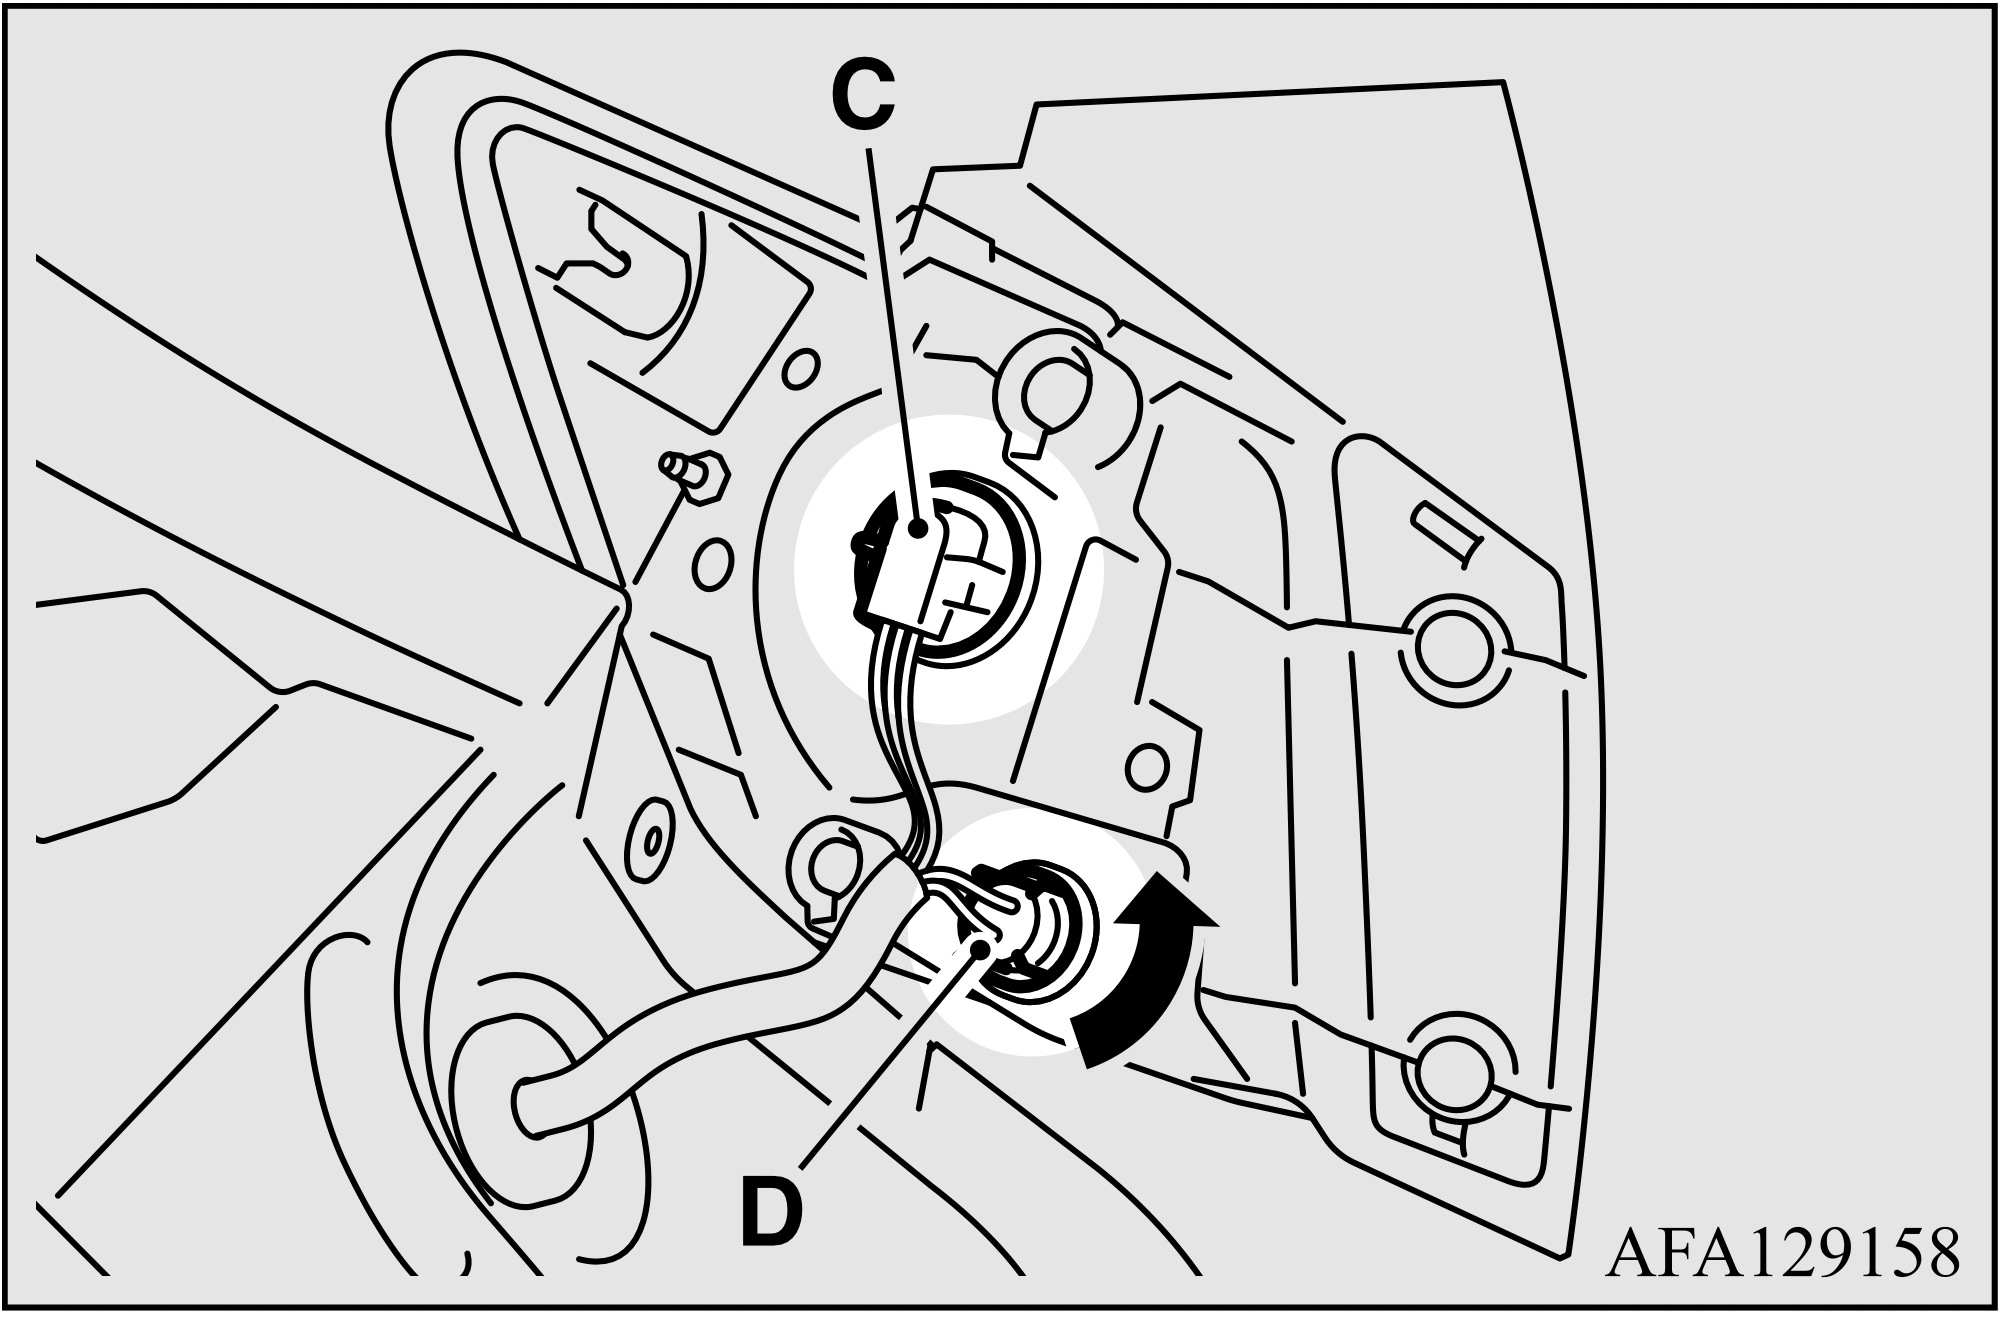
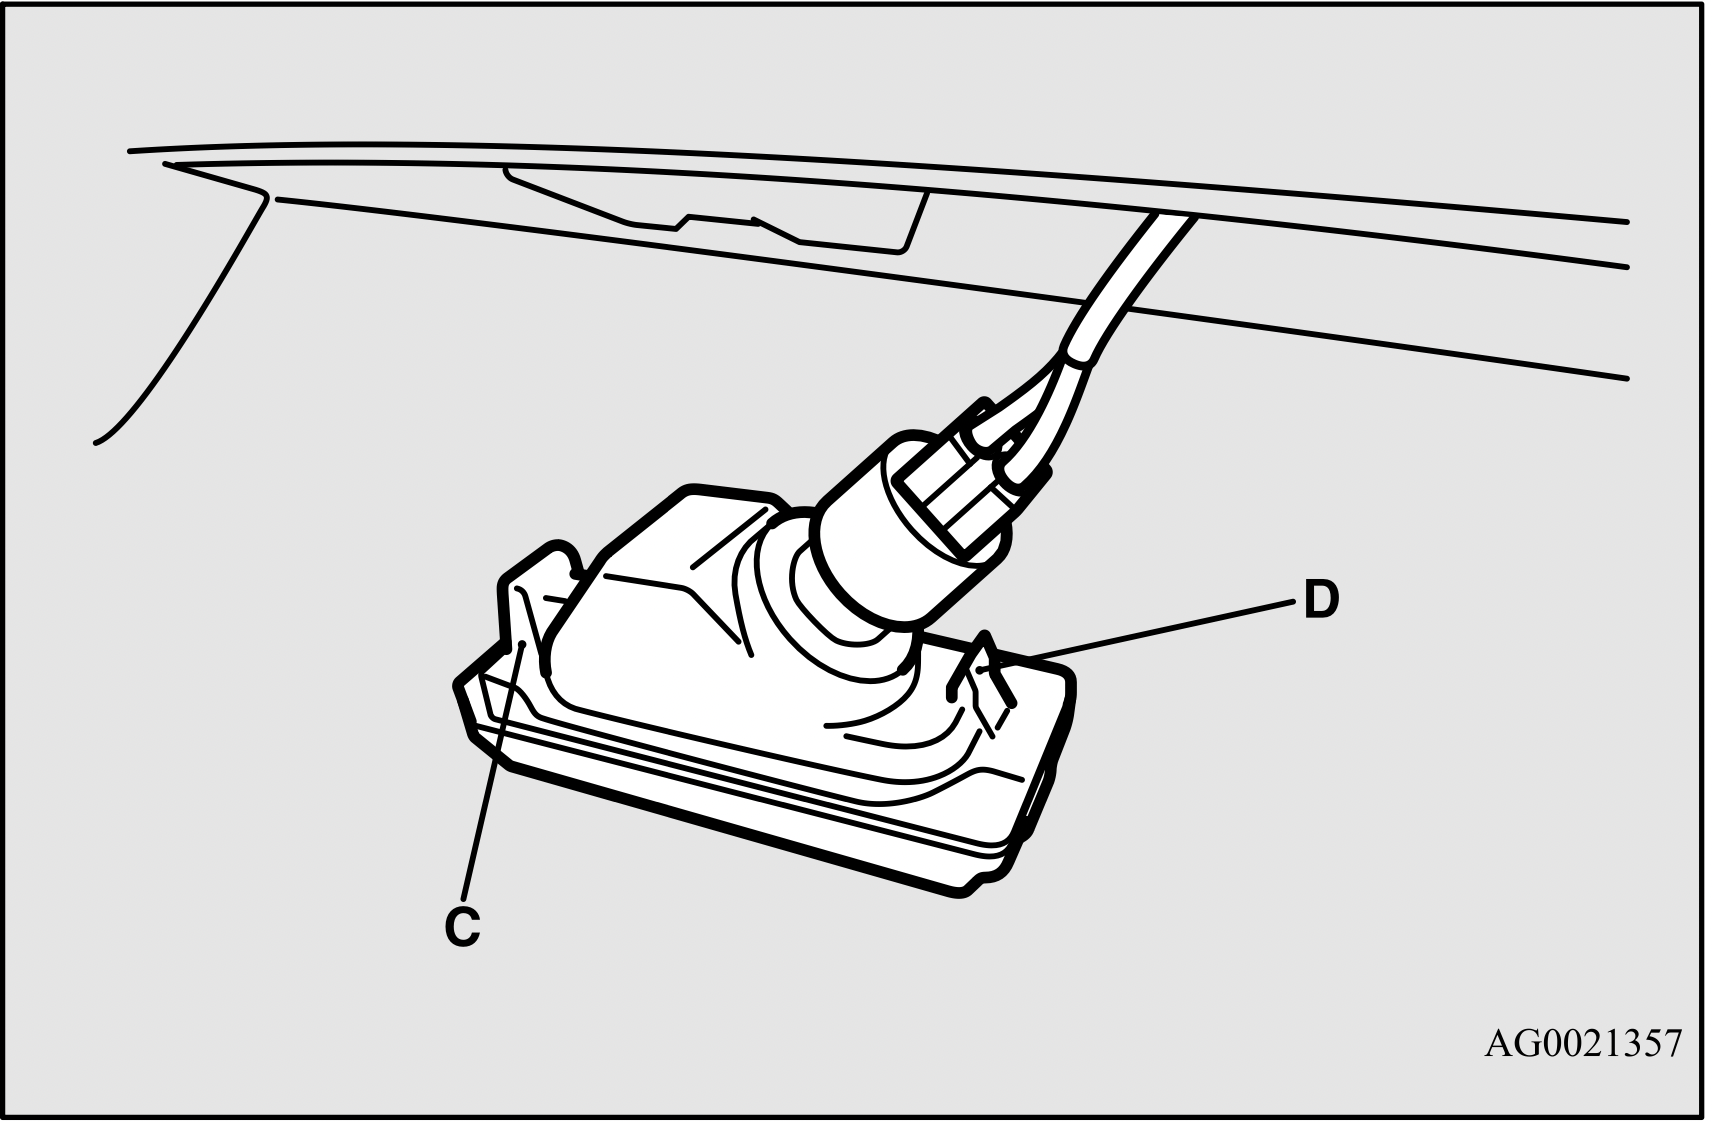
NOTE: When mounting the light unit, insert tab (C) first then align tab (D) with its hole.
High-mounted stop light
NOTE: The high-mounted stop light uses an LED.
Check with an authorized Mitsubishi Motors dealer or a repair facility of your choice when the light needs to be repaired or replaced.
In order to maintain the value of your vehicle, perform regular maintenance using the proper materials and procedures. Be sure to use only those materials and procedures that meet your local environmental pollution control regulations. Choose the materials you will use carefully, to be sure that they do not contain corrosives. If you are not sure, contact an authorized Mitsubishi Motors dealer for help in choosing these materials.
CAUTION:
After washing the inside of your vehicle with any cleaner, wipe it dry in a shady, well ventilated area.
CAUTION: Do not use organic substances (solvents, benzine, kerosene, alcohol, gasoline, etc.) or alkaline or acidic solutions. These chemicals can cause discoloring, staining or cracking of the surface. If you use cleaners or polishing agents, make sure their ingredients do not include the substances mentioned above.
NOTE: Always read the instructions on the cleaner label.
Plastic, vinyl leather, fabric and flocked parts
NOTE: Do not use cleaners, conditioners, and protectants containing silicones or wax.
Such products, when applied to the instrument panels or other parts, may cause reflections on the windshield and obscure vision. Also, if such products get on the switches of the electrical accessories, it may lead to failure of these accessories.
Upholstery
NOTE: If fuzzing is difficult to remove from the seat upholstery, draw a suitable defuzzing brush over the surface in one direction.
Genuine leather (if so equipped)
NOTE
NOTE:
To protect your vehicle’s finish, wash it often and thoroughly. If desired, you may wax your vehicle using a nonabrasive automobile wax.
Foreign material
Industrial pollution, road tar, bird droppings, tree sap, insect remains, sea water and other foreign matters can damage the finish on your vehicle.
Generally, the longer any foreign material stays on the finish, the worse the damage. Wash your vehicle as soon as possible whenever the finish gets soiled.
Washing
Chemicals contained in the dirt and dust picked up from air, rain, snow, or road surfaces can damage the paint and body of your vehicle if left on.
Frequent washing and waxing is the best way to protect your vehicle from this damage.
Do not wash the vehicle in direct sunlight. Park the vehicle in the shade and spray it with water to remove dust. Next, using plenty of clean water and a car washing mitt or sponge, wash the vehicle from top to bottom.
Use a mild car washing soap if necessary. Rinse thoroughly and wipe dry with a chamois or soft cloth. After washing the vehicle, carefully clean the joints and flanges of the doors, hood, etc., where dirt is likely to remain.
CAUTION
CAUTION
CAUTION: If your vehicle is equipped with the rain sensor wipers, place the wiper switch lever in the “OFF” position to deactivate the rain sensor.
During cold weather
Salt and other chemicals spread on winter roads in some geographical areas can have a detrimental effect on the vehicle underbody. You should flush the underbody with a high pressure hose every time you wash the outside of your vehicle.
Take special care to remove mud or other debris which could trap and hold salt and moisture.
After washing your vehicle, wipe off all waterdrops from the rubber parts around the doors to prevent the doors from freezing.
NOTE: When the door is frozen, opening it by force may tear off or crack the rubber gasket installed around the door. Pour warm water to melt the ice. Be sure to thoroughly wipe off the water after opening the door. To prevent freezing of the weatherstripping on the doors, hood, etc., treat with silicone lubricant.
Waxing
Wax your vehicle once or twice a year, or when water does not bead up on the paint. Use a soft cloth to put a small amount of wax on the painted surfaces. After the wax has dried, polish with a dry soft cloth.
Do not wax your vehicle in direct sunlight. You should wax when the painted surfaces are cool.
CAUTION
Polishing
If painted surfaces have been severely damaged and lost their original luster and color tone, polish the surface lightly with a fine polishing compound. Avoid limiting your polishing to the damaged surface only; polish a somewhat wider area, moving the polishing cloth in one direction. After polishing, flush the compound from the surface and apply a coat of wax to regain a beautiful luster.
Damaged paint
Small cracks and scratches in the paint coat should be touched up as soon as possible with touch-up paint to prevent corrosion.
Check body areas facing the road or the tires carefully for damage to the paint caused by flying stones, etc. The paint code number for your vehicle can be found on the vehicle information code plate in the engine compartment.
Cleaning plastic parts
Use a sponge or chamois to clean these parts. If a vehicle wax sticks to a gray or black rough surface of the bumper, molding or lights, the surface may appear white in color.
In this case, wipe it off using lukewarm water and a soft cloth or chamois.
CAUTION
Chrome parts
To prevent spots and corrosion of chrome parts, wash with water, dry thoroughly, and apply a nonabrasive automotive wax. If the chrome is severely damaged or pitted, use a commercially available chrome polish.
Aluminum wheels (if so equipped)
CAUTION
Window glass
The window glass can usually be cleaned using only a sponge and water. Glass cleaner can be used to remove wax, oil, grease, dead insects, etc. After washing the glass, wipe it dry with a clean, dry, soft cloth.
Wiper blades
Use a soft cloth and glass cleaner to remove grease, dead insects, etc., from the wiper blades.
Replace the wiper blades when they no longer clean the windshield and rear window properly.
Engine compartment
Never spray or splash water on the electrical accessories in the engine compartment. This puts the engine at risk of being damaged.
Do not bring the circumferential parts, the plastic parts and so on into contact with sulfuric acid (battery electrolyte) which may crack, stain or discolor them.
If they are in contact, wipe off with soft cloth, chamois or the like and an aqueous solution of neutral detergent then immediately rinse the affected parts with plenty of water.


 ” or “
  ” position.
 ” in the multi-information display is flashing. Steam comes out of the engine compartment.
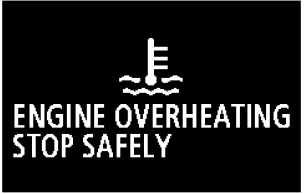
 or
or  warning display on the multi-information display will not turn off, or if they come on frequently, immediately have the vehicle checked at your nearest Mitsubishi Motors dealer.