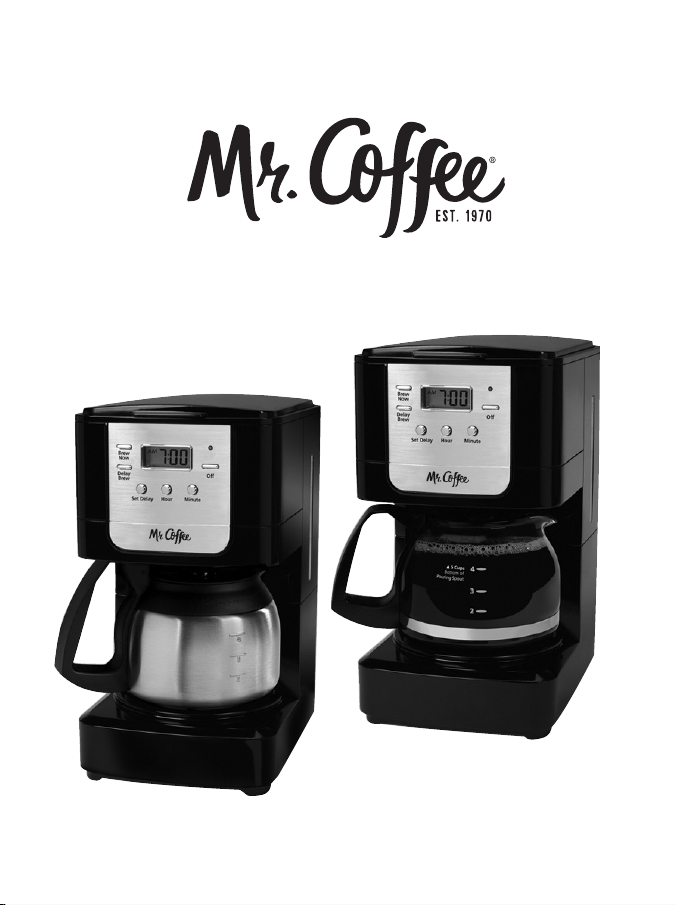
User Manual /Manual del Usuario
5-Cup Coffeemaker / Cafetera para 5 Tazas
JW Series / Serie JW
©2015 Sunbeam Products, Inc. doing business as Jarden
Consumer Solutions. All rights reserved. Distributed by
Sunbeam Products, Inc. doing business as Jarden Consumer
Solutions, Boca Raton, Florida 33431.
U.S. 1-800-MR COFFEE (1-800-672-6333)
Canada 1-800-667-8623
Visit us at www.mrcoffee.com
You will find exciting and entertaining tips and ideas,
including great recipes!
©2015 Sunbeam Products, Inc. operando bajo el nombre de
Jarden Consumer Solutions. Todos los derechos reservados.
Distribuido por Sunbeam Products, Inc. operando bajo el
nombre de Jarden Consumer Solutions, Boca Raton, Florida
33431.
Visítenos en www.mrcoffee.com
Ahí encontrará consejos e ideas excitantes y entretenidos,
¡incluyendo excelentes recetas!
www.mrcoffee.com
Printed in China/Impreso en China P.N. 180106
BVMC-JWX 5 Cup_15ESM1 GCDS-MRC38629-JC
BVMC-JWX 5 Cup_15ESM1.indd 1-2 4/27/15 9:34 AM

IMPORTANT SAFEGUARDS
To reduce the risk of fire, electric shock and/or injury to
persons, basic safety precautions should always be followed
when using electrical appliances, including the following:
1. READ ALL INSTRUCTIONS BEFORE USING THE COFFEEMAKER.
2. Do not touch the coffeemaker’s hot surfaces. Use
handles or knobs and do not open the lid or cover
while brewing.
3. To protect against electric shock, do not immerse
the power cord, power plug or coffeemaker in
water or in any other liquid.
4. Close adult supervision is necessary when this
appliance is used by or near children.
5. Turn the coffeemaker OFF and unplug the power
cord from the power source when the coffeemaker
and clock are not in use and before cleaning. Allow
the coffeemaker parts to cool before putting on or
taking off parts and before cleaning the appliance.
6. Do not operate any appliance with a damaged
power cord or power plug, or operate it after the
appliance malfunctions, or has been damaged
in any manner. Return this appliance only to the
nearest Authorized Service Center for examination,
repair or adjustment.
7. The use of accessory attachments other than Mr.
Coffee
®
brand products may cause hazards or injuries.
8. Do not use the coffeemaker outdoors.
9. Do not let the power cord hang over edge of table
or counter, or allow it to come into contact with
hot surfaces.
10. Do not place this coffeemaker on or near a hot gas
2 3
stove or electric burner or in a heated oven.
11. To disconnect the coffeemaker, turn it OFF, then
remove the power plug from the power supply.
12. Place the appliance on a hard, flat level surface to avoid
interruption of airflow underneath the coffeemaker.
13. Avoid contact with any moving parts.
14. This coffeemaker is designed for household use only.
15. Do not use appliance for other than intended use.
16. Scalding may occur if lid is removed during brewing
cycles.
DECANTER USE AND CARE
Follow the instructions below to reduce or eliminate
the chance of breaking the decanter:
• ThisdecanterisdesignedforusewithyourMR.
COFFEE
®
coffeemaker and therefore must never
be used on a range top or in any oven, including a
microwave oven.
• Donotsetahotdecanteronawetorcoldsurface.
• Donotuseacrackeddecanteroradecanterhaving
a loose or weakened handle.
• Donotcleanthedecanterwithabrasivecleaners,
steel wool pads or other abrasive materials.
• Discardthedecanterimmediatelyifitiseverboileddry.
• Protectthedecanterfromsharpblows,scratchesor
rough handling.
WARNING: To reduce the risk of fire or electric shock,
do not remove any service covers. There
are no user serviceable parts inside the
coffeemaker. Only authorized personnel
should repair the coffeemaker.
BVMC-JWX 5 Cup_15ESM1.indd 3-4 4/27/15 9:34 AM

SAVE THESE INSTRUCTIONS
SPECIAL CORD SET INSTRUCTIONS
1. For your convenience the plug is stored inside the
cord storage.
2. A short power supply cord is provided to reduce
the hazards resulting from a person or pet becoming
entangled in, or tripping over, a longer cord.
3. An extension cord may be purchased and used if
care is exercised in its use.
4. If an extension cord is used, the marked electrical
rating of the extension cord must be at least 10
amps and 120 volts. The resulting extended cord
must be arranged so that it will not drape over a
countertop or tabletop where it can be pulled on
by children or tripped over accidentally.
5. This appliance has a polarized plug (one blade is
wider than the other). To reduce the risk of electric
shock, this plug will fit in a polarized outlet only one
way. If the plug does not fit fully in the outlet, reverse
the plug. If it still does not fit, contact a qualified
electrician. Do not modify the plug in any way. You
can customize the length of the power cord so that
it is the exact length you desire. To increase the
length of the power cord: grasp the power cord
(not the power plug) and gently lift it out of the slot,
then pull it away from the coffeemaker. To decrease
the length of the power cord: Grasp the power cord
(not the power plug), lift it out of the slot and gently
feed it into the coffeemaker. Lock the cord in the
slot when finished.
4 5
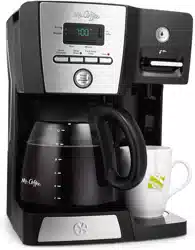
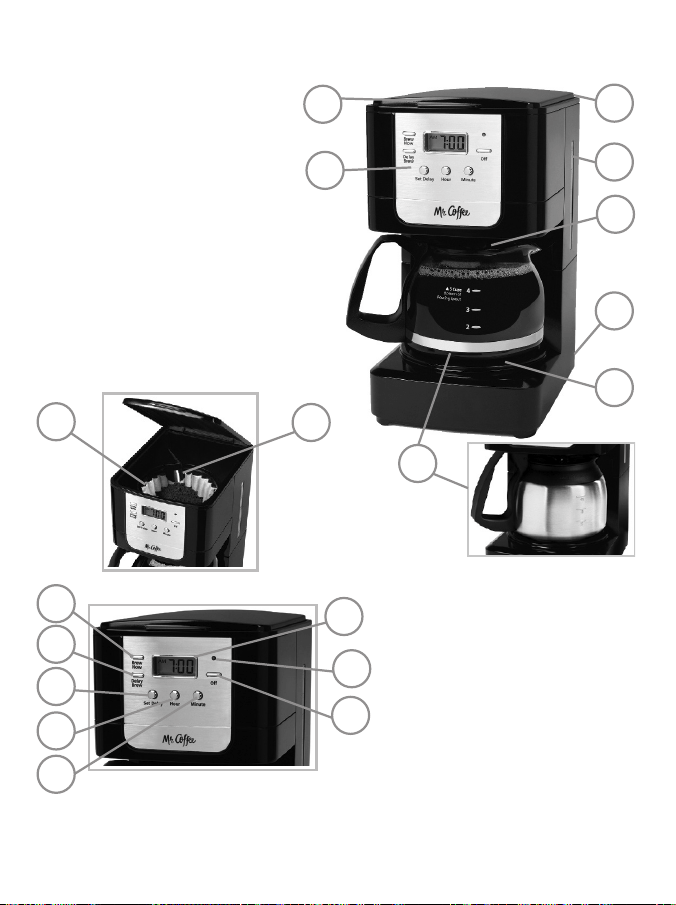
1. Coffeemaker Lid
2. Water Reservoir
3. Water Window
4. Pause ’n Serve
5. Cord Storage
6. Warming Plate
7. Control Panel (see
detail below)
8. Decanter
9. Removable Filter Basket
10. Shower Head
Control Panel,
Programmable Models
a. Brew Now Button
b. Delay Brew Button
c. Set Delay Button
d. Hour Button
e. Minute Button
f. Clock Display
g. On/Off Indicator Light
h. Off Button
DIAGRAM OF PARTS
7
6
9
a
b
c
d
e
f
g
h
8
10
3
5
2
1
4
BVMC-JWX 5 Cup_15ESM1.indd 5-6 4/27/15 9:34 AM
SAVE THESE INSTRUCTIONS
SPECIAL CORD SET INSTRUCTIONS
1. For your convenience the plug is stored inside the
cord storage.
2. A short power supply cord is provided to reduce
the hazards resulting from a person or pet becoming
entangled in, or tripping over, a longer cord.
3. An extension cord may be purchased and used if
care is exercised in its use.
4. If an extension cord is used, the marked electrical
rating of the extension cord must be at least 10
amps and 120 volts. The resulting extended cord
must be arranged so that it will not drape over a
countertop or tabletop where it can be pulled on
by children or tripped over accidentally.
5. This appliance has a polarized plug (one blade is
wider than the other). To reduce the risk of electric
shock, this plug will fit in a polarized outlet only one
way. If the plug does not fit fully in the outlet, reverse
the plug. If it still does not fit, contact a qualified
electrician. Do not modify the plug in any way. You
can customize the length of the power cord so that
it is the exact length you desire. To increase the
length of the power cord: grasp the power cord
(not the power plug) and gently lift it out of the slot,
then pull it away from the coffeemaker. To decrease
the length of the power cord: Grasp the power cord
(not the power plug), lift it out of the slot and gently
feed it into the coffeemaker. Lock the cord in the
slot when finished.
4 5
1. Coffeemaker Lid
2. Water Reservoir
3. Water Window
4. Pause ’n Serve
5. Cord Storage
6. Warming Plate
7. Control Panel (see
detail below)
8. Decanter
9. Removable Filter Basket
10. Shower Head
Control Panel,
Programmable Models
a. Brew Now Button
b. Delay Brew Button
c. Set Delay Button
d. Hour Button
e. Minute Button
f. Clock Display
g. On/Off Indicator Light
h. Off Button
DIAGRAM OF PARTS
7
6
9
a
b
c
d
e
f
g
h
8
10
3
5
2
1
4
BVMC-JWX 5 Cup_15ESM1.indd 5-6 4/27/15 9:34 AM
6 7
allows you to set the Delay Brew feature.
– Delay Brew – Allows you to preset when you
would like the coffeemaker to automatically brew
your coffee, up to 24 hours in advance.
– One-Hour Auto Shut-Off – Keeps your
coffee warm for 1 hour after you brew, then
automatically turns off.
NOTE: If you have selected any of the operating
functions, the coffeemaker will act upon the last
operation selected if the power is restored within 10
seconds after a power outage.
CLEAN YOUR COFFEEMAKER BEFORE USING THE
FIRST TIME
Make sure your first cup of coffee is as good as can be
by cleaning your MR. COFFEE
®
Coffeemaker before its
first use. Just follow these simple steps:
1. Wash the decanter, decanter lid and the filter
basket in a mixture of mild detergent and water.
Rinse each thoroughly (please refer to the parts
diagram listed above).
2. Replace all the parts and close the lid. Then, run a
brew cycle with water only, without adding coffee
and coffee filter.
3. When brewing is complete, turn your coffeemaker
off, discard the water in the decanter and rinse the
decanter, decanter lid, and filter basket.
Your coffeemaker is now ready to use. Enjoy it!
SETTING THE CLOCK AND DELAY BREW TIME
To Set the Clock:
1. Plug the power cord into a standard electrical
COFFEEMAKER FEATURES AND BENEFITS
Your new MR. COFFEE
®
coffeemaker has the following
features:
• Brewing Capacity – 5 cups – Glass decanter
5 cups – Stainless Steel Carafe
• Brew Basket with Removable Filter Basket – Lifts
out for fast and easy cleaning and filling.
• Pause ‘n Serve – Allows you up to 30 seconds to pour
a cup of coffee while the coffeemaker is still brewing.
Carefully remove the decanter and the Pause ’n Serve
feature will be automatically activated, temporarily
stopping the flow of coffee into the decanter.
• Water Window – Shows amount of water in the
reservoir for accurate filling.
• Non-Stick Warming Plate – Allows you to keep your
coffee hot after brewing. The non-stick attribute
prevents the decanter from sticking to the surface
of the warming plate.
• Cord Storage – Safely stores excess cord to keep
your countertop neat.
• On/Off Indicator Light – Lets you know when your
coffeemaker is “on.”
• Additional Programmable Control Features:
– Clock – Serves as a handy kitchen clock and
Mr. Coffee
®
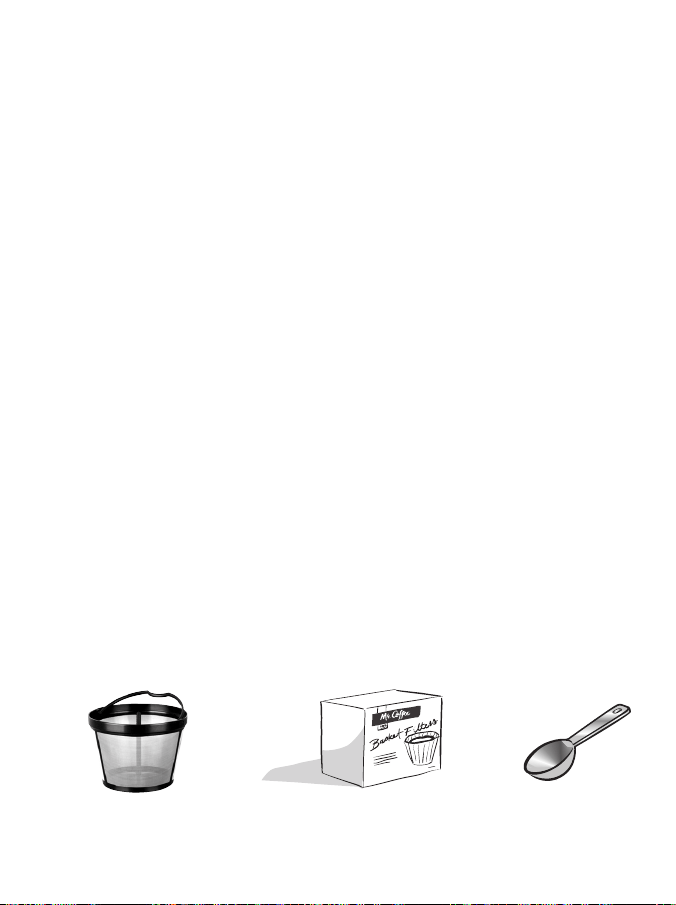
Brand 4-Cup
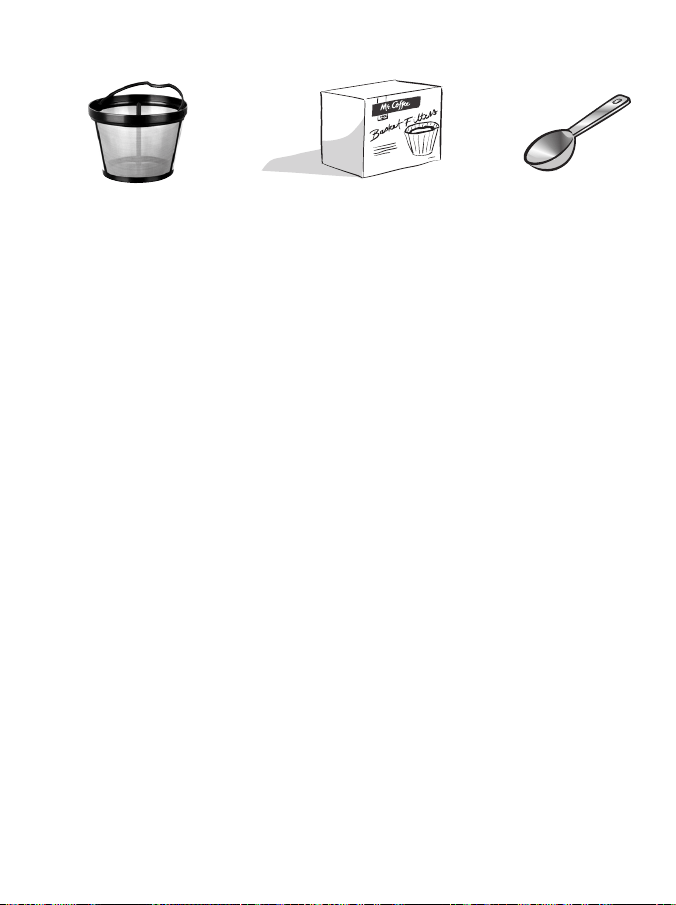
Basket-Style Paper Filters
Mr. Coffee
®
Brand
4-Cup Permanent Filter
Coffee Scoop
Coffeemaker Extras (not included with all models)
BVMC-JWX 5 Cup_15ESM1.indd 7-8 4/27/15 9:34 AM

6 7
allows you to set the Delay Brew feature.
– Delay Brew – Allows you to preset when you
would like the coffeemaker to automatically brew
your coffee, up to 24 hours in advance.
– One-Hour Auto Shut-Off – Keeps your
coffee warm for 1 hour after you brew, then
automatically turns off.
NOTE: If you have selected any of the operating
functions, the coffeemaker will act upon the last
operation selected if the power is restored within 10
seconds after a power outage.
CLEAN YOUR COFFEEMAKER BEFORE USING THE
FIRST TIME
Make sure your first cup of coffee is as good as can be
by cleaning your MR. COFFEE
®
Coffeemaker before its
first use. Just follow these simple steps:
1. Wash the decanter, decanter lid and the filter
basket in a mixture of mild detergent and water.
Rinse each thoroughly (please refer to the parts
diagram listed above).
2. Replace all the parts and close the lid. Then, run a
brew cycle with water only, without adding coffee
and coffee filter.
3. When brewing is complete, turn your coffeemaker
off, discard the water in the decanter and rinse the
decanter, decanter lid, and filter basket.
Your coffeemaker is now ready to use. Enjoy it!
SETTING THE CLOCK AND DELAY BREW TIME
To Set the Clock:
1. Plug the power cord into a standard electrical
COFFEEMAKER FEATURES AND BENEFITS
Your new MR. COFFEE
®
coffeemaker has the following
features:
• Brewing Capacity – 5 cups – Glass decanter
5 cups – Stainless Steel Carafe
• Brew Basket with Removable Filter Basket – Lifts
out for fast and easy cleaning and filling.
• Pause ‘n Serve – Allows you up to 30 seconds to pour
a cup of coffee while the coffeemaker is still brewing.
Carefully remove the decanter and the Pause ’n Serve
feature will be automatically activated, temporarily
stopping the flow of coffee into the decanter.
• Water Window – Shows amount of water in the
reservoir for accurate filling.
• Non-Stick Warming Plate – Allows you to keep your
coffee hot after brewing. The non-stick attribute
prevents the decanter from sticking to the surface
of the warming plate.
• Cord Storage – Safely stores excess cord to keep
your countertop neat.
• On/Off Indicator Light – Lets you know when your
coffeemaker is “on.”
• Additional Programmable Control Features:
– Clock – Serves as a handy kitchen clock and
Mr. Coffee
®
Brand 4-Cup
Basket-Style Paper Filters
Mr. Coffee
®
Brand
4-Cup Permanent Filter
Coffee Scoop
Coffeemaker Extras (not included with all models)
BVMC-JWX 5 Cup_15ESM1.indd 7-8 4/27/15 9:34 AM
8 9
outlet. The clock will flash on the control panel to
indicate that the time has not been set yet.
2. Press and hold the HOUR and MINUTE buttons until
you reach the current time. The PM indicator will
display when a PM hour is showing.
NOTE: Pressing any button before setting the clock will
cause the clock to start keeping time
from 12:00 a.m. You must set the clock if
you want to use the Delay Brew feature.
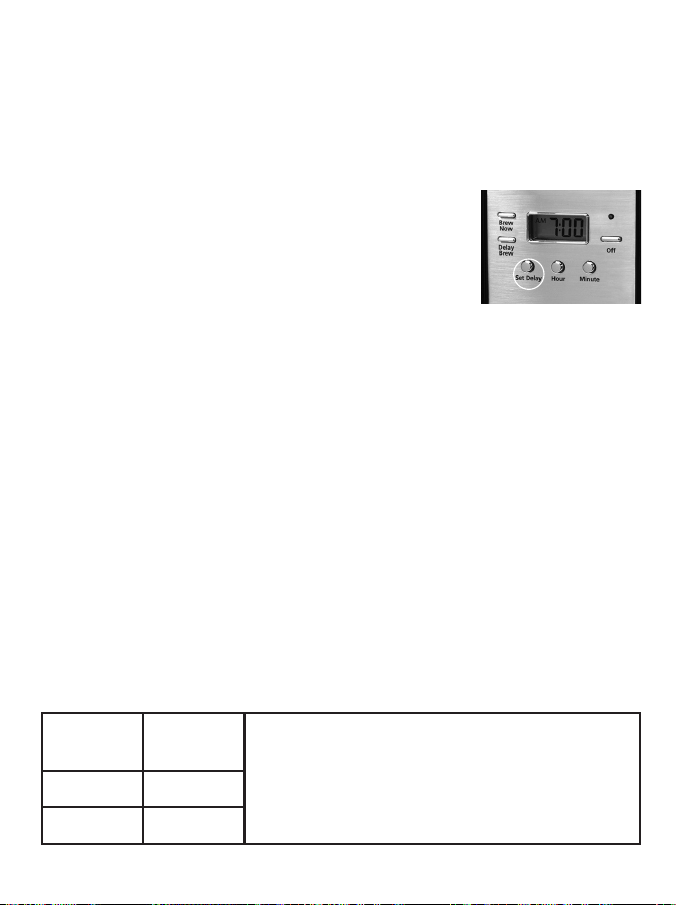
To Set the Delay Brew Time:
After setting the clock, simply press
and hold the SET DELAY button (Figure
1), and set the brew time by pressing the HOUR and
MINUTE buttons. The PM indicator will display when a
PM hour is shown.
NOTE: To activate the DELAY BREW cycle, see the
“Brewing Coffee Later” section.
To check the programmed time, push the SET DELAY
button. The display will show the time you have
programmed the coffee to brew.
PREPARING FOR USE
Selecting and Measuring Ground Coffee
For best results, use a level tablespoon for ground
coffee measurement. Make sure you use medium grind
coffee for a perfect brew.
Suggested Coffee Measurement Chart
Water Filtration System (Not Included on All Models)
This carbon based water filter improves the taste of
your coffee by removing up to 97% of the chlorine from
the water you may use to brew your
coffee.
First, look for the MR.COFFEE
®
Filtration Friendly symbol on the
bottom of your filter basket. If you do
not see this symbol, please call 1-800-
672-6333.
To use the water filtration system in
your MR.COFFEE
®
Coffeemaker, please follow
these steps:
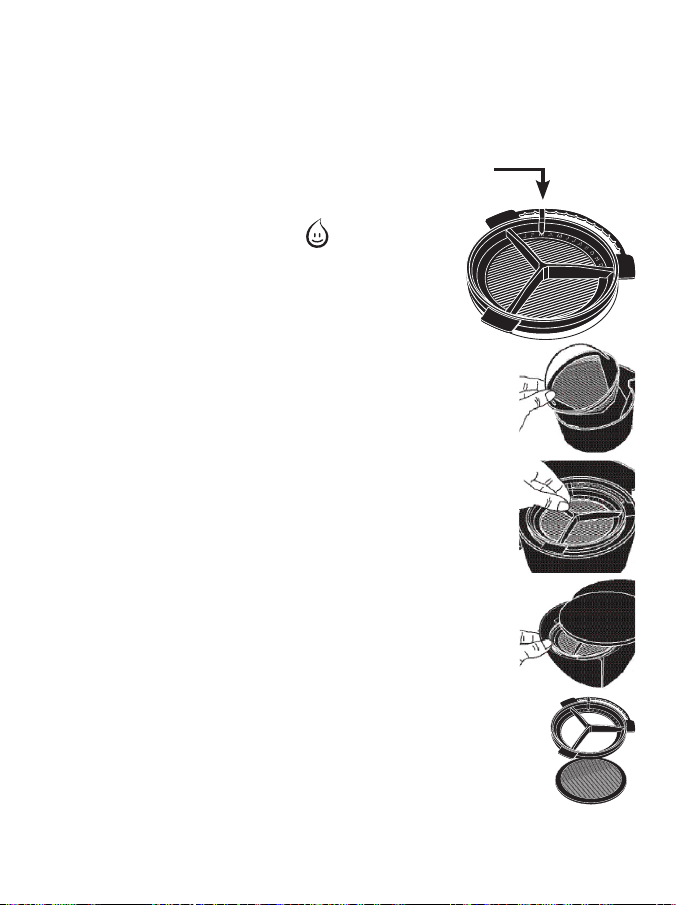
1. Align the red indicator on the frame
to the letter that corresponds with the
month that you are using the disk for the
first time. This serves to remind you to
change the disk every month. (approx.
30 brewing cycles)
NOTE: For optimum results, use the water
filtration system with a permanent filter.
2. Rinse the water filter in fresh water
before first use.
3. Follow Adding Water and Coffee
instructions.
4. When you are done brewing your coffee,
rinse the water filter with fresh
water. Do not put your water filter
in the dishwasher.
Replacement water filtration disks can
be purchased online at www.mrcoffee.com, at a local
To Brew Ground
Coffee
1 level tablespoon (tbsp) = 5
gr./0.17 oz.
1 cup = 5 f. oz. of brewed coffee
Use more or less coffee to suit your
taste
5 Cups 6 tbsp.
2 Cups 3 tbsp.
(Figure 1 – Set Delay)
Frame
Filter Disk
Red
Indicator
BVMC-JWX 5 Cup_15ESM1.indd 9-10 4/27/15 9:34 AM
8 9
outlet. The clock will flash on the control panel to
indicate that the time has not been set yet.
2. Press and hold the HOUR and MINUTE buttons until
you reach the current time. The PM indicator will
display when a PM hour is showing.
NOTE: Pressing any button before setting the clock will
cause the clock to start keeping time
from 12:00 a.m. You must set the clock if
you want to use the Delay Brew feature.
To Set the Delay Brew Time:
After setting the clock, simply press
and hold the SET DELAY button (Figure
1), and set the brew time by pressing the HOUR and
MINUTE buttons. The PM indicator will display when a
PM hour is shown.
NOTE: To activate the DELAY BREW cycle, see the
“Brewing Coffee Later” section.
To check the programmed time, push the SET DELAY
button. The display will show the time you have
programmed the coffee to brew.
PREPARING FOR USE
Selecting and Measuring Ground Coffee
For best results, use a level tablespoon for ground
coffee measurement. Make sure you use medium grind
coffee for a perfect brew.
Suggested Coffee Measurement Chart
Water Filtration System (Not Included on All Models)
This carbon based water filter improves the taste of
your coffee by removing up to 97% of the chlorine from
the water you may use to brew your
coffee.
First, look for the MR.COFFEE
®
Filtration Friendly symbol on the
bottom of your filter basket. If you do
not see this symbol, please call 1-800-
672-6333.
To use the water filtration system in
your MR.COFFEE
®
Coffeemaker, please follow
these steps:
1. Align the red indicator on the frame
to the letter that corresponds with the
month that you are using the disk for the
first time. This serves to remind you to
change the disk every month. (approx.
30 brewing cycles)
NOTE: For optimum results, use the water
filtration system with a permanent filter.
2. Rinse the water filter in fresh water
before first use.
3. Follow Adding Water and Coffee
instructions.
4. When you are done brewing your coffee,
rinse the water filter with fresh
water. Do not put your water filter
in the dishwasher.
Replacement water filtration disks can
be purchased online at www.mrcoffee.com, at a local
To Brew Ground
Coffee
1 level tablespoon (tbsp) = 5
gr./0.17 oz.
1 cup = 5 f. oz. of brewed coffee
Use more or less coffee to suit your
taste
5 Cups 6 tbsp.
2 Cups 3 tbsp.
(Figure 1 – Set Delay)
Frame
Filter Disk
Red
Indicator
BVMC-JWX 5 Cup_15ESM1.indd 9-10 4/27/15 9:34 AM

10 11
retailer, or by calling 1-800-MRCOFFEE in the U.S. or
1-800-667-8623 in Canada.
Adding Water and Ground Coffee
1. Lift and open the coffeemaker lid. For
your convenience, you can lift out the
removable filter basket.
2. Place a MR.COFFEE
®
brand 4 cup paper
basket-style filter or a MR.COFFEE
®
permanent filter into the removable
filter basket. (Figure 2)
NOTE: If using paper filters, it is important that the
sides of the filter fit flush against the side of the
filter basket. If filter collapse occurs, dampen the
filter before placing in the filter basket and adding
ground coffee and water.
3. Add the desired amount of coffee and gently shake
to level the coffee. See the Suggested Coffee
Measurement Chart.
4. Be sure the filter basket is properly centered and all
the way down in the filter basket.
5. Fill the decanter with cold, fresh water to the
desired capacity (1 cup equals 5 ounces). For easy
and accurate filling, the water markings on the
glass decanter and on the dual water windows
show the amount of water needed to make the
corresponding desired number of cups. Do not fill
past the “MAX line” or water will flow out of the
overfill hole in the back of the water reservoir.
The amount of coffee brewed will always be
slightly less than the amount of water poured in
the water reservoir. This is due to the minimum
absorption of water by the coffee grounds.
6. Pour the water into the water reservoir. Close the
lid and place the empty decanter onto the warming
plate.
NOTE: Make sure the decanter is fully placed on the
warming plate or the water and the grounds will
overflow from the filter basket. An overflow may cause
personal injury or damage to property.
CAUTION! To reduce the risk of damaging the
decanter and/or the risk of personal injury,
do not add cold water to the decanter if the
decanter is already hot. Allow the decanter to
cool before using.
BREWING COFFEE NOW
1. After completing the steps in the Adding Water
and Coffee section and with the glass decanter and
filter basket secure in place, turn the coffeemaker
on by pressing the BREW NOW button once. Your
coffeemaker will keep your coffee hot for 1 hour,
then automatically shut off. To turn the coffeemaker
off, push the OFF button so the light is no longer
illuminated. While the coffee is brewing, the Pause
’n Serve feature allows you to sneak a cup of coffee
from the decanter. REPLACE THE DECANTER ON THE
WARMING PLATE WITHIN 30 SECONDS TO PREVENT
OVERFLOW AND POSSIBLE INJURY.
If the brew basket overflows or fails to empty
into the decanter, do not open the brew
basket. Turn off the coffeemaker. Unplug the
coffeemaker and wait for the contents to
cool before handling.
(Figure 2 - Adding
water and ground
coffee)
BVMC-JWX 5 Cup_15ESM1.indd 11-12 4/27/15 9:34 AM

12 13
2. After the used coffee grounds have cooled,
carefully discard them.
3. Make sure the decanter is empty before starting to
brew coffee.
4. Be sure to turn your coffeemaker off when no
longer using it.
BREWING COFFEE LATER
1. You must first set the time when you would like
the coffeemaker to begin brewing your coffee as
described in “Setting the Clock and the Delay Brew
Timer” section.
2. Prepare your coffeemaker as described in “Adding
Water and Ground Coffee” section.
3. To activate DELAY BREW and program your
coffeemaker to brew coffee at a later time, press
the DELAY BREW button. The DELAY indicator will
appear on the digital display.
The coffeemaker is now set to automatically brew
coffee at the pre-set later time.
4. At the pre-set time the DELAY indicator will go off,
indicating that brewing has started.
5. The coffeemaker warming plate will keep your coffee
hot for 1 hour and then automatically turn off.
As a safety feature, your coffeemaker will NOT start
again automatically the next day. If you want your
coffee to brew at the same time the following day,
simply add a new filter, coffee and water and set
DELAY BREW, by repeating Steps 2 and 3 above.
To cancel DELAY BREW: Press the OFF button. The
DELAY indicator will disappear.
CLEANING AND MAINTAINING YOUR COFFEEMAKER
Daily Cleaning
Always unplug the coffeemaker and allow to cool
before cleaning.
Remove the filter basket, permanent filter (not included
on all models), decanter and decanter lid and wash
them in a solution of hot water and mild liquid soap.
Never use abrasive cleansers, steel wool pads or other
abrasive materials.
Dishwasher top rack safe parts: glass decanter and lid,
filter basket and permanent filter.
CAUTION! Never immerse the coffeemaker itself in
water, or in any other liquid or place in the dishwasher.
Regular Cleaning and Maintenance
Decalcifying your MR. COFFEE
®
Coffeemaker
Minerals (calcium) found in water will leave deposits in
your coffeemaker and will affect it. It’s recommended
that you regularly remove these deposits by using MR.
COFFEE
®
Cleaner or vinegar. MR. COFFEE
®
Cleaner is
available at many retail stores or by calling the MR.
COFFEE
®
Consumer Service Department at 1-800-MR
COFFEE (1-800-672-6333).
1. Follow package instructions to prepare one batch
of MR. COFFEE
®
Coffeemaker Cleaner. Pour the
mixture into the water reservoir.
NOTE: 4 cups or 20 f. oz. of undiluted, white household
vinegar may be used as a substitute for the cleaner.
2. Place an empty MR. COFFEE
®
4 cup basket-style
paper filter or MR. COFFEE
®
permanent filter into the
filter basket and close coffeemaker lid.
BVMC-JWX 5 Cup_15ESM1.indd 13-14 4/27/15 9:34 AM
14 15
TROUBLESHOOTING YOUR COFFEEMAKER
Your MR. COFFEE
®
Coffeemaker has been carefully
designed to give you many years of trouble-free service.
In the unlikely event that your new coffeemaker does
not operate satisfactorily, please review the following
potential problems and try the steps recommended
BEFORE you call an Authorized Sunbeam Service Center.
PROBLEM POSSIBLE CAUSE SOLUTION
THE ON LIGHT
DOES NOT LIGHT
UP
The appliance is
unplugged.
PLUG UNIT IN.
There’s a power
outage.
WAIT FOR POWER TO
BE RESTORED.
THE COFFEE IS
NOT BREWING
The appliance is
unplugged.
PLUG UNIT IN.
There’s a power
outage.
WAIT FOR POWER TO
BE RESTORED.
The water
reservoir is empty.
CHECK THE WATER
WINDOWS.
The filter basket
is not properly
inserted.
INSERT FILTER BASKET
CORRECTLY.
The decanter is
not placed all
the way on the
warming plate.
PLACE DECANTER
CORRECTLY ON
WARMING PLATE.
THE
COFFEEMAKER
ONLY BREWS
WATER
There are no
coffee grounds
in the filter
basket.
ADD THE DESIRED
AMOUNT OF COFFEE.
3. Place the empty decanter back in the unit, centered
on the warming plate.
4. Brew three cups of cleaning solution through the
coffeemaker.
5. Turn the coffeemaker off and let stand for 30 minutes.
6. Run the remainder of the cleaning solution through
the coffeemaker.
7. Discard the cleaning solution and rinse the decanter
thoroughly with clean water.
8. Fill the water reservoir with clean, fresh water.
9. Place the empty decanter back on the coffeemaker,
centered on the warming plate.
10. Remove and discard the paper filter used during
the cleaning cycle. If a MR. COFFEE
®
permanent filter
was used during cleaning, remove it and rinse it
thoroughly before replacing it in the filter basket.
11. Begin brewing and allow the full brew cycle to complete.
12. Repeat Steps 8 through 11 one more time.
Your coffeemaker is now clean and ready to brew the
next pot of delicious, hot coffee!
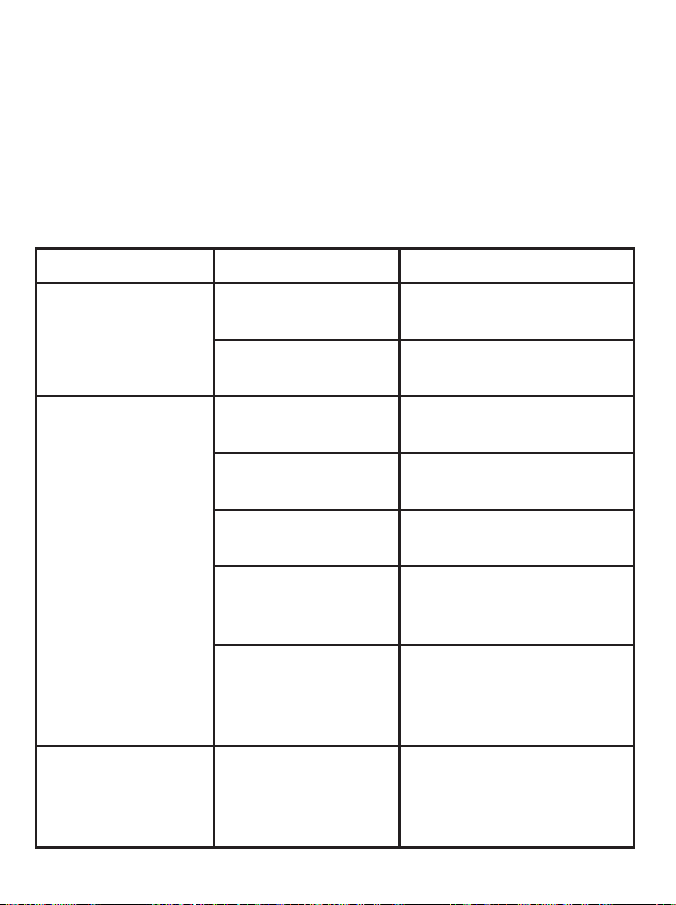
Type of Water
Soft Water
Hard Water
Cleaning Frequency
Every 80 Brew Cycles
Every 40 Brew Cycles
Suggested Decalcifying Interval
BVMC-JWX 5 Cup_15ESM1.indd 15-16 4/27/15 9:34 AM
14 15
TROUBLESHOOTING YOUR COFFEEMAKER
Your MR. COFFEE
®
Coffeemaker has been carefully
designed to give you many years of trouble-free service.
In the unlikely event that your new coffeemaker does
not operate satisfactorily, please review the following
potential problems and try the steps recommended
BEFORE you call an Authorized Sunbeam Service Center.
PROBLEM POSSIBLE CAUSE SOLUTION
THE ON LIGHT
DOES NOT LIGHT
UP
The appliance is
unplugged.
PLUG UNIT IN.
There’s a power
outage.
WAIT FOR POWER TO
BE RESTORED.
THE COFFEE IS
NOT BREWING
The appliance is
unplugged.
PLUG UNIT IN.
There’s a power
outage.
WAIT FOR POWER TO
BE RESTORED.
The water
reservoir is empty.
CHECK THE WATER
WINDOWS.
The filter basket
is not properly
inserted.
INSERT FILTER BASKET
CORRECTLY.
The decanter is
not placed all
the way on the
warming plate.
PLACE DECANTER
CORRECTLY ON
WARMING PLATE.
THE
COFFEEMAKER
ONLY BREWS
WATER
There are no
coffee grounds
in the filter
basket.
ADD THE DESIRED
AMOUNT OF COFFEE.
3. Place the empty decanter back in the unit, centered
on the warming plate.
4. Brew three cups of cleaning solution through the
coffeemaker.
5. Turn the coffeemaker off and let stand for 30 minutes.
6. Run the remainder of the cleaning solution through
the coffeemaker.
7. Discard the cleaning solution and rinse the decanter
thoroughly with clean water.
8. Fill the water reservoir with clean, fresh water.
9. Place the empty decanter back on the coffeemaker,
centered on the warming plate.
10. Remove and discard the paper filter used during
the cleaning cycle. If a MR. COFFEE
®
permanent filter
was used during cleaning, remove it and rinse it
thoroughly before replacing it in the filter basket.
11. Begin brewing and allow the full brew cycle to complete.
12. Repeat Steps 8 through 11 one more time.
Your coffeemaker is now clean and ready to brew the
next pot of delicious, hot coffee!
Type of Water
Soft Water
Hard Water
Cleaning Frequency
Every 80 Brew Cycles
Every 40 Brew Cycles
Suggested Decalcifying Interval
BVMC-JWX 5 Cup_15ESM1.indd 15-16 4/27/15 9:34 AM
16 17
PROBLEM POSSIBLE CAUSE SOLUTION
THE
COFFEEMAKER
BREWS SLOWLY
The coffeemaker
needs cleaning.
CLEAN COFFEEMAKER
AS DESCRIBED IN
“CLEANING AND
MAINTAINING”
SECTION.
THE FILTER
BASKET
OVERFLOWS
The filter basket
is not properly
inserted.
INSERT FILTER BASKET
CORRECTLY.
The decanter is
not placed all
the way on the
warming plate.
PLACE DECANTER
CORRECTLY ON
WARMING PLATE.
The decanter
lid is not on
decanter.
PLACE LID ON THE
DECANTER.
Too many coffee
grounds were
placed in the
filter.
REMOVE FILTER
DISCARD GROUNDS.
IF PAPER FILTER,
REPLACE. IF
PERMANENT FILTER,
RINSE. BEGIN BREWING
PROCESS AGAIN.
The decanter
was removed
from the
warming plate
for more than 30
seconds.
TURN OFF AND
UNPLUG THE UNIT.
ALLOW TO COOL.WIPE
UP THE SPILL. DO NOT
SET HOT DECANTER
BACK ON THE WET
WARMING PLATE OR IT
MIGHT CRACK.
PROBLEM POSSIBLE CAUSE SOLUTION
THE COFFEE IS
NOT HOT
There’s a power
outage.
WAIT FOR POWER TO
BE RESTORED.
Auto SHUT-
OFF has been
activated.
(Programmable
models only)
FOR BEST RESULTS,
BREW A FRESH POT OF
COFFEE.
THE COFFEE
TASTES BAD
Coffee grounds
other than for
an automatic
drip coffeemaker
were used.
USE COFFEE GROUNDS
RECOMMENDED FOR
AUTOMATIC DRIP
COFFEEMAKERS.
The ground
coffee-to-
water ratio was
unbalanced.
USE CORRECT
GROUND COFFEE-TO-
WATER RATIO.
The coffeemaker
needs cleaning.
CLEAN COFFEEMAKER AS
DESCRIBED IN “CLEANING
AND MAINTAINING YOUR
COFFEEMAKER” SECTION.
THE GROUNDS
ARE IN THE
COFFEE
The filter is not
properly seated
in the basket.
SEAT FILTER PROPERLY
WITHIN THE FILTER
BASKET.
The filter
collapsed.
REMOVE FILTER AND
REPLACE.
Do you still have questions? You can call us toll-free at
the MR. COFFEE
®
Consumer Service Department, 1-800-
MR COFFEE (1-800-672-6333) or you can visit us at
www.mrcoffee.com.
BVMC-JWX 5 Cup_15ESM1.indd 17-18 4/27/15 9:34 AM

18 19
Cleaning the Decanter
Hard water can leave a whitish stain on the decanter,
and coffee may then turn this stain brown.
To remove decanter stains:
1. Fill the decanter with a solution of equal parts
water and vinegar and let the solution stand in the
decanter for approximately 20 minutes.
2. Discard the solution, then wash and rinse the
decanter.
Do not use harsh abrasive cleaners that may scratch the
decanter, scratches may cause the decanter to break.
SERVICE AND MAINTENANCE
Replacement Parts
• CoffeeFilters–Forbettertastingcoffee,we
recommend that you use a MR. COFFEE
®
brand
4-cup basket paper filter or MR. COFFEE
®
brand
permanent filter. These filters are available at most
grocery stores.
• Decanters–Youcanusuallypurchaseareplacement
decanter from the store where you purchased your
coffeemaker. If you are unable to find a replacement,
please visit mrcoffee.com or call 1-800-MR-COFFEE
(1-800-672-6333) in the U.S. or 1-800-667-8623 in
Canada for information on where you can find a store
that carries replacement decanters.
Repairs
If your coffeemaker requires service, do not return it
to the store where you purchased it. All repairs and
replacements must be made by Sunbeam or by an
authorized MR. COFFEE
®
Service Center.
If you live in the U.S. or Canada, please call us at the
following toll-free telephone numbers to find the
location of the nearest authorized service center:
U.S. 1-800-MR COFFEE (1-800-672-6333)
Canada 1-800-667-8623
You may also visit our website at www.mrcoffee.com for
a list of service centers.
To assist us in serving you, please have the coffeemaker
model number and date of purchase available when
you call. The model number is on the bottom of the
coffeemaker.
We welcome your questions, comments or suggestions.
In all your communications, please include your
complete name, address and telephone number and a
description of the problem.
Visit our website at www.mrcoffee.com and discover
the secret to brewing the perfect cup of coffee.
You will also find a rich blend of gourmet recipes,
entertaining tips and the latest information on MR.
COFFEE
®
products.
BVMC-JWX 5 Cup_15ESM1.indd 19-20 4/27/15 9:34 AM

20 21
WARRANTY INFORMATION
1-YEAR LIMITED WARRANTY
Sunbeam Products, Inc. doing business as Jarden
Consumer Solutions or if in Canada, Sunbeam
Corporation (Canada) Limited doing business as Jarden
Consumer Solutions (collectively “JCS”) warrants that
for a period of one year from the date of purchase,
this product will be free from defects in material and
workmanship. JCS, at its option, will repair or replace
this product or any component of the product found to
be defective during the warranty period. Replacement
will be made with a new or remanufactured product
or component. If the product is no longer available,
replacement may be made with a similar product of
equal or greater value. This is your exclusive warranty.
Do NOT attempt to repair or adjust any electrical or
mechanical functions on this product. Doing so will void
this warranty.
This warranty is valid for the original retail purchaser
from the date of initial retail purchase and is not
transferable. Keep the original sales receipt. Proof of
purchase is required to obtain warranty performance.
JCS dealers, service centers, or retail stores selling JCS
products do not have the right to alter, modify or any
way change the terms and conditions of this warranty.
This warranty does not cover normal wear of parts or
damage resulting from any of the following: negligent
use or misuse of the product, use on improper voltage
or current, use contrary to the operating instructions,
disassembly, repair or alteration by anyone other than
JCS or an authorized JCS service center. Further, the
warranty does not cover: Acts of God, such as fire,
flood, hurricanes and tornadoes.
What are the limits on JCS’s Liability?
JCS shall not be liable for any incidental or consequential
damages caused by the breach of any express, implied
or statutory warranty or condition.
Except to the extent prohibited by applicable law, any
implied warranty or condition of merchantability or
fitness for a particular purpose is limited in duration to
the duration of the above warranty.
JCS disclaims all other warranties, conditions or
representations, express, implied, statutory or otherwise.
JCS shall not be liable for any damages of any kind
resulting from the purchase, use or misuse of, or
inability to use the product including incidental, special,
consequential or similar damages or loss of profits, or for
any breach of contract, fundamental or otherwise, or for
any claim brought against purchaser by any other party.
Some provinces, states or jurisdictions do not allow the
exclusion or limitation of incidental or consequential
damages or limitations on how long an implied warranty
lasts, so the above limitations or exclusion may not apply
to you.
This warranty gives you specific legal rights, and you
may also have other rights that vary from province to
province, state to state or jurisdiction to jurisdiction.
BVMC-JWX 5 Cup_15ESM1.indd 21-22 4/27/15 9:34 AM

22 23
How to Obtain Warranty Service
In the U.S.A.
If you have any question regarding this warranty or
would like to obtain warranty service, please call 1-800-
672-6333 and a convenient service center address will
be provided to you.
In Canada
If you have any question regarding this warranty or
would like to obtain warranty service, please call 1-800-
667-8632 and a convenient service center address will
be provided to you.
In the U.S.A., this warranty is offered by Sunbeam
Products, Inc. doing business as Jarden Consumer
Solutions located in Boca Raton, Florida 33431.
In Canada, this warranty is offered by Sunbeam
Corporation (Canada) Limited doing business as Jarden
Consumer Solutions, located at 20 B Hereford Street,
Brampton, Ontario L6Y 0M1. If you have any other
problem or claim in connection with this product,
please write our Consumer Service Department.
PLEASE DO NOT RETURN THIS PRODUCT TO ANY OF
THESE ADDRESSES OR TO THE PLACE OF PURCHASE
MEDIDAS DE SEGURIDAD
IMPORTANTES
Al utilizar artefactos eléctricos, a fin de reducir los riesgos
de incendio, choques eléctricos y/o lesiones a personas
se deben respetar siempre las precauciones de seguridad
básicas, incluidas las siguientes:
1. LEA TODAS LAS INSTRUCCIONES ANTES DE UTILIZAR
LA CAFETERA.
2. No toque las superficies calientes de la cafetera.
Utilice las manijas y perillas y no abra la tapa o cubierta
durante la preparación.
3. Para evitar choques eléctricos, no sumerja el cable
de alimentación eléctrica, el enchufe o la cafetera
en agua ni en ningún otro líquido.
4. En caso de que el artefacto sea utilizado por niños
o cerca de ellos, se recomienda la supervisión de
un adulto.
5. Apague la cafetera y desenchufe el cable de la fuente
de alimentación eléctrica cuando la cafetera y el reloj
no estén en uso y antes de limpiar el artefacto. Deje
enfriar las piezas de la cafetera antes de colocar o
retirar piezas y antes de limpiar el artefacto.
6. No utilice ningún artefacto eléctrico con el cable de
alimentación eléctrica o el enchufe dañados, que
funcione defectuosamente o que haya resultado
dañado de cualquier otra manera. Devuelva
este artefacto únicamente al Centro de Servicio
Autorizado más cercano para su inspección,
reparación o ajuste.
BVMC-JWX 5 Cup_15ESM1.indd 23-24 4/27/15 9:34 AM

• Noutiliceunajarraconfisurasoquetengauna
manija o asa floja o suelta.
• Nolimpielajarraconlimpiadoresabrasivos,lanade
acero u otros materiales abrasivos.
• Desecheinmediatamentelajarrasilamismahirvió
hasta quedarse sin líquido.
• Protejalajarradegolpesfuertes,rasguñoso
manipulación brusca.
¡ADVERTENCIA! Para reducir el riesgo de incendio o
choque eléctrico, no retire ninguna de las
tapas de servicio. El artefacto no tiene piezas
que puedan ser mantenidas por el usuario. Las
reparaciones deben ser realizadas únicamente
por personal autorizado.
CONSERVE ESTAS
INSTRUCCIONES
INSTRUCCIONES ESPECIALES PARA EL CABLE DE
ALIMENTACIÓN ELÉCTRICA
1. Para su conveniencia, el enchufe se guarda dentro
del espacio para almacenamiento del cable.
2. Se provee un cable de alimentación eléctrica corto
para reducir el riesgo de que alguna persona o mascota
se tropiecen o enreden con un cable más largo.
3. Si se lo utiliza con cuidado, es posible adquirir un
cable de extensión.
4. Si se utiliza un cable de extensión, éste debe ser
apto para 120 voltios y no menos de 10 amperios.
El cable de extensión debe colocarse de manera
24 25
7. El uso de accesorios que no sean productos de la marca
MR. COFFEE
®
podría ser peligroso o causar lesiones.
8. No utilice la cafetera en exteriores.
9. No permita que el cable de alimentación eléctrica
cuelgue del borde de la mesa o mostrador, o que
entre en contacto con superfcie s calientes.
10. No coloque la cafetera sobre una estufa caliente,
calentador eléctrico u horno caliente, ni tampoco
cerca de ellos.
11. Para desconectar la cafetera, apáguela y luego
desenchufe el cable de la fuente de alimentación
eléctrica.
12. Coloque el artefacto sobre una superfcie frme,
plana y nivelada para evitar la interrupción del fujo
de aire debajo de la cafetera.
13. Evite el contacto con cualquier pieza móvil.
14. Esta cafetera está diseñada únicamente para uso
doméstico.
15. No utilice el artefacto para otros fnes que no sean
los especifcados.
16. Si retira la tapa durante el ciclo de preparación
puede escaldarse.
USO Y CUIDADO DE LA JARRA
Siga las siguientes instrucciones para reducir o eliminar
la posibilidad de que la jarra se rompa:
• Estajarraestádiseñadaparaserutilizadaconla
cafetera MR. COFFEE
®
. Por lo tanto, no debe usarse
nunca sobre el fuego o en cualquier tipo de horno,
incluidos los hornos de microondas.
• Noapoyelajarracalientesobresuperficiesmojadas
o frías.
BVMC-JWX 5 Cup_15ESM1.indd 25-26 4/27/15 9:34 AM
26 27
que no caiga sobre el borde de un mostrador o
mesa, ya que podría ser jalado por niños o alguien
podría tropezarse con él.
5. Este artefacto cuenta con un enchufe polarizado
(una pata es más ancha que la otra). Para reducir
el riesgo de choques eléctricos, este enchufe
sólo puede introducirse en un tomacorriente
polarizado de una sola manera. Si el enchufe no
encaja completamente dentro del tomacorriente,
introdúzcalo del otro lado. Si aun así no encaja,
consulte a un electricista calificado. No intente
modificar el enchufe de ninguna manera. Es posible
adaptar la longitud del cable de alimentación
eléctrica a la medida exacta deseada. Para aumentar
la longitud del cable de alimentación eléctrica,
tome el cable de alimentación eléctrica (no el
enchufe) y levántenlo suavemente para retirarlo
de la ranura. Luego, tire del mismo para alejarlo de
la cafetera. Para reducir la longitud del cable de
alimentación eléctrica: levántelo suavemente para
retirarlo de la ranura y hágalo entrar suavemente
dentro de la cafetera. Para finalizar, trabe el cable
nuevamente en la ranura.
1. Tapa del cafetera
2. Depósito de agua
3. Ventanilla del agua
4. Control de pausa y
servir
5. Almacenamiento del cable
6. Plato Calefactor
7. Panel de control (ver
detalle a continuación)
8. Jarra
9. Portafiltro extraíble
10. Cabezal rociador
Panel de control de los
modelos programables
a. Boton de Color Ahora
b. Boton de demora de
preparacion
c. Boton de configuracion
de demora
d. Boton de hora
e. Boton de minutos
f. Panalla con reloj
g. Luz de indicator de
en/lejos
h. Baton de apagada
DIAGRAMA EPIEZAS
7
6
9
a
b
c
d
e
f
g
h
8
10
3
5
2
1
4
Filtros de papel para
4 tazas marca Mr. Coffee
®
Filtro permanente 4
tazas marca Mr. Coffee
®
Cuchara para café
Adicionales de la cafetera (no incluidos en todos los
modelos)
BVMC-JWX 5 Cup_15ESM1.indd 27-28 4/27/15 9:34 AM

29
FUNCIONES Y BENEFICIOS DE LA CAFETERA
Su nueva cafetera MR. COFFEE
®
ofrece las siguientes
funciones:
• Capacidad de preparación – 5 tazas – Serie con
jarra de vidrio, 5 tazas – Serie con jarra de metal
• Recipiente de preparación con portafiltro extraíble
– El portafiltro se levanta y se retira para realizar la
limpieza y permitir un llenado fácil y rápido.
• Control de pausa y servir – La función de pausa
y servir le permite servirse una taza de café
en 30 segundos mientras la cafetera continúa
preparándolo. Retire la jarra con cuidado y la función
de pausa y servir se activará automáticamente,
deteniendo por un instante el fujo de café a la jarra.
• Ventanilla del agua – Muestran la cantidad de agua
en el depósito, para lograr un llenado preciso.
• Placa calentadora antiadherente – Esta función
permite conservar el café caliente luego de prepararlo.
La característica antiadherente evita que la jarra se
pegue a la superfcie de la placa calentadora.
• Almacenamiento de cable – Permite guardar el
exceso de cable de manera segura, brindado un
aspecto prolijo en la mesa o el mostrador.
• Luz indicadora de encendido/apagado – Permite
saber si la cafetera está encendida.
• Funciones de control programables adicionales:
– Reloj – El reloj con indicador LCD funciona como
un práctico reloj de cocina y permite configurar la
función de demora de preparación.
– Demora de preparación – El temporizador
permite programar, hasta 24 horas antes, la hora
en que usted desea que la cafetera prepare
28
automáticamente el café.
– Apagado automático al cabo de 1 hora – Esta
función de seguridad mantiene el café caliente
durante 1 hora después de la preparación, y
luego apaga la unidad automáticamente.
NOTA: En caso de una interrupción de la alimentación
eléctrica, la cafetera realizará la última función operativa
que usted haya seleccionado si la alimentación eléctrica
es restaurada al cabo de 10 segundos.
LIMPIE SU CAFETERA ANTES DE UTILIZARLA POR
PRIMETA VEZ
Para asegurarse de que la primera taza de café sea lo
más deliciosa posible, limpie su cafetera MR. COFFEE
®
antes de utilizarla por primera vez. Simplemente, siga
estos sencillos pasos:
1. Lave la jarra, la tapa de la jarra y el portafiltro
con agua y detergente suave. Enjuáguelos bien
(consulte el diagrama de piezas más arriba).
2. Coloque todas las piezas y cierre la tapa. Luego,
realice un ciclo de preparación solamente con
agua, sin agregar café o filtro de café.
3. Cuando la preparación haya finalizado, apague la
cafetera, deseche el agua de la jarra y lave la jarra,
su tapa y el portafiltro.
La cafetera ahora ya está lista para ser usada. ¡Disfrútela!!
Para configurar el reloj:
1. Enchufe el cable de alimentación eléctrica en un
tomacorriente eléctrico estándar. El reloj destellará
en el panel de control para indicar que la hora aún
no ha sido configurada.
BVMC-JWX 5 Cup_15ESM1.indd 29-30 4/27/15 9:34 AM

2. Presione y mantenga los botones de HOUR y
MINUTE hasta que sea alcanzada la hora actual. El
indicador de PM se mostrará en la pantalla cuando
una hora PM esté apareciendo.
NOTA: Si presiona cualquier botón antes de poner en
hora el reloj, éste comenzará a funcionar desde las
12:00 am. Si desea utilizar la función de preparación
demorada, debe poner en hora el reloj.
Para seleccionar la hora de preparación demorada:
Después de ajustar el reloj,
simplemente presione y mantenga el
botón de preparación demorada “SET
DELAY” (Figura 1), y ajuste el tiempo
de preparación de café presionando
los botones de HOUR y MINUTE. El
indicador PM se mostrará en la pantalla
cuando una hora PM aparezca.
NOTA: Para activar el ciclo de PREPARACIÓN DEMORADA,
vea la sección “Preparación demorada de café”.
Para verificar la hora programada, presione el botón
SET DELAY. La pantalla mostrará la hora en que usted ha
programado la preparación de café.
PREPARACIÓN DE LA CAFETERA
Cómo seleccionar y medir el café molido
Para obtener mejores resultados, utilice cucharadas
a ras para medir el café molido. Para obtener una
preparación perfecta, asegúrese de utilizar café molido
de grano mediano.
3130
Tabla de medidas de café recomendadas
Sistema de Filtracion de Agua (No Incluidos en todos
los Modelos)
Este filtro de agua a base de carbono mejora el sabor
de su café al remover el 97% del cloro del agua que
usted utiliza para colar su café.
Primero busque el símbolo MR.COFFEE
®
de Afinidad
con la Filtracion en la parte inferior de la canasta del
filtro. Si no ve este símbolo, favor de llamar al 1-800-
672-6333.
Para utilizar el sistema de filtración de agua en su Cafetera
MR.COFFEE
®
, favor de seguir los siguientes pasos:
1. Alinee el indicador rojo del disco con la letra
que corresponde al mes en que use el disco por
primera vez. Esto sirve para recordarle cambiar el
disco cada mes (aprox. 30 ciclos de preparación).
NOTA: Para obtener resultados óptimos, use el sistema
de filtración del agua con un filtro permanente.
2. Enjuague el filtro del agua con agua fresca antes del
primer uso.
3. Siga con las instrucciones para “Agregar agua y café
molido” en la siguiente sección.
4. Cuando termine de preparar su café, lave el filtro
con agua fresca. No coloque el filtro del agua en el
lavavajillas.
Para
preparar
Cantidad de
café molido
1 cucharada a ras = 5 gr./0.17 oz.
1 taza = 5 f. oz. de café
preparado
Utilice más o menos cantidad
de café según su preferencia.
5 tazas 6 cucharadas
2 tazas 3 cucharadas
(Figura 1 – Configurar
demora)
BVMC-JWX 5 Cup_15ESM1.indd 31-32 4/27/15 9:34 AM
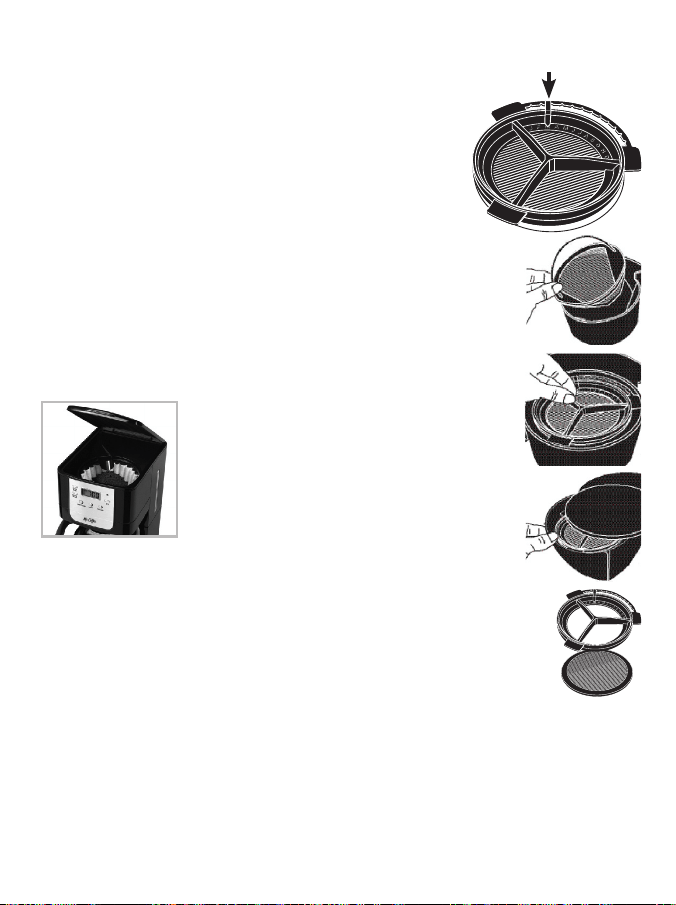
las marcas de agua en la jarra de vidrio y en las
ventanas dobles de agua, ya que las mismas indican
la cantidad de agua necesaria para preparar el
número de tazas que usted desea. No supere la
línea de nivel “MÁX.”, ya que se derramará agua
fuera del orifcio de llenado en la parte posterior del
depósito de agua.
La cantidad de café preparado siempre será
levemente menor a la cantidad de agua introducida
en el depósito de agua. Esto se debe a que el café
molido absorbe una cantidad mínima de agua.
6. Vierta el agua dentro del depósito de agua. Cierre
la tapa y coloque la jarra vacía sobre la placa
calentadora.
NOTA: Asegúrese de que la jarra esté correctamente
colocada sobre la placa calentadora, ya que de lo
contrario el agua y el café molido se derramarán del
portafiltro. Un derrame puede provocar lesiones físicas
o daños a la unidad.
¡PRECAUCIÓN! Para reducir el riesgo de dañar
la jarra y/o de sufrir lesiones físicas, no agregue
agua fría a la jarra si la misma está caliente. Deje
enfriar la jarra antes de utilizarla.
PREPARACIÓN INMEDIATA DE CAFÉ
1. Luego de completar los pasos en la seccion
“Anadiendo Agua y Cafe Molido” y con la jarra de
vidrio y la canasta del filtro colocadas en su sitio,
encienda la cafetera. Oprima el boton de BREW
NOW una sola vez para encender la cafeteria. La
cafetera conservará el café caliente durante 1 hora,
y luego se apagará automáticamente. Para apagar la
Los discos de repuesto para filtrado
del agua se pueden comprar por
Internet en www.mrcoffee.com, o en
un comercio local, o bien, llamando al
1-800-MRCOFFEE en EE.UU. o al 1-800-
667-8623 en Canadá.
Cómo agregar agua y café molido
1. Levante y abra la tapa del cafetera.
Para su comodidad, usted puede
levantar y quitar el portafiltro retirable.
2. Coloque un filtro de papel para 4
tazas marca MR. COFFEE
®
o un filtro
permanente marca MR. COFFEE
®
dentro
del portafiltro retirable. (Figura 2)
NOTA: Si utiliza filtros de papel,
es importante que los lados del
filtro encajen perfectamente
dentro del portafiltro. Si el
filtro se dobla, humedézcalo
antes de colocarlo dentro del
portafiltro y agregar café molido
y agua.
3. Agregue la cantidad de café
deseada y sacuda suavemente
para nivelar el café. Vea la Tabla de
medidas de café recomendadas.
4. Asegúrese de que el filtro esté
centrado correctamente y bien insertado dentro del
portafiltro.
5. Llene la jarra con agua fría y potable hasta la
cantidad deseada (1 taza equivale a 5 onzas).
Para lograr un llenado fácil y preciso, observe
Marco
Disco de
Filtro
Indicador Rojo
(Figura 2 - Como
agregar agua y
café molido)
3332
BVMC-JWX 5 Cup_15ESM1.indd 33-34 4/27/15 9:34 AM
5. La placa calentadora de la cafetera mantendrá
el café caliente por 1 hora y después se apagará
automáticamente.
Como función de seguridad, su cafetera NO se pondrá
en marcha automáticamente al día siguiente. Si desea
que su café sea preparado a la misma todos los días,
simplemente coloque un filtro nuevo, café y agua y
seleccione PREPARACIÓN DEMORADA repitiendo los
pasos 2 y 3 anteriores.
Para cancelar la PREPARACIÓN DEMORADA: presione
el botón OFF. El indicador de Preparación DEMORADA
desaparecerá.
LIMPIEZA Y MANTENIMIENTO DE LA CAFETERA
Limpieza diaria
Antes de limpiar la cafetera, desenchúfela y deje que
se enfríe. Retire el portafiltro, el filtro permanente (no
se incluye en todos los modelos), la jarra y su tapa, y
lávelos en una solución de agua caliente y jabón líquido
suave. No utilice nunca limpiadores abrasivos, lana
de acero u otros materiales ásperos. Las piezas que
pueden lavarse con seguridad en el estante superior
del lavavajillas son las siguientes: jarra de vidrio y tapa,
portafiltros y filtro permanente.
¡PRECAUCIÓN! No sumerja nunca la cafetera
en agua u otros líquidos y no la lave en el
lavavajillas.
Servicio y mantenimiento regulares
Descalcifcación de la cafetera MR. COFFEE
®
Los minerales (calcio) contenidos en el agua dejan depósitos
en la cafetera que afectan su rendimiento. Se recomienda
3534
cafetera, presione el botón de apagado. Mientras
el café se esté filtrando, la función de pausa y servir
le permite servirse una taza de café de la jarra.
VUELVA A COLOCAR LA JARRA SOBRE LA PLACA
CALENTADORA ANTES DE 30 SEGUNDOS PARA
EVITAR DERRAMES Y POSIBLES LESIONES.
Si el portafiltros se derrama o no vierte café
dentro de la jarra, no lo abra. Apague la
cafetera. Desenchufe la cafetera y espere
hasta que se enfríe antes de manipularla.
2. Después de que el café molido se haya enfriado,
abra con cuidado el portafiltro y deseche el café.
3. Asegúrese de que la jarra esté vacía antes de
comenzar a preparar café.
4. Asegúrese de apagar la cafetera cuando no la use.
PREPARACIÓN DE MORADA DE CAFÉ
1. Antes de que la cafetera pueda comenzar a preparar
el café como se describe en la sección “Confguración
del reloj y hora de preparación demorada”, es
necesario seleccionar la hora en el reloj.
2. Prepare la cafetera como se describe en la sección
“Cómo agregar agua y café molido”.
3. Para activar la PREPARACIÓN DEMORADA y
programar su cafetera para preparar café más tarde,
presione el botón DELAY BREW. El indicador de
Preparación DELAY aparecerá en la pantalla digital.
La cafetera está ahora programada para preparar
café a la hora pre-programada para más tarde.
4. El indicador de Preparación Demorada se apagará
a la hora pre-programada indicando que la
preparación del café ha comenzado.
BVMC-JWX 5 Cup_15ESM1.indd 35-36 4/27/15 9:34 AM

11. Ponga la unidad en marcha y deje que se realice un
ciclo de preparación completo.
12. Repita una vez más los pasos 8 a 11.
Ahora, su cafetera está limpia y en condiciones de
preparar el más delicioso café caliente.
Limpieza de la jarra
El agua dura puede dejar manchas blancuzcas en la
jarra y el café puede teñirlas de color marrón.
Para eliminar las manchas en la jarra:
1. Llene la jarra con una solución de partes iguales de
agua y vinagre y deje la solución dentro de la jarra
por unos 20 minutos.
2. Deseche la solución y luego lave y enjuague la jarra.
No utilice limpiadores altamente abrasivos, pues
podrían rayar la jarra y éste podría entonces romperse.
eliminar regularmente estos depósitos utilizando el limpiador
MR. COFFEE
®
o bien vinagre. El limpiador MR. COFFEE
®
puede
adquirirse en numerosas tiendas o llamando al Departamento
de Servicio al Consumidor de MR. COFFEE
®
, 1-800-MR
COFFEE (1-800-672-6333).
1. Para preparar la cantidad de solución de limpieza
necesaria para limpiar la cafetera, siga las instrucciones
en el envase del limpiador de cafeteras MR. COFFEE
®
.
Vierta la mezcla en el depósito de agua.
NOTA: En lugar del limpiador, pueden utilizarse 4 tazas
(20 f. oz.) de vinagre doméstico blanco no diluido.
2. Coloque en el portafiltro de la cafetera un filtro de
papel vacío para 4 tazas MR. COFFEE
®
o un filtro
permanente MR. COFFEE
®
y cierre la tapa del cafetara.
3. Ponga la jarra vacía nuevamente en la unidad,
centrada sobre la placa de calentamiento.
4. Haga funcionar la cafetera y llene 4 tazas con
solución de limpieza.
5. Apague la cafetera y déjela reposar por 30 minutos.
6. Haga funcionar la cafetera con el resto de la
solución de limpieza.
7. Deseche la solución de limpieza y limpie la jarra
completamente con agua limpia.
8. Llene el depósito de agua con agua limpia y fresca.
9. Ponga la jarra vacía nuevamente en la cafetera,
centrada sobre la placa de calentamiento.
10. Retire y deseche el filtro de papel utilizado durante
el ciclo de limpieza. Si durante la operación
de limpieza se utilizó un filtro permanente MR.
COFFEE
®
, retírelo y enjuáguelo completamente
antes de ponerlo en el portafiltro.
3736
Tipo de Agua
Agua Blanda
Agua Dura
Frecuencia de la Limpieza
Cada 80 Ciclos de Colado
Cada 40 Ciclos de Colado
Intervalo de Limpieza Sugerido
BVMC-JWX 5 Cup_15ESM1.indd 37-38 4/27/15 9:34 AM
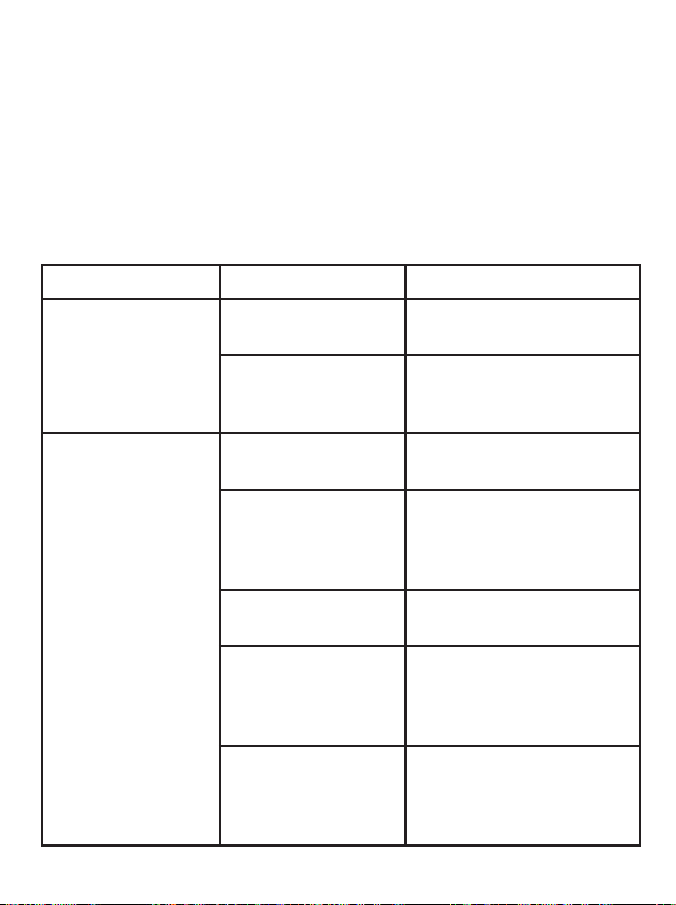
RESOLVIENDO PROBLEMAS CON SU CAFETERA
Su Cafetera MR. COFFEE
®
ha sido diseñada con esmero
para darle muchos años de servicio sin contratiempos.
En el caso improbable de que su nueva cafetera
no funcione adecuadamente, favor de examinar los
siguientes problemas potenciales y efectuar los pasos
recomendados ANTES de llamar a un Centro de Servicio
Autorizado Sunbeam.
PROBLEMA CAUSA POSIBLE SOLUCIÓN
LA LUZ DE
ENCENDIDO NO
SE ILUMINA
El aparato está
desenchufado.
ENCHÚFELO.
Hay un corte de
electricidad.
ESPERE HASTA QUE SE
REANUDE SUMINISTRO
DE ELECTRICIDAD.
LA CAFETERA
NO FILTRA
El aparato está
desenchufado.
ENCHÚFELO.
Hay un corte de
electricidad.
ESPERE HASTA
QUE SE REANUDE
EL SUMINISTRO DE
ELECTRICIDAD.
El depósito de
agua está vacío.
COMPRUEBE LAS
VENTANAS DE AGUA.
El portafiltro
no está
correctamente
colocado.
COLOQUE EL
PORTAFILTRO
CORRECTAMENTE.
La jarra no está
bien colocada
en la placa
calentadora.
COLOQUE LA JARRA
CORRECTAMENTE
EN LA PLACA
CALEFACTOR.
3938
PROBLEMA CAUSA POSIBLE SOLUCIÓN
LA CAFETERA
SÓLO PRODUCE
AGUA
No hay café
molido dentro
del portafiltro.
AGREGUE LA
CANTIDAD DE CAFÉ
DESEADA.
LA CAFETERA
FILTRA
LENTAMENTE
La cafetera debe
ser limpiada.
LIMPIE LA CAFETERA TAL
COMO SE DESCRIBE EN
LA SECCIÓN “LIMPIEZA
Y MANTENIMIENTO DE
LA CAFETERA”.
EL PORTAFILTRO
DESBORDA.
El portafiltro
no está
correctamente
colocado.
COLOQUE EL
PORTAFILTRO
CORRECTAMENTE.
La jarra no está
correctamente
colocada
en la placa
calentadora.
COLOQUE LA JARRA
CORRECTAMENTE EN LA
PLACA CALENTADORA.
La jarra no tiene
la tapa colocada.
COLOQUE LA TAPA EN
LA JARRA.
El filtro tiene
demasiado café
molido.
RETIRE EL FILTRO Y
DESECHE EL CAFÉ
MOLIDO. SI EL
FILTRO ES DE PAPEL,
REEMPLÁCELO. SI ES UN
FILTRO PERMANENTE,
ENJUÁGUELO.
COMIENCE
NUEVAMENTE
EL PROCESO DE
PREPARACIÓN.
BVMC-JWX 5 Cup_15ESM1.indd 39-40 4/27/15 9:34 AM
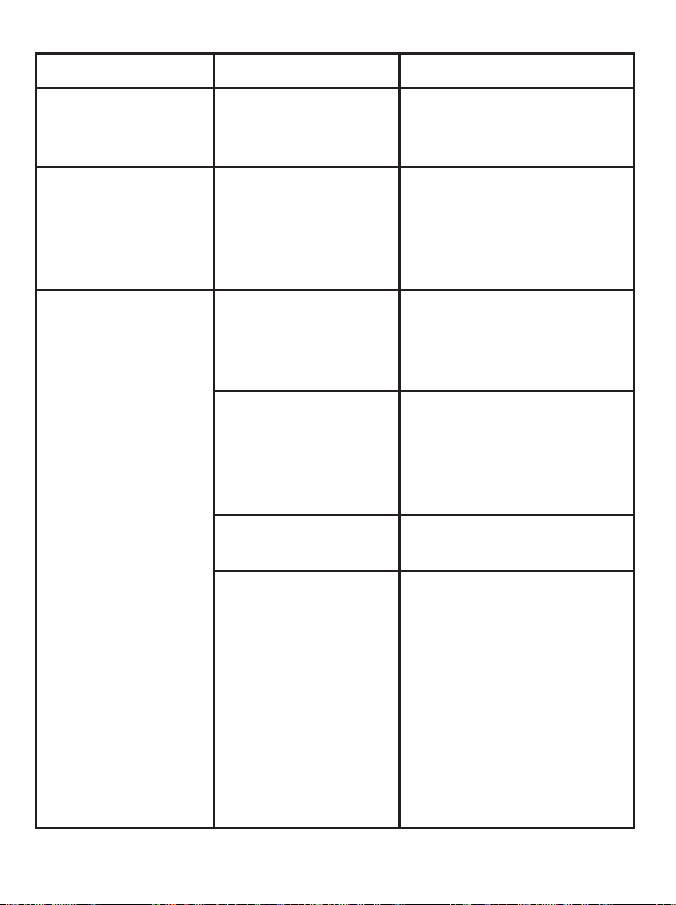
PROBLEMA CAUSA POSIBLE SOLUCIÓN
EL PORTAFILTRO
DESBORDA.
La jarra fue
retirada
de la placa
calentadora
por más de 30
segundos.
APAGUE Y DESENCHUFE
LA UNIDAD. DEJE
QUE SE ENFRÍE.
LIMPIE EL DERRAME.
NO COLOQUE LA
JARRA CALIENTE
SOBRE LA PLACA DE
CALENTAMIENTO
HÚMEDA PORQUE
PODRÍA QUEBRARSE.
LA CAFETERA
NO ESTÁ
CALIENTE
Hay un corte de
electricidad.
ESPERE HASTA
QUE SE REANUDE
EL SUMINISTRO DE
ELECTRICIDAD.
Se ha activado
el APAGADO
AUTOMÁTICO.
(Para Modelos
Programables)
PARA OBTENER
LOS MEJORES
RESULTADOS, FILTRE
UNA NUEVA JARRA DE
CAFÉ.
EL CAFÉ NO
TIENE BUEN
SABOR
Se utilizó café
molido con
un grano no
adecuado para
una cafetera de
goteo.
UTILICE EL GRANO
RECOMENDADO
PARA LAS CAFETERAS
DE GOTEO
AUTOMÁTICAS.
Las cantidades
de café y de
agua no son
adecuadas.
UTILICE LAS
CANTIDADES
ADECUADAS DE CAFÉ
Y DE AGUA.
4140
PROBLEMA CAUSA POSIBLE SOLUCIÓN
EL CAFÉ NO
TIENE BUEN
SABOR
La cafetera debe
ser limpiada.
LIMPIE LA CAFETERA
TAL COMO SE
DESCRIBE EN LA
SECCIÓN “LIMPIEZA Y
MANTENIMIENTO DE
LA CAFETERA”.
HAY CAFÉ
MOLIDO
DENTRO DEL
CAFÉ LÍQUIDO
El filtro no está
correctamente
colocado en el
portafiltro.
COLOQUE EL FILTRO
CORRECTAMENTE
DENTRO DEL
PORTAFILTRO.
El filtro se
aplastó.
RETIRE EL FILTRO Y
REEMPLÁCELO.
¿Aún tiene preguntas? Llame sin cargo al Departamento
de Servicio al Consumidor de MR. COFFEE
®
, 1-800-MR
COFFEE (1-800-672-6333) o visítenos en www.mrcoffee.
com.
BVMC-JWX 5 Cup_15ESM1.indd 41-42 4/27/15 9:34 AM
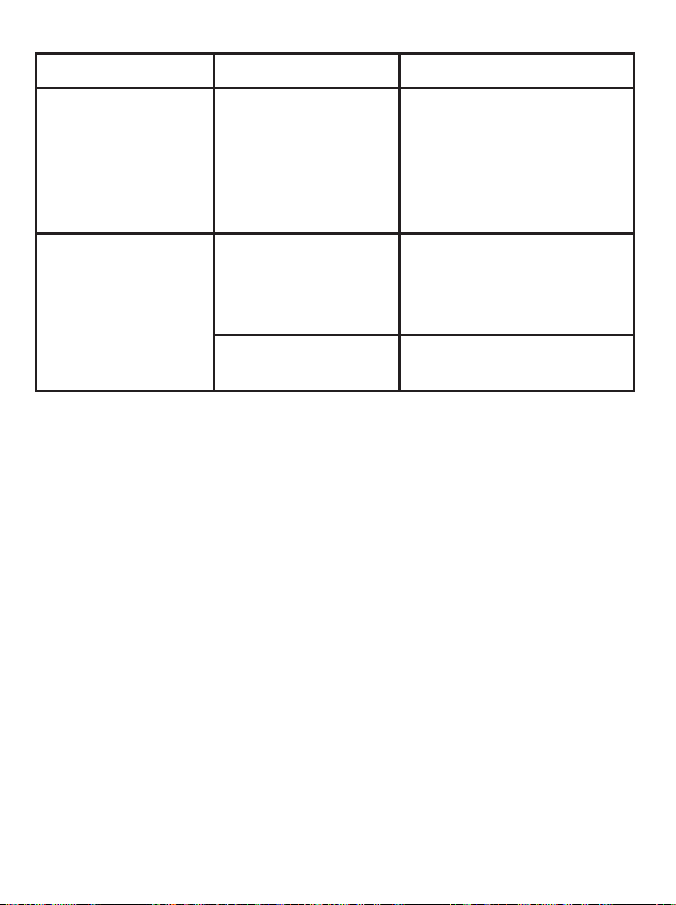
PROBLEMA CAUSA POSIBLE SOLUCIÓN
EL PORTAFILTRO
DESBORDA.
La jarra fue
retirada
de la placa
calentadora
por más de 30
segundos.
APAGUE Y DESENCHUFE
LA UNIDAD. DEJE
QUE SE ENFRÍE.
LIMPIE EL DERRAME.
NO COLOQUE LA
JARRA CALIENTE
SOBRE LA PLACA DE
CALENTAMIENTO
HÚMEDA PORQUE
PODRÍA QUEBRARSE.
LA CAFETERA
NO ESTÁ
CALIENTE
Hay un corte de
electricidad.
ESPERE HASTA
QUE SE REANUDE
EL SUMINISTRO DE
ELECTRICIDAD.
Se ha activado
el APAGADO
AUTOMÁTICO.
(Para Modelos
Programables)
PARA OBTENER
LOS MEJORES
RESULTADOS, FILTRE
UNA NUEVA JARRA DE
CAFÉ.
EL CAFÉ NO
TIENE BUEN
SABOR
Se utilizó café
molido con
un grano no
adecuado para
una cafetera de
goteo.
UTILICE EL GRANO
RECOMENDADO
PARA LAS CAFETERAS
DE GOTEO
AUTOMÁTICAS.
Las cantidades
de café y de
agua no son
adecuadas.
UTILICE LAS
CANTIDADES
ADECUADAS DE CAFÉ
Y DE AGUA.
4140
PROBLEMA CAUSA POSIBLE SOLUCIÓN
EL CAFÉ NO
TIENE BUEN
SABOR
La cafetera debe
ser limpiada.
LIMPIE LA CAFETERA
TAL COMO SE
DESCRIBE EN LA
SECCIÓN “LIMPIEZA Y
MANTENIMIENTO DE
LA CAFETERA”.
HAY CAFÉ
MOLIDO
DENTRO DEL
CAFÉ LÍQUIDO
El filtro no está
correctamente
colocado en el
portafiltro.
COLOQUE EL FILTRO
CORRECTAMENTE
DENTRO DEL
PORTAFILTRO.
El filtro se
aplastó.
RETIRE EL FILTRO Y
REEMPLÁCELO.
¿Aún tiene preguntas? Llame sin cargo al Departamento
de Servicio al Consumidor de MR. COFFEE
®
, 1-800-MR
COFFEE (1-800-672-6333) o visítenos en www.mrcoffee.
com.
BVMC-JWX 5 Cup_15ESM1.indd 41-42 4/27/15 9:34 AM

SERVICIO Y MANTENIMIENTO
Piezas de repuesto
• Filtrosdecafé–Paraprepararuncafémássabroso,
recomendamos el uso de filtros de papel marca MR.
COFFEE
®
para 4 tazas, o filtros permanentes marca
MR. COFFEE
®
. Estos filtros pueden comprarse en la
mayoría de las tiendas de alimentos.
• Jarras–Usualmenteesposibleadquirirjarrasde
repuesto en la tienda donde compró su cafetera. Si
no puede conseguir un reemplazo, visite mrcoffee.
com o llame al 1-800-MRCOFFEE (1-800-672-6333)
en los Estados Unidos o al 1-800-667-8623 en
Canadá y solicite información sobre una tienda que
ofrezca jarras de reemplazo.
Reparaciones
Si su cafetera requiere servicio, no la devuelva a la
tienda donde la compró. Todas las reparaciones y
reemplazos deben ser realizados por Sunbeam o
por un Centro de Servicio MR. COFFEE
®
autorizado.
Si usted vive en los Estados Unidos o en Canadá,
llámenos sin cargo a los siguientes números de teléfono
para averiguar la ubicación del Centro de Servicio
Autorizado más próximo:
Estados Unidos: 1-800-MR COFFEE (1-800-672-6333)
Canadá: 1-800-667-8623
También puede visitar nuestro sitio web, www.
mrcoffee.com, donde podrá obtener una lista de
nuestros centros de servicio.
Para que podamos atenderlo mejor, cuando llame
tenga a mano el número de modelo de la cafetera y la
fecha de compra. El número de modelo se encuentra
4342
en la parte inferior de la cafetera.
Sus preguntas, comentarios o sugerencias serán
bienvenidos. Le solicitamos que en todas sus
comunicaciones con nosotros incluya su nombre
completo, dirección y número de teléfono, así como
una descripción del problema.
Visite nuestro sitio web www.mrcoffee.com y descubra
el secreto de preparar una taza de café perfecta.
También encontrará una exquisita selección de
recetas de cocina, consejos para recibir invitados y la
última información sobre los productos MR. COFFEE
®
.
BVMC-JWX 5 Cup_15ESM1.indd 43-44 4/27/15 9:34 AM

INFORMACIÓN DE GARANTÍA
GARANTÍA LIMITADA POR UN AÑO
Sunbeam Products, Inc. operando bajo el nombre de
Jarden Consumer Solutions, o en Canadá, Sunbeam
Corporation (Canada) Limited operando bajo el nombre
de Jarden Consumer Solutions, (en forma conjunta,
“JCS”), garantiza que por un período de un año a
partir de la fecha de compra, este producto estará
libre de defectos de materiales y mano de obra. JCS, a
su elección, reparará o reemplazará este producto o
cualquier componente del mismo que presente defectos
durante el período de garantía. El reemplazo se realizará
por un producto o componente nuevo o reparado. Si el
producto ya no estuviera disponible, se lo reemplazará
por un producto similar de valor igual o superior. Ésta
es su garantía exclusiva. No intente reparar o ajustar
ninguna función eléctrica o mecánica de este producto.
Al hacerlo elimínará ésta garantía.
La garantía es válida para el comprador minorista
original a partir de la fecha de compra inicial y la
misma no es transferible. Conserve el recibo de
compra original. Para solicitar servicio en garantía se
requiere presentar un recibo de compra. Los agentes y
centros de servicio de JCS o las tiendas minoristas que
venden productos de JCS no tienen derecho a alterar,
modificar ni cambiar de ningún otro modo los términos
y las condiciones de esta garantía.
Esta garantía no cubre el desgaste normal de las piezas
ni los daños que se produzcan como resultado de
4544
uso negligente o mal uso del producto, uso de voltaje
incorrecto o corriente inapropiada, uso contrario a
las instrucciones operativas, y desarme, reparación o
alteración por parte de un tercero ajeno a JCS o a un
Centro de Servicio autorizado por JCS. Asimismo, la
garantía no cubre actos fortuitos tales como incendios,
inundaciones, huracanes y tornados.
¿Cuál es el límite de responsabilidad de JCS?
JCS no será responsable de daños incidentales o
emergentes causados por el incumplimiento de alguna
garantía o condición expresa, implícita o legal.
Excepto en la medida en que lo prohíba la ley aplicable,
cualquier garantía o condición implícita de comerciabilidad
o aptitud para un fin determinado se limita, en cuanto a su
duración, al plazo de la garantía antes mencionada.
JCS queda exenta de toda otra garantías, condiciones o
manifestaciones, expresa, implícita, legal o de cualquier otra
naturaleza.
JCS no será responsable de ningún tipo de daño que
resulte de la compra, uso o mal uso del producto, o
por la imposibilidad de usar el producto, incluidos los
daños incidentales, especiales, emergentes o similares,
o la pérdida de ganancias, ni de ningún incumplimiento
contractual, sea de una obligación esencial o de otra
naturaleza, ni de ningún reclamo iniciado contra el
comprador por un tercero.
Algunas provincias, estados o jurisdicciones no permiten
la exclusión o limitación de los daños incidentales o
emergentes ni las limitaciones a la duración de las garantías
implícitas, de modo que es posible que la exclusión o las
limitaciones antes mencionadas no se apliquen en su caso.
BVMC-JWX 5 Cup_15ESM1.indd 45-46 4/27/15 9:34 AM

46 47
Esta garantía le otorga derechos legales específicos y es
posible que usted tenga otros derechos que varían de
un estado, provincia o jurisdicción a otro.
Cómo solicitar el servicio en garantía
En los Estados Unidos
Si tiene alguna pregunta sobre esta garantía o desea
recibir servicio de garantía, llame al1.800.672.6333 y
podrá obtener la dirección del centro de servicio que
le resulte más conveniente.
En Canadá
Si tiene alguna pregunta sobre esta garantía o desea
recibir servicio de garantía, llame al1.800.667.8623 y
podrá obtener la dirección del centro de servicio que
le resulte más conveniente.
En los Estados Unidos, esta garantía es ofrecida por
Sunbeam Products, Inc. operando bajo el nombre de
Jarden Consumer Solutions, Boca Ratón, Florida 33431.
En Canadá, esta garantía es ofrecida por Sunbeam
Corporation (Canada) Limited operando bajo el
nombre de Jarden Consumer Solutions, 20 B Hereford
Street, Brampton, Ontario L6Y 0M1. Si usted tiene otro
problema o reclamo en conexión con este producto,
por favor escriba al Departamento de Servicio al
Consumidor.
POR FAVOR NO DEVUELVA ESTE PRODUCTO A NINGUNA
DE ESTAS DIRECCIONES NI AL LUGAR DE COMPRA.
BVMC-JWX 5 Cup_15ESM1.indd 47-48 4/27/15 9:34 AM

User Manual /Manual del Usuario
5-Cup Coffeemaker / Cafetera para 5 Tazas
JW Series / Serie JW
©2015 Sunbeam Products, Inc. doing business as Jarden
Consumer Solutions. All rights reserved. Distributed by
Sunbeam Products, Inc. doing business as Jarden Consumer
Solutions, Boca Raton, Florida 33431.
U.S. 1-800-MR COFFEE (1-800-672-6333)
Canada 1-800-667-8623
Visit us at www.mrcoffee.com
You will find exciting and entertaining tips and ideas,
including great recipes!
©2015 Sunbeam Products, Inc. operando bajo el nombre de
Jarden Consumer Solutions. Todos los derechos reservados.
Distribuido por Sunbeam Products, Inc. operando bajo el
nombre de Jarden Consumer Solutions, Boca Raton, Florida
33431.
Visítenos en www.mrcoffee.com
Ahí encontrará consejos e ideas excitantes y entretenidos,
¡incluyendo excelentes recetas!
www.mrcoffee.com
Printed in China/Impreso en China P.N. 180106
BVMC-JWX 5 Cup_15ESM1 GCDS-MRC38629-JC
BVMC-JWX 5 Cup_15ESM1.indd 1-2 4/27/15 9:34 AM