User Manual for Coffeemaker
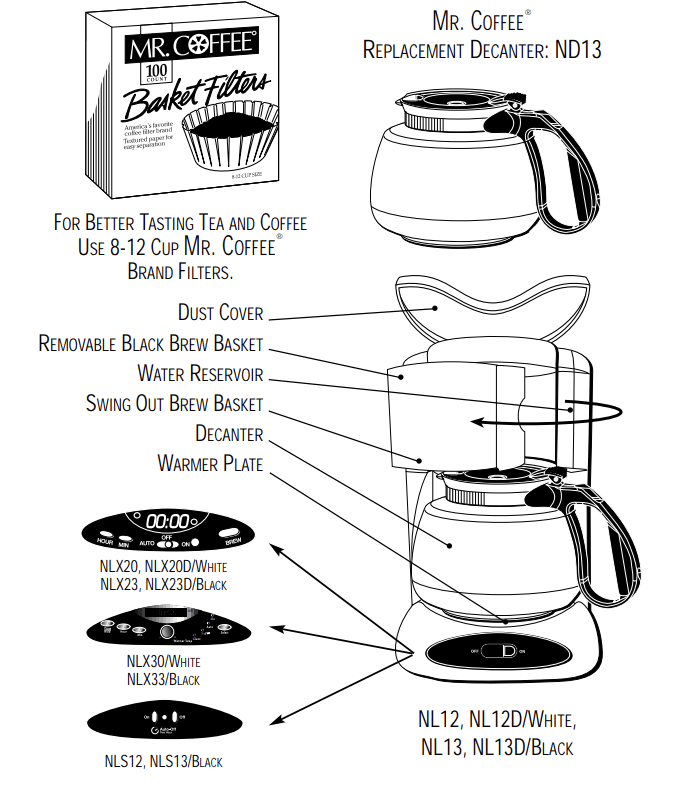
DIAGRAM OF PARTS
OPERATION AND USE
BEFORE FIRST USE
Before using your Coffeemaker for the first time, wash decanter/lid and removable brew basket (black) using a mild, non-abrasive detergent and water. Rinse each thoroughly. Follow Steps 4 – 6 (Brewing Coffee) using water, to clean the inside.
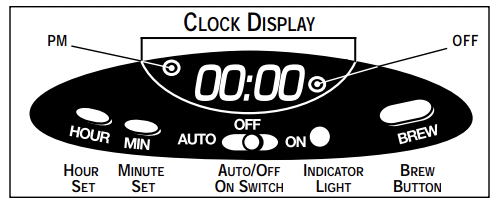
SETTING CLOCK AND TIMER (NLX20, NLX20D, NLX23, NLX23D)
NOTE: You do not have to set your clock before the Coffeemaker will operate. Plug in the power cord, slide the control lever to the “on” position. The green light will illuminate.
SETTING THE CLOCK
1. Turn the AUTO/OFF/ON switch to “OFF.”
2. Plug the power cord into your electrical outlet. The clock display will flash until you set the time.
3. Alternately press and hold the “HOUR” and “MINUTE” buttons until you reach the current time. The “PM” indicator light in the display will illuminate to indicate PM time.
PRESETTING THE BREWING TIME
1. Press and hold the “BREW” button while setting the desired brew time with the “HOUR” and “MINUTE” buttons. The “PM” indicator light in the display will illuminate to indicate PM time.
BREWING AUTOMATICALLY AT THE PRESET TIME
1. Follow Steps 1 – 5 in the “BREWING” Section.
2. Press the PRESS/HOLD button. The “AUTO” indicator light should illuminate.
3. Brewing will begin at the preset time. The coffee will remain hot in the decanter for 2 hours. To keep your coffee hot for an additional 2 hours, press the “SELECT” button. The “ON”indicator light should illuminate.
IMPORTANT: RESETTING AUTO BREW AT THE PRE-SET TIME
The programmable timer will not automatically brew the next day if left in the “AUTO” position after its last use. This is a safety feature. If the “OFF” indicator light in the lower right hand corner of the clock display is illuminated, reset “AUTO BREW” by turning the control switch to “OFF”, then to “AUTO.” (Models NLX20, NLX23, NLX20D, NLX23D Only)
BREWING COFFEE
If the clock display is flashing, refer to Section “Setting the Clock” before continuing.
1. Open the swing-out brew basket to your left. Insert a MR. COFFEE filter into the removable black inner brew basket.
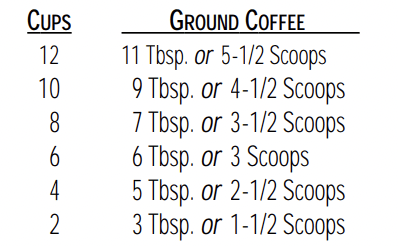
2. Add desired amount of coffee, referring to the Coffee Measurement Chart. Shake lightly to level coffee.
3. Be sure the paper filter is centered before closing the brew basket.
4. Fill the decanter with cold water to desired capacity as marked on the side of the decanter. (1cup = 5 oz).
5. Pour the water into the water reservoir. NOTE: For easy and accurate filling, refer to cup markings inside the reservoir. Place the empty decanter onto the warmer plate.
6. Turn your Coffeemaker switch to “ON”. When the coffee stops flowing, the brewing cycle is complete.
7. Carefully remove the black inner brew basket and discard the used grounds and filter. Rinse the black brew basket and replace. NOTE: Remove decanter from the warming plate before opening the swivel basket. This will prevent the drip stop valve from catching on the decanter lid.
8. To make another pot of coffee, repeat Steps 1 – 7.
9. Turn your Coffeemaker off when the decanter is empty.
WARNING: To avoid risk of personal injury or damage to property as a result of overflow, be sure the decanter is squarely centered under the brew basket during the brewing cycle. Brewed coffee and grounds, both in brew basket and decanter, are very hot. Handle with care to avoid scalding. If brew basket overflows, or if brew basket fails to drain into decanter during brew cycle, do not open or handle basket. Unplug Coffeemaker and wait for contents to cool before handling.
COFFEE MEASUREMENT CHART
FOR BEST RESULTS, USE DRIP GRIND RECOMMENDED FOR AUTOMATIC DRIP COFFEEMAKERS.
2 LEVEL TBSP. = 1 LEVEL SCOOP
1 CUP = 5 OZ. BREWED COFFEE
Use more or less coffee to suit taste.
BREWING PAUSE ’N SERVE – DRIP STOP VALVE
Our Brewing Pause ’n Serve feature allows you up to 30 seconds to pour a cup while the coffee is still brewing. It also prevents any remaining coffee in the brew basket from dripping onto the warmer plate once brew cycle is complete.
WARNING: To prevent injury from hot overflow, replace decanter within 30 seconds if removed during brewing. If the decanter is not replaced within 30 seconds, the filter basket will fill with water and overflow.
AUTOMATIC SHUT-OFF (Models NLX20, NLX20D, NLX23, NLX23D)
Your Coffeemaker will keep your coffee hot for 2 hours, then automatically shut off.
To keep your coffee hot for an additional 2 hours, slide the control switch to “OFF” and then to “ON.” When your decanter is empty, turn Coffeemaker off by turning the switch to “OFF.”
AUTOMATIC SHUT-OFF (Models NLX30, NLX33 Only)
Your Coffeemaker will keep your coffee hot for 2 hours, then automatically shut off. To keep your coffee hot for an additional 2 hours, press the SELECT button.
The ON Indicator Light should illuminate. When your decanter is empty, turn your Coffeemaker off by pressing the SELECT button. All lights should be off.
AUTOMATIC SHUT-OFF (Models NLS12, NLS13)
Your Coffeemaker will keep your coffee hot for 2 hours, then automatically shut off. To keep your coffee hot for an additional 2 hours, slide the control switch to “OFF” and then to “ON”. When your decanter is empty, turn Coffeemaker off by turning the switch to “OFF”.
BREWING 1 – 4 CUPS (Models NLX30, NLX33 Only)
If you want to brew 4 cups or less, the 1 – 4 Cup mode will slow the brewing cycle to ensure optimal saturation of the ground coffee beans. NOTE: Use only the proper amount of ground coffee and fill the water reservoir with 4 cups or less of water.
1. Press the SELECT button twice.
2. The ON and 1 – 4 Cup Indicator Lights should be illuminated.
If you want to brew 4 cups or less at a preset time, follow Steps 1 – 3 in the “Presetting Your Brewer” section.
1. Press the SELECT button twice.
2. The ON and 1 – 4 Cup Indicator Lights should be illuminated.
ADJUSTING THE WARMER PLATE TEMPERATURE (Models NLX30, NLX33 Only)
After the coffee is brewed, you can keep the coffee at your preferred temperature.
Turn the Warmer Temp knob clockwise to increase the temperature, or turn counterclockwise to decrease the temperature. To maintain a constant temperature, you may need to lower the warmer plate temperature as you decrease the amount of coffee in the pot. DO NOT allow the decanter to boil dry. This will damage the decanter.
AUDIBLE INDICATORS (Models NLX30, NLX33 Only)
When the Coffeemaker is finished brewing and your coffee is ready, your Coffeemaker will beep five times.
Just before the Coffeemaker shuts off automatically, it will beep three times.
Upon completion of the clean cycle, the Coffeemaker will beep once.
CLEANING
Your Coffeemaker must be cleaned when you begin to notice excessive steaming or the brewing time increases considerably. This condition is caused by a build-up of lime and mineral deposits from your water. If the pumping action stops before all the water has been pumped out of the machine, the appliance requires cleaning.
The frequency of cleaning depends on the hardness of water used.
The following table gives a suggested cleaning schedule.
SUGGESTED CLEANING INTERVAL
| Type of Water |
Cleaning Frequency |
| Soft Water |
Hard Water |
| Every 80 Brew Cycles |
Every 40 Brew Cycles |
Your Coffeemaker may be cleaned by using MR. COFFEE ® Cleaner or vinegar.
MR. COFFEE Cleaner is available at many retail stores or by calling the
MR. COFFEE Consumer Affairs Department at 1-800-MR COFFEE (1-800-672-6333).
CLEANING INSTRUCTIONS (Models NLX30, NLX33 Only)
Your NLX30/NLX33 Coffeemaker will notify you when cleaning is required. After one minute into the brew cycle, the electronic controls will determine if the Coffeemaker needs cleaning. If it does, the CLEAN Indicator Light will flash. If the CLEAN Indicator Light flashes, clean the Coffeemaker before the next brew cycle. Failure to clean the Coffeemaker when indicated could result in excessive steaming and increased brewing time. To clean, follow Steps 1 – 4 in the “Cleaning” Section, then press the “SELECT” button three times. When the cycle is complete, continue with Steps 6 – 8.
USING MR. COFFEE CLEANER
Read caution statement on side panel of box before use.
CLEANING
USING VINEGAR
1. Pour 1 quart of undiluted white household vinegar into Coffeemaker.
2. Place a paper filter into the black brew basket and close the swivel basket.
3. Place the empty decanter on the warming plate. Turn the Coffeemaker to “ON.” When three cups have flowed through, turn the Coffeemaker to “OFF.” Let stand for 1/2 hour.
4. After 1/2 hour, pour vinegar back into the Coffeemaker. Place the empty decanter on the warming plate.
5. Turn Coffeemaker to “ON” and let all of the vinegar run to completion.
6. Discard the vinegar and paper filter.
7. To flush out all traces of vinegar, pour decanter full of tap water into Coffeemaker, slide switch to “ON.” Allow it to cycle through.
8. Discard water and turn Coffeemaker off. Repeat Steps 7 through 8.
CLEANING THE DECANTER
DECANTER AND LID ARE TOP-RACK DISHWASHER SAFE
Hard water can leave a whitish mineral deposit inside the decanter. Coffee and tea discolor these deposits, sometimes leaving a brownish stain inside the decanter. To remove these stains, follow these easy steps.
1. Use a solution of equal parts white vinegar and hot water.
2. Let solution stand in decanter for about 20 minutes. Discard.
3. Wash and rinse decanter thoroughly using soft cloth. Do not use harsh abrasive cleaners. These may cause scratches and can lead to breakage.


