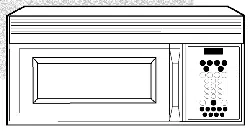
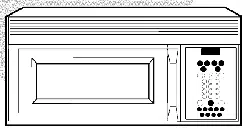
CONTROL PANEL
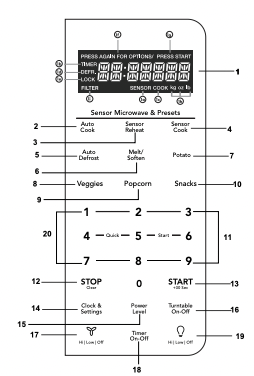
Number next to the control panel key illustration indicates pages on which there are feature descriptions and usage information.
(1) Display: The display includes a clock and indicators that show the time of day. cooking time settings. cook powers. sensor. quantities. weights and cooking functions selected.
1a. SENSOR: Icon displayed when using sensor cook.
1b. TIMER: Icon displayed when timer is being set or running.
1c. COOK: Icon displayed when starting microwave cooking.
1d. DEFR: Icon displayed when defrosting food.
1e. LOCK: Icon displayed in control lock.
1f. PRESS AGAIN FOR OPTIONS: Icon displayed when additional options are available.
1g. PRESS START: Icon displayed when a valid function can be started.
1h. kg. 02. Ib: Icon displayed when choosing the weight.
1i. FILTER: Icon displayed replace PureAir Filter.
(2) Auto Cook (P18)
(3) Sensor Reheat (5 different settings) (P14)
(4) Sensor Cook (P13)
(5) Auto Defrost (P21)
(6) Melt Soften (P17)
(7) Potato (1-4 potatoes) (P16)
(8) Veggies (P15)
(9) Popcorn (P15)
(10)Snacks (P16)
(11) Numeric pads (0 thru 9)
(12) Stop/Clear (P10)
(13) START +30 sec (P11)
(14) Clock & Settings (P10) (P25)
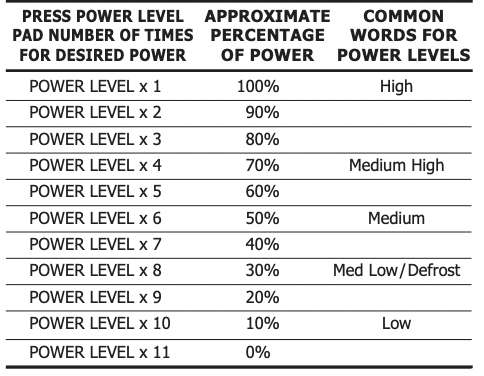
(15) Power Level (11 power levels available) (P12)
(16) Turntable (On-Off)(P28)
(17) Exhaust (High/Low/Off) ~ Use to turn the exhaust fan off. or to adjust fan speed. (P28)
(18) Timer (On-Off)(P28)
(19) Surface Light (High/Low/Off) ~ Press this pad to adjust the brightness of surface lights. (P28)
(20) Quick Start (9 instant key settings)(P10)
Note:For detailed information,please go to relative page listed above.
BEFORE OPERATING
- Before operating your new oven make sure you read and understand this Use and Care Guide completely.
- The clock can be disabled when the microwave is first plugged in and the STOP key is selected.
To re-enable the clock foll w clock instructions.
To Set the Clock
- Suppose you want to enter the correct time of day 10:59
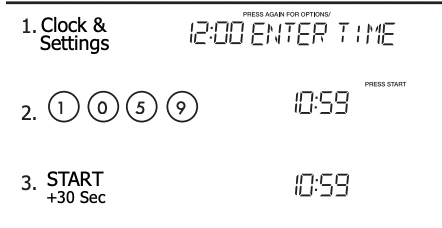
NOTE
- If you begin to enter in an incorrect time (e.g. 2:89) the 8 is an invalid digit and cannot be entered. Enter the correct time.
- If you touch
 while setting the clock, the ear display will show the last time of day set or a blank display if no time of day has been set.
STOP clear
Press the to:
- Erase if you make a mistake during programming.
- Cancel timer setting and the signal after cooking.
- Stop the oven temporarily during cooking.
- Return the time of day to the display.
- Cancel a program during cooking. press twice.
MANUAL COOKING
Time Cooking
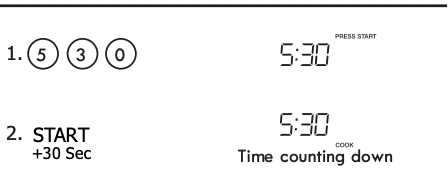
Your Over the Range Microwave Oven can be programmed for 99 minutes 99 seconds (99 :99). Always enter the seconds after the minutes. even if they are both zeros. e Suppose you want to cook for 5 minutes. 30 seconds at 100% power.
Interrupting Cooking
You can stop the oven during a cycle by opening the door The oven stops heating and the fan turns off. but the light stays on.
To restart cooking. close the door and Touch.
If you do not want to continue cooking. open the door and touch
Using One Touch Start
This is a time saving pad that will automatically start cooking 2 seconds after selected. Numeric key
1. 2. or 3 can be touched for a 1 minute. 2 minute or 3 minute automatic start cooking feature.
NOTE: “Food” will be displayed if a quick start cooking cycle or +30 sec key is not selected within 5 minutes of placing food in the microwave. You must open then close the door again to clear "Food" from the display.
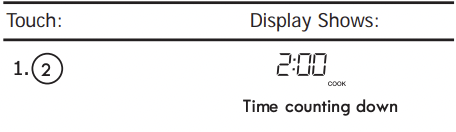
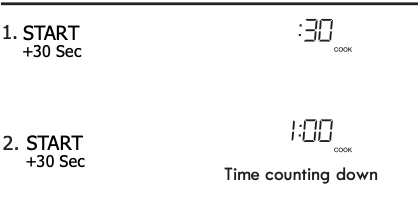
Using Add 30 Sec.
This is a time-saving pad. It is a simplified feature that lets you quickly set and start microwave cooking at 100% power.
- Suppose you want to cook for one minute.
Touch Display Shows
NOTE “Food” will be displayed if a quick start cooking cycle or +30 sec key is not selected within 5 minutes of placing food in the microwave. You must open then close the door again to clear ''Food" from the display.
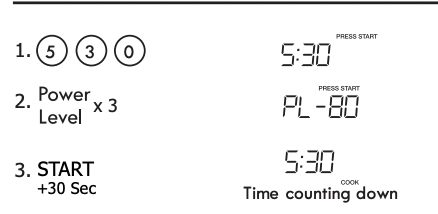
Setting Timed Cooking With Power Level
This feature lets you program a specific cook time and power. For best results, there are 10 power level settings in addition to HIGH (100%) power.
- Suppose you want to cook for minutes, 30 seconds at 80% power.
Touch Display Shows
NOTE
If you do not select a power level, the oven will automatically cook at HIGH (100%) power.
Setting Two-Stage Cooking
For best results , some recipes call for different power levels during a cook cycle . You can program your oven for two power level stages during the cooking cycle.
- Suppose you want to set a 2-stage cook cycle. The first stage is a 3 minute cook time at 80% cook power then a 7 minute cook time at 50% cook power.
Touch Display Shows
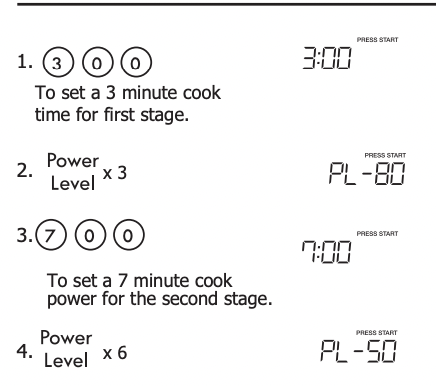
NOTE You can program a "0" power second stage for standing time inside the oven.

To Set Power Level
There are eleven preset power levels. Using lower power levels increases the cooking time which is recommended for foods such as cheese. milk and long slow cooking of meats. Consult cookbook or recipes for specific recommendations.
NOTE : DO NOT STORE THE RACK IN THE MICROWAVE WHEN NOT IN USE.
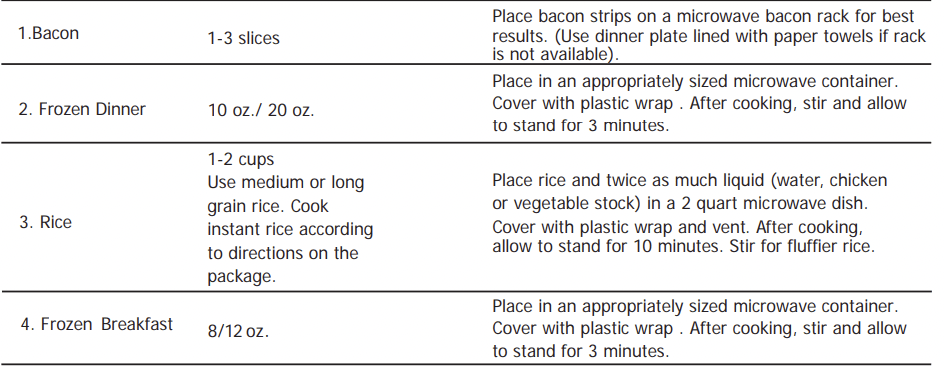
Using the Rack
The rack allows several foods to be cooked or reheated at one time. However. for the best cooking and reheating, use Turntable ON function and cook with SENSOR COOKING or AUTO COOKING without the rack. When the rack is used. set time and power level manually. Allow plenty of space around and between the dishes. Pay close attention to the cooking and reheating progress. Reposition the foods and reverse them from the rack to turntable and/or stir them at least once during any cooking or reheating time. After cooking or reheating. stir if possible. Using a lower power level will assist in better cooking and reheating uniformity.
Avoid:
- Storing the rack in the microwave oven when not in use.
- Popping popcorn with the rack in the microwave oven.
- Using any browning dish on the rack.
- Using SENSOR COOKING and AUTO COOKING with the rack.
- Cooking directly on the rack—use microwave-safe cookware.
NOTE
Turntable on/off function can be used in Manual Operation. See page 28.
Manual Defrost
If the food that you wish to defrost is not listed on the Defrost chart or is above or below the limits in the Amount column on the Defrost chart (see page 22-23). you need to defrost manually.
You can defrost any frozen food. either raw or previously cooked. by using power level for 30%. For either raw or previously cooked frozen food the rule of thumb is approximately 4 minutes per pound. For example. defrost 4 minutes for 1 pound of frozen spaghetti sauce.
Always stop the oven periodically to remove or separate the portions that are defrosted. If food is not defrosted at the end of the estimated defrosting time. program the oven in 1 minute increments on power level 30% until totally defrosted.
When using plastic containers from the freezer. defrost only long enough to remove from the plastic in order to place in a microwave-safe dish.
Sensor cooking has an electronic controlled sensor that detects the vapor (moisture and humidity) emitted from the food as it heats. The sensor adjusts the cooking times and power level for various foods and quantities automatically
Using Sensor Settings:
1. Be sure the exterior of the cooking container and the interior of the oven are dry. Wipe off any moisture with a dry cloth or paper towel.
2. The oven works with foods at normal storage tem perature. For example. popcorn would be at room temperature.
3. More or less food than the quantity listed in the chart should be cooked following the guidelines in any micro wave cookbook.
4. During the first part of SENSOR COOKING. food name will appear in the display. Do not open the oven door or press the STOP clear pad during this part of the cycle. The measurement of vapor will be interrupted.
When the sensor detects the vapor emitted from the food. remainder of cooking time will appear. Door may be opened when remaining cooking time appears in the display. At this time. you may stir or season food. as desired.
5. If the sensor does not detect vapor properly when pop ping popcorn. the oven will turn off. and the correct time of day will be displayed. If the sensor does not detect vapor properly when cooking other foods. AN ERROR CODE will be displayed. and the oven will turn off.
6. Check food for temperature after cooking. If additional time is needed. continue to cook manually.
Covering Foods:
Some foods cook better when covered.
- Casserole lid.
- Plastic wrap: Use plastic wrap recommended for microwave cooking. Cover dish loosely; allow approximately 1/2 inch to remain uncovered to allow steam to escape. Plastic wrap should not touch food.
- Wax paper: Cover dish completely; fold excess wrap under dish to secure. If dish is wider than paper. overlap two pieces at least one inch to cover.
Be careful when removing any covering to allow steam to escape away from you.
NOTES for SENSOR COOKING
1. The final cooking result will vary according to the food condition (e.g. initial temperature. shape. quality). Check food for temperature after cooking. If additional time is needed. continue to cook manually.
2. Stay near the oven while it's in use and check cooking progress frequently so that there is no chance of overcooking food.
3. When SENSOR COOKING is selected Turntable On is automatically set for optimum cooking.
Sensor Cook
You can cook foods by pressing the sensor cook pad multiple times. You don’t need to calculate cooking time or power level.
- Suppose you want to cook frozen breakfast
Touch Display Shows
1.Sensor Cook. 
2.Sensor Cook. 
3.Sensor Cook. 
4. Sensor Cook. 
5. 

SENSOR COOKING
Sensor Cook chart
FOOD AMOUNT PROCEDURE
Sensor Reheat
- Suppose you want to reheat rolls with sensor reheat.
Touch Display Shows
1. Sensor Reheat 
2. Sensor Reheat 
3. Sensor Reheat 
4. Sensor Reheat 
5. Sensor Reheat 
6. . 
Sensor Reheat chart
FOOD. AMOUNT. PROCEDURE
 ONE TOUCH COOK
Popcorn
The Popcorn quick touch pad lets you pop 3.3, 3.0, 1.75 ounce bags of commercially packaged microwave popcorn. Pop only one package at a time. If you are using a microwave popcorn popper, follow manufacturer's instructions.
- Suppose you want to pop a 3.3 oz. popcorn.
Touch Display Shows

Veggies
There are 2 options (Frozen Vegetables , Fresh Vegetables) under the Veggies.
- Suppose you want to cook two cups of frozen veggies.
Touch Display Shows

Vegetables chart
FOOD. AMOUNT. PROCEDURE
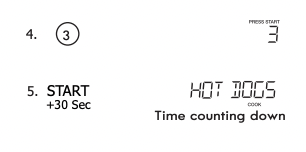
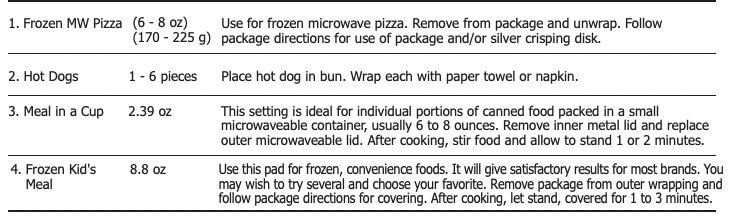
 Snack Menu
Snack Menu is for cooking/heating foods that take a short amount of time!
- Suppose you want to reheat 3 hotdogs.
Touch Display Shows

Snack Menu chart
FOOD AMOUNT PROCEDURE
Potato
• Suppose you want to cook 1 to 4 baked Potatoes.
Touch Display Shows
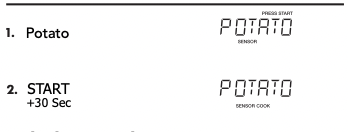
NOTES
1. Cooking times are based on an average 8 ounce potato.
Baked Potato chart
FOOD AMOUNT PROCEDURE
 * It is not necessary to enter amount or number
Setting Melt/Soften
The oven uses low power to melt and soften items. See the following table.
• Suppose you want to melt 2 sticks of Butter.
Touch Display Shows

MELT TABLE
CATEGORY. AMOUNT PROCEDURE

AUTO COOKING
Auto Cook
Auto cook is divided into 2 parts-Quick Meals (Scrambled Eggs, Hot Cereal, Frozen Pizza, Fudge Brownies) and Dinner Recipes (Garlic Shrimp, Asiago Red Potatoes, Roasted Vegetable Medley, Lemon and Shrimp Risotto, White Chicken Chili).
Key Food. Amount
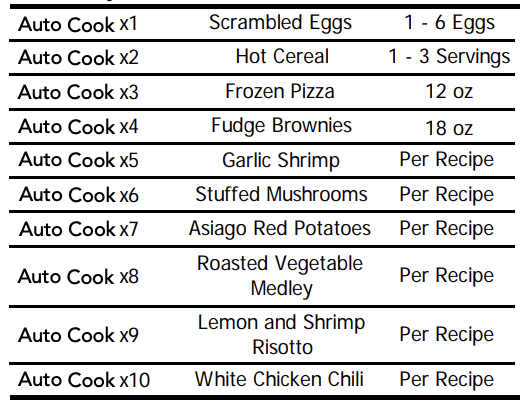
< Quick Meals>
• Suppose you want to cook Hot Cereal for 1 serving .
Touch Display Shows

NOTES When AUTO COOKING selected, Turntable On is automatically set for optimum cooking.
Quick Meals chart
FOOD AMOUNT PROCEDURE
 < Dinner Recipes >
Touch Display Shows

AUTO DEFROST
Using Auto Defrost
The auto defrost feature provides you with the best defrosting method for frozen foods. The cooking guide will show you which defrost sequence is recommended for the food you are defrosting.
For added convenience, the Auto Defrost includes a built-in beep mechanism that reminds you to check, turn over, separate, or rearrange the food in order to get the best defrost results. Three different defrosting levels are provided:
- MEAT
- POULTRY
- FISH
Available weight is 0.1-6.0 lbs
- Suppose you want to defrost 1.2 lbs of fish.
Touch Display Shows

NOTES
The oven will beep during the DEFROST cycle. At this time open the door and turn, separate, or rearrange the food. Remove any portions that have thawed. Return frozen portions to the oven and touch to resume the defrost cycle.
Operating Tips
- For best results, remove fish, shell fish, meat and poultry from its original closed paper or plastic package (wrapper). Otherwise, the wrap will hold steam and juice close to the foods, which can cause the outer surface of the foods to cook.
- For best results, roll your ground meat into a ball before freezing. During the DEFROST cycle, the microwave will signal when it is time to turn the meat over. Scrape off any excess frost from the meat and continue defrosting.
- Place foods in a shallow container or on a microwave roasting rack to catch drippings
This table shows food type selections and the weights you can set for each type. For best results, loosen or remove covering on food.

Weight conversion table
You are probably used to measuring food in pounds and ounces that are fractions of a pound (for example, 4 ounces equals 1/4 pound). However, in order to enter food weight in Auto Defrost, you must specify pounds and tenths of a pound. If the weight on the food package is in fractions of a pound, you can use the following table to convert the weight to decimals.

NOTES If between two decimal weights, choose the lower weight for the best defrosting results.
Auto Defrost Table
NOTE: Meat of irregular shape and large, fatty cuts of meat should have the narrow or fatty areas shielded with foil at the beginning of the defrost sequence.
Meat Settings
FOOD. SETTING. AT BEEP. SPECIAL INSTRUCTIONS
 Poultry Settings
FOOD. SETTING. AT BEEP. SPECIAL INSTRUCTIONS
 Fish Settings
FOOD. SETTING. AT BEEP. SPECIAL INSTRUCTIONS
 Defrosting Tips
- When using Auto Defrost. the weight to be entered is the net weight in pounds and tenths of pounds (the weight of the food minus the container).
- Before starting, make sure to remove any and all metal twist-ties that often come with frozen food bags. and replace them with strings or elastic bands.
- Open containers. such as cartons, before placing in the oven.
- Always slit or pierce plastic pouches or packaging.
- If food is foil wrapped. remove foil and place food in a suitable container.
- Slit the skin of skinned food, such as sausage.
- Bend plastic pouches of food to ensure even defrosting.
- Always underestimate defrosting time. If defrosted food is still icy in the center, return it to the microwave oven for more defrosting.
- The length of defrosting time varies according to how solidly the food is frozen.
- The shape of the package affects how quickly food will defrost. Shallow packages will defrost more quickly than a deep block.
- As food begins to defrost, separate the pieces. Separated pieces defrost more easily.
- Use small pieces of aluminum foil to shield parts of food such as chicken wings, leg tips, fish tails, or areas that start to get warm. Make sure the foil does not touch the sides, top, or bottom of the oven. The foil can damage the oven lining.
- For better results, let food stand after defrosting.
- Turn over food during defrosting or standing time. Break apart and remove food as required.
CLEANING AND CARE
Disconnect the power cord or leave the door open to deactivate the oven during cleaning. Disconnect the power cord before replacing filters and lights.
EXTERIOR
The outside surface is precoated steel and plastic. Clean the outside with mild soap and water; rinse and dry with a soft cloth. Do not use any type of household or abrasive cleaner.
DOOR
Wipe the window on both sides with a soft cloth to remove any spills or spatters. Metal parts will be easier to maintain if wiped frequently with a soft cloth. Avoid the use of spray and other harsh cleaners as they may stain, streak or dull the door surface.
EASY CARE™ STAINLESS STEEL / SMUDGE PROOF™ STAINLESS _ STEEL /BLACK STAINLESS STEEL(SOME MODELS)
Your microwave oven(some models) may have a Stainless Steel finish or coating. Clean the stainless with warm soapy water using a clean sponge or cloth. Rinse with clean water and dry with a soft clean cloth. DO NOT use ANY store bought cleaners like Stainless Steel cleaners or any other types of cleaners containing any abrasive, chlorides, chlorines or ammonia. It is recommended to use mild dish soap and water or a 50/50 solution of water and vinegar.
TOUCH CONTROL PANEL
Care should be taken in cleaning the touch control panel. If the control panel becomes soiled, open the microwave oven door before cleaning. Wipe the panel with a cloth dampened slightly with water only. Dry with a soft cloth. Do not scrub or use any sort of chemical cleaners. Close door and touch STOP/CLEAR
INTERIOR
Cleaning is easy because little heat is generated to the interior surfaces. To clean the interior surfaces. wipe with a soft cloth and warm water. DO NOT USE ABRASIVE OR HARSH CLEANERS OR SCOURING PADS. For heavier soil. use baking soda or a mild soap; rinse thoroughly with hot water. The round wire rack and shelf can be cleaned with hot soapy water. rinsed and dried.
WAVEGUIDE COVER
The waveguide cover is located on the right side in the microwave oven cavity. It is made from mica so requires special care. Keep the waveguide cover clean to assure good microwave oven performance. Carefully wipe with a damp cloth any food spatters from the surface of the cover immediately after they occur. Built-up splashes may overheat and cause smoke or possibly catch fire. DO NOT REMOVE THE WAVEGUIDE COVER.
ODOR REMOVAL
Occasionally. a cooking odor may remain in the microwave oven. To remove. combine 1 cup water. grated peel and juice of 1 lemon in a 2-cup glass measuring cup. Boil for several minutes using 100% power. Allow to set in microwave oven until cool. Wipe interior with a soft cloth.
TURNTABLE/TURNTABLE SUPPORT
The turntable and turntable support can be removed for easy cleaning. Wash them in mild. sudsy water; for stubborn stains use a mild cleanser and non-abrasive scouring sponge. They are also dishwasher-proof. Use upper wirerack of dishwasher. The turntable motor shaft is not sealed. so excess water or spills should be wiped up immediately.
Disconnect the power cord or leave the door open to deactivate the oven during cleaning. Disconnect the power cord before replacing filters and lights.
Cleaning the exhaust filters
The oven ventilation exhaust filters should be removed and cleaned often; generally at least once every month.
CAUTION : To avoid risk of personal injury or property damage, do not operate oven hood without filters properly in place.
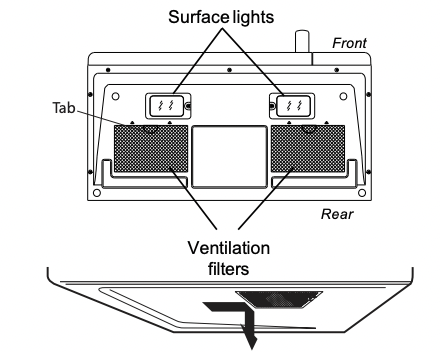
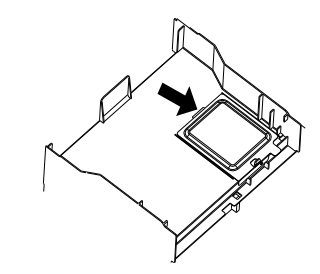
1. To remove the exhaust ventilation filters, slide the filter to the rear. Then pull filter downward and push to the other side. The filter will drop out. Repeat for the 2nd filter
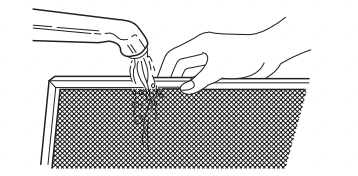
2. Soak the ventilation filters in hot water using a mild detergent. Rinse well and shake to dry or wash in a dishwasher. Do not use ammonia. The aluminum on the filter will corrode and darken.
3. To reinstall the exhaust ventilation filter, slide it into the side slot, then push up and toward oven to lock. Reinstall the 2nd filter using the same procedure.
Surface light replacement
CAUTION : To avoid risk of personal injury or property damage, wear gloves when replacing the light bulbs.
1. Unplug the microwave oven or turn off power at the main circuit breaker.
2. Remove the LED light cover mounting screws at both light positions under the microwave.
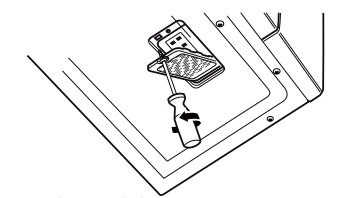
3. Remove the LED light mounting screw
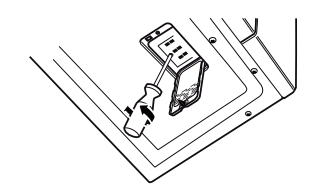
4. Unplug the LED light from the harness, replace with LED light of part # 5304499540.To order parts call 800-599-7569. Then reconnect the harness.
5. Re-install LED light and mounting screw When re-installing mounting screw be careful not to damage the LED light
6. Re-install LED light cover and mounting screw.
7. Plug the microwave back into the power supply or turn the power back on at the main circuit breaker.
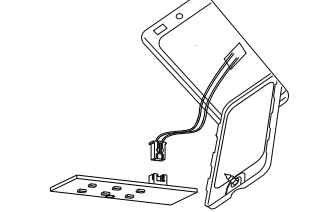
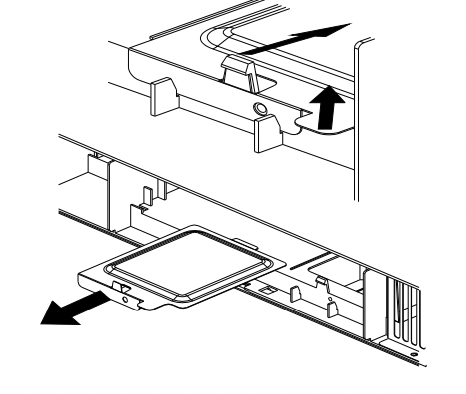
Oven light replacement
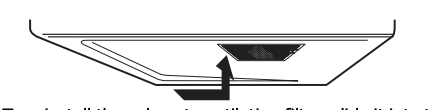
To access the light cover remove the PureAir Microwave Carbon Filter per instructions 1-4 above in the
PureAir Microwave Carbon Fitter re-placement section.
1. Open light cover located behind PureAir Microwave Carbon Filter by carefully pulling up on the front edge.
2. Remove the LED bracket and light assembly. Remove the LED light from the bracket by removing the moun ting screw and replace only with part 5304499540. To order parts call 800-599-7569.
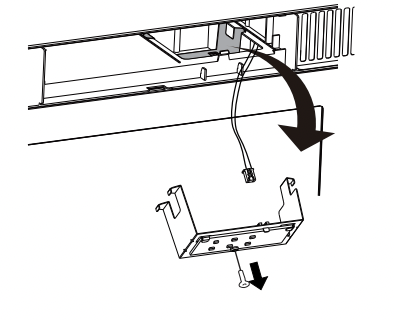
3. Re-install LED light to the bracket with mounting screw. When re-installing mounting screw be careful not to damage the LED light.
4. Reconnect LED light to the harness and place the LED light assembly back into the plastic housing.
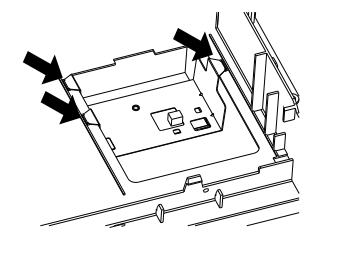
5. Replace the microwave oven light cover by carefully pushing into place (make sure the light cover rear tab is inserted into slot at rear).
6.Replace the PureAir Microwave Carbon Filter Close the vent grille door and tighten the vent grill door mounting screw.
SERVICE CALL CHECK
Please check the following before calling for service: Place one cup of water in a glass measuring cup in the microwave oven and close the door securely. Operate the microwave oven for one minute at HIGH 100%.
A Does the microwave oven light come on? YES ____ NO ____
B Does the cooling fan work? (Put your hand on the louver above the .) YES ____ NO ____
C Does the turntable rotate? (It is normal for the turntable to turn in either direction.) YES ____ NO ____
D Is the water in the microwave oven warm? YES ____ NO ____
If “NO” is the answer to any of the above questions, please check electrical outlet, fuse and/or circuit breaker. If they are functioning properly, CONTACT YOUR NEAREST ELECTROLUX AUTHORIZED SERVICER.
A microwave oven should never be serviced by a “do-it-yourself” repair person
NOTES: If time appearing in the display is counting down very rapidly, check Demonstration Mode on page 27.