Documents: Go to download!
User Manual
- User Manual - (English, French)
- Energy Guide - (English)
- Preparing
- Using the button
- Mounting on a wall
- Connections (Notifications)
- Remote control
- Troubleshooting
Table of contents
Owner Manual Televisions


Preparing
NOTE: (Depending upon model)
- If the TV is turned on for the first time after it was shipped from the factory, initialization of the TV may take a few minutes.
- Image shown may differ from your TV.
- Your TV’s OSD (On Screen Display) may differ slightly from that shown in this manual.
- The available menus and options may differ from the input source or product model that you are using.
- New features may be added to this TV in the future.
- The items supplied with your product may vary depending upon the model.
- Product specifications or contents of this manual may be changed without prior notice due to upgrade of product functions.
- For an optimal connection, HDMI cables and USB devices should have bezels less than 10 mm (0.3 inches) thick and 18 mm (0.7 inches) width.
- Use an extension cable that supports USB 2.0 if the USB cable or USB flash drive does not fit into your TV’s USB port.
- Use a certified cable with the HDMI logo attached. If you do not use a certified HDMI cable, the screen may not display or a connection error may occur.
- Recommended HDMI cable types
- High-Speed HDMI® /™ cable
- High-Speed HDMI® /™ cable with Ethernet

- This Smart TV is for VOD (Video On Demand) service, some smart functions may not be supported including web browser.
CAUTION
- Do not use any unapproved items to ensure the safety and product’s lifespan.
- Any damages or injuries by using unapproved items are not covered by the warranty.
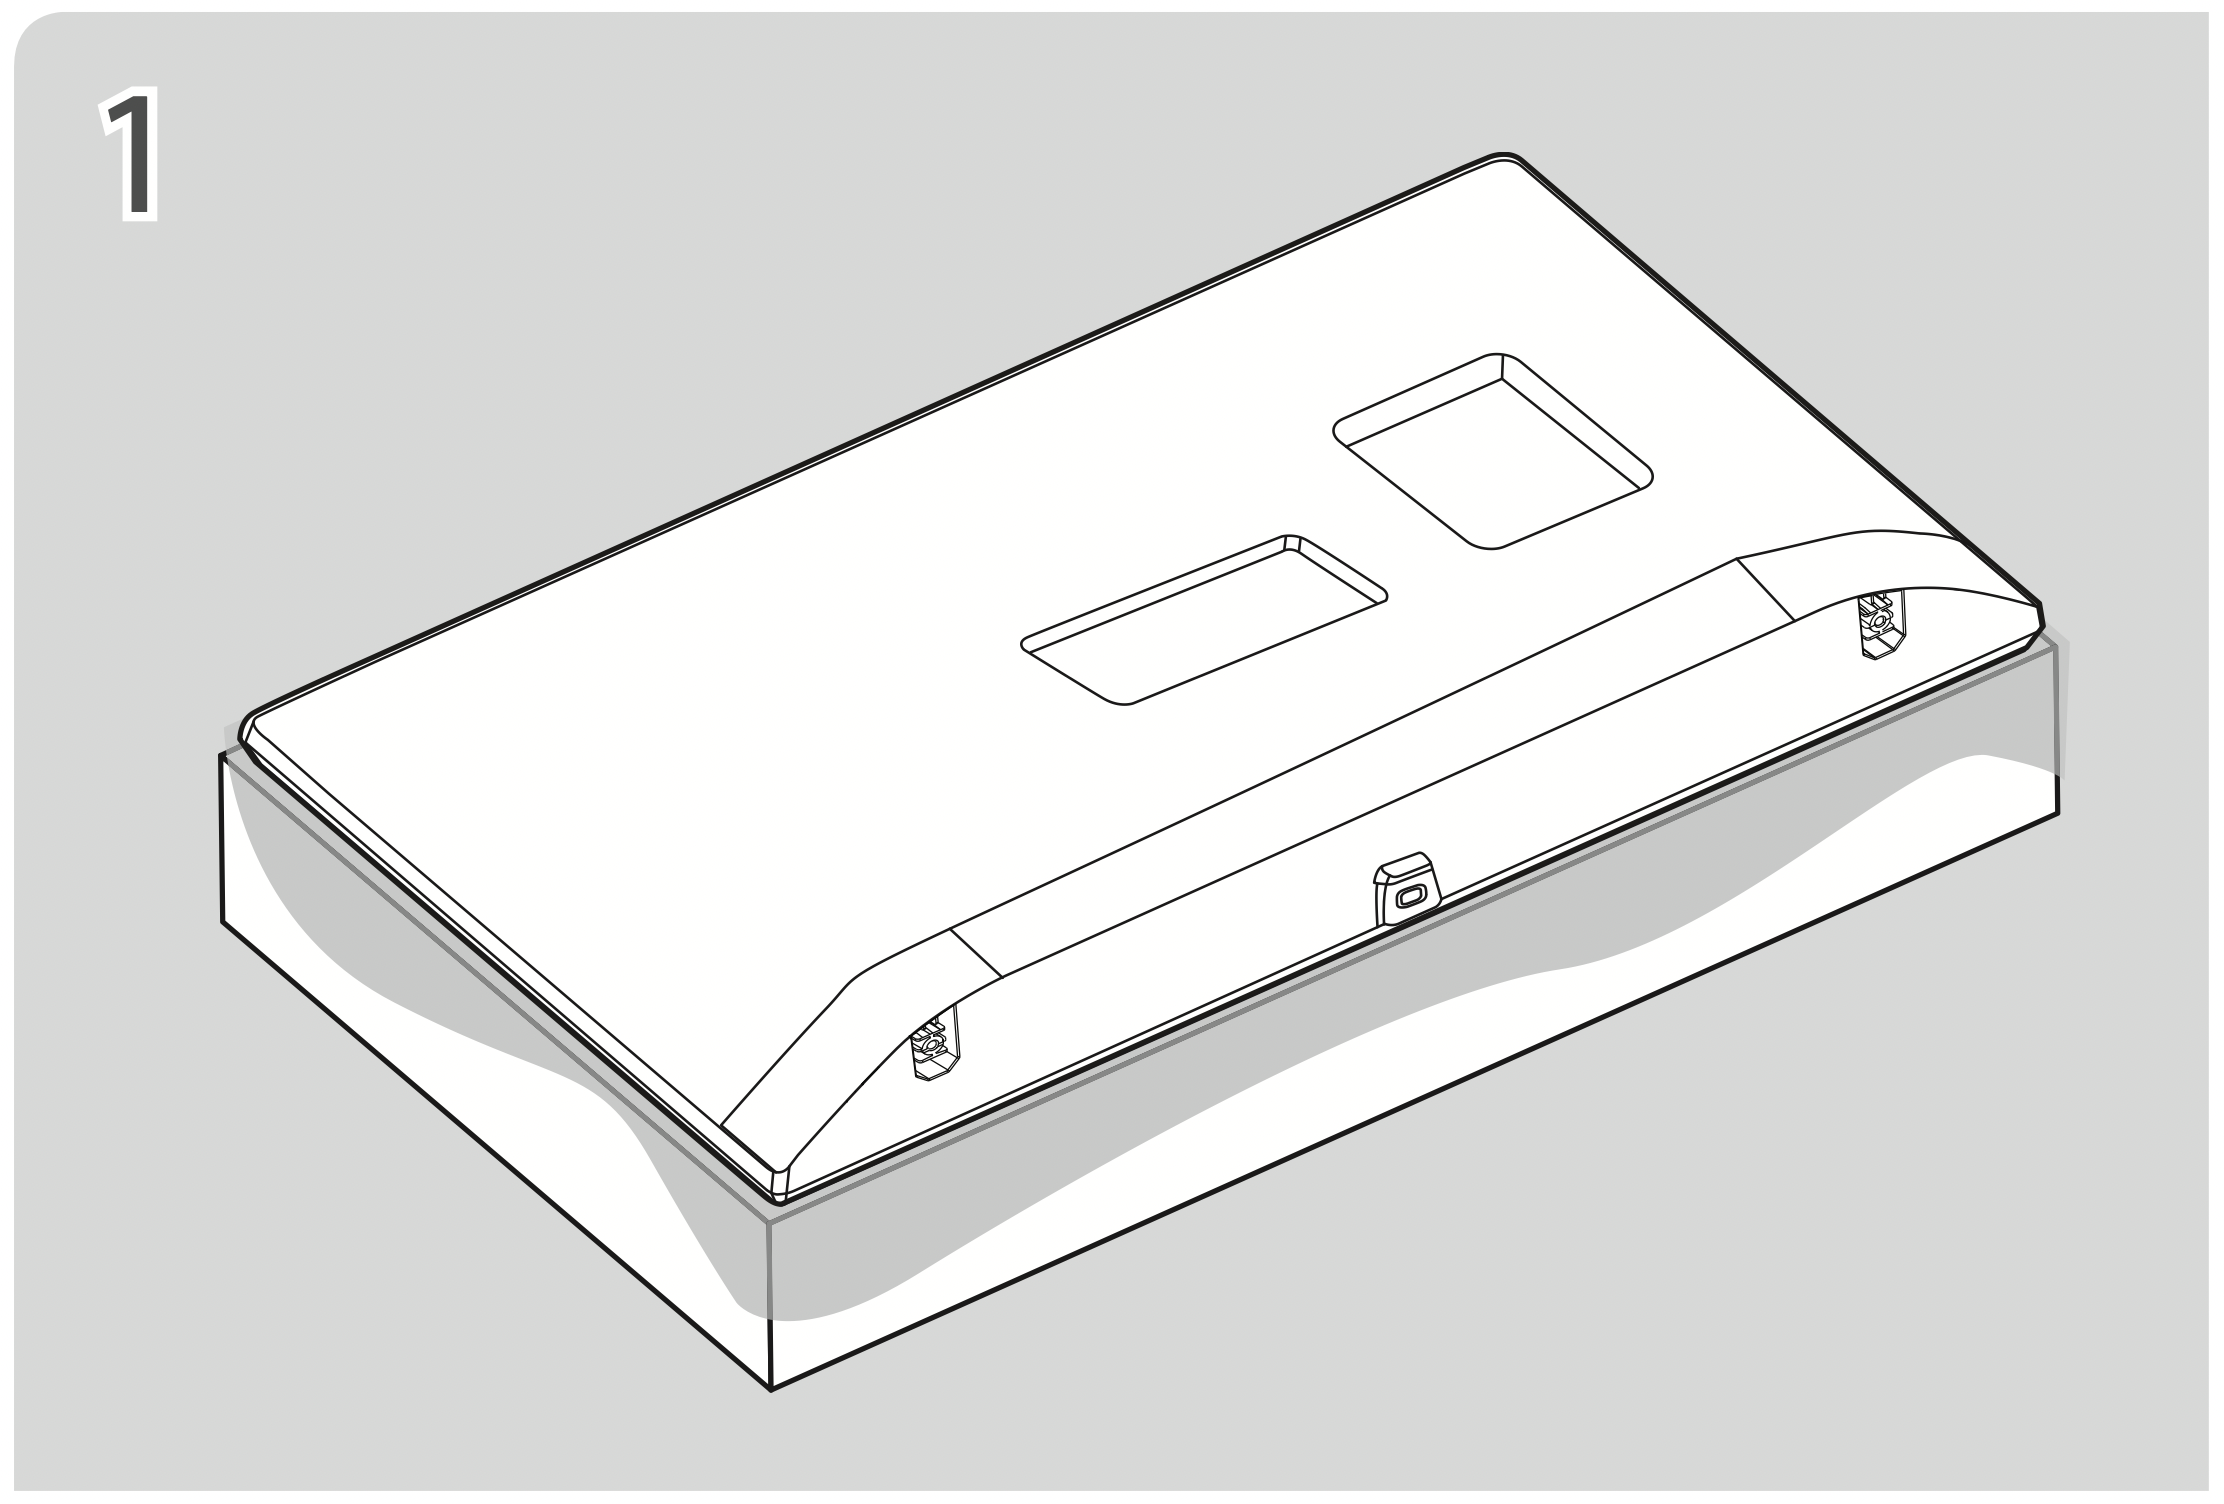
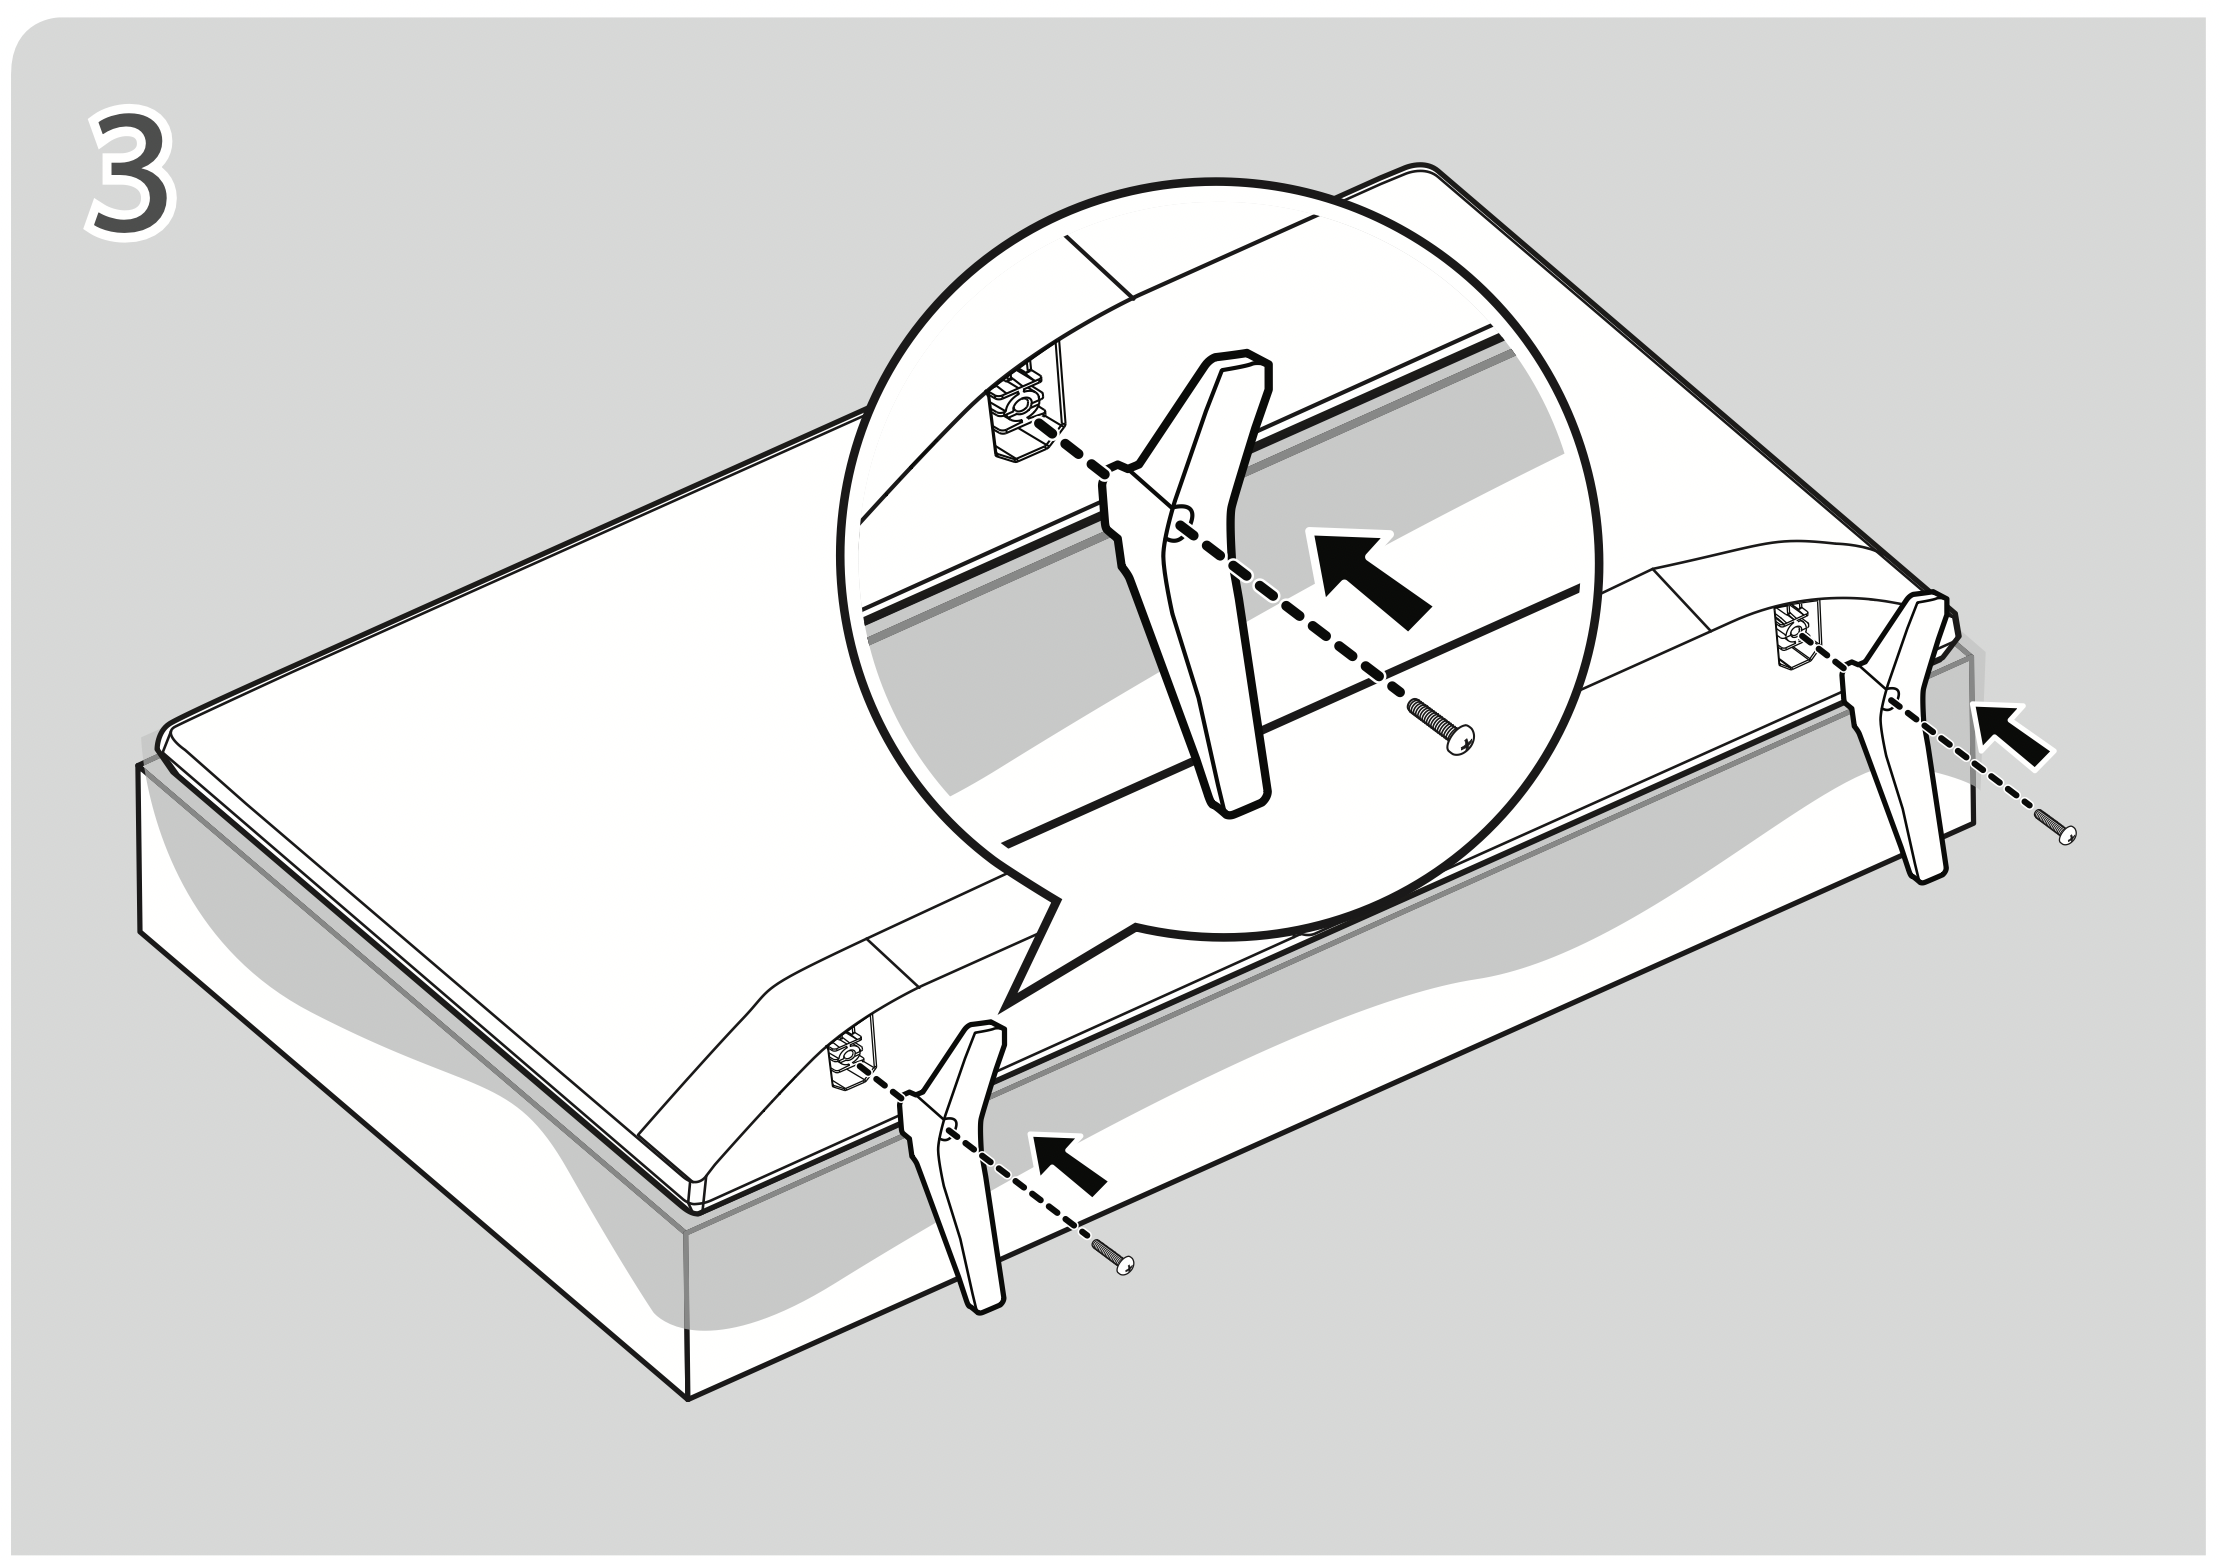
- When attaching the stand to the TV set, place the screen facing down on a cushioned table or flat surface to protect the screen from scratches.
Using the button
You can simply operate the TV functions, using the button.
- Image shown may differ from your TV.
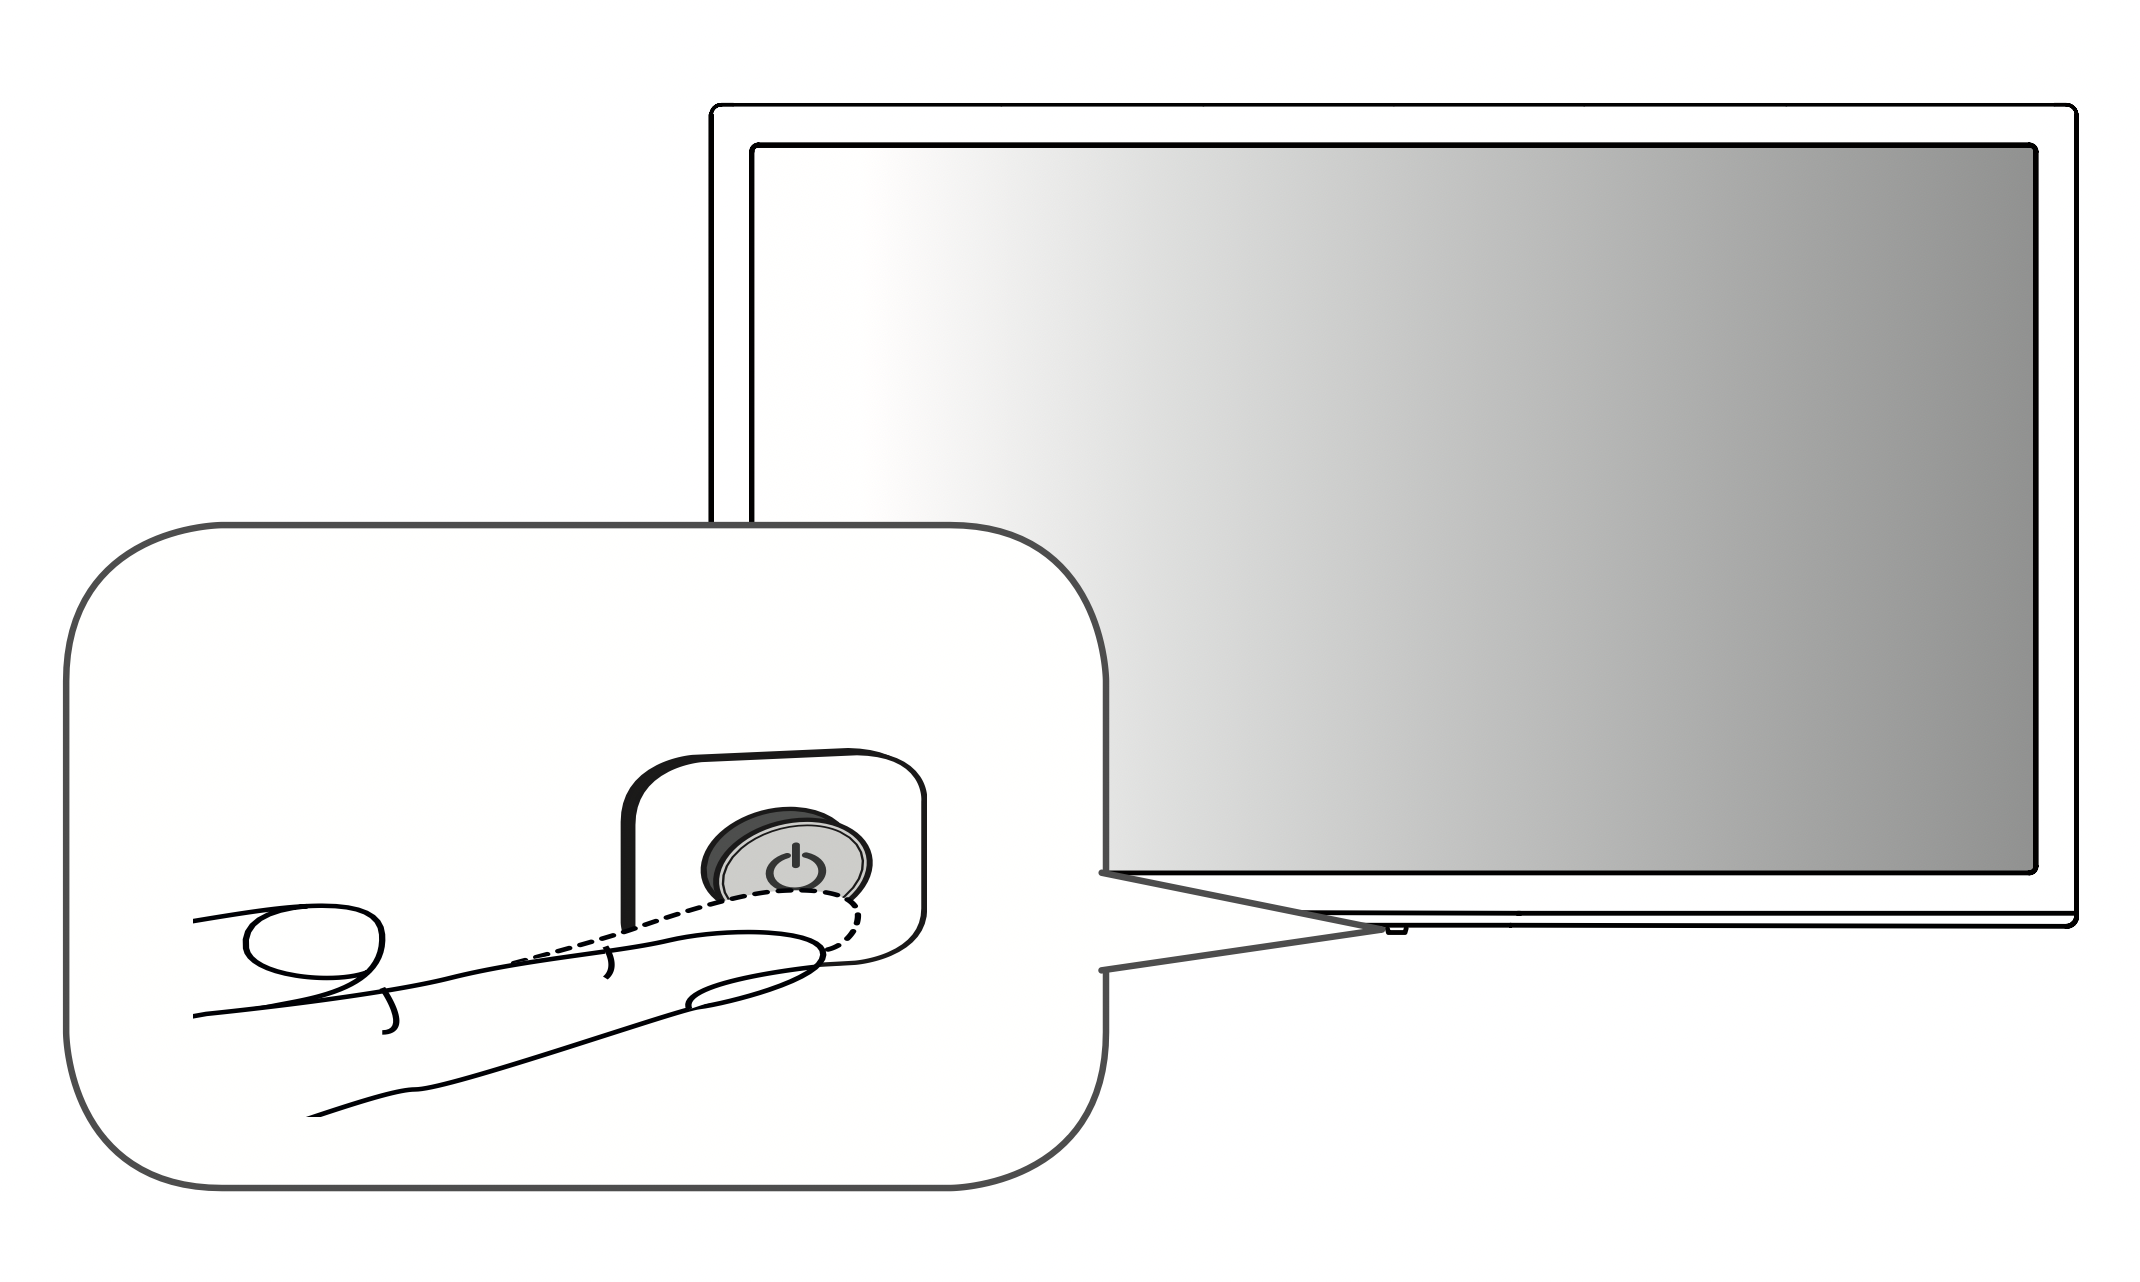
Basic Functions
Power On (Press)
Power Off1 (Press and hold)
Menu Control (Press2 )
Menu Selection (Press and Hold3 )
- All running apps will close.
- You can access and adjust the menu by pressing the button when TV is on.
- You can use the function when you access menu control.
Adjusting the Menu
When the TV is turned on, press the button one time. You can adjust the menu items using the buttons.
Mounting on a table
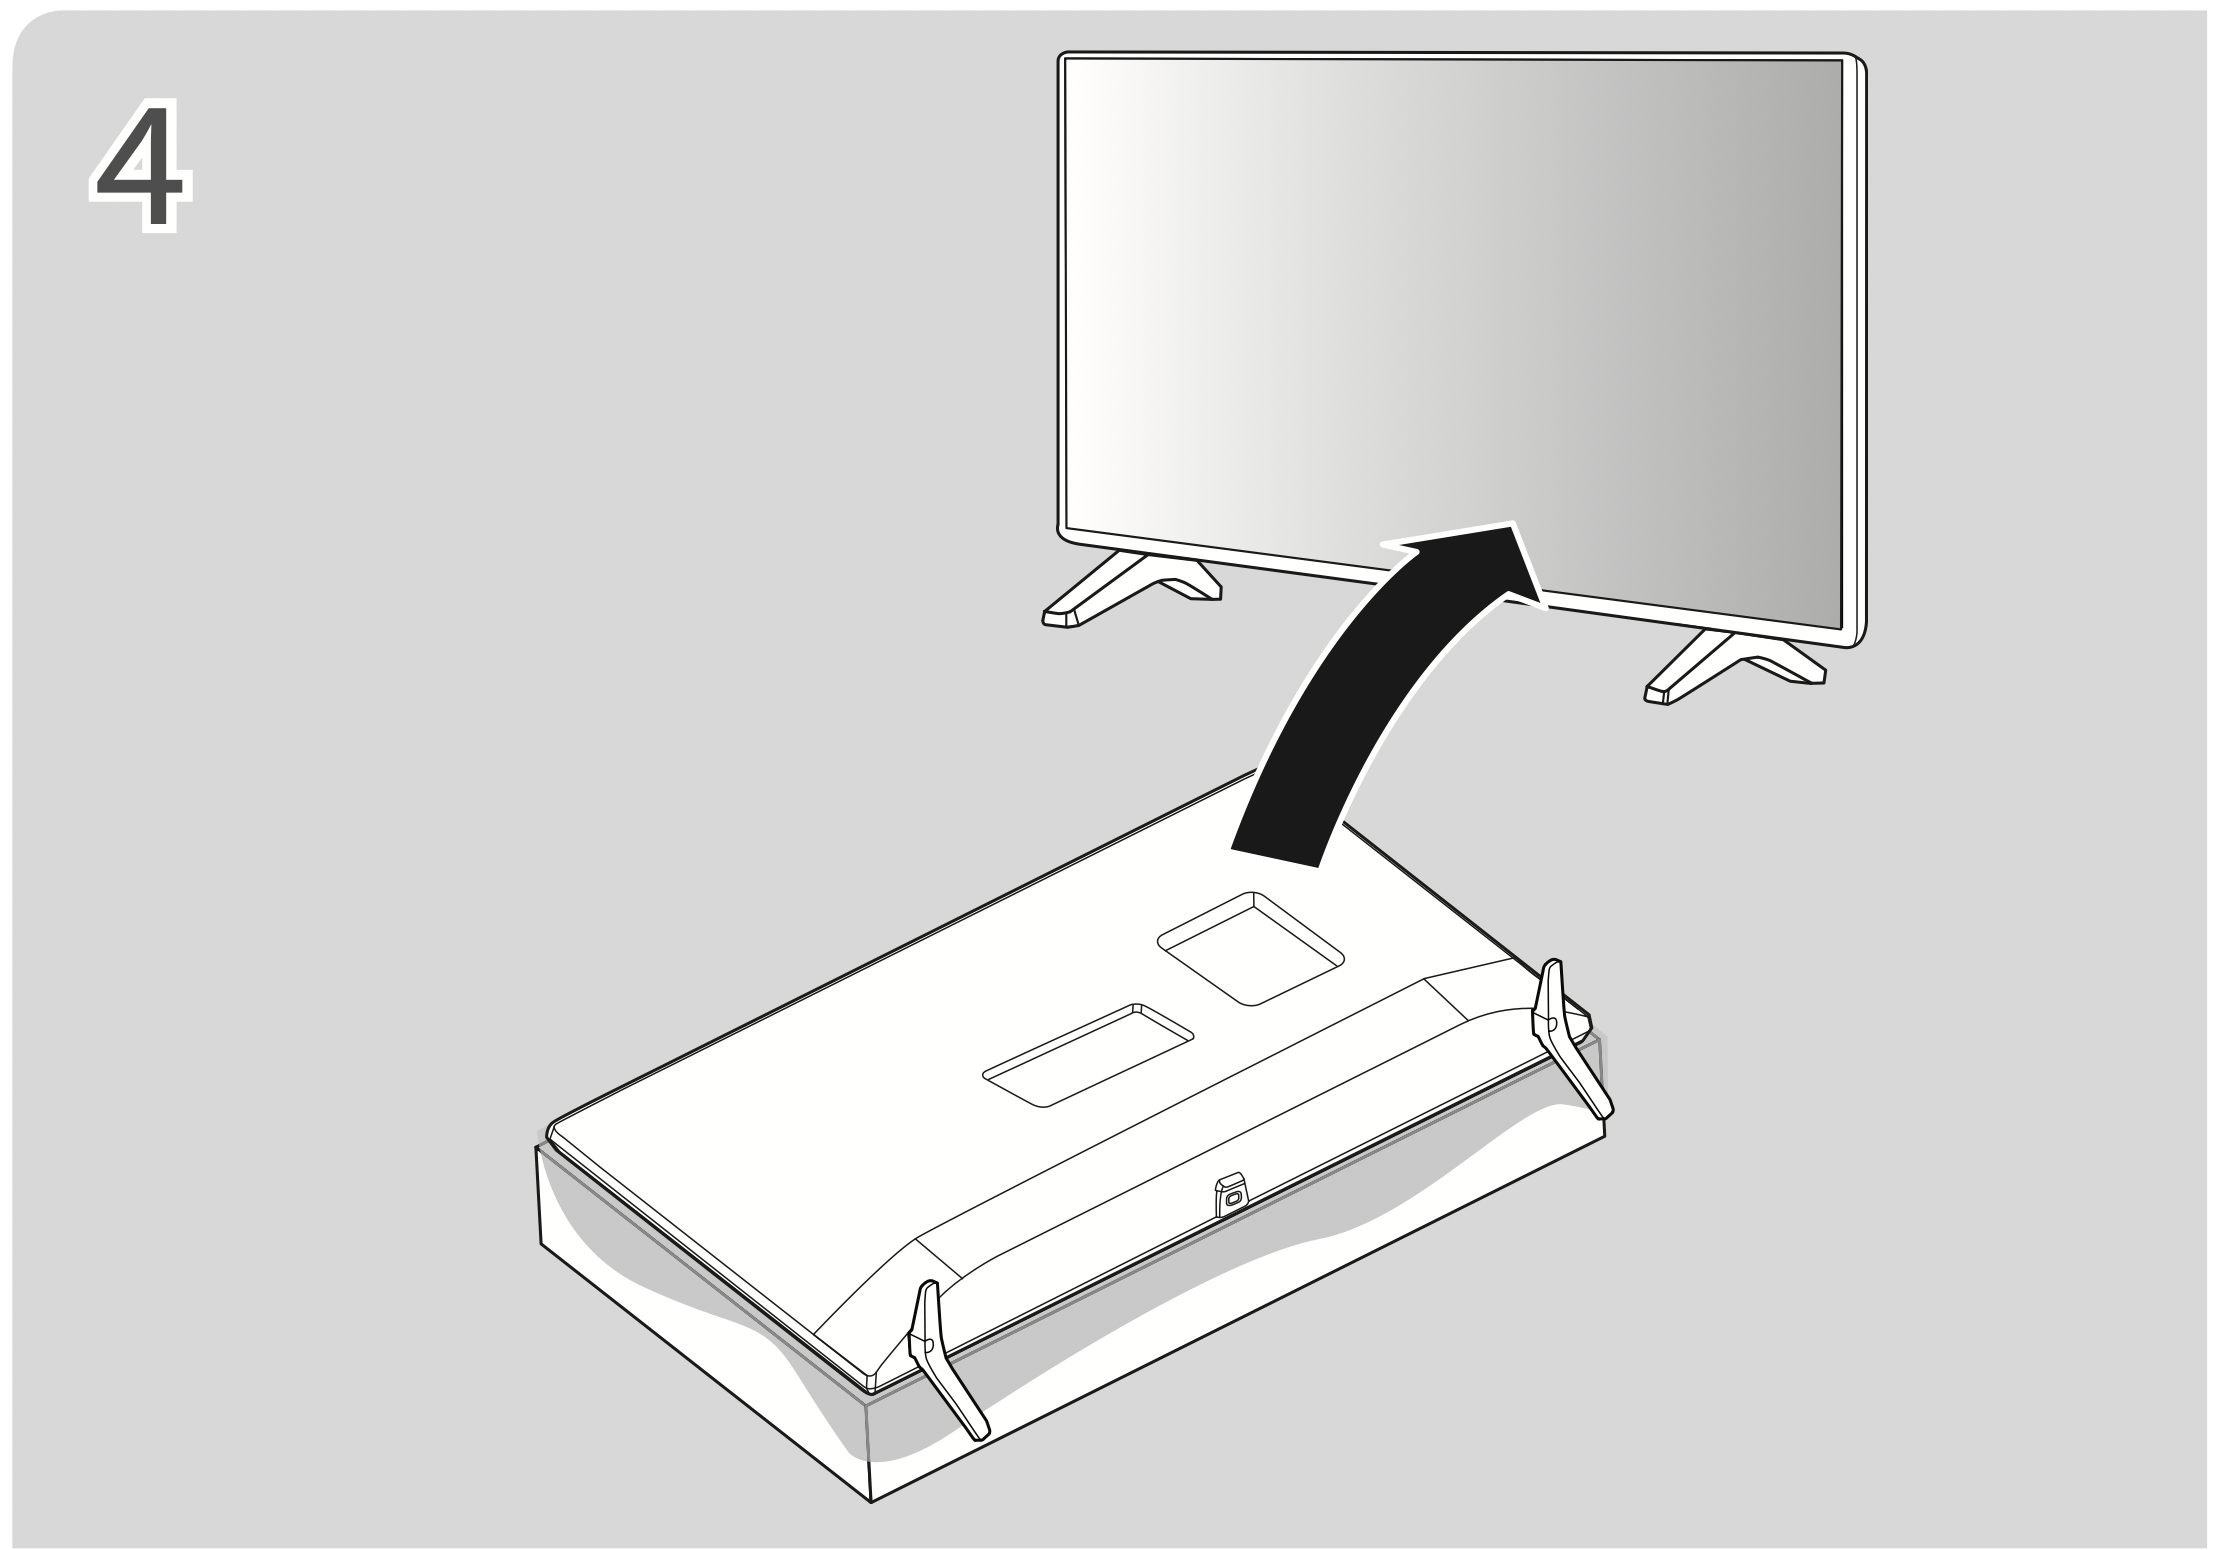
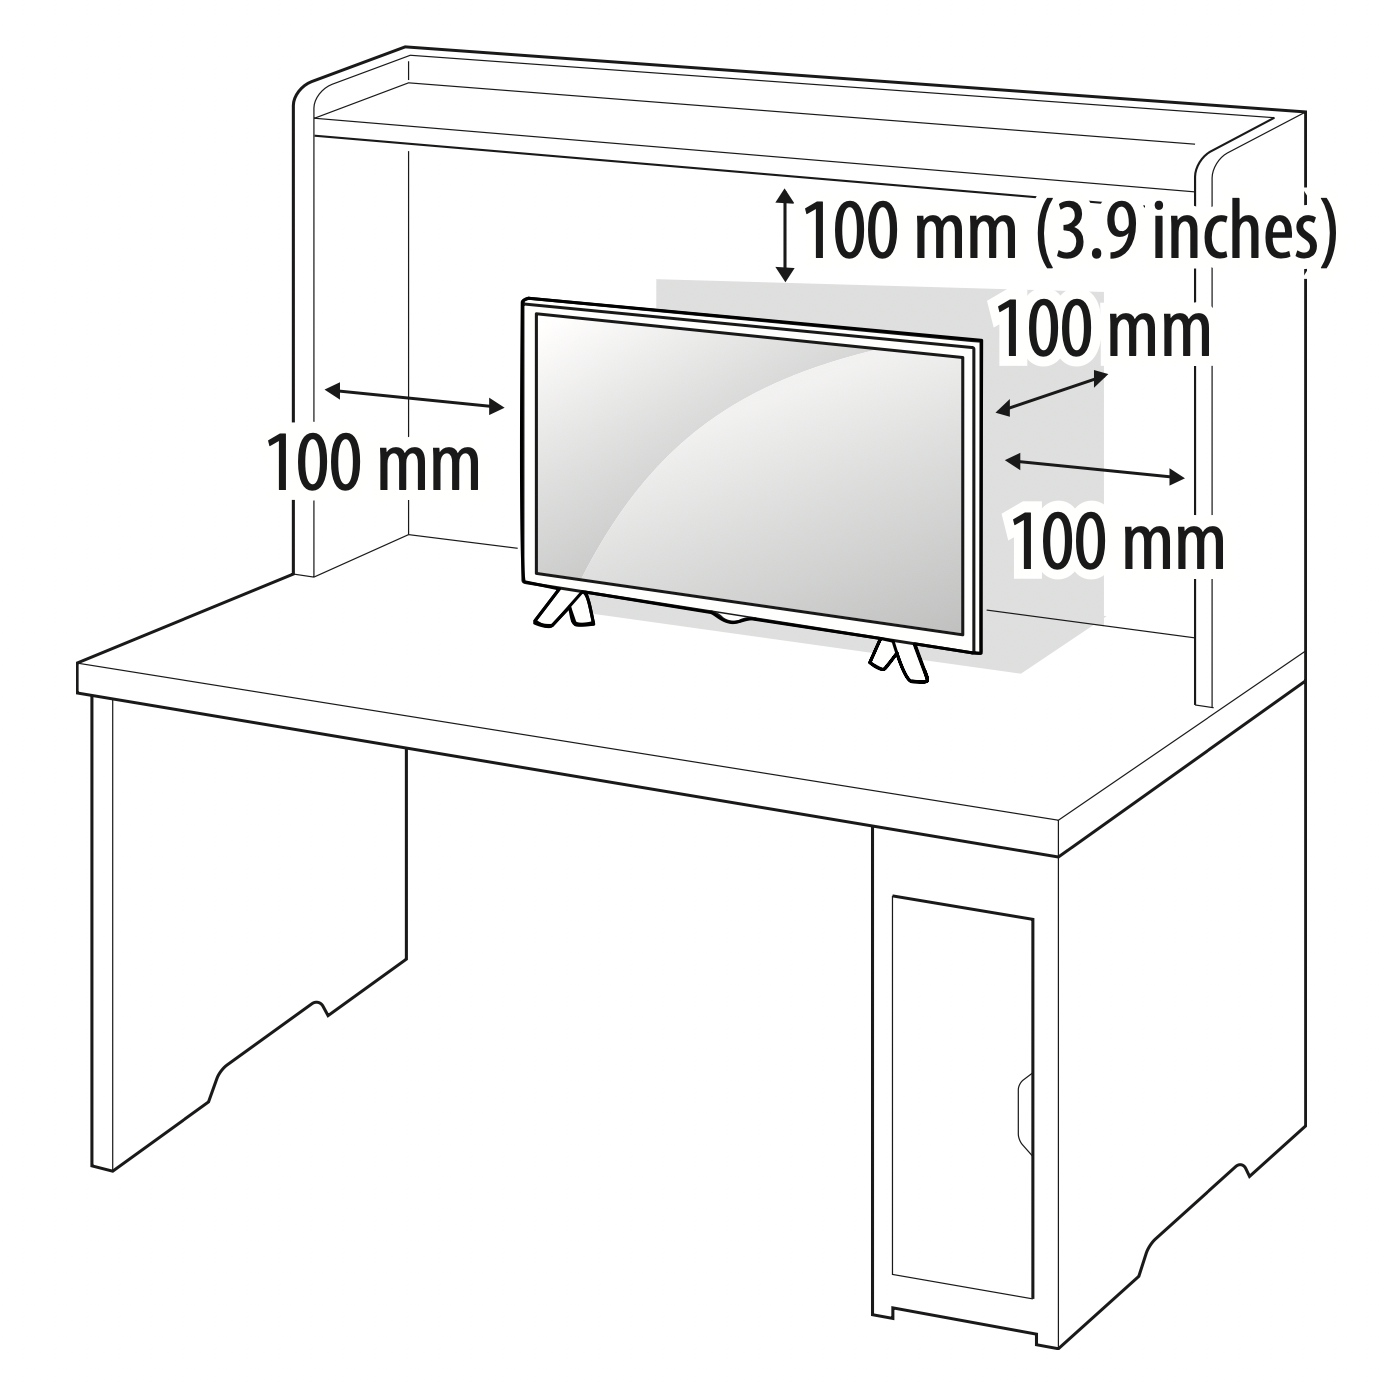
- Lift and tilt the TV into its upright position on a table.
Leave a 100 mm (3.9 inches) (minimum) space from the wall for proper ventilation.
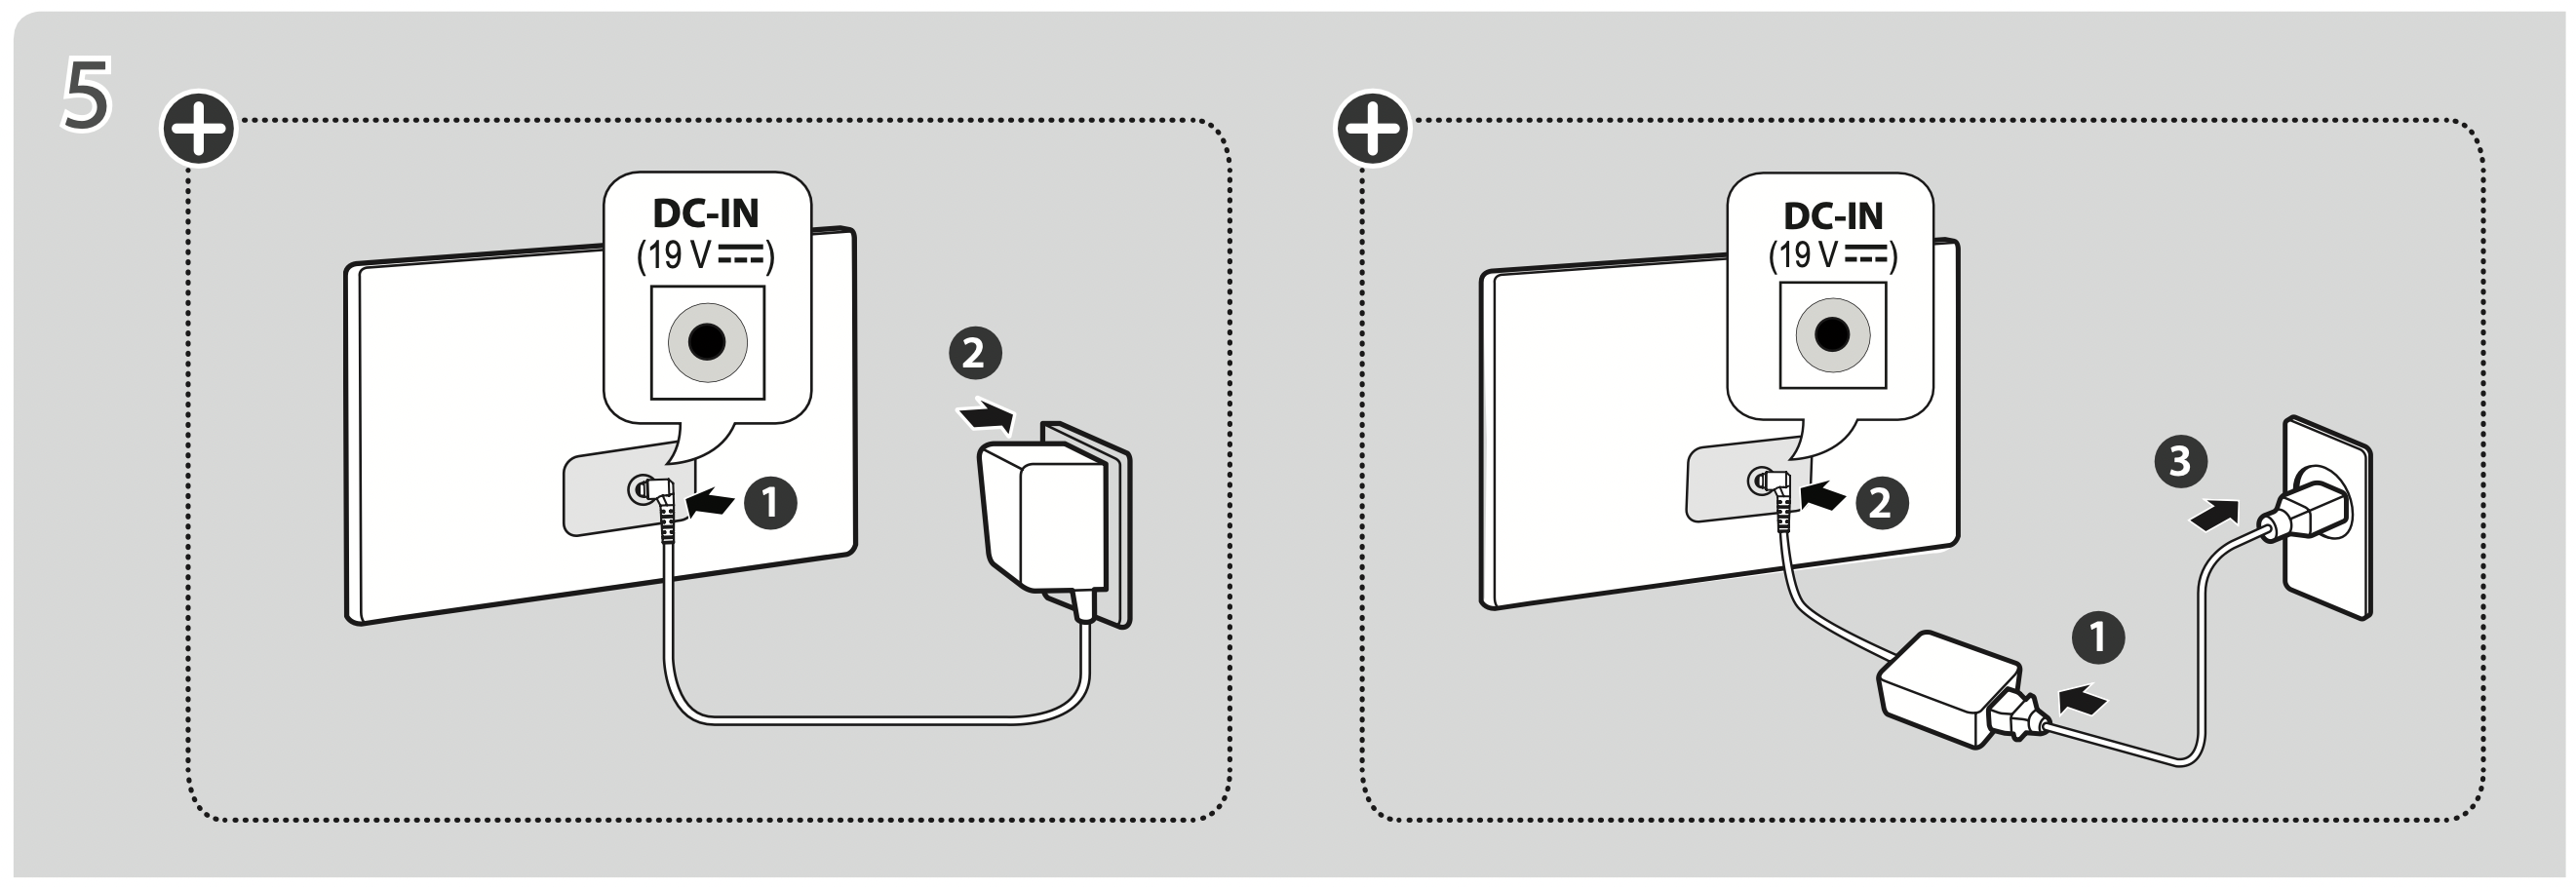
- Connect the AC-DC Adapter and Power Cord to a wall outlet.
CAUTION
- Do not place the TV near or on sources of heat, as this may result in fire or other damage.
- Please be sure to connect the TV to the AC/DC power adapter before connecting the TV’s power plug to a wall power outlet.
Using the kensington security system (optional)
(This is not available for all models.)
- Image shown may differ from your TV.
See other models: 34WN750-B F1281TD5 FH496AD5 55LH604V FDJ608W
The Kensington security system connector is located at the rear of the TV.
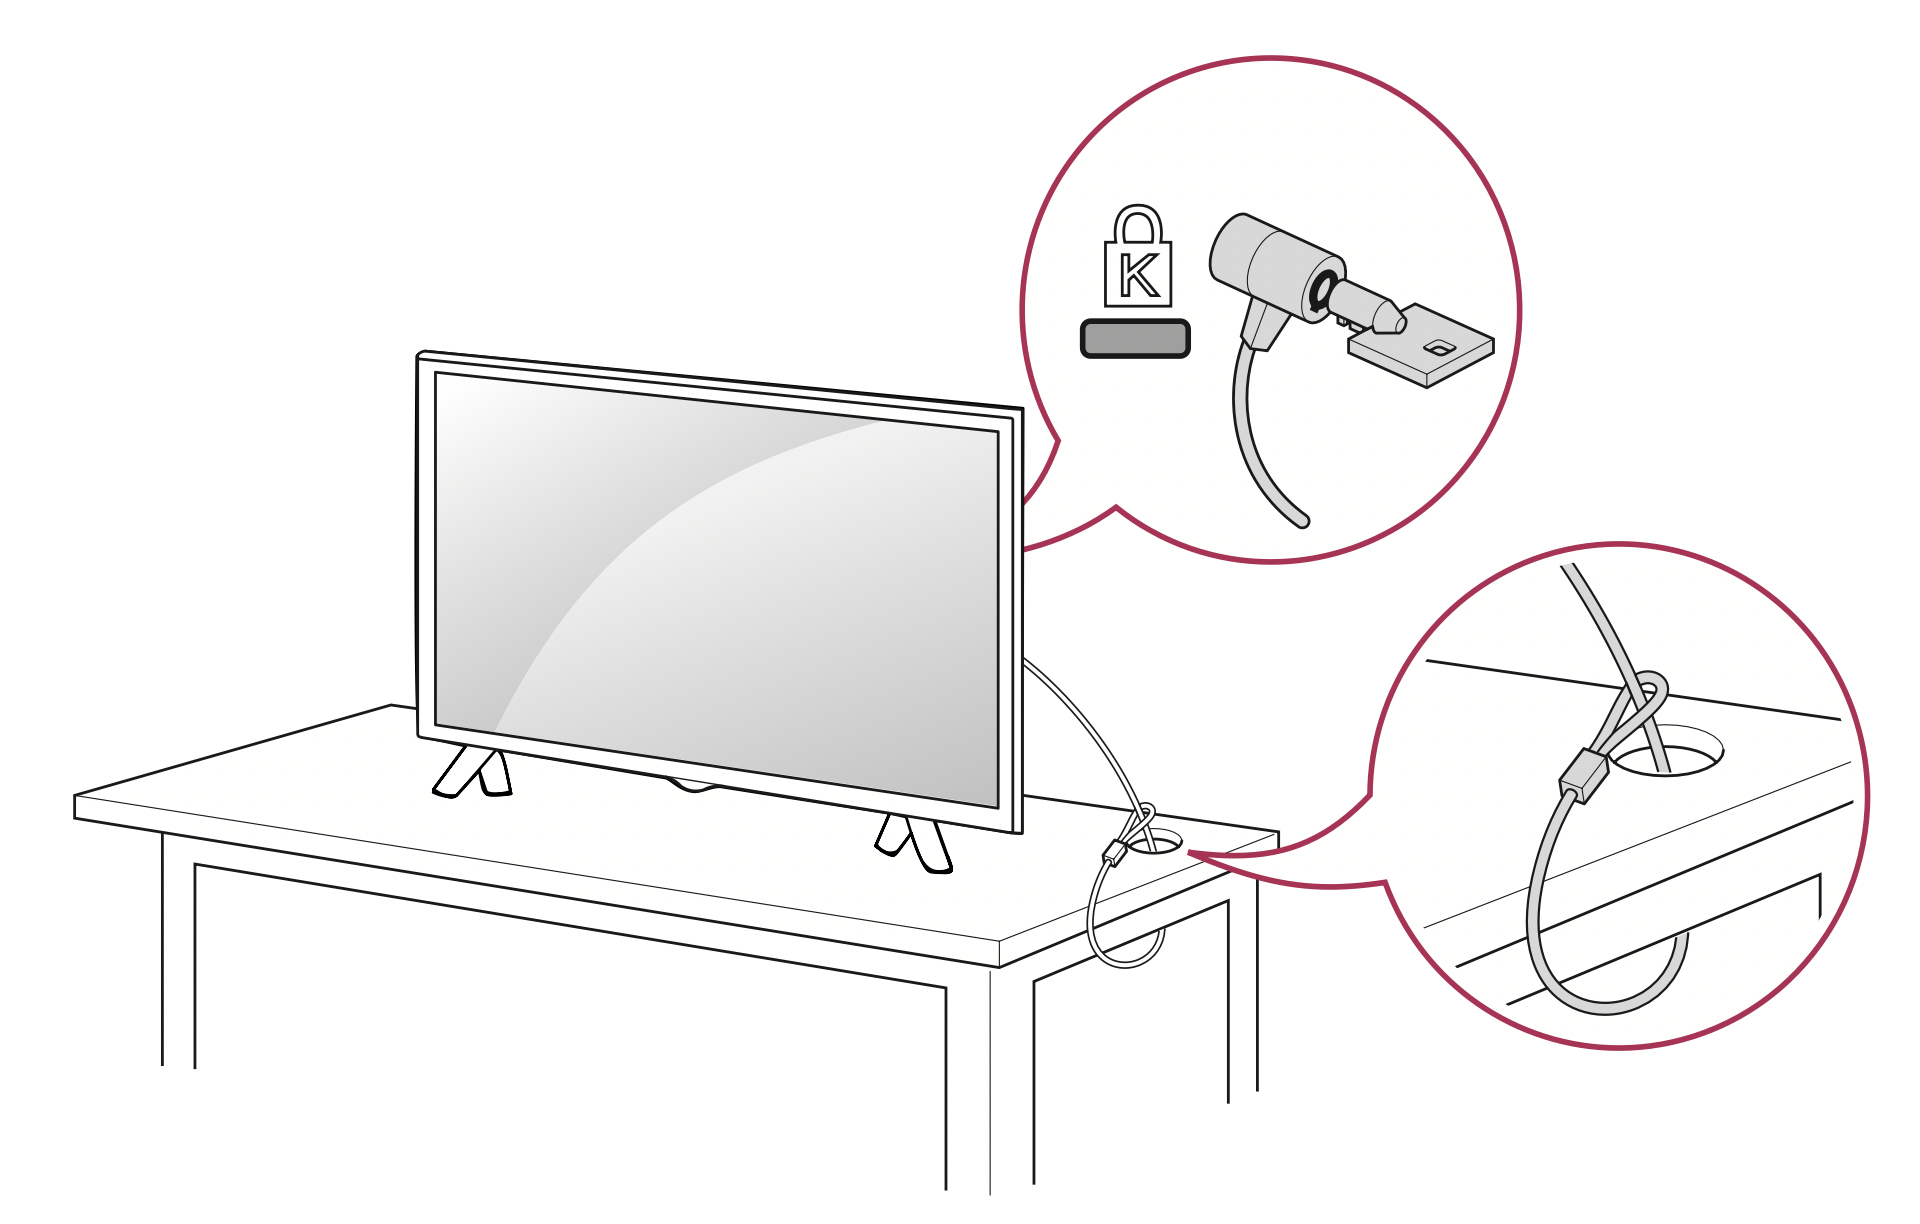
NOTE: The Kensington security system is optional. You can obtain additional accessories from your local dealer.
Mounting on a wall
An optional wall mount can be used with your LG Television. Consult with your local dealer for a wall mount that supports the VESA standard used by your TV model. Carefully attach the wall mount bracket at the rear of the TV. Install the wall mount bracket on a solid wall perpendicular to the floor. If you are attaching the TV to other building materials, please contact qualified personnel to install the wall mount. Detailed instructions will be included with the wall mount. We recommend that you use an LG brand wall mount. The LG wall mount is easy to adjust or to connect the cables. When you do not use LG’s wall mount bracket, use a wall mount bracket where the device is adequately secured to the wall with enough space to allow connectivity to external devices. If you are using a non-adjustable mount, attach the mount to the wall. Attach the cables to the TV first, then attach the TV to the mount.
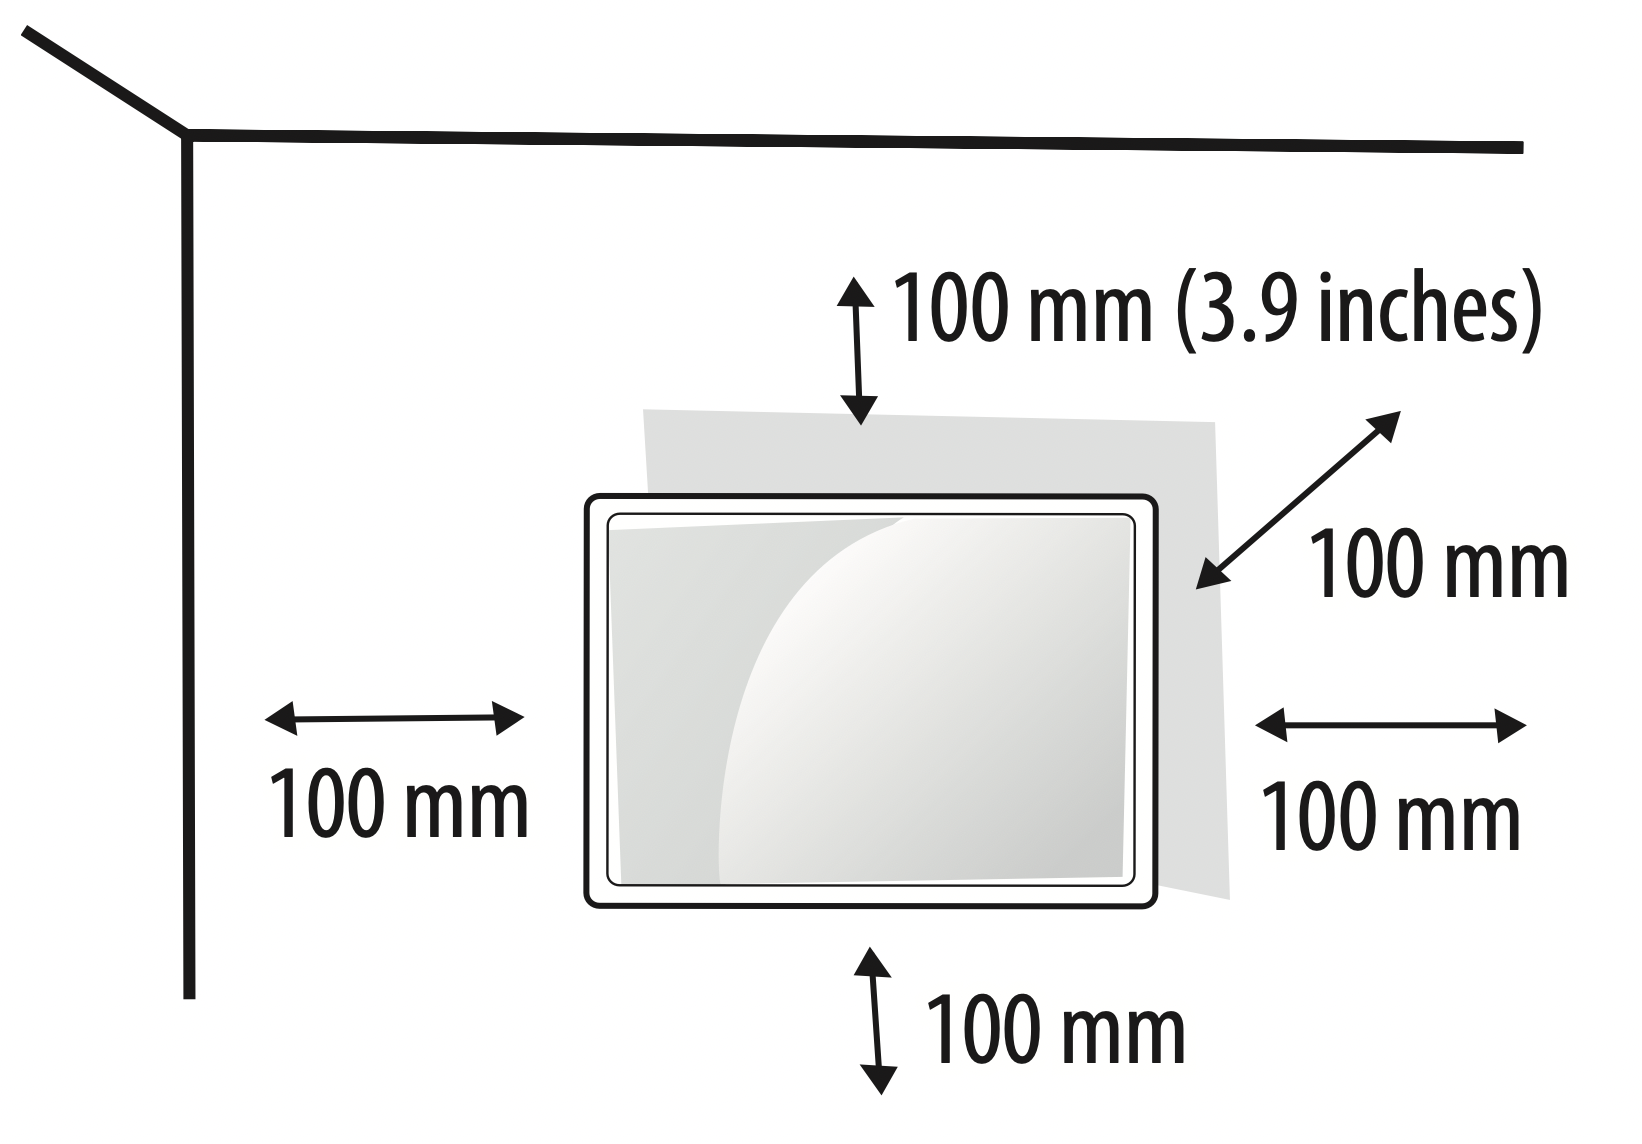
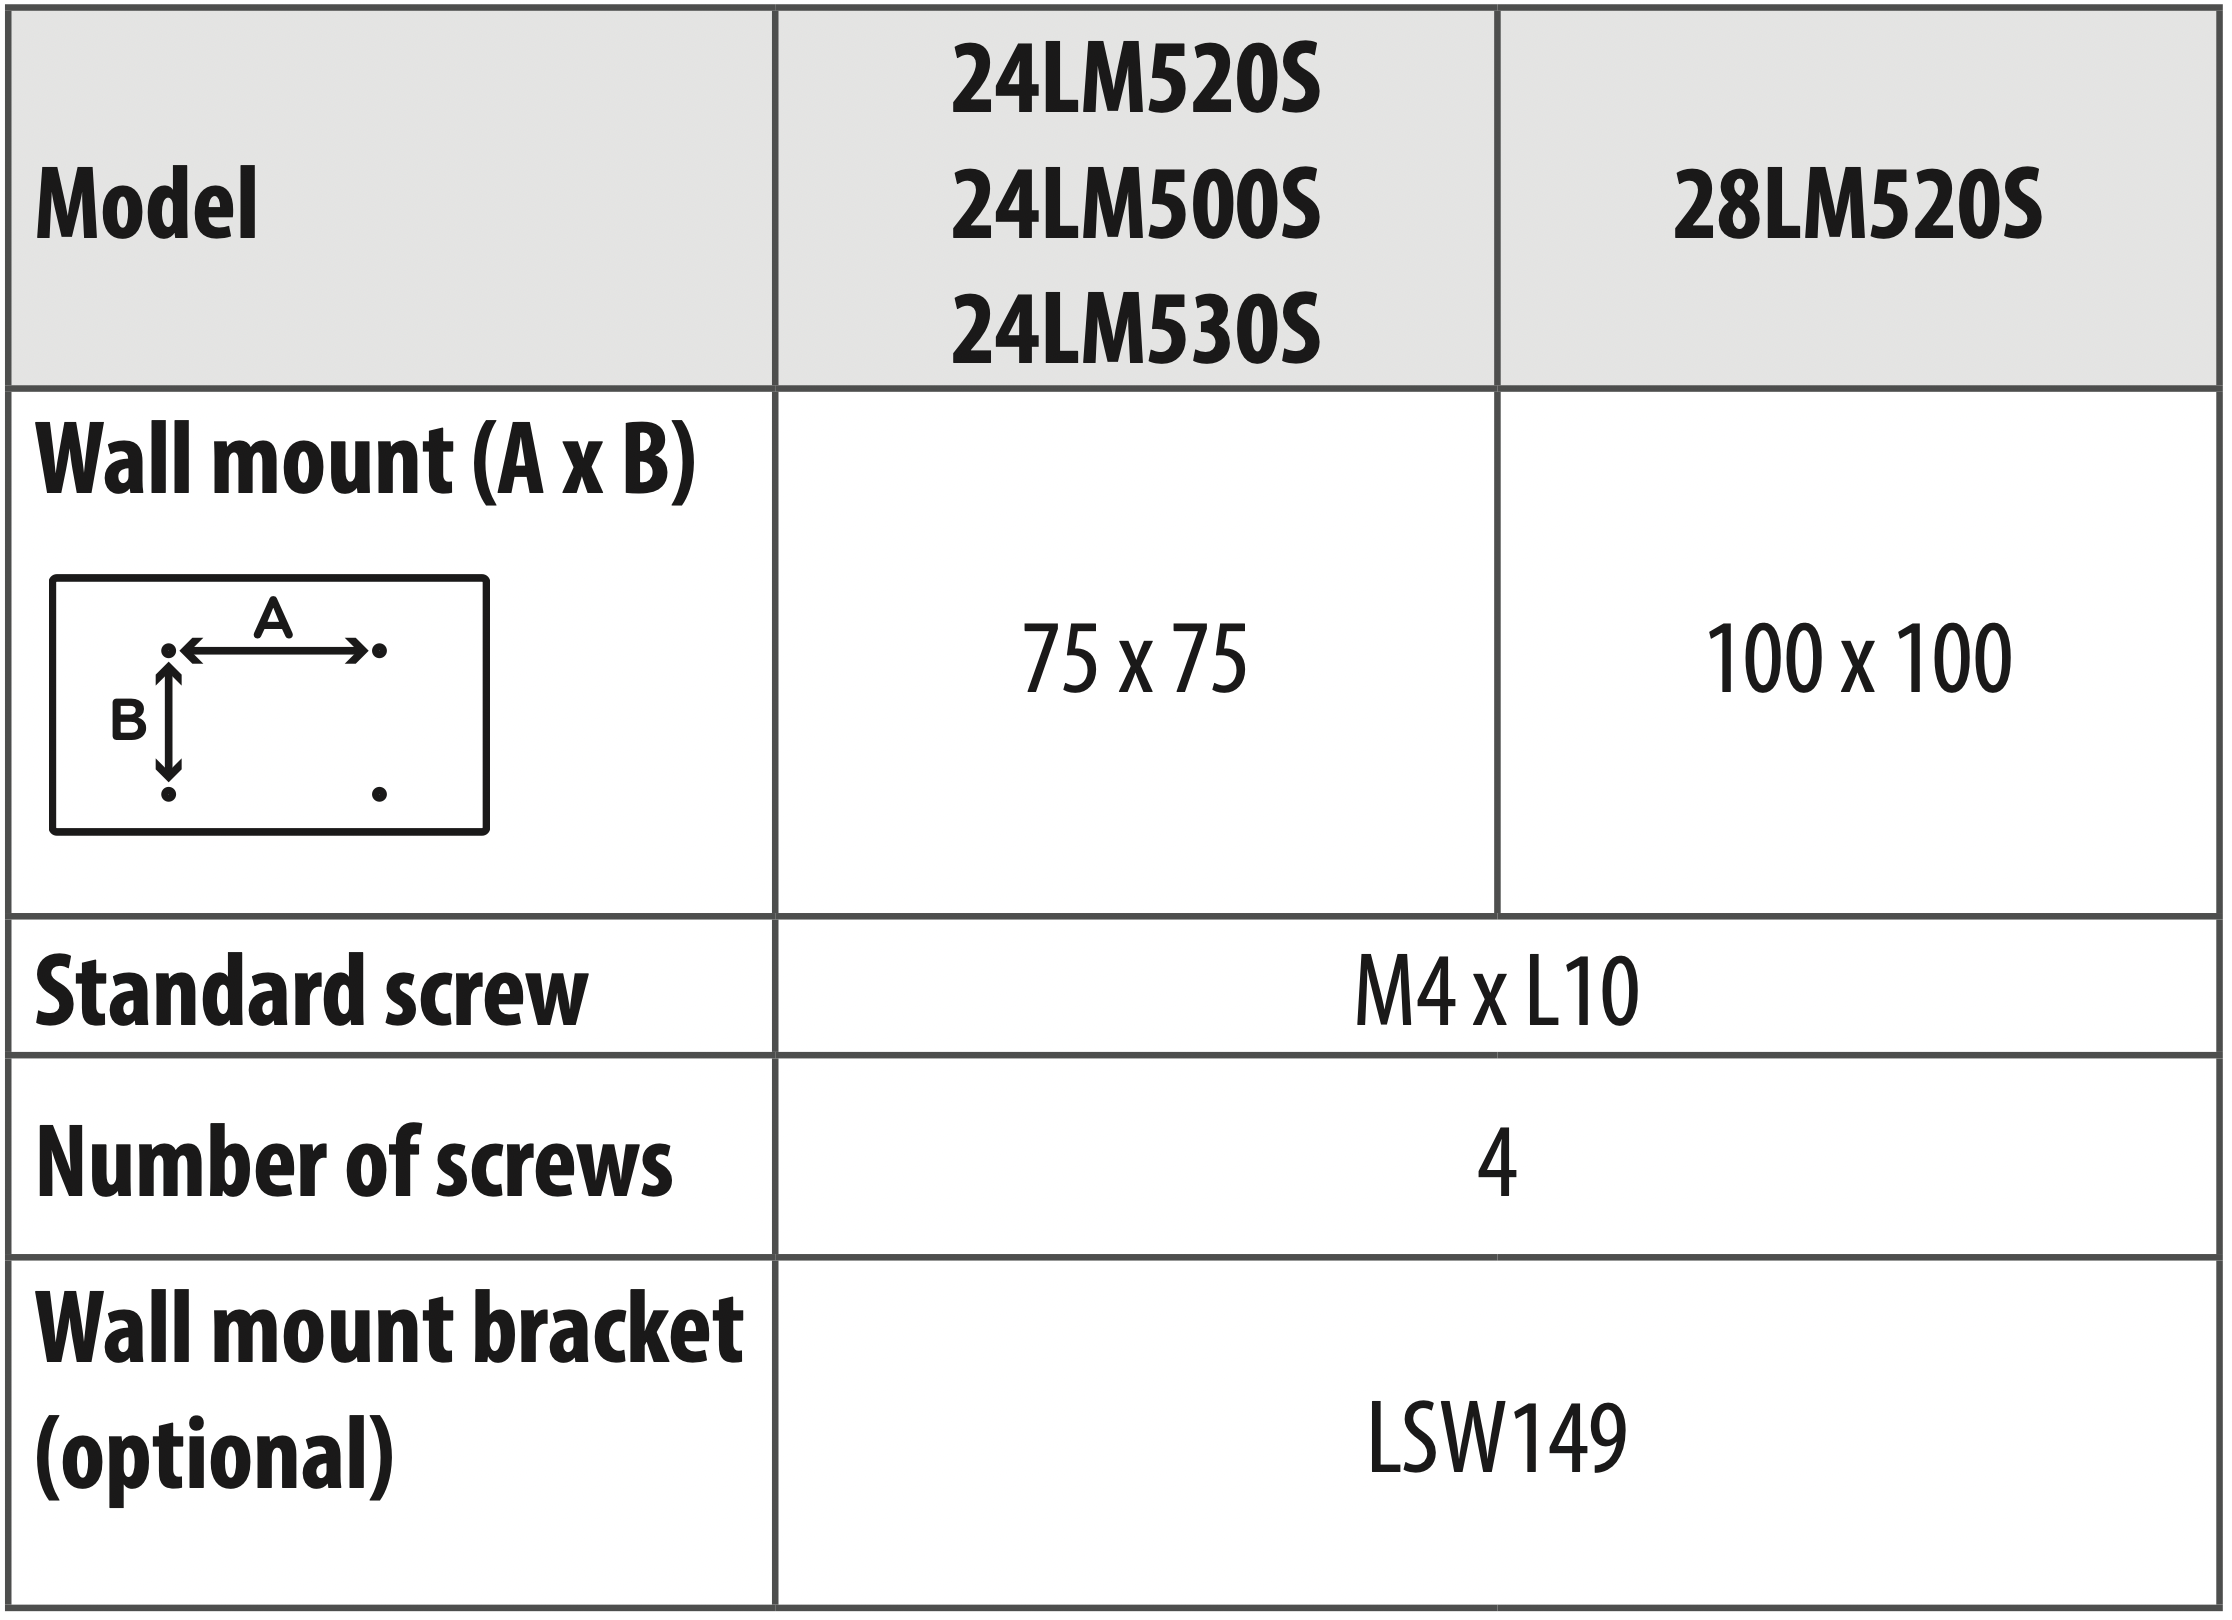
Make sure to use screws and wall mounts that meet the VESA standard. Standard dimensions for the wall mount kits are described in the following table.
CAUTION
- Must use the enclosed screw in the box. (Depending upon model)
- Disconnect the power before moving or installing the TV. Otherwise electric shock may occur.
- Remove the stand before installing the TV on a wall mount by performing the stand attachment in reverse.
- If you install the TV on a ceiling or slanted wall, it may fall and result in severe injury. Use an authorized LG wall mount and contact the local dealer or qualified personnel. When using a third-party wall mount, it is not covered by the warranty.
- Do not overtighten the screws as this may cause damage to the TV and void your warranty.
- Use the screws and wall mounts that meet the VESA standard. Any damages or injuries by misuse or using an improper accessory are not covered by the warranty.
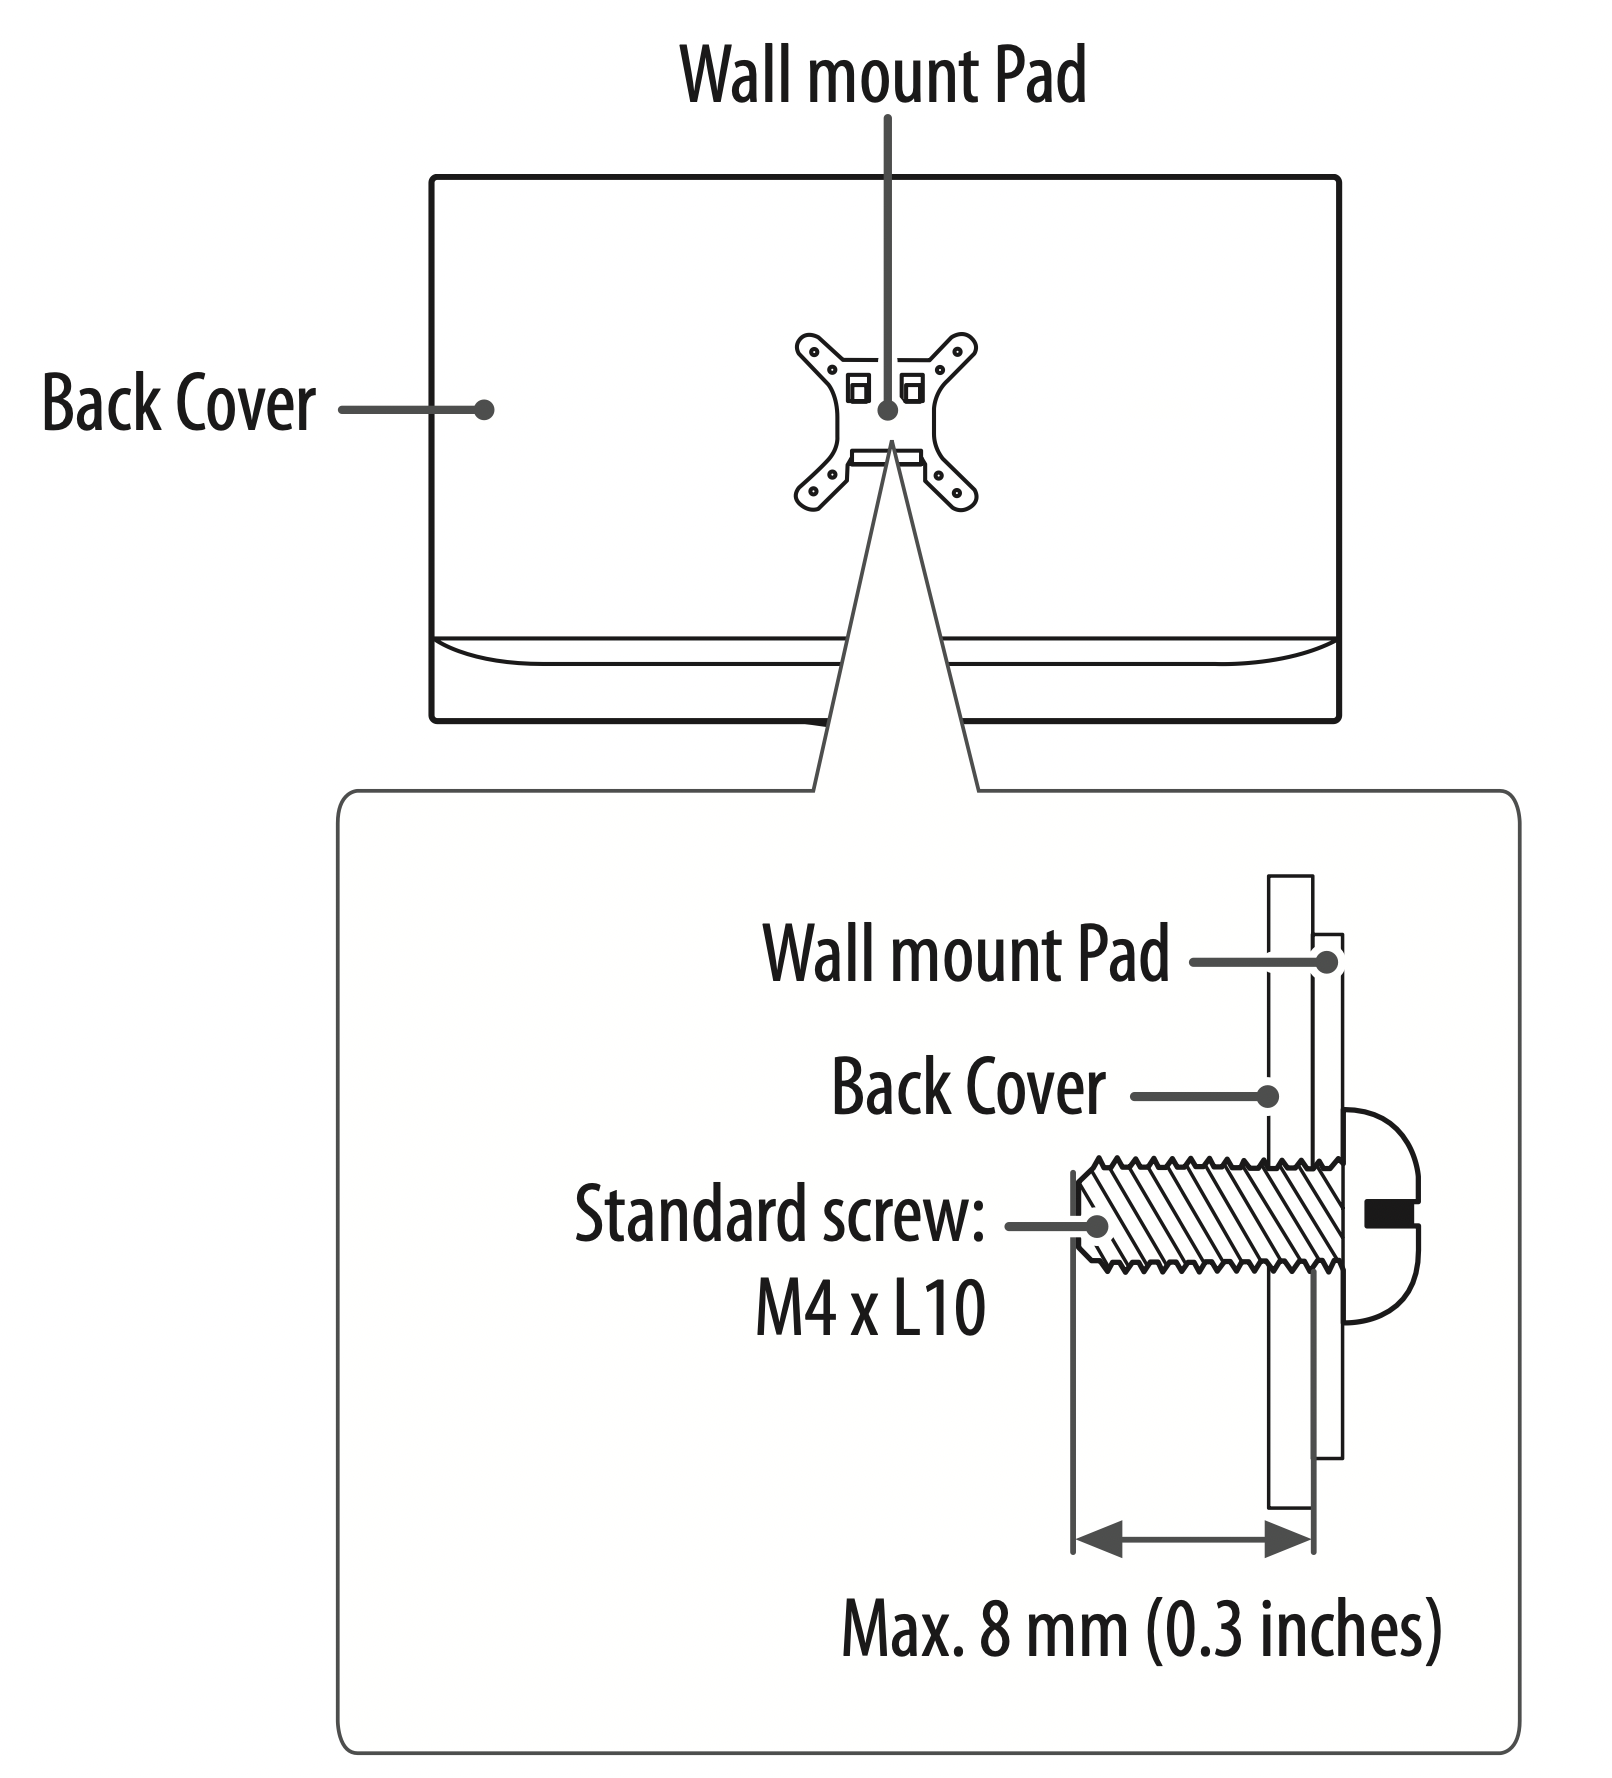
- Screw length from outer surface of back cover should be less than 8 mm (0.3 inches).
NOTE
- Use the screws that are listed on the VESA standard screw specifications.
- The wall mount kit includes an installation manual and necessary parts.
- The wall mount bracket is optional. You can obtain additional accessories from your local dealer.
- The length of screws may differ depending upon the wall mount. Make sure to use the proper length.
- For more information, refer to the manual supplied with the wall mount.
Connections (Notifications)
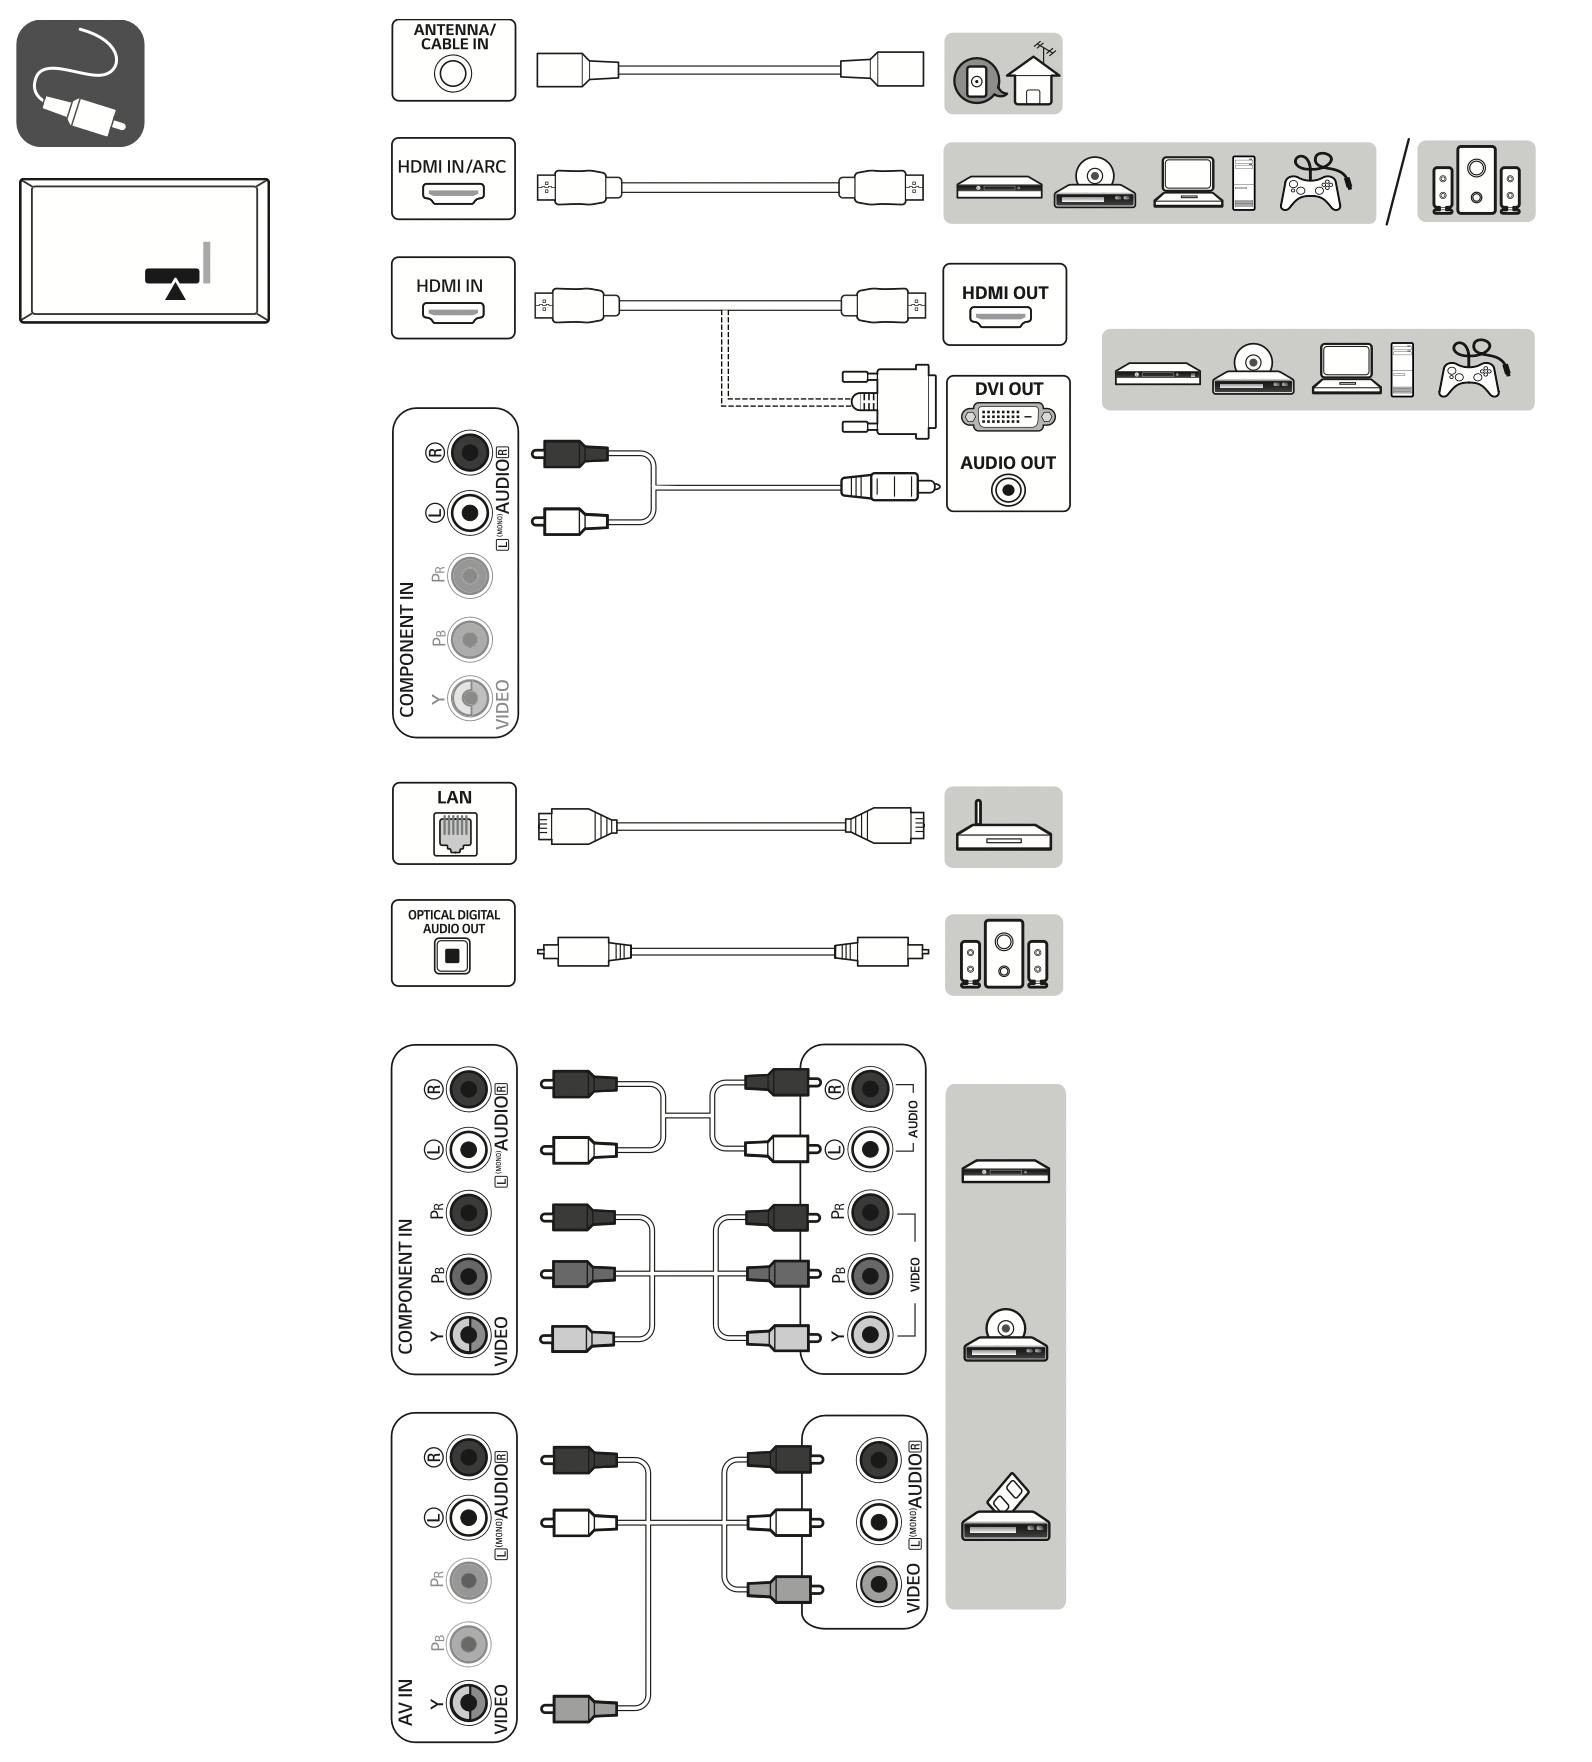
You can connect various external devices to the TV. Supported external devices are: HD receivers, DVD players, VCRs, audio systems, USB storage devices, PC, gaming devices, and other external devices. For more information on an external device’s connection, refer to the manual provided with each device.
NOTE
- The external device connections shown may differ slightly from illustrations in a manual.
- Connect external devices to the TV regardless about the order of the TV port.
- If you record a TV program on a DVD recorder or VCR, make sure to connect the TV signal input cable to the TV through a DVD recorder or VCR. For more information about recording, refer to the manual provided with the connected device.
- If you connect a gaming device to the TV, use the cable supplied with the gaming device.
- Refer to the external equipment’s manual for operating instructions.
- In PC mode, there may be noise associated with the resolution, vertical pattern, contrast, or brightness. If noise is present, change the PC output to another resolution, change the refresh rate to another rate, or adjust the brightness and contrast on the [PICTURE] menu until the picture is clear.
- Depending upon the graphics card, some resolution settings may not allow the image to be positioned on the screen properly.
Connecting to an antenna or cable
Connect an antenna, cable, or cable box to watch TV. The illustrations may differ from the actual items and an RF cable is optional.
CAUTION:
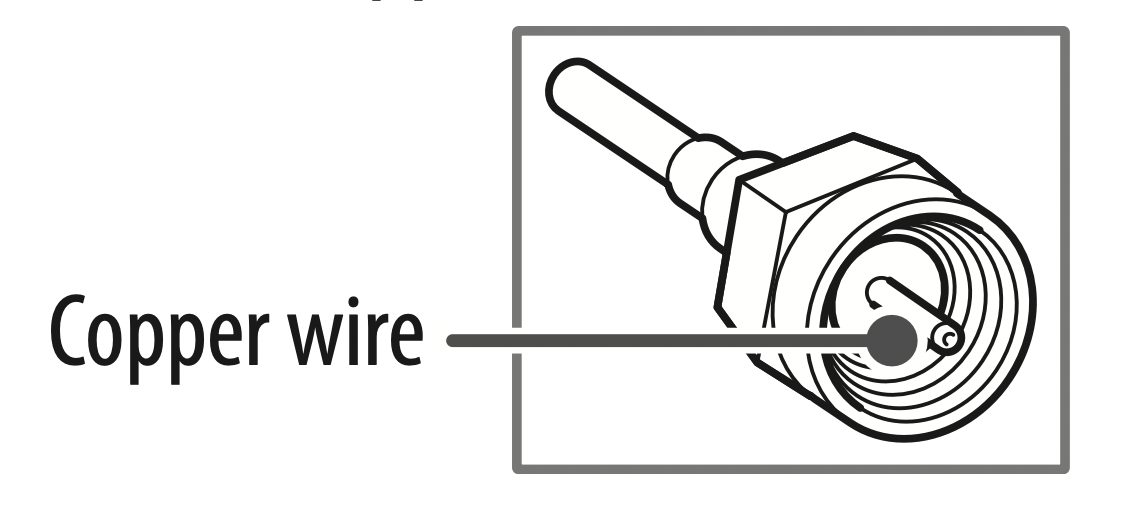
- Make sure not to bend the copper wire of the RF cable.
- Complete all connections between devices, and then connect the power cord to the power outlet to prevent damage to your TV.
NOTE
- Use a signal splitter to use 2 TVs or more.
- DTV Audio Supported Codec: MPEG, Dolby Digital.
PC connection
When connecting your PC to the HDMI input, set the HDMI input’s [Input Label] to [PC].
 (Inputs) > [All Inputs] > [EDIT ICON] >
  [PC]
[PC]
Other connections
Connect your TV to external devices. For the best picture and audio quality, connect the external device and the TV with the HDMI cable. Some separate cable is not provided.
- USB port supports 0.5 A electric current. If you need more electric current in case of HDD, use the separate power adaptor.
- Supported HDMI Audio format:
Dolby Digital / Dolby Digital Plus (32 kHz, 44.1 kHz, 48 kHz), DTS (44.1 kHz, 48 kHz), PCM (32 kHz, 44.1 kHz, 48 kHz, 96 kHz, 192 kHz) (Depending upon model)
Remote control
(Some buttons and services may not be provided depending upon models or regions.)
The descriptions in this manual are based on the buttons on the remote control. Please read this manual carefully and use the TV correctly.
To install batteries, open the battery cover, replace batteries (1.5 V AAA) matching the  and
and  ends to the label inside the compartment, and close the battery cover. To remove the batteries, perform the installation actions in reverse.
Make sure to point the remote control toward the remote control sensor on the TV.
* To use the button, press and hold for more than 3 seconds.

 (Power) Turns the TV on or off.
 (Inputs) Changes the input source.
CAPTION Activates or deactivates the subtitles.
 (User Guide) Sees user-guide.
 (Search) Shows the search mode.
TV Returns to the last TV channel.
Number buttons Enters numbers.
 (Dash) Inserts a dash between numbers such as 2-1 and 2-2.
LIST Accesses the saved channel list.
FLASHBK Alternates between the two last channels selected. (pressing repeatedly)
QUICK ACCESS* You can access apps or Live TV using the number buttons corresponding to the features.
 Adjusts the volume level.
FAV Accesses your favorite channel list.
 INFO Views the information of the current program and screen.
 (Mute) Mutes all sounds.
* Accesses the [Accessibility] menu.
 Scrolls through the saved channels.
 Moves to the previous or next screen.
 Streaming Service buttons Connects to the Video Streaming Service.
 (Home) Accesses the Home menu.
* Shows the previous history.
 (Settings) Accesses the settings.
LIVE ZOOM By zooming in on the selected area, you can view it in full screen.
Navigation buttons (up/down/left/right) Scrolls through menus or options.
OK  Selects menus or options and confirms your input.
BACK Returns to the previous screen.
EXIT Clears on-screen displays and returns to TV viewing.
SAP/  Enables SAP (Secondary Audio Program) Feature.
SLEEP Sets the length of time until the TV to turns off.
MAGIC LINK* Provides content related to the program you are currently watching.
 (Control buttons) Controls the media contents.
 These access special functions in some menus.
Troubleshooting
Cannot control the TV with the remote control.
- Check if anything such as tape has been placed over the receiver.
- Check if there is any obstacle between the product and the remote control.
- Replace the batteries with new ones.
No image display and no sound is produced.
- Check if the product is turned on.
- Check if the power cord is connected to a wall outlet.
- Check if there is a problem in the wall outlet by connecting other products.
The TV turns off suddenly.
- Check the power control settings. The power supply may be interrupted.
- Check if the auto-off function is activated on the settings related time.
- If there is no signal while the TV is on, the TV will turn off automatically after 15 minutes of inactivity.
When connecting to the PC (HDMI), no signal is detected.
- Turn the TV off/on using the remote control.
- Reconnect the HDMI cable.
- Restart the PC with the TV on.
If TV is turned off automatically.
- If [Timer Power On] is enabled, the TV will be turned on at the specified time. If you do not operate the TV for two hours, the TV will be turned off automatically.
- To disable this function, use your remote control to go to
 (Settings) > [General] > [Timers] > [2 Hours Auto Power Off] > [Off].
