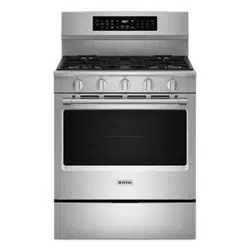
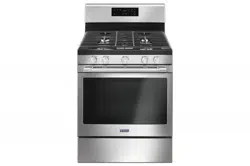
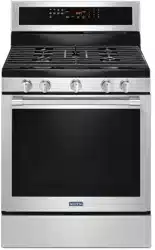
This manual covers several models. Your model may have some or all of the items listed. Refer to this manual or the Frequently Asked Questions (FAQs) section of our website
COOKTOP USE
Electric igniters automatically light the surface burners when control knobs are turned to LITE.
Before setting a control knob, place filled cookware on the grate. Do not operate a burner using empty cookware or without cookware on the grate.
The flame should be adjusted so it does not extend beyond the edge of the pan.
To Set:
Push in and turn knob counterclockwise to LITE.
All surface burners will click. Only the burner with the control knob turned to LITE will produce a flame.
Turn knob to anywhere between HIGH and LOW.
Power™ Burner Feature
The left front burner is designed to give ultra-power when fully on. It can be used to rapidly bring liquid to a boil and to cook large quantities of food.
Flex-Choice™ Burner Feature
The Flex-Choice™ feature allows for more precise simmering and low temperature cooking. It is the right rear burner.
Power Failure
In case of prolonged power failure, the surface burners can be lit manually. Hold a lit match near a burner and turn knob counterclockwise to LITE. After burner lights, turn knob to desired setting.
Sealed Surface Burners
IMPORTANT: Do not obstruct the flow of combustion and ventilation air around the burner grate edges.
Burner cap: Always keep the burner cap in place when using a surface burner. A clean burner cap will help avoid poor ignition and uneven flames. Always clean the burner cap after a spillover and routinely remove and clean the caps according to the “General Cleaning” section.
Gas tube opening: Gas must flow freely throughout the gas tube opening for the burner to light properly. Keep this area free of soil and do not allow spills, food, cleaning agents or any other material to enter the gas tube opening. Keep spillovers out of the gas tube by always using a burner cap.
Burner ports: Check burner flames occasionally for proper size and shape as shown in the previous illustration. A good flame is blue in color, not yellow. Keep this area free of soil and do not allow spills, food, cleaning agents or any other material to enter the burner ports.
To Clean:
IMPORTANT: Before cleaning, make sure all controls are off and the oven and cooktop are cool. Do not use oven cleaners, bleach or rust removers.
Remove the burner cap from the burner base and clean according to “General Cleaning” section.
Clean the gas tube opening with a damp cloth.
Clean clogged burner ports with a straight pin as shown. Do not enlarge or distort the port. Do not use a wooden toothpick. If the burner needs to be adjusted, contact a trained repair specialist.
Replace the burner cap, making sure the alignment pins are properly aligned with the burner cap.
Turn on the burner. If the burner does not light, check cap alignment. If the burner still does not light, do not service the sealed burner yourself. Contact a trained repair specialist.
Burner Size
Select a burner that best fits your cookware. See the following illustration and chart.
Cookware
IMPORTANT: Do not leave empty cookware on a hot surface cooking area, element or surface burner.
Ideal cookware should have a flat bottom, straight sides and a wellfitting lid, and the material should be of medium-to-heavy thickness.
Rough finishes may scratch the cooktop or grates. Aluminum and copper may be used as a core or base in cookware.
Cookware material is a factor in how quickly and evenly heat is transferred, which affects cooking results.
Cookware with nonstick surfaces should not be used under the broiler.
Check for flatness by placing the straight edge of a ruler across the bottom of the cookware. While you rotate the ruler, no space or light should be visible between it and the cookware.
Use the following chart as a guide for cookware material characteristics.
Aluminum
Heats quickly and evenly.
Suitable for all types of cooking.
Medium or heavy thickness is best for most cooking tasks.
Cast iron
Heats slowly and evenly.
Good for browning and frying.
Maintains heat for slow cooking.
Ceramic or Ceramic glass
Follow manufacturer’s instructions.
Heats slowly, but unevenly.
Ideal results on low to medium heat settings.
Copper
Heats very quickly and evenly.
May leave copper residues, which may be diminished if cleaned immediately after cooking
Earthenware/ Stoneware
Follow manufacturer’s instructions.
Use on low heat settings.
Porcelain enamel-onsteel or cast iron
See stainless steel or cast iron.
Stainless steel
Heats quickly, but unevenly.
A core or base of aluminum or copper on stainless steel provides even heating.
For best results, the cookware should be centered above the burner with the bottom sitting level on the grate. The flame should be adjusted so that it does not extend up the sides of the pan.
Home Canning
When canning for long periods, alternate the use of surface burners between batches. This allows time for the most recently used areas to cool.
Center the canner on the grate above the burner.
Do not place canner on 2 surface burners at the same time.
For more information, contact your local agricultural extension office, or refer to published home canning guides. Companies that manufacture home canning products can also offer assistance.
OVEN USE
The normal operation of the range will include several noises that may be heard each time the Bake or Broil burners ignite during the cooking cycle:
gas valves may make a “popping” sound when opening or closing
igniters will “click” several times until a flame is sensed
a “poof” sound is heard when a Bake or Broil burner ignites
Odors and smoke are normal when the oven is used the first few times, or when it is heavily soiled.
IMPORTANT: The health of some birds is extremely sensitive to the fumes given off. Exposure to the fumes may result in death to certain birds. Always move birds to another closed and wellventilated room.
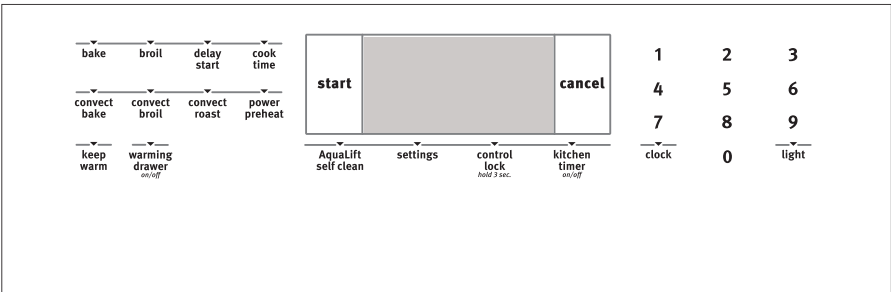
Electronic Oven Controls
Control Display
The display will flash when powered up or after a power loss. Press CANCEL to clear. When oven is not in use, the time of day is displayed, unless the range is in Energy Save mode. During Energy Save mode, the display will be blank. Indicator lights show functions that are in use.
Tones
Tones are audible signals, indicating the following:
One tone
Valid pad press
Oven is preheated (long tone)
Function has been entered
Reminder (on some models), repeating each minute after the end-of-cycle tones
Three tones
Invalid pad press
Four tones
End of cycle
Use the Settings key to change the tone settings.
Settings
Many features of the oven control can be adjusted to meet your personal needs. These changes are made using the Settings key.
Use the Settings key to scroll through the features that can be changed. Each press of the Settings key will advance the display to the next setting. After selecting the feature to be changed, the control will prompt you for the required input. After the setting is saved by pressing Start, the control will exit Settings and display the time of day. Details of all of the feature changes are explained in the following sections.
Press CANCEL to exit Settings.
Clock Time of Day
This clock can use a 12- or 24-hour cycle. To adjust, see “12/24 Hour Clock” in this section.
Check that the oven and Timer are off.
To Change Time of Day:
Press SETTINGS once. After 3 seconds, “SET CLOCK-PUSH
START TO CHANGE” will be displayed.
Press START to display the current setting.
Press “3” for AM or “6” for PM.
Press the number keypads to set the time of day.
Press START.
Press CANCEL to exit.
Oven Temperature Offset Control
IMPORTANT: Do not use a thermometer to measure oven temperature because opening the oven door may cause element cycling to give incorrect readings.
The oven provides accurate temperatures; however, it may cook faster or slower than your previous oven, so the temperature can be adjusted to personalize it for your cooking needs. It can be changed in Fahrenheit or Celsius.
To Adjust Oven Temperature:
Press SETTINGS until “TEMP OFFSET” is displayed.
Press START to display the current setting.
Press the “3” keypad to increase the temperature in 5°F (3°C) increments, or press the “6” keypad to decrease the temperature in 5°F (3°C) increments. The range is from -30°F to +30°F (-18°C to 18°C).
Press START to save the setting.
Press CANCEL to exit.
Fahrenheit and Celsius
The temperature is preset at Fahrenheit, but can be changed to Celsius.
To change:
Press SETTINGS until “TEMP UNIT” is displayed.
Press START to display the current setting.
Press the “3” keypad to adjust the setting.
Press START to save the setting.
Press CANCEL to exit.
Audible Tones Disable
Turns off all tones, including the end of cycle tone and key press tones. Reminder tones are still active when all tones are disabled.
Press SETTINGS until “ALL SOUNDS” is displayed.
Press START to display the current setting.
Press the “3” keypad to adjust the setting.
Press START to save the setting.
Press CANCEL to exit.
End of Cycle Tone
Activates or turns off the tones that sound at the end of a cycle.
Press SETTINGS until “CYCLE TONE END” is displayed.
Press START to display the current setting.
Press the “3” keypad to adjust the setting.
Press START to save the setting.
Press CANCEL to exit.
Reminder Tones Disable
Turns off the short repeating tone that sounds every 1 minute after the end of cycle tones.
Press SETTINGS until “REMINDER TONE” is displayed.
Press START to display the current setting.
Press the “3” keypad to adjust the setting.
Press START to save the setting.
Press CANCEL to exit.
Key Press Tones
Activates or turns off the tones when a keypad is pressed.
Press SETTINGS until “KEY PRESS TONE” is displayed.
Press START to display the current setting.
Press the “3” keypad to adjust the setting.
Press START to save the setting.
Press CANCEL to exit.
Tone Pitch
Sets the pitch of the tone to either high or low.
Press SETTINGS until “TONE PITCH” is displayed.
Press START to display the current setting.
Press the “3” keypad to adjust the setting.
Press START to save the setting.
Press CANCEL to exit.
Demo Mode
IMPORTANT: This feature is intended for use on the sales floor with 120 V power connection and permits the control features to be demonstrated without heating elements turning on. If this feature is activated, the oven will not work.
Press SETTINGS until “DEMO MODE” is displayed.
Press START to display the current setting.
Press the “3” keypad to adjust the setting.
Press START to save the setting.
Press CANCEL to exit.
12-Hour Shutoff
The oven control is set to automatically shut off the oven 12 hours after the oven initiates a cook or clean function. This will not interfere with any timed or delay cook functions.
Press SETTINGS until “12-HR SHUT-OFF” is displayed.
Press START to display the current setting.
Press the “3” keypad to adjust the setting.
Press START to save the setting.
Press CANCEL to exit.
12/24 Hour Clock
Press SETTINGS until “12/24 HR” is displayed.
Press START to display the current setting.
Press the “3” keypad to adjust the setting.
Press START to save the setting.
Press CANCEL to exit.
Languages - Scrolling Display Text
Language options are English, Spanish and French.
Press SETTINGS until “LANGUAGE” is displayed.
Press START to display the current setting.
Press the “3” keypad to adjust the setting.
Press START to save the setting.
Press CANCEL to exit.
Sabbath Mode
The Sabbath Mode sets the oven to remain on in a bake setting until turned off.
When the Sabbath Mode is set, only the Bake cycle will operate. All other cooking and cleaning cycles are disabled. No tones will sound, and the displays will not show messages or temperature changes.
When the oven door is opened or closed, the oven light will not turn on or off and the heating elements will not turn on or off immediately.
To Enable Sabbath Mode Capability (one time only):
Open oven door.
Press 7-8-9-6. “SABBATH ON” or “SABBATH OFF” and “PRESS START TO ENTER” will appear in the display.
Press START to change the displayed status.
Close oven door. Sabbath Mode can be used for baking.
NOTE: To disable the Sabbath Mode, repeat steps 1 - 3 to change the status from “SABBATH ON” to “SABBATH OFF.”
To Activate Sabbath Mode:
Press BAKE.
Press the number keypad to set a temperature other than 350°F (177°C).
Press START.
For timed cooking in Sabbath Mode, press COOK TIME, then the number keypad to set the desired cook time.
Press SETTINGS, then press “7.” “SAb” will appear in the display.
To Adjust Temperature (when Sabbath Mode is running):
Press the number keypad as instructed by the scrolling text to select the new temperature.
NOTE: The temperature adjustment will not appear on the display. The scrolling text will be shown on the display as it was before the keypad was pressed.
Press START.
To Deactivate Sabbath Mode:
Press SETTINGS, then press “7” to return to regular baking or press CANCEL to turn off the range.
Aluminum Foil
IMPORTANT: To avoid permanent damage to the oven bottom finish, do not line the oven bottom with any type of foil or liner.
For best cooking results, do not cover entire oven rack with foil because air must be able to move freely
Positioning Racks and Bakeware
IMPORTANT: To avoid permanent damage to the porcelain finish, do not place food or bakeware directly on the oven door or bottom.
Bakeware
To cook food evenly, hot air must be able to circulate. Allow 2" (5 cm) of space around bakeware and oven walls. Make sure that no bakeware piece is directly over another.
Racks
Position racks before turning on the oven.
Do not move racks with bakeware on them.
Make sure racks are level.
To move a rack, pull it out to the stop position, raise the front edge, and then lift out. Use the following illustration and charts as a guide.
The oven has 7 positions for a flat rack, as shown in the previous illustration and the following table.
If your model has a Max Capacity Oven Rack, the recessed ends must be placed in the rack position above the desired position of the food. See the following illustration.
IMPORTANT: These rack positions are for flat racks. If a Max Capacity Oven Rack is used, the rack position must be adjusted as shown in the previous figure.
Multiple Rack Cooking
2-rack: Use rack positions 2 and 5 for regular or convection baking.
3-rack (convection only): Use rack positions 2, 4 and 6.
Baking Cakes on 2 Racks
For best results when baking cakes on 2 racks, use racks 2 and 5. For best results when convection baking cakes on 2 racks, use racks 2 and 5. Place the cakes on the racks as shown.
Oven Vent
The oven vent releases hot air and moisture from the oven, and should not be blocked or covered. Blocking or covering the oven vent will cause poor air circulation, affecting cooking and cleaning results. Do not set plastics, paper or other items that could melt or burn near the oven vent.
Baking and Roasting
Precision Cooking™ System - Precise Bake
The Precise Bake system electronically regulates the oven heat levels during preheat and bake to maintain a precise temperature range for optimal cooking results. The bake burner cycles on and off in intervals. On convection range models, the fan may run while preheating and may be cycled on and off for short intervals during preheating to provide the best results. This feature is automatically activated when the oven is in use.
The convection fan will not be on during the first 5 minutes of the cycle.
Before baking and roasting, position racks according to “Positioning Racks and Bakeware” section. When roasting, it is not necessary to wait for the oven preheat cycle to end before putting food in unless it is recommended in the recipe.
Preheating
When Start is pressed, the oven will begin preheating. Once 100ºF (38ºC) is reached, the display temperature will increase as the actual temperature of the oven increases. When the preheat temperature is reached, a tone will sound, and the selected temperature will appear on the display. The time necessary to preheat the oven to 350°F (177°C) is approximately 10 to 15 minutes, depending on the model.
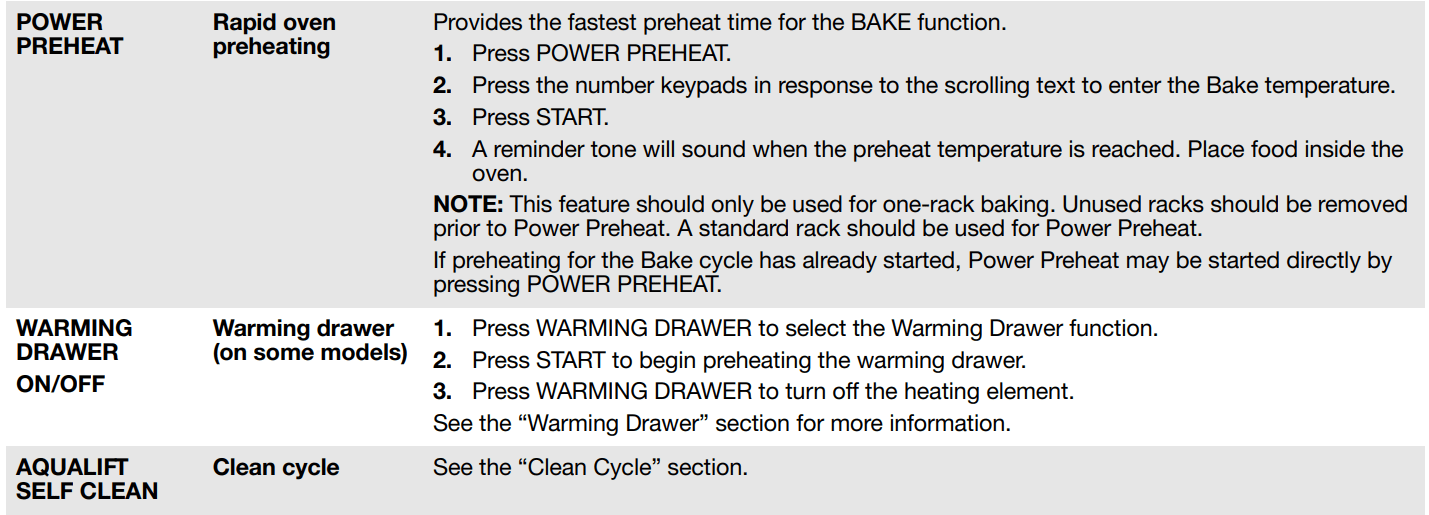
Power Preheat
Power Preheat can be used to shorten the preheating time. Only one standard flat rack should be in the oven during Power Preheat. Extra racks should be removed prior to starting Power Preheat. Press POWER PREHEAT and follow the oven control prompts, or, if preheating has already started, simply press POWER PREHEAT. The preheating cycle should be completed before placing food in the oven and should be used only for one-rack baking. When the power preheat cycle is complete, the oven starts a normal Bake cycle.
Broiling
When broiling, preheat the oven for 5 minutes before putting food in unless recommended otherwise in the recipe. Position food on grid in a broiler pan, then place it in the center of the oven rack.
IMPORTANT: Close the door to ensure proper broiling temperature.
Changing the temperature when Custom Broiling allows more precise control when cooking. The lower the broil setting, the slower the cooking. Thicker cuts and unevenly shaped pieces of meat, fish and poultry may cook better at lower broil settings. Use racks 6 or 7 for broiling. Refer to the “Positioning Racks and Bakeware” section for more information.
For best results, use a broiler pan and grid. It is designed to drain juices and help avoid spatter and smoke.
If you would like to purchase a broiler pan, one may be ordered. Please refer to the “Accessories” section for more information.
NOTE: Odors and smoke are normal the first few times the oven is used or if the oven is heavily soiled.
Convection Cooking
In a convection oven, the fan-circulated hot air continually distributes heat more evenly than the natural movement of air in a standard thermal oven. This movement of hot air helps maintain a consistent temperature throughout the oven, cooking foods more evenly, crisping surfaces while sealing in moisture, and yielding crustier breads.
IMPORTANT: With convection cooking, most foods can be cooked at a lower temperature or at a shorter time. This range automatically reduces the set oven temperature by 25°F (15°C) for convection cooking.
During convection cooking, the bake and broil burners and convection element cycle on and off in intervals to maintain the oven temperature, while the fan circulates the hot air.
NOTE: The convection fan will turn on approximately 5 minutes into any convection cycle.
If the oven door is opened during convection cooking, the fan will turn off immediately. It will come back on when the oven door is closed.
NOTE: The oven door must be closed for convection broiling.
EvenAir™ True Convection
When convection baking, broiling or roasting, enter your normal baking temperature. The control will automatically reduce the set oven temperature by 25°F (15°C).
Press BAKE or BROIL, or press CONVECT MODES until the desired convection mode appears on the display.
Press the number keypads to enter a temperature other than the one displayed.
Press COOK TIME. The cook time oven indicator light will light up.
Press the number keypads to enter the length of time to cook.
Press START. The display will count down the time. When the time ends, the oven will shut off automatically.
Press CANCEL to clear the display.
To Set a Delayed Timed Cook:
Press BAKE or BROIL, or press CONVECT MODES until the desired convection mode appears on the display.
Press the number keypads to enter a temperature other than the one displayed.
Press COOK TIME. The cook time oven indicator light will light up.
Press number keypads to enter the length of time to cook.
Press DELAY START.
Press number keypads to enter the number of hours and/or minutes you want to delay the start time.
Press START. When the start time is reached, the oven will automatically turn on. The temperature and/or time settings can be changed anytime after the oven turns on by repeating steps 2 through 4. When the set cook time ends, the oven will shut off automatically.
Press CANCEL to clear the display
RANGE CARE
AquaLift® Technology is an innovative cleaning solution that utilizes heat and water to release baked-on spills from the oven in less than 1 hour. This new cleaning technology is a low-heat, odor-free alternative to traditional self-cleaning options.
Allow the oven to cool to room temperature before using the Clean cycle. If your oven cavity is above 200°F (93°C), “OVEN COOLING” will appear in the display, and the Clean cycle will not be activated until the oven cavity cools down.
To Clean:
1. Remove all racks and accessories from the oven cavity, and wipe excess soil. Use a plastic scraper to remove easily removed soils.
2. Pour 1¾ cups (14 oz [414 mL]) of distilled or filtered water onto the bottom of the empty oven, and close the oven door.
IMPORTANT: Do not use chemicals or other additives with the water. Do not open the oven door during the Clean cycle. The water on the oven bottom is hot.
3. Press AQUALIFT SELF CLEAN and then START on the oven control panel.
4. Allow 40 minutes for cleaning and cooldown. A beep will sound when the Clean cycle is complete.
5. Press CANCEL at the end of the cycle. Cancel may be pressed at any time to stop the Clean cycle
6. Remove the residual water and loosened soils with a sponge or cloth immediately after the Clean cycle is complete. Much of the initial 2 cups (16 oz [500 mL]) of water will remain in the oven after the cycle is completed. If additional soils remain, leave a small amount of water in the oven bottom to assist with the cleaning.
7. If any soils remain, remove them with a non-scratch scrubbing sponge or plastic scraper. Additional Clean cycles may be run to help remove the stubborn soils.
IMPORTANT: Do not use oven cleaners. The use of chemicals, including commercial oven cleaners or metal scouring pads, may cause permanent damage to the porcelain surface of the oven interior.
NOTES:
The range should be level to ensure that the entire surface of the bottom of the oven cavity is covered by water at the beginning of the Clean cycle.
For best results, use distilled or filtered water. Tap water may leave mineral deposits on the oven bottom.
Before removing the residual water and loosened soils at the end of the Clean cycle, insert a cloth or paper towel between the lower edge of the oven door and the front frame to keep water from spilling onto the front of the range and the floor.
Soil baked on through several cooking cycles will be more difficult to remove with the Clean cycle.
Nonabrasive scrub sponges or eraser-style cleaning pads (without cleaners) can be effective for cleaning the oven cavity walls, oven door, and oven bottom for difficult soils. For best results, moisten the pads and sponges before use.
Run an additional Clean cycle for stubborn soils.
affresh® Kitchen Appliance Cleaner and affresh® Cooktop Cleaner may be used to clean the oven bottom, walls, and door when the oven has finished the cycle and returned to room temperature. If affresh® Cooktop Cleaner is used, it is recommended to wipe out the cavity with distilled water as well. Refer to the “Accessories” section for information on ordering.
Additional AquaLift® Technology Cleaning Kits may be obtained by ordering Part Number W10423113RP. See the “Accessories” section for more information.
TROUBLESHOOTING
Nothing will operate
Power supply cord is unplugged.
Plug into a grounded 3 prong outlet.
Household fuse is blown or a circuit breaker is tripped.
Replace the fuse or reset the circuit breaker. If the problem continues, call an electrician.
Main or regulator gas shutoff valve is in the off position.
See the Installation Instructions.
The range is improperly connected to the gas supply.
Contact a trained repair specialist or see Installation Instructions.
Surface burners will not operate
The control knob is not set correctly.
Push in knob before turning to a setting.
Air in the gas lines
If this is the first time the surface burners have been used, turn on any one of the surface burner knobs to release air from the gas lines.
Clogged burner ports
See “Sealed Surface Burners” section.
Surface burner flames are uneven, yellow and/or noisy
Clogged burner ports
See “Sealed Surface Burners” section.
Burner caps positioned improperly
See “Sealed Surface Burners” section.
Range converted improperly
If propane gas is being used, contact a service technician or see cover for contact information.
Excessive heat around cookware on cooktop
Cookware that is not the proper size
The cookware should be centered above the burner with the bottom sitting level on the grate. The flame should be adjusted so that it does not extend up the sides of the pan.
Cooktop cooking results not what expected
Improper cookware
Ideal cookware should have a flat bottom, straight sides and a well fitting lid, and the material should be of a medium to heavy thickness.
Control knob set to incorrect heat level
See “Cooktop Use” section.
Range is not level
Level the range. See the Installation Instructions.
Oven will not operate
Air in the gas lines
If this is the first time the oven has been used, turn on any one of the surface burner knobs to release air from the gas lines.
Electronic oven control set incorrectly
See “Electronic Oven Controls” section.
Control is locked.
Press and hold CONTROL LOCK for 3 seconds.
The range is in Demo Mode.
Demo Mode will deactivate all heating elements. See “Demo Mode” in the “Electronic Oven Controls” section.
Convention fan not turning on.
The convection cycle is in the first 5 minutes of operation.
This is normal. The convection fan will start running approximately 5 minutes into the cycle.
Oven door is open.
If the oven door is opened during convention cooking, the fan will turn off immediately. It will come back on when the oven door is closed.
Oven burner flames are yellow or noisy
Range converted improperly
If propane gas is being used, contact a service technician or see cover for contact information.
Oven temperature too high or too low
Oven temperature is calibrated incorrectly.
See “Oven Temperature Control” in the “Electronic Oven Controls” section.
Display shows messages
Power failure (display shows flashing time)
Clear the display. On some models, reset the clock, if needed. See “Clock” keypad feature in the “Feature Guide” section.
Error code (display shows letter followed by number)
Press CANCEL to clear the display. See “Control Display” in the “Electronic Oven Controls” section. If it reappears, call for service. See cover for contact information.
Start needs to be pressed so a cycle can begin (display shows “PRESS START”).
See the “Start” keypad feature in the “Feature Guide” section.
Mineral deposits are left on the oven bottom after the Clean cycle
Tap water was used in the Clean cycle.
Use distilled or filtered water in the Clean cycle.
To remove deposits, use a cloth soaked with vinegar. Then use a cloth dampened with water to thoroughly remove any vinegar residue.
Range is not level.
Mineral deposits will collect on dry areas of the oven bottom during the Clean cycle. Level the range. See the Installation Instructions.
To remove deposits, use a cloth soaked with vinegar. Then use a cloth dampened with water to thoroughly remove any vinegar residue.
Oven cooking results not what expected
Range is not level.
Level the range. See the Installation Instructions.
The temperature set was incorrect.
Double-check the recipe in a reliable cookbook.
Oven temperature is calibrated incorrectly.
See “Oven Temperature Control” in the “Electronic Oven Controls” section.
Oven was not preheated.
See “Baking and Roasting” section.
Racks were positioned improperly.
See “Positioning Racks and Bakeware” section.
Not enough air circulation around bakeware
See “Positioning Racks and Bakeware” section.
Darker browning of food caused by dull or dark bakeware
Lower oven temperature 25°F (15°C) or move rack to a higher position in the oven.
Lighter browning of food caused by shiny or light colored bakeware
Move rack to a lower position in the oven.
Batter distributed unevenly in pan
Check that batter is level in the pan.
Incorrect length of cooking time was used.
Adjust cooking time.
Oven door was not closed.
Be sure that the bakeware does not keep the door from closing.
Oven door was opened during cooking.
Oven peeking releases oven heat and can result in longer cooking times.
Rack is too close to bake burner, making baked items too brown on bottom.
Move rack to higher position in the oven.
Pie crusts browning too quickly
Use aluminum foil to cover the edge of the crust and/or reduce baking temperature.
Surface burner making popping noises
Wet burner
Allow it to dry.
Gas range noises during Bake and Broil operations
The following are some normal sounds with the explanations.
These sounds are normal operational noises that can be heard each time the Bake or Broil burners ignite during the cycle.
Pop
Gas valve is opening or cycling on and will make a single pop when it snaps open from the solenoid. It sounds similar to a suction cup being pulled off of a piece of glass.
This is normal.
Click
The igniters will click several times until the flame is detected.
These are short clicking sounds like tapping a nail onto a piece of glass.
This is normal.
Convection fan relay is cycling on and off (on some models).
This is normal.
Woosh or poof
Bake or Broil burner is igniting.
This is normal.
Oven burner flames are yellow or noisy
Range converted improperly
If propane gas is being used, contact a service technician or see cover for contact information.


-32019.png)
-703524.png)
-736528.png)
-362751.png)
-250455.png)
-697126.png)
-220640.png)
-855018.png)
-61015.png)
-740396.png)
-474377.png)
-30000.png)
-902134.png)
-52527.png)
-175604.png)
-86788.png)