User Guide Samsung WW22K6800AW/A2 Washer
- The air pressure in the water supply hose or the water pipe may damage a product part or result in a water leak.
- If a draining error occurs during an operation, check if there is a draining problem.
- If the washer is used when it is flooded because of a draining problem, it may result in electric shock or fire.
- Insert the laundry into the washer completely so that the laundry does not get caught in the door.
- If laundry gets caught in the door, it may result in damage to the laundry or the washer, or result in a water leak.
- Turn the water supply off when the washer is not being used.
- Ensure that the water supply hose connectors are properly tightened.
- Ensure that the rubber seal and front door glass are not contaminated by a foreign substance (e.g. waste, thread, hair, etc.).
- If a foreign substance is caught in the door or the door is not completely closed, it may cause a water leak.
- Open the faucet and check if the water supply hose connectors are firmly tightened and that there are no water leaks before using the product.
Usage cautions
- When the washer is contaminated by a foreign substance such as detergent, dirt, food waste, etc., unplug the power plug and clean the washer using a damp, soft cloth.
- Failure to do so may result in discoloration, deformation, damage, or rust.
- The front glass may be broken by a strong impact. Take care when using the washer.
- If the glass is broken, it may result in injury.
- After a water supply failure or when reconnecting the water supply hose, open the faucet slowly.
- Open the faucet slowly after a long period of non-use.
- The air pressure in the water supply hose or the water pipe may damage a product part or result in a water leak.
- If a draining error occurs during an operation, check if there is a draining problem.
- If the washer is used when it is flooded because of a draining problem, it may result in electric shock or fire.
- Insert the laundry into the washer completely so that the laundry does not get caught in the door.
- If laundry gets caught in the door, it may result in damage to the laundry or the washer, or result in a water leak.
- Turn the water supply off when the washer is not being used.
- Ensure that the screws on the water supply hose connector are properly tightened.
- Ensure that the rubber seal and front door glass are not contaminated by a foreign substance (e.g. waste, thread, hair, etc.).
- If a foreign substance is caught in the door or the door is not completely closed, it may cause a water leak.
Installation
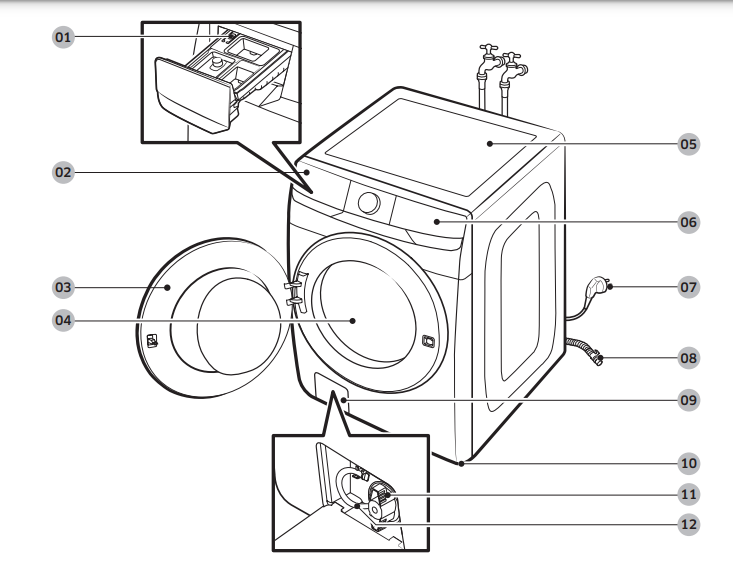
01 Release lever
02 Detergent drawer
03 Door 04 Drum
05 Worktop
06 Control panel
07 Power plug
08 Drain hose
09 Filter cover
10 Leveling feet
11 Pump filter
12 Emergency drain tube

Electrical supply and grounding
- AC 120 V / 60 Hz / 15 AMP fuse or circuit breaker is required.
- Use an individual branch circuit. Connect only the washer to the circuit.
- To ensure proper grounding, the washer comes with a power cord featuring a three-prong grounding plug for use in a properly installed and grounded outlet.
- Check with a qualified electrician or service person if you are not sure about the grounding.
- Do not modify the provided plug. If it does not fit the outlet, call a qualified electrician to install a proper outlet.
WARNING
- Do NOT use an extension cord.
- Use only the power cord that comes with the washer.
- Do NOT connect the ground wire to plastic plumbing, gas lines, or hot water pipes.
- Improperly connected grounding conductors may cause electric shock.
- To prevent unnecessary risk of fire, electrical shock, or personal injury, all wiring and grounding must be done in accordance with local codes, or in the absence of local codes, in accordance with the National Electrical Code, ANSI/NFPA No. 70-Latest
- Revision (for the U.S.) or the Canadian Electrical Code CSA C22.1 – Latest Revisions and local codes and ordinances. It is your responsibility to provide adequate electrical service for your washer.
Water supply
- Proper water pressure for this washer is between 20-116 psi (137-800 kPa). Water pressure less than 20 psi (137 kPa) may cause the water valve not to close completely.
- Or, it may take longer to fill the drum, causing the washer to turn off. Water taps must be within 4 ft. (122 cm) from the rear of the washer so that the provided inlet hoses reach the washer.
To reduce the risk of leaks:
- Make sure water taps are easily accessible.
- Turn off the taps when the washer is not in use.
- Check for any leaks at the water inlet hose fittings on a regular basis.
CAUTION
- Before using the washer for the first time, check all connections at the water valve and taps for any leaks.
Drain
- Samsung recommends a standpipe 18 in. (460 mm) high. The drain hose must be connected through the hose clip to the standpipe, and the standpipe must fully cover the drain hose.
Flooring
- For best performance, the washer must be installed on a solid floor. Wood floors may need to be reinforced to minimize vibration and/or unbalanced loads.
- Carpeting and soft tile surfaces do not provide good resistance to vibrations and may cause the washer to move slightly during the spin cycle.
CAUTION
- Do NOT install the washer on a platform or a poorly supported structure.
Water temperature
- Do not install the washer in areas where water may freeze as the washer always retains some water in its water valves, pumps, and/or hoses. Frozen water can cause damage to belts, the pump, and other components of the washer.
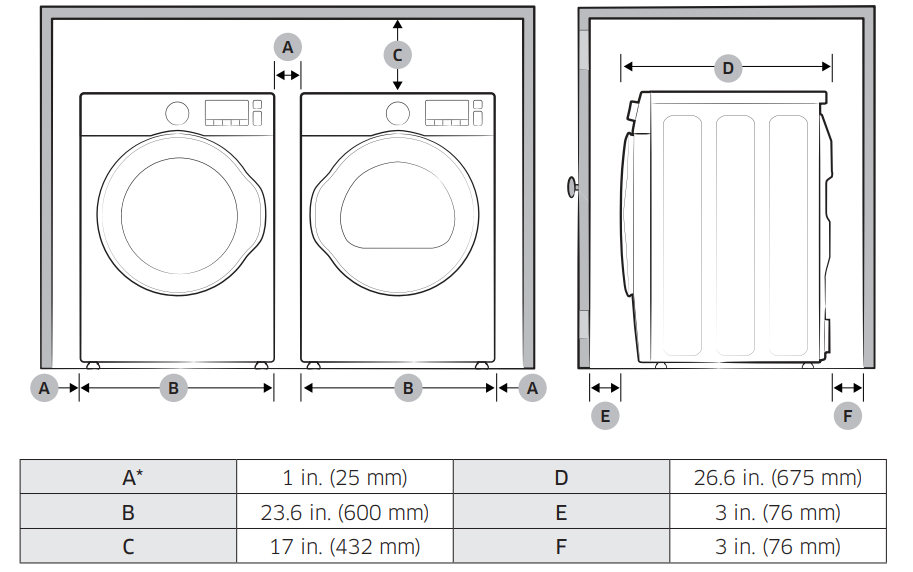
Alcove or closet installation
Minimum clearance for stable operation:

If both the washer and a dryer are installed in the same location, the front of the alcove or closet must have at least a 72 in² (465 cm²) unobstructed air opening. Your washer alone does not require a specific air opening.
Undercounter installation

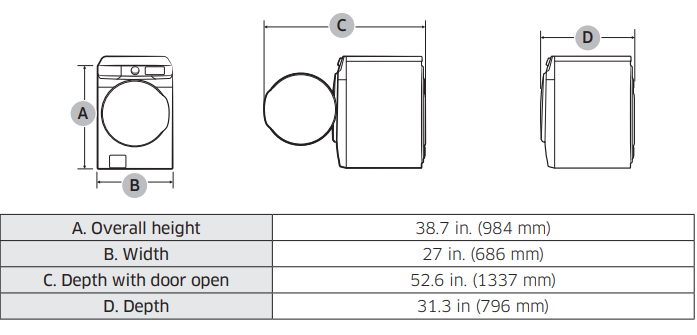
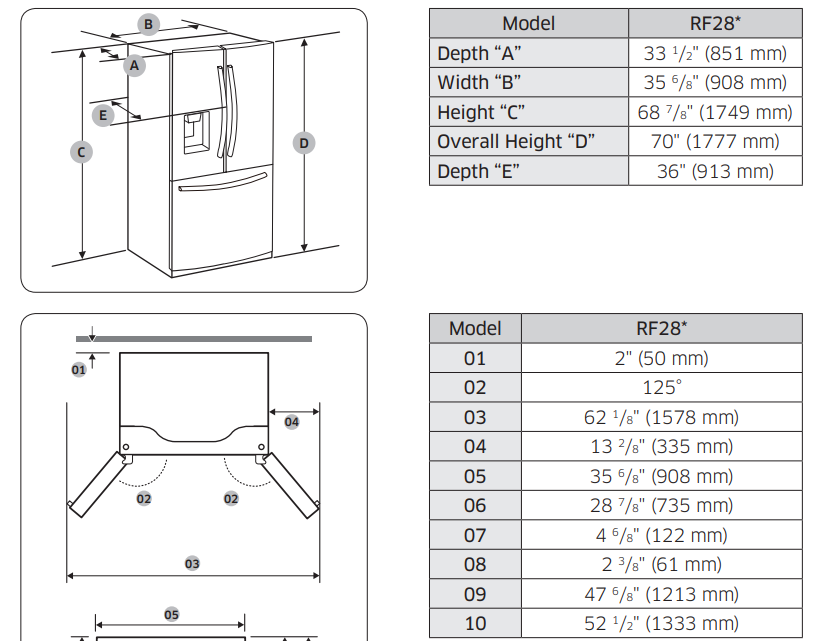
Dimensions
Side by side installation
Step-by-step installation
STEP 1 Select a site Select a site that:
• Has a solid, level surface without carpeting or flooring that may obstruct ventilation • Is away from direct sunlight
• Has adequate room for opening and closing the door
• Is away from any heat sources
• Provides room for maintenance and servicing
• Has a temperature range between 50 °F (10 °C) and 109 °F (43 °C) CAUTION
• If your refrigerator is equipped with an ice maker, provide extra space at the rear of the refrigerator for the water line connection.
• When you install the refrigerator next to a fixed wall, you must provide a minimum clearance of 3 3/4" (95 mm) from the wall to allow the door to swing open.
STEP 2 Flooring
- If the refrigerator cannot pass through the entrance due to its size, see STEP 3 Door removal for entrance
NOTE
- To prevent floor damage, make sure the front leveling legs are in the upright position.
- The surface you install the refrigerator on must support a fully loaded refrigerator.
- To protect the floor, put a large piece of cardboard along the path to the refrigerator's final installation location.
- Once the refrigerator is in its final position, do not move it unless necessary to protect the floor. If you have to move the refrigerator, place thick paper or cloth such as old carpets along the path of movement.
STEP 3 Door removal for entrance
- If the refrigerator cannot pass through the entrance to your home or kitchen due to its size, follow these instructions to remove and then re-install the refrigerator's doors. If you do not need to remove the doors, go to page 29 to continue the installation procedure.
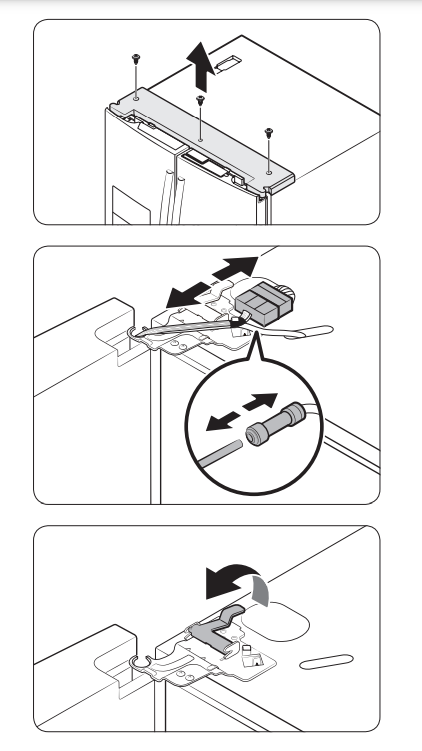
- With the doors closed, use a Phillips head screwdriver to remove the screws x3) in the top cover.
- Disconnect the wires and the water tube from the left-side door. Do the following sequentially:
- Decouple the connector.
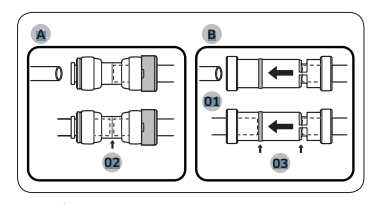
- While holding down one end of the water line coupler, disconnect the water tube.
CAUTION
- Keep the water tube clips out of children’s reach.
- Gently draw up the clamp. To prevent finger injuries, do not apply a sudden force to the clamp.
To reattach the fridge door
- After you have moved the refrigerator to its final location, reattach the doors by following the removal instructions in reverse order.
Dispenser
- Center of transparent coupler
Guidelines
To detach the freezer drawer
- Lift up the front of the upper basket and pull to remove.
- Lift the door bin to remove.
- Then, pull up to remove the lower basket from the rail assembly.
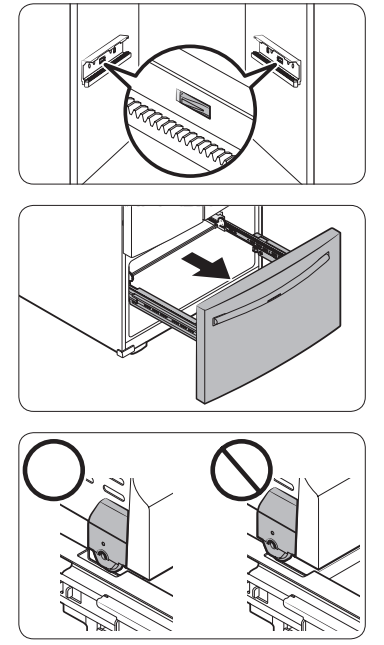
- Press down the hooks to unlock the rail assembly.
- While holding the upper area of the freezer drawer front, slide the drawer out all the way to remove the freezer drawer from the rail assembly.
CAUTION
- Be careful not to scratch or dent the rail assembly.
- Make sure you mount the freezer baskets in the correct position.
- Otherwise, the door will not open or close properly, which causes frost to build up.
- Do not store too much food in the freezer drawer. This prevents the freezer drawer from closing properly, resulting in frost buildup.
STEP 4 Leveling the refrigerator
- To adjust the height of the left side:
- Insert a flat-head screwdriver into the leveler of the left side front leg. Turn the leveler clockwise to raise the left side or turn it counterclockwise to lower.
- To adjust the height of the right side:
- Insert a flat-head screwdriver into the leveler of the right side front leg. Turn the leveler clockwise to raise the right side or turn it counterclockwise to lower.
STEP 5 Adjust the door height and the door gap
- Check the height difference between the doors, and then lift up and hold the door with the lower height.
- Insert a suitable-sized snap ring (A) between the door grommet (B) and the hinge as shown.
Over the edge of a wash basin
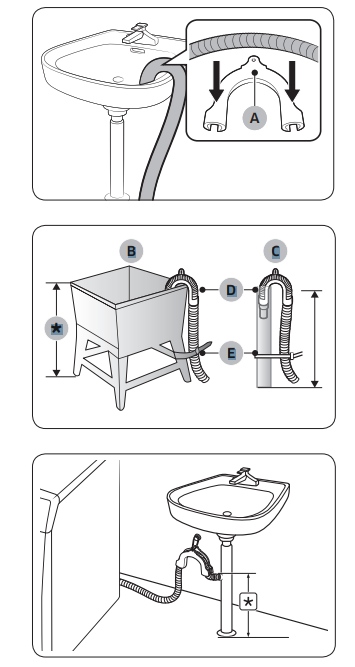
- The drain hose must be placed at a height of between 24 in. (60 cm) and 35 in. cm) from the floor. To keep the spout of the drain hose bent, use the supplied plastic hose guide (A). Secure the guide to the wall using a hook to ensure stable drainage.
- ln a standpipe or laundry tub
- The laundry tub (B) or standpipe (C) must be no shorter than 18 in. (46 cm) and no longer than 96 in. (245 cm). Make sure the drain hose and the standpipe are not airtight.
NOTE
D: Hose retainer / E: Tie straps in. (46 cm) ~ 96 in. (245 cm)
In a sink drain pipe branch
The drain pipe branch must be above the sink siphon so that the end of the hose is at least 24 in. (60 cm) above the ground. in. (60 cm)
CAUTION
- Insert only one snap ring. If you insert two or more snap rings, the rings may slip out or make a rubbing noise.
- Keep the snap rings out of children’s reach and keep them for future use.
- Do not raise the door too much. The door can contact and damage the top cover.
STEP 6 Attach the handles
- Using a Phillips screwdriver, attach the handle screws to the refrigerator, two for each handle respectively, as shown in the illustration to the left.
- Attach the handle to the handle screws on the door.
- For type B handle: Insert the hook on the middle of the handle to its designated hole on the door, and then place the upper and lower part of the handles to the handle screws.
Run Calibration (recommended)
- Calibration ensures accurate weight detection by the washer. Make sure the drum is empty before running Calibration.
- Press Power to turn on the washer.
- Press and hold Temp. and Delay End simultaneously for 3 seconds.
- Press Start/Pause to start Calibration.
- The door is locked during the operation.
- The drum keeps rotating clockwise and anticlockwise for several minutes.
- When complete, the washer turns off automatically
STEP 7 Connect the water dispenser line
- A water dispenser with a filter is one of the helpful features on your new refrigerator. To help promote better health, the water filter removes unwanted particles from your water. However, it does not sterilize or destroy microorganisms.
- You may need to purchase a water purifying system to do that. The water line also connects to the ice maker. For the ice maker to operate properly, water pressure of 30 to 120 psi (206 to 827 kPa) psi is required.
- If the refrigerator is installed in an area with low water pressure (below 30 psi / 206 kPa), you can install a booster pump to compensate for the low pressure.
- After you have connected the water line, make sure the water storage tank inside the refrigerator is properly filled. To do this, press the water dispenser lever until water runs from the water outlet.
STEP 8 Initial settings
- By completing the following steps, the refrigerator should be fully functioning.
- Plug the power cord into the wall socket to turn the refrigerator on.
- Open the door, and check if the interior light lights up.
- Set the temperature to the coldest setting, and wait for about an hour. Then, the freezer will be slightly chilled, and the motor should be running smoothly.
- Wait until the refrigerator reaches the set temperature. Now the refrigerator is ready for use.
STEP 9 Final check
- When installation is complete, confirm that:
- The refrigerator is plugged into an electrical outlet and grounded properly.
- The refrigerator is installed on a flat, level surface with a reasonable clearance from walls and cabinets.
- The refrigerator is level and is sitting firmly on the floor.
- The door opens and closes freely, and the interior light turns on automatically when you open the door.
Before you start
STEP 1 Sort
- Sort the laundry according to these criteria:
- Care Label: Sort the laundry into cottons, mixed fibres, synthetics, silks, wools, and rayon.
- Color: Separate whites from colors.
- Size: Mixing different sized items together in the drum improves the washing performance.
- Sensitivity: Wash delicate items separately using Delicates cycle for pure, new woollen items, curtains, and silk items. Check the labels on the items.
STEP 2 Empty pockets
- Empty all the pockets of your laundry items
- Metal objects such as coins, pins, and buckles on clothing may damage other laundry items as well as the drum.
- Turn clothing with buttons and embroideries inside out
- If pants or jacket zippers are open while washing, the drum may be damaged.
- Zippers should be closed and fixed with a string.
- Clothing with long strings may become entangled with other clothes. Make sure to tie the strings before starting the wash.
STEP 3 Use a laundry net
- Brassieres (water washable) must be placed in a laundry net. Metal parts of the brassieres may break through and tear other laundry items.
- Small, light clothing such as socks, gloves, stockings, and handkerchiefs may become caught around the door.
- Place them inside a fine laundry net.
- Do not wash the laundry net by itself without other laundry. This may cause abnormal vibrations that could move the washer and result in injury.
STEP 4 Determine the load capacity
- Do not overload the washer. Overloading may cause the washer to not wash properly.
NOTE
- When washing bedding or bedding covers, the wash time may be lengthened or the spin efficiency may be reduced.
- For bedding or bedding covers, the recommended maximum spin level is “Low or Medium Spin”, and the load capacity is kg or less.
CAUTION
- If the laundry is unbalanced and the “Ub” information code is displayed, redistribute the load. Unbalanced laundry
STEP 5 Apply a proper detergent type
- The type of detergent depends on the type of fabric (cotton, synthetic, delicate items, wool), color, wash temperature, and degree of soiling. Always use “low suds” laundry detergent, which is designed for automatic washers.
NOTE
- Follow the detergent manufacturer’s recommendations based on the weight of the laundry, the degree of soiling, and the hardness of the water in your local area. If you are not sure about the water hardness, contact a local water authority.
- Do not use detergent that tends to be hardened or solidified. This detergent may remain after the rinse cycle, blocking the drain outlet.
CAUTION
- When washing wool using the WOOL, use only a neutral liquid detergent. If used with WOOL, powder detergent may remain on the laundry and discolor the laundry.
Use HE detergent only
- Your washer is designed to use high efficiency (HE) detergents.
- For the best cleaning results, use a high efficiency detergent such as Tide HE,
- Wisk HE, Cheer HE or Gain HE*. High efficiency detergents contain suds suppressors that reduce or eliminate suds. When fewer suds are produced, the load tumbles more efficiently and cleaning is maximized. (* Brand names are trademarks of their respective manufacturers.)
WARNING
- Regular detergent is not recommended.
- Use HE detergents only.
To use powdered detergent
- First, remove the provided liquid detergent container from the mainwash compartment. Then, add powdered detergent to the main-wash compartment according to the detergent manufacturer’s instructions.
CAUTION
- Do not add powdered detergent to the liquid detergent container.

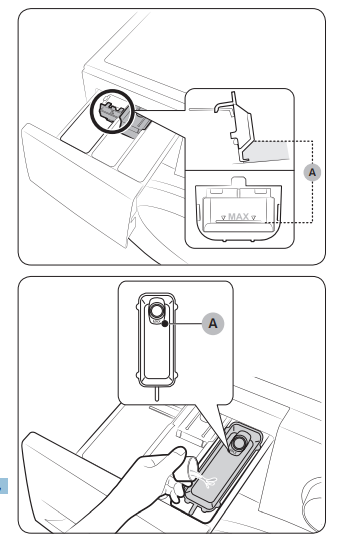
To apply washing agents to the detergent drawer
- Slide open the detergent drawer.
- Apply laundry detergent to the main-wash compartment as instructed or recommended by the manufacturer. To use liquid detergent, see page 31.
- Apply fabric softener to the softener compartment. Do not exceed the max line (A).
CAUTION
- Powder fabric softener is not recommended. Use liquid fabric softener only.
- Close the detergent drawer.
To use the bleach compartment
- Add only liquid chlorine bleach to the bleach compartment. Do not exceed the max line.
CAUTION
- Do not add undiluted liquid chlorine bleach directly to the load or to the drum. It is a powerful chemical and can cause fabric damage, such as weakening of the fibers or color loss if not used properly.
- To use oxygen boosters or color-safe bleach
- Oxygen boosters or color-safe bleach can increase washing performance. Make sure to add the oxygen booster or color-safe bleach after putting the laundry into the drum.
To use liquid detergent
- First insert the provided liquid container in the main-wash compartment. Then, apply liquid detergent to the container below the marked max line (A).
CAUTION
- Do not exceed the max line that is marked inside the container.
- Remove the liquid container if using power detergent.
- To use bleach compartment
- First insert the provided drawer bleach in the bleach compartment.
- Apply only liquid chlorine bleach to the drawer bleach. Do not exceed the max line (A).
CAUTION
- Do not apply undiluted liquid chlorine bleach directly onto the load or into the drum. It is a powerful chemical and can cause fabric damage, such as weakening of the fibers or color loss, if not used properly.
- To use oxi-type boosters or color-safe bleach
- Oxygen boosters or color-safe bleach can increase washing performance.
- Make sure to add the oxygen booster or color-safe bleach after putting the laundry into the drum.
NOTE
- To use both powdered detergent and powdered oxygen booster or powdered color-safe bleach, it is more effective to put them together into the drum before loading the laundry.
Operations
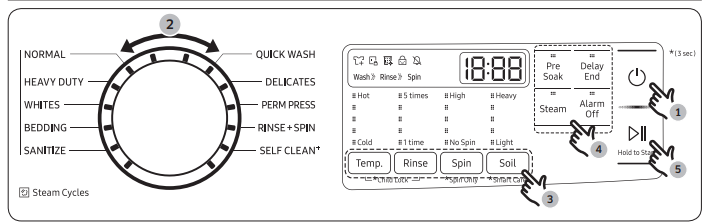
- Press Power to turn on the washer.
- Turn the Cycle Selector to select a cycle.
- Change the cycle settings (Temp., Rinse, Spin, and Soil) as necessary.
- Select desired options as necessary.
- Press and hold Start/Pause (Hold to Start).
To change the cycle during operation
- Press Start/Pause (Hold to Start) to stop operation.
- Select a different cycle.
- Press and hold Start/Pause (Hold to Start) again to start the new cycle.
Fridge
- You can use the Fridge button to set the fridge temperature or to activate Power Cool.
- Press Fridge repeatedly to select a desired temperature between 34 °F (1 °C) and 44 °F (7 °C).
- The temperature indicator displays the currently set or selected temperature.
- To activate Power Cool, press Fridge repeatedly until the
Power Cool indicator ( ) lights up.
- To deactivate Power Cool, simply press Fridge again while the Power Cool function is on.
- Power Cool speeds up the cooling process at maximum power to lower the fridge temperature. The Power Cool process continues to run for several hours, and then turns off and the fridge returns to the previous temperature setting.
- Use Power Cool to rapidly cool food that spoils quickly or to rapidly cool the refrigerator after the door has been left open for some time.
Autofill Pitcher
- Press and hold Fridge for 3 seconds to turn this function on. Open the left door of the fridge, and then insert the water pitcher. Close the door and the water pitcher will be filled with water up to the preset level.
- To turn the function off, press and hold Fridge again for seconds.
NOTE
- By default, Autofill Pitcher is disabled. Enable this function after you have installed the water line.
- If you open the door or push the dispenser lever, this function is stopped temporarily.
- The Autofill Pitcher indicators blink if there is a leak. This may occur because the water pitcher overflows, or the water-line or water-level sensor fails. If this is the case, follow these steps. a. Open the rubber cap and drain water. b. When draining is complete, the indicators stop blinking and turn solid. c. Close the rubber cap.
- If the indicators continue to blink, this might be a system failure. Contact a local service center.
Freezer
- You can use the Freezer button to set the freezer temperature or to activate Power Freeze.
- Press Freezer repeatedly to select a desired temperature between 5 °F (-15 °C) and -8 °F (-23 °C).
- The temperature indicator displays the currently set or selected temperature.
- To activate Power Freeze, press Freezer repeatedly until the
- Power Freeze indicator ( ) lights up.
- To deactivate Power Freeze, simply press Freezer again while the Power Freeze function is on.
- Power Freeze speeds up the freezing process at maximum power to lower the freezer temperature. The Power Freeze process continues to run for several hours, and then turns off and the freezer returns to the previous temperature setting.
- To freeze large amounts of food, activate Power Freeze for at least 20 hours before putting the food in the freezer.
Ice Maker
- Press Ice Maker to turn the ice maker on or off.
- The ice maker has 2 indicators ( / ) to indicate its operating status.
- When the ice maker operates, the corresponding indicator turns on.
- When the ice maker is turned off, the corresponding indicator ( ) turns on. In this case, ice making is disabled even if you press the Cubed or Crushed Ice buttons on the dispenser panel. To enable ice making, you must turn the ice maker on.
NOTE
- If the fridge part ice maker is turned off, it will turn on if you press and hold the ice lever for more than 5 seconds.
Filter Reset
- After about 6 months (and typically, about 300 gallons
- L) of water), the Filter indicator blinks red for several seconds when you open the door, reminding you that the filter needs to be replaced.
- When this happens, replace the filter, and then press and hold
- Ice Maker for 3 seconds. The filter lifecycle will be reset and the Filter indicator turns off.
NOTE
- Some regions have relatively large amounts of lime in their water. This can reduce the lifecycle of the filter. In these areas, you will have to replace the water filter more often than specified above.
- If water is not dispensing properly, the water filter is most likely clogged. Replace the water filter.
Door Alarm
- If the door is left open for more than 2 minutes, an alarm will sound and the alarm indicator will blink. You can toggle the alarm on and off by pressing Door Alarm. The alarm is enabled by factory default.
- If the door is left open for 5 minutes, internal lights (in the fridge and freezer) will blink for 10 seconds and then turn on.
- The whole process will be repeated every minute for 5 minutes. This is to alert hearing-impaired users that a door is open. Note that this function is normal.
Control Lock
- To prevent accidental setting changes, press and hold Door Alarm for 3 seconds. The main panel will be disabled and the Lock indicator ( ) will turn on.
- When Control Lock is on, the indicator blinks if any button on the main panel is pressed.
- If you press and hold the button again for more than 3 seconds,
- Control Lock will be deactivated.
- However, Control Lock will be reactivated if no button is pressed within 1 minute.
NOTE
- Control Lock on the main panel does not affect the dispenser.
- The dispenser operates independently and so does the dispenser lever. To lock the dispenser and the dispenser lever, use the
- Dispenser Lock function.
Sabbath Mode
- The Sabbath mode stays active for 85 hours once it is activated. After that, it will be deactivated automatically.
- To activate Sabbath Mode, press and hold Door Alarm and Water/Ice simultaneously for 5 seconds. When the refrigerator is in Sabbath mode, the buttons, the display, and the internal lights do not function. The refrigerator and freezer, however, continue to cool.
- To deactivate Sabbath Mode, press and hold Door Alarm and Water/Ice simultaneously again for 5 seconds.
NOTE
- If the refrigerator powers off and restarts (for example, if there is a power failure), the Sabbath mode remains active. To end Sabbath Mode, you must deactivate it as described above.
- Controls must be unlocked before activating Sabbath mode.
Cooling Off
- Cooling Off mode (also called Shop mode) is designed for use by retailers when they are displaying refrigerators on a retail floor.
- In Cooling Off mode, the refrigerator’s fan motor and lights operate normally, but the compressors do not run so neither the refrigerator nor the freezer become cold.
- To enter or exit the Cooling Off mode, press and hold Fridge and Cool Select Zone simultaneously for 6 seconds. Then, when the display blinks, press Door Alarm.
- When the Cooling Off mode is on, the refrigerator chime sounds, and the refrigerator shows “0” on the fridge temperature display and “FF” on the freezer temperature display.
Lock
- To prevent the use of the dispenser panel buttons and the dispenser lever, press and hold Water for more than 3 seconds.
- If you press and hold the button again for more than 3 seconds, the dispenser lock will be deactivated.
- When dispenser lock is on, the indicator blinks if any button on the dispenser panel is pressed or the dispenser lever is pressed.
NOTE
- The Lock on the dispenser panel does not affect the controls on the main panel. To lock the main panel, use the Control Lock function on the main panel.
To fill the Water pitcher
- Grasp a handle groove of the sealed mouth, and then pull up to open the lid.
- Put tea leaves or fruit to your taste into the infuser.
NOTE
- If you want to keep the infused water in its initial concentration, turn the Autofill
- Pitcher function off.
- Enable the Autofill Pitcher function on the main panel. Open the left door of the fridge door, and then mount the water pitcher onto the holder. Push it straight in as shown in the illustration on the left.
- Close the door. The water pitcher will start to fill with chilled water a short time later.
Water/Ice dispenser
- Using the dispenser, you can dispense water with or without ice.
- The water dispenser offers 3 options: chilled water, cubed ice, and crushed ice. To dispense chilled water, press Water on the dispenser panel. Put a water glass under the dispenser, and then push the dispenser lever.
To dispense water with ice
- With the Ice Maker enabled, press
- Cubed Ice or Crushed Ice to select the ice type.
- Put a water glass under the dispenser, and then push the dispenser lever with the glass. Ice will be dispensed from the dispenser.
- Press Water to select water.
- Push the dispenser lever with the glass. Water will be dispensed from the dispenser
Maintenance
Self Clean
- Certain usage and environmental conditions may result in some residue build-up or odor in the washer drum.
- To prevent this build-up of residue or odor causing bacteria and keep your washer drum fresh and clean, perform the SELF CLEAN cycle at least once a month or every 40 cycles. Perform the recommended procedure below when using the SELF
CLEAN cycle.
- Remove all items from the washer drum and ensure the drum is empty. Laundry left in the drum during the SELF CLEAN cycle may be damaged.
- Press Power to turn on the washer.
- Turn the Cycle Selector to SELF CLEAN .
- Press and hold Start/Pause (Hold to Start).
NOTE
- The water temperature for SELF CLEAN is defaulted to Hot. This temperature cannot be changed.
- In the case where residue is present in the washer drum, add liquid chlorine bleach to the MAX level line in the main-wash compartment before starting the SELF CLEAN cycle. Do not add the liquid chlorine bleach to the bleach compartment (This is only the case for SELF CLEAN cycle).
- Do not exceed the max line. Do not use or mix any other detergent or chemicals during the SELF CLEAN cycle. If necessary, run a RINSE+SPIN cycle after the SELF CLEAN cycle has completed to help remove any remaining residue.
Smart Care
- To enable this function, you must first download the Samsung Laundry app from the Play
- Store or the App Store and install it on a mobile device that has a camera function. The
- Smart Care function has been optimized for Galaxy and iPhone mobile devices (applicable models only).
- When the washer detects an issue to check, an information code appears on the display. To enter Smart Care mode, press and hold Soil for 3 seconds.
- The washer starts the self-diagnosis procedure and displays an information code if a problem is detected.
- Run the Samsung Laundry app on your mobile device, and then tap Smart Care.
- Put the mobile device close to the washer’s display so that the smartphone camera and the washer face each other. The information code will be recognized automatically by the app.
- When the information code is recognized correctly, the app provides detailed information about the problem with applicable solutions.
Emergency drain
- In case of a power failure, drain the water inside the drum before taking out the laundry.
- Turn off the washer, and then unplug the power cord.
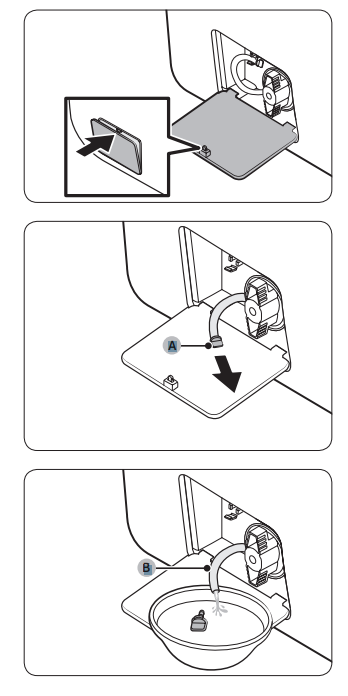
- Gently press the top area of the filter cover to open.
- Put an empty, spacious container around the cover, and stretch the emergency drain tube to the container while holding the tube cap (A).
- Open the tube cap and let water in the
- Emergency drain tube (B) flow into the container.
- When done, close the tube cap, and reinsert the tube. Then, close the filter cover.
Autofill pitcher (applicable models only)
- Grasp a handle groove of the sealed mouth, and then pull up to remove.
- Grasp both sides of the sealed mouth, and then lift to remove.
- While slightly twisting the infuser, pull it out of the sealed mouth.
- Clean the infuser with neutral agents and running water. Rinse and dry well.
- Reassemble the Autofill pitcher in the reverse order of disassembly.
Fridge shelves
- The appearance of the shelves differs by model.
- To remove a shelf, fully open the corresponding door. Hold the front of the shelf, and then gently lift up and slide out.
NOTE
- Do not lift up the shelf fully when removing or reinserting the shelf. The rear wall of the fridge room can be dented.
- To reinsert, hold the shelf at an angle so the front is higher than the back, and then insert the top hook into the top shelf notch. Then, lower the shelf and insert the bottom shelf hook into the bottom shelf notch.
Vegetable shelf
- Slide out the left-side vegetable drawer.
- While supporting the vegetable shelf with one hand, slide it out with the other hand.
NOTE
- To use the space that is opened up after removing the glass shelf, take out the vegetable shelf.
- To reinsert, follow the steps above in the reverse order.
Door bins
- To remove the door bin, hold the front sides of the bin, and then gently lift up to remove.
- To reinsert, insert the door bin slightly above its final location making sure that the back of the bin is against the door.
- Hold the rear of the door bin with both hands, and then press down so that it fits snugly.
Cool Select Zone
- To remove, fully open the Cool Select
- Zone. Then, slightly lift the front side and pull straight out.
- To reinsert, push the rails to the back of the refrigerator. Then, place the Cool
- Select Zone drawer onto the rails and slide it back until it is in place.
- To remove the divider, lift the front side of the divider to unhook it from the wall, and then pull the divider out.
- To reinsert the divider, hook the back of the divider over the rear wall, and then push the divider down
To remove, fully open the Cool Select
- Zone. Then, slightly lift the front side and pull straight out.
- To reinsert, push the rails to the back of the refrigerator. Then, place the Cool
- Select Zone drawer onto the rails and slide it back until it is in place.
- To remove the divider, lift the front side of the divider to unhook it from the wall, and then pull the divider out.
- To reinsert the divider, hook the back of the divider over the rear wall, and then push the divider down
Lower basket
- To remove, first remove the upper basket. Then, tilt up the front of the lower basket to pull out.
- To reinsert, put the basket onto the rail assembly rear side first.
Interior and exterior
- Do not use benzene, thinner, home/car detergent, or Clorox™ to clean the refrigerator.
- They may damage the surface of the refrigerator and cause a fire.
- Do not spray water onto the refrigerator. This may cause electric shock.
- Regularly use a dry cloth to remove all foreign substances such as dust or water from the power plug terminals and contact points.
- Unplug the power cord.
- Use a moistened, soft, lint-free cloth or paper towel to clean the refrigerator’s interior and exterior.
- When done, use a dry cloth or paper towel to dry well.
- Plug in the power cord.
Rubber seals
- If the rubber seals of a door become dirty, the door may not close properly and reducing refrigerator performance and efficiency.
- Use a mild detergent and damp cloth to clean the rubber seals. Then, dry well with a cloth.
Rear panel
- To keep cords and exposed parts of the rear panel free of dirt, vacuum the panel once or twice a year.
Water filter
- Shut off the water supply line.
- Turn the knob of the filter cartridge degrees counterclockwise (1/4 turn).
- The filter cartridge unlocks.
- Pull out to remove the cartridge.
- If the water filter is severely contaminated, the cartridge may not be easy to remove. If that is the case, use force to remove the cartridge.
- To prevent water leaks from the filter opening, pull the cartridge straight out while removing it.
- Insert a new filter cartridge. Use only
- Samsung-provided or approved filters.
Maintenance
Self Clean
- Perform this cycle regularly to clean the drum and to remove bacteria from it.
- Press Power to turn on the washer.
- Press Self Clean.
- Press Start/Pause.
NOTE
- The water temperature for Self Clean is set to Extra Hot, which cannot be changed.
CAUTION
- Do not use any cleaning agents for cleaning the drum. Chemical residue in the drum deteriorates the washing performance.
Self Clean reminder ( )
- The Self Clean reminder appears on the main screen once every 40 washes. It is advisable to perform the Self Clean regularly.
- When you first see this reminder, you can ignore the reminder for 6 consecutive washes. From the 7th wash, the reminder no longer appears. However, it appears again on the second 40th wash.
Smart Care
- To enable this function, you must first download the Samsung Smart Washer at the Play
- Store or the Apple Store, and install it on a mobile device featuring the camera operation.
- The Smart Care function has been optimized for:
- Galaxy & iPhone series (cannot be supported for some models)
- The washer runs the self-diagnosis in the background, and displays an information code if an error is found. If this is the case, follow the steps below:
- Run the Samsung Smart Washer app on your mobile device, then press and hold the
- Super Speed button for 3 seconds within 10 seconds after turning the power on by pressing the Power button.
- Present the mobile device to the washer’s display panel so that the mobile device and the washer face each other. Then, the information code will be recognized automatically by the app.
- When the information code is recognized correctly, the app provides detailed information for the error with further actions.
NOTE
- The function name, Smart Care, may differ depending on the language.
- If the washer reflects light on the display, the app may fail to recognize the information code.
- If the app fails to recognize the Smart Care code consecutively, enter the information code manually onto the app screen.
Emergency drain
- In case of a power failure, drain the water inside the drum before taking out the laundry.
- Power off and unplug the washer from the electrical outlet.
- Gently press the top area of the filter cover to open.
- Put an empty, spacious container around the cover, and stretch the emergency drain tube to the container while holding the tube cap (A).
- Open the tube cap and let water in the
- Emergency drain tube (B) flow into the container.
- When done, close the tube cap, and reinsert the tube. Then, close the filter cover.
NOTE
- Use a spacious container because the water in th
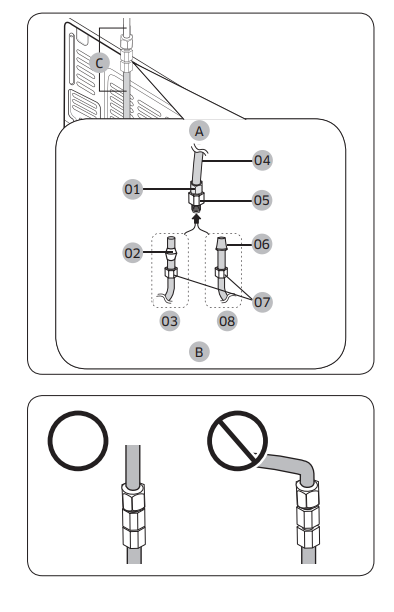
Mesh filter
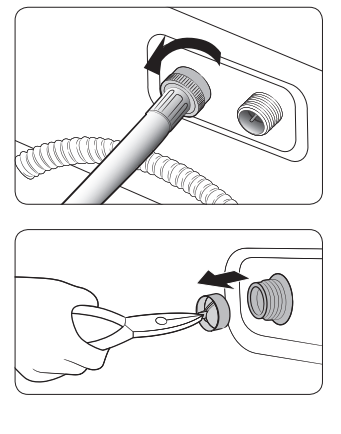
- Clean the mesh filter of the water hose once or twice a year.
- Turn off the washer, and unplug the power cord.
- Close the faucet.
- Loosen and disconnect the water hose from the back of the washer. Cover the hose with a cloth to prevent water from gushing out.
- Use pliers to pull out the mesh filter from the inlet valve.
- Submerge the mesh filter deeply in water so that the threaded connector is also submerged.
- Dry the mesh filter completely in the shade.
- Reinsert the mesh filter into the inlet valve, and reconnect the water hose to the inlet valve.
Open the faucet.

Pump filter
- It is advisable to clean the pump filter 5 or 6 times a year to prevent its clogging.
- Turn off the washer, and unplug the power cord.
- Drain the remaining water inside the drum. See the “Emergency drain” section.
- Gently press the top area of the filte cover to open.
- Turn the pump filter knob (A) to the left, and drain off the remaining water.
- Clean the pump filter using soft brushes. Make sure the drain pump propeller inside the filter is unclogged.
- Reinsert the pump filter, and turn the filter knob to the right.
NOTE
- Some pump filters feature a safety knob that is designed to prevent accidents by children. To open the safety knob of the pump filter, push in and turn it anticlockwise. The spring mechanism of the safety knob helps open the filter.
- To close the safety knob of the pump filter, turn it clockwise. The spring makes a rattling sound, which is normal.
Door diaphragm
- Open the washer door and remove any clothing or items from the washer.
- Check if there are any foreign substances on the grey Diaphragm between the lid and the drum.
- To check this, turn the Diaphragm out.
- If there are any foreign substances, remove them.
- If you find stained areas, wipe them down using the procedure below: a) Carefully combine ¾ cup (177 mL) of liquid chlorine bleach with 1 gal. (3.8L) of warm tap water. b) Wipe the Diaphragm area with the dilute solution using a damp cloth. c) Let stand 5 minutes. d) Wipe down the area thoroughly with a dry cloth and let the washer interior air dry with the door open.
Care against an extended time of disuse
- Avoid leaving the washer unused for an extended time. If this is the case, drain the washer and unplug the power cord.
- Turn the Cycle Selector to select RINSE+SPIN.
- Empty the drum, and press Start/Pause.
- When the cycle is complete, close the faucet and disconnect the water hose.
- Turn off the washer, and unplug the power cord.
- Open the door to let air circulate through the drum.
Troubleshooting
Interior wall is hot.
- Refrigerator has heat-proof piping in the interior wall.
- To prevent condensation from forming, the refrigerator has heat-proof piping in the front corners.
- If the ambient temperature rises, this equipment may not work effectively. This is not a system failure.
Refrigerator has odors.
• Spoiled food.
• Food with strong odors
- Clean the refrigerator and remove any spoiled food.
- Make sure strong smelling food is wrapped airtight.
Frost around the vents.
- Make sure no food blocks the refrigerator vents.
Frost on interior walls.
- Make sure food does not block the door. Clean the door gasket.
Fruits or vegetables are frozen.
- Do not store most kinds of fruit or vegetables in the Cool Select Zone.
Condensation forms on the interior walls.
- If door is left open, moisture enters the refrigerator.
- Food with high moisture content.
- Remove the moisture and do not leave a door open for extended periods of time
- Make sure food is wrapped airtight.
Water flow is weaker than normal.
- Water pressure is too low
- Make sure the water pressure is between 30 to 120 psi (206 to 827 kPa).
Ice maker makes a buzzing sound.
- The ice maker function is activated, but the water supply to the refrigerator has not been connected.
Ice maker does not make ice.
- Ice maker has just been installed.
- Freezer temperature is too high.
- Dispenser panel Lock is activated.
- Ice maker is off.
- Ice maker is off.
- Set the freezer temperature below 0 °F (-18 °C) or -4 °F (-20 °C) in warm ambient air.
- Deactivate dispenser panel Lock.
- Turn on the ice maker.
Ice does not dispense.
- Ice may jam if the ice dispenser is not used for a long time (approx. 3 weeks).
- Ice bucket is not properly inserted.
- Water line is not connected properly or water supply is not on.
- If you won't be using the refrigerator for a long time, empty the ice bucket an
- Make sure the ice bucket is properly inserted.
- Check if the water line is installed correctly. Check if the water line stop cock is closed.
Refrigerator will not operate
- Not connected to an electrical supply - Plug the power cord into a grounded 3 prong outlet. Do not use an extension cord.
- No power to the electrical outlet - Plug in a lamp to see if the outlet is working.
- Household fuse has blown or circuit breaker has tripped - Replace the fuse or reset the circuit breaker. If the problem continues, contact a licensed electrician.
New installation
- Following installation, allow 24 hours for the refrigerator and freezer to cool completely. NOTE: Adjusting the temperature control(s) to the coldest setting will not cool either compartment (refrigerator or freezer) more quickly.
Motor seems to run too much
- Your new refrigerator has an energy-efficient motor
- The refrigerator may run longer than you’re used to, because the compressor and fans operate at lower speeds that are more energyefficient. This is normal.
NOTE:
- Your refrigerator may run even longer if the room is warm, a large load of food is added, the doors are opened often, or if a door has been left open.
Refrigerator seems noisy
- The compressor in your new refrigerator regulates temperature more efficiently and uses less energy than older models. During various stages of operation, you may hear normal operating sounds that are unfamiliar. The following noises are normal:
- Buzzing/Clicking - Heard when the water valve opens and closes to dispense water or fill the ice maker. If the refrigerator is connected to a water line, this is normal. If the refrigerator is not connected to a water line, turn off the ice maker.
- Cracking/Crashing - Heard when ice is ejected from the ice maker mold.
- Popping - Heard when the inside walls contract/expand, especially during initial cooldown.
- Pulsating/Whirring - Heard when the fans/compressor adjust to optimize performance during normal operation.
- Rattling - Heard when water passes through the water line, or due to the flow of refrigerant. Rattling may also come from items placed on top of the refrigerator.
- Water running or gurgling - Heard when ice melts during the defrost cycle and water runs into the drain pan. Sizzling - Heard when water drips onto the heater during the defrost cycle.
Temperature is too warm
- New installation - Following installation, allow 24 hours for the refrigerator and freezer to cool completely.
NOTE:
Adjusting the temperature control(s) to the coldest setting will not cool either compartment (refrigerator or freezer) more quickly.
- Doors are opened often or not closed completely - This allows warm air to enter the refrigerator. Minimize door openings, keep the doors fully closed, and make sure both doors are properly sealed.
- Air vents are blocked - Remove items that are immediately in front of the vents.
- Large amount of warm food recently added - Allow several hours for the refrigerator to return to its normal temperature.
- Controls are not set correctly for the surrounding conditions - Adjust the controls to a colder setting. Check the temperature again in 24 hours.
Temperature is too cold
- Controls are not set correctly for the surrounding conditions - Adjust the controls to a warmer setting. Check the temperature again in 24 hours.
- Top refrigerator shelf is colder than lower shelves - On some models, air from the freezer enters the refrigerator compartment through vents near the top refrigerator shelf. As a result, the top shelf can be slightly colder than lower shelves.
- Air vents are blocked - Remove items that are immediately in front of the vents.
- Interior moisture buildup NOTE: Some moisture buildup is normal. Clean with a soft dry cloth.
- Room is humid - A humid environment contributes to moisture buildup. Use the refrigerator only in an indoor location, with as little humidity as possible.
- Doors are opened often or not closed completely - This allows humid air to enter the refrigerator. Minimize door openings, keep the doors fully closed, and make sure both doors are properly sealed.
Interior lights do not work
- Doors have been open for an extended period of time - Close the doors to reset the lights.
- Light bulb is loose in the socket or has burned out - On models with incandescent interior light bulbs, tighten or replace the bulb. See the “Lights” section.
NOTE:
These sounds are normal.
- Car engine ignition. As the operation stabilizes, the sounds will decrease.
Clicking! or Chirping!
Buzzing!
- While the fan is operating, these sounds may occur. When the refrigerator reaches the set temperature, the fan sound will stop.
SSSRRR! Whir!
- During a defrost cycle, water may drip on the defrost heater, causing sizzling sounds.
- As the refrigerator cools or freezes, refrigerant gas moves through sealed pipes, causing bubbling sounds.
- Bubbling!As the refrigerator temperature increases or decreases, plastic parts contract and expand, creating knocking noises. These noises occur during the defrosting cycle or when electronic parts are working.
Cracking!
- For ice maker models: When the water valve opens to fill the ice maker, you may hear a buzzing sound.
- Due to pressure equalizing when you open and close the refrigerator door, you may hear a whooshing sound
What Do I Need to use the Energy Management and Smart Grid functions?
To use the Smart Grid (Demand Response) and Energy Management functions on your refrigerator, you need the following:
• A wireless access point (router)
• A Samsung Energy Management-supported refrigerator
• A smartphone Registration
• Connect your refrigerator to your home Wi-Fi network. Register for the EMS service with your electric company. Your electric company must have an EMS (Energy Management System) supporting SEP (Smart Energy profile).
• Download the SmartThings app from the Google Play Store, Apple App Store, or Samsung Galaxy
Install and run the SmartThings app on your smartphone. Why isn’t the Energy Management function working normally?
- Make sure that your home router is operating normally with proper Internet service and connection.
- Make sure that the refrigerator is connected to the AP router).
- Checkpoints
- Connect your smartphone to the router (AP, Access Point), and then check if you can browse the Internet on the smartphone.
Why isn’t the Delay Defrost Capability working normally?
- Make sure that your home router is operating normally with proper Internet service and connection.