
English / Español
Use & Care Guide
Customer Assistance/Asistencia al Cliente
1-855-438-7899
Manual de Uso y Cuidado
Kenmore ®
Model/Modelo: 100.88914610
P/N 134779000B(0807)
Sears Brands Management Corporation
Hoffman Estates, IL 60179 U.S.A.
www.kenmore.com
www.sears.com
www.kmart.com
Countertop
Toaster Oven
Countertop Toaster Oven
KENMORE LIMITED WARRANTY
FOR ONE YEAR from the date of sale this appliance is warranted against defects
in material or workmanship when it is operated and maintained according to all
supplied instructions.
WITH PROOF OF SALE a defective appliance will be replaced free of charge.
For warranty coverage details to obtain free replacement, visit the web page:
www.kenmore.com/warranty
This warranty is void if this appliance is ever used for other than private
household purposes.
This warranty gives you specific legal rights, and you may also have other rights
which vary from state to state.
Sears Brands Management Corporation, Hoffman Estates, IL 60179

2
3
IMPORTANT SAFETY INSTRUCTIONS
TABLE OF CONTENTS
IMPORTANT SAFETY INSTRUCTIONS
When using electrical appliances, basic safety precautions should always be
followed, including the following:
1. Read all instructions.
2. DO NOT touch hot surfaces. Use handles or knobs.
3. To protect against electric shock, DO NOT immerse cord, plug, or Toaster
Oven in water or other liquids.
4. Close supervision is necessary when any appliance is used by or near children.
5. UNPLUG from outlet when not in use and before cleaning. Allow to cool
before putting on or taking off parts.
6. DO NOT operate any appliance with a damaged cord or plug, or after the
appliance malfunctions or has been dropped or damaged in any manner.
Take the appliance to a qualified service facility for inspection and possible
repair.
7. The use of accessory attachments not recommended by the appliance
manufacturer may cause injuries.
8. DO NOT use outdoors.
9. NEVER let the cord hang over the edge of table or counter, or touch hot
surfaces.
10. DO NOT place on or near a hot gas or electric burner, or in a heated oven.
11. Extreme caution must be used when moving an appliance containing hot oil
or other hot liquids.
12. DO NOT use this appliance for anything other than its intended use.
13. Oversized foods or metal utensils must not be inserted in a toaster oven, as
they may create a fire or risk of electric shock.
14. A fire may occur if the toaster oven is covered or touching flammable material,
including curtains, draperies, walls and the like when in operation. Do not
store any item on top of the appliance during operation.
15. DO NOT clean with metal scouring pads. Pieces can break off the pad and
touch electrical parts involving a risk of electric shock.
16. Extreme caution should be exercised when using containers constructed of
materials other than metal or glass.
1 7. DO NOT store any materials, other than manufacturer’s recommended
accessories, in this toaster oven when not in use.
18. DO NOT place the following materials in the toaster oven: cardboard,
plastic, paper, or other flammable materials.
19. DO NOT cover Crumb Tray or any part of the toaster oven with metal foil.
This will cause overheating of the toaster oven.
20. To turn toaster oven power Off, switch the Time knob to OFF until the unit
beeps and shuts off, then unplug.
21. Extension cords are available and may be used if care is exercised in their use.
22. This appliance has a polarized plug (one blade is wider than the other).
To reduce the risk of electric shock, this plug is intended to fit into a polarized
outlet only one way, if the plug does not fit fully into the out let, reverse the plug.
23.
This product is designed for household use only!
Short Power Cord Instructions
A short power-supply cord is to be provided to reduce the risk resulting from
becoming entangled in or tripping over a longer cord. This appliance is equipped
with a short power-supply cord. Longer detachable power-supply cords or
extension cords are available and may be used if care is exercised in their use.
If a longer detachable power-supply cord or extension cord is used:
1. The marked electrical rating of the cord set or extension cord should be at least
as great as the electrical rating of the appliance cord.
2. The cord should be arranged so that it will not drape over the counter top or
tabletop where it can be pulled on by children or tripped over unintentionally.
SAVE THESE INSTRUCTIONS!
Important Safety Instructions.....................................................................2 - 3
Parts and Features.......................................................................................4
Operating Instructions..............................................................................5 - 6
Care and Maintenance..................................................................................7
Warranty......................................................................................Back Cover

54
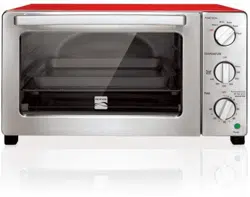
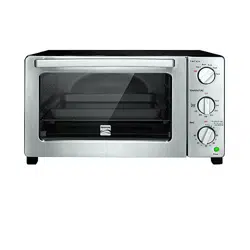
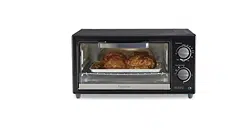
OPERATING YOUR TOASTER OVEN PARTS AND FEATURES
Fig. 1
Door
Handle
Glass
Door
Temperature
Control
Knob
Time/Taste
Shade Knob
Power
Indicator
Crumb Tray
Bake Pan
Wire Rack
Appliance surfaces are hot during and after use. Always wear
protective, insulated oven mitts when touching hot toaster oven or hot dishes and
food, or when inserting or removing Wire Rack, Bake Pan, or other baking dishes.
CAUTION:
NEVER leave Toaster Oven unattended while it is in use.
CAUTION:
BEFORE FIRST USE
1. Remove all accessories and wash them in hot sudsy water. Dry thoroughly before
placing in the oven.
2. Place Toaster Oven on a dry, flat, level surface such as a countertop or table.
3. Be sure the sides, back and top of the oven are at least four inches away from
any walls cabinets or objects on the counter or table.
4. Remove all items not required for the next cooking procedure.
5. Plug power cord into a standard 120-V, 60 Hz AC-only 2-prong electrical outlet.
The Toaster Oven should be the only appliance operating on the circuit.
6. Make sure the crumb tray is in place.
TOASTING
The toasting feature allows for toasting 4 slices of bread, frozen waffles, frozen
pancakes or 6 English Muffin halves. When toasting only 1 or 2 items, place the food
in the center of the Toaster Oven’s rack.
1. Be sure the crumb tray is in place.
2. Wire Rack should be in the lower rack guide.
3. Turn the Temperature Control Knob fully clockwise to the Toast position.
4. Place the food to be toasted on the wire rack and close the door.
5. To turn on the power, turn the time knob clockwise. The green Power light
illuminates.
IMPORTANT: Turn the Time knob past the 10 minute point, then back to the desired
darkness. For dark toast, turn the knob to point with the Dark icon . For medium
toast point with the Medium icon . For light toast, point with the Light icon .
Within each icon space, adjust pointer for doneness as desired.
6. The bell will ring and the power will automatically shut off when the Toaster
Oven has finished toasting.
7. If toast is removed before the bell rings, turn the time knob to 0 (off).
Time/Toast Shade
Rotate knob past 10
then set desired time
Min
Toast
Broil
450
400
350
Bake
300
250
200
Warm
Temperature
10
20
30
0
54
OPERATING YOUR TOASTER OVEN PARTS AND FEATURES
Fig. 1
Door
Handle
Glass
Door
Temperature
Control
Knob
Time/Taste
Shade Knob
Power
Indicator
Crumb Tray
Bake Pan
Wire Rack
Appliance surfaces are hot during and after use. Always wear
protective, insulated oven mitts when touching hot toaster oven or hot dishes and
food, or when inserting or removing Wire Rack, Bake Pan, or other baking dishes.
CAUTION:
NEVER leave Toaster Oven unattended while it is in use.
CAUTION:
BEFORE FIRST USE
1. Remove all accessories and wash them in hot sudsy water. Dry thoroughly before
placing in the oven.
2. Place Toaster Oven on a dry, flat, level surface such as a countertop or table.
3. Be sure the sides, back and top of the oven are at least four inches away from
any walls cabinets or objects on the counter or table.
4. Remove all items not required for the next cooking procedure.
5. Plug power cord into a standard 120-V, 60 Hz AC-only 2-prong electrical outlet.
The Toaster Oven should be the only appliance operating on the circuit.
6. Make sure the crumb tray is in place.
TOASTING
The toasting feature allows for toasting 4 slices of bread, frozen waffles, frozen
pancakes or 6 English Muffin halves. When toasting only 1 or 2 items, place the food
in the center of the Toaster Oven’s rack.
1. Be sure the crumb tray is in place.
2. Wire Rack should be in the lower rack guide.
3. Turn the Temperature Control Knob fully clockwise to the Toast position.
4. Place the food to be toasted on the wire rack and close the door.
5. To turn on the power, turn the time knob clockwise. The green Power light
illuminates.
IMPORTANT: Turn the Time knob past the 10 minute point, then back to the desired
darkness. For dark toast, turn the knob to point with the Dark icon . For medium
toast point with the Medium icon . For light toast, point with the Light icon .
Within each icon space, adjust pointer for doneness as desired.
6. The bell will ring and the power will automatically shut off when the Toaster
Oven has finished toasting.
7. If toast is removed before the bell rings, turn the time knob to 0 (off).
Time/Toast Shade
Rotate knob past 10
then set desired time
Min
Toast
Broil
450
400
350
Bake
300
250
200
Warm
Temperature
10
20
30
0
76
OPERATING YOUR TOASTER OVEN OPERATING YOUR TOASTER OVEN
WARNING: DO NOT use roasting bags, plastic or glass containers in
the toaster oven.
1. Place the wire rack in the upper rack guide.
NOTE: The left wall is labeled "Broil only" just above the guide.
2. Set the Temperature knob to Broil.
3. Next, turn the Time knob clockwise to start heating.The green Power light
illuminates. Preheat oven by turning the Time knob clockwise past the 10 minute
position then back to the medium toast icon (approx. 3-4 minutes).
4. Place food to be broiled on the bake pan*. Brush food with sauces or oils,
as desired.
5. When the toaster oven is preheated, the bell will ring and the toaster oven
shuts off. Slide the Bake pan onto the wire rack positioned in the upper rack
guide. Now set the Time knob to the desired amount of cooking time based on
the recipe you are using. If a recipe has a range of time, always start with the
shortest time and check the food for doneness at this point.
7. Turn food over halfway through cooking time or as directed in recipe.
8. When the cook time is up, the bell rings, the Time knob is back at 0 (off), the
Power light goes out, and the toaster Oven is Off. If more broiling time is
needed, reset Time knob for more minutes.
9. If the food is done before the bell rings, turn the Time knob to 0 (Off).
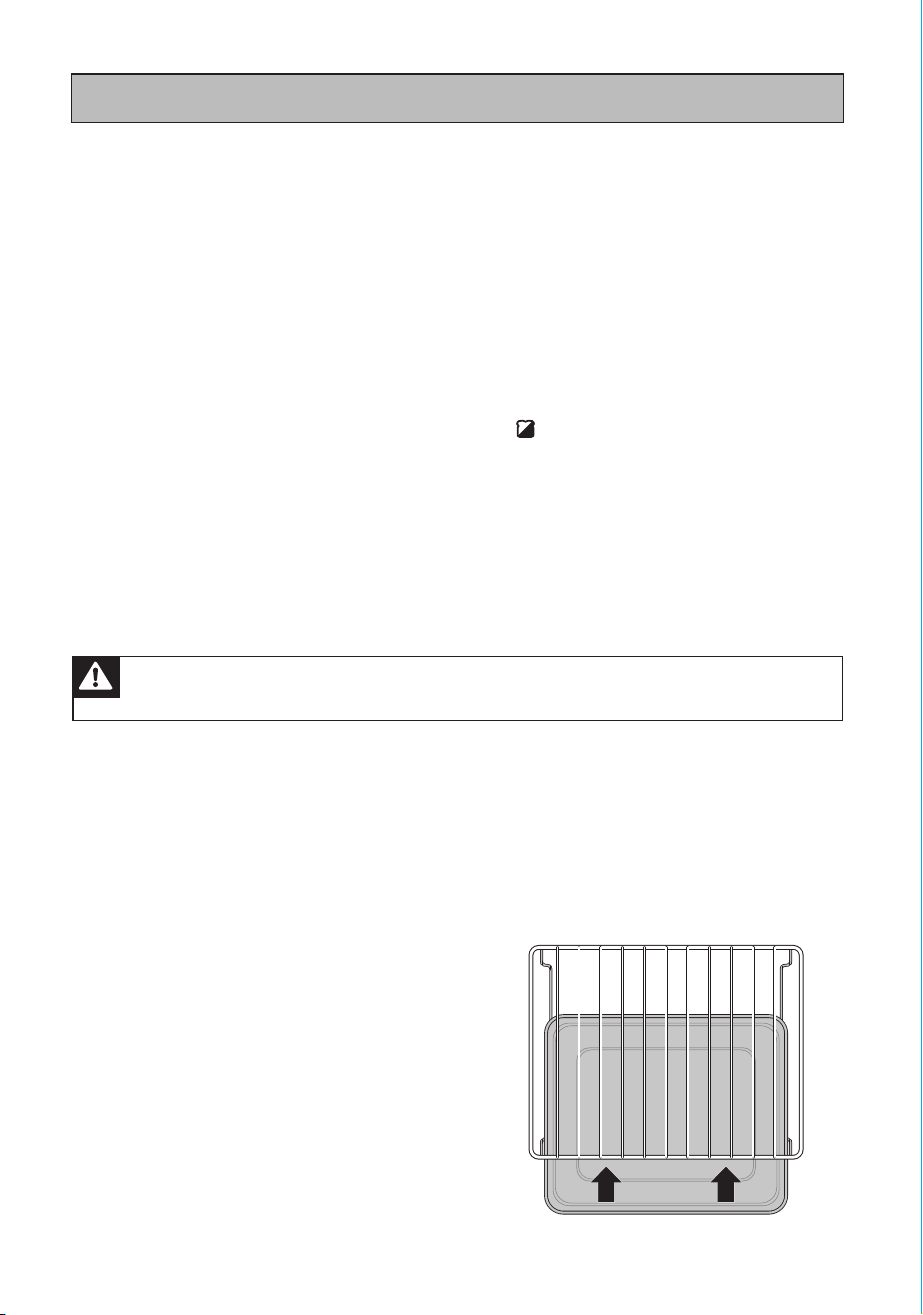
* ALTERNATE RACK AND BAKE PAN SETUP
You may slide the bake pan between the
rack legs so that it hangs below the rack.
In this setup the pan will serve as a drip
collection tray while food is broiling on the
rack. Place food directly on the rack
after the preheat period.
BROILING
For best results, it is recommended that you preheat the Toast Oven for 5 Minutes.
Trim off any excess fat from meat, and dry off any excess moisture that may be
on the food you are broiling.
BAKING
When baking one item at a time, position the wire rack in the lower rack guide.
A pizza up to 9 inches in diameter will fit on the rack.
1. Place the wire rack in the lower rack guide. You may use the bake pan as a drip
collection tray. See Alternate Rack and Bake Pan Setup at the bottom of the
next page.
2. To preheat the Toaster Oven, turn the Temperature knob to Bake.
3. Next, turn the Time knob clockwise to start heating. The green Power light
illuminates. Preheat OVEN by turning the Time knob clockwise past the
10 minute position then back to the dark toast icon (approx. 5 minutes)
4. When the toaster oven is preheated the bell will ring and Toaster Oven shuts
Off. Place the item to be baked on the wire rack. If you do not use the bake
pan as a drip tray, you may place the item to be baked on the bake pan,
and then place the bake pan on top of the rack. Now set the time knob to the
desired amount of cook time based on the recipe you are using. If a recipe has
a range of time, always start with the shortest time and check the food for
doneness at this point.
5. When the cook time is up,the bell rings, the Time knob is back at 0 (off), the
power light goes out, and the Toaster Oven is Off. If more bake time is needed,
reset time knob for more minutes.
6. If the food is done before the bell rings, turn the Time knob to 0 (off).
WARMING
Cooked foods can be kept warm for up to 30 minutes. Longer periods of time are
not recommended.
1. Set the Temperature knob to Warm.
2. Turn the Time knob clockwise all the way to the 30 minute mark.
3. If you wish to use Keep Warm feature for less time, adjust the Time knob
accordingly, and if food is taken out before the bell goes off, turn the Time
knob to 0 (Off).
CAUTION: Always use protective oven mitts to avoid burns to fingers
when inserting or removing food or pan onto the rack in the heated oven.
CAUTION: Always use a protective oven mitts to avoid burns to fingers
when inserting or removing food or pan onto the rack in the heated oven.
76
OPERATING YOUR TOASTER OVEN OPERATING YOUR TOASTER OVEN
WARNING: DO NOT use roasting bags, plastic or glass containers in
the toaster oven.
1. Place the wire rack in the upper rack guide.
NOTE: The left wall is labeled "Broil only" just above the guide.
2. Set the Temperature knob to Broil.
3. Next, turn the Time knob clockwise to start heating.The green Power light
illuminates. Preheat oven by turning the Time knob clockwise past the 10 minute
position then back to the medium toast icon (approx. 3-4 minutes).
4. Place food to be broiled on the bake pan*. Brush food with sauces or oils,
as desired.
5. When the toaster oven is preheated, the bell will ring and the toaster oven
shuts off. Slide the Bake pan onto the wire rack positioned in the upper rack
guide. Now set the Time knob to the desired amount of cooking time based on
the recipe you are using. If a recipe has a range of time, always start with the
shortest time and check the food for doneness at this point.
7. Turn food over halfway through cooking time or as directed in recipe.
8. When the cook time is up, the bell rings, the Time knob is back at 0 (off), the
Power light goes out, and the toaster Oven is Off. If more broiling time is
needed, reset Time knob for more minutes.
9. If the food is done before the bell rings, turn the Time knob to 0 (Off).
* ALTERNATE RACK AND BAKE PAN SETUP
You may slide the bake pan between the
rack legs so that it hangs below the rack.
In this setup the pan will serve as a drip
collection tray while food is broiling on the
rack. Place food directly on the rack
after the preheat period.
BROILING
For best results, it is recommended that you preheat the Toast Oven for 5 Minutes.
Trim off any excess fat from meat, and dry off any excess moisture that may be
on the food you are broiling.
BAKING
When baking one item at a time, position the wire rack in the lower rack guide.
A pizza up to 9 inches in diameter will fit on the rack.
1. Place the wire rack in the lower rack guide. You may use the bake pan as a drip
collection tray. See Alternate Rack and Bake Pan Setup at the bottom of the
next page.
2. To preheat the Toaster Oven, turn the Temperature knob to Bake.
3. Next, turn the Time knob clockwise to start heating. The green Power light
illuminates. Preheat OVEN by turning the Time knob clockwise past the
10 minute position then back to the dark toast icon (approx. 5 minutes)
4. When the toaster oven is preheated the bell will ring and Toaster Oven shuts
Off. Place the item to be baked on the wire rack. If you do not use the bake
pan as a drip tray, you may place the item to be baked on the bake pan,
and then place the bake pan on top of the rack. Now set the time knob to the
desired amount of cook time based on the recipe you are using. If a recipe has
a range of time, always start with the shortest time and check the food for
doneness at this point.
5. When the cook time is up,the bell rings, the Time knob is back at 0 (off), the
power light goes out, and the Toaster Oven is Off. If more bake time is needed,
reset time knob for more minutes.
6. If the food is done before the bell rings, turn the Time knob to 0 (off).
WARMING
Cooked foods can be kept warm for up to 30 minutes. Longer periods of time are
not recommended.
1. Set the Temperature knob to Warm.
2. Turn the Time knob clockwise all the way to the 30 minute mark.
3. If you wish to use Keep Warm feature for less time, adjust the Time knob
accordingly, and if food is taken out before the bell goes off, turn the Time
knob to 0 (Off).
CAUTION: Always use protective oven mitts to avoid burns to fingers
when inserting or removing food or pan onto the rack in the heated oven.
CAUTION: Always use a protective oven mitts to avoid burns to fingers
when inserting or removing food or pan onto the rack in the heated oven.
8
9
NOTES CARE AND CLEANING
1. Allow oven and accessories to cool completely before cleaning.
NOTE: Sugar and Salt based foods have a tendency to stick to all surfaces and
are very hard to clean. When cooking these types of foods, soak and clean the
Bake Pan and Wire Rack immediately after use.
2. The Bake Pan and Wire Rack should be washed by hand in hot sudsy water.
Rinse and dry thoroughly. Automatic dish washing is not recommended.
3. The Glass Door can be wiped clean with a damp sponge and wiped dry with
a paper or cloth towel.
4. To clean the crumb tray, slide it out of the oven and brush off crumbs. Wipe with
a damp cloth and dry thoroughly.
5. Baked on stains can be removed with a paste made from baking soda and water.
Rinse and dry thoroughly.
6. Clean the outside and interior surfaces of the oven with a clean damp sponge or
cloth and dry thoroughly. A non-abrasive liquid cleaner may be used for stubborn
stains. Rinse and dry thoroughly. NEVER immerse Toaster Oven in water or
any liquid.
7. Allow all parts and surfaces to dry thoroughly before plugging in and using
Toaster Oven.
NOTE: All other servicing should be performed by a qualified service technician.
WARNING:
• DO NOT immerse Toaster Oven in water or any other liquid.
• ALWAYS make sure Time knob is in the 0 (off) position and UNPLUG toaster
oven from the electric outlet before cleaning.
WARNING: NEVER use steel wool, scouring pads or abrasive cleaners
to clean any parts of Toaster Oven interior, exterior, or Accessories.

English / Español
Use & Care Guide
Customer Assistance/Asistencia al Cliente
1-855-438-7899
Manual de Uso y Cuidado
Kenmore ®
Model/Modelo: 100.88914610
P/N 134779000B(0807)
Sears Brands Management Corporation
Hoffman Estates, IL 60179 U.S.A.
www.kenmore.com
www.sears.com
www.kmart.com
Countertop
Toaster Oven
Countertop Toaster Oven
KENMORE LIMITED WARRANTY
FOR ONE YEAR from the date of sale this appliance is warranted against defects
in material or workmanship when it is operated and maintained according to all
supplied instructions.
WITH PROOF OF SALE a defective appliance will be replaced free of charge.
For warranty coverage details to obtain free replacement, visit the web page:
www.kenmore.com/warranty
This warranty is void if this appliance is ever used for other than private
household purposes.
This warranty gives you specific legal rights, and you may also have other rights
which vary from state to state.
Sears Brands Management Corporation, Hoffman Estates, IL 60179
KENMORE LIMITED WARRANTY
FOR ONE YEAR from the date of sale this appliance is warranted against defects
in material or workmanship when it is operated and maintained according to all
supplied instructions.
WITH PROOF OF SALE a defective appliance will be replaced free of charge.
For warranty coverage details to obtain free replacement, visit the web page:
www.kenmore.com/warranty
This warranty is void if this appliance is ever used for other than private
household purposes.
This warranty gives you specific legal rights, and you may also have other rights
which vary from state to state.
Sears Brands Management Corporation, Hoffman Estates, IL 60179