0 0 0 0
0
0
de
en
el
es
de Gebrauchsanweisung
en Instructions for use
el
Οδηγίες χρήσεως
es Instrucciones para el uso

2
Inhaltsverzeichnis
Gebrauchsanweisung
Für den Benutzer Seite
Worauf Sie achten müssen
❑ Hinweise zur Entsorgung 3
❑ Vor dem Anschluss
des neuen Gerätes 3
❑ Sicherheitshinweise 4
Vor dem ersten Benutzen
❑ Vorreinigung 5
❑ Ausheizen 5
❑ Sicherheit der Brenner 5
❑ Wahl der Kochtöpfe 5
Das ist Ihr neuer Herd
❑ Gerätebeschreibung 6
❑ Zubehör 7
❑ Einschubhöhen 7
Zünden und Regeln der Brenner
❑ Kochstellenbrenner 8
❑ Backofenbrenner 9
Backen und braten
❑ Backofen-Funktionen 10
❑ Backofen ein- und ausschalten 11
❑ Backen 12–14
❑ Braten 15+16
❑ Rundum-Grillen 17
Grillen 18
Seite
Tipps und Tricks 19
Auftauen und Garen 20
Sterilisieren 21+22
Reinigen und Pflegen
❑ Wichtige Hinweise 23
❑ Email und Glas 23
❑ Edelstahlfront 23
❑ Spiegelnde Glasfront 23
❑ Backofen 23
❑ Rippenrost und Herdmulde 24
❑ Kochstellenbrenner 24
❑ EasyClean
©
-Reinigungssystem 25+26
❑ Aus- und Einhängen
der Backofentür 27
❑ Einhängegitter 27
❑ Heizkörper 27
Störungen Reparaturen 28
Was ist, wenn etwas
nicht funktioniert? 29–31
de
Seite 02–31
el Σελίδα
56 – 079
en
page 32 – 55
es
página 80 – 103
Noch Fragen? Sie erreichen uns:
Per Post: Per Fax: Per Telefon:
Postfach 10 02 50 Fax: 0 89 / 45 90-30 99
D-80076 München Im Internet:
http.//www.neff.de
1 0,12/min. DTAG

3
Worauf Sie achten müssen
Hinweise zur Entsorgung
❑ Altgeräte sind kein wertloser Abfall.
Durch umweltgerechte Entsorgung
können wertvolle Rohstoffe
wiedergewonnen werden.
Bevor Sie das Altgerät entsorgen,
machen Sie es unbrauchbar.
❑ Ihr neues Gerät wurde auf dem Weg zu
Ihnen durch die Verpackung geschützt.
Alle eingesetzten Materialien sind
umweltverträglich und wieder
verwertbar. Bitte helfen Sie mit und
entsorgen Sie die Verpackung
umweltgerecht.
Über aktuelle Entsorgungswege
informieren Sie sich bitte bei Ihrem
Fachhändler oder bei Ihrer
Gemeindeverwaltung.
Vor dem Anschluss des neuen
Gerätes
❑ Der Backofen des Gerätes darf nur
betrieben werden, wenn ein elektrischer
Anschluss hergestellt ist.
❑ Bevor Sie das neue Gerät benutzen,
lesen Sie bitte sorgfältig die Gebrauchs-
anweisung. Sie enthält wichtige Infor-
mationen für Ihre Sicherheit sowie zum
Gebrauch und zur Pflege des Gerätes.
❑ Diese Gebrauchsanweisung gilt für
mehrere Geräte-Ausführungen. Es ist
möglich, daß einzelne Ausstattungs-
merkmale beschrieben sind, die nicht
auf Ihr Gerät zutreffen.
❑ Bewahren Sie die Gebrauchs- und
Montageanweisung ggf. für einen
Nachbesitzer gut auf.
❑ Ist das Gerät beschädigt, dürfen Sie es
nicht in Betrieb nehmen.
❑ Montage und Anschluss des Gerätes
bitte nur nach beiliegenden
Anweisungen und dem Anschlussbild
von einem konzessionierten Fachmann
bzw. zugelassenen Gasinstallateur
vornehmen lassen. Wird das Gerät
falsch angeschlossen, entfällt bei
Schaden der Garantieanspruch.
❑ Unsere Geräte entsprechen den
einschlägigen Sicherheitsbestimmungen
für Elektro- bzw. Gaskochgeräte.
Reparaturen dürfen nur vom Hersteller
geschulte Kundendiensttechniker
durchführen. Bei unsachgemäß
durchgeführten Reparaturen können für
Sie erhebliche Gefahren entstehen.
❑ Die Benutzung eines Gaskochgerätes
führt zu einer Wärme- und Feuchtigkeits-
bildung im Aufstellungsraum. Auf gute
Belüftung der Küche achten: Die
natürlichen Belüftungsöffnungen
offenhalten oder eine mechanische
Lüftungseinrichtung (Dunstabzugshaube)
vorsehen.
❑ Gas-Geräte dürfen nicht in Fahrzeugen
oder Schiffen installiert werden.
❑ Eine intensive und langandauernde
Benutzung des Gerätes kann eine
zusätzliche Belüftung, z. B. eine erhöhte
Leistung der gegebenenfalls
vorhandenen mechanischen
Lüftungseinrichtung, erforderlich
machen.

4
Worauf Sie achten müssen
Sicherheitshinweise
❑ Benutzen Sie das Gerät nur für das
Zubereiten von Speisen.
❑ Die Oberflächen von Heiz- und Koch-
geräten werden bei Betrieb heiß. Die
Backofeninnenflächen und die Heiz-
elemente werden sehr heiß. Halten Sie
Kinder grundsätzlich fern.
❑ Bleiben Sie in der Nähe, wenn Sie
Speisen mit Fett oder Öl bereiten. Bei
Überhitzung kann es sich entzünden.
❑ Anschlusskabel von Elektrogeräten
dürfen die heißen Kochstellen nicht
berühren und nicht mit der heißen
Backofentür eingeklemmt werden. Die
Isolierung könnte beschädigt werden.
❑ Bei einem Defekt schalten Sie die
Sicherung in der Hausinstallation aus.
Stellen Sie die Gaszufuhr ab.
❑ Bewahren Sie keine brennbaren Gegen-
stände im Backofen auf. Sie könnten
sich bei unbeabsichtigtem Einschalten
entzünden. Legen Sie keine brennbaren
Gegenstände auf das Kochfeld.
❑ Legen Sie Backpapier beim Arbeiten mit
Heißluft
v nicht lose in den Backofen
(z. B. beim Aufheizen). Das Heißluft-
gebläse kann das Papier ansaugen.
Das kann zu Beschädigungen von
Heizung und Gebläse führen.
❑ Reinigen Sie den Backofen und das
Kochfeld nicht mit Dampf- oder Hoch-
druckreinigern.
❑ Schieben Sie auf dem Backofenboden
kein Backblech ein oder legen Sie ihn
nicht mit Alufolie aus, sonst entsteht ein
Wärmestau. Back- und Bratzeiten
stimmen nicht mehr und das Email wird
beschädigt.
❑ Gießen Sie nie Wasser direkt in den
heißen Backofen. Es können Email-
schäden entstehen.
❑ Obstsäfte, die vom Backblech tropfen,
hinterlassen Flecken, die nicht mehr
entfernt werden können.
Vor dem Anschluß des neuen
❑ Stellen oder setzen Sie sich nicht auf die
offene Backofentür.
❑ Öffnen und Schließen Sie die
Backofentür behutsam, damit die
Flammen der Brenner (besonders in
Kleinstellung) nicht verlöschen.
❑ Die Backofentür muss gut schließen.
Halten Sie die Türdichtungsflächen
sauber.
❑ Beobachten Sie Schnellkochtöpfe beim
Erhitzen. Ist der richtige Kochdruck
erreicht, rechtzeitig zurückschalten.
❑ Legen Sie die Brennerdeckel vor
Gebrauch der Kochstellenbrenner exakt
auf.
❑ Betreiben Sie die Kochstellenbrenner nur
mit aufgesetztem Kochgut.
❑ Zwischen dem Backofen und der
Hahnblende kann heißer Wrasen
austreten.
❑ Verwenden Sie das Gerät nicht zum
Heizen.
❑ Bei Betrieb mit Flüssiggas
(Propan/Butan) müssen Sie alle
Verbindungen zwischen Flasche und
Gerät absolut dicht herstellen.
Lassen Sie den Druckminderer der
Flüssiggasflasche in regelmäßigen
Abständen überprüfen und die
Anschlussteile der Flüssiggasversorgung
regelmäßig warten.
❑ Überzeugen Sie sich anhand des
Typenschildes, ob Ihr Gerät auf die
örtlichen Gasverhältnisse abgestimmt ist.
Bei Nichtbeachtung besteht die
Möglichkeit einer Gasverpuffung, oder
Brandgefahr.
❑ Die Bedienknebel dürfen nicht
abgezogen werden, auch nicht zur
Reinigung (Berührungsschutz).
5
Vor dem ersten Benutzen
Sicherheit der Brenner:
❑ Alle Kochstellenbrenner und der
Backofenbrenner sind so gesichert, dass
die Gaszufuhr bei Verlöschen der Flamme
unterbrochen wird.
Die Sicherung erfolgt thermoelektrisch.
❑ Sind die Kochstellenbrenner in Betrieb, ist
ein Rauschen hörbar.
❑ Ist der Backofenbrenner in Betrieb, muss
auch das Kühlgebläse in Betrieb sein.
Vorreinigung:
1. Reinigen Sie das Gerät außen mit einem
weichen feuchten Tuch.
2. Reinigen Sie den Backofen und das
Zubehör mit heißer Spüllauge.
Ausheizen:
1. Heizen Sie den Backofen leer
ca. 30 Minuten lang auf.
❑ Dabei dürfen sich keine Teile, wie z. B.
Transportschutz, Schriftgut oder
ähnliches im Backofen befinden.
❑ Wählen Sie dazu die Temperatur-
einstellung 200° C.
❑ Öffnen Sie während des Ausheizens die
Fenster Ihrer Küche um Geruchs-
belästigung zu vermeiden.
Wahl der Kochtöpfe und ihre Anordnung:
Richtig!
❑ Stellen Sie den Topf immer mitten auf die
Kochstellenbrenner.
❑ Benutzen Sie nur Töpfe und Pfannen mit
einem ebenen Boden.
❑ Wählen Sie die Topfdurchmesser
passend zum Kochstellenbrenner
(siehe Tabelle).
– geringer Gasverbrauch
– optimale Kochzeit
– günstige Anordnung
Wahl der Kochtöpfe und ihre Anordnung:
Falsch!
❑ Topf-Durchmesser zu klein.
❑ Flamme der Kochstellenbrenner brennt
über den Boden der Töpfe hinaus.
❑ Topf ragt über den Rand der
Einbaukochmulde hinaus.
– Hoher Gasverbrauch
– schlechte Anordnung
Brenner
Starkbrenner
Normalbrenner
Sparbrenner
Belastung in kW
Kochmulde
2,85
1,85
1,10
2,90
1,70
1,00
240 bis 260 mm
200 bis 220 mm
120 bis 180 mm
Glaskeramik-
Kochmulde
Topf-Durchmesser
6
Das ist Ihr neuer Herd
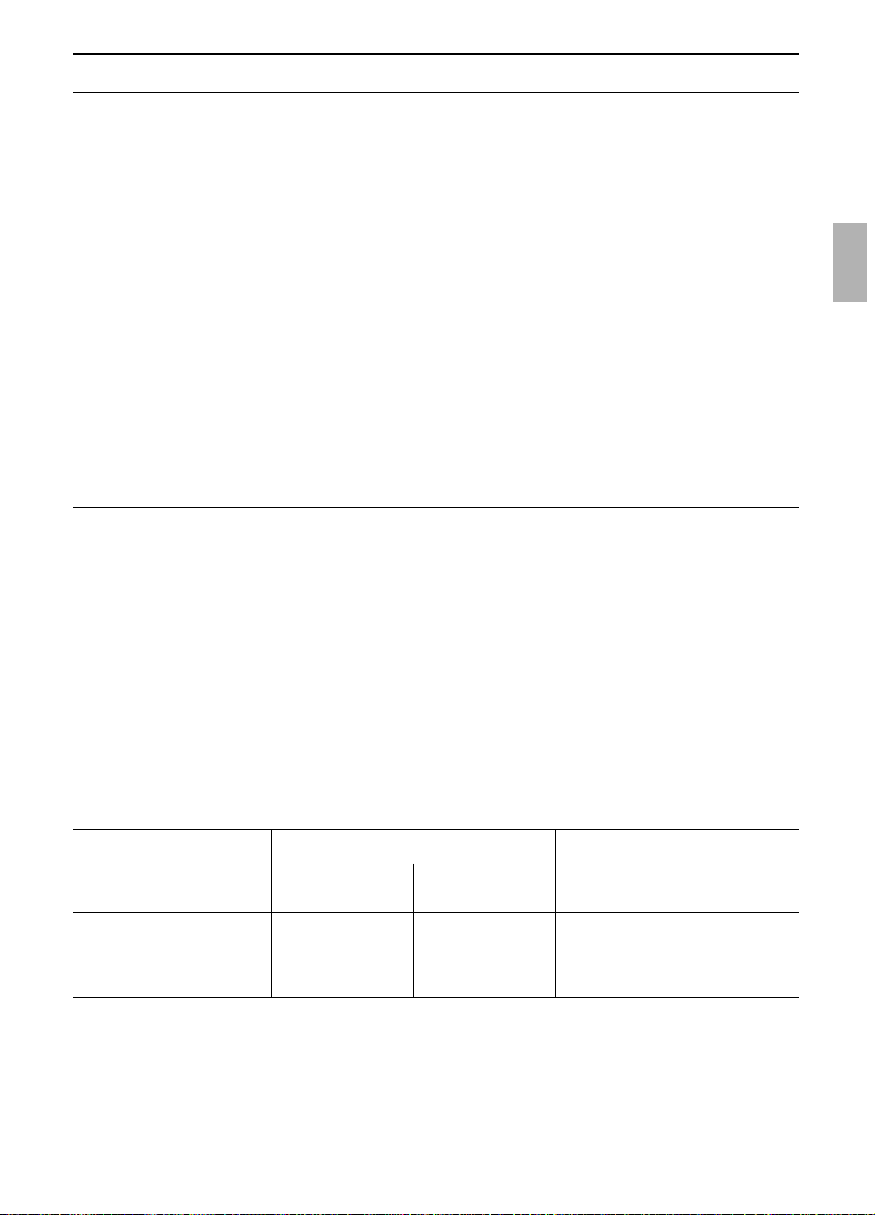
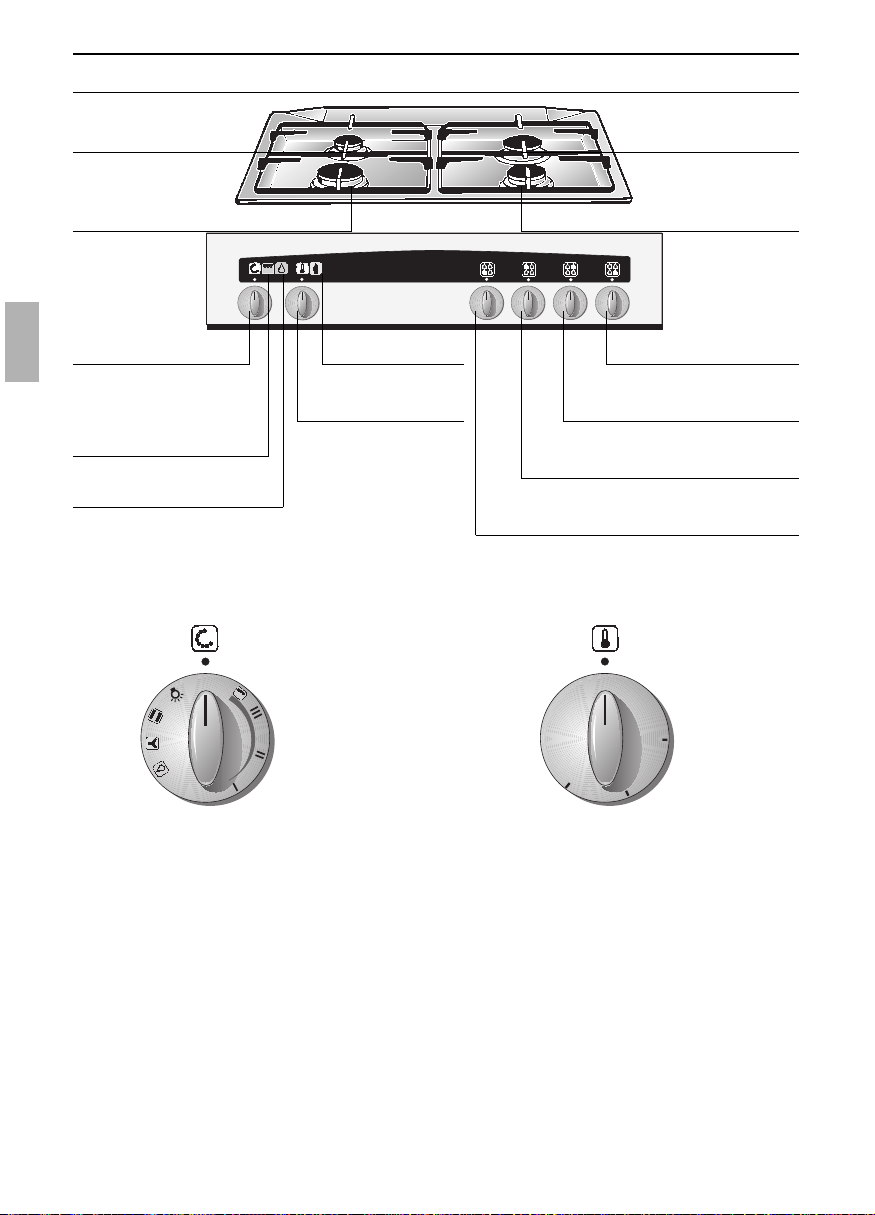
Normalbrenner C
Normalbrenner DStarkbrenner A
Stellungen:
a Backofenbeleuchtung ohne
Beheizung
e Konventionelles System
v Heißluft (Circotherm-System)
x EasyClean
®
-Reinigungssystem
(feste Einstellung ohne
Temperaturwahl)
F Flächengrillen
I–II–III Grillstufen Temperatureinstellung
❑ Ist die Gasbeheizung des Backofens in
Betrieb, wird die Grillbeheizung und die
Beheizung für Backofenreinigung
automatisch gesperrt.
Temperaturangaben in ° C
❑ Die Temperaturen für das
Konventionelle System
e : 150 – 250
und das Heißluft-System
v : 120 – 250
müssen mit dem Temperaturwähler für
Gas-Backofen eingestellt werden.
❑ Das Zünden des Gas-Backofens erfolgt
nur über den Temperaturwähler für Gas-
Backofen.
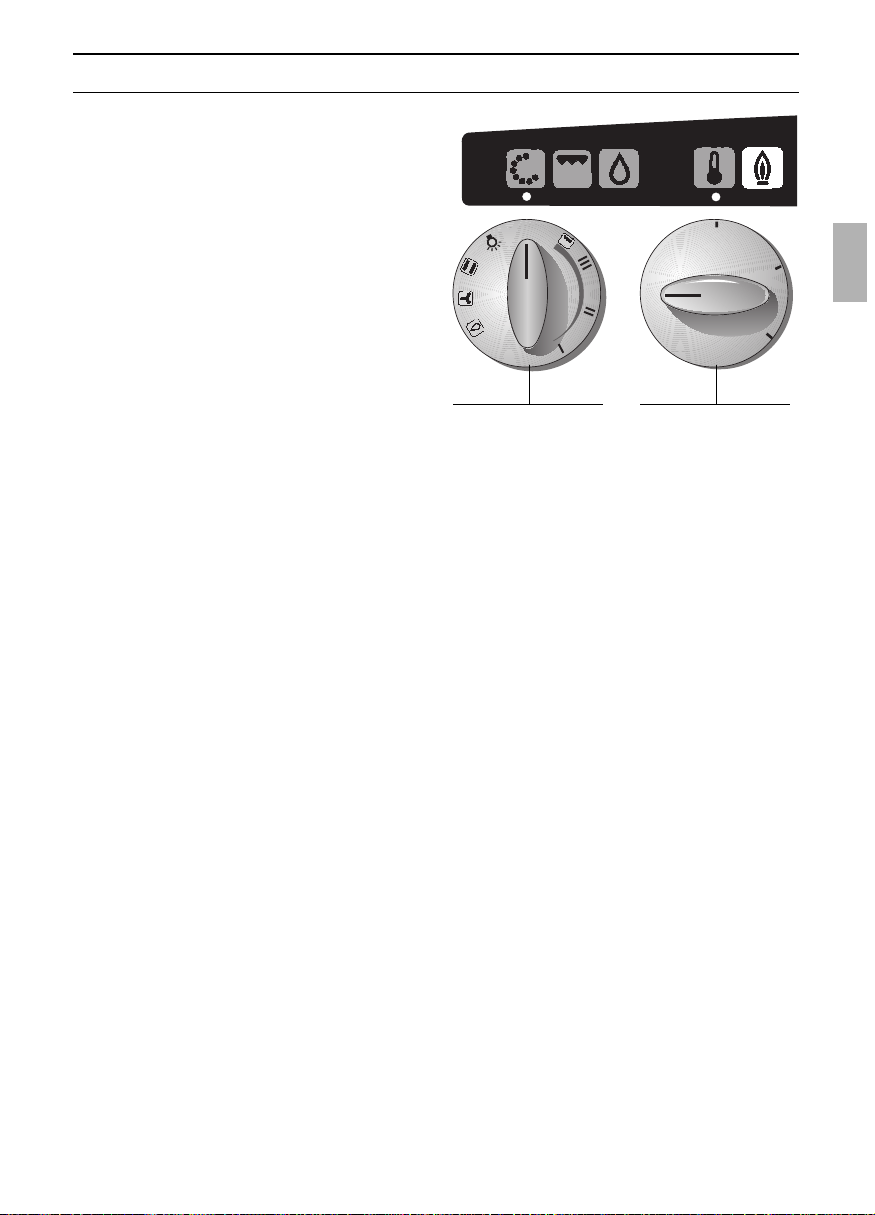
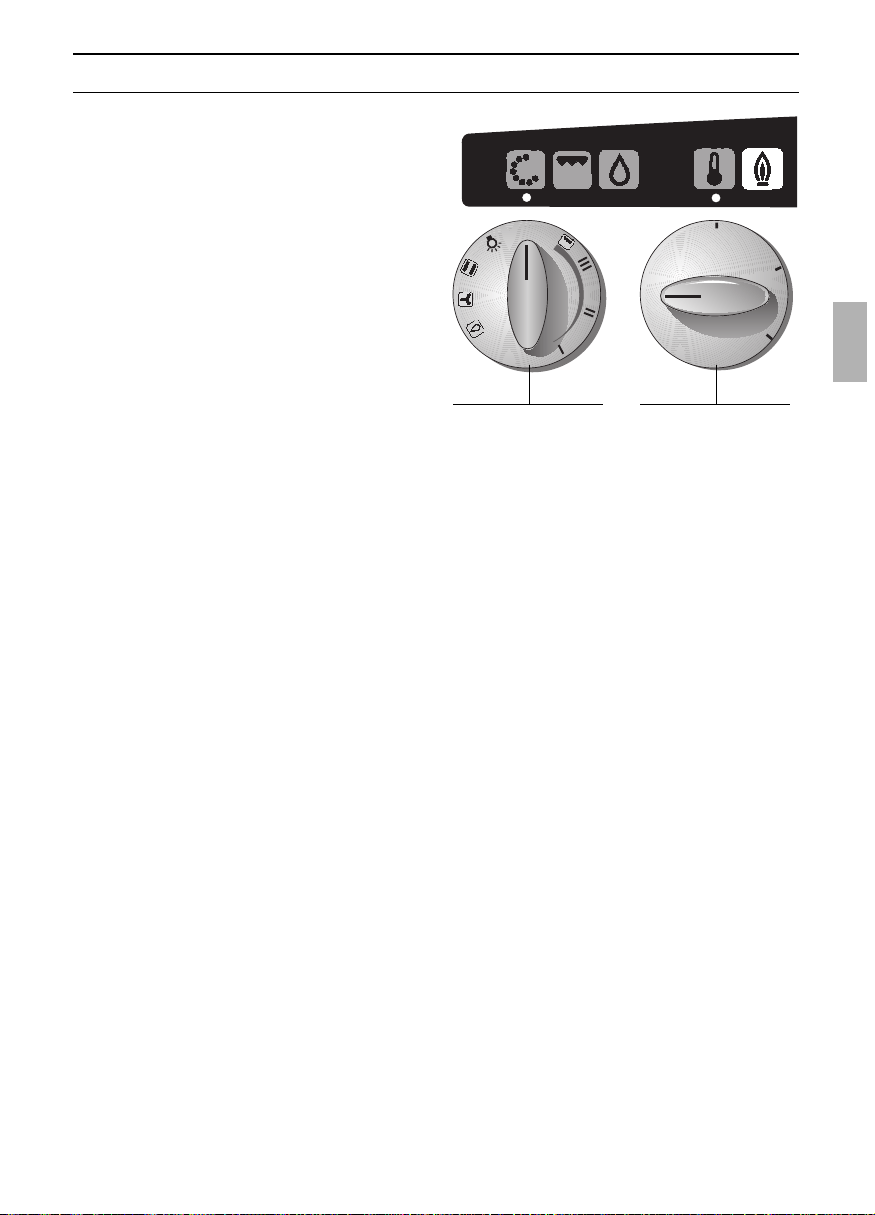
Funktionswähler für Gas-Backofen und
Temperaturwähler für Elektrogrill
0
Temperaturwähler für Gas-Backofen
150
200
250
●
●
●
●
●
●
●
●
●
●
●
0
0 0 0 0
0
0
Anzeigelampe für
Elektro-Grill
Knebel für Kochstelle D
Knebel für Kochstelle C
Knebel für Kochstelle B
Knebel für Kochstelle A
Funktionswähler für
Gas-Backofen und
Temperaturwähler für
Elektro-Grill
Anzeigelampe für
EasyClean
®
-Reinigungssystem
Temperaturwähler
für Gas-Backofen
Anzeigelampe für
Gas-Backofen
Sparbrenner B
7
Das ist Ihr neuer Herd
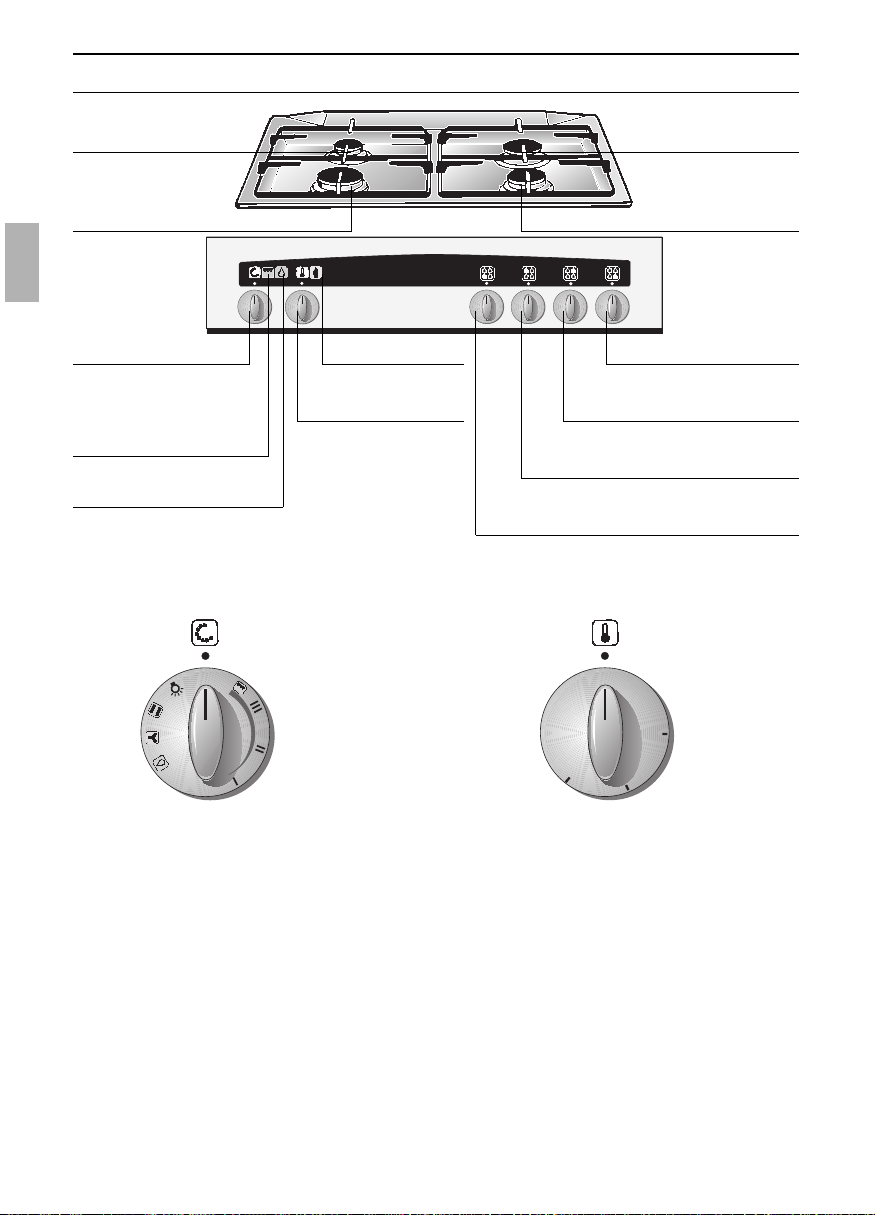
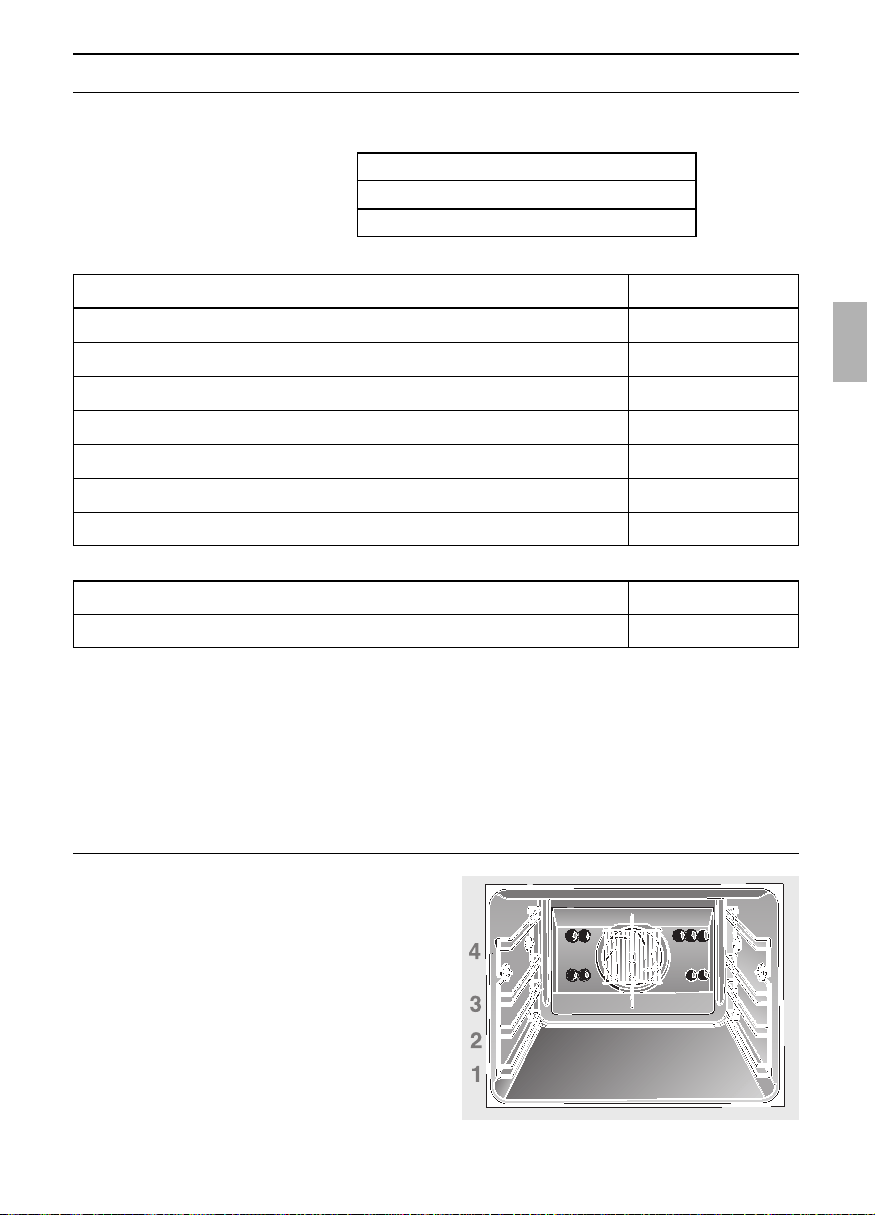
Einschubhöhen
❑ Ihr Backofen ist mit 4 Einschubhöhen
ausgestattet.
Die Einschubhöhen werden von unten
nach oben gezählt.
Sie sind am Backofen gekennzeichnet.
Beim Arbeiten mit Heißluft
Einschubhöhe »2« nicht benutzen,
damit die Luftumwälzung nicht
beeinträchtigt wird.
Der Verzug geht bereits während des
Backens, Bratens oder Grillens wieder
zurück.
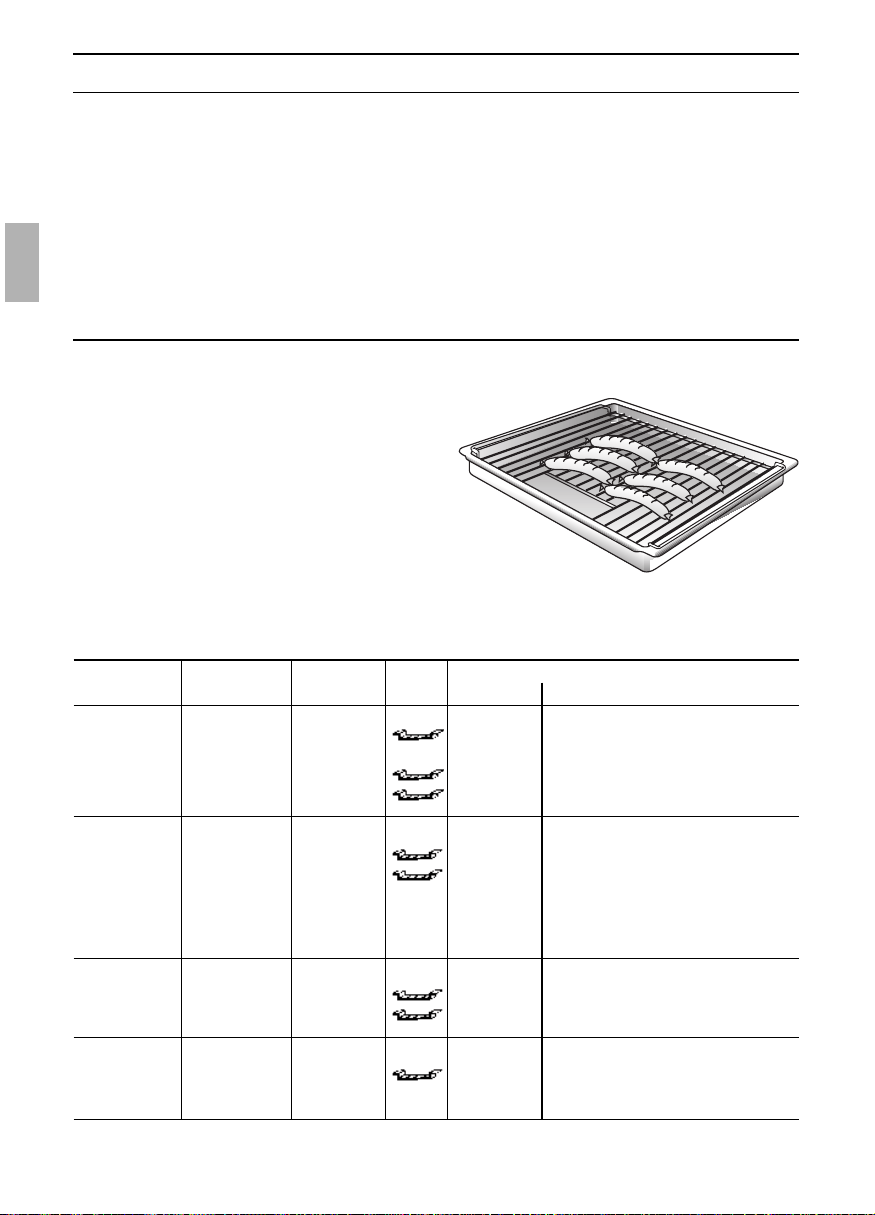
Zubehör
❑ Ihr Backofen ist mit folgendem Zubehör ausgestattet:
Bestell-Nr.
Universalpfanne mit Rost
Backblech Alu
Z 1230 X0
Z 1330 X0
Auflaufpfanne Z 1270 X0
Back-/Bratrost engmaschig Z 1440 X0
Bratenblech (nur in Universalpfanne einsetzbar) Z 1510 X1
Brotbackstein Z 1910 X0
Nachrüstsatz-Clou Z 1750 X0
Back-/Bratrost gekröpft Z 1430 X0
Hinweis:
❑ Backblech oder Universalpfanne können
sich während des Backofenbetriebes
verziehen. Ursache dafür sind große
Temperaturunterschiede auf dem
Zubehör. Sie können entstehen, wenn
nur ein Teil des Zubehörs belegt wurde
oder Tiefgefrorenes, wie z. B. Pizza auf
das Zubehör gegeben wurde.
❑ Weiteres Zubehör erhalten Sie im Fachhandel:
Bestell-Nr.
Sicherheitsgasschlauch – für Gassicherheitssteckdose –
Anschlussgarnitur – für Flüssiggas –
Z 2500 X1
Z 2300 X0
❑ Für die Installation:
1 Backblech Alu
1 Back-/Bratrost
1 Universalpfanne mit Rost

8
Zünden mit der elektrischen
Funkenzündung:
1. Drücken Sie den entsprechenden
Schalter ein und drehen ihn nach links
auf Großstellung.
❑ Die elektrische Funkenzündung
arbeitet so lange der Schalter
eingedrückt ist.
2. Halten Sie nach dem Zünden der
Flamme den Schalter noch ca. 5
Sekunden eingedrückt.
3. Drücken Sie vor dem Loslassen den
Schalter noch einmal kräftig ein.
4. Erfolgt keine Zündung oder verlischt die
Flamme, wiederholen Sie den
Zündvorgang nach ca. 3 Sekunden.
5. Zum Ausschalten der Brenner drehen
Sie den Schalter nach rechts auf
Nullstellung.
Zünden mit Streichholz oder ähnlichem
Hilfmittel:
1. Drücken Sie den entsprechenden
Schalter ein, drehen ihn nach links auf
Großstellung und zünden den Brenner
mit dem Streichholz.
2. Halten Sie den Schalter noch ca.
5 Sekunden eingedrückt.
3. Verlischt die Flamme, wiederholen Sie
den Zündvorgang nach
ca. 3 Sekunden.
4. Zum Ausschalten der Brenner drehen
Sie den Schalter nach rechts auf
Nullstellung.
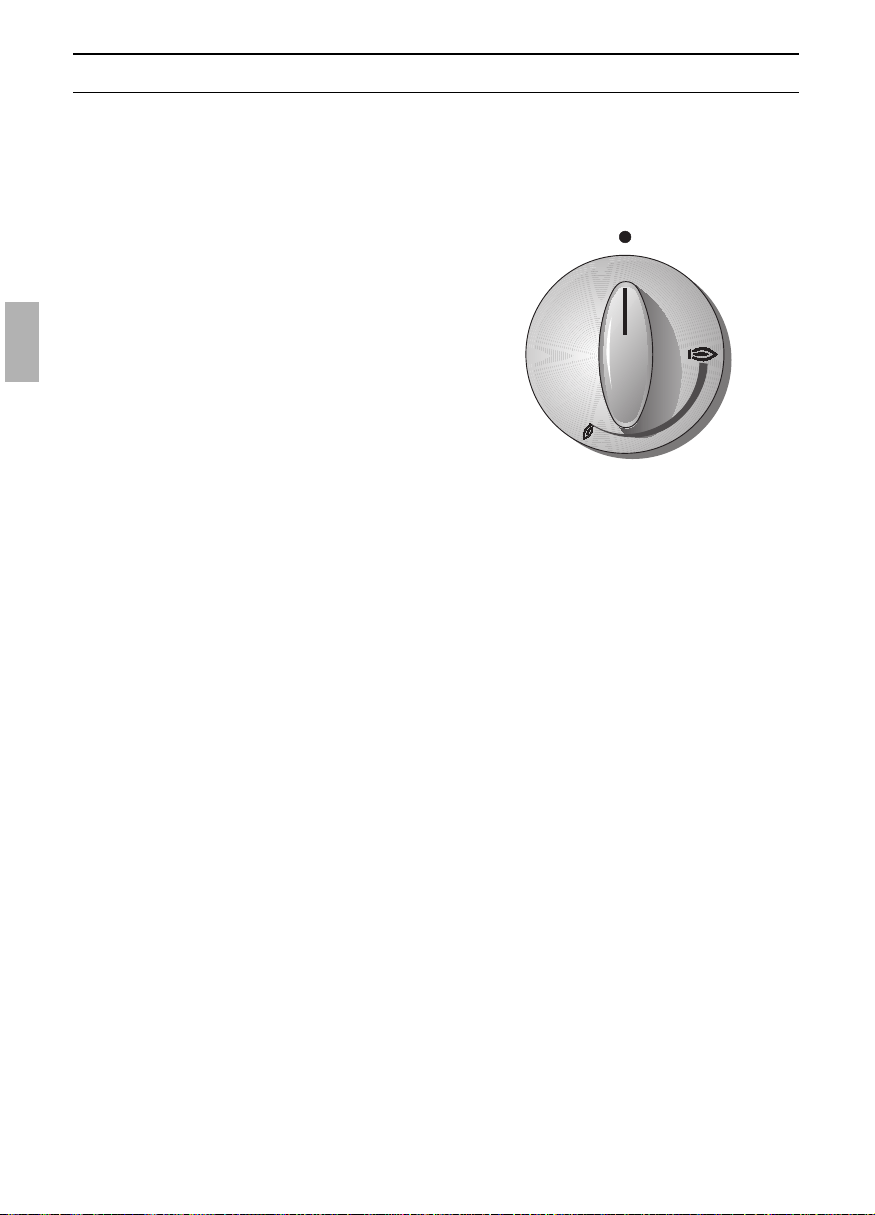
Zünden und Regeln der Brenner
❑ Die Zugehörigkeit der Schalter zu den Brennern erkennen Sie aus der
Gerätebeschreibung und an den Symbolen auf der Hahnblende.
❑ Das Zünden der Brenner wird Ihnen durch eine elektrische Funkenzündung erleichtert.
,
=Großstellung
,
=Kleinstellung
Kochstellenbrenner:
❑ Die Regelung ist zwischen Großstellung
und Kleinstellung stufenlos möglich.
0
9
Zünden und Regeln der Brenner
Backofenbrenner:
❑ Die Regelung ist stufenlos möglich.
❑ Nennwärmebelastung: 3,3 kW.
Zünden mit der elektrischen
Funkenzündung:
1. Wählen Sie das Heizsystem
(konventionell
e oder Heißluft v).
2. Drücken Sie den Schalter (Temperatur-
wähler für Gas-Backofen) ein und
drehen ihn nach links auf Stellung 250.
❑ Die elektrische Funkenzündung
arbeitet so lange der Schalter
eingedrückt ist.
❑ Sie darf jedoch nicht länger als
15 Sekunden betätigt werden.
3. Halten Sie nach dem Zünden der
Flamme den Schalter noch ca. 5 – 7
Sekunden eingedrückt.
❑ Die ordnungsgemäß erfolgte
Zündung des Backofenbrenners ist
auch am Dauerleuchten der
Anzeigelampe erkennbar.
4. Drücken Sie vor dem Loslassen den
Schalter noch einmal kräftig ein.
5. Erfolgt keine Zündung oder verlischt die
Flamme, öffnen Sie die Backofentür.
Unterbrechen Sie den Zündvorgang für
mindestens 1 Minute.
6. Zum Ausschalten der Brenner drehen
Sie den Temperaturwähler und den
Funktionswähler auf Nullstellung.
Anzeigelampe für Gas-Backofen:
❑ Die Anzeigelampe fur den Gas-Backofen
blinkt, wenn der Temperaturwähler
eingestellt ist, jedoch noch keine
Zündung erfolgt ist, oder wenn die
Gaszufuhr unterbrochen ist.
❑ Die Anzeigelampe für den Gas-Backofen
leuchtet, wenn der Backofenbrenner in
Betrieb ist.
150
200
250
●
●
●
●
●
●
●
●
●
●
●
0
0
Funktionswähler Temperaturwähler
für Backofen

10
Backofen-Funktionen
Ober-/Unterhitze ————————— e
(Konventionelles Heizsystem)
Durch den Backofenbrenner wird die
Wärme erzeugt und durch Strahlung auf
das Back- und Bratgut übertragen.
Backen und Braten ist nur auf einer
Einschubhöhe möglich.
Vorteile:
– Backen von Kuchen mit feuchtem
Belag, Pizza, Quiche
Heißluft —————————————
v
Durch ein Gebläse in der Backofenrück-
wand wird die erwärmte Luft im Backofen
umgewälzt, wodurch ein besonders guter
Wärmeübergang auf das Back- oder
Bratgut erreicht wird.
Vorteile:
– geringe Verschmutzung des Back-
ofens
–Backen und Braten auf mehreren
Ebenen gleichzeitig möglich
– kurze Aufheizzeiten
– niedrige Backofentemperaturen
– schonendes Auftauen
–Sterilisieren
– Backen von Brot
Elektrogrill———————————— F
Flächengrillen:
❑ Durch den Heizkörper an der
Backofendecke wird die Wärme erzeugt
und auf das Grillgut übertragen.
Vorteile:
– besonders geeignet für flache, kleine
Fleischstücke z.B. Steaks, Würstchen,
Fisch, Gemüse und Toast.
EasyClean
®
-Reinigungssystem —— x
Um Ihnen die Reinigung des Backofens zu
erleichtern, ist Ihr Gerät mit einer Reinigungs-
hilfe ausgestattet. Durch eine automatisch
gesteuerte Verdampfung von Reinigungs-
lösung weichen die Schmutzrückstände auf
dem Email durch Wärme und Wasserdampf
auf und lassen sich anschließend leichter
entfernen.
Nähere Angaben siehe „Reinigen und
Pflegen”.
Nur bei kaltem Backofen anwenden.
Vorteile:
– leichtere Backofenreinigung
– Schonung der Emailflächen des
Backofens
– umweltfreundlich

11
Backofen ein- und ausschalten
Nachwärme:
❑ Zum Ausnutzen der Nachwärme kann
der Backofen je nach Backgut ca. 5 bis
10 Minuten vor Ende der Backzeit
ausgeschaltet werden.
Wichtige Hinweise:
❑ Nach dem Zünden des Backofen-
brenners läuft das Kühlgebläse.
Es ist durch ein leichtes Summen
bemerkbar.
Bei einem Ausfall des Gebläses,
z. B. bei Stromausfall, muss der
Backofen sofort ausgeschaltet werden,
bzw. darf nicht in Betrieb genommen
werden.
❑ Zwischen dem Backofen und der
Hahnblende kann heißer Wrasen
austreten.
Durch ein Verschließen des
Wrasenaustrittes kann eine Störung des
Backofenbrenners erfolgen.
Kühlgebläse:
❑ Zum Kühlen kann das Gebläse nach
dem Ausschalten des Backofens noch
einige Zeit nachlaufen.
Temperatureinstellung:
❑ Die Einstellung ist stufenlos möglich.
❑ Die Backofenbeleuchtung wird mit der
Funktionswahl gleichzeitig ein- und
ausgeschaltet.
❑ Zum Einschalten der Backofen-
beleuchtung ohne Backofenbetrieb,
drehen Sie den Funktionswähler auf
Symbol
a
.
❑ Wählen Sie zuerst das Heizsystem
(konventionell
e
oder Heißluft
v
).
Zünden Sie dann den Backofenbrenner
und stellen Sie die erforderliche
Temperatur ein (siehe Back- oder
Brattabelle).
Wir empfehlen beim ersten Versuch die
niedrigere der angegebenen
Temperatureinstellungen zu wählen.
Vorheizen:
❑ In den meisten Fällen erübrigt sich das
Vorheizen.
❑ Vorgeheizt wird (wenn erforderlich) mit
der gleichen Temperatureinstellung, mit
der auch gebacken wird (siehe
Backtabelle). Vorheizzeit ca. 10 Minuten.
12
Backen
Backen in Backformen
❑ Stellen Sie die Backformen immer auf
die Mitte des Rostes.
❑ Nur helle Backformen oder
Backbleche verwenden.
❑ Durch Drehen des gewölbten Rostes
können Sie die Einschubhöhe fein
abstimmen (Zwischenhöhen).
❑ Wird der Kuchen unten zu dunkel:
Überprüfen Sie die Einschubhöhe.
Verkürzen Sie die Backzeit und wählen
Sie eventuell eine niedrigere Temperatur.
❑ Wird der Kuchen unten zu hell:
Überprüfen Sie die Einschubhöhe. Ver-
längern Sie die Backzeit.
Backen auf Backblechen:
❑ Die Abschrägung des Backbleches
muss immer zur Backofentür zeigen.
❑ Schieben Sie Backbleche immer bis
zum Anschlag ein.
❑ Verwenden Sie nur Originalbleche.
Hinweise:
❑ Das Bräunungsergebnis können Sie
durch Verändern der Temperaturein-
stellung beeinflussen.
❑ Fällt ein Kuchen nach dem Herausneh-
men zusammen, verwenden Sie das
nächste Mal weniger Flüssigkeit, wählen
Sie eventuell eine längere Backzeit oder
stellen Sie die Temperatur etwas
niedriger ein.
13
Backen
❑ Die Angaben in der Tabelle sind Richtwerte. Die Werte können je nach Art und Menge des
Teiges und je nach Backform variieren.
❑ Hinweise in der Tabelle zum Vorheizen beachten.
❑ Wir empfehlen beim ersten Versuch, die niedrigere der angegebenen Temperaturen
einzustellen. Grundsätzlich ergibt die niedrigere Temperatur eine gleichmäßigere
Bräunung.
❑ Wenn Sie nach eigenen Rezepten backen, orientieren Sie sich an ähnlichen Gebäcken in
der Tabelle.
❑ Wenn in Rezepten nur Temperaturangaben zu Ober- und Unterhitze gemacht werden und
Sie gerne Heißluft backen möchten so stellen Sie eine 20° – 30° C tiefere Temperatur ein.
❑ Bei sehr saftigen Blechkuchen verwenden Sie die Universalpfanne.
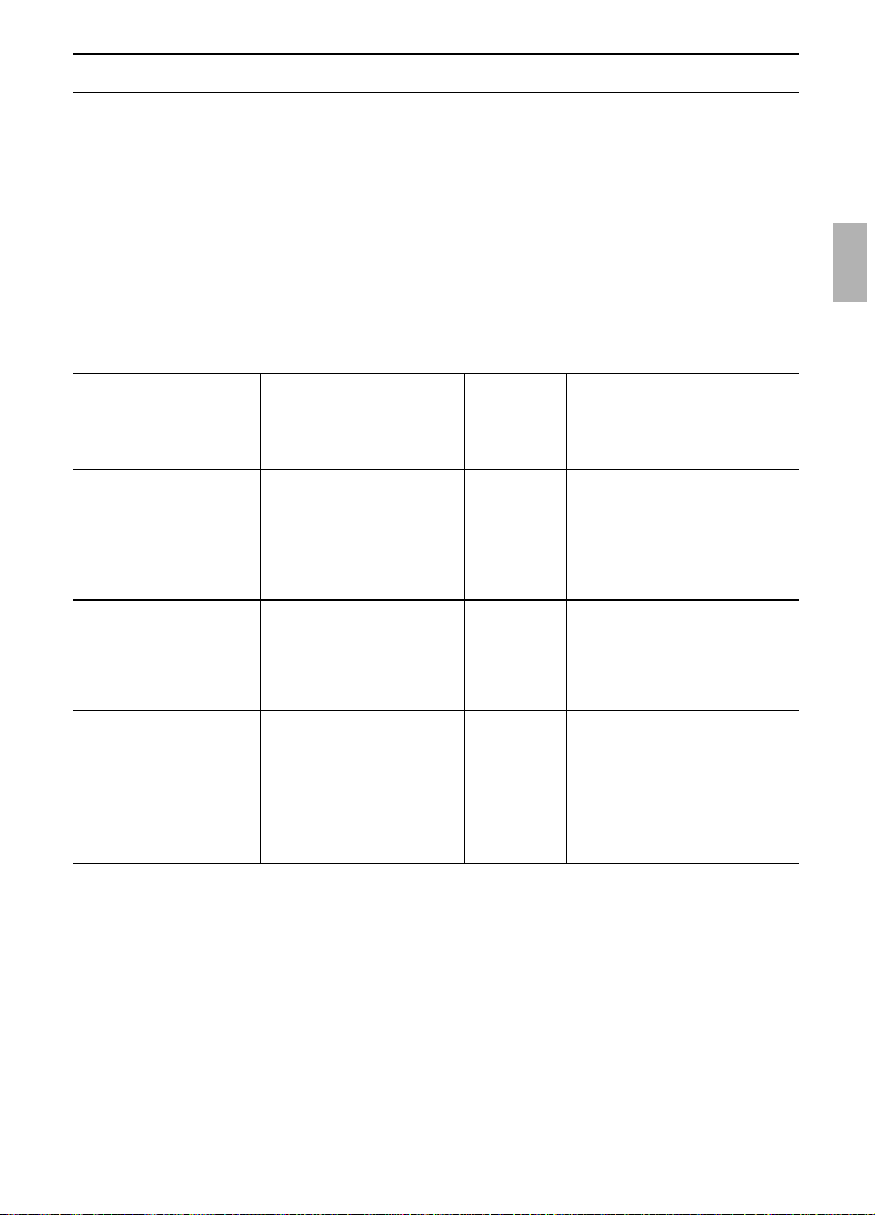
Heißluft v Ober- und Unterhitze e
Gebäckart Einschub- Temperatur Backdauer Einschub- Temperatur
höhe in ° C Minuten höhe in ° C
Rührteige
Blechkuchen mit Belag 1 160 – 170 50 – 70 3 180 – 200
Kastenkuchen 1 160 – 170 60 – 75 2 180 – 190
Kuchen in runder
Form 3 160 – 170 60 – 75 3 180 – 190
Mürbeteige
Blechkuchen mit Belag 1 160 – 170 50 – 70 3 180 – 200
Kuchen in Form
(z. B. Quarktorte) 3 160 – 170 60 – 75 3 180 – 200
Biskuitteige
Biskuitrolle 1 180 – 190 10 – 20 3 190 – 210
(vorheizen)
Wasserbiskuit 3 160 – 170 35 – 50 3 180 – 190
Biskuit ohne
Wasser 3 160 – 170 35 – 50 3 180 – 190
Weitere Hinweise und Rezepte können Sie dem beiliegenden Kochbuch entnehmen.

14
Backen
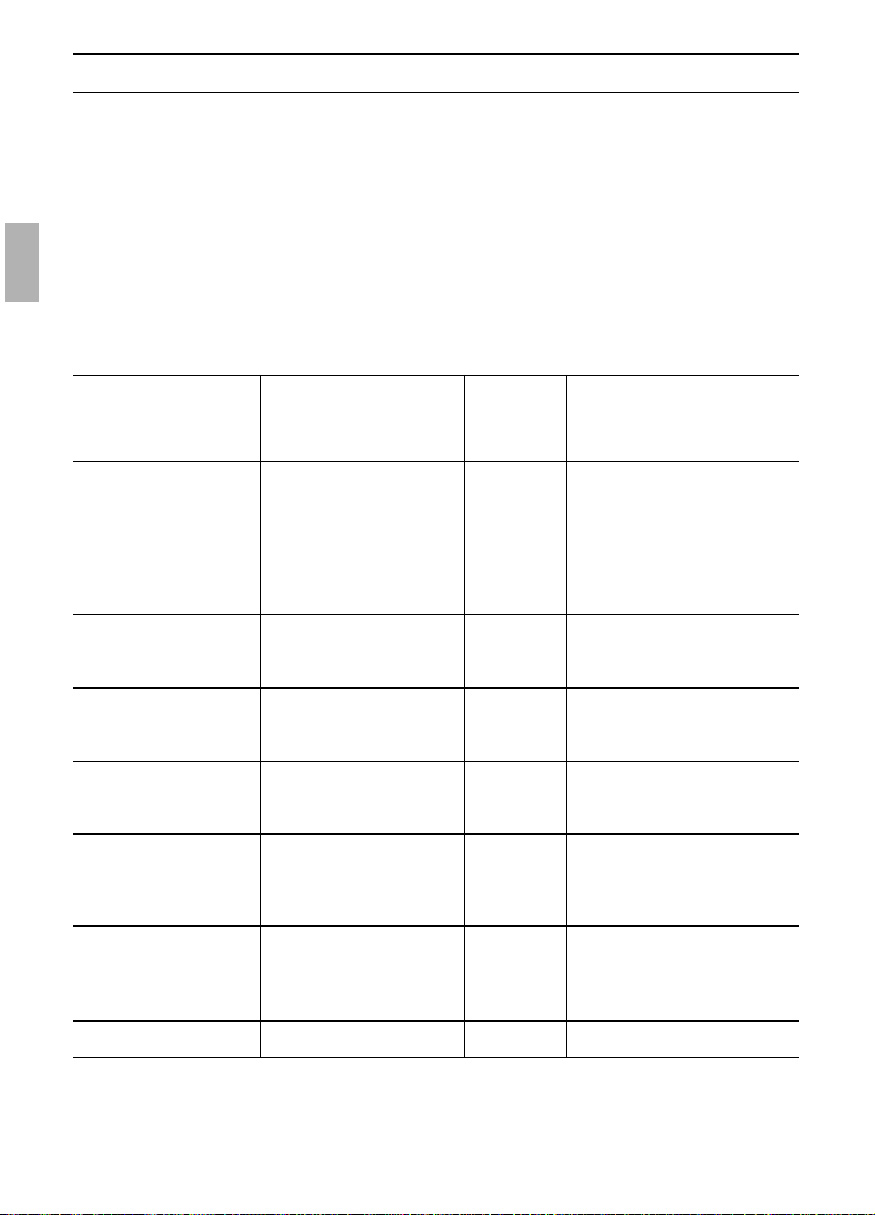
Heißluft v Ober- und Unterhitze e
Gebäckart Einschub- Temperatur Backdauer Einschub- Temperatur
höhe in ° C Minuten höhe in ° C
Hefeteig
Blechkuchen mit Belag
(z. B. Apfelstreusel) 1 160 – 170 50 – 60 3 190 – 200
Hefekranz und -zopf
(500 g Mehl) 3 160 – 170 40 – 50 3 190 – 200
Kuchen hohe Form 1 160 – 170 40 – 50 2 200 – 210
Kleingebäck
Blätterteig (vorheizen) 3 180 – 200 25 – 40 3 210 – 220
Brandteig (vorheizen) 3 170 – 180 35 – 40 3 210 – 220
Spritzgebäck
1 Blech 3 160 – 170 25 – 35 3 170 – 190
2 Bleche 1 + 3 160 – 170 30 – 40 – –
Pikantes
Auflauf aus rohen
Zutaten
(z. B. Kartoffelgratin) 3 180 – 190 45 – 80 3 200 – 220
Pizza
1 Blech 1 180 – 190 25 – 45 3 200 – 220
2 Bleche 1 + 3 180 – 190 30 – 50 – –
Quiche (vorheizen) 3 180 – 190 40 – 60 3 200 – 220
Brot (vorheizen) 1 200 – 220 10 – 15 1 220 – 240
anbacken und anbacken
180 – 210 45 – 50 1 190 – 230
fertigbacken fertigbacken
Weitere Hinweise und Rezepte können Sie dem beiliegenden Kochbuch entnehmen.

15
Braten
Hinweise:
❑ Legen Sie den Rost in die Universal-
pfanne ein und schieben Sie gemein-
sam in dieselbe Einschubhöhe ein.
❑ Fleisch kann besonders wirtschaftlich
bei einem Gewicht von über 750 g im
Backofen gebraten werden.
❑ Braten im offenen Geschirr:
Spülen Sie die Universalpfanne bzw. das
Bratgeschirr mit Wasser aus und legen
Sie das Fleisch ein.
❑ Geben Sie für fettes Fleisch und Ge-
flügel je nach Größe und Art des
Bratens
1
/
8
bis
1
/
4
Liter Wasser in die
Universalpfanne. Bei Bedarf heißes
Wasser nachgießen. Bestreichen Sie
mageres Fleisch nach Belieben mit Fett
oder belegen Sie es mit Speckstreifen.
❑ Eine schmackhafte Soße ergibt der Fond
(Bratensaft) der sich in der Universal-
pfanne bildet. Löschen Sie den Fond mit
heißem Wasser ab, kochen Sie ihn auf,
binden ihn mit Speisestärke, schmecken
ihn ab und gießen Sie ihn wenn nötig
durch ein Sieb.
❑ Schieben Sie den Braten in den kalten
Backofen (Vorheizen nicht nötig –
Energieeinsparung).
❑ Braten im geschlossenen Geschirr:
Legen Sie das Fleisch in einen
Bratentopf, decken Sie es mit einem
passenden Deckel ab und schieben Sie
es auf dem Rost in den Backofen.
Wir empfehlen Rinderbraten im
geschlossenen Bratentopf zuzubereiten.
Tipps:
❑ Verwenden Sie nur Bratgeschirr mit
hitzebeständigen Griffen.
❑ Bereiten Sie große Braten ohne Rost
direkt in der Universalpfanne zu.
❑ Kleinere Bratenstücke können Sie auf
Alu-Folie braten. Dazu die Alu-Folie zu
einer Form mit hochgestellten Kanten
formen und auf den Rost legen.
❑ Belassen Sie nach dem Ende der Brat-
zeit den Braten noch ca. 10 Minuten im
abgeschalteten, geschlossenen
Backofen.
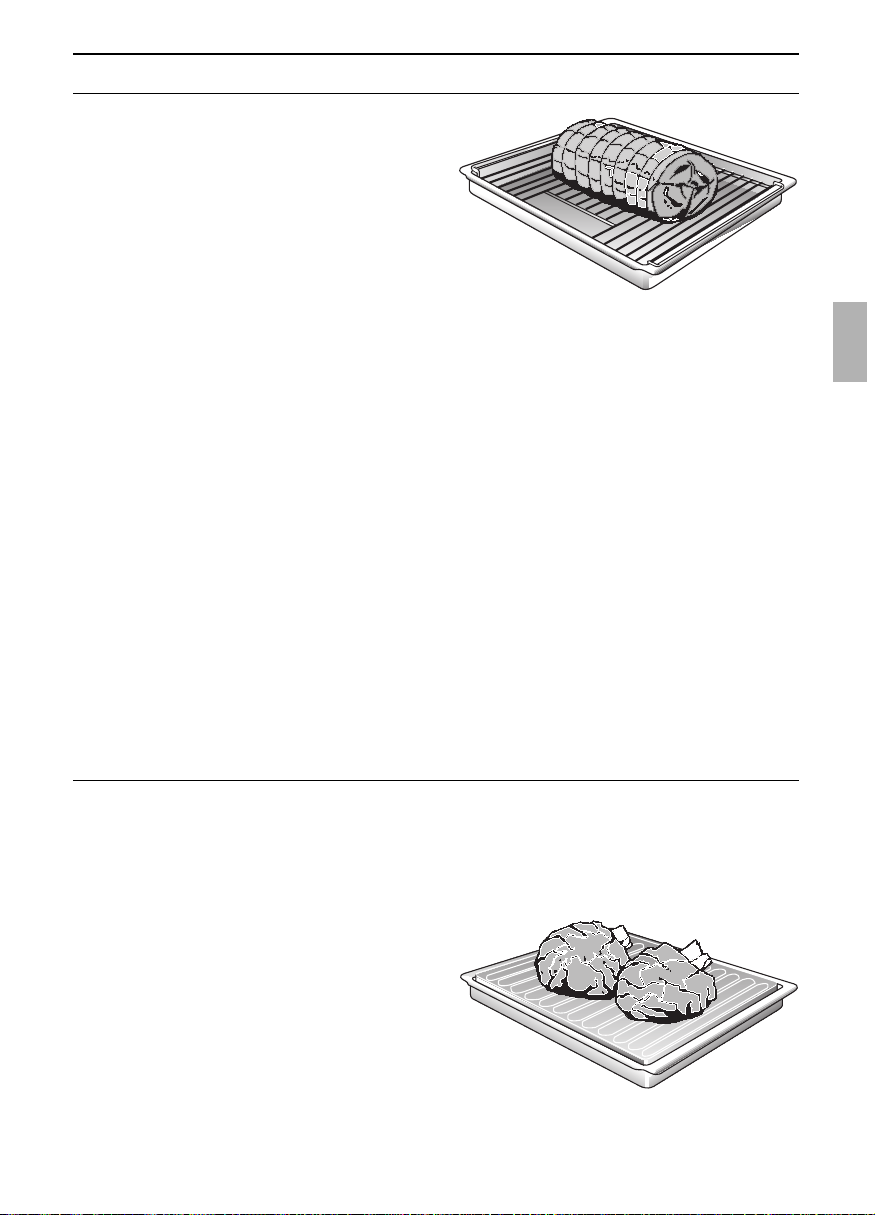
Braten auf dem Bratenblech
(Als Sonderzubehör im Fachhandel
erhältlich).
Mit Heißluft
v
für große fette Braten.
❑ Legen Sie das Bratenblech in die
Universalpfanne ein. Das Bratenblech
vermindert das Verschmutzen des
Backofens.
❑ Abtropfendes Fett und Bratensaft
werden in der Universalpfanne
aufgefangen.
❑ Mit dem Bratenblech können Sie ent-
gegen der Temperaturangabe eine
etwas höhere Temperatur einstellen,
wenn das Bratgut besonders knusprig
werden soll.
16
❑ Die Angaben in der Tabelle sind Richtwerte. Die Werte können je nach Art und Menge und
je nach dem Bratgeschirr variieren.
Allgemein:
Große, hohe Braten, Gans, Pute, Ente = Lange Bratzeit, niedrige Temperatur
Mittelgroße, niedrige Braten = Mittlere Bratzeit, mittlere Temperatur
Kleine, flache Braten = Kurze Bratzeit, hohe Temperatur
Bratzeit je cm Fleischhöhe ohne Knochen ca. 13 – 15 Min.
Bratzeit je cm Fleischhöhe mit Knochen ca. 15 – 18 Min.
Wir empfehlen beim ersten Versuch die niedrigere der angegebenen Temperaturen
einzustellen. Grundsätzlich ergibt die niedrigere Temperatur eine gleichmäßigere Bräunung.
Brattabelle
Heißluft
v Ober- und Unterhitze e
Bratgut Einschub- Temperatur Bratdauer Einschub- Temperatur
höhe in ° C Minuten höhe in ° C
Schwein
Braten mit Schwarte
(z. B. Schulter od. Haxe)
3 160 – 180 100 – 120 2 180 – 200
Braten/Rollbraten 3 160 – 180 100 – 120 2 180 – 200
Kasseler 3 160 – 180 70 – 80 2 190 – 210
Schweinefilet 3 160 – 180 40 – 50 2 180 – 200
Hackbraten 3 170 – 190 60 – 70 2 190 – 210
Rind
Filet 3 180 – 190 30 – 45 2 210 – 220
Roastbeef (rosa) 3 180 – 190 30 – 45 2 210 – 220
Kalb
Braten/-brust 3 160 – 170 90 – 120 2 190 – 210
Haxe 3 160 – 170 100 – 120 2 190 – 210
Lamm
Keule 3 160 – 170 90 – 110 2 190 – 210
Rücken 3 160 – 170 60 – 80 2 190 – 210
Geflügel
Hähnchen 1 kg 3 170 – 180 60 – 70 3 200 – 220
Ente 1 150 – 170 90 – 120 2 180 – 200
Gans 4 kg 1 150 – 170 130 – 170 2 180 – 200
Wild
Rehrücken 3 160 – 170 45 – 60 2 190 – 200
Rehbraten 3 170 – 180 80 – 120 2 190 – 210
Schwein-/Hirschbraten 3 170 – 180 100 – 120 2 190 – 210
Fische 3 170 – 190 25 – 40 2 180 – 200
Weitere Hinweise und Rezepte können Sie dem beiliegenden Kochbuch entnehmen.
Braten

17
Grillen mit Heißluft v
❑ Die Grillzeiten für das Rundum-Grillen sind Richtwerte. Die Werte können je nach Art und
Menge des Grillgutes variieren.
❑ Ein Wenden des Grillgutes ist nicht erforderlich.
❑ Hinweise auf Vorheizen beachten.
Grillgut Temperatureinstellung Einschubhöhe Grillzeit
Schweinesteak 180 – 190° C (vorheizen) 3 115 – 120 Min.
Schweinehaxen 170° C (mit Bratenblech bis 190° C) 3 100 – 130 Min.
Rindersteak 190° C (vorheizen) 3 ca. 15 Min.
Hacksteak 180 – 190° C 3 125 – 130 Min.
Hähnchen 170 – 180° C 3 160 – 170 Min.
Weitere Hinweise und Rezepte können Sie dem beiliegenden Kochbuch entnehmen.
Rundum-Grillen
18
Grillen
❑ Legen Sie das Grillgut immer auf die
Mitte des Rostes.
❑ Schaltet sich der Grillheizkörper automa-
tisch aus, wurde der Überhitzungs-
schutz wirksam. Der Grillheizkörper
schaltet sich nach kurzer Zeit wieder ein.
❑ Legen Sie den Rost in die Universal-
pfanne ein und schieben sie
gemeinsam in dieselbe Einschubhöhe
ein.
Beim Grillen ist Vorsicht geboten.
! Kinder grundsätzlich fernhalten.
Hinweise:
❑ Grillen Sie bei geschlossener
Backofentür.
❑ Die Grilltemperaturen sind regelbar.
❑ Verwenden Sie immer den Rost und die
Universalpfanne.
Flächengrillen F
Für flache kleinere Gerichte.
❑ Verwenden Sie immer den Rost und die
Universalpfanne.
❑ Wenden Sie das Grillgut nach ca. zwei
Drittel der Zeit.
❑ Streichen Sie den Rost und das Grillgut
nach Belieben leicht mit Öl ein.
Tabelle für Flächengrillen F
Grillgut Temperatur- Einschub- Rost- Grillzeit Bemerkungen
einstellung höhe lage 1. Seite 2. Seite
Schwein
Filetsteaks F 4 08–11 Min. 6 – 09 Min.
(2 – 2,5 cm)
Kammsteaks III 4 11 – 14 Min. 9 – 12 Min.
Bratwürste III 4 07–10 Min. 5 – 07 Min. leicht einschneiden
Rind Je nach ge-
Filetsteaks F 410–13 Min. 6 – 09 Min. wünschtem Gar-
Tournedos F 4 09–12 Min. 5 – 08 Min. grad können die
Grillzeiten verkürzt
oder verlängert
werden.
Toa s t
Scheiben F 4 04–05 Min. 0,5 – 1,5 Min.
mit Belag F 2 oder 3 06–09 Min. –
Fisch
Kleine Fische II 4 12 – 15 Min. 9 – 12 Min. wenden

19
Tipps und Tricks
Zum Energie sparen:
❑ Heizen Sie nur vor, wenn es in der
Backtabelle angegeben ist.
❑ Nachwärme: Bei längeren Backzeiten
können Sie den Backofen 5 – 10
Minuten vor Ende der Backzeit
ausschalten.
Zum Backen:
❑ Der Blechkuchen ist unten zu hell.
❑ Der Formkuchen ist unten zu hell.
❑ Kuchen oder Gebäck sind unten zu
dunkel.
❑ Der Kuchen ist zu trocken.
❑ Der Kuchen ist innen glitschig, teigig,
oder das Fleisch innen nicht gar.
❑ Form- oder Kastenkuchen sind bei Heiß-
luft hinten zu dunkel.
❑ Die Bräunung ist bei Heißluft ungleich-
mäßig.
❑ Bei sehr feuchtem Back- und Bratgut
z. B. Obstkuchen oder mit Wasser zube-
reitetem Braten entsteht viel Wasser-
dampf im Backofen, der sich an der
Backofentür niederschlägt und eventuell
zum Abtropfen von Wasser auf den
Boden oder die Einbaumöbel führt.
Schieben Sie den Kuchen tiefer ein.
Nehmen Sie nicht benötigte Backbleche
oder die Universalpfanne aus dem Back-
ofen.
Schieben Sie Backformen nicht auf dem
Backblech sondern auf dem Rost ein.
Schieben Sie Kuchen oder Gebäck höher
ein.
Stellen Sie die Backofentemperatur etwas
höher ein. Wählen Sie die Backzeit etwas
kürzer.
Stellen Sie die Back- oder Brattemperatur
etwas niedriger ein.
Merke: Back- oder Bratzeiten können Sie
durch höhere Temperaturen nicht verkürzen
(außen gar, innen roh). Back- oder Bratzeit
etwas länger wählen, Kuchenteig länger
gehen lassen. Weniger Flüssigkeit in den
Teig geben.
Stellen Sie die Backform nicht direkt vor die
Luftaustritte an der Backofenrückwand.
Das Luftaustrittsblech muss an der Back-
ofenrückwand ringsum gleichmäßig an-
liegen.
Durch kurzzeitiges, vorsichtiges Öffnen der
Backofentür (1 bis 2 mal, bei langer Back-
oder Bratzeit öfter) können Sie den Was-
serdampf dem Backofen entziehen und
dadurch die Wasserbildung wesentlich
vermindern.

20
Auftauen und Garen
Auftauen und Garen mit Heißluft: v
Wichtige Hinweise:
❑ Verwenden Sie zum Auftauen und
Garen von Gefrier- oder Tiefkühlpro-
dukten nur Heißluft.
❑ Beachten Sie bei allen tiefgekühlten
Lebensmitteln grundsätzlich die An-
gaben des Herstellers.
❑ Aufgetaute Gefrier- oder Tiefkühlpro-
dukte (vor allem Fleisch) benötigen ge-
nerell kürzere Garzeiten als frische Pro-
dukte, weil das Frosten eine Art Vorga-
ren bewirkt.
❑ Wird gefrorenes Fleisch in den Back-
ofen gegeben, verlängert sich die Gar-
zeit um die Auftauzeit.
❑ Tauen Sie Tiefkühl-Geflügel vor dem
Garen immer auf, um die Innereien
entfernen zu können.
❑ Garen Sie Tiefkühl-Fisch mit den
gleichen Temperaturen wie Frisch-Fisch.
❑ Sie können Tiefkühl-Fertigmenüs in
Alu-Portionsschalen in größeren Mengen
gleichzeitig in den Backofen geben.
Auftauen:
Einschubhöhen:
Bei 1 Blech:en Einschubhöhe 3
Bei 2 Blechen: Einschubhöhe 1 + 3.
❑ Zeitangaben sind Richtwerte, die von
der Form und Menge der Tiefkühlpro-
dukte beeinflusst werden.
❑ Tauen Sie in Alufolie oder geschlos-
senen Alubehältern verpackte Tiefkühl-
Gerichte bei 130 – 140° C auf.
❑ Tiefkühl-Backwaren bei 120 – 140° C
auftauen und wärmen. Bestreichen Sie
Brot, Brötchen oder Hefegebäck dünn
mit Wasser, damit die Kruste schöner
wird.
❑ Tauen Sie trockene Tiefkühl-Blech-
kuchen bei 160 – 170° C, 20 – 30 Minu-
ten auf.
❑ Tauen Sie feuchte Tiefkühl-
Blechkuchen (mit Obstbelag) bei 160 –
170° C, 30 – 50 Minuten auf. Dazu
packen Sie die Kuchen in Alufolie ein,
damit der Belag nicht abtrocknet.
❑ Tiefkühl-Toast (fertig belegt) bei 160 –
170° C, ca. 20 Minuten auftauen und
toasten.
❑ Tiefkühl-Pizza:
Beachten Sie bitte die Angaben der
Hersteller.

21
Sterilisieren von Obst und Gemüse
Sterilisieren mit Heißluft v
Im Backofen können bis zu sechs Einweckgläser mit
1
/
2
, 1 oder 1
1
/
2
Liter Inhalt
gleichzeitig sterilisiert werden.
Hinweise:
❑ Obst und Gemüse müssen frisch und
in einwandfreiem Zustand sein.
❑ Beim Vorbereiten und Verschließen ist
Sauberkeit oberstes Gebot.
❑ Verwenden Sie nur Einweckgläser, die
einwandfrei sauber und unbeschädigt
sind.
❑ Verwenden Sie nur Gummiringe, die
hitzebeständig sind.
❑ Sterilisieren Sie Blechdosen oder
festverschraubte Gläser nicht im
Backofen sondern im Einkochtopf oder -
kessel, da diese während des
Sterilisierens im Wasser schwimmen
müssen.
Vorbereiten von Obst:
❑ Obst waschen, je nach Art schälen,
entkernen, zerteilen und in Einweck-
gläser bis ca. 2 cm unter den Rand
einfüllen.
❑ Einweckgläser mit heißer, abge-
schäumter Zuckerlösung auffüllen
(ca.
1
/
3
Liter für ein Literglas) und
verschließen.
Auf 1-Liter Wasser:
bei süßem Obst ca. 250 g Zucker
bei saurem Obst ca. 500 g Zucker
❑ Sehr hartes Obst einige Minuten in der
Zuckerlösung vorgaren oder im
Schnellkochtopf vorbehandeln.
Vorbereiten von Gemüse:
❑ Gemüse waschen, putzen, je nach Art
zerteilen und in Einweckgläser einfüllen.
❑ Einweckgläser sofort mit heißem,
abgekochtem Wasser auffüllen und
verschließen.
Verschließen der Gläser:
❑ Wischen Sie die Ränder der Einweck-
gläser mit einem sauberen feuchten
Tuch ab. Legen Sie die Gummiringe und
Deckel nass auf und verschließen Sie
die Gläser mit einer Klammer.Hinweise:
22
Sterilisieren von Obst und Gemüse
Entnehmen der Gläser:
❑ Stellen Sie die Gläser auf ein saugfähiges Tuch, decken Sie sie ab und schützen Sie sie
vor Zugluft.
❑ Entfernen Sie die Klammern erst nach dem Erkalten der Gläser.
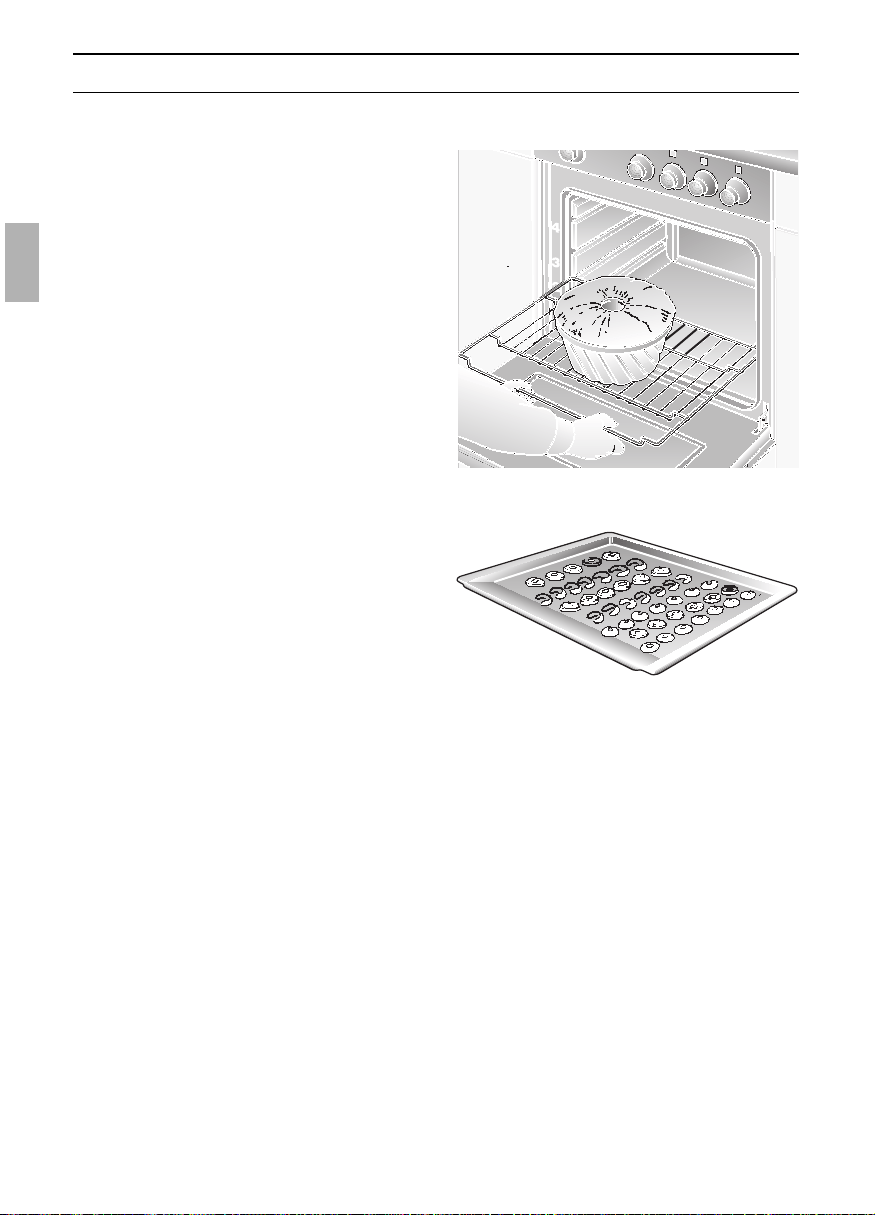
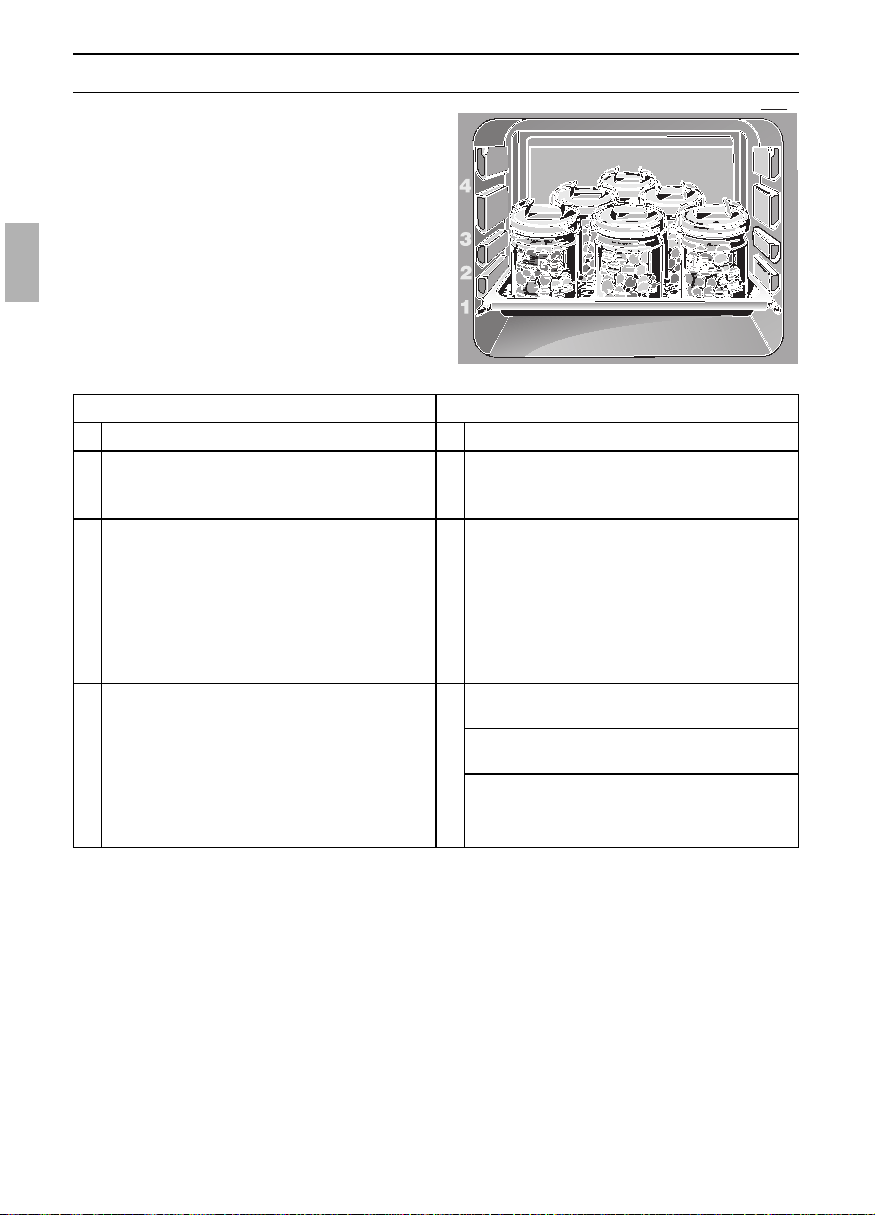
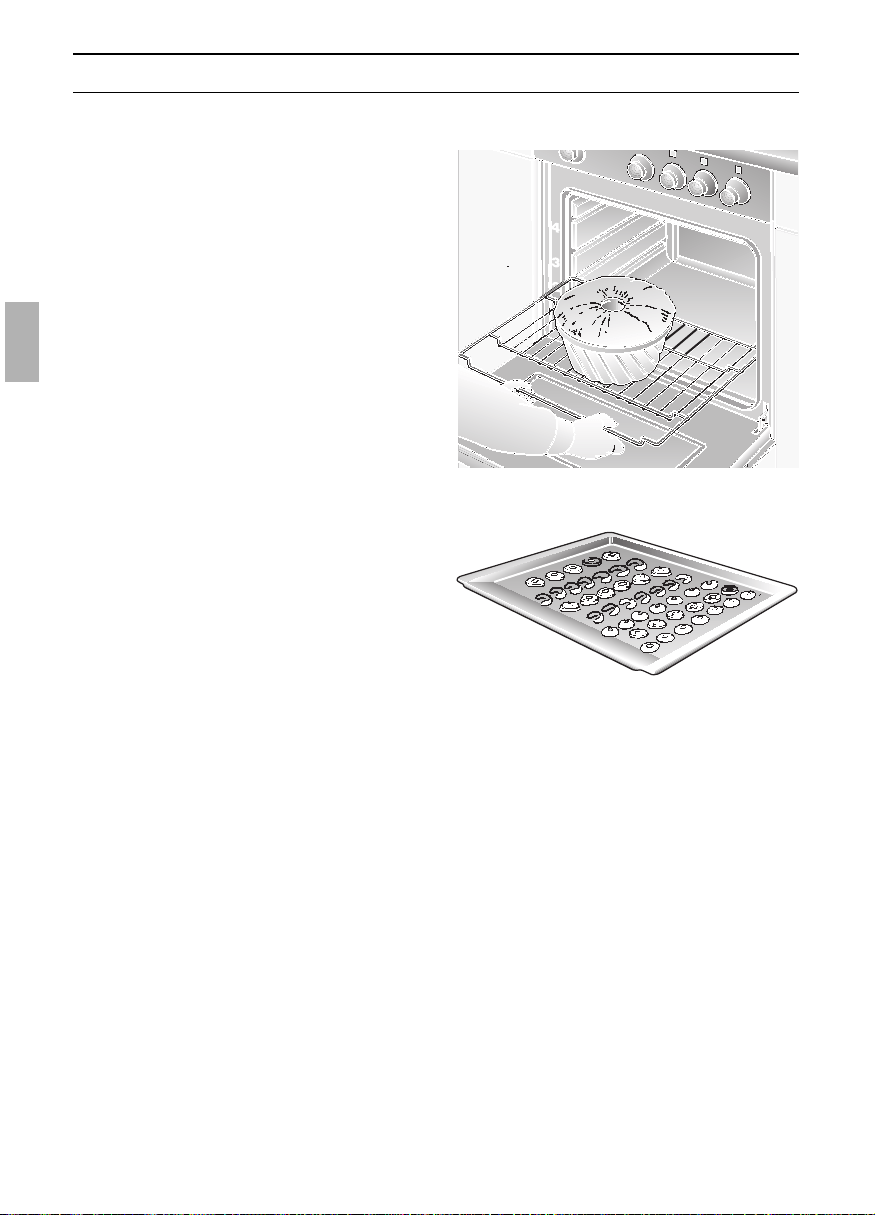
Einsetzen der Gläser:
❑ Schieben Sie die Universalpfanne in
Einschubhöhe 1 ein.
❑ Stellen Sie die Einweckgläser im Dreieck
auf (siehe Abb.), dabei ca. 5 cm
Abstand zur Backofenrückwand halten.
❑ Stellen Sie die Einweckgläser so in die
Universalpfanne, dass sie sich nicht
berühren.
❑ Gießen Sie
1
/
2
l heißes Wasser
(ca. 80° C) in die Universalpfanne.
Obst, Gurken und Tomatenmark Gemüse (jedoch keine Gurken)
1 Gläser einsetzen (siehe oben) 1 Gläser einsetzen (siehe oben)
2
Drehen Sie den Funktionswähler auf v,
zünden Sie den Backofenbrenner und
stellen Sie ca. 160° C ein.
2
Drehen Sie den Funktionswähler auf v,
zünden Sie den Backofenbrenner und
stellen Sie ca. 160° C ein.
3
Das hintere Glas und das rechte Glas
in der zweiten Reihe perlen zuerst.
1
/
2
+ 1 l nach ca. 50 Minuten
1
1
/
2
l nach ca. 60 Minuten.
Sobald die anderen Gläser zu perlen
beginnen, den Backofen ausschalten.
4 4
Gläser noch einige Minuten im
geschlossenen Backofen belassen.
– Himbeeren, Erdbeeren
Kirschen, Gurken: 05–10 Min.
– Anderes Obst: 10 – 15 Min.
–Tomatenmark,
Apfelmus: 15 – 20 Min.
Gläser im geschlossenen Backofen
ca. 60 Minuten weiterperlen lassen.
Backofen ausschalten.
Gläser noch ca. 15 – 30 Minuten im
geschlossenen Backofen belassen.
3
Das hintere Glas und das rechte Glas in
der zweiten Reihe perlen zuerst.
1
/
2
+ 1 l nach ca. 50 Minuten
1
1
/
2
l nach ca. 60 Minuten.
Sobald die anderen Gläser zu perlen
beginnen, Temperaturwähler auf 120° C
drehen.

23
Reinigen und Pflegen
Wichtige Hinweise:
❑ Verwenden Sie zum Reinigen keine Scheuermittel, keine scharfen Mittel und keine
kratzenden Gegenstände.
❑ Kratzen Sie eingebrannte Speisenrückstände nicht ab, sondern weichen Sie diese mit
einem feuchten Tuch und Spülmittel auf.
❑ Verwenden Sie Spezialreiniger (z. B. Sprays) nicht für Aluminium- und Kunststoffteile.
Email und Glas:
❑ Verwenden Sie zum Reinigen heiße
Spüllauge.
❑ Zum Reinigen der Backofenfront (hinter
der Backofentür) sollten Sie die
Backofentürdichtung aushängen.
Edelstahlfront:
❑ Bei Verwendung von handelsüblichen
Edelstahlreinigern kann die Bedruckung
angegriffen werden.
❑ Verwenden Sie keine kratzenden
Schwämme.
❑ Tragen Sie handelsübliche Spülmittel
auf einen weichen, feuchten Lappen
oder Fensterleder auf.
Spiegelnde Glasfront:
❑ Verwenden Sie keine scheuernden Mittel
oder kratzende Schwämme.
❑ Verwenden Sie handelsübliche
Fensterputzmittel.
– Tragen Sie das Fensterputzmittel auf
einen weichen, feuchten Lappen oder
– Fensterleder auf.
– Sprühen Sie die Schalterblende nicht
ein.
Backofen:
❑ Reinigen Sie den Backofen am besten
nach jedem Gebrauch, insbesondere
nach dem Braten oder Grillen. Dadurch
vermeiden Sie ein Einbrennen von
Rückständen.
Nach mehrfachem Einbrennen lassen
sich die Rückstände nur noch schwer
entfernen.
❑ Beim Arbeiten mit Heißluft ist die
Verschmutzung geringer, als bei den
anderen Heizsystemen.
Führen Sie keine Warmreinigung mit
speziell dafür vorgesehenen Backofen-
reinigern durch.
❑ Verwenden Sie zum Backen von sehr
feuchten Kuchen die Universalpfanne.
❑ Verwenden Sie zum Braten geeignetes
Geschirr (Bräter).
❑ Waschen Sie den Backofen bei geringer
Verschmutzung in warmem Zustand mit
heißer Spüllauge aus.
❑ Lassen Sie den Backofen zum Trocknen
geöffnet.
Backofentürscheibe:
❑ Die Innenscheibe der Backofentür hat
zum Absenken der Temperatur eine
Beschichtung zur Reflektion der Wärme.
❑ Die Sicht durch das Backofentürfenster
wird dadurch nicht beeinträchtigt.
❑ Bei geöffneter Backofentür kann diese
Beschichtung wie ein heller Belag
wirken. Das ist technisch bedingt und
stellt keinen Qualitätsmangel dar.
24
Reinigen und Pflegen
Rippenrost und Herdmulde:
❑ Der Rippenrost kann abgenommen
werden. Entfernen Sie eingebrannte
Speisenrückstände am Rippenrost mit
heißer Spüllauge.
Hinweis: Der Rippenrost kann nur in der
richtigen Lage eingelegt werden.
❑ Zum Reinigen der Herdmulde nehmen
Sie den Rippenrost ab. Wischen Sie die
Herdmulde feucht aus und polieren Sie
nach.
❑ Zusätzliche Auflagegummi für die Roste
können Sie über den Kundendienst
erwerben.
Kochstellenbrenner:
❑ Reinigen Sie emaillierte Brennerdeckel
mit heißer Spüllauge.
❑ Reinigen Sie Zündkerze und Zündspalt
vorsichtig mit einem feuchten Tuch.
❑ Die blanken Metallteile der
Kochstellenbrenner können sich bei
Gebrauch verfärben. Verwenden Sie
zum Reinigen Metallpflegemittel, die für
Aluminium geeignet sind.
❑ Reinigen Sie die Brennerteile nicht in der
Geschirrspülmaschine.
❑ Beachten Sie beim Auflegen der
Brennerteile:
– In trockenem Zustand auflegen.
– Eben auflegen.
– Flammen müssen nach dem Auflegen
rundum gleichmäßig brennen.
❑ Schief aufliegende Brennerdeckel
erschweren das Zünden und rufen außer
Beschädigungen auch unangenehmen
Gasgeruch hervor.
25
Reinigen und Pflegen
EasyClean
®
-Reinigungssystem: x
Um Ihnen die Reinigung des Backofens zu
erleichtern, ist Ihr Gerät mit einer Reini-
gungshilfe ausgestattet. Durch eine auto-
matisch gesteuerte Verdampfung von
Reinigungslösung weichen die Schmutz-
rückstände auf dem Email durch Wärme
und Wasserdampf auf und lassen sich
anschließend leichter entfernen.
Achtung:
❑ Benutzen Sie die Reinigungshilfe nur bei
vollständig abgekühltem Backofen.
❑ Verwenden Sie nur normales Leitungs-
wasser, kein destilliertes Wasser.
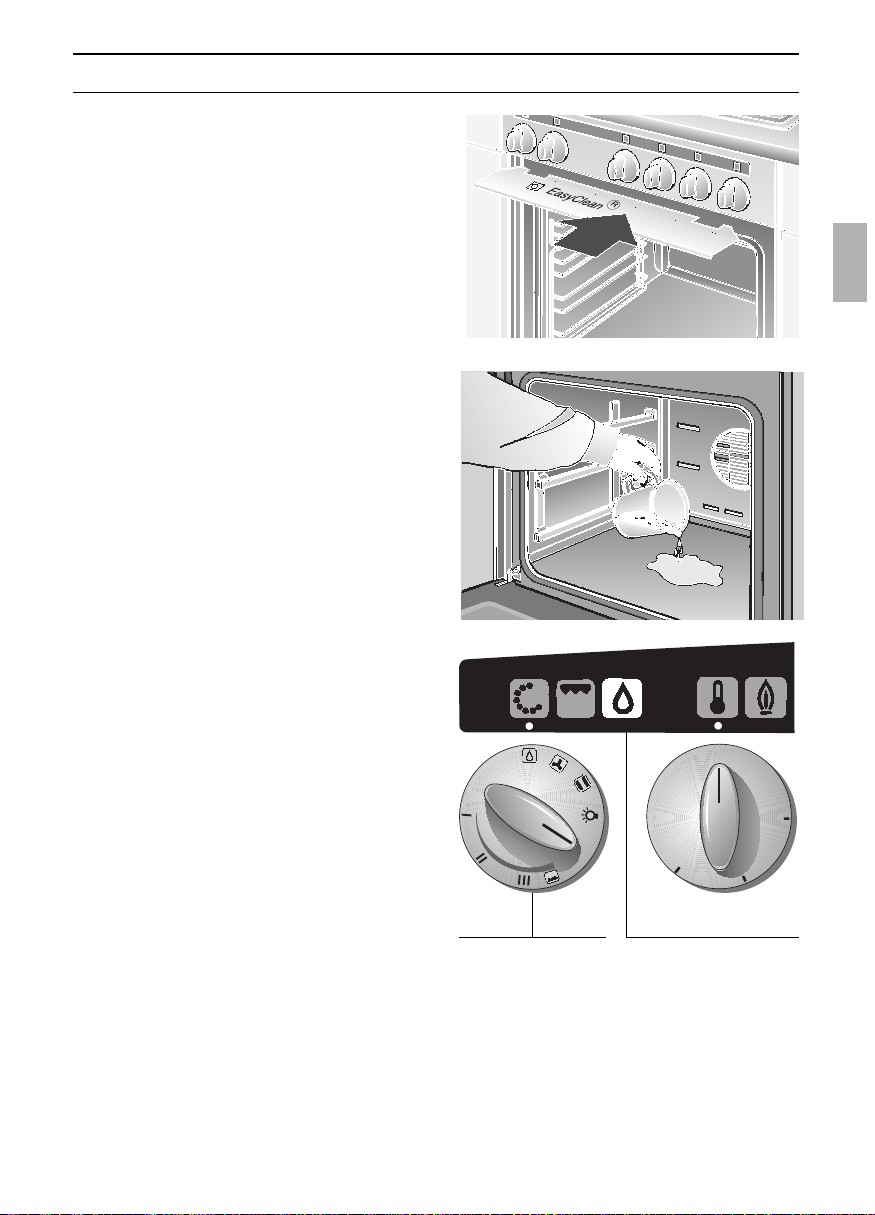
❑ Um das Beschlagen von Hahnblende,
Knebel und Arbeitsplatte zu verhindern,
müssen Sie das beiliegende
Schutzblech unter der Hahnblende
einklipsen.
Nach dem Reinigungsvorgang das
Schutzblech wieder entfernen.
Einschalten:
1. Entfernen Sie das Backblech und die
Universalpfanne aus dem Backofen. Der
Grillrost kann im Backofen bleiben.
2. Füllen Sie vorsichtig in die Bodenwanne
des Backofens ca. 0,4 Liter Wasser mit
etwas Spülmittel ein.
Bei stärkerer Verschmutzung können Sie
die Spüllauge einige Zeit vor dem
Einschalten einwirken lassen.
3. Schließen Sie die Backofentür.
4. Drehen Sie den Funktionswähler auf
Position
x
. Die Anzeigelampe für
Backofenreinigung leuchtet. Nach 21
Minuten ist das Programm beendet. Es
ertönt ein Signal.
Ausschalten:
Drehen Sie den Funktionswähler auf 0.
Die Anzeigelampe für Backofenreinigung
erlischt.
Funktionswähler Anzeigelampe für
EasyClean
®
-
Reinigungssystem
150
200
250
●
●
●
●
●
●
●
●
●
●
●
0
0
26
Reinigen und Pflegen
Nach dem Abschalten der
Reinigungshilfe:
Hinweis:
❑ Lassen Sie das Restwasser nicht
längere Zeit, z. B. über Nacht im
Backofen.
1. Öffnen Sie die Backofentür und nehmen
Sie das Restwasser mit einem großen
saugfähigen Schwammtuch auf.
2. Reinigen Sie den Backofen mit dem
laugen-getränkten Schwammtuch, einer
weichen Bürste, oder einem Topfreiniger
aus Plastik.
Noch vorhandene, hartnäckige Rück-
stände können Sie mit einem Glasscha-
ber (für Glaskeramik) entfernen.
Achtung: Den Glasschaber vorsichtig
handhaben und nicht zu flach aufsetzen,
das Email könnte verkratzen!
3. Kalkränder können Sie mit einem
essiggetränkten Tuch entfernen.
4. Wischen Sie mit klarem Wasser nach
und reiben Sie mit einem weichen Tuch
trocken (bitte auch unter der
Backofentürdichtung).
Hinweise:
❑ Bei stärkerer Verschmutzung können Sie
den Vorgang nach Abkühlen des Back-
ofens wiederholen.
❑ Bei starker Verschmutzung mit Fett,
nach dem Braten oder Grillen,
empfehlen wir die verschmutzten Stellen
vor dem Einschalten der Reinigungshilfe
mit Spülmittel einzureiben.
❑ Lassen Sie die Backofentür nach der
Reinigung noch ca. 1 Stunde in
Raststellung ca. 30° schräg geöffnet,
damit die Emailflächen des Backofens
gut abtrocknen können.
Schnelltrocknung:
(bei geschlossener Backofentür)
1. Stellen Sie den Funktionswähler auf
v.
2. Zünden Sie mit dem Temperaturwähler
den Backofenbrenner und stellen ihn auf
150° C.
3. Dauer: 2 Minuten.
4. Danach stellen Sie den Temperatur-
wähler und den Funktionswähler wieder
auf 0.

27
Reinigen und Pflegen
Backofen
Hinweis: Zur bequemeren Reinigung nach
der automatischen Reinigungshilfe bietet
Ihnen das Gerät folgende Möglichkeiten.
Backofentür
Aushängen:
1. Öffnen Sie die Backofentür ganz.
2. Klappen Sie die Sperrhebel links und
rechts ganz auf.
3. Stellen Sie die Backofentür hoch
(schräg) und nehmen Sie diese nach
vorne ab.
Einhängen:
1. Setzen Sie beide Scharniere in die
Halterungen links und rechts ein und
schwenken Sie die Backofentür nach
unten.
2. Klappen Sie die Sperrhebel links und
rechts zu.
3. Schließen Sie die Backofentür.
Backofenbeleuchtung einschalten:
❑ Drehen Sie den Funktionswähler auf
Position
a.
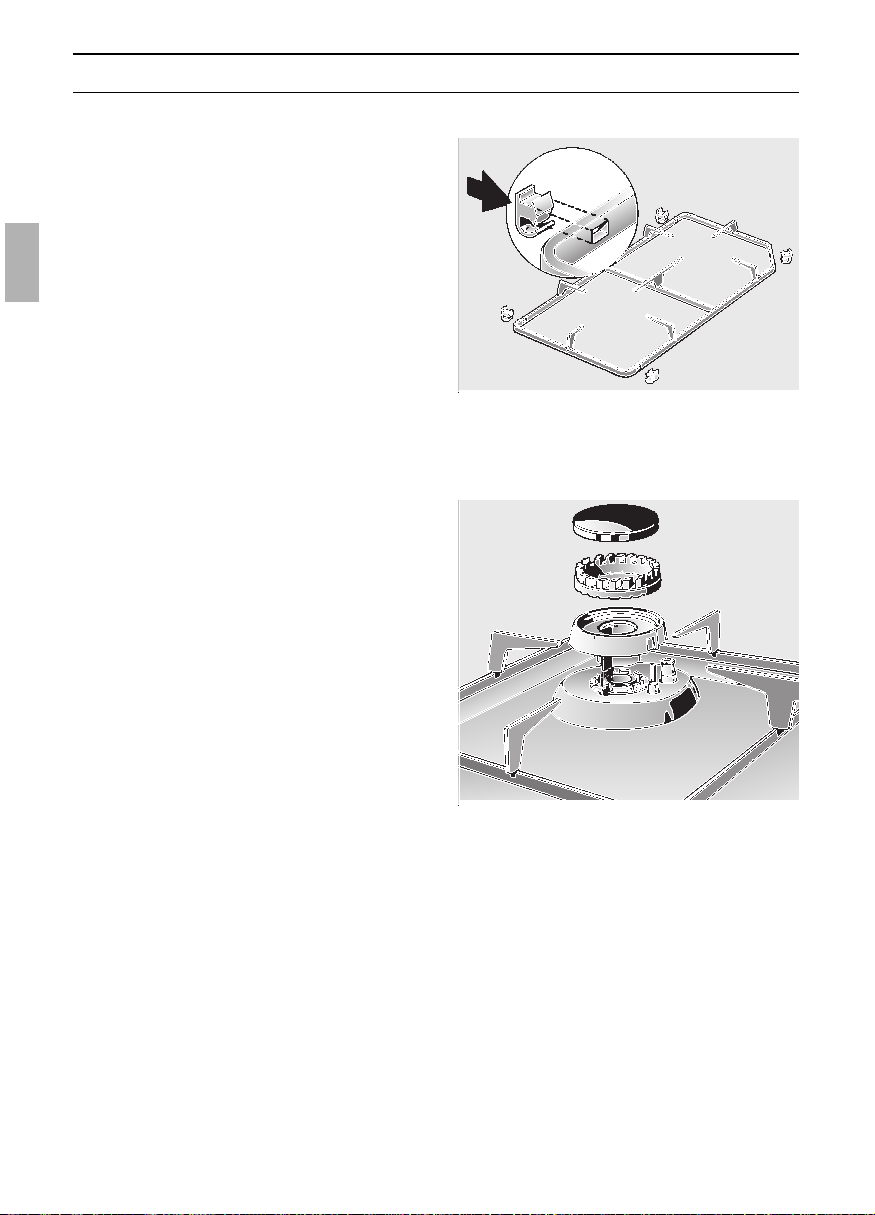
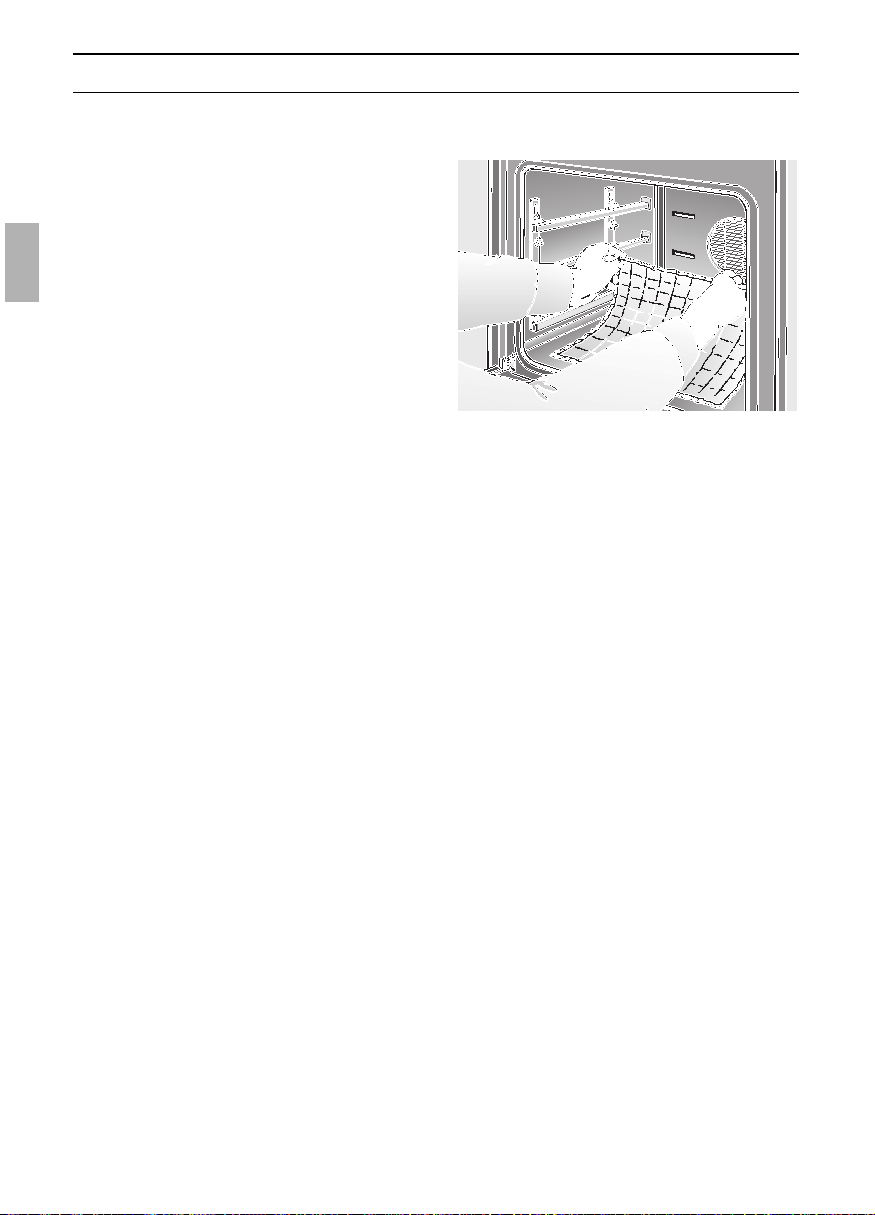
Einhängegitter abnehmen:
1. Drehen Sie die Rändelschrauben links
und rechts heraus.
2. Nehmen Sie die Einhängegitter
vorsichtig heraus.
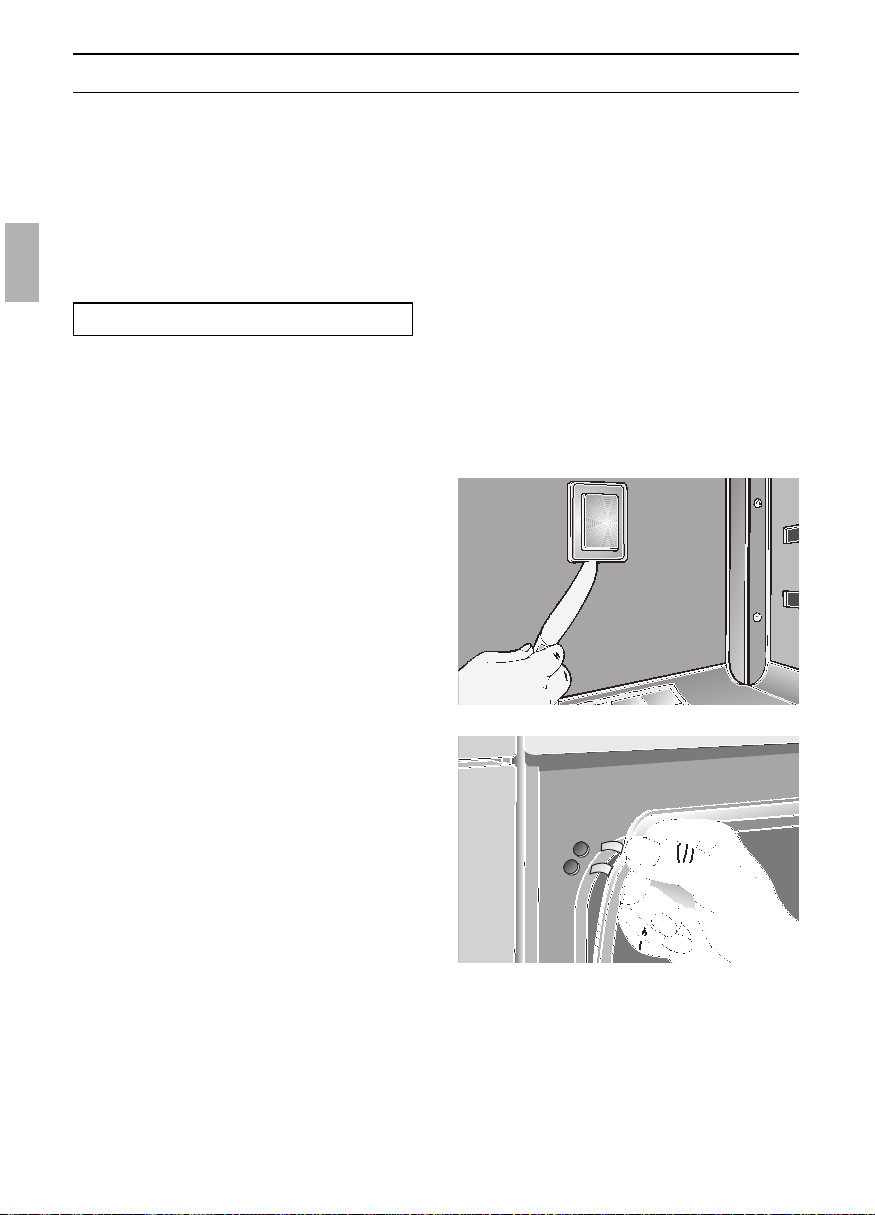
Heizkörper absenken:
Achtung: Der Heizkörper muss abgekühlt
sein.
1. Zum Entriegeln drehen Sie die Raste
an der Backofendecke.
Achtung: Schalten Sie den Heizkörper in
abgesenkter Stellung nicht ein und
belasten Sie ihn nicht.
2. Nach dem Reinigen der Backofendecke
schwenken Sie den Heizkörper hoch
und verriegeln ihn wieder.
1.
2.
28
Bei Störungen oder Reparaturen, die Sie
nicht selbst beheben können, ist der
Kundendienst für Sie da.
Anschriften siehe Kundendienststellenver-
zeichnis.
Achtung: Es kostet Ihr Geld, wenn Sie
wegen eines Bedienfehlers den Kunden-
dienst rufen. Bei Kundendienstfällen bitte
angeben:
Sie finden diese Angaben auf dem Geräte-
schild. Das Geräteschild finden Sie hinter
der Backofentür, links unten am seitlichen
Rand des Backofens.
Austauschen der Backofenlampe:
Achtung: Gerät stromlos machen!
1. Legen Sie ein Geschirrtuch in den kalten
Backofen, um Schäden zu vermeiden.
2. Nehmen Sie die Glasabdeckung ab.
Dazu fassen Sie mit einem Messer, oder
ähnlichem, zwischen das Glas und dem
Halterahmen.
3. Lampe ersetzen.
–Typ Glühlampe E 14, 220–235 Volt,
25 Watt, hitzebeständig bis 300° C.
– Die Glühlampe erhalten Sie beim
Kundendienst oder beim Fachhandel.
Austauschen der Backofen-Türdichtung:
1. Nehmen Sie die defekte Backofen-
Türdichtung durch einfaches Aushängen
ab.
Die neue Backofentürdichtung erhalten
Sie beim Kundendienst.
E-Nr. FD
Störungen und Reparaturen

29
Was ist wenn?
Nicht immer ist der Ruf nach dem Kundendienst erforderlich. In manchen Fällen können Sie selbst Abhilfe
schaffen. In der nachfolgenden Tabelle finden Sie einige Tipps.
Grundsätzlicher Hinweis:
Arbeiten an der Geräte-Elektrik und an den Gasarmaturen dürfen nur von einem Fachmann ausgeführt werden. Vor Beginn
solcher Arbeiten muss das Gerät unbedingt stromlos gemacht werden: Durch Betätigen des Sicherungsautomaten, oder
durch Herausdrehen der Sicherungen im Sicherungskasten Ihrer Wohnung.
Muss der Gaseinbauherd durch den Fachmann aus dem Möbel herausgezogen werden, sind zuerst die Verbindungen zwi-
schen Gaskochmulde und Gaseinbauherd zu lösen. Dazu gehören die Teleskope an den Kochstellenknebeln sowie die
elektrischen und gastechnischen Verbindungen zwischen Gaskochmulde und Gaseinbauherd.
was ist . . . Mögliche Ursache Abhilfe
. . . wenn die elektrische Funktion
generell gestört ist?
Sicherung defekt. Sicherung im Sicherungskasten prü-
fen und bei Defekt austauschen.
. . . wenn sich Flüssigkeit oder dünn-
flüssiger Teig stark einseitig vertei-
len?
Gerät nicht waagrecht aufgestellt
oder eingebaut.
Gerät ausrichten oder Einbau über-
prüfen.
. . . wenn eine Störung von elektro-
nisch gesteuerten Funktionen auf-
tritt?
Energetische Impulse (z. B. Blitz-
schlag).
Entsprechende Funktionen neu ein-
stellen.
. . . wenn der Flachkuchen unten zu
hell wird?
Falsche Einschubhöhe. Kuchen tiefer einschieben.
. . . wenn der Formkuchen unten zu
hell wird?
Backform auf Backblech oder Grill-
pfanne im Backofen.
Backform auf Rost in den Backofen
einschieben.
. . . wenn der Kuchen zu trocken
wird?
Zu niedrige Backtemperatur. Backtemperatur etwas höher ein-
stellen.
. . . wenn der Kuchen innen glit-
schig, teigig oder das Fleisch innen
nicht gar wird?
Zu hohe Back- oder Brattemperatur. Back- oder Brattemperatur etwas
niedriger einstellen.
Merke:
Back- oder Bratzeiten können durch
höhere Einstellung der Backofen-
temperatur nicht verkürzt werden!
(Außen gar, innen roh).
. . . wenn Kuchen oder Gebäck
unten dunkler wird?
Dunkle Backbleche. Helle Backbleche verwenden.
Zu lange Backzeit. Wartung des Gerätes durch den
Kundendienst.
Nicht benötigte Backbleche oder
Grillpfanne im Backofen.
Nicht benötigte Backbleche oder
Grillpfanne aus dem Backofen ent-
fernen.
Zu kurze Back- oder Bratzeit. Back- oder Bratzeit länger wählen,
Kuchenteig länger gehen lassen.
Zu viel Flüssigkeit im Kuchenteig. Weniger Flüssigkeit in den Kuchen-
teig geben.
Falsche Einschubhöhe. Kuchen oder Gebäck höher in den
Backofen einschieben.
30
Was ist wenn?
was ist . . . Mögliche Ursache Abhilfe
. . . wenn die Brennerdeckel unan-
sehnlich sind?
Normale Verschmutzung. Brennerdeckel mit Metallpflegemittel
reinigen, die für Aluminium geeignet
sind.
. . . wenn der emaillierte Rost im
Bereich der Kochstellenbrenner rauh
geworden ist?
. . . wenn die Kochstellenbrenner
nach der Aufstellung des Gerätes
ungleichmäßig brennen?
Normale Erscheinung durch hohe
Temperatur.
Nicht möglich, Gebrauchstauglich-
keit wird nicht beeinträchtigt.
Flammenbild durch falsche Gasein-
stellung ungleichmäßig.
Gaseinstellung vom Händler oder
vom Geräteaufsteller überprüfen las-
sen.
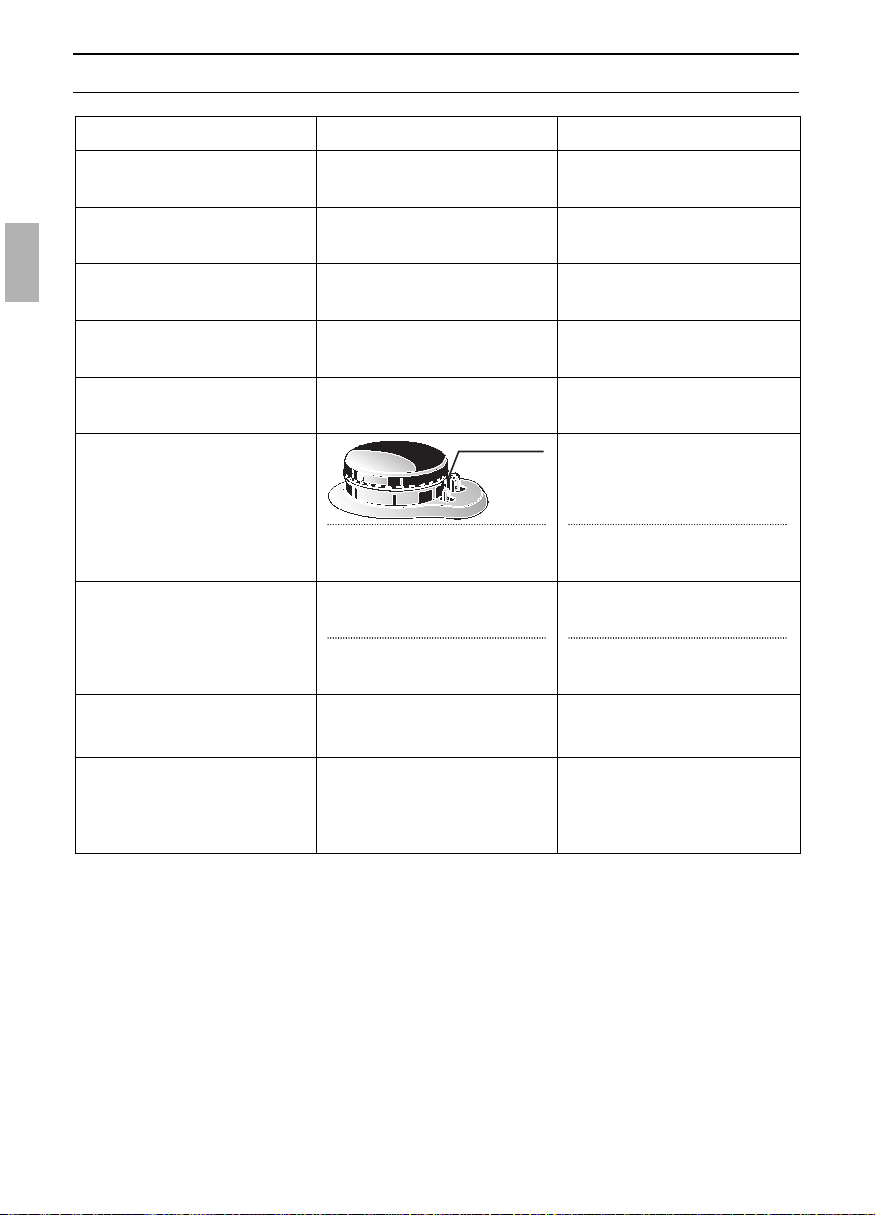
. . . wenn das Flammenbild der
Kochstellen plötzlich verändert ist?
Falsch aufgelegte Brennerteile. Die abnehmbaren Brennerteile rich-
tig auflegen.
. . . wenn die elektrische Zündung
der Kochstellenbrenner nicht mehr
funktioniert?
Kochgutreste oder Putzmittel zwi-
schen Zündkerze und Kochstellen-
brenner.
Spalt zwischen Zündkerze und
Kochstellenbrenner vorsichtig frei-
machen und säubern.
. . . wenn zum Zünden der Koch-
stellenbrenner der Knebel plötzlich
länger gedrückt werden muss?
. . . wenn nach dem Zünden der
Brenner die Flamme erlischt?
. . . wenn die Flammen größer sind,
als gewohnt, oder Gasgeruch auf-
tritt?
Fühler verbogen
Falsch aufgelegte Brennerteile.
Zu kurz gedrückt.
Fühler vorsichtig in die senkrechte
Lage zurückbiegen.
Die abnehmbaren Brennerteile rich-
tig auflegen.
Knebel länger drücken.
Zu leicht gedrückt.
Knebel vor dem Loslassen kräftig
eindrücken.
Druckminderer an der Flküssiggas-
flasche defekt.
Gerät sofort außer Betrieb setzen.
Ventil an der Gasflasche schließen.
Prüfung und Austausch durch einen
Fachmann.
. . . wenn ein Kochstellenhahn
schwergängig ist, oder klemmt?
. . . wenn das Flammenbild stark
vom gewohnten abweicht?
Notwendige Wartung. Wartung des Gerätes durch den
Kundendienst.
31
Was ist wenn?
was ist . . . Mögliche Ursache Abhilfe
. . . wenn der Backofenbrenner laufend
verlöscht?
Falsche Gaseinstellung. Gaseinstellung vom Händler oder
vom Geräteaufsteller überprüfen las-
sen.
. . . wenn der Backofenbrenner
plötzlich verlöscht?
Schnelles Schließen der Backofentür
(entstehender Luftdruck).
Backofentür langsam schließen,
wenn der Backofen in Betrieb ist.
. . . wenn die Backofentemperatur
auffällig stark abweicht?
Thermostat defekt. Wartung des Gerätes durch den
Kundendienst.
. . . wenn das Kühlgebläse für den
Backofen nicht läuft?
Stromausfall. Sicherungen der Hausinstallation
überprüfen.
Gebläse defekt. Wartung des Gerätes durch den
Kundendienst.
. . . wenn beim Braten oder Grillen
Qualm entsteht?
Zu hohe Brattemperatur. Brattemperatur niedriger einstellen.
Zu geringer Abstand zwischen Grill
und Grillgut.
Abstand zwischen Grill und Grillgut
vergrößern.
. . . wenn der Backofen beim Braten
oder Grillen stark verschmutzt?
Zu hohe Brattemperatur. Brattemperatur niedriger einstellen.
Rost und Fettpfanne flasch einge-
schoben.
Rost über Fettpfanne legen und
zusammen in eine Einschubleiste
schieben.
. . . wenn Backofentürscheibe oder
-fenster beschlägt?
Normale Erscheinung. Beruht auf
vorhandenen Temperaturunter-
schied.
Backofen ca. 5 Minuten bei 100° C
einschalten.
. . . wenn im Backofen verstärkt
Kondenswasser auftritt?
Normale Erscheinung z. B. bei
Kuchen mit sehr feuchtem Belag
(Obst) oder großen Braten.
Kondenswasser nach dem Betrieb
aufwischen.
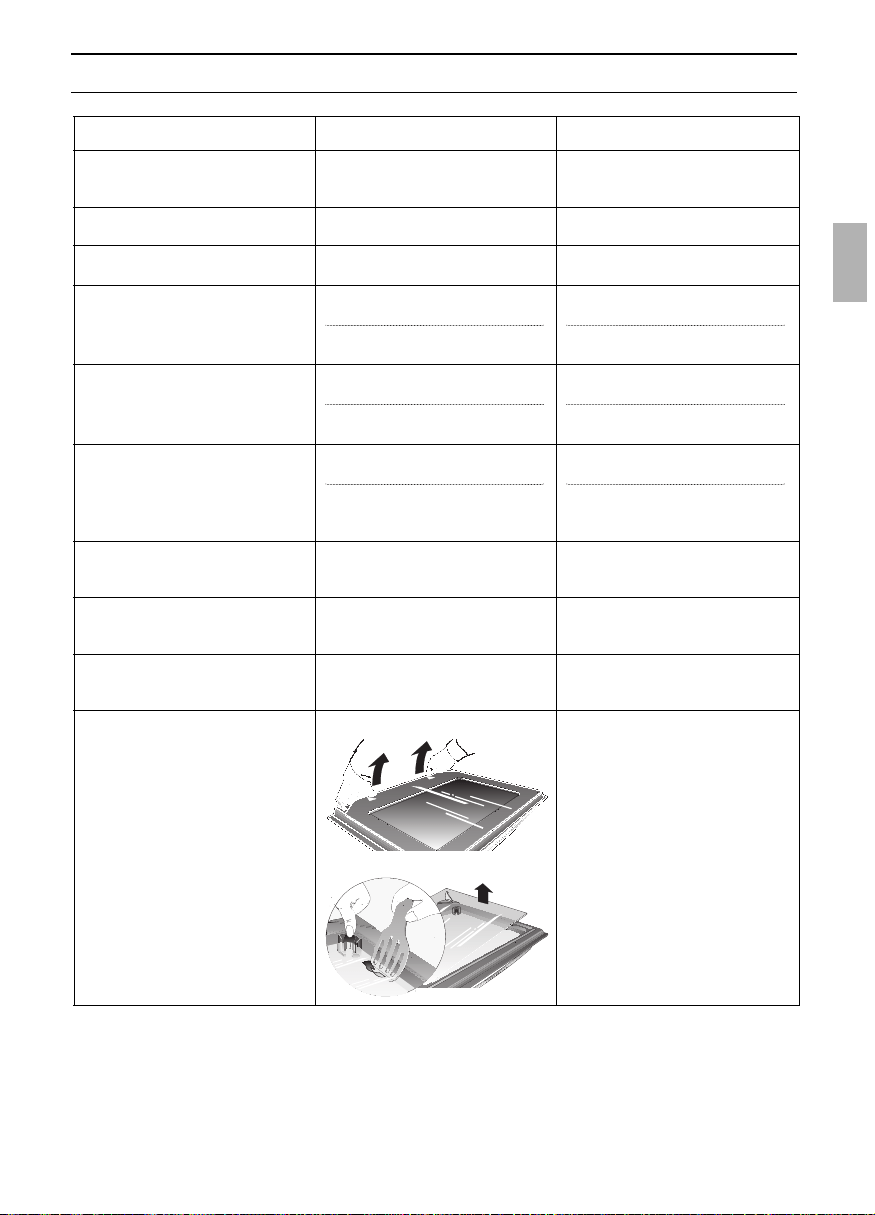
… wenn nach längerem Gebrauch
die Backofentürscheiben innen ver-
schmutzt sind?
Normale Verschmutzung Backofentür aushängen und mit
der Vorderseite nach unten auf eine
weiche, saubere Unterlage legen.
Türglas neben den Scharnieren
anfassen, nach oben ausrasten und
abnehmen.
Bei Türen mit 3 Scheiben:
Innentürglas an den Eckstücken
ausrasten und z. B. mit einem Bra-
tenwender aus Kunststoff oder Holz
anheben.
Montage nach dem Reinigen:
Innentürglas einsetzen und einra-
sten.
Türglas einhängen und durch
Drücken neben den Scharnieren ein-
rasten.
… wenn emaillierte Einschubteile
mattierte, helle Flecken haben?
Normale Erscheinung durch ab-
tropfenden Fleischsaft.
Nicht möglich.

32
Table of Contents
Operating Instructions
for the user Page
Important Information
❑ Notes on disposal 33
❑ Before connecting your
new appliance ... 33
❑ Appliance safety considerations 34
Before Using Your Appliance for the
First Time
❑ Preliminary cleaning 35
❑ Initial heating 35
❑ Burner safety 35
❑ Matching the pan size to the burner 35
Introducing: Your New Cooker
❑ Control panel overview 36
❑ Accessories 37
❑ Slide-in levels 37
Igniting and Controlling the burners
❑ Hob burners 38
❑ Oven burners 39
Baking and Roasting
❑ Description of Oven Features 40
❑ Switching the oven ON and OFF 41
❑ Baking 42
❑ Roasting 43
Grilling 44
Cooking Tips and Helpful Hints 45
Defrosting and Cooking 46
Page
Cleaning and Care
❑ Important cleaning basics 47
❑ Enamel and glass 47
❑ Stainless steel front 47
❑ Reflecting glass front 47
❑ Oven interior 47
❑ Pan supports 48
❑ Hob burners 48
❑ EasyClean
®
oven cleaning system 49+50
❑ Removing/installing the oven door 51
❑ Removing the suspend grids 51
❑ Heating elements 51
Service and Repair Information 52
Trouble-shooting Guide 53–55

33
Important Information
Notes on disposal
❑ Old appliances still have some residual
value. An environment-friendly method
of disposal will ensure that valuable raw
materials can be recovered and used
again.
Before you dispose of your old
appliance, make sure that it has been
rendered inoperable.
Before connection of your
new appliance
❑ The oven must not be put into operation
before it has been connected to the
electricity supply.
❑ Before you use your new appliance for
the first time, please read the operating
instructions very carefully. They contain
important information concerning your
safety as well as how to use and look
after the oven.
❑ These operating instructions apply to
several different appliance models. It is
therefore possible that individual features
are described here that are not actually
included on your appliance.
❑ Keep the operating and installation
instructions in a safe place so that you
can pass them on to the next owner, if
applicable.
❑ Do not use the appliance if it is
damaged in any way.
❑ This appliance should only be installed
and connected by an approved
specialist or properly authorized gas
fitter working in accordance with the
enclosed instructions and connection
diagram. The warranty will be rendered
invalid if the appliance is damaged as a
result of being connected incorrectly.
❑ This appliance complies with all safety
regulations relevant to electrical and gas
appliances. Repairs should only be
carried out by service engineers trained
by the manufacturer. Repairs that have
not been carried out properly represent
a considerable hazard to the user.
❑ Whenever a gas cooker is in operation,
there is an increase in heat and moisture
in the room where it is installed. Make
sure that the kitchen is well ventilated.
Ensure that any natural sources of
ventilation are kept open or install a
mechanical ventilation system (extractor
hood).
❑ Gas appliances must not be installed in
vehicles or on ships.
❑ Intensive and lengthy use of the
appliance could make it necessary to
provide additional ventilation, such as by
increasing the power setting of the
extractor hood if one has been installed.
❑ Your new appliance was protected by
suitable packaging while it was on its
way to you. All materials used for this
purpose are environment-friendly and
suitable for recycling. Please make a
contribution to protecting the
environment by disposing of the
packaging appropriately.
Up-to-date information concerning
options for disposing of your old
appliance and the packaging from the
new one can be obtained from your
retailer or local government office.

34
Important Information
Safety information
❑ Use this appliance solely for cooking
food.
❑ The surface of heating devices and
cookers becomes hot during use. The
interior lining of the oven and the heating
elements also become very hot. Make
sure that children are kept away from
the cooker at all times.
❑ Do not leave the cooker unattended if
you are cooking with fat or oil. Oil can
catch fire if it overheats.
❑ Make sure that the connecting cable of
an electrical appliance does not touch
the hob or get trapped in the oven door
while they are hot, otherwise the
insulation could be damaged.
❑ If a fault occurs, switch off the electricity
at the fuse box and turn off the gas
supply.
❑ Do not keep any combustible objects
inside the oven. They could ignite if the
oven is turned on inadvertently. Do not
put any object which could catch fire
onto the hob.
❑ If using hot air
v, do not place
greaseproof paper loosely in the oven
(e.g. when heating the oven).
The hot-air fan could draw in the paper
which may damage the heater and fan.
❑ Do not clean the oven with a steam or
high-pressure cleaner.
❑ Do not place a baking tray on the floor
of the oven or cover it with aluminium
foil, otherwise the heat will accumulate
at this point. Baking and roasting times
will no longer be accurate and the
enamel surface will be damaged.
❑ Never pour water directly into a hot
oven. This could cause damage to the
enamel.
❑ Fruit juices that drip from the baking tray
will cause stains that cannot be
removed later.
Vor dem Anschluß des neuen
❑ Do not stand or sit on the oven door.
❑ Open and close the door with care, so
that the flames from the gas burner are
not extinguished (especially when it is on
its lowest setting).
❑ The oven door must close properly.
Keep the door seals clean.
❑ Pressure cookers should be kept under
observation while they are heating up.
As soon as the correct pressure for
cooking is reached, turn the flame
down.
❑ Make sure the caps are properly fitted
onto the burners before you use the
hob.
❑ Only operate the hob burners when a
pan with food to be cooked has been
placed on top.
❑ Hot vapour or steam can escape
between the oven and the control panel.
❑ Do not use the appliance as a heater.
❑ If you are using liquid gas
(propane/butane), make sure that all
connections between the bottle and the
appliance are sealed absolutely tight.
Arrange for the reducing regulator and
gas bottle to be inspected at regular
intervals, and the connection point for
the gas supply to be serviced regularly.
❑ Check the rating plate and make sure
that your appliance matches the local
gas supply (type of gas and pressure).
If they are incompatible, the gas could
explode or catch fire.
❑ The control knobs should not be pulled
off, not even for cleaning (protection
against contact).
35
Before you use the appliance for the first time
Burner safety:
❑ All hob burners and the oven burner are
protected so that the gas supply is cut off
if the flame is extinguished.
The safety devices work according to
thermo-electrical principles.
❑ A rushing sound can be heard while the
hob burners are working.
❑ The cooling fan should also be on while
the oven burner is working.
Preliminary cleaning:
1. Clean the outside of the appliance with
a soft damp cloth.
2. Clean the oven and accessories with hot
soapy water.
Initial heating:
1. Heat the empty oven for approx.
30 minutes.
❑ Make sure nothing has been left in the
oven, such as materials used for transit
protection, documents, etc.
❑ Set the temperature to 200º C.
❑ Keep the kitchen window open while the
oven is switched on in order to get rid of
any smells.
Selection of the cooking pots and their
arrangement:
Correct!
❑ Always place pot in the middle of the
hotplate burner.
❑ Use only pots and pans with a flat
bottom.
❑ Select pot diameter to match the hotplate
burner (see table).
– low gas consumption
– optimal cooking time
–favourable arrangement
Selection of the cooking pots and their
arrangement:
Incorrect!
❑ Pot diameter too small.
❑ Hotplate burner flame burns beyond the
bottom of the pots.
❑ Pot projects over the edge of the built-in
hob.
– High gas consumption
– poor arrangement
Burner
High-speed burner
Normal burner
Simmer burner
Load in kW
Hob
2.85
1.85
1.10
2.90
1.70
1.00
240 to 260 mm
200 to 220 mm
120 to 180 mm
Ceramic hob
Pan base diameter
36
Your new cooker
Positions:
a Oven light without heating
e Conventional heating
v Forced air (Circotherm system)
x EasyClean
®
oven cleaning
system (fixed temperature
setting)
F Grill
I–II–III Grill temperature settings
❑ The electric grill and the oven cleaning
system are both automatically barred
from working while the gas burner for
heating the oven is in operation.
Temperatures in º C
❑ Set the temperatures for the
conventional system
e : 150 – 250
and the forced-air system
v : 120 – 250
by adjusting the temperature selector for
the gas oven.
❑ The gas oven burner can only be ignited
via the oven temperature selector.
Function selector for gas oven and
temperature selector for electric grill
Temperature selctor for gas oven
Normal burner C
Normal burner DHigh-speed burner A
0 0 0 0
0
0
Indicator light for electric
grill
Control knob for burner D
Control knob for burner C
Control knob for burner B
Control knob for burner A
Function selector for gas
oven and temperature
selector for electric grill
Indicator light for
EasyClean
®
oven clenaing system
Temperature selector
for gas oven
Indicator light for
gas oven
High-speed burner B
0
150
200
250
●
●
●
●
●
●
●
●
●
●
●
0
37
Introducing: Your new Cooker
Slide-in levels
❑ Your oven features 4 slide-in levels.
The slide-in levels are counted from
bottom to top. The numbers are marked
in the oven.
When using hot-air baking or
roasting, do not use slide-in level »2«,
in order not to block air circulation.
The distortion will already subside again
during baking, roasting or grilling.
Accessories
❑ Your appliance is supplied with:
Order no.
Universal pan with grid
Baking tray, aluminium
Z 1230 X0
Soufflé pan Z 1270 X0
Z 1330 X0
Wire shelf, close mesh Z 1440 X0
Pizza stone Z 1910 X0
Roasting tray (only for use with Universal pan) Z 1510 X1
Clou retrofit kit Z 1750 X0
Wire shelf, high/low Z 1430 X0
Note:
❑ The baking tray or universal pan may
distort while the oven is operating. This
is caused by major temperature
differences on the utensil. These
differences may occur if only one part of
the utensil was covered or if deep-frozen
food, e. g. pizza, was placed on the
utensil.
❑ The following accessories can be obtained from a specialist dealer:
Order no.
Gas safety hose – for gas safety connection –
Connection fittings – for liquid gas –
Z 2500 X1
Z 2300 X0
❑ For installation:
1 Baking tray, aluminium
1 Universal pan
1 Wire shelf, high/low
38
Igniting a burner with the integrated
electric igniter:
1. Press the appropriate control knob
inwards and turn it anti-clockwise to the
high setting.
❑ The electric igniter will continue to
generate a spark for as long as the
knob is pressed.
2. After the flame has been ignited, keep
the control knob pressed for about
5 seconds.
3. Before you release the control knob,
press it inwards firmly once more.
4. If the flame does not ignite or it
extinguishes, wait approx. 3 seconds
and repeat the ignition procedure.
5. To switch off the burner, turn the
control knob clockwise to the zero
position.
Igniting a burner with a match or similar
means:
1. Press the appropriate control knob
inwards, turn it anti-clockwise to the
high setting and light the burner with
the match.
2. After the flame has been ignited, keep
the control knob pressed for about
5 seconds.
3. If the flame extinguishes, wait approx.
3 seconds and repeat the ignition
procedure.
4. To switch off the burner, turn the
control knob clockwise to the zero
position.
Igniting and controlling the burners
❑ The control knob belonging to a specific burner can be identified from the cooker
description or by the symbols on the control panel.
❑ Lighting the burners is made easy by the integrated electric igniter.
,
= high setting (maximum)
,
= low setting (minimum)
Hob burners:
❑ It is possible to continuously adjust the
flame between high (maximum) and low
(minimum).
0
150
200
250
●
●
●
●
●
●
●
●
●
●
●
0
0
39
Igniting and controlling the burners
Oven burner:
❑ It is possible to continuously adjust the
flame.
❑ Nominal load: 3,3 kW.
Igniting the burner with the integrated
electric igniter:
1. Select the heating system (conventional
e
or hot-air
v
).
2. Press the control knob (temperature
selector for gas oven) inwards and turn
it anti-clockwise to the 250 setting.
❑ The electric igniter will continue to
generate a spark for as long as the
knob is pressed.
❑ It should not however be allowed to
operate for longer than 15 seconds.
3. After the flame has been ignited, keep
the control knob pressed for about
5–7 seconds.
❑ When the oven burner has ignited
properly, the indicator light will come
on and remain illuminated.
4. Before you release the control knob,
press it inwards firmly once more.
5. If the flame does not ignite or it
extinguishes, open the oven door. Wait
at least 1 minute before you repeat the
ignition procedure.
6. To switch off the burner, turn the
temperature selector and function
selector to the »0« position.
Indicator light for gas oven:
❑ The indicator light for the gas oven
flashes when the temperature selector
has been turned to a temperature
setting but the burner flame has not
been ignited, or when the supply of gas
is interrupted.
❑ The indicator light for the gas oven
remains continuously illuminated when
the oven burner is operating properly.
Function selector Temperature
selector for oven

40
Oven functions
Top and bottom heat ——————— e
❑ The oven burner generates heat which
is radiated onto the food inside the
oven.
Forced air
————————————
v
Hot air is circulated around each shelf by a
powerful fan mounted in the back wall of
the oven. This results in a very effective
transfer of heat to the item being baked or
roasted.
Advantages:
– low soiling of oven interior
– simultaneous baking and roasting on
several oven levels is possible
– shorter preheating times
– low oven temperatures
– gentle defrosting
Electric grill ——————————— F
Flat grill:
❑ The heating element mounted at the top
of the oven generates heat which is
radiated down onto the food to be
grilled.
Advantages:
– particularly suitable for grilling small
flat pieces of meat such as steaks
and sausages, fish, vegetables and
toast.
EasyClean
®
system
————————
x
The oven cleaning function featured in your
oven is intended to help you keep your
oven neat and tidy. An amount of cleaning
solution is vaporised automatically. The
combined effects of heat and steam soften
the soil deposits on the oven wall enamel
and facilitate their removal. For more
information on this function, see the section
on “Cleaning and Care” later in this booklet.
Use this function with a cold oven only.
Advantages:
–takes the toil out of oven cleaning
–protects the enamel on interior surfaces
– constitutes an environmentally friendly
cleaning method

41
Switching the oven ON and OFF
Residual heat:
❑ Efficient use of residual heat can be
made by switching off the oven approx.
5 to 10 minutes before the cooking time
expires.
Important information:
❑ The cooling fan works as soon as the
oven burner has been ignited. A slight
humming sound will be heard.
If the fan fails to work, for example
when there is a power cut, the oven
must be switched off straight away, or
not switched on in the first place.
❑ Hot steam or vapours can escape from
the opening between the oven and the
control panel.
If this opening is closed off, the oven
might not function correctly.
Cooling fan:
❑ It is possible that the cooling fan will
continue to operate for a while after the
oven has been switched off.
Setting the temperature:
❑ The temperature can be continuously
adjusted.
❑ The oven light is switched on or off at
the same time as the function is
selected.
❑ To switch on the oven light without
putting the oven into operation, turn the
function selector to the
a
symbol.
❑ First of all select the heating system
(conventional
e
or forced air
v
).
Then ignite the burner and turn the
temperature selector to the required
setting (see Baking or Roasting Table).
We recommend that you select the
lower of the quoted temperature
settings when using the oven for the first
time.
Preheating:
❑ In most cases it is not necessary to
preheat the oven.
❑ If it is nevertheless desirable to preheat
the oven, this is carried out at the same
temperature as will eventually be used
for baking (see Baking Table). Approx.
10 minutes are required to preheat the
oven.
42
Baking
Using baking tins
❑ Always place baking tins in the centre
of the baking grill.
❑ Use only bright baking forms or
baking tins.
❑ For fine-tuning your baking results,
create an intermediate slide-in level by
turning the baking grill upside-down.
❑ If the cake bottom gets too dark:
Check the slide-in level. Shorten the
baking time, and possibly use a lower
baking temperature.
❑ If the cake bottom stays too light:
Check the slide-in level. Increase the
baking time, select a lower temperature,
or use a dark metal baking tin.
Using baking sheets
❑ The slanted (handle) end of the baking
sheet must always face the oven door.
❑ Always fully insert baking sheets into the
oven.
❑ Use only original baking sheets.
Notes:
❑ You can influence the degree of
browning by changing the temperature
setting.
❑ If a cake collapses after removing it from
the oven, use less liquid on your next
attempt, consider using a longer baking
time, or use a slightly lower temperature
setting.
43
Roasting
Roasting with hot-air
circulation v
or with top/bottom heat e
Notes:
❑ Place the grill into the universal
baking pan and slide them together
into the same slide-in level.
❑ Meat can be roasted in the oven in a
particularly economical fashion if the
weight of the cut exceeds 750 grams.
❑ Roasting in an uncovered pot:
Rinse the universal baking pan and/or
the roaster with water, and place the
meat into it.
❑ With fat meat and poultry, pour 125 to
250 ml of water (to suit the size and
kind of roast) into the universal pan. At
your discretion, baste lean meat with fat,
or cover it with bacon strips.
❑ The roast drippings collecting in the
universal pan make a tasty gravy.
Dissolve the drippings with hot water,
bring to a boil, thicken with corn starch,
season to taste and, if required, pass it
through a strainer.
❑ No preheating is required. Save energy
by putting the roast into the oven while it
is still cold.
❑ Roasting in a covered pot:
Place the meat into the roasting pot (or
Dutch oven), cover it with a matching lid,
and place it on the grill in the oven.
We recommend that beef roast be
prepared in a covered roasting pot.
Cooking tips:
❑ For roasting, use only cookware with
oven-proof handles.
❑ Prepare large roast directly in the
universal pan, without using the grill.
❑ Smaller cuts of roast can be roasted on
aluminium foil. To do so, bend the edges
of the foil upward, as if to form a dish,
and place it on the grill.
❑ After the end of the selected roasting
time and with the oven switched OFF,
leave the roast in the closed oven for
approx. 10 minutes.
Roasting on the roasting sheet
(Optional accessory available from your
dealer.)
With hot-air
v
for large, fatty roasts.
❑ Place the roasting sheet into the
universal pan. The roasting sheet
prevents soiling of the oven.
❑ Grease and juice drippings from the
roast are collected in the universal pan.
❑ To render your roast more crispy when
using the roasting sheet, you may wish
to set a slightly higher temperature than
indicated in the roasting table.
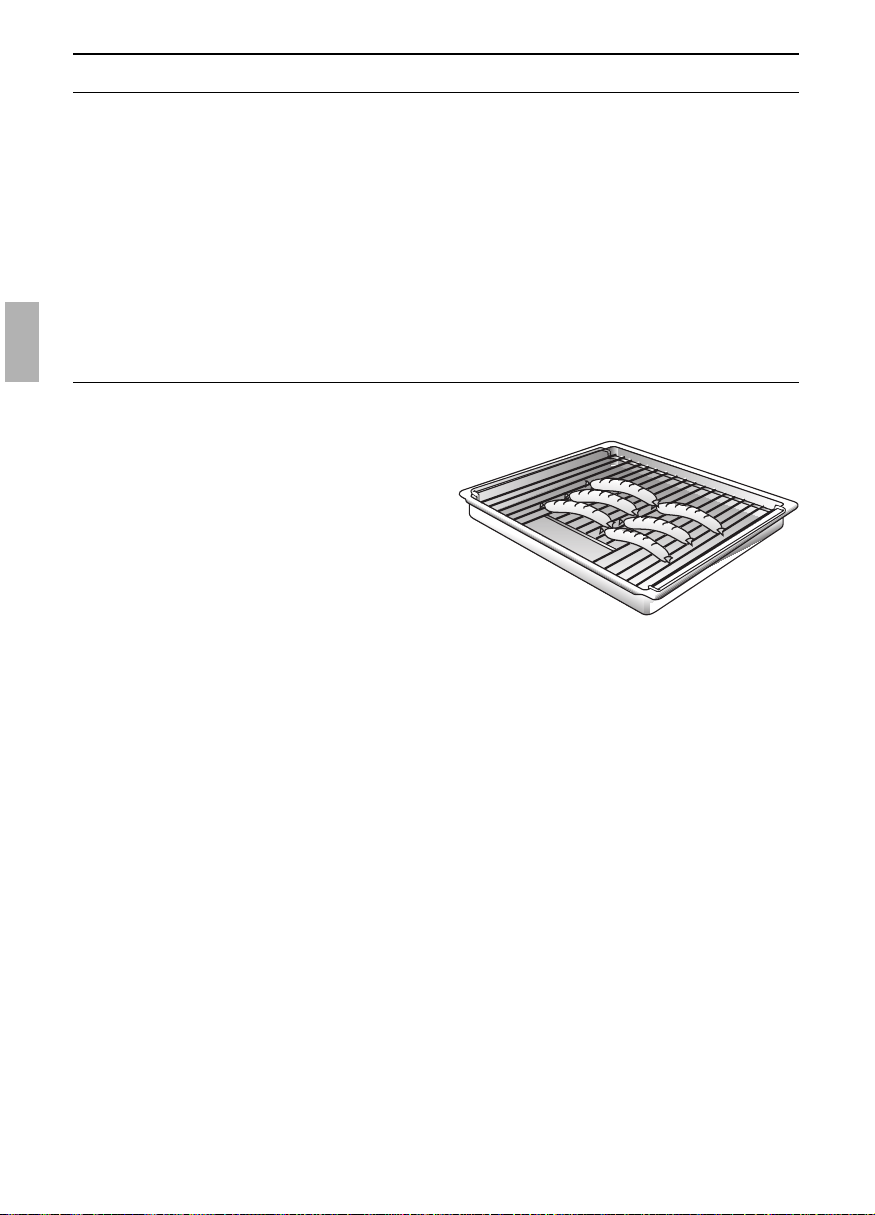
44
Grilling
❑ Always place food to be grilled in the
centre of the wire grill.
❑ If the grilling radiator (heating element)
switches OFF automatically, the
overheating protection was activated.
The radiator will be reactivated after a
short period of time.
❑ Place the grill into the universal
baking pan and slide them together
into the same slide-in level.
Exercise CAUTION when grilling.
! Always keep children at a safe
distance.
Notes on grilling:
❑ Always close the oven door when
grilling.
❑ The grilling temperatures are variable.
❑ Always use the grill and the universal
pan.
Surface grilling F
Used for smaller dishes having little
height/thickness.
❑ Always use the grill and universal pan
together.
❑ Turn the food after approx. two-thirds of
the grilling time has elapsed.
❑ At your discretion, lightly baste the grill
and the food with oil.

45
Cooking Tips and Helpful Hints
To save energy:
❑ Preheat only if expressly required by the
recipe.
❑ Dark baking tins have a higher degree of
heat absorption.
❑ Residual heat: In the case of longer
baking times, you can switch off the
oven 5 – 10 minutes before the full
baking time has elapsed.
For baking:
❑ The bottom of a cake baked on a
baking sheet stays too light.
❑ The bottom of a cake baked in a tin
stays too light.
❑ The bottom of cake or cookies gets too
dark.
❑ The cake gets too dry.
❑ The inside of the cake remains spongy
or doughy, or meat stays raw in the
centre.
❑ When baked with hot-air circulation,
cake baked in round or square tins gets
too dark at the rear.
❑ With very moist baked or roasted
goods: For example, when making fruit
pie or a water-basted roast, steam
develops, condenses on the oven door,
and may cause water to drip onto the
floor or into the modular furniture
enclosing the appliance.
Remove from the oven all baking sheets or
universal baking pan currently not in use.
Use a grill and not a baking sheet to
support the cake tin during baking.
Set cake or cookies into a higher set of
slide-in rails.
Select a slightly higher oven temperature,
and shorter baking time.
Use a slightly lower baking or roasting
temperature.
Note: Baking or roasting times cannot be
shortened by using higher temperatures
(done on the outside, raw inside). Select a
slightly longer baking or roasting time, allow
cake dough more time to rise. Reduce the
amount of liquid used in the dough.
Avoid blocking the air vents at the rear wall
of the oven cavity with the cake tins.
Several brief periods of opening the oven
door during baking (1 to 2 times, more
frequently with longer roasting times) will
aid in venting the water vapours from the
oven, thereby greatly reducing water
condensation.

46
Defrosting and Cooking
Defrosting and cooking using the hot-air system v
Important heating system information:
❑ For defrosting and cooking of frozen
or deep-frozen foods, use only the
hot-air heating system.
❑ With all deep-frozen foods, follow the
food processing company‘s
instructions on the package.
❑ As a rule, defrosted frozen or deep-
frozen foods (especially meats) require
less cooking time than fresh products,
since freezing has a pre-cooking effect.
❑ If frozen meat is placed in the oven, the
defrosting time must be added to the
required cooking time.
❑ Always defrost deep-frozen poultry
before cooking because the giblets must
be removed.
❑ For cooking deep-frozen fish, use the
same temperatures as for fresh fish.
❑ Deep-frozen ready-to-eat meals in
aluminium dishes may be placed into
the oven several at a time.
Standard defrosting of various foods:
Slide-in levels:
With 1 baking sheet: Slide-in level 3
With 2 baking sheets: Slide-in levels 1 and 3
❑ All stated times are approximate
guidelines that vary with the shape and
volume of deep-frozen products.
❑ Defrost deep-frozen meals packed in
aluminium foil or closed aluminium
containers at a setting of 130 – 140° C.
❑ Defrost and warm up deep-frozen
baked goods at 120 – 140° C. Brush
bread, rolls or yeast pastry lightly with
water to make the crust more appealing.
❑ Defrost dry deep-frozen yeast cakes
at 160 – 170° C for 20 – 30 minutes.
❑ Defrost moist deep-frozen yeast cakes
(with fruit topping) at 160 – 170° C for
30 – 50 minutes after wrapping in
aluminium foil to prevent cake from
drying out.
❑ Defrost and toast deep-frozen toast
(with topping) at 160 – 170° C for about
20 minutes.
❑ Frozen pizza:
Please follow the manufacturers’
instructions.

47
Cleaning and Care
Important cleaning basics:
❑ For cleaning, do not use abrasives, no corrosive cleaners, and no sharp objects.
❑ Do not scratch off burnt-in food residues, but soak them off with a moist cloth and
dishwashing detergent.
❑ Special cleaners, such as oven cleaning spray, must not be used on aluminium or plastic
parts.
Enamel and glass:
❑ Use hot detergent suds for cleaning.
❑ For cleaning the mating surface of the
oven door at the front of the oven, the
door should be removed.
Stainless steel front:
❑ When using commercially available
stainless steel cleaning agents, the
lettering may become damaged.
❑ Do not use scouring sponges.
❑ Use commercially available detergents
applied to a soft, moistened cloth or a
chamois.
Reflecting glass front:
❑ Do not use abrasive agents or scouring
sponges
❑ Use commercially available window
cleaners.
– Apply the window cleaner to a soft,
moistened cloth or a chamois.
–Avoid spraying on the switch panel.
Oven interior:
❑ Clean the oven interior after each use,
especially after roasting and grilling. This
prevents a burning-in of food residues.
In the event that food residues have
been baked several times, they may be
very difficult to remove.
❑ You can reduce the degree of soiling by
frequent cleaning using the hot-air
system.
Do not clean the warm oven with any
of the cleaning products specifically
designed for this purpose.
❑ When baking very moist cake, use the
universal baking pan.
❑ For roasting, use the appropriate
utensils (Dutch oven).
❑ Clean the oven before soiling becomes
too heavy. Wash out the oven cavity
with hot detergent suds.
❑ Leave the door open until the interior
has dried.
Oven door pane (stainless steel front):
❑ The temperature of the pane inside the
oven door is reduced by a heat-
reflecting coating.
❑ The reduced temperature ensures that
visibility through the oven door window
is not impaired.
❑ When the oven door is open, this
coating may have a bright appearance.
This is quite normal and does not
indicate a quality defect.
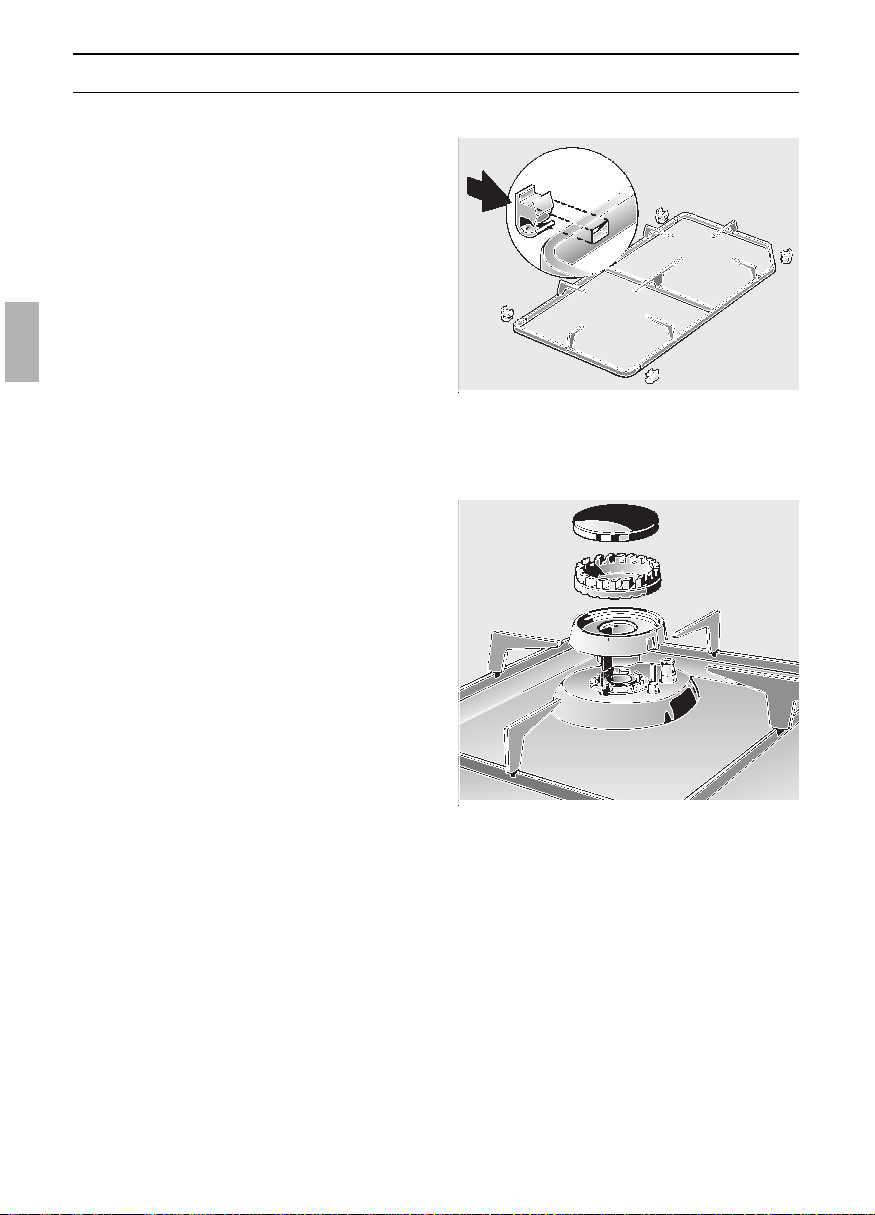
48
Cleaning and care
Pan supports and spillage tray:
❑ The pan supports can be lifted off. Use
hot soapy water to remove any food
remains burnt onto the pan supports.
Note: There is only one correct position
in which the pan supports can be
placed back onto the hob.
❑ To clean the spillage tray, first remove
the pan supports and then wipe the tray
clean with a wet cloth. Finally, polish the
tray dry.
❑ Replacement rubber feet for the pan
supports can be purchased from your
local service centre.
Hob burners:
❑ Clean the enamel burner caps with hot
soapy water.
❑ Carefully clean the ignition electrodes
and the gap in between with a damp
cloth.
❑ The blank metal parts of the burners can
change colour during use. Clean these
parts with a cleaning agent that is
specifically suitable for use on
aluminium.
❑ Do not put the parts of the burners into
a dishwasher.
❑ Observe the following when refitting the
parts of the burners:
– All parts must be dry before they are
refitted.
–Make sure they are level.
–When they have been refitted, the
flame must be uniform all the way
round the circumference.
❑ If a burner cap is not level after it has
been refitted, not only will it be more
difficult to ignite the flame but it is also
possible that damage will occur or there
will be an unpleasant smell of gas as a
result.
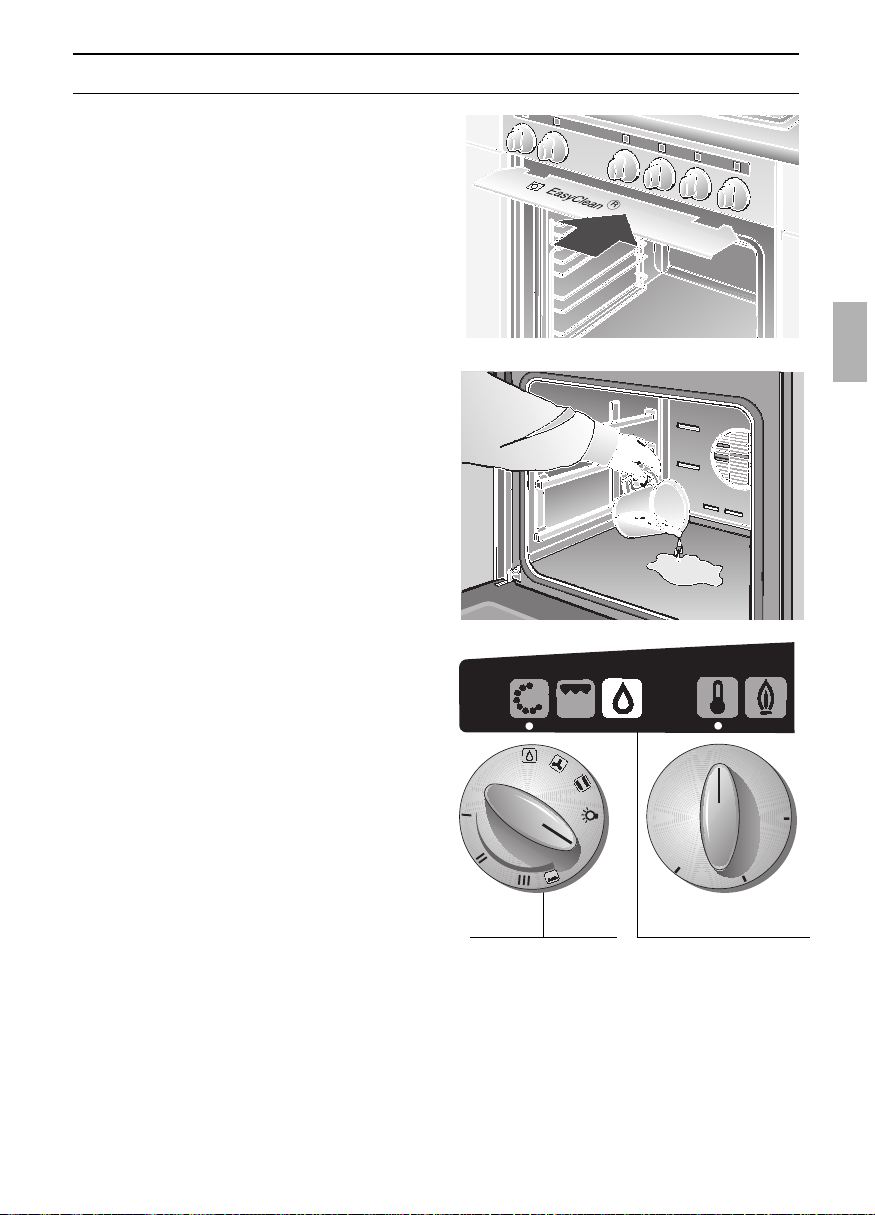
49
Cleaning and Care
EasyClean
®
System: x
The oven cleaning function featured in your
oven is intended to help you keep your
oven neat and tidy. An amount of cleaning
solution is vaporised automatically. The
combined effects of heat and steam soften
the soil deposits on the oven wall enamel
and facilitate their removal.
Caution:
❑ Use this function only after the oven has
completely cooled.
❑ Use normal water only, and no distilled
water.
❑ To prevent the control panel, control
knobs and worktop from tarnishing,
attach the enclosed deflector under the
control panel.
When the cleaning process is complete,
remove the deflector.
Activate oven cleaning:
1. Remove the baking sheet and the
universal baking pan from the oven. The
baking grill may remain in the oven.
2. Pour approx. 400 ml of water mixed
with a little dishwashing detergent into
the floor pan of the oven cavity.
In the case of heavy soil build-up, you
may wish to allow the cleaning solution
to soak in for a while before you activate
the cleaning function.
3. Close the oven door.
4. Turn the function selector to the
x
symbol. The indicator light for the oven
cleaning system illuminates. The
programme runs for 21 minutes. An
acoustic signal is sounded when it has
ended.
Switching the oven OFF:
Turn the function selector to the 0 position.
The oven cleaning control lamp
extinguishes.
Function selector Indicator light for
EasyClean
®
oven
cleaning system
150
200
250
●
●
●
●
●
●
●
●
●
●
●
0
0
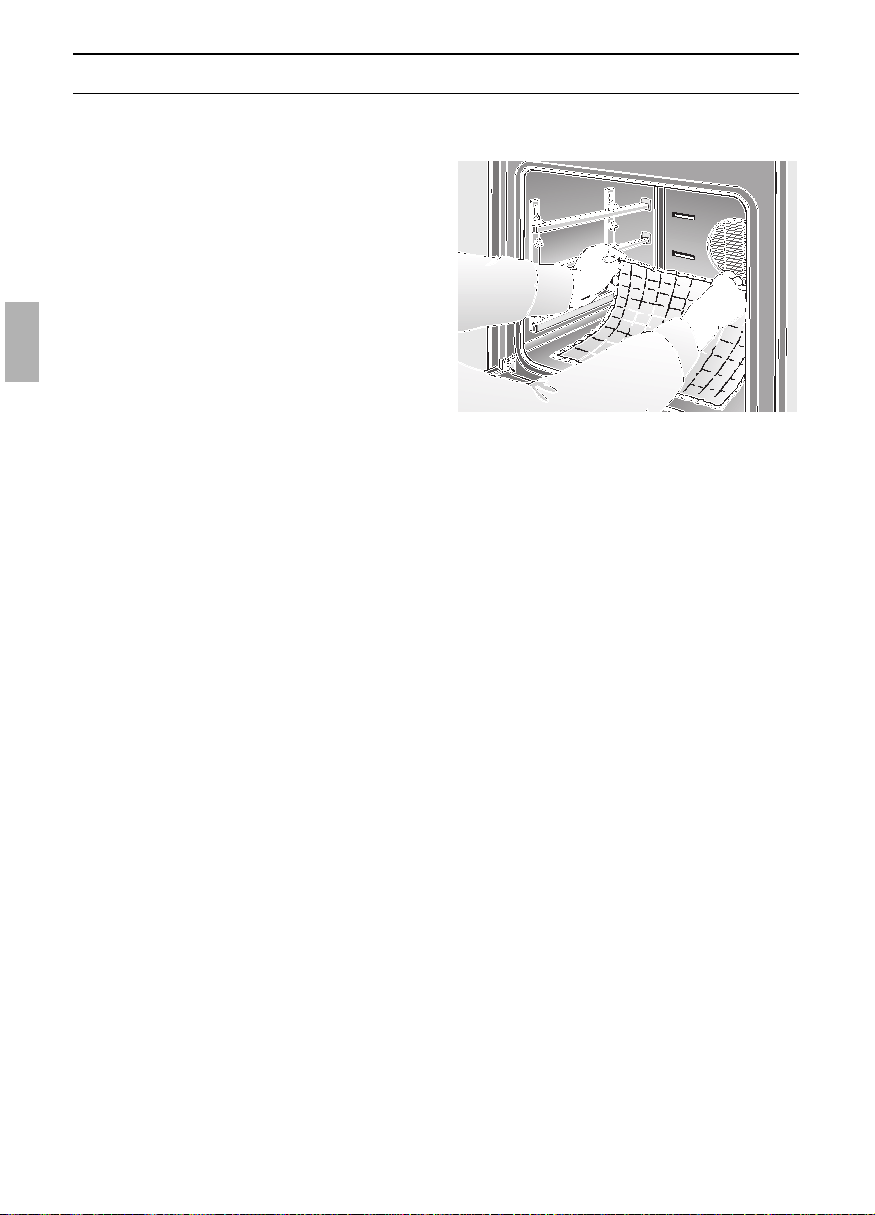
50
Cleaning and Care
After deactivating the oven cleaning
function:
Cleaning tips:
❑ Never leave the residual water in the
oven for any length of time, e.g.
overnight.
1. Open the oven door and pick up the
remaining water with a large absorbent
sponge cloth.
2. Using the detergent-soaked sponge
cloth, a soft brush or a plastic pot
scrubber, wipe of the oven interior.
Stubborn soil remnants can be removed
with a cleaning scraper for glass-
ceramic.
Caution: Use the scraper carefully, and
do not apply the tool at too flat an
angle, because the enamel could be
scratched!
3. Calciferous deposits may be removed
with a cloth soaked in vinegar.
4. Wipe clean with clear water and dry with
a soft cloth (do not forget to wipe under
the oven door seal).
Cleaning tips:
❑ If the oven is heavily soiled, the
procedure may be repeated after the
oven has cooled.
❑ If the oven is heavily soiled with grease,
e.g. after roasting or grilling, we would
recommend rubbing any stubborn dirt
with detergent before activating the
oven cleaning function.
❑ After cleaning, leave the oven door in
its slanted detent position, i.e., at a
30-degree angle, to allow the interior
enamel surfaces to dry thoroughly.
Rapid drying:
(with oven door closed)
1. Turn the function selector to the
v
symbol.
2. Ignite the oven burner via the
temperature selector and set it to
150ºC.
3. Leave the oven switched on for 2
minutes.
4. At the end of this period, turn the
temperature selector and the function
selector to 0.

51
Cleaning and Care
Manual cleaning steps:
Note: To make the manual cleaning steps
following the automatic oven cleaning
function more convenient, the appliance
features the following options:
Removing the oven door:
1. Fully open the oven door.
2. Move the catch levers on the right and
left-hand sides to the fully open position.
3. Placing the door at an upward angle
toward you, grasp the door with both
hands and lift it out of the hinges toward
you.
Hanging the oven door:
1. Set both hinges into their respective
receptacles on the left and right, and
swing the oven door downward.
2. Close the catch levers on the left and
right.
3. Close the oven door.
Switch On the oven light:
❑ Turn the function selector to the
a
symbol.
Removing the suspend grids:
1. On both left and right sides, remove two
milled screws each.
2. Carefully remove the suspended grids.
Lowering the heating element:
Caution: The heating element must have
been allowed to cool.
1. Unlock the heating element by turning
the ratchet at the ceiling of the oven
cavity.
Caution: in the lowered position, never
switch on the heating element or place
any weight on it.
2. After cleaning, swing the heating
element again upward, and latch it into
place.
1.
2.

52
In the event of problems or repairs that you
cannot solve or perform yourself, our
customer service will be happy to help.
Check the customer service directory for a
customer service facility in your area.
Caution: Calling the customer service
because of an operator error can be very
costly! In the event of a customer service
request, please have the following
information handy:
You can find this information on the
appliance‘s nameplate. The nameplate is
located on the appliance, behind the oven
door, on the left bottom edge of the oven.
Replacing the oven light:
Caution: Unplug the appliance or
remove the fuse!
1. To prevent damage, place a dish towel
into the cold oven.
2. Remove the glass cover by inserting a
knife or similar object between the glass
and the frame.
3. Replace the lamp.
–Type: Incandescent bulb E 14, 220 –
235 V, 25 W, heat-resistant to 300° C.
–You may obtain this bulb from your
customer service or from your
appliance dealer.
Replacing the oven door seal:
1. Remove the defective oven door seal by
simply unhooking it.
You may obtain the new oven door seal
from your customer service.
E-Number FD
Service and Repair Information
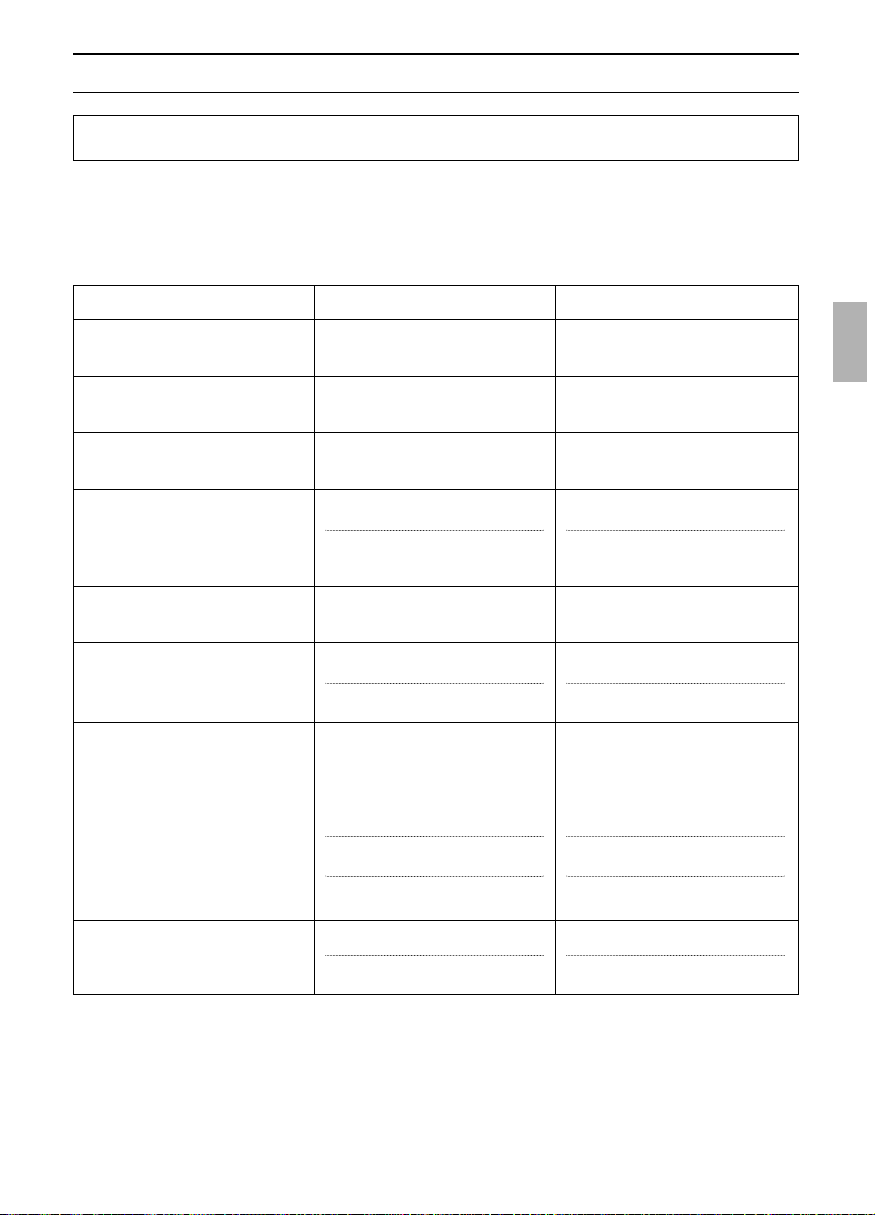
53
Trouble-shooting Guide
It is not always necessary to call out a service engineer. In a lot of cases you should be able to resolve the pro-
blem yourself. The following table contains a number of useful tips on how to do so.
Fundamental information:
Work on the cooker electrics or the gas fittings should only be carried out by a suitably qualified person. Before any such
work is begun, the appliance must always be isolated from the mains electricity supply, for example, by switching it off at
the main fuse box for your accommodation.
If the built-in gas cooker has to be withdrawn from the cupboard unit, the qualified person undertaking the repair must first
undo all connections between the cooker and the gas hob. This includes the telescopic linkage connecting the burner con-
trol knobs as well as the electricity and gas connections between hob and oven.
What to do … Possible cause Remedy
… if there is an overall power failure. Blown fuse. Check fuse in main fuse box and
replace if defective.
… if liquids or thin doughs flow to
one side of the pan.
Cooker is not level. Align appliance or check installation.
… if a fault occurs with electronically
controlled functions.
Pulses of energy such as when light-
ning strikes.
Reset corresponding function.
… if the underside of cakes or pies
baked directly on a tray is too light.
Item inserted at wrong shelf height. Insert cakes at lower level.
… if the underside of cakes or pies
baked in a tin or dish is too light.
Cake tin or dish has been placed
inside oven on a baking sheet or grill
pan.
Place baking tin or dish on a wire
shelf inside oven.
… if the cake is too dry. Oven temperature is too low. Set oven to a slightly higher tempe-
rature.
… if the cake is still uncooked or
doughy inside or meat is not roasted
all the way through.
Oven temperature set too high. Set oven to a slightly lower tempe-
rature.
Note:
Cooking time cannot be shortened
by setting oven to a higher tempera-
ture! (Outside cooked, inside un-
cooked).
… if the underside of cakes or bis-
cuits is too dark.
Dark-coloured baking tray was used. Use light-coloured baking trays.
Cooking time was too long. Arrange for oven to be serviced.
Baking trays or grill pan that are not
currently being used have been sto-
red at bottom of oven.
Remove all baking sheets and grill
pans from oven if they are not requi-
red for use.
Cooking time too short. Select a longer cooking time, allow
dough to rise for longer period.
Too much liquid in the cake mixture. Use less liquid in cake mixture.
Item inserted at wrong shelf height. Place cakes or biscuits on a higher
shelf position inside oven.
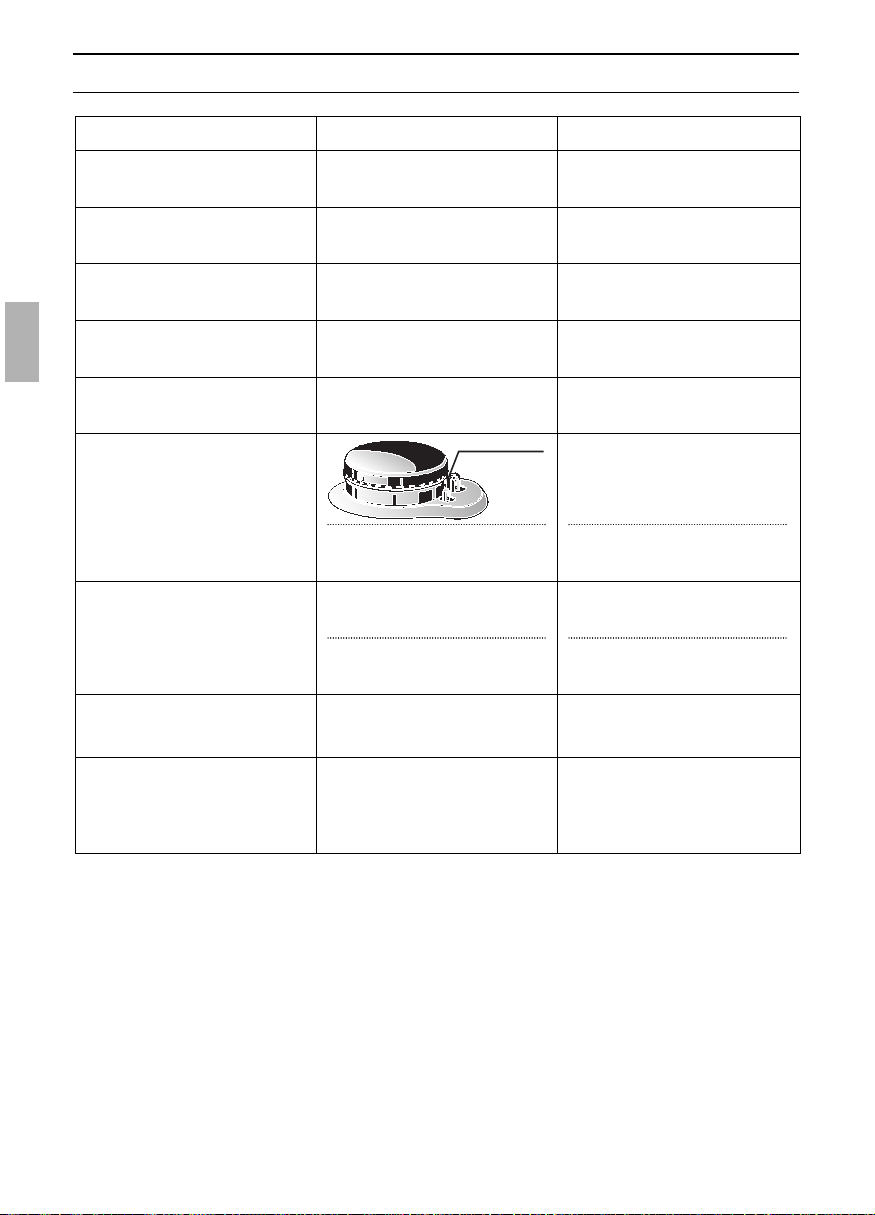
54
Bent sensor
Trouble-shooting Guide
What to do … Possible cause Remedy
… if the appearance of the burner
caps becomes unsightly.
Normal consequence of use. Clean burner cap with metal polish
specifically suitable for aluminium.
… if the enamel grid becomes rough
where it is close to the burner.
… if after the appliance has been
installed the burner flames are not
uniform.
Normal consequence of high tempe-
ratures.
Not possible. Does not effect appli-
ance performance.
Uneven flame caused by incorrect
gas setting.
Arrange for appliance to be inspec-
ted by dealer or installer.
… if the shape of the burner flames
changes suddenly.
Burner parts positioned incorrectly. Fit loose burner parts correctly.
… if the electric igniter for the hob
burners no longer works.
Traces of food or cleaning material
between ignition electrode and bur-
ner.
Carefully clean gap between ignition
electrode and burner.
… if all of a sudden it becomes
necessary to keep the burner control
knob pressed for a longer period in
order to ignite the flame.
… if after the flame has been ignited
it extinguishes again.
… if the size of the flames is larger
than normal or you can smell gas.
Burner parts positioned incorrectly.
Knob not pressed for long enough.
Carefully bend sensor back into ver-
tical position.
Fit loose burner parts correctly.
Press knob for longer period.
Knob not pressed in firmly enough.
Press knob in firmly before releasing
it.
Defective reducing regulator on gas
bottle.
Switch off appliance immediately.
Close valve on gas bottle. Arrange
for qualified person to check regula-
tor and replace it if necessary.
… if the control knob is difficult to
turn or sticks.
… if the shape of the flame is totally
different than normal.
Due for servicing. Arrange for appliance to be serviced.

55
Trouble-shooting Guide
What to do … Possible cause Remedy
… if the oven burner constantly
extinguishes.
Gas supply set up incorrectly. Arrange for gas setting to be
checked by dealer or installer.
… if the oven burner suddenly extin-
guishes.
Oven door was closed too quickly
(created a draft).
Close oven door slowly whenever
oven burner is lit.
… if the oven temperature varies sig-
nificantly.
Defective thermostat. Arrange for appliance to be serviced.
… if the oven cooling fan does not
work.
Power failure. Check fuses in main fuse box for
house.
Defective fan. Arrange for appliance to be serviced.
…if smoke occurs while roasting or
grilling.
Oven temperature set too high. Set oven to a lower temperature.
Distance between grill element and
food is too small.
Increase distance between grill ele-
ment and food.
… if the oven becomes very dirty as
a result of roasting or grilling.
Oven temperature set too high. Set oven to a lower temperature.
Wire shelf or grill pan not inserted
properly.
Place wire shelf over grill pan and
slide both into oven at same level.
… if the glass pane in the oven door
steams up.
Normal occurrence. Caused by diffe-
rence in temperature between inside
and outside.
Switch on oven for approx. 5 minu-
tes at 100º C.
… if a large amount of condensation
occurs inside the oven.
Normal occurrence, for example with
cakes or pies with very moist fillings
(e.g. fruit) or large joints of meat.
Wipe off condensation when you
have finished using oven.
... if after prolonged use, the oven
window panes are soiled from the
inside.
This kind of soiling is normal. Detach the oven door and lay front
side down on a soft, clean base.
Grip the door glass near the hinges,
pull up and remove.
Doors with 3 panels:
Disengage inner door glass at the
corner pieces and lift it up using, for
example, a pair of frying tongs made
of plastic or wood.
Installing the cleaned glass:
Insert the inner door glass and lock
into position.
Attach the door glass and lock into
position by pressing the glass near
the hinges.
… if enamelled slide-in parts have
dull, light blotches?
Normal occurrence due to dripping
meat juices.
Not possible.

56
Πίνακασ περιεχοµένων
Οδηγίεσ χρήσησ
Γι α τον χρήστη Σελίδα
Τι πρέπει να προσέχετε
❑ Υποδείξεισ απσυρσησ 57
❑ Πριν τη σύνδεση τησ καινούργιασ
συσκευήσ 57
❑ Υποδείξεισ ασφαλείασ 58
Πριν την πρώτη χρήση
❑ Προκαθαρισµσ 59
❑ Θέρµανση του φούρνου 59
❑ Ασφάλεια των καυστήρων 59
❑ Επιλογή των µαγειρικών σκευών 59
Αυτή είναι η καινούργια σασ κουζίνα
❑ Περιγραφή συσκευήσ 60
❑ Εξαρτήµατα 61
❑ Υποδοχέσ 61
Άναµµα και ρύθµιση των καυστήρων
❑ Καυστήρεσ εστιών 62
❑ Καυστήρασ φούρνου 63
Ψήσιµο γλυκισµάτων και φαγητών στον
φούρνο
❑ Λειτουργίεσ φούρνου 64
❑ Θέση φούρνου σε και εκτσ
λειτουργίασ 65
❑ Ψήσιµο γλυκισµάτων 66
❑ Ψήσιµο φαγητών 67
Ψήσιµο στο γκριλ 68
Συµβουλέσ και τρικ 69
Ξεπάγωµα και σιγοβράσιµο 70
Σελίδα
Καθαρισµσ και περιποίηση
❑ Σηµαντικέσ υποδείξεισ 71
❑ Εµαγιέ και γυαλί 71
❑ Πρσοψη απ ανοξείδωτο χάλυβα 71
❑ Γυάλινη πρσοψη κατοπτρισµού 71
❑ Φούρνοσ 71
❑ Σχάρα τοποθέτησησ µαγειρικών
σκευών και σκαφοειδήσ εστία
µαγειρέµατοσ 72
❑ Καυστήρεσ επιµέρουσ εστιών 72
❑ Σύστηµα καθαρισµού EasyClean
®
73+75
❑ Αφαίρεση και τοποθέτηση τησ πρτασ
του φούρνου 75
❑ Πλέγµατα ανάρτησησ 75
❑ Θερµαντικά στοιχεία 75
Βλάβεσ, Επισκευέσ 76
Τι πρέπει να κάνετε, ταν κάτι δεν
λειτουργεί; 77–79

57
Tι πρέπει να προσέχετε
Υποδείξεισ απσυρσησ
❑ Οι παλιέσ συσκευέσ δεν αποτελούν
άχρηστα απορρίµµατα. Με την
απσυρσή τουσ σύµφωνα µε τουσ
κανονισµούσ για την προστασία του
περιβάλλοντοσ µπορούν να
επαναποκτηθούν πολύτιµεσ πρώτεσ
ύλεσ.
Προτού αποσύρετε την παλιά σασ
συσκευή, πρέπει να την αχρηστέψετε.
Πριν τη σύνδεση τησ
καινούργιασ συσκευήσ
❑ Ο φούρνοσ τησ συσκευήσ επιτρέπεται
να τεθεί σε λειτουργία µνον, ταν έχει
γίνει ηλεκτρική σύνδεση.
❑ Προτού χρησιµοποιήσετε την
καινούργια συσκευή, παρακαλείσθε να
διαβάσετε προσεκτικά τισ οδηγίεσ
χρήσησ. Αυτέσ περιέχουν σηµαντικέσ
πληροφορίεσ για την ασφάλειά σασ
καθώσ και για τη χρήση, την περιποίηση
και την συντήρηση τησ συσκευήσ.
❑ Αυτέσ οι οδηγίεσ χρήσησ ισχύουν για
περισστερεσ παραλλαγέσ τησ
συσκευήσ. Είναι δυνατν να έχουν
περιγραφεί επιµέρουσ χαρακτηριστικά
του εξοπλισµού, τα οποία δεν αφορούν
τη συσκευή σασ.
❑ Φυλάξτε καλά τισ οδηγίεσ χρήσησ και
εγκατάστασησ ενδεχοµένωσ για
κάποιον επµενο χρήστη.
❑ Αν έχει πάθει βλάβη η συσκευή, δεν
επιτρέπεται να τεθεί σε λειτουργία.
❑ Η εγκατάσταση και η σύνδεση τησ
συσκευήσ πρέπει να γίνεται µνον απ
αδειούχο ηλεκτρολγο και αντίστοιχα
απ αδειούχο ειδικ εγκατάστασησ
αερίου σύµφωνα µε τισ
επισυναπτµενεσ οδηγίεσ και το σχέδιο
σύνδεσησ. Αν δεν συνδεθεί σωστά η
συσκευή, παύει να ισχύει η αξίωση
παροχήσ δωρεάν εγγύησησ σε
περίπτωση βλάβησ.
❑ Οι συσκευέσ µασ ανταποκρίνονται
στουσ σχετικούσ κανονισµούσ
ασφαλείασ για ηλεκτρικέσ και
αντίστοιχα συσκευέσ µαγειρέµατοσ µε
αέριο. Επισκευέσ επιτρέπεται να
εκτελούν µνον οι τεχνικοί τησ
υπηρεσίασ τεχνικήσ εξυπηρέτησησ
πελατών, οι οποίοι εκπαιδεύτηκαν απ
τον κατασκευαστή. ταν δεν γίνονται
σωστά οι επισκευέσ, είναι δυνατν να
προκύψουν σοβαροί κίνδυνοι για σασ.
❑ Η χρήση συσκευήσ µαγειρέµατοσ µε
αέριο οδηγεί στην έκλυση θερµτητασ
και στον σχηµατισµ υγρασίασ στον
χώρο τοποθέτησησ. Προσέξτε να
γίνεται καλσ αερισµσ τησ κουζίνασ:
∆ιατηρείτε ανοιχτά τα φυσικά
ανοίγµατα αερισµού ή τοποθετήστε
µηχανικ σύστηµα αερισµού
(απορροφητήρα).
❑ Οι συσκευέσ αερίου δεν επιτρέπεται να
εγκατασταθούν σε οχήµατα ή πλοία.
❑ Η εντατική και µακρχρονη χρήση τησ
συσκευήσ είναι δυνατν να καταστήσει
απαραίτητο επιπλέον αερισµ, π.χ.
µεγαλύτερη ισχύ του ενδεχοµένωσ
υπάρχοντοσ µηχανικού συστήµατοσ
αερισµού.
Υποδείξεισ απσυρσησ
❑ Η συσκευασία προστατεύει την
καινούργια σασ συσκευή κατά τη
µεταφορά µέχρι το σπίτι σασ. λα τα
χρησιµοποιούµενα υλικά συσκευασίασ
είναι αβλαβή για το περιβάλλον και
µπορούν να ξαναχρησιµοποιηθούν.
Παρακαλούµε να συντελέσετε κι εσείσ
στην προστασία του περιβάλλοντοσ και
ν' αποσύρετε τη συσκευασία µε τρπο
αβλαβή για το περιβάλλον.
Γι α τουσ επίκαιρουσ τρπουσ
απσυρσησ παρακαλείσθε να ζητήσετε
πληροφορίεσ απ το ειδικ κατάστηµα,
απ το οποίο αγοράσατε τη συσκευή ή
απ την ∆ηµοτική ή Κοινοτική Αρχή τησ
περιοχήσ σασ.

58
Τι πρέπει να προσέχετε
Υποδείξεισ ασφαλείασ
❑ Χρησιµοποιείτε τη συσκευή µνο για
µαγείρεµα.
❑ Οι επιφάνειεσ συσκευών θέρµανσησ και
µαγειρικήσ καίνε, ταν λειτουργούν. Οι
εσωτερικέσ επιφάνειεσ του φούρνου
και τα στοιχεία θέρµανσησ. Γι' αυτ
κρατάτε τα παιδιά οπωσδήποτε µακριά
απ τέτοιεσ συσκευέσ.
❑ Μείνετε κοντά, ταν ετοιµάζετε
φαγητά µε λίποσ ή λάδι. ταν αυτ
υπερθερµανθεί, µπορεί να πάρει φωτιά.
❑ Τα τροφοδοτικά καλώδια ηλεκτρικών
συσκευών δεν επιτρέπεται να
ακουµπούν στισ ζεστέσ εστίεσ ούτε να
πιαστούν στη ζεστή πρτα του
φούρνου, διτι θα µπορούσαν να
προκληθούν βλάβεσ στη µνωση των
καλωδίων.
❑ Σε περίπτωση βλάβησ κατεβάστε την
ασφάλεια στον ηλεκτρικ πίνακα του
σπιτιού. ∆ιακψτε την παροχή αερίου.
❑ Μη φυλάτε εύφλεκτα αντικείµενα µέσα
στον φούρνο. Σε περίπτωση αθέλητησ
θέσησ σε λειτουργία θα µπορούσαν να
πάρουν φωτιά. Μην τοποθετείτε
εύφλεκτα αντικείµενα επάνω στην
εστία.
❑ Κατά το “ήσιµο µε θερµ αέρα v µη
βάζετε το χαρτί “ησίµατοσ ελεύθερο
µέσα στον φούρνο (π.χ. κατά την
προθέρµανση). Η φτερωτή θερµού
αέρα µπορεί να αναρροφήσει το χαρτί.
Αυτ µπορεί να οδηγήσει σε ζηµιέσ του
θερµαντικού στοιχείου και τησ
φτερωτήσ.
❑ Μην καθαρίζετε τον φούρνο και την
εστία µε συσκευέσ καθαρισµού µε ατµ
ή µε υψηλή πίεση.
❑ Μη βάζετε λαµαρίνα επάνω στον
πυθµένα του φούρνου ούτε να τον
ντύνετε µε αλουµινχαρτο, διτι έτσι
δηµιουργείται θερµική συµφρηση. ∆εν
ισχύουν πλέον οι χρνοι ψησίµατοσ και
προκαλούνται ζηµιέσ στο εµαγιέ.
❑ Μη χύνετε ποτέ νερ κατευθείαν µέσα
στον καυτ φούρνο. Μπορεί να
προκληθούν ζηµιέσ στο εµαγιέ.
❑ Χυµοί φρούτων, που στάζουν απ τη
λαµαρίνα στον πυθµένα του φούρνου,
αφήνουν λεκέδεσ που δεν µπορούν
πλέον να αποµακρυνθούν.
Vor dem Anschluß des neuen
❑ Μην ανεβαίνετε και µην κάθεστε ποτέ
επάνω στην ανοιχτή πρτα του
φούρνου.
❑ Ανοίγετε και κλείνετε την πρτα του
φούρνου προσεκτικά, για να µη
σβήσουν οι φλγεσ των καυστήρων
(ιδιαίτερα στη χαµηλή ρύθµιση).
❑ Η πρτα του φούρνου πρέπει να
κλείνει καλά. ∆ιατηρείτε καθαρέσ τισ
επιφάνειεσ τησ τσιµούχασ τησ πρτασ.
❑ Επιβλέπετε τισ χύτρεσ ταχύτητασ κατά
τη θέρµανση. ταν επιτευχθεί η σωστή
πίεση µαγειρέµατοσ, ρυθµίζετε έγκαιρα
προσ τα πίσω.
❑ Τοποθετείτε καλά τα καπάκια των
καυστήρων πριν τη χρήση των
καυστήρων των επιµέρουσ εστιών.
❑ Θέτετε τουσ καυστήρεσ των επιµέρουσ
εστιών σε λειτουργία µνον, ταν
έχετε τοποθετήσει προηγουµένωσ
µαγειρικ σκεύοσ επάνω στην εστία.
❑ Ανάµεσα στον φούρνο και το ταµπλ
αεριοκρουνών µπορεί να εξέλθει
καυτσ ατµσ.
❑ Μη χρησιµοποιείτε τη συσκευή για
θέρµανση.
❑ Σε περίπτωση λειτουργίασ µε υγραέριο
(προπάνιο/βουτάνιο), πρέπει λεσ οι
συνδέσεισ µεταξύ τησ φιάλησ
υγραερίου και τησ συσκευήσ να είναι
απολύτωσ αεριοστεγείσ. Ελέγχετε τον
µειωτήρα πίεσησ τησ φιάλησ υγραερίου
σε τακτικά χρονικά διαστήµατα και
συντηρείτε τακτικά τα µέρη σύνδεσησ
τησ τροφοδοσίασ υγραερίου.
❑ Βεβαιωθείτε βάσει τησ πινακίδασ
τύπου, τι η συσκευή σασ και οι τοπικέσ
συνθήκεσ αερίου βρίσκονται σε πλήρη
συµφωνία.
Αν δεν προσεχθεί αυτ το σηµείο,
υφίσταται κίνδυνοσ ανάφλεξησ του
αερίου ή κίνδυνοσ πυρκαϊάσ.
❑ Οι διακπτεσ χειρισµού δεν
επιτρέπεται να αφαιρεθούν, επίσησ και
κατά τον καθαρισµ (προστασία
επαφήσ).

59
Πριν την πρώτη χρήση
Ασφάλεια των καυστήρων:
❑ λοι οι καυστήρεσ των επιµέρουσ
εστιών και ο καυστήρασ του φούρνου
είναι ασφαλισµένοι κατά τέτοιον τρπο,
ώστε σε περίπτωση που σβήσει η φλγα
να διακπτεται η παροχή αερίου.
Η ασφάλεια δρα θερµοηλεκτρικά.
❑ ταν οι καυστήρεσ των επιµέρουσ
εστιών βρίσκονται σε λειτουργία,
ακούγεται ένασ φλοίσβοσ.
❑ ταν ο φούρνοσ βρίσκεται σε
λειτουργία, πρέπει να βρίσκεται και ο
ανεµιστήρασ σε λειτουργία.
Προκαθαρισµσ:
1. Καθαρίζετε τη συσκευή απ' έξω µ' ένα
µαλακ βρεγµένο πανί.
2. Καθαρίζετε τον φούρνο και τα
εξαρτήµατα µε ζεστ διάλυµα
απορρυπαντικού πιάτων.
Θέρµανση του φούρνου:
1. Προθερµάνετε τον άδειο φούρνο επί
περ. 30 λεπτά.
❑ Κατά τη θέρµανση του φούρνου δεν
επιτρέπεται να βρίσκονται µέσα σ'
αυτν διάφορα κοµµάτια πωσ π.χ.
προστασία µεταφοράσ, επιγραφέσ ή
παρµοια.
❑ Γι α τη θέρµανση ρυθµίζετε τη
θερµοκρασία στουσ 200° C.
❑ Κατά τη θέρµανση του φούρνου
ανοίγετε το παράθυρο τησ κουζίνασ
(του δωµατίου), για να αποφύγετε την
ενοχλητική οσµή.
Επιλογή των µαγειρικών σκευών και τησ
διάταξήσ τουσ:
Σωστ µαγειρικ σκεύοσ!
❑ Τοποθετείτε το µαγειρικ σκεύοσ
πάντοτε µε το κέντρο του επάνω στουσ
καυστήρεσ των επιµέρουσ εστιών.
❑ Χρησιµοποιείτε µνον µαγειρικά σκεύη
και τηγάνια µε επίπεδο πάτο.
❑ Επιλέγετε τη διάµετρο του σκεύουσ
ανάλογα µε τον καυστήρα τησ
επιµέρουσ εστίασ (βλ. στον πίνακα).
– χαµηλτερη κατανάλωση αερίου
–ιδανικσ χρνοσ µαγειρέµατοσ
–ιδανική διάταξη
Keuze van de kookpannen en hun o
pstelling:
Λάθοσ µαγειρικ σκεύοσ!
❑ Μαγειρικ σκεύοσ πολύ µικρήσ
διαµέτρου
❑ Η φλγα των καυστήρων των επιµέρουσ
εστιών βγαίνει έξω απ τον πάτο των
µαγειρικών σκευών.
❑ Το µαγειρικ σκεύοσ βγαίνει έξω απ
την άκρη τησ σκαφοειδούσ εστίασ
µαγειρέµατοσ.
– µεγάλη κατανάλωση αερίου
–χι καλή διάταξη
Καυστήρασ
∆υνατσ καυστήρασ
Κανονικσ καυστήρασ
Οικονοµικσ καυστήρασ
Ισχύσ σε kW
Σκαφοειδήσ
εστία
2,85
1,85
1,10
2,90
1,70
1,00
240
έωσ 260 mm
200
έωσ 220 mm
120
έωσ 180 mm
Σκαφοειδήσ εστία απ
υαλοκεραµικ υλικ
∆ιάµετροσ µαγειρικού
σκεύουσ

Αυτή είναι η καινούργια σασ κουζίνα
Κανονικσ
καυστήρασ C
Κανονικσ
καυστήρασ D
∆υνατσ
καυστήρασ A
Θέσεισ:
a Φωτισµσ φούρνου χωρίσ
θέρµανση
e Συµβατικ σύστηµα θέρµανσησ
v Θερµσ αέρασ (σύστηµα
Circotherm)
x Σύστηµα καθαρισµού
EasyClean
®
(σταθερή ρύθµιση
χωρίσ επιλογή θερµοκρασίασ)
F Ψήσιµο στο γκριλ
I–II–III Ρύθµιση θερµοκρασίασ για τισ
βαθµίδεσ του γκριλ
❑ ταν το θερµαντικ στοιχείο αερίου
του φούρνου βρίσκεται σε λειτουργία,
ασφαλίζεται αυτµατα το θερµαντικ
στοιχείο του γκριλ και το θερµαντικ
στοιχείο για τον καθαρισµ του
φούρνου.
Ρύθµιση θερµοκρασίασ σε ° C
❑ Οι θερµοκρασίεσ για το
συµβατικ σύστηµα
θέρµανσησ
e
:150–250
και το σύστηµα θέρµανσησ µε θερµ
αέρα
v
:120–250
πρέπει να ρυθµιστούν µε τον διακπτη
επιλογήσ θερµοκρασίασ για τον φούρνο
αερίου.
❑ Η ανάφλεξη του φούρνου αερίου γίνεται
µνον µέσω του διακπτη επιλογήσ
θερµοκρασίασ για τον φούρνο αερίου.
∆ιακπτησ επιλογήσ λειτουργίασ για τον
φούρνο αερίου και διακπτησ επιλογήσ
θερµοκρασίασ για το ηλεκτρικ γκριλ
∆ιακπτησ επιλογήσ θερµοκρασίασ για τον
φούρνο αερίου
0 0 0 0
0
0
Ενδεικτική λυχνία για το
ηλεκτρικ γκριλ
∆ιακπτησ για την
(επιµέρουσ) εστία D
∆ιακπτησ για την
(επιµέρουσ) εστία C
∆ιακπτησ για την
(επιµέρουσ) εστία B
∆ιακπτησ για την (επιµέρουσ) εστία A
∆ιακπτησ επιλογήσ
λειτουργίασ για τον φούρνο
αερίου και διακπτησ επιλογήσ
θερµοκρασίασ για το
ηλεκτρικ γκριλ
Ενδεικτική λυχνία για το σύστηµα
καθαρισµού EasyClean
®
∆ιακπτησ επιλογήσ
θερµοκρασίασ για
τον φούρνο αερίου
Ενδεικτική λυχνία για
τον φούρνο αερίου
Οικονοµικσ
καυστήρασ B
60
0
150
200
250
●
●
●
●
●
●
●
●
●
●
●
0
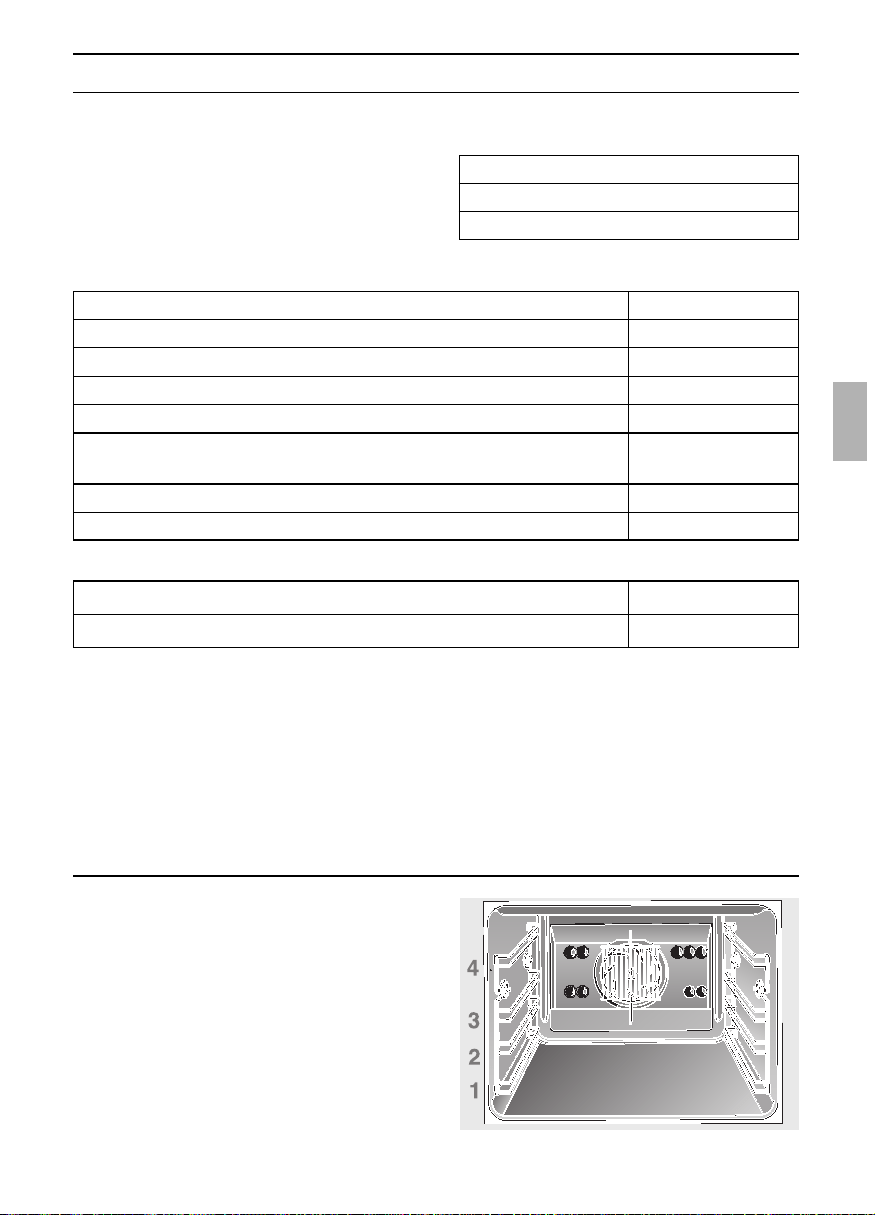
Aυτή είναι η καινούργια σασ κουζίνα
Ύψη σχάρασ / ταψιών
❑ O φούρνοσ διαθέτει 4 θέσεισ ύψουσ για
σχάρεσ/ταψιά. Oι θέσεισ αυτέσ
αριθµούνται απ κάτω προσ τα πάνω
και αυτή η αρίθµηση βρίσκεται µέσα
στο φούρνο.
ταν µαγειρεύετε µε αέρα, να µη
χρησιµοποιείτε το ύψοσ »2« για να µην
επηρεάζεται η κυκλοφορία του αέρα.
Υπδειξη:
❑ Η λαµαρίνα και το ταψί γενικήσ χρήσησ
µπορεί κατά τη διάρκεια τησ
λειτουργίασ του φούρνου να
παραµορφωθούν. Αιτία είναι οι µεγάλεσ
διαφορέσ θερµοκρασίασ στα
εξαρτήµατα. Οι παραµορφώσεισ µπορεί
να επέλθουν, ταν µνο ένα µέροσ του
εξαρτήµατοσ έχει καλυφεί ή έχουν
τοποθετηθεί σ’ αυτ κατεψυγµένα
τρφιµα, π. χ. πίτσα.
Το στράβωµα εξαφανίζεται πάλι ήδη
κατά τη διάρκεια του ψησίµατοσ
γλυκισµάτων ή κρέατοσ.
Eξοπλισµσ
❑ Ωσ εξαρτήµατα, συνοδεύοντα κάθε µοντέλο,
περιέχονται
Αριθµ. παραγγελίασ
Ταψί γενικήσ χρήσησ µε σχάρα
Αλουµινένια λαµαρίνα
Σχάρα ψησίµατοσ, γωνιασµένη
Σχάρα ψησίµατοσ µε πυκν πλέγµα
Λαµαρίνα ψησίµατοσ (κρέατοσ) (µπορεί να τοποθετηθεί µνον
µέσα στο ταψί γενικήσ χρήσησ)
Οπτπλινθοσ για το ψήσιµο ψωµιού
Z 1230 X0
Ταψί για σουφλέ, ο γκρατέν
Z 1270 X0
Z 1330 X0
Z 1430 X0
Z 1440 X0
Z 1510 X1
Z 1910 X0
Πλέγµατα ανάρτησησ – Clou
Z 1750 X0
❑ Περαιτέρω εξαρτήµατα µπορείτε να προµηθευτείτε απ τα ειδικά
καταστήµατα:
1 Εµαγιέ λαµαρίνα
1 σχάρα ψησίµατοσ
1 Ταψί γενικήσ χρήσησ µε σχάρα
Αριθµ. παραγγελίασ
Εύκαµπτοσ σωλήνασ ασφαλείασ για αέριο - για πρίζα ασφαλείασ για αέριο -
Σέτ σύνδεσησ - για υγραέριο -
Z 2500 X1
Z 2300 X0
❑
Γι α την εγκατάσταση:
61
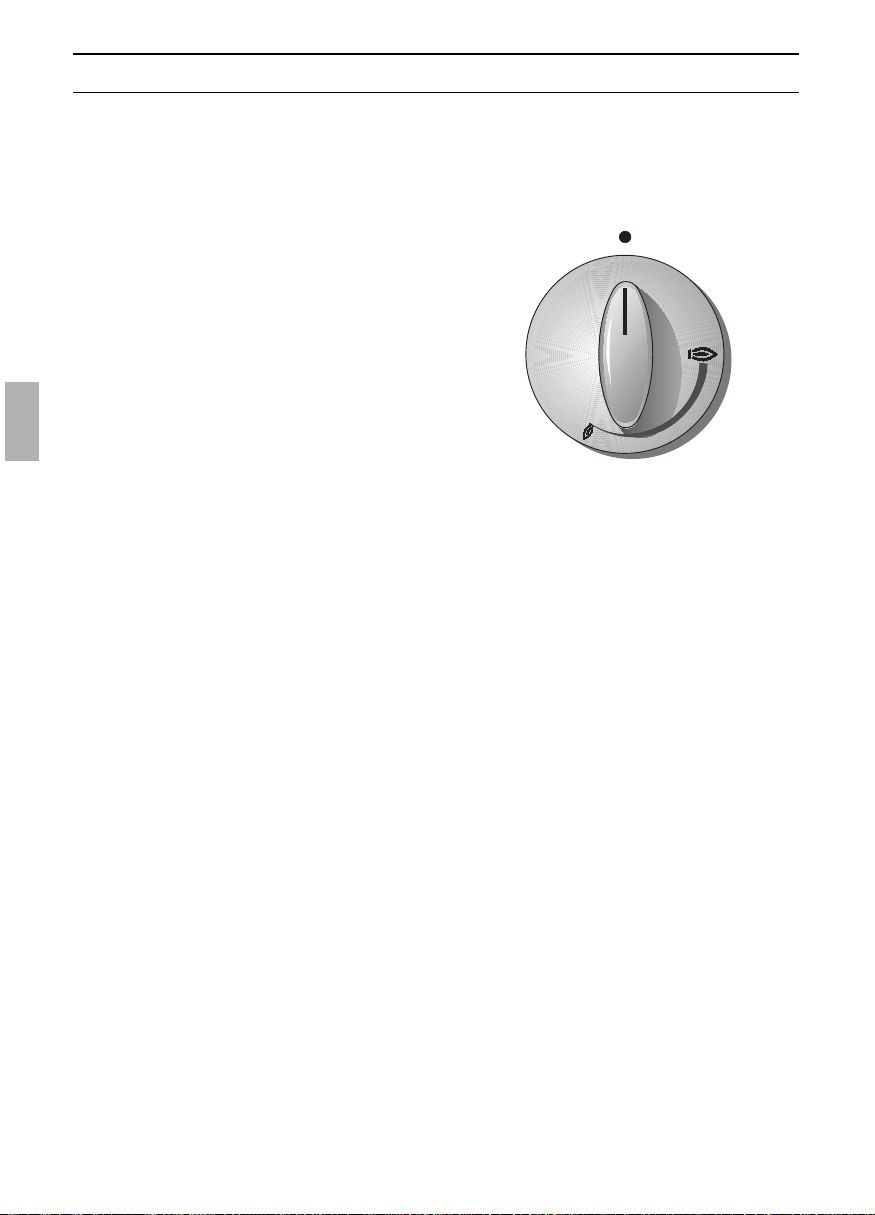
62
Άναµµα µε την ηλεκτρική ανάφλεξη
σπινθήρα:
1. Πιέζετε τον ανάλογο διακπτη προσ τα
µέσα και τον γυρίζετε προσ τ' αριστερά
στην υψηλή “φλγα”.
❑ Η ηλεκτρική ανάφλεξη σπινθήρα
δουλεύει επί τσο χρονικ
διάστηµα, καθ' σο ο διακπτησ
είναι πιεσµένοσ προσ τα µέσα.
2. Μετά το άναµµα τησ φλγασ κρατάτε
τον διακπτη για ακµα 5
δευτερλεπτα περίπου πιεσµένον
προσ τα µέσα.
3. Προτού αφήσετε τον διακπτη
ελεύθερο, τον πιέζετε ακµα µία φορά
δυνατά προσ τα µέσα.
4. Αν δεν γίνει ανάφλεξη ή σε περίπτωση
που σβήσει η φλγα, επαναλαµβάνετε
τη διαδικασία ανάφλεξησ µετά απ
περ. 3 δευτερλεπτα.
5. Για να σβήσετε τουσ καυστήρεσ,
γυρίζετε τον διακπτη προσ τα δεξιά
στη µηδενική θέση.
Άναµµα µε σπίρτα ή παρµοιο βοηθητικ
µέσο:
1. Πιέζετε τον ανάλογο διακπτη προσ τα
µέσα, τον γυρίζετε προσ τ' αριστερά
στην υψηλή “φλγα” και ανάβετε τον
καυστήρα µε το σπίρτο.
2. Κρατάτε τον διακπτη για ακµα 5
δευτερλεπτα περίπου πιεσµένον
προσ τα µέσα.
3. Σε περίπτωση που σβήσει η φλγα,
επαναλαµβάνετε τη διαδικασία
ανάφλεξησ µετά απ περ. 3
δευτερλεπτα.
4. Για να σβήσετε τουσ καυστήρεσ,
γυρίζετε τον διακπτη προσ τα δεξιά
στη µηδενική θέση.
Άναµµα και ρύθµιση των καυστήρων
❑ Την αντιστοιχία των στοιχείων χειρισµού "∆ιακπτεσ" µε τουσ καυστήρεσ θα την
αναγνωρίσετε απ την περιγραφή τησ συσκευήσ και στα σύµβολα που βρίσκονται στο
ταµπλ αεριοκρουνών.
❑ Στο άναµµα των καυστήρων διευκολύνεστε απ ηλεκτρική ανάφλεξη σπινθήρα.
,
=Υψηλή “φλγα”
,
= Χαµηλή “φλγα”
Καυστήρεσ επιµέρουσ εστιών:
❑ Η ρύθµιση µεταξύ τησ υψηλήσ και τησ
χαµηλήσ “φλγασ” µπορεί να γίνει
χωρίσ διαβαθµίσεισ.
0
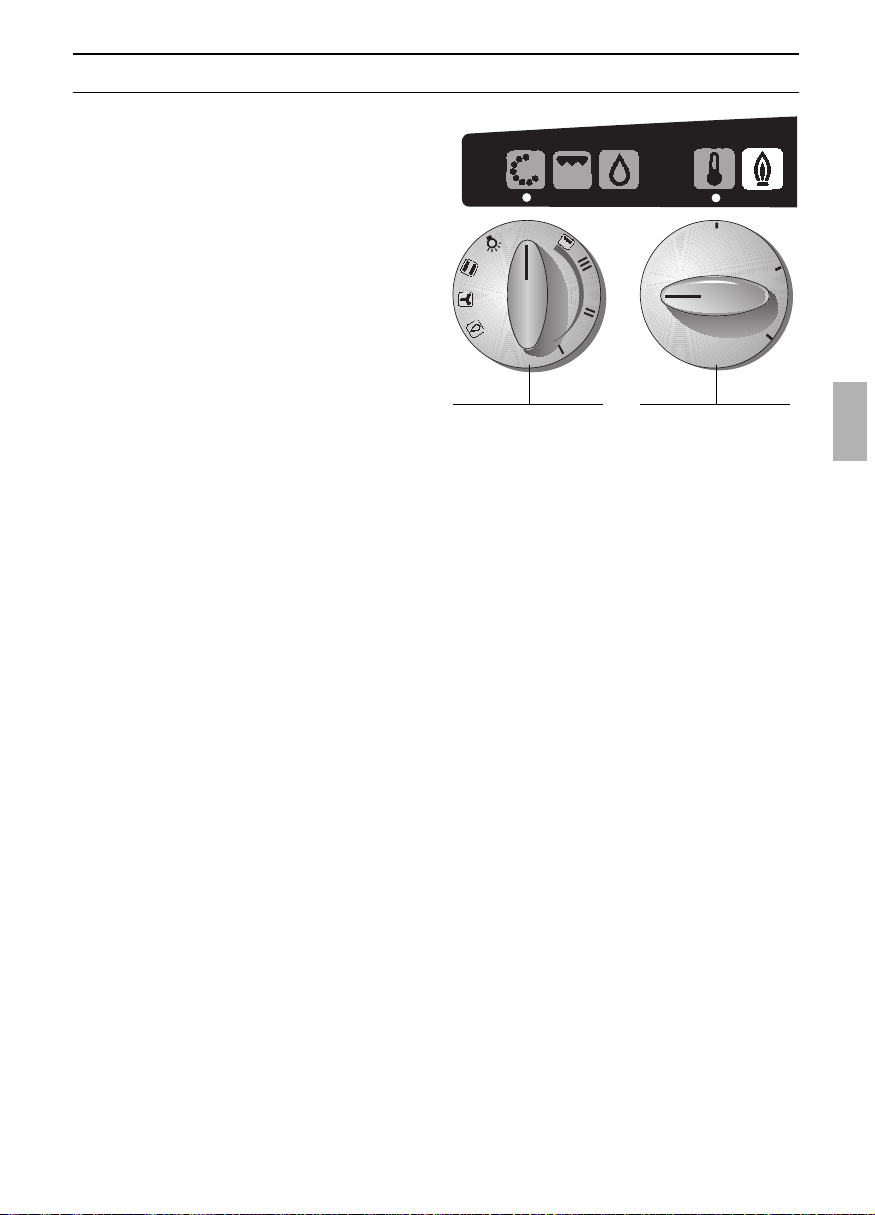
150
200
250
●
●
●
●
●
●
●
●
●
●
●
0
0
63
Άναµµα και ρύθµιση των καυστήρων
Καυστήρασ φούρνου:
❑ Η ρύθµιση µπορεί να γίνει χωρίσ
διαβαθµίσεισ.
❑ Ονοµαστικη ετπβάρυνση
: 3,3 kW.
Άναµµα µε την ηλεκτρική ανάφλεξη
σπινθήρα:
1. Επιλέγετε το είδοσ ψησίµατοσ
(συµβατικ
e
ή ζεστσ αέρασ
v
).
2. Πιέζετε τον διακπτη (διακπτησ
επιλογήσ θερµοκρασίασ για τον φούρνο
αερίου) προσ τα µέσα και τον γυρίζετε
προσ τ' αριστερά στη θέση 250.
❑ Η ηλεκτρική ανάφλεξη σπινθήρα
δουλεύει επί τσο χρονικ
διάστηµα, καθ' σο ο διακπτησ
είναι πιεσµένοσ προσ τα µέσ
❑ Αυτή δεν επιτρέπεται ωστσο να
χρησιµοποιηθεί για περισστερο απ
15 δευτερλεπτα.
3. Μετά το άναµµα τησ φλγασ, κρατάτε
τον διακπτη για ακµα 5-7
δευτερλεπτα περίπου πιεσµένον προσ
τα µέσα.
❑ Η ανάφλεξη του καυστήρα του
φούρνου που έγινε κανονικά,
αναγνωρίζεται επίσησ και απ το τι
η ενδεικτική λυχνία είναι συνεχώσ
αναµµένη.
4. Προτού αφήσετε τον διακπτη
ελεύθερο, τον πιέζετε ακµα µία φορά
δυνατά προσ τα µέσα.
5. Αν δεν γίνει ανάφλεξη ή σε περίπτωση
που σβήσει η φλγα, ανοίγετε την
πρτα του φούρνου. ∆ιακπτετε τη
διαδικασία ανάφλεξησ για τουλάχιστον
1 λεπτ.
6. Για να σβήσετε τουσ καυστήρεσ,
γυρίζετε τον διακπτη επιλογήσ
θερµοκρασίασ και τον διακπτη
επιλογήσ λειτουργίασ στη µηδενική
θέση.
∆ιακπτησ
επιλογήσ
λειτουργίασ
∆ιακπτησ
επιλογήσ
θερµοκρασίασ για
τον φούρνο
αερίου
Ενδεικτική λυχνία για τον φούρνο
αερίου:
❑ Η ενδεικτική λυχνία για τον φούρνο
αερίου αναβοσβήνει, ταν ο διακπτησ
επιλογήσ θερµοκρασίασ είναι
ρυθµισµένοσ, ενώ δεν έχει λάβει χώρα
ανάφλεξη ή ταν έχει διακοπεί η
παροχή αερίου.
❑ Η ενδεικτική λυχνία για τον φούρνο
αερίου αναβοσβήνει, ταν ο καυστήρασ
του φούρνου βρίσκεται σε λειτουργία.

64
Λειτουργίεσ Φούρνου
Θέρµανση απ πάνω και απ κάτω — e
(Συµβατικ σύστηµα θέρµανσησ του
φούρνου)
Μέσω του καυστήρα του φούρνου
παράγεται θερµτητα, η οποία
µεταδίδεται µε ακτινοβολία στα τρφιµα
που πρκειται να ψηθούν.
Το ψήσιµο γλυκισµάτων και φαγητών είναι
δυνατ µνο σε µία υποδοχή µέσα στον
φούρνο.
Πλεονεκτήµατα:
– Ψήσιµο γλυκισµάτων µε χυµώδη
γέµιση, πίτσασ, κισ λορέν
Θερµσ αέρασ ———————————
v
Μέσω ενσ ανεµιστήρα στο οπίσθιο
τοίχωµα του φούρνου ανακυκλώνεται ο
ζεσταµένοσ αέρασ µέσα στον φούρνο και
έτσι επιτυγχάνεται µία ιδιαίτερα καλή
µετάδοση θερµτητασ στα τρφιµα που
πρκειται να ψηθούν.
Πλεονεκτήµατα:
–O φούρνοσ δε λερώνεται πολύ.
– Mπορούν να ψηθούν φαγητά σε
περισστερεσ απ µία θέσεισ ύψουσ.
– Συντοµτεροι χρνοι προθέρµανσησ.
– Xαµηλέσ θερµοκρασίεσ στο φούρνο.
– Ήπια απψυξη.
– Aποστείρωση.
Γκριλ ——————————————— F
Γκ ριλ µε αέρα:
Tο θερµαντικ σώµα στην οροφή του
φούρνου παράγει θερµτητα, η οποία
µεταδίδεται στο φαγητ για ψήσιµο.
Πλεονεκτήµατα:
– Kατάλληλο ιδιαίτερα για µικρά επίπεδα
κοµµάτια κρέατοσ π.χ. στέικ,
λουκάνικα, ψάρι, λαχανικά και τοστ.
Σύστηµα καθαρισµού EasyClean
®
——
x
H συσκευή είναι εφοδιασµένη µε ένα
καθαριστικ βοήθηµα για διευκλυνσή
σασ στον καθαρισµ του φούρνου. Mε τη
βοήθεια µιασ αυτµατα ρυθµιζµενησ
εξάτµισησ καθαριστικού διαλύµατοσ
µαλακώνουν µε τη θερµτητα και τουσ
υδρατµούσ τα κατάλοιπα πάνω στο εµαγιέ
και µπορούν στη συνέχεια να καθαριστούν
ευκολτερα.
Γι α περισστερεσ λεπτοµέρειεσ βλ. Kαθα-
ρισµσ και Περιποίηση.
Nα γίνεται χρήση µνο ταν ο φούρνοσ
είναι κρύοσ.
Πλεονεκτήµατα:
– Eύκολοσ καθαρισµσ του φούρνου.
– Προστασία των επιφανειών εµαγιέ.
–Φιλικ προσ το περιβάλλον.

65
Θέση του φούρνου σε και εκτσ λειτουργίασ
Υπλοιπη θερµτητα:
❑ Γι α την εκµετάλλευση τησ υπλοιπησ
θερµτητασ µπορεί ο φούρνοσ,
ανάλογα µε το τι ψήνετε, να τεθεί
εκτσ λειτουργίασ περ. 5 έωσ 10 λεπτά
πριν τη λήξη του χρνου ψησίµατοσ.
Σηµαντικέσ υποδείξεισ:
❑ Μετά την ανάφλεξη του καυστήρα του
φούρνου ανάβει ο ανεµιστήρασ. Αυτ
γίνεται αισθητ µέσω ενσ σιγανού
βµβου.
Σε περίπτωση που ο ανεµιστήρασ
σταµατήσει, π.χ. σε περίπτωση
διακοπήσ του ρεύµατοσ, ο φούρνοσ
πρέπει να τεθεί αµέσωσ εκτσ
λειτουργίασ ή αντίστοιχα αυτσ δεν
επιτρέπεται να τεθεί σε λειτουργία.
❑ Ανάµεσα στον φούρνο και το ταµπλ
αεριοκρουνών µπορεί να εξέρχεται
καυτσ ατµσ.
Αν κλείσετε την έξοδο ατµού,
µπορεί να προκληθεί βλάβη στον
καυστήρα του φούρνου.
Ανεµιστήρασ:
❑ Μετά το σβήσιµο του φούρνου είναι
δυνατν να βρίσκεται ο ανεµιστήρασ
για ακµα ορισµένο χρονικ διάστηµα
σε λειτουργία, ούτωσ ώστε να κρυώσει
καλά ο φούρνοσ.
Ρύθµιση θερµοκρασίασ:
❑ Η ρύθµιση είναι δυνατή χωρίσ
διαβαθµίσεισ.
❑ Ο φωτισµσ του φούρνου τίθεται µε
την επιλογή λειτουργίασ αυτµατα σε
και εκτσ λειτουργίασ.
❑ Γι α τη θέση του φωτισµού του φούρνου
σε λειτουργία, χωρίσ ν' ανάψετε τον
φούρνο, γυρίζετε τον διακπτη
επιλογήσ λειτουργίασ στο σύµβολο
a
.
❑ Επιλέγετε πρώτα το σύστηµα
θέρµανσησ (συµβατικ
e
ή θερµσ
αέρασ
v
).
Ανάβετε κατπιν τον καυστήρα του
φούρνου και ρυθµίζετε την
απαιτούµενη θερµοκρασία (βλ. στον
πίνακα ψησίµατοσ γλυκισµάτων και
στον πίνακα ψησίµατοσ φαγητών).
Στην πρώτη προσπάθεια σάσ
συνιστούµε να επιλέξετε τισ
χαµηλτερεσ ρυθµίσεισ θερµοκρασίασ
απ αυτέσ που δίνονται στουσ πίνακεσ.
Προθέρµανση:
❑ Στισ περισστερεσ περιπτώσεισ δεν
χρειάζεται προθέρµανση.
❑ Η προθέρµανση (αν χρειάζεται) γίνεται
µε την ίδια ρύθµιση θερµοκρασίασ, µε
την οποία πρκειται να γίνει και το
ψήσιµο (βλ. στον πίνακα ψησίµατοσ
γλυκισµάτων). Ο χρνοσ προθέρµανσησ
είναι περ. 10 λεπτά.
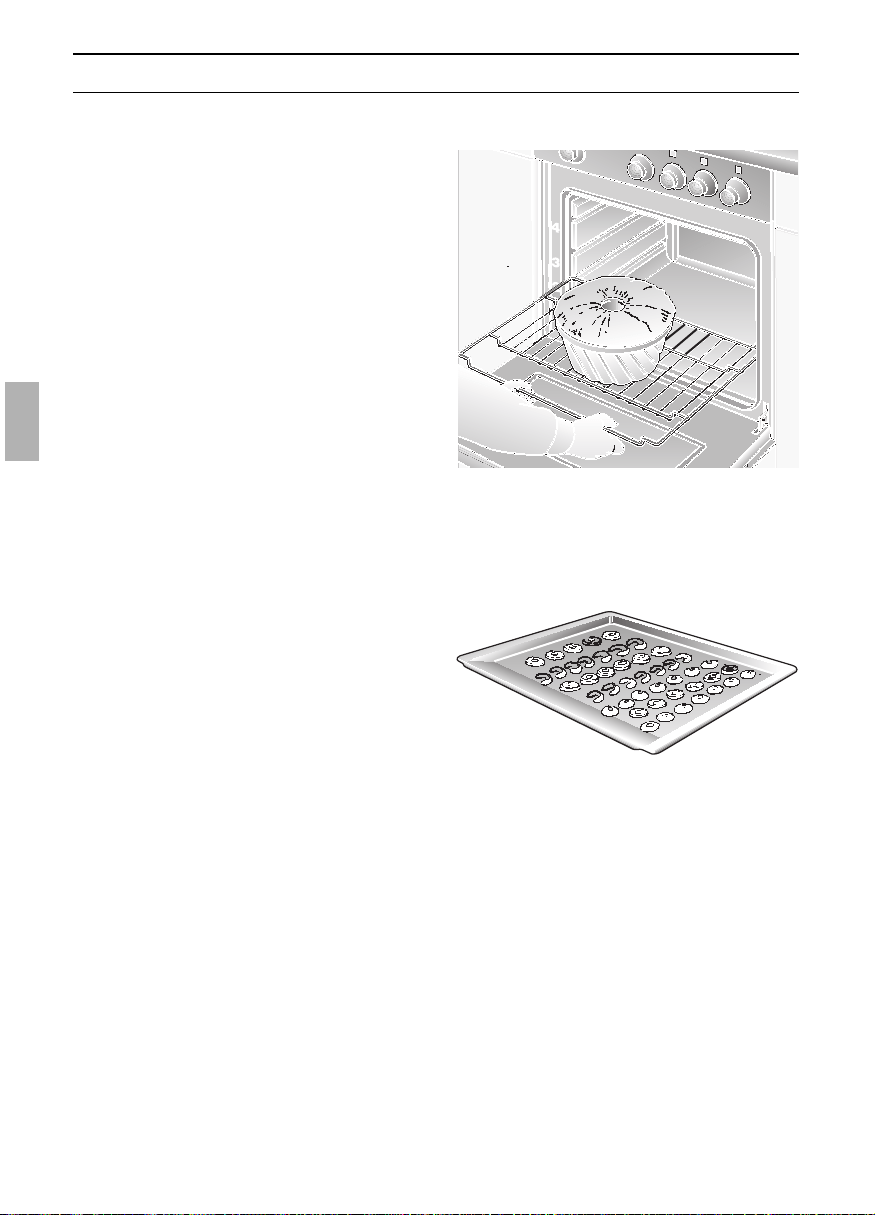
66
Ψήσιµο αρτοσκευασµάτων
Ψήσιµο σε φρµεσ
❑ Πάντοτε να βάζετε τη φρµα στο
κέντρο τησ σχάρασ.
❑ Χρησιµοποιείτε µνον ανοιχτχρωµεσ
φρµεσ ψησίµατοσ και λαµαρίνεσ.
❑ Mε περιστροφή τησ θολωτήσ σχάρασ
µπορείτε να κάνετε λεπτοµερείσ
ρυθµίσεισ του ύψουσ (ενδιάµεσα ύψη).
❑ Aν το γλυκ γίνεται κάτω πιο σκούρο:
Eλέγξτε το ύψοσ ψησίµατοσ. Mειώστε
το χρνο ψησίµατοσ και ενδεχοµένωσ
επιλέξτε µια χαµηλτερη θερµοκρασία.
❑ Aν το γλυκ γίνεται κάτω πιο
ανοιχτχρωµο:
Eλέγξτε το ύψοσ ψησίµατοσ. Aυξήστε
το χρνο ψησίµατοσ, επιλέξτε µια
χαµηλτερη θερµοκρασία ή
χρησιµοποιήστε µια φρµα απ
λαµαρίνα.
Ψήσιµο σε ρηχά ταψιά:
❑ H κύρτωση του ταψιού θα πρέπει
πάντοτε να βλέπει προσ την πρτα του
φούρνου.
❑ Πάντοτε να βάζετε τα ταψιά στο
φούρνο µέχρι το ριο.
❑ Χρησιµοποιείτε µνον τα αυθεντικά
ταψιά.
Yποδείξεισ:
❑ Mπορείτε να επηρεάσετε το ρδισµα
αλλάζοντασ τη θερµοκρασία.
❑ Aν ένα γλυκ καθίζει ταν το έχετε
βγάλει απ το φούρνο, την επµενη
φορά, χρησιµοποιήστε λιγτερο υγρ,
ενδεχοµένωσ επιλέξτε ένα µακρύτερο
χρνο ψησίµατοσ ή ρυθµίστε λίγο
χαµηλτερα τη θερµοκρασία.
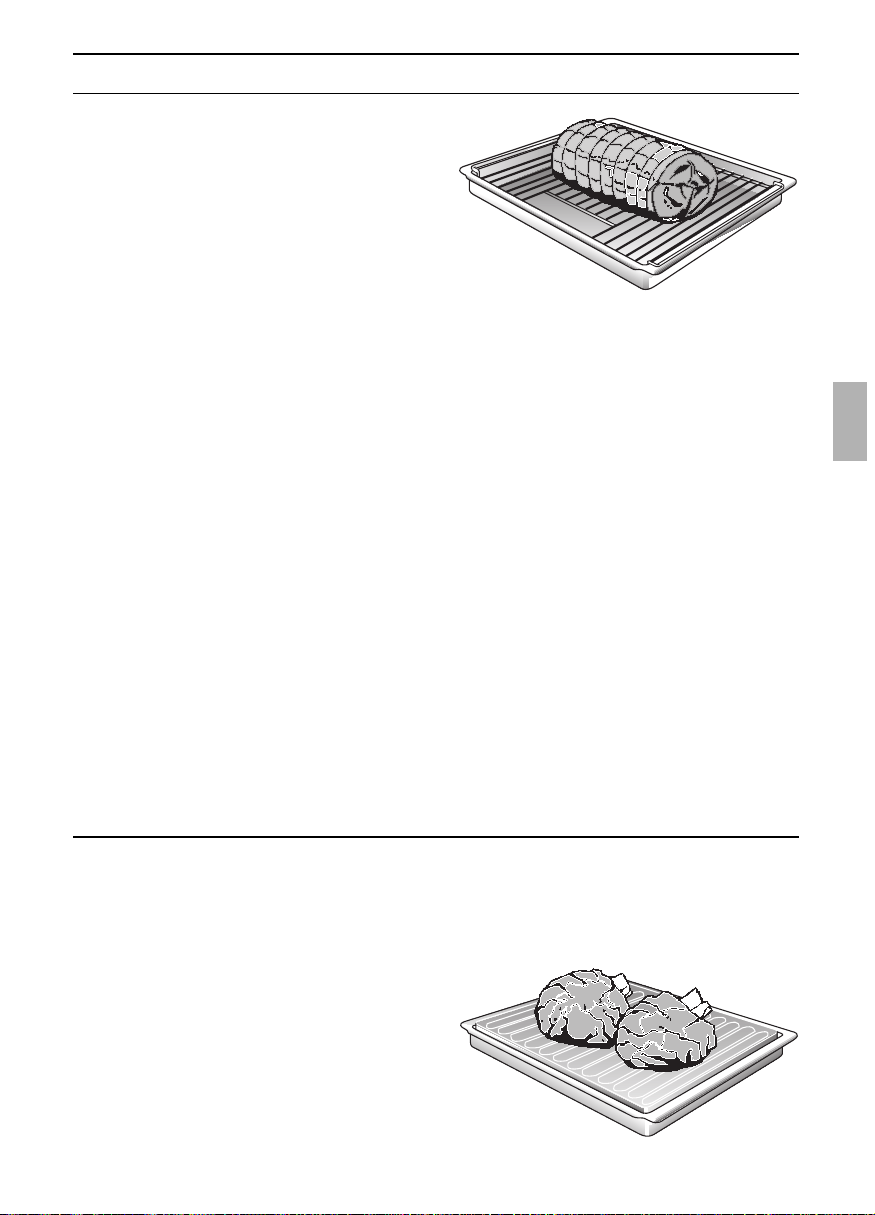
67
Ψήσιµο
Ψήσιµο µε αέρα v
ή µε θέρµανση πάνω/κάτω e
Yποδείξεισ:
❑ Eγκαταστήστε τη σχάρα στο ταψί
γενικήσ χρήσησ και βάλτε τα και τα δύο
στην ίδια θέση ύψουσ στο φούρνο.
❑ Kρέασ µε βάροσ πάνω απ 750 γραµ-
µάρια µπορεί να ψηθεί ιδιαίτερα
οικονοµικά στο φούρνο.
❑ Ψήσιµο σε ανοικτ σκεύοσ:
Ξεπλύνετε το ταψί γενικήσ χρήσησ ή το
µαγειρικ σκεύοσ µε νερ και βάλτε
σ' αυτ το κρέασ.
❑ Γι α λιπαρ κρέασ και πουλερικά
προσθέστε ανάλογα µε το µέγεθοσ και
το είδοσ του ψητού
1
/
8
ωσ
1
/
4
του λίτρου
νερ στο ταψί γενικήσ χρήσησ. Aν
θέλετε, αλείψτε το ψαχν κρέασ µε
λίποσ ή καλύψτε το µε φέτεσ µπέικον.
❑ Aπ το ζωµ του ψητού, ο οποίοσ
συγκεντρώνεται στο ταψί µπορεί να
γίνει µια νστιµη σάλτσα. ∆ιαλύστε το
ζωµ αυτ µε ζεστ νερ, αφήστε τον
να πάρει µια βράση, δέστε τη σάλτσα µε
κορν φλάουερ, προσθέστε τα
καρυκεύµατα και αν χρειάζεται,
στραγγίστε την.
❑ Bάλτε το ψητ στον κρύο φούρνο (δεν
χρειάζεται προθέρµανση – οικονοµία
στην ενέργεια).
❑ Ψήσιµο σε κλειστ σκεύοσ:
Bάλτε το κρέασ σε µία γάστρα,
σκεπάστε το σκεύοσ µε το κατάλληλο
καπάκι και βάλτε το στο φούρνο, πάνω
στη σχάρα.
Σασ προτείνουµε να µαγειρεύετε το
ψητ µοσχάρι σε κλειστ σκεύοσ.
Συµβουλέσ:
❑ Xρησιµοποιείτε πάντοτε σκεύη µε
λαβέσ ανθεκτικέσ στη θέρµανση.
❑ Mαγειρεύετε µεγάλα κοµµάτια ψητού
χωρίσ χρήση τησ σχάρασ, απευθείασ
µέσα στο ταψί γενικήσ χρήσησ.
❑ Mικρτερα κοµµάτια ψητού µπορείτε
να τα ψήνεται σε αλουµινχαρτο. Για το
σκοπ αυτ φτιάξτε µε το αλουµιν-
χαρτο µια φρµα µε ψηλέσ πλευρέσ και
βάλτε την πάνω στη σχάρα.
❑ Aφήστε το ψητ στο σβηστ φούρνο,
µε την πρτα του φούρνου κλειστή, για
περίπου 10 λεπτά µετά το πέρασ του
ψησίµατοσ.
Ψήσιµο στο ταψί για ψητά
(προσφέρεται στα ειδικά καταστήµατα σαν
ειδικσ εξοπλισµσ)
Με θερµ αέρα
v
για µεγάλα, παχειά
ψητά.
❑ Βάλτε το ταψί για ψητά στο ταψί
γενικήσ χρήσησ. Το ταψί για ψητά
εµποδίζει το λέρωµα του φούρνου.
❑ Λίποσ που στάζει ή ζωµσ ψητού
µαζεύουνται στο ταψί γενικήσ χρήσησ.
❑ Με το ταψί για ψήσιµο, αντίθετα µε τα
στοιχεία θερµοκρασίασ, µπορείτε να
ρυθµίσετε µια κάπωσ υψηλτερη
θερµοκρασία, ταν το ψητ θα πρέπει
να γίνει ιδιαίτερα τραγαν.

68
Γκριλ
❑ Πάντοτε να βάζετε το ψητ στο κέντρο
τησ σχάρασ.
❑ Oταν το θερµαντικ σώµα του γκριλ
σβήνει αυτµατα, ττε έχει ενεργο-
ποιηθεί η ασφάλεια υπερθέρµανσησ.
Tο θερµαντικ σώµα του γκριλ ανάβει
και πάλι µετά απ σύντοµο χρονικ
διάστηµα.
❑ Eγκαταστήστε τη σχάρα στο ταψί
γενικήσ χρήσησ και βάλτε τα και τα δύο
στην ίδια θέση ύψουσ στο φούρνο.
H λειτουργία του γκριλ απαιτεί
προσοχή.
!Kρατήστε πάντοτε µακριά τα παιδιά.
Yποδείξεισ:
❑ Ψήνετε στο γκριλ µε κλειστή την πρτα
του φούρνου.
❑ Oι θερµοκρασίεσ του γκριλ είναι
ρυθµιζµενεσ.
❑ Πάντοτε να βάζετε τη σχάρα και το
ταψί γενικήσ χρήσησ µαζί στο φούρνο.
Γκριλ F
Γι α επίπεδα µικρού µεγέθουσ φαγητά.
❑ Nα χρησιµοποιείτε πάντοτε τη σχάρα
και το ταψί γενικήσ χρήσησ.
❑ Γυρίστε το ψητ µετά απ πάροδο
περίπου των δύο τρίτων του χρνου
ψησίµατοσ.
❑ Mπορείτε, αν θέλετε, να αλείψετε
ελαφρά τη σχάρα και το ψητ µε λάδι.

69
Yποδείξεισ και Tεχνάσµατα
Γι α εξοικονµηση ενέργειασ:
❑ Mην προθερµαίνετε το φούρνο, ακµη
και αν το συνιστά η συνταγή.
❑ Σκούρεσ φρµεσ µαζεύουν καλύτερα
τη θερµτητα.
❑ Περίσσευµα θερµτητασ: Σε µεγάλουσ
χρνουσ ψησίµατοσ µπορείτε να
σβήσετε το φούρνο περίπου 5 –10
λεπτά πριν απ το τέλοσ του χρνου
ψησίµατοσ.
Για αρτοσκευάσµατα:
❑ Tο γλυκ ταψιού έχει πολύ ανοιχτ
χρώµα στο κάτω µέροσ του.
❑ Tο γλυκ φρµασ έχει πολύ ανοιχτ
χρώµα στο κάτω µέροσ του.
❑ Το γλυκ ή τα κουλουράκια είναι στο
κάτω µέροσ πολύ σκούρα.
❑ Tο γλυκ είναι πολύ στεγν.
❑ Tα γλυκ ή τα κουλουράκια έχουν στο
εσωτερικ τουσ ακµη άψητη ζύµη ή το
κρέασ είναι ακµη ωµ στο εσωτερικ
του.
❑ Tα γλυκά στρογγυλήσ ή τετράγωνησ
φρµασ, ψηµένα µε αέρα, είναι πολύ
σκούρα στο πίσω µέροσ τουσ.
❑ Oταν το γλυκ ή το ψητ είναι πολύ
ζουµερ, π.χ. κέικ φρούτων (τάρτεσ) ή
ψητά που µαγειρεύονται µε νερ,
σχηµατίζεται στο φούρνο µεγάλη
ποστητα υδρατµών, που νοτίζει την
πρτα του φούρνου και µπορεί να έχει
σαν αποτέλεσµα να στάζει νερ στο
δάπεδο ή στο έπιπλο τησ κουζίνασ.
Bγάλτε τα ταψιά που δεν χρησιµοποιείτε
απ το φούρνο.
Mη βάζετε τισ φρµεσ στο φούρνο πάνω
σε ταψί αλλά πάνω στη σχάρα.
Bάλτε το γλυκ ή τα κουλουράκια πι
ψηλά.
Eπιλέξτε µια λίγο πι ψηλή θερµοκρασία
φούρνου. Eπιλέξτε λίγο πι σύντοµο
χρνο ψησίµατοσ.
Eπιλέξτε µια πι χαµηλή θερµοκρασία
ψησίµατοσ.
Eχετε υπψη: ∆εν µπορείτε να µειώσετε
τουσ χρνουσ ψησίµατοσ αυξάνοντασ τη
θερµοκρασία (έξω ψηµένο, µέσα ωµ).
Eπιλέξτε λίγο µεγαλύτερο χρνο
ψησίµατοσ, αφήστε τη ζύµη του γλυκού να
φουσκώσει για περισστερο χρνο.
Προσθέτε λιγτερα υγρά στη ζύµη.
Mη βάζετε τη φρµα απευθείασ µπροστά
απ τουσ απαγωγούσ αέρα στην πίσω
πλευρά του φούρνου.
Mε προσεκτικ άνοιγµα τησ πρτασ του
φούρνου για σύντοµο χρονικ διάστηµα
(1 ωσ 2 φορέσ, συχντερα για µεγαλύτε-
ρουσ χρνουσ ψησίµατοσ) µπορείτε να
αφαιρείτε τουσ υδρατµούσ απ το φούρνο
και µε τον τρπο αυτ να µειώνετε το
σχηµατισµ νερού.

70
Aπψυξη και άχνισµα
Aπψυξη και άχνισµα µε αέρα: v
Σηµαντικέσ υποδείξεισ:
❑ Για την απψυξη και το άχνισµα κατεψυγ-
µένων προϊντων χρησιµοποείτε πάντοτε
µνο θερµ αέρα.
❑ Nα προσέχετε πάντοτε τα στοιχεία του
παρασκευαστή σε λα τα κατεψυγµένα
προϊντα.
❑ Aποψυγµένα προϊντα κατάψυξησ
(κυρίωσ κρέασ) γενικά χρειάζονται συ-
ντοµτερουσ χρνουσ αχνίσµατοσ απ τι
τα φρέσκα προϊντα, επειδή η κατάψυξη
λειτουργεί ωσ ένα είδοσ προβρασµού.
❑ Aν βάλετε για να ψήσετε στο φούρνο
κατεψυγµένο κρέασ, ττε ο χρνοσ
µαγειρέµατοσ αυξάνεται κατά το χρνο
απψυξησ.
❑ Πάντοτε να αποψύχετε τα κατεψυγµένα
πουλερικά πριν απ το µαγείρεµα για να
µπορέσετε να αφαιρέσετε τα εντσθια.
❑ Mαγειρεύετε κατεψυγµένο ψάρι στην
ίδια θερµοκρασία πωσ και το φρέσκο.
❑ Mπορείτε να βάλετε στο φούρνο έτοιµα
κατεψυγµένα φαγητά σε ατοµικούσ
δίσκουσ απ αλουµίνιο σε µεγαλύτερεσ
ποστητεσ ταυτχρονα.
Aπψυξη:
Θέσεισ ύψουσ:
Γι α ένα ταψί: Θέση 3
Γι α δύο ταψιά: Θέσεισ 1 + 3
❑ Tα στοιχεία για το χρνο είναι κατά προ-
σέγγιση και επηρεάζονται απ το σχήµα
και την ποστητα των κατεψυγµένων
προϊντων.
❑ Aποψύχετε κατεψυγµένα φαγητά που
είναι συσκευασµένα σε αλουµινχαρτο
ή σε κλειστά δοχεία απ αλουµίνιο στουσ
130 –140° C.
❑ Aποψύχετε και ζεσταίνετε κατεψυγµένα
αρτοσκευάσµατα στουσ 120 –140°C. Nα
αλείφετε ψωµί, ψωµάκια και σφολιάτεσ
ελαφρά µε νερ για να επιτύχει
καλύτερα η κρούστα.
❑ Aποψύχετε κατεψυγµένα στεγνά
µπισκτα / κουλουράκια για 20 – 30 λεπτά
στουσ 160 –170° C.
❑ Aποψύχετε κατεψυγµένα υγρά
µπισκτα / κουλουράκια (µε επίστρωση
φρούτων) για 30 – 50 λεπτά στουσ 160 –
170° C. Για το σκοπ αυτ τυλίξτε τα σε
αλουµινχαρτο για να µη στεγνώσει
ηεπίστρωση.
❑ ποψύχετε και ψήνετε κατεψυγµένα τστ
(µε έτοιµη γέµιση) στουσ 160 –170° C για
περίπου 20 λεπτά.
❑
Κατεψυγµένη πίτσα:
Παρακαλείσθε να προσέχετε τα
στοιχεία του παρασκευαστή.

71
Kαθαρισµσ και περιποίηση
Σηµαντικέσ υποδείξεισ:
❑ Mη χρησιµοποιείτε για καθαρισµ απορρυπαντικά σε σκνη, ισχυρά καθαριστικά και
αιχµηρά αντικείµενα που χαράζουν.
❑ Nα µην ξύνετε καµµένα κατάλοιπα φαγητών, αλλά να τα µαλακώνετε µε ένα υγρ πανί
και απορρυπαντικ πιάτων.
❑ Nα µη χρησιµοποιείτε ειδικά καθαριστικά (π.χ. σπρέυ) για µέρη απ αλουµίνιο και
πλαστικ.
Εµαγιέ και Γυαλί:
❑ Xρησιµοποιείτε για καθαρισµ ζεστ
διάλυµα απορρυπαντικού.
❑ Γι α τον καθαρισµ τησ πρσοψησ του
φούρνου, πίσω απ την πρτα, θα
πρέπει να αφαιρέσετε τη µνωση τησ
πρτασ του φούρνου.
Πρσοψη απ ανοξείδωτο χάλυβα:
❑ Mε τη χρήση των καθαριστικών
ανοξείδωτου χάλυβα του εµπορίου
µπορεί σβηστούν τα γράµµατα.
❑ Mη χρησιµοποιείτε σφουγγάρια που
χαράζουν.
❑ Xρησιµοποιείτε ένα κοιν απορρυ-
παντικ του εµπορίου πάνω σε ένα
υγρ µαλακ πανί ή δέρµα καθαρισµού
παραθύρων.
Kαθρεπτίζουσα γυάλινη πρσοψη:
❑ Mη χρησιµοποιείτε απορρυπαντικά σε
σκνη ή σφουγγάρια που χαράζουν.
❑ Nα χρησιµοποιείτε τα κοινά
καθαριστικά του εµπορίου για τζάµια.
– Pίξτε πρώτα το καθαριστικ σε ένα
υγρ µαλακ πανί ή δέρµα καθα-
ρισµού παραθύρων.
– Mη ψεκάζετε το επίπεδο µε τουσ
διακπτεσ.
Φούρνοσ:
❑ Eίναι προτιµτερο να καθαρίζετε το
φούρνο µετά απ κάθε χρήση,
ιδιαίτερα µετά απ ψήσιµο στο φούρνο
ή στο γκρίλ. Eτσι αποφεύγετε να
καίγονται τα κατάλοιπα του
µαγειρέµατοσ.
Aν αυτά καούν πολλέσ φορέσ, καθαρί-
ζονται πολύ δύσκολα.
❑ Aν χρησιµοποιείτε συχνά το θερµ
αέρα, µπορείτε να περιορίσετε την
έκταση τησ ρύπανσησ.
Μην καθαρίζετε τον φούρνο, σο είναι
ακµα ζεστσ, µε ειδικά γι' αυτ
προβλεπµενα µέσα καθαρισµού
φούρνων.
❑ Γι α ψήσιµο ζουµερών κέικ να
χρησιµοποιείτε το ταψί γενικήσ χρήσησ.
❑ Nα χρησιµοποιείτε κατάλληλα για
ψήσιµο σκεύη (ταψιά).
❑ Πλένετε το φούρνο, ταν αυτσ δεν
είναι πολύ λερωµένοσ, σο είναι ακµη
ζεστσ, µε ζεστ διάλυµα απορρυπαντι-
κού και αφήνετέ τον ανοικτ για να
στεγνώσει.
Τζάµι πρτασ φούρνου
(Πρσοψη απ ανοξείδωτο χάλυβα):
❑ Το εσωτερικ τζάµι τησ πρτασ του
φούρνου είναι εφοδιασµένο, για την
πτώση τησ θερµοκρασίασ, µε
επίστρωση, ούτωσ ώστε να
αντανακλάται η θερµτητα.
❑ Η επίστρωση αυτή δεν επιδρά αρνητικά
στην οραττητα απ το τζάµι τησ
πρτασ του φούρνου.
❑ ταν η πρτα του φούρνου είναι
ανοιχτή, αυτή η επίστρωση είναι
δυνατν να έχει την εµφάνιση
ανοιχτχρωµου επιχρίσµατοσ.
Αυτ είναι τεχνικ χαρακτηριστικ τησ
συσκευήσ και δεν αποτελεί ποιοτικ
ελάττωµα.

72
Kαθαρισµσ και περιποίηση
Σχάρα τοποθέτησησ µαγειρικών σκευών
και σκαφοειδήσ εστία µαγειρέµατοσ:
❑ Η σχάρα τοποθέτησησ µαγειρικών
σκευών µπορεί να αφαιρεθεί.
Αποµακρύνετε τα καµµένα κατάλοιπα
των φαγητών απ τη σχάρα µε ζεστ
διάλυµα απορρυπαντικού πιάτων.
Υπδειξη: Η σχάρα µπορεί να
τοποθετηθεί µνον στη σωστή τησ
θέση.
❑ Γι α τον καθαρισµ τησ σκαφοειδούσ
εστίασ µαγειρέµατοσ αφαιρείτε την
σχάρα. Σκουπίζετε τη σκαφοειδή εστία
µαγειρέµατοσ µε βρεγµένο πανί και την
τρίβετε κατπιν µε στεγν πανί για να
γυαλίσει.
❑ Γι α τισ σχάρεσ µπορείτε να
προµηθευτείτε απ την υπηρεσία
τεχνικήσ εξυπηρέτησησ των πελατών
µασ επιπλέον λάστιχα για την καλύτερη
τοποθέτηση των σκευών επάνω σ'
αυτέσ.
Καυστήρεσ επιµέρουσ εστιών:
❑ Καθαρίζετε τα εµαγιέ καπάκια των
καυστήρων µε ζεστ διάλυµα
απορρυπαντικού πιάτων.
❑ Καθαρίζετε τον αναφλεκτήρα και τη
σχισµή ανάφλεξησ προσετικά µε
ελαφρά βρεγµένο πανί.
❑ Τα γυαλιστερά µεταλλικά µέρη των
καυστήρων των επιµέρουσ εστιών είναι
δυνατν να υποστούν κατά τη χρήση
χρωµατικέσ αλλοιώσεισ. Για τον
καθαρισµ χρησιµοποιείτε µέσα
περιποίησησ µετάλλων, τα οποία είναι
κατάλληλα για αλουµίνιο.
❑ Μην πλένετε τα µέρη των καυστήρων
στο πλυντήριο πιάτων.
❑ Κατά την τοποθέτηση των µερών των
καυστήρων προσέχετε τα εξήσ:
–Τοποθετείτε τα µέρη, ταν αυτά
είναι στεγνά.
–Τοποθετείτε τα µέρη ίσια.
– Μετά την τοποθέτηση των µερών
των καυστήρων οι φλγεσ πρέπει να
καίγονται οµοιµορφα γύρω γύρω.
❑ Αν τα καπάκια των καυστήρων έχουν
τοποθετηθεί λοξά, δυσκολεύουν την
ανάφλεξη και εκτσ απ ζηµιέσ έχουν
σαν αποτέλεσµα και την εµφάνιση
ενοχλητικήσ οσµήσ αερίου.
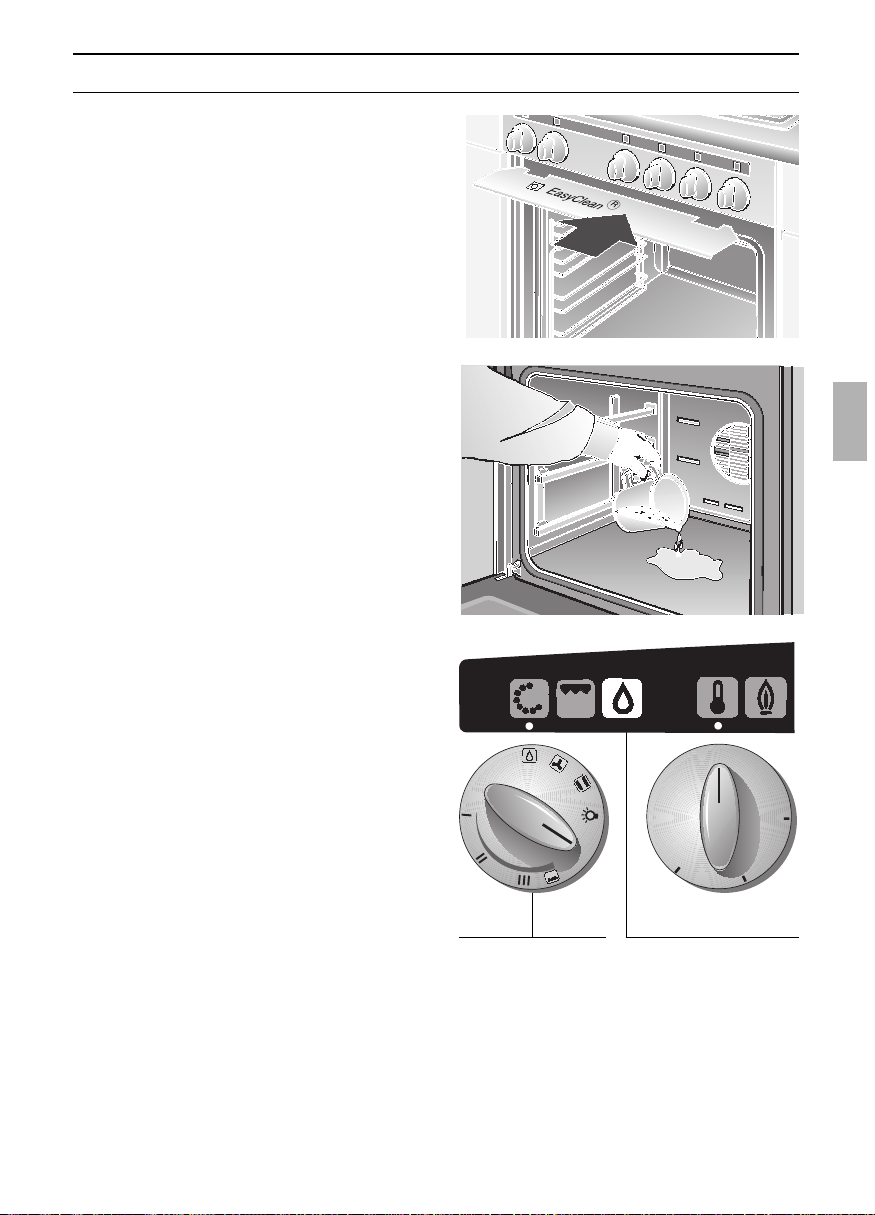
73
Kαθαρισµσ και περιποίηση
Σύστηµα EasyClean
®
: x
H συσκευή είναι εφοδιασµένη µε ένα
βοηθητικ σύστηµα καθαρισµού φούρνου
για να σασ διευκολύνει στον καθαρισµ
του φούρνου. Mε τη βοήθεια µιασ αυτ-
µατα ρυθµιζµενησ εξάτµισησ διαλύµατοσ
απορρυπαντικού µαλακώνουν τα κατά-
λοιπα πάνω στο εµαγιέ µε τη θέρµανση
και τουσ υδρατµούσ και µπορούν να
καθαριστούν ευκολτερα στη συνέχεια.
Προσοχή:
❑ Nα χρησιµοποιείτε το σύστηµα
καθαρισµού φούρνου µνον ταν ο
φούρνοσ έχει κρυώσει εντελώσ.
❑ Χρησιµοποιείτε νερ τησ βρύσησ, χι
απεσταγµένο νερ.
❑ Γι α να εµποδίσετε τον σχηµατισµ
νερού συµπύκνωσησ στο ταµπλ
αεριοκρουνών, στουσ διακπτεσ και
στον πάγκο εργασίασ, πρέπει να
στερεώσετε κάτω απ το ταµπλ
αεριοκρουνών την προστατευτική
λαµαρίνα που συνοδεύει τη συσκευή.
Μετά τη διαδικασία καθαρισµού
αφαιρέστε πάλι την προστατευτική
λαµαρίνα.
Θέση σε λειτουργία:
1. Aφαιρέστε τη λαµαρίνα και το ταψί
γενικήσ χρήσησ απ το φούρνο.
H σχάρα µπορεί να παραµείνει µέσα
στο φούρνο.
2. Γεµίστε το δοχείο του πυθµένα µε
περίπου 0,4 λίτρα νερ µε µικρή
ποστητα απορρυπαντικού . Aν ο
φούρνοσ είναι πολύ λερωµένοσ,
µπορείτε να αφήσετε διάλυµα
απορρυπαντικού επιπλέον να δράσει
για περισστερο χρνο, προτού
ανάψετε το φούρνο.
3. Kλείστε την πρτα του φούρνου.
4. Γυρίζετε τον διακπτη επιλογήσ
λειτουργίασ στη θέση
x
.Η ενδεικτική
λυχνία για τον καθαρισµ του φούρνου
ανάβει. Μετά απ 21 λεπτά το
πργραµµα έχει λήξει και ηχεί ένα
σήµα.
Θέση εκτσ λειτουργίασ:
Γυρίζετε τον διακπτη επιλογήσ
λειτουργίασ στο 0. Η ενδεικτική λυχνία για
τον καθαρισµ του φούρνου σβήνει.
∆ιακπτησ
επιλογήσ
λειτουργίασ
Eνδεικτική λυχνία για
καθαρισµ φούρνου.
150
200
250
●
●
●
●
●
●
●
●
●
●
●
0
0
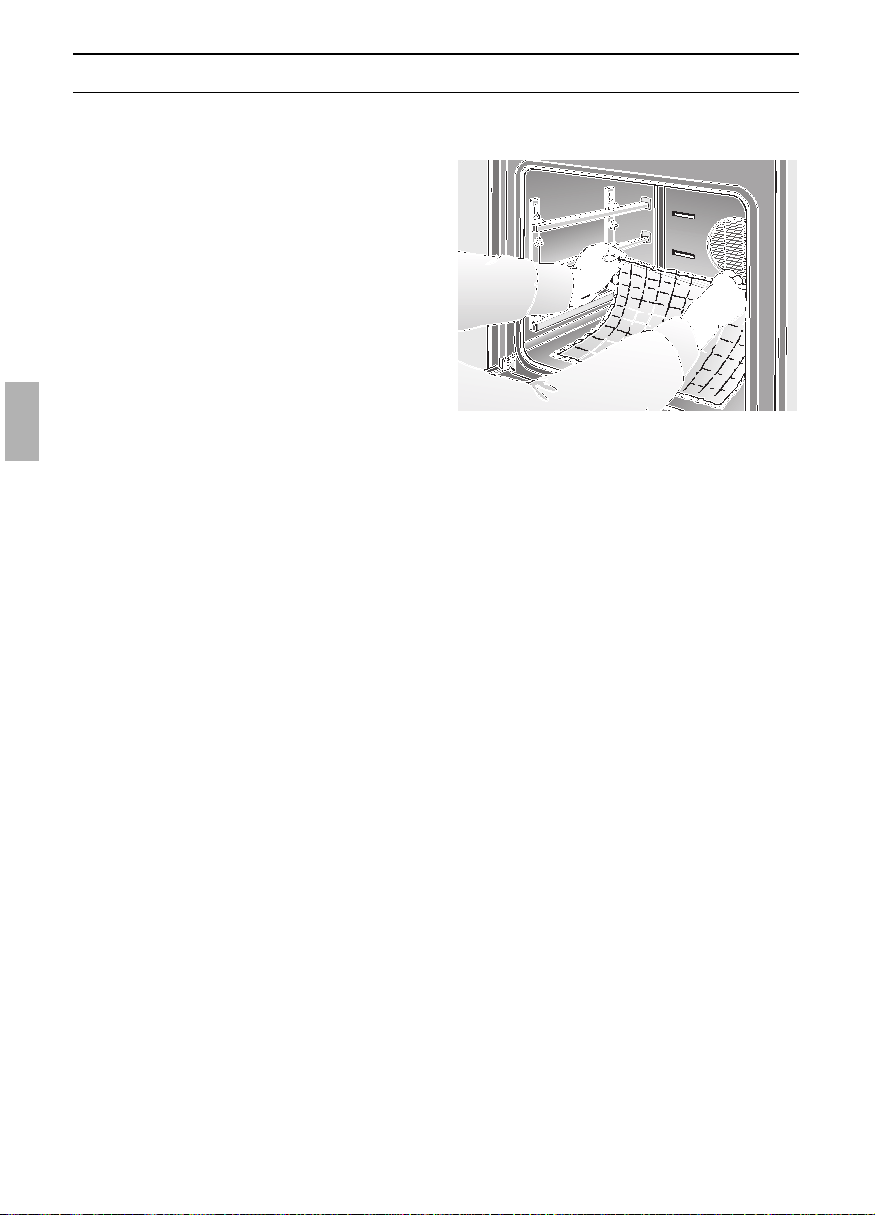
74
Kαθαρισµσ και περιποίηση
Mετά τη διακοπή τησ λειτουργίασ του
συστήµατοσ καθαρισµού του φούρνου:
Yποδείξεισ:
❑ Μην αφήνετε το υπλοιπο νερ για
πολύ, π.χ. λη τη νύχτα, στο φούρνο.
1. Aνοίξτε την πρτα του φούρνου και
αφαιρέστε το υπλοιπο νερ µε ένα
µεγάλο απορροφητικ πανί.
2. Kαθαρίστε το φούρνο µε ένα
απορροφητικ πανί, βρεγµένο ελαφρά
µε απορρυπαντικ, µια µαλακή βούρτσα
ή έναν καθαριστήρα για χύτρεσ απ
πλαστικ.
Tα σκληρά κατάλοιπα που αποµένουν
µπορείτε να τα αφαιρέσετε µε µια
γυάλινη ξύστρα (για υαλοκεραµικά
σκεύη).
Προσοχή: Nα χειρίζεστε την ξύστρα µε
προσοχή και να µη την κρατάτε πολύ
πλάγια για να µη χαράξετε το εµαγιέ.
3. Σηµάδια αλάτων µπορούν να καθαρι-
στούν µε ένα πανί εµποτισµένο µε ξύδι.
4. Σκουπίστε µε καθαρ νερ και στεγνώ-
στε µε ένα στεγν πανί (και κάτω απ
το λάστιχο τησ πρτασ του φούρνου).
Yποδείξεισ:
❑ Oταν ο φούρνοσ είναι πολύ λερωµένοσ,
µπορείτε να επαναλάβετε τη δια-
δικασία, ταν θα έχει κρυώσει εντελώσ
ο φούρνοσ.
❑ Σε περίπτωση ισχυρήσ ρύπανσησ µε
λίποσ, µετά το τηγάνισµα ή το ψήσιµο,
πριν απ τη θέση τησ βοήθειασ
καθαρισµού σε λειτουργία, συνιστούµε
να αλείφετε τα λερωµένα σηµεία µε
ουσία πλυσίµατοσ σκευών.
❑ Aφήστε την πρτα του φούρνου µετά
τον καθαρισµ ανοικτή στη σταθερή
θέση σε γωνία περίπου 30° για περίπου
1 ώρα, για να στεγνώσουν καλά οι
επιφάνειεσ εµαγιέ του φούρνου.
Γρήγορο στέγνωµα:
(µε κλειστή την πρτα του φούρνου)
1. Γυρίζετε τον διακπτη επιλογήσ
λειτουργίασ στο
v
.
2. Ανάβετε µε τον διακπτη επιλογήσ
θερµοκρασίασ τον καυστήρα του
φούρνου και τον ρυθµίζετε στουσ
150 °C.
3. ∆ιάρκεια: 2 λεπτά.
4. Ρυθµίζετε κατπιν τον διακπτη
επιλογήσ θερµοκρασίασ και τον
διακπτη επιλογήσ λειτουργίασ πάλι
στο 0.
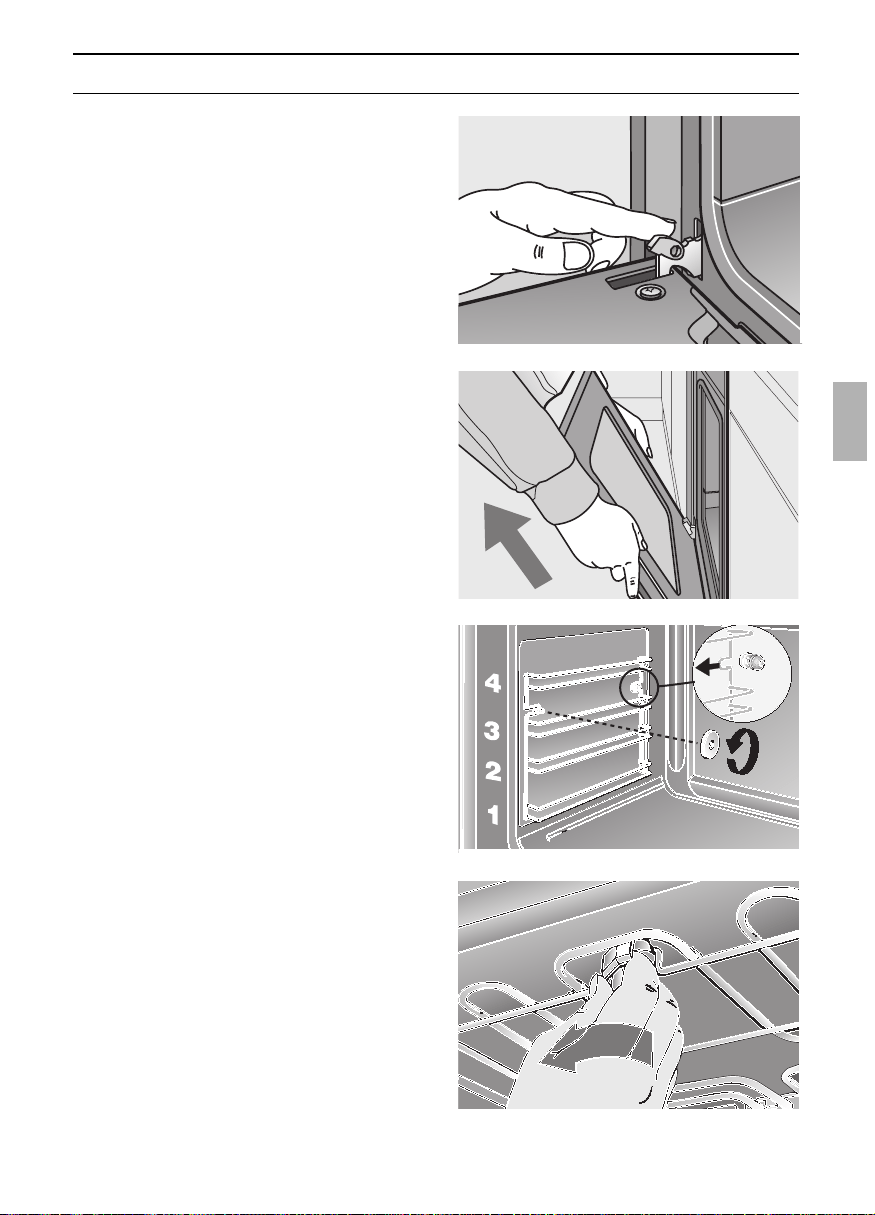
75
Kαθαρισµσ και περιποίηση
Φούρνοσ:
Yπδειξη: Γι α πι άνετο καθαρισµ µετά
απ τη χρήση του αυτµατου συστήµατοσ
καθαρισµού, η συσκευή σασ προσφέρει τισ
ακλουθεσ δυναττητεσ.
Aφαίρεση τησ πρτασ του φούρνου:
Aφαίρεση:
1. Aνοίξτε εντελώσ την πρτα του
φούρνου.
2. Aνεβάστε ωσ πάνω τουσ ασφαλιστικούσ
µοχλούσ αριστερά και δεξιά.
3. Σηκώστε ψηλά την πρτα του φούρνου
(σε πλάγια θέση) και βγάλτε την προσ
τα εµπρσ.
Eγκατάσταση:
1. Eγκαταστήστε τισ δύο αρθρώσεισ στισ
θέσεισ τουσ αριστερά και δεξιά και
κατεβάστε την πρτα του φούρνου
προσ τα κάτω.
2. Kλείστε τουσ ασφαλιστικούσ µοχλούσ
αριστερά και δεξιά.
3. Kλείστε την πρτα του φούρνου.
Aνάψτε τον φωτισµ του φούρνου:
❑ Γυρίζετε τον διακπτη επιλογήσ
λειτουργίασ στη θέση
a.
Αφαίρεση πλεγµάτων εξάρτησησ:
1. Ξεβιδώστε κάθε φορά δύο απ τισ
οδοντωτέσ βίδεσ αριστερά και δεξιά.
2. Βγάλτε προσεκτικά τα πλέγµατα
εξάρτησησ.
Kατέβασµα του θερµαντικού σώµατοσ:
Προσοχή: Tο θερµαντικ σώµα πρέπει να
έχει κρυώσει εντελώσ.
1. Γι α απασφάλιση περιστρέψτε την
ασφάλεια στην οροφή του φούρνου.
Προσοχή: Mην ανάβετε το θερµαντικ
σώµα στην κατεβασµένη θέση και µη
το επιβαρύνετε.
2. Mετά τον καθαρισµ τησ οροφήσ του
φούρνου ανυψώστε το θερµαντικ σώµα
και ασφαλίστε το πάλι.
1.
2.

76
Σε περίπτωση βλαβών ή επισκευών, που
δεν είστε σε θέση να τισ αντιµετωπίσετε
µνοι σασ, υπάρχει για σασ το τµήµα
εξυπηρέτησησ πελατών. Tισ διευθύνσεισ
θα τισ βρείτε στον κατάλογο των
γραφείων εξυπηρέτησησ πελατών.
Προσοχή: Σε περίπτωση που καλέσετε το
τµήµα εξυπηρέτησησ πελατών, λγω δικού
σασ λανθασµένου χειρισµού, θα χρεωθείτε
κάποιο ποσ. Oταν καλείτε το τµήµα
εξυπηρέτησησ πελατών, παρακαλούµε να
δίνετε τουσ αναγραφµενουσ στη
συσκευή σασ αριθµούσ
Θα βρείτε αυτά τα στοιχεία στην πλακέτα
τησ συσκευήσ ή στο πίσω εξώφυλλο του
παρντοσ εγχειριδίου. Tην πλακέτα τησ
συσκευήσ θα βρείτε πίσω απ την πρτα
του φούρνου, αριστερά κάτω στο
πλευρικ περιθώριο του φούρνου.
Aλλαγή τησ λάµπασ του φούρνου:
Προσοχή: Aποσυνδέστε το ηλεκτρικ
ρεύµα απ τη συσκευή!
1. Aπλώστε µια πετσέτα στον κρύο
φούρνο για να αποφύγετε ζηµίεσ.
2. Aφαιρέστε το κάλυµµα τησ λάµπασ
περιστρέφοντάσ το αριστερστροφα.
3. Aλλάξτε τη λάµπα.
– Tύποσ λάµπασ πυράκτωσησ E 14,
220 – 235 Volt, 40 Watt, ανθεκτική σε
θερµοκρασίεσ µέχρι 300° C.
– Mπορείτε να προµηθευτείτε τη
λάµπα απ το τµήµα εξυπηρέτησησ
πελατών ή απ τα ειδικά
καταστήµατα.
Aλλαγή τησ µνωσησ τησ πρτασ του
φούρνου:
1. Aφαιρέστε την κατεστραµµένη µνωση
ξεκρεµώντασ την απλά απ τη θέση
τησ. Mπορείτε να προµηθευτείτε την
καινούργια µνωση απ το τµήµα
εξυπηρέτησησ πελατών.
E-Nr. FD
Eπισκευέσ και Bλάβησ
77
Τι πρέπει να κάνετε, ταν παρουσιαστεί κάποια µικροβλάβη ή ανωµαλία;
∆εν είναι πάντοτε απαραίτητη η κλήση τησ υπηρεσίασ τεχνικήσ εξυπηρέτησησ πελατών. Σε µερικέσ περιπτώσεισ
µπορείτε να αντιµετωπίσετε µνεσ/οι σασ τισ µικροβλάβεσ ή ανωµαλίεσ που παρουσιάζονται. Στον ακλουθο πίνακα θα
βρείτε µερικέσ συµβουλέσ.
Βασική υπδειξη:
Εργασίεσ στα ηλεκτρικά µέρη τησ συσκευήσ και στουσ κρουνούσ αερίου επιτρέπεται να εκτελούνται µνον απ τον ειδικ.
Πριν απ τέτοιεσ εργασίεσ πρέπει να αποµονωθεί η συσκευή οπωσδήποτε απ το ρεύµα είτε κατεβάζοντασ τον αυτµατο
ασφαλείασ είτε ξεβιδώνοντασ τισ ασφάλειεσ στον πίνακα του σπιτιού σασ.
Σε περίπτωση που η εντοιχισµένη κουζίνα αερίου πρέπει να αφαιρεθεί απ το ερµάριο απ τον ειδικ, πρέπει να διακοπούν
πρώτα οι συνδέσεισ µεταξύ τησ σκαφοειδούσ εστίασ µαγειρέµατοσ µε αέριο και τησ εντοιχισµένησ κουζίνασ αερίου. Σ'
αυτέσ ανήκουν οι ράβδοι τηλεσκοπικού τύπου στουσ διακπτεσ των επιµέρουσ εστιών καθώσ και οι ηλεκτρικέσ και οι
τεχνικέσ συνδέσεισ αερίου µεταξύ τησ σκαφοειδούσ εστίασ µαγειρέµατοσ µε αέριο και τησ εντοιχισµένησ κουζίνασ αερίου.
Τι πρέπει να κάνετε, Πιθανή αιτία Αντιµετώπιση
... ταν η ηλεκτρική λειτουργία
γενικά παρουσιάζει βλάβη;
Καµµένη ασφάλεια Εξετάστε την ασφάλεια στον πίνακα
του σπιτιού και αν αυτή έχει καεί,
αλλάξτε την.
... ταν υγρά ή λεπτρευστη ζύµη
συσσωρεύονται περισστερο απ τη
µία µεριά;
Η συσκευή δεν είναι τοποθετηµένη
σε οριζντια θέση.
Ευθυγραµµίστε τη συσκευή ή
ελέγξτε την τοποθέτηση αυτήσ µέσα
στο ερµάριο.
... ταν παρουσιαστεί κάποια βλάβη
σε λειτουργίεσ που ελέγχονται
ηλεκτρονικά;
Ενεργειακή κρούση (π.χ. κεραυνσ). Ρυθµίστε εκ νέου τισ ανάλογεσ
λειτουργίεσ.
... ταν το λεπτ γλύκισµα έχει πολύ
ανοιχτ χρώµα απ κάτω;
∆εν επιλέξατε τη σωστή υποδοχή. Τοποθετήστε το γλύκισµα σε
χαµηλτερη υποδοχή µέσα στον
φούρνο.
... ταν το γλύκισµα φρµασ έχει
πολύ ανοιχτ χρώµα στο κάτω
µέροσ;
Η φρµα ψησίµατοσ τοποθετήθηκε
µέσα στον φούρνο επάνω σε λαµαρίνα
ή σε ταψί για ψήσιµο στο γκριλ.
Τοποθετήστε τη φρµα ψησίµατοσ
επάνω στην σχάρα µέσα στον
φούρνο.
... ταν το γλύκισµα στεγνώσει πολύ; Πολύ χαµηλή θερµοκρασία
ψησίµατοσ
Ρυθµίστε λίγο υψηλτερη
θερµοκρασία ψησίµατοσ.
... ταν το γλύκισµα έχει πολύ
υγρασία στο εσωτερικ του ή η ζύµη
του µείνει ωµή ή ταν το κρέασ δεν
ψηθεί στο εσωτερικ του;
Πολύ υψηλή θερµοκρασία
ψησίµατοσ
Ρυθµίστε λίγο χαµηλτερη
θερµοκρασία ψησίµατοσ.
Μην ξεχνάτε:
Οι διάρκειεσ ψησίµατοσ δεν µπορούν
να µειωθούν ρυθµίζοντασ υψηλτερη
θερµοκρασία µέσα στον φούρνο!
(Εξωτερικά ψηµένα τρφιµα, αλλά
ωµά στο εσωτερικ τουσ).
Μεγάλη διάρκεια ψησίµατοσ Συντήρηση τησ συσκευήσ απ την
υπηρεσία τεχνικήσ εξυπηρέτησησ
πελατών.
Μέσα στον φούρνο βρίσκονται
άχρηστεσ λαµαρίνεσ ή ταψιά για
ψήσιµο στο γκριλ.
Αφαιρέστε τισ άχρηστεσ λαµαρίνεσ ή
το ταψί για ψήσιµο στο γκριλ απ τον
φούρνο.
Πολύ µικρή διάρκεια ψησίµατοσ Επιλέξτε µεγαλύτερη διάρκεια
ψησίαµτοσ, αφήστε τη ζύµη των
γλυκισµάτων (µε µαγιά) να “γίνει”
περισστερο.
Μεγάλη ποστητα υγρού στη ζύµη
του γλυκίσµατοσ
Προσθέστε λιγτερα υγρά στη ζύµη
των γλυκισµάτων.
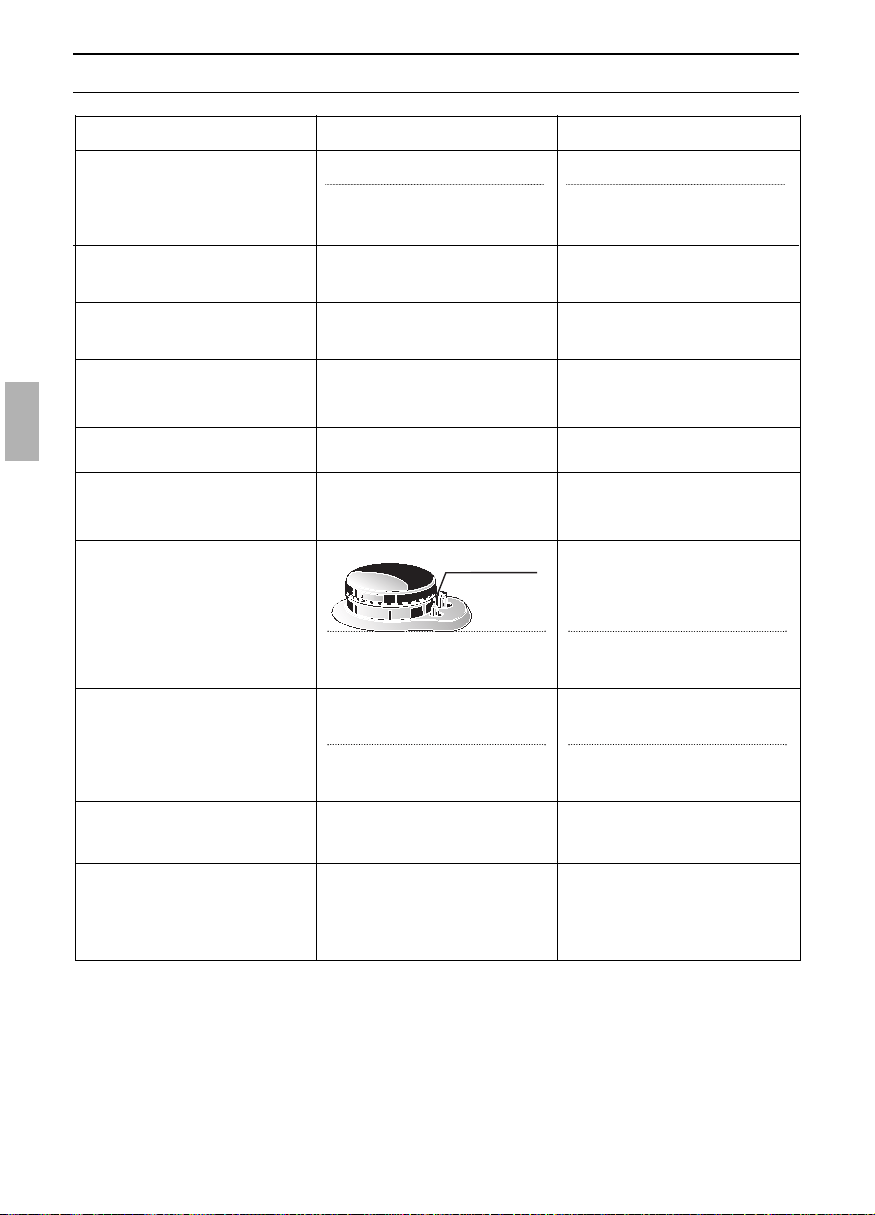
78
Τι πρέπει να κάνετε, ταν παρουσιαστεί κάποια µικροβλάβη ή ανωµαλία;
Τι πρέπει να κάνετε, Πιθανή αιτία Αντιµετώπιση
... ταν το καπάκι του καυστήρα έχει
άσχηµη εµφάνιση;
Συνήθεισ ρύποι Καθαρίστε το καπάκι του καυστήρα
µε µέσα περιποίησησ µετάλλων, τα
οποία είναι κατάλληλα για αλουµίνιο.
... ταν η εµαγιέ σχάρα έχει αποκτήσει
τραχιά επιφάνεια στην περιοχή των
καυστήρων των επιµέρουσ εστιών;
... ταν η καύση στουσ καυστήρεσ
των επιµέρουσ εστιών δεν είναι
οµοιµορφη µετά την τοποθέτηση
τησ συσκευήσ;
Συνηθισµένο φαινµενο λγω τησ
υψηλήσ θερµοκρασίασ
∆εν µπορεί να αντιµετωπιστεί, η
ικαντητα χρήσησ δεν επηρεάζεται
αρνητικά.
Η εικνα τησ φλγασ είναι
ανοµοιµορφη λγω λανθασµένησ
ρύθµισησ του αερίου.
Πρέπει να γίνει έλεγχοσ τησ ρύθµισησ
του αερίου απ το κατάστηµα, απ'
που αγοράσατε τη συσκευή ή απ τον
ειδικ τοποθέτησησ τησ συσκευήσ.
... ταν η εικνα τησ φλγασ των
επιµέρουσ εστιών αλλάξει ξαφνικά;
χι σωστά τοποθετηµένα µέρη
καυστήρα
Τοποθετήστε σωστά τα αφαιρούµενα
µέρη των καυστήρων.
... ταν η ηλεκτρική ανάφλεξη των
καυστήρων των επιµέρουσ εστιών
δεν λειτουργεί πλέον;
Κατάλοιπα φαγητών ή µέσα καθαρισµού
ανάµεσα στον αναφλεκτήρα και τον
καυστήρα τησ επιµέρουσ εστίασ
∆ιανοίξτε και καθαρίστε προσεκτικά
την σχισµή µεταξύ του αναφλεκτήρα
και του καυστήρα κάθε επιµέρουσ
εστίασ.
... ταν για το άναµµα των
καυστήρων των επιµέρουσ εστιών
πρέπει να πιεστεί ξαφνικά ο
διακπτησ για περισστερο χρνο
προσ τα µέσα;
... ταν µετά το άναµµα των
καυστήρων η φλγα σβήσει;
... ταν οι φλγεσ είναι µεγαλύτερεσ
απ' τι συνήθωσ ή ταν εµφανιστεί
οσµή αερίου;
Στρεβλωµένοσ αισθητήρασ
χι σωστά τοποθετηµένα µέρη
καυστήρα
Πιέσατε πολύ λίγο.
Λυγίστε προσεκτικά τον αισθητήρα
σε κάθετη θέση.
Τοποθετήστε σωστά τα αφαιρούµενα
µέρη των καυστήρων.
Πιέστε τον διακπτη επί περισστερο
χρνο προσ τα µέσα.
∆εν πιέσατε αρκετά δυνατά.
Προτού ελευθερώσετε τον διακπτη,
πιέστε τον δυνατά προσ τα µέσα.
Ο µειωτήρασ πίεσησ στη φιάλη
υγραερίου είναι χαλασµένοσ.
Θέτετε τη συσκευή αµέσωσ εκτσ
λειτουργίασ. Κλείστε τη βαλβίδα στη
φιάλη αερίου. Έλεγχοσ και αλλαγή
απ τον ειδικ.
... ταν ο κρουνσ κάποιασ
επιµέρουσ εστίασ γυρίζει δύσκολα ή
έχει µαγκώσει;
... ταν η εικνα τησ φλγασ
διαφέρει πολύ απ τη συνηθισµένη;
Απαιτούµενη συντήρηση Συντήρηση τησ συσκευήσ απ την
υπηρεσία τεχνικήσ εξυπηρέτησησ
πελατών.
... ταν το γλύκισµα ή τα µισκοτάκια
και κουλουράκια µαυρίσουν απ
κάτω;
Σκούρεσ λαµαρίνεσ Χρησιµοποιήστε ανοιχτχρωµεσ
λαµαρίνεσ.
Λάθοσ υποδοχή µέσα στον φούρνο Τοποθετήστε το γλύκισµα ή τα
µισκοτάκια και κουλουράκια σε
υψηλτερη υποδοχή µέσα στον
φούρνο.

79
Τι πρέπει να κάνετε, ταν παρουσιαστεί κάποια µικροβλάβη ή ανωµαλία;
Τι πρέπει να κάνετε, Πιθανή αιτία Αντιµετώπιση
... ταν ο καυστήρασ του φούρνου
σβήνει διαρκώσ;
Λανθασµένη ρύθµιση αερίου Πρέπει να γίνει έλεγχοσ τησ
ρύθµισησ του αερίου απ το
κατάστηµα, απ' που αγοράσατε τη
συσκευή ή απ τον ειδικ
τοποθέτησησ τησ συσκευήσ.
... ταν ο καυστήρασ του φούρνου
σβήσει ξαφνικά;
Απτοµο κλείσιµο τησ πρτασ του
φούρνου (ρεύµα αέρα)
ταν ο φούρνοσ βρίσκεται σε
λειτουργία, κλείνετε την πρτα του
σιγά σιγά.
... ταν η θερµοκρασία του φούρνου
διαφέρει αισθητά απ τη
ρυθµισµένη θερµοκρασία;
Χαλασµένοσ θερµοστάτησ Συντήρηση τησ συσκευήσ απ την
υπηρεσία τεχνικήσ εξυπηρέτησησ
πελατών
... ταν δεν λειτουργεί ο
ανεµιστήρασ για τον φούρνο;
∆ιακοπή του ηλεκτρικού ρεύµατοσ Ελέγξτε τισ ασφάλειεσ στην οικιακή
εγκατάσταση.
Χαλασµένοσ ανεµιστήρασ Συντήρηση τησ συσκευήσ απ την
υπηρεσία τεχνικήσ εξυπηρέτησησ
πελατών
... ταν σχηµατίζεται πολύσ καπνσ
κατά το ψήσιµο φαγητών ή κατά το
ψήσιµο στο γκριλ;
Πολύ υψηλή θερµοκρασία
ψησίµατοσ
Ρυθµίστε χαµηλτερη θερµοκρασία
ψησίµατοσ
Πολύ µικρή απσταση µεταξύ του
γκρίλ και των τροφίµων που
ψήνονται στο γκριλ
Αυξήστε την απσταση µεταξύ του
γκριλ και των τροφίµων που ψήνετε
στο γκριλ.
... ταν ο φούρνοσ λερώνεται πολύ
κατά το ψήσιµο φαγητών ή κατά το
ψήσιµο στο γκριλ;
Πολύ υψηλή θερµοκρασία
ψησίµατοσ
Ρυθµίστε χαµηλτερη θερµοκρασία
ψησίµατοσ.
∆εν έχουν τοποθετηθεί σωστά η
σχάρα και το ταψί συλλογήσ λίπουσ.
Τοποθετήστε τη σχάρα πάνω απ το
ταψί συλλογήσ λίπουσ και
τοποθετήστε κατπιν τα εξαρτήµατα
αυτά µαζί σε µία υποδοχή.
... ταν σχηµατίζεται νερ
συµπύκνωσησ στο τζάµι τησ πρτασ
του φούρνου;
Συνηθισµένο φαινµενο, το οποίο
οφείλεται στην υπάρχουσα διαφορά
θερµοκρασίασ.
Ρυθµίστε τον φούρνο επί περ. 5
λεπτά στουσ 100 °C.
... ταν µέσα στον φούρνο
σχηµατίζεται επανειληµµένα νερ
συµπύκνωσησ;
Συνηθισµένο φαινµενο π.χ. σε
γλυκίσµατα µε χυµώδη γέµιση
(φρούτα) η µεγάλο ψητ
Αφού σβήσετε τον φούρνο,
σκουπίζετε το νερ συµπύκνωσησ.
… ταν µετά απ µακροχρνια
χρήση τα τζάµια το φούρνου είναι
απ µέσα λερωµένα;
Κανονικ λέρωµα
Ξεκρεµάστε την πρτα του φούρνου
και τοποθετήστε την µε την
εµπρσθια µεριά τησ προσ τα κάτω
πάνω σε µαλακή, καθαρή επιφάνεια.
Πιάστε το τζάµι τησ πρτασ δίπλα
στουσ µεντεσέδεσ, ξεκουµπώστε το
µε τράβηγµα προσ τα πάνω και
αφαιρέστε το.
Σε πρτεσ µε 3 τζάµια:
Ξεκουµπώστε το εσωτερικ τζάµι
τησ πρτασ απ τα γωνιακά τεµάχια
και ανασηκώστε το π.χ. µε πλαστική
ή ξύλινη σπάτουλα.
Συναρµολγηση µετά τον
καθαρισµ:
Τοποθετήστε το εσωτερικ τζάµι τησ
πρτασ και κουµπώστε το.
Κρεµάστε το τζάµι τησ πρτασ και
κουµπώστε το, πιέζοντάσ το δίπλα
στουσ µεντεσέδεσ.
… ταν τα εµαγιέ συρταρωτά
τεµάχια εµφανίζουν µατ,
ανοιχτχρωµουσ λεκέδεσ;
Κανονικ φαινµενο µετά απ
στάξιµο ζωµού κρέατοσ.
Μη δυνατή.

80
Indice
Página
Puntos a tener en cuenta
❑ Protección del medio ambiente 81
❑ Antes de conectar el aparato nuevo 81
❑ Advertencias y consejos
de seguridad 82
Antes de conectar el aparato nuevo
❑ Limpieza inicial 83
❑ Calentamiento inicial (en vacío)
del horno 83
❑ Sistema de seguridad de los
quemadores 83
❑ Selección de los recipientes 83
Su nuevo horno
❑ Descripción del aparato 84
❑ Accesorios 85
❑ Diferentes alturas o pisos
de colocación 85
Encendido y regulación del quemador
❑ Quemadores de las zonas
de cocción 86
❑ Quemador del horno 87
Horneado y asado
❑ Funciones del horno 89
❑ Conexión y desconexión del horno 89
❑ Horneado 90
❑ Asado 91
Asado al grill 92
Advertencias y conejos prácticos 93
Descongelar y cocer a fuego lento 94
Página
Limpieza y cuidados
❑ Consejos y advertencias
importantes 95
❑ Elementos esmaltados y de vidrio 95
❑ Frontal de acero inoxidable 95
❑ Frente de cristal reluciente 95
❑ Placa de cocción 95
❑ Horno 95
❑ Parrilla y encimera 96
❑ Quemadores de las
zonas de cocción 96
❑ Sistema de limpieza EasyClean 97+98
❑ Retirar y montar la puerta del horno 99
❑ Retirar la rejilla suspendida 99
❑ Cuerpo radiador de calefacción
(resistencia) 99
Localización y subsanamiento
de averías 100
¿Qué hacer en caso de que
algo no funcione? 101–103

81
Puntos a tener en cuenta
Protección del medio
ambiente
❑ Los aparatos usados incorporan
materiales valiosos que se pueden
recuperar, entregando el aparato a dicho
efecto en un centro oficial de recogida o
recuperación de materiales reciclables.
Antes de deshacerse de su aparato
usado deberá inutilizarlo.
Antes de conectar el aparato
nuevo
❑ El horno sólo podrá usarse en caso de
haber establecido la conexión eléctrica y
de gas del mismo.
❑ Antes de usar su aparato nuevo deberá
leer detenidamente las instrucciones de
servicio correspondientes. En éstas se
facilitan informaciones y consejos
importantes relativos a su seguridad
personal, así como al manejo y cuidado
correcto del aparato.
❑ Estas Instrucciones de servicio son
válidas para diferentes modelos de
aparato; por ello puede ser posible que
se describan detalles y características
de equipamiento que no concuerdan
con las de su aparato concreto.
❑ Guarde las instrucciones de servicio y
de montaje para un posible propietario
posterior.
❑ Si el aparato presentara daños o
desperfectos, no deberá ser utilizado.
❑ El montaje y acoplamiento del aparato a
la red eléctrica sólo deberá ser
efectuado por un fontanero o instalador
de gas debidamente instruido y
autorizado, cumpliendo las
correspondientes instrucciones y según
el esquema de conexión. En caso de
efectuarse un acoplamiento erróneo del
aparato y producirse algún daño o
desperfecto en éste, la garantía del
fabricante no entra en vigor.
❑ Nuestros aparatos cumplen las normas
de seguridad específicas del ramo para
aparatos de cocina eléctricos o de gas.
Las reparaciones que fuera necesario
efectuar sólo podrán ser ejecutadas por
técnicos debidamente instruidos del
Servicio Técnico Postventa. Las
reparaciones efectuadas de modo
erróneo o incorrecto, pueden implicar
serios peligros para el usuario.
❑ El uso de aparatos de cocción de gas
puede dar lugar a la formación de calor y
humedad en el lugar de emplazamiento
de los mismos. Por ello debe procurarse
una buena ventilación del lugar:
Mantener abiertas las aberturas
naturales del lugar o bien instalar un
dispositivo de ventilación o evacuación
mecánica (campana extractora de
humos).
❑ Los aparatos y equipos de gas no deben
instalarse en vehículos ni buques.
❑ El uso durante un período prolongado
del aparato puede requerir una
ventilación adicional, por ejemplo el
funcionamiento a mayor potencia del
dispositivo de ventilación o evacuación
mecánica (campana extractora de
humos) existente.
Protección del medio
ambiente
❑ Su nuevo aparato está protegido
durante el transporte hasta su hogar por
un embalaje protector. Todos los
materiales de embalaje utilizados son
respetuosos con el medio ambiente y
pueden ser reciclados o reutilizados.
Contribuya activamente a la protección
del medio ambiente insistiendo en unos
métodos de eliminación y recuperación
de los materiales de embalaje
respetuosos con el medio ambiente.

82
Puntos a tener en cuenta
Advertencias y consejos
de seguridad
❑ Utilice el aparato sólo para la preparación
de alimentos.
❑ Las superficies de los dispositivos de
calentamiento y de los recipientes de
cocción pueden calentarse fuertemente
durante su servicio. Lo mismo ocurre con
las superficies interiores de los hornos y los
elementos de calefacción. Mantenga
siempre alejados los niños de la cocina.
❑ Permanezca siempre en las inmediaciones
del aparato al preparar platos o alimentos
con grasa o aceite. La grasa o aceite
excesivamente calentados pueden
inflamarse.
❑ Los cables de conexión a la red de
aparatos eléctricos no deben entrar en
contacto en ningún momento con las
zonas de cocción que estuvieran calientes
o incandescentes, ni tampoco ser
aprisionados con la puerta del horno
caliente. El aislamiento de los cables podría
resultar seriamente dañado.
❑ En caso de comprobar algún defecto en el
horno, deberá desconectarse el fusible
correspondiente en la caja central de
fusibles de la vivienda.
❑ No guarde ni coloque objetos inflamables
en el interior del horno. Podrían inflamarse
en caso de conexión fortuita del horno. No
colocar tampoco objetos inflamables sobre
la placa de cocción.
❑ En caso de seleccionar la modalidad de
calentamiento «Aire caliente forzado»
v
,
no forrar el horno o las bandejas de
horneado con papel especial para hornear
suelto, dado que éste podría resultar
aspirado por el ventilador durante la fase
de calentamiento, dando lugar a
importantes daños en el ventilador y el
circuito de calentamiento del horno.
❑ No limpiar el horno ni la placa de cocción
con limpiadoras de vapor o de alta presión,
ni tampoco con sprays corrosivos.
❑ No colocar bandejas sobre el fondo del
horno ni recubirir el fondo del horno con
papel aluminio, pues de lo contrario puede
produc irse sobrecarga térmica, los
tiempos de asado o cocción no
concuerdan y pueden producirse daños en
el esmalte de la cocina.
❑ No verter nunca agua directamente en
el interior del horno caliente. El esmalte
podría resultar dañado.
❑ El jugo de fruta que gotea de la bandeja
de horneado produce manchas
indelebles. Por ello aconsejamos utilizar
la bandeja universal, que es más honda.
❑ No se apoye ni se siente sobre la puerta
del horno estando abierta.
❑ Abrir y cerrar con cuidado la puerta del
horno a fin de evitar que las llamas de
los quemadores se apaguen
(particularmente en caso de haber
ajustado las llamas a poca potencia).
❑ Cerciorarse de que la puerta del horno
cierre bien. Mantenga limpia las
superficies de la junta de la puerta.
❑ En caso de cocinar con ollas exprés,
observe las mismas atentamente. Una
vez que alcancen la presión de cocción
adecuada, reducir la potencia de
cocción ajustada.
❑ Antes de poner en funcionamiento el
quemador, cerciorarse del asiento
correcto de la tapa del quemador.
❑ Usar el quemador de la zona de cocción
sólo con un recipiente colocado encima.
❑ Entre el cuerpo del horno y el panel de
llaves de gas puede salir vaho caliente.
❑ No usar nunca el aparato como
calefacción.
❑ En caso de funcionar el aparato con
gas licuado (butano/propano): La
instalación del gas tiene que ser con
tubo rigido, adaptándose a la normativa
vigente. Verifique regularmente el
reductor de presión de la bombona de
gas por un técnico especialista; efectúe
asimismo regularmente el
mantenimiento de los elementos de la
conexión de alimentación de gas licuado
por un técnico.
❑ Cerciorarse mediante la placa de
características del aparato, de que éste
cumple las normas nacionales y las
condiciones de alimentación de gas
locales. En caso contrario existe peligro
de deflagración o incendio.
❑ Las llaves de muletilla no deberán
desmontarse, tampoco para su limpieza
a fin de no dañar la protección contra
contacto fortuito que incorporan.

83
Antes de conectar el aparato nuevo
Sistema de seguridad de los
quemadores:
❑ Todos los quemadores, incluido el
quemador del horno, están equipados
con un dispositivo de seguridad de
funcionamiento termoeléctrico, que
interrumpe automáticamente la
alimentación de gas al quemador tan
pronto como se apaga la llama.
❑ Estando los quemadores de las zonas de
cocción en funcionamiento, se puede
escuchar una especie de murmullo o
susurro.
❑ Estando en funcionamiento el quemador
del horno, tiene que funcionar asimismo
el ventilador del horno.
Limpieza inicial:
1. Limpiar la superficie exterior del aparato
con un paño suave húmedo.
2. Limpiar el horno y los accesorios con
una solución de agua y agente
lavavajillas corriente caliente.
Calentamiento inicial (en vacío) del
horno:
1. Calentar el horno en vacío durante
aprox. 30 minutos.
❑ Prestar atención a que no se encuentren
objetos ni cuerpos extraños en su
interior, como por ejemplo el seguro de
transporte, la documentación del horno,
etc.
❑ Seleccione para el calentamiento inicial
del horno la posición correspondiente a
200° C.
❑ Con objeto de evitar la acumulación de
los molestos olores producidos durante
este proceso, deberá procurarse que las
ventanas de la cocina estén abiertas.
Cómo elegir las ollas y disponerlas:
¡Correcto!
❑ Colocar la olla siempre en el centro del
quemador de la zona de cocción.
❑ Utilizar sólo ollas y sartenes con fondo
liso.
❑ Elegir el diámetro de la olla según el
quemador de la zona de cocción (véase
tabla).
– bajo consumo de gas
– tiempo de cocción óptimo
– disposición favorable
Cómo elegir las ollas y disponerlas:
¡Falso!
❑ Diámetro de la olla demasiado pequeño.
❑ La llama de los quemadores de la zona
de cocción sobresale del fondo de las
ollas.
❑ La olla sobresale del borde de la
placa de cocción.
– alto consumo de gas
– mala disposición
Quemador
Quemador fuerte
Quemador normal
Quemador auxiliar
Carga en kw
Placa
de cocción
2,85
1,85
1,10
2,90
1,70
1,00
240 a 260 mm
200 a 220 mm
120 a 180 mm
Placa
vitrocerámica
Diámetro olla
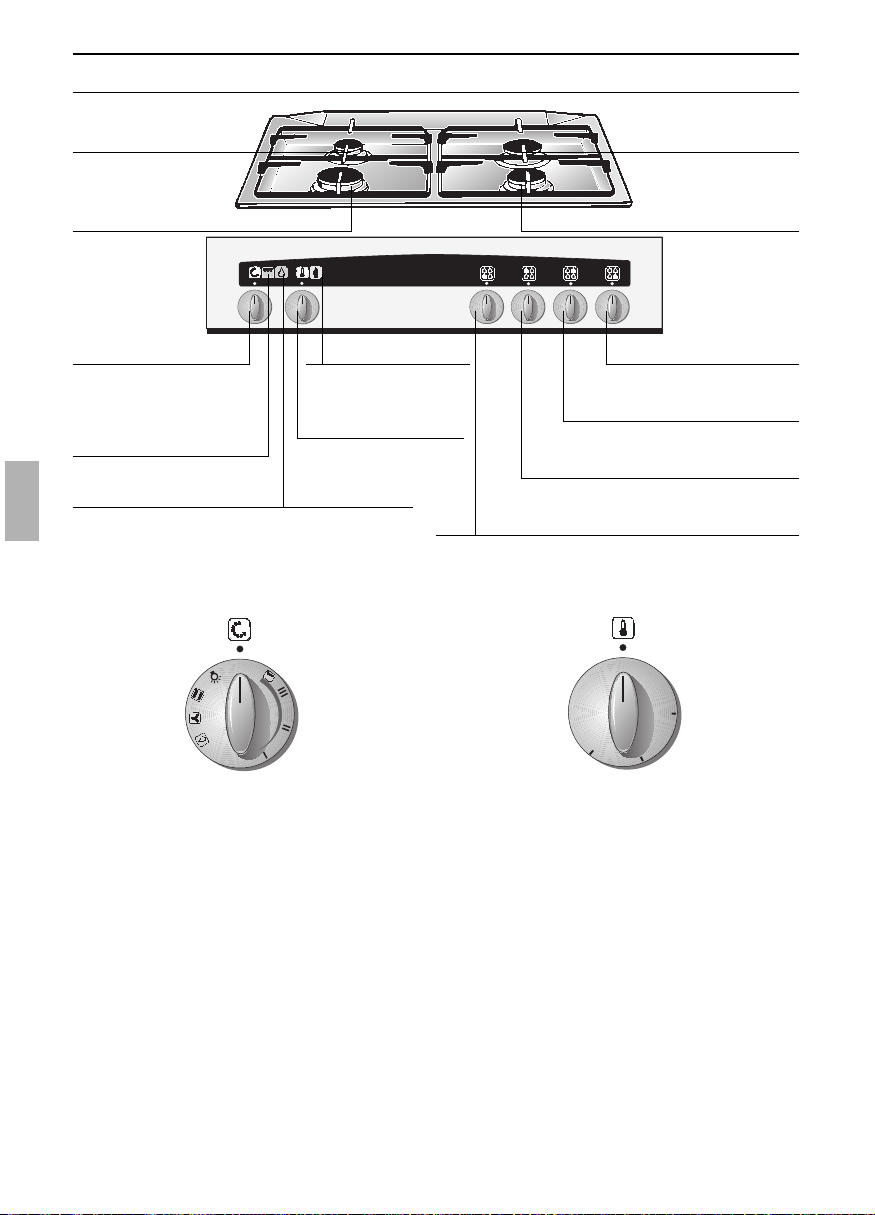
Su nuevo horno
Quemador normal C
Quemador normal DQuemador fuerte A
Posiciones:
a Iluminación interior del horno,
sin calentamiento
e Sistema de calentamiento
convencional
v Aire caliente forzado
(Sistema Circotherm)
x Limpieza del horno EasyClean
(temperatura fija, no es posible
modificarla)
F Asado con grill de superficie
I–II–III Escalones de funcionamiento
del grill, ajuste de temperatura
❑ En caso de estar en funcionamiento el
quemador de gas del horno se bloquean
automáticamente las funciones de
calentamiento del asador (grill) y de la
limpieza del horno.
Indicaciones
de temperatura, en ° C
❑ Las temperaturas para
el sistema de calentamiento
convencional
e : 150 – 250
el sistema de aire caliente
forzado
v : 120 – 250
tienen que ajustarse mediante el
selector de temperatura para el horno.
❑ El encendido del quemador del horno
sólo tiene lugar a través del selector de
temperatura del horno de gas.
Selector de funciones para el horno de
gas y selector de temperatura para el
asador eléctrico
Selector de temperatura para el horno
de gas
0 0 0 0
0
0
Piloto de aviso para el
asador eléctrico
Mando de muletilla para
la zona de cocción D
Mando de muletilla para la
zona de cocción C
Mando de muletilla para
la zona de cocción B
Mando de muletilla para la zona de cocción A
Selector de funciones
para el horno de gas y
selector de temperatura
para el asador eléctrico
Piloto de aviso para el sistema de limpieza
rápida y fácil del horno EasyClean
Selector de
temperatura para el
horno de gas
Pilotos de aviso para
el funcionamiento
del horno de gas
Quemador
económico B
84
0
150
200
250
●
●
●
●
●
●
●
●
●
●
●
0
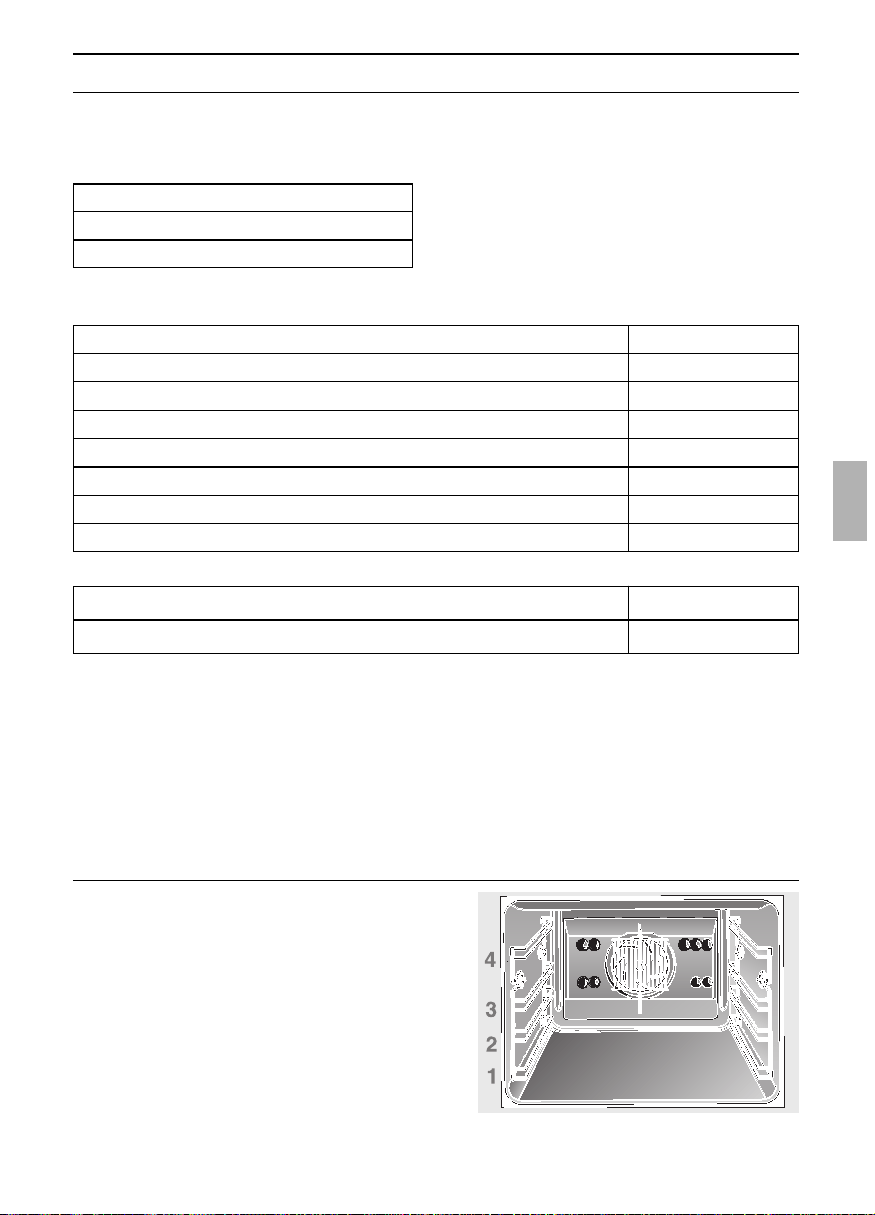
85
Su nuevo horno
Alturas de colocación
❑ El horno dispone de 4 alturas o pisos de
colocación diferentes.
Estos pisos se cuentan de abajo hacia
arriba, y están marcados en el horno.
En caso de trabajar con la
modalidad de aire caliente forzado, no
debe utilizarse el piso »2« a fin de no
perjudicar la circulación del aire.
La deformación vuelve a desaparecer
durante el horneado, asado o la
preparación al grill.
Accesorios
❑ El equipo de serie del aparato incluye:
Nº de pedido
Bandeja universal con rejilla
Bandeja pastelera, de aluminio
Z 1230 X0
Z 1330 X0
Bandeja para soufflés Z 1270 X0
Rejilla para hornear o asar, tupida Z 1440 X0
Parrilla de asado (sólo para colocar dentro de la bandeja universal) Z 1510 X1
Bandeja para cocer pan Z 1910 X0
Juego adicional – clou Z 1750 X0
Rejilla para hornear o asar, acodada Z 1430 X0
Advertencia:
❑ Es posible que durante el
funcionamiento del horno se deformen
la bandeja de horneado o la sartén
universal. Las causas de ello son
grandes diferencias de temperatura en
los accesorios. Estas diferencias pueden
aparecer si se cubrió solamente una
parte del accesorio, o si se pusieron
productos ultracongelados (como p. ej.
una pizza) en los accesorios.
❑
Más accesorios opcionales los podrá adquirir Vd. en el comercio
especializado.
Nº de pedido
Manguera de seguridad – para el enchufe de seguridad del gas
Juego de acoplamiento – para gas licuado –
Z 2500 X1
Z 2300 X0
❑ Para la instalación del aparato:
1 Bandeja pastelera, esmaltada
1 rejilla para hornear o asar
1 Bandeja universal con rejilla
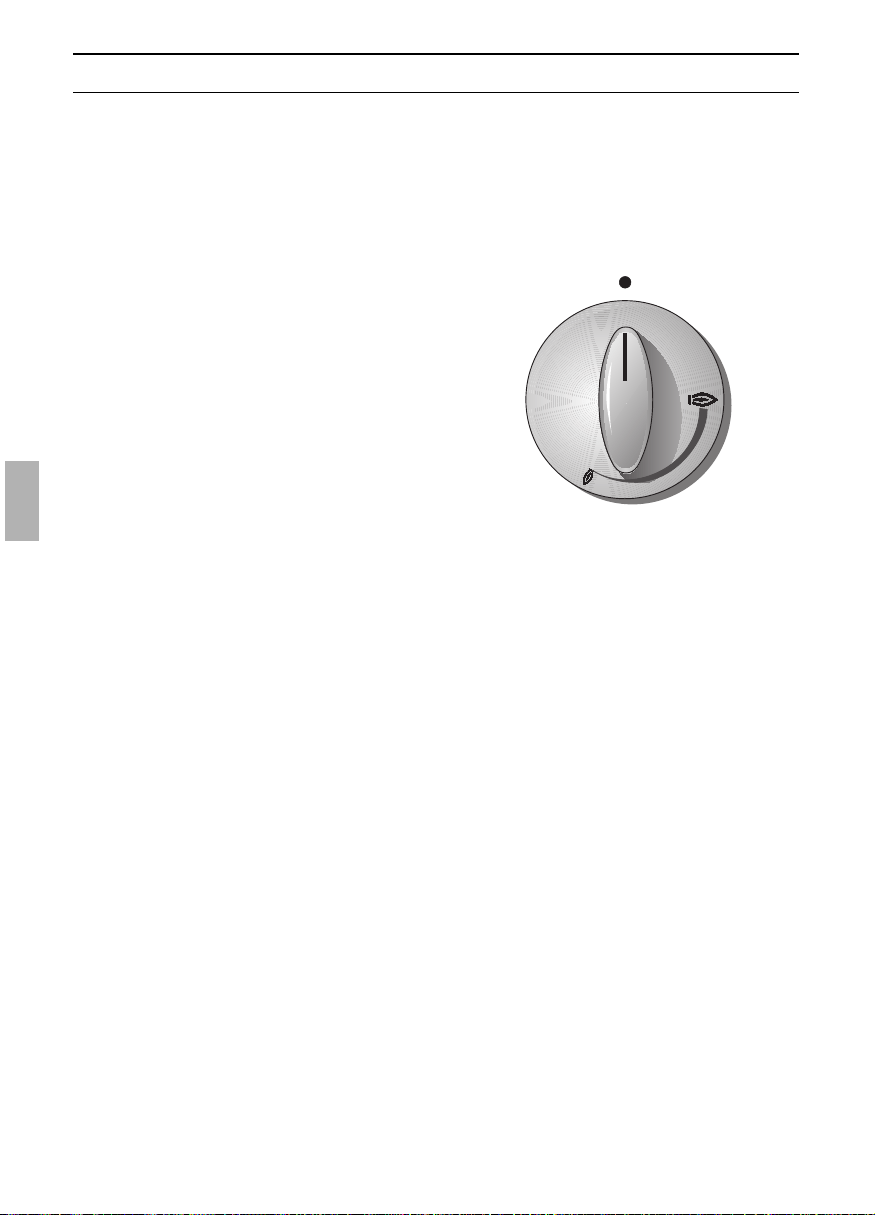
86
Encendido con encendedor electrónico:
1. Apretar el mando de muletilla de la
zona de cocción seleccionada y girarlo
hacia la izquierda, hacia la posición de
máxima potencia.
❑ El encendido electrónico está
activado mientras se esté apretando
el mando de muletilla.
2. Tras encenderse el quemador,
mantenga apretado el mando de
muletilla unos 5 segundos más.
3. Antes de soltar el mando de
muletilla, púlselo una vez más con
fuerza.
4. En caso de no producirse el encendido
del quemador o de apagarse la llama,
repetir la operación al cabo de unos
3 segundos.
5. Para desconectar los quemadores,
girar el mando de muletilla hacia la
derecha, hasta la posición de
desconexión (posición cero).
Encendido del quemador con cerilla o
algo similar:
1. Apretar el mando de muletilla de la
zona de cocción seleccionada y girarlo
hacia la izquierda, hacia la posición de
máxima potencia.
Efectuar el encendido del quemador
aproximando la cerilla al mismo.
2. Tras encenderse el quemador,
mantenga apretado el mando de
muletilla unos 5 segundos más.
3. En caso de no producirse el encendido
del quemador o de apagarse la llama,
repetir la operación al cabo de unos
3 segundos.
4. Para desconectar los quemadores,
girar los mandos selectores de
temperatura y de funciones a la
posición cero.
Encendido y regulación del quemador
❑ La asignación de las llaves de muletilla y los quemadores respectivos figura en la
descripción del aparato y en los símbolos del panel de las llaves de gas.
❑ El encendido de los quemadores se efectúa por medio de un dispositivo de encendido
electrónico (chispas eléctricas).
,
= Posición de máxima potencia
,
= Posición de mínima potencia
Quemadores de las zonas de
cocción:
❑ La regulación de la potencia se efectúa
de modo continuo entre las posiciones
de máxima y mínima potencia.
0
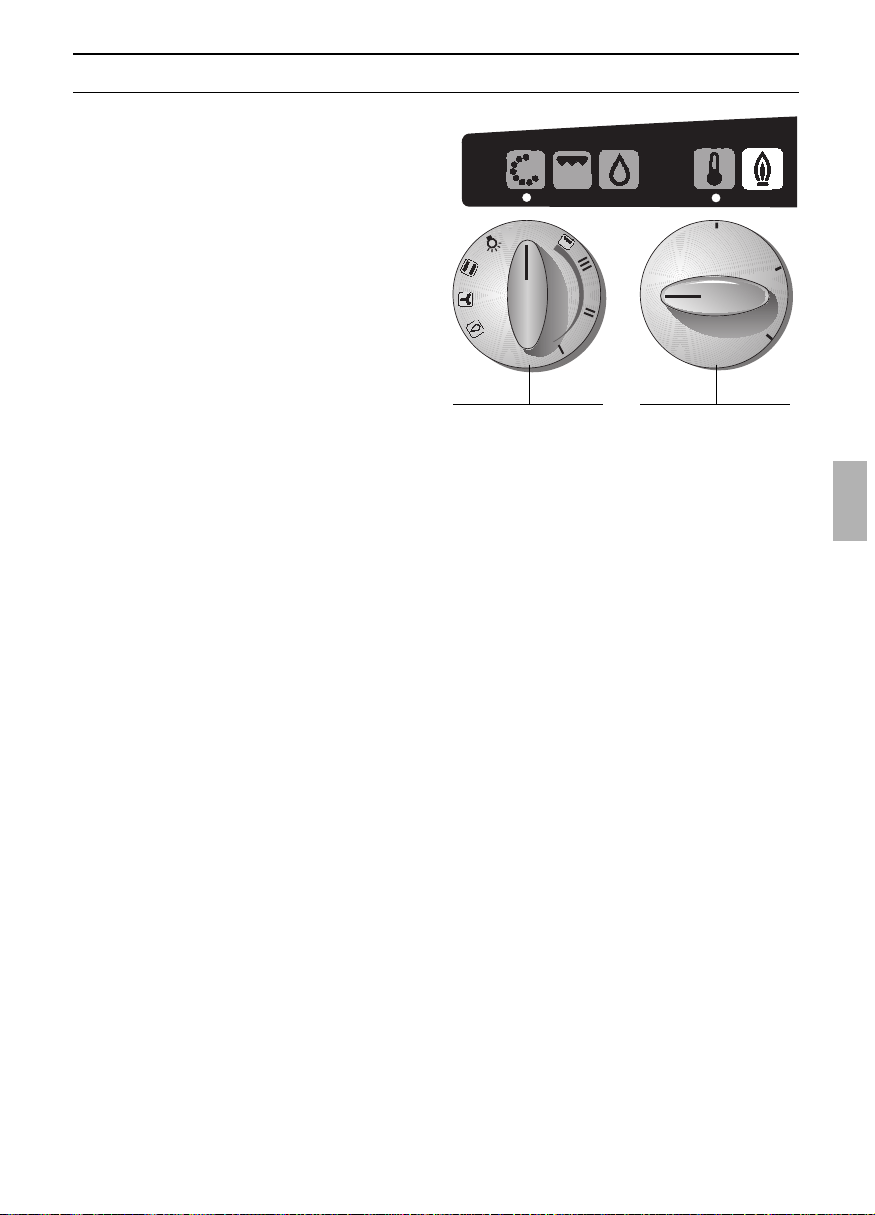
150
200
250
●
●
●
●
●
●
●
●
●
●
●
0
0
87
Encendido y regulación del quemador
Quemador del horno:
❑ El ajuste de la potencia se efectúa de
modo continuo.
❑ Carga nominal: 3,3 kW.
Encendido electrónico:
1. Seleccionar la modalidad de
calentamiento del horno (sistema
convencional
e o aire forzado v).
2. Pulsar el mando de muletilla (selector de
temperatura para el horno de gas);
girarlo hacia la posición de 250° C.
❑ El encendido electrónico está
activado mientras se esté apretando
el mando de muletilla.
❑ Prestar atención, sin embargo, a no
accionarlo durante más de 15
segundos.
3. Tras encenderse el quemador,
mantenga el mando de muletilla
apretado unos 5 a 7 segundos más.
❑ El encendido correcto del quemador
del horno se puede comprobar
también de la iluminación
permanente del piloto de aviso.
4. Antes de soltar el mando de muletilla,
púlselo una vez fuertemente.
5. En caso de no producirse el encendido
del quemador o de apagarse la llama,
abrir la puerta del horno. Interrumpa el
proceso de encendido durante 1 minuto
aproximadamente.
6. Para desconectar el quemador, girar
los mandos selectores de temperatura y
de funciones a la posición cero.
Piloto de aviso para funcionamiento
del horno de gas:
❑ El piloto de aviso destella cuando se ha
ajustado una temperatura a través del
mando selector de la temperatura, pero
aún no se ha producido el encendido
del horno o se ha interrumpido la
alimentación de gas del horno.
❑ El piloto de aviso para el funcionamiento
del horno de gas se ilumina al estar el
horno en funcionamiento.
Mando selector de
funciones
Mando selector de
temperatura para
el horno

88
Funciones del horno
Sistema de calentamiento
convencional ——————————
e
El quemador del horno genera el calor
necesario, que es transmitido por proceso
de irradiación a los alimentos y productos
que se desean asar u hornear.
Horneado y asado sólo es posible en un
piso.
Las ventajas:
– Adecuado para hacer pasteles
húmedos, pizzas, quiches
– Posibilidad de hornear pan
Aire caliente forzado (circulante)——
v
Un ventilador instalado en la pared de
fondo del horno se encarga de hacer
circular el aire caliente por el interior del
horno, lográndose así una transmisión
óptima del calor a los alimentos.
Las ventajas:
– Menor acumulación de suciedad en
el horno
– Posibilidad de hornear y asar en varios
pisos al mismo tiempo
–Tiempos de calentamiento del horno
más cortos
– El horno trabaja con menores
temperaturas
– Descongelación cuidadosa
de alimentos
– Posibilidad de esterilizado
Asador electrico ————————— F
Asado con grill de superficie:
❑ El cuerpo de calefacción instalado en la
parte superior del horno genera el calor
que, mediante proceso de radiación, es
transmitido a los alimentos.
Las ventajas:
– Particularmente apropiado para asar
trozos o piezas de carne pequeños y no
muy gruesos, como por ejemplo filetes
o salchichas, así como pescado,
verduras y emparedados.
Sistema de limpieza EasyClean ——
x
Con objeto de facilitar las tareas de
limpieza del interior del horno, su aparato
dispone de un sistema de limpieza auxiliar.
Mediante la evaporación automática de
una solución detergente adecuada, los
restos de alimentos acumulados o
incrustados sobre las superficies
esmaltadas del horno son ablandados
gracias a la acción conjunta del calor y el
vapor de agua, pudiéndose concluir la
limpieza con gran facilidad y rapidez. Para
una información más detallada al respecto,
véase el capítulo »Limpieza y cuidados«.
Emplear esta opción sólo con el horno frío.
Las ventajas:
– Facilidad de limpieza del horno
–Preservación de las superficies esmaltadas
– Limpieza respetuosa con el medio
ambiente

89
Conexión y desconexión del horno
Calor residual del horno:
❑ Para aprovechar el calor residual del
horno se puede apagar éste, según el
tipo y naturaleza de los alimentos o
productos que se estén horneando,
unos 5 a 10 minutos antes de cumplirse
el tiempo de horneado previsto.
Advertencia importante:
❑ Al encender el quemador del horno, el
ventilador de refrigeración se pone en
marcha. Esto se percibe a través de un
ligero zumbido.
En caso de no funcionar el
ventilador a causa de una avería o al
producirse un corte en el suministro de
corriente, desconectar inmediatamente
el horno (si estuviera funcionando) o no
ponerlo en marcha.
❑ Entre el cuerpo del horno y el panel de
llaves de gas puede salir vaho caliente.
En caso de cerrar u obstruir la salida
de vahos del horno, pueden producirse
perturbaciones en el funcionamiento
correcto del quemador del horno.
Ventilador de refrigeración:
❑ Con objeto de facilitar el enfriamiento del
horno, el ventilador puede continuar
funcionando durante un cierto tiempo
después de haber desconectado el
horno.
Ajustar la temperatura del horno:
❑ El ajuste se efectúa de modo continuo.
❑ La iluminación interior del horno se
conecta y desconecta al mismo tiempo
que se gira el mando selector de
funciones.
❑ Para conectar la iluminación interior del
horno sin estar éste en funcionamiento,
girar el mando de selector de funciones
hasta el símbolo
a
.
❑ Seleccionar primero el sistema de
calentamiento que se desee emplear
(sistema convencional
e
o aire caliente
forzado
v
).
Encender el quemador del horno de gas
y ajustar la temperatura necesaria
(véanse la respecto las tablas de
cocción y asados).
Aconsejamos seleccionar en el primer
ensayo práctico con el horno las
temperaturas más bajas recomendadas
en la tabla.
Calentamiento previo:
❑ En la mayoría de los casos no es
necesario efectuar el calentamiento
previo del horno.
❑ En caso de ser necesario el
calentamiento previo del horno, éste se
efectúa ajustando la misma temperatura
con la que se horneará (véase al
respecto la tabla de horneado).
Duración del ciclo de precalentamiento
del horno: 10 minutos.

90
Horneado
Hornear en moldes
❑ Colocar los moldes siempre sobre la
parrilla, fijándose que ocupen el
centro del horno.
❑ Utilizar para los trabajos de horneado
sólo moldes o bandejas pasteleras
de color claro.
❑ Girando la parrilla abombada, se puede
graduar la altura de los pisos (se
pueden ajustar alturas intermedias).
❑ El pastel está muy tostado por abajo:
Verificar la altura de la parrilla. Reducir el
tiempo de horneado; ajustar una
temperatura más baja.
❑ El pastel está muy claro:
Verificar la altura de la parrilla. Prolongar
el tiempo de horneado o seleccionar un
molde de chapa negra.
Hornear en bandejas:
❑ La parte oblicua de la bandeja de
horneado debe mostrar siempre hacia la
puerta del horno.
❑ Intorduzca siempre las bandejas en el
horno hasta el tope.
❑ Se aconseja utilizar preferentemente las
bandejas originales del fabricante.
Advertencias:
❑ El tostado de los alimentos puede ser
influido a través de los ajustes de la
temperatura del horno.
❑ Si el pastel se aplasta al sacarlo del
horno, deberá utilizarse la vez próxima
menos líquido, seleccionar un tiempo de
horneado más largo o ajustar una
temperatura más baja.
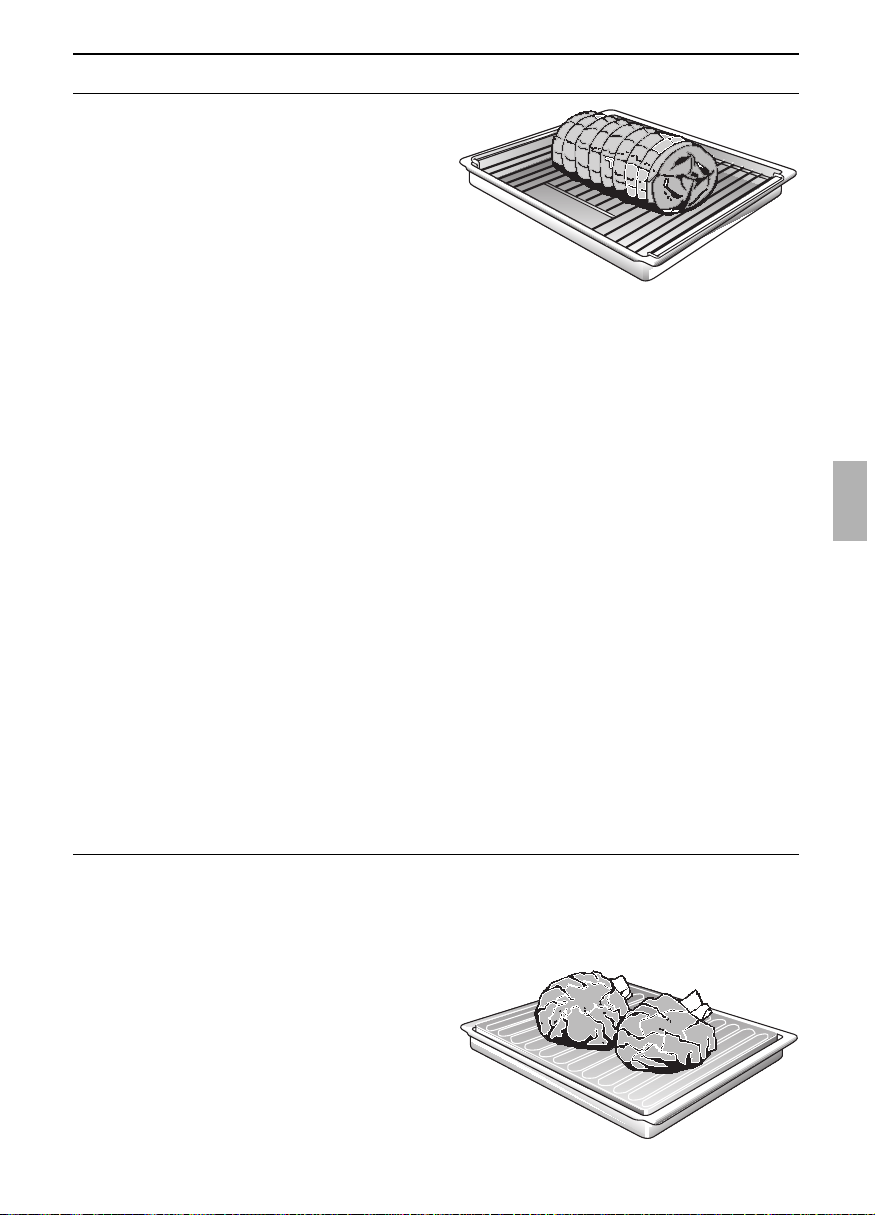
91
Asado
Asar con aire caliente
forzado v o con calor
superior e inferior e
Advertencias:
❑ Colocar la parrilla en la bandeja
universal recogedora de grasa.
Introducirla conjuntamente con ésta
en el mismo piso (altura).
❑ Los trozos de carne a partir de un peso
de 750 gramos se pueden asar de modo
particularmente económico en el horno.
❑ Asar en recipientes abiertos:
Enjuagar la bandeja universal o los
utensilios de asado que se vayan
a utilizar con agua. Colocar la carne
sobre los mismos.
❑ Para carnes y aves con grasa deberá
ponerse, según el tamaño de la pieza,
entre
1
/
8
y
1
/
4
litro de agua en la bandeja
universal. Untar las carnes magras con
grasa a discreción, o mecharlas con una
lonja de tocino.
❑ Una buena salsa se puede hacer con el
«fondo« o jugo del asado recogido
y concentrado en la bandeja. Para ello,
agregar agua caliente al mismo para
disolverlo, ponerla a cocer y agregarle
fécula para espesarla. En caso necesario,
pasarla por un tamiz.
❑ Meter la carne en el horno frío (no hace
falta calentarlo previamente = Ahorro de
energía).
❑ Asado en recipiente cerrado
(cacerola):
Colocar la carne, ya se trate de un trozo
de carne en una cacerola adecuada
para el asado y cubrirla con la tapadera.
Introducirla en el horno, colocándola
sobre la parrilla.
Aconsejamos preparar el asado de
vacuno en una cacerola cerrada.
Consejos prácticos:
❑ Utilizar sólo recipientes con asas
resistentes a las elevadas temperaturas
del horno.
❑ Preparar los trozos de carne grandes
directamente en la bandeja universal, sin
utilizar la parrilla.
❑ Los trozos de asado más pequeños se
pueden preparar con papel de aluminio.
Para ello se corta un trozo de papel de
aluminio en las medidas aproximadas de
la parrilla, se la da una forma con los
bordes elevados por los laterales, y se
coloca sobre la parrilla.
❑ Una vez transcurrido el tiempo de asado
prescrito, dejar reposar la carne durante
unos 10 minutos aproximadamente en
el horno desconectado y cerrado.
Asar con la parrilla de asado
(Disponible como accesorio opcional en el
comercio especializado del ramo)
Con aire caliente forzado
v
, para grandes
trozos de carne con grasa.
❑ Colocar la parrilla en la bandeja universal
recogedora de grasa. La parrilla contri-
buye a evitar que el horno quede sucio.
❑ La grasa y el jugo del asado son
recogidos en la bandeja universal
❑ Con la parrilla de asado puede cocinarse
la carne a una temperatura algo superior
a la indicada en la correspondiente tabla
o receta, para el caso de de desear que
la carne tenga una corteza crujiente.
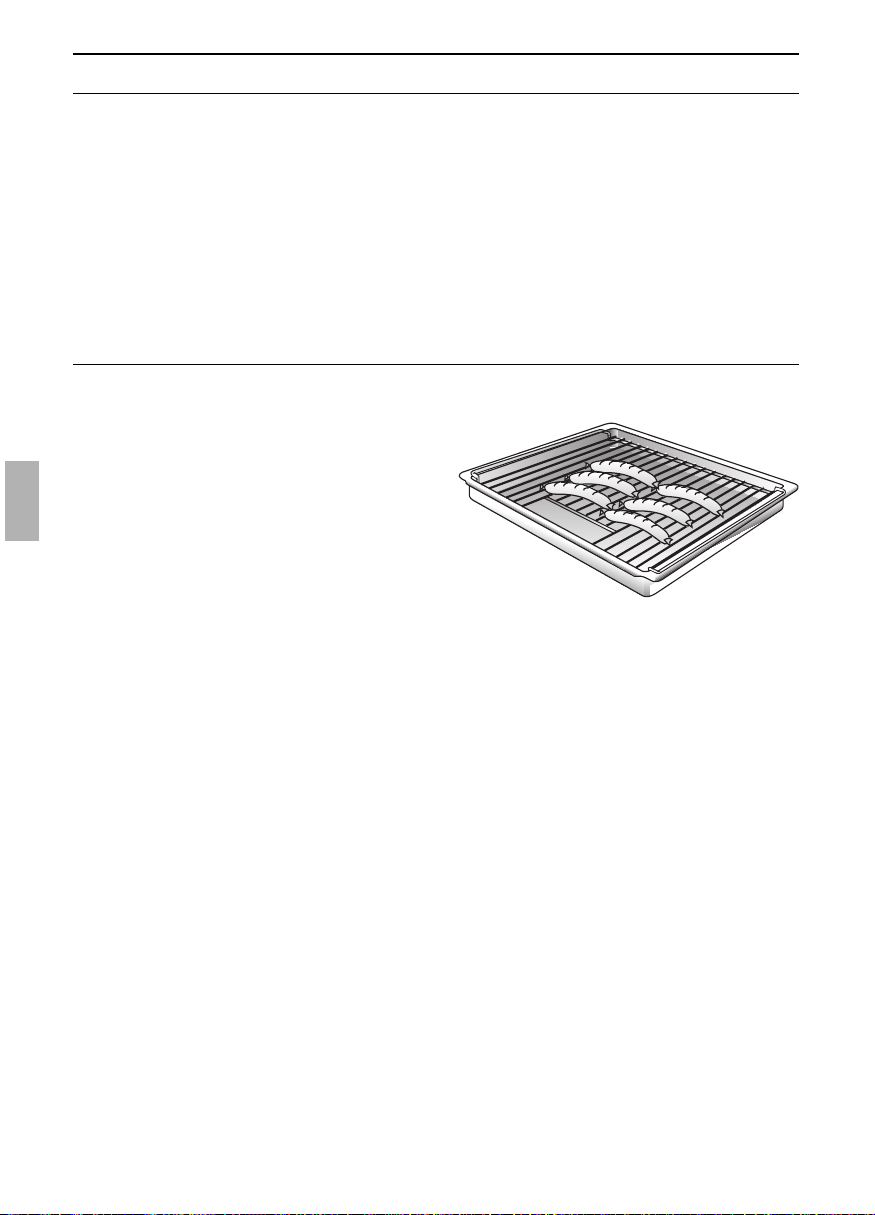
92
Asado al grill
❑ Colocar siempre la carne en el centro
del parrilla.
❑ Si el cuerpo de calefacción del grill se
desconectara, ello es debido a la
activación del circuito protector contra
sobrecalentamiento. El cuerpo de
calefacción volverá a conectarse al cabo
de unos breves instantes.
❑ Colocar la parrilla en la bandeja
universal recogedora de grasa.
Introducirla conjuntamente con ésta
en el mismo piso (altura).
Prestar atención al asar al grill.
! Mantener alejados los niños de la
cocina durante las operaciones.
Atención:
❑ Asar al grill con la puerta cerrada.
❑ Las temperaturas del asado al grill
pueden regularse.
❑ Introducir siempre conjuntamente la
bandeja universal y la parrilla.
Asado al grill, sistema clásico
de superficies F
Para platos pequeños y planos.
❑ Utilizar siempre conjuntamente la parilla
yla bandeja universal.
❑ Dar la vuelta a la pieza a asar una vez
transcurridas las dos terceras partes del
tiempo de asado prescrito.
❑ Untar ligeramente la parrilla y el alimento
de aceite.

93
Advertencias y conejos prácticos
Para ahorrar energía:
❑ Calentar el horno previamente sólo en
caso de exigirlo la receta del plato a
cocinar.
❑ Los moldes oscuros absorben mejor el
calor.
❑ Calor residual: En los procesos de
horneado o asado prolongados, puede
desconectarse el horno 5 a 10 minutos
antes de alcanzar el tiempo de
horneado prescrito.
Para el horneado:
❑ El pastel colocado sobre la bandeja no
está suficientemente cocido por abajo
❑ El pastel de molde está demasiado claro
por abajo.
❑ El pastel o las pastas están demasiado
tostadas por abajo.
❑ El pastel está demasiado seco.
❑ El pastel está falto de consistencia
o pastoso por dentro, o la carne no está
bien hecha por dentro.
❑ Al trabajar con la modalidad «Aire
caliente forzado», los pasteles en
moldes redondos o rectangulares se
tuestan demasiado por detrás.
❑ Al preparar alimentos horneados
o asados muy húmedos p.e. tarta de
frutas o asados con agua, se produce
gran cantidad de vapor de agua en el
horno, que se precipita sobre la puerta
del mismo, pudiendo gotear sobre el
piso o el mueble empotrado.
Retirar las bandejas de horneado o univer-
sales que no vayan a usarse, del horno.
No colocar el molde sobre la bandeja de
horneado, sino sobre la parrilla.
Colocar el pastel o las pastas en un piso
más elevado.
Aumentar algo la temperatura ajustada del
horno. Seleccionar un tiempo de horneado
más corto.
Reducir algo las temperaturas de horneado
o asado ajustadas.
Atención: Los tiempos de horneado
o asado no se pueden acortar aumentando
las temperaturas (alimentos tostados por
fuera, enteros o crudos por dentro).
Seleccionar unos tiempos de horneado
o asado más largos. Dejar reposar la masa.
Poner menos líquido en la masa.
No colocar el molde directamente delante
de las salidas de aire en la pared de fondo
del horno.
Abriendo varias veces por breve tiempo la
puerta del horno (una a dos veces en largos
tiempos de horneado o asado), puede
evacuarse el vapor de agua acumulado en
el interior del horno, con lo que se reduce
sensiblemente el peligro de goteo.

Descongelar y preparar al horno
Descongelar y preparar al horno con la modalidad
«Aire caliente forzado v»
Advertencias importantes:
❑ Para descongelar o cocer a fuego lento
alimentos congelados, utilizar sólo la
opción de aire caliente circulante.
❑ Observar las instrucciones e informa-
ciones de los fabricantes consignadas en
las envolturas de los alimentos
congelados.
❑ Los alimentos congelados que se han
descongelado (en particular carne) requieren
unos tiempos de cocción más cortos que los
alimentos frescos, dado que el proceso de
congelación desarrolla un efecto semejante a
una cocción previa.
❑ En caso de preparar carne congelada
directamente en el horno, hay que sumar el
tiempo necesario para la descongelación al
tiempo de cocción de la carne.
❑ Descongelar las aves congelades antes de
cocinarlas, dado que hay que vaciarlas
primero.
❑ Cocinar el pescado congelado a la misma
temperatura que el pescado fresco.
❑ Los alimentos cocinados, envasados en
bandejas de porciones de aluminio, se
pueden preparar simultáneamente en el
horno.
Descongelar:
Pisos:
Para 1 bandeja: Piso 3
Para 2 bandejas: Piso 1 + 3
❑ Los tiempos consignados sólo son
valores orientativos, que pueden variar en
función de la forma y cantidad de los
productos congelados.
❑ Descongelar los alimentos envueltos en
papel o envases de aluminio cerrado a
una temperatura de 130 – 140° C.
❑ Descongelar y calentar los productos de
panadería congelados a una temperatura
de 120 a 140° C. Untar ligeramente los
panes, panecillos y productos hechos con
levadura con agua, a fin de que salgan
más crujientes.
❑ Descongelar los pasteles congelados
secos planos a una temperatura de 160 –
170° C, durante 20 a 30 minutos.
❑ Descongelar pasteles congelados
húmedos planos (con capa de frutas)
auna temperatura de 160 – 170°C,
durante 30 a 50 minutos. Envolverlos en
papel aluminio para evitar que las frutas se
sequen.
❑ Descongelar y hornear los emparedados
congelados (ya preparados) a una
temperatura de 160 – 170°C, durante
20 minutos.
❑
Pizzas congeladas:
Ténganse presentes las indicaciones
que facilita el fabricante en el embalaje
de las mismas.
94

95
Limpieza y cuidados
Advertencias importantes:
❑ No utilizar agentes frotadores ni abrasivos, así como tampoco objetos rascadores para
limpiar la cocina.
❑ No eliminar los restos de alimentos quemados con objetos rascadores, sino ablandarlos
con un paño húmedo y agente lavavajillas.
❑ No utilizar limpiadores especiales (p.e. sprays) para limpiar elementos o partes de aluminio
o plástico.
Elementos esmaltados y de vidrio:
❑ Limpiarlos con una solución de agua
jabonosa caliente.
❑ Para limpiar el frontal del horno detrás
de la puerta, deberá desengancharse la
junta de goma de la puerta.
Frontal de acero inoxidable:
❑ En caso de utilizar limpiadores de uso
corriente para acero inoxidable, los
textos estampados sobre el mismo
pueden ser atacados por el agente.
❑ No utilizar esponjas abrasivas.
❑ Aplicar un lavavajillas de uso corriente
sobre un paño suave húmedo o una
gamuza para secar cristales.
Frente de cristal reluciente:
❑ No utilizar agentes o esponjas abrasivas.
❑ Utilizar un limpiacristales de uso
corriente.
– Aplicar el limpiacristales sobre un paño
suave húmedo o una gamuza para
secado de los cristales.
– No pulverizar el agente sobre el panel
de mandos.
Horno:
❑ Limpiar el horno inmediatamente
después de usarlo, en particular tras
asados normales o asados con grill. De
este modo se evita que se adhieran
e incrusten restos de alimentos.
Una vez que los restos de alimentos se
han quemado e incrustado repetidas
veces, sólo pueden eliminarse con
grandes dificultades.
❑ Al trabajar frecuentemente con el
sistema de circulación del aire caliente
se puede reducir la suciedad acumulada
en el mismo.
No limpie el horno en caliente con
limpiadores de hornos específicos para
limpieza en caliente.
❑ Al preparar y hornear pasteles o tartas
muy húmedas, deberá emplearse la
bandeja universal.
❑ Utilizar recipientes adecuados para
hacer asados.
❑ En caso de escaso grado de suciedad,
limpiar el horno estando aún templado
con una solución de lejía caliente. Dejar
la puerta abierta para que se seque.
Cristal de la puerta del horno
(Frontal de acero inoxidable):
❑ Con objeto de lograr una reducción de
la temperatura, el cristal interior de la
puerta del horno está dotado de una
capa termorreflectora.
❑ Esta capa no interfiere en absoluto la
buena visibilidad a través del cristal.
❑ Estando la puerta del horno abierta, la
capa reflectora puede aparecer como
una especie de velo de color claro.
Esto se debe a razones técnicas y no
tiene ningún efecto negativo sobre la
calidad y prestaciones del material.
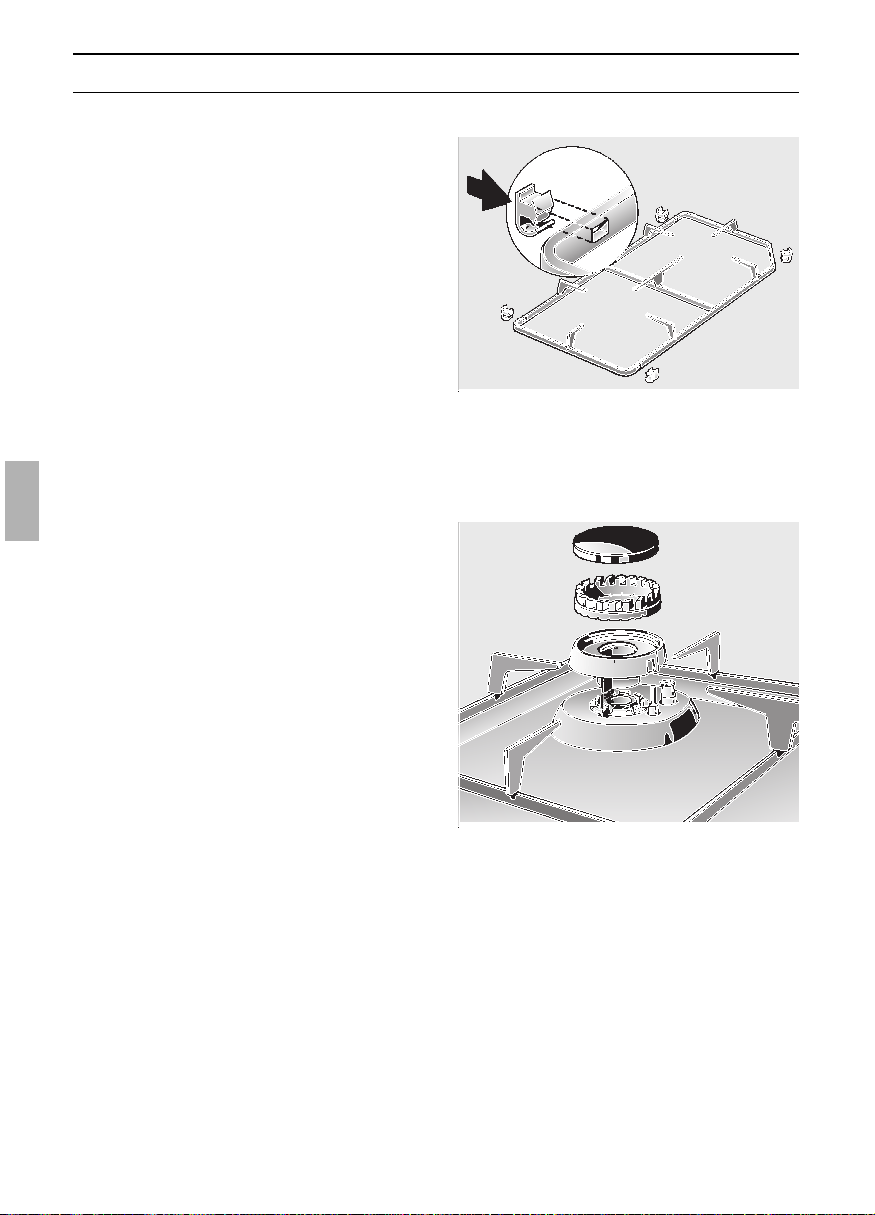
96
Limpieza y cuidados
Parrilla y encimera:
❑ La parrilla se puede retirar de la
encimera. Eliminar de la parrilla los
restos de alimentos incrustados o
quemados con agua jabonosa caliente.
Advertencia: La parrilla sólo se puede
colocar sobre la encimera estando en su
posición correcta.
❑ Para limpiar la encimera hay que retirar
la parrilla. Limpie la encimera con un
paño húmedo, secándola y
abrillantándola a continuación.
❑ Los soportes de goma adicionales para
la parrilla se pueden adquirir a través del
Servicio de Asistencia Técnica.
Quemadores de las zonas de cocción:
❑ Limpiar las tapas esmaltadas de los
quemadores con agua jabonosa
caliente.
❑ Limpiar cuidadosamente la bujía y la
rendija de encendido del dispositivo de
encendido electrónico con un paño
húmedo.
❑ Las piezas de metal no recubierto del
quemador pueden decolorarse con el
uso. Para su limpieza deberán
emplearse limpiadores de metal
apropiados para piezas de aluminio.
❑ ¡No lavar las piezas del quemador en el
lavavajillas!.
❑ Prestar atención al colocar las piezas del
quemador:
–a que éstas estén secas.
–a que estén niveladas.
–a que las llamas ardan con
regularidad en todo el perímetro del
quemador.
❑ Las tapas de quemador desniveladas
dificultan el proceso de encendido del
quemador, pueden provocar daños en el
quemador y originan un molesto olor a
gas.
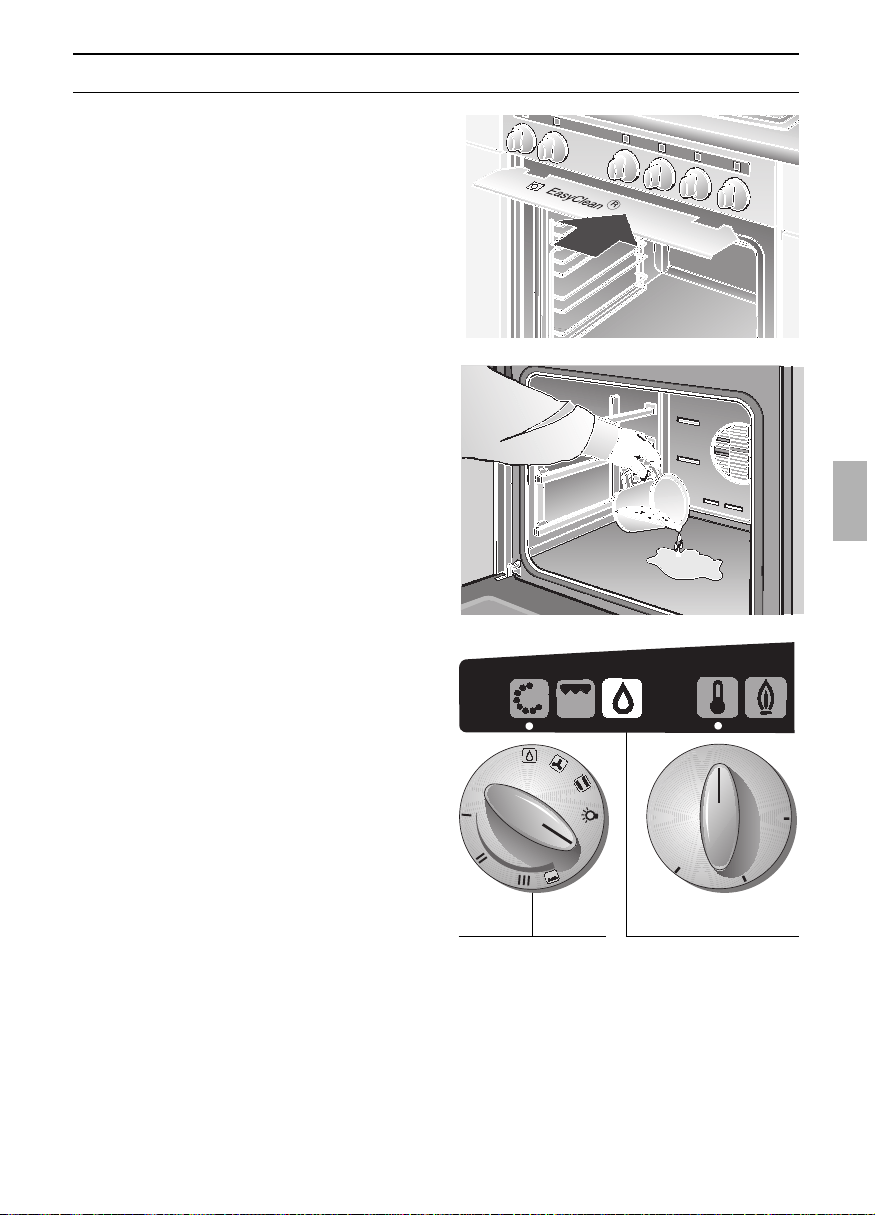
97
Limpieza y cuidados
Sistema de liempieza EasyClean: x
Con objeto de facilitar las tareas de
limpieza del interior del horno, su aparato
dispone de un sistema de limpieza auxiliar.
Mediante la evaporación automática de
una solución detergente adecuada, los
restos de alimentos acumulados o
incrustados sobre las superficies
esmaltadas del horno son ablandados
gracias a la acción conjunta del calor y el
vapor de agua, pudiéndose concluir la
limpieza con gran facilidad y rapidez. Para
una información más detallada al respecto,
véase el capítulo «Limpieza y cuidados».
Atención:
❑ Emplear esta opción sólo estando el
horno completamente frío.
❑ Utilizar sólo agua normal de red. ¡No
utilizar agua destilada!
❑ Con objeto de impedir que se empañen
el panel de llaves de gas, los mandos
selectores de las zonas de cocción y la
placa de trabajo encimera, deberá
colocarse la chapa protectora
suministrada con el aparato debajo del
panel de las llaves de gas.
Una vez concluidos los trabajos de
limpieza, retirar la chapa protectora.
Conexión de la función auxiliar:
1. Retirar del horno las bandejas para
horneado o asado. La parrilla puede
permanecer en el horno.
2. Verter sobre el fondo del horno
aproximadamente 0,4 l de agua con
algo de detergente (lavavajillas).
En caso de fuerte suciedad del horno,
se deja actuar la solucióm detergente
durante un tiempo más prolongado,
antes de conectar la función auxiliar de
limpieza del horno.
3. Cerrar la puerta del horno.
4. Girar el mando selector de funciones
hasta la posición
x
. El piloto de aviso
para la limpieza del horno se ilumina. Al
cabo de 21 minutos, el programa de
limpieza ha concluido y se produce un
señal acústica de aviso.
Desconexión de la función auxiliar:
Girar el mando selector de funciones a la
posición «0». El piloto de aviso para la
limpieza del horno se apaga.
Mando selector de
funciones
Piloto de aviso para la
limpieza del horno
150
200
250
●
●
●
●
●
●
●
●
●
●
●
0
0
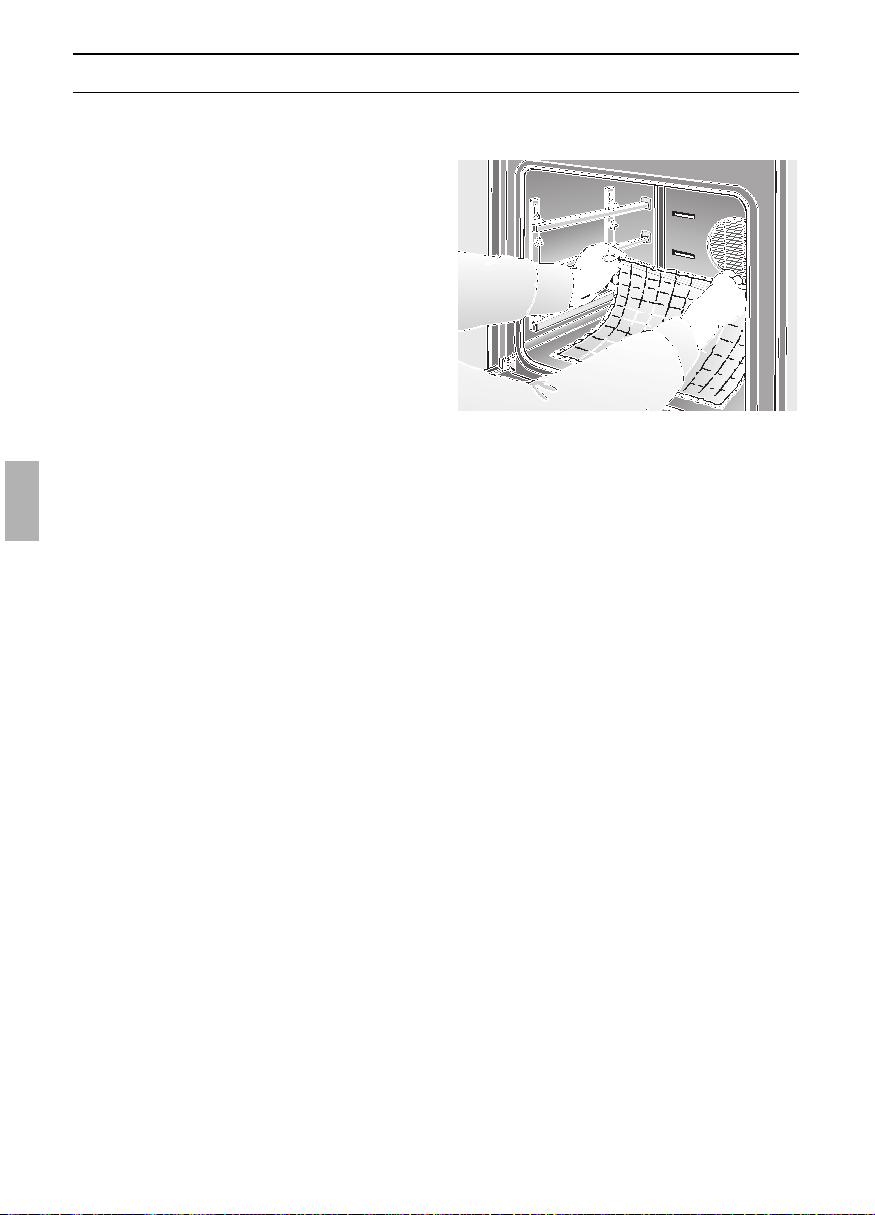
98
Limpieza y cuidados
Tras desconectar la función auxiliar
de limpieza:
Consejos y advertencias:
❑ No dejarla durante un período
prolongado (por ejemplo durante la
noche) en el interior del horno.
1. Abrir la puerta del horno y recoger al
agua residual que se encontrara en el
horno con un paño de esponja grande
absorbente.
2. Limpiar el horno con el paño de esponja
empapado con la solución detergente,
con un cepillo blando o un estropajo de
plástico.
Los restos de suciedad fuertemente
adherida o incrustada pueden eliminarse
con un raspador para placa
vitrocerámica.
Atención: Manejar con sumo cuidado el
raspador, no aplicándolo en un ángulo
excesivamente plano, dado que podría
ocasionar daños en el esmalte.
3. Las manchas de cal se pueden eliminar
con un paño empapado en vinagre.
4. Enjuagar con agua limpia y secar el
horno con un paño seco (secar
asimismo la parte inferior de la junta del
horno).
Consejos y advertencias:
❑ En caso de fuerte grado de suciedad
del horno, se puede repetir la operación
una vez que se ha enfriado el horno.
❑ En caso de encontrarse el horno muy
sucio de grasa tras preparar platos de
asado o al grill, aconsejamos aplicar
primero un agente lavavajillas sobre la
suciedad antes de conectar la función
de limpieza del horno.
❑ Dejar la puerta del horno entreabierta,
enclavada en ángulo de 30°, durante 1
hora, a fin de que se sequen bien las
superficies esmaltadas.
Secado rápido:
(con la puerta del horno cerrada)
1. Gire el selector de funciones a la
posición
v
.
2. Encienda el quemador del horno con
ayuda del mando selector de la
temperatura y ajuste el valor de 150° C.
3. Duración: 2 minutos.
4. Girar a continuación los mandos
selectores de temperatura y de
funciones a la posición «0».
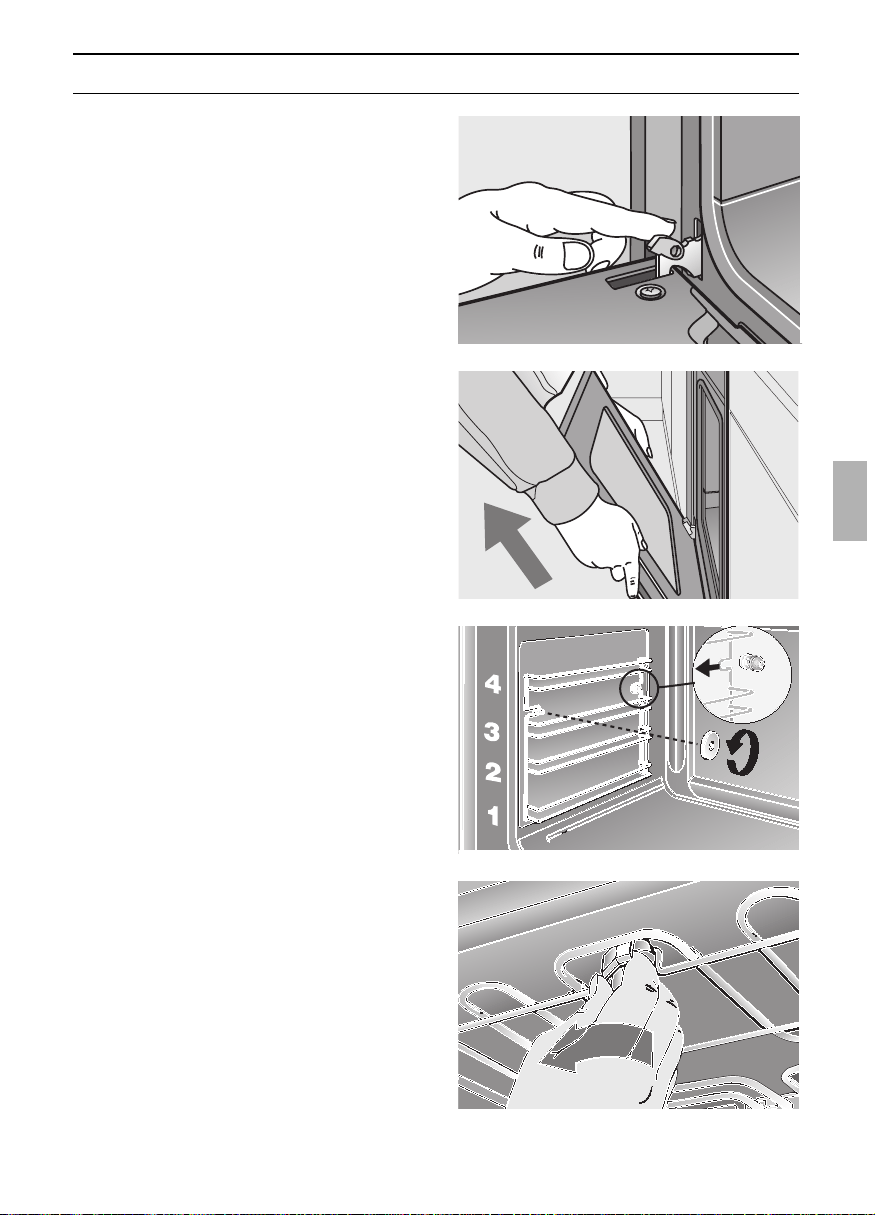
99
Limpieza y cuidados
Horno:
Advertencia: Para una limpieza fácil del
horno después de la activación de la
función de limpieza automática, el aparato
dispone de las siguientes opciones:
Desmontaje de la puerta del horno
Desenganchar la puerta:
1. Abrir la puerta completamente.
2. Abatir los bloqueos de cierre a izquierda
y derecha de la puerta.
3. Colocar la puerta en posición inclinada y
extraerla hacia adelante de su sujeción.
Enganchar la puerta:
1. Colocar las bisagras a derecha e
izquierda en sus respectivos
alojamientos y abrir la puerta hacia
abajo.
2. Abatir los bloqueos de cierre de las
bisagras.
3. Cerrar la puerta del horno.
Conectar la iluminación interior
del horno:
❑ Girar el mando selector de funciones a
la posición
a.
Retirar la rejilla suspendida:
1. Soltar y extraer los tornillos moleteados.
2. Extraer cuidadosamente la rejilla
suspendida.
Abatir el cuerpo de calefacción
(resistencia)
Atención: El cuerpo de calefacción tiene
que estar completamente frío.
1. Desenclavar el mecanismo de
enclavamiento que se encuentra en la
parte superior del horno.
Atención: Estando el cuerpo de
calefacción en posición desenclavada y
abatida, no conectarlo ni colocar cargas
sobre el mismo.
2. Tras efectuar la limpieza de la resistencia,
devolverla a su posición normal. Bloquear
el enclavamiento de la resistencia.
1.
2.
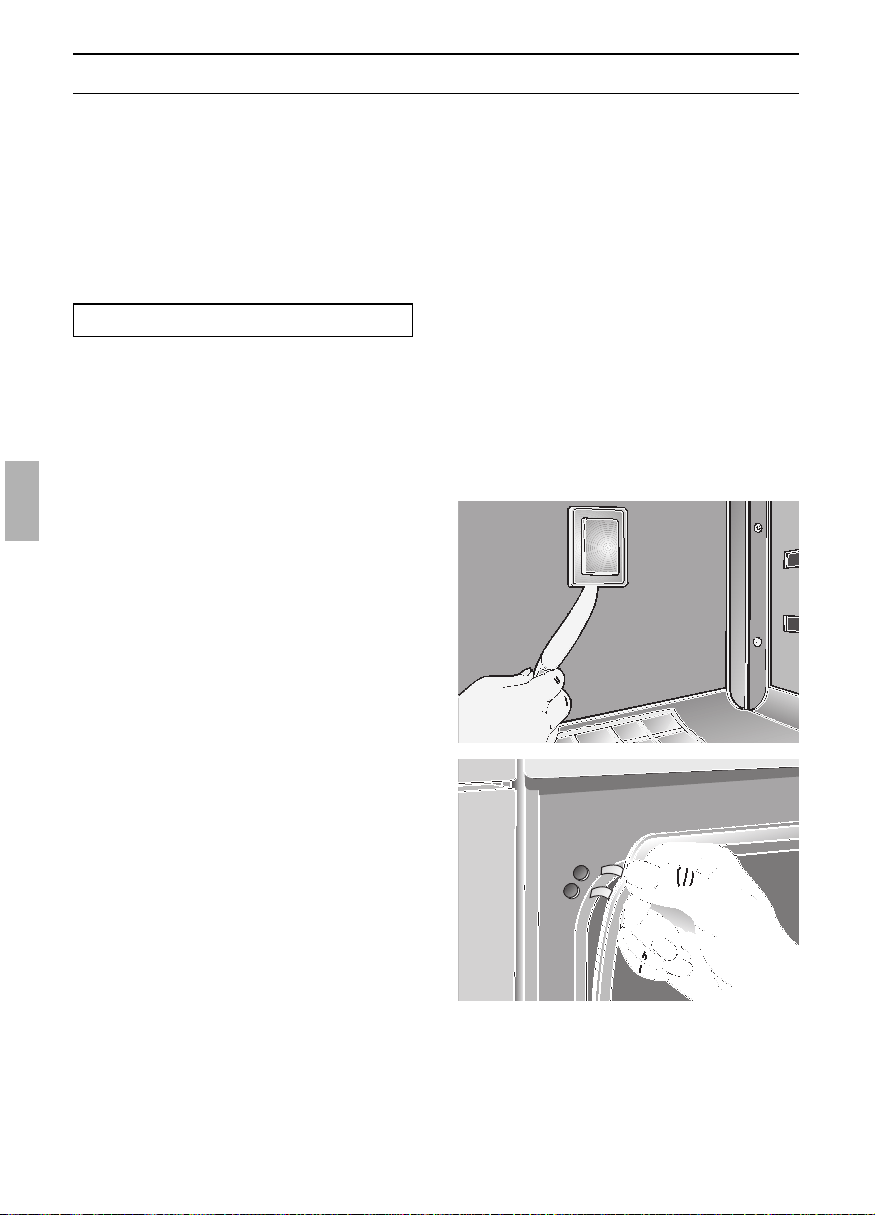
100
En caso de perturbaciones o de averías
que Vd. misma no pudiera subsanar,
deberá avisar al Servicio Técnico
Postventa. Las señas figuran en la
correspondiente guía.
Atención: No olvide que Vd. gasta su
dinero si avisa al Servicio Postventa sólo
por haber cometido un error de manejo. Al
avisar al Servicio Técnico Postventa,
deberá indicar:
Estos datos e indicaciones figuran en la
placa de características del aparato. La
placa de características del aparato se en-
cuentra emplazada detrás de la puerta del
horno, en el lateral inferior izquierdo del
horno.
Sustituir la lámpara de iluminación del
horno:
Atención: ¡El aparato debe estar sin
corriente!
1. Colocar un paño sobre el fondo del
horno frío, para evitar posibles daños del
mismo.
2. Retirar la tapa de vidrio. Para ello se
introduce un cuchillo o un objeto
semejante entre la tapa de vidrio y el
bastidor de soporte.
3. Sustituir la lámpara fundida.
– Lámpara modelo E 14, 220 – 235
voltios, 25 watios, resistente
a temperaturas hasta 300° C
– Estas lámparas las puede adquirir en
el Servicio Postventa Oficial o en el
comercio especializado del ramo.
Sustituir la junta de goma de la puerta
del horno:
1. Retirar la junta de goma deteriorada
desenganchándola simplemente de sus
grapas de sujeción.
Una junta de goma nueva la puede
adquirir en el Servicio Postventa Oficial.
Nº E FD
Localización y subsanamiento de averías
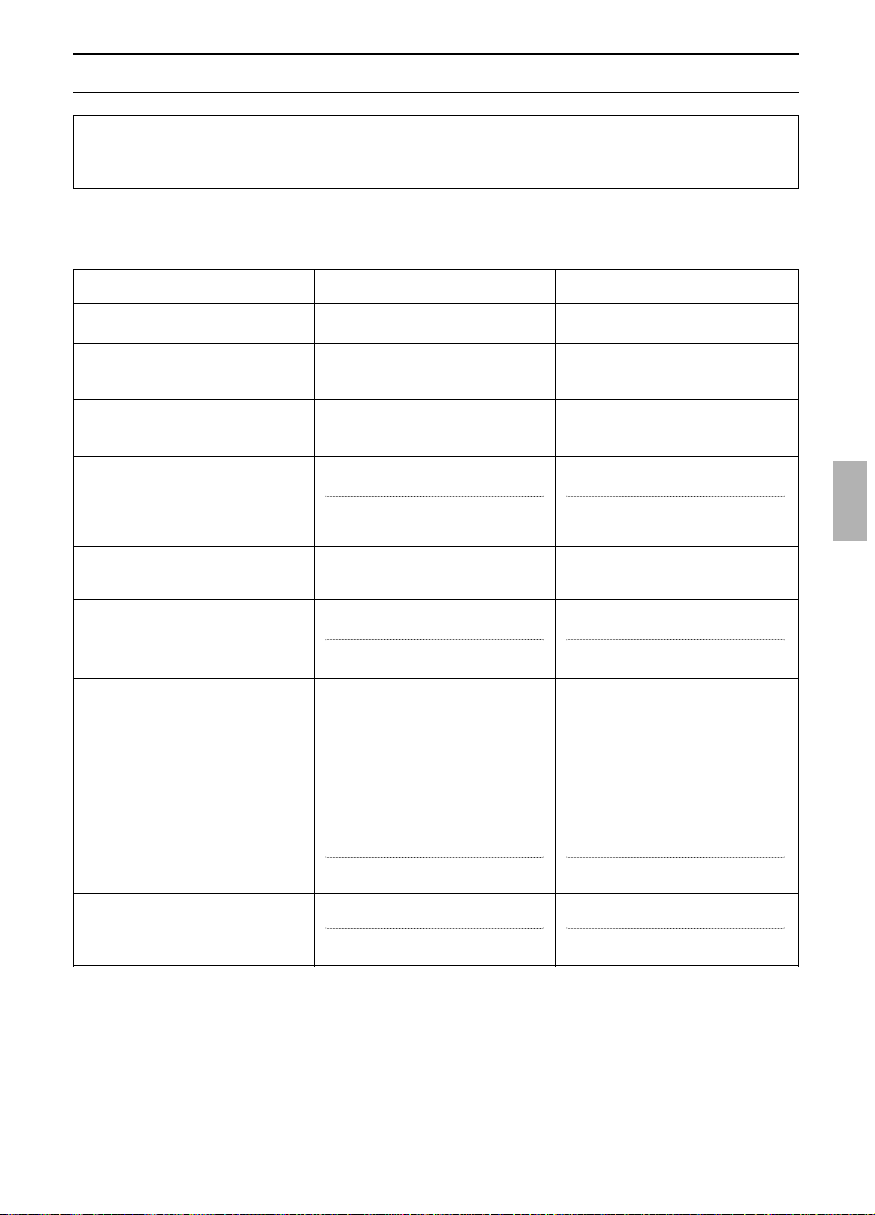
101
¿Qué hacer en caso de que algo no funcione?
Hay pequeñas anomalías que no suponen necesariamente la existencia de una avería y, por consiguiente. no
requieren la intervención del Servicio de Asistencia Técnica. Con frecuencia se trata de pequeñas anomalías
fáciles de subsanar. Para evitar una intervención innecesaria del servicio técnico, compruebe si la avería o fallo
que usted ha constatado se encuentra recogida en los siguientes consejos y advertencias.
Advertencia importante:
Los trabajos que fuera necesario realizar en los sistemas electrónicos sólo deberán ser ejecutados por técnicos especia-
listas del ramo.
Antes de iniciar cualquier trabajo en el aparato, éste deberá ser desconectado de la red eléctrica a través de la caja de
fusibles automáticos o extrayendo el fusible de la caja de fusibles de su piso o vivienda.
¿Qué hacer . . . Posible causa Modo de subsanamiento
. . . en caso de perturbación general del
funcionamiento eléctrico del aparato?
El fusible está defectuoso.
Verificar el fusible de la caja. En caso
de defecto, sustituirlo por uno nuevo.
. . . si se produce una fuerte distribu-
ción o acumulación en un solo lado
de líquido o masa semilíquida?
El aparato está desnivelado. Nivelar el aparato o el mueble en
donde se encuentra integrado.
. . . si se produce una avería en las
funciones electrónicas del horno?
Se han registrado impulsos eléctri-
cos (por ejemplo a causa de un
rayo).
Reajustar las funciones afectadas.
. . . cuando el pastel bajo sale
demasiado claro por abajo?
El pastel se ha colocado en una altu-
ra inadecuada.
Colocar el pastel a una altura de hor-
neado más baja.
. . . cuando el pastel de molde sale
demasiado claro por abajo?
El molde se ha colocado sobre la
bandeja pastelera o la bandeja para
el grill.
Colocar el molde sobre la parrilla.
. . . cuando el pastel está demasiado
seco?
Se ha ajustado una temperatura de
horneado demasiado baja.
Ajustar una temperatura más eleva-
da para el horno.
. . . cuando el pastel está falto de
consistencia o pastoso por dentro, o
la carne no esta bien hecha por den-
tro?
Se han ajustado unas temperaturas
de horneado o asado demasiado
elevadas.
Reducir la potencia (temperatura) de
horneado o asado ajustada.
Atención:
Los tiempos de horneado o asado
no se pueden acortar aumentando
las temperaturas (alimentos tosta-
dos por fuera, enteros o crudos por
dentro).
. . . cuando el pastel o las pastas
están demasiado tostadas por
abajo?
Se han usado bandejas pasteleras
oscuras.
Usar bandejas pasteleras claras.
El horneado tarda demasiado tiem-
po.
Avisar al Servicio de Asistencia Téc-
nica y hacer revisar el aparato.
En el horno hay introducidas diferen-
tes bandejas que no se necesitan.
Retirar del horno las bandejas de
horneado o de grill que no vayan a
usarse.
Se han ajustado unos tiempos de
horneado o asado demasiado cor-
tos.
Seleccionar unos tiempos de hor-
neado o asado más largos. Dejar
reposar la masa.
Se ha agregado demasiado líquido a
la masa del pastel.
Poner menos líquido en la masa.
El pastel se ha introducido en una
altura inadecuada.
Colocar el pastel o las pastas en una
altura de horneado superior.

102
¿Qué hacer en caso de que algo no funcione?
¿Qué hacer . . . Posible causa Modo de subsanamiento
. . . cuando las tapas de los quema-
dores adquieren un aspecto poco
atractivo?
Proceso normal de acumulación de
suciedad.
Limpiar las tapas de los quemadores
con un limpiametales adecuado
también para objetos de aluminio.
. . . cuando la parrilla esmaltada de la
encimera se ha puesto basta en las
zonas de los quemadores?
. . . cuando, tras instalar el aparato,
el quemador funciona con irregulari-
dad?
Fenómeno normal debido a las altas
temperaturas.
Es inevitable. Su funcionamiento no
es afectado en absoluto por este
fenómeno.
La geometría de las llamas es irregu-
lar a causa del ajuste incorrecto del
gas.
Verificar el ajuste del aparato al tipo
de gas empleado por el distribuidor
o el técnico que efectuó el montaje
del aparato.
. . . cuando la geometría de las lla-
mas de los quemadores está altera-
da?
Montaje incorrecto de las piezas del
quemador.
Montar correctamente las piezas del
quemador.
. . . cuando no funciona el encendi-
do electrónico para los quemadores
de las zonas de cocción?
Se han acumulado restos de alimen-
tos incrustados o detergentes entre
la bujía de encendido y el quemador
de las zonas de cocción.
Eliminar cuidadosamente la sucie-
dad acumulada en la rendija existen-
te entre la bujía de encendido y el
quemador de la zona de cocción;
limpiarla.
. . . cuando de repente hay que apre-
tar durante más tiempo la llave de
muletilla para encender el quema-
dor?
. . . cuando se apaga la llama
despúes de haber encendido el que-
mador?
. . . cuando el tamaño de las llamas
es mayor de lo acostumbrado o se
percibe olor a gas?
Sensor doblado
Piezas del quemador montadas
incorrectamente.
Se ha pulsado el mando de muletilla
muy poco tiempo.
Colocar cuidadosamente el sensor
en posición vertical.
Montar correctamente las piezas del
quemador.
Apretar el mando de muletilla un
poco de más tiempo.
Se ha pulsado el mando de muletilla
sin fuerza suficiente.
Apretar fuertemente el mando de
muletilla antes de soltarlo.
El reductor de presión en la bombo-
na de gas está defectuoso.
Parar el aparato inmediatamente.
Cerrar la válvula de la bombona de
gas. Encargar la verificación del apa-
rato y la sustitución a un técnico
especialista del ramo.
. . . cuando una de las llaves de paso
del gas para las diferentes zonas de
cocción está agarrotada o incluso
bloqueada?
. . . cuando la geometría de las lla-
mas se diferencia fuertemente de la
acostumbrada?
Hay que efectuar trabajos de man-
tenimiento.
Avisar al Servicio de Asistencia Téc-
nica para que efectúe el manteni-
miento del aparato.
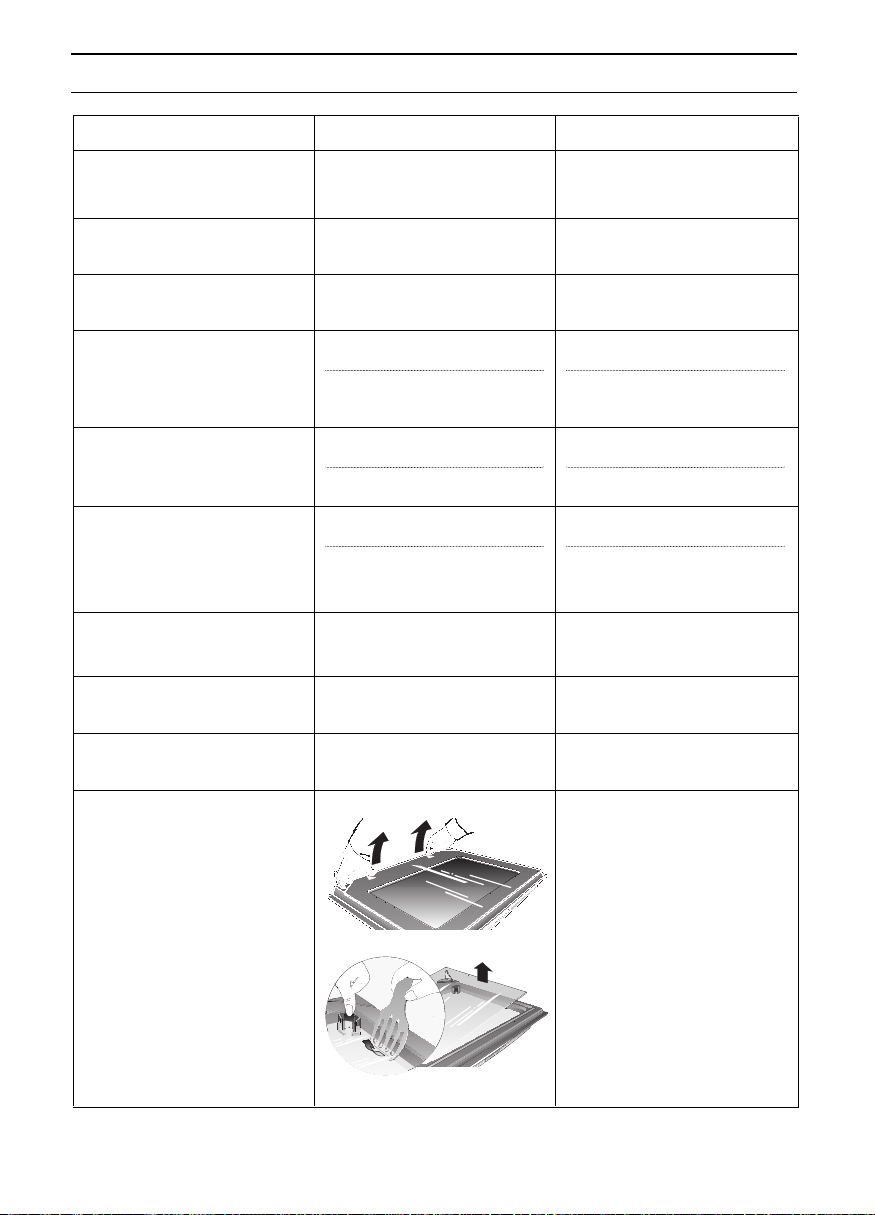
103
¿Qué hacer en caso de que algo no funcione?
¿Qué hacer. . . Posible causa Modo de subsanamiento
. . . cuando la llama del quemador se
apaga constantemente?
Ajuste incorrecto del aparato al tipo
de gas.
Verificar el ajuste del aparato al tipo
de gas empleado por distribuidor o
el técnico que efectuó el montaje del
aparato.
. . . cuando la llama del quemador
del horno se apaga de repente?
Se ha cerrado la puerta del horno
con gran rapidez.
Cerrar lentamente la puerta del
horno mientras éste esté en funcio-
namiento.
. . . cuando la temperatura del horno
desciende fuertemente?
El termostato está defectuoso. Encargar el mantenimiento del apa-
rato al Servicio de Asistencia Técni-
ca.
. . . cuando no se activa el ventilador
de refrigeración del horno?
Se ha producido un corte en el sumi-
nistro de corriente.
Verificar los fusibles de la instalación
eléctrica de la vivienda.
El ventilador está defectuoso. Encargar el mantenimiento del apa-
rato al Servicio de Asistencia Técni-
ca.
. . . cuando se producen humos
durante los ciclos de asado o asado
al grill?
Se ha ajustado una temperatura de
asado excesivamente elevada.
Ajustar una temperatura de asado
más baja.
Distancia insuficiente entre el asador
y las piezas que se desean asar.
Aumentar la distancia entre el asador
y las piezas de asado.
. . . cuando se produce una fuerte
acumulación de suciedad en el inte-
rior del horno durante el masado o el
asado al grill?
Se ha ajustado una temperatura de
asado excesivameente elevada.
Ajustar una temperatura de asado
más baja.
La parrilla y la bandeja para asado al
grill se han colocado incorrectamen-
te.
Colocar la parrila dentro de la ban-
deja para grill; introducirlas conjunta-
mente en una misma altura en el
horno.
. . . cuando se empañan el cristal o la
mirilla de la puerta del horno?
Fenómeno normal. Se debe a las
diferencias de temperatura existen-
tes.
Conectar el horno durante unos 5
minutos, a 100°C de temperatura.
. . . cuando se produce agua de con-
densación?
Fenómeno normal, por ejemplo en el
caso de pasteles con guarniciones
muy húmedas (fruta) de piezas de
asado de grandes dimensiones.
Secar el agua de condensación tras
concluir el funcionamiento del horno.
… si al cabo de algún tiempo se ha
acumulado suciedad por la cara
interior de los cristales de la puerta
del horno?
Suciedad normal.
Desenganchar la puerta del horno
y colocarla, con la parte frontal hacia
abajo, sobre una superficie suave y
limpia.
Sujetar el cristal exterior de la puer-
ta junto a las bisagras, desenclavar-
lo hacia arriba y retirarlo de la puerta.
En las puertas de horno con tres crista-
les:
Desencajar por las esquinas el cri-
stal interior y levantarlo con ayuda,
por ejemplo, de una espátula de plá-
stico o de madera.
Montaje tras la limpieza:
Colocar el cristal interior en su
emplazamiento; encajarlo.
Enganchar el cristal exterior de la
puerta en su emplazamiento y encla-
varlo, presionando junto a las bisa-
gras.
… si las bandejas extraibles esmal-
tadas tienen manchas mates y cla-
ras?
Jugo de carne ha caído sobre estas
piezas.
No es posible.

E 2331 . .
E 2431 . .
5750 187 671
Printed in Germany 0901 Es.
Ident-Nr. 523 867