CS UŽIVATELSKÁ PŘÍRUČKA
ET KASUTUSJUHEND
HR KORISNIČKI PRIRUČNIK
LV LIETOT JA ROKASGR MATA
LT NAUDOTOJO VADOVAS
HU FELHASZNÁLÓI KÉZIKÖNYV
PL INSTRUKCJA OBSŁUGI
RO MANUAL DE UTILIZARE
SL UPORABNIŠKI PRIROČNIK
SK NÁVOD NA POUŽITIE
SR УПУТСТВО ЗА КОРИШЋЕЊЕ
BG РЪКОВОДСТВО ЗА ПОТРЕБИТЕЛЯ
RU РУКОВОДСТВО ПОЛЬЗОВАТЕЛЯ
UK ПОСІБНИК КОРИСТУВАЧА
KK ПАЙДАЛАНУШЫ НҰСҚАУЛЫҒЫ
WWW.SAECO.COM/CARE
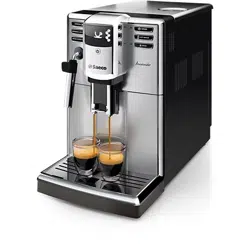
SM7686, SM7685, SM7684
SM7683, SM7680
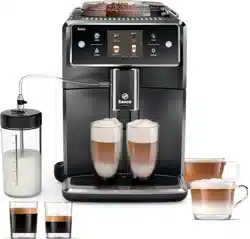
SM7686, SM7685, SM7684
SM7683, SM7680
EN USER MANUAL
FR MODE D’EMPLOI
繁體中文 使用手冊
WWW.SAECO.COM/CARE
4219.440.8482.1_XELSIS BETTER ENG-FR-CHINESE_FRONTCOVER_A5_FC.indd 1 13-06-18 09:39


English
Contents
IMPORTANT SAFEGUARDS__________________________________________________________________ 6
SAVE THESE INSTRUCTIONS ________________________________________________________________ 7
CAUTION _____________________________________________________________________________________ 7
Instructions for the power supply cord______________________________________________________ 7
Important safety information ________________________________________________________________ 7
Introduction _________________________________________________________________________________ 10
Machine overview (Fig. 1) ____________________________________________________________________ 11
First installation ______________________________________________________________________________ 11
Using the control panel and touchscreen___________________________________________________ 12
AquaClean filter ______________________________________________________________________________ 12
Measuring water hardness __________________________________________________________________ 13
Brewing drinks _______________________________________________________________________________ 13
Personalizing drinks and creating profiles __________________________________________________ 15
Adjusting machine settings __________________________________________________________________ 15
Handling the brew group ____________________________________________________________________ 16
Cleaning and maintenance __________________________________________________________________ 17
Descaling procedure _________________________________________________________________________ 19
Warning icons and error codes ______________________________________________________________ 20
Ordering accessories_________________________________________________________________________ 22
Troubleshooting _____________________________________________________________________________ 22
Beverage types and lengths _________________________________________________________________ 27
Technical specifications _____________________________________________________________________ 28
Disposal ______________________________________________________________________________________ 28
Warranty and support _______________________________________________________________________ 29
IMPORTANT SAFEGUARDS
When using electrical appliances, basic safety precautions should always be followed,
including the following:
1 Read all instructions.
2 Do not touch hot surfaces. Use handles or knobs.
3 To protect against fire, electric shock and injury to persons do not immerse cord, plugs, or
appliance in water or other liquid.
4 Close supervision is necessary when the appliance is used by or near children.
5 Unplug from outlet when not in use and before cleaning. Allow to cool before putting on or
taking off parts, and before cleaning the appliance.
6 Do not operate any appliance with a damaged cord or plug or after the appliance
malfunctions, or has been damaged in any manner. Return appliance to the nearest
authorized service facility for examination, repair or adjustment.
7 The use of accessory attachments not recommended by the appliance manufacturer may
result in fire, electric shock or injury to persons.
6
English

8 Do not use outdoors.
9 Do not let cord hang over edge of table or counter, or touch hot surfaces.
10 Do not place on or near a hot gas or electric burner, or in a heated oven.
11 Always attach plug to appliance first, then plug cord into wall outlet. To disconnect, turn
any control to “off”, then remove plug from wall outlet.
12 Do not use appliance for other than intended use.
13 Save these instructions.
SAVE THESE INSTRUCTIONS
CAUTION
This appliance is for household use only. Any servicing, other than cleaning and user
maintenance, should be performed by an authorized service center. Do not immerse machine
in water. To reduce the risk of fire or electric shock, do not disassemble the machine. There
are no parts inside the machine serviceable by the user. Repair should be done by authorized
service personnel only.
1 Check voltage to be sure that the voltage indicated on the nameplate corresponds with
your voltage.
2 Never use warm or hot water to fill the water tank. Use cold water only.
3 Keep your hands and the cord away from hot parts of the appliance during operation.
4 Never clean with scrubbing powders or harsh cleaners. Simply use a soft cloth dampened
with water.
5 For optimal taste of your coffee, use purified or bottled water. Periodic descaling is still
recommended every 2-3 months.
6 Do not use caramelized or flavored coffee beans.
Instructions for the power supply cord
-
A short power-supply cord (or detachable power-supply cord) is to be provided to reduce
risks resulting from becoming entangled in or tripping over a longer cord.
-
Longer detachable power-supply cords or extension cords are available and may be used
if care is exercised in their use.
-
If a long detachable power-supply cord or extension cord is used:
1 the marked electrical rating of the detachable power-supply cord or extension cord should
be at least as great as the electrical rating of the appliance.
2 if the appliance is of the grounded type, the extension cord should be a grounding-type
3-wire cord, and
3 the longer cord should be arranged so that it will not drape over the counter top or table
top where it can be pulled on by children or tripped over.
Important safety information
This machine is equipped with safety features. Nevertheless, read and follow the safety
instructions carefully and only use the machine as described in these instructions, to avoid
7
English

accidental injury or damage due to improper use of the machine. Keep this user manual for
future reference.
Warning
General
-
Check if the voltage indicated on the machine corresponds to the local mains voltage
before you connect the appliance.
-
Connect the machine to an earthed wall socket.
-
Do not let the power cord hang over the edge of a table or worktop and do not let it touch
hot surfaces.
-
To avoid the danger of electric shock, never immerse the machine, mains plug or power
cord in water or any other liquid.
-
Do not pour liquids on the power cord connector.
-
To avoid the danger of burns, keep body parts away from hot water jets produced by the
machine.
-
Do not touch hot surfaces. Use handles and knobs.
-
Switch off the machine with the main switch located on the back (if present) and remove
the mains plug from the wall socket:
-
if a malfunction occurs.
-
if you are not going to use the appliance for a long time.
-
before you clean the machine.
-
Pull at the plug, not at the power cord.
-
Do not touch the mains plug with wet hands.
-
Do not use the machine if the mains plug, the power cord or the machine itself is damaged
-
Do not make any modifications to the machine or its power cord.
-
Only have repairs carried out by a service center authorized by Philips to avoid ahazard
-
The machine should not be used by children.
-
This machine is not intended for use by persons (including children) with reduced physical,
sensory or mental capabilities, or lack of experience and knowledge, unless they have been
given supervision or instruction concerning use of the machine by a person responsible for
their safety.
-
Cleaning and user maintenance shall not be made by children.
-
Keep the machine and its cord out of the reach of children.
-
Children should be supervised to ensure that they do not play with the machine.
-
Never insert fingers or other objects into the coffee grinder.
-
Be carefull when you dispense hot water. Dispensing may be preceded by small jets of hot
water. Wait until the end of the dispensing cycle before you remove the hot water
dispensing spout.
Caution
General
-
This machine is intended for normal household use only. It is not intended for use in
environments such as staff kitchens of shops, offices, farms or other work environments.
8
English

-
Always put the machine on a flat and stable surface. Keep it in upright position, also during
transport
-
Do not place the machine on a hotplate or directly next to a hot oven, heater or similar
source of heat.
-
Only put roasted coffee beans in the bean hopper. Putting ground coffee, instant coffee,
raw coffee beans or any other substance in the coffee bean hopper may cause damage to
the machine.
-
Let the machine cool down before you insert or remove any parts. The heating surfaces
may retain residual heat after use.
-
Never fill the water tank with warm, hot or sparkling water, as this may cause damage to
the water tank and the machine.
-
Never use scouring pads, abrasive cleaning agents or aggressive liquids such as petrol or
acetone to clean the machine. Simply use a soft cloth dampened with water.
-
Descale your machine regularly. The machine indicates when descaling is needed. Not
doing this will make your machine stop working properly. In this case, repair is not covered
by your warranty.
-
Do not keep the machine at temperatures below 0°C/32°F. Water left in the heating system
may freeze and cause damage.
-
Do not leave water in the water tank when you are not going to use the machine for a long
period of time. The water can become contaminated. Use fresh water every time you use
the machine.
-
Never use any accessories or parts from other manufacturers or that Philips does not
specifically recommend. If you use such accessories or parts, your guarantee becomes
invalid.
-
Regular cleaning and maintenance prolongs the lifetime of your machine and ensures
optimum quality and taste of your coffee.
-
The machine is exposed continuously to moisture, coffee and scale. Therefore it is very
important to regularly clean and maintain the machine as described in the user manual
and shown on the website. If you do not perform these cleaning and maintenance
procedures, your machine eventually may stop working. In this case repair is not covered
by warranty.
-
Do not clean the brew group in the dishwasher and do not use washing-up liquid or a
cleaning agent to clean it. This may cause the brew group to malfunction and may have a
negative effect on the coffee taste.
-
Do not dry the brew group with a cloth to prevent fibers from collecting inside the brew
group.
-
Never drink the solution dispensed during the descaling process.
-
Only put preground coffee into the preground coffee compartment. Other substances and
objects may cause severe damage to the machine. In this case, repair is not covered by
your warranty.
-
The machine shall not be placed in a cabinet when in use.
Cappuccinatore and milk container
Warning
-
To avoid the danger of burns, be aware that dispensing steam or hot water may be
preceded and followed by small jets of hot water or steam.
9
English

-
Never touch or open the door of the internal cappuccinatore while dispensing drinks, as it
may become very hot.
-
Never touch the metal part of the milk tube during and right after performing one of the
cleaning programs for the internal cappuccinatore, as it may become very hot. Let it cool
down first.
-
Never drink the solution dispensed during the monthly cleaning procedure of the
adjustable coffee and milk dispensing spout.
Caution
-
For hygienic reasons, make sure that the outer surface of the adjustable coffee and milk
dispensing spout is clean.
-
Make sure that the milk tube tube is connected to the cappuccinatore before you select a
milk-based drink.
-
Do not put any other liquids in the milk container than water (for cleaning) or milk.
-
After brewing milk-based drinks, the adjustable coffee and milk dispensing spout
automatically dispenses a small amount of steam to clean the internal cappuccinatore and
the metal part of the milk spout.
-
Be careful, the adjustable coffee and milk dispensing spout and the metal part of the milk
spout may be hot if the machine has been used recently.
-
Be careful when you open the internal cappuccinatore door, the adjustable coffee and milk
dispensing spout may dispense a small amount of steam to clean the internal
cappuccinatore.
-
If the internal cappuccinatore door is difficult to close, check if the internal cappuccinatore
is inserted correctly. Follow the instructions in the user manual. Do not push the internal
cappuccinatore too far on the coffee/milk dispensing spout when you insert it. In this case,
the internal cappuccinatore would not work correctly as it would not be able to suck up
milk.
-
The metal part of the milk spout may become hot. To avoid the danger of burns, always put
the milk spout in the milk spout holder before you start the cleaning program for the
internal cappuccinatore.
-
Do not clean the internal cappuccinatore in the dishwasher.
Electromagnetic fields (EMF)
This machine complies with all applicable standards and regulations regarding exposure to
electromagnetic fields.
Introduction
Congratulations on your purchase of a Saeco full-automatic coffee machine! To fully benefit
from the support that Saeco offers, please register your product at www.saeco.com/care.
Read this user manual carefully before you use the machine for the first time and save it for
future reference.
To help you get the best out of your coffee machine, Saeco offers full support in 3 different
ways:
1 The separate quick start guide for first installation and first use.
2 This user manual for more detailed information.
10
English
3 Online support and movies: scan the QR code on the front page or visit
www.saeco.com/care
Note: This machine has been tested with coffee. Although it has been carefully cleaned, there
may be some coffee residues and/or water left. We guarantee, however, that the machine is
absolutely new.
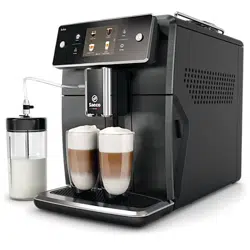
Machine overview (Fig. 1)
1
Control panel and touchscreen 12 Drip tray release grip
2 Cup holder 13 Mains cord with plug
3 Lid of bean hopper 14 Grind setting knob
4 Lid of pre-ground coffee
compartment
15 Bean hopper
5 Internal cappuccinatore 16 Brew group
6 Adjustable coffee and milk dispensing
spout
17 Coffee funnel
7 Milk tube holder 18 Coffee residues drawer
8 Main switch 19 Coffee grounds container
9 Socket for cord 20 Drip tray
10 Service door 21 Drip tray cover
11 'Drip tray full' indicator 22 Water tank
Accessories
23
Grease tube 26 Measuring scoop
24 Cleaning brush 27 Water hardness test strip
25 AquaClean filter
Milk frothing parts
28
Lid of milk container 30 Metal milk tube
29 Milk container 31 Flexible milk tube
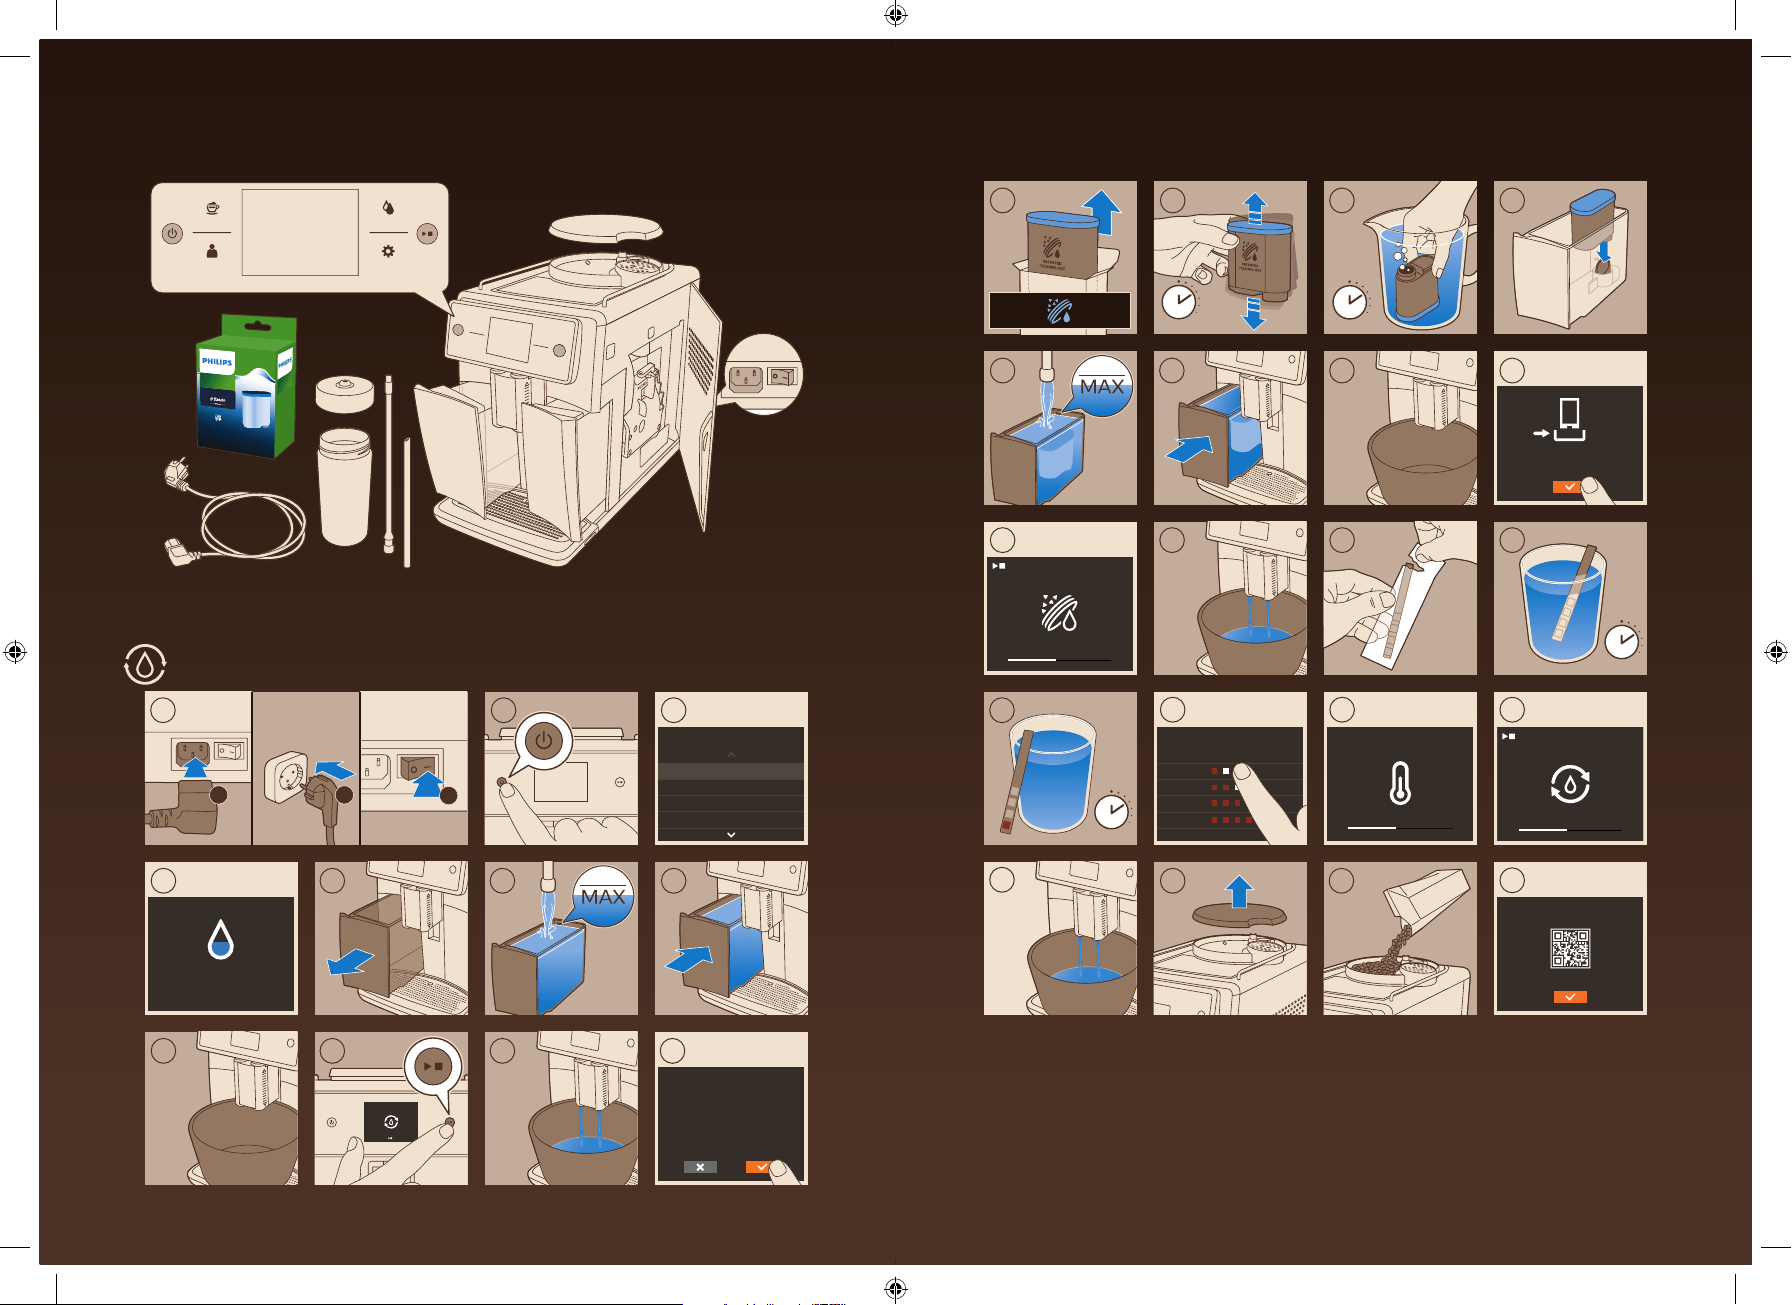
First installation
To prepare your coffee machine for use, you need to perform a few simple steps such as
filling the water circuit and activating the AquaClean filter. These steps are shown in the
separate quick start guide.
For the best-tasting coffee, you need to brew 5 coffees initially to allow the machine to
complete its self-adjustment.
11
English
The machine has been set up to get the best taste out of your coffee beans. Therefore we
advise you not to adjust the grinder settings until you have brewed 100-150 cups (approx. 1
month of usage).
Thoroughly clean the milk container, the milk tubes and the cappuccinatore before first use.
We advise you not to clean the cappuccinatore in the dishwasher, to prevent food particles or
detergent residues from clogging it.
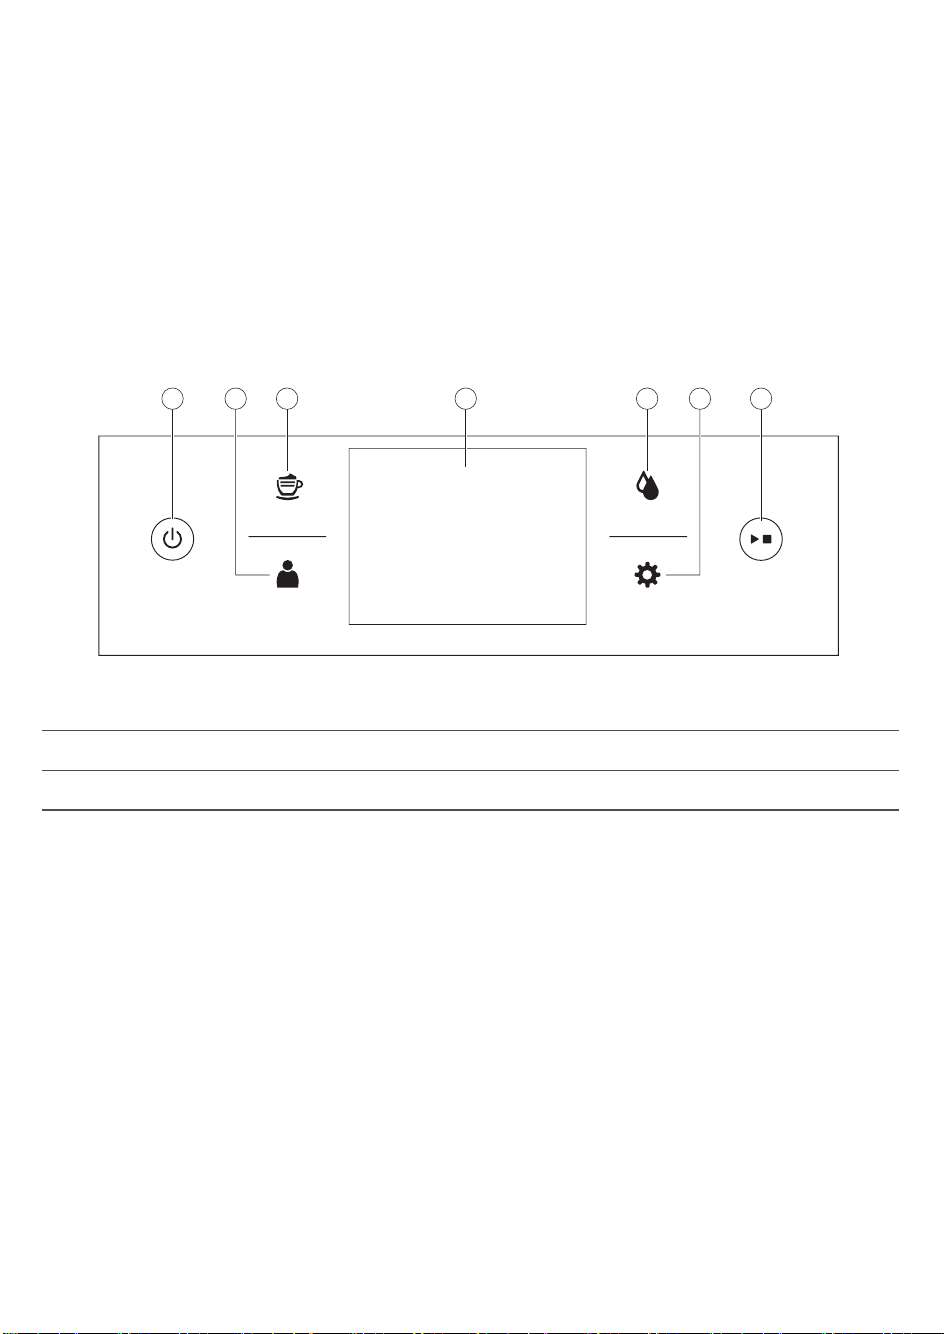
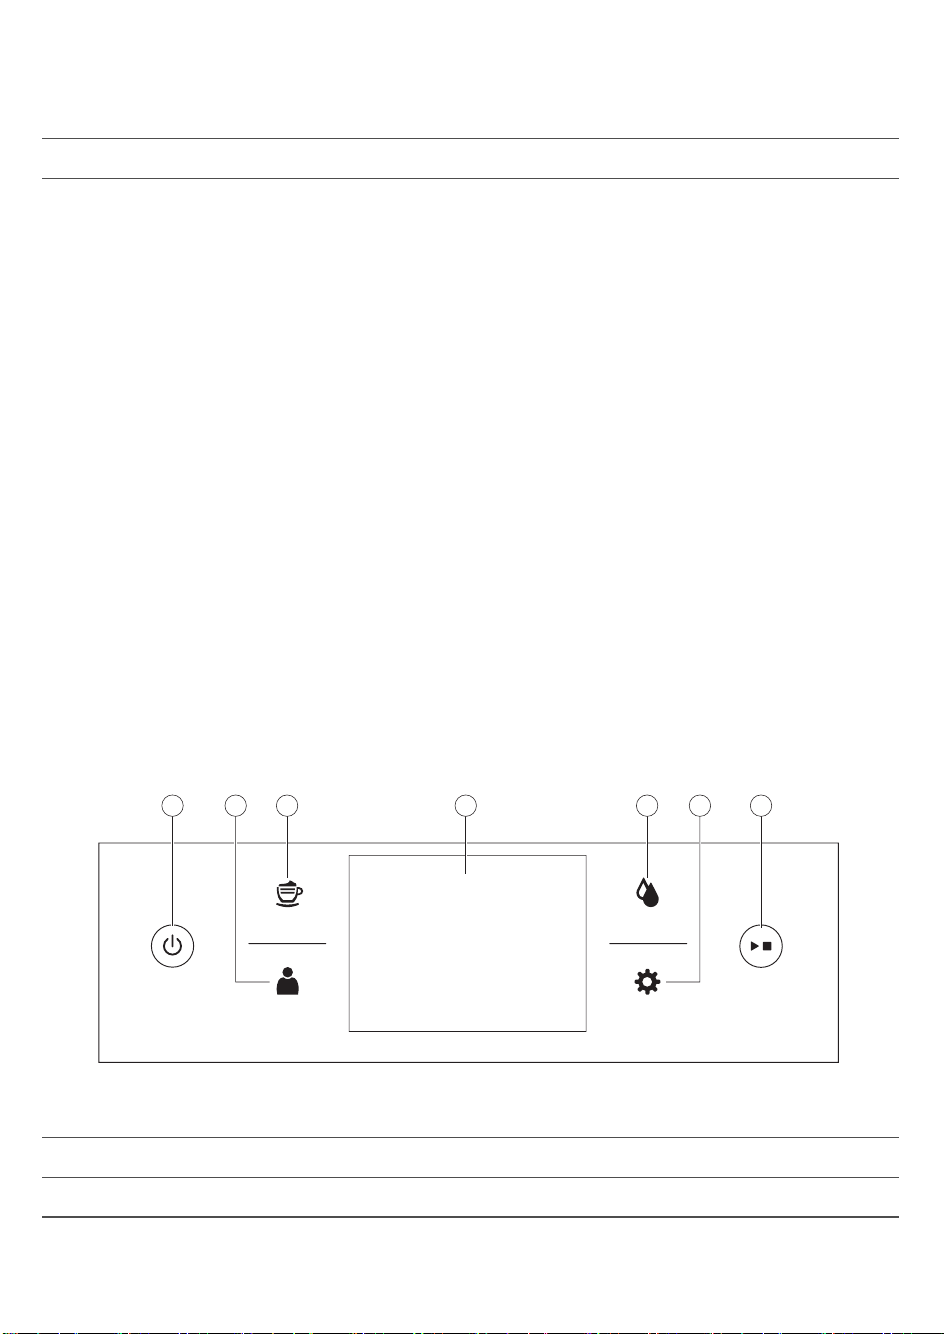
Using the control panel and touchscreen
Below you find an overview and description of the control panel and touchscreen of the
machine. You can swipe the touchscreen and tap to select or confirm your choices.
Drinks
Proles
Clean
Settings
43 51 72 6
1. On/off button 4. Touchscreen 7. Start/stop button
2. Personal profiles 5. Cleaning menu
3. Drinks menu 6. Machine settings
AquaClean filter
The AquaClean filter is designed to reduce limescale deposits in your coffee machine and
provide filtered water to preserve the aroma and flavor of each cup of coffee. If you use a
series of 8 AquaClean filters as indicated by the machine and in this user manual, you don't
have to descale your machine for up to 5000 cups. With each filter you can enjoy up to 625
cups, depending on the selected coffee varieties and the rinsing and cleaning frequencies.
Preparing the AquaClean filter for activation
Before you place the AquaClean filter in the water tank, you need to prepare it for use:
1 Shake the filter for about 5 seconds (Fig. 2).
2 Fully immerse the filter upside down in a jug with cold water for at least 30 seconds. Wait
until no more air bubbles come out (Fig. 3).
3 Push the filter onto the filter connection to the lowest possible point. (Fig. 4)
12
English
Activating the AquaClean filter
You need to activate every new AquaClean filter that you use. By activating the AquaClean
filter, the machine monitors the capacity of the AquaClean filter and the number of filters
used. There are 3 ways to activate the AquaClean filter.
1. Activating the AquaClean filter during first installation
After switching on for the first time, the machine guides you through the first installation steps
such as filling the water tank, filling the water circuit and activating the AquaClean filter.
Simply follow the instructions on the screen.
2. Activating the AquaClean filter when prompted
Replace the AquaClean filter when the screen shows the message 'Replace AquaClean filter?'.
Then follow the instructions on the screen to activate the filter properly.
Replace the AquaClean filter at least every 3 months, even if the machine has not yet
indicated that replacement is required.
3. Activating the AquaClean filter at any other time
You can start using the AquaClean filter at any time by following the instructions below.
1 Tap the Settings
icon and then select 'AquaClean' (Fig. 5).
2 Select 'new' and when the activation screen appears, press the start/stop
button.
3 Follow the instructions on the screen.
Note: In some situations the machine will tell you that you need to descale the machine
before you can install and activate a new AquaClean filter. This is because your machine has
to be completely limescale-free before you start to use the AquaClean filter. Follow the
instructions on the screen.
Measuring water hardness
During first installation, you have to set the water hardness. Follow the steps on the screen
and use the water hardness test strip supplied. To set the water hardness later, tap the
Settings
icon and select 'water hardness'.
1 Immerse the water hardness test strip in tap water for 1 second. Then wait for 1 minute.
2 Check how many squares have turned red.
3 Select the appropriate water hardness setting and tap the OK icon to confirm.
Number of red squares:
Value to be set 1 2 3 4
Brewing drinks
Tap the Drinks
icon to enter the 'Drinks' menu. Scroll through the different pages to find
your drink. After selecting a drink you can personalize it by adjusting the settings (see
'Personalizing your drinks').
-
Tap the '2x' icon if you want to brew two cups (Fig. 6). The machine automatically carries
out two grinding cycles in sequence of the selected drinks.
13
English
-
Tap the Profiles
icon to brew one of your saved drinks.
-
Slide the dispensing spout up or down to adjust the height to the size of the cup or glass
you are using.
Brewing coffee drinks
1 Fill the water tank with tap water and fill the bean hopper with beans.
2 Tap the Drinks
icon and select your coffee.
3 You can personalize coffee strength and volume in the first screen, by swiping the
adjustable bars up and down (Fig. 7). If you click on the arrow on the right (Fig. 8), the
second screen appears with more settings to adjust.
4 Press the start/stop button to start brewing the selected drink.
Brewing milk-based drinks
1 Fill the water tank with tap water and fill the bean hopper with beans.
Tip: Slide the dispensing spout to the uppermost position for easy access to the water tank.
2 Unscrew the lid of the milk container and fill the milk container with milk (Fig. 9).
We advise you to use milk coming directly from the fridge for optimal results.
3 Place the metal milk tube in the container. Open the door of the internal cappuccinatore
(Fig. 10) and connect the flexible milk tube to the cappuccinatore (Fig. 11). Then close the
door of the internal cappuccinatore again.
4 Tap the Drinks
icon and select your milk-based drink.
5 You can personalize coffee strength, coffee and milk volume in the first screen, by swiping
the adjustable bars up and down (Fig. 7). If you click on the arrow on the right (Fig. 8), the
second screen appears with more settings to adjust.
6 You can adjust the settings to your preference by swiping the adjustable bars up and
down.
7 Press the start/stop
button to start brewing the selected drink.
8 Directly after dispensing the milk, the 'Auto Steam Shoot' is performed. The machine forces
steam through the internal milk system to rinse it quickly.
Tip: You can also use a regular milk carton to brew your milk-based drinks. Place the metal
milk tube directly into the milk carton.
Brewing coffee with pre-ground coffee
1 Open the lid of the pre-ground coffee compartment and pour one measuring scoop of
pre-ground coffee into it (Fig. 12). Then close the lid.
2 After selecting a drink, tap the pre-ground coffee icon (Fig. 13)
and then press the
start/stop
button.
Note: If you select pre-ground coffee, you cannot adjust the coffee strength and brew more
than one drink at the same time.
Dispensing hot water
1 Tap the Drinks
icon and then select 'Hot water'.
14
English

2 Press the start/stop button to start dispensing hot water.
Personalizing drinks and creating profiles
This machine allows you to adjust the settings of a drink to your own preference and to save
the adjusted drink in a personal profile. There are two ways to create a profile:
1 In the 'Drinks' menu: Select and adjust a drink and then tap the 'save'
icon.
2 In the 'Profiles' menu: Create a profile by tapping the 'add profile' icon. Select the newly
created profile, select a drink, adjust it to your preference and then tap the 'save' icon.
Personalizing your drinks
You can adjust the drink settings to your own preference:
1 Tap the Drinks icon.
2 Select your preferred drink.
3 The screen shows the settings you can adjust to your preference. Tap on the arrow on the
right (Fig. 8) to go to the next screen for more settings to adjust. Depending on the type of
drink, you can adjust the settings. For coffee drinks you can adjust volume, strength, taste
and temperature. For milk-based drinks you can adjust the milk volume, foam level and the
order of brewing coffee and milk. For hot water you can adjust the volume.
4 Swipe the bars you want to adjust up or down to your preferred level (Fig. 7).
5 You can save these settings to a profile by tapping the 'save'
icon (Fig. 14) and selecting
an existing profile or adding a new one (Fig. 15).
Creating a profile
1 Tap the Profiles
icon.
2 Select 'Add profile' (Fig. 15).
3 Enter a name for the new profile and confirm (Fig. 16).
4 Select the newly created profile.
5 Add drinks to the profile by selecting 'Add drink' (Fig. 17).
Removing a profile
1 Tap the Profiles
icon.
2 Press and hold the icon you want to delete.
3 Select 'Delete' and confirm.
Adjusting machine settings
You can adjust the grinder settings by using the grind setting knob inside the bean container.
There are 12 different grind settings you can choose from. The lower the setting, the stronger
the coffee.
Note: You need to brew 2 to 3 drinks before you can taste the full difference.
Caution: Do not turn the grind setting knob more than one notch at a time to prevent damage
to the grinder.
15
English

1 Open the lid of the bean hopper.
2 Press down the grind setting knob and turn it to the left or right (Fig. 18). Turn the grind
setting knob one notch at at time. Each time you have turned the grind setting one notch,
brew a coffee drink to prevent damage to the grinder.
3 Close the lid of the bean hopper.
Adjusting default settings
Use the SETTINGS icon to change the following settings:
-
AquaClean: To check the status of AquaClean and install a new one.
-
Water hardness: to be able to adjust the machine settings to the water in your region,
please measure the water hardness.
-
Stand-by time: this is the time after which the machine goes into stand-by mode.
-
Brightness: to adjust the display contrast
-
Water tank light: to adjust the light in the water tank
-
Coffee spout light: to adjust the light illuminating the cup tray.
-
Language: to select a different language
-
Measurement unit: to select millilitres or US fluid ounces
-
Sound feedback: to activate/deactivate the sound feedback of the display,
Handling the brew group
Go to www.saeco.com/care for detailed video instructions on how to remove, insert and
clean the brew group.
Removing the brew group from the machine
1 Switch off the machine by pressing the main switch on the back of the machine.
2 Open the service door (Fig. 19).
3 Remove the coffee residues drawer (Fig. 20).
4 Press the PUSH button (Fig. 21) and pull at the grip of the brew group to remove it from the
machine (Fig. 22).
Reinserting the brew group
Before you slide the brew group back into the machine, make sure it is in the correct position.
1 Check if the arrow on the yellow cylinder on the side of the brew group is aligned with the
black arrow and N (Fig. 23).
-
If they are not aligned, push down the lever until it is in contact with the base of the
brew group (Fig. 24).
2 Make sure that the yellow locking hook on the other side of the brew group is in the correct
position.
-
To position the hook correctly, push it upwards until it is in uppermost position (Fig. 25).
3 Slide the brew group back into the machine along the guiding rails on the sides (Fig. 26)
until it locks into position with a click (Fig. 27). Do not press the PUSH button.
4 Place back the coffee residues drawer and close the service door.
16
English

Cleaning and maintenance
Regular cleaning and maintenance keeps your machine in top condition and ensures good-
tasting coffee for a long time, a steady coffee flow and a perfect milk froth.
Consult the table on when and how to clean all detachable parts of the machine. You can find
more detailed information and video instructions on www.saeco.com/care.
Cleaning table
Part description
When to clean How to clean
Brew group Weekly Remove the brew group and rinse it under
the tap and let it air-dry.
Monthly Perform the 'Brew group clean' procedure
with the Philips coffee oil remover tablet.
Select 'Brew group clean' in the cleaning
menu and follow the instructions on the
screen. Go to www.saeco.com/care for
detailed video instructions.
Lubrication of
the brew group
Depending on the type of
usage. Consult the
lubrication table (see
'Lubricating the brew
group').
Lubricate the brew group with the Philips
grease. Go to www.saeco.com/care for
detailed video instructions.
Milk
system/internal
cappuccinatore
After every day of use Perform the HYGIESTEAM program in the
cleaning menu. Select HYGIESTEAM in the
cleaning menu and follow the instructions on
the screen. Wipe the outside of the metal
milk tube with a damp cloth before placing it
into the milk tube holder.
Weekly Remove and disassemble the internal
cappuccinatore (see 'Cleaning the internal
cappuccinatore under the tap'). Rinse all
parts under the tap with some washing-up
liquid.
Monthly Perform the 'DEEP MILK CLEAN' procedure
with the Philips milk circuit cleaner. Select
'DEEP MILK CLEAN' in the cleaning menu and
follow the instructions on the screen. Go to
www.saeco.com/care for detailed video
instructions.
Milk container Weekly Disassemble the milk container (Fig. 28) and
push the ball out with the measuring scoop
(Fig. 29). Rinse all parts under the tap or in
the dishwasher
17
English

Part description When to clean How to clean
Drip tray Empty the drip tray every
day or as soon as the red
'drip tray full' indicator
pops up through the drip
tray (Fig. 30).
Remove the drip tray and rinse it under the
tap with some washing-up liquid.
Coffee grounds
container
Empty the coffee grounds
container when prompted
by the machine. Clean it
weekly.
Remove the coffee grounds container while
the machine is switched on and rinse it under
the tap with some washing-up liquid.
Water tank Weekly Rinse the water tank under the tap
Coffee funnel Check the coffee funnel
weekly to see if it is
clogged.
Unplug the machine and remove the brew
group. Open the lid of the pre-ground coffee
compartment and insert the spoon handle
into the coffee funnel. Move the handle up
and down until the clogged ground coffee
falls down (Fig. 31). Go to
www.saeco.com.care for detailed video
instructions.
Tip: There is a cleaning calender on the last page of this user manual. Write down the dates
on which you have performed a cleaning action.
Cleaning the brew group
Regular cleaning of the brew group prevents coffee residues from clogging up the internal
circuits. Visit www.saeco.com/care for support videos on how to remove, insert and clean the
brew group.
Cleaning the brew group under the tap
1 Open the service door and remove the brew group (see 'Removing the brew group from
the machine').
2 Rinse the brew group thoroughly with water. Carefully clean the upper filter (Fig. 32).
3 Let the brew group air-dry before you place it back. Do not dry the brew group with a cloth
to prevent fibers from collecting inside the brew group.
Cleaning the brew group with the coffee oil remover tablets
Only use Philips coffee oil remover tablets. Tap the Clean
icon and select 'Brew group
clean'. Then follow the instructions on the screen. Visit www.saeco.com/care for detailed
video instructions.
Lubricating the brew group
Lubricate the brew group regularly to ensure that the moving parts continue to move
smoothly.
1 Apply a thin layer of grease around the shaft in the bottom of the brew group (Fig. 33).
2 Apply a thin layer of grease to the rails on both sides (Fig. 34).
18
English

See the table below for the lubrication frequency. Visit www.saeco.com/care for detailed
video instructions.
Usage frequency Nr of drinks brewed daily Lubrication frequency
Low 1-5 Every 4 months
Normal 6-10 Every 2 months
Heavy >10 Every month
Cleaning programs for the internal cappuccinatore
The machines has three programs to clean the internal cappuccinatore. The Auto Steam
Shoot cleaning program is automatically performed by the machine after brewing a milk-
based drink. You can select the HYGIESTEAM or DEEP MILK CLEAN program by tapping the
Clean
icon and scrolling through the cleaning menu. Then follow the instructions on the
screen.
-
Auto Steam Shoot: the machine shoots steam through the internal cappuccinatore to
quickly rinse it.
-
HYGIESTEAM: the machine thoroughly cleans the internal milk system with steam. Place
the milk tube in the milk tube holder (Fig. 35) and follow the instructions on the screen.
-
DEEP MILK CLEAN: Perform the 'DEEP MILK CLEAN' procedure with the Philips milk circuit
cleaner for a thorough cleaning of the internal milk system.
Cleaning the internal cappuccinatore under the tap
1 Open the door of the internal cappuccinatore (Fig. 10).
2 Remove the internal cappuccinatore by pulling it down (Fig. 36).
3 Disassemble the internal cappuccinatore by pulling the bottom part off the top part (Fig.
37).
4 Disassemble all parts (Fig. 38) and clean them under the tap.
5 Reassemble the internal cappuccinatore.
6 To place back the internal cappuccinatore, put it in upright position and make sure the
holes are aligned with the two tubes on the machine. Then move the internal
cappuccinatore upwards until it locks into place (Fig. 39).
7 Close the door.
Visit www.saeco.com/care for detailed video instructions.
Descaling procedure
Please use Philips descaler only. Under no circumstances should you use a descaler based on
sulfuric acid, hydrochloric acid, sulfamic or acetic acid (vinegar) as this may damage the water
circuit in your machine and not dissolve the limescale properly. Not using the Philips descaler
will void your warranty. Failure to descale the appliance will also void your warranty. You can
buy Philips descaling solution in the online shop at www.saeco.com/care.
1 When the machine asks you to descale it, press the start/stop
button to start. To start
descaling without being prompted by the machine, tap the Clean
icon and select
'Descale' (Fig. 40).
19
English
2 Remove the drip tray and the coffee grounds container, empty them and put them back
into place.
3 Remove the water tank and empty it. Then remove the AquaClean filter.
4 Pour the whole bottle of Philips descaler in the water tank and then fill it with water up to
the CALC CLEAN level. Then place it back into the machine.
5 Place a large container (1.5 l) under the coffee dispensing spout.
6 Follow the instructions on the screen to start the descaling procedure. The descaling
procedure lasts approx. 15 minutes and consists of a descaling cycle and a rinsing cycle.
7 Once the descaling cycle is finished, you need to rinse the water tank and water circuit.
Follow the instructions on the screen.
8 Place a new AquaClean filter in the water tank and reactivate the AquaClean filter in the
menu.
Tip: Using the AquaClean filter reduces the need for descaling!
What to do if the descaling procedure is interrupted
You can exit the descaling procedure by pressing the on/off button on the control panel. If
the descaling procedure is interrupted before it is completely finished, do the following:
1 Empty and rinse the water tank thoroughly.
2 Fill the water tank with fresh water up to the CALC CLEAN level indication and switch the
machine back on. The machine will heat up and perform an automatic rinsing cycle.
3 Before brewing any drinks, perform a manual rinsing cycle. To perform a manual rinsing
cycle, first dispense half a water tank of hot water and then brew 2 cups of pre-ground
coffee without adding ground coffee.
Note: If the descaling procedure was not completed, the machine will require another
descaling procedure as soon as possible.
Warning icons and error codes
Meaning of the warning icons
Fill the water tank with fresh
water to the MAX level
indication.
Close the service door.
The bean hopper is empty. Put
new coffee beans in the bean
hopper.
Close the lid of the bean hopper.
20
English
The brew group is not inserted
or is not inserted correctly. Insert
the brew group and make sure
that it locks into place.
The internal cappuccinatore is not
inserted or is not inserted
correctly and/or the spout door is
open. Make sure that the holes in
the cappuccinatore are aligned
with the tubes in the machine
before you push the internal
cappuccinatore upwards into
place. Then close the spout door.
The coffee grounds container is
full. Make sure that the machine
is switched on. Then remove
and empty the coffee ground
container.
The coffee grounds container is
not in place. Place back the
coffee grounds container.
The machine needs to fill the
water circuit with water. Make
sure there is water in the water
tank and press the start/stop
button to start.
Meaning of error codes
Below you find a list of the error codes showing problems that you can solve yourself. Video
instructions are available on www.saeco.com/care. If another error code appears, please
contact the Philips Consumer Care Center in your country. For contact details, see the
warranty leaflet.
Error
code
Problem Possible solution
01 The coffee funnel is
clogged.
Switch off the machine and unplug it. Remove the brew
group. Then open the lid of the pre-ground coffee
compartment and insert the spoon handle. Move the
handle up and down until the clogged ground coffee falls
down (Fig. 31). Visit www.saeco.com/care for detailed
video instructions.
03 The brew group is
dirty or not well-
greased.
Switch off the machine with the main switch. Rinse the
brew group with fresh water, let it air-dry and then
lubricate it. Consult chapter 'Cleaning the brew group' or
visit www.saeco.com/care for detailed video instructions.
Then switch the machine on again.
04 The brew group is not
positioned correctly.
Switch off the machine with the main switch. Remove the
brew group and reinsert it. Make sure that the brew group
is in the correct position before you insert it. Consult
chapter 'Handling the brew group or visit
www.saeco.com/care for detailed video instructions.
Then switch the machine on again.
21
English

Error
code
Problem Possible solution
05 There is air in the
water circuit.
Restart the machine by switching it off and on again with
the main switch. If this works, dispense 2-3 cups of hot
water. Descale the machine if you have not done so for a
longer period of time.
The AquaClean filter
was not prepared
properly before
installation or it is
clogged.
Remove the AquaClean filter and try again to brew a
coffee. If this works, make sure that the AquaClean filter is
prepared properly before you place it back (see
'Preparing the AquaClean filter for activation'). Put the
AquaClean filter back into the water tank. If this still does
not work, the filter might be clogged and needs to be
replaced.
14 The machine is
overheated.
Switch the machine off and switch it back on again after
30 minutes.
Ordering accessories
To clean and descale the machine, only use the Philips maintenance products. These
products can be purchased from your local retailer, from the authorized service centers or
online at www.saeco.com/care. To find a full list of spare parts online, enter the model
number of your machine. You can find the model number on the inside of the service door.
Maintenance products and type numbers:
-
Descaling solution CA6700
-
AquaClean filter CA6903
-
Brew group grease HD5061
-
Coffee oil remover tablets CA6704
-
Milk circuit cleaner CA6705
-
Maintenance kit CA6707
Troubleshooting
This chapter summarizes the most common problems you could encounter with the machine.
Support videos and a complete list of frequently asked questions are available on
www.saeco.com/care. If you are unable to solve the problem, contact the Consumer Care
Center in your country. For contact details, see the warranty leaflet.
Problem
Cause Solution
The drip tray fills up
quickly.
This is normal. The machine
uses water to rinse the
internal circuit and brew
group. Some water flows
through the internal system
directly into the drip tray.
Empty the drip tray every day or as
soon as the red 'drip tray full'
indicator pops up through the drip
tray (Fig. 30). Place a cup under the
dispensing spout to collect rinsing
water.
22
English

Problem Cause Solution
The machine is in
DEMO mode.
You pressed the standby
button for more than 8
seconds.
Switch the machine off and then on
again with the main switch on the
back of the machine.
The 'coffee grounds
container full' icon
remains displayed.
You emptied the coffee
grounds container while the
machine was switched off.
Always empty the coffee grounds
container while the machine is
switched on. If you empty the coffee
grounds container when the
machine is switched off, the coffee
cycle counter is not reset.
You placed back the coffee
grounds container too fast.
Do not place back the coffee
grounds container until the screen
prompts you to put it back.
The 'coffee grounds
container full' icon is
displayed even though
the container is not
full.
The machine did not reset
the counter the last time you
emptied the coffee grounds
container.
Always wait approx. 5 seconds when
you place back the coffee grounds
container.In this way the coffee
grounds counter will be reset to zero.
Always empty the coffee grounds
container while the machine is
switched on. If you empty the coffee
grounds container when the
machine is switched off, the coffee
grounds counter will not be reset.
I cannot remove the
brew group.
The brew group is not in the
correct position.
Reset the machine in the following
way: place back the drip tray and the
coffee grounds container. Then close
the service door and switch the
machine off and back on again. Try
again to remove the brew group.
You have not removed the
coffee grounds container.
Remove the coffee grounds
container before you remove the
brew group.
I cannot insert the
brew group.
The brew group is not in the
correct position.
Reset the machine in the following
way: place back the drip tray and the
coffee grounds container. Leave the
brew group out. Close the service
door and switch the machine on and
off. Then put the brew group in the
correct position and reinsert it into in
the machine (see 'Reinserting the
brew group').
The coffee is watery. The brew group is dirty or
needs to be lubricated.
Clean and lubricate the brew group.
23
English

Problem Cause Solution
The grinder is set to a too
coarse setting.
Set the grinder to a finer (lower)
setting.
The coffee settings have
been adjusted.
Select your coffee drink and adjust
the settings to a stronger coffee.
The machine is performing
its self-adjustment
procedure after a change in
grinder settings or bean
types.
Brew a few cups of coffee.
The coffee is not hot
enough.
The cups you use are cold. Preheat the cups by rinsing them
with hot water.
The temperature is set too
low. Check the menu
settings.
Set the temperature to 'high' in the
menu.
You added milk. Whether the milk you add is warm or
cold, it always decreases the
temperature of the coffee to some
extent.
Coffee does not come
out or coffee comes
out slowly.
The AquaClean filter was not
prepared properly for
installation or it is clogged.
Remove the AquaClean filter and try
to brew a coffee again. If this works,
make sure the AquaClean filter is
prepared properly before you place
it back. Place back the prepared
filter. If this still does not work, the
filter might be clogged and needs to
be replaced.
The grinder is set to a too
fine setting.
Set the grinder to a coarser (higher)
setting.
The brew group is dirty. Clean the brew group.
The coffee dispensing spout
is dirty.
Clean the coffee dispensing spout
and its holes with a needle.
The machine circuit is
blocked by limescale.
Descale the machine.
The milk does not
froth.
The internal cappuccinatore
is dirty or not inserted
correctly.
Clean the internal cappuccinatore
and make sure that you position and
insert it correctly (see 'Cleaning the
internal cappuccinatore under the
tap').
24
English

Problem Cause Solution
The type of milk used is not
suitable for frothing.
Different types of milk result in
different amounts of froth and
different froth qualities. We have
tested the following milk types which
proved to deliver a good milk froth
result: semi-skimmed or full-fat
cow's milk, soy milk and lactose-free
milk.
The milk is splashing. The milk you use is not cold
enough.
Make sure you use cold milk coming
directly from the fridge.
The flexible milk tube is not
connected properly.
Open the door of the coffee
dispensing spout (Fig. 10) and check
if the flexible milk tube is fully
connected to the cappuccinatore
(Fig. 11). Note that the
cappuccinatore and milk tubes may
be hot. Let the cappuccinatore and
the tubes cool down before you
touch them.
The cappuccinatore and milk
tubes are not clean.
Remove and disassemble the
internal cappuccinatore (see
'Cleaning the internal
cappuccinatore under the tap').
Rinse all parts under the tap. For a
thorough cleaning, use the Philips
milk circuit cleaner and perform the
DEEP MILK CLEAN procedure via the
cleaning (
) menu. Note that if the
parts have been cleaned in the
dishwasher, they may have become
clogged by food particles or
detergent residues. A visual check
that they are not obstructed is also
recommended.
We advise you to perform the
HygieSteam program every day: 1)
Press 'Clean'
on the control panel.
2) Select 'HygieSteam'. 3) Press the
start button to start the process,
then confirm all steps on the display.
25
English

Problem Cause Solution
The milk tubes are clogged. Always store the milk container
without the milk tubes in the
refrigerator. Leftover milk could
accumulate within the milk tubes
and block the flow of milk going
through the tubes. Rinse the milk
tubes before storage.
The machine seems to
be leaking.
The machine uses water to
rinse the internal circuit and
brew group. Some water
flows through the internal
system directly into the drip
tray.
Empty the drip tray every day or as
soon as the 'drip tray full' indicator
pops up through the drip tray cover
(Fig. 30). Place a cup under the
dispensing spout to collect rinsing
water.
The drip tray is too full and
has overflowed which makes
it look like the machine is
leaking.
Empty the drip tray every day or as
soon as the 'drip tray full' indicator
pops up through the drip tray cover
(Fig. 30). Place a cup under the
dispensing spout to collect rinsing
water.
The machine is not placed
on a horizontal surface.
Place the machine on a horizontal
surface so that the 'drip tray full'
indicator works properly.
I cannot activate the
AquaClean filter and
the machine asks for
descaling.
The filter has not been
replaced in time after the
AquaClean filter icon flashed
and the capacity dropped to
0%.
Descale your machine first and then
install the AquaClean filter.
You did not install the
AquaClean filter during first
installation, but after having
brewed approx. 25 coffees
(based on 100ml/3oz cups).
The machine has to be
completely limescale-free
before you install the
AquaClean filter.
First descale the machine and then
install a new AquaClean filter. After
descaling, the filter counter is reset
to 0/8. Always confirm filter
activation in the machine menu. Also
do this after filter replacement.
The new water filter
does not fit.
You are trying to install
another filter than the
AquaClean filter.
Only the AquaClean filter fits into the
machine.
The machine is making
a noise.
It is normal that your
machine makes noise during
use.
If the machine starts to make a
different kind of noise, clean the
brew group and lubricate it (see
'Lubricating the brew group').
26
English
Problem Cause Solution
The AquaClean filter was not
prepared properly and air is
now drawn into the machine.
Remove the AquaClean filter from
the water tank. Shake the filter for
about 5 seconds. Immerse the filter
upside down in a jug with cold water
for at least 30 seconds. Wait until no
more air bubbles come out. Place
the prepared AquaClean filter back
into the water tank. Then dispense
2-3 cups of hot water.
Beverage types and lengths
Beverage types
Beverage name
Description
Espresso Coffee with thick crema served in a small cup
Coffee Coffee served in a larger cup or in a mug
Americano Espresso coffee diluted with hot water in a larger cup
Cappuccino 1/3 espresso, 1/3 hot milk and 1/3 milk foam served in a large cup
Latte macchiato Long shot of hot milk with foam and a shot of espresso served in a tall
glass
Cafè latte Espresso with a long shot of milk and a small amount of milk foam on
top of it, served in a large glass
Espresso
macchiato
Espresso with a small amount of milk foam on top of it, served in a
small cup
Cafè au lait Coffee mixed with the same amount of hot milk, served in a large glass
Espresso lungo A longer espresso with thick crema served in a medium-sized cup
Ristretto A short shot of espresso coffee served in a small cup
Froth milk Hot milk with foam
Beverage lengths
Beverage
Default length / Adjustable length range (min-max)
Coffee Milk Water
Espresso 1.4oz / 1.1 - 2.3oz - -
Coffee 4.1oz / 3.3 - 7.5oz - -
Americano 1.4oz / 0.7 - 2.7oz - 3.7oz / 2.1 - 5.4oz
27
English
Cappuccino 1.4oz / 0.7 - 2.7oz 4.1oz / 3.3 - 11.5oz -
Latte macchiato 1.4oz / 0.7 - 1.7oz 6.8oz / 4.1-11.5oz -
Cafè latte 2.1oz / 0.7 - 2.7oz 4.8oz / 4.1-11.5oz -
Hot water - - 5.1oz
Espresso macchiato 1.4oz /0.7 -
2.3oz
0.7oz / 0.4 - 1.4oz -
Cafè au lait 3.0oz / 1.7
- 5.1oz
3.0oz / 1.7 - 5.1oz -
Espresso lungo 2.7oz /
2.1 - 3.7oz
- -
Ristretto 1.1oz / 0.7 - 1.4oz - -
Froth milk - 6.0oz / 1.4 - 9.4oz -
Warm milk - 6.0oz / 1.4 - 9.4oz -
Technical specifications
The manufacturer reserves the right to improve the technical specifications of the product. All
the
preset quantities are approximate.
Description
Value
Size (w x
h x d)
283 x 393 x 489 mm (11.2 x 15.5 x 19.3 in)
Weight 10.8 - 12.2 kg
(23.8 - 26.9 lbs)
Power cord length 1200 mm (473 in)
Water tank 1.7 litres (57 oz), removable
Coffee bean hopper capacity 450 g
(16 oz)
Coffee grounds container
capacity
14 pucks
Milk container capacity 600 ml
(20 oz)
Adjustable spout height 75-148 mm (2.9 - 5.9 in)
Nominal voltage - Power rating -
Power supply
See data plate on inside of service door
Disposal
Your product is designed and manufactured with high quality materials and components,
which
can be recycled and reused. For recycling information, please contact your local waste
management facilities or visit www.recycle.philips.com.
28
English
Beverage Default length / Adjustable length range (min-max)
Coffee Milk Water

Warranty and support
If you need information or support, please visit www.saeco.com/care or read the separate
warranty leaflet.
29
English

Français (Canada)
Table des matières
MISES EN GARDE IMPORTANTES___________________________________________________________ 30
CONSERVEZ CES INSTRUCTIONS ___________________________________________________________ 31
AVERTISSEMENT_____________________________________________________________________________ 31
Directives pour le cordon d’alimentation ___________________________________________________ 31
Renseignements importants sur la sécurité_________________________________________________ 32
Introduction _________________________________________________________________________________ 35
Vue d’ensemble de la machine (fig.1) _______________________________________________________ 35
Première installation_________________________________________________________________________ 36
Utilisation du panneau de commande et de l’écran tactile ________________________________ 36
Filtre AquaClean _____________________________________________________________________________ 37
Mesure de la dureté de l’eau ________________________________________________________________ 38
Infusion de boissons _________________________________________________________________________ 38
Personnalisation de boissons et création de profils________________________________________ 39
Réglage des paramètres de la machine_____________________________________________________ 40
Manipulation du groupe de percolation ____________________________________________________ 41
Nettoyage et entretien_______________________________________________________________________ 42
Procédure de détartrage ____________________________________________________________________ 45
Icônes d’avertissement et codes d’erreur ___________________________________________________ 46
Commande d'accessoires ___________________________________________________________________ 48
Résolution des problèmes___________________________________________________________________ 48
Longueurs et types de boisson______________________________________________________________ 53
Caractéristiques techniques _________________________________________________________________ 54
Mise au rebut ________________________________________________________________________________ 55
Garantie et support __________________________________________________________________________ 55
MISES EN GARDE IMPORTANTES
Quand vous utilisez un produit électrique, suivez toujours les mesures de sécurité
fondamentales, notamment ce qui suit:
1 Lisez toutes les instructions.
2 Ne touchez pas aux surfaces chaudes. Utilisez les poignées ou les boutons.
3 Pour prévenir les risques d’incendie, d’électrocution et de blessure, ne plongez pas le
cordon, les fiches ou l’appareil dans l’eau ni dans aucun autre liquide.
4 Exercez toujours une surveillance étroite lorsque l’appareil est utilisé par des enfants ou en
leur présence.
5 Débranchez l’appareil de la prise électrique lorsque vous ne l’utilisez pas et avant de le
nettoyer. Laissez-le refroidir avant d’y mettre des objets ou d’en retirer et avant le
nettoyage.
6 Cessez d’utiliser l’appareil si son cordon d’alimentation ou toute autre partie est
endommagé ou si vous constatez un dysfonctionnement, quel qu’il soit. Apportez-le au
centre de service autorisé le plus proche afin de le faire examiner, réparer ou ajuster.
30
Français (Canada)

7 L’utilisation d’un accessoire non recommandé par le fabricant peut entraîner un risque
d’incendie, d’électrocution ou de blessure.
8 N’utilisez pas cet appareil à l’extérieur.
9 Ne laissez pas le cordon d’alimentation dépasser du bord de la table ou du comptoir sur
lequel l’appareil est posé ni entrer en contact avec des surfaces chaudes.
10 Ne placez pas l’appareil à proximité d’un brûleur à gaz ou électrique ni sur un four chaud.
11 Branchez toujours le cordon à l’appareil en premier, puis à la prise murale. Pour le
débrancher, réglez tous les boutons sur la position d’arrêt, puis retirez la fiche de la prise.
12 N’utilisez l’appareil pour aucun autre usage que celui prévu.
13 Conservez ces consignes.
CONSERVEZ CES INSTRUCTIONS
AVERTISSEMENT
Cet appareil est destiné à un usage domestique uniquement. Toute maintenance autre que le
nettoyage et l’entretien normal devrait être effectuée par un centre de services autorisé.
N’immergez pas l’appareil dans l’eau. Afin de réduire les risques d’incendie ou de décharge
électrique, ne désassemblez pas l’appareil. Aucune pièce se trouvant à l’intérieur de l’appareil
ne peut être entretenue par l’utilisateur. Les réparations devraient être effectuées par un
technicien qualifié autorisé seulement.
1 Consultez le voltage pour vous assurer que le voltage indiqué sur la plaque signalétique
correspond au vôtre.
2 N’utilisez jamais d’eau tiède ou chaude pour remplir le réservoir. Utilisez seulement de l’eau
froide.
3 Gardez les mains et le cordon d’alimentation loin des parties chaudes de l’appareil durant
le fonctionnement.
4 Ne nettoyez jamais l’appareil à l’aide de poudre à récurer ou de nettoyant fort. Utilisez
simplement un linge humide.
5 Pour un goût de café optimal, utilisez de l’eau purifiée ou en bouteille. Le détartrage est
recommandé tous les deux ou trois mois.
6 N’utilisez pas de grains de café caramélisés ou assaisonnés.
Directives pour le cordon d’alimentation
-
Le cordon d’alimentation à utiliser doit être court (ou amovible) pour éviter qu’il ne
s’emmêle ou qu’il ne soit accroché.
-
Vous pouvez toutefois utiliser des cordons détachables plus longs ou des rallonges en
redoublant de vigilance.
-
Si vous utilisez un cordon détachable plus long ou une rallonge:
1 Les caractéristiques électriques du cordon d’alimentation détachable ou de la rallonge
doivent être au moins aussi élevées que celles de l’appareil.
2 Si la fiche de l’appareil est munie d’un fil de terre, la rallonge utilisée doit être un cordon
d’alimentation trifilaire avec mise à la terre.
31
Français (Canada)

3 Le cordon plus long doit être disposé de façon à ne pas reposer sur une table ou un
comptoir, car un enfant pourrait alors facilement l’attraper ou quelqu’un pourrait s’y
prendre les pieds.
Renseignements importants sur la sécurité
Cette machine est dotée de caractéristiques de sécurité. Néanmoins, lisez et suivez
attentivement les directives de sécurité et utilisez l’appareil seulement de la manière décrite
dans les présentes instructions afin d’éviter les blessures ou dommages accidentels causés
par une mauvaise utilisation de l’appareil. Conservez ce guide pour un usage ultérieur.
Avertissement
Généralités
-
Avant de brancher l’appareil, vérifiez si la tension indiquée sur l’adaptateur correspond à
celle du réseau local où vous vous trouvez.
-
Branchez la machine sur une prise murale équipée d’une mise à la terre.
-
Ne laissez pas le cordon d’alimentation dépasser de la table ou du plan de travail sur
lequel l’appareil est posé ni entrer en contact avec des surfaces chaudes.
-
Pour éviter le risque d’électrocution, n’immergez jamais l’appareil, la fiche ou le cordon
d’alimentation dans l’eau ou d'autre liquide.
-
Ne versez pas de liquide sur le connecteur du cordon d’alimentation.
-
Pour éviter tout risque de brûlure, gardez toutes les parties de votre corps éloignées des
jets d’eau chaude produits par la machine.
-
Ne touchez pas les surfaces chaudes. Utilisez les poignées et les boutons.
-
Éteignez la machine en vous servant de l’interrupteur principal situé à l’arrière (si présent)
et retirez la fiche de la prise murale:
-
en cas de défaillance,
-
si vous comptez ne pas utiliser l’appareil pendant une longue période,
-
avant de nettoyer l’appareil.
-
Tirez sur la fiche et non sur le cordon d’alimentation.
-
Ne touchez pas la fiche avec des mains mouillées.
-
N’utilisez jamais la machine si la fiche, le cordon d’alimentation ou la machine elle-même
est endommagée.
-
N’apportez aucune modification à la machine ou à son cordon d’alimentation.
-
Faites réparer la machine uniquement par un centre de services autorisé par Philips afin
d’éviter toutdanger.
-
Ne laissez pas des enfants utiliser la machine.
-
Cette machine n’est pas destinée à être utilisée par des personnes (notamment des
enfants) dont les capacités physiques, sensorielles ou intellectuelles sont réduites ni par
des personnes manquant d’expérience ou de connaissances, à moins que celles-ci ne
soient sous surveillance ou qu’elles n’aient reçu des instructions quant à l’utilisation de
l’appareil par une personne responsable de leur sécurité.
-
Le nettoyage et l’entretien par l’utilisateur ne doivent pas être effectués par des enfants.
-
Gardez la machine et son cordon d’alimentation hors de la portée des enfants.
-
Les enfants doivent être surveillés pour s’assurer qu’ils ne s’amusent pas avec la machine.
32
Français (Canada)

-
N’insérez jamais de doigts ou d’autres objets dans le moulin à café.
-
Faites attention lorsque vous versez de l’eau chaude. De petits jets d’eau chaude peuvent
précéder l’écoulement d'eau. Attendez la fin du cycle de distribution avant de retirer la
buse de distribution d’eau chaude.
Attention
Généralités
-
Cette machine est destinée à un usage domestique normal uniquement. Elle n’est pas
conçue pour les cuisines du personnel de magasins, de bureaux, de fermes ou d’autres
environnements de travail.
-
Mettez toujours la machine sur une surface plane et stable. Gardez-la toujours en position
verticale, même durant le transport.
-
Ne placez pas la machine sur une plaque chauffante ou directement à côté d’un four
chaud, d’un élément chauffant ou d’une source de chaleur similaire.
-
Ne mettez que des grains de café torréfiés dans le compartiment à grains. Mettre du café
prémoulu, du café soluble, des grains de café bruts ou toute autre substance dans le
compartiment à grains de café pourrait endommager l’appareil.
-
Laissez l’appareil refroidir avant d’y insérer ou d’en retirer des pièces. Les surfaces
chauffantes peuvent conserver de la chaleur résiduelle après utilisation.
-
Ne remplissez jamais le réservoir d’eau avec de l’eau tiède, chaude ou gazeuse, car cela
pourrait endommager le réservoir d’eau et la machine.
-
N’utilisez jamais de tampons à récurer, de nettoyants abrasifs ou de produits puissants tels
que de l’essence ou de l’acétone pour nettoyer la machine. Utilisez simplement un linge
humide.
-
Détartrez votre machine régulièrement. La machine indique à quel moment un détartrage
est nécessaire. Si un détartrage n’est pas effectué, votre machine cessera de fonctionner
correctement. Dans ce cas, la réparation n’est pas couverte par votre garantie.
-
Ne conservez pas l’appareil à des températures sous 0°C/32°F. L’eau qui reste dans le
système de chauffage pourrait geler et causer des dommages.
-
Ne laissez pas l’eau dans le réservoir d’eau lorsque vous comptez ne pas utiliser la machine
pendant une longue période de temps. L’eau pourrait devenir contaminée. Utilisez de l’eau
fraîche chaque fois que vous utilisez l’appareil.
-
N’utilisez jamais d’accessoires ni de pièces d’autres fabricants ou qui n’ont pas été
spécifiquement recommandés par Philips. L’utilisation de tels accessoires ou pièces
entraîne l’annulation de votre garantie.
-
Un nettoyage régulier et un entretien adéquat prolongent la durée de vie de votre machine
et garantissent le goût optimal et la qualité supérieure de votre café.
-
La machine est continuellement exposée à l’humidité, au café et au tartre. Il est donc très
important de nettoyer régulièrement la machine et de l’entretenir comme indiqué dans le
manuel de l’utilisateur et sur le site Web. Si vous n’effectuez pas ces procédures de
nettoyage et d’entretien, votre machine peut finir par cesser de fonctionner. Dans ce cas, la
réparation n’est pas couverte par la garantie.
-
Ne mettez pas le groupe de percolation dans le lave-vaisselle et n’utilisez pas de liquide
vaisselle ou de détergent pour le nettoyer. Cela peut causer un mauvais fonctionnement
du groupe de percolation et avoir un effet désagréable sur le goût du café.
33
Français (Canada)

-
Évitez d’utiliser un chiffon pour sécher le groupe de percolation afin d’empêcher que des
fibres ne s’accumulent dans le dispositif.
-
Ne buvez jamais la solution versée pendant le processus de détartrage.
-
Ne mettez que du café prémoulu dans le compartiment à café prémoulu. D’autres
substances et objets peuvent causer des dommages importants à la machine. Dans ce cas,
la réparation n’est pas couverte par votre garantie.
-
La machine ne doit pas être placée dans une armoire lorsqu’elle est en cours d’utilisation.
Cappuccinatore et récipient à lait
Avertissement
-
Pour éviter tout risque de brûlure, sachez que la distribution de vapeur et d’eau chaude
peut être précédée et suivie de petits jets d’eau chaude ou de vapeur.
-
Ne touchez et n’ouvrez jamais la porte du cappuccinatore interne lors de la préparation de
boissons, car elle peut devenir très chaude.
-
Ne touchez jamais la partie métallique du tube à lait pendant l’exécution d’un programme
de nettoyage du cappuccinatore interne ou juste après le nettoyage, car elle peut devenir
très chaude. Laissez la machine refroidir d’abord.
-
Ne buvez jamais la solution versée pendant la procédure de nettoyage mensuel de la buse
de distribution réglable de lait et de café.
Attention
-
Pour des raisons d’hygiène, assurez-vous que la surface extérieure de la buse de
distribution réglable de lait et de café est propre.
-
Assurez-vous que le tube d’aspiration du lait est attachée au cappuccinatore avant de
sélectionner une boisson à base de lait.
-
Dans le récipient à lait, ne mettez pas d’autres liquides que de l’eau (pour le nettoyage) ou
du lait.
-
Après l’infusion de boissons à base de lait, la buse de distribution réglable de lait et de café
distribue automatiquement une petite quantité de vapeur afin de nettoyer le
cappuccinatore interne et la partie métallique du diffuseur de lait.
-
Faites attention, car la buse de distribution réglable de lait et de café et la partie métallique
du diffuseur de lait peuvent être chaudes si la machine a été utilisée récemment.
-
Faites attention lorsque vous ouvrez la porte du cappuccinatore interne, car la buse de
distribution réglable de lait et de café peut distribuer une petite quantité de vapeur afin de
nettoyer le cappuccinatore interne.
-
Si la porte du cappuccinatore interne ne peut pas se fermer correctement, assurez-vous
que le cappuccinatore interne est correctement inséré. Suivez les instructions indiquées
dans le manuel de l’utilisateur. Ne poussez pas le cappuccinatore interne trop loin sur la
buse de distribution de café et de lait lorsque vous l’insérez. Sinon, le cappuccinatore
interne ne fonctionnera pas correctement, car il ne pourra pas aspirer de lait.
-
La partie métallique du diffuseur de lait peut devenir chaude. Afin d’éviter les risques de
brûlure, mettez toujours le diffuseur de lait dans son support avant de démarrer le
programme de nettoyage du cappuccinatore interne.
-
Ne mettez pas le cappuccinatore interne au lave-vaisselle.
Champs électromagnétiques (CEM)
Cet appareil est conforme à toutes les normes et à tous les règlements applicables relatifs à
l’exposition aux champs électromagnétiques.
34
Français (Canada)
Introduction
Toutes nos félicitations pour votre achat d’une machine à café automatique Saeco! Pour
profiter pleinement de l’assistance Saeco, veuillez enregistrer votre produit à l’adresse
www.saeco.com/care.
Lisez attentivement le présent mode d’emploi avant d’utiliser la machine pour la première fois
et conservez-le pour référence ultérieure.
Pour vous aider à utiliser votre machine à café de manière optimale, Saeco vous offre trois
outils d’assistance complète:
1 Le guide de mise en route rapide séparé, pour la première installation et la première
utilisation.
2 Ce mode d’emploi qui donne des informations détaillées.
3 Assistance et vidéos en ligne: scannez le code QR sur la première page ou consultez le site
www.saeco.com/care
Remarque: Cette machine a été soumise à un essai avec du café. Même si elle a été
soigneusement nettoyée, de l’eau ou des résidus de café peuvent s’y trouver. Nous
garantissons cependant que la machine est tout à fait neuve.
Vue d’ensemble de la machine (fig. 1)
1
Panneau de commande et écran
tactile
12 Bouton de déverrouillage du plateau
égouttoir
2 Porte-tasse 13 Cordon d’alimentation avec prise
3 Couvercle du compartiment à grains 14 Bouton de réglage de la mouture
4 Couvercle du compartiment du café
prémoulu
15 Compartiment à grains
5 Cappuccinatore interne 16 Groupe de percolation
6 Buse de distribution du café et du lait
réglable
17 Entonnoir pour café
7 Support du tube d’aspiration du lait 18 Tiroir à résidus de café
8 Interrupteur principal 19 Récipient à marc de café
9 Prise pour cordon 20 Plateau égouttoir
10 Porte d’accès 21 Grille du plateau égouttoir
11 Indicateur «Plateau égouttoir plein» 22 Réservoir d’eau
Accessoires
23
Tube de graisse 26 Cuillère à mesurer
24 Brosse de nettoyage 27 Bande de test de la dureté de l’eau
25 Filtre AquaClean
35
Français (Canada)
Pièces du mousseur à lait
28
Couvercle de récipient à lait 30 Tube d’aspiration du lait en métal
29 Récipient à lait 31 Tube d’aspiration du lait flexible
Première installation
Avant la première utilisation de votre machine à café, vous devez effectuer quelques étapes
simples, comme remplir le circuit d’eau et activer le filtre AquaClean. Ces étapes sont
indiquées dans le guide de mise en route rapide distinct.
Pour obtenir un café au meilleur goût, vous devez d’abord infuser cinq tasses de café pour
permettre à la machine de terminer son autoréglage.
L’appareil a été configuré de manière à extraire une saveur optimale de vos grains de café.
Nous vous conseillons donc de ne pas modifier les réglages du moulin avant d’avoir préparé
100 à 150tasses (environ un mois d’utilisation).
Nettoyez soigneusement le récipient à lait, les tubes d’aspiration du lait et le cappuccinatore
avant la première utilisation. Nous vous conseillons de ne pas mettre le cappuccinatore au
lave-vaisselle afin d’éviter que des particules de nourriture ou des résidus de détergent ne
l’obstruent.
Utilisation du panneau de commande et de
l’écran tactile
Vous trouverez ci-dessous une présentation et une description du panneau de commande et
de l’écran tactile de la machine. Vous pouvez balayer l’écran tactile et appuyer pour
sélectionner ou confirmer vos choix.
Drinks
Proles
Clean
Settings
43 51 72 6
1. Bouton de veille 4. Écran tactile 7. Bouton marche/arrêt
2. Profils personnels 5. Menu de nettoyage
3. Menu des boissons 6. Réglages de la machine
36
Français (Canada)

Filtre AquaClean
Le filtre AquaClean est conçu pour réduire les dépôts de calcaire dans votre cafetière et
fournir de l’eau filtrée afin de préserver l’arôme et la saveur de chaque tasse de café. Si vous
utilisez une série de huit filtres AquaClean au moment indiqué par la machine et en suivant le
présent mode d’emploi, il ne sera pas nécessaire de détartrer votre machine avant d’avoir
servi 5000tasses. Chaque filtre permet de servir jusqu’à 625tasses, en fonction des variétés
de café sélectionnées et de la fréquence de rinçage et de nettoyage.
Préparation du filtre AquaClean avant son activation
Avant de placer le filtre AquaClean dans le réservoir d’eau, vous devez le préparer à
l’utilisation:
1 Secouez le filtre pendant environ cinq secondes (fig. 2).
2 Immergez complètement le filtre à l’envers dans un pichet d’eau froide pendant au moins
30secondes. Attendez qu’il n’y ait plus de bulles d’air qui sortent (fig. 3).
3 Poussez le filtre dans le raccordement du filtre au niveau le plus bas possible. (fig. 4)
Activation du filtre AquaClean
Vous devez activer chaque nouveau filtre AquaClean utilisé. Lorsque vous activez le filtre
AquaClean, la machine détecte la capacité du filtre AquaClean et le nombre de filtres utilisés.
Il y a trois façons d’activer le filtre AquaClean.
1. Activation du filtre AquaClean lors de la première installation
Après la première mise en marche, la machine vous guide dans les premières étapes
d’installation, comme le remplissage du réservoir d’eau, le remplissage du circuit d’eau et
l’activation du filtre AquaClean. Il suffit de suivre les instructions à l’écran.
2. Activation du filtre AquaClean au moment demandé
Remplacez le filtre AquaClean lorsque l’écran affiche le message «Remplacer le filtre
AquaClean?». Puis suivez les instructions affichées à l’écran pour activer correctement le filtre.
Remplacez le filtre AquaClean au moins tous les 3mois, même si la machine n’indique pas
encore que c’est nécessaire.
3. Activation du filtre AquaClean à tout autre moment
Vous pouvez commencer à utiliser le filtre AquaClean à tout moment en suivant les
instructions ci-dessous.
1 Appuyez sur l’icône Réglage
, puis sélectionnez «AquaClean» (fig. 5).
2 Sélectionnez «nouveau» et lorsque l’écran d’activation s’affiche, appuyez sur le bouton de
marche/arrêt
3 Suivez les instructions indiquées à l’écran.
Remarque: Dans certaines situations, la machine vous indiquera que vous devez la détartrer
avant d’installer et d’activer un nouveau filtre AquaClean. Cela est dû au fait qu’il ne doit plus
y avoir de calcaire dans la machine pour que le filtre AquaClean puisse être utilisé. Suivez les
instructions indiquées à l’écran.
37
Français (Canada)
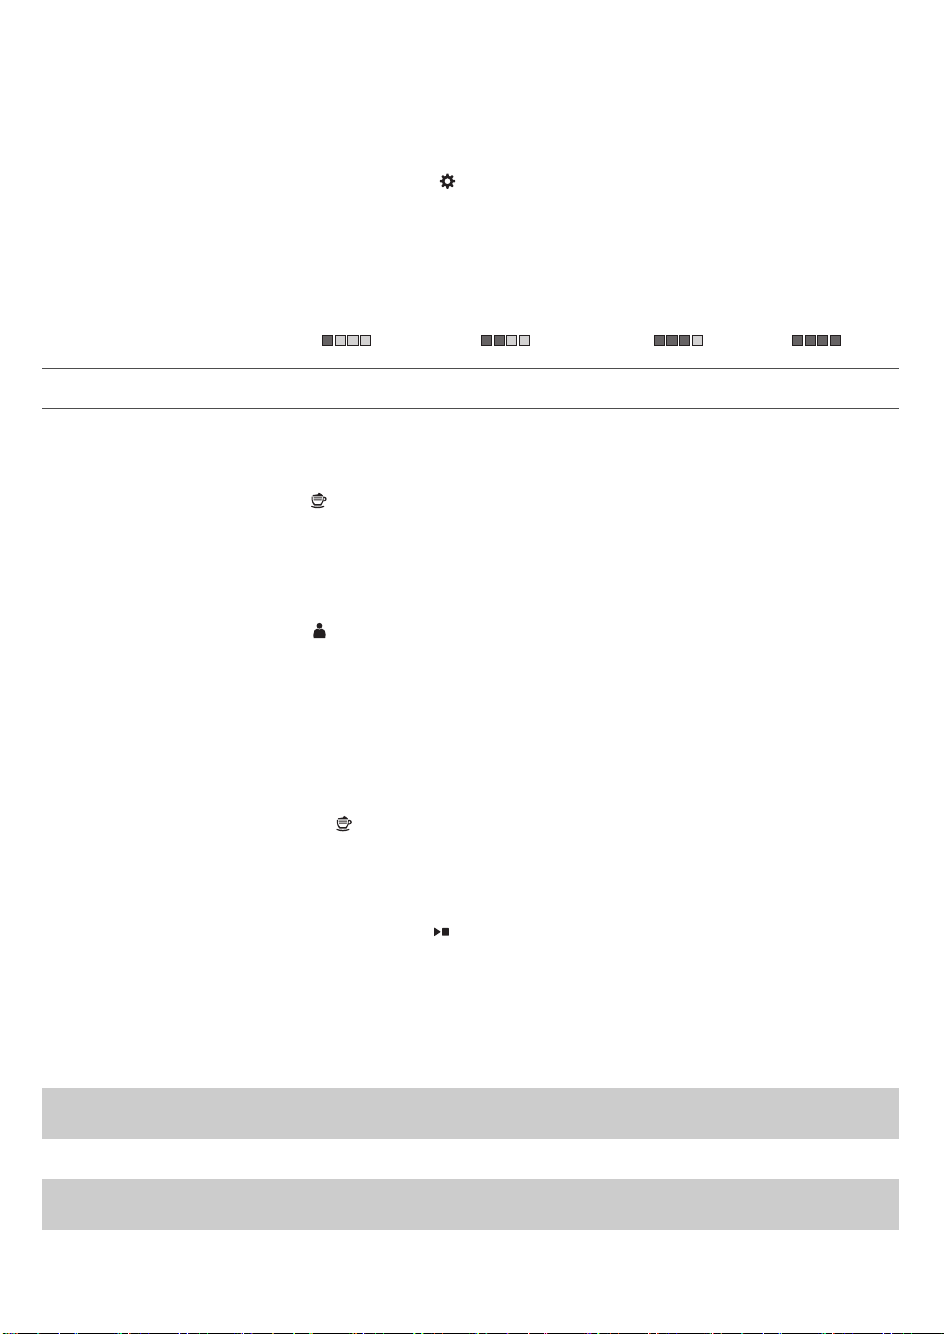
Mesure de la dureté de l’eau
Lors de la première installation, vous devez régler la dureté de l’eau. Suivez les étapes à
l’écran et utilisez la bandelette de test de dureté de l’eau fournie. Pour régler la dureté de
l’eau plus tard, appuyez sur l’icône Réglage
et sélectionnez «dureté de l’eau».
1 Immergez la bande de mesure de la dureté de l’eau dans de l’eau du robinet pendant une
seconde. Attendez une minute.
2 Vérifiez le nombre de carrés qui sont devenus rouges.
3 Sélectionnez le réglage de dureté de l’eau approprié et appuyez sur l’icône OK pour
confirmer votre choix.
Nombre de carrés rouges:
Valeur à définir 1 2 3 4
Infusion de boissons
Appuyez sur l’icône Boissons
pour entrer dans le menu des boissons. Faites défiler les
différentes pages pour trouver votre boisson. Après avoir sélectionné une boisson, vous
pouvez la personnaliser en réglant les paramètres (voir 'Personnalisez vos boissons').
-
Appuyez sur l’icône «2x» si vous voulez préparer deux tasses (fig. 6). La machine effectue
automatiquement deux cycles de mouture de suite pour les boissons sélectionnées.
-
Appuyez sur l’icône Profils
pour préparer l’une de vos boissons enregistrées.
-
Faites coulisser la buse de distribution vers le haut ou vers le bas pour adapter la hauteur
au format de la tasse ou du verre utilisé.
Infusion de boissons au café
1 Mettez de l’eau du robinet dans le réservoir d’eau et mettez des grains de café dans le
compartiment à grains de café.
2 Appuyez sur l’icône Boissons
et sélectionnez votre café.
3 Vous pouvez personnaliser l’intensité et le volume du café dans le premier écran en
balayant les barres réglables de haut en bas (fig. 7). Si vous cliquez sur la flèche à droite (fig.
8), le deuxième écran s’affiche avec d’autres paramètres à régler.
4 Appuyez sur le bouton de marche/arrêt
pour commencer à préparer la boisson
sélectionnée.
Infusion de boissons à base de lait
1 Mettez de l’eau du robinet dans le réservoir d’eau et mettez des grains de café dans le
compartiment à grains de café.
Suggestion: Faites glisser la buse de distribution dans la position la plus élevée pour
accéder facilement au réservoir d’eau.
2 Dévissez le couvercle du récipient à lait et remplissez de lait le récipient à lait (fig. 9).
Pour un résultat optimal, nous vous conseillons d’utiliser du lait sortant directement du
réfrigérateur.
38
Français (Canada)
3 Placez le tube d’aspiration du lait en métal dans le récipient. Ouvrez la porte du
cappuccinatore interne (fig. 10) et raccordez le tube d’aspiration du lait flexible au
cappuccinatore (fig. 11). Puis refermez la porte du cappuccinatore interne.
4 Appuyez sur l’icône Boissons
et sélectionnez votre boisson à base de lait.
5 Vous pouvez personnaliser l’intensité du café ainsi que le volume de café et de lait dans le
premier écran en faisant glisser les barres réglables vers le haut et vers le bas (fig. 7). Si
vous cliquez sur la flèche à droite (fig. 8), le deuxième écran s’affiche avec d’autres
paramètres à régler.
6 Vous pouvez régler les paramètres à votre convenance en faisant glisser les barres
réglables vers le haut ou vers le bas.
7 Appuyez sur le bouton de marche/arrêt
pour commencer à préparer la boisson
sélectionnée.
8 Immédiatement après la distribution du lait, la procédure d’injection de vapeur
automatique (Auto Steam Shoot) est effectuée. La machine force la vapeur à travers le
système de lait interne pour le rincer rapidement.
Suggestion: Vous pouvez également utiliser un carton de lait classique pour préparer vos
boissons à base de lait. Placez le tube d’aspiration du lait en métal directement dans le carton
de lait.
Infuser du café avec du café prémoulu
1 Ouvrez le couvercle du compartiment à café prémoulu et versez une mesure de café
prémoulu dans le compartiment (fig. 12). Puis fermez le couvercle.
2 Après avoir sélectionné une boisson, appuyez sur l’icône (fig. 13) de café prémoulu
, puis
sur le bouton marche/arrêt
.
Remarque: Si vous sélectionnez du café prémoulu, vous ne pouvez pas régler l’intensité du
café et préparer plus d’une tasse à la fois.
Distribution d’eau chaude
1 Appuyez sur l’icône Boissons , puis sélectionnez «Eau chaude».
2 Appuyez sur le bouton marche/arrêt
pour commencer la distribution d’eau chaude.
Personnalisation de boissons et création de
profils
Cette machine vous permet de régler les paramètres d’une boisson à votre convenance et
d’enregistrer le réglage de la boisson dans un profil personnel. Il existe deux façons de créer
un profil:
1 Dans le menu «Boissons»: sélectionnez et réglez une boisson, puis appuyez sur l’icône
«Enregistrer»
.
2 Dans le menu «Profils»: Créez un profil en appuyant sur l’icône «Ajouter un profil».
Sélectionnez le profil nouvellement créé, sélectionnez une boisson, réglez-la à votre
convenance, puis appuyez sur l’icône «Enregistrer»
.
39
Français (Canada)

Personnalisez vos boissons
Vous pouvez ajuster les paramètres des boissons selon vos préférences:
1 Appuyez sur l’icône Boissons
.
2 Sélectionnez votre boisson préférée.
3 L’écran affiche les paramètres que vous pouvez régler à votre convenance. Appuyez sur la
flèche à droite (fig. 8) pour passer à l’écran suivant afin de régler d’autres paramètres. Selon
le type de boisson, vous pouvez régler les paramètres. Pour les boissons au café, vous
pouvez régler le volume, l’intensité, le goût et la température. Pour les boissons à base de
lait, vous pouvez régler le volume de lait, le niveau de mousse et l’ordre de préparation du
café et du lait. Pour l’eau chaude, vous pouvez régler le volume.
4 Faites glisser les barres vers le haut ou vers le bas pour les régler au niveau (fig. 7) de votre
choix.
5 Vous pouvez enregistrer ces paramètres dans un profil en appuyant sur l’icône (fig. 14)
«Enregistrer»
et en sélectionnant un profil existant ou en ajoutant un (fig. 15) nouveau
profil.
Créer un profil
1 Appuyez sur l’icône de profils .
2 Sélectionnez «Ajouter un profil» (fig. 15).
3 Entrez un nom pour le nouveau profil et confirmez (fig. 16) votre choix.
4 Sélectionnez le profil nouvellement créé.
5 Ajoutez des boissons au profil en sélectionnant «Ajouter une boisson» (fig. 17).
Supprimer un profil
1 Appuyez sur l’icône de profils
.
2 Appuyez longuement sur l’icône que vous voulez supprimer.
3 Sélectionnez «Supprimer» et confirmez votre choix
Réglage des paramètres de la machine
Vous pouvez modifier les réglages du moulin en utilisant le bouton de réglage de la mouture
à l’intérieur du réservoir à café en grains. Vous pouvez choisir parmi 12différents réglages de
mouture. Plus le réglage est bas, plus le café est fort.
Remarque: Vous devez infuser deux ou trois tasses avant de pouvoir goûter la différence
complète.
Attention: Ne déplacez pas le bouton de réglage de la mouture de plus d’une encoche à la
fois afin d’éviter d’endommager le moulin
1 Ouvrez le couvercle du compartiment à grains.
2 Appuyez sur le bouton de réglage de la mouture et tournez-le vers la gauche ou vers la
droite (fig. 18). Tournez le bouton de réglage de la mouture d’un cran à la fois. Chaque fois
que vous tournez le réglage de la mouture d’un cran, préparez une boisson au café pour
éviter d’endommager le moulin.
3 Fermez le couvercle du compartiment à grains.
40
Français (Canada)

Réglage des paramètres par défaut
Utilisez l’icône RÉGLAGES pour modifier les paramètres suivants:
-
AquaClean: Pour vérifier l’état du filtre AquaClean et en installer un nouveau.
-
Dureté de l’eau: pour être en mesure de régler les paramètres de la machine en fonction
de l’eau dans votre région, veuillez mesurer la dureté de l’eau.
-
Délai de mise en veille: il s’agit du laps de temps après lequel la machine passe en mode
veille.
-
Luminosité: pour régler le contraste de l’affichage
-
Lumière du réservoir d’eau: pour régler la lumière dans le réservoir d’eau
-
Lumière de la buse de distribution du café: pour régler la lumière qui éclaire le plateau à
tasses.
-
Langue: pour sélectionner une autre langue
-
Unité de mesure: pour sélectionner des millilitres ou des onces liquides (États-Unis)
-
Commentaires sonores: pour activer/désactiver les commentaires sonores de l’affichage
Manipulation du groupe de percolation
Consultez le site www.saeco.com/care pour obtenir des instructions vidéo détaillées sur le
retrait, l’insertion et le nettoyage du groupe de percolation.
Retrait du groupe de percolation de la machine
1 Éteignez la machine en appuyant sur l’interrupteur principal situé à l’arrière de la machine.
2 Ouvrez la porte (fig. 19) d’accès.
3 Retirez le tiroir (fig. 20) à résidus de café.
4 Appuyez sur le bouton (fig. 21) PUSH et tirez sur la poignée du groupe de percolation pour
le retirer de la machine (fig. 22).
Réinsersion du groupe de percolation
Avant de faire glisser le groupe de percolation dans la machine, assurez-vous qu’il est placé
dans la bonne position.
1 Vérifiez que la flèche située sur le cylindre jaune sur le côté du groupe de percolation est
alignée sur la flèche noire et le N (fig. 23).
-
Si ce n’est pas le cas, poussez le levier vers le bas jusqu’à ce qu’il touche la base du
groupe (fig. 24) de percolation.
2 Assurez-vous que le crochet de verrouillage jaune de l’autre côté du groupe de percolation
est placé dans la bonne position.
-
Pour placer le crochet correctement, poussez-le vers le haut jusqu’à ce qu’il se trouve le
plus haut possible (fig. 25).
3 Replacez le groupe de percolation dans la machine en le faisant glisser le long des rainures
latérales (fig. 26) de guidage jusqu’à ce qu’il soit enclenché (fig. 27).N’appuyez pas sur le
boutonPUSH.
4 Replacez le tiroir à résidus de café et fermez la porte d’accès.
41
Français (Canada)

Nettoyage et entretien
Un nettoyage et un entretien réguliers optimisent le fonctionnement de votre machine,
préservent le bon goût du café pendant longtemps et assurent un débit du café stable et une
parfaite mousse de lait.
Consultez le tableau indiquant à quel moment et de quelle façon vous devez nettoyer toutes
les parties détachables de la machine. Vous trouverez des informations plus détaillées et des
instructions vidéo sur le site www.saeco.com/care.
Tableau relatif au nettoyage
Pièce
Quand nettoyer Comment nettoyer
Groupe de
percolation
Une fois par semaine Retirez le groupe de percolation, rincez-le
sous le robinet et laissez-le sécher à l’air
libre.
Une fois par mois Effectuez la procédure pour «Nettoyer le
groupe de percolation» à l’aide d’une pastille
dégraissante pour café Philips. Sélectionnez
«Nettoyer le groupe de percolation» dans le
menu de nettoyage et suivez les instructions
à l’écran. Visitez le site www.saeco.com/care
pour obtenir des instructions vidéo
détaillées.
Lubrification du
groupe de
percolation
Selon le type d’utilisation.
Consultez le tableau (voir
'Lubrification du groupe
de percolation') de
lubrification.
Lubrifiez le groupe de percolation en vous
servant de graisse Philips. Visitez le site
www.saeco.com/care pour obtenir des
instructions vidéo détaillées.
Système de
distribution de
lait/cappuccina
tore interne
Après chaque journée
d’utilisation
Exécutez le programme HYGIESTEAM dans le
menu de nettoyage. Sélectionnez
HYGIESTEAM dans le menu de nettoyage et
suivez les instructions à l’écran. Essuyez
l’extérieur du tube d’aspiration du lait en
métal avec un chiffon humide avant de le
placer dans le support de tube d’aspiration
du lait.
Une fois par semaine Retirez et démontez le cappuccinatore (voir
'Nettoyage du cappuccinatore interne sous le
robinet') interne. Rincez toutes les pièces
sous le robinet avec un peu de liquide
vaisselle.
42
Français (Canada)

Pièce Quand nettoyer Comment nettoyer
Une fois par mois Effectuez la procédure «DEEP MILK CLEAN»
à l’aide du nettoyeur de circuit du lait Philips.
Sélectionnez «DEEP MILK CLEAN» dans le
menu de nettoyage et suivez les instructions
à l’écran. Visitez le site www.saeco.com/care
pour obtenir des instructions vidéo
détaillées.
Récipient à lait Une fois par semaine Démontez le récipient (fig. 28) à lait et faites
sortir la boule à l’aide de la cuillère (fig. 29) à
mesurer. Rincez toutes les pièces sous le
robinet ou passez-les au lave-vaisselle.
Plateau
égouttoir
Videz le plateau égouttoir
tous les jours ou dès que
le voyant rouge «Plateau
égouttoir plein» s’allume à
travers le couvercle du
plateau égouttoir (fig. 30).
Retirez le plateau égouttoir et nettoyez-le
sous le robinet avec un peu de liquide
vaisselle.
Récipient à marc
de café
Videz le récipient à marc
de café lorsque la
machine le demande.
Nettoyez-le chaque
semaine.
Retirez le récipient à marc de café pendant
que la machine est allumée et rincez-le sous
le robinet avec un peu de liquide vaisselle.
Réservoir d’eau Une fois par semaine Rincez le réservoir d’eau sous le robinet.
Entonnoir pour
café
Vérifiez l’entonnoir pour
café toutes les semaines
pour vous assurer qu’il
n’est pas obstrué.
Débranchez la machine et retirez le groupe
de percolation. Ouvrez le couvercle du
compartiment à café prémoulu et insérez le
manche d’une cuillère dans l’entonnoir pour
café. Agitez le manche de haut en bas pour
faire tomber (fig. 31) le café moulu qui cause
l’obstruction. Visitez le site
www.saeco.com.care pour obtenir des
instructions vidéo détaillées.
Suggestion: Vous trouverez un calendrier de nettoyage sur la dernière page du présent mode
d’emploi. Notez les dates auxquelles vous devez procéder à un nettoyage.
Nettoyage du groupe de percolation
Un nettoyage régulier du groupe de percolation empêche l’obstruction des circuits internes
par des résidus de café. Visitez le site www.saeco.com/care pour visionner des vidéos d’aide
qui vous montrent comment retirer, insérer et nettoyer le groupe de percolation.
Nettoyage du groupe de percolation sous le robinet
1 Ouvrez la porte de service et retirez le groupe (voir 'Retrait du groupe de percolation de la
machine') de percolation.
43
Français (Canada)

2 Rincez soigneusement le groupe de percolation à l’eau. Nettoyez soigneusement le filtre
(fig. 32) du haut.
3 Laissez le groupe de percolation sécher à l’air libre avant de le remettre en place. Évitez
d’utiliser un chiffon pour sécher le groupe de percolation afin d’empêcher que des fibres
ne s’accumulent dans le dispositif.
Nettoyage du groupe de percolation avec les pastilles dégraissantes
Utilisez uniquement des pastilles dégraissantes pour café Philips. Appuyez sur l’icone de
nettoyage
, puis sélectionnez «Nettoyer le groupe de percolation». Suivez ensuite les
instructions indiquées à l’écran. Visitez le site www.saeco.com/care pour obtenir des
instructions vidéo détaillées.
Lubrification du groupe de percolation
Lubrifiez régulièrement le groupe de percolation afin que ses pièces mobiles puissent
continuer à bouger correctement.
1 Appliquez une fine couche de graisse autour de l’axe dans le fond du groupe de
percolation (fig. 33).
2 Appliquez une fine couche de graisse sur les rails des deux côtés (fig. 34).
Reportez-vous au tableau ci-dessous pour connaître la fréquence de lubrification. Visitez le
site www.saeco.com/care pour obtenir des instructions vidéo détaillées.
Fréquence
d’utilisation
Nombre de boissons brassées
quotidiennement
Fréquence de lubrification
Faible 1-5 Tous les 4mois
Normale 6-10 Tous les 2mois
Élevée plus de10 Tous les mois
Programmes de nettoyage pour le cappuccinatore interne
La machine propose trois programmes de nettoyage pour le cappuccinatore interne. Le
programme de nettoyage Auto Steam Shoot (Injection de vapeur automatique) est
automatiquement exécuté par la machine après l’infusion d’une boisson à base de lait. Vous
pouvez sélectionner le programme HYGIESTEAM ou DEEP MILK CLEAN en appuyant sur
l’icône de nettoyage
et en faisant défiler le menu de nettoyage. Suivez ensuite les
instructions indiquées à l’écran.
-
Auto Steam Shoot (Injection de vapeur automatique): la machine injecte de la vapeur dans
le cappuccinatore interne pour le nettoyer rapidement.
-
HYGIESTEAM: la machine nettoie à la vapeur le système interne de distribution de lait en
profondeur. Placez le tube d’aspiration du lait dans le support (fig. 35) de tube d’aspiration
et suivez les instructions à l’écran.
-
DEEP MILK CLEAN: Effectuez la procédure «DEEP MILK CLEAN» à l’aide du nettoyeur de
circuit de lait Philips pour un nettoyage en profondeur du système interne de distribution
de lait.
44
Français (Canada)

Nettoyage du cappuccinatore interne sous le robinet
1 Ouvrez la porte du cappuccinatore (fig. 10) interne.
2 Retirez le cappuccinatore interne en le tirant vers le bas (fig. 36).
3 Démontez le cappuccinatore interne en tirant la partie inférieure pour la séparer de la
partie (fig. 37) supérieure.
4 Démontez toutes les pièces (fig. 38) et nettoyez-les sous le robinet.
5 Remontez le cappuccinatore interne.
6 Pour remettre le cappuccinatore interne en place, mettez-le en position verticale et
assurez-vous que les orifices sont alignés sur les deux tubes de la machine. Puis déplacez
le cappuccinatore interne vers le haut jusqu’à ce qu’il s’enclenche (fig. 39).
7 Fermez la porte.
Visitez le site www.saeco.com/care pour obtenir des instructions vidéo détaillées.
Procédure de détartrage
Veuillez utiliser uniquement le détartrant Philips. Vous ne devriez en aucun cas utiliser un
détartrant à base d’acide sulfurique, d’acide chlorhydrique, d’acide sulfamique ou acétique
(vinaigre) puisque cela pourrait endommager le circuit d’eau de votre machine et l’empêcher
de dissoudre correctement le calcaire. Le fait de ne pas utiliser le détartrant Philips entraîne
l’annulation de votre garantie. Le fait d’omettre de détartrer l’appareil entraîne également
l’annulation de votre garantie. Vous pouvez vous procurer la solution de détartrage Philips
dans la boutique en ligne www.saeco.com/care.
1 Lorsque la machine vous demande de la détartrer, appuyez sur le bouton marche/arrêt
pour commencer le détartrage. Pour lancer un détartrage sans y être invité par la machine,
appuyez sur l’icône de nettoyage
et sélectionnez «Détartrage» (fig. 40).
2 Retirez le plateau égouttoir et le récipient à marc de café, videz-les et replacez-les dans la
machine.
3 Retirez le réservoir d’eau et videz-le. Retirez ensuite le filtre AquaClean.
4 Versez le contenu d’une bouteille complète de détartrant Philips dans le réservoir d’eau,
puis remplissez ce dernier d’eau jusqu’au niveau CALC CLEAN. Puis replacez le réservoir
d’eau dans la machine.
5 Placez un grand récipient (1,5litre) sous la buse de distribution de café.
6 Suivez les instructions à l’écran pour lancer la procédure de détartrage. La procédure de
détartrage dure environ 15minutes et consiste en un cycle de détartrage et un cycle de
rinçage.
7 Une fois le cycle de détartrage terminé, vous devez rincer le réservoir d’eau et le circuit
d’eau. Suivez les instructions indiquées à l’écran.
8 Placez un nouveau filtre AquaClean dans le réservoir d’eau et réactivez le filtre AquaClean
dans le menu.
Suggestion: L’utilisation du filtre AquaClean réduit le besoin de détartrage!
Que faire si la procédure de détartrage est interrompue
Vous pouvez interrompre la procédure de détartrage en appuyant sur le bouton de veille du
panneau de commande. Si la procédure de détartrage est interrompue avant qu’elle ne soit
terminée, procédez comme suit:
45
Français (Canada)
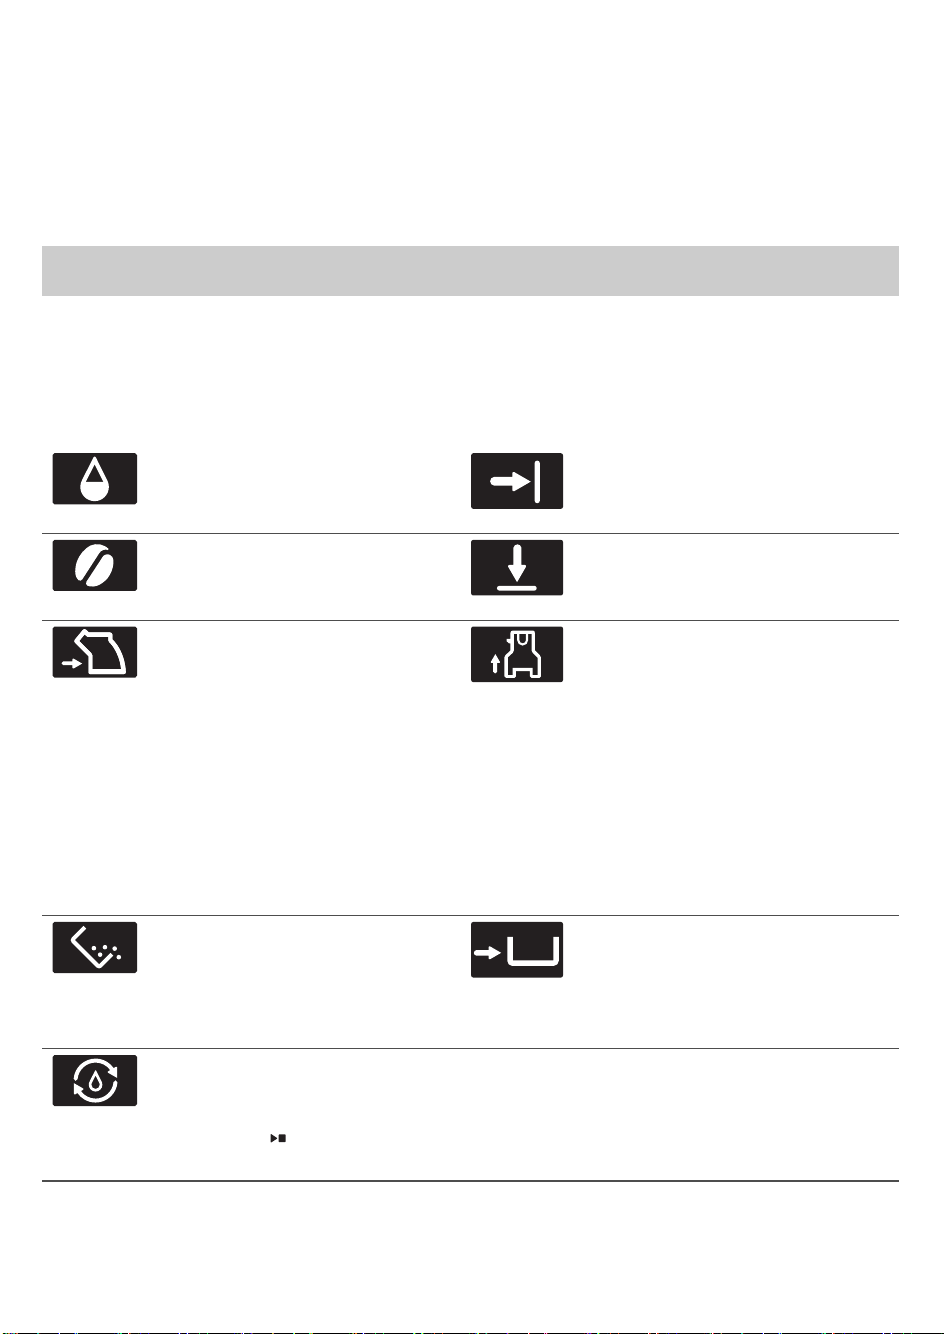
1 Videz le réservoir d’eau et rincez-le soigneusement.
2 Remplissez le réservoir d’eau fraîche jusqu’à la mesure CALC CLEAN et rallumez la
machine. La machine chauffera et effectuera un cycle de rinçage automatique.
3 Avant de préparer une boisson, effectuez un cycle de rinçage manuel.Pour effectuer un
cycle de rinçage manuel, faites d’abord couler la moitié d’un réservoir d’eau chaude, puis
infusez deux tasses de café prémoulu sans ajouter de café moulu.
Remarque: Si la procédure de détartrage n’est pas allée jusqu’au bout, la machine
nécessitera une nouvelle procédure de détartrage dès que possible.
Icônes d’avertissement et codes d’erreur
Signification des icônes d’avertissement
Remplissez le réservoir d’eau
avec de l’eau fraîche jusqu’à
atteindre la mesure MAX.
Fermez la porte de service.
Le compartiment à grains est
vide. Mettez de nouveaux grains
dans le compartiment à grains.
Fermez le couvercle du
compartiment à grains.
Le groupe de percolation n’est
pas dans la machine ou n’est
pas inséré correctement. Insérez
le groupe de percolation et
assurez-vous qu’il est
correctement enclenché.
Le cappuccinatore interne n’est
pas dans la machine ou n’est pas
inséré correctement et (ou) la
porte de la buse est ouverte.
Assurez-vous que les orifices du
cappuccinatore sont alignés sur
les deux tubes de la machine
avant de pousser le
cappuccinatore interne vers le
haut pour l’enclencher. Puis
fermez la porte de la buse de
distribution.
Le récipient à marc de café est
plein. Assurez-vous que la
machine est allumée. Ensuite,
retirez et videz le récipient à
marc de café.
Le récipient à marc de café n’est
pas en place. Remettez le
récipient à marc de café en place.
La machine doit remplir le circuit
d’eau. Assurez-vous qu’il y a de
l’eau dans le réservoir d’eau et
appuyez sur
le bouton
marche/arrêt.
46
Français (Canada)

Signification des codes d’erreur
Vous trouverez ci-dessous une liste des codes d’erreur indiquant les problèmes que vous
pouvez résoudre vous-même. Les instructions vidéo sont disponibles sur le site
www.saeco.com/care. Si un autre code d’erreur s’affiche, communiquez avec le service à la
clientèle Philips de votre pays. Vous trouverez les coordonnées du centre dans le feuillet de
garantie.
Code
d’erreur
Problème Solution possible
01 L’entonnoir à café est
obstrué.
Éteignez la machine et débranchez-la. Retirez le groupe
de distribution. Ouvrez le couvercle du compartiment à
café prémoulu et insérez-y le manche d’une cuillère.
Agitez le manche de haut en bas pour faire tomber (fig.
31) le café moulu qui cause l’obstruction. Visitez le site
www.saeco.com/care pour obtenir des instructions vidéo
détaillées.
03 Le groupe de
percolation est sale
ou n’est pas bien
graissé.
Éteignez la machine au moyen de l’interrupteur principal.
Rincez le groupe de percolation à l’eau fraîche, laissez-le
sécher à l’air libre, puis lubrifiez-le. Consultez le chapitre
«Nettoyage du groupe de distribution» ou visitez le site
www.saeco.com/care pour obtenir des instructions vidéo
détaillées. Puis rallumez la machine.
04 Le groupe de
percolation n’est pas
placé correctement.
Éteignez la machine au moyen de l’interrupteur principal.
Retirez le groupe de percolation et réinsérez-le. Assurez-
vous que le groupe de percolation est dans la bonne
position avant de l’insérer. Consultez le chapitre
«Manipulation du groupe de percolation» ou visitez le
site www.saeco.com/care pour obtenir des instructions
vidéo détaillées. Puis rallumez la machine.
05 Le circuit d’eau
contient de l’air.
Redémarrez la machine en l’éteignant et en le rallumant
au moyen de l’interrupteur principal. Si cela fonctionne,
versez deux à trois tasses d’eau chaude. Détartrez la
machine si vous ne l’avez pas fait depuis longtemps.
Le filtre AquaClean
n’a pas été
correctement préparé
avant l’installation ou
il est obstrué.
Retirez le filtre AquaClean, puis essayez de préparer de
nouveau un café. Si cela fonctionne, assurez-vous que le
filtre AquaClean a été correctement préparé avant de le
remettre en place (voir 'Préparation du filtre AquaClean
avant son activation'). Remettez le filtre AquaClean dans
le réservoir d’eau. Si cela ne fonctionne toujours pas, le
filtre peut être bouché et doit être remplacé.
14 La machine
surchauffe.
Éteignez la machine et rallumez-la après 30minutes.
47
Français (Canada)

Commande d'accessoires
Pour nettoyer et détartrer la machine, utilisez uniquement les produits d’entretien Philips.
Vous pouvez acheter ces produits chez votre détaillant local, dans les centres de service
autorisés ou en ligne sur le site www.saeco.com/care. Pour trouver la liste complète des
pièces de rechange en ligne, entrez le numéro de modèle de votre machine à café. Vous
trouverez le numéro de modèle à l’intérieur de la porte d’accès.
Produits d’entretien et numéros de référence:
-
Solution de détartrage CA6700
-
Filtre AquaClean CA6903
-
Graisse pour groupe de percolation HD5061
-
Pastilles dégraissantes pour café CA6704
-
Nettoyeur du circuit à lait CA6705
-
Trousse d’entretien CA6707
Résolution des problèmes
Ce chapitre récapitule les problèmes les plus courants que vous pouvez rencontrer avec la
machine. Des vidéos d’aide et la liste complète des questions fréquemment posées sont
disponibles sur le site www.saeco.com/care. Si vous n’arrivez pas à résoudre le problème,
veuillez communiquer avec le service à la clientèle Philips de votre pays. Vous trouverez les
coordonnées du centre dans le feuillet de garantie.
Problème
Cause Solution
Le plateau égouttoir se
remplit rapidement.
Ce phénomène est normal.
La machine utilise l’eau pour
rincer le circuit interne et le
groupe de percolation. De
l’eau coule dans le système
interne directement dans le
plateau égouttoir.
Videz le plateau égouttoir tous les
jours ou dès que le voyant rouge
«Plateau égouttoir plein» s’allume à
travers le couvercle du plateau (fig.
30) égouttoir. Placez une tasse sous
la buse de distribution pour recueillir
l’eau de rinçage.
La machine est en
mode DÉMO.
Vous avez appuyé sur le
bouton de mise en veille
pendant plus de huit
secondes.
Éteignez la machine, puis rallumez-
la en utilisant l’interrupteur principal
situé à l’arrière.
L’icône indiquant que
le récipient à marc de
café est plein reste
affichée.
Vous avez vidé le bac à marc
de café alors que l’appareil
était éteint.
Videz toujours le bac à marc de café
pendant que l’appareil est allumé. Si
vous videz le bac à marc de café
pendant que la machine est éteinte,
le compteur du cycle du café n’est
pas réinitialisé.
Vous avez remis en place le
bac à marc de café trop
rapidement.
Ne remettez pas le récipient à marc
de café en place avant que l’écran
ne vous invite à le faire.
48
Français (Canada)

Problème Cause Solution
L’icône indiquant que
le récipient à marc de
café est plein s’affiche
même si le récipient
n’est pas plein.
La machine n’a pas
réinitialisé le compteur la
dernière fois que vous avez
vidé le récipient à marc de
café.
Patientez toujours environ cinq
secondes lorsque vous replacez le
récipient à marc de café. De cette
manière, le compteur de marc de
café se réinitialisera à zéro.
Videz toujours le bac à marc de café
pendant que l’appareil est allumé. Si
vous videz le récipient à marc de
café lorsque la machine est éteinte,
le compteur de marc de café ne sera
pas réinitialisé.
Je ne peux pas retirer
le groupe de
percolation.
Le groupe de percolation
n’est pas positionné
correctement.
Réinitialisez la machine de la
manière suivante: remettez en place
le plateau égouttoir et le récipient à
marc de café. Fermez ensuite la
porte d’accès au groupe de
percolation, puis éteignez et
rallumez la machine. Réessayez de
retirer le groupe de percolation.
Vous n’avez pas retiré le
récipient à marc de café.
Retirez le récipient à marc de café
avant de retirer le groupe de
percolation.
Je ne peux pas insérer
le groupe de
percolation.
Le groupe de percolation
n’est pas positionné
correctement.
Réinitialisez la machine de la
manière suivante: remettez en place
le plateau égouttoir et le récipient à
marc de café. Laissez le groupe de
percolation à l’extérieur. Fermez la
porte d’accès, éteignez la machine,
puis rallumez-la. Placez ensuite le
groupe de percolation dans la
bonne position et réinsérez-le dans
la machine (voir 'Réinsersion du
groupe de percolation').
Le café est dilué. Le groupe de percolation est
sale et doit être lubrifié.
Nettoyez et lubrifiez le groupe de
percolation.
Le réglage du moulin est
défini sur une mouture trop
grosse.
Réglez le moulin sur une mouture
plus fine (numéro inférieur).
Les paramètres du café ont
été réglés.
Sélectionnez votre boisson au café
et réglez les paramètres pour obtenir
un café plus fort.
49
Français (Canada)

Problème Cause Solution
La machine effectue sa
procédure de réglage
automatique après une
modification des réglages du
moulin ou des types de
grains.
Préparez quelques tasses de café.
Le café n’est pas assez
chaud.
Les tasses que vous utilisez
sont froides.
Préchauffez les tasses en les rinçant
à l’eau chaude.
La température sélectionnée
est trop basse. Consultez les
paramètres du menu.
Choisissez une température élevée
dans le menu.
Vous avez ajouté du lait. Si le lait que vous ajoutez est tiède
ou froide, il abaisse toujours un peu
la température du café.
Le café ne s’écoule pas
ou s’écoule lentement.
Le filtre AquaClean n’a pas
été correctement préparé
avant l’installation ou il est
obstrué.
Retirez le filtre AquaClean, puis
essayez de préparer un café de
nouveau. Si cela fonctionne,
assurez-vous que le filtre AquaClean
a été correctement préparé avant de
le remettre en place. Remettez le
filtre préparé en place. Si cela ne
fonctionne toujours pas, le filtre peut
être bouché et doit être remplacé.
Le réglage du moulin est
défini sur une mouture trop
fine.
Réglez le moulin sur une mouture
plus grosse (numéro supérieur).
Le groupe de percolation est
sale.
Nettoyez le groupe de percolation.
La buse de distribution du
café est sale.
Nettoyez la buse de distribution du
café et ses trous avec une aiguille.
Du calcaire obstrue le circuit
de la machine.
Détartrez la machine.
Le lait ne mousse pas. Le cappuccinatore interne
est sale ou n’est pas bien
inséré.
Nettoyez le cappuccinatore interne
et assurez-vous de le placer dans la
bonne position et de l’insérer
correctement (voir 'Nettoyage du
cappuccinatore interne sous le
robinet').
50
Français (Canada)
Problème Cause Solution
Le type de lait utilisé ne
convient pas pour produire
de la mousse.
Différents types de lait produisent
différentes quantités et qualités de
mousse. Nous avons testé les types
de laits suivants, qui ont produit une
mousse satisfaisante: du lait de
vache demi-écrémé ou entier, du lait
de soja et du lait sans lactose.
Le lait éclabousse. Le lait que vous utilisez n’est
pas assez froid.
Assurez-vous d’utiliser du lait froid
sortant directement du réfrigérateur.
Le tube d’aspiration du lait
flexible n’est pas raccordé
correctement.
Ouvrez la porte de la buse (fig. 10) de
distribution du café et vérifiez si le
tube d’aspiration du lait flexible est
complètement raccordé au
cappuccinatore (fig. 11). Notez que le
cappuccinatore et les tubes
d’aspiration du lait peuvent être
chauds. Laissez le cappuccinatore et
les tubes refroidir avant de les
toucher.
Le cappuccinatore et les
tubes d’aspiration du lait ne
sont pas propres.
Retirez et démontez le
cappuccinatore (voir 'Nettoyage du
cappuccinatore interne sous le
robinet') interne. Rincez toutes les
pièces sous le robinet. Pour un
nettoyage en profondeur, utilisez le
nettoyeur de circuit du lait Philips et
effectuez la procédure DEEP MILK
CLEAN en utilisant le menu
nettoyage (
). Notez que si les
pièces ont été lavées au lave-
vaisselle, elles peuvent avoir été
obstruées par des particules de
nourriture ou des résidus de
détergent. Nous vous conseillons
d’effectuer également une
inspection visuelle pour vérifier que
rien n’obstrue les pièces.
Nous vous conseillons d’effectuer le
programme HygieSteam tous les
jours: 1) Appuyez sur «Nettoyage»
sur le panneau de commande. 2)
Sélectionnez «HygieSteam». 3)
Appuyez sur le bouton de
démarrage pour démarrer le
processus, puis confirmez toutes les
étapes sur l’écran.
51
Français (Canada)

Problème Cause Solution
Les tubes d’aspiration du lait
sont bouchés.
Conservez toujours le récipient à lait
sans les tubes d’aspiration dans le
réfrigérateur. Des résidus de lait
peuvent s’accumuler dans les tubes
d’aspiration du lait et bloquer le
passage du lait dans les tubes.
Rincez les tubes d’aspiration du lait
avant de les ranger.
La machine semble
fuir.
La machine utilise l’eau pour
rincer le circuit interne et le
groupe de percolation. De
l’eau coule dans le système
interne directement dans le
plateau égouttoir.
Videz le plateau égouttoir tous les
jours ou dès que le voyant «Plateau
égouttoir plein» s’allume à travers le
couvercle du plateau (fig. 30)
égouttoir. Placez une tasse sous la
buse de distribution pour recueillir
l’eau de rinçage.
Le plateau égouttoir est trop
plein et a débordé, ce qui
donne l’impression que la
machine fuit.
Videz le plateau égouttoir tous les
jours ou dès que le voyant «Plateau
égouttoir plein» s’allume à travers le
couvercle du plateau (fig. 30)
égouttoir. Placez une tasse sous la
buse de distribution pour recueillir
l’eau de rinçage.
La machine ne repose pas
sur une surface horizontale.
Placez la machine sur une surface
horizontale afin que le voyant
«Plateau égouttoir plein»
fonctionne correctement.
Je ne peux pas activer
le filtre AquaClean et la
machine demande un
détartrage.
Le filtre n’a pas été remplacé
lorsque l’icône du filtre
AquaClean a clignoté et la
capacité a atteint 0%.
Détartrez d’abord votre machine,
puis installez le filtre AquaClean.
Vous n’avez pas installé le
filtre AquaClean au cours de
la première installation, mais
après avoir préparé environ
25cafés (sur la base de
tasses de 100ml/3oz). La
machine doit être
complètement exempte de
dépôts de calcaire avant que
vous n’installiez le filtre
AquaClean.
Commencez par détartrer la
machine, puis installez un nouveau
filtre AquaClean. Après le détartrage,
le compteur de filtres est réinitialisé
à0/8. Confirmez toujours l’activation
du filtre dans le menu de la machine.
Faites-le également après un
remplacement de filtre.
Ce nouveau filtre à eau
ne convient pas.
Vous essayez d’installer un
autre filtre qu’un filtre
AquaClean.
Seul le filtre AquaClean s’insère dans
la machine.
52
Français (Canada)

Problème Cause Solution
La machine fait du
bruit.
Il est normal que votre
machine fasse du bruit
pendant l’utilisation.
Si la machine se met à produire un
son différent, nettoyez le groupe de
percolation et lubrifiez-le (voir
'Lubrification du groupe de
percolation').
Le filtre AquaClean n’a pas
été préparé correctement et
de l’air est maintenant aspiré
dans la machine.
Retirez le filtre AquaClean du
réservoir d’eau. Secouez le filtre
pendant environ cinq secondes.
Immergez le filtre à l’envers dans un
pichet d’eau froide pendant au
moins 30secondes. Attendez qu’il
n’y ait plus de bulles d’air qui sortent.
Placez le filtre AquaClean préparé
dans le réservoir d’eau. Puis versez
deux ou trois tasses d’eau chaude.
Longueurs et types de boisson
Types de boisson
Nom de la
boisson
Description
Espresso Café avec crème épaisse, servi dans une petite tasse
Café Café servi dans une grande tasse ou un gobelet
Américain Espresso dilué avec de l'eau chaude, servi dans une grande tasse
Cappuccino 1/3 espresso, 1/3 lait chaud et 1/3 mousse de lait, servi dans une grande
tasse
Latte macchiato Jet de lait chaud avec mousse de lait et un jet d’espresso, servi dans
une tasse haute
Café latte Espresso avec un jet de lait, nappé d'une petite quantité de mousse de
lait, servi dans un grand verre
Espresso
macchiato
Espresso nappé d'une petite quantité de mousse de lait, servi dans une
petite tasse
Café au lait Café mélangé avec une quantité équivalente de lait chaud, servi dans
un grand verre
Espresso lungo Espresso plus long avec une crème épaisse, servi dans une tasse
moyenne
Ristretto Jet de café espresso, servi dans une petite tasse
Mousse de lait Lait chaud avec de la mousse
53
Français (Canada)
Longueurs de boisson
Boisson
Longueur par défaut/Plage de variation de la longueur (min.-
max.)
Café Lait Eau
Espresso 40ml/30-70ml - -
Café 120ml/100-220ml - -
Américain 40ml/20-80ml - 110ml/60-160ml
Cappuccino 40ml/20-80ml 120ml/100-340ml -
Latte macchiato 40ml/20-50ml 200ml/120-340ml -
Café latte 60ml/20-80ml 140ml/120-340ml -
Eau chaude - - 150
Espresso macchiato 40ml/20-70ml 20ml/10-40ml -
Café au lait 90ml/50-150ml 90ml/50-150ml -
Espresso lungo 80ml/60-110ml - -
Ristretto 30ml/20-40ml - -
Mousse de lait - 180ml/40-280ml -
Lait chaud - 180ml/40-280ml -
Caractéristiques techniques
Le fabricant se réserve le droit d’améliorer les caractéristiques techniques du produit. Toutes
les quantités prédéfinies sont approximatives.
Description
Valeur
Dimensions (l x h x p) 283x393x489mm (11,2x15,5x19,3po)
Poids 10,8 à 12,2kg (23,8 à 26,9lb)
Longueur du cordon
d’alimentation
1200mm (473po)
Réservoir d’eau 1,7litre (57oz), amovible
Capacité du compartiment à
grains de café
450g (16oz)
Capacité du bac à marc de café 14rondelles
Capacité du récipient à lait 600ml (20oz)
Hauteur de la buse réglable 75 à 148mm (2,9 à 5,9po)
54
Français (Canada)

Tension nominale – Puissance
nominale – Alimentation
électrique
Mise au rebut
Votre produit a été conçu et fabriqué avec des matériaux et composants de grande qualité,
qui peuvent être recyclés et réutilisés. Pour obtenir des informations sur le recyclage,
contactez vos installations locales de gestion des déchets ou visitez le site
www.recycle.philips.com.
Garantie et support
Pour obtenir des renseignements ou de l’aide, visitez le site Web www.saeco.com/care ou
lisez le livret de garantie distinct.
Français (Canada)
55
Voir la plaque signalétique à l’intérieur de la porte de
service

繁體中文
內容
重要防護措施
__________________________________________________________________________________________ 56
請保存使用說明
________________________________________________________________________________________ 57
警告:
_________________________________________________________________________________________________ 57
電源線的指示
__________________________________________________________________________________________ 57
重要安全資訊
__________________________________________________________________________________________ 57
簡介
___________________________________________________________________________________________________ 59
咖啡機概觀 (圖 1)
______________________________________________________________________________________ 59
首次安裝
_______________________________________________________________________________________________ 60
使用控制面板與觸摸屏
_________________________________________________________________________________ 60
AquaClean 濾水器
_____________________________________________________________________________________ 61
測試水質硬度
__________________________________________________________________________________________ 61
沖煮飲品
_______________________________________________________________________________________________ 62
客製化飲品,建立個人設定
____________________________________________________________________________ 62
調整咖啡機的設定
_____________________________________________________________________________________ 63
處理沖煮組件
__________________________________________________________________________________________ 64
清潔與維護
____________________________________________________________________________________________ 64
除鈣程序
_______________________________________________________________________________________________ 66
警示圖示與錯誤碼
_____________________________________________________________________________________ 67
訂購配件
_______________________________________________________________________________________________ 68
疑難排解
_______________________________________________________________________________________________ 68
飲品類型與份量
________________________________________________________________________________________ 71
技術規格
_______________________________________________________________________________________________ 72
處理方式
_______________________________________________________________________________________________ 72
保固與支援
____________________________________________________________________________________________ 72
重要防護措施
重要防護措施
使用電子產品時,必須隨時遵照基本的安全防護措施進行,包括下列項目:
1 閱讀所有指示。
2 請勿接觸高溫表面, 務必使用握把或旋鈕。
3 為防止火災、電擊和人身傷害,請勿將電線、插頭或產品浸泡在水或其他液體中。
4 兒童使用產品,或在兒童附近使用產品時,務必審慎監督。
5 不使用時及清潔前,請從插座拔除插頭。 安裝或移除零件之前,以及清潔產品之前,先讓其冷卻。
6 若電線或插頭損壞、產品故障之後或有任何損壞時,請勿操作任何產品。 將產品送回最近的授權服務中心
進行檢查、修理或調整。
7 產品製造商不建議的配件使用方式可能會造成火災、電擊或人身傷害。
8 請勿在戶外使用。
9 請勿讓電線懸掛在餐桌或流理台邊緣,或是接觸高溫表面。
10 請勿置於或靠近炙熱氣體或電子鍋,或放在加熱烤箱中。
11 務必先插上產品的插頭,再將電線插入牆上插座。 若要拔離,請將控制器轉到「關閉」,然後從牆上插座
拔下插頭。
56
繁體中文

12 請勿將產品用於其他用途。
13 保存使用說明
請保存使用說明
警告:
警告
本電器用品僅供家用。 除清潔和使用者維護之外,任何維修都應由授權的服務中心執行。 請勿將咖啡機浸泡
在水中。 為降低火災或電擊風險,請勿拆卸咖啡機。 咖啡機內部沒有使用者可維修的零件。 維修僅限授權的
服務人員進行。
1 請檢查電壓,確認標示牌上指示的電壓與您的電壓相符。
2 切勿在水箱中注入溫水或熱水。 只使用冷水。
3 操作期間,您的手部和電線應遠離產品的高溫部分。
4 切勿使用去污粉或刺激性清潔劑進行清潔。 使用軟布沾水擦拭即可。
5 為擁有最佳的咖啡口感,請使用淨化水或瓶裝水。 仍建議您每 2-3 個月定期除垢。
6 請勿使用焦糖化或加味的咖啡豆。
電源線的指示
-
隨附的短電源線(或可拆式電源線)造成纏繞或絆倒的風險比長電線更低。
-
使用長的可拆式電源線或延長線時請格外小心。
-
若使用長的可拆式電源線或延長線。
1 可拆式電源線或延長線上標示的電氣額定值至少應與產品的電氣額定值相等。
2 如果是接地類型的產品,延長線應為接地型 3 線電線,且
3 長電線不得懸掛在流理台或餐桌邊緣,否則兒童可能會拉扯或絆倒。
重要安全資訊
咖啡機帶有多種安全功能, 但仍應仔細閱讀並遵照安全說明,僅根據相關說明操作咖啡機,以避免不當使用
咖啡機所造成的意外傷害或毀壞。 請保留本使用說明以供日後參考。
警示
一般
-
在您連接電源之前,請先檢查咖啡機上所標示的電壓是否與您當地的電源系統電壓一致。
-
將咖啡機連接到有接地的電源插座。
-
請勿讓電源線懸掛在餐桌或工作台邊緣,並確定不會接觸高溫表面。
-
為避免有觸電的危險,請勿將咖啡機、插頭或電源線浸入水或任何其他液體中。
-
請勿讓液體淋濕電源線接頭。
-
為避免有燙傷的危險,身體各部位應遠離咖啡機噴出的熱水。
-
請勿接觸高溫表面, 務必使用握把和旋鈕。
-
使用咖啡機背後的主開關 (如果有的話),關閉咖啡機電源,並將電源插頭從牆上插座拔除:
-
若發生故障。
-
若長時間不使用本產品。
57
繁體中文

-
清潔咖啡機之前。
-
請拔插頭,切勿拉扯電源線。
-
接觸插頭時,請確保雙手乾燥。
-
當插頭、電源線或機器本身受損時,請停止使用。
-
請勿擅自改裝咖啡機或電源線。
-
務必讓飛利浦授權的維修中心進行維修作業,以免發生危險。
-
八歲以下的兒童切勿使用咖啡機。
-
在有人從旁監督或適當指示如何安全使用咖啡機,以及瞭解潛在危險的狀況下,咖啡機可供 8 歲以上兒
童、身體官能或心智能力退化者,或是經驗與使用知識缺乏者使用。
-
除非兒童年滿 8 歲以上且有人監督,否則請勿讓兒童進行清潔和使用者維護。
-
請將咖啡機、其配件和電源線放在 8 歲以下兒童無法取得之處。
-
請看管孩童,避免他們將咖啡機當成玩具。
-
請勿將手指或其他物品插入咖啡研磨機。
-
取用熱水時請小心。 咖啡流出之前可能會先稍微噴出熱水。 取下熱水流出口前,請靜待出水循環結束。
警告
一般
-
本咖啡機僅供一般家用, 並非用於商店的員工廚房、辦公室、農舍或其他工作場所。
-
務必將產品置於穩固的平面上。 搬運時也請保持直立狀態。
-
請勿將咖啡機放在加熱盤上,或直接放在高溫烤箱、加熱器或類似熱源旁邊。
-
豆槽只能放入烘焙的咖啡豆。 豆槽中放入咖啡粉、即溶咖啡、未烘焙的咖啡豆或其他任何物質可能會造成
機器損壞。
-
裝入或拆除任何零件前,請務必先讓咖啡機冷卻。 加熱面在使用後可能會有餘熱。
-
請勿在水箱中裝入溫水、熱水或氣泡礦泉水,否則可能會損害水箱和咖啡機。
-
絕對不可使用鋼絲絨、磨蝕性的清潔劑或侵蝕性的液體 (例如汽油或丙酮) 清潔咖啡機。 使用軟布沾水擦拭
即可。
-
定期為咖啡機除垢。 咖啡機會提示除垢的時間。 不定期除垢,咖啡機可能出故障。 此類故障不屬於保修
範圍。
-
請勿將咖啡機放在低於 0°C/32°F 的地方。 加熱系統內殘留的水可能會凍結並造成損壞。
-
若長時間不使用咖啡機,則請勿將水留在水箱內。 水可能會有汙染, 每次使用咖啡機時均請使用乾淨的
水。
-
請勿使用其他製造商的任何配件或零件,或非飛利浦建議之配件或零件。 如果您使用上述的配件或零件,
產品保固將失效。
-
定期清潔及維護可延長咖啡機的壽命,並可確保最佳咖啡品質與口感。
-
由於咖啡機持續接觸到水氣、咖啡和水垢, 因此依網站上使用手冊的說明來定期清潔及維護咖啡機是十分
重要的。 若未執行這些清潔及維護程序,咖啡機最終可能會停止運作。 若是這樣,保固將不涵蓋此種維
修。
-
請勿將沖煮組件放入洗碗機清洗,同時也請勿使用洗碗精或清潔劑來清潔。 這可能會造成沖煮組件故障,
並影響咖啡的口感。
-
請勿用布擦乾沖煮組件,以避免沖煮組件內累積纖維。
-
在除垢程序期間,請勿飲用流出的溶液。
-
預磨咖啡粉槽只能放入預磨咖啡粉。 其他物質和物品可能會嚴重損壞咖啡機。 若是這樣,保固將不涵蓋此
種維修。
-
正在使用機器時,請勿將機器放置於櫥櫃內。
卡布奇諾機及牛奶容器
警示
-
為避免燙傷,請注意放蒸氣或熱水前可能會稍微有些熱水或蒸汽噴出。
58
繁體中文

-
放飲料時,請勿碰觸或打開卡布奇諾機內部的門,可能會很燙。
-
在卡布奇諾機內部清潔流程中或清潔流程剛結束時,請勿碰觸牛奶管的金屬部分,因為可能會很燙。 請等
待其冷卻。
-
在進行每月清潔流程時,不要飲用可調節咖啡及牛奶噴口放出的液體。
警告
-
基於衛生考量,請確保可調節咖啡及牛奶噴口的外側表面的清潔。
-
選擇製作奶類飲品前,請確定牛奶管已連接至卡布奇諾機。
-
除了用於清潔的水或牛奶外,請勿在牛奶壺中放入其他任何液體。
-
煮奶類飲品後,可調節咖啡與牛奶噴嘴會自動放出少量的蒸氣以清潔內置式卡布奇諾機與牛奶噴嘴的金屬
部件。
-
請注意,可調節咖啡及牛奶噴嘴以及牛奶噴嘴的金屬部件可能才使用不久後還很燙。
-
打開內置式卡布奇諾機的門時請小心,可調節咖啡與牛奶噴嘴可能會放出少量蒸汽以清洗卡布奇諾機。
-
如內置式卡布奇諾機的門不太好關,請檢查是否正確插入卡布奇諾機。 請按照使用說明操作。 在插入內置
式卡布奇諾機時,請不要用力過猛使其太靠近咖啡/牛奶噴嘴處。 否則卡布奇諾機會因無法吸到牛奶,而不
能正確運作。
-
牛奶噴嘴的金屬部件可能會變得非常燙。 為了避免燙傷,在開始內置式卡布奇諾機清潔程序前,請務必將
牛奶噴嘴放入噴嘴架裡。
-
請勿使用洗碗機來清潔內置的卡布奇諾機的任何零件。
電磁波 (EMF)
本咖啡機符合所有電磁波暴露的相關適用標準和法規。
簡介
感謝您購買 Saeco 全自動咖啡機! 為充分享受 Saeco 為您提供的好處,請至下列位址註冊產
品:www.saeco.com/care。
首次使用咖啡機前,請先仔細閱讀本使用手冊,並保留說明以供日後參考。
為使您的咖啡機充分發揮其功能,Saeco 提供以三方面的支持:
1 另外的快速入門指南適用於第一次安裝與使用。
2 本使用手冊提供更詳細的資訊。
3
顯上支援和影片: 掃描封面上的 QR 碼或造訪 www.saeco.com/care。
注意: 本機器經過咖啡沖泡測試。 機器經仔細清潔後,仍可能留有咖啡殘渣。 但是我們保證此咖啡機為全新
機器。
咖啡機概觀 (圖 1)
1
控制面板與顯示屏 12 水盤取出鈕
2 杯子固定座 13 電源線附插頭
3 豆槽蓋 14 研磨設定旋鈕
4 預磨咖啡粉槽蓋 15 豆槽
5 自動奶泡器 16 沖煮器
6 可調式咖啡與牛奶飲品出口 17 咖啡漏斗
7 奶泡管固定座 18 咖啡豆渣槽
59
繁體中文
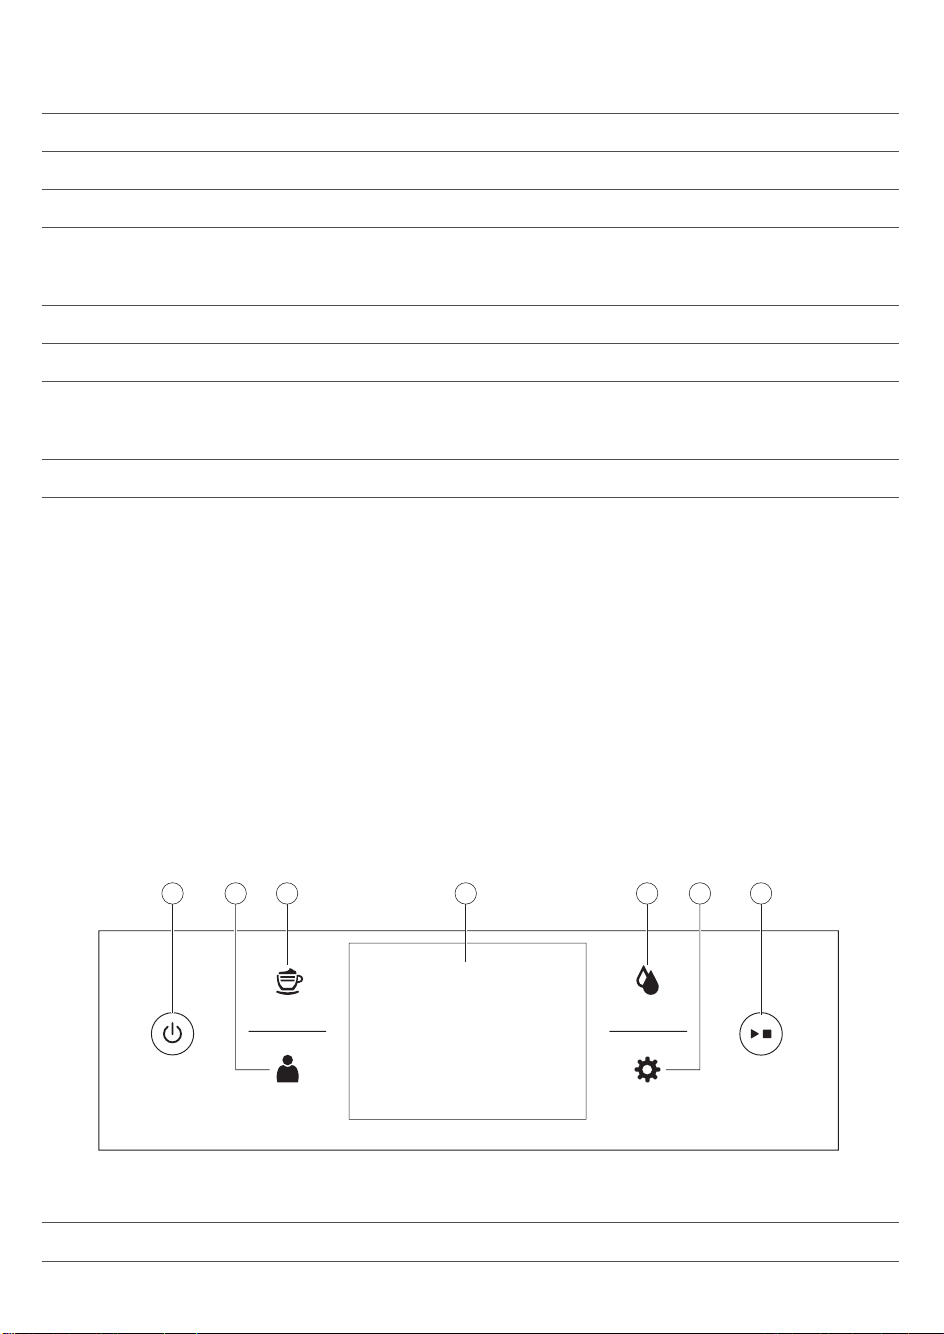
8 主開關 19 咖啡粉槽
9 電線插座 20 水盤
10 維修門蓋 21 水盤蓋
11 「水盤已滿」指示燈 22 水箱
配件
23
潤滑劑管 26 量匙
24 清潔刷 27 水質硬度試紙
25 AquaClean 濾水器
牛奶發泡部分
28
奶泡罐蓋 30 金屬奶泡管
29 奶泡罐 31 彈性奶泡管
首次安裝
為準備使用您的咖啡機,您需要進行幾個簡單的步驟,例如注水到水流管路和啟動 AquaClean 濾水器。 這些
步驟如個別的快速入門指南所述。
為萃取出最佳風味的咖啡,您一開始需要沖煮 5 分鐘,讓咖啡機完成自行調整。
咖啡機已設定為從咖啡豆中萃取出最佳風味。 因此我們建議您不要調整研磨設定,直到您已沖煮 100-150 杯
(約 1 月使用量) 為止。
首次使用前請徹底清洗奶泡罐、奶泡管及自動奶泡器。 建議您不用使用洗碗機清洗自動奶泡器,以防食物碎
屑或清潔劑殘渣導致機器堵塞。
使用控制面板與觸摸屏
以下是咖啡機控制面板和觸摸屏的介紹和描述。 您可滑動觸摸屏,點擊進行選擇或確認選項。
Drinks
Proles
Clean
Settings
43 51 72 6
1. 開關按鈕 4. 觸摸屏 7. 開始/停止按鈕
2. 個人信息 5. 清潔菜單
60
繁體中文
3. 飲品菜單 6. 咖啡機
AquaClean 濾水器
AquaClean 濾水器的設計是用來減少咖啡機中的水垢沈積物,並提供過濾水,以完整保留每一杯咖啡的香氣
與美味。 若您依照咖啡機和本使用手冊使用一系列 8 個 AquaClean 濾水器,就無須每沖泡 5,000 杯咖啡後為
咖啡機除鈣。 視選擇的咖啡種類和沖洗及清潔頻率而定,每個濾水器最多可讓您享用 625 杯咖啡。
準備 AquaClean 濾水器,以便啟動
將 AquaClean 濾水器放入水箱中前,您需要準備好濾水器:
1 甩動濾水器約 5 秒 (圖 2)。
2 將過濾器倒置並完全浸入裝有冷水容器中至少 30 秒。 等到不再有空氣氣泡。
3 將過濾器盡可能推到過濾器連接的最低位置。
啟動 AquaClean 濾水器
您需要啟動每個使用的全新 AquaClean 濾水器。 啟動 AquaClean 濾水器後,咖啡機即可監控 AquaClean 濾
水器的容量和濾水器的使用次數。 AquaClean 濾水器的啟動方式共有三種。
1. 首次安裝時啟動 AquaClean 過濾器
首次開機後,咖啡機會引導您進行首次安裝步驟,例如加水至水箱內、注水到水流管路及啟動 AquaClean 過
濾器。 請依照螢幕上的指示進行即可。
2. 出現提示時啟動 AquaClean 濾水器
當屏幕顯示 「更換AquaClean濾芯?」,請更換 AquaClean 濾水器。 然後按螢幕指示妥善啟動濾水器。
至少每 3 個月更換 AquaClean 濾水器,即便咖啡機尚未指示需要更換濾水器。
3. 在任何其他時間啟動 AquaClean 濾水器
您可以開始依照下列說明隨時使用 AquaClean 濾水器。
1 按一下設定
圖標,然後選取「AquaClean」 (圖 5)。
2 選擇「新」,當激活屏幕出現,按下開始/停止 按鈕。
3 請依照螢幕上的指示進行。
注意: 在部分情況下,咖啡機將會指示您在安裝和啟動全新的 AquaClean 濾水器之前,先為咖啡機除垢。 這
是因為在開始使用 AquaClean 濾水器前,咖啡機必須完全沒有水垢。 請依照螢幕上的指示進行。
測試水質硬度
首次安裝時您應設定水質硬度。 依照屏幕顯示步驟使用提供的水質硬度試紙。 若要稍後設定水質硬度,請按
一下設定 圖標,選擇「水硬度」。
1 將水質硬度試紙在自來水中浸泡 1 秒。 然後等待 1 分鐘。
2 檢查有幾個方塊變成紅色。
3 選擇合適的水質硬度設定,然後按下 OK 按鈕確認。
紅色方塊數:
設定的值 1 2 3 4
61
繁體中文
沖煮飲品
按一下飲品
圖標,即可進入功能表中的「飲品」。 翻看頁面找到合適的飲料。 選完飲品調整設定內容進行
個性化設定 (見 '個人化您的飲品')。
-
若要沖煮兩杯,請按一下「2 x」圖標。 機器便會自動依序執行兩次研磨循環,沖煮所選的飲品。
-
按一下保存飲品
圖標,即可沖煮儲存的飲品。
-
請向上或向下滑動噴嘴,將其高度調至符合所使用杯子或玻璃杯尺寸的位置。
沖煮咖啡飲品
1 使用自來水注入水箱,然後將咖啡豆放入咖啡豆槽。
2 按一下飲品 圖標,選擇您要的咖啡。
3 可在首次屏幕上將調節柄上下滑動,個性化設置咖啡濃度和量。 如點擊右邊箭頭,會出現有更多設定選項
的第二個屏幕。
4 按下開始/停止
按鈕,開始沖煮所選的飲品。
沖煮奶類飲品
1 使用自來水注入水箱,然後將咖啡豆放入咖啡豆槽。
提示: 將噴嘴滑到最高位置,以方便使用水箱。
2 轉開奶泡罐蓋,將牛奶 (圖 9)裝入奶泡罐中。
請務必使用直接從冰箱取出的牛奶,以獲得最佳效果。
3 將金屬奶泡管放入壺內。 打開內置式自動奶泡器 (圖 10)門,將彈性奶泡管接到自動奶泡器 (圖 11)上, 然
後再次關閉內置式自動奶泡器門。
4 按一下飲品 圖標選擇所需奶類飲品。
5 可在第一個屏幕上將調節柄上下 (圖 7)滑動,客製化咖啡濃度和牛奶量。 如點擊右邊 (圖 8)箭頭,會出現
有更多設定選項的第二個屏幕。
6 調節柄上下滑動可根據自己喜好調整設定。
7 按下開始/停止 按鈕,開始沖煮所選的飲品。
8 一放完牛奶,會立即執行「自動蒸氣清潔」。 咖啡機讓蒸汽透過內置式奶泡系統快速沖洗。
提示: 您也可以使用一般盒裝牛奶沖煮奶類飲品。 請將金屬奶泡管直接插入牛奶盒。
以預磨咖啡粉沖煮咖啡
1 打開預磨咖啡粉槽蓋,然後倒入一量匙的預磨咖啡粉至預磨咖啡粉槽中。 然後關閉預磨咖啡粉槽蓋。
2 選擇完飲品後,請點選預磨的咖啡粉圖標 (圖 13) ,然後按下開始/停止 按鈕。
注意: 如選擇預磨的咖啡粉,就無法調整咖啡濃度,也不能同時沖煮一個以上的飲品。
提供熱水
1 按一下飲品 圖標,然後選擇「熱水」。
2 按開始/停止按鈕放熱水。
客製化飲品,建立個人設定
本咖啡機可讓您根據自己的喜好調整飲品的設定,並將調整後的飲品保存在個人設定中。 設定個人設定有兩
種方法:
1 在「飲品」選單裡: 選擇並調整飲品,然後按「保存」
圖標
62
繁體中文

2 在「個人設定」選單裡: 點擊「輸入個人設定」圖標設定。 選擇新設定的個人設定,選擇一個飲品,調整
您的喜好設定,然後按「保存」
圖標。
個人化您的飲品
您可以依自己的喜好調整飲料設定:
1 按飲品
圖標。
2 選擇您想要的飲品。
3 屏幕會顯示您可以調整至您喜好的設定。 點擊右面的箭頭, (圖 8)移至下一個畫面可調節更多設定。 取決
於飲品的種類,您可以調整設定。 咖啡飲品,您可以調節量、濃度、口味和溫度。 牛奶飲品,您可調整牛
奶量、奶泡量和沖煮咖啡與牛奶的順序。 熱水——可調節水量。
4 滑動顯示條來向上或下調節您所要的位置 (圖 7)。
5 您可點擊「保存」
圖標 (圖 14)並選擇現有個人設定或輸入新的個人設定 (圖 15),來保存這些設定。
創建個人資料
1 按個人設定 圖標。
2 選擇「新增個人設定」 (圖 15)。
3 為新個人設定輸入名稱並確認 (圖 16)。
4 選擇新設定的個人設定。
5 選擇「新增飲品」 (圖 17),將飲品新增到個人設定。
刪除個人設定
1 按個人設定 圖標。
2 按住並保持您要刪除的圖標。
3 選擇「刪除」,並確認。
調整咖啡機的設定
您可以使用咖啡豆槽內的研磨設定旋鈕調整研磨設定。 您共有 12 種不同的研磨設定可以選擇。 設定越低,
咖啡越濃。
注意: 在沖煮 2 至 3 杯飲品後,才能品出味道的不同。
警告: 轉動研磨設定旋鈕時,每次請勿超過一個溝槽,以免研磨機受損。
1 打開豆槽蓋。
2 按下研磨設定旋鈕,然後轉左或轉右 (圖 18)。 一格一格地旋轉研磨設定旋鈕。 每次旋轉一格研磨旋鈕,
沖煮一杯咖啡,以免研磨器受損。
3 關閉豆槽蓋。
調整預設設定
用設定圖標變更以下設定:
-
AquaClean: 檢查 AquaClean 狀態,並安裝新的。
-
水質硬度: 為了讓咖啡機能依據您所在地區的水質調整,請測量水質硬度。
-
待機時間: 此時間後機器進入待機模式。
-
亮度: 調整螢幕亮度
-
水壺燈: 調整水壺指示燈
-
飲品出口指示燈: 調整指示燈亮度。
-
語言: 選擇不同的語言
63
繁體中文

-
計量單位: 選擇毫升或美國液體計量單位盎司
-
按鍵音: 開啟/關閉顯示幕的按鍵音
處理沖煮組件
訪問www.saeco.com/care,了解如何拆下、插入和清潔沖煮組件的詳細視頻說明。
從咖啡機中取出沖煮器
1 按下咖啡機背後的主開關,關閉咖啡機。
2 打開維修門 (圖 19)蓋。
3 取下咖啡豆渣槽 (圖 20)。
4 按下「PUSH」(推) 按鈕 (圖 21)並拉動沖煮器上的提把,將其從咖啡機 (圖 22)取下。
重新插入沖煮組件
將沖煮組件推回咖啡機之前,請先確定沖煮組件位於正確的位置。
1 檢查沖煮組件側邊黃色濾網筒上的箭頭是否對其黑色箭頭和 N (圖 23)。
-
如果未對齊,請壓下控制桿,直到控制桿接觸沖煮組件 (圖 24)的底座。
2 請確定沖煮組件另一側的黃色鎖定鉤位於正確的位置。
-
要將鉤正確定位,請將它往上推到最上方的位置 (圖 25)。
3 沿著兩側 (圖 26)的導引軌道將沖煮組件推回咖啡機,直到聽見「喀噠」 (圖 27)一聲卡入定位為止。 請勿
按下 PUSH 按鈕。
4 將咖啡殘渣抽屜放回,並關上維修門蓋。
清潔與維護
定期清潔與維護可讓咖啡機保持在最佳狀態,並確保長期都能享用美味的咖啡、咖啡穩定流入,以及完美的奶
泡。
請參閱表格以了解何時及如何清潔咖啡機所有可拆卸的零件。 您可以在 www.saeco.com/care 找到更詳細的
資訊和視頻說明。
清潔與保養表
零件說明
何時清潔 如何清潔
沖煮器 每週 拆下沖煮器,並置於水龍頭下沖洗,然後讓其自然風
乾。
每月 用飛利浦咖啡油清潔片進行「清潔沖煮器」程序。 在
清潔選單中選擇「清潔沖煮器」,並按照螢幕上程序
操作。 前往 www.saeco.com/care 取得詳細的影片說
明。
潤滑沖煮器 依據使用的類型。 請查閱潤滑
表 (見 '潤滑沖煮組件')。
使用飛利浦潤滑劑潤滑沖煮器。 前往
www.saeco.com/care 取得詳細的影片說明。
奶泡系統/內置式自
動奶泡器
每日使用後 在清潔選單中,執行 HYGIESTEAM 蒸氣清潔程序。
在清潔選單中,選擇 HYGIESTEAM 蒸氣清潔,並按
照螢幕說明操作。 將金屬奶泡管放回奶泡管固定座
前,請用濕布擦拭。
64
繁體中文
零件說明 何時清潔 如何清潔
每週 取下並拆卸自動奶泡器 (見 '在水龍頭下沖洗內置式自
動奶泡器')。 將所有零件加些清潔劑在水龍頭下沖
洗。
每月 使用飛利浦牛奶管路清潔劑進行「深度清潔奶泡器」
程序。 在清潔選單中,選擇「深度清潔奶泡器」,並
按照螢幕說明操作。 前往 www.saeco.com/care 取得
詳細的影片說明。
奶泡罐 每週 拆下牛奶罐 (圖 28),並用計量勺 (圖 29)將球推出。
將所有零件置於水龍頭下沖洗或放入洗碗機清洗
水盤 每天或當水盤 (圖 30)上「水盤
已滿」紅色指示燈亮起後,立
即清空水盤。
取出水盤,然後在水龍頭下使用些許清潔劑沖洗。
咖啡粉槽 咖啡機提示時請清空咖啡粉
槽。 每週清潔。
請在咖啡機為開機狀態時拆除咖啡粉槽,然後在水龍
頭下使用些許清潔劑沖洗。
水箱 每週 將水箱放在水龍頭下沖洗
咖啡漏斗 請每週查看咖啡漏斗是否阻
塞。
請拔下咖啡機插頭,然後取出沖煮器。 打開預磨咖啡
粉槽蓋,然後將湯匙握把插入咖啡漏斗。 上下移動握
把,直到堵塞的咖啡粉掉落 (圖 31)。 前往
www.saeco.com.care 取得詳細的影片說明。
提示: 本使用手冊的最後一頁提供清潔行事曆。 請記下您進行清潔動作的日期。
清洗沖煮組件
定期清潔沖煮組件可防止咖啡粉殘渣堵塞內部管路。 造訪 www.saeco.com/care,以觀看如何取下、插入和清
潔沖煮組件的視頻說明。
在水龍頭下清潔沖煮組件
1 打開維修門蓋,然後取下沖煮組件 (見 '從咖啡機中取出沖煮器')。
2 用水徹底沖洗沖煮組件。 仔細清潔 (圖 32)上方濾網。
3 裝回沖煮組件前,請先讓沖煮組件風乾。 請勿用布擦乾沖煮組件,以避免沖煮組件內累積纖維。
使用咖啡去油汙錠清潔沖煮組件
僅使用飛利浦咖啡有清潔锭。 按清潔 圖標,選擇「清潔沖煮組件」。 然後依照屏幕上的指示進行。 訪問
www.saeco.com/care 獲得詳細的視頻說明。
潤滑沖煮組件
請定期潤滑沖煮組件,確保活動零件能持續平順移動。
1 在沖煮組件底部的軸周圍塗抹一層薄薄的潤滑劑。
2 在軌道兩側塗抹一層薄薄的潤滑劑 。
請參考下表的潤滑頻率。 訪問 www.saeco.com/care 獲得詳細的視頻說明。
使用頻率
每日沖煮飲品數量 潤滑頻率
低度 1-5 每 4 個月
65
繁體中文

使用頻率 每日沖煮飲品數量 潤滑頻率
一般 6-10 每 2 個月
重度 >10 每月
內置式自動奶泡器的清潔程序
本機器有三種清潔內置式自動奶泡器的程序。 沖煮過奶類飲品後,咖啡機會自動執行自動蒸氣清潔程序。 您
可點擊清潔圖標並捲動清潔選單,選擇 HYGIESTEAM 蒸氣清潔或深度清潔奶泡器程序
。 然後依照屏幕上的
指示進行。
-
自動蒸氣清潔: 機器噴出蒸氣到內置式自動奶泡器快速沖洗。
-
HYGIESTEAM 蒸氣清潔: 咖啡機用蒸氣徹底清潔內置式奶泡系統。 將奶泡管放到奶泡管固定座 (圖 35),
並按照螢幕操作。
-
深度清潔奶泡器: 執行「深度清潔奶泡器」程序,使用飛利浦牛奶管路清潔劑徹底清潔內置式奶泡系統。
在水龍頭下沖洗內置式自動奶泡器
1 打開內置式自動奶泡器 (圖 10)門。
2 將內置式自動奶泡器往下拉可卸下該裝置 (圖 36)。
3 將內置式自動奶泡器的底部從頂部拉下以拆卸該裝置 (圖 37)。
4 拆除所有部件在水龍頭 (圖 38)下沖洗。
5 重新組裝內置式自動奶泡器。
6 若要裝回內置式自動奶泡器,將其垂直放置,並確定洞口與機器上的兩個管子對齊。 然後將內置式自動奶
泡器往上移,直到鎖住 (圖 39)。
7 關閉門蓋。
訪問 www.saeco.com/care 獲得詳細的視頻說明。
除鈣程序
只能使用飛利浦除鈣劑。 絕不可使用硫酸、鹽酸、氨基磺酸或醋酸 (例如醋) 為基底的除鈣劑,因為它們可能
損害咖啡機的水流管路,且無法妥善溶解水垢。 未使用飛利浦除鈣劑會使保固失效。 未去除咖啡機水垢也會
使保固失效。 您可以前往 www.saeco.com/care 線上商店購買飛利浦除鈣溶液。
1
當咖啡機指示應除鈣,請按下開始/停止按鈕,開始除鈣。 若不等咖啡機指示除鈣,請點選清潔 圖標然
後選擇「除鈣」 (圖 40)。
2 取下水盤與咖啡粉槽後,清空之後再裝回原位。
3 取出水箱然後倒空。 然後再取下 AquaClean 濾水器。
4 將整瓶飛利浦除鈣劑倒入水箱,再將水箱的水裝滿至 CALC CLEAN 刻度。 然後將其放回咖啡機。
5 將一個大容器 (1.5 公升) 放在咖啡流出口下方。
6 按屏幕上的除鈣程序開始除鈣。 除鈣程序會持續約 15 分鐘,其中包含除鈣循環和沖洗循環。
7 一旦除鈣循環結束,必須沖洗水箱和水管路。 請依照螢幕上的指示進行。
8 將新的 AquaClean 濾水器放在水箱中,並在選單中重新啟動 AquaClean 濾水器。
提示: 使用 AquaClean 濾水器可減少除鈣需求!
若除鈣程序中斷該怎麼做
您可按下控制面板上的開/關按鈕,結束除鈣程序。 如果在完全完成前中斷除鈣程序,執行下列步驟:
1 請倒光水箱內的水後,徹底洗淨水箱。
2 將清水注入水箱至 CALC 刻度後,開啟咖啡機電源。 咖啡機將加熱,並執行自動沖洗循環。
66
繁體中文
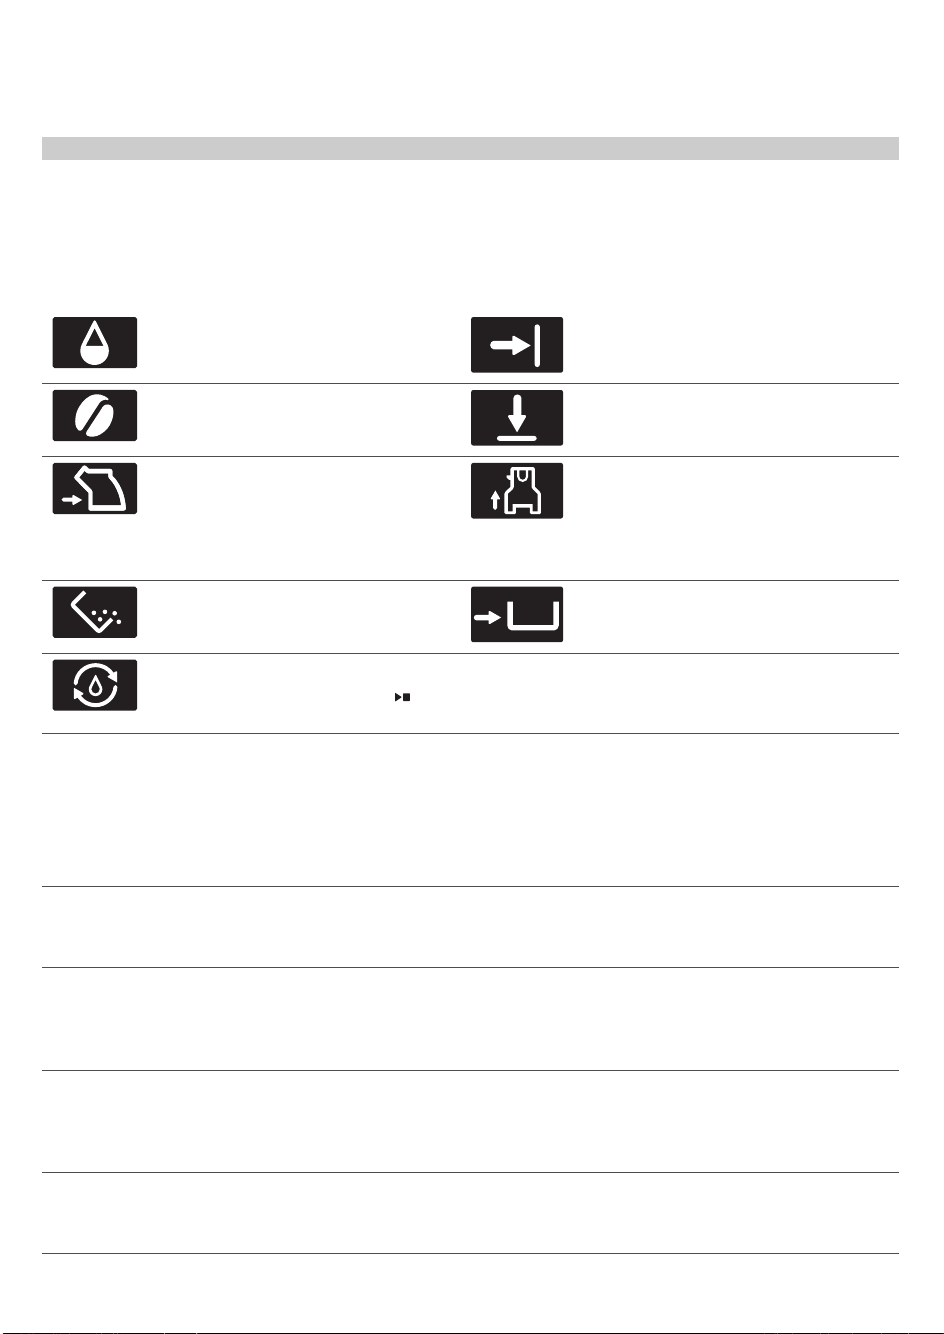
3 沖煮任何咖啡飲品前,請執行手動沖洗循環。若要進行手動沖洗循環,請先將水箱注入一半的熱水,然後
沖煮 2 杯預磨咖啡粉咖啡,但不要添加咖啡粉。
注意: 若除鈣程序尚未完成,需要儘快讓咖啡機執行另一次除鈣程序。
警示圖示與錯誤碼
警示圖示的意義
將清水注入水箱至 MAX 水位刻度。 關閉維修門蓋。
豆槽已空。 在豆槽內放入新的咖啡
豆。
關閉豆槽蓋。
沖煮器未插入或未正確插入。 插入沖
煮器,並確定使其卡入位置。
內置式自動奶泡器未插入或未正確插
入,且/或噴嘴門未關。 確保自動奶泡器
的洞口與咖啡機的吸塵管對齊,然後再
將內置式自動奶泡器往上推到位。 關上
噴嘴門。
代表咖啡粉槽已滿。 確定咖啡機 接上
電源. 然後移除並清空咖啡粉槽。
咖啡粉槽未放好。 放回咖啡粉槽。
機器應在水路管中裝上水。 請確認水
箱中有水,然後按下開始/停止
按鈕
開始操作。
錯誤碼的意義
下列是顯示問題的錯誤碼清單,您可以自行解決這些問題。 www.saeco.com/care 提供影片說明。 如果出現
另一個錯誤碼,請聯絡您所在國家/地區的飛利浦客戶服務中心。 如需聯絡詳細資料,請參閱保固說明書。
錯誤碼
問題 可能的解決方法
01 咖啡漏斗堵塞。 關閉咖啡機電源,並拔除插頭。 拆卸沖煮器。 打開預磨咖啡粉槽
蓋,插入湯匙握把。 上下移動握把,直到堵塞的咖啡粉掉落 (圖
31)。 造訪 www.saeco.com/care 取得詳細的影片說明。
03 沖煮器有髒汙或沒有充分
潤滑。
使用主開關關閉咖啡機。 以清水沖洗沖煮器、使其自然風乾,然後
潤滑沖煮器。 請參閱「清潔沖煮器」章節或造訪
www.saeco.com/care 取得詳細的影片說明。 然後再開啟咖啡機電
源。
04 沖煮器安裝不正確。 使用主開關關閉咖啡機。 請取出沖煮器並重新裝入。 插入沖煮器
前,請確定沖煮器位於正確的位置。 請參閱「處理沖煮器」章節或
造訪 www.saeco.com/care 取得詳細的影片說明。 然後再開啟咖啡
機電源。
05 水流管路中有空氣。 使用主開關關閉咖啡機電源後再次開啟,藉此重新啟動咖啡機。 如
果有效,讓熱水流出 2-3 杯的量。 若您有很長一段時間沒這樣做,
請為咖啡機除鈣。
67
繁體中文

錯誤碼 問題 可能的解決方法
安裝前未正確準備
AquaClean 濾水器,或
AquaClean 濾水器阻塞。
請拆下 AquaClean 濾水器,然後再試著沖煮咖啡。 如果有效,請
確定在裝回 (見 '準備 AquaClean 濾水器,以便啟動') AquaClean
濾水器前已正確準備此濾水器。 將 AquaClean 濾水器推回水箱
中。 如果此方法仍無效,表示濾水器已阻塞,需要更換。
14 代表咖啡機已過熱。 關閉咖啡機電源,在 30 分鐘後重新開啟咖啡機電源。
訂購配件
如欲為本機器進行清潔與除鈣,只能使用飛利浦維護產品。 可向您當地零售商、授權服務中心,或
www.saeco.com/care 線上購買這些產品。 若要上網尋找完整的備用零件清單,請輸入咖啡機的型號。 您可
以在維修門內側找到型號。
保養產品和型號:
-
除鈣溶液 CA6700
-
AquaClean 濾水器 CA6903
-
沖煮器潤滑劑 HD5061
-
咖啡去油汙錠 CA6704
-
牛奶管路清潔劑 CA6705
-
保養套件 CA6707
疑難排解
本單元概述了使用本機器最常遇到的問題。 www.saeco.com/care 提供支援影片和完整的常見問題清單。 如
果您無法解決問題,請聯絡您所在國家/地區的客戶服務中心。 如需聯絡詳細資料,請參閱保固說明書。
問題
原因 解決方法
水盤一下就滿了。 這是正常現象。 咖啡機會用水清
洗內部管路和沖煮器。 部分的水
會經由內部系統直接流入水盤。
每天或當水盤 (圖 30)上「水盤已滿」紅色
指示燈亮起後,立即清空水盤。 在流出口
下方放一個杯子,來收集清洗後的水。
咖啡機處於 DEMO (示範)
模式。
您按壓待機按鈕超過 8 秒。 使用咖啡機背後的主開關,關閉咖啡機電源
後再重新開啟。
「咖啡粉槽已滿」圖示持
續顯示。
您在咖啡機關閉時清空咖啡粉槽。 請一定要在咖啡機電源開啟時清空咖啡粉
槽。 如果您在咖啡機關閉時清空咖啡粉
槽,表示咖啡循環計數器並未重新設定。
您太快裝回咖啡粉槽。 請在顯示幕提示您將咖啡粉槽裝回咖啡機之
後,再將咖啡粉槽裝回去。
即使咖啡粉槽不滿,仍顯
示「咖啡粉槽已滿」圖
標。
上次情況咖啡研磨槽時未重新設定
計數器。
將咖啡粉槽放回時請等待約 5 秒鐘,讓咖
啡粉計數器重置為 0。
請一定要在咖啡機電源開啟時清空咖啡粉
槽。 如果您在咖啡機關閉時清空咖啡粉
槽,咖啡研磨計數器不會重置。
68
繁體中文
問題 原因 解決方法
我無法拆下沖煮器。 沖煮器的位置不正確。 請以如下方式重新設定機器: 請重新裝回
水盤和咖啡粉槽, 然後關閉維修門蓋,關
閉咖啡機電源後再開啟。 再次試著拆下沖
煮器。
您尚未拆除咖啡粉槽。 請先拆除咖啡粉槽後,再拆除沖煮器。
我無法插入沖煮器。 沖煮器的位置不正確。 請以如下方式重新設定機器: 請重新裝回
水盤和咖啡粉槽, 但不要裝回沖煮器。 關
閉維修門蓋,開啟咖啡機電源後再關閉。
然後將沖煮器放到位 (見 '重新插入沖煮組
件'),再重新插入咖啡機內。
咖啡太淡。 沖煮器有髒汙,或需要潤滑。 清潔並潤滑沖煮器。
研磨器設為過粗的顆粒設定。 將研磨器設為較細 (較低) 的設定。
咖啡設置已被調整。 選擇您的咖啡飲品,並調得更濃。
研磨器設定或咖啡豆種類調整後,
咖啡機正自動調整程序。
沖煮幾杯咖啡。
咖啡不夠燙。 您使用的杯子過冷。 先以熱水清洗來預熱杯子。
溫度設定過低。 檢查功能表設
定。
在功能表中將溫度設定為「高」。
您加了牛奶。 無論您加的牛奶是熱還是冷,多少都會降低
咖啡的溫度。
沒有流出咖啡,或咖啡流
出的速度太慢。
未正確準備要安裝的 AquaClean
濾水器,或 AquaClean 濾水器阻
塞。
請拆下 AquaClean 濾水器,然後再試著沖
煮咖啡。 如果有效,請確定在裝回
AquaClean 濾水器前已正確準備此濾水
器。 裝回準備好的濾水器。 如果此方法仍
無效,表示濾水器已阻塞,需要更換。
研磨器設為過細的顆粒設定。 將研磨器設為較粗 (較高) 的設定。
沖煮器有髒汙。 清潔沖煮器。
咖啡流出口有髒汙。 以細針清潔咖啡流出口及其洞口。
咖啡機管路被水垢阻塞。 為咖啡機除鈣。
牛奶沒有奶泡。 內置式自動奶泡器有髒汙,或插入
不正確。
清潔內置式自動奶泡器,並確認正確 (見
'在水龍頭下沖洗內置式自動奶泡器')插
入。
所用的牛奶種類不適合製作奶泡。 牛奶種類會影響奶泡量和奶泡品質。 我們
已測試下列的牛奶種類,結果證明這些牛奶
都能製作出優質奶泡: 半脫脂牛奶或全脂
牛奶、豆漿和零乳糖牛奶。
牛奶噴濺。 您使用的牛奶不夠冰。 請確認您使用直接從冰箱拿出的冰牛奶。
69
繁體中文
問題 原因 解決方法
彈性奶泡管未正確連接。 打開咖啡噴嘴門 (圖 10),檢查是否已完全
將彈性奶泡管連接到自動奶泡器 (圖 11)。
請注意,奶泡器及奶泡管可能很燙。 奶泡
器及管子冷卻後才可碰觸。
奶泡器及奶泡管不清潔。 取下並拆卸自動奶泡器 (見 '在水龍頭下沖
洗內置式自動奶泡器')。 在水龍頭下沖洗所
有零部件。 若要徹底清潔,使用飛利浦牛
奶管路清潔劑,在清潔 ( ) 選單中執行
「深度清潔奶泡器」程序。 請注意,如零
件放入洗碗機清洗,可能會被食物碎屑或清
潔劑殘渣堵塞。 亦建議用肉眼檢查是否有
堵塞現象。
我們建議您每日執行 HygieSteam 蒸氣清潔
程序: 1) 按下 控制面板上的「清潔」。
2) 選擇「HygieSteam 蒸氣清潔」。 3) 按
開始按鈕,開始程序,然後確認屏幕上的所
有步驟。
奶泡管阻塞。 請務必拆除奶泡管後才將奶泡罐存放在冰
箱。 剩餘牛奶會在奶泡管中堆積並堵塞管
子。 存放前請先沖洗奶泡管。
咖啡機似乎會漏水。 咖啡機會用水清洗內部管路和沖煮
器。 部分的水會經由內部系統直
接流入水盤。
每天或當水盤蓋 (圖 30)上「水盤已滿」指
示燈亮起後,立即清空水盤。 在流出口下
方放一個杯子,來收集清洗後的水。
水盤過滿而溢出,讓咖啡機看起來
似乎是在漏水。
每天或當水盤蓋 (圖 30)上「水盤已滿」指
示燈亮起後,立即清空水盤。 在流出口下
方放一個杯子,來收集清洗後的水。
咖啡機未放在水平表面上。 將咖啡機置於水平表面上,以便「水盤已
滿」指示燈能夠正常運作。
我無法啟動 AquaClean 濾
水器,咖啡機要求進行除
鈣程序。
在 AquaClean 濾水器圖示快速閃
爍且容量下降至 0% 之後,未及時
更換濾水器。
先為咖啡機除鈣,再安裝 AquaClean 濾水
器。
您未在首次安裝時安裝
AquaClean 濾水器,但已沖煮約
25 杯咖啡 (每杯 100 毫升/3盎
司)。 在您安裝 AquaClean 濾水
器前,咖啡機必須完全沒有水垢。
首先為咖啡機除鈣,接著安裝新的
AquaClean 濾水器。 除鈣後,濾水器計數
器將重設為 0/8。 請一律在咖啡機功能表中
確認濾水器啟動。 當您更換濾水器之後也
必須這麼做。
新的濾水器不符。 您嘗試安裝 AquaClean 濾水器之
外的濾水器。
只有 AquaClean 濾水器會符合咖啡機需
求。
咖啡機發出噪音。 這是正常現象,咖啡機會在使用時
發出噪音。
如果咖啡機開始發出不同的噪音,請清潔並
潤滑沖煮器 (見 '潤滑沖煮組件')。
AquaClean 濾水器安裝不正確,
導致空氣進入咖啡機。
拆掉水壺上的 AquaClean 濾水器。 甩動濾
水器約 5 秒。 將濾水器倒置並完全浸入裝
有冷水的容器中至少 30 秒。 等到不再有空
氣氣泡。 然後將準備好的 AquaClean 濾水
器推回水箱中。 再放掉 2-3 杯熱水。
70
繁體中文

飲品類型與份量
飲品類型
飲品名稱
說明
義式濃縮咖啡 泡沫層厚的小杯咖啡
咖啡 大杯或馬克杯盛裝的咖啡
美式咖啡 以熱水稀釋的大杯義式濃縮咖啡
卡布奇諾 大杯的 1/3 義式濃縮咖啡、1/3 熱牛奶和 1/3 奶泡
拿鐵瑪奇朵 大份量熱牛奶帶有泡沫的高腳玻璃杯小份量義式濃縮咖啡
拿鐵咖啡 大份量熱牛奶且表面有少量奶泡的大杯義式濃縮咖啡
瑪琪雅朵濃縮咖啡 表面有少量奶泡的小杯義式濃縮咖啡
咖啡歐蕾 混合相同份量熱牛奶的大杯咖啡
淡式義式濃縮咖啡 泡沫層厚的中杯大份量義式濃縮咖啡
芮斯崔朵 小份量的小杯義式濃縮咖啡
奶泡 帶有泡沫的熱牛奶
飲品份量
飲品
預設長度 / 可調整的長度範圍(最小-最大)
咖啡 牛奶 水
義式濃縮咖啡 40 毫升 / 30-70 毫升 - -
咖啡 120 毫升 / 100-220 毫
升
- -
美式咖啡 40 毫升 / 20-80 毫升 - 110 毫升 / 60-160 毫升
卡布奇諾 40 毫升 / 20-80 毫升 120 毫升 / 100-340 毫升 -
拿鐵瑪奇朵 40 毫升 / 20-50 毫升 200 毫升 / 120-340 毫升 -
拿鐵咖啡 60 毫升 / 20-80 毫升 140 毫升 / 120-340 毫升 -
熱水 - - 150
瑪琪雅朵濃縮咖啡 40 毫升 / 20-70 毫升 20 毫升 / 10-40 毫升 -
咖啡歐蕾 90 毫升 / 50-150 毫升 90 毫升 / 50-150 毫升 -
淡式義式濃縮咖啡 80 毫升 / 60-110 毫升 - -
芮斯崔朵 30 毫升 / 20-40 毫升 - -
奶泡 - 180 毫升 / 40-280 毫升 -
溫奶 - 180 毫升 / 40-280 毫升 -
71
繁體中文
技術規格
製造商保有更新此產品技術規格的權利。 所有預設的數量皆為約略值。
說明 值
尺寸 (寬 x 高 x 深) 283 x 393 x 489 m(11.2 x 15.5 x 19.3 英吋)
體重 10.8-12.2 公斤 (23.8 26.9 磅)
電線長度 1200 毫米(473 英吋)
水箱 1.7升(57盎司),可拆卸
咖啡豆槽容量 450 克(16 盎司)
咖啡粉槽容量 14 包
牛奶槽容量 600 毫升(20 盎司)
壺嘴高度可調節 75-148毫米(2.9-5.9 英吋)
額定電壓 - 功率定額 - 電力供應 詳見維修門內的數據片
處理方式
本產品是使用可回收、重複使用的高品質材料和元件所設計及製造。 如需回收資訊,請洽當地相關單位或訪
問 www.recycle.philips.com。
保固與支援
如需資訊或支援,請造訪:www.saeco.com/care,或另行參閱保固說明書。
72
繁體中文
設備名稱:飛利浦
Saeco Xelsis
全自動義式咖啡機 型號(型式):
SM7685
Equipment name Type designation (Type)
單元Unit
限用物質及其化學符號
Restricted substances and its chemical symbols
鉛
Lead
(Pb)
汞
Mercury
(Hg)
鎘
Cadmium
(Cd)
六價鉻
Hexavalent
chromium
(
Cr
+6
)
多溴聯苯
Polybro-
minated
biphenyls
(PBB)
多溴二苯醚
Polybro-
minated
diphenyl
ethers
(PBDE)
電源線組
- O O O O O
分配電機螺絲
- O O O O O
齒輪金屬棒
- O O O O O
印刷電路板
- O O O O O
備考1. 〝超出0.1 wt %〞及〝超出0.01 wt %〞係指限用物質之百分比含量超出百分比含
量基準值。
Note 1:“Exceeding 0.1 wt %” and “exceeding 0.01 wt %” indicate that the
percentage content of the restricted substance exceeds the reference
percentage value of presence condition.
備考2. 〝O〞係指該項限用物質之百分比含量未超出百分比含量基準值。
Note 2:“O” indicates that the percentage content of the restricted substance
does not exceed the percentage of reference value of presence.
備考3. 〝-〞係指該項限用物質為排除項目。
Note 3: The “−” indicates that the restricted substance corresponds to the
exemption.

inside back page

Page appears only if there are more than 24 figures
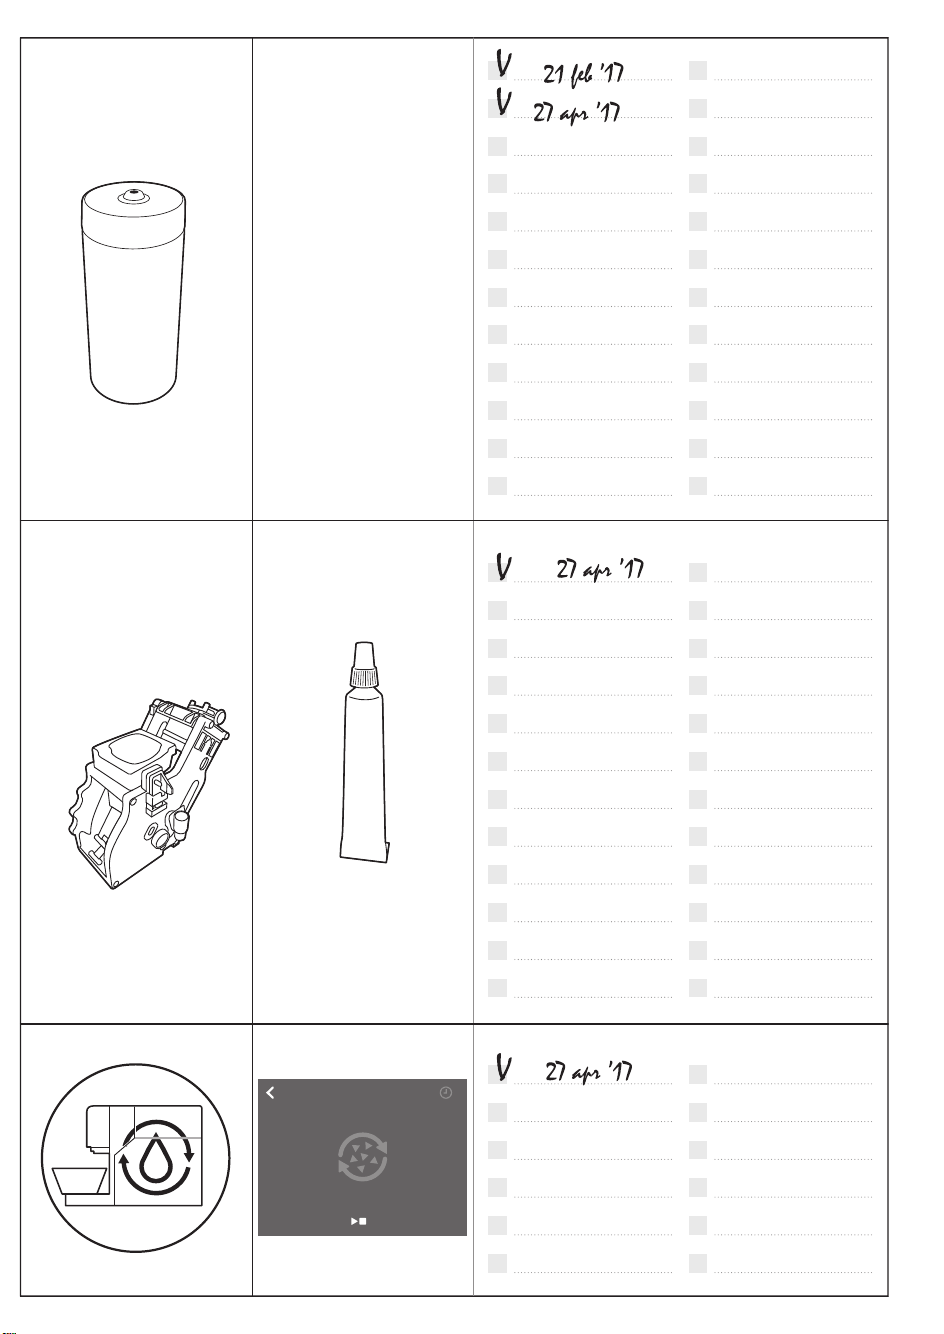
Milk
circuit
cleaner
press to start
15 min
DESCALING
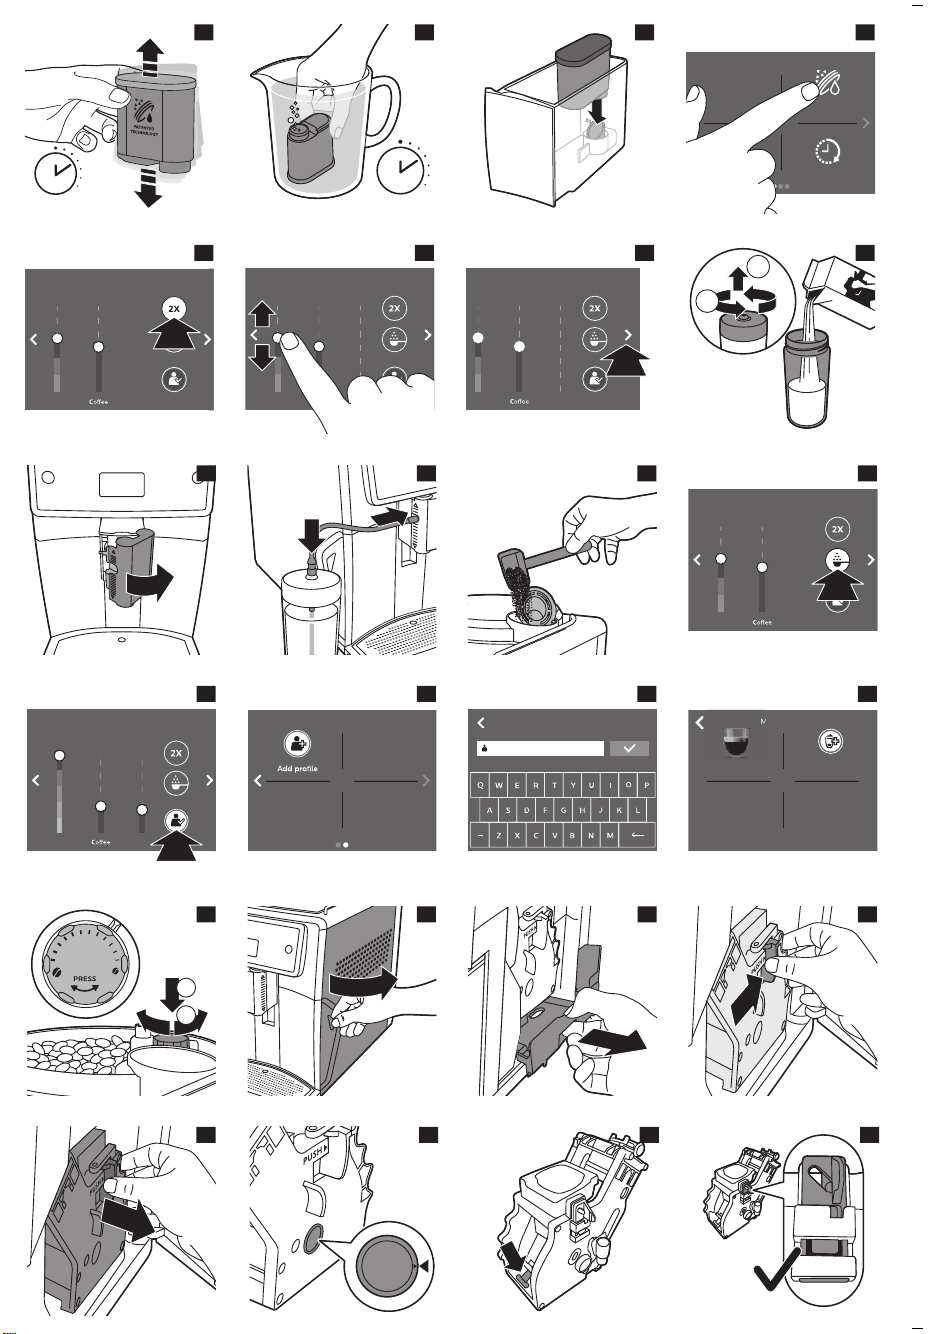
5 sec.
2
30 sec.
3
4
AquaClean
Stand-by
time
Water
hardness
5
1.4oz
Very
Strong
Strength
ESPRESSO
6
1.4oz
Strength
ESPRESSO
Very
Strong
7
1.4oz
Strength
ESPRESSO
Very
Strong
8
2
1
9
10
11
12
1.4oz
Strength
ESPRESSO
Very
Strong
13
ESPRESSO MACCHIATO
Milk
Strength
1.4oz 0.4oz
Very
strong
14
15
NEW PROFILE
16
MARJOLEIN
Add drink
Espresso
MAR
17
1
2
1
2
11
10
9
8
7
6
5
4
3
2
1
18
19
20
21
22
23
24
25
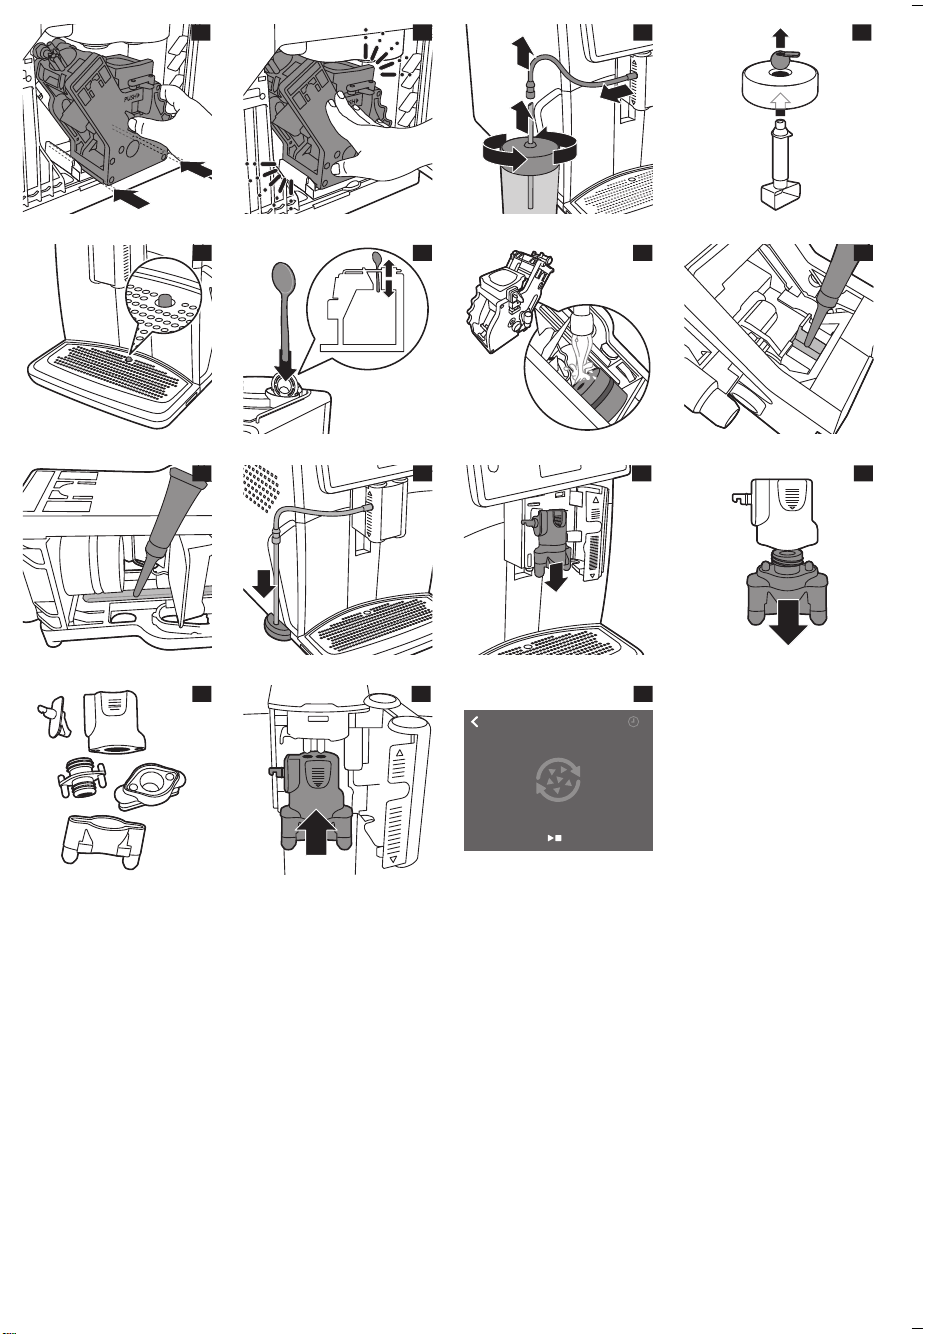
26
27
28
29
30
31
32
33
34
35
36
37
38
39
press to start
15 min
DESCALING
40
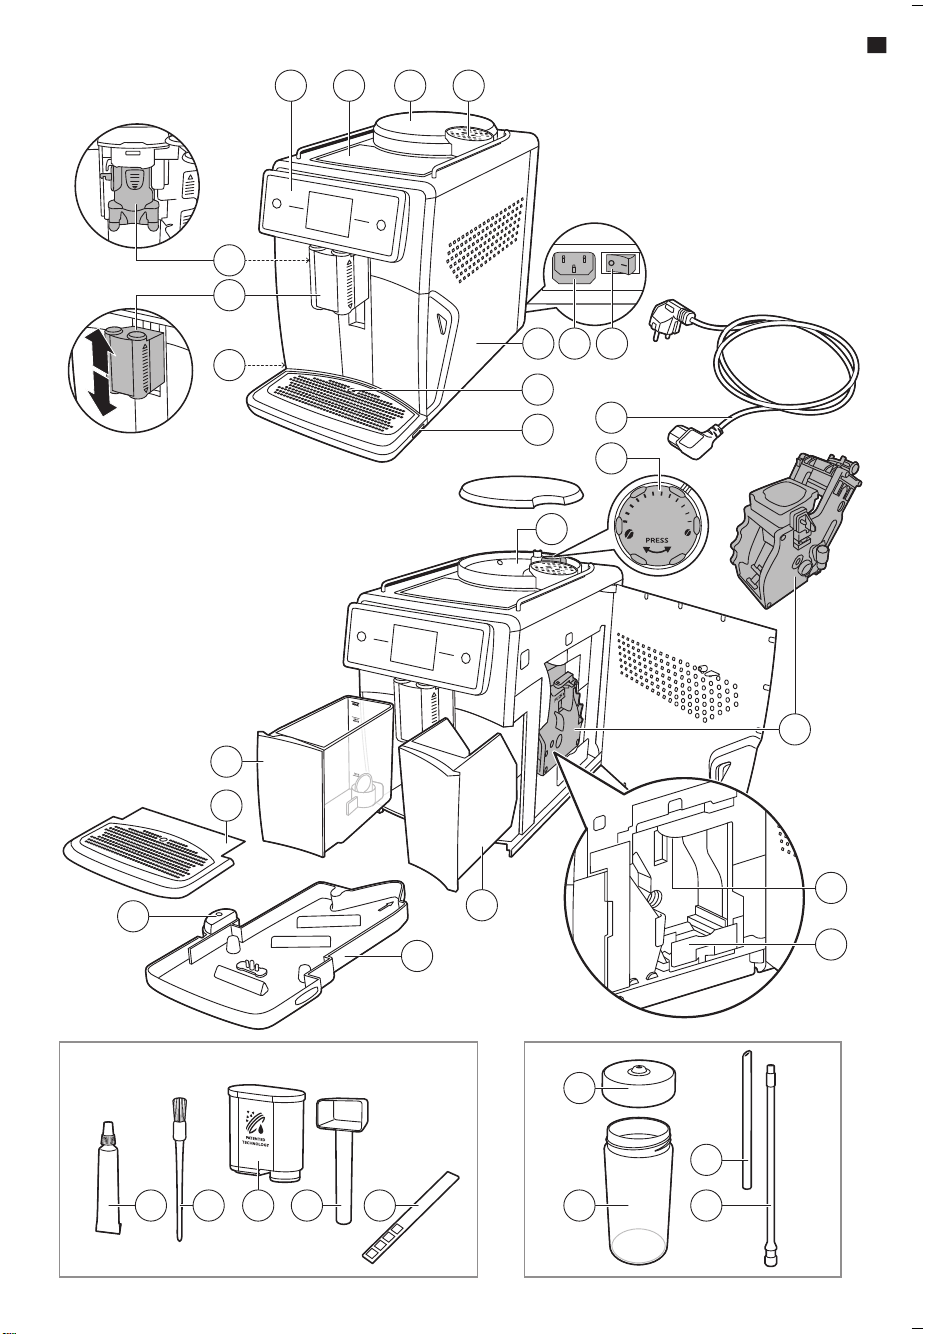
12
1
1
10
9
8
7
6
5
4
3
2
1
21 3 4
12
10
11
7
15
13
14
29
28
30
31
16
19
22
26 2724 2523
18
17
6
9 8
20
5
21
7
1
www.saeco.com/care
>75% recycled paper
>75% papier recyclé
4219.440.8482.1 (5/2018) rev.00
4219.440.8482.1_XELSIS BETTER US_BACKCOVER_A5_FC.indd 1 08-05-18 17:52