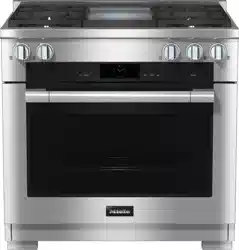
Operating Instructions
36" Dual Fuel Range
(Convection Oven)
To prevent accidents and damage to the range, you must read all
instructions supplied before installing or using the appliance.
en-US, CA M.-Nr. 09 898 061
IMPORTANT SAFETY INSTRUCTIONS
2
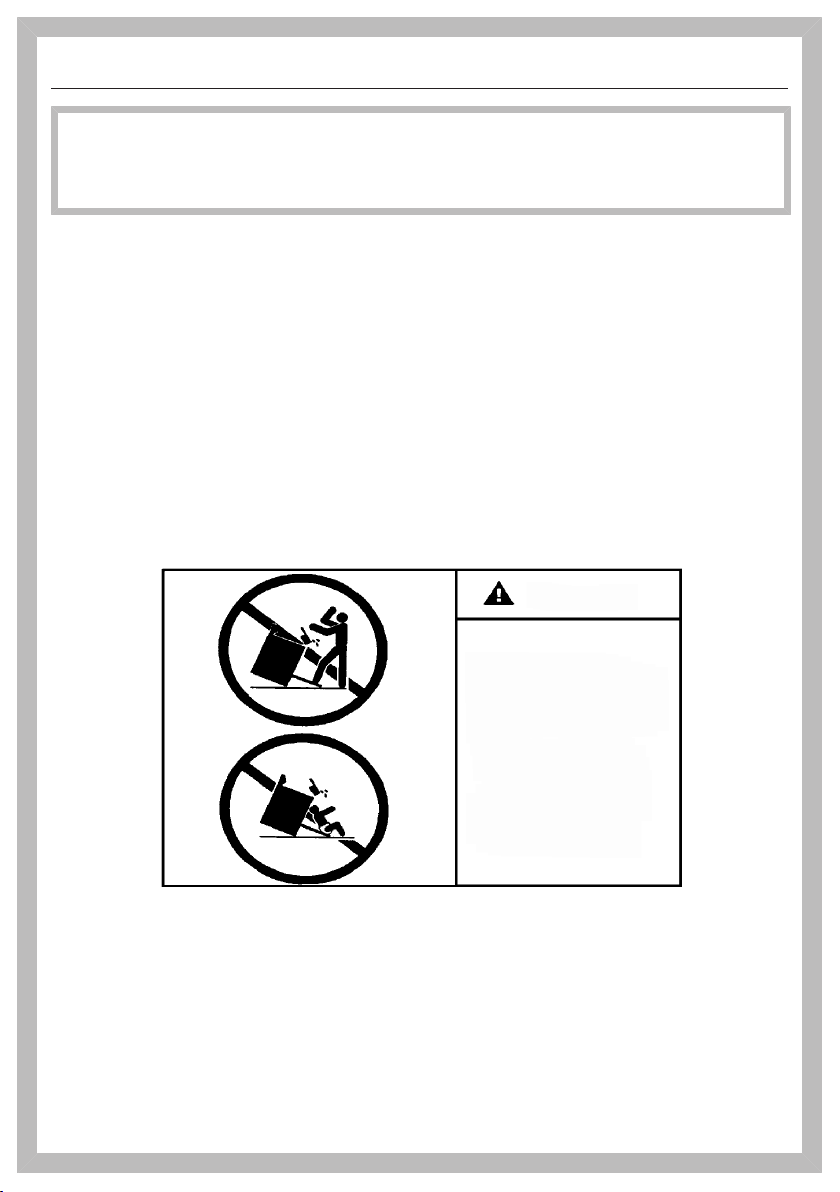
WARNING
Children and adults can tip over the range if has not been secured.
This may lead to fatal injuries.
This range must be secured and connected using the anti-tip
device according to the installation instructions.
If you have moved the range, slide the locking latch onto the anti-
tip device until you feel it lock into place.
Do not use the range if the anti-tip device has not been properly
installed and engaged.
Failure to observe the information contained in the installation
instructions can lead to serious or fatal injuries for children and
adults.
All ranges can tip
Injury to persons
could result
Install anti-tip devices
packed with range
See installation
instructions
WARNING

Contents
3
IMPORTANT SAFETY INSTRUCTIONS ................................................................ 2
IMPORTANT SAFETY INSTRUCTIONS ................................................................ 8
Guide to the range............................................................................................... 20
HR 1934 ................................................................................................................ 20
HR 1935, HR 1936 ................................................................................................ 21
Control panel ....................................................................................................... 22
HR 1934 ................................................................................................................ 22
HR 1935, HR 1936 ................................................................................................ 23
Burner knob........................................................................................................... 23
Sensor buttons...................................................................................................... 24
M Touch display .................................................................................................... 25
Symbols............................................................................................................ 26
Basic operation ..................................................................................................... 26
Features................................................................................................................ 28
Model numbers .................................................................................................... 28
Data plate ............................................................................................................. 28
Items included with this range............................................................................... 28
Standard and optional accessories....................................................................... 28
Shelf runners .................................................................................................... 29
Universal tray and Wire oven rack.................................................................... 29
FlexiClips with wire rack HFCBBR36-2........................................................... 30
Rotisserie HDGR30+ ....................................................................................... 33
Oven controls ....................................................................................................... 34
Oven safety features ............................................................................................. 34
System lock for the oven ............................................................................. 34
Safety shut-off.................................................................................................. 34
Cooling fan ....................................................................................................... 34
Vented oven door ............................................................................................. 34
Safety Door Lock for Self Clean....................................................................... 34
PerfectClean surfaces ........................................................................................... 35
Self Clean ready accessories ................................................................................ 35
Before using for the first time ............................................................................ 36
Before using for the first time................................................................................ 36
Heating up the oven for the first time and rinsing the steam injection system ..... 38
Operating the oven.............................................................................................. 40
Energy saving tips ................................................................................................. 40
Quick Guide........................................................................................................... 41
Cooling fan ........................................................................................................... 41

Contents
4
Settings ................................................................................................................ 42
Accessing the "Settings" menu............................................................................. 42
Changing and saving settings .......................................................................... 42
Settings overview .................................................................................................. 43
Language ........................................................................................................... 45
Time of day............................................................................................................ 45
Display.............................................................................................................. 45
Clock Type........................................................................................................ 45
Clock Format .................................................................................................... 45
Set .................................................................................................................... 45
Date ....................................................................................................................... 46
Lighting.................................................................................................................. 46
Start screen ........................................................................................................... 46
Brightness ............................................................................................................. 46
Volume................................................................................................................... 47
Buzzer tones..................................................................................................... 47
Keypad tone ..................................................................................................... 47
Welcome melody.............................................................................................. 47
Units of measurement ........................................................................................... 47
Weight .............................................................................................................. 47
Temperature ..................................................................................................... 47
Cooling fan ............................................................................................................ 48
Default temperatures............................................................................................. 48
Self Clean .............................................................................................................. 49
Safety .................................................................................................................... 49
System lock .................................................................................................49
Sensor lock ...................................................................................................... 49
Catalyzer................................................................................................................ 50
Voltage................................................................................................................... 50
Sensor group......................................................................................................... 50
Calibrate temperature............................................................................................ 51
Showroom Program .............................................................................................. 51
Demo Mode...................................................................................................... 51
Factory default....................................................................................................... 52
Lift panel................................................................................................................ 52
MyMiele ................................................................................................................ 53
To add an entry...................................................................................................... 53
Editing MyMiele..................................................................................................... 54
Deleting entries................................................................................................. 54
Sorting entries .................................................................................................. 54

Contents
5
Alarm + Timer ...................................................................................................... 55
Using the Alarm ................................................................................................ 55
Setting the alarm .............................................................................................. 55
Changing an alarm ...........................................................................................55
Deleting an alarm .............................................................................................55
Using the Timer ................................................................................................. 56
Setting the timer............................................................................................... 56
Resetting the timer ........................................................................................... 57
Canceling the timer .......................................................................................... 57
Guide to the modes............................................................................................. 58
Additional functions ............................................................................................ 61
Changing the temperature..................................................................................... 61
Rapid PreHeat ....................................................................................................... 62
Rapid PreHeat .................................................................................................. 62
Using the Crisp function (Moisture Reduction) ..................................................... 63
Changing the oven mode ...................................................................................... 63
Setting additional durations .................................................................................. 64
Turning off automatically .................................................................................. 65
Turning on and off automatically ...................................................................... 65
Sequence of a cooking program that turns on and off automatically .............. 66
Changing the set time ...................................................................................... 66
Canceling cooking............................................................................................ 66
Moisture Plus ................................................................................................ 67
Cooking with the Moisture Plus function........................................................ 68
Setting the temperature....................................................................................68
Setting the number of steam bursts................................................................. 68
Timing the bursts of steam............................................................................... 68
Changing the type of heating ........................................................................... 69
Injecting bursts of steam.................................................................................. 70
Automatic burst of steam................................................................................. 70
1, 2 or 3 Bursts of steam.................................................................................. 70
Evaporating residual moisture ............................................................................... 71
Starting residual water evaporation immediately ............................................. 72
Skipping residual moisture evaporation ........................................................... 72
Gourmet Center................................................................................................... 73
List of food types................................................................................................... 73
MasterChef Plus.................................................................................................... 73
Using MasterChef and MasterChef Plus programs............................................... 74
Notes on using these programs ....................................................................... 74
Search ................................................................................................................... 75

Contents
6
MasterChef Plus Recipes...................................................................................... 75
Baguette........................................................................................................... 76
Banana Bread................................................................................................... 77
Brioche ............................................................................................................. 78
Ciabatta............................................................................................................ 79
Cinnamon Raisin Bread.................................................................................... 80
French Bread .................................................................................................... 81
Italian Bread ..................................................................................................... 82
Jalapeño Cheese Bread ................................................................................... 83
Multigrain Bread ............................................................................................... 84
Rolls.................................................................................................................. 85
Rye Bread......................................................................................................... 86
San Francisco Sourdough ................................................................................ 87
Walnut Bread.................................................................................................... 88
White Bread...................................................................................................... 89
Whole Grain Bread ........................................................................................... 90
Favorites............................................................................................................... 91
Creating a Favorite ................................................................................................ 91
Starting a Favorite ................................................................................................. 92
Changing Favorites................................................................................................ 93
Changing cooking stages.................................................................................93
Changing the name .......................................................................................... 94
Deleting a Favorite................................................................................................. 94
Bake...................................................................................................................... 95
Roast .................................................................................................................... 97
Wireless roast probe.............................................................................................. 98
How it works..................................................................................................... 98
When to use the wireless roast probe.............................................................. 99
Important notes on using the wireless roast probe.......................................... 99
Using the wireless roast probe....................................................................... 101
Time left display ............................................................................................. 102
Using residual heat......................................................................................... 103
Slow Roasting.................................................................................................... 104
Using the Slow Roasting function ....................................................................... 105
Adjusting the Slow Roasting temperature........................................................... 106
Broil..................................................................................................................... 107
Special Modes ................................................................................................... 111
Defrost................................................................................................................. 112

Contents
7
Dehydrate ............................................................................................................ 113
Reheat ................................................................................................................. 114
Warm-up Cookware ............................................................................................ 114
Proof .................................................................................................................... 115
Pizza .................................................................................................................... 115
Sabbath Program ................................................................................................ 116
Gentle Bake......................................................................................................... 117
Canning ............................................................................................................... 118
Frozen food.......................................................................................................... 119
Cleaning and care ............................................................................................. 120
Unsuitable cleaning agents ................................................................................. 120
Tips...................................................................................................................... 121
Normal soiling...................................................................................................... 121
Wireless Roast Probe ..................................................................................... 121
Stubborn soiling .................................................................................................. 122
Cleaning the oven interior with Self Clean .................................................... 123
Preparing for the Self Clean program............................................................. 123
Starting the Self Clean program ..................................................................... 124
Starting the Self Clean program ..................................................................... 124
Delaying the start of the Self Clean program ................................................. 124
At the end of the Self Clean program............................................................. 125
The Self Clean program is canceled ..............................................................126
Removing the door.............................................................................................. 127
Reinstalling the door ........................................................................................... 128
Removing the shelf runners................................................................................. 129
Frequently asked questions ............................................................................. 130
Technical Service............................................................................................... 135
Copyright and licenses ..................................................................................... 136

IMPORTANT SAFETY INSTRUCTIONS
8
When using the appliance, follow basic safety precautions, including the
following:
Read all instructions before installation and use of the range to prevent
accidents and machine damage.
This appliance complies with current safety requirements.
Improper use of the appliance can lead to personal injury and
material damage.
Read all instructions before installing or using the oven for the first
time. Only use the appliance for its intended purpose.
Keep these operating instructions in a safe place and pass them
on to any future user.
Use
This appliance is intended for residential use only. Use only as
described in these operating instructions.
This appliance is not intended for outdoor use.
Only use this oven for residential cooking, and the purposes
described in this manual.
Other uses are not permitted and can be dangerous.
Risk of Fire! Do not use this oven to store or dry flammable
materials.
Persons who lack physical, sensory or mental abilities, or
experience with the appliance should not use it without supervision
or instruction by a responsible person.

IMPORTANT SAFETY INSTRUCTIONS
9
Children
As with any appliance, close supervision is necessary when the
oven is used by children.
Do not leave children unattended: Children should not be alone or
unsupervised in the area where the appliance is installed. Do not
allow them to sit or stand on the appliance.
As with any appliance, close supervision is necessary when used
by children.
Children 8 years and older may only use the oven unsupervised if
they have been shown how to use it safely and recognize and
understand the consequences of incorrect operation.
Children must not be allowed to clean or maintain the appliance
unsupervised.
Children should not be left alone or unattended in an area where
an oven is in use. Never allow children to operate, sit or stand on any
part of the oven. Caution: Do not store items of interest to children
in cabinets above an oven. Children climbing on the oven to reach
these items could be injured.
Danger of burns. The oven gets hot at the oven door glass, the
vapor vent, the handle and the operating controls. Do not allow
children to touch or play in, on or near the oven.
Danger of burns.
Children's skin is more sensitive to high temperatures than that of
adults. The oven becomes hotter during self-cleaning than it does in
normal use. Do not let children touch the oven while the Self Clean
program is running.
Burn Hazard - Do not allow children to use the oven. Failure to do
so can result in severe burns or serious injury.
Danger of suffocation! Ensure that any plastic wrappings, bags,
etc. are disposed of safely and kept out of the reach of children.

IMPORTANT SAFETY INSTRUCTIONS
10
Burn hazard!
Keep the spaces above and behind the range clear of any items that
could draw the attention of children. Otherwise, they can be tempted
into climbing onto the appliance.
Danger of injury. Never allow children to hang or lean on any part
of the appliance.

IMPORTANT SAFETY INSTRUCTIONS
11
Technical safety
Installation, repair and maintenance work should be performed by
a Miele authorized service technician in accordance with national
and local safety regulations and the provided installation
instructions. Contact Miele’s Technical Service Department for
examination, repair or adjustment. Repairs and other work by
unauthorized persons could be dangerous and may void the
warranty.
Do not carry or lift the range by the oven door handle or the
control panel!
Maintenance by the user: Never repair or replace any part of the
appliance unless the instructions specifically recommend doing so.
Service work may only be performed by a qualified technician.
Changes or modifications not expressly approved by Miele may
void the user's authority to operate the oven.
A damaged range can be dangerous. Always check for visible
signs of damage. Never use a damaged appliance.
Reliable and safe operation of the range can only be guaranteed if
it is connected to the public power supply.
The electrical safety of the range can only be guaranteed when it
is properly grounded. Compliance with this essential safety
requirement is absolutely mandatory. If in any doubt, please have the
building's wiring system inspected by a qualified electrician.
Proper installation: Make sure that your appliance has been
installed correctly and that it has been grounded by a qualified
technician.
The oven is not to be operated until it has been properly installed
within cabinetry.

IMPORTANT SAFETY INSTRUCTIONS
12
To avoid damaging the range, make sure that the connection data
(voltage and frequency) on the data plate correspond to the
building's power supply before connecting the appliance.
When in doubt, consult a qualified electrician.
Do not use a power strip or extension cord to connect the range
to electricity. These are a fire hazard and do not guarantee the
required level of appliance safety.
This appliance must not be installed and operated in mobile
installations (e.g. on a ship).
Danger of electric shock!
Under no circumstances open the outer casing of the appliance.
Do not repair or replace any part of the appliance unless
specifically recommended in the operating instructions. All other
servicing should be referred to a qualified technician.
Defective components should be replaced by Miele original parts
only. Only with these parts can the manufacturer guarantee the
safety of the appliance.
During installation, maintenance and repair work, e.g. if the oven
lighting is broken (see "Frequently asked questions"), the range must
be completely disconnected from the household electricity supply.
The gas supply must be shut off. Ensure that this is the case by:
– removing the fuse,
– "tripping" the circuit breaker, or
– unplugging the unit. Pull the plug not the cord.
– Shut off the gas supply and, if necessary, disconnect the range
from the gas line. Installation and maintenance of the gas
connection must be performed by qualified installers, service
agencies or gas providers.

IMPORTANT SAFETY INSTRUCTIONS
13
If the range is installed behind a cabinet door, do not close the
door while the appliance is in operation. Heat and moisture can build
up behind the closed door and cause damage to the range and to
the surrounding cabinets and flooring. Do not close the door until the
appliance has completely cooled down.
Do not install kitchen cabinets above the range, since reaching
over a hot stovetop to access the cabinets can result in burns. If it is
necessary to install cabinets, you can reduce the risk of burns by
installing a range hood that extends at least 4 3/4" (12 cm) past the
bottom of the cabinets.
The water shutoff valve must be accessible after the range has
been installed.
The protective sleeve of the water intake hose must not be
damaged or become kinked. This will cause it to leak.
The integrated Waterproof System offers protection against water
damage if the following conditions are met:
– The range is properly installed (connected to electric and water
supply).
– The range is repaired immediately whenever damage is detected.
– The water supply is shut off during extended periods of non-use
(e.g. vacation).
Hard water, water containing minerals and water from reverse
osmosis filtering systems can damage the range. Only use filtered,
softened and demineralized water from the building's plumbing to
supply the range.

IMPORTANT SAFETY INSTRUCTIONS
14
Proper use
The oven becomes very hot while in use. Use caution to
ensure that you are not burned on the heating elements or interior
surfaces of the oven. Use pot holders when placing food in the
oven, adjusting the racks, etc. in a hot oven.
Caution: Heating elements may be hot even though they are not
glowing. Interior surfaces of an oven become hot enough to cause
burns. External parts of the oven such as the door glass, vents, and
the control panel can become hot. During and after use, do not
touch, or let clothing or other flammable materials come into contact
with heating elements or interior surfaces of the oven until they have
had sufficient time to cool.
Do not let food sit in the oven for more than one hour before or
after cooking. Doing so can result in food poisoning or sickness.
Use only dry, heat-resistant potholders. Moist or damp potholders
used on hot surfaces may result in steam burns. Do not let
potholders come in contact with oil or grease. Do not substitute dish
towels or other bulky items for potholders. Do not let potholders
touch hot heating elements.
Loose fitting or hanging garments present a fire hazard. Wear
proper apparel while operating the appliance.
Do not heat unopened containers of food in the oven, pressure
may cause the containers to burst and result in injury.
Never pour cold water onto hot surfaces in a hot oven.
The steam created could cause serious burns or scalding and the
sudden change in temperature can damage the enamel in the oven.
To prevent burns, always place oven racks at their desired height
while the oven is cool. If the rack must be moved while the oven is
hot, do not let pot holders touch hot heating elements.

IMPORTANT SAFETY INSTRUCTIONS
15
Open the door carefully to allow hot air or steam to escape before
placing or removing food.
To prevent burns, allow the heating elements to cool before
cleaning by hand.
Do not leave the oven door open unnecessarily as someone may
trip over it or be injured by it.
Never leave the appliance unattended when cooking with oil or
fat. They can ignite if overheated. Do not use water on grease
fires.Turn off the oven immediately and suffocate the flames by
keeping the oven door closed.
Smother the fire or flames, or use a dry chemical extinguishing
agent or foam fire extinguisher.
Never store flammable liquids and materials in, above or under an
oven, or near cooking surfaces.
Do not use the oven to heat the room. The high temperatures
radiated could cause objects near the oven to catch fire.
WARNING
NEVER use this appliance as a space heater to heat or warm the
room. Doing so may result in carbon monoxide poisoning and
overheating of the oven.
WARNING
NEVER use this appliance as storage space. Doing so may result
in carbon monoxide poisoning and overheating of the oven.
WARNING
NEVER cover any slots, holes or passages in the oven bottom or
cover an entire rack with materials such as aluminum foil. Doing so
blocks air flow through the oven and may cause carbon monoxide
poisoning. Aluminum foil linings may also trap heat, causing a fire
hazard.

IMPORTANT SAFETY INSTRUCTIONS
16
Broiling food for an excessively long time can cause it to dry out
and may result in the food catching fire.
Do not exceed recommended broiling times.
Some foods dry out very quickly and can be ignited by high
broiling temperatures. Do not use broiling modes for crisping rolls or
bread, or to dry flowers or herbs. Instead use the Convection Bake
or Surround modes.
Use caution when using alcohol in your recipes. Alcohol
evaporates at high temperatures but may, in rare circumstances,
combust on the hot heating elements.
Plastic containers, which are not heat-resistant, melt and may
ignite at high temperatures and can damage the oven. Use only
plastic containers that are indicated by the manufacturer as being
suitable for use in ovens.
When residual heat is used to keep food warm, the high level of
humidity and condensation can cause damage in the oven. The
control panel, countertop or cabinetry may also be damaged.
Do not switch the oven off completely while food is inside it, but
select the lowest possible temperature for the oven mode you are
using. This will ensure the fan will automatically continue to run.
It is recommended to cover all cooked food that is left in the oven
to be kept warm. This will prevent moisture from condensing on the
interior of the oven.
To avoid damage, do not place aluminum foil, pots, pans or
baking sheets directly on the oven floor. This can cause a build up of
heat that will damage the oven floor.
Do not slide pots or pans on the oven floor. This could scratch
and damage the surface.

IMPORTANT SAFETY INSTRUCTIONS
17
The door can support a maximum weight of 33lbs (15kg). Do not
sit on or lean against an open door, and do not place heavy objects
on it. Also make sure that nothing can get trapped between the door
and the oven cavity. The oven could get damaged.
This oven must only be used for cooking food. Fumes, vapors or
heat given off by glues, plastics or flammable liquids and materials
could be hazardous. Do not use it as a dryer, kiln, dehumidifier, etc.
Do not obstruct the flow of combustion and ventilation air.
Do not let metal objects (aluminum foil, pans) come in contact
with the heating element.
Make certain that the power cords of small appliances do not
come in contact with or get caught in the oven door.
When baking frozen pizzas or pies, place them on the wire rack
lined with parchment paper. Do not use the baking tray or the
roasting pan for frozen foods with a large surface area. The tray or
pan could become warped and difficult to remove from the oven
when hot. Frozen foods like french fries, chicken nuggets, etc. can
be baked on the baking tray.
Cleaning and care
Do not use a steam cleaner to clean this oven.
Steam could penetrate electrical components and cause a short
circuit.
Only clean parts listed in these Operating and Installation
Instructions.
Scratches on the door glass can cause the glass to break.
Do not use abrasive cleaners, hard sponges, brushes or sharp metal
tools to clean the door glass.
The shelf runners can be removed for cleaning purposes (see
"Cleaning and care"). Ensure they are correctly fitted after cleaning
and never operate the oven without the shelf runners inserted.

IMPORTANT SAFETY INSTRUCTIONS
18
There is a seal around the oven interior which seals the inside of
the door. Take care not to rub, damage or move the gasket.
Do not use oven cleaners. Commercial oven cleaners or oven
liners of any kind should not be used in or around any part of the
oven.
Debris should be removed before running the Self Clean program.
If not removed this debris can smoke causing the self-cleaning
program to turn itself off.

IMPORTANT SAFETY INSTRUCTIONS
19
Accessories
Use only genuine original Miele parts. If parts or accessories from
other manufacturers are used, the warranty will become void.
Only use the Miele roast probe supplied with this oven. If it is
faulty, it must only be replaced with a Miele genuine roast probe.
The plastic on the roast probe can melt at very high temperatures.
Do not use the roast probe when using the broil functions (exception:
Convection Broil). Do not store the roast probe in the oven if it is
not in use.
This oven complies with Industry Canada licence-exempt RSS
standard(s) and part15 of the FCC Rules. Operation is subject to the
following two conditions: (1) This device may not cause harmful
interference, and (2) this device must accept any interference
received, including interference that may cause undesired operation.
The high temperatures used during self-cleaning will damage
accessories that are not designed for cleaning in the Self Clean
program. Please remove these accessories from the oven before
starting the Self Clean program. This also applies to accessories
purchased separately (see "Cleaning and care").
Preparing your appliance for an extended vacation
If you elect to turn off the water to your home for an extended
period of time, please note that this may not be enough to reduce
the risk of a leak. To be completely safe, you must turn off the water
supply to each individual appliance.
SAVE THESE INSTRUCTIONS AND REVIEW THEM PERIODICALLY
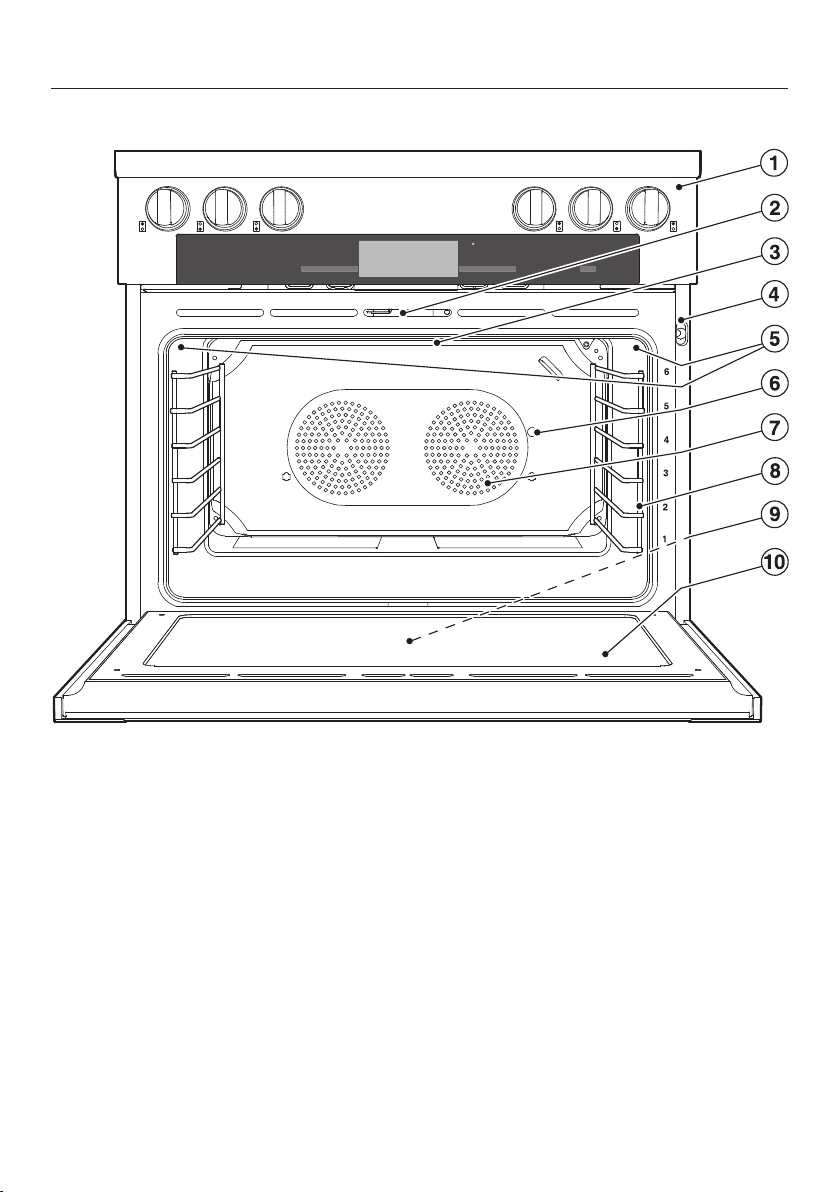
Guide to the range
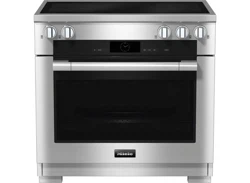
20
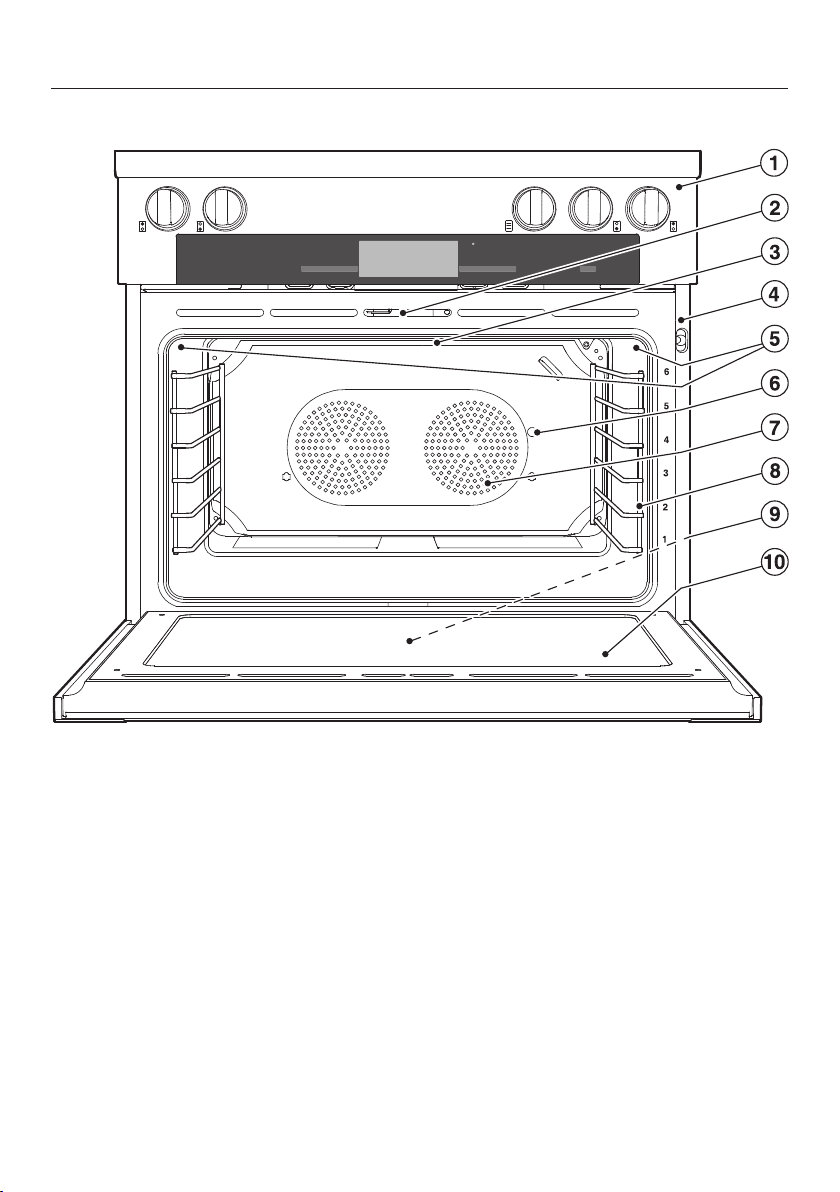
HR 1934
a
Oven and cooktop controls
b
Door lock with contact switch for Self
Clean
This switch ensures that the heating
elements and the convection fans
turn off when the door is opened
during use.
c
Browning/Broiling element
d
Storage for wireless roast probe
e
Oven interior lighting
f
Rotisserie motor
g
TwinPower convection fans with
heating element
h
Shelf runners with 6levels
i
Data plate
The data plate is located behind the
toe kick.
j
Door
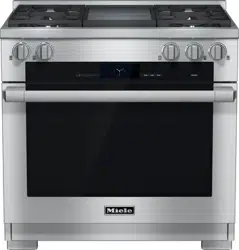
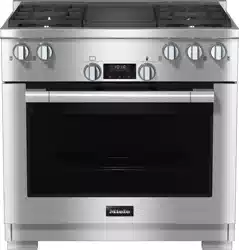
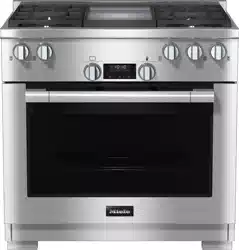
Guide to the range
21
HR 1935, HR 1936
a
Oven and cooktop controls
b
Door lock with contact switch for Self
Clean
This switch ensures that the heating
elements and the convection fans
turn off when the door is opened
during use.
c
Browning/Broiling element
d
Storage for wireless roast probe
e
Oven interior lighting
f
Rotisserie motor
g
TwinPower convection fans with
heating element
h
Shelf runners with 6levels
i
Data plate
The data plate is located behind the
toe kick.
j
Door
Control panel
22
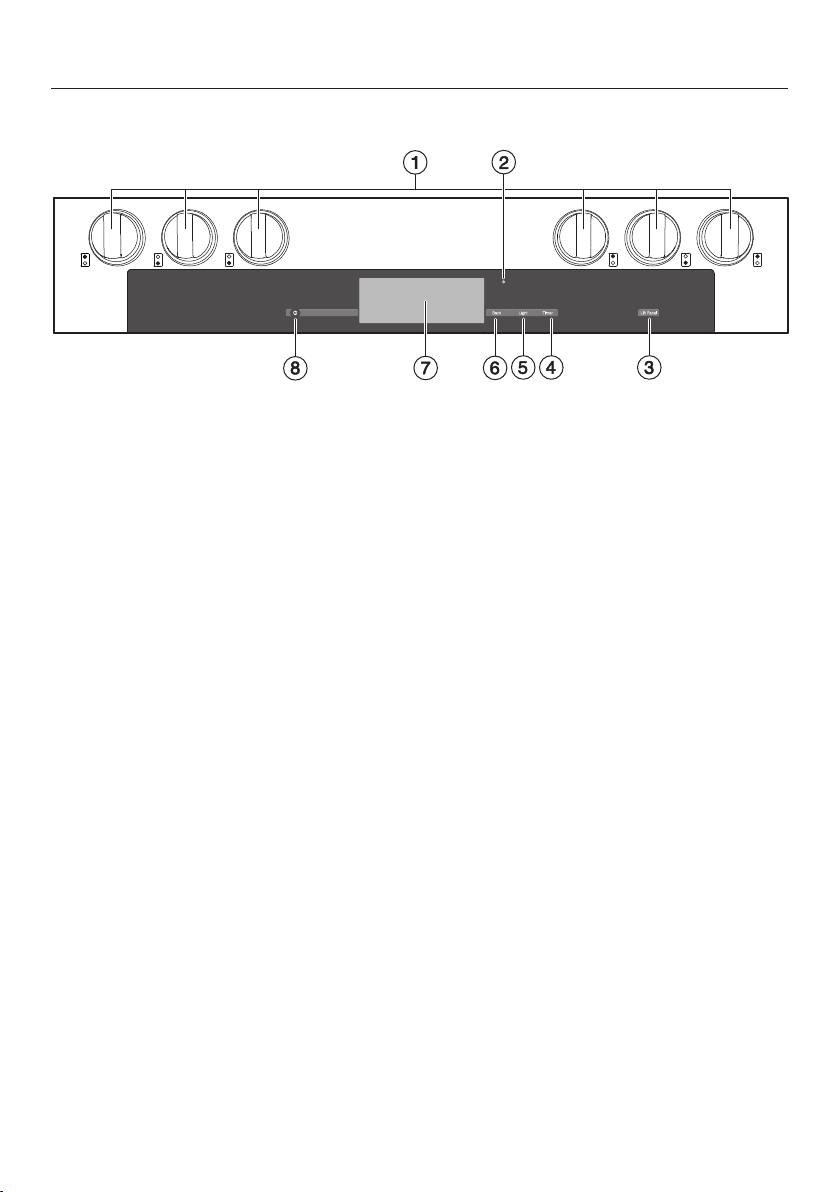
HR 1934
a
Backlit burner control knobs
b
Optical interface
(for service technician use only)
c
Sensor button for lift panel
To lift up the control panel
d
"Timer" sensor button
To set the timer
e
"Light" sensor button
To turn the oven cavity lighting on
and off
f
"Back" sensor button
To go back one step at a time
g
Display
To display time of day and
information for operation
h
On / Off button in the cut-out
To turn the appliance on and off
Control panel
23
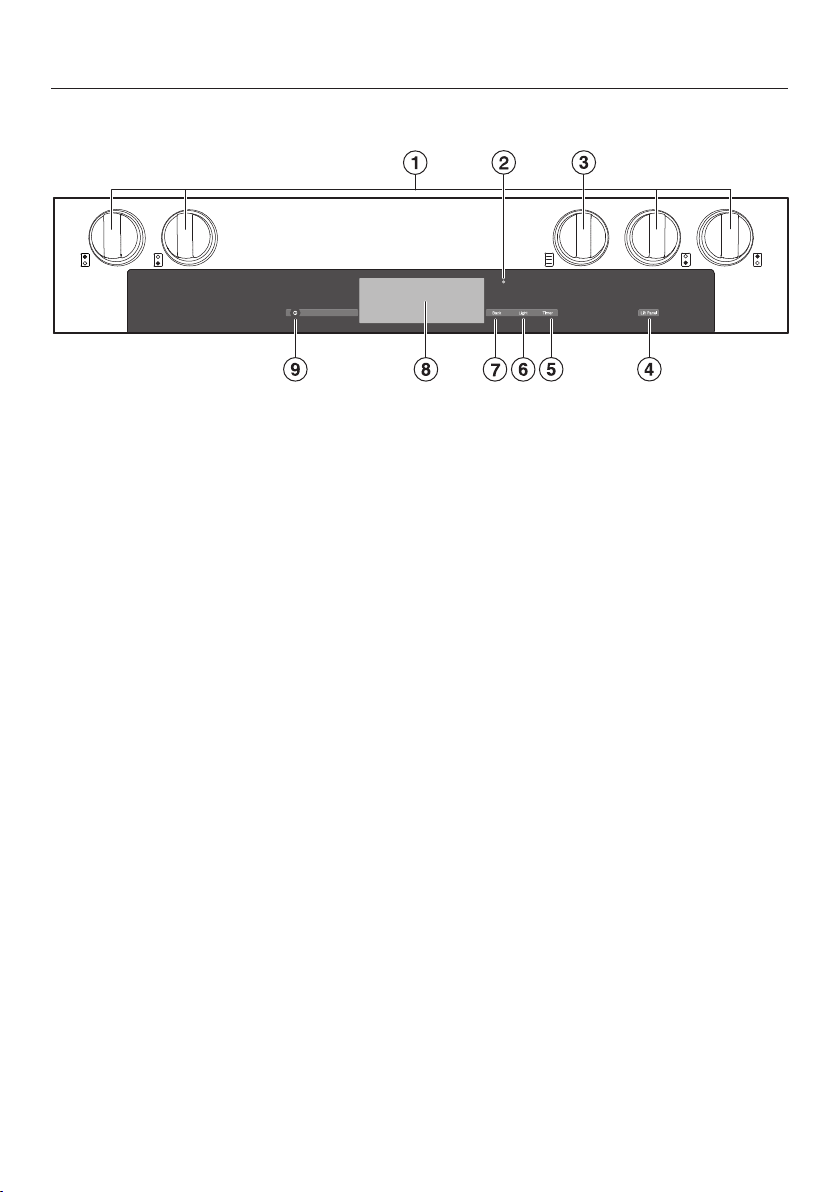
HR 1935, HR 1936
a
Backlit burner control knobs
b
Optical interface
(for service technician use only)
c
Backlit burner control knob
HR 1935: Grill
HR 1936: Griddle plate
d
Sensor button for lift panel
To lift up the control panel
e
"Timer" sensor button
To set the timer
f
"Light" sensor button
To turn the oven cavity lighting on
and off
g
"Back" sensor button
To go back one step at a time
h
Display
To display time of day and
information for operation
i
On / Off button in the cut-out
To turn the appliance on and off
Burner knob
With the burner knob, you can ignite the burner and regulate the flame. The
burners can be variably adjusted between the lowest and highest settings.
The burner knobs are backlit with an illuminated ring.

Control panel
24
Sensor buttons
The sensors react to touch. Each touch is confirmed with an audible tone. This
tone can be turned off (see "Settings – Volume - Keypad tone").
Sensor
button
Function Notes
Lift
panel
For raising and
lowering the
control panel for
the oven
You can lift up and put down the control panel for
the oven automatically or manually (see "Settings –
Lift panel").
As soon as you start the self-cleaning cycle, the lift
panel goes down automatically.
Timer For activating and
deactivating timer /
alarm
If a list of options is shown in the display, or if a
cooking process is running, you can enter a timer
duration (e.g. when boiling eggs on the cooktop) or
an alarm time, i.e. a specific time, at any point (see
"Alarm + Timer").
If the time of day display is turned off, the "Timer"
sensor will not react until the oven is turned on.
Light For turning the
oven interior
lighting on and off
If a menu appears in the display or if a cooking
process is running, touching "Light" will turn the
interior light on or off.
If the time of day display is turned off, the "Light"
sensor will not react until the oven is turned on.
The oven interior lighting turns off after 15 seconds
during a cooking process or remains constantly
turned on, depending on the setting selected.
Back To go back a step

Control panel
25
M Touch display
The touch screen can be scratched by hard objects, e.g. pens and pencils.
Only touch the display with your fingers.
Touching the display with your finger emits a small electrical charge, which in turn
triggers an electrical pulse that is detected by the surface of the touch display.
The display is divided into three sections:
MyMiele
Operating
Modes
Gourmet Center
Special
Modes
Favorites
12:00
Main Menu
Main Menu 12:00
The top line shows what menu level you are currently in. Options within a menu are
separated by a vertical line. If there is not enough space to show the whole path,
additional options are indicated by … . The Time of Day, Alarm and Timer
are shown in the top right-hand corner of the display.
The middle row shows the current menu and options. You can scroll to the right or
left by swiping your finger across the display.
The and arrows at the bottom of the screen are used for scrolling to the left or
right. The number of small squares between the arrows indicates the number of
pages available and your position within the current menu.

Control panel
26
Symbols
The following symbols may appear in the display:
Symbol Description
Some settings, e.g. display brightness and buzzer volume, are
selected using a bar chart.
This symbol indicates that there is additional information and
advice about using the oven. Select OK to access the
information.
The system lock or sensor lock is active (see "Settings - System
Lock "). The oven cannot be operated.
Alarm
Timer
Core temperature when using the roast probe
Basic operation
Each time you touch a possible option the relevant field will light up orange.
To select or open a menu
Touch the desired field to select it.
Scrolling
You can scroll left or right.
Swipe the screen, i.e., place your finger on the touch display and move it in the
desired direction.
Or: Using your finger you can tap the and arrows to scroll left or right.
Exiting a menu
Touch "Back", select an option in the menu path at the top of the screen, or
touch … .
Depending on the current menu, this will take you back one level or return you to
the Main Menu.
Help function
With some functions and options Help appears.
Select the function.
Helpful information will then appear in text and pictures.
Control panel
27
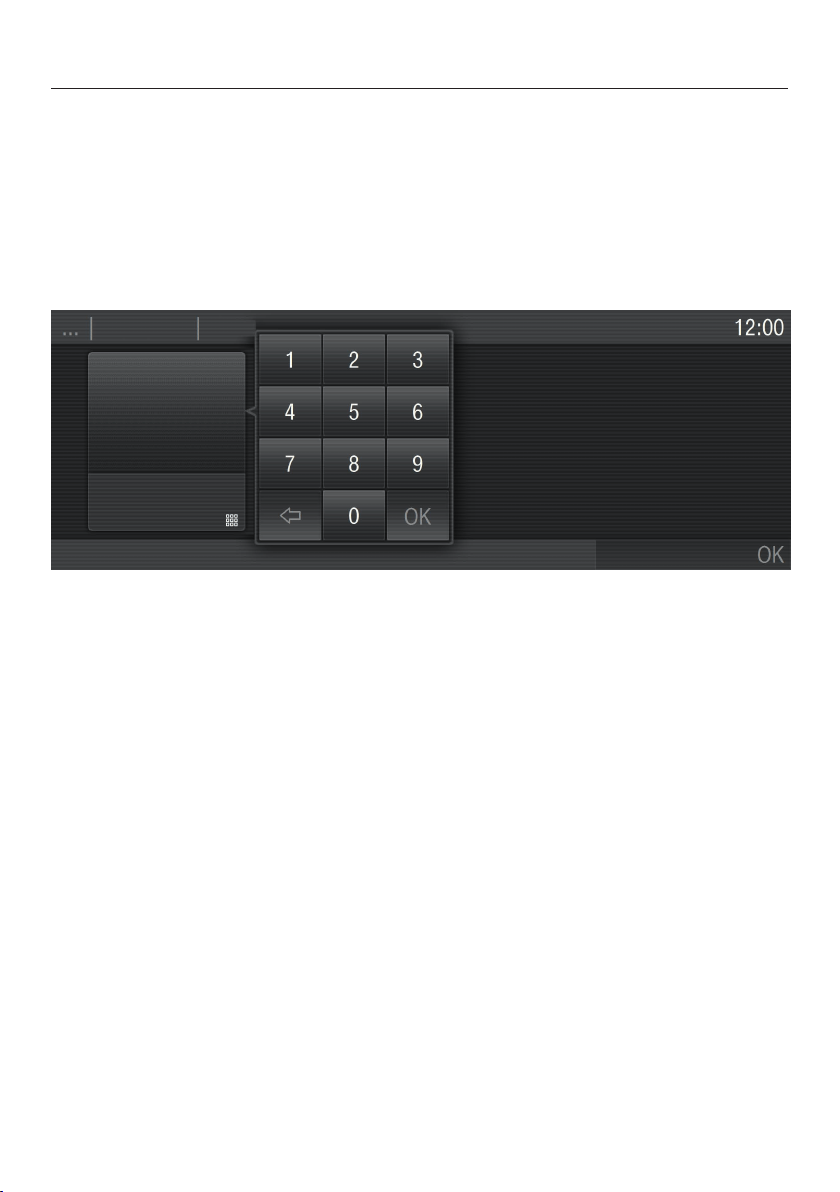
Entering numbers
You can enter numbers by scrolling through and touching the roller, or by using the
numerical keypad.
To enter numbers using the roller:
Swipe the roller up or down to select the desired number.
To enter numbers using the numerical keypad:
Touch in the bottom right of the input field.
The numerical keypad appears.
Touch the required numbers.
Once you have entered a valid value, the OK sensor will light up green.
The last figure entered can be deleted using the arrow.
Touch "OK".
Entering letters
Enter a name using a keyboard. Try to use short, concise names.
Select the required letters or characters.
Touch Save.

Features
28
Model numbers
A list of the ovens described in these
operating instructions can be found on
the back page.
Data plate
The data plate is behind the toe-kick.
The toe-kick cover is attached to the
base of the range by magnets so it can
be removed and put back again easily.
There you can find the model number,
the serial number and the connection
data (voltage/frequency/maximum rated
load) for your range.
Have this information available when
contacting Miele Technical Service.
Items included with this range
The following items are included with
this appliance:
– Installation instructions for the range
– The operating instructions for the
range:
– Gas Cooktop
– Convection Oven
– An anti-tip device, including screws
for fastening the range
– Various accessories
Standard and optional
accessories
Accessories vary depending on
model. All ovens are supplied with
shelf runners, a universal tray and a
wire oven rack. Depending on the
model, your oven may also come with
the additional accessories listed.
All accessories and cleaning and care
products in these instructions are
designed to be used with Miele ovens.
They can be ordered from the
Mieleusa.com website or Miele.
When ordering, please have ready the
model number of your oven and of the
desired accessories.
Features
29
Shelf runners
The shelf runners are located on the
right and left-hand sides of the oven
with the levels for inserting accessories.
The shelf level numbers are indicated
on the front of the oven frame.
Each level consists of a strut on which
you can place the wire oven rack, for
example.
The runners can be removed for
cleaning purposes. See "Cleaning and
Care".
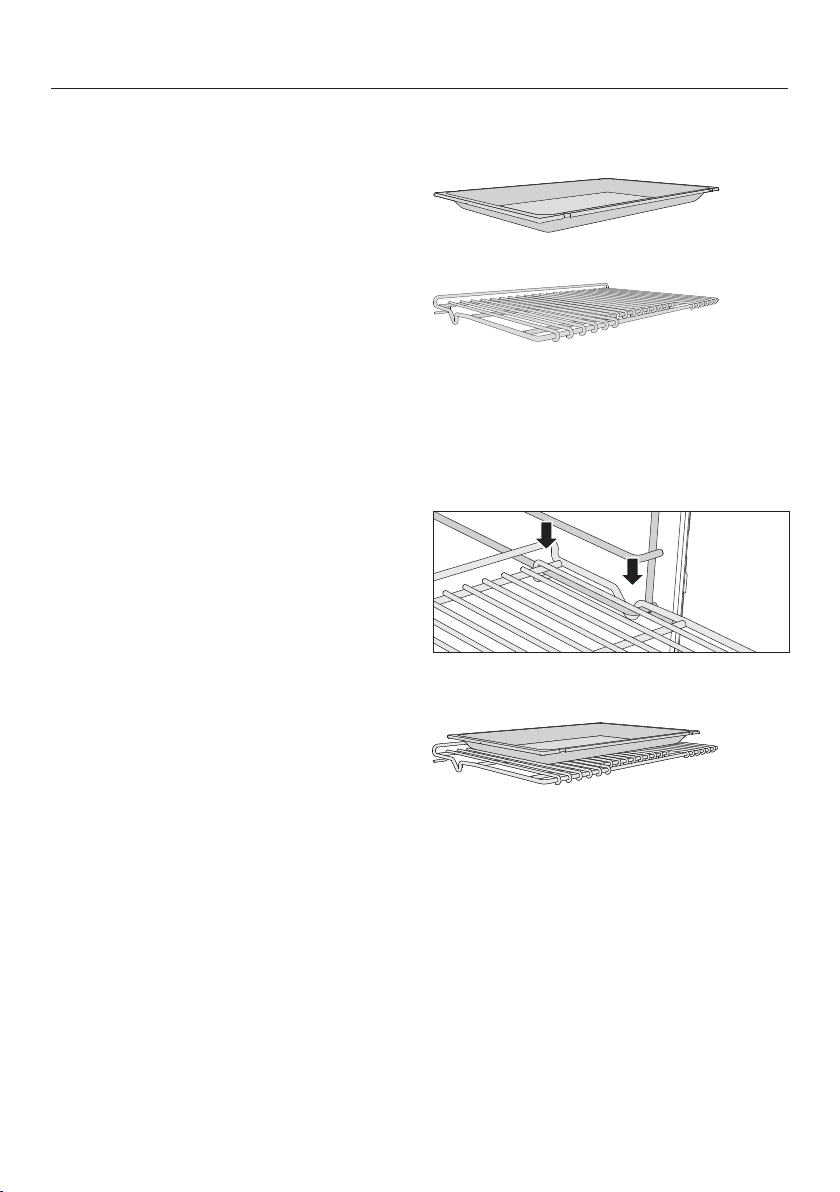
Universal tray and Wire oven rack
Universal tray HUBB30-1
Wire oven rack HBBR36-2
Non-tip safety notches are located on
the shorter sides of these
accessories.These prevent the trays
being pulled completely out of the side
runners when you only wish to pull
them out partially.
Always place the wire oven rack on the
runner with the notch facing down.
When using the universal tray, place it
directly on the wire oven rack.
Features
30
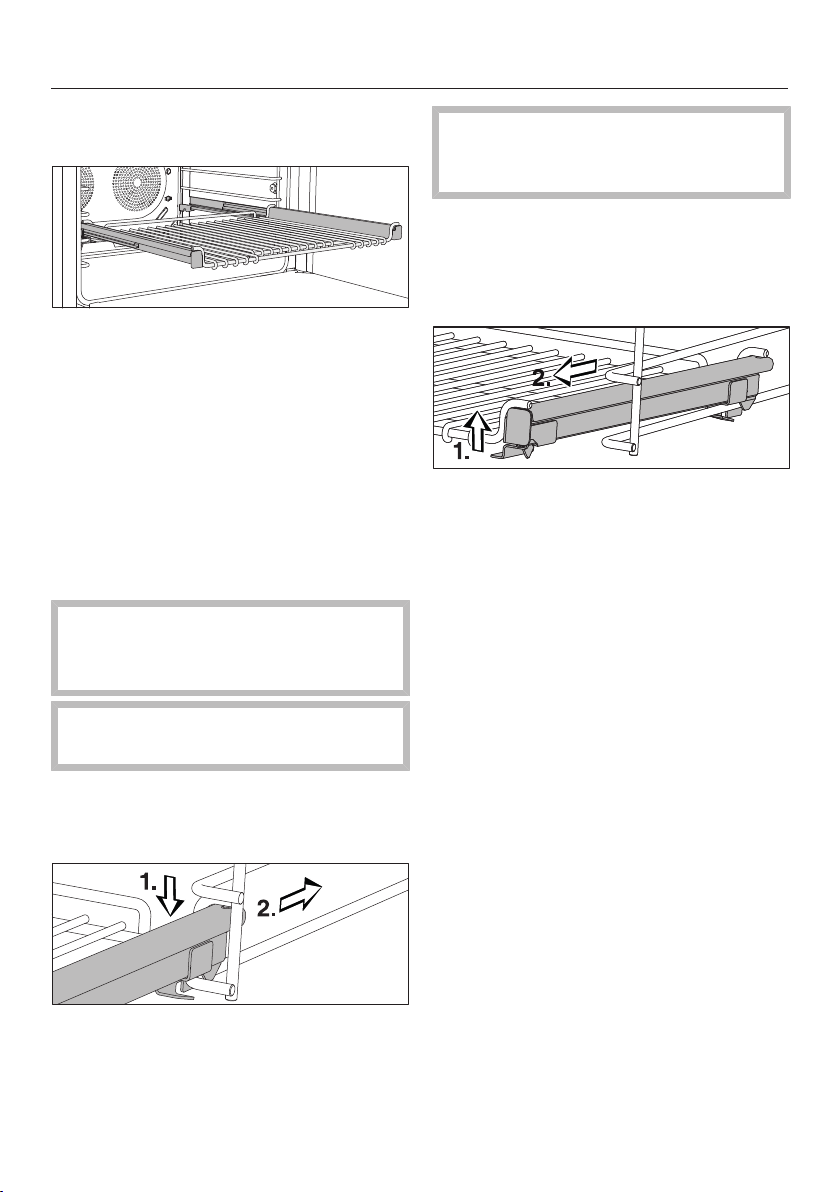
FlexiClips with wire rack
HFCBBR36-2
The FlexiClips with wire rack can be
mounted on any shelf level and pulled
completely out of the oven This allows
you to see the food easily.
The FlexiClips with wire rack is pushed
in and then locked onto a level.
The rack can hold a maximum of 33 lbs
(15 kg).
Installing and removing the FlexiClips
with wire rack
Danger of burns! Make sure the
heating elements are turned off and
that the oven cavity is cool.
Do not pull the FlexiClips apart
during installation or removal.
Hold the FlexiClips with wire rack with
both hands and position it in front of
the desired level.
Insert the FlexiClips with wire rack
onto the level (1.) and slide it along
the struts of the level (2.) until it clicks
into place.
If the FlexiClips with wire rack jams
when sliding it onto the level, pull it
out using some force and reinsert.
To removing the FlexiClips with wire
rack:
Push the FlexiClips with wire rack in
all the way.
Using both hands lift the front of the
FlexiClips with wire rack on both
sides (1.) and pull it out of the level
(2.).
Using the universal tray
When using the universal tray, place it
directly on the FlexiClips with wire
rack.

Features
31
Perforated baking tray HBBL71
The perforated baking tray has been
specially developed for the preparation
of baked goods.
The tiny perforations assist in browning
the underside of baked goods.
The tray can also be used for
dehydrating or drying food.
The surface has been treated with
PerfectClean enamel for easy cleaning.
The perforated baking tray can be
placed on the rack.
Grilling and Roasting insert
HGBB30-1
The grilling and roasting insert is placed
in the universal tray.
The drippings from the meat or poultry
are collected under the insert reducing
spattering in the oven. The drippings
can then be used for gravy and sauces.
The surface has been treated with
PerfectClean enamel for easy cleaning.
Round baking form HBF27-1
This circular form is suitable for cooking
fresh or frozen pizzas, flat cakes, tarts
and baked goods.
The surface has been treated with
PerfectClean enamel.
Gourmet Baking Stone HBS60
The baking stone is ideal for baking
dishes with a crisp bottom such as
pizza and bread.
The baking stone is made from a heat
retaining stone and is glazed. Place the
stone directly on the wire rack.
A wooden peel is supplied with it for
placing food on and off the stone.
Features
32
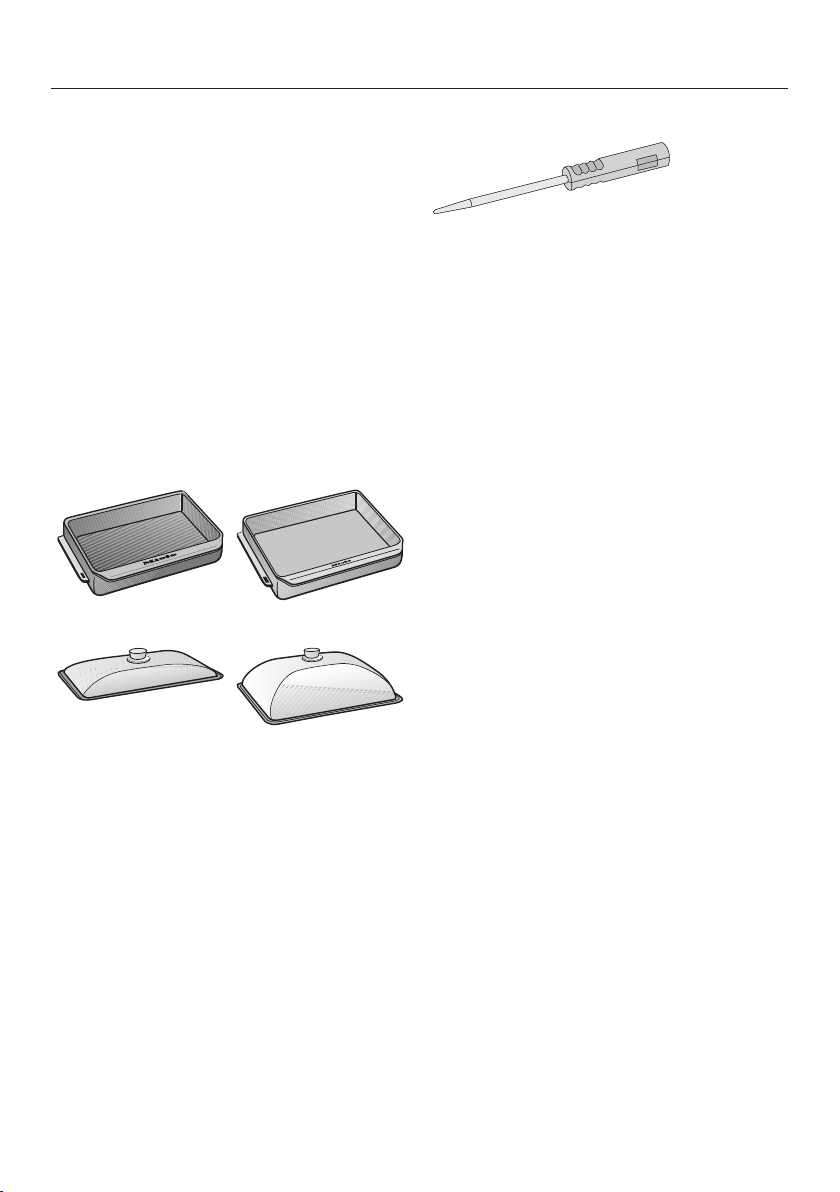
Gourmet Casserole Dishes HUB and
Lids HBD
Miele Gourmet Casserole Dishes can be
placed directly on the wire oven rack.
They have an anti-stick coating.
The oven dishes have depths of
81/2" (22cm) or 133/4" (35cm). They
have the same width and height.
Matching lids are also available
separately.
Depth:
81/2" (22cm)
Depth:
133/4" (35cm)
HUB61-22 HUB61-35
HBD60-22 HBD60-35
Wireless Roast Probe
The oven is equipped with a wireless
roast probe that enables you to monitor
the temperature of the cooking process
simply and accurately (see "Roasting -
Wireless roast probe"). The roast probe
is kept in the front frame of the oven.
Features
33
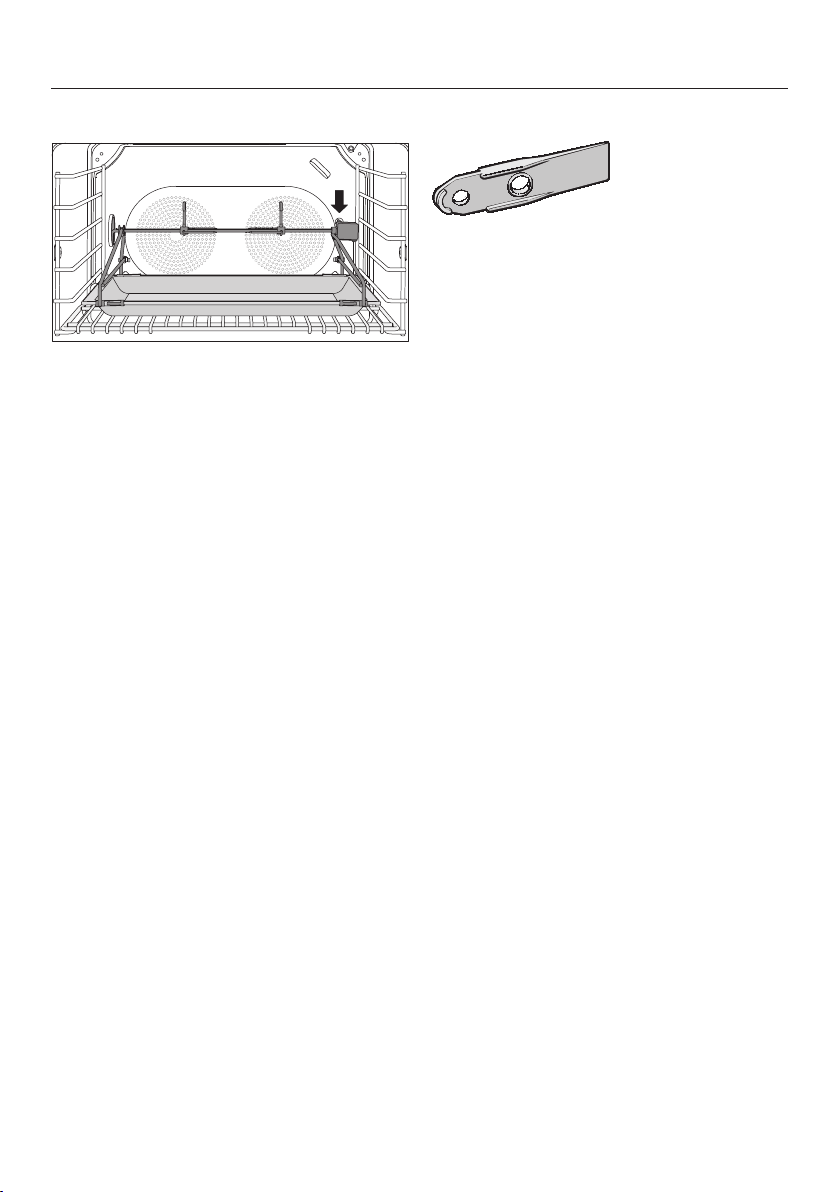
Rotisserie HDGR30+
The rotisserie is ideal for broiled foods
such as meat, poultry or kebabs. The
food browns evenly on all sides as it
rotates (see "Broil - Using the rotisserie
to Broil").
The rotisserie is placed on the universal
tray and connected to the motors in the
back wall of the oven.
The rotisserie can support a maximum
weight of 11 lbs (5 kg).
Use of kebab device as well as meat
clamps possible.
Opener
The opener allows you to open the
cover of the over light.
Miele Oven Cleaner
Miele oven cleaner is suitable for
removing stubborn soiling. It is not
necessary to preheat the oven before
use.

Features
34
Oven controls
The oven controls allow you to use the
various cooking modes to bake, roast
and broil.
It also allows you to access:
– the time of day display,
– a timer,
– a timer to automatically turn cooking
programs on and off,
– Moisture Plus cooking,
– the MasterChef programs,
– the MasterChef Plus programs,
– the creating of a Favorite program,
– settings that can be customized.
Oven safety features
System lock for the oven
The system lock prevents the oven from
being used unintentionally (see "System
lock ").
The system lock will remain activated
even after a power failure.
Safety shut-off
The oven automatically turns itself off if
it is used for an exceedingly long
period. The length of time depends on
the oven mode being used.
Cooling fan
The cooling fan comes on automatically
when a cooking program is started. The
cooling fan mixes hot air from the oven
cavity with cool room air before venting
it out into the kitchen through vents
located between the appliance door
and the control panel.
The cooling fan will continue to run for a
while after a program is complete to
prevent moisture from building up in the
oven, on the control panel or
surrounding cabinetry.
When the temperature in the oven has
fallen sufficiently, the cooling fan will
turn off automatically.
Vented oven door
The oven door is made of glass panes
that have a heat-reflective coating on
part of their surface.
During operation, air is also circulated
through the door to keep the outer
panel cool.
The door can be removed and
disassembled for cleaning purposes
(see "Cleaning and care").
Safety Door Lock for Self Clean
For safety reasons, the door is locked
as soon as the Self Clean program is
started. After the self-cleaning program
has finished, the door will remain locked
until the temperature in the oven has
fallen below 535°F (280°C).

Features
35
PerfectClean surfaces
The revolutionary PerfectClean finish is
a smooth, non-stick surface that is
exceptionally easy to clean.
Food and grime from baking or roasting
are easily removed.
Do not use ceramic knives, as these
will scratch the PerfectClean surface.
Follow the instructions in the "Cleaning
and Care" section of this manual so the
anti-stick and easy cleaning properties
are retained.
The following have all been treated with
PerfectClean:
– Universal tray
– Grilling and Roasting insert
– Perforated baking tray
– Round baking form
Self Clean ready accessories
The following accessories can be left in
the oven during the Self Clean program.
– Shelf runners,
– FlexiClips with wire rack
– Wire oven rack
See "Cleaning and care" for more
information.

Before using for the first time
36
Before using for the first time
The range may only be operated
after it has been installed properly.
Read the Installation Instructions
carefully before installing the range.
Read the Operating Instructions
carefully before using the range.
The range will turn on automatically
when it is connected to the power
supply.
Welcome screen
A welcome greeting is displayed. You
will then be asked to select some basic
settings which are needed before the
appliance can be used.
Follow the instructions on the display.
Setting the language
Select the desired language.
Confirm with OK.
Setting the country
Select the desired country.
Confirm with OK.
Setting the voltage (electrical
version)
The voltage set must match that
of the house as to not damage the
oven.
Confirm the voltage before setting. If
in doubt contact a qualified
technician.
Select the voltage.
Confirm with OK.
Setting the date
You can enter numbers by scrolling
through and touching the roller, or by
using the numerical keypad.
Set the day, month and year.
Confirm with OK.

Before using for the first time
37
Set the time of day
You can enter numbers by scrolling
through and touching the roller, or by
using the numerical keypad.
Set the time of day in hours and
minutes.
Confirm with OK.
The time of day can be displayed in a
12 hour or 24 hour format (see
"Settings - Time of day - Clock
format").
Time of day display
You will then be asked when you want
the time of day to show in the display
when the oven is turned off (see
"Settings - Time - Display"):
– On
The time is always visible in the
display.
– Off
The display appears dark to save
energy. Some modes are limited.
– Night Dimming
The time only shows in the display
between 5:00 am and 11:00 pm. It
turns off at night to save energy.
Select the desired option.
Confirm with OK.
Information regarding energy
consumption will appear in the display.
Confirm with OK.
Follow further instructions in the
display.
Set-up Successfully Completed is
displayed.
Confirm with OK.
The oven is now ready to use.
If you accidentally select the wrong
language, follow the instructions
described in "Settings - Language ".

Before using for the first time
38
Heating up the oven for the
first time and rinsing the steam
injection system
New ovens can give off an unpleasant
odor on first use. Heating up the oven
for at least 1 hour with nothing in it will
get rid of this smell. It is a good idea to
rinse the steam injection system at the
same time.
Ensure that the kitchen is well
ventilated while the appliance is
being heated up for the first time.
Close doors to other rooms to
prevent the smell spreading
throughout the house.
Remove any protective wrapping and
sticky labels from the oven.
Before heating the oven up, wipe the
interior with a damp cloth to remove
any dust or bits of packaging that
may have accumulated in the oven
cavity during storage and unpacking.
Insert the FlexiClips with wire rack
(available to order) to the shelf
runners and insert all trays and the
rack.
Turn on the oven.
The main menu will appear.
Select Operating Modes.
Select Moisture Plus .
The default temperature is displayed
(350 °F/160 °C).
The oven heating, lighting and cooling
fan will turn on.
Set the highest possible temperature
(475 °F/250 °C).
Confirm with OK.
Select Automatic burst of steam.
After a short time, a burst of steam is
injected automatically.
Risk of injury!
Steam can cause scalding.
Do not open the door during a steam
burst.
Heat up the oven for at least an hour.
After at least one hour:
Turn the oven off.

Before using for the first time
39
After heating up for the first time
Danger of burns! Allow the oven
to cool before cleaning.
Turn on the oven.
Select Light to turn on the oven light.
Take all accessories out of the oven
and clean them by hand (see
"Cleaning and care").
Clean the oven interior with warm
water and liquid dish soap, applied
with a soft sponge or cloth.
Dry all surfaces with a soft cloth.
Turn the lighting and the oven off.
Leave the oven door open until the
oven interior is completely dry.

Operating the oven
40
Energy saving tips
– Remove any accessories from the
oven that you do not require for
cooking.
– Try not to open the door when
cooking.
– If a temperature range is given, it is
best to select the lower temperature
and check the food after the shortest
cooking time given.
– The default setting for the Time of
Day display Time - Display - Off will
consume the least amount of energy.
– With the factory default setting
Lighting - On for 15 seconds the oven
interior lighting turns off automatically
after 15 seconds. It can be turned on
again at any time by touching "Light".
– When cooking with automatic shut-
off or the wireless roast probe, the
oven heating will turn off
automatically shortly before the end
of cooking. The residual heat is
sufficient to finish the cooking
process. Energy Save will appear in
the display. The cooling fan or hot air
fan (depending on mode used) will
remain on.
– The oven turns off automatically if a
button is not pressed to save power.
The amount of time before the oven
turns off depends on the selected
settings, e.g. mode, temperature,
cooking duration, etc.

Operating the oven
41
Quick Guide
Turn on the oven.
The main menu will appear.
Place the food in the oven.
Select Operating Modes.
Select the desired mode.
The oven mode and default temperature
will appear.
The oven heating, lighting and cooling
fan will turn on.
Adjust the default temperature if
necessary.
The default temperature will be
automatically accepted within a few
seconds. If necessary, select Change
to go back to the temperature setting
(see "Additional functions - Changing
the temperature").
Confirm with OK.
The required and the actual
temperatures will appear.
You will see the temperature rising in
the display. A buzzer will sound when
the oven temperature is reached if this
option is selected (see "Settings -
Volume - Buzzer tone").
After the cooking process:
Take the food out of the oven.
Turn the oven off.
Cooling fan
After the cooking process the cooling
fan will continue to run for a while after
a program is complete to prevent
moisture from building up in the oven,
on the control panel or surrounding
cabinetry.
When the temperature in the oven has
fallen sufficiently the cooling fan will
turn off automatically.
The default setting can be changed if
desired (see "Settings - Cooling Fan").

Settings
42
Accessing the "Settings" menu
From the main menu:
Select Settings.
They can be checked and changed, if
needed.
Settings cannot be altered while a
cooking program is in progress.
Changing and saving settings
Select Settings.
Swipe across the screen until the
desired setting appears, then touch it
to select.
The settings which are currently
selected will have a colored frame
around them.
Swipe across the screen until the
desired option appears, then touch it
to select it.
Confirm with OK.
The setting is now saved.
Settings
43
Settings overview
Option Available settings
Language ... / deutsch / english / ...
Country
Time Display
On / Off * / Night Dimming
Clock Type
Analog * / Digital
Clock Format
24 h / 12 h (am/pm) *
Set
Date
Lighting On / On for 15 seconds *
Start Screen Main Menu
Operating Modes
Gourmet Center
Special Modes
MyMiele
Favorites
Brightness
Volume Buzzer tones
Keypad tone
Welcome Melody
Units of Measurement Weight
g * / lb / lb/oz
Temperature
°C * / °F
Cooling Fan Temperature Controlled *
Time Controlled
* Factory default
Settings
44
Option Available settings
Self Clean With reminder
Without reminder *
Default temperatures
Safety System Lock
On / Off *
Sensor Lock
On / Off *
Catalyzer
Electrical Version 208V / 60Hz
220V / 60Hz
240V / 60Hz
Sensor group Sensor group 0 – 9
Calibrate Temperature
Showroom Program Demo Mode
On / Off *
Factory default Settings
Favorites
Default temperatures
MyMiele
Lift-up control panel Automatically
Manual *
* Factory default

Settings
45
Language
The desired country and language can
be set.
After selecting and confirming your
choice, the language selected will
appear in the display.
Tip: If you accidentally select a
language you do not understand, select
Settings and use the symbol to
return to the Language submenu.
Time of day
Display
Select how you would like the time of
day to appear in the display when the
oven is turned off:
– On
The time of day will always appears
in the display. To turn the "Light" on
and off or use the "Timer" touch the
relevant sensor.
– Off
The display is turned off to save
energy. The oven has be to be turned
on before you can use it. This also
applies when using the Alarm +
Timer and the oven light.
– Night Dimming
To save energy, the time is only
visible in the display between 5:00
am and 11:00 pm. The rest of the
time it is not visible.
Clock Type
You can choose from an analogue clock
face or a digital (h:min) display.
The date will also appear in the digital
clock display.
Clock Format
You can select the clock format for the
time of day:
– 24 h
The time of day is shown in a 24 hour
clock format.
– 12 h (am/pm)
The time of day is shown in a 12 hour
clock format.
Set
Set the hours and the minutes.
If there is a power failure, the current
time of day will reappear once the
power has been restored. The time is
stored in memory for about 200 hours.

Settings
46
Date
Set the date.
When the oven is turned off, the date
only appears if the oven is set to
"Time – Clock Type – Digital".
Lighting
– On
The interior lighting is turned on
during the entire cooking period.
– On for 15 seconds
The oven lighting turns off 15
seconds after a program starts.
Touching "Light" turns it on for
another 15 seconds.
Start screen
The main menu will appear in the
display when the oven is turned on. You
can change this default setting so that,
for instance, the oven modes or
MyMiele settings appear in the display.
Brightness
The display brightness is represented
by a bar with seven segments.
Select Darker or Lighter, to change the
brightness of the display.

Settings
47
Volume
Buzzer tones
The volume is represented by a bar with
seven segments.
Maximum volume is selected when all
segments are filled. If none of the
segments are filled, the volume is
turned off.
Select Quieter or Louder, to adjust the
volume.
Select On or Off to turn the buzzer
tones on or off.
Keypad tone
The volume is represented by a bar with
seven segments.
Maximum volume is selected when all
segments are filled. If none of the
segments are filled, the volume is
turned off.
Select Quieter or Louder, to adjust the
volume.
Select On or Off, to turn the keypad
tone on or off.
Welcome melody
You can turn the welcome melody on or
off. It sounds when the On / Off button
is touched.
Units of measurement
Weight
– g
The weight of food in MasterChef
programs is shown in grams.
– lb
The weight of food in MasterChef
programs is shown in pounds.
– lb/oz
The weight of food in MasterChef
programs is shown in pounds and
ounces.
Temperature
– °C
The temperature is displayed in
Celsius.
– °F
The temperature is displayed in
Fahrenheit.

Settings
48
Cooling fan
The cooling fan will continue to run for
some time after the oven has been
turned off to prevent humidity from
building up in the oven, on the control
panel or in the surrounding cabinetry.
– Temperature Controlled
The cooling fan turns off when the
temperature in the oven drops below
160°F (70°C).
– Time Controlled
The cooling fan will turn off after
approx. 25 minutes.
Condensation can cause the
cabinetry and the countertop to be
damaged. This could lead to
corrosion of the appliance.
When keeping food warm in the
oven, increases to the Time Controlled
setting can lead to condensation of
the control panel, moisture on the
countertop and on the cabinetry.
Do not adjust the Time Controlled
setting and try not to leave food in
the warm oven.
Default temperatures
If you often cook with temperatures that
differ from the default, it makes sense
to change the default temperatures.
After selecting this option, a list of oven
modes will appear in the display.
Select the desired mode.
The default temperature is displayed
along with the available temperature
range.
Change the default temperature.
Confirm with OK.

Settings
49
Self Clean
– With reminder
A reminder to run the Self Program
program will appear in the display.
– Without reminder
You will not be reminded to run the
Self Clean program.
Safety
System lock
The system lock prevents the oven
being turned on inadvertently.
The system lock will remain activated
even after a power failure.
Select On to activate the system lock.
The alarm and timer functions can still
be used when the system lock is
active.
– On
The system lock is now active. If you
want to use the oven, touch for at
least 6 seconds.
– Off
The system lock is not active. The
oven can be used as normal.
Sensor lock
The sensor button lock prevents you
from accidently turning the oven off or
changing a cooking program.
– On
Before you can use a mode, touch
for at least 6 seconds.
– Off
The buttons respond immediately to
a finger touch.

Settings
50
Catalyzer
The level of odor reduction is
represented by a bar with seven
segments.
Maximum odor reduction is selected
when all segments are filled. If none of
the segments are filled the catalyzer is
turned off.
Select Minimum or Maximum to change
the level of odor reduction.
Select On or Off to turn the catalyzer
on and off.
Voltage
Setting the voltage (electrical version)
Select the desired voltage and
corresponding frequency.
Confirm with OK.
Sensor group
Your oven was set at the factory to
automatically detect the wireless roast
probe supplied. If you have purchased
a new Miele roast probe, you will need
to reset the sensor group (e.g. to P1-
D01-0000001).
Select the sensor group that is
printed on the metal tip of the
wireless roast probe.
The sensor group is the second digit
of the twelve-digit code (P0 – P9).
Confirm with OK.

Settings
51
Calibrate temperature
Using temperature calibration the
temperature can be modified, in all
modes and Gourmet Center (oven) and
MasterChef (speed oven) programs, so
that it is slightly higher or lower than
shown.
The temperature calibration is
represented by a bar with seven
segments.
If all of the segments are filled the oven
temperature is much higher than
indicated in the display. If no segment is
filled the oven temperature is much
lower than indicated.
Select or , to adjust the
temperature calibration.
Confirm with OK.
Showroom Program
This mode enables the oven to be
demonstrated in showrooms without
heating up. It should not be set for
domestic use.
Demo Mode
If you have demo mode activated
Demo Mode is active. The appliance will
not heat up will appear when you turn
on the oven.
– On
Touch OK for at least 4 seconds to
activate demo mode.
– Off
Touch for at least 4 seconds to
deactivate demo mode. The oven
can then be used as normal.

Settings
52
Factory default
– Settings
Any settings that have been altered
will be reset to the factory default
setting.
– Favorites
All Favorites will be deleted.
– Default temperatures
Any default temperatures that have
been changed will reset to the factory
default settings.
– MyMiele
All MyMiele entries will be deleted.
Lift panel
Regardless of the setting selected, as
soon as you start the self-cleaning
cycle, the lift panel goes down
automatically.
– Automatically
The lift panel lifts up automatically as
soon as you switch the oven on.
The lift panel goes down
automatically as soon as you switch
the oven off.
– Manual
Touch the lift panel sensor button to
lift the control panel up and put it
down.

MyMiele
53
You can personalize your oven using
the MyMiele function by inputting
frequently used processes.
It is particularly useful with Gourmet
Center (oven) and MasterChef (speed
oven) programs as you do not need to
work through every screen in order to
start your program.
You can also set processes that you
have entered into MyMiele to appear in
the Start screen (see "Settings – Start
screen").
To add an entry
You can add up to 20 entries.
Select MyMiele.
Select Add entry.
You can select options from the
following categories:
– Operating Modes
– Gourmet Center
– Special Modes
– Favorites
Confirm by touching OK.
The option selected appears in the list
together with the corresponding
symbol.
Proceed as described above for any
other entries. You will only be able to
choose from options which have not
already been selected.

MyMiele
54
Editing MyMiele
After selecting Edit you can
– add entries as long as MyMiele
contains fewer than 20 entries,
– delete entries,
– sort entries as long as MyMiele
contains more than 4 entries.
Deleting entries
Select MyMiele.
Select Edit.
Select Delete entry.
Select the entry that you want to
delete.
Confirm with OK.
The entry will then be removed from the
list.
Sorting entries
The order can be rearranged as long as
there are more than 4 entries.
Select MyMiele.
Select Edit.
Select Sort entry.
Select the entry.
Select the position you want to move
it to.
Confirm with OK.
The entry will now appear in the
position selected.

Alarm + Timer
55
Using "Timer", you can set an alarm for
a specific time or set the timer duration
to time an activity in the kitchen e.g.
boiling eggs.
Two alarms can be set simultaneously,
two timer durations or an alarm and a
kitchen timer duration.
Using the Alarm
The alarm can be used to set a specific
time at which the oven buzzer will
sound.
Setting the alarm
If the setting Time - Display - Off is
selected, you will need to turn the
oven off before setting the alarm. The
alarm time will then appear in the
display when the oven is turned off.
Select "Timer".
Select New Alarm.
Set the time for the alarm.
Confirm with OK.
When the oven is switched off, the
alarm time and will appear instead of
the time of day.
If you are cooking at the same time or if
you are in a different menu, the alarm
time and will appear in the top right-
hand corner of the display.
At the set alarm time
– the Alarm symbol will flash next to
the time in the display.
– a buzzer will sound if turned on (see
"Settings - Volume - Buzzer tones").
Select "Timer" or the alarm in the
upper right of the display.
The buzzer will turn off and the symbols
in the display will go out.
Changing an alarm
Select the alarm in the upper right of
the display or select "Timer" and the
desired alarm.
The alarm selected appears.
Set the new time for the alarm.
Confirm with OK.
The adjusted alarm time is now saved
and will appear in the display.
Deleting an alarm
Select the alarm in the upper right of
the display or select "Timer" and the
desired alarm.
The alarm selected appears.
Select Reset.
The alarm will be deleted.

Alarm + Timer
56
Using the Timer
The timer can be used to time any
activity in the kitchen, e.g. boiling eggs.
The timer can also be used at the same
time as a cooking program if a start and
finish time have been set, e.g. a
reminder to stir the dish or add
seasoning.
A maximum timer duration of 9hours,
59minutes and 59seconds can be set.
Tip: Use the timer in Moisture Plus
to remind you to inject the bursts of
steam at the desired time.
Setting the timer
When the setting Time - Display - Off is
set the oven must be turned on to set
the timer. The timer can then be seen
counting down in the display when the
oven is turned off.
Example: Boiling eggs and setting the
timer for 6 minutes and 20 seconds
Select "Timer".
Select New Timer Time.
Set the timer for the required time.
Confirm with OK.
When the oven is turned off, the timer
duration counts down in the display and
appears instead of the time of day.
If you are cooking at the same time or if
you are in a different menu, the timer
duration and will appear in the top
right-hand corner of the display.

Alarm + Timer
57
At the end of the timer
– the Timer symbol flashes,
– the time starts counting upwards,
– A buzzer will sound if turned on (see
"Settings - Volume - Buzzer tones").
Select "Timer" or the timer in the
upper right of the display.
The buzzer will turn off and the symbols
in the display will go out.
Resetting the timer
Select the timer in the upper right of
the display, or select "Timer" and the
desired timer.
The time previously set appears.
Set a new timer duration.
Confirm with OK.
The changed time is saved and will
count down in seconds.
Canceling the timer
Select the timer in the upper right of
the display, or select "Timer" and the
desired time.
The time previously set appears.
Select Reset.
The timer has been canceled.

Guide to the modes
58
The oven has a wide range of modes for preparing a variety of foods.
Due to country-specific preferences for preparation of food, default temperatures
and temperature ranges in °F and °C do not correspond. The temperature values
have been defined as given in the chart.
Mode Default
temperature
Temperature
range
Convection Bake
Use this mode for baking and roasting on several
levels at the same time. You can cook at lower
temperatures than with the Surround mode
because the fan distributes the heat evenly
throughout the cavity for a consistent baking
temperature.
350 °F (160 °C) 75–475 °F
(30–250 °C)
Surround
This premium baking mode uses heat from the
upper and lower elements to create perfect results
on all baking recipes.
350 °F (180 °C) 75–525 °F
(30–280 °C)
Moisture Plus
Infuse up to 3 bursts of moisture, either manually
or time driven, throughout the cooking program to
ensure a soft, moist interior with a crispy crust.
MasterChef Plus programs use Moisture Plus
during the cooking/baking process.
350 °F (160 °C) 275–475 °F
(130–250 °C)
Intensive
This mode gently circulates heated air from the
lower heating element using the fan to create a
brick oven environment. Ideal for baking pizza,
focaccia, pies and tarts that require a crisp base
and moist toppings.
400 °F (170 °C) 125–475 °F
(50–250 °C)
Auto Roast
For a premium result, the meat is seared at a high
temperature keeping meat tender and juicy.
375 °F (160 °C) 200–450 °F
(100–230 °C)

Guide to the modes
59
Mode Default
temperature
Temperature
range
Surround Roast
For roasting traditional recipes, e.g. pot roast, and
braising or cooking at low temperatures.
400 °F (180 °C) 75–525 °F
(30–280 °C)
Convection Roast
This mode uses the convection fan to circulate
heated air throughout the oven. Ideal for cooking
delicate cuts of meat, fish and crispy poultry.
375 °F (160 °C) 75–475 °F
(30–250 °C)
Bake
This mode uses traditional baking techniques to
perfect pies and biscuits.
375 °F (190 °C) 200–525 °F
(100–280 °C)
Browning
For a perfectly browned topping, for example
when making a gratin or browning the top of a
casserole.
350 °F (190 °C) 200–475 °F
(100–250 °C)
Maxi Broil
For broiling meats e.g. steak, chops, kebabs, etc.
The entire Browning / Broiling element will glow
red to produce the required heat.
500 °F (240 °C) 400–575 °F
(200–300 °C)
Broil
For grilling smaller quantities of steak, chops,
kebabs, etc.
500 °F (240 °C) 400–575 °F
(200–300 °C)

Guide to the modes
60
Mode Default
temperature
Temperature
range
Convection Broil
This mode distributes hot air from the Browning/
Broiling element over the food using the fan. This
allows for a lower temperature to be used than
when using Broil . Ideal for broiling thicker cuts
of meat (e.g. chicken, roulades).
400 °F (200 °C) 200–500 °F
(100–260 °C)
Rotisserie
The rotisserie evenly broils and adds a finishing
touch to items such as stuffed meat, tied roasts,
poultry, vegetables and kabobs.
400 °F (200 °C) 200–500 °F
(100–260 °C)
Gentle Bake
A combination of different heating elements
ensures excellent baked good, gratins and
lasagna.
350 °F (190 °C) 200–475 °F
(100–250 °C)

Additional functions
61
You have placed the food in the oven,
selected a mode and set the
temperature.
By selecting Additional Settings you can
adjust cooking times and adjust
additional settings.
Select Change.
Select Additional Settings.
Additional options will appear in the
display for you to select for change if
desired.
– Duration
– Core temperature (This will only
appear if you are using the wireless
roast probe. You cannot set a
cooking duration when using the
roast probe.)
– Ready at
– Start at (This will appear if a Duration
or Ready at time has been set.)
– Rapid PreHeat (This only appears if a
temperature of more than 210°F
(100°C) has been set for Convection
Bake / Convection Roast , Auto
Roast , Surround / Surround
Roast or Moisture Plus ).
– Crisp function (This moisture
reduction feature will allow surfaces
to crisp on the outside.)
– Change type of heating (This option
will only appear with Moisture Plus
. You can combine bursts of
steam with another type of heating.)
– Change Operating Mode (You can
change the cooking mode during
operation.)
Changing the temperature
As soon as a cooking mode is selected,
a default temperature will appear in the
display together with its possible range
(see "Guide to the modes").
If the default temperature is suitable
for your recipe, confirm it with "OK".
If it is not suitable for your recipe, you
can change it for this particular
cooking program.
You can also permanently reset the
default temperature to suit your
personal cooking habits (See
"Settings - Default temperatures").
Example: You have selected Convection
Bake and 350°F (170°C) and can
see the temperature increasing.
You want to reduce the target
temperature to 310°F (155°C).
Select Change.
Change the temperature.
Confirm with OK.
The adjusted target temperature is
saved. The target and actual
temperatures are displayed.

Additional functions
62
Rapid PreHeat
Rapid PreHeat can be used to speed up
the preheating phase.
The Rapid heat-up function switches on
automatically if you set a temperature of
more than 212°F (100°C) for Convection
Bake / Convection Roast , Auto
Roast , Surround Roast / Surround
and Moisture Plus .
You can turn-off Rapid PreHeat for a
relevant cooking process.
Rapid PreHeat
– On
The Browning / Broiling and
convection heating elements turn on
together with the fan to enable the
oven to reach the required
temperature as quickly as possible.
– Off
Only the heating elements associated
with the cooking program are turned
on.
To turn the Rapid PreHeat function off:
Select Change.
Select Additional Settings.
Select Rapid PreHeat.
In Rapid PreHeat, Off will appear.
Confirm with OK.
Rapid PreHeat has been deactivated.
Instead of Rapid PreHeat, Preheating will
appear in the display.
Select the required oven mode and
temperature.
Wait for the preheating phase to
complete.
A buzzer will sound when the set
temperature is reached, if the buzzer is
set (see "Settings").
Place the food in the oven.

Additional functions
63
Using the Crisp function
(Moisture Reduction)
It is a good idea to use this function
when cooking items which are moist on
the inside but which should be crispy
on the outside, e.g. french fries.
It is also suitable for fruit cakes, such as
apple cake.
You have placed the food in the oven,
selected a mode and set the
temperature.
You can activate the "Crisp function"
with any oven mode. It must be
activated separately for a cooking
process. For best results, activate it at
the beginning of the cooking process.
Select Change.
Select Additional Settings.
Select Crisp function.
In Crisp function, On will appear.
Confirm with OK.
Moisture reduction is now activated.
Changing the oven mode
You can change the oven mode during
operation.
Select Change.
Select Additional Settings.
Select Change Operating Mode.
Select the desired mode.
The new mode will appear in the display
together with its default temperature.
Change the temperature, if
necessary.
Confirm with OK.
The oven mode has been changed.
The times entered will be kept.

Additional functions
64
Setting additional durations
You have placed the food in the oven,
selected a mode and set the
temperature.
By entering Duration, Ready at or Start at
you can automatically turn the cooking
program on or off.
– Duration
Enter the cooking duration required.
Once the duration set has elapsed,
the heating will turn off automatically.
The maximum duration that can be
set is 12:00 hours.
A cooking duration cannot be
entered if you are using the wireless
roast probe. When using the roast
probe, the cooking duration is
determined by when the set core
temperature is reached.
– Ready at
You can specify when you would like
the cooking program to complete.
The oven will turn off automatically at
the time set.
A Ready at time cannot be entered if
you are using the wireless roast
probe. When using the roast probe
the end time is determined by when
the set core temperature is reached.
– Start at
Set the time you would like cooking
to start at. The oven will turn on
automatically at the time set.
Start at can only be used together
with Duration or Ready at, except
when using the wireless roast probe.

Additional functions
65
Turning off automatically
It is now 11:45. The food takes 30
minutes to cook and should be ready at
12:15.
Select Duration and set 00:30 h or select
Ready at and set the time for 12:15.
The oven will turn off automatically after
this duration has elapsed or the time set
has been reached.
Setting the duration
Select Change.
Select Additional Settings.
Set the cooking duration.
Confirm with OK.
Setting the "Ready at" time
Select Change.
Select Additional Settings.
In the Ready at field, set the time at
which the food should be ready.
Confirm with OK.
Turning on and off automatically
It is recommended to use the
automatic On/Off feature when
roasting. Do not delay the start of the
program for too long when baking.
Cake mixtures and doughs will dry
out, and the leavening agents will lose
their effectiveness.
To turn a cooking program on and off
automatically, you have a choice of how
to enter the time parameters:
– Duration and Ready at
– Duration and Start at
– Ready at and Start at
It is now 11:30. The food takes 30
minutes to cook and should be ready at
12:30.
Select Change.
Select Additional Settings.
In the Duration field, set 0:30 h.
In the Ready at field, set 12:30 h.
Confirm with OK.
The Start at time will be automatically
calculated. Start at 12:00 will appear in
the display.
The oven will turn on automatically
when this time is reached.

Additional functions
66
Sequence of a cooking program that
turns on and off automatically
Up until the start time the mode, the
selected temperature, Start at and the
start time will appear in the display.
After the program has started you
can follow the preheating phase in the
display until the required temperature
has been reached.
Once this temperature is reached, a
buzzer will sound if turned on (see
"Settings - Volume - Buzzer tone").
After the preheating phase the
remaining time will appear in the
display.
The time will count down in the display.
The last minute counts down in
seconds.
At the end of the cooking process a
buzzer will sound if turned on (see
"Settings - Volume - Buzzer tones").
The oven heating and lighting are
turned on. Program Finished appears in
the display.
You have the option to save the
program as a Favorite (see "Favorites")
or to increase the cooking duration
using Change.
During the cooling down phase the
cooling fan will continue to run.
Changing the set time
Select Change.
All options that can be changed will
appear.
Change the desired time.
Confirm with OK.
These settings will be deleted in the
event of a power failure.
Canceling cooking
Touch "Back" twice.
Cancel Cooking? appears in the display.
Select Yes.
The oven heating and lighting will turn
off, and any durations set will be
deleted.

Moisture Plus
67
Your oven is equipped with a steam
injection system for cooking with
moisture. Baking, roasting and cooking
with Moisture Plus guarantees
optimized steam and air conduction for
excellent cooking and browning results.
After selecting Moisture Plus you
need to set the temperature and the
number of bursts of steam.
Available options are:
– Automatic burst of steam
This requires enough water for one
burst of steam. The burst of steam
will be injected into the oven
automatically after the heating-up
phase.
– 1 Burst of steam
2 Bursts of steam
3 Bursts of steam
You have to release the bursts of
steam yourself.
The steam bursts are injected into the
oven cavity during the cooking
program. The steam inlet is located on
the ceiling of the oven interior in the
rear left corner.
One burst of steam takes approx. 5–8
minutes. The number of bursts of steam
and when they are injected will depend
on the type of food being cooked:
– Yeast doughs will rise better if steam
is injected at the beginning of the
program.
– Bread and rolls will also rise better if
exposed to steam at the start.
Injecting a burst of steam at the end
of the program will give the bread
and rolls a shiny crust.
– When roasting meat with a high fat
content, injecting steam at the
beginning of roasting will help render
the fat.
Moisture Plus is not suitable for
mixtures which contain a lot of
moisture, such as meringues, as the
addition of steam does not allow them
to dry out sufficiently.

Moisture Plus
68
Cooking with the Moisture Plus
function
It is normal for condensation to form
on the inside of the door during steam
injection. This will dissipate during the
course of the cooking program.
Prepare the food and place in the
oven if no preheating is required.
Select Operating Modes.
Select Moisture Plus .
The default temperature (350°F/160°C)
is displayed
The oven heating, lighting and cooling
fan will turn on.
Setting the temperature
Set the required temperature.
Confirm with OK.
Setting the number of steam bursts
The oven will draw in water
automatically from the water supply
and then release the steam at the
specified times. You will hear some
pumping noises during the water
intake process.
If you would like a burst of steam to
be automatically injected into the
oven after the heating-up phase,
select Automatic burst of steam.
If you would like to inject one or more
bursts of steam manually at specific
times, select 1 Burst of steam, 2 Bursts
of steam or 3 Bursts of steam.
Timing the bursts of steam
This option will only appear in the
display after you have selected 1, 2 or
3 bursts of steam.
Tip: If you have selected more than one
burst of steam, the second burst should
be released at least 10 minutes after
starting the program.
Manual bursts of steam
To inject the bursts of steam yourself,
select Manual.
Time-controlled steam
If you want to set a time for injecting
the bursts of steam, select Time
Controlled.
Set the desired time for each burst of
steam. The oven will then release the
steam at the specified times. The
time begins counting down when the
program is started.
Confirm by touching OK.

Moisture Plus
69
Changing the type of heating
All four modes (Convection Bake,
Surround, Intensive and Auto Roast) are
available to use with Moisture Plus ,
however Convection Bake is set as the
default mode. You can combine
Moisture Plus with four different heating
types (Convection Bake, Surround,
Intensive and Auto Roast). The default
setting is Convection Bake.
Select Change.
Select Change type of heating.
Select the desired mode.
Confirm with OK.
The cooking program will then continue
using the different type of heating
selected.

Moisture Plus
70
Injecting bursts of steam
Steam can cause scalding.
Do not open the door during bursts
of steam. Also, condensation on the
sensors will cause then to have a
slow reaction time.
Automatic burst of steam
Automatic burst of steam appears in the
display.
Once the preheating phase has been
completed, the automatic burst of
steam is injected.
The water will vaporize in the oven while
steam is being released and Burst of
steam active will appear in the display.
After the burst of steam Burst of steam,
completed will appear in the display.
Continue cooking until the end of the
cooking duration.
1, 2 or 3 Bursts of steam
Manual bursts of steam
When Manual has been selected, you
can trigger bursts of steam once Start
Manual burst of steam appears.
Please wait until the preheating phase
is completed to allow the steam to be
distributed evenly by the warm air in
the oven.
Tip: Set the "Timer" as a reminder.
Select Start Manual burst of steam.
The burst of steam will be released and
Burst of steam active will appear in the
display.
Proceed as described to inject further
bursts of steam.
Burst of steam, completed will appear in
the display after each burst of steam.
Continue cooking until the end of the
cooking duration.
Time-controlled steam
The oven will release the steam after
the specified amount of time.

Moisture Plus
71
Evaporating residual moisture
When cooking with added moisture, the
water will be equally distributed
between the number of steam bursts
and completely used up, as long as the
program is not interrupted.
However, if a program that uses added
moisture is interrupted (either manually
or due to a loss of power) before all the
bursts of steam have been injected, the
unused water will remain in the
evaporation system.
The next time the Moisture Plus
mode or a MasterChef Plus program is
used, Evaporate Residual Moisture? will
appear in the display with the options
Skip and Yes.
It is best to start the residual water
evaporation right away so that only
fresh water is steamed onto the food
during the next cooking program.
The residual moisture evaporation
process
The oven will heat up and the residual
water in the oven compartment will
evaporate.
Depending on the amount of water, this
can take up to approximately 30
minutes.
Steam can cause scalding.
Do not open the door.
The moisture will condense on the
door and in the oven compartment
and needs to be wiped off after the
oven has cooled down.

Moisture Plus
72
Starting residual water evaporation
immediately
Steam can cause scalding.
Do not open the door while the
residual water is being evaporated.
Select the Moisture Plus mode or
a MasterChef Plus program.
Evaporate Residual Moisture? will appear
in the display.
Select Yes.
Evaporate Residual Moisture and a time
then appear in the display.
The evaporation process will start. You
can monitor the remaining time in the
display.
The time displayed depends on the
amount of water in the evaporation
system. This time may be corrected
during the evaporation process to
reflect the actual amount of water left in
the system.
At the end of the residual water
evaporation process, Program Finished
appears in the display.
Touch the "Back" sensor.
A cooking process using Moisture Plus
or a MasterChef Plus program can
now be carried out.
During residual water evaporation,
moisture will condense on the door
and in the oven interior. Be sure to
wipe away the condensation once the
interior has cooled down.
Skipping residual moisture
evaporation
Skipping the residual moisture
evaporation process can cause
water to overflow into the oven
cavity.
Do not cancel the evaporation
process.
Select the Moisture Plus function
or a MasterChef Plus program.
Evaporate Residual Moisture? appears.
Select Skip.
A cooking process using Moisture Plus
or a MasterChef Plus program can
now be carried out.
You will be prompted to carry out the
evaporation of the residual moisture
process the next time you select the
Moisture Plus function or a
MasterChef Plus program and when
you turn the oven off.

Gourmet Center
73
Your oven has a wide range of
MasterChef, and MasterChef Plus
programs that enable you to achieve
excellent cooking results with ease.
Simply select the appropriate program
for the type of food you are cooking
and follow the instructions in the
display.
In the Gourmet Center you will find:
– MasterChef programs for the
preparation of cakes, meats, fish
dishes, desserts, etc.
– MasterChef Plus program for the
preparation of bread with Moisture
Plus.
List of food types
The MasterChef programs can be found
under Gourmet Center – MasterChef.
– Baked Goods
– Fish
– Meat
– Pizza
– Potatoes
– Poultry
MasterChef Plus
In MasterChef Plus a variety of bread
programs are available. These
MasterChef programs work with
Moisture Plus.

Gourmet Center
74
Using MasterChef and
MasterChef Plus programs
From the Main Menu:
Select Gourmet Center.
Select MasterChef or MasterChef Plus.
A list of food types will appear in the
display.
Select the desired type (there is only
one type for MasterChef Plus).
The MasterChef or MasterChef Plus
programs available for the food type
selected will then appear.
Select the desired MasterChef or
MasterChef Plus program.
The individual steps that must be
completed before starting the program
appear as a list in the display.
Depending on the program selected,
the following information or instruction
will appear in the display:
– Type of cookware
– Shelf level
– Use of the wireless roast probe
– Cooking time
Follow the instructions on the display
Notes on using these programs
– The oven interior should be at room
temperature before starting a
MasterChef program.
– Some programs require a preheating
phase before food is placed in the
oven. A prompt will appear to tell you
when to add the food.
– The duration quoted for MasterChef
programs is an estimate. It may
increase or decrease depending on
the program. When using the roast
probe, the duration will be
determined by when the core
temperature is reached. The duration,
in particular with meat, will vary
depending on the initial temperature
of the food.

Gourmet Center
75
Search
You can search the Gourmet Center by
the name of the food type and
MasterChef program.
This search is a full-text search and can
also be used to search for parts of
words.
From the Main Menu:
Select Gourmet Center.
A list of food types will appear in the
display.
Select Search.
Use the keyboard to enter the desired
search text, e.g. "bread".
The number of hits will be shown in the
bottom right of the display.
If no match is found, or if there are
more than 40 matches, the hits field
will be deactivated and you will need
to modify the search text.
Select hits.
The matching food types and programs
will then appear.
Select the desired program, or select
the food type and then the desired
program.
The program will begin.
Follow the instructions on the display.
MasterChef Plus Recipes
On the following pages you will find
some bread recipes for the MasterChef
plus programs.

Gourmet Center
76
Baguette
Yields: 3 Loaves
Ingredients
26 oz. Bread Flour (approx. 5cups plus
1tablespoon)
2 cups lukewarm water (16oz)
4 teaspoons instant yeast
3 teaspoons salt
Method
In a mixing bowl of a stand up mixer,
whisk together the bread flour, yeast
and salt. Make sure that the salt and
yeast do not come into direct contact.
With a paddle attachment, slowly add
the water. Then switch to a dough hook
and knead for 8 minutes.
Turn the dough out onto a lightly flour-
dusted countertop. Shape into a ball.
Cover with plastic wrap. Let rest for
30minutes.
Knead the dough by hand for
1-3minutes. Cover the dough and let
rest 1½hours.
Decompress the dough by gently
indenting with fingers into the center of
the dough. Stretch and fold the dough.
Working along the length of the dough,
start from the upper edge of the dough,
pull forward, away from you and then
bring it to the center. Pull the bottom of
the dough backwards (towards
yourself) and fold to the center. Do the
same for the left and right side of the
dough. Flip the dough over and cover
with plastic wrap. Let rest 1hour.
Divide the dough into three equal
portions
Shape the dough into 6"cylinders.
Working with one piece of dough at a
time, (keeping the other covered in
plastic wrap), shape into a rectangle.
Working along the length of the dough,
press with three fingers gently making
several indentations into the dough.
Repeat the process; roll the dough over
onto itself three times until the upper
edge meets the lower edge and creates
a deep seam. Sealing each turn with
your fingers. Pinch the seam tight and
let rest for about 5minutes (or when the
dough is relaxed enough to roll) with the
seam facing up. Cover with a towel.
Roll and shape the baguettes to fit the
universal tray. Place on universal tray,
seam side down, and let rest for about
5minutes covered with a towel.
Score each baguette 5times and place
directly into oven. Select the
MasterChef Plus program for Baguettes.
Follow the directions on the display.
Settings
Gourmet Center \ MasterChef plus \ Bread
\ Baguettes
Level: see display
Baking time: approx.70minutes

Gourmet Center
77
Banana Bread
Yields: 1 Loaf
Ingredients
1 cup walnuts, coarsely chopped
1 3/4 cups bread flour
3/4 cup granulated white sugar
1 teaspoon baking powder
1/4 teaspoon baking soda
1/4 teaspoon salt
1 teaspoon ground cinnamon
2 large eggs, lightly beaten
1/2 cup unsalted butter, melted and
cooled
3 ripe large bananas, mashed well
1 teaspoon pure vanilla extract
Method
In a large mixing bowl, whisk the
walnuts, flour, sugar, baking powder,
baking soda, salt, and cinnamon; set
aside. Mix the butter, mashed bananas,
eggs and vanilla with a wooden spoon
in a medium bowl. Fold the wet banana
mixture into the dry ingredients with a
rubber spatula just until combined. Be
careful not to over mix.
Pour batter into a prepared loaf pan
that has been greased and dusted with
flour.
Place loaf pan into oven and select the
MasterChef Program for Banana Bread.
Follow the directions in the display.
Settings
Gourmet Center \ MasterChef plus \ Bread
\ Banana Bread
Level: see display
Baking time: approx.55minutes

Gourmet Center
78
Brioche
Yields: 8 Brioches
Ingredients for dough
15.2 oz. bread flour (approx.,
23/4cups plus 3tablespoons)
1 1/2 teaspoon osmotolerant yeast
2 tablespoons plus 11/4teaspoon
sugar
3/4 teaspoon salt
1/4 cup water
4 large eggs
19 tablespoons butter
Ingredients for egg wash
1 egg whisked
Pinch of salt
1/2 teaspoon milk
Method
Cut butter into ½inch pieces and place
on a plate. Let butter sit at room
temperature until softened. In the bowl
of a stand mixer, add flour, yeast, sugar
and salt. Whisk to combine. Make sure
yeast and salt do not come into direct
contact.
With the paddle attachment, add the
water and eggs until well combined.
Switch to a dough hook and knead for
about 10minutes.
When dough is soft and elastic,
gradually add the softened butter one
piece at a time until well incorporated.
(If butter is not thoroughly incorporated,
it will be difficult to roll out the dough.)
Transfer dough to a large greased bowl
and cover with plastic wrap. Place the
bowl into refrigerator for about
15hours.
Remove the dough from the refrigerator
and turn out onto a flour-dusted
countertop. Divide the dough into
4equal squares. Roll the dough into
cylinders. Visually mark the dough
cylinder into thirds. Place the edge of
your hand on the top third and make a
sawing/rolling motion.
With the flat part of your hand, pat
down the thicker sides to 1½inch
thickness. Take your thumb and poke a
hole about a ½ inch from the bottom.
Take the top third and loop it through
the bottom hole.
Shape the brioche. Set each piece into
a greased mold with the larger (base)
part on the bottom.
Repeat steps for the 8brioches.
Place brioches on the perforated
baking tray. Brush with egg wash.
Place in oven and select MasterChef
Plus Program for Brioche.
Follow the directions in the display.
Settings
Gourmet Center \ MasterChef plus \ Bread
\ Brioche
Level: see display
Baking time: approx.43minutes

Gourmet Center
79
Ciabatta
Yields: 2 Loaves
Ingredients for Sponge
16 oz. 00 flour or Italian-style flour
(approx. 31/4cups)
.3 oz. instant yeast (2 teaspoons)
17 oz. water, lukewarm (21/4cups)
.8 oz. olive oil (2tablespoons)
Ingredients for Final Dough
.5 oz. salt (13/4 teaspoons)
9 oz. 00 flour or Italian-style flour
(approx. 1cup plus 3tablespoons)
Method
In the bowl of a stand mixer, add in the
flour and the yeast and whisk together.
With a paddle attachment, add the wet
ingredients until a soft, smooth sponge
is formed. Loosely cover with plastic
wrap and let proof for 1hour in the
mixing bowl.
After proofing slowly, add the
ingredients for the final dough with the
paddle attachment. Mix the dough for
about 2minutes maximum. The dough
should feel sticky to the touch.
Grease a baking sheet with olive oil.
Transfer the dough to the baking pan
and cover with lightly oiled plastic wrap.
Shape the dough into a rectangle and
let rise at room temperature for
20minutes.
Stretch and fold the dough. Fold the
short end of the rectangle over each
other (away from you) then fold it to the
center.
Then fold the bottom of the dough
down (towards you) and fold to the
center. Do the same for the left and
right side of the dough. Turn the dough
over seam side down gently and cover
with plastic wrap. Let the dough rest for
20minutes and repeat the procedure
three more times.
During the last 20minute rest select the
MasterChef Plus program for Ciabatta.
Follow the directions in the display.
(Oven will Preheat). Once the last
twenty-minutes has past, transfer the
Ciabatta to a flour-dusted universal
tray. Dust the top of the dough with
flour. Using a dough cutter, cut the
dough lengthwise to create two long
loaves. Shape the loaves evenly. Using
your first three fingers gently make
about five rows of indentations in the
dough about ¼"deep.
Once the oven has preheated place the
Ciabatta in the oven.
Settings
Gourmet Center \ MasterChef plus \ Bread
\ Ciabatta
Level: see display
Baking time: approx.38minutes

Gourmet Center
80
Cinnamon Raisin Bread
Yields: 1 Loaf
Ingredients for dough
3 1/2 cups (18.6oz.) Bread Flour
3 T + 2 t (2oz.) Granulated Sugar
1 t (0.3oz.) Salt
1 1/4 t (0.2oz.) Osmotolerant Yeast
2 T + 1/2 t (1oz) Vegetable Oil
2 Large Eggs
2 Large Egg Yolks, reserve whites and
whisk until frothy
3/4 to 1 cup Water
1/4 t (0.2oz) Cinnamon
1 cup (6oz) Baking Raisins
Ingredients for cinnamon sugar (for
dusting)
1/4 cup Sugar
1 T Cinnamon
Method
Mix wet and dry ingredients separately
(excluding the raisins and the cinnamon
sugar).
While using a stand-up mixer with a
paddle attachment, slowly add the wet
to the dry and mix until incorporated.
Switch to a dough hook and knead at
low speed for about 6minutes. In the
last two minutes add raisins.
When raisins are thoroughly
incorporated into the dough, remove
and shape into ball. Place the dough
ball into greased bowl. Cover with
plastic wrap and let rise for 1hour.
Next, on a lightly floured surface, knead
dough for 2minutes. Place back into
the greased bowl and proof for 1hour.
Roll dough into a rectangle about
1/2inch thick, sprinkle heavily with
cinnamon sugar. Roll like a jelly roll to fit
the length of a loaf pan. Pinch off any
seams. Place into a well-greased loaf
pan.
Egg wash the loaf with reserved egg
whites and cover with plastic wrap and
proof for 60minutes.
Egg wash again and dust with
cinnamon sugar to taste.
Place in oven and select MasterChef
Plus Program for Cinnamon Raisin Bread.
Follow the directions in the display.
Settings
Gourmet Center \ MasterChef plus \ Bread
\ Cinnamon Raisin Bread
Level: see display
Baking time: approx.85minutes

Gourmet Center
81
French Bread
Yields: 2 Loaves
Ingredients
26 oz. French Style Flour (approx.
5cups plus 1tablespoon)
2 cups lukewarm water (16oz)
4 teaspoons instant yeast
3 teaspoons salt
Method
In a mixing bowl of a stand mixer, whisk
together the French flour, yeast and
salt. Make sure that the salt and yeast
do not come into direct contact. With a
paddle attachment, slowly pour in
water. Then switch to a dough hook
and knead for 8minutes.
Transfer dough to a lightly flour-dusted
work surface. Shape the dough into a
ball. Cover with plastic wrap. Let rest
for 30minutes.
Knead dough for 5minutes by hand.
Cover the dough and let rest 1½hours.
Stretch and fold the dough. Start from
the top of the dough pull forwards
(away from you) then bring it to the
middle. Then pull bottom of the dough
backwards (towards yourself) and fold
to the middle. Do the same for the left
and right side of the dough. Flip the
dough over and cover with plastic
wrap. Let rest 1hour.
Divide the dough in half and shape into
loaves that are about 10"long and
2"wide and tapered at the ends.
Place on perforated baking tray. Cover
with a towel and rest for 20minutes.
Score the loaves three times and place
directly into the oven and select the
MasterChef Plus program for French
Bread.
Follow the directions on the display.
Settings
Gourmet Center \ MasterChef plus \ Bread
\ French Bread
Level: see display
Baking time: approx.54minutes

Gourmet Center
82
Italian Bread
Yields: 2 Loaves
Ingredients
25.4 oz. bread flour (approx. 43/4cups
plus 3tablespoons)
6 oz. extra fancy (fine grain) semolina
flour (approx. 1cup)
1 tablespoon sugar
1 tablespoon instant yeast
1 tablespoon salt
1 pound lukewarm water (approx.
2cups)
1/4 cup extra virgin olive oil
Untoasted sesame seeds
Method
Mix the bread flour, semolina flour,
sugar, yeast and salt together in the
bowl of a stand mixer. Make sure yeast
and salt do not come into direct
contact. With a paddle attachment,
slowly add the wet ingredients until
combined.
Switch to a dough hook and knead for
about 10minutes.
Turn dough out onto a lightly floured
work surface. Shape the dough into a
ball, cover with plastic wrap and proof
for 1½hours
Divide the dough into equal two pieces.
Shape into two loafs that are about a
14"long by 2"wide and taper at both
ends. Place dough on perforated
baking tray and cover with plastic wrap.
Proof for another 20minutes.
Score dough 3times, lightly brush with
water and sprinkle with sesame seeds
immediately.
Place in oven and select the
MasterChef Plus program for Italian
Bread.
Follow the directions on the display.
Settings
Gourmet Center \ MasterChef plus \ Bread
\ Italian Bread
Level: see display
Baking time: approx.49minutes

Gourmet Center
83
Jalapeño Cheese Bread
Yields: 2 Loaves
Ingredients
2 cups hot water
.2 ounces instant yeast
2 teaspoons sugar
2 tablespoons olive oil
5 cups unbleached all-purpose flour
9 ounces cheddar cheese, grated
4 ounces fresh jalapeños, finely
chopped
2 tablespoons salt
3 tablespoons garlic powder (or to
taste)
Extra grated cheddar cheese, to cover
loaves
Method
In a measuring cup add the water,
yeast and 1teaspoon of sugar. Mix
together until incorporated. Let rest for
10minutes or until foamy.
Add the olive oil to the water and yeast
mixture.
In the bowl of a stand mixer, add all of
the dry ingredients except for the garlic
powder. Make sure the cheddar and
jalapeños are coated with flour.
With a dough hook attachment, slowly
add the wet ingredients to the dry.
Mix about 5minutes or until well
incorporated. During the last minute
add in the garlic powder.
Transfer the dough into a well-greased
large bowl and cover. Proof for about
1hour.
Then shape into loaves, place into a
well-greased tea loaf pan and cover.
Proof for another 1hour.
Grate extra cheddar to cover the top of
the loaves as desired.
Place the loaves in the oven and select
the MasterChef Plus program for
Jalapeño Cheese Bread.
Follow the directions on the display.
Settings
Gourmet Center \ MasterChef plus \ Bread
\ Jalapeño Cheese Bread
Level: see display
Baking time: approx.55minutes

Gourmet Center
84
Multigrain Bread
Yields: 2 Loaves
Ingredients
15 oz. nine grain flour blend (approx.
3cups plus 2tablespoons)
16.5 oz. bread flour (approx. 3cups
plus 3tablespoons)
16.5 oz. bread flour (approx. 3cups
plus 3tablespoons)
1 1/3 cups harvest grains mix
3 teaspoons salt
4 teaspoons instant yeast
1 tablespoon light brown sugar
1 tablespoon honey
4 tablespoons vegetable oil
3 cups water
Method
In the bowl of a stand mixer, add the
dry ingredients and whisk together.
Make sure the yeast does not come
into contact with salt.
In a small bowl, combine honey,
vegetable and water. With the paddle
attachment, slowly incorporate the wet
ingredients into the dry.
Switch to a dough hook and knead for
about 8minutes.
Turn the dough out onto a work surface
and shape the dough into a ball.
Place the dough into an oiled bowl,
cover with plastic wrap and proof for
1hour.
Divide dough and shape into two round
loaves and place on perforated baking
tray.
Place into oven immediately and select
the MasterChef plus program for
Multigrain Bread.
Follow the directions on the display.
Settings
Gourmet Center \ MasterChef plus \ Bread
\ Multigrain Bread
Level: see display
Baking time: approx.54minutes

Gourmet Center
85
Rolls
Yields: 8 Rolls
Ingredients
21.2 oz. unbleached bread flour
(approx. 4cups plus 1tablespoon)
2 teaspoons instant yeast
2 1/2 teaspoons salt
8 ounces sourdough starter (approx.
1cup)
13.4 oz. water (approx. 1 3/4cups)
Method
In the bowl of a stand mixer, combine
flour, yeast and salt. Mix together with a
whisk. With the paddle attachment mix
in sourdough starter until coated with
the dry ingredients. Slowly incorporate
water, mix until combined. Switch to
the dough hook and knead for
15minutes.
Dust countertop lightly with flour.
Transfer dough to countertop and
knead by hand for 5minutes. The
dough will be slightly sticky. Dust
dough very lightly with flour as needed.
Shape the dough into a ball and cover
with plastic wrap, let rest for 2hours on
countertop
Divide dough into 8equal portions and
shape into rolls. Cover with plastic wrap
and let rest for 30minutes.
Place dough on the perforated baking
tray.
Score dough and make one quick slice
down the center of the roll.
Immediately place rolls in oven and
select MasterChef Plus program for
Rolls.
Follow the directions on the display
Settings
Gourmet Center \ MasterChef plus \ Bread
\ Rolls
Level: see display
Baking time: approx.54minutes

Gourmet Center
86
Rye Bread
Yields: 2 Loaves
Ingredients for Preferment
5.6 oz. bread flour (approx.1cup plus
2tablespoons)
.02 oz. instant yeast (approx.
1/8teaspoon)
.2 oz. salt (approx. 3/4teaspoon)
5.4 oz. water (approx. 3/4cup)
Ingredients for Final Dough
14 ounces bread flour (approx.
23/4cup)
11 oz. medium rye flour (approx.
21/2cups plus 1tablespoon)
.2 oz. instant yeast
(approx.11/2teaspoons)
.375 oz. salt (approx.11/2teaspoons)
14 oz. water (approx. 3/4cup)
2 oz. caraway seeds (11/2teaspoons)
Method
In the bowl of a stand mixer, combine
flour, yeast and salt for the preferment.
Then add 5.4ounces of lukewarm
water. Mix until thoroughly
incorporated. Cover with plastic wrap
and let rise for 1hour or up to 15hours
at room temperature.
In the bowl of a stand mixer, combine
all of the dry ingredients for the final
dough together except for the caraway
seeds. Add dry ingredients to
preferment. With the paddle
attachment, slowly drizzle in the
14ounces of lukewarm water. Switch to
a dough hook. Knead for about
6minutes. Add the caraway seeds
during the last two minutes of mixing.
Remove dough from the bowl and
shape into a ball. Cover the dough and
proof for 1½ hours.
Divide dough in half. Shape into two
loaves. Start by patting the dough into
a rectangle about the length of the tea
loaf pan (12") and about 6"wide. Fold
the dough into thirds; repeat this two
more times until you have a log. Pinch
the ends and the long seam to seal.
Place into ceramic tea loaf pans. Cover
and let rest for 35minutes.
Place into oven and select the
MasterChef Plus program for Rye Bread.
Follow the directions on the display.
Settings
Gourmet Center \ MasterChef plus \ Bread
\ Rye Bread
Level: see display
Baking time: approx.60minutes

Gourmet Center
87
San Francisco Sourdough
Yields: 2 Loaves
Ingredients
27.5 oz. bread flour (approx. 51/4 cups
plus 2tablespoons)
.03 oz. instant (approx.
21/2teaspoons)
.7 oz. salt (approx. 21/2teaspoons)
10.5 sour dough starter (approx.
11/4cups)
2 cups water (1pound)
Method
Add bread flour, yeast and salt in the
bowl of a stand mixer. Mix together
with a whisk. Add the sourdough
starter, mix until coated with the dry
ingredients. Slowly incorporate water.
Mix until combined. Switch to a dough
hook and knead for 15minutes.
Dust a work surface lightly with flour.
Turn the dough onto the work surface
and knead by hand for 3-5minutes.
The dough will be slightly sticky. Dust
the dough very lightly with flour as
needed.
Shape into a ball and cover with plastic
wrap, proof for 2hours on countertop
Divide dough into 2equal portions and
shape into a boule (round loaf). Place
loaves on perforated baking tray. Cover
loosely with plastic wrap and let rest for
20minutes.
Score the dough with 4strokes to form
a square design with a lame (double
edge blade) or a very sharp paring
knife.
Immediately place in oven and select
the MasterChef Plus Program for
Sourdough Bread.
Follow the directions in the display.
Settings
Gourmet Center \ MasterChef plus \ Bread
\ Sourdough Bread
Level: see display
Baking time: approx.45minutes

Gourmet Center
88
Walnut Bread
Yields: 2 Loaves
Ingredients
26 oz. French Style Flour (approx.
5cups plus 1tablespoon)
2 cups lukewarm water (16oz)
4 teaspoons instant yeast
3 teaspoons salt
2/3 cups walnuts
2/3 cup dried cherries
Method
In a mixing bowl of a stand mixer, whisk
together the French flour, yeast and
salt. Make sure that the salt and yeast
do not come into direct contact. With a
paddle attachment, slowly pour in
water. Then switch to a dough hook
and knead for 8minutes. During the
last two minutes add in the cherries and
the walnuts.
Transfer dough to a lightly flour-dusted
work surface. Shape the dough into a
ball. Cover with plastic wrap. Let rest
for 30minutes.
Knead dough for 5minutes by hand.
Cover the dough and let rest 1½hours.
Stretch and fold the dough. Start from
the top of the dough pull forwards
(away from you) then bring it to the
middle. Then pull bottom of the dough
backwards (towards yourself) and fold
to the middle. Do the same for the left
and right side of the dough. Flip the
dough over and cover with plastic
wrap. Let rest 1hour.
Divide the dough in half and shape into
round loaves.
Place on perforated baking tray. Cover
with a towel and rest for 20minutes.
Score the loaves three times and place
directly into the oven and select the
MasterChef Plus program for Walnut
Bread.
Follow the directions on the display.
Settings
Gourmet Center \ MasterChef plus \ Bread
\ Walnut Bread
Level: see display
Baking time: approx.55minutes

Gourmet Center
89
White Bread
Yields: 2 Loaves
Ingredients
26 oz. Bread Flour (approx. 5cups plus
1tablespoon)
2 cups lukewarm water (16oz)
4 teaspoons instant yeast
3 teaspoons salt
Method
In a mixing bowl of a stand mixer, whisk
together the French flour, yeast and
salt. Make sure that the salt and yeast
do not come into direct contact. With a
paddle attachment, slowly pour in
water. Then switch to a dough hook
and knead for 8minutes.
Transfer dough to a lightly flour-dusted
work surface. Shape the dough into a
ball. Cover with plastic wrap. Let rest
for 30minutes.
Knead dough for 5minutes by hand.
Cover the dough and let rest 1½ hours.
Stretch and fold the dough. Start from
the top of the dough pull forwards
(away from you) then bring it to the
middle. Then pull bottom of the dough
backwards (towards yourself) and fold
to the middle. Do the same for the left
and right side of the dough. Flip the
dough over and cover with plastic
wrap. Let rest 1hour.
Divide the dough in half and shape into
loaves that are about 10"long and
2"wide and tapered at the ends.
Place on perforated baking tray. Cover
with a towel and rest for 20minutes.
Score the loaves three times and place
directly into the oven and select the
MasterChef Plus program for White
Bread.
Follow the directions on the display.
Settings
Gourmet Center \ MasterChef plus \ Bread
\ White Bread
Level: see display
Baking time: approx.48minutes

Gourmet Center
90
Whole Grain Bread
Yields: 2 Loaves
Ingredients
29.3 oz. bread flour (approx. 5cups
plus 2tablespoons)
14.6 oz. whole wheat flour (approx.
3cups plus 2tablespoons)
1 tablespoon salt
1 tablespoon instant yeast
4 oz. sour dough starter (approx.
1/2cup)
11/3 cup whole grains (your favorite
blend)
29.2 oz. water (approx. 33/4cups)
Method
In the bowl of a stand mixer combine all
the ingredients except for the water
with the paddle attachment. Slowly
drizzle in water until combined. Switch
to the dough hook attachment and
knead for about 4minutes.
Turn the dough out to a lightly dusted
work surface. Shape the dough into a
ball. Cover with plastic wrap. Let rest
for 30minutes.
Knead the dough by hand for one
minute. Cover the dough and let rest
1½hours.
Stretch and fold the dough; start from
the top of the dough, stretch up (away
from you) then bring it to the center.
Then stretch the bottom of the dough
up (towards you) and fold in the middle.
Do the same for the left and right sides
of the dough. Turn the dough over,
seam side down and cover with plastic
wrap. Let rest 1hour.
Divide the dough into 2portions. Shape
each portion into a rectangle; start by
taking one of the dough portions and
shape into a rectangle, roughly the
dimension of a loaf pan. With your first
three fingers gently make several
indentations into the dough. Next, roll
the dough over three times. Sealing
each turn with your hand. Pinch the
seam tightly and place seam side down
into well-greased loaf pans.
Cover and let rest for 35-40minutes.
Place into oven and select the
MasterChef Plus program for Whole
Grain Bread.
Follow the directions on the display.
Settings
Gourmet Center \ MasterChef plus \ Bread
\ Whole Grain Bread
Level: see display
Baking time: approx.60minutes

Favorites
91
You can create and save up to 20 of
your own programs.
– Each one can have up to 10 cooking
stages. This enables you to save your
most frequently used recipes very
accurately. In each stage you can
select settings such as mode,
temperature and duration or core
temperature.
– You can specify the shelf level(s) for
the food.
– You can enter a program name for
your recipe.
When you next select the program, it
will start automatically.
There are different ways of creating a
Favorite:
– At the end of running a MasterChef
Program, save it as a separate
program.
– After running a program with a set
duration, select Save.
Then name the program.
Creating a Favorite
Select Favorites.
Select Create Program.
You can now specify the settings for
cooking stage 1.
Follow the instructions in the display:
Select and confirm the settings.
Depending on the mode selected you
can add the functions Rapid PreHeat
and Crisp function in Additional Settings.
The settings for the first cooking stage
have now been set.
More cooking stages can be added, for
example, if you would like to add
another cooking mode to follow the
first.
If additional cooking stated are
required, select Add and proceed as
you did for the 1st cooking stage.
When you have completed setting the
cooking stages. select Finish.
Set the shelf level(s) to be used:
Select the desired level(s).
Confirm with OK.
A summary of your settings will appear
in the display.
Check the settings and select OK to
confirm, or select Change to correct
the settings.
Select Save.
Enter the program name using the
keyboard.

Favorites
92
You can add a line break for longer
program names using the symbol.
Once you have entered the program
name select Save.
A message will appear in the display
confirming that the name has been
saved.
Confirm with OK.
You can start the saved program
immediately, delay the start or change
the cooking stages.
More information regarding Change
Cooking Stages can be found in
"Changing favorites".
Starting a Favorite
Place the food in the oven.
Select Favorites.
The program names will appear in the
display.
Select the desired program.
You can start the saved program
immediately, delay the start or show the
cooking stages.
– Start Now
The program will start right away and
the oven heating will turn on.
– Start Later
This option will only appear if you are
using the wireless roast probe. You
can specify when you would like the
program to start. The oven heating
will turn on automatically at the time
set.
– Ready at
You can specify when you would like
the cooking program to complete.
The oven will turn off automatically at
the time set.
– Start at
You can specify when you want the
program to start. The oven heating
will turn on automatically at the time
you set.

Favorites
93
– Display Stages
A summary of your settings will
appear in this display. You can adjust
the setting under Change (see
"Changing Favorites").
Select the desired menu item.
Confirm the message regarding
which shelf level to use with OK.
The selected program will begin
automatically right away or at the time
set.
Changing Favorites
Changing cooking stages
Cooking stages in a MasterChef
program that have been saved under a
different name cannot be changed.
Select Favorites.
The program names will appear in the
display.
Select Edit.
Select Change Program.
Select the desired program.
Select Change Cooking Stages.
The setting specified for a cooking
stage can be changed or more cooking
stages can be added to the program.
Change the program as desired (see
"Creating a Favorite").
Check the settings and select OK to
confirm.
Select Save.
The changes made to the program will
be saved.

Favorites
94
Changing the name
Select Favorites.
The program names will appear in the
display.
Select Edit.
Select Change Program.
Select the desired program.
Select Change name.
Change the name (see "Creating a
Favorite") and select Save.
A message will appear in the display
confirming that the name has been
saved.
Confirm with OK.
The new program name will be saved.
Deleting a Favorite
Select Favorites.
The program names will appear in the
display.
Select Edit.
Select Delete Program.
Select the desired program.
Select OK.
The program is deleted.
You can delete all of your Favorites at
the same time (see "Settings - Factory
Default - Favorites").

Bake
95
Eating food which has been cooked
correctly is important for good
health.
Only bake cakes, pizza, french fries,
etc. until they are golden brown. Do
not overcook them.
Oven modes
Depending on how you would like the
food prepared, you can use Convection
Bake , Intensive , Moisture Plus
or Surround .
Bakeware
The bakeware used depends on the
oven mode chosen and how the food is
prepared.
– Convection Bake , Intensive ,
Moisture Plus :
Baking tray, universal tray, any heat-
resistant baking dishes.
– Surround :
Dark metal, enamel or aluminum
baking tins with a matte finish, as
well as heat-resistant glass, ceramic
and coated dishes can be used.
Avoid bright, shiny metal tins as they
result in uneven or poor browning,
and in some cases cakes might not
cook properly.
– Always place baking pans on the wire
rack.
Position rectangular pans with the
longer side across the width of the
rack. This will allow for optimum heat
distribution and even baking results.
– When baking cakes with fruit
toppings or deep cakes, place the tin
in the universal tray to catch any
spillages.
Parchment paper / Greasing the pan
All Miele accessories (baking tray,
universal tray, perforated baking tray
and round baking dish) are treated with
PerfectClean finish.
Surfaces treated with PerfectClean
finish generally do not need to be
greased or covered with parchment
paper.
Parchment paper is only needed with:
– anything with a high salt content (e.g.
pretzels, bread sticks), because
sodium can damage the PerfectClean
surface;
– meringues or dishes with a high egg-
white content, because they are more
likely to stick,
– frozen food cooked on the wire oven
rack.

Bake
96
Temperature
As a general rule, select the lower
temperature given in the chart.
Choosing a baking temperature higher
than those recommended may reduce
the cooking time, but will lead to
uneven browning, and unsatisfactory
cooking results.
Baking duration
Check if the food is cooked at the end
of the shortest duration quoted. To
check if a cake is ready insert a wooden
skewer or toothpick into the center, it
should come out clean.
Shelf levels
The shelf level that you place the food
on for baking depends on the oven
mode and the number of trays being
used.
– Convection Bake
1 Tray: Level 3
2 Trays: Levels 1+3 / 2+4
3 Trays: Levels 1+3+5
– Moisture Plus
1 Tray: Level 3
– Intensive Bake
1 Tray: Level 2 or 3
– Surround
1 Tray: Level 3
Bake moist cakes and muffins on a
maximum of two levels at the same
time.

Roast
97
Always follow USDA guidelines on
food safety.
Oven modes
Depending on how you would like the
food cooked, you can use Convection
Bake / Convection Roast , Moisture
Plus , Auto Roast , Surround /
Surround Roast or a MasterChef
program.
Cookware
Any heat-resistant cookware can be
used:
Wire oven rack, grilling and roasting
insert (if available) on the universal tray,
roasting pans, heat-resistant glass/
earthen/cast iron dishes, roasting bags
Temperature
Select the suggested temperature if
possible.
If higher temperatures are used, the
meat will brown on the outside, but will
not be properly cooked through.
When cooking with Convection Bake /
Convection Roast, Moisture Plus
or Auto Roast, select a
temperature that is approx. 25°F (20°C)
lower than the temperature for
Surround / Surround Roast.
Shelf levels
In most cases level 3 should be used.
With large items, such as a turkey, use
level 1 or 2.
Tips
– Resting time: At the end of the
program, take the roast out of the
oven, cover with aluminum foil and let
stand for about 10 minutes. This
helps retain the juices when the meat
is sliced.
– The larger the cut of meat, the lower
the temperature setting should be.
– Use a roast probe for accurate
cooking temperatures and best
results.

Roast
98
Wireless roast probe
The wireless roast probe allows you to
accurately monitor the food's internal
temperature during the cooking
process. It is dishwasher safe.
How it works
The metal part of the wireless roast
probe is inserted into the food. A
temperature sensor located in the tip
measures the core temperature of the
food during cooking.
The temperature sensor is located
approx. 3/4" (2cm) from the tip. Insert
the tip so that the temperature sensor
is positioned in the middle of the food
(see "Important notes on using the
roast probe").
The rise in the core temperature reflects
the extent to which the food is cooked.
You can program the core temperature
to be lower or higher, depending on
whether you want your meat to be rare,
medium or well done.
The maximum core temperature setting
is 210°F (99°C). Please refer to the
roasting chart and the "Slow Roasting"
section for information about the types
of meat and the corresponding core
temperatures.
The cooking time will be similar when
cooking with or without the roast probe.
The core temperature value is sent via
radio signal from the transmitter in the
handle of the wireless roast probe via
the antenna in the back wall of the oven
to the appliance's electronic unit as
soon as the food with the roast probe is
placed in the oven.
Uninterrupted transmission of the radio
signal is only possible when the door is
closed. If the oven door is opened
during the cooking program, e.g. to
baste the meat, then the radio signal
will be interrupted. It will only resume
after the door has been closed. It will
take a few seconds for the current core
temperature to once again appear in the
display.
The temperature sensor will be
destroyed at temperatures above
212°F (100°C). As long as it
remains inserted in the food, there
is no risk of damage, since the
maximum core temperature
setting is 210°F (99°C).
If you do not intend to use the
wireless roast probe, do not leave it
in the oven while cooking. Always
put it in the storage sleeve located in
the front frame.

Roast
99
When to use the wireless roast probe
Apart from MasterChef programs,
Special Modes and Favorites, the
wireless roast probe can be used with
the following functions:
– Auto Roast
– Convection Bake
– Intensive
– Surround
– Moisture Plus
– Convection Broil
Important notes on using the
wireless roast probe
To ensure that the probe works
correctly, please observe the
instructions below.
– Do not use deep, narrow cooking
containers made of metal, as these
will weaken the radio signal.
– Do not place any metal objects, such
as lids or aluminum foil, above the
wireless roast probe. Do not use the
wire oven rack and universal tray on a
shelf level above the food containing
the roast probe. Glass lids may be
used.
– Do not use another standard metal
cooking thermometer when using the
wireless roast probe.
– Do not allow the handle of the
wireless roast probe to sit in any
sauce or cooking liquid, or to rest on
the food or the edge of the cooking
container.
Risk of breakage!
Do not use the wireless roast probe
to lift or carry the food.
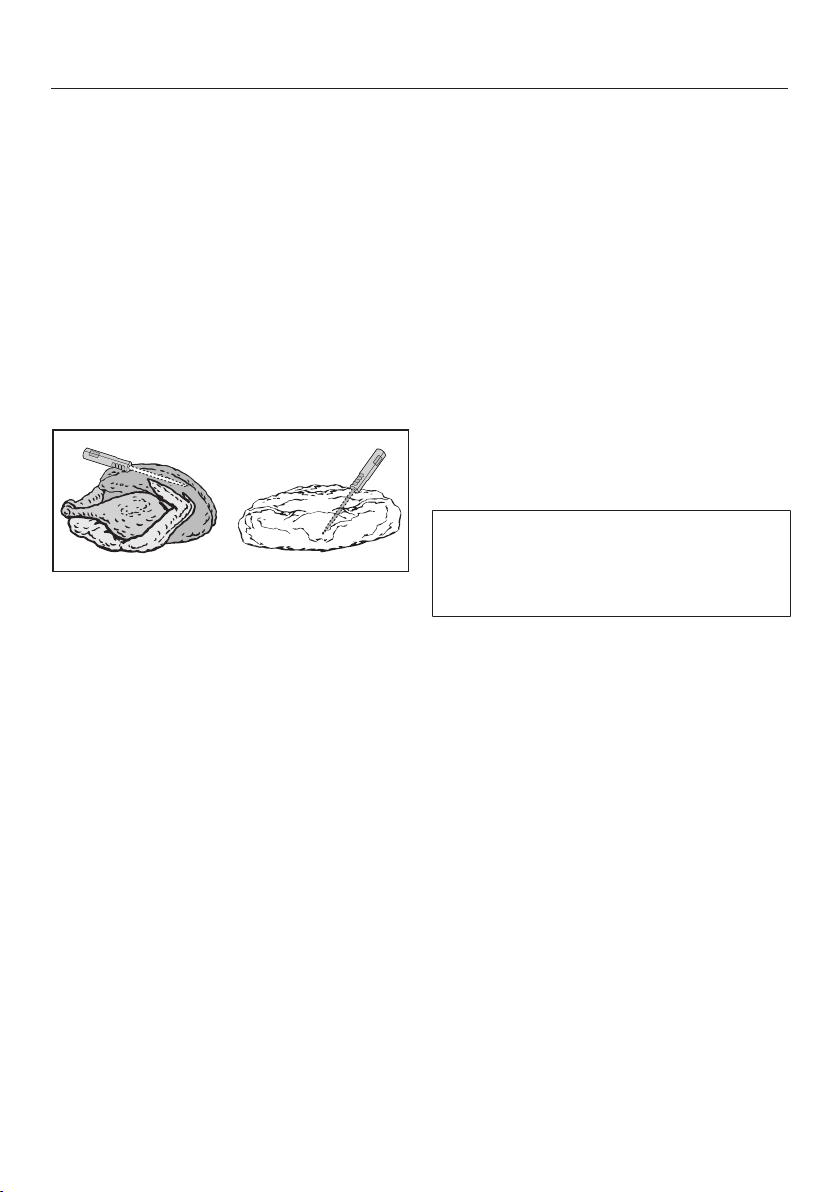
Roast
100
Please also note the following
information:
– The meat can be placed in a pot or
on the universal tray and wire oven
rack.
– The metal part of the wireless roast
probe must be fully inserted into the
center of the food. The handle should
be angled upwards. Make sure that
the handle is not horizontal, facing
the door or the corners of the oven
interior.
– When cooking poultry, insert the
metal part into the thickest part of the
breast. You can find the thickest part
of the breast by pressing the area
with your thumb and index finger.
– Do not let the metal part touch any
bones, and do not insert it into a
particularly fatty area of the meat.
The oven may turn off too early if the
tip comes into contact with the
probe.
– If the meat contains heavy marbling,
select the highest core temperature
stated in the roasting chart.
– When using roasting bags or
aluminum foil, insert the probe
through the bag or foil into the center
of the meat. You can also place meat
inside the bag/foil with the probe
already inserted. Be sure to follow the
instructions provided by the
manufacturer of the roasting bag /
aluminum foil.
– The wireless roast probe can only be
inserted horizontally into flat foods,
such as fish. Therefore, place flat
food in glass or ceramic cooking
containers, since the walls of a metal
container will interfere with the radio
signals.
If the wireless roast probe is no longer
recognized during cooking, a message
will appear in the display. Change the
position of the probe in the food.

Roast
101
Using the wireless roast probe
Remove the wireless roast probe
from its holder in the door.
Insert the metal tip of the wireless
roast probe fully into the food. Make
sure that the handle is angled
upwards.
Place the food in the oven.
Close the door.
Select an oven mode or MasterChef
program.
The message Continue cooking with roast
probe? will appear.
Select Yes.
Adjust the default temperature if
necessary.
Change the default core temperature
if necessary.
The core temperatures cannot be
changed for the MasterChef
programs.
You can also start the process at a later
time. Select Additional Settings and set a
time in the Start at field. In MasterChef
program select Start Later.
You can estimate approximately when
the food will be ready as the duration of
the cooking program is about the same
as if you were cooking food without
using the wireless roast probe.
Duration and Ready at cannot be set
because the total time depends on how
long it takes for the core temperature to
be reached.

Roast
102
Time left display
If you have set a cooking temperature
above 275°F (140°C), the estimated
duration of the cooking process
remaining (time left) will appear on the
display.
The time left is calculated from the
cooking temperature selected, the set
core temperature, and the pattern of the
increasing core temperature.
The time left first shown is an estimate.
As the cooking process continues, the
time is revised continuously, and a
more accurate figure is shown.
The time left will be deleted if the
cooking or core temperature is changed
or if a different mode is selected. If the
door is opened for a longer time, the
time left will be recalculated.
Displaying the core temperature
As soon as the time remaining appears,
you can also display the actual core
temperature.
Select Change.
Select Display core temperature.
Select On.
Confirm with OK.
The actual core temperature will also
appear in the display.

Roast
103
Using residual heat
Shortly before the end of the cooking
program the oven heating will turn off.
The residual heat in the oven is
sufficient to complete the cooking
process.
Using the residual heat in the oven
saves energy.
Energy Save Phase will appear in the
display to show that the oven is in
energy save mode. The measured core
temperature is no longer visible.
The cooling fan and hot air fan (if turned
on) will continue to run.
When the selected core temperature
has been reached,
– Program Finished appears in the
display,
– A buzzer will sound if turned on (see
"Settings - Volume - Buzzer tones").
Tip: If the food is not sufficiently
cooked, insert the probe into another
place and repeat the program.

Slow Roasting
104
This cooking method is ideal for
cooking beef, pork, veal or lamb when a
tender result is desired.
First, using a cooktop sear the meat on
all sides to seal in the juices.
Then place the meat in a preheated
oven. It will be cooked at a low
temperature for an extended time
allowing the meat to become very
tender.
The meat will rest and the juices start to
circulate evenly throughout.
This gives the meat a very tender and
juicy result.
Tips
– Use fresh, lean meat that has been
trimmed. Remove the bones before
cooking.
– When searing, use a suitable cooking
oil or fat that can withstand high
temperatures (e.g. clarified butter,
vegetable oil).
– Do not cover the meat during
cooking.
Cooking will take approx. 2-4 hours,
depending on the size and weight of
the meat, as well as the desired
degree of doneness and browning.
Cooking time / Core
temperatures
Always observe USDA food safety
guidelines.
Meat
[min]
°F / °C
Beef Tenderloin 80–100 138/59
Sirloin
– rare
– medium
– well done
50–70
100–130
160–190
118/48
135/57
156/69
Pork tenderloin 80–100 145/63
Smoked pork
chop *
140–170 154/68
Filet of veal 80–100 140/60
Veal loin * 100–130 145/63
Saddle of lamb * 50–80 140/60
*
boneless
After cooking:
Because the cooking temperatures are
very low:
– The meat can be carved immediately.
No resting time is required.
– The cooking result will not be
affected if the meat is left in the oven
after the program is complete. It can
be kept warm until you serve it.
– The meat is at an ideal temperature
to be eaten right away. Serve on pre-
warmed plates with a hot sauce or
gravy to keep warm.

Slow Roasting
105
Using the Slow Roasting
function
Select Special Modes.
Select Slow Roasting.
Set the required temperature.
Set the core temperature.
Follow the instructions in the display.
Let the wire oven rack and universal
tray preheat in the oven.
While the oven is preheating, sear the
meat on all sides on the cooktop.
Burn hazard!
When the oven is hot use pot holders
to insert, remove or turn the food, or
when adjusting the oven shelves,
etc.
Once Use the roast probe appears in
the display, place the seared meat on
the rack and insert the roast probe,
so that the metal tip is fully in the
center of the meat.
For more information, see "Roast -
Roast probe."
Use Caution!
The Browning / Broiling element will
be hot. Danger of burns!
Close the door.
When the program is completed
Program Finished will appear in the
display and a buzzer will sound, if
turned on (see Settings - Volume -
Buzzer tone").
If the meat is not cooked to your
satisfaction, you can extend the
cooking time.

Slow Roasting
106
Adjusting the Slow Roasting
temperature
Use the wire oven rack with the
universal tray positioned on top.
Do not use the Rapid PreHeat
function to preheat the oven.
Slide the universal tray and rack onto
shelf level 3.
Select Operating Modes.
Select the Surround mode and
set the temperature to 265°F (130°C).
Turn off the Rapid PreHeat function
by selecting Change – Additional
Settings – Rapid PreHeat – Off.
Preheat the oven with the universal
tray and wire oven rack for approx.
15minutes.
While the oven is preheating, sear the
meat on all sides on the cooktop.
Burn hazard!
Use pot holders when inserting,
removing or turning hot food, or
when adjusting shelves, etc. in a hot
oven.
Place the seared meat on the wire
oven rack.
Select Change.
Reduce the temperature to 210°F
(100°C).
Allow the meat to finish cooking.
You can set the cooking program to
switch off automatically (see
"Additional functions - Setting the
cooking time").

Broil
107
Danger of burns!
Broil with the oven door closed. If
you broil with the door open the hot
air will escape from the oven before
it has been cooled by the cooling
fan.
The controls will get hot.
Oven modes
Maxi Broil
This mode delivers excellent browning
and broiling results when cooking larger
amounts of food. Use to broil chops,
ribs and large quantities of meat and for
browning large dishes.
The entire Browning/Broiling element
will become red hot to produce the
necessary heat.
Broil
This mode delivers excellent browning
and broiling results when cooking
smaller amounts of food. Use to broil
chops, ribs and small quantities of meat
and for browning small dishes.
Only the center of the Browning/Broiling
element will become red hot to produce
the necessary heat.
Convection Broil
For broiling thicker items, e.g. poultry or
London broil.
The Browning/Broiling element and the
fan switch on in alternating phases.
Cookware
Use the universal tray with the grilling
and roasting insert (if available), and
place the tray in the oven. The insert
prevents any collected meat juices from
burning, allowing them to be used for
gravy and sauces.
Temperature
As a general rule, select the default
temperature.
If higher temperatures are used, the
meat will brown on the outside, but will
not be properly cooked through.
Preheating
Always preheat the oven for about
5minutes with the door closed before
Broiling.

Broil
108
Shelf levels
Select the shelf level according to the
thickness of the food.
– Thin cuts: Shelf level 4 or 5
– Thick cuts: Shelf level 2 or 3
Broiling time
Flat pieces of fish and meat usually take
6–8minutes per side.
When broiling thicker pieces, each side
will take a bit longer. Make sure that the
pieces have roughly the same thickness
so that their broiling times do not vary
too greatly.
Testing doneness
Always observe USDA food safety
guidelines.
Preparing food for broiling
Rinse the meat under cold water and
pat dry. Do not season the meat with
salt before broiling, this will draw out
the juices.
Brush the meat with oil, if necessary.
Do not use other types of fat as they
can easily burn and cause smoke.
Clean fish as usual. To enhance the
flavor, salt or lemon can be added.

Broil
109
Broil
Place the grilling and roasting insert
(if available) in the universal tray.
Place the food on top.
Select the required oven mode and
temperature.
Preheat the Browning/Broiling
element for approx. 5 minutes with
the door closed.
Danger of burns!
When the oven is hot use pot holders
to insert, remove or turn the food, or
when adjusting the oven shelves,
etc.
Place the food on the appropriate
shelf level (see the "Broiling chart").
Close the door.
Turn the food halfway through
cooking.
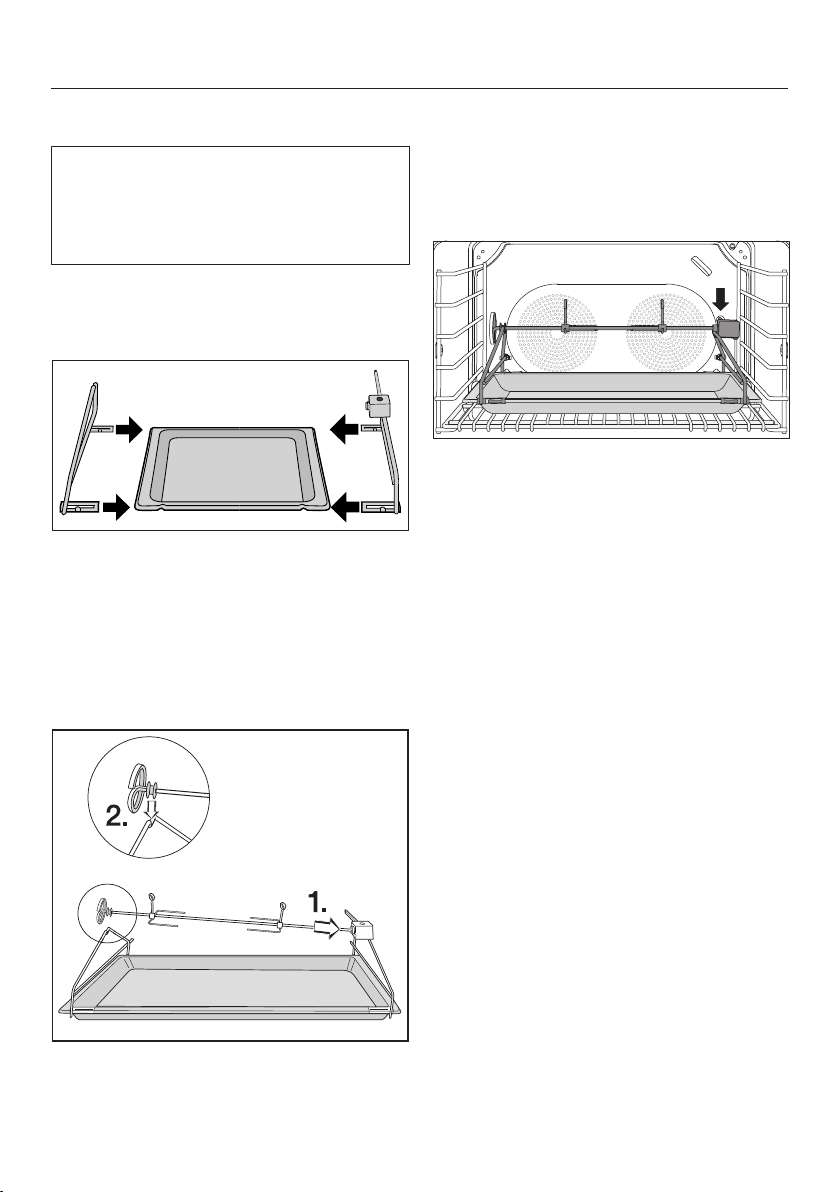
Broil
110
Using the rotisserie to Broil
The rotisserie is an optional accessory
for the Rotisserie function.
The rotisserie can support a maximum
weight of 11 lbs (5 kg).
Place the wire oven rack or the
FlexiClips with wire rack in shelf level
1.
Push the latch on the rotisserie into
the notches of the universal tray.
Secure the meat to the rotisserie spit
using clips, making sure it is held
centrally. The meat needs to be
balanced in the middle for even
rotation.
Insert the pointed end of the
rotisserie (1.) into the motor slot at the
back of the rotisserie set up and set
the other end onto the holder (2.) as
illustrated.
Slide the universal tray including
rotisserie on the wire oven rack or the
FlexiClip rail with wire oven rack.
Insert the spit into the motor slot at
the back of the oven.
Close the door.
Select the Rotisserie function.
Set the temperature and duration.
The rotisserie motor will turn on after a
short time. The rotation will brown the
food evenly on all sides.
After the cooking process:
Take the food out of the oven.
Turn the oven off.

Special Modes
111
In addition to the MasterChef programs
your oven has a variety of Special
Modes.
Select Special Modes.
The following Special Modes are
available:
– Defrost
– Dehydrate
– Reheat
(to reheat plated meals)
– Warm-up Cookware
– Proof
– Slow Roasting
See "Slow Roasting" for more
information.
– Pizza
– Sabbath Program
This section also gives information on
the following applications:
– Gentle Bake
– Canning
– Frozen food

Special Modes
112
Defrost
Use the Defrost mode to gently defrost
frozen food.
The temperature can be set between
75-150°F (25-50°C).
Select Special Modes.
Select Defrost.
If necessary, adjust the default
temperature and set the duration.
Follow the instructions in the display.
Air is circulated throughout the cabinet
to gently defrost the food.
Risk of salmonella poisoning!
Be sure to strictly observe proper
hygiene rules when defrosting
poultry.
Do not use the liquid from the
defrosted poultry.
Tips
– Remove the packaging and place the
frozen food on the universal tray or in
a suitable bowl or dish.
– When defrosting poultry, place it on
the wire oven rack and position the
rack on the universal tray so that the
poultry does not sit in the defrosting
liquid.

Special Modes
113
Dehydrate
This program is designed for traditional
drying of food to preserve it.
The temperature can be set between
175-250°F (80-100°C).
It is important that fruit and vegetables
are ripe and not bruised before they are
dehydrated.
Prepare the food for dehydrating.
– Peel and core apples, and cut into
slices 1/4" (.5 cm) thick.
– Core plums if necessary.
– Peel, core and cut pears into wedges.
– Peel and slice bananas.
– Clean mushrooms, then either halve
or slice them.
– Remove parsley and dill from the
stem.
Distribute the food evenly over the
roasting pan.
You could also use the rack or
perforated baking tray, if available.
Select Special Modes.
Select Dehydrate.
If necessary, adjust the default
temperature and set the duration.
Follow the instructions in the display.
Food Approx. dehydrating
time
Fruit 2–8 hours
Vegetables 3–8 hours
Herbs* 50–60 minutes
*
Because this program uses the fan, it is
recommended that you use Surround
with a temperature of 175-250°F
(80-100°C) for drying herbs.
Reduce the temperature if
condensation begins to form in the
oven.
Danger of burns!
Use pot holders when removing the
dehydrated food from the oven.
Allow the fruit or vegetables to cool
down after dehydrating.
Dried fruit must be completely dry, but
also soft and elastic. Juice should not
escape when cut.
Store in sealed glass jars or tins.

Special Modes
114
Reheat
This program is designed for reheating
plated meals and uses added moisture.
The available options are:
– Pizza
– Large roasting pan
– Bakes
Use heat-resistant cookware.
Place the food to be reheated in a
dish on the rack. Do not cover.
Select Special Modes.
Select Reheat.
Select the desired dish and adjust the
power level.
Follow the instructions on the display
Burn hazard!
Use pot holders when removing
dishes from the oven. Condensation
may accumulate on the bottom of
the dish.
Warm-up Cookware
This program is designed to warm your
cookware.
The temperature can be set between
75-175°F (50-80°C).
Use heat-resistant cookware.
Place the rack on shelf level 3 and
place the cookware to be heated on
it.
Select Special Modes.
Select Warm-up Cookware.
If necessary, adjust the default
temperature and set the duration.
Follow the instructions in the display.
Danger of burns!
Use pot holders when removing
dishes from the oven. Condensation
may accumulate on the bottom of
the dish.

Special Modes
115
Proof
This program was designed to proof
dough without humidity.
The temperature can be set between
75-125°F (30-50°C).
Select Special Modes.
Select Proof.
If necessary, adjust the default
temperature and set the duration.
Follow the instructions in the display.
If you would like to proof dough with
the addition of moisture, select the
appropriate MasterChef program.
Pizza
This program is designed specifically
for baking pizza.
The temperature can be set between
300-475°F (160-250°C).
Select Special Modes.
Select Pizza.
If necessary, adjust the default
temperature and set the duration.
Follow the instructions in the display.

Special Modes
116
Sabbath Program
This program is designed for religious
observance.
Select the Sabbath Program and then
select the oven mode and temperature.
The program will only start once the
door is opened and closed:
– The cooking process will start after
about 5 minutes using Surround
or Bake .
– The oven will heat up to the
temperature you have set and will
maintain this temperature for a
maximum of 72 hours.
– The interior lighting does not come
on, even when the door is opened.
If Settings - Lighting - On has been
selected, the lighting will remain
turned on throughout the program.
– Sabbath Program appears in the
display constantly.
– The time of day is turned off.
Once the Sabbath Program has started
it cannot be changed or saved as a
Favorites.
Using the Sabbath Program
The program can only be canceled by
turnng the oven off.
Select Special Modes.
Select Sabbath Program.
Select the desired mode.
The Sabbath Program cannot be
started if the timer is being used.
Set the required temperature.
Confirm with OK.
The oven is now ready for use.
Sabbath Program and the
temperature set will appear.
Open the door to start the program.
Place the food in the oven.
Close the door.
The oven heating will turn on after 5
minutes.
To end the program early:
Turn the oven off.

Special Modes
117
Gentle Bake
The Gentle Bake mode is ideal for
casseroles and gratins.
You can select a temperature setting
from 200-475°F (100-250°C).
Select Operating Modes.
Select Gentle Bake and change the
default temperature if necessary.
Follow the instructions on the display.

Special Modes
118
Canning
Always observe USDA food safety
guidelines.
Canning containers
Danger of injury!
Do not use the appliance to heat up
or can food in sealed jars or
containers. Pressure will build up
inside them and they can explode
causing damage to the appliance, as
well as the risk of injury and scalding.
Only use jars designed for canning:
– Canning jars,
– Jars with twist-off lids.
Canning fruit and vegetables
We recommend using the Convection
Bake mode.
The instructions below are for 6one-
liter glass jars.
Slide the universal tray onto shelf
level 3. Place the jars on the tray.
Select the Convection Bake
mode and a temperature of
300-340°F (150–170°C).
Wait until bubbles rise evenly in the
jars.
Then reduce the temperature to
avoid a boil-over.
Fruit / Cucumbers
As soon as bubbles begin to rise
evenly in the jars, reduce the
temperature to the lowest setting.
Then, leave the jars in the warm oven
for an additional 25-30minutes.
Vegetables
Reduce the temperature to 210°F
(100°C) as soon as bubbles begin to
rise evenly in the jars.
After the canning time has finished,
reduce the temperature to the lowest
setting and leave the jars in the oven
for an additional 25-30minutes.
After canning
Danger of burns!
Use pot holders when removing the
jars from the oven.
Take the jars out of the oven.
Cover the jars with a towel and leave
to set for approx. 24 hours.
Make sure all jars are closed properly
when storing them.

Special Modes
119
Frozen food
Tips for pizza, French fries,
croquettes and other similar items
Cakes, pies, pizza, baguettes
– Bake frozen pizza on parchment
paper placed on the wire oven rack.
– Cook smaller frozen food items on
parchment paper placed on a baking
tray or the universal tray.
– For smaller frozen food items, use the
lowest temperature recommended on
the packaging.
– Turn small frozen food items several
times during cooking.
Preparation
Handling food carefully will help
protect your health.
Select the oven mode and
temperatures recommended on the
food's packaging.
Preheat the oven.
Place the food in the preheated oven
on the shelf level recommended on
the packaging.
Check the food at the end of the
shortest time recommended on the
packaging.

Cleaning and care
120
Danger of burns!
Make sure the heating elements are
turned off and allowed to cool
completely.
Danger of injury! The steam from
a steam cleaner could reach
electrical components and cause a
short circuit.
Do not use a steam cleaner to clean
this appliance.
All surfaces can discolor or be
damaged if unsuitable cleaning
agents are used. The front of the
oven, in particular, will be damaged
by oven cleaners and descalers.
All surfaces are susceptible to
scratches. Scratches on glass
surfaces could cause a breakage.
Remove any cleaning agent residues
immediately.
Unsuitable cleaning agents
To avoid damaging surfaces when
cleaning, do not use:
– Cleaners containing soda, ammonia,
acids or chlorides
– Lime removers on the front of the
ovens
– Abrasive cleaning agents, such as
scouring powder, scouring cream,
pumice stones
– Solvent-based cleaners
– Stainless steel cleaners
– Dishwasher cleaners
– Glass cleaners
– Ceramic cooktop cleaners
– Hard, abrasive sponges and brushes,
such as pot scrubbers or used
sponges that still contain traces of
abrasive cleaner
– Eraser sponges
– Sharp metal scrapers
– Steel wool
– Spot cleaners
– Oven cleaners*
– Stainless steel scouring pads*
* Can be used to remove very heavy
soiling from PerfectClean surfaces.

Cleaning and care
121
If stains and food residues are
allowed to remain on surfaces for a
longer period of time, it may no
longer be possible to remove them.
Continued use without cleaning will
make the oven much harder to clean.
Remove any soiling immediately.
The accessories are not dishwasher-
safe, with the exception of the wireless
roast probe.
Tips
– Soiling caused by spilt juices and
cake mixtures is best removed while
the oven is still warm. Use caution
and make sure the oven is not too hot
- Danger of burns.
– To make cleaning easier, you can
dismantle the oven door and remove
the side runners.
Normal soiling
There is a seal around the oven
interior which seals the inside of the
door.
Take care not to rub, damage or
move the gasket.
Remove normal soiling immediately
using a clean sponge with warm
water and liquid dish soap applied
with a clean, damp microfiber cloth.
After cleaning, ensure that any
detergent residue is removed with
clean water.
This is particularly important when
cleaning surfaces treated with
PerfectClean enamel as detergent
residue can impair the non-stick
properties.
After cleaning, dry the surfaces with a
soft cloth.
Wireless Roast Probe
The wireless roast probe can be
cleaned in the dishwasher.

Cleaning and care
122
Stubborn soiling
Spilt fruit and roasting juices may
permanently discolor surfaces of the
oven. This discoloration is permanent
but will not affect the performance of
the oven. Do not use force to remove
these stains. Clean using the
instructions in this manual.
Baked on deposits can be removed
with a glass scraper or a non-
abrasive stainless steel scrubbing
pad.
Stubborn soiling on PerfectClean
surfaces can be cleaned using Miele
Oven Cleaner. It must only be applied
to cold surfaces in accordance with
the instructions on the packaging.
Non-Miele oven spray must only be
used in a cold oven and for no longer
than 10 minutes.
If necessary, the rough side of a dish
sponge can be used to remove the
soiling.
After cleaning, remove all oven
cleaning agent residues thoroughly
with clean water, and dry with a soft
cloth.

Cleaning and care
123
Cleaning the oven interior with
Self Clean
Instead of cleaning the oven by hand,
you can use the Self Clean
program.
Any grime that has accumulated will be
broken down and burnt to ash as a
result of the high temperatures.
This oven has three Self Clean levels,
each with a different duration:
– Level 1 for light soiling
– Level 2 for heavier soiling
– Level 3 for very heavy soiling
Once the Self Clean program has
started, the door will lock automatically.
It cannot be opened again until the
program has ended.
You can also set a delayed start time for
the Self Clean program, in order to take
advantage of off-peak electricity rates,
for example.
At the end of the Self Clean program,
any remaining residues (e.g., ash) can
be easily wiped away.
Once you start the Self Clean
program, the grill and the griddle will
be turned off.
During the Self Clean program, the
grill and the griddle cannot be turned
on.
Preparing for the Self Clean program
The high temperatures used during
self cleaning will damage
accessories that are not designed for
cleaning in the Self Clean program.
Please remove these accessories
from the oven before starting the Self
Clean program. This also applies to
accessories purchased separately.
The following accessories are suitable
for cleaning during the Self Clean
program and can remain in the oven:
– Shelf runners,
– FlexiClips with wire rack
HFCBBR36-2,
– Wire oven rack HBBR36-2.
Take all accessories that are not "Self
Clean safe" out of the oven.
Place the wire oven rack on the top
shelf level.
If not removed, coarse soiling can
smoke and cause the Self Clean
program to turn itself off.
Remove any coarse soiling before
running the Self Clean program.

Cleaning and care
124
Starting the Self Clean program
Danger of burns!
When Self Cleaning the front of the
oven becomes hotter than with
normal oven use.
Prevent children from touching the
oven during the Self Clean program.
Select Maintenance.
Select Self Clean.
Select the level required according to
the level of soiling.
Confirm with OK.
Follow the instructions in the display.
Confirm with OK.
Starting the Self Clean program
To start the Self Clean program
immediately, select Start Now.
Confirm by touching OK.
The Self Clean program will then start.
The door locks automatically. The oven
heating and cooling fan functions are
then automatically activated.
The oven light does not come on during
the Self Clean program.
The time remaining for the Self Clean
program appears in the display. This
time cannot be changed.
You can use the timer while the Self
Clean program is running. When the set
time has elapsed, the buzzer will sound
and will flash. The time will then
continue to increase in the display.
The buzzer will stop and the visual
indicators will go out after you touch the
"Timer" sensor.
Delaying the start of the Self Clean
program
To delay the start of the Self Clean
program, select Start Later.
Set the desired time for starting the
Self Clean program.
Confirm by touching OK.
The door will lock automatically. Start at
and the set start time appear in the
display.
Up until the start time you can alter the
start and end time with Change.
As soon as the start time has been
reached, the oven heating and the
cooling fan will turn on automatically.
The duration remaining will appear in
the display.

Cleaning and care
125
At the end of the Self Clean program
When the duration remaining reaches
00:00 h, a message will appear in the
display to tell you that the door is
unlocking.
When the door lock has been
deactivated:
– Program Finished appears in the
display,
– A buzzer will sound if turned on (see
"Settings - Volume - Buzzer tones").
Turn the oven off.
Acoustic and visual signals are turned
off.
Danger of burns!
Danger of burns! Wait until the oven
has cooled down before removing
any residual soiling left in the oven
compartment from the Self Clean
program.
Wipe any residues (e.g.ash) left
behind after the Self Clean program
out of the oven compartment and off
of any accessories. The amount of
ash will vary depending on how dirty
the oven was.
Most soiling can be easily removed
using a clean, soft sponge and a mild
solution of warm water and liquid dish
soap.
Depending on the degree of soiling
before cleaning, there may be a visible
layer of soiling across the inner glass
pane on the door. This should be
removed using the scouring side of a
dish sponge or with a stainless steel
spiral sponge and liquid dish soap.
After the Self Clean program pull the
FlexiClips with wire rack apart several
times.
Please note:
– There is a seal around the oven
interior which seals the inside of the
door. Take care not to rub, damage
or move the gasket.
– The FlexiClips with wire rack may
appear discolored or a lighter color in
places after they have been cleaned.
This will not affect the function of the
runners in any way.
– Spilt fruit juices may cause lasting
discoloration to enameled surfaces.
This discoloration is permanent but
will not affect the efficiency of the
enamel. Do not attempt to remove
these marks.

Cleaning and care
126
The Self Clean program is canceled
If the Self Clean program is canceled
the oven door will remain locked until
the temperature inside the oven drops
to below 535°F (280°C).
The following will cause the Self Clean
program to cancel:
– Turning the oven off.
– A power failure.
If you turn the oven off the display still
show Turn appliance off?.
If you would like to cancel the Self
Clean program, select Yes.
The door will unlock once the
temperature in the oven has dropped
below 535°F (280°C) and the oven is
turned off.
If you would like to continue running
the Self Clean program, select No.
The Self Clean program will continue.
Once the power returns after a power
failure, Program Canceled Cooling Down
will appear in the display.
The door will unlock once the
temperature in the oven has dropped
below 535°F (280°C) and the oven is
turned off.
A buzzer will sound if turned on (see
"Settings - Volume - Buzzer tones").
Program Finished appears in the display.
Select "Back".
Start the Self Clean program again.
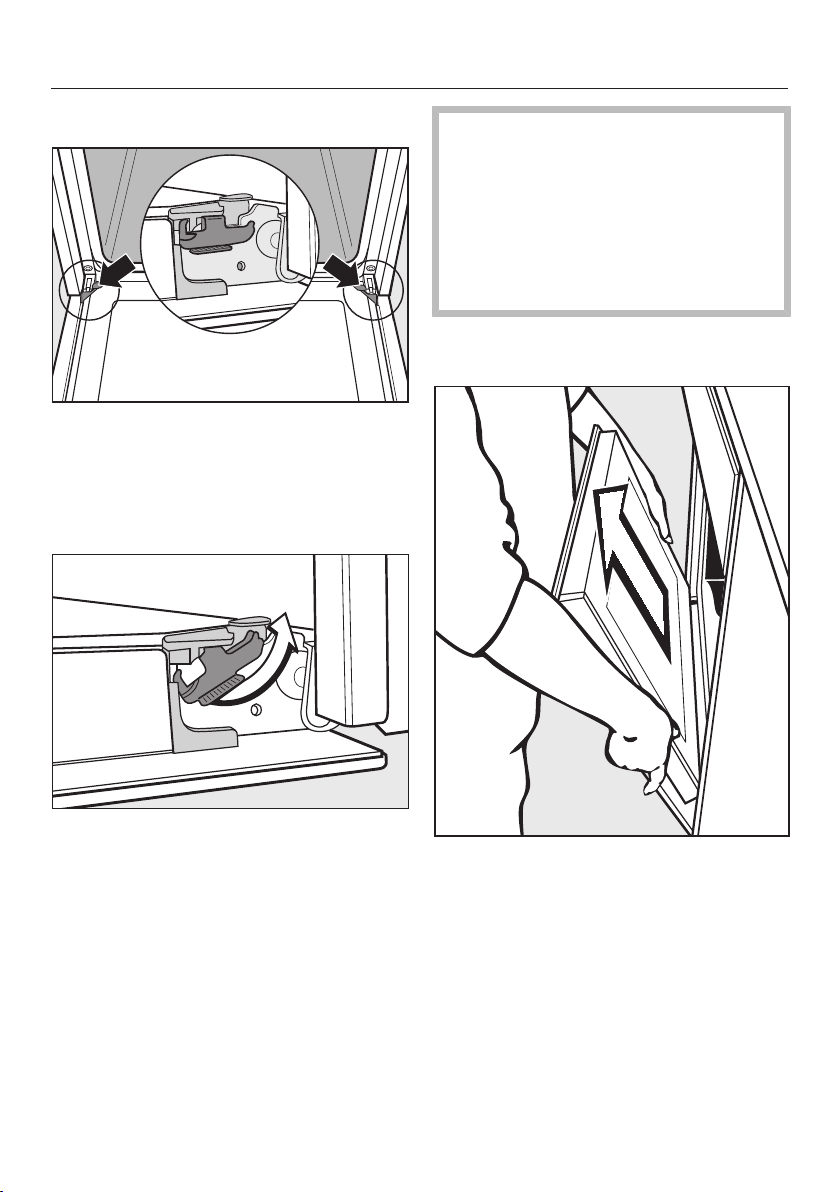
Cleaning and care
127
Removing the door
The door is connected with brackets on
each door hinge.
Before the door can be removed the
hinges must first be unlocked.
Open the door fully.
Release the locking clamps by
turning them as far as they will go.
Do not attempt to take the door off
the brackets when it is in the
horizontal position, the brackets will
spring back against the oven.
Do not use the handle to pull the
door off the brackets, the handle
could break.
Close the door until it rests partially
open.
Holding the door securely at both
sides, lift it straight upwards.
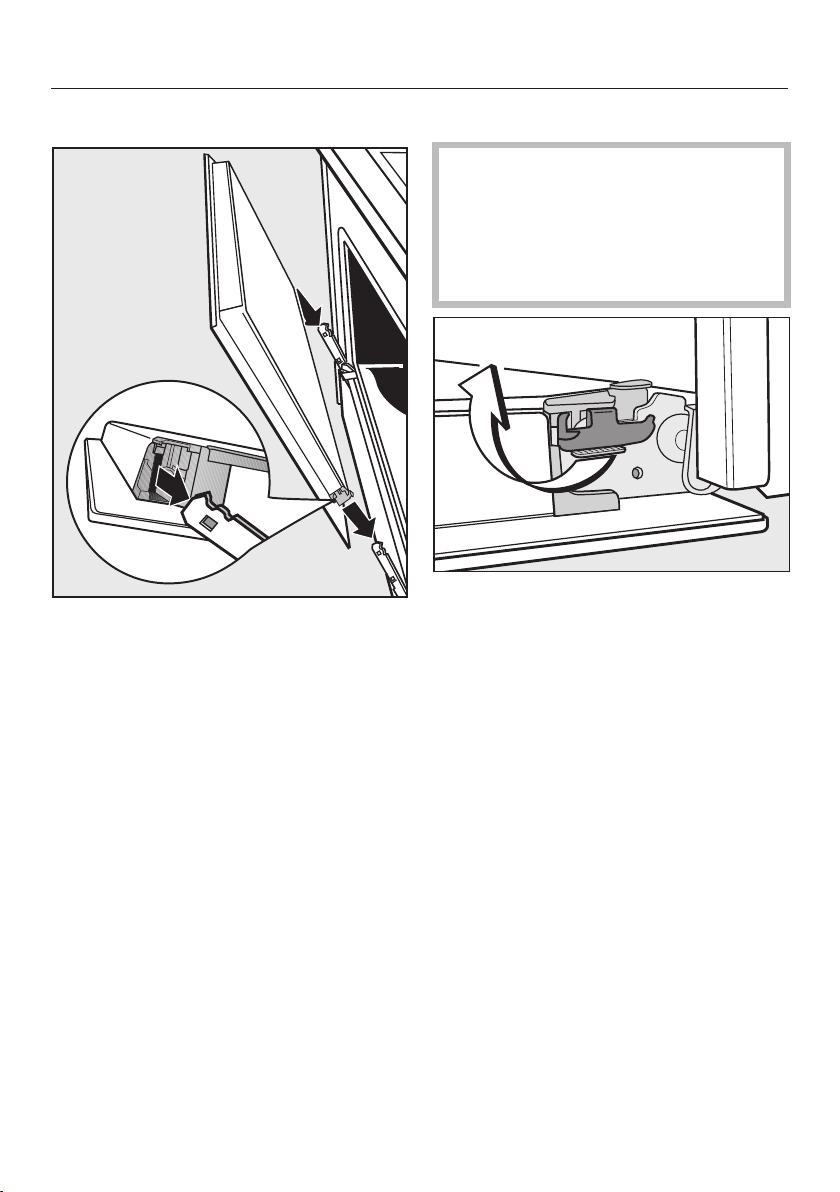
Cleaning and care
128
Reinstalling the door
Hold both sides of the door securely
and carefully fit it onto the brackets of
the hinges.
Make sure that the door goes on
straight.
Open the door fully.
If the locking clamps are not locked,
the door can easily become
detached from the brackets and be
damaged.
You must make sure that the locking
clamps are locked again.
To relock the locking clamps, turn
them back up to the horizontal
position as far as they will go.
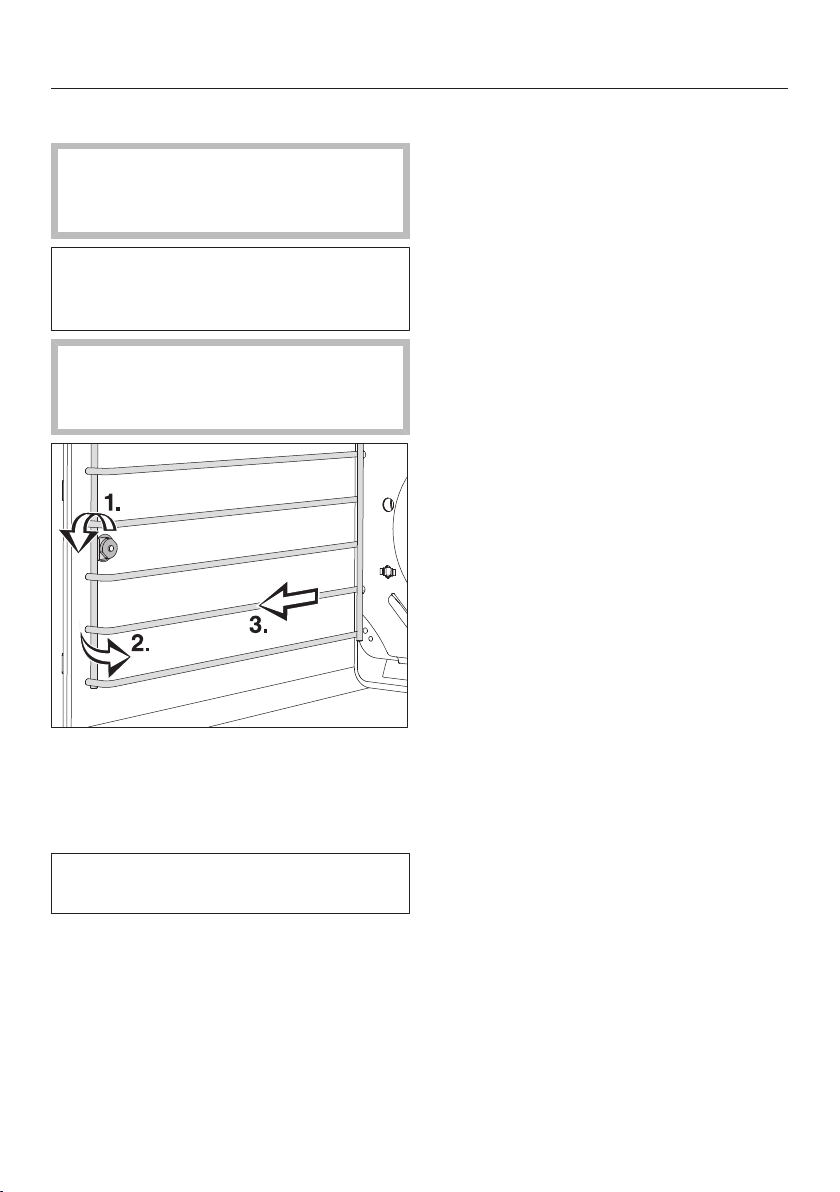
Cleaning and care
129
Removing the shelf runners
Danger of injury!
Do not use the oven without the shelf
runners correctly inserted.
The FlexiClips with wire rack must be
removed before the shelf runners (see
"Features - FlexiClips with rack").
Danger of burns! Make sure the
heating elements are turned off and
that the oven cavity is cool.
Loosen the screw (1.).
Pull the runners out of the holder (2.)
at the front of the oven, and then pull
them out of the oven (3.).
The runners can be reinstalled in the
reverse order.
Be sure that all parts are installed
correctly.

Frequently asked questions
130
The following faults can be corrected without contacting the Miele Service
Department. If in doubt, please contact Miele.
Danger of injury! Repairs should only be carried out by a qualified and
trained professional in accordance with local and national safety regulations.
Unauthorized repairs could cause personal injury or machine damage.
Problem Possible cause and solution
This display is dark. The time of day display is deactivated. When the
appliance is turned off, the time of day display is
turned off.
As soon as the oven is turned on, the time of day
will appear. If you want it to be displayed
continuously, the setting to turn the time of day
display back on must be changed (see "Settings –
Time of day - Display").
There is no power to the appliance.
Check if the circuit breaker has tripped.
System Lock appears
in the display when the
oven is turned on.
The system lock is On.
You can unlock the oven to start a cooking
program by pressing for at least 6 seconds.
To permanently deactivate the lock, see "Settings -
System Lock ".

Frequently asked questions
131
Problem Possible cause and solution
The oven does not heat
up.
Demo mode is activated.
The oven can be operated but will not heat up.
Deactivate Demo mode (see "Settings –
Showroom Program").
Power Failure - Program
Canceled appears in the
display.
There has been a power failure which has caused the
current cooking process to stop.
Turn the oven off and then back on again.
Restart the cooking process.
12:00 appears in the
display.
The power supply was interrupted for longer than 200
hours.
Reset the date and time.
Maximum operating
duration reached appears
in the display.
The oven was operated for an unusually long period
of time. The Safety cut-out feature has been
activated.
Confirm with OK. Clear the message Program
Finished by selecting "Back".
The oven is now ready to use.
Fault XX appears in
the display.
A fault has occurred that you cannot resolve.
Contact Miele Technical Service.
Door not locked appears
in the display.
The Self Cleaning program door lock is not locking.
Turn the oven off and then back on again. Then
restart the Self Clean program.
If the message appears again, contact Miele
Technical Service.
Door not released
appears in the display.
The door lock for the Self Clean program will not
deactivate.
Turn the oven off and then back on again.
If the door lock still does not deactivate itself,
contact Miele.
No signal to roast probe.
Reposition roast probe in the
oven. appears in the
display.
The wireless roast probe is not recognized.
Reposition the probe in the food.
If the oven still does not recognize the wireless roast
probe, it may be faulty. A replacement roast probe
can be ordered from Miele.

Frequently asked questions
132
Problem Possible cause and solution
Fault with moisture control -
the MasterChef programs
will operate without moisture
appears in the display
after a MasterChef Plus
has been selected.
The evaporation system is faulty.
Contact Miele Service.
In the meantime, you can run a program that does
not use added moisture.
Fault with moisture control
- Moisture Plus program not
available appears in the
display after selecting
Moisture Plus .
The steam injection system is faulty.
Contact Miele Technical Service.
Use the Convection Bake program instead of
Moisture Plus .
A noise is heard after
the cooking process is
complete.
The fan remains turned on after a cooking program
(see "Settings - Cooling fan").
The oven has turned
itself off.
The oven turns off automatically if a button is not
pressed after a certain amount of time or after a
cooking program has ended to save power.
Turn the oven back on.
Baked goods are not
cooked properly after
following the times
given in the chart.
A different temperature than that given in the recipe
was used.
Select the temperature required for the recipe.
The ingredient quantities are different from those
given in the recipe.
Double check the recipe. The addition of more
liquid or more eggs will make a wetter mixture
which will take longer to cook.
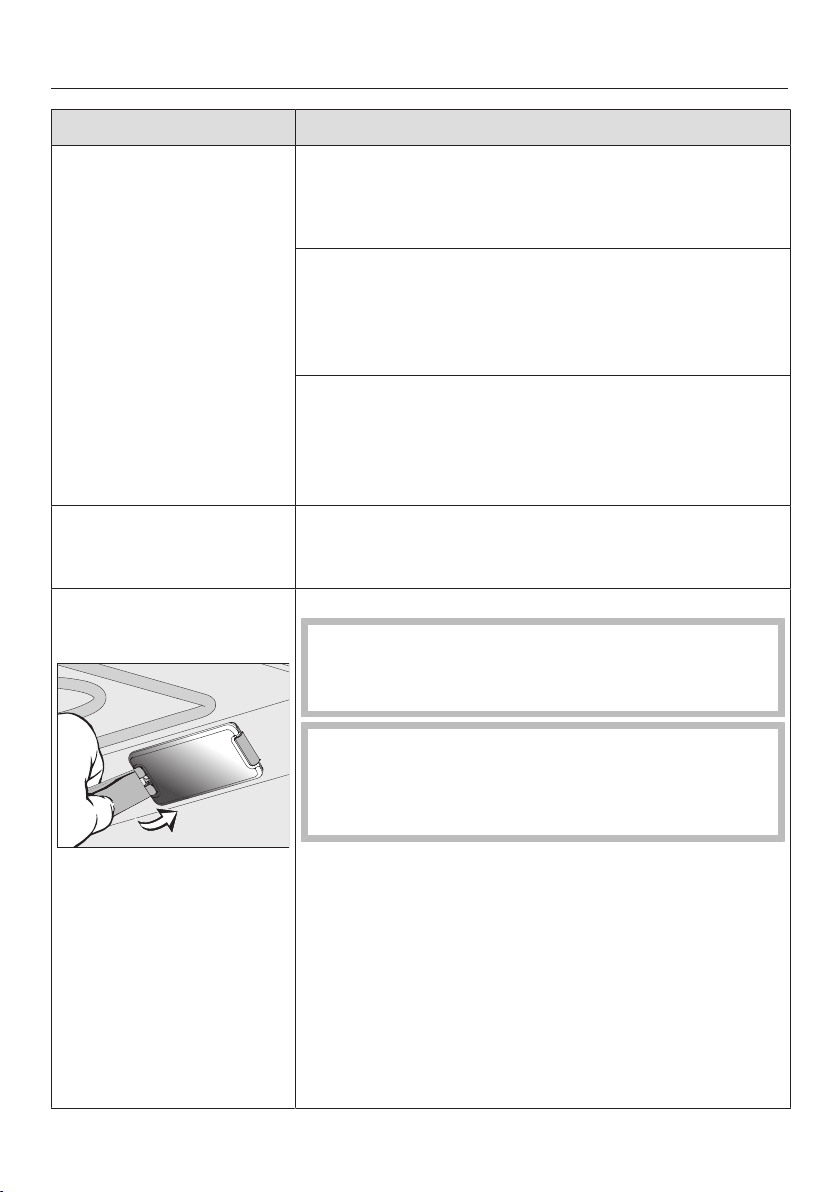
Frequently asked questions
133
Problem Possible cause and solution
The browning is
uneven.
The wrong temperature or shelf level was selected.
There will always be a slight unevenness. If the
unevenness is great, check whether the correct
temperature and shelf level were selected.
That material or color of the bakeware is not suitable
for the oven mode selected.
When using Surround use matte, dark colored
pans. Light colored, shiny pans will not produce as
desirable results.
The catalyzer has been set at too high a level. This
can lead to an uneven browning result on more
delicate food such as sponge cakes.
Set the odor reduction catalyzer to a lower level or
turn it off (see "Settings - Catalyzer").
The oven lighting turns
off after a short time.
The oven is factory set to turn off automatically after
15 seconds. This setting can be changed (see
"Settings - Lighting").
The oven lighting does
not turn on.
The halogen bulb needs to be replaced.
Danger of burns!
Make sure the heating elements are turned off and
allowed to cool completely.
The lamp cover may be damaged if it falls.
When removing the cover hold it firmly so that it
does not fall. Place a towel on the oven floor and
open door to avoid damage.
Disconnect the appliance from the power supply.
Loosen the bulb cover with the tool supplied at the
back of the frame.
Do not touch the halogen bulb with bare fingers.
Observe the manufacturer's instructions.
Remove the halogen bulb.
Replace it with a new halogen bulb (Sylvania
66740, 120 V, 40 W, G9, FS1).
Press the bulb cover back into place.
Reconnect the oven to the electrical supply.

Frequently asked questions
134
Problem Possible cause and solution
There is soiling in the
over after the Self Clean
program.
The Self Clean program burns off soiling in the oven
and leaves it as ash.
Using a soft sponge, warm water and liquid dish
soap remove the ashes.
If coarse soiling remains, start the Self Clean
program again with a longer duration.
Grill and griddle are
turned off/cannot be
turned on
Once you start the self cleaning program, grill and
griddle will be turned off.
This is not an error. The Safety cut-out feature has
been activated.
At 1-minute intervals, a maximum of 5ignition tests
will be performed.
Turn the grill and griddle control knob to the right
until it reaches the "Off" position.
At the end of the self clean program, you can turn
rill and griddle on again.
During the self cleaning program, grill and griddle
cannot be turned on.
This is not an error. The Safety cut-out feature has
been activated.
At 1-minute intervals, a maximum of 5ignition tests
will be performed.
Turn the grill and griddle control knob to the right
until it reaches the "Off" position.
At the end of the self clean program, you can turn
grill and griddle on again.
The rack and other
accessories make a
noise when being
pushed into or pulled
out of the oven.
The heat resistant surface of the shelf runners creates
friction when accessories are taken in and out of the
oven.
To reduce the friction, lubricate the runners with a
few drops of cooking oil applied with a paper
towel. Repeat this process after each Self Clean
program.

Technical Service
135
After sales service
In the event of a fault which you cannot
easily correct yourself, please contact:
– your Miele dealer, or
– the Miele Technical Service
Department.
See back cover for contact details.
Please quote the model and serial
number of your appliance when
contacting Miele.
You will find this information on the data
plate, which is behind the toe-kick
cover.
Warranty
For further information, please refer to
your warranty booklet.

Copyright and licenses
136
Miele uses software to operate and control the appliance.
The copyright authorization from Miele and other relevant software suppliers (e.g.
Adobe) must be respected.
Miele and their suppliers reserve the rights to the software components.
In particular the following are prohibited:
– copying and distribution,
– modifications and derivations,
– decompilation, reverse engineering, disassembling and other such reductions of
software.
This product contains Adobe® Flash® Player Software under licence from Adobe
Systems Incorporated, Adobe Macromedia Software LLC. Adobe and Flash are
registered trademarks of Adobe Systems Incorporated.
Components which fall under GNU General Public Licence and further Open
Source licenses are integrated into the software.
An overview of the integrated Open Source components and a copy of the current
licence can be obtained at http://www.miele.com/device-software-licenses. You will
need to enter the specific product name.
Miele will provide the source code for all components of software licensed under
the GNU General Public License and comparable Open Source licenses.
For source code requests, please email [email protected].


9 Independence Way
Princeton, NJ 08540
Phone:
Fax:
www.mieleusa.com
U.S.A.
Miele, Inc.
National Headquarters
Please have the model and serial number
of your appliance available before
contacting Technical Service.
Canada
Importer
Miele Limited
Headquarters and Miele Centre
800-843-7231
609-419-4298
Technical Service & Support
Nationwide
Phone:
Fax:
161 Four Valley Drive
Vaughan, ON L4K 4V8
www.miele.ca
800-999-1360
888-586-8056
Customer Care Centre
Phone:
800-565-6435
905-532-2272
Germany
Manufacturer
Miele & Cie. KG
Carl-Miele-Straße 29
33332 Gütersloh

M.-Nr. 09 898 061 / 01en-US, CA
HR1934; HR1935; HR1936