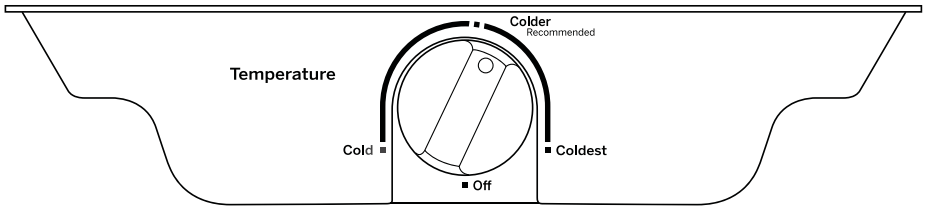
The controls on your refrigerator will look like the following:
Control Settings
Initially, set the refrigerator control to the recommended setting. Allow 24 hours for the temperature to stabilize.
Several adjustments may be required. Adjust the refrigerator control one increment at a time and allow 12 hours after each adjustment for the refrigerator to reach the temperature you have set.
Setting the refrigerator control to Off stops cooling in both the freezer and refrigerator compartments but does not shut off electrical power to the refrigerator.
Control settings will vary based on personal preferences, usage and operating conditions, and may require more than one adjustment. Factors that affect temperature include the amount of food in the refrigerator or freezer, the frequency of door opening and the temperature of food when it is placed in the refrigerator.
Shelves and Bins
Not all features are on all models.
Rearranging the Shelves
Shelves in the refrigerator and freezer compartments are adjustable.
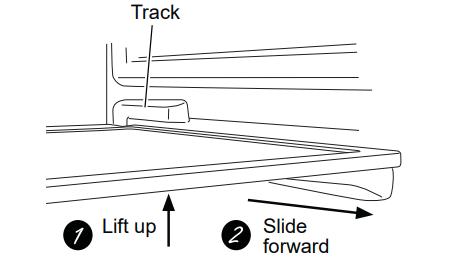
REFRIGERATOR COMPARTMENT
Full Width Shelves
The shelf rests on a molded side-wall support and locks into a track on the rear cabinet wall on each side.
To remove:
Lift the shelf up through the space in the track.
Slide the shelf forward along the track.
Pull the shelf out of the unit.
To replace:
Reverse removal steps above.
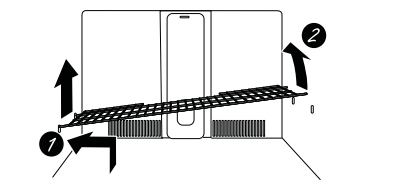
FREEZER COMPARTMENT
To remove:
Lift up both sides of the shelf and slide it left into the center of the shelf supports.
Rotate the right side of the shelf up and out of the shelf supports.
To replace:
Holding the shelf diagonally, insert the left end of the shelf into the top of the shelf supports on the side wall.
Insert the right end of the shelf into the shelf supports on the side wall. Rest each end of the shelf on the bottom of the shelf supports.
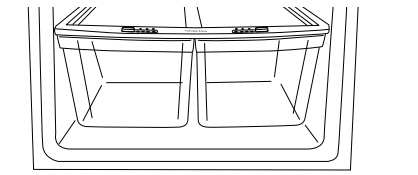
Crispers and Pans
Not all features are on all models.
Fruit and Vegetable Crispers
Excess water that may accumulate in the bottom of the drawers or under the drawers should be wiped dry.
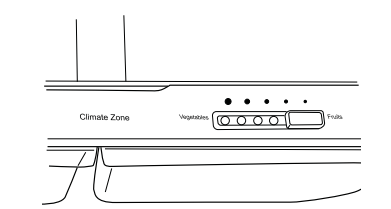
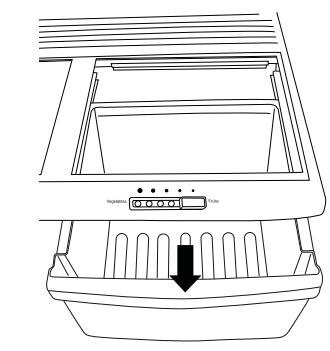
Adjustable Humidity Crisper
Slide the control all the way to the Vegetables setting to provide high humidity recommended for most vegetables.
Slide the control all the way to the Fruits setting to provide lower humidity levels recommended for most fruits.
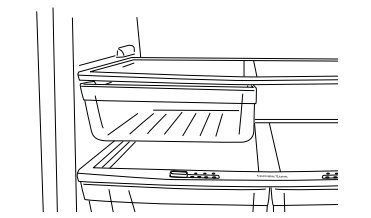
Snack Pan
This pan can be moved to the most useful location for your family’s needs.
To remove, slide the pan out to the stop position, lift the pan up and past the stop position, and lift out.
Crisper Removal
Unload the bottom shelf before attempting to remove the storage drawers.
To remove:
Lift the drawers up slightly while pulling them past the stop location.
If the door prevents you from taking out the drawers, first try to remove the door bins. If this does not offer enough clearance, the refrigerator will need to be rolled forward until the door opens enough to slide the drawers out. In some cases, when you roll the refrigerator out, you will need to move the refrigerator to the left or right as you roll it out.
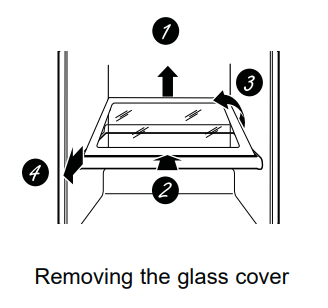
To remove the glass cover:
Remove the glass, then the frame. When replacing the glass, push the front edge firmly into the frame.
Push up the glass cover at the rear.
Slide the glass cover backwards until the front edge comes out of the frame.
Rotate the side of the glass cover up.
Remove the glass cover.
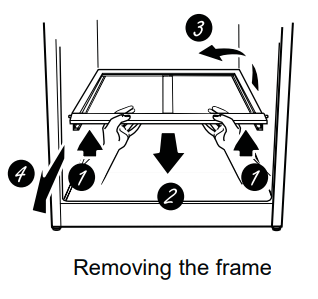
To remove the frame:
Lift up the front of the frame using both hands.
Slide the frame forward.
Rotate the side of the frame up.
Remove the frame.
Automatic Icemaker
A newly-installed refrigerator may take 12-24 hours to begin making ice.
Automatic Icemaker (on some models)
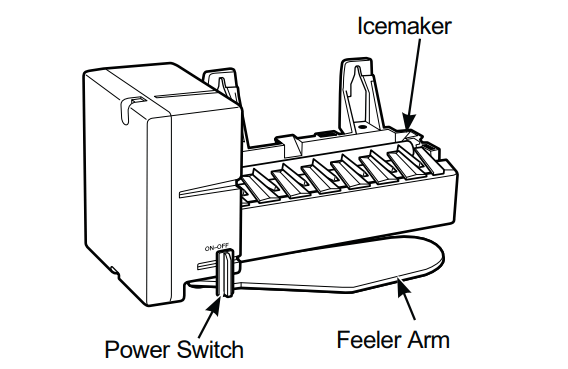
CAUTION: Avoid contact with the moving parts of the ejector mechanism, or with the heating element (located on the bottom of the ice maker) that releases the cubes. Do not place fingers or hands on the automatic ice making mechanism while the refrigerator is plugged in.
The icemaker will produce approximately 3 to 3-1/2 lbs. (1.36 to 1.59 kg) of ice in a 24-hour period, depending on the freezer compartment temperature, room temperature, number of door openings and other use conditions.
If the refrigerator is operated before the water connection is made to the icemaker, move the power switch to OFF.
When the refrigerator has been connected to the water supply, set power switch to ON
The icemaker will fill with water when it cools to 15°F (-9°C). A newly-installed refrigerator may take 12 to 24 hours to begin making ice cubes.
Once the icemaker starts to make ice, it may take up to 48 hours to fill the bin, depending on the temperature settings and number of door openings.
You will hear a buzzing sound each time the icemaker fills with water.
Throw away the first few batches of ice to allow the water line to clear.
Be sure nothing interferes with the sweep of the feeler arm.
When the bin fills to the level of the feeler arm, the icemaker will stop producing ice.
It is normal for several cubes to be joined together.
If ice is not used frequently, old ice cubes will become cloudy, taste stale, shrink or fuse together.
NOTE: In homes with lower-than-average water pressure, you may hear the icemaker cycle multiple times when making one batch of ice.
Icemaker Accessory Kit
If your refrigerator did not already come equipped with an automatic icemaker, an icemaker accessory kit is available at extra cost.
Check the back of the refrigerator for the specific ice maker kit needed for your model.
Care And Cleaning
Cleaning the Outside
The door handles and trim. Clean with a cloth dampened with soapy water. Dry with a soft cloth.
Keep the outside clean. Wipe with a clean cloth lightly dampened with kitchen appliance wax or mild liquid dish detergent. Dry and polish with a clean, soft cloth.
The stainless steel panels and door handles (on some models) can be cleaned with a commercially available stainless steel cleaner. Cleaners with oxalic acid such as Bar Keepers Friend Soft Cleanser will remove rust, tarnish, and small blemishes Use only a liquid cleanser free of grit and rub in the direction of the brush lines with a damp soft sponge. Do not use appliance wax or polish on the stainless steel.
Do not wipe the refrigerator with a soiled dish cloth or wet towel. These may leave a residue that can erode the paint. Do not use scouring pads, powdered cleaners, bleach or cleaners containing bleach because these products can scratch and weaken the paint finish.
Cleaning the Inside
To help prevent odors, leave an open box of baking
soda in the fresh food and freezer compartments.
Unplug the refrigerator before cleaning.
If this is not practical, wring excess moisture out of sponge or cloth when cleaning around switches, lights or controls.
Use warm water and baking soda solution—about a tablespoon (15 ml) of baking soda to a quart (1 liter) of water. This both cleans and neutralizes odors. Rinse and wipe dry.
Do not clean with any products containing detergent, bleach or ammonia. They may damage the refrigerator.
After cleaning the door gaskets, apply a thin layer of petroleum jelly to the door gaskets at the hinge side. This helps keep the gaskets from sticking and bending out of shape. Do not use cleansing powders or other abrasive cleaners.
CAUTION: Do not clean glass shelves or covers with warm water when they are cold. Glass shelves and covers may break if exposed to sudden temperature changes or impact such as bumping or dropping. Tempered glass is designed to shatter into many small pieces if it breaks.
Do not wash any plastic refrigerator parts in the dishwasher.
Condenser
Depending on the model, the condenser is either located near the compressor or behind the back wall. For condensers near the compressor, there is no need for routine condenser cleanings in normal home operating environments. However, in environments that may be particularly dusty or greasy, the condenser should be cleaned periodically for efficient refrigerator operation.
Cleaning the condenser:
Sweep away or vacuum up dust.
Moving the Refrigerator
Be careful when moving the refrigerator away from the wall. All types of floor coverings can be damaged, particularly cushioned coverings and those with embossed surfaces.
Turn the leveling legs at each front corner of the refrigerator counterclockwise until the rollers support the refrigerator. Pull the refrigerator straight out and return it to position by pushing it straight in.
Moving the refrigerator in a side direction may result in damage to the floor covering or refrigerator.
After rolling the refrigerator back into place, turn the legs clockwise until the legs again bear the weight of the refrigerator.
Preparing for Vacation
For long vacations or absences, remove food and unplug the refrigerator. Move the refrigerator control to the OFF position and clean the interior with a baking soda solution of one tablespoon (15 ml) of baking soda to one quart (1 liter) of water. Leave the doors open.
Set the icemaker power switch to the OFF position and shut off the water supply to the refrigerator.
If the temperature can drop below freezing, have a qualified servicer drain the water supply system (on some models) to prevent serious property damage due to flooding.
Preparing to Move
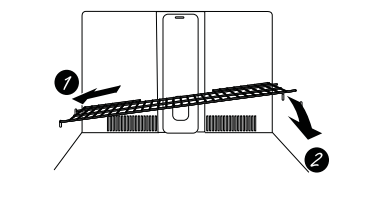
Secure all loose items such as grille, shelves and drawers by taping them securely in place to prevent damage. To prevent the doors from opening while moving, secure them to the case with tape. Be sure the refrigerator stays in an upright position during moving.
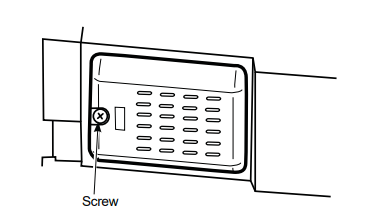
Replacing the Light Bulb
Setting the refrigerator control to OFF does not remove power to the light circuit.
Unplug the refrigerator.
Remove the top shelf (if necessary).
The bulb is located behind a light lens in the ceiling of the refrigerator section. Remove the light lens by removing the single screw using a Phillips head screwdriver.
Replace the bulb with an appliance bulb of the same or lower wattage.
Replace the light lens.
Plug the refrigerator back in.
TROUBLESHOOTING TIPS
Normal Operating Sounds
Newer refrigerators sound different from older refrigerators. Modern refrigerators have more features and use newer technology
Do you hear what I hear? These sounds are normal.
HUMMM... WHOOSH...
The new high efficiency compressor may run faster and longer than your old refrigerator and you may hear a high-pitched hum or pulsating sound while it is operating.
You may hear a whooshing sound when the doors close. This is due to pressure equalizing within the refrigerator.
WHIR!
You may hear the fans spinning at high speeds. This happens when the refrigerator is first plugged in, when the doors are opened frequently or when a large amount of food is added to the refrigerator or freezer compartments. The fans are helping to maintain the correct temperatures.
CLICKS, POPS, CRACKS and CHIRPS
You may hear cracking or popping sounds when the refrigerator is first plugged in. This happens as the refrigerator cools to the correct temperature.
The compressor may cause a clicking or chirping sound when attempting to restart (this could take up to 5 minutes).
Expansion and contraction of cooling coils during and after defrost can cause a cracking or popping sound.
On models with an icemaker, after an icemaking cycle, you may hear the ice cubes dropping into the ice bucket.
On models with a dispenser, during water dispense, you may hear the water lines move at initial dispense and after dispenser button is released.
WATER SOUNDS
The flow of refrigerant through the freezer cooling coils may make a gurgling noise like boiling water.
Water dropping on the defrost heater can cause a sizzling, popping or buzzing sound during the defrost cycle.
A water dripping noise may occur during the defrost cycle as ice melts from the evaporator and flows into the drain pan.
Closing the door may cause a gurgling sound due to pressure equalization.
Troubleshooting Tips... Before you call for service
Save time and money! Review the charts on the following pages first and you may not need to call for service. If needed, service can be scheduled by visiting us online.
Problem
Possible Causes
What To Do
Freezer door pops open when refrigerator door is closed
This is normal if, after popping open, the freezer door closed on its own.
This indicates that there is a good seal on the freezer door. If the freezer door does not automatically close after popping open, the rollers need adjusting. See Rollers and Leveling Legs.
Door does not close by itself
Leveling legs need adjusting.
See Rollers and Leveling Legs.
Refrigerator does not operate
Refrigerator in defrost cycle.
Wait about 40 minutes for defrost cycle to end.
Refrigerator control in 1 (off) position.
Move the refrigerator and freezer control to a temperature setting.
Refrigerator is unplugged.
Push the plug completely into the outlet.
The fuse is blown/circuit breaker is tripped.
Replace fuse or reset the breaker.
Vibration or rattling (slight vibration is normal)
Refrigerator is not resting on all four rollers.
Adjust leveling legs (See Rollers and Leveling Legs).
Motor operates for long periods or cycles on and off frequently (Modern refrigerators with more storage space and a larger freezer require more operating time. They start and stop often to maintain even temperatures.)
Normal when refrigerator is first plugged in.
Wait 24 hours for the refrigerator to completely cool down.
Often occurs when large amounts of food are placed in refrigerator.
This is normal.
Door left open.
Check to see if package is holding door open.
Hot weather or frequent door openings.
This is normal.
Temperature controls set at the coldest setting.
See About the controls.
Refrigerator or freezer compartment too warm
Temperature control not set cold enough.
See About the controls.
Warm weather or frequent door openings.
Set the temperature control one step colder. See About the controls.
Door left open.
Check to see if package is holding door open.
Freezer door popped open.
See the problem Freezer door pops open when refrigerator door is closed.
Frost or ice crystals on frozen food (frost within package is normal)
Door left open.
Check to see if package is holding door open.
Too frequent or too long door openings.
Food blocking freezer air vents.
Move items away from the back wall of the freezer.
Frequent “buzzing” sound
Icemaker feeler arm is in the ON (down) position, but the water supply to the refrigerator has not been connected.
Set the feeler arm to the STOP (up) position. Keeping it in the ON (down) position will damage the water valve.
Small or hollow cubes
Water filter clogged.
Replace filter cartridge with new cartridge or with plug.
Automatic icemaker (on some models) does not work
Ice maker feeler arm is not set ON.
Move the feeler arm to the ON position.
Water supply turned off or not connected.
See Installing the water line.
Freezer compartment too warm.
Wait 24 hours for the refrigerator to completely cool down.
Piled up cubes in the storage bin cause the icemaker to shut off.
Level cubes by hand.
Ice cubes stuck in icemaker. (Green power light on icemaker blinking.)
Turn off the icemaker, remove cubes and turn the icemaker back on.
Ice cubes have odor/taste
Ice storage bin needs cleaning.
Empty and wash bin. Discard old cubes.
Food transmitting odor/taste to ice cubes.
Wrap foods well.
Interior of refrigerator needs cleaning.
See Care and cleaning.
Slow ice cube freezing
Door left open.
Check to see if package is holding door open.
Temperature control not set cold enough.
See About the controls.
A newly installed refrigerator may take 12-24 hours to begin making ice cubes.
Moisture forms on cabinet surface between the doors
Not unusual during periods of high humidity.
Wipe surface dry; then adjust the fresh food control setting one number higher and check again in 24 hours.
Refrigerator has odor
Foods transmitting odor to refrigerator.
Foods with strong odors should be tightly wrapped.
Keep an open box of baking soda in the refrigerator; replace every three months.
Interior needs cleaning.
See Care and cleaning.
Moisture collects inside (in humid weather, air carries moisture into refrigerator when doors are opened)
Too frequent or too long door openings.
Open containers of water or warm food in the refrigerator.
Cover or seal open containers. During a defrost cycle, moisture will be removed from the refrigerator, but may return with long or frequent door openings.
Refrigerator compartment light does not work
No power at outlet.
Replace fuse or reset the breaker.
Light bulb burned out or loose.
See Replacing the light bulbs.
Hot air from bottom of refrigerator.
Normal air flow cooling motor. In the refrigeration process, it is normal that heat be expelled in the area under the refrigerator. Some floor coverings will discolor at these normal and safe temperatures.
Food freezing in the refrigerator
Food too close to the air vent at the back of the refrigerator.
Move the food away from the air vent (near the controls).
Refrigerator control is set too cold.
Move the refrigerator control to a warmer Temperature setting one increment at a time.
Orange glow in the freezer
Defrost heater is on.
This is normal.
Door bins do not fit in the door
The freezer door bins are a different size than the refrigerator door bins.
Try to install the bins in both doors.
Controls do not light up controls.
Some models do not have lighted controls.
If you can read white numbers on the control setting, the model does not have lighted
Refrigerator light bulb burned out or loose.
See Replacing the light bulbs.
Water has poor taste/odor
Water dispenser has not been used for a long time.
Dispense water until all water in system is replenished.
Water in first glass is warm
Normal when refrigerator is first installed.
Wait 24 hours for the refrigerator to completely cool down.
Water dispenser has not been used for a long time.
Dispense water until all water is system is replenished.
Water system has been drained.
Allow several hours for replenished supply to chill.