Refrigerators
Top-Mount No-Frost
Part No. 162D7742P005 Pub. No. 49-60044 350A4636P004 WR6M407 8-99 JR
Model 12
Owner’s Manual
GE Appliances
Customer Service Troubleshooting Tips
Operating Instructions
Safety InstructionsInstallation Instructions
Congratulations!
We’re proud of our quality products and we are
committed to providing dependable service. You’ll
see it in this easy-to-use Owner’s Manual and you’ll
hear it in the friendly voices of our customer service
department.
Best of all, you’ll experience these values each time
you use your refrigerator. That’s important, because
your new refrigerator will be part of your family for
many years. And we hope you will be part of ours for
a long time to come.
We appreciate your purchase, and hope you will
continue to rely on us whenever you need quality
appliances for your home.
A Service Partnership.
Safety Information
Safety Precautions . . . . . . . . . .3
Use of Extension Cords . . . . . .3
How to Connect Electricity . . .4
Use of Adapter Plugs . . . . . . . .4
Operating Instructions
Control . . . . . . . . . . . . . . . . . .5
Features . . . . . . . . . . . . . . . .5, 6
Ice Service . . . . . . . . . . . . . . . .6
Care and Cleaning . . . . . . . .6, 7
Installation Instructions
Preparing to
Install the Refrigerator . . . . . . .8
Reversing the Door Swing
.8–12
Troubleshooting Tips
Normal Operating Sounds . . .13
Before You
Call For Service . . . . . . . .13, 14
Customer Service
Warranty
for Canadian Customers . . . .15
Warranty
for U.S. Customers . . . . . . . . .16
Service Telephone
Numbers . . . . . . . . . . . . . . . .17
Product Registration . . . .19–20
FOR YOUR RECORDS
Write the model and serial numbers here:
#
#
You can find them on a label inside the refrigerator on the upper
left side wall.
Staple sales slip or cancelled check here.
Proof of the original purchase date is needed to obtain service
under the warranty.
Inside you will find many helpful hints on how to use and maintain
your refrigerator properly. Just a little preventive care on your part
can save you a great deal of time and money over the life of your
refrigerator.
READ THIS MANUAL
IF YOU NEED SERVICE
You’ll find many answers to common problems in the
Before You
Call For Service
section. If you review our chart of
Troubleshooting
Tips
first, you may not need to call for service at all.
If you do need service, you can relax knowing help is only a phone
call away. A list of toll-free customer service numbers is included in
the back section. Or,
in the U.S.,
you can always call the GE Answer
Center® at 800.626.2000, 24 hours a day, 7 days a week.
In Canada,
call 1-800-361-3400.
2
IMPORTANT!
Fill out and return the Consumer Product Registration Card that is
packed with this product. If you cannot find it, please send in the
duplicate card printed in the back of this section.

3
Customer ServiceTroubleshooting Tips
Operating Instructions
Safety Instructions Installation Instructions
IMPORTANT SAFETY INFORMATION.
READ ALL INSTRUCTIONS BEFORE USING.
WARNING!
Use this appliance only for its intended purpose as described in this Owner’s Manual.
SAFETY PRECAUTIONS
When using electrical appliances, basic safety precautions should be followed, including the following:
■
■This refrigerator must be properly installed
and located in accordance with the Installation
Instructions before it is used.
■
■Do not allow children to climb, stand or hang
on the shelves in the refrigerator. They could
damage the refrigerator and seriously injure
themselves.
■
■Do not touch the cold surfaces in the freezer
compartment, particularly when hands are
damp or wet. Skin may stick to these extremely
cold surfaces.
■
■Do not store or use gasoline or other flammable
vapors and liquids in the vicinity of this or any
other appliance.
■
■In refrigerators with automatic icemakers,
avoid contact with the moving parts of the
ejector mechanism, or with the heating element
that releases the cubes. Do not place fingers or
hands on the automatic icemaking mechanism
while the refrigerator is plugged in.
■
■Keep fingers out of the “pinch point” areas;
clearances between the doors and between
the doors and cabinet are necessarily small.
Be careful closing doors when children are
in the area.
■
■Unplug the refrigerator before cleaning and
making repairs.
NOTE: We strongly recommend that any servicing be performed
by a qualified individual.
■
■Turning the control to the
OFF
position does
not remove power to the light circuit.
■
■Do not refreeze frozen foods which have
thawed completely.
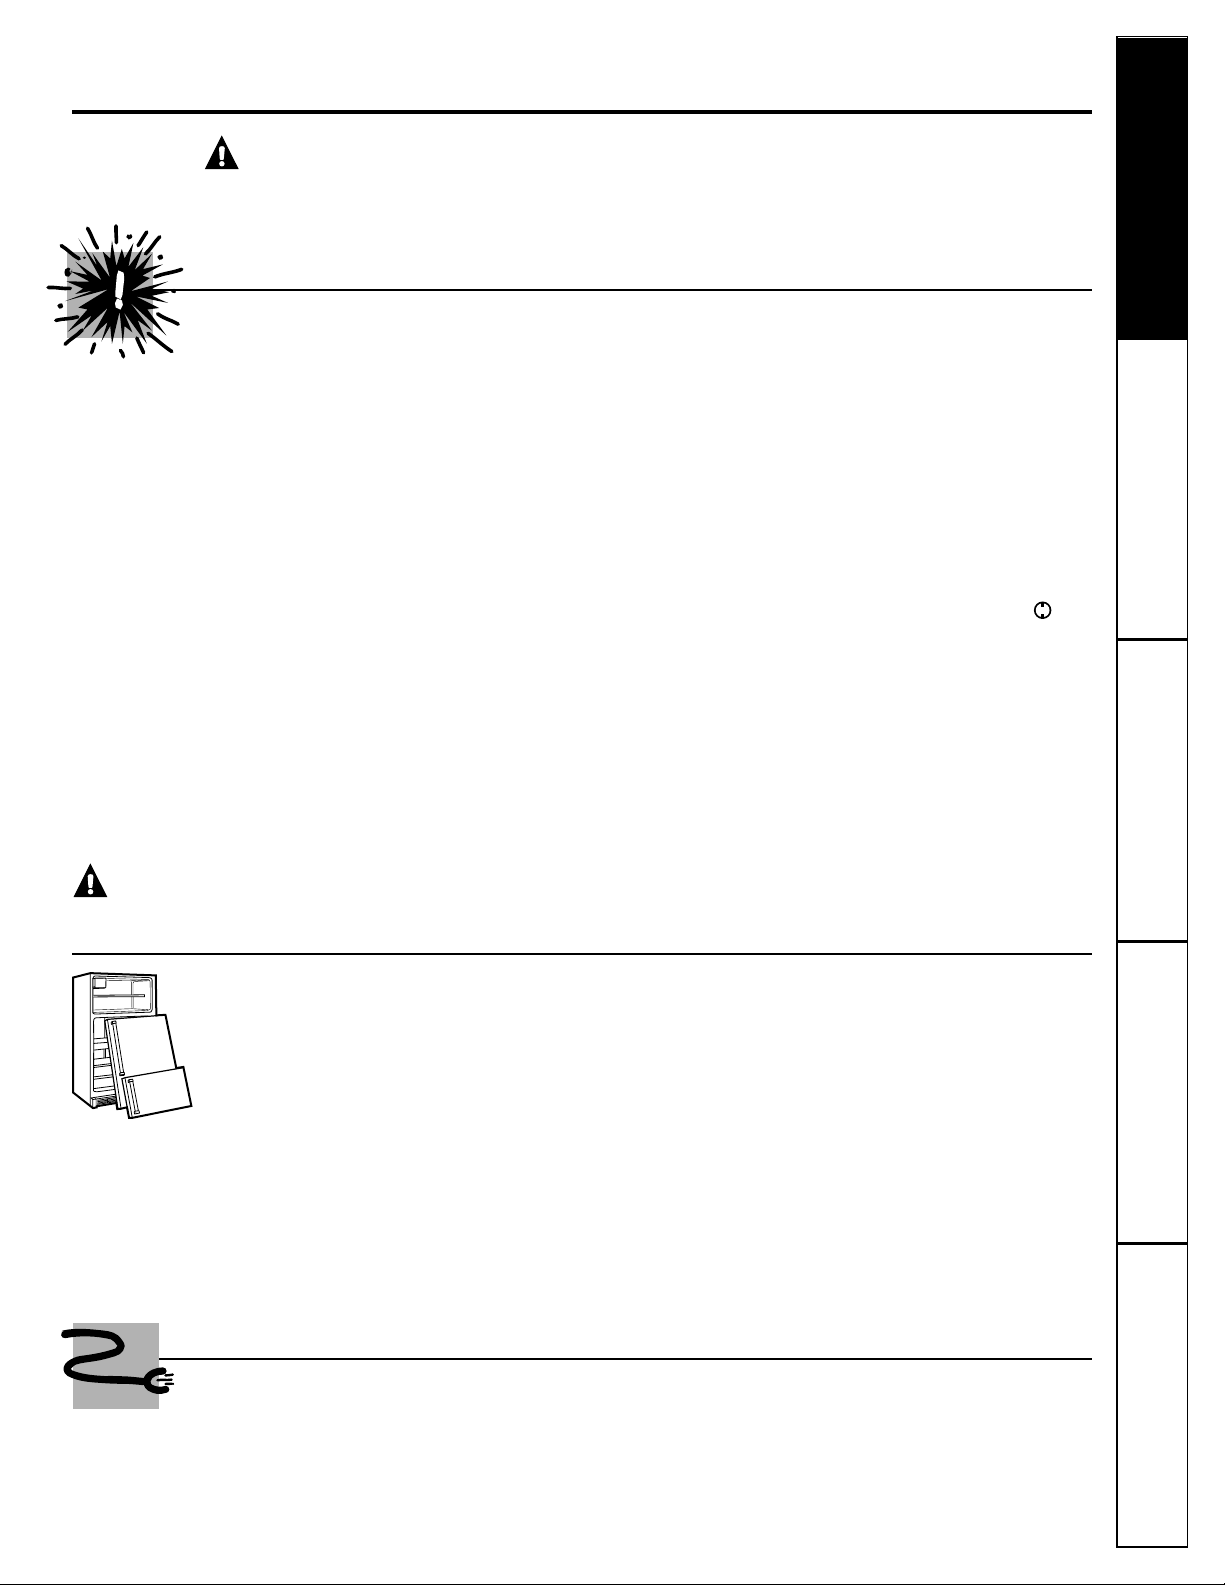
PROPER DISPOSAL OF THE REFRIGERATOR
Child entrapment and suffocation are not problems
of the past. Junked or abandoned refrigerators are
still dangerous…even if they will sit for “just a few
days.” If you are getting rid of your old refrigerator,
please follow the instructions below to help prevent
accidents.
Before You Throw Away Your Old Refrigerator
or Freezer:
■Take off the doors.
■Leave the shelves in place so that children may
not easily climb inside.
CFC Disposal
Your old refrigerator has a cooling system that used
CFCs (chlorofluorocarbons). CFCs are believed to
harm stratospheric ozone.
If you are throwing away your old refrigerator, make
sure the CFC refrigerant is removed for proper
disposal by a qualified servicer. If you intentionally
release this CFC refrigerant you can be subject to
fines and imprisonment under provisions of the
Federal Clean Air Act.
USE OF EXTENSION CORDS
Because of potential safety hazards under certain conditions, we strongly recommend
against the use of an extension cord.
However, if you must use an extension cord, it is absolutely necessary that it be a UL-listed (in the United
States) or a CSA-listed (in Canada), 3-wire grounding type appliance extension cord having a grounding
type plug and outlet and that the electrical rating of the cord be 15 amperes (minimum) and 120 volts.
DANGER! RISK OF CHILD ENTRAPMENT

4
Customer Service Troubleshooting Tips
Operating Instructions
Safety InstructionsInstallation InstructionsCustomer Service Troubleshooting Tips Installation Instructions Safety Instructions
Operating Instructions
Customer Service Troubleshooting Tips Installation Instructions Safety Instructions
Operating Instructions
IMPORTANT SAFETY INFORMATION.
READ ALL INSTRUCTIONS BEFORE USING.
WARNING!
HOW TO CONNECT ELECTRICITY
Do not, under any circumstances, cut or remove the third (ground) prong from the power cord. For
personal safety, this appliance must be properly grounded.
The power cord of this appliance is equipped
with a 3-prong (grounding) plug which mates
with a standard 3-prong (grounding) wall outlet to
minimize the possibility of electric shock hazard
from this appliance.
Have the wall outlet and circuit checked by a
qualified electrician to make sure the outlet is
properly grounded.
Where a standard 2-prong wall outlet is
encountered, it is your personal responsibility and
obligation to have it replaced with a properly
grounded 3-prong wall outlet.
The refrigerator should always be plugged into its
own individual electrical outlet which has a voltage
rating that matches the rating plate.
This provides the best performance and also
prevents overloading house wiring circuits which
could cause a fire hazard from overheated wires.
Never unplug your refrigerator by pulling on the
power cord. Always grip plug firmly and pull straight
out from the outlet.
Repair or replace immediately all power cords that
have become frayed or otherwise damaged. Do not
use a cord that shows cracks or abrasion damage
along its length or at either end.
When moving the refrigerator away from the
wall, be careful not to roll over or damage the
power cord.
USE OF ADAPTER PLUGS
(Adapter plugs not permitted in Canada)
Because of potential safety hazards under certain conditions, we strongly recommend against
the use of an adapter plug.
However, if you must use an adapter, where local
codes permit, a
temporary connection
may be made
to a properly grounded 2-prong wall outlet by use
of a UL-listed adapter available at most local
hardware stores.
The larger slot in the adapter must be aligned with
the larger slot in the wall outlet to provide proper
polarity in the connection of the power cord.
When disconnecting the power cord from the
adapter, always hold the adapter in place with one
hand while pulling the power cord plug with the
other hand. If this is not done, the adapter ground
terminal is very likely to break with repeated use.
If the adapter ground terminal breaks,
DO NOT USE
the refrigerator until a proper ground has been
established.
Attaching the adapter ground terminal to a wall outlet
cover screw does not ground the appliance unless the
cover screw is metal, and not insulated, and the wall
outlet is grounded through the house wiring. You should
have the circuit checked by a qualified electrician to make
sure the outlet is properly grounded.
Read and follow this Safety Information carefully.
SAVE THESE INSTRUCTIONS

Customer ServiceTroubleshooting Tips
Operating InstructionsSafety Instructions
Installation Instructions
About the control on the refrigerator.
Control Settings
The temperature control maintains the temperature in both the fresh food and freezer compartments.
Setting
1
is the warmest setting and
9
is the coldest. Moving the control to
OFF
stops cooling in both
areas—fresh food and freezer—but does not shut off power to the refrigerator.
How To Test Temperatures
Use the milk test for the fresh food compartment. Place a container of milk on the top shelf
and check it a day later. If the milk is too warm or too cold, adjust the temperature control.
Use the ice cream test for the freezer compartment. Place a container of ice cream in the
center of the freezer and check it after a day. If it’s too hard or too soft, adjust the
temperature control.
After changing the control, allow 24 hours for the refrigerator to reach the temperature you have set.
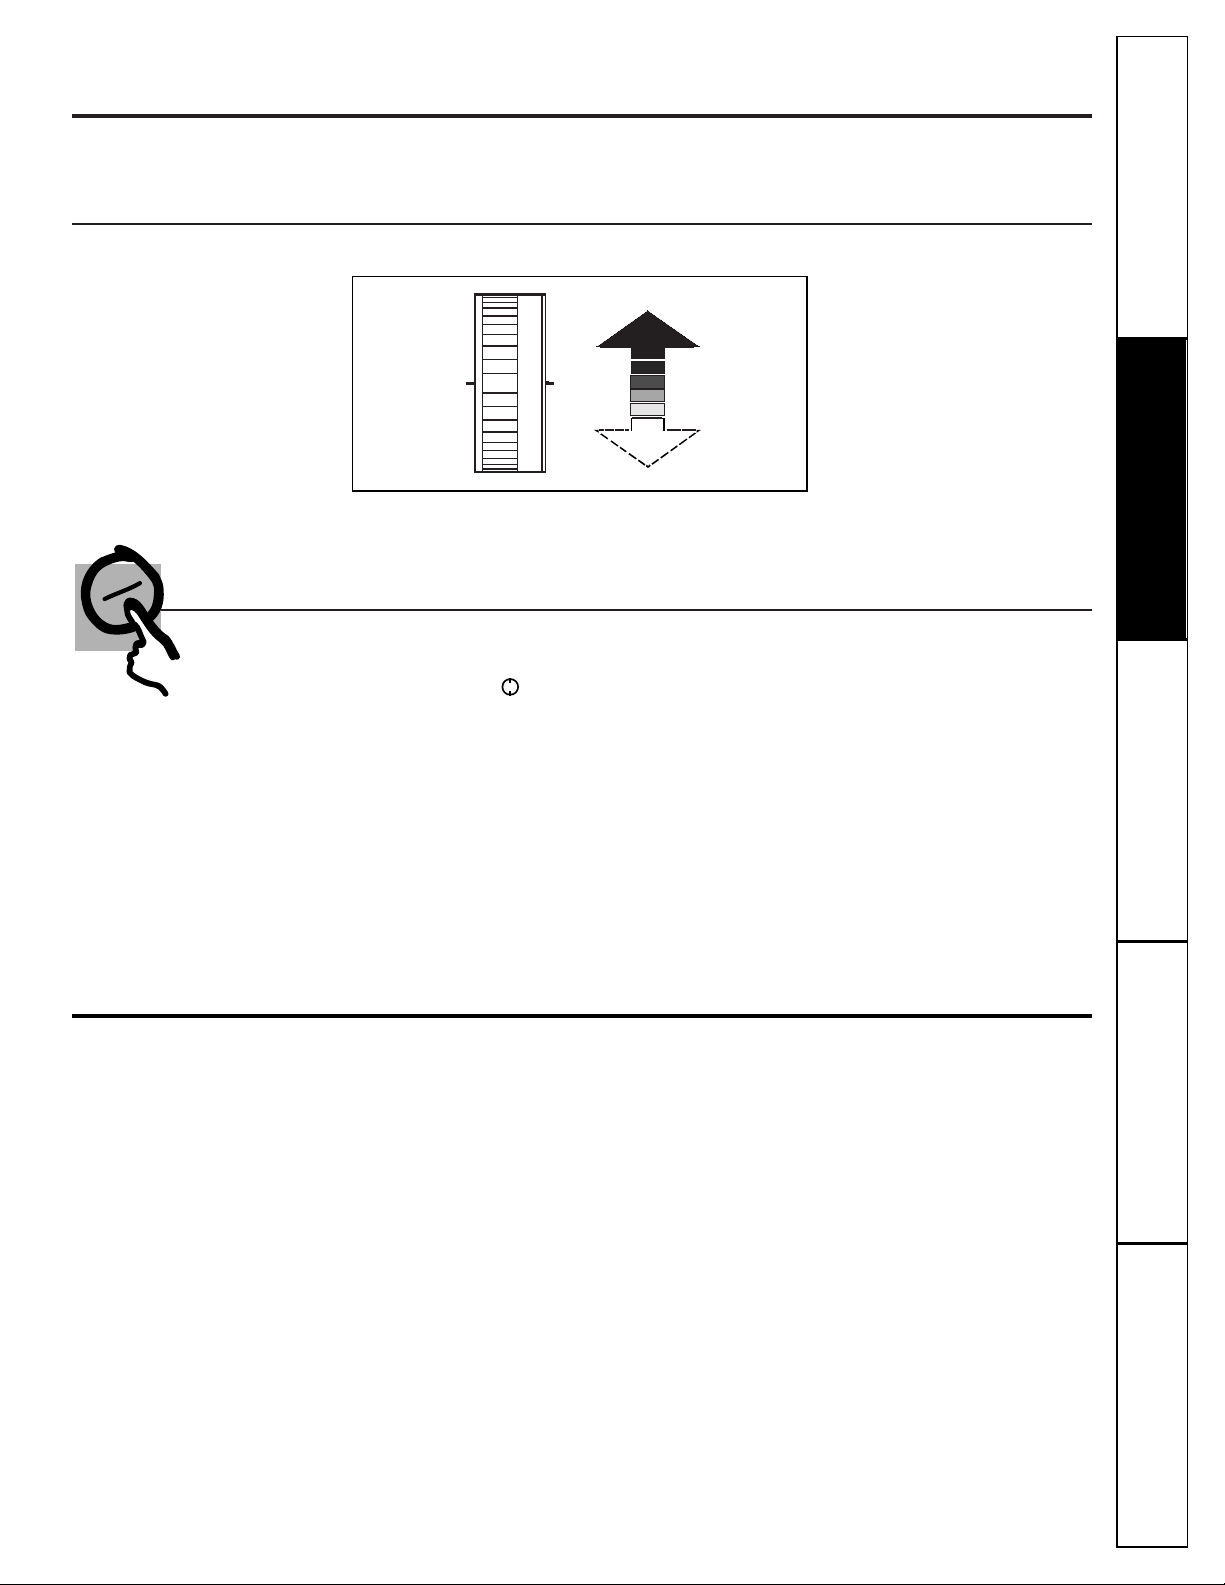
The temperature control on your refrigerator regulates the
temperature in the fresh food and freezer compartments.
Initially set the control at 5.
If you want colder or warmer temperatures, move the dial
one number at a time.
5
6
7
5
4
3
About the storage drawers.
Fruit and Vegetable Drawers
One or more storage drawers provide space to store
fruits, vegetables and meats.
Models with a single full-width drawer have a divider
to separate meats and vegetables. The divider can be
removed if a single large storage space is needed.
The drawer will stop before coming all the way out
of the refrigerator to help prevent contents from
spilling onto the floor. It can be removed easily
by lifting up slightly and pulling past the “stop”
position.
To replace the drawer and the cover above it, the
door must be fully opened. In some installations the
refrigerator may have to be moved away from the
wall for the door to be fully opened.

Customer Service Troubleshooting Tips
Operating Instructions
Safety InstructionsInstallation InstructionsCustomer Service Troubleshooting Tips Installation Instructions Safety Instructions
Operating Instructions
Customer Service Troubleshooting Tips Installation Instructions Safety Instructions
Operating Instructions
About ice service.
Care and cleaning of the refrigerator.
6
Icemaker Accessory Kit
An icemaker accessory kit is available from your dealer. Check the back of the
refrigerator for the specific icemaker kit needed for your model.
Water Supply Kits
Kits containing copper tubing, shutoff valve, fittings and instructions needed to
connect the icemaker to your cold water line are available at extra cost from your
dealer or from Parts and Accessories. In the U.S. call 800-626-2002. In Canada call
1-800-361-3400 and refer to kit numbers WX8X1 through WX8X4.
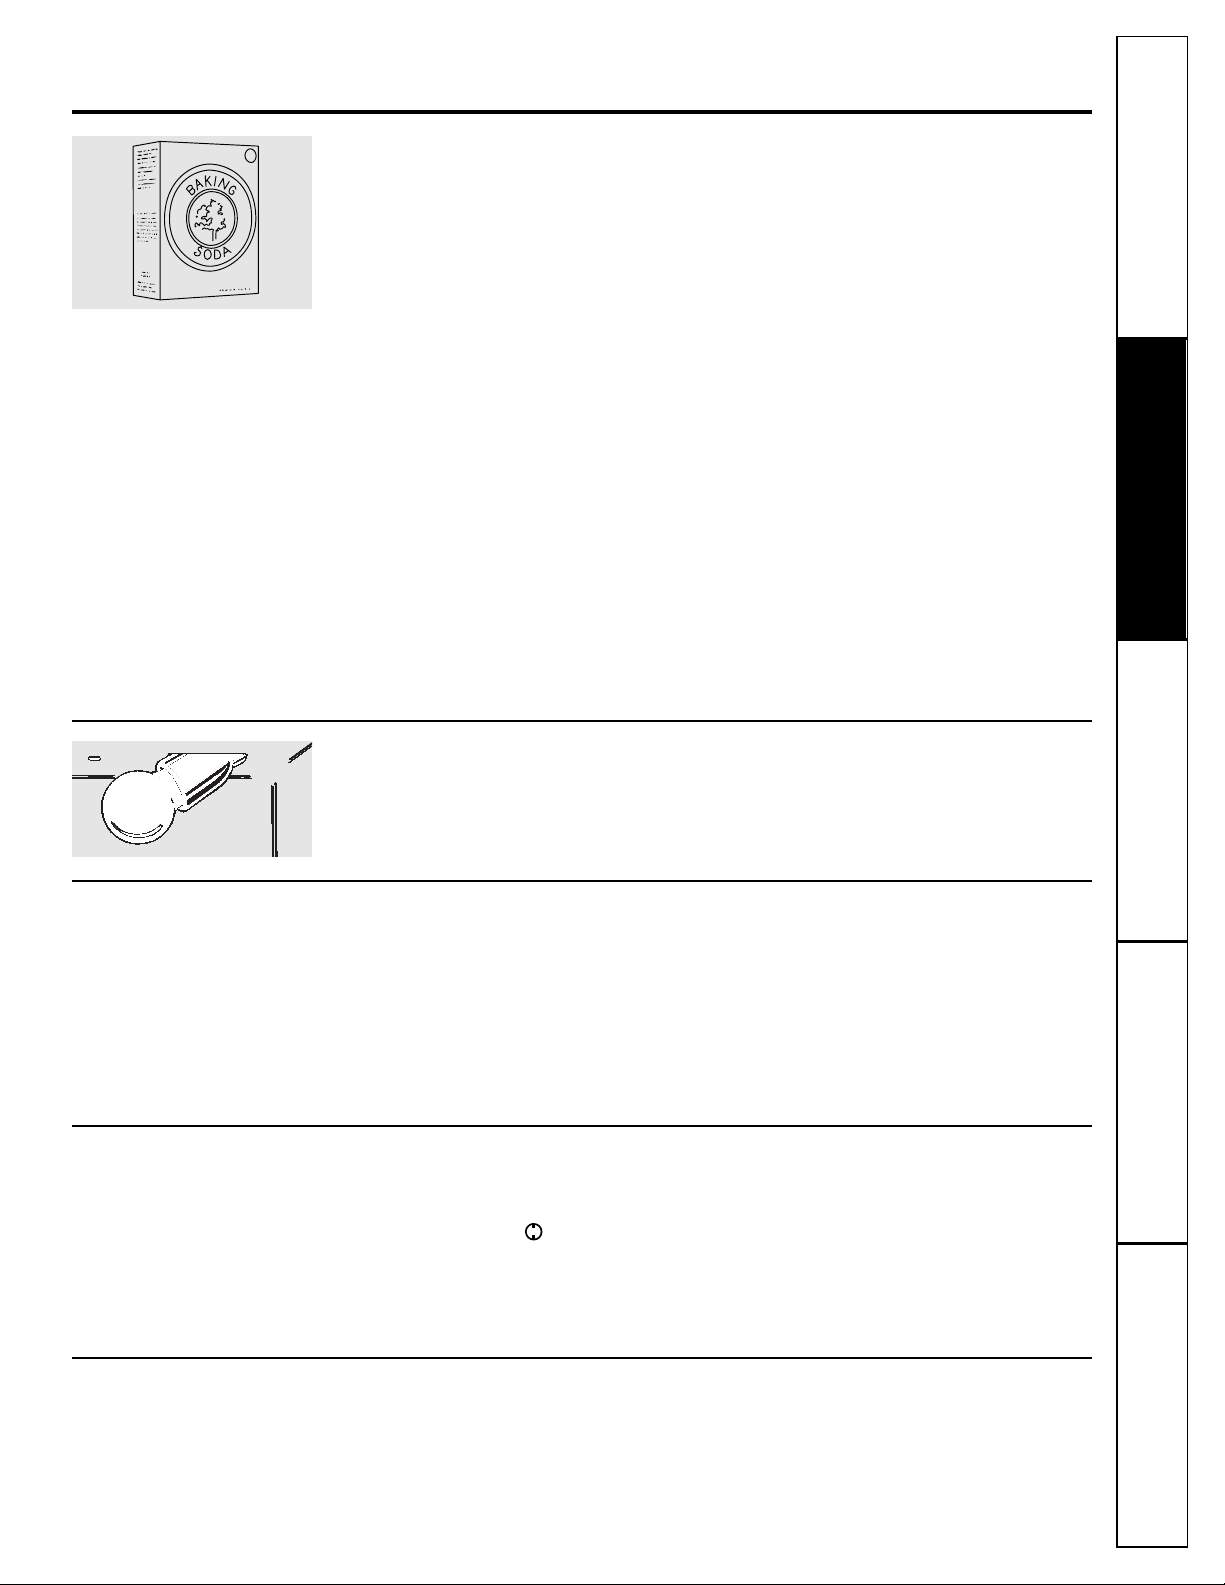
Ice Trays
To release ice cubes, turn the tray upside
down, hold it over a container, and twist
both ends.
For only one or two ice cubes, leave the
tray right-side up, twist both ends slightly,
and remove as many cubes as you want.
Wash ice trays in lukewarm water only—do not
put them in an automatic dishwasher.
Cleaning the Outside
Keep the outside clean.
Wipe with a clean
cloth lightly dampened with kitchen
appliance wax or mild liquid dish detergent.
Dry and polish with a clean, soft cloth.
Do not wipe the refrigerator with a soiled dish
cloth or wet towel. These may leave a residue
that can erode the paint. Do not use scouring
pads, powdered cleaners, bleach or cleaners
containing bleach because these products can
scratch and weaken the paint finish.
Protect the paint finish.
The finish on the
outside of the refrigerator is a high quality,
baked-on paint finish. With proper care, it
will stay new-looking and rust free for years.
Apply a coat of kitchen/appliance wax
when the refrigerator is new, and then at
least twice a year.
7
Customer ServiceTroubleshooting Tips
Operating InstructionsSafety Instructions
Installation Instructions
Cleaning the Inside
To help prevent odors,
leave an open box of
baking soda in the fresh food and freezer
compartments.
Unplug the refrigerator before cleaning.
If this
is not practical, wring excess moisture out of
sponge or cloth when cleaning around
switches, lights or controls.
Use warm water and baking soda solution—
about a tablespoon (15 ml) of baking soda
to a quart (1 l) of water. This both cleans
and neutralizes odors. Rinse and wipe dry.
Other parts of the refrigerator—including
door gaskets, fruit and vegetable drawers,
and all plastic parts—can be cleaned the
same way.
After cleaning the door gaskets, apply a thin
layer of petroleum jelly to the door gaskets
at the hinge side. This helps keep the
gaskets from sticking and bending out of
shape. Do not use cleansing powders or
other abrasive cleaners.
Defrost water pan.
The non-removable pan is
located under the compressor at the rear of
the refrigerator. It should be cleaned at
least once a year. Move the refrigerator out
from the wall as far as necessary, and unplug
the power cord from the wall outlet. Let the
compressor cool before cleaning the pan.
Use a clean cloth or sponge dampened in
warm water and baking soda solution—one
tablespoon (15 ml) of baking soda to a
quart (1 l) of water.
Do not use
cleansing
powders, abrasive cleaners, bleach or
cleaners containing chlorides.
Do not wash any plastic refrigerator parts in
the dishwasher.
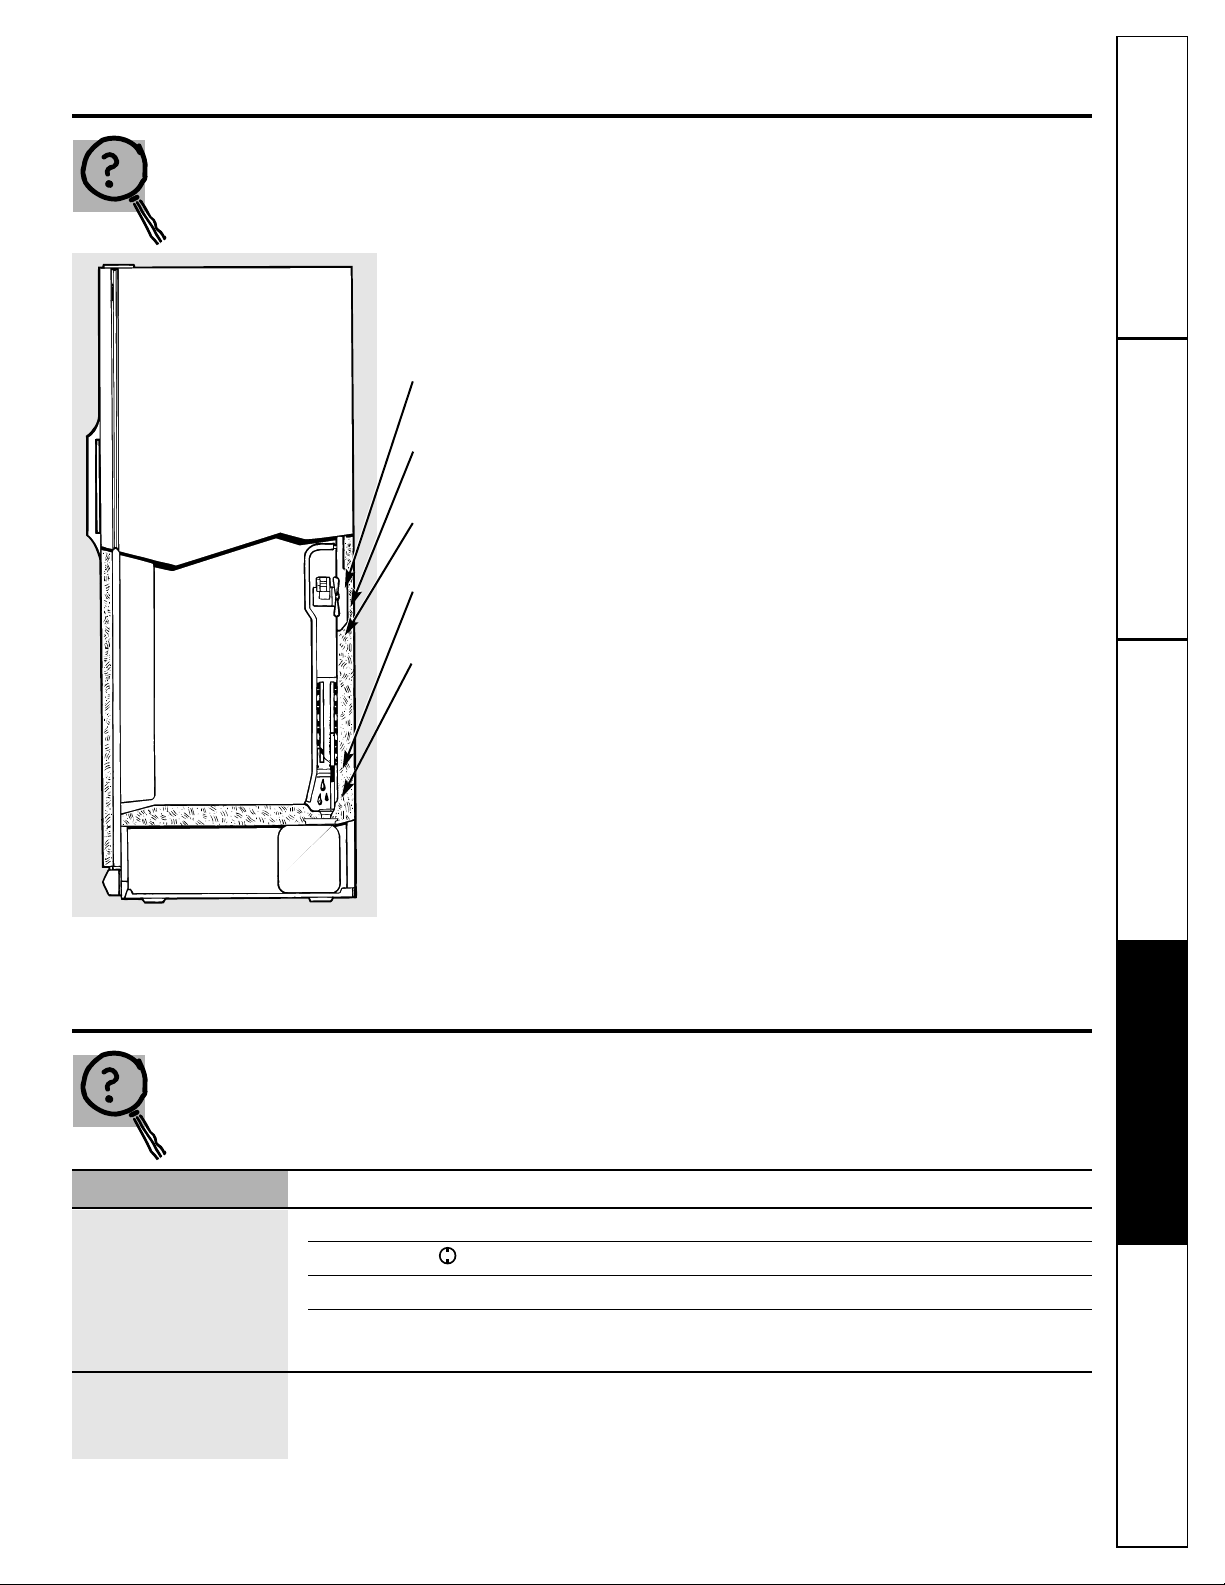
Behind the Refrigerator
Once a year, move the refrigerator out and
vacuum the back coils. Be careful when
moving the refrigerator away from the wall.
All types of floor coverings can be
damaged, particularly cushioned coverings
and those with embossed surfaces.
Pull the refrigerator straight out and return
it to position by pushing it straight in.
Moving the refrigerator in a side direction
may result in damage to the floor covering
or refrigerator.
When pushing the refrigerator back, make sure
you don’t roll over the power cord.
Replacing the Light Bulb
Unscrew the burned-out bulb and replace it
with a standard 40-watt bulb.
Preparing for Vacation
For long vacations or absences, remove
food and unplug the refrigerator. Move
the control to the
OFF
position, and
clean the interior with a baking soda
solution of one tablespoon (15 ml) of
baking soda to one quart (1 l) of water.
Leave the doors open.
Preparing to Move
Secure all loose items such as grille, shelves and drawers by taping them securely
in place to prevent damage.
Be sure the refrigerator stays in an upright position during moving.
Customer Service Troubleshooting Tips
Operating Instructions
Safety InstructionsInstallation InstructionsCustomer Service Troubleshooting Tips Installation Instructions Safety Instructions
Operating Instructions
Customer Service Troubleshooting Tips Installation Instructions Safety Instructions
Operating Instructions
Preparing to install the refrigerator.
8
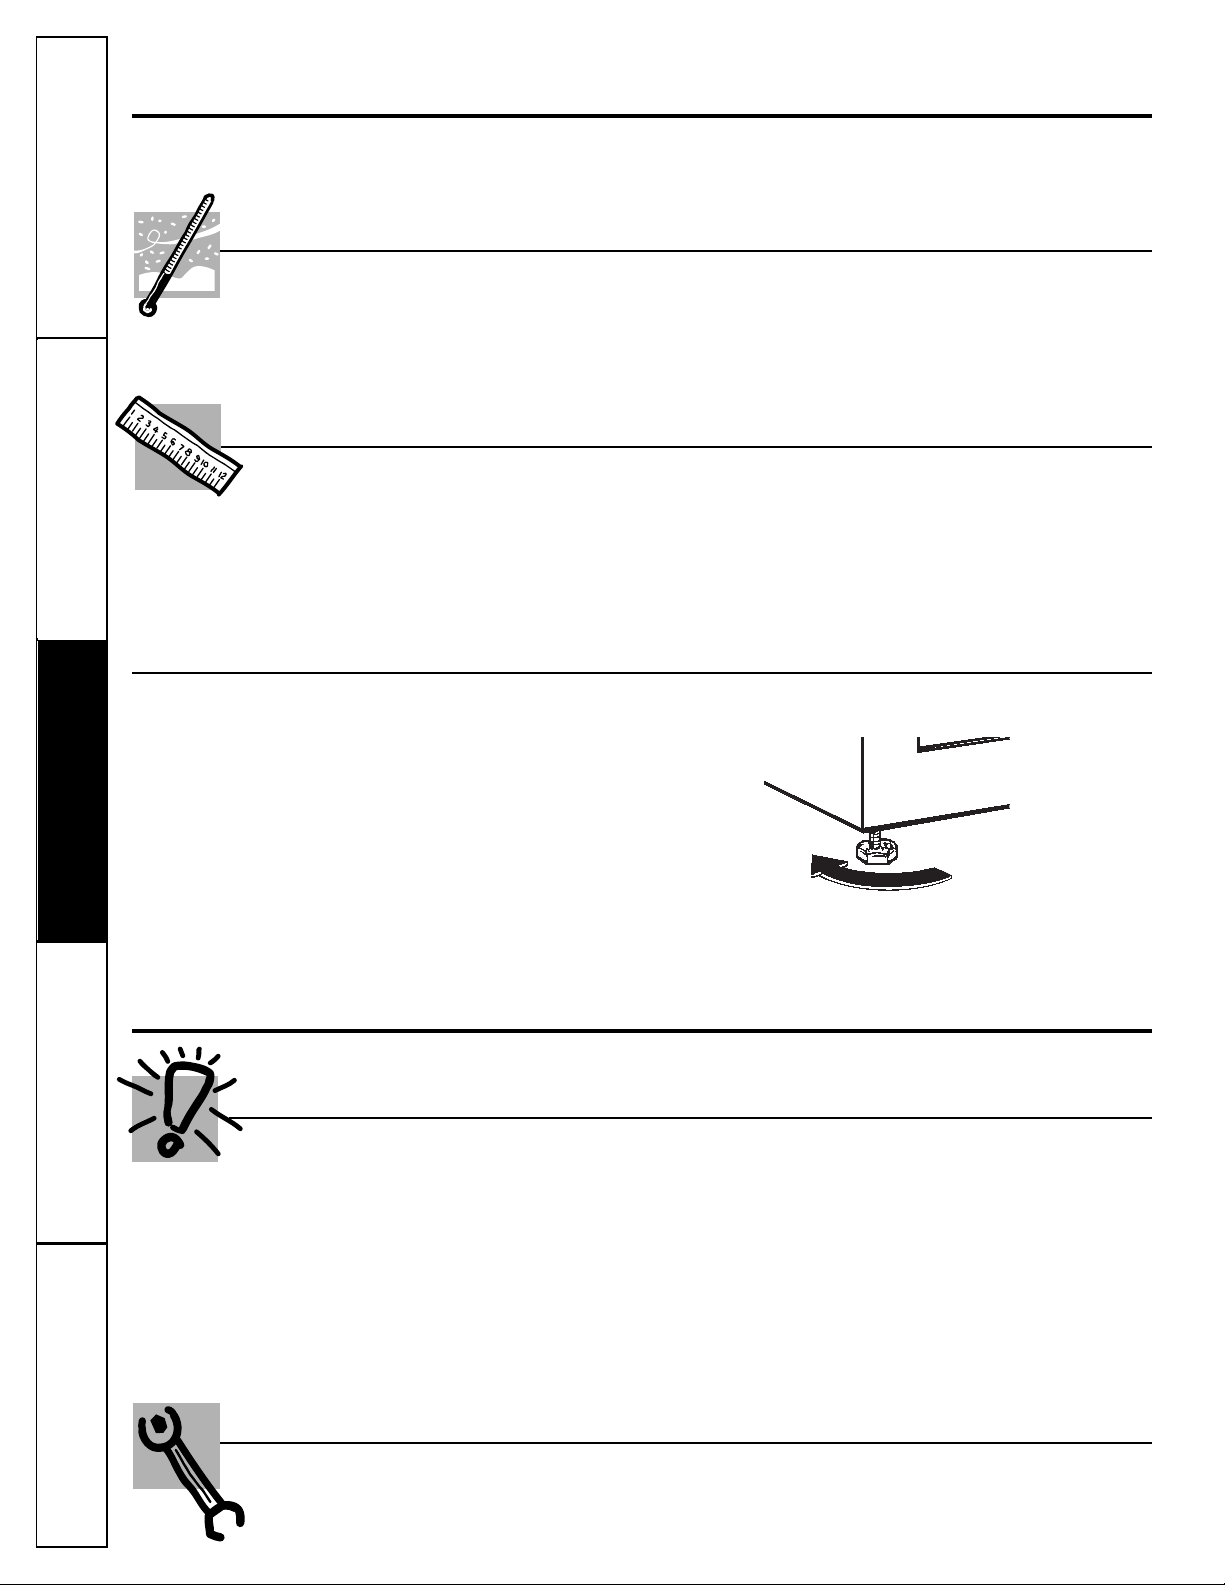
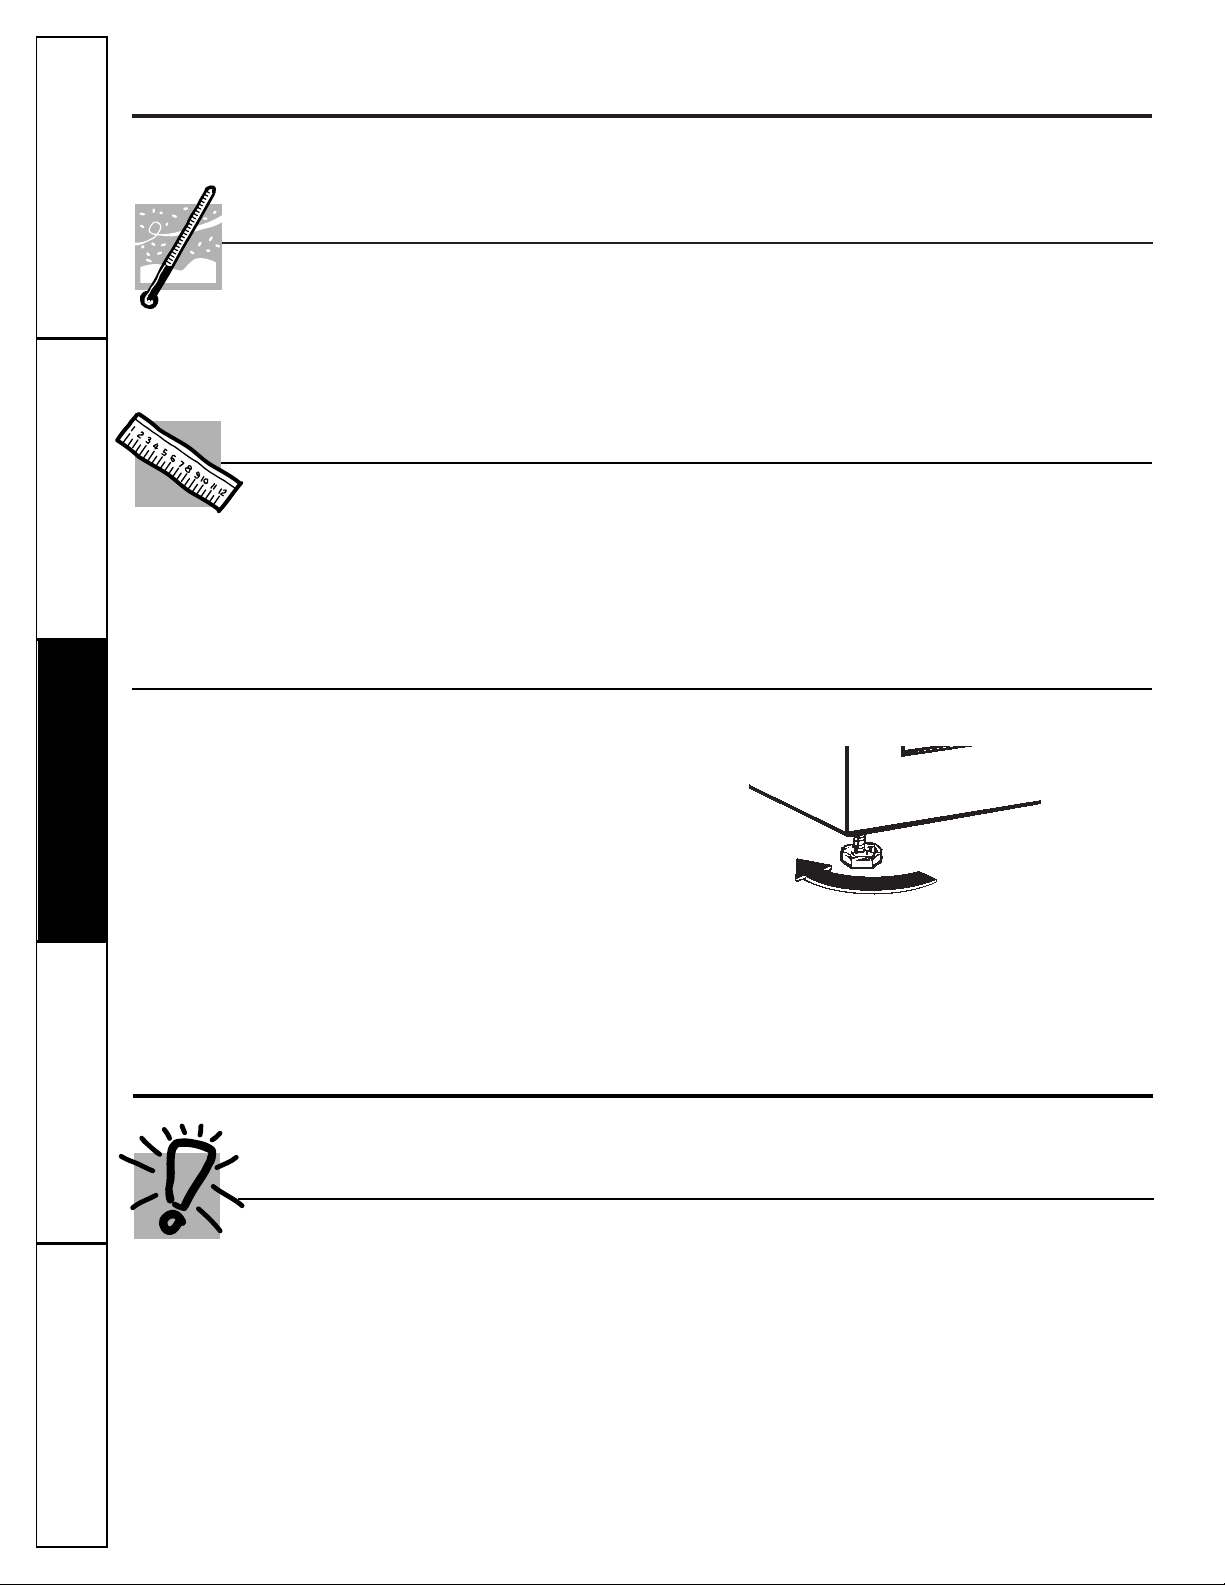
To raise the refrigerator
Leveling Legs
Adjustable legs
at the front corners of the
refrigerator should be set so the refrigerator is firmly
positioned on the floor and the front is raised just
enough that the door closes easily when opened
about halfway.
To adjust the leveling legs,
turn the legs
clockwise to
raise
the refrigerator,
counterclockwise to lower
it.
About reversing the door swing.
Read these instructions completely and carefully.
Refrigerator Location
Do not install the refrigerator where the
temperature will go below 55°F (13°C) because
it will not run often enough to maintain proper
temperatures.
Install it on a floor strong enough to support it
fully loaded.
Do not install it closer than 5″(13 cm) next to a
range.
Clearances
Allow the following clearances for ease of
installation and proper air circulation.
Sides 1″(25 mm)
Top 4″(102 mm)
Back 3″(76 mm) from the rear cabinet surface
to the wall
To help with proper spacing and ventilation, make
sure the metal spacer or twist-on rubber bumper (at
the back of some models) is in place.
Before You Begin
When reversing the door swing:
■Read the instructions all the way through before
starting.
■Handle parts carefully to avoid scratching paint.
■Set screws down by their related parts to avoid
using them in the wrong places.
■Provide a non-scratching work surface for the
doors.
These instructions are for changing the hinges from the
right side to the left side.
If you ever want to change the hinges back to the
right side, follow these same instructions (merely
reverse all references to left and right).
Unplug the refrigerator from its electrical outlet.
Empty all door shelves, including the dairy
compartment.
What You Will Need
Tools required:
■Phillips screwdriver
■Putty knife or thin-blade screwdriver
■5/16″ hex head socket driver
■7/32″ hex head socket driver
Customer ServiceTroubleshooting Tips
Operating InstructionsSafety Instructions
Installation Instructions
9
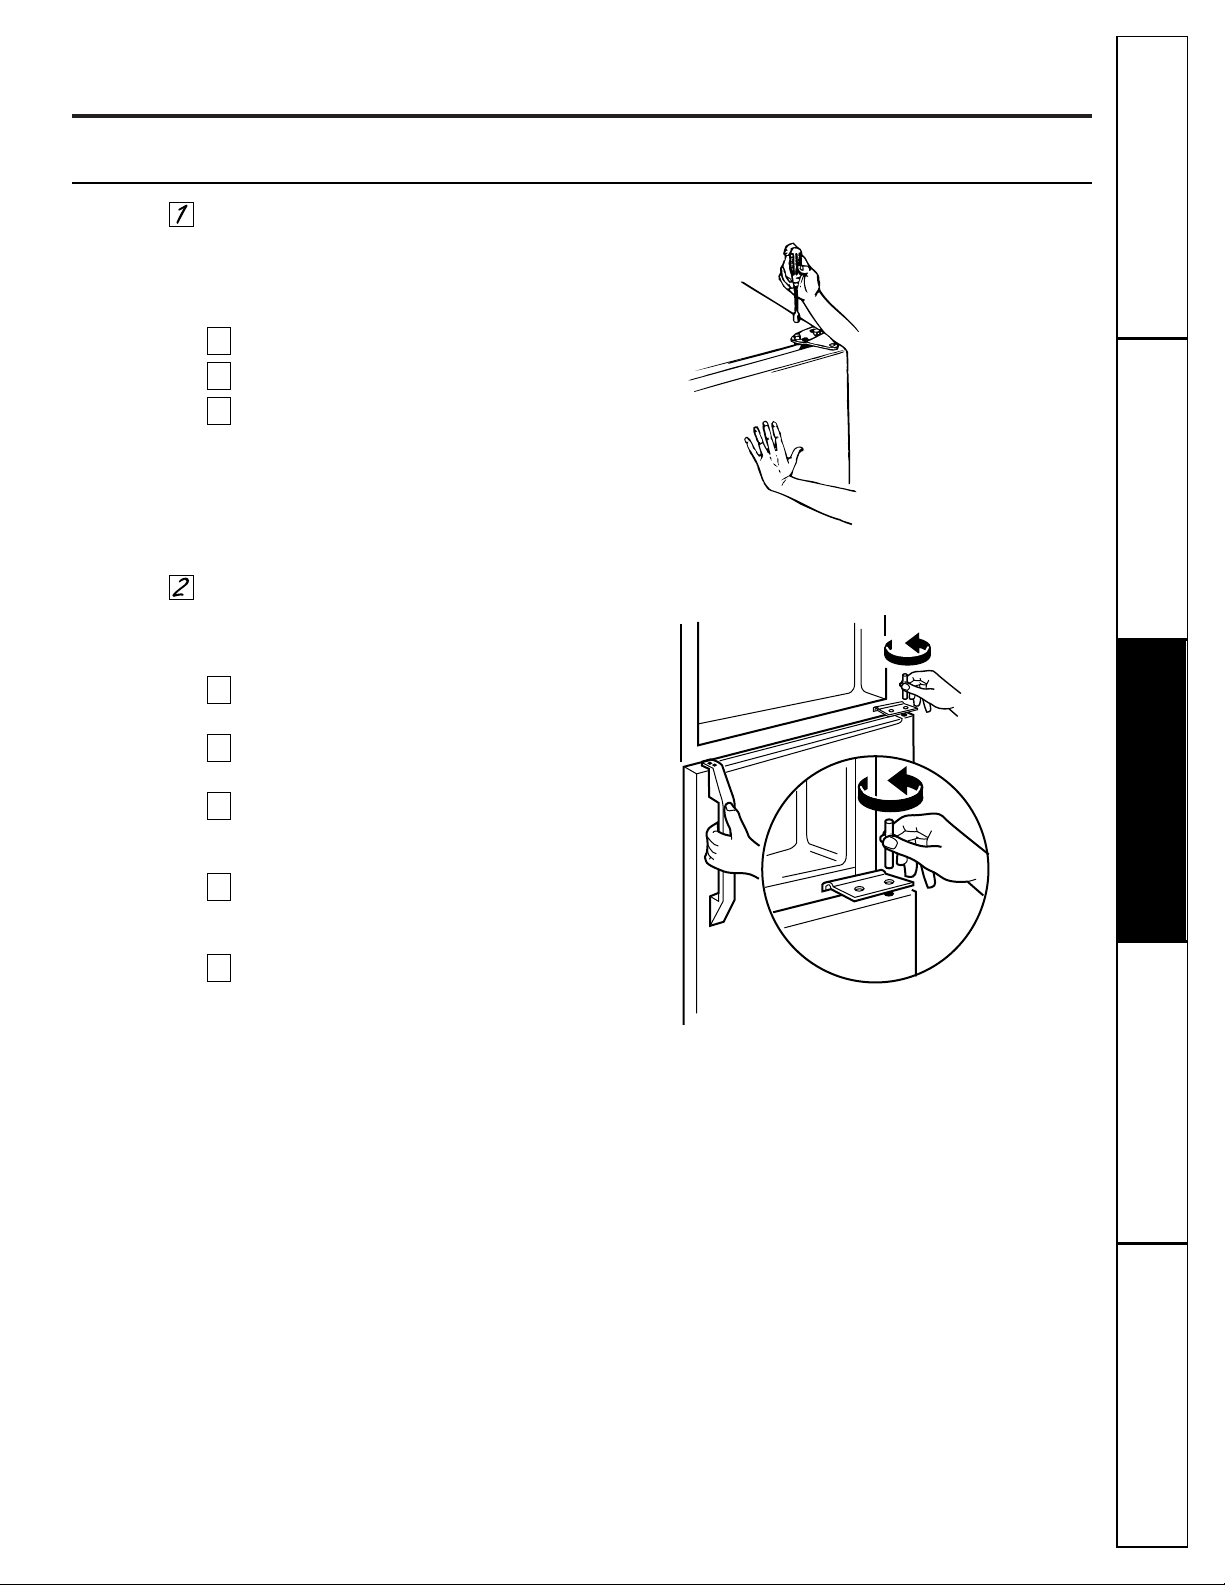
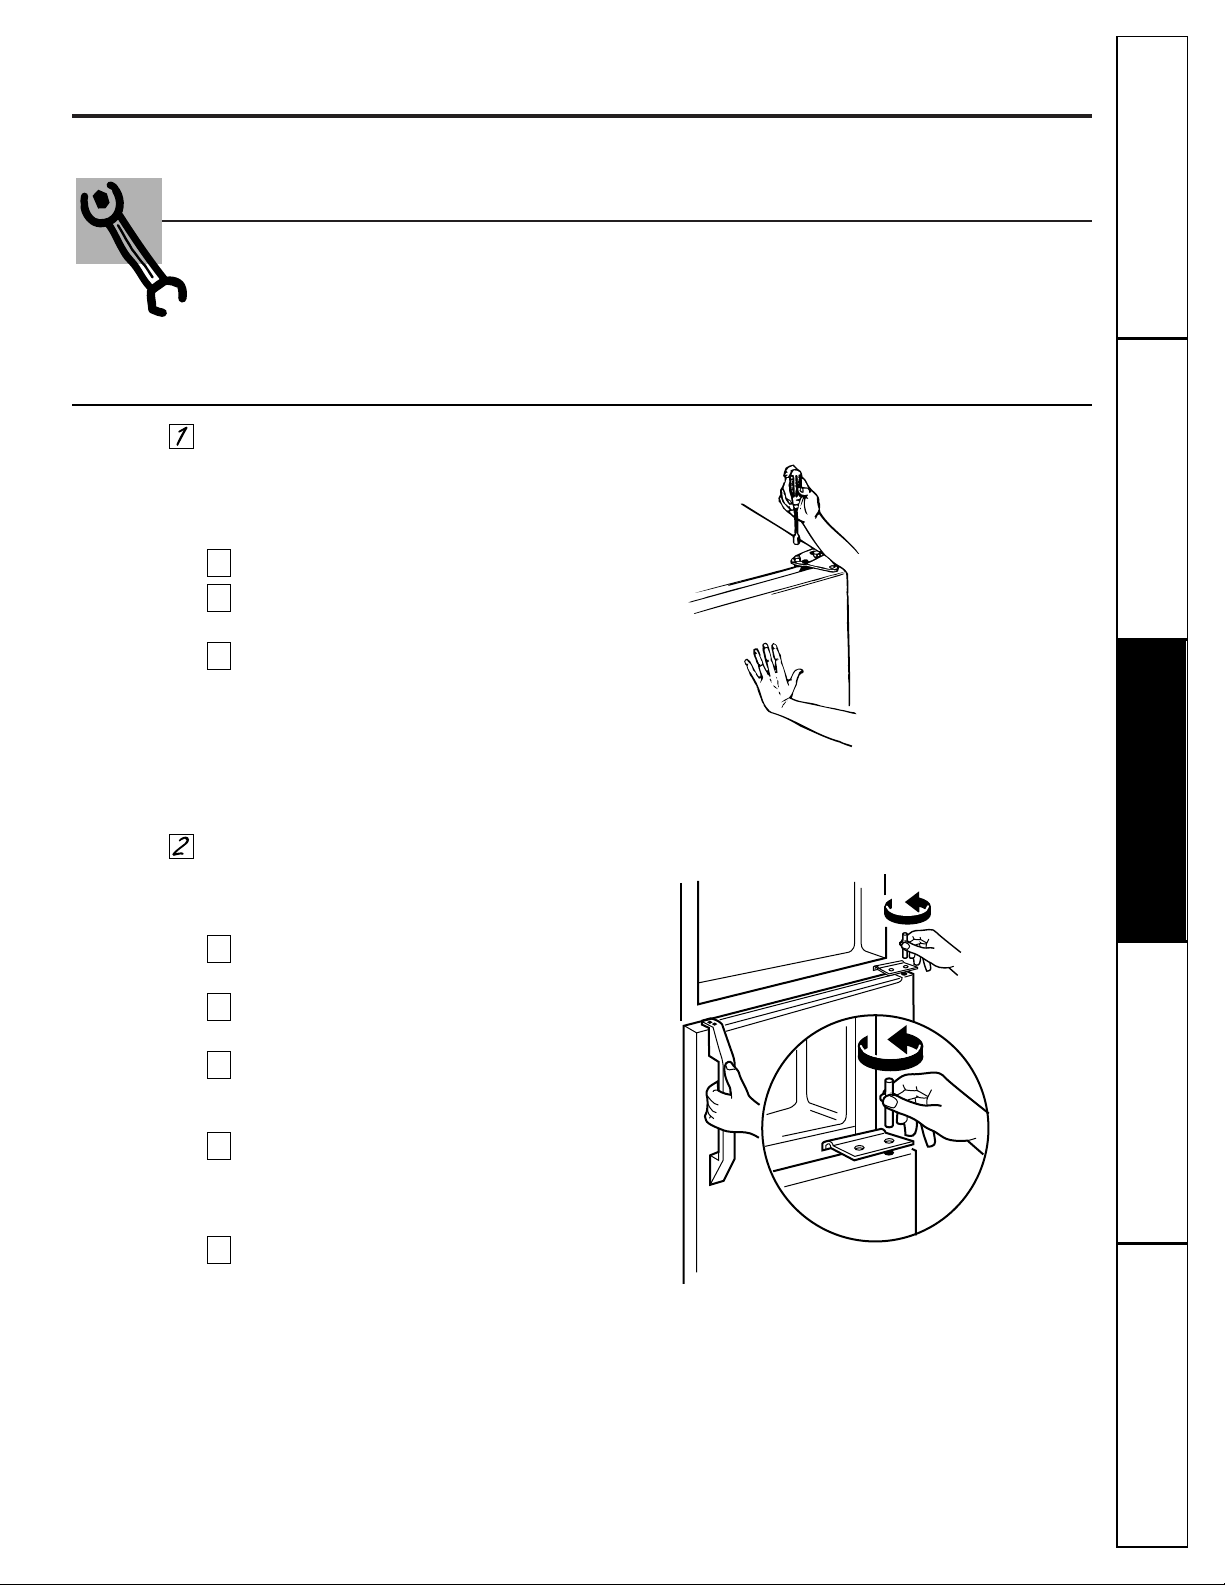
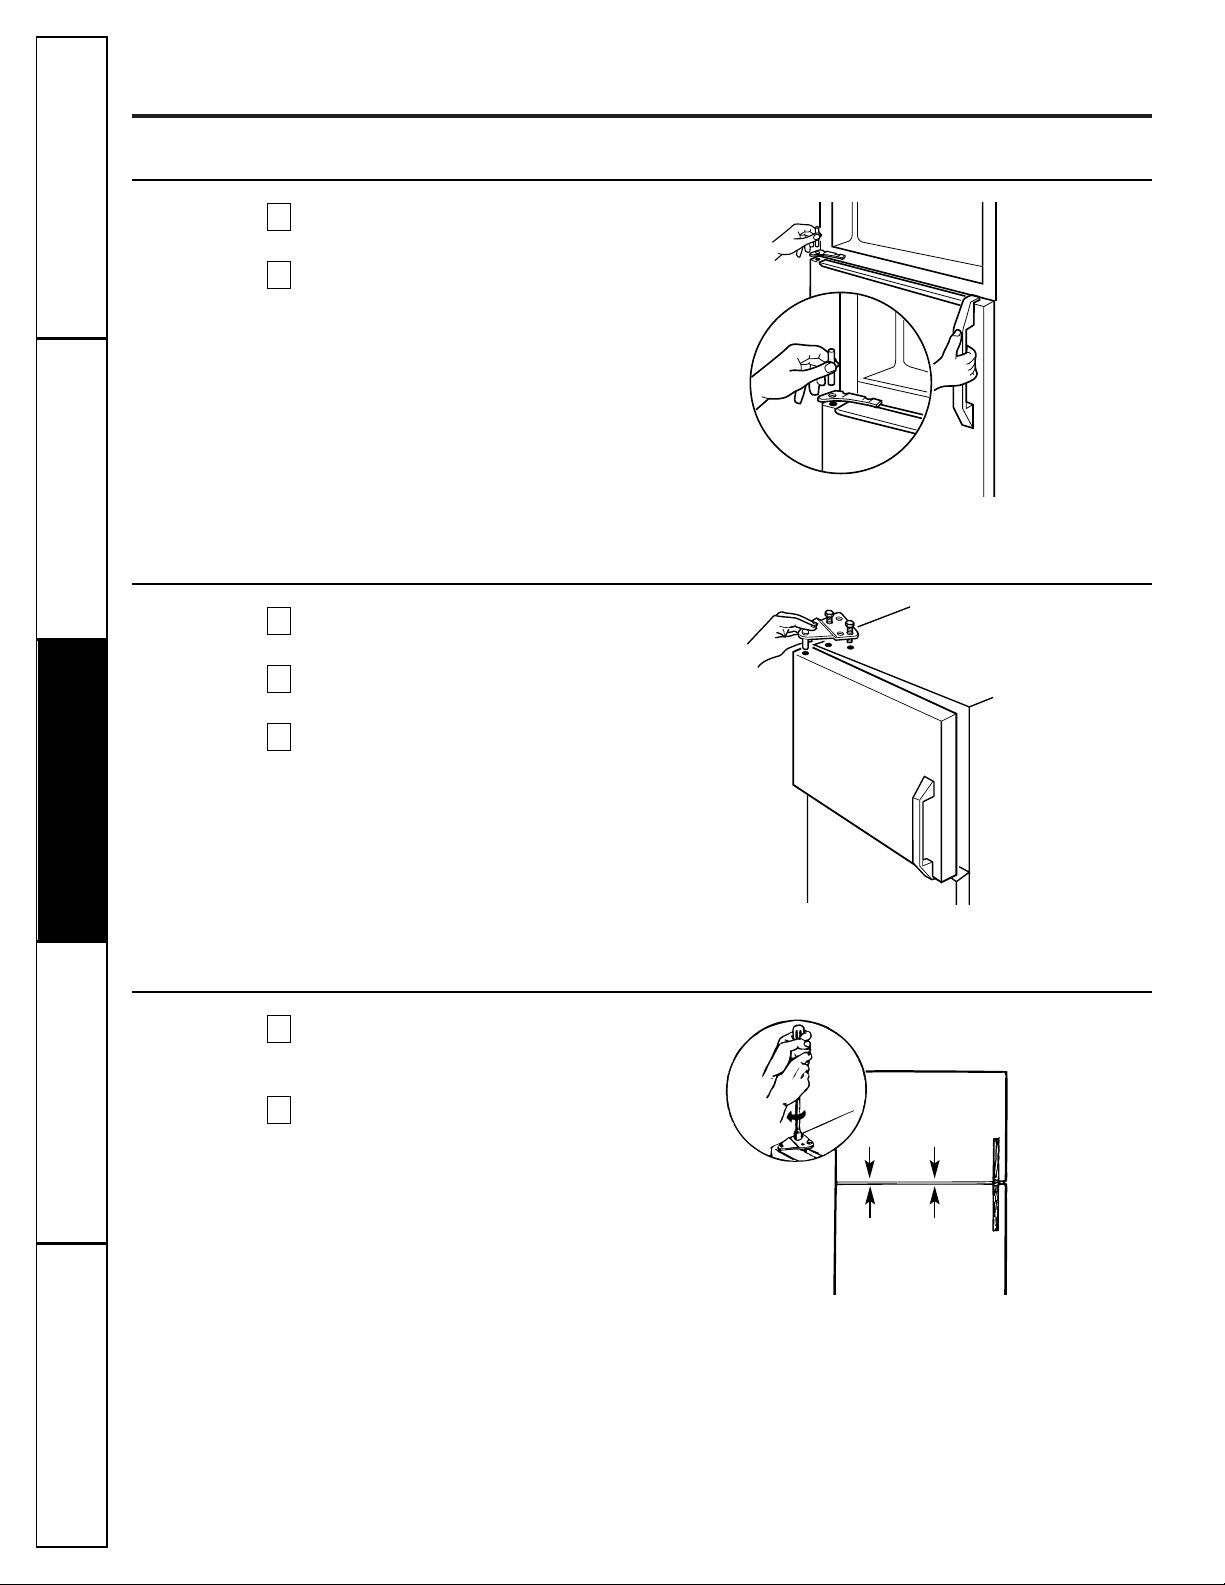
Remove the Doors
Remove Freezer Door
CAUTION: Hold the door in place while
removing the top hinge to keep the door from
falling.
Remove the hinge cover.
Remove the top hinge, shim and two screws.
Set the door on a non-scratching surface with
the outside up.
NOTE: When removing the freezer door, washer(s)
between the center hinge and the door may stick to
the door. Do not lose.
c
b
a
Remove the Fresh Food Door
CAUTION: The door must be held in place to
keep it from falling.
Remove the hinge pin by turning it counter-
clockwise.
Lift up slightly on the door handle while pulling
the pin out of the center hinge.
Remove the door by opening it slightly while
lifting it straight up and out in order to clear the
center hinge and the bottom hinge pin.
Set the door on a non-scratching surface with
the outside up. Make sure the butter bin does
not swing open.
Replace the washer(s) on the bottom hinge if
they stick to the door.
CAUTION: Do not let either door drop to the
ground. To do so could damage the door stop.
e
d
c
b
a

10
Customer Service Troubleshooting Tips
Operating Instructions
Safety InstructionsInstallation InstructionsCustomer Service Troubleshooting Tips Installation Instructions Safety Instructions
Operating Instructions
Customer Service Troubleshooting Tips Installation Instructions Safety Instructions
Operating Instructions
About reversing the door swing.
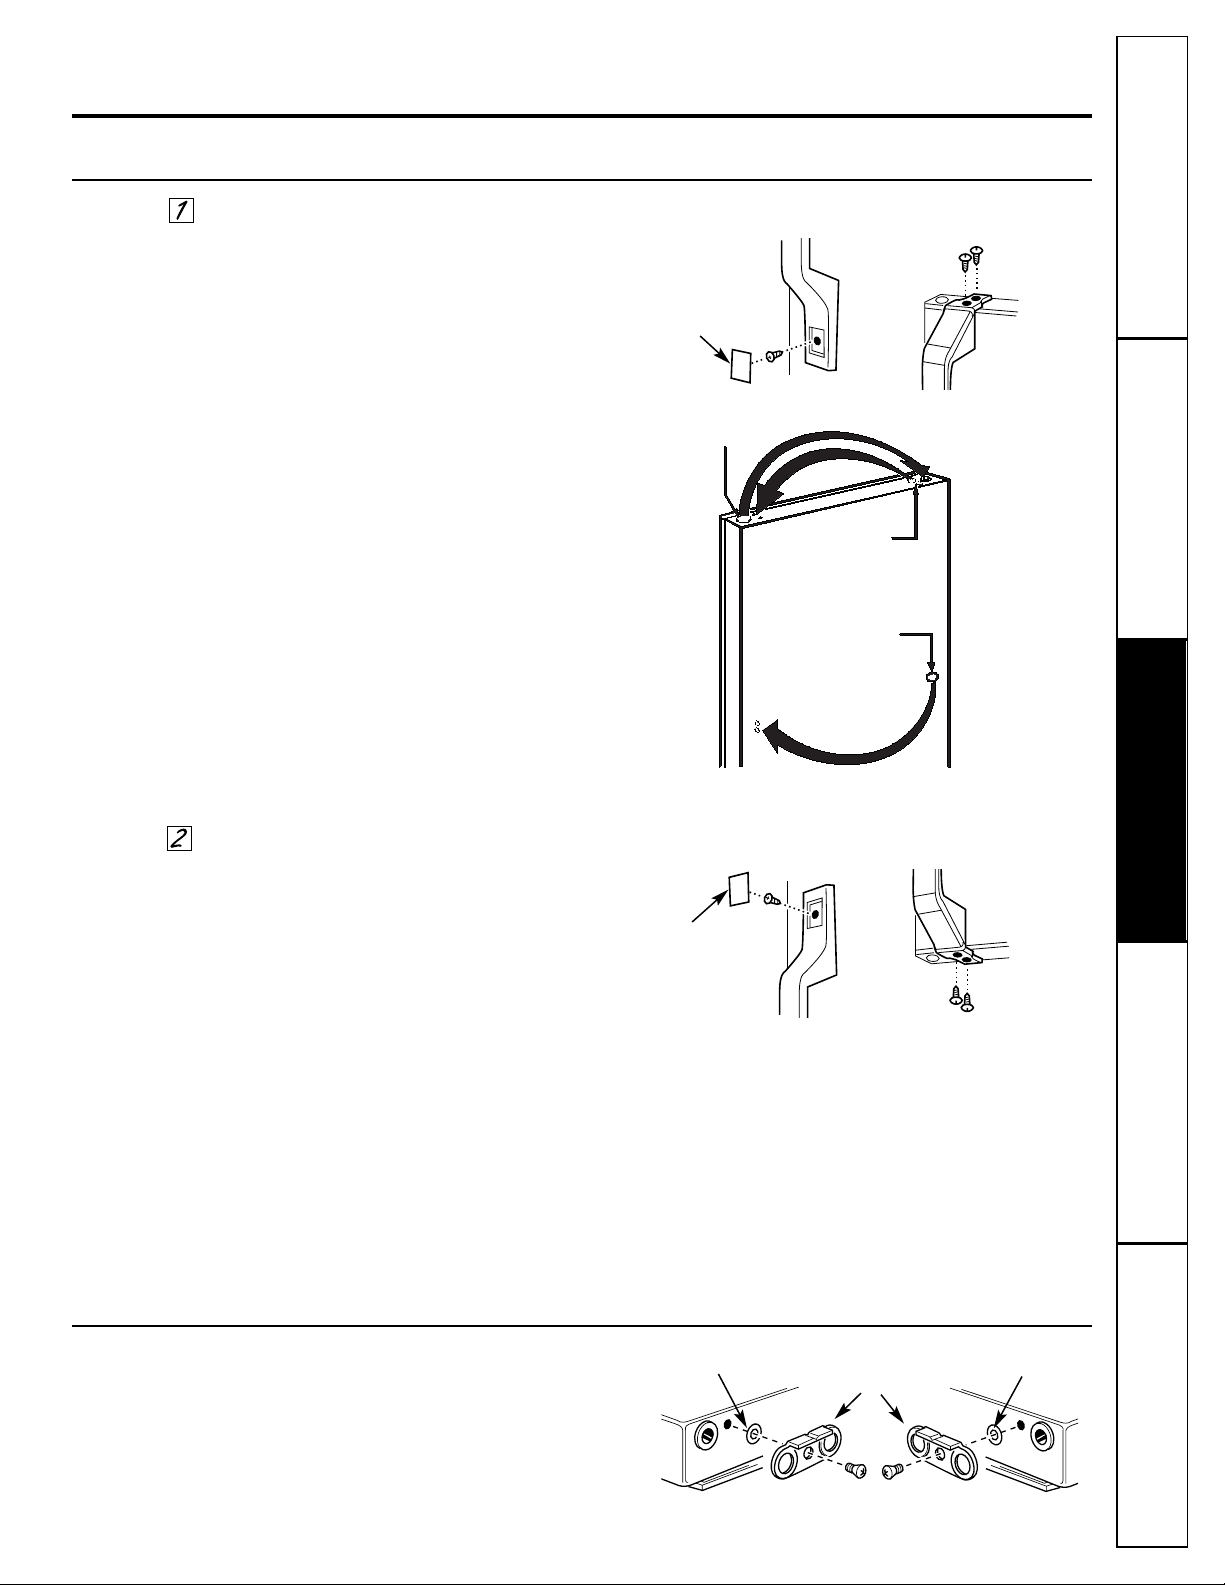
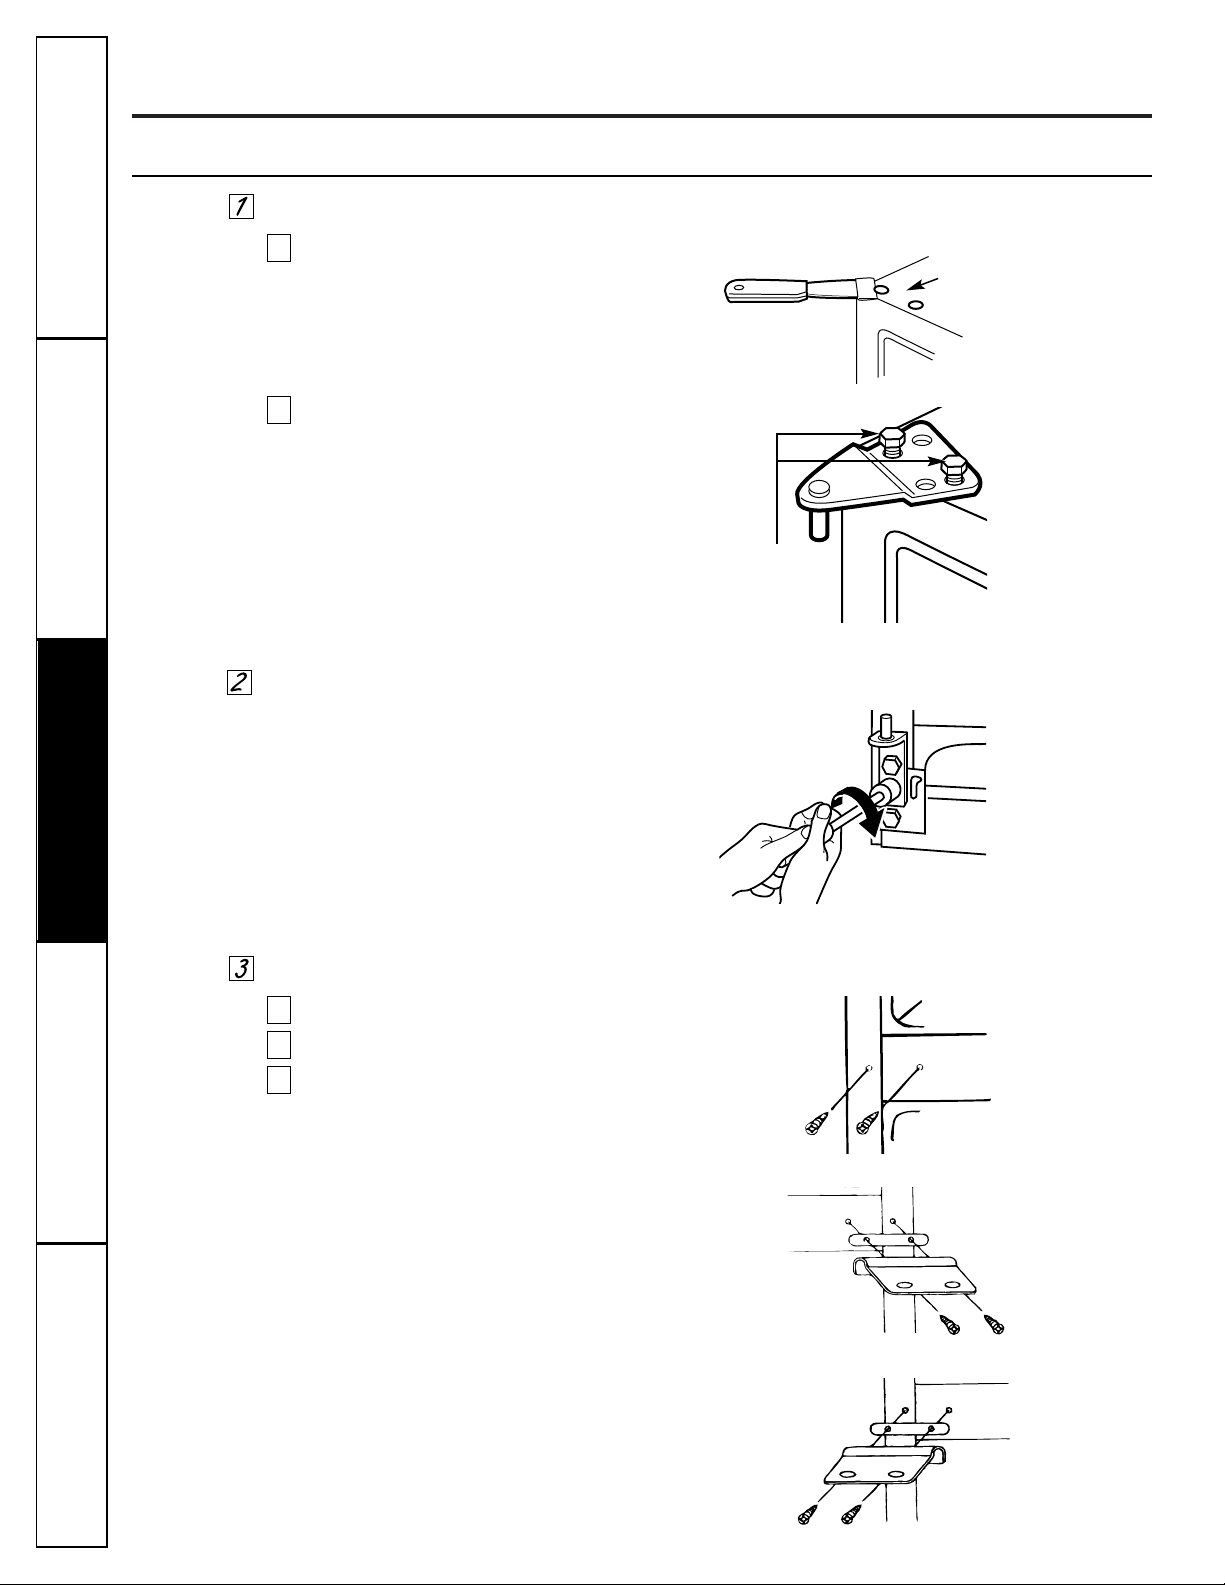
Reinstall Top Hinge on Left Side
Remove the plug buttons by carefully prying
under the edge with a putty knife. Be careful of
the paint finish.
Reinstall the plug buttons on the right side by
inserting them into the holes vacated by the top
hinge screws.
Reassemble the top hinge and shim on the left
side, turning the screws just enough to hold the
hinge in place.
b
a
Reverse Hardware on Cabinet
Be sure screws
go through these
holes for left side.
Plug Buttons
Transfer Bottom Hinge to the Left
Remove the bottom hinge, screws and shim(s) from
the right side and reassemble them on the left side
of the cabinet.
ATTENTION: The screws must be properly tightened.
Turn the screws until snug. Then tighten the screws a
minimum of one full turn using both hands.
Transfer Center Hinge to the Left
Remove the two screws on the opposite side.
Remove the center hinge, shim and screw(s).
Reassemble the center hinge on the left side.
CAUTION: When assembled correctly, the hinge is tight
against the cabinet.
ATTENTION: The screws must be properly tightened.
Turn the screws until snug. Then tighten the screws a
minimum of 1/2 turn using both hands.
c
b
a
Customer ServiceTroubleshooting Tips
Operating InstructionsSafety Instructions
Installation Instructions
Transfer Fresh Food Door Handle to the Right
To remove the handle:
■Remove the plug button by carefully prying
under the edge with a putty knife.
■Remove the exposed screw holding the handle.
■Remove the two screws holding the handle to the
top of the door.
After removing the handle:
■Remove the screws from the right edge of the
door top and insert them into the handle screw
holes on the left side.
■Remove the plug button from the left edge of the
door and insert it into the hole on the opposite
side.
■Transfer the button on the door to the opposite
side.
Reinstalling the handle:
■Attach the handle to the right side of the door,
reversing the above procedure.
Reverse Door Handles
Transfer Door Stops
Plug Button
Plug Button
Handle Bottom
Handle Top
Screws for
handle holes
Button
Transfer Freezer Door Handle to the Right
■Remove the nameplate plug button by carefully
prying under the edge with a putty knife.
■Remove the exposed screw holding the handle.
■Remove the two screws holding the handle to the
bottom of the door.
■Remove the handle.
■Remove the door stops as shown below.
■Reverse the buttons and screw on top flange
of door.
■Transfer the button on door face to
opposite side.
■Attach the handle to the right side of the door,
reversing the above procedure.
Move the metal door stop on each door from the
right end to the left end.
Door Stop
Left Side Right Side
Washer Washer
11
Nameplate
Plug Button
Handle Bottom
Handle Top
12
Customer Service Troubleshooting Tips
Operating Instructions
Safety InstructionsInstallation InstructionsCustomer Service Troubleshooting Tips Installation Instructions Safety Instructions
Operating Instructions
Customer Service Troubleshooting Tips Installation Instructions Safety Instructions
Operating Instructions
About reversing the door swing.
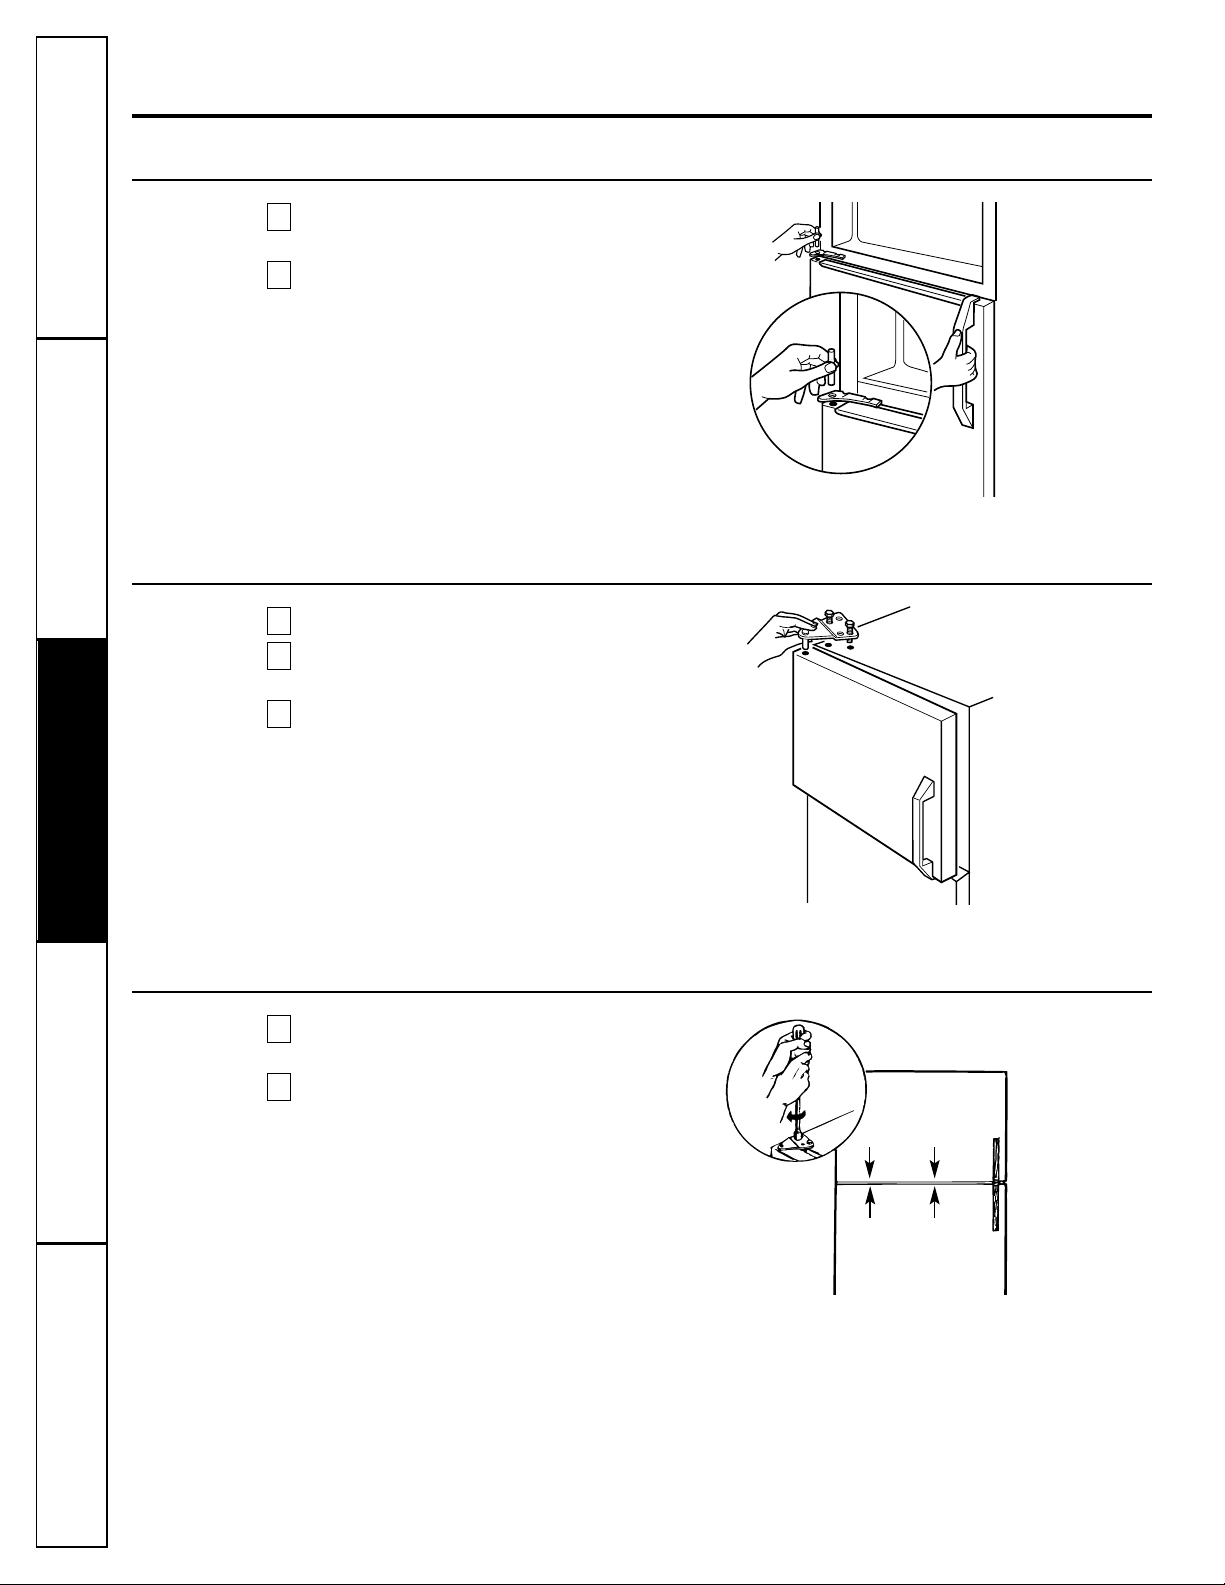
Rehang Fresh Food Door
Make sure the washer(s) are in place on the
bottom hinge pin.
Place the fresh food door on the bottom hinge
and position it under the center hinge. Drop the
hinge pin into the center hinge to hold the door
in place and tighten the screw.
b
a
Rehang Freezer Door
Place the washer(s) on the center hinge pin.
Place the freezer door on the center hinge over
the pin.
Raise the top hinge by hand and insert the pivot
pin into the hole in the door. Then swing the
door shut.
c
b
a
Align the Doors
Align the freezer door with the fresh food door
so that the gap between the doors is even.
Tighten the top hinge screws by turning them
until snug. Then turn the screws a minimum
of 1/2 turn using both hands.
b
a
Align the doors so that
the gap between them
is even.
Customer ServiceTroubleshooting Tips
Operating InstructionsSafety Instructions
Installation Instructions
Normal operating sounds.
Depending on the placement of the refrigerator in your kitchen,
you may want to place a piece of rubber backed carpet under
the refrigerator to reduce noise.
The new high efficiency compressor runs faster and will have a higher pitch hum
or pulsating sound while operating.
Defrost timer and refrigerator control click on and off.
The fan circulating air inside the freezer which keeps the temperatures
throughout.
Water dropping on the defrost heater causing a sizzling, hissing or popping
sound during the defrost cycle.
The flow of refrigerant through the freezer cooling coils sounds like boiling
water or a gurgling noise.
Cracking or popping of cooling coils caused by expansion and contraction
during defrost and refrigeration following defrost.
Water dripping as it melts from the evaporator and flows to the drain pan
during the defrost cycle.
These sounds are normal and are due mostly to highly efficient operation.
Before you call for service…
Troubleshooting Tips
Save time and money! Review the charts on the following
pages first and you may not need to call for service.
Problem Possible Causes What To Do
Refrigerator does not
Refrigerator in defrost cycle. • Wait about 30 minutes for defrost cycle to end.
operate
Control in
OFF
position. • Move the control to a temperature setting.
Refrigerator is unplugged. • Push the plug completely into the outlet.
The fuse is blown/circuit • Replace fuse or reset the breaker.
breaker is tripped.
Vibration or rattling
Front leveling legs need • See
Leveling Legs.
(slight vibration
adjusting.
is normal)
13

Customer Service Troubleshooting Tips
Operating Instructions
Safety InstructionsInstallation InstructionsCustomer Service Troubleshooting Tips Installation Instructions Safety Instructions
Operating Instructions
Customer Service Troubleshooting Tips Installation Instructions Safety Instructions
Operating Instructions
Before you call for service…
Problem Possible Causes What To Do
Motor operates for
Normal when refrigerator • Wait 24 hours for the refrigerator to completely
long periods or cycles
is first plugged in. cool down.
on and off frequently.
Often occurs when large • This is normal.
(Modern refrigerators
amounts of food are
with more storage
placed in refrigerator.
space and a larger
Door left open. • Check to see if package is holding door open.
freezer require more
Hot weather or frequent • This is normal.
operating time. They
door openings.
start and stop often
Temperature control •See
About the control.
to maintain even
set at the coldest setting.
Fresh food or freezer
Temperature control not set • See
About the control.
compartment too warm
cold enough.
Warm weather or frequent • Set the temperature control one step colder.
door openings. See
About the control.
Door left open. • Check to see if package is holding door open.
Frost or ice crystals
Door left open. • Check to see if package is holding door open.
on frozen food
Too frequent or too long
(frost within package
door openings.
is normal)
Ice cubes have
Food transmitting odor/taste • Wrap foods well.
odor/taste
to ice cubes.
Interior of refrigerator •See
Care and cleaning.
needs cleaning.
Slow ice cube freezing
Door left open. • Check to see if package is holding door open.
Temperature control not set • See
About the control.
cold enough.
Refrigerator has odor
Foods transmitting • Foods with strong odors should be tightly wrapped.
odor to refrigerator.
• Keep an open box of baking soda in the refrigerator;
replace every three months.
Interior needs cleaning. • See
Care and cleaning.
Defrost water pan needs cleaning.
• See
Care and cleaning.
Moisture forms on
Not unusual during • Wipe surface dry.
outside of refrigerator
periods of high humidity.
Moisture collects inside
Too frequent or too
(in humid weather, air
long door openings.
carries moisture into
refrigerator when doors
are opened)
Interior light does
No power at outlet. • Replace fuse or reset the breaker.
not work
Light bulb burned out. • See
Replacing the light bulb.
14
temperatures.)
15
CONSUMER WARRANTY
(for customers in Canada)
Your refrigerator is warranted to be free of defects in material and workmanship.
What is covered How Long Warranted Parts Labor
(From Date of Sale) Repair or Replace
at Camco’s Option
Compressor Five (5) Years Five (5) Years Five (5) Years
Sealed System (including Five (5) Years Five (5) Years Five (5) Years
evaporator, condenser
tubing and refrigerant)
All Other Parts One (1) Year One (1) Year One (1) Year
TERMS AND CONDITIONS:
This warranty applies only for single family
domestic use in Canada when the
Refrigerator has been properly installed
according to the instructions supplied by
Camco and is connected to an adequate
and proper utility service.
Damage due to abuse, accident, commercial
use, and alteration or defacing of the serial
plate cancels all obligations of this warranty.
Service during this warranty must be
performed by an Authorized Camco
Service Agent.
Neither Camco nor the Dealer is liable for
any claims or damages resulting from any
failure of the Refrigerator or from service
delays beyond their reasonable control.
To obtain warranty service, purchaser must
present the original bill of sale. Components
repaired or replaced are warranted through the
remainder of the original warranty period only.
This warranty is in addition to any statutory
warranty.
WHAT IS NOT COVERED:
• Service trips to your home to teach you
how to use the product.
• Damage to finish after delivery.
• Improper installation—proper installation
includes adequate air circulation to the
refrigeration system, adequate electrical,
plumbing and other connecting facilities.
• Replacement of house fuses or resetting
of circuit breakers.
• Replacement of light bulbs.
• Damage to product caused by accident,
fire, floods or acts of God.
• Loss of food due to spoilage.
• Proper use and care of product as listed
in the owner’s manual, proper setting of
controls.
• WARRANTOR IS NOT RESPONSIBLE
FOR CONSEQUENTIAL DAMAGES.
IMPORTANT
Keep this warranty and your bill of sale as proof of original purchase and purchase date.
Camco Service is available coast to coast.
If further help is needed concerning this warranty, contact:
Manager, Consumer Relations
Camco Inc.
Suite 310,
1 Factory Lane
Moncton, N.B.
E1C 9M3
Customer Service Troubleshooting Tips
Operating Instructions
Safety InstructionsInstallation InstructionsCustomer Service Troubleshooting Tips Installation Instructions Safety Instructions
Operating Instructions
Customer Service Troubleshooting Tips Installation Instructions Safety Instructions
Operating Instructions
Refrigerator Warranty
(For customers in the United States)
16
All warranty service provided by our Factory Service Centers,
or an authorized Customer Care
®
technician. For service,
call 800-GE-CARES.
For The Period Of: GE Will Replace:
One Year Any part
of the refrigerator which fails due to a defect in materials or workmanship.
From the date of the
During this
full one-year warranty,
GE will also provide,
free of charge,
all labor
original purchase
and in-home service to replace the defective part.
Five Years Any part of the sealed refrigerating system
(the compressor, condenser, evaporator
From the date of the
and all connecting tubing) which fails due to a defect in materials or workmanship.
original purchase
During this
five-year warranty,
GE will also provide,
free of charge,
all labor and
in-home service to replace the defective part.
■Service trips to your home to teach you how to use the
product.
■Improper installation.
■Failure of the product if it is abused, misused, or used for
other than the intended purpose or used commercially.
■Loss of food due to spoilage.
■Replacement of house fuses or resetting of circuit
breakers.
■Damage to the product caused by accident, fire, floods or
acts of God.
■Incidental or consequential damage to personal property
caused by possible defects with this appliance.
What GE Will Not Cover:
This warranty is extended to the original purchaser and any succeeding owner for products purchased for home
use within the USA. In Alaska, the warranty excludes the cost of shipping or service calls to your home.
Some states do not allow the exclusion or limitation of incidental or consequential damages. This warranty gives
you specific legal rights, and you may also have other rights which vary from state to state. To know what your
legal rights are, consult your local or state consumer affairs office or your state’s Attorney General.
Warrantor: General Electric Company. Louisville, KY 40225
17
Customer ServiceTroubleshooting Tips
Operating Instructions
Safety Instructions Installation Instructions
Service Telephone Numbers
GE Answer Center
®
In the U.S.: 800.626.2000
The GE Answer Center® is open 24 hours a day, 7 days a week.
In Canada,
contact: Manager, Consumer Relations, Camco Inc., Suite 310, 1 Factory Lane,
Moncton, N.B. E1C 9M3.
In-Home Repair Service
In the U.S.: 800-432-2737
Expert GE repair service is only a phone call away.
In Canada,
call 1-800-361-3400.
Special Needs Service
In the U.S.: 800.626.2000
GE offers, free of charge, a brochure to assist in planning a barrier-free kitchen for persons
with limited mobility.
In the U.S., call 800-TDD-GEAC (800-833-4322).
In Canada,
contact: Manager, Consumer Relations, Camco Inc., Suite 310, 1 Factory Lane,
Moncton, N.B. E1C 9M3.
Service Contracts
In the U.S.: 800-626-2224
Purchase a GE service contract while your warranty is still in effect and you’ll receive a
substantial discount. GE Consumer Service will still be there after your warranty expires.
In Canada,
call 1-800-461-3636.
Parts and Accessories
In the U.S.: 800-626-2002
Individuals qualified to service their own appliances can have parts or accessories sent directly
to their homes (VISA, MasterCard and Discover cards are accepted).
Instructions contained in this manual cover procedures to be performed by any user. Other servicing
generally should be referred to qualified service personnel. Caution must be exercised, since
improper servicing may cause unsafe operation.
Customers
in Canada
should consult the yellow pages for the nearest Camco service center, or
call 1-800-361-3400.
Service Satisfaction
If you are not satisfied with the service you receive from GE:
First,
contact the people who serviced your appliance.
Next,
if you are still not pleased,
in the U.S.,
write all the details—including your phone number—
to: Manager, Consumer Relations, GE Appliances, Appliance Park, Louisville, KY 40225; or,
in Canada,
to Director, Consumer Relations, Camco Inc., Suite 310, 1 Factory Lane, Moncton,
N.B. E1C 9M3.
Printed in Canada

Customer Service Troubleshooting Tips
Operating Instructions
Safety InstructionsInstallation InstructionsCustomer Service Troubleshooting Tips Installation Instructions Safety Instructions
Operating Instructions
Customer Service Troubleshooting Tips Installation Instructions Safety Instructions
Operating Instructions
Notes
18

General Electric Company
Warranty Registration Department
P.O. Box 34070
Louisville, KY 40232-4070
GE Service Protection Plus
™
GE, a name recognized worldwide for quality and dependability, offers you
Service Protection Plus
™
—comprehensive protection on all your appliances—
No Matter What Brand!
Benefits Include:
• Backed by GE
• All brands covered
• Unlimited service calls
• All parts and labor costs included
• No out-of-pocket expenses
• No hidden deductibles
• One 800 number to call
You will be completely satisfied with our service protection or you may request your money back
on the remaining value of your contract. No questions asked. It’s that simple.
Protect your refrigerator, dishwasher, washer and dryer, range, TV, VCR and much more—any brand!
Plus there’s no extra charge for emergency service and low monthly financing is available. Even icemaker
coverage and food spoilage protection is offered. You can rest easy, knowing that all your valuable
household products are protected against expensive repairs.
Place your confidence in GE and call us in the U.S. toll-free at 800-626-2224
for more information.
*All brands covered, up to 20 years old, in the continental U.S.
We’ll Cover Any Appliance.
Anywhere. Anytime.*
Please place in envelope and mail to:
✁
Cut here
Consumer Product Ownership Registration
Important
Mail
Today!
GE Appliances
General Electric Company
Louisville, Kentucky 40225
www.ge.com/appliances
First
Name
Mr. ■■ Ms. ■■ Mrs. ■■ Miss ■■
Street
Address
City
State
Date Placed
In Use
Month
Day
Year
Zip
Code
Apt. #
Last
Name
Phone
Number
_
_
Consumer Product Ownership Registration
Dear Customer:
Thank you for purchasing our product and thank you for placing your confidence in us.
We are proud to have you as a customer!
Follow these three steps to protect your new appliance investment:
Important: If you did not get a registration card with your
product, detach and return the form below to
ensure that your product is registered.
1
23
Model Number Serial Number
✁
Cut here
Complete and mail
your Consumer
Product Ownership
Registration today.
Have the peace of
mind of knowing we
can contact you in
the
unlikely event of
a
safety modification.
After mailing the
registration below,
store this document
in a safe place. It
contains information
you will need should
you require service.
Our service number is
800 GE CARES
(800-432-2737).
Read your Owner’s
Manual carefully.
It will help you
operate your new
appliance properly.
If you have questions,
or need more
information, call the
GE Answer Center
®
800.626.2000.
Model Number Serial Number
E-mail Address
Occasionally, we may allow selected companies to send you information.
■■ Check here if you do not want this information.

21
Réfrigérateurs
Sans givre à compartiment supérieur
Part No. 162D7742P005 Pub. No. 49-60044 350A4636P004 WR6M407
Modèle 12
Manuel d’utilisation
Électroménagers GE
Service à la clientèle Conseils de dépannage
Fonctionnement
Mesures de sécuritéInstallation
Félicitations!
Nous sommes fiers de la qualité de nos produits et
de la fiabilité de notre service après-vente. Vous le
constaterez dans le présent manuel, facile à utiliser,
et dans la voix amicale de notre personnel du service
à la clientèle.
Mais, surtout, vous le constaterez chaque fois que
vous vous servirez de votre réfrigérateur. C’est
important, car votre nouveau réfrigérateur fera
partie de votre famille pendant des années. Et nous
espérons que vous ferez partie de la nôtre pendant
longtemps aussi.
Nous espérons qu’à l’avenir vous penserez à nous
chaque fois que vous aurez besoin d’un
électroménager de qualité.
Un partenariat de service.
Mesures de sécurité
Mesures de sécurité . . . . . . . .3
Cordons prolongateurs . . . . . . .3
Raccordement électrique . . . . .4
Fiche d’adaptation . . . . . . . . . .4
Fonctionnement
Commande . . . . . . . . . . . . . . . .5
Caractéristiques . . . . . . . . . .5, 6
Service à glaçons . . . . . . . . . . .6
Entretien et nettoyage . . . . .6, 7
Installation
Préparation . . . . . . . . . . . . . . . .8
Inversion des portes . . . . .8–12
Conseils de dépannage
Bruits de fonctionnement
normaux . . . . . . . . . . . . . . . . .13
Avant d’appeler
un réparateur . . . . . . . . . .13–15
Service à la clientèle
Garantie pour
la clientèle au Canada . . . . . .19
Numéros de service . . . . . . . .20
À CONSERVER SOIGNEUSEMENT
Transcrivez les numéros de modèle et de série ici.
#
#
Ils figurent sur l’étiquette qui se trouve à l’intérieur du réfrigérateur
sur la paroi gauche supérieure.
Agrafez ici votre facture ou une copie de votre chèque.
Pour bénéficier de réparations sous garantie, il faut fournir une
preuve de la date d’achat d’origine.
Vous y trouverez de nombreux conseils pour l’utilisation et
l’entretien de votre réfrigérateur. Ces quelques mesures préventives
vous permettront d’économiser du temps et de l’argent, et, ainsi, de
prolonger la vie de votre réfrigérateur.
LISEZ VOTRE MANUEL
SI VOUS AVEZ BESOIN DE SERVICE
Vous trouverez des solutions aux problèmes courants que vous
pourriez rencontrer dans la section
Avant d’appeler un réparateur.
Et, en consultant d’abord nos
Conseils de dépannage,
vous pourrez
peut-être éviter de faire appel à un réparateur.
Si vous avez besoin de service, vous savez que vous n’avez qu’à nous
téléphoner. Vous trouverez à la fin du présent manuel les numéros
sans frais du service à la clientèle.
Aux États-Unis,
vous pouvez
appeler 24 heures par jour, 7 jours par semaine au GE Answer
Center®, 800.626.2000.
Au Canada,
appelez le 1-800-361-3400.
2
Service à la clientèleConseils de dépannage
Fonctionnement
Mesures de sécurité Installation
MESURES DE SÉCURITÉ IMPORTANTES.
LISEZ D’ABORD TOUTES LES DIRECTIVES.
AVERTISSEMENT!
N’utilisez cet électroménager que pour l’usage auquel il est destiné, comme expliqué dans le présent manuel.
MESURES DE SÉCURITÉ
Lorsque vous utilisez un appareil électrique, observez toujours les mesures de sécurité de base,
y compris les suivantes.
■Installez le réfrigérateur conformément aux
directives d’installation avant de l’utiliser.
■Ne laissez pas les enfants grimper, s’asseoir, se
tenir debout ni se pendre aux clayettes du
réfrigérateur. Ils pourraient endommager le
réfrigérateur et se blesser gravement.
■Ne touchez pas les surfaces froides du congélateur,
surtout si vous avez les mains humides ou mouillées :
la peau risque d’adhérer à ces surfaces très froides.
■N’entreposez et n’utilisez pas d’essence ou autres
vapeurs et liquides inflammables à proximité de cet
appareil ou de tout autre appareil électroménager.
■Si votre réfrigérateur est doté d’une machine à
glaçons automatique évitez le contact avec les
pièces mobiles du mécanisme éjecteur, ou avec
l’élément chauffant qui libère les glaçons. Ne
posez pas les doigts ou les mains sur le mécanisme
de la machine à glaçons pendant que le
réfrigérateur est branché.
■Éloignez les doigts des parties du réfrigérateur où
l’on peut facilement se pincer : les espaces entre
les portes et entre les portes et les placards sont
toujours étroits. Soyez prudent lorsque vous fermez
les portes de l’appareil en présence des enfants.
■Débranchez votre réfrigérateur avant de le
nettoyer ou de le réparer.
REMARQUE : Nous vous recommandons vivement de confier
toute réparation à un technicien qualifié.
■Lorsque vous réglez la commande sur
OFF
(éteint), l’alimentation électrique de l’ampoule
n’est pas coupée.
■Ne recongelez pas les aliments surgelés qui ont
complètement dégelé.
COMMENT VOUS DÉBARRASSER CONVENABLEMENT DE VOTRE ANCIEN RÉFRIGÉRATEUR
Les enfants pris au piège ou morts d’asphyxie sont
toujours d’actualité. Les réfrigérateurs abandonnés
sont toujours aussi dangereux, même si on n’attend
que «quelques jours» pour s’en débarrasser. Si vous
ne gardez pas votre ancien réfrigérateur, veuillez
suivre les directives ci-dessous afin de prévenir les
accidents.
Avant de vous débarrasser de votre ancien
réfrigérateur ou congélateur :
■Démontez les portes.
■Laissez les clayettes en place afin d’empêcher les
enfants de grimper à l’intérieur.
Se débarrasser du CFC
Votre ancien réfrigérateur a un système de
refroidissement qui a utilisé les CFC
(chlorofluorocarbones). Les CFC sont jugés nocifs
pour l’ozone stratosphérique.
Si vous vous débarrassez de votre ancien
réfrigérateur, assurez-vous que le frigorigène avec
CFC soit enlevé correctement par un technicien
qualifié. Si vous libérez intentionnellement ce
frigorigène avec CFC vous pouvez être soumis aux
contraventions et à l’emprisonnement sous
provisions du Clean Air Act fédéral.
CORDONS PROLONGATEURS
Nous vous recommandons fortement de ne pas utiliser de cordons prolongateurs à cause des risques
potentiels qu’ils présentent dans certaines conditions.
Toutefois si vous décidez d’utiliser tout de même un cordon prolongateur, il est absolument nécessaire
qu’il s’agisse d’un cordon à 3 fils avec mise à la terre pour appareils électroménagers homologué UL
(aux États-Unis) ou homologué CSA (au Canada), pourvu d’une fiche et d’une prise mises à la terre
de 15 ampères (minimum) et de 120 volts.
3
DANGER! RISQUES POUR LES ENFANTS
4
MESURES DE SÉCURITÉ IMPORTANTES.
LISEZ D’ABORD TOUTES LES DIRECTIVES.
AVERTISSEMENT!
RACCORDEMENT ÉLECTRIQUE
Ne coupez ni retirez en aucun cas la troisième broche (mise à la terre) de la fiche du cordon
d’alimentation. Pour votre sécurité, cet appareil doit être correctement mis à la terre.
Le cordon d’alimentation de cet appareil est muni
d’une fiche à 3 broches (mise à la terre) qui se
branche dans une prise murale ordinaire à 3
alvéoles (mise à la terre) pour réduire au minimum
les risques de chocs électriques.
Faites examiner la prise de courant et le circuit par
un électricien qualifié pour vous assurer que la prise
est correctement mise à la terre.
Si la prise murale est du type standard à 2 alvéoles, il
vous incombe de la faire remplacer par une prise à 3
alvéoles correctement mise à la terre.
Le réfrigérateur doit toujours être branché dans sa
propre prise de courant, dont la tension nominale est
identique à celle indiquée sur la plaque signalétique.
Cette précaution est recommandée pour garantir
un rendement optimum et éviter une surcharge des
circuits électriques de la résidence, ce qui pourrait
créer un risque d’incendie par surchauffe des fils.
Ne débranchez jamais le réfrigérateur en tirant sur le
cordon d’alimentation. Saisissez fermement la fiche
du cordon et tirez droit pour la retirer de la prise.
Réparez ou remplacez immédiatement tout cordon
effiloché ou endommagé. N’utilisez pas un cordon
fendillé ou présentant des signes d’usure.
Lorsque vous déplacez votre réfrigérateur du mur,
faites attention de ne pas le faire rouler sur le cordon
d’alimentation afin de ne pas l’endommager.
FICHE D’ADAPTATION
(Fiches d’adaptation non permises au Canada)
Nous vous recommandons fortement de ne pas utiliser une fiche d’adaptation à cause des risques
potentiels qu’elle présente dans certaines circonstances.
Toutefois, si vous décidez d’utiliser tout de même
une fiche d’adaptation, vous pouvez effectuer un
raccordement temporaire,
si les codes locaux le
permettent, dans une prise de courant à 2 alvéoles
adéquatement mise à la terre en utilisant une fiche
d’adaptation homologuée UL, en vente dans la
plupart des quincailleries.
La fente la plus longue de la fiche doit être alignée
avec la fente la plus longue de la prise murale afin
d’assurer la polarité appropriée pour le
branchement du cordon d’alimentation.
Lorsque vous débranchez le cordon d’alimentation
de la fiche d’adaptation, saisissez toujours la fiche
d’une main pendant que vous tirez sur la fiche du
cordon d’alimentation de l’autre. Sinon,
la borne de mise à la terre de la fiche d’adaptation
risque de casser avec le temps.
Si la borne de mise à la terre de la fiche casse,
N’UTILISEZ PAS
l’appareil tant qu’une mise à la terre
adéquate n’aura pas été rétablie.
Le fait de fixer la borne de mise à la terre de la fiche
d’adaptation à la plaque de la prise de courant n’assure
pas automatiquement la mise à la terre de l’appareil. Il
faut que la vis soit en métal, non isolée, et que la prise de
courant soit mise à la terre par l’entremise du câblage de
la résidence. Faites vérifier le circuit par un électricien
qualifié pour vous assurer que la prise est adéquatement
mise à la terre.
Veuillez lire et suivre attentivement ces mesures de sécurité.
CONSERVEZ CES DIRECTIVES
Service à la clientèle Conseils de dépannage
Fonctionnement
Mesures de sécuritéInstallation
La commande du réfrigérateur.
Réglage de la commande
La commande de température maintient la température dans les deux compartiments, réfrigérateur et
congélateur. Le réglage
1
est le moins froid et le réglage
9
est le plus froid.
Si vous réglez la commande sur
OFF
(éteint), la réfrigération cesse dans les compartiments réfrigérateur
et congélateur, mais le courant alimentant le réfrigérateur n’est pas coupé.
Vérification de la température
Pour le réfrigérateur, placez un récipient de lait sur la clayette supérieure. Vérifiez-le le lendemain. Si le lait
est trop chaud ou trop froid, réglez la température en conséquence.
Pour le congélateur, placez un récipient de crème glacée au centre du congélateur. Vérifiez-la le
lendemain. Si la crème glacée est trop dure ou trop molle, réglez la température en conséquence.
Après avoir réglé la commande, attendez 24 heures pour laisser le réfrigérateur atteindre la température que vous avez réglée.
La commande de température de votre réfrigérateur
contrôle la température dans les compartiments
réfrigérateur et congélateur.
Si vous désirez augmenter ou abaisser la température,
augmentez ou abaissez la commande d’une position à la
fois.
5
Service à la clientèleConseils de dépannage
Fonctionnement
Mesures de sécurité Installation
6
7
5
4
3
Les bacs de rangement.
Bacs à fruits et à légumes
Un ou plusieurs bacs vous permettent de ranger des
fruits, des légumes et des viandes.
Les modèles équipés d’un seul bac de pleine largeur
sont dotés d’un séparateur qui vous permet de
séparer les viandes et les légumes. Le séparateur
peut être enlevé lorsque vous avez besoin d’un seul
grand espace de rangement.
Le bac se bloquera avant de sortir complètement du
réfrigérateur afin d’empêcher que son contenu ne
se renverse sur le sol. On peut l’enlever facilement
en l’inclinant légèrement puis en le tirant au-delà
des «butées».
Pour replacer le bac et le couvercle situé au-dessus
du bac, la porte doit être complètement ouverte.
Dans certains cas, il sera peut-être nécessaire
d’éloigner le réfrigérateur du mur pour que la porte
puisse s’ouvrir complètement.

Service à glaçons.
Entretien et nettoyage du réfrigérateur.
6
Service à la clientèle Conseils de dépannage
Fonctionnement
Mesures de sécuritéInstallation
Moules à glaçons
Pour libérer les glaçons, retournez le
moule, tenez-le au-dessus d’un bac ou d’un
bol et exercez une torsion aux deux
extrémités.
Pour deux ou trois glaçons, laissez le moule
à l’endroit, exercez une légère torsion aux
deux extrémités et enlevez le nombre
désiré de glaçons.
Lavez les moules et le bac à glaçons dans de
l’eau tiède—ne les lavez pas au lave-vaisselle.
Nécessaire de machine à glaçons automatique
Si votre réfrigérateur n’est pas déjà doté d’une machine à glaçons automatique, un
nécessaire de machine à glaçons est disponible chez votre marchand. Vérifiez au dos du
réfrigérateur quel ensemble spécifique est recommandé pour votre modèle.
Ensembles d’alimentation en eau
Des ensembles d’alimentation en eau comprenant chacun un tuyau de cuivre, un robinet
d’arrêt, et des directives pour raccorder la machine à glaçons à votre conduite d’eau froide
sont disponibles moyennant supplément chez votre marchand ou auprès du Service de
pièces et accessoires. Aux États-Unis appelez le 800-626-2002. Au Canada appelez le
1-800-361-3400 et demandez les ensembles dont le numéro de réference se trouve entre
WX8X1 et WX8X4.
Nettoyage de l’extérieur
Gardez l’extérieur du réfrigérateur propre.
Essuyez-le avec un linge propre légèrement
humecté de cire pour appareils
électroménagers ou d’un détergent liquide
doux pour la vaisselle. Essuyez et polissez
avec un linge doux et propre.
N’essuyez pas le réfrigérateur avec un linge à
vaisselle sale ou une serviette humide car ils
laisseront un résidu qui pourra endommager la
peinture. N’utilisez pas de tampons à récurer, de
produits nettoyants en poudre, de javellisants ou de
produits nettoyants contenant un javellisant, car ces
produits peuvent égratigner la peinture et la rendre
moins résistante.
Protégez le fini de l’appareil.
La carrosserie
du réfrigérateur est recouverte d’une
peinture de haute qualité cuite au four.
Moyennant certaines précautions, cette
peinture gardera son éclat et résistera à la
rouille pendant de longues années.
Appliquez une couche de cire pour
appareils électroménagers lorsque vous
installez votre réfrigérateur, et, par la suite,
au moins 2 fois par année.

Service à la clientèleConseils de dépannage
FonctionnementMesures de sécurité
Installation
Nettoyage de l’intérieur
Pour éviter les mauvaises odeurs,
laissez une
boîte ouverte de bicarbonate de soude dans
les compartiments réfrigérateur et
congélateur.
Débranchez le réfrigérateur avant de le
nettoyer.
S’il est trop difficile de le faire,
essorez bien votre linge ou votre éponge
pour enlever l’excès d’eau lorsque vous
nettoyez autour des interrupteurs, des
lampes ou des commandes.
Utilisez une solution d’eau tiède et de
bicarbonate de soude—environ une cuillère à
soupe (15 ml) de bicarbonate de soude par
pinte (1 L) d’eau—afin de nettoyer tout en
neutralisant les odeurs. Rincez et essuyez bien.
Les autres pièces du réfrigérateur—y compris
les bacs à viande et à légumes, le bac à glaçons
et toutes les pièces en plastique—peuvent être
nettoyées de la même manière.
Après avoir nettoyé les joints de porte,
appliquez une fine couche de vaseline
sur les joints du côté des charnières pour
empêcher les joints de coller ou de se
déformer. N’utilisez pas de poudre à récurer
ou autres produits nettoyants abrasifs.
Plateau de dégivrage.
Ce plateau non-
amovible est situé sous le compresseur à
l’arrière du réfrigérateur. Il doit être
nettoyé au moins une fois par an. Déplacez
le réfrigérateur du mur aussi loin que
nécessaire et débranchez le cordon
d’alimentation de la prise murale. Laissez
refroidir le compresseur avant de nettoyer
le plateau. Utilisez un linge ou une éponge
propre que vous avez trempé dans une
solution d’eau tiède et de bicarbonate de
soude—une cuillerée (15 ml) de
bicarbonate de soude par pinte (1 L) d’eau.
N’utilisez pas
de produits nettoyants en
poudre, de produits abrasifs, d’eau de Javel
ou de nettoyants contenant des chlorures.
Ne lavez aucune pièce de plastique du réfrigérateur
au lave-vaisselle.
Remplacement de l’ampoule
Dévissez l’ampoule grillée et remplacez-
la par une ampoule standard de 40 watts.
Derrière le réfrigérateur
Une fois par an, déplacez le réfrigérateur
du mur et aspirez les serpentins à l’arrière.
Prenez un soin particulier lorsque vous
éloignez le réfrigérateur du mur. Tous les
types de revêtements de sol peuvent être
endommagés, particulièrement ceux qui
sont coussinés ou dont la surface est gaufrée.
Tirez le réfrigérateur en ligne droite et,
lorsque vous le remettez en place, poussez-
le vers le mur en ligne droite. Les
déplacements latéraux du réfrigérateur
pourraient endommager le revêtement de
sol ou le réfrigérateur.
Lorsque vous remettez le réfrigérateur en place en
le poussant, veillez à ne pas le faire rouler sur le
cordon d’alimentation.
Départ en vacances
Lorsque vous vous absentez pendant une période prolongée, videz et débranchez le
réfrigérateur. Réglez la commande sur
OFF
(éteint) et nettoyez l’intérieur avec une
solution d’eau et de bicarbonate de soude, à raison d’une cuillère à soupe (15 ml) de
bicarbonate par pinte (1 L) d’eau. Laissez les portes ouvertes.
Déménagement
Immobilisez toutes les pièces amovibles, tels que la grille, les clayettes et les bacs, à l’aide de
ruban gommé pour éviter de les endommager.
Assurez-vous que le réfrigérateur demeure debout pendant son déménagement.
7
8
Préparation.
Veuillez lire toutes les directives attentivement.
Emplacement du réfrigérateur
N’installez pas le réfrigérateur dans une pièce où la
température ambiante risque d’être inférieure à
55 °F (13 °C) parce qu’il ne se mettra pas en
marche suffisamment souvent pour maintenir les
températures convenables.
Installez le réfrigérateur sur un plancher
suffisamment solide pour le supporter lorsqu’il
est plein.
Assurez-vous que le réfrigérateur soit installé à au
moins 5 po (13 cm) de la cuisinière.
Inversion des portes.
Avant de commencer
Lorsque vous invertissez le sens d’ouverture des
portes :
■Lisez toutes les directives avant de commencer.
■Manipulez les pièces avec précaution pour éviter
de rayer la peinture.
■Posez les vis à côté des pièces correspondantes
pour éviter de les utiliser aux mauvais endroits.
■Prévoyez un plan de travail qui ne se raye pas pour
poser les portes.
Ces directives s’appliquent au transfert des charnières du
côté droit au côté gauche.
Si vous décidez plus tard de déplacer les charnières
du côté droit, procédez de la même façon (en
intervertissant simplement les références aux côtés
gauche et droit).
Débranchez le réfrigérateur de sa prise de
courant.
Videz tous les balconnets de porte, y compris le
compartiment à produits laitiers.
Dégagements
Prévoyez les dégagements suivants pour faciliter
l’installation et la bonne circulation d’air.
Côtés 1 po (25 mm)
Dessus 4 po (102 mm)
Arrière 3 po (76 mm)de la surface du
cabinet arrière jusqu’au mur
Pour améliorer l’espacement et la ventilation
assurez-vous que le dispositif de dégagement en
métal ou le pare-chocs en caoutchouc de l’appareil
qui se visse (à l’arrière de certains modèles) soit
en place.
Pieds de nivellement
Les pieds de nivellement réglables
situés aux deux
coins à l’avant du réfrigérateur doivent être réglés
de façon à ce que le réfrigérateur repose fermement
sur le sol et l’avant soit suffisamment relevé pour
que les portes se ferment facilement lorsqu’elles
sont à moitié ouvertes.
Pour
régler les pieds de nivellement,
tournez les
pieds
dans le sens des aiguilles d’une montre
pour
soulever le réfrigérateur, et
dans le sens contraire
pour l’abaisser.
Service à la clientèle Conseils de dépannage
Fonctionnement
Mesures de sécuritéInstallation
Pour soulever le réfrigérateur
Ce dont vous aurez besoin
Matériel nécessaire :
■Tournevis Phillips
■Couteau à mastic ou tournevis à lame mince
■Tourne-écrou hexagonal de 5/16 po
■Tourne-écrou hexagonal de 7/32 po
Service à la clientèleConseils de dépannage
FonctionnementMesures de sécurité
Installation
Enlevez les portes
Enlevez la porte du congélateur
ATTENTION : Maintenez la porte en place tout
en retirant la charnière supérieure pour éviter
que la porte ne tombe par terre.
Retirez la partie supérieure de la charnière.
Retirez la charnière supérieure, la cale et les
deux vis.
Posez la porte sur une surface qui ne se raye pas
en la faisant coucher sur sa contre-porte.
REMARQUE : Lorsque vous enlevez la porte du
congélateur, la (les) rondelle(s) entre la charnière centrale
et la porte peut (peuvent) rester collée(s) à la porte. Ne la
(les) perdez pas.
c
b
a
Enlevez la porte du réfrigérateur
ATTENTION : Il faut maintenir la porte en place
pour qu’elle ne tombe par terre.
Retirez l’axe de la charnière en la tournant dans
le sens contraire des aiguilles d’une montre.
Soulevez légèrement la poignée tout en sortant
l’axe de la charnière centrale.
Retirez la porte en l’ouvrant légèrement tout en
la soulevant pour la libérer de la charnière
centrale et l’axe de la charnière inférieure.
Posez la porte sur une surface qui ne se raye pas
en la faisant coucher sur sa contre-porte.
Assurez-vous que le compartiment à beurre ne
reste pas ouvert.
Remplacez la (les) rondelle(s) sur la charnière
inférieure si elle(s) est (sont) restée(s) collée(s)
à la porte.
ATTENTION : Ne laissez pas les portes tomber
par terre. Vous risquez d’endommager la butée
de porte.
e
d
c
b
a
9
10
Inversion des portes.
Service à la clientèle Conseils de dépannage
Fonctionnement
Mesures de sécuritéInstallation
Réinstallez la charnière supérieure à gauche
Retirez soigneusement les capuchons à l’aide
d’un couteau à mastic. Faites attention de ne pas
rayer la peinture.
Réinstallez les capuchons à droite, en les
insérant dans les trous laissés libres par
l’enlèvement des vis de la charnière supérieure.
Remontez la charnière supérieure et la cale à
gauche, en tournant les vis juste assez pour
maintenir la charnière en place .
b
a
Invertissez la visserie de montage
Assurez-vous que les
vis passent par ces
trous du côté gauche.
Capuchons
Réinstallez la charnière inférieure à gauche
Retirez la charnière inférieure, la (les) vis et la cale
du côté droit et remontez-les au côté gauche de la
carrosserie.
ATTENTION : Les vis doivent être correctement
serrées. Vissez-les jusqu’à ce qu’elles soient bien serrées.
Ensuite serrez-les d’un tour au minimum en vous servant
des deux mains.
Réinstallez la charnière centrale à gauche
Retirez les deux vis du côté opposé.
Retirez la charnière centrale, la cale et la (les) vis.
Remontez la charnière centrale à gauche.
ATTENTION : Lorsque la charnière est montée
correctement, elle restera serrée contre la carrosserie.
ATTENTION : Les vis doivent être correctement
serrées. Vissez-les jusqu’à ce qu’elles soient bien serrées.
Ensuite serrez-les d’un demi-tour au minimum en vous
servant des deux mains.
c
b
a

Service à la clientèleConseils de dépannage
FonctionnementMesures de sécurité
Installation
Réinstallez la poignée de porte du réfrigérateur à droite
Pour retirer la poignée :
■Enlevez soigneusement le capuchon à l’aide d’un
couteau à mastic.
■Enlevez la vis visible qui retient la poignée.
■Retirez les deux vis qui retiennent la poignée sur
le dessus de la porte.
Après avoir retiré la poignée :
■Retirez les vis du bord droit sur le dessus de la
porte et insérez-les dans les trous de vis de
poignée du côté gauche.
■Retirez le capuchon au côté gauche de la porte et
insérez-le dans le trou qui se trouve de l’autre
côté.
■
Transférez le capuchon de la porte de l’autre côté.
Lorsque vous réinstallez la poignée :
■
Fixez la poignée du côté droit de la porte en
suivant les directives ci-dessus.
Invertissez les poignées de porte
Capuchon
Vis de fixation de
la poignée
Capuchon
Réinstallez la poignée de porte du congélateur à droite
■Retirez le capuchon plaque/marque à l’aide d’un
couteau à mastic.
■Retirez la vis visible qui retient la poignée.
■Retirez les deux vis qui retiennent la poignée à la
partie inférieure de la porte.
■Retirez la poignée.
■Retirez les butées de porte, comme indiqué dans
les directives ci-dessus.
■Transférez les capuchons et la vis du côté opposé
sur le dessus de la porte.
■Transférez le capuchon sur le devant de la porte
au côté opposé.
■
Fixez la poignée au côté droit de la porte en
suivant les directives ci-dessus dans l’ordre inverse.
Capuchon
Poignée supérieure
Poignée inférieure Poignée supérieure
Poignée inférieure
Transférez les butées de porte
Déplacez la butée en métal de chaque porte du côté
droit au côté gauche.
Butées de porte
Côté gauche Côté droit
Rondelle Rondelle
Capuchon
plaque/marque
11
12
Inversion des portes.
Service à la clientèle Conseils de dépannage
Fonctionnement
Mesures de sécuritéInstallation
Réinstallez la porte du réfrigérateur
Assurez-vous que la (les) rondelle(s) est (sont)
bien en place sur l’axe de charnière inférieure.
Placez la porte du compartiment réfrigérateur
sur l’axe de charnière inférieure et positionnez-
la sous la charnière centrale. Mettez l’axe de
charnière dans la charnière centrale pour
maintenir la porte bien en place et serrez la vis.
b
a
Réinstallez la porte du congélateur
Placez la (les) rondelle(s) sur l’axe de charnière
centrale.
Placez la porte du congélateur sur la charnière
centrale au-dessus de l’axe.
Soulevez la charnière supérieure avec la main et
insérez l’axe de pivotement dans le trou de la
porte. Ensuite, fermez la porte.
c
b
a
Alignez les portes
Alignez la porte du congélateur et la porte du
compartiment réfrigérateur en vous assurant
que l’espace entre les portes est régulier.
Serrez les vis de la charnière supérieure en les
tournant jusqu’à ce qu’elles soient bien serrées.
Ensuite serrez-les d’un demi-tour au minimum
en vous servant des deux mains.
b
a
Alignez les portes en vous
assurant que l’espace entre
les portes est régulier.

Bruits de fonctionnement normaux.
Selon l’emplacement du réfrigérateur dans votre cuisine, vous
aurez peut-être envie d’installer celui-ci sur un tapis caoutchouté
afin de réduire le bruit de l’appareil.
Les compresseurs modernes à haut rendement fonctionnent plus rapidement et
produisent un bourdonnement ou un bruit de pulsation plus audible pendant le
fonctionnement.
La minuterie de dégivrage et la commande du réfrigérateur font entendre des
déclics lorsqu’elles se mettent en marche ou s’arrêtent.
Le ventilateur fait circuler de l’air dans le congélateur afin de maintenir une
température uniforme.
Des gouttes d’eau tombent sur l’élément de dégivrage, ce qui produit un
crépitement ou un sifflement pendant le cycle de dégivrage.
Le frigorigène qui circule dans les bobines de refroidissement du congélateur fait un
bruit qui ressemble à de l’eau qui bout ou à un gargouillis.
L’expansion et la contraction des bobines de refroidissement pendant le dégivrage et
la réfrigération qui suit le dégivrage produisent des craquements.
De l’eau s’égoutte lorsqu’elle fond dans l’évaporateur et s’écoule dans le plateau de
dégivrage pendant le cycle de dégivrage.
Ces bruits sont normaux et, pour la plupart, imputables au fonctionnement à haut
rendement de l’appareil.
Avant d’appeler un réparateur…
Conseils de dépannage—Économisez du temps et de l’argent!
Consultez d’abord les tableaux qui suivent et vous pourrez peut-
être éviter de faire appel à un réparateur.
Problème
Causes possibles Correctifs
Le réfrigérateur ne
Le cycle de dégivrage est en cours.
•Attendez environ 30 minutes afin que le cycle de
fonctionne pas
dégivrage puisse terminer.
La commande est réglée sur •Réglez la commande de température sur un réglage
OFF
(éteint). de température.
Le réfrigérateur est débranché. •Enfoncez la fiche de l’appareil dans la prise murale.
Le disjoncteur ou le fusible •Remplacez le fusible ou réenclenchez le disjoncteur.
peut avoir sauté.
Vibration ou bruit
Les pieds de nivellement avant •Consultez
Pieds de nivellement.
métallique (une légère
doivent être réglés.
vibration est normale)
13
Service à la clientèleConseils de dépannage
Fonctionnement
Mesures de sécurité Installation

Problème
Causes possibles Correctifs
Le moteur fonctionne
Ceci est normal lorsque le •Attendez 24 heures pour que le réfrigérateur refroidisse
pendant de longues
réfrigérateur vient d’être branché. complètement.
périodes ou démarre
Ceci arrive souvent lorsque •C’est normal.
et s’arrête fréquemment.
une grande quantité d’aliments
a été mise au réfrigérateur.
(Les réfrigérateurs
Porte laissée ouverte. •Vérifiez qu’il n’y a pas un paquet qui empêche
modernes et leurs
la porte de fermer.
congélateurs étant plus
Temps chaud ou ouverture •C’est normal.
grands, leur moteur doit
fréquente des portes.
fonctionner plus
La commande de température •Consultez
La commande.
longtemps. Ils démarrent
a été réglée à la température
et s’arrêtent afin de
la plus froide.
Température trop élevée
La commande de température •Consultez
La commande.
dans le congélateur ou
n’a pas été réglée à une
le réfrigérateur
température assez basse.
Temps chaud ou ouverture •Abaissez la commande de température d’une position.
fréquente des portes. Consultez
La commande.
Porte laissée ouverte. •Vérifiez qu’il n’y a pas un paquet qui empêche la
porte de fermer.
Givre sur les aliments
Porte laissée ouverte. •Vérifiez qu’il n’y a pas un paquet qui empêche la
surgelés (il est normal
porte de fermer.
que du givre se forme à
Les portes ont été ouvertes
l’intérieur du paquet)
trop souvent ou pendant trop
longtemps.
Odeur/saveur
Des aliments ont transmis leur •Emballez bien les aliments.
anormale des glaçons
odeur/goût aux glaçons.
Il faut nettoyer l’intérieur du •Consultez
Entretien et nettoyage.
réfrigérateur.
Formation lente des
Porte laissée ouverte. •Vérifiez qu’il n’y a pas un paquet qui empêche la porte
glaçons
de fermer.
La commande de température •Consultez
La commande.
n’est pas réglée à une température
assez froide.
Avant d’appeler un réparateur…
14
Service à la clientèle Conseils de dépannage
Fonctionnement
Mesures de sécuritéInstallation
Le moteur fonctionne
pendant de longues
périodes ou démarre et
s’arrête fréquemment.
(Les réfrigérateurs
modernes et leurs
congélateurs étant plus
grands, leur moteur doit
fonctionner plus
longtemps. Ils démarrent
et s’arrêtent afin de
maintenir des
températures uniformes.)

15
Service à la clientèleConseils de dépannage
FonctionnementMesures de sécurité
Installation
Problème
Causes possibles Correctifs
Odeur dans
Des aliments ont transmis •Les aliments à odeur forte doivent être emballés
le réfrigérateur
leur odeur au réfrigérateur. hermétiquement.
•Gardez une boîte ouverte de bicarbonate de soude
dans le réfrigérateur.
Il faut nettoyer l’intérieur. •Consultez
Entretien et nettoyage.
Il faut nettoyer le plateau de •Consultez
Entretien et nettoyage.
dégivrage.
De la condensation
Cela n’est pas inhabituel pendant •Essuyez bien la surface extérieure.
s’accumule à l’extérieur
les périodes de forte humidité.
De la condensation
Les portes sont ouvertes trop
s’accumule à l’intérieur
fréquemment ou pendant trop
(par temps humide,
longtemps.
l’ouverture des portes
laisse entrer de
l’humidité)
L’éclairage intérieur
Il n’y a pas de courant au niveau •Remplacez le fusible ou réenclenchez le disjoncteur.
ne fonctionne pas
de la prise.
L’ampoule est grillée. •Consultez
Remplacement de l’ampoule.

Notes
16
Service à la clientèle Conseils de dépannage
Fonctionnement
Mesures de sécuritéInstallation

17
Service à la clientèleConseils de dépannage
FonctionnementMesures de sécurité
Installation

18
Notes
Service à la clientèle Conseils de dépannage
Fonctionnement
Mesures de sécuritéInstallation
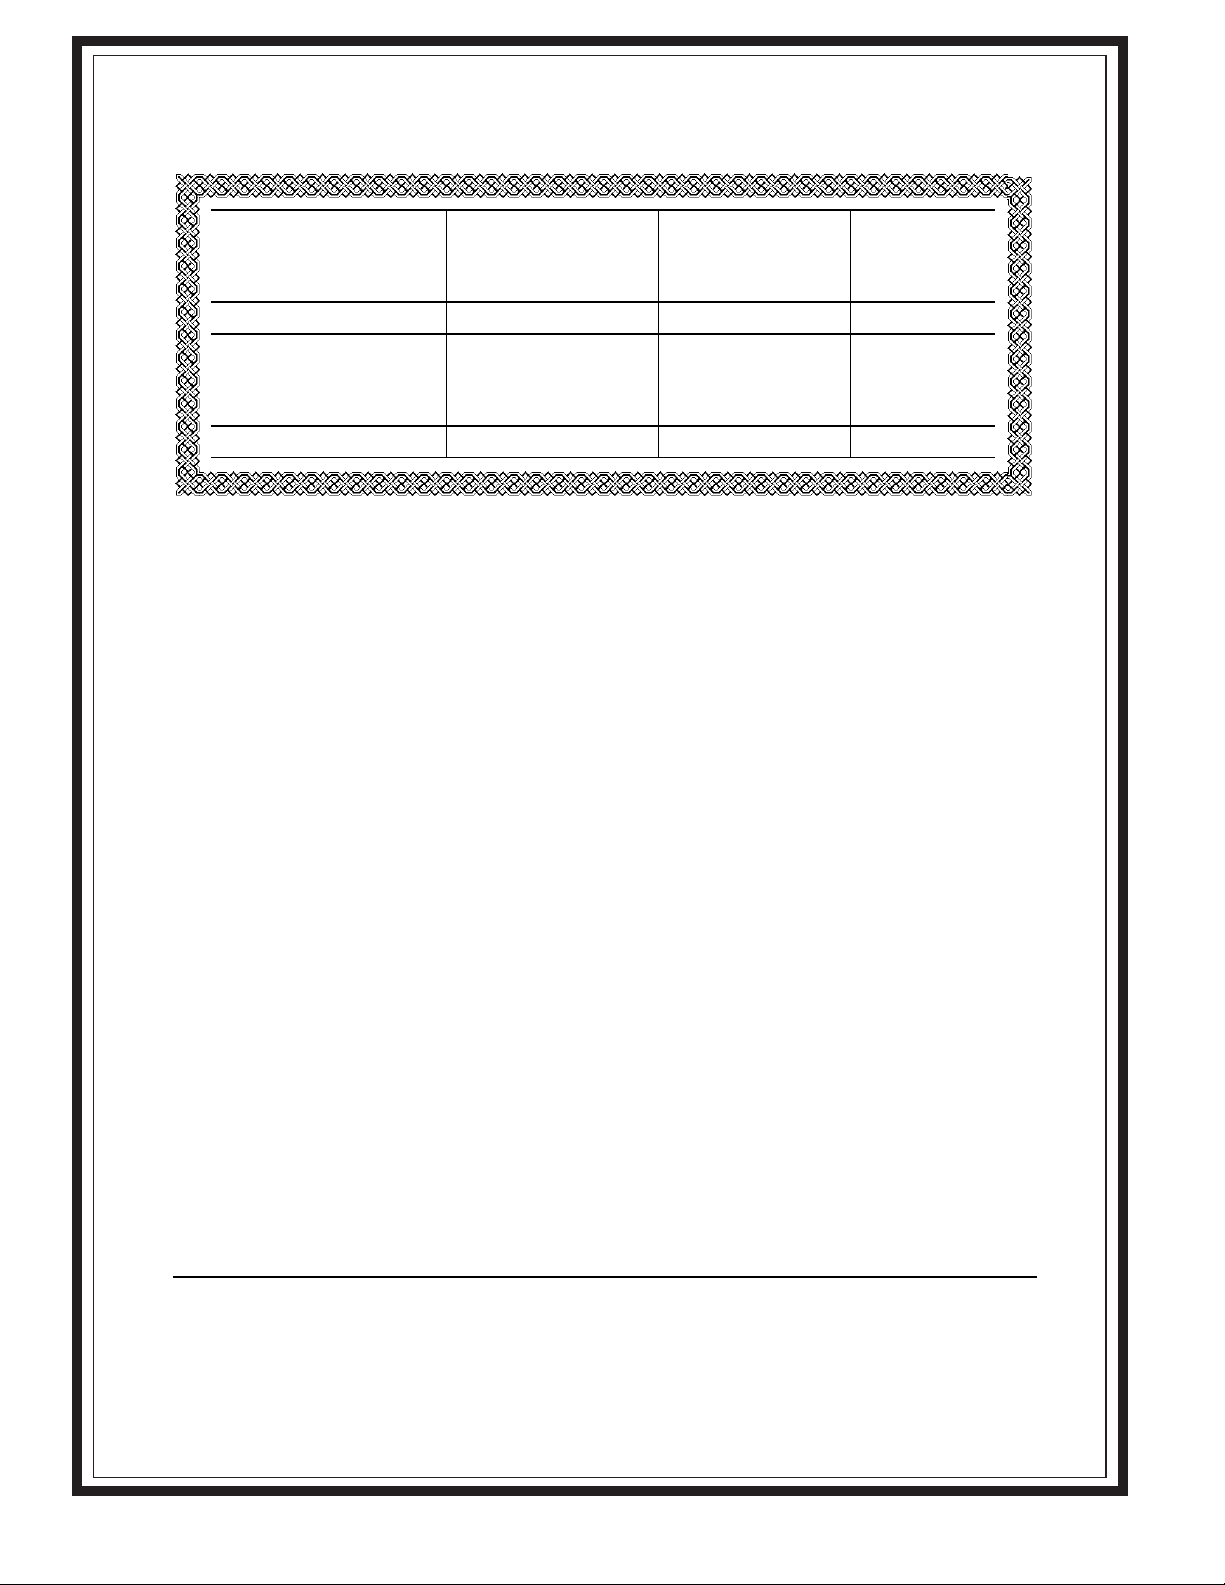
19
GARANTIE DU CLIENT
(pour la clientèle au Canada)
Votre réfrigérateur est garanti contre tout défaut de matériau et de fabrication.
Ce que cette Durée de garantie Pièces Main-d’oeuvre
garantie couvre (à partir de la Réparation ou
date d’achat) remplacement au
choix de Camco
Compresseur Cinq (5) ans Cinq (5) ans Cinq (5) ans
Système scellé (y Cinq (5) ans Cinq (5) ans Cinq (5) ans
compris l’évaporateur, la
tuyauterie du condenseur
et le frigorigène)
Toutes les autres pièces Un (1) an Un (1) an Un (1) an
TERMES ET CONDITIONS :
La présente garantie ne s’applique qu’à
l’utilisation domestique par une seule
famille au Canada, lorsque le réfrigérateur a
été installé conformément aux instructions
fournies par Camco et est alimenté
correctement en eau et en électricité.
Les dommages dûs à une utilisation
abusive, un accident, une exploitation
commerciale, ainsi que la modification,
l’enlèvement ou l’altération de la plaque
signalétique annulent la présente garantie.
L’entretien effectué dans le cadre de la
présente garantie doit l’être par un
réparateur agréé Camco.
Camco et le marchand ne peuvent être
tenus pour responsables en cas de
réclamations ou dommages résultant de
toute panne du réfrigérateur ou d’un
entretien retardé pour des raisons qui
raisonnablement échappent à leur contrôle.
L’acheteur doit, pour obtenir un service
dans le cadre de la garantie, présenter la
facture originale. Les éléments réparés ou
remplacés ne sont garantis que pendant le
restant de la période de garantie initiale.
Cette garantie est en sus de toute garantie
statutaire.
EXCLUSIONS DE LA GARANTIE :
• Visites à domicile pour vous apprendre
à vous servir de l’appareil.
• Dommages causés à la peinture ou à
l’émail après livraison.
• Installation incorrecte—l’installation
correcte inclut la bonne circulation
d’air pour le système de réfrigération,
des possibilités de branchement aux
circuits électriques, d’alimentation en
eau et autres.
• Remplacement des fusibles ou
réarmement des disjoncteurs.
• Remplacement des ampoules
électriques.
• Dommages subis par l’appareil à
la suite d’un accident, d’un incendie,
d’inondations ou en cas de force
majeure.
• Perte des aliments dûe à la
déterioration.
• Utilisation correcte et entretien adéquat
de l’appareil selon les manuel
d’utilisation, réglage correct des
commandes.
• LE GARANT N’EST PAS RESPONSABLE
DES DOMMAGES INDIRECTS.
IMPORTANT
Gardez cette garantie et votre facture originale comme preuve d’achat et preuve
de la date d’achat.
Camco vous offre ses services dans tout le pays. Pour de plus amples
renseignements sur la présente garantie, veuillez prendre contact avec :
Directeur, Relations avec les consommateurs
Camco Inc., Bureau 310
1 Factory Lane
Moncton, N.B.
E1C 9M3

20
Numéros de service.
GE Answer Center
®
Aux États-Unis : 800.626.2000
Notre service d’information est ouvert 24 heures par jour, 7 jours par semaine.
Au Canada,
écrivez au Directeur, Relations avec les consommateurs, Camco Inc., Bureau 310,
1 Factory Lane, Moncton, N.B. E1C 9M3.
Réparations à domicile
Aux États-Unis : 800-432-2737
Pour faire réparer votre électroménager GE, il suffit de nous téléphoner.
Au Canada,
appelez le 1-800-361-3400.
Pour les besoins particuliers
Aux États-Unis : 800.626.2000
Sur demande, GE peut fournir une brochure sur l’aménagement d’une cuisine pour les
personnes à mobilité réduite.
Aux États-Unis, appelez le 800-TDD-GEAC (800-833-4322).
Au Canada,
écrivez au Directeur, Relations avec les consommateurs, Camco Inc., Bureau 310,
1 Factory Lane, Moncton, N.B. E1C 9M3.
Contrats d’entretien
Aux États-Unis : 800-626-2224
Achetez un contrat d’entretien GE avant que votre garantie n’expire et bénéficiez d’un rabais
substantiel. Ainsi le service après-vente GE sera toujours là après expiration de la garantie.
Au Canada,
appelez le 1-800-461-3636.
Pièces et accessoires
Aux États-Unis : 800-626-2002
Ceux qui désirent réparer eux-mêmes leurs électroménagers peuvent recevoir pièces et
accessoires directement à la maison (cartes VISA, MasterCard et Discover acceptées).
Les directives stipulées dans le présent manuel peuvent être effectuées par n’importe quel utilisateur.
Les autres réparations doivent généralement être effectuées par un technicien qualifié. Soyez prudent,
car une réparation inadéquate peut affecter le fonctionnement sécuritaire de l’appareil.
Les clients
au Canada
devraient consulter les pages jaunes pour connaître la succursale Camco la
plus près, ou appelez le 1-800-361-3400.
Un service satisfaisant
Si vous n’êtes pas satisfait du service après-vente dont vous avez bénéficié :
Premièrement,
communiquez avec les gens qui ont réparé votre appareil.
Ensuite,
si vous n’êtes toujours pas satisfait,
aux États-Unis,
envoyez tous les détails—numéro de
téléphone compris—au Manager, Consumer Relations, GE Appliances, Appliance Park,
Louisville, KY 40225; ou,
au Canada,
au Directeur, Relations avec les consommateurs, Camco
Inc., Bureau 310, 1 Factory Lane, Moncton, N.B. E1C 9M3.
Imprimé aux Canada
Service à la clientèle Conseils de dépannage
Fonctionnement
Mesures de sécuritéInstallation

