Google Assistant on Android TV Android TV brings a world of content to your biggest screen. With the Google Assistant built in, you can quickly access entertainment, get answers, and control devices around your home. Find the latest blockbuster, check the score of the big game, or dim the lights. Just say “Hey Google,” or press the mic button on your remote to get started.
Google Play Android TV offers thousands of movies, shows, and games from Google Play, YouTube, and your favorite apps. Discover your favorite content, apps, and games on Google Play.
DTV / Analog TV / CATV You can use your remote control to select channels which are broadcast in digital format and conventional analog format. Also, cable and satellite subscribers can access their TV channels.
Information display You can display on the TV screen the title, contents (DTV only) and other information on the current program.
Autoprogram This unit automatically scans and memorizes channels available in your area, eliminating difficult setup procedures.
Parental controls This feature allows you to block children’s access to inappropriate programs.
Internet Browsing
Closed caption decoder Built-in closed caption decoder displays text for closed caption supported programs.
MTS / SAP tuner Audio can be selected from the remote control.
Auto standby If there is no input signal and no operation for 15 minutes, the unit will go into standby mode automatically.
Sleep timer You can set the unit to go into standby mode after a specific amount of time.
Choices for on-screen language Select your on-screen language: English, Spanish or French.
Stereo sound function
PLL frequency synthesized tuning Provides free and easy channel selection and lets you tune directly to any channel using the number and decimal point “•” keys on the remote control.
Various adjustments for picture and sound Customizes picture quality suitable for your room and sets your sound preference.
HDMI control HDMI control allows your other HDMI link devices to be controlled by the HDMI cable connected to your TV.
HDMI input
HDMI-DVI input If your video device has a DVI output jack, use an HDMI-DVI conversion cable to connect the unit.
Digital audio output
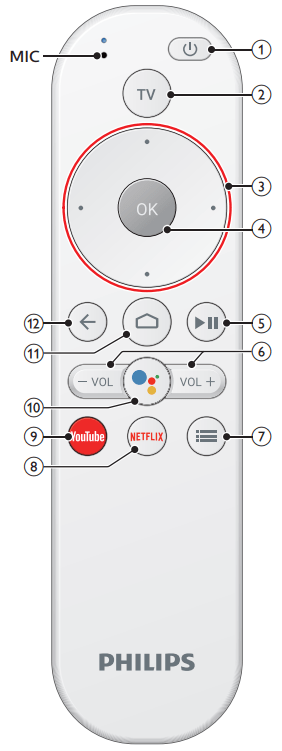
Remote control
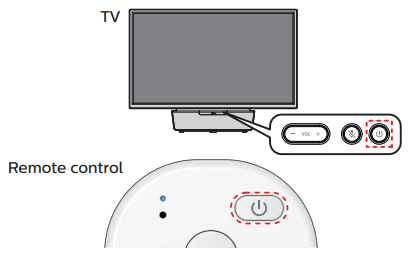
(POWER) Turns the TV on and off of standby.
TV Direct access to your installed TV channels. (This feature is only available for OTA and select cable channels.)
(NAVIGATION buttons) Moves the cursor, selects the on-screen menu items.
OK Press to decide the command of setting when the Home menu is displayed.
Starts, pauses or resumes playback.
VOL + / – Adjusts the volume.
(OPTIONS) Displays a list of menu options applicable to the active screen.
NETFLIX Access directly to Netflix.
YouTube Access directly to YouTube.
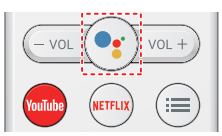
0 (Google Assistant) Activates your personal Google Assistant.
(HOME) Access to your apps, Live TV, input devices, settings, and the Google Play Store.
(BACK) Returns to the previous menu screen.
Control panel
VOL + / – Adjusts the volume. VOL + : Volume up VOL – : Volume down
Remote control sensor Receives IR signal from remote control.
(Mic Off) Disable the Google Assistant from listen mode.
(POWER) Turns the TV on or switches the TV into standby mode.
Terminals
5. USB terminal
Data input from USB memory stick only. Can be used to play media files via apps that can be installed such as VLC and others OR can be used to expand the Application memory of the television.
Note(s): This TV has a USB port which is designed for USB media playback or to connect peripheral devices, such as a keyboard or mouse. While you may find that a particular keyboard or mouse works to some extent, we cannot guarantee full functionality. You will not damage the TV in any way by trying various keyboards or mice, but the performance of that device may be limited.
6. 75 ohm Cable / Antenna connection
Signal input from an antenna or Cable / Satellite set-top boxes.
7. Digital audio output (Optical) jack
Digital audio (S/PDIF) output to home theaters and other digital audio systems.
8. HDMI input jack(s)
Digital audio and video input from high definition digital devices such as DVD / Blu-ray Disc™ players, cable / satellite set-top boxes, PC’s, etc.
9. Ethernet port
For internet connection using an Ethernet cable with an RJ-45 connector.
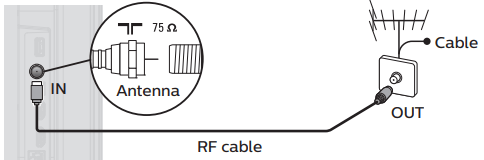
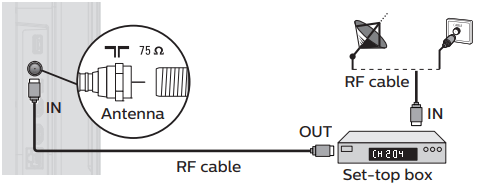
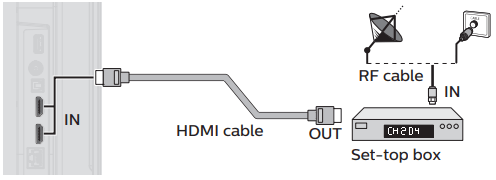
Connecting antenna or cable / satellite / IPTV set-top box
Be sure your antenna or another device is connected properly before plugging in the AC power cord.
If connecting to an antenna through an RF cable
Any DTV programs that are broadcast in your area can be received for free through an antenna connection.
If connecting cable / satellite / IPTV set-top box using an RF cable
If the TV is connected to a cable / satellite set-top box via a coaxial connection, set the TV to channel 3/4 or the channel specified by the service provider.
If connecting cable / satellite / IPTV set-top box using an HDMI cable
If the TV is connected to a cable or satellite set-top-box via an HDMI cable, you must select the correct source. On the Android TV home screen, select Inputs in the upper right corner of the screen, and press OK to switch input device list.
Note(s)
Depending on your antenna system, you may need different types of combiners (mixers) or separators (splitters) for HDTV signal. The minimum RF bandpass on these devices is 2,000MHz or 2GHz.
For your safety and to avoid damage to this unit, please unplug the RF coaxial cable from the antenna input jack before moving the unit.
If you did use an antenna to receive analog TV, it should also work for DTV reception. Outdoor or attic antennas will be more effective than a set-top box or inside antenna.
To turn on your reception source easily between antenna and cable, install an antenna selector.
If you are not receiving a signal from your cable service, contact the cable provider.
Plugging in the AC power cord
Make sure that the AC power cord must be plugged to an AC outlet after all the necessary connections are made.
Caution(s): If you have an amplifier, connect the HDMI cable to the HDMI input via your amplifier.
Note(s): Each time you plug in the AC power cord, no operations will be performed for several seconds. This is not a malfunction.
Before you connect the AC power cord:
Be sure other devices are connected properly before plugging in the AC power cord.
HDMI
Supports high-definition digital signals and gives highest picture and sound quality. Video and audio signals are combined in one cable. You must use HDMI for full high-definition video and to enable HDMI control (HDMI CEC).
Note(s):
Philips HDMI supports HDCP (High-bandwidth Digital Contents Protection). HDCP is a form of digital rights management that protects high-definition content in Blu-ray Disc™ or DVDs.
The HDMI-ARC connector on the TV features HDMI-ARC functionality. This allows output of TV audio to an HDMI-ARC-compliant device.
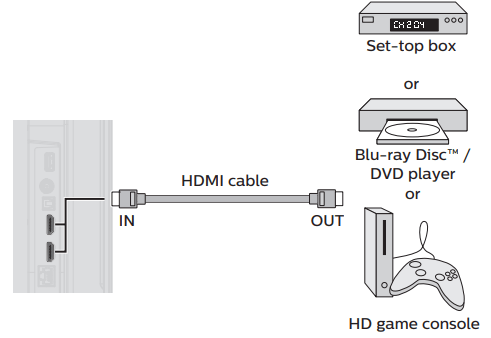
Connecting your devices
HDMI digital connection
HDMI connection offers the highest picture quality. HDMI (High-Definition Multimedia Interface) transports highdefinition digital video and multi-channel digital audio through a single cable.
Note(s):
Some HDMI cables and devices may not be compatible with the TV due to different HDMI specifications.
Use an HDMI cable with the HDMI logo (a certified HDMI cable). High speed HDMI cable is recommended for the better compatibility.
The unit accepts 480i / 480p / 720p / 1080i, 1080p 24/30/60Hz of video signals, 32kHz / 44.1kHz and 48kHz of audio signals.
This unit accepts LPCM, AC-3, DD+ audio signal.
This unit accepts only signals in compliance with CTA-861-G.
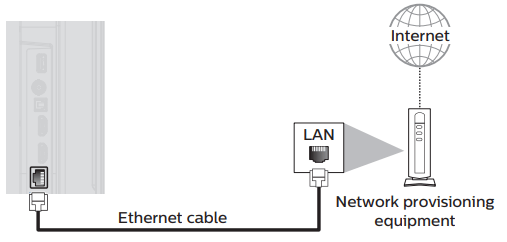
Connecting the TV to the internet using an Ethernet cable
Note(s):
Please purchase shielded Ethernet cables at your local store and use them when you connect to network equipment.
After connecting an Ethernet cable, set up necessary network settings.
Do not insert any cable other than an Ethernet cable to the Ethernet port to avoid damaging the unit.
If your telecommunications equipment (modem, etc.) does not have broadband router functions, connect a broadband router.
If your telecommunications equipment (modem, etc.) has broadband router functions but there is no vacant port, then add a hub.
For a broadband router, use a router which supports 10BASE-T / 100BASETX.
Do not connect your PC directly to the Ethernet port of this unit
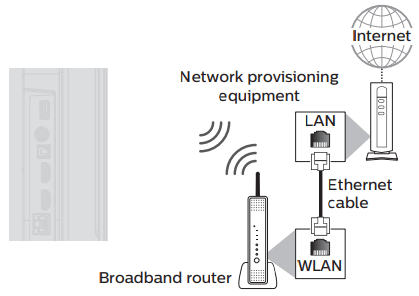
Connecting the TV to the internet using a wireless LAN
Note(s):
After you make the wireless connection, set up the necessary network settings.
Use a wireless LAN Access Point (AP) (e.g. broadband wireless router) which supports IEEE 802.1 1 a/b/g/n/ac. (n is recommended for stable operation of the wireless network.)
This unit does not support Ad-hoc mode.
Other radio devices or obstacles may cause interference to the wireless network connection.
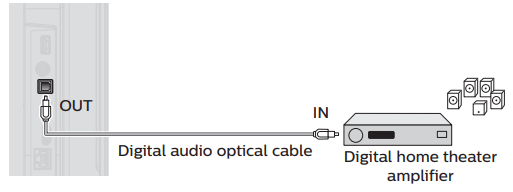
Digital audio output connection
If you connect this unit to an external digital audio device, you can enjoy multi-channel audio like 5.1ch digital broadcasting sound.
Use a digital audio optical cable to connect the unit to external digital audio devices.
Note(s): To enable audio output from the optical cable, go to Settings > Sound > Speakers. It must be set to Digital audio output
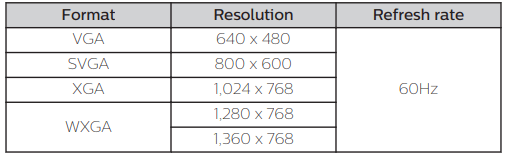
PC connection
Should mention that PC content can also be sent to the TV via GoogleCast compatible apps such as Chrome and many others.
HDMI connection
This unit can be connected to your PC that has an HDMI terminal. Use an HDMI cable for this digital connection.
The following PC-input video signals can be displayed:
Other formats or non-standard signals will not be displayed correctly.
Note(s):
The following operations may reduce noise. – Attach a ferrite core to the AC power cord of your PC. – Unplug the AC power cord and use the built-in battery of your portable / laptop PC.
Some HDMI cables and devices may not be compatible with the TV due to different HDMI specifications.
Use an HDMI cable with the HDMI logo (a certified HDMI cable). High speed HDMI cable is recommended for the better compatibility.
The unit accepts 480i, 480p, 720p, 1080i and 1080p video signals only when using the HDMI connection.
DVI does not display 480i image which is not in compliance with CTA-861-G.
Use your TV
Switching on your TV and putting it in standby mode
Turns the TV on and off of standby.
Press (POWER) on the TV or the remote control.
Note(s): Energy consumption contributes to air and water pollution. When the AC power cord is plugged in, your TV consumes energy with a very low standby power consumption.
Adjusting volume
To decrease or increase volume
Press VOL + / – on the TV or the remote control.
VOL + : Volume up
VOL – : Volume down
Switching channels
To change channels, you can do any of the following:
Press to change to the next higher channel.
Press to change to the next lower channel.
Press OK to display the channel list (in non-connected mode) or Smart Guide (in connected mode), and then press to select the channel or show you want to watch.
When you’ve highlighted the channel or show you want to watch, press OK. (If you decide you don’t want to change channels, press (BACK)).
Watching channels from an external device
On the Android TV home screen, select Inputs in the upper right corner of the screen, and press OK to switch input device list.
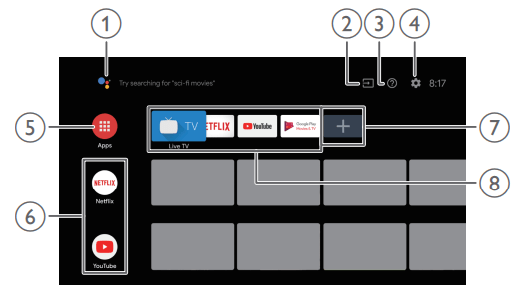
Access the Home menu
1. Press (HOME)
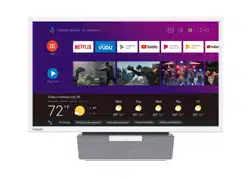
Guide to Home menu
From the Android TV home screen, you can easily access movies, TV shows, music, apps, input devices, settings, and more. To go back to the home screen at any time, press (HOME) on your remote control.
1. Google Assistant:
Activates your personal Google Assistant. Type or speak to search for content, control your TV, manage your smart home devices, and more.
2. Inputs:
Toggle inputs between your favorite source devices.
3. e-Help:
Online help videos and tutorials
4. Settings:
Configure your television settings and connect to wireless devices.
5. Apps:
Apps gallery You must sign in with a Google account to visit and download apps from the Google Play store.
6. How to rearrange channels:
Within the row, you want to rearrange, press on your remote control.
To rearrange channels, Select arrow () icon, and press OK.
Use to move up or down. Press OK.
To delete channels, Select minus (–) icon, and press OK.
7. Install additional apps:
Select the “+” and click on the Google Play Store to expand your entertainment library.
8. How to move or delete applications:
Select the application and long press OK on your remote control.
To move, Select Move in the list, and press OK. Use J K to move left or right. Press OK.
To delete, Select Remove from favorites in the list, and press OK.
Apps
You can download the apps.
Press (HOME) and use to select Apps, then press OK.
Search for the app or type of app you want to install.
Select the app.
Select install.
Google Assistant
Press (Google Assistant) to launch Google Assistant. You can operate what you want to do and what you want to ask by hands-free.
Mic
Activating the Google Assistant on the home screen will launch
Google Query. Activating the Google Assistant within an app will allow you to search and find information only related to a specific app.
Speak into the microphone located on the top of your remote control.
Using options menu
You can access to some TV settings directly by using (OPTIONS).
Press (OPTIONS) to display options menu, then press OK.
Use to select a desired setting, then press OK.
Picture style
Following settings can be configured.
Standard
Natural
Vivid
Sports
Movie
Game
Energy saving
Picture format
Display modes can be selected when your TV receives a 16:9 or 4:3 video signal.
Three types of display modes can be selected for a PC input signal.
4:3
Wide screen
Unscaled
Closed captions
This item displays only when captions are on the streaming.
Off
On
CC w/ mute
Multi audio
Language list This item is displayed when DTV broadcasting is received.
Mono
Stereo
SAP This item is displayed when ATV broadcasting is received.
Speakers
TV speakers
Digital audio output
Power
Sleep time
Off
10 minutes
20 minutes
30 minutes
60 minutes
90 minutes
120 minutes
180 minutes
240 minutes
Picture off
Select Picture off, the TV screen is switched off, to switch the TV screen back on, press any key on the remote control.
Useful tips
FAQ
Question
Answer
My remote control does not work. What should I do?
Check the antenna or cable connection to the main unit.
Check the batteries on the remote control.
Check if there is an obstacle between the infrared sensor window and the remote control.
Test the IR signal output use IR signal check. If okay, then possible infrared sensor trouble.
Aim the remote control directly at the infrared sensor window on the front of the unit.
Reduce the distance to the unit.
Re-insert or replace the AAA batteries with their polarities (+/–) as indicated on the remote control battery area.
When there is an infrared-equipped device such as PC near this unit, it may interrupt the remote control signal on this unit. Move the infrared-equipped device away from this unit, change the angle of the device's infrared sensor or turn off the infrared communication function
How come the initial setup appears every time I turn on this unit?
Make sure to complete the initial setup before the unit goes into standby mode.
Why can I not watch some RF signal TV programs?
The selected channel may not be broadcasting.
The selected channel cannot be viewed by the Parental controls setting.
The unit requires some kind of antenna input. An indoor antenna (Digital or VHF / UHF), an external antenna (Digital or VHF / UHF) or an RF coaxial cable from your wall cable or set-top box needs to be plugged into the unit.
How come there is no image from the connected external devices?
Check if the correct input is selected. On the Android TV home screen, select Inputs in the upper right corner of the screen, and press OK to switch input device list.
Check the antenna, cable or other input connection to the unit.
When I enter a channel number, why does it change automatically?
Many digital channels have alternate channel numbers. The unit changes the numbers automatically to the ones signifying the broadcasting station's channel number. These basic numbers used for the previous analog broadcasts. (e.g., input digital ch# 30 automatically changes to digital ch# 8.1)
Why are captions not displayed entirely? Or why are captions delayed behind the dialog?
Closed captions that are delayed a few seconds behind the actual dialog are common for live broadcasts. Most captioning production companies can display a dialog to maximum of 220 words per minute. If a dialog exceeds that rate, selective editing is used to insure that the closed captions remain up-to date with the current TV screen dialog.
How can I set the clock?
From the Android TV home screen, select Settings in the upper right of the screen.
Scroll down to Preferences and select Date & time.
Please set it automatically or manually.
Troubleshooting tips
If the unit does not perform properly when operated as instructed in this manual, Please check the following Troubleshooting tips and all connections once before calling for service.
Power
No power
Make sure the AC power cord is plugged in.
Make sure that the AC outlet supplies the proper voltage, plug another electrical appliance into the AC outlet to ensure that the AC outlet operates normally.
If a power failure occurs, unplug the AC power cord for 1 minute to allow the unit to reset itself.
Remote
Control buttons do not work.
Do NOT press more than one button at the same time.
Ensure that no buttons on the remote control are depressed and move freely.
Re-insert or replace the AAA batteries with their polarities (+/–) as indicated on the remote control battery area.
Universal remote control does not work properly.
Refer to the User manual of the universal remote control for the Philips code.
Google Assistant microphone on the remote control does not work.
To pair the remote control, refer to the step “6 Connecting your devices” in the Quick start guide and see “How to connect to your Bluetooth® devices”.
Performance
Remote response is delayed or sluggish during initial use.
Your television is automatically, downloading and installing the latest applications, for the best user experience.
During this time, you may experience a delayed response from your remote control. Upon successful installation, your remote control will operate normally.
Accessibility
Television is speaking prompts out-loud.
To enable or disable the talkback (text to speech) on your television, press (HOME) on your remote control, navigate to settings (found in the upper right corner of the home screen) and select accessibility, select talkback, press OK to toggle between on or off. Shortcut: Press (OPTIONS) on your remote control seven times in rapid succession to enable text to speech.
Picture
Power is on but screen image is off.
Check if the connection for your source device is properly secured.
Check if the correct input is selected. On the Android TV home screen, select Inputs in the upper right corner of the screen, and press OK to switch input device list.
Sound
No sound is heard when using the HDMI digital connection.
Some HDMI cables and devices may not be compatible with the TV due to different HDMI specifications.
Sound intermittent or no sound.
Check if the audio cable is connected into the unit correctly.
You switch to a different input and the volume changes.
This unit will memorize the volume level from the last time you adjusted it.
If the volume of the sound from another device is higher or lower, then the loudness will change.
Make sure Auto volume leveling is set to On.
Picture & Sound
No sound with distorted picture occurs when using the HDMI digital connection.
Some HDMI cables and devices may not be compatible with the TV due to different HDMI specifications.
No picture or sound
Check if the power is on.
Check whether all the cables to the unit are connected to the correct output jack on your separate device like Blu-ray Disc™ / DVD recorder.
View other TV channels. The problem might be limited to the broadcasting station or weak signal strength.
Unplug the AC power cord and wait for about 1 minute, then plug the AC power cord and turn on the unit again.
Check whether the connection of the antenna or cable / satellite set-top box is connected correctly.
Make sure that the selected input mode is connected to the working input jack.
Make sure that the volume is NOT set to 0. If so, use VOL + / – to adjust to the desired volume.
Make sure that the headphone is NOT connected to the headphone audio output jack.
Make sure that the TV speakers is NOT set to Off.
Please make sure that the speaker of the TV is not set for Digital audio output.
Adjusted Picture or Sound settings are not effective every time the unit is turned on.
You need to turn off the Retail mode setting. (Otherwise, the settings you adjusted will not be memorized after the unit goes into standby mode.)
You see a distorted picture or hear an unusual sound. (Analog TV - NTSC signal)
You may be getting NTSC (Analog) TV signal (not HDTV signal) interference from electrical appliances, automobiles, motorcycles or fluorescent lights.
Try moving the unit to another location to see if this is the cause of the problem.
Ghosts, lines or streaks in picture.
Electrical interference from nearby appliances may affect picture quality.
View other TV channels. The problem might be limited to the broadcasting station or weak signal strength.
Picture poor, sound intermittent or no sound
View other TV channels. The problem might be limited to the broadcasting station or weak signal strength.
Screen
You switch to a different input and the screen size changes.
This unit will memorize the viewing mode from the last time you used the particular input modes.
The display image does not cover the entire screen.
If you are watching TV or using the composite video or HDMI with 480i input, select Picture format, and then switch to various screen modes.
Different color marks on the TV screen
View other TV channels. The problem might be limited to the broadcasting station, missing data or pixelation due to weak signal strength.
#1 How do I disable or enable the Talkback feature on my Philips Android Television
To fully disable the "Talkback" feature on your Philips Android TV, please navigate to the settings icon in the upper right of the home screen. Scroll down to "Accessibility" and then select "Talkback" to enable or disable the feature.
#2 How do I connect my Philips Android TV to a network that requires a login such as in a dorm room or hotel?
To connect your Philips Android TV to a wireless network that requires a unique login, such as those used in hotels, public areas or dorm rooms, please follow the below instructions. Once your TV is set up, press the home button on your remote control and navigate to settings. Select Network and then choose the wireless network you want to connect to. Once the Connected Successfully message appears, press the home button on your remote and navigate to Notifications. Your notifications panel will display “Sign in to Wi-Fi network”, press OK on your remote control.
#3 Will my Discover tab recommendations include content from all my apps?
Recommendations come from the apps you select during the Discover Tab onboarding process, which takes place directly on your screen.
#4 How do I disable the talkback (text to speech) feature on my Philips Android television?
If your television is “talking” every time you press a button on the remote, you may have enabled the text to speech or “talkback” mode. This mode is for customers who are visually challenged and enables them to navigate all of the menus in order to use the television. How to disable (or enable) text to speech (talkback). Simply follow these simple steps: Press the Home button on your remote Go to Settings (the gear shaped icon in the upper right of the home screen) Select Accessibility Select Talkback Choose between Off or On
#5 How do I browse the internet on my Philips Android TV?
Your Philips Android TV is fully capable of browsing the internet. However, an application to surf the internet (i.e. a browser) is not pre-installed, to allow you the choice of the one you prefer. To enable this functionality, simply open the Google Play Store and search for one of the browsers available there. We have found that the Puffin TV Browser s excellent.
#6 How do I play media files from a USB drive on my Philips Android TV?
Your Philips Android TV is fully capable of playing media files from a USB drive. However, an application to play those files is not pre-installed, to allow you the choice of the one you prefer. To enable this functionality, simply open the Google Play Store and search for one of the media players available there. We have found that VLC Media Player is excellent and supports a wide variety of file formats.
 (POWER)
  (NAVIGATION buttons)
 (OPTIONS)
  (Google Assistant)
  (HOME)
  (BACK)
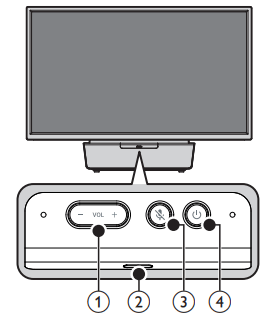
 (Mic Off)
  (POWER)

 (POWER) on the TV or the remote control.
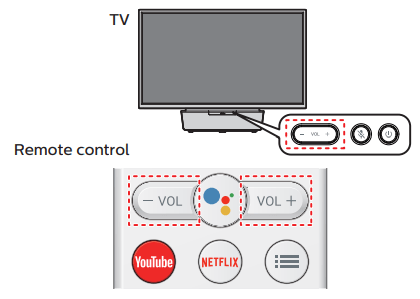
 to change to the next higher channel.
 to change to the next lower channel.
 to select the channel or show you want to watch.
 (BACK)).
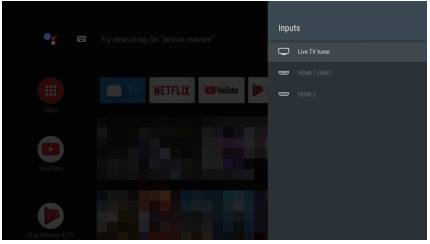
 (HOME)
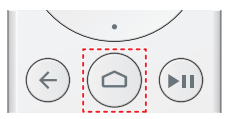
 on your remote control.
 ) icon, and press OK.
 to move up or down. Press OK.
 (HOME) and use
  to select Apps, then press OK.
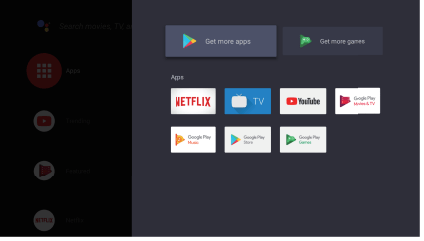
 (Google Assistant) to launch Google Assistant. You can operate what you want to do and what you want to ask by hands-free.
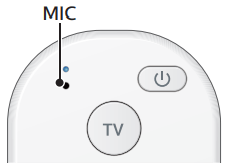
 (OPTIONS).
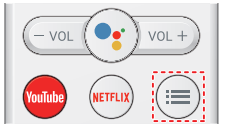
 to select a desired setting, then press OK.
 Google Assistant microphone on the remote control does not work.
 (HOME) on your remote control, navigate to settings (found in the upper right corner of the home screen) and select accessibility, select talkback, press OK to toggle between on or off.
  (OPTIONS) on your remote control seven times in rapid succession to enable text to speech.