User manual Television
Front/Back View

NOTICE:There is a square glue to protect the IR model,it can be removed after instal the base.
1. POWER LED: illuminates green when the TV is turned on. illuminates red when the TV is in standby mode.
2. IR(Infrared Receiver): Receives IR signals from the remote control. DO not put anything near the sensor, as its function may be affected.
3 
- POWER ON: Press the middle button.
- CH+: Push forward to choose the next higher channel in the channel list.
- CH-: Pull back to choose the next lower channel in the channel list.
- VOL+: Push right to increase the volume.
- VOL-: Push left to decrease the volume.
- QUICK MENU:Press the middle button for 2~5 seconds.
- MUTE:Press “ ^ ” to select press the middle button to enter.
- POWER OFF:Press “ ” to select press the middle button to turn off.
- MENU:Press “ - ” to select press the middle button to enter.
- INPUT:Press “ + ” to select press the middle button to enter.

Connecting to External Devices
Connecting external devices to your LED TV

1. HEADPHONES :Connect to the Headphones.
2. OPTICAL:Connect a digital sound system to this jack.
3. RJ45:Network connection port.
4. HDMI :Connect to High-Definition(HD) signal output device.(HDMI can support 4K60Hz Signal)
5. RF: Connect to the antenna(75Ω VHF/UHF) socket with the RF coaxial cable.
6. USB
7. YPBPR/AV: Connect to the YPbPr video output terminal of the DVD. Connect video output from a DVD or VCR.
8. AUDIO IN: Audio input.
Remote Control
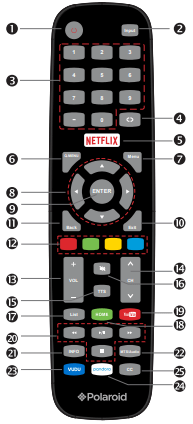
1. POWER: Turn the TV on and off
2. Input: This button is used to switch among different sources, Select a source and press ENTER button to confirm.
3. Digital Buttons(0-9, -): Directly select channel with digital buttons.
4  : Switch to the previous program.
5. NETFLIX: If network connects, press this key to view NETFLIX directly.
6. Q.MENU: Press this key to go to quick menu.
7. MENU: Display the main menu or exit the current menu.
8. Arrow buttons  : Use to select on-screen menu items and change menu values.
9. ENTER: Validation key
10. Exit: Exit the menu.
11. Back: Return.
12. COLOR BUTTONS: It's used as it's showed in the EPG or Program Edit menu.
13. VOL+/-: Press these buttons to adjust the volume.
14. CH ^/v: Press these buttons to change channel upward or downward.
15. TTS: Press this button to set TTS on or off.
16  : Press this button to cut off the sound of the TV set temporarily, press again to resume.
17.List: Press it to show channel list and favorite list on screen.
18. HOME: Press it to go to App home page.
19. YouTube: If network connects, press this key to view YouTube directly.
20. DIGITAL MEDIA PLAYER CONTROL BUTTON: Include play/pause, stop, backward, forward is used in USB mode .Please refer to relevnat instructions in the section of multimed player.
21. INFO: Display the program information .
22. MTS/AUDIO: In USB mode, press this button to switch audio track when movie is playing. In TV mode, press this button to switch MTS or Audio Language.
23. VUDU: Press this button to select VUDU application.
24. pandora: Press this button to select pandora application.
25. CC: Press this button to adjust CC mode.
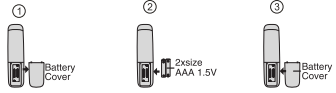
Install the Batteries
If the remote control fails to operate the TV functions, replace the batteries in the remote control.
1.Open the battery compartment cover on the back side.
2.Insert two 1.5V AAA size batteries incorrect polarity. Don´t mix old or usedbatteries with new ones.
3.Closed the cover.
Initial Setup

1. Connecting your TV on the poweroutlet;
2. Press the POWER button on the remote to turn on the TV in green for the LED light.
CAUTION: Always disconnect the TV from the power outlet when the TV will not be used for a long period of time. The POWER button on the front panel is only used for switching the TV into standby, it does not disconnect the device from the main voltage. To completely disconnect the main voltage, please remove the power plug from the socket.
3. Press the key▼/▲/◄ / ►and following the picture as bellow to operate the subject.
NOTE: The picture is for reference only.
Basic Operations
Menu Operation
Setup Wizard
Select OSD Language
Press ▼ / ▲ button to select the language to be used for menus and message.
Press ENTER button to enter the next menu.

DATA COLLECTION AND FIRMWARE UPDATES NOTICE
Press ◄ / ► button to select.
Press ENTER button to enter the next menu.
Note: Select the “VIEW ADDITIONAL DETAILS” for more information.

Select Clock
Press ▼ / ▲ button to select the clock .
Press ENTER button to enter the next menu.

Select Home or Retail
Set the TV Mode to Home or Retail display use.
Press ▼ / ▲ button to select(Home Mode / Retail).
Press ENTER button to enter the sub-menu.

Select Time Zone
Press ▼ / ▲ button to select the Time Zone.
Press ENTER button to enter the next menu.

Select DST
Press ▼ / ▲ button to select the Select Daylight saving time.
Press ENTER button to enter the next menu.

Select Network Configuration
Press ▼ / ▲ button to select Network Configuration.
Select YES to enter the Network Configuration, More details please see the page 24~26.

Select Auto Search
Press ▼ / ▲ button to select Auto Search.
Sleect YES to enter the Auto Search,More details please see the page 22.

Input Setup
Press input key on the remote control to enter "INPUT SOURCE" menu. There are these options for you to select: "TV", "AV","Component", "HDMI1", “HDMI2",“HDMI3", “USB".
Use ◄ / ► key to select a input source and press Enter key to confirm.

Current Channel Information
Press “INFO” key on the remote control to view currentchannel information, the indications of channel information are listed in the following table.

Press “EXIT” key on the remote control to exit this OSD.
Picture
1. Press Menu key to display the main menu on the screen.
2. Press ▲/▼ key to select "Picture" option.
3. Press ► key to enter "Picture" submenu.
Picture Mode
Your TV has four picture settings (Dynamic, Standard,Movie, Game,Power Saving,User) that are preset at the factory. Only "User" mode can be set to your preference by adjusting particular items such as Contrast, Brightness, Color, Sharpness.
1. Press ▲/▼ key to select "Picture Mode" option.
2. Press ▲/▼ key to select one picture mode.

User settings for PICTURE (Contrast, Brightness, Color, Sharpness,Tint)
Your set has several settings which allow you to control picture quality.
1. Press ▲/▼ key to select a particular item.
2. Press ◄ / ► key to decrease or increase the value of a particular item. Note: The adjusted values are stored according to the selected particular item.
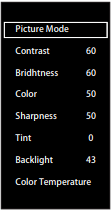
Backlight
You can Change the brightness of the entire screen according to your preference.
1. Press ▲/▼key to select "Backlight" option.
2. Press ◄ / ► key to increace or decreace the backlight value.
Color Temperature
You can change the color of the entire screen according to your preference.
1. Press ▲/▼ key to select "Color Temperature" option.
2. Press ◄ / ► key to select one color temp.
Sound
1. Press Menu key to display the main menu on the screen.
2. Press ▲/▼ key to select "Sound" option.
3. Press ► key to enter "Sound" submenu.
Sound Mode
You can select the type of the special sound effect to be used when watching a given broadcast.
Your TV has five sound settings (“Standard”, “Music”,“Movie”, “Sports”,“User”) that are preset at the factory.
1. Press ▲/▼ key to select "Sound Mode" option. Press ENTER or ► to enter.
2. Press ◄ / ► key to select one sound mode.

Digital Audio Output
This is used to set digital audio output
1. Press ▲/▼ key to select "Digital Audio Output” option.
2. Press ▲/▼ key to select “Auto” or “PCM”.
Audio Languages
You can set the first and secondary language for audio.
DAP
This is used to set DAP.
1. Press ▲/▼ key to select "DAP” option.
2. Press ► key to enter “DAP” submenu.
HDMI ARC
Turn on or turn off the HDMI ARC function.

CEC Link Setup
1. Press ▲/▼ key to select “Link Setup” option.
2. Press ENTER or ► key to enter “Link Setup”submenu.
Enable Link: Press ◄ / ► to turn on/off the link setup.
Auto Power On: When this option is “On” and the TV is in standby mode. To turn on the DVD can also turn the TV at the same time.
Auto Standby: When this Option is “On” and the TVis on, to turn off TV can also turn the DVD into standby mode.

HDMI EDID
This function is only used in HDMI mode.
1. Press ▲/▼ key to select “ HDMI EDID” option.
2. Press ▲/▼ key to select “ 1.4” or “ 2.0”.
The HDMI jacks on your TV are Ultra HD (UHD) jacks.Depending on the HDMI device you connect to the HDMI jack or the streaming content you watch, youmay need to adjust the timing.

Netflix Deactive
1. Press “▲/▼" key to select “Netflix Deactive" option.
2. Press “►” or "ENTER" key to confirm.
3. Press "Yes" to confirm again, the Netflix will be activated.
Netflix ESN
Display the Netflix Esn information.
Netflix Version
Display the Netflix version.
Time
1. Press Menu key to display the main menu on the screen.
2. Press ▲/▼ key to select "Time" option.
3. Press ► key to enter "Time" submenu.
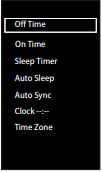
Off Time
In "Off Time” item, press ► button or ENTER button to enter the submenu, set the day & time to turn off the TV set.
On Time
In "On Time” item, press ► button or ENTER button to enter the submenu, set the time to turn on the TV set, when the TV set is in the standby mode. You can also choose which day to control you TV set in a week.
Sleep Timer
1. Press ▲/▼ key to select "Sleep Timer" option.
2. Press ▲/▼ key repeatedly until the desired time appears (Off, 10mins, 20mins, 30mins, 60mins, 90mins, 120mins, 180mins, 240mins).
Notes: The sleep timer you have set will be cancelled when the TV turns off or if a power failure occurs.
Notes: When the time is less than 60 seconds, remind information will be displayed on the screen. Press any key button to cancel timer function.
Auto Sleep
Press ▲/▼ key to select whether to open the Nosignal Power off features. If this function is opened, the TV will power off in ten minutes when there is no signal.
Auto Sync
You can modify the time of your TV set in Manual mode. In Auto mode, the “clock” is decided by the DTV signal.
Clock --:--
When Auto Sync is on, the clock is got from DTV streams; Set the clock when Auto Sync is off.
Time Zone
You can choose it to modify your time zone in the TV set.
1. Press ▲/▼ key to select "Time Zone" option.
2. Press ▲/▼ key to select time zone.
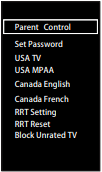
Set Password
1. Press ▲/▼ key to select "Set Password" option.
2. Enter your 4-digit password to enter"Set Password" submenu. Choose any 4-digits for your new password and enter them. As soon as the 4 digits are entered, the cursor skipped to “Confirm Password” item, re-enter the same 4 digits, and your new password has been memorized.
When the programs is locked, you can also press the menu key, Info key and so on. Then you can press ◄ / ► key to call back the input-password window.
Channel
- Before your television can begin memorizing the available channels, you must specify the type of signal source that is connected to the TV (i.e. an antenna or a cable system).
- 1. Press Menu key to display the main menu on the screen.
- 2. Press ▲/▼ key to select "Channel" option.
- 3. Press ENTER or ► key to enter "Channel" submenu.
Antenna Mode
1. Press ▲/▼ key to select "Antenna" option.
2. Press ▲/▼ key to select "Antenna" or "CABLE".

Auto Search
1. Press ▲/▼ key to select "Auto Search" option.
2. Press ► or ENTER key to confirm. then a notice window will be displayed on the screen.
Select "Start" to start search or "Cancel" to cancel it. When searching, press EXIT key to exit tuning at any moment. Press Menu key to skip DTV tuning when searching DTV, skip ATV tuning when searching ATV, skip CATV tuning when searching CATV.
3. After all the available channels are stored, the searching menu will exit.

Program Edit
After the program is searched, select “Program Edit” in the “Channel” menu, press “enter” button, program can be edited such as delete or skip according to the user's habit.
Skip (Blue) Button
This function can help shield certain program. Program skips when selecting program by the "▲/▼" button on the TV or remote control.
1. Select the program to be shielded in the“Program Edit”.
2. Press “Skip” (Blue) button, the skip mark is displayed at the left side of the program and this program is shielded.
3. To cancel the Skip function, enter the channel edit menu, select the shielded program and press “Skip” (Blue) button, the skip mark at the left side of the program disappears then program is recovered.
Delete (Red) Button
This function can help delete program.
1. Select the program to be deleted in the "Program Edit".
2. Press "Delete"(Red) button, the program will be deleted.
Favorite(Yellow) button
This function can help store the favorite program then these programs can be quickly selected.
1. Select the program which is favorite.
2. Press “Fav”(Yellow) Button, the favorite mark is displayed at the left side of the program and this program is store into the Favorites.
3.To cancel the Favorite function, enter the program edit menu, select the program and press “Fav”(Yellow) button, the favorite mark at the left side of the program disappears.
Network Setting
1.Press the “ Menu ” to enter, then pitch on the ”Options”,and press “ENTER” or click the right button to enter the submenu.

2.Pitch on the "Network Configuration",and press "ENTER" or click right button to enter the "Network Configuration".

3.When the wired network is used, if select dynamic IP address setting, pitch on the"DHCP" in the "Network Configuration", then click the "Setting", and press the "ENTER"button to enter.
If select static IP address setting,pitch on the "Static" in the "Network configuration", then setting up the IP,Nemask,Gateway and DNS in sequence.When the setting complete,pitch on the "setting" and press the"Enter".
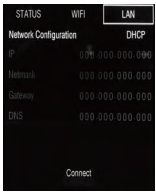
4.If shows "Success",the "WLAN" on the bottom right corner will turn to green from red, and it means the network connect successfully; If shows "Fail",it means the network can not connect, please check whether the net wire and router connect successfully or not.

5. Select the "WIFI" in the Network Configuration before using WIFI connecting.
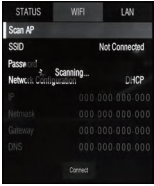
Pitch on the "Setting",press the "ENTER" to confirm. If shows "Success", the "WIFI" on the bottom right corner will turn to green from red, and it means the network connect successfully; If shows "Fail", it means the network can not connect, please check whether the wireless router connects successfully or not.

USB Operation
Note: Before operating USB menu,Plug in USB device, then press INPUT button to set the Input Source to USB.
Press ◄ / ► button to select USB in the Source menu, then press ENTER button to enter.
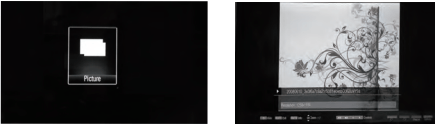
Picture Menu
Select Picture in the main menu, then press Enter button to enter.
Press Exit button to return to the previous menu and exit menu to quit.
USB version 2.0

Troubleshooting
If the device performance fails, check whether the detected problem is in the following table. If your device still fails, contact customer service.
TV – No signal input connected, loose or disconnected.
- Signal cable is loose or not connected.
Ensure signal cable is not loose or disconnected. Reattach and try again.
Remote Control - Distance is short, no control.
- Receiver of remote control is covered.
Ensure the remote receiver is not obstructed.
- The battery energy of the remote control is too low.
Change the batteries.
TV - Display is faint.
Use auto-adjustment function.
- Display mode is incorrect.
Use recommended mode.
TV - Display image does not fill the screen.
Use auto-adjustment function.
Enter PICTURE to adjust the horizontal and vertical position.
- Display mode is incorrect.
Use recommended mode
TV - Unable to operate the TV
- Exterior influence, for example lighting, static electricity and so on, which might disturb the normal operation of the TV.
Press the  button to tum off electrical source, then press the button to turn on the TV again after 1-2 minutes.
Static and sound noise.
- Antenna cable connector is loose, cable is damaged.
Check the antenna cable connector plug for secure connection and any damage.
- Antenna cable type is not correct.
Check antenna cable type (VHF/ UHF).
- Direction or position of antenna is incorrect.
Adjust the direction or position of antenna.
Attempt to use signal amplifier.
TV image is better, but has noise .
- Antenna cable connector is loose, cable is damaged.
Check the antenna cable connector plug for secure connection and any damage.
No image. No sound.
- Power plug is loose, power cord does not connect well.
Check to ensure power cord is connected.
Press POWER on panel or remote control.
Check if the button is on.
TV image has stripes.
- Signal is exposed to interference, such as a car, neon light, electric blower, etc.
Do not use an electric blower around unit.
Adjust antenna cable direction to reduce interference.
TV image has shadows.
- TV signal is reflected by valley or building.
Use a high-directional antenna.
- Direction of antenna is incorrect.
Adjust direction of the antenna.
TV has no sound.
- Volume setting is too low.
Adjust volume to proper level.
Press MUTE to deactivate mute.