Use and Care Manual for Range
Getting Started
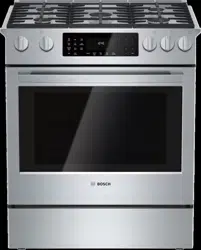
Parts and Accessories
Your appliance may vary slightly.
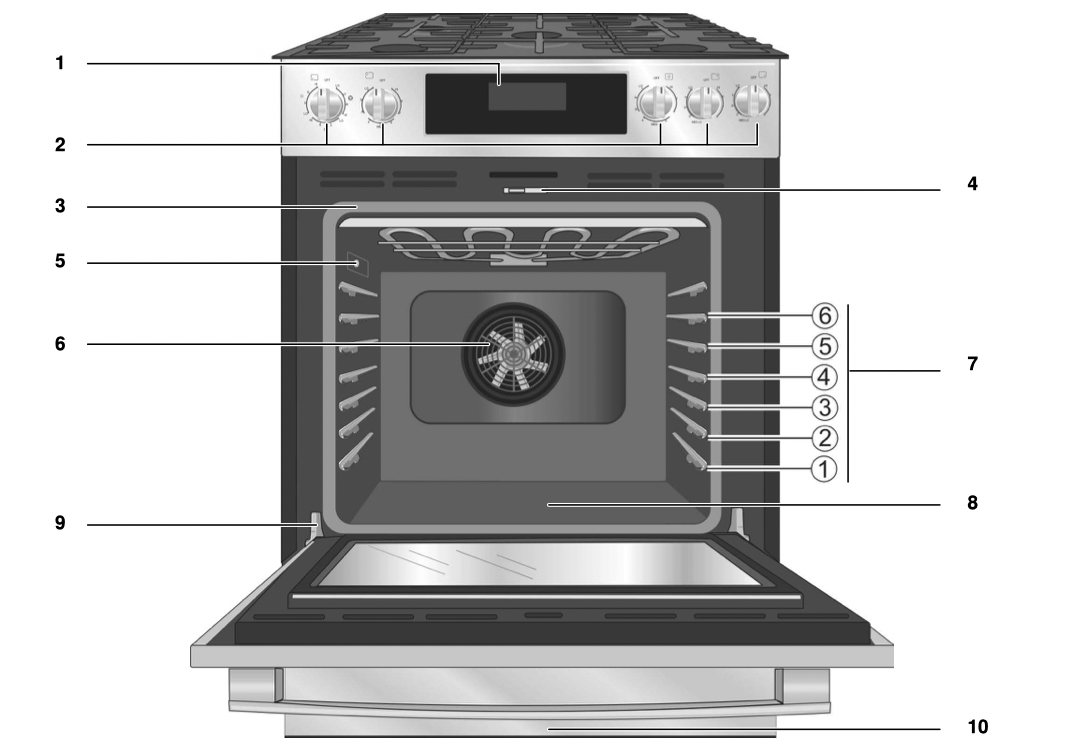
Range Parts Key
- Oven Control Panel
- Cooktop Control Knobs
- Door Gasket
- Door Latch
- Probe Jack
- Convection Fan
- Rack Position Guides with 6 rack positions
- Oven Bottom
- Door Hinge
- Warming Drawer
Range Features
Sealed Gas Burners
The cooktop has sealed gas burners. As a result, there are no parts under the cooktop to clean, disassemble or adjust. Spills stay on top of the cooktop where they are easier to wipe up.
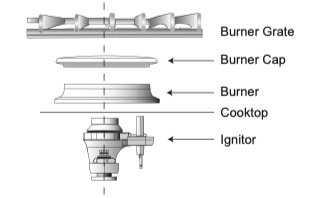
Burner Caps
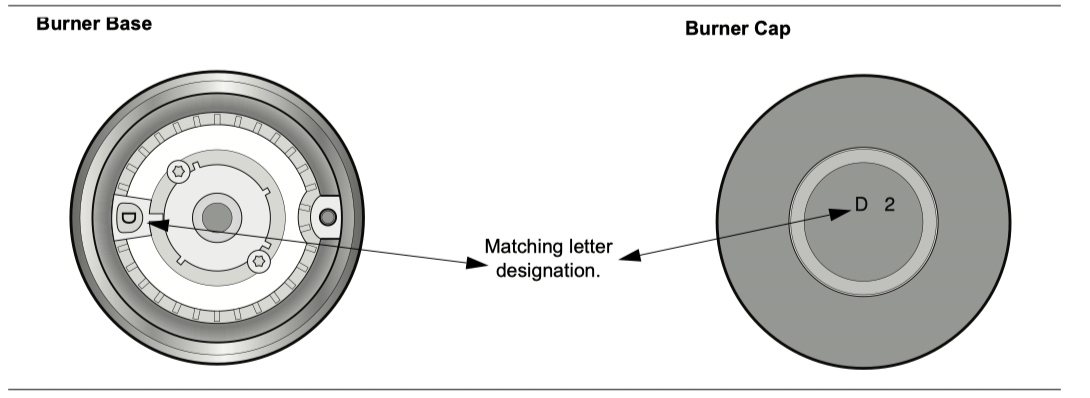
The cooktop has three different burner sizes; small, medium, and large. Match the corresponding letters on the burner cap and burner base.
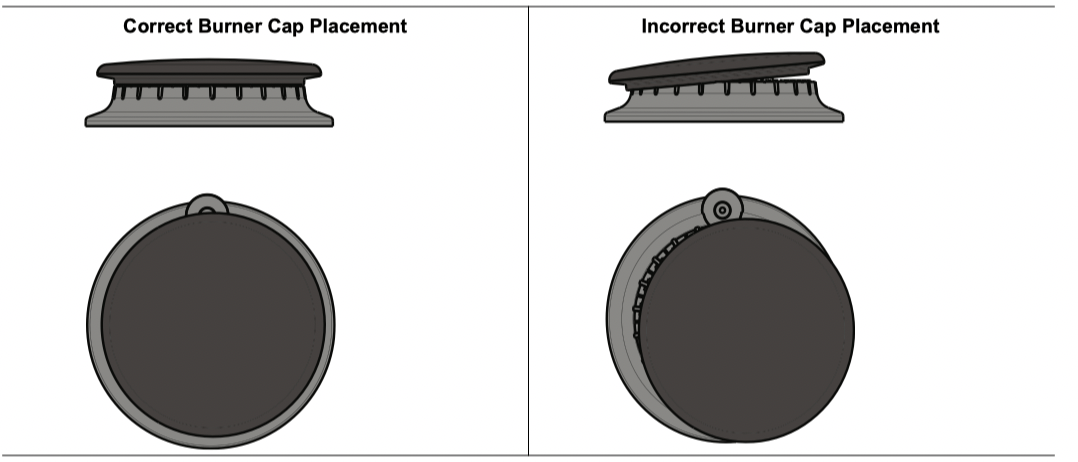
The burner cap is porcelainized steel. The burner caps must be properly placed for the cooktop to function properly. If the burner cap is not properly placed, one or more of the following problems may occur:
• Burner flames are too high.
• Flames shoot out of burners.
• Burners do not ignite.
• Burner flames light unevenly.
• Burner emits gas odor.
WARNING
To prevent flare-ups and avoid creation of harmful by-products, do not use the cooktop without all burner caps and all burner grates properly positioned.
WARNING
To prevent burns, do not touch burner caps or grates while hot. Turn the cooktop off and allow the burners to cool.
Placing Burner Caps
Each cap has a letter (A, D, or F) cast in the underside of the cap that corresponds to a letter (A, D, or F) cast in the burner base that is attached to the appliance.
Note: In some models the center burner does not have a letter designation on the burner base.
• Place each burner cap on its correct burner base per its corresponding letter designation. See figure “Matching letter designation.” on page 7.
Place burner cap gently on top of base so that the prongs of the burner base fit snugly into the groove of the burner cap.
Checking Burner Cap Placement
• Check to make sure there is not a gap between the burner cap and burner base. See figure “Burner Cap Placement” on page 8 to see the correct and incorrect placements of the burner cap.
• You may gently try to move the burner cap from side to side to check if it is properly placed. If properly placed, the cap will click from side to side as the prongs hit the groove ridge.
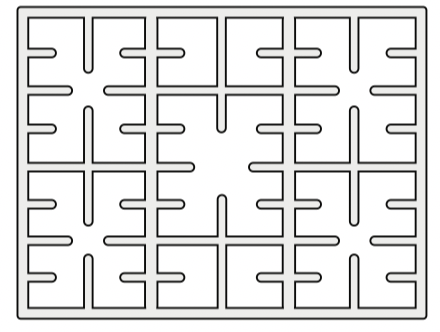
Burner Grates
Grates must be properly positioned before cooking.
WARNING
To prevent flare-ups, properly support pots, and avoid spills, all grates must be properly positioned on the cooktop whenever the cooktop is in use. Do not use a grate if the rubber feet are missing or damaged.
To purchase replacement rubber feet: Part # 416438, contact your dealer or call the service number listed inside the cover.
Control Knobs
The cooktop has one control knob for each burner.
CAUTION
Failure to operate knobs properly may result in personal injury and damage to the appliance.
The cooktop has standard burner controls and rubber grommets.
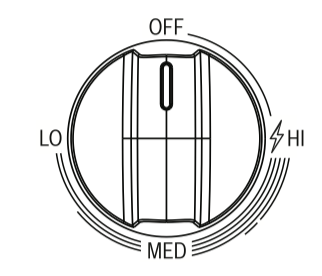
The standard burner controls have an infinite number of heat settings. These settings are located on the burner knob.
To operate: Select the appropriate control knob, push down and turn to the left to the ignition symbol until the burner ignites. Turn the knob to the desired setting. Turn burner off by turning the control knob clockwise to OFF.
Burner Control Knob Removal
To remove knob and grommet: With burner in the OFF position, gently lift knob up and off. Gently pull the grommet from the sides and lift out.
WARNING
To avoid possible electric shock, do not reach through control opening into rough-in box located under the cooktop.
To replace grommet and knob: Carefully insert the grommet into the opening, ensuring that the maintop is seated in the track around the entire perimeter of the grommet. Replace control knob by placing indicator line at the 12 o’clock position. Press down firmly.
Oven Features
Cooling Fan
The cooling fan runs during all cooking modes. The fan can be heard when it is running, and warm air may be felt as it is released from the oven vent. The fan may also run after the oven is off.
Convection Fan
The convection fan operates during any convection mode. When the oven is operating in the convection mode, the fan will turn off automatically when the door is opened. The convection fan does run during self-clean, although not at the beginning of the mode.
Note: On some models, the convection fan also runs during preheat for the bake mode.
Oven Bottom
The oven bottom conceals the lower heating element. As a result the element is protected from damage and spills.
Note:
Do not place food directly on the oven bottom.
Oven Vent
The oven vent is located at the back of the range. Warm air may be released from the vent before, during and after cooking. It is normal to see steam escaping from the vent and condensation may collect in this area. This area may be hot when the oven is in use. Do not block the vent as it is important for air circulation.
CAUTION
Do not use aluminum foil or protective liners to line any part of an appliance, especially oven bottom. Installation of these liners may result in a risk of electric shock or fire.
Automatic Shutoff
The oven will automatically shut off after 24 hours.
Self-Cleaning
The oven features a self-cleaning function that eliminates the manual labor involved with cleaning your oven.
Indicators and Other Features
Default Settings - The cooking modes automatically select the default temperature. These can be changed when a different one is needed.
E Number Codes -These codes display when there is a problem with the range.
Stand By Mode
Stand by mode means that the oven has power but no cooking mode or timer is running.
Before Using the Appliance for the First Time
• Remove all packing materials and labels from range. Remove packing materials from inside the oven and inside the drawer.
• While cool, wipe with a clean, damp sponge and dry.
• There may be a slight odor during first uses; this is normal and will disappear.
• Optimum cooking results depend on proper cookware and bakeware being used.
• Read and understand all safety precautions and Use and Care Manual information prior to operating.
Operation - Cooktop
This section explains how to operate the cooktop. See “Getting the Most Out of Your Cooktop” for guidelines to improve cooktop results.
About the Cooktop
Use the cooktop for surface cooking applications such as boiling, frying, simmering, steaming and sautéing.
WARNING
To avoid risk of personal injury, while the self-clean cycle is operating, the cooktop will not operate.
When using the cooktop and the oven is set to self-clean, "Turn Off Cooktop" is shown in the display. The self-clean cycle does not come on. Turn off the cooktop to use selfclean.
The cooktop cannot be used when self-clean is running in the oven.
WARNING
The burning of gas cooking fuel can create small amounts of Carbon Monoxide, Benzene and Formaldehyde. To minimize exposure to these substances, the burners should be adjusted by a certified installer or agency to ensure proper combustion. Ensure proper ventilation with an open window or use a ventilation fan or hood when cooking with Gas. Always operate the unit according to the instructions in this manual.
The cooktop has one control knob for each burner. Push down and turn to the desired heat setting.
Normal Operation
(Electronic Ignition/Reignition)
The cooktop uses electronic igniters to light the burners. There is no pilot light. Each burner has its own igniter. If a burner flame blows out during use, the burner will automatically reignite.
CAUTION
To avoid possible injury or damage to the appliance, ensure grates are installed exactly per installation instructions and not backwards or upside down.
Typical Flame Characteristics
The burner flame should be blue in color and stable with no yellow tips, excessive noise or fluttering. It should burn completely around the burner cap.
Yellow Flames:
Further adjustment is required.
Yellow Tips on Outer Cones:
Normal for LP Gas.
Soft Blue Flames:
Normal for Natural Gas.

If the flame is completely or mostly yellow, verify that the regulator is set for the correct fuel. After adjustment, retest.
Some yellow streaking is normal during the initial startup. Allow unit to operate 4-5 minutes and re-evaluate before making adjustments.
Foreign particles in the gas line may cause an orange flame during initial use. This should disappear with use. Check burner to make sure port holes are not obstructed. If the ports are clogged, see “Self Help” on page 38.
NOTE:
An audible “pop” may be heard when the burner is turned off manually. The “popping” may be louder with LP gas than with natural gas. This is normal.
Operation - Oven
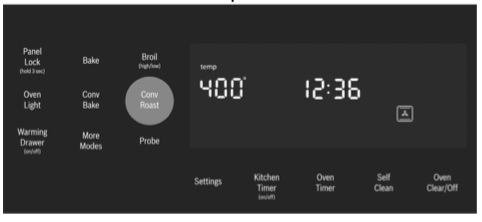
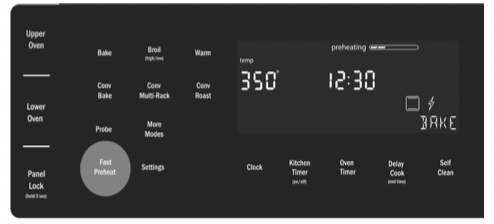
Oven Control Panel
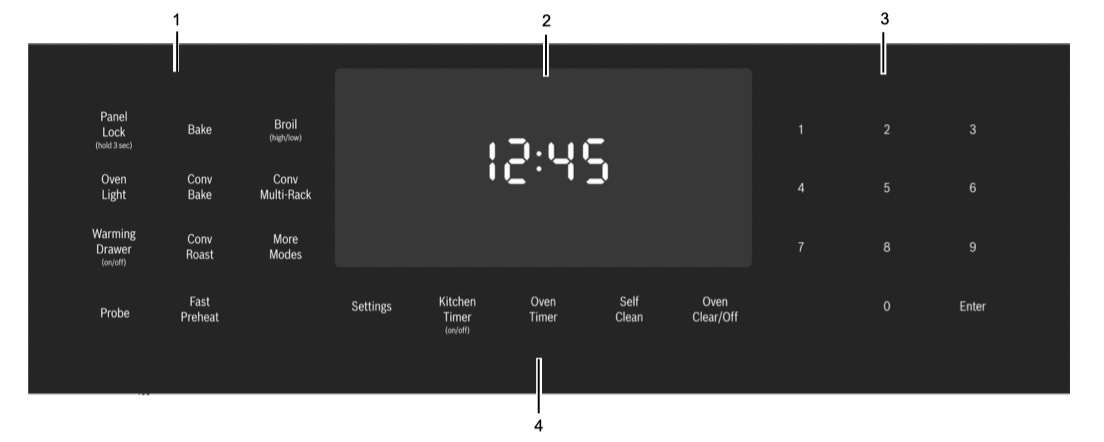
- Mode Selection Touchpads
- Display
- Numeric Keypad Touchpads
- Special Function Touchpads
Touchpads
Note: You only need to press lightly on the touchpads to operate them.
Touchpad Descriptions
More Modes
Additional modes are available by pressing the More Modes touchpad. These modes include Convection Broil, Warm, Pizza, Proof and Roast. These are discussed in the Getting the Most Out of Your Appliance section later in this manual.
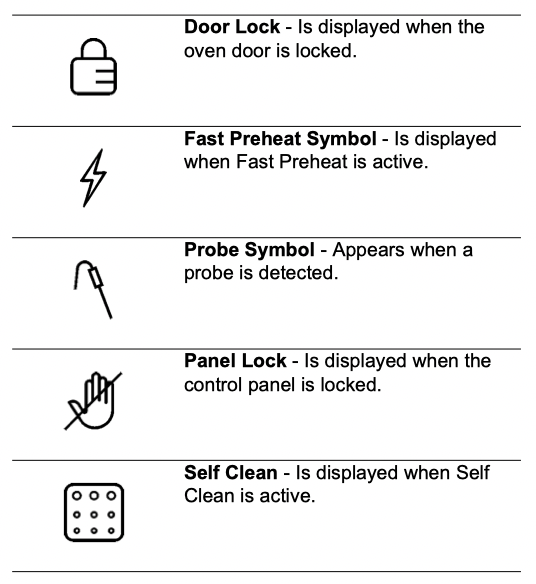
Display Symbols
Before Using the Oven for the First Time
• Oven must be properly installed by a qualified technician before use.
• Remove all packing materials from inside and outside the oven.
• While cool, wipe with a clean, damp cloth and dry.
• There may be a slight odor during first uses; this is normal and will disappear.
• Optimum cooking results depend on proper bakeware being used.
• Read and understand all safety precautions and Use and Care Manual information prior to operating.
Operation
About the Appliance
Your new oven combines premium cooking results and simple operation.
The oven design has been optimized to improve heat distribution in the oven cavity. The result is even browning, shorter cooking times and lower energy consumption.
Thanks to the Self-Clean mode, hours of scrubbing into the darkest corners of the oven is a thing of the past. The oven burns off soil simply and easily. All that is left to do is to remove a few ashes from the oven when Self-Clean is done and the oven is cool enough to touch.
Clear labeling of the touch pads makes operating the oven very easy. This manual includes all instructions for operating the oven.
Please call us if you ever have any questions. Our telephone number is located at the beginning of this manual. We welcome your comments and suggestions!
Basic Features
Setting the Clock
The oven includes time functions that require the current time to be set. It is therefore important to set the clock before beginning to use the oven. The oven cannot be in a cooking mode to access the clock set mode.
To set the clock:
1. The oven must be in Stand-By mode (oven is powered on, but no cooking mode or timer in operation).
2. To access the clock set mode:
Press the Settings touchpad. The display shows “SET CLOCK”. Press Enter to edit the clock.
3. Use the numeric keypad to enter the desired time.
Each number pressed is entered at the right and moving previously entered digits to the left. To set “12:45 pm”, press 1, 2, 4, 5.
4. When the desired time is entered, set the time by pressing Enter.
The clock is now set and running.
Setting the Cooking Mode and Temperature
There are two alternate methods to set cooking mode and temperature.
To set the Cooking Mode first, then the temperature:
1. Press the desired Cooking Mode Touchpad. The cooking mode and default temperature are displayed. The temperature flashes to show it can be edited.
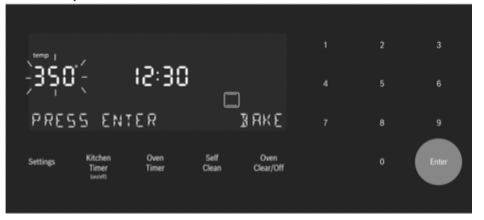
2. Press Enter to start the mode using the default temperature.
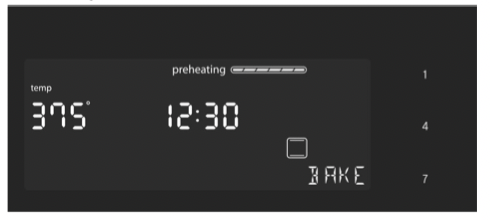
3. To change the temperature, enter the new temperature using the numeric touchpads. 375° is used for this example. Press Enter to set the updated temperature.
Note: The new temperature is automatically set after 10 seconds if Enter is not pressed.
4. Preheating starts.
Note: If a temperature is entered that is not within the allowed range for the mode, an error tone will sound and the lower part of the screen will display “TEMP NOT ALLOWED”.
To set the Temperature first and then the Cooking Mode: (not for Broil or Convection Broil)
1. Press the numeric keys to enter the desired temperature setting. The temperature entered is displayed beside the current time.
2. Select a cooking mode that is compatible with the temperature entered. If no cooking mode is selected within 5 seconds of setting the temperature, an error tone sounds and a SELECT MODE message is displayed and blinks.
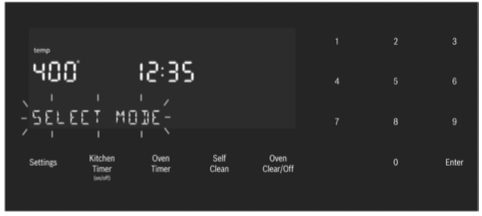
3. Press a Mode Selection Touchpad to select a cooking mode.
The new mode and temperature set automatically after 10 seconds if Enter is not pressed.
Note: If a temperature is entered that is not within the allowed range for the mode selected, an error tone will sound and the lower part of the screen will display “TEMP NOT ALLOWED”.
To change the Oven Temperature
1. Press the Cooking Mode Touchpad.
2. The current temperature flashes. Use the numeric touchpads to enter a new temperature. Press Enter.
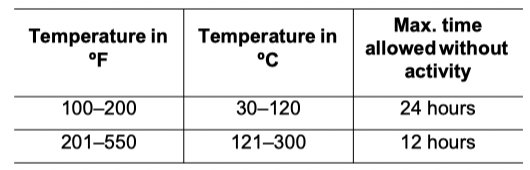
Heating Time Limitation
The maximum heating time is limited. If you forget to turn off the oven, it turns off automatically after a set period of time.
The maximum time for Sabbath mode is 74 hours; for all other cooking modes the maximum allowed time is 24 hours.
Timer
Your new oven is equipped with two types of timers.
Kitchen Timer - is a countdown timer that has no affect on oven heating. The kitchen timer is used for general kitchen timing needs.
Oven Timer - is a countdown timer which upon reaching 00:00 turns the oven off, stopping the current mode. The oven timer is used to set how long a mode will run (not available for Broil, Convection Broil).
To set a kitchen timer:
(for general kitchen timer needs)
1. Press the Kitchen Timer On/Off. 0:00 is displayed and blinks in the display. Enter the desired timer value in H/MM format using the numeric touchpads.
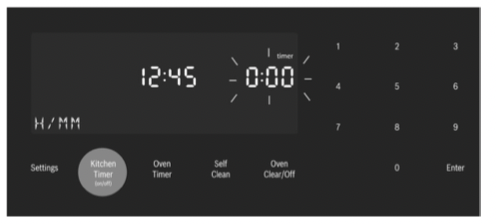
2. Press Enter. The kitchen timer starts.
3. When the kitchen timer has counted down to zero an alarm tone sounds every 10 seconds for 2 minutes and the message “TIMER END” is displayed.
Cancel the kitchen timer - by pressing the Kitchen Timer On/Off button.
Note
• The timer does not change when other settings are changed.
To edit an kitchen timer:
1. Press the Kitchen Timer On/Off button.
2. The current time value blinks and can be edited.
To set an oven timer:
(for setting a timer to turn the oven off)
Note: An oven timer cannot be run during Self Clean.
1. Press the Oven Timer touchpad.
2. Select mode, press Enter.
0:00 is displayed and blinks in the display. Enter the desired timer value in H/MM format using the numeric keypad.
Press the Enter touchpad. The oven timer counts down to 0:00.
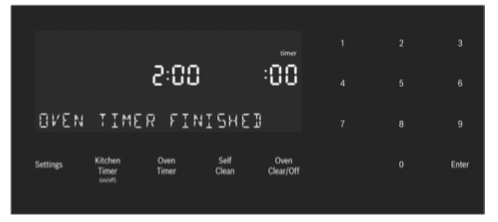
3. When the timer reaches :00 the cooking mode ends and the message “OVEN TIMER FINISHED” is displayed. The oven alarm tone sounds every 10 seconds for 2 minutes.
Editing the oven timer
1. If the oven timer is running and the time remaining needs to be changed, enter the oven timer mode by pressing the Oven Timer touchpad.
2. The temperature blinks, indicating it can be edited.
Input a new temperature or press Enter for no change.
3. The timer value blinks, indicating it can be edited. Input the new time and restart the timer by pressing the Enter touchpad.
The oven timer may be cleared by entering 0:00.
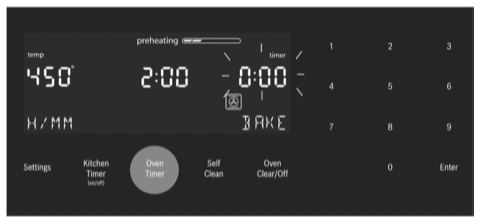
Fast Preheat
Fast Preheat heats the oven quicker than standard preheat. It is available for Bake, Convection Multi Rack, Convection Bake, Convection Roast, Roast, and Pizza (Roast is found in the “More Modes” menu). If Fast Preheat is not allowed for the selected cooking mode an error tone sounds. Fast Preheat is not available for Broil, Convection Broil, Proof or Warm.
To set Fast Preheat:
1. Press Fast Preheat.
The fast preheat icon appears in the display just above the mode name.
2. Press Start. Fast Preheat can be turned off by pressing Fast Preheat again.
Special Features
The special features provide you with additional conveniences when cooking.
Learn more about these special features in the following sections:
• Probe
• Sabbath Mode
• Panel Lock
Probe
The probe measures the internal temperature of the food. The probe is available for Bake, Roast and all convection cooking modes except Convection Broil.
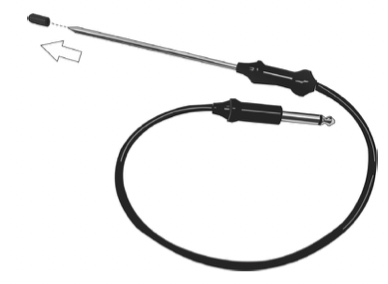
Remove Safety Cap before Using Probe
Some models include a temperature probe used to sense internal tempererature of meats during cooking.
The probe ships with a black plastic safety cap over the pointed metal end of the probe. The cap must be removed prior to use.
Inserting the probe:
Insert the tip of the probe in the middle and thickest part of the meat or breast for poultry. Make sure the probe is not touching fat, bone, or parts of the oven or the pan.
Note: Food must be completely thawed before inserting the probe into the meat.
To use the probe:
1. Insert the probe into the meat as described above. The probe symbol is displayed.
2. Connect the probe to the oven. If the probe is not connected to the oven prior to starting Probe mode, an error tone sounds and the message “INSERT PROBE” is displayed.
3. Set the cooking mode and temperature.
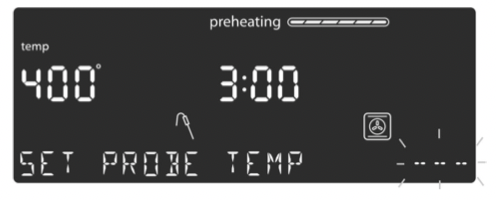
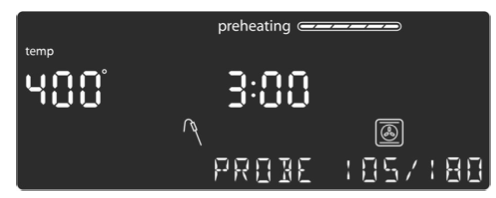
4. The Set Probe Temp screen is displayed. A three digit input prompt “- - -” blinks in the lower right corner. Use the numeric keypad to enter the desired probe temperature and press Enter on the numeric keypad. Note: The minimum probe temperature that can be set is 100° F (40° C) and the maximum is 200° F (100° C). If the probe temperature entered is outside this range, an error is displayed.
5. The probe current temperature and target temperature are both displayed in the format “105 / 180” at the lower right corner of the display. The actual temperature will display < 80 until the food temperature reaches 80° F.
The displayed probe temperature is updated in increments of 5° during the cooking process.
6. When the probe temperature reaches the set temperature, the cooking mode turns off. The current time is displayed and the message “COOKING COMPLETE” blinks at the bottom left of the display. An alarm tone sounds every 10 seconds for 2 minutes.
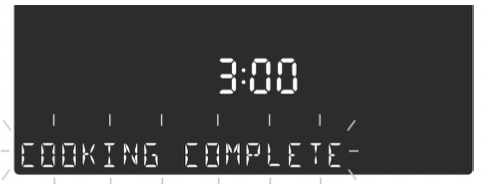
This screen remains in the display until it is cleared by pressing the Oven Clear/Off touchpad or until the probe is removed. The display then goes back to stand by mode.
Note:
• Probe is not available when an Oven Timer has been set.
• To change the probe temperature press the Probe touchpad. The display enters probe temperature editing mode and displays the message “SET PROBE TEMP”. Enter the new probe temperature and press Enter to accept the new value.
• Do not store the probe in the oven.
• Always use the handle of the probe for inserting and removing.
• Always use a potholder to remove the probe since it becomes hot.
• Since meat continues to cook after being removed from the oven, set the internal (probe) temperature 5 - 10 degrees below the desired final internal temperature (exception poultry).
Sabbath Mode
The Sabbath mode enables those of particular faiths to use their ovens on the Sabbath.
The Sabbath mode can be entered in a Bake mode only. The bake temperature must be within the Sabbath mode temperature range of 100° to 450° F.
If the oven light is on during setup, it remains on throughout the Sabbath mode operation. If the oven light is off during setup, it remains off throughout the Sabbath mode operation.
To set the Sabbath Mode:
No kitchen timers or oven timers may be running when Sabbath mode is entered.
1. Begin a Bake operation. While Bake is running, press and hold the Oven Timer touchpad for five seconds. If a timer is running when Sabbath mode attempts to start, the display blinks the message: “SABBATH NOT AVAILABLE”.

If no timers are running, the Sabbath mode settings appear in the display. The Sabbath Mode timer blinks showing the value can be edited. The default value is 74:00 (the maximum number of hours for which Sabbath Mode can be set.)
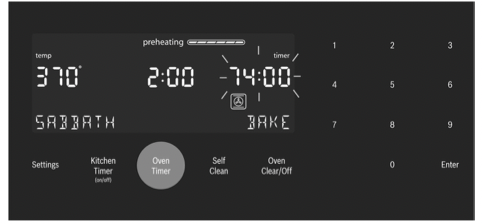
2. Press Enter to accept the default 74:00 hours and start Sabbath Mode. Or use the numeric keypad to enter the desired Sabbath mode timer value. Timer values between 0:01 and 74:00 can be entered.
Note: If no changes are made within 10 seconds, Sabbath Mode auto starts.
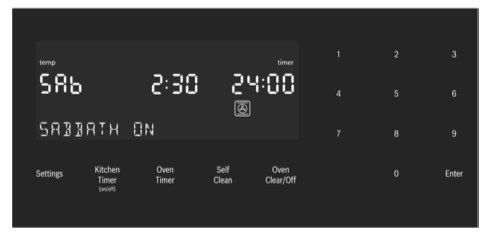
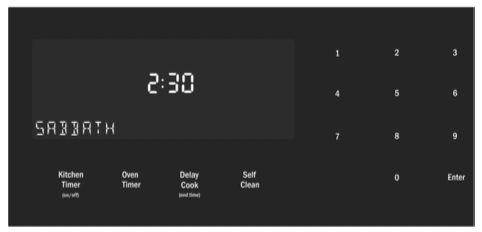
3. Once Sabbath mode has begun, the display changes to show the message “SABBATH ON”.
4. After the Sabbath mode countdown reaches zero, the oven displays the current time and the message “SABBATH”. No changes can be made at this point. To end the Sabbath Mode and return to normal function, press the Oven Clear/Off touchpad.
Note:
• The temperature range in Sabbath Mode is 100° F to 450° F.
• The Sabbath Mode timer can be set between 0:01 and 74 hours.
To edit the Sabbath Temperature:
While editing the temperature in Sabbath mode, there is no feedback from the control. If an invalid temperature is set, the oven will default back to the previous running temperature.
1. Press the Bake touchpad.
2. Enter the new desired set temperature.
3. Press Enter.
The oven will adjust its set temperature after a randomized delay.
Panel Lock
Allows the user to disable all buttons on the control panel. Panel Lock can only be enabled in stand by mode
1. To enable Panel Lock, press and hold the Panel Lock touchpad for 3 seconds (in stand by mode).
2. To disable Panel Lock, press and hold the Panel Lock touchpad for 3 seconds. The display returns to stand by mode.
Settings
The oven settings menu is used to customize certain oven settings.
The oven must be in Stand by mode (no cooking mode or timer running) in order to access the setup menu.
To make changes to Settings Menu Items:
1. Press the Settings touchpad.
2. The first setup item is displayed. The display shows “SET CLOCK”. Press Settings again to access the settings menu.
3. To display a different setup item, press the number corresponding to that setting (see following table or press the Settings touchpad to cycle through available options).
4. To change the value for the displayed setting press the Enter touchpad to enter the edit mode. Use the numeric keypad to change the setting value. The corresponding setting value is shown in the table following.
For the temperature offset, with the item in edit mode, press “-” or “+” first, then the numeric offset value.
The new value is automatically accepted as the display reverts from edit mode back to display mode.
To exit the Settings menu:
Press the Clear On/Off touchpad.
Oven Temperature Offset
The oven is calibrated to provide accurate results. This feature is useful if you prefer your foods lighter or darker. When an offset temperature is selected, the actual oven temperature is raised or lowered by this value.
The oven must be turned off in order to set an offset value. Refer to “Temperature Offset” in “Settings Menu Options” for setting.
Settings Menu Options

Operation - Warming Drawer
This section explains how to operate the warming drawer. See “Getting the Most Out of Your Warming Drawer” on page 28 for guidelines to improve warming drawer results.
About the Warming Drawer
The warming drawer will keep hot, cooked foods at serving temperature. Warming drawer settings are Low, Medium, and High.
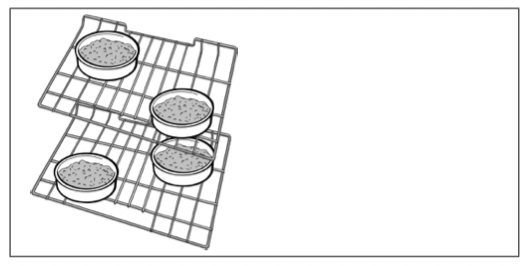
Warming Drawer Specifications
Drawer Interior: 25" W x 17" D x 5" H Dish sizes:
• 2 -9 x 13" Pyrex 3-quart dishes, side by side
• 2 -9 1/2 x 15" Pyrex 4-quart dishes, side by side
• 4 -10 1/2" plates, single or stacked
• 3 -11" plates, single or stacked
Operation
CAUTION
To maintain food safety, follow these guidelines:
• DO NOT use the warming drawer to heat cold food (exception: it is safe to use the drawer to crisp crackers, chips or dry cereal and to warm plates).
• Be sure to maintain proper food temperature. The USDA recommends holding hot food at 140°F or warmer.
• DO NOT warm food for longer than one hour.
• Plastic containers, plastic wrap or aluminum foil can melt if in direct contact with the drawer or a hot cooking container. If it melts onto the drawer, it may not be removable.
Preheating
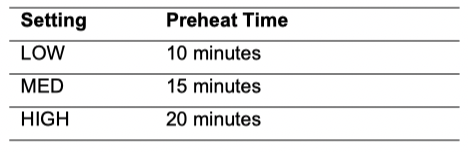
For best results, preheat the warming drawer when warming food.
Preheat Times:
• Low: 10 minutes
• Medium: 15 minutes
• High: 20 minutes
Turning Warming Drawer On and Off
1. Press the Warming Drawer touchpad.
2. WARMING DRAWER will be displayed with the default setting “MED”. The warming drawer amber icon is displayed below the clock.
3. To accept the “MED” setting, press the “Enter” touchpad on the numeric keypad. The setting is accepted and the warming drawer icon remains illuminated. If enter is not pressed, the warming drawer setting is not accepted and the warming drawer turns off.
4. To change the setting, when “MED” is displayed, press the warming drawer touchpad again. The setting changes to “HIGH”. Press the warming drawer touchpad again to change the setting to “LOW”. To accept a setting, press the Enter key on the numeric keypad. The displayed setting will be accepted and the warming drawer icon is illuminated below the clock, indicating that the warming drawer is active.
5. To turn the warming drawer off, press the warming drawer touchpad and the warming drawer will turn off and the warming drawer icon will no longer appear under the clock.
Warming Empty Serving Bowls and Plates
• Use only heat-safe dishes.
• Warm on low setting for cooking container.
• Check dish temperature during warming period.
• Place empty plates or dishes in a cold warming drawer. Do not preheat drawer prior to placing dishes.
Getting the Most Out of Your Cooktop
Cooktop Cooking Guide
Boiling Water
Time to boil can vary greatly depending on environmental conditions. Try the following tips to decrease boil time:
• Use a lid.
• Use a pan that is appropriately sized for the amount of water and the size of the burner.
• Select a pan with a flat base (See “Cookware Selection Guide” in the next column for details).
• Choose a medium-weight pan (rather than a heavyweight one).
• Make sure that the pan is positioned so that the entire base is in contact with the burner grate.
• Start with water that is already warm.
• Boil the smallest amount of water necessary. Smaller volumes will boil faster than larger volumes.
Recommended Settings
Use this chart as a guide for heat settings. A range of heat settings are listed because the actual setting depends on:
• type and quality of pan (See “Cookware Selection Guide”),
• type, quantity and temperature of the food,
• element used and
• the cook’s preference.
|
Uses
|
Heat Settings
|
|
Bringing water to boil
|
High
|
|
Pan frying, sautéing, browning meat, deep fat frying
|
Medium High
|
|
Most frying, eggs, pancakes, slow boil
|
Medium
|
|
Simmering, finish cooking, covered foods, steaming
|
Medium Low
|
|
Melting butter and chocolate
|
Low
|
Cookware Selection Guide
Cookware Characteristics
• Aluminum or copper bottomed pans conduct heat evenly.
• Steel pans, if not combined with other metals, may cook unevenly.
• Cast-iron cookware absorbs heat slowly and cooks more evenly at low-to-medium settings.
• Flat, heavy bottom pans provide even heat and stability.
• DO NOT USE pans that are thin, warped, dented or ridged as they heat unevenly.
Tight Fitting Lids – A lid shortens cooking/boiling time by holding heat inside the pot.
Cookware Tips
• Use of pots and pans with rounded (either concave or convex) warped or dented bottoms should be avoided.
• Make sure the bottom of the pot or pan being used is clean and dry.
• Use pots and pans with thick, smooth metal bottoms.
Specialty Pans
|
Pan Bottom Diameter
• The flame should be the same size as the bottom of the pan or smaller. Do not use small pans with high flame settings as the flames can lick up the sides of the pan.
• Oversize pans that span two burners are placed front to back, not side to side.
• For best cooking results, large pans should not extend over the sides of the grates.
|
 |
|
Use Balanced Pans
• Balance is important for stability and even cooking.
• Pans must sit level on the cooktop grate without rocking or wobbling.
• Center pan over burner.
|
 |
|
Use a Lid That Fits Properly
A well-fitting lid helps shorten the cooking time.
|
 |
Specialty Pans
Specialty pans such as griddles, roasters, pressure cookers, woks, water bath canners and pressure canners must have the same features as described above. Use only a flat-bottomed wok or wok ring when using a wok.
Tight Fitting Lids – A lid shortens cooking/boiling time by holding heat inside the pot.
Cookware Tips
• Use of pots and pans with rounded (either concave or convex) warped or dented bottoms should be avoided.
• Make sure the bottom of the pot or pan being used is clean and dry.
• Use pots and pans with thick, smooth metal bottoms.
Getting the Most Out of Your Oven
General Tips
Pan Placement
Baking results are better if pans are placed in the center of the oven. If baking more than one pan on a rack, allow at least 1" to 1 ½" of air space around the pan. When baking four cake layers at the same time, stagger pans on two racks so that one pan is not directly above the other.
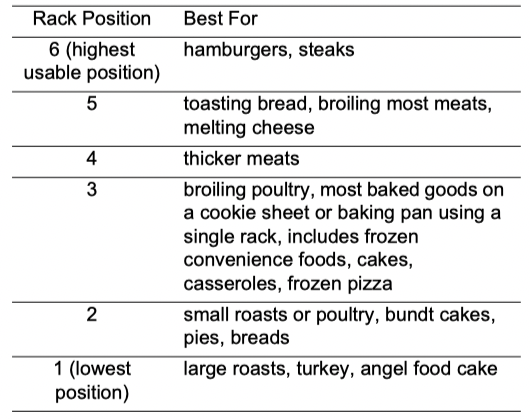
Rack Position
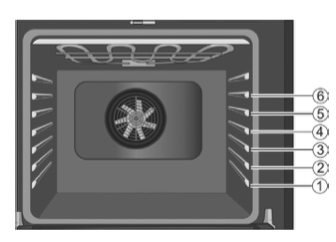
Rack positions are numbered from 1 to 6, from bottom to top. Consult the food cooking charts at the back of this manual for recommended rack positions.
The rail at the top of the oven is used as the guide for the top rack (position 6). Use rack positions 1 through 6 only. DO NOT attempt to use the top guide to support an oven rack.
Aluminum Foil
Do not use aluminum foil or protective liners to line any part of the appliance, especially the oven bottom. Installing these liners may result in risk of electric shock or fire.
Preheating the Oven
• Place oven racks in desired position before heating the oven.
• Preheat the oven when using the Bake, Convection Bake, Convection Multi Rack, Pizza, Broil, Convection Broil, and Warm modes.
• Preheat is not used for Roast, Convection Roast and Proof modes.
• Allow oven to preheat while preparing recipe ingredients or food items.
• Setting a higher temperature does not shorten preheat time.
• Once oven is preheated, place food in the oven as quickly as possible to minimize the loss of heat and reduction of oven temperature.
• Use Fast Preheat to speed up preheating time.
Preheat Reminders
Your oven has one of the fastest preheat times in the market using a concealed bake element. The lower element is hidden under the oven bottom. It is normal that the preheat time is different than your previous oven that had an exposed element on the bottom.
• Cleaning the oven is easier because there is no cleaning around a coil element showing on the bottom of the oven. The hidden lower element is protected from food soils and spills. Wiping up excess spills is easy.
• Preheating is not necessary for meats, poultry, casseroles and some frozen foods.
• Preheat time will be longer when the electrical supply to your house is less than 240 volts.
• Increasing the oven temperature will require a longer preheat time. For example, the preheat time for 425° F is longer than the preheat time for 350° F.
When broiling, preheat the oven 3-4 minutes. Do not preheat for more than 5 minutes.
For Best Results
• Use the cooking recommendations as a guide.
• Open the door as briefly as possible to avoid temperature reduction.
• Use the interior oven light to view the food through the oven window rather than opening the door frequently.
• Use the KitchenTimer to keep track of cooking times.
Baking Pans and Dishes
• Glass baking dishes absorb heat. Reduce oven temperature 25° F when baking using glass dishes.
• Preheat the oven before adding glass baking dishes.
• Use pans that provide the desired browning. For tender, light, golden-brown crusts, use light, anodized or shiny metal bakeware.
• Dark, rough or dull pans (nonstick or anodized) will absorb heat and result in a browner, crisper crust. Some manufacturers recommend reducing the temperature 25 ºF when using this type of pan. Follow manufacturers' recommendations.
• Insulated cookie sheets or bakeware will increase the length of cooking time.
• Do not set any heavy object on the open oven door.
• Do not keep empty pans or pizza stones in the oven during cooking as this could change the cooking performance. Store pans outside the oven.
Opening the Oven Door
• Open and close the appliance door only by holding the door handle. To avoid risk of burns, do not touch any other parts of the door.
High Altitude Baking
• When cooking at high altitudes, recipes and cooking times will vary.
• For accurate information, write the Extension Service, Colorado State University, Fort Collins, Colorado 80521. There may be a cost for the guides. Specify which high altitude food preparation guide you prefer: general information, cakes, cookies, breads, etc.
Condensation
• It is normal for a certain amount of moisture to evaporate from the food during any cooking process. The amount depends on the moisture content of the food. The moisture may condense on any surface cooler than the inside of the oven, such as the control panel.
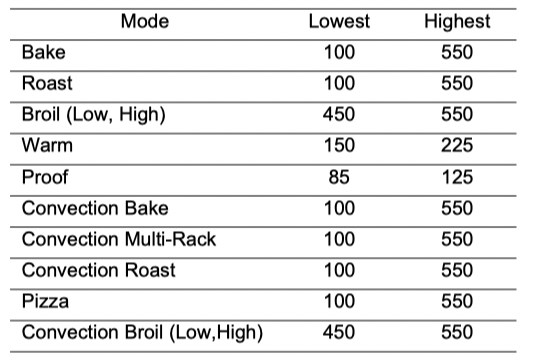
Temperature Range by Cooking Mode
Temperatures shown are in Fahrenheit.
Cooking Modes
Bake

Bake is cooking with dry, heated air. Both the upper and lower elements cycle to maintain the oven temperature.
The Bake mode can be used to prepare a variety of food items, from pastries to casseroles. Refer to recipe or package directions for oven temperature and baking time.
Tips
• When using the Bake mode, preheat the oven if the recipe recommends it.
• Baking time will vary with the size, shape and finish of the bakeware. Dark metal pans or nonstick coatings will cook faster with darker results. Insulated bakeware will lengthen the cook time for most foods.
• For best results, bake food on a single rack with at least 1 1/2” space between pans or dishes and oven walls.
• Eliminate heat loss from the oven by using the window to periodically check food for doneness instead of opening the door.
Convection Bake

Convection Bake is similar to Bake. Heat comes from the upper and lower heating elements. The main difference in convection baking is that the heat is circulated throughout the oven by the convection fan.
The Convection Bake mode is well suited for cakes, bar cookies and breads to take advantage of the bottom heat, yielding a better crust on baked items.
The benefits of Convection Bake include:
• Slight decrease in cook time.
• Higher volume (yeast items rise higher).
Tips
• Place food in shallow, uncovered pans such as cookie sheet without sides.
• For cakes use rack positions 2 and 5.
• If baking more than one pan on a rack, allow at least 1” to 1 1/2” of air space around the pan. Stagger pans so that one is not directly above the other (see image). Use these rack positions.
Auto Convection Conversion
Convection Bake and Convection Multi-Rack modes require a 25° F reduction in temperature. Auto Convection Conversion reduces the temperature you enter automatically. Simply enter the package or recipe temperature when setting the mode. The control calculates the correct temperature and it is shown in the display.
The Auto Convection Conversion feature can be turned on to allow for automatic temperature adjustments. See “Auto Convection Conversion” in the “Settings Menu Options” on page 20 for details.
Convection Multi-Rack

Multi-Rack mode cooks with heat from a third element behind the back wall of the oven. The heat is circulated throughout the oven by the convection fan.
The Convection Multi-rack mode is well suited for cooking individual serving-sized foods such as cookies and biscuits. It is also good for cooking on multiple racks (2 or 3) at the same time. Baking cookies is possible on 6 racks simultaneously. In this case, the baking time increases slightly.
The benefits of Multi-Rack include:
• Even browning.
• Time savings as a result of using multiple racks at one time.
Tips
• Reduce recipe temperature by 25° F if Auto Convection Conversion is not activated.
• Place food in low-sided, uncovered pans such as cookie sheets without sides.
• If baking more than one pan on a rack, allow at least 1” to 1 1/2” of air space around the pan. Stagger pans so that one is not directly above the other.
Pizza

In the Pizza mode, heat from the upper and lower elements is circulated throughout the oven by the convection fan.
Use the Pizza mode for fresh or frozen pizza.
Tips
• There might be a slight decrease in baking time. Check before minimum package time.
• When baking a frozen pizza: For a crispy crust, place pizza directly on the rack. For a softer crust, use a pizza pan.
• When proofing pizza dough, coat dough with olive oil and cover it in a bowl tightly with plastic wrap to prevent crust formation.
• Sprinkle cornmeal on the pizza pan to prevent sticking.
• If using a pizza paddle, sprinkle the paddle liberally with cornmeal for ease in transferring the dough to the pan.
• If par baking handmade pizza dough, prick the dough with a fork before baking.
• If using a pizza pan, choose a dark, perforated pan for a more crisp crust and a non-perforated pan for a softer crust.
• Preheat baking stones following manufacturer’s recommendations while the oven is preheating.
• Bake homemade pizzas on rack position 2 in the center of the rack.
• Follow manufacturer’s directions for frozen pizza.
• The convection fan cycles on and off when using pizza mode.
Roast

Roast uses both the upper and lower elements to maintain the oven temperature. Roasting uses more intense heat from the upper element than the lower element. This results in more browning of the exterior while the inside remains especially moist.
Roast is best suited for meat and poultry and less tender cuts of meat.
Tips:
• Preheating the oven is not necessary.
• Use a high-sided broil pan or roasting pan. Cover dish with a lid or foil for less tender cuts of meat.
• For less tender cuts of meat, add liquids such as water, juice, wine, bouillon or stock for flavor and moisture.
• Roasting bags and using a lid are suitable for use in this mode.
• When roasting whole chicken or turkey, tuck wings behind back and loosely tie legs with kitchen string.
Convection Roast

Convection Roast uses heat from the top and bottom elements as well as heat circulated by the convection fan.
The Convection Roast mode is well suited for preparing tender cuts of meat and poultry. It is also suitable for roasting vegetables.
The benefits of Convection Roast include:
• As much as 25% faster cooking than non-convection modes.
• Rich, golden browning.
Tips:
• Preheating the oven is not necessary.
• Use the same temperature as indicated in the recipe.
• Check doneness early, since roasting time may decrease. Refer to the Meat/Poultry cooking chart for examples.
• Do not cover meat or use cooking bags.
• Use a broil pan with a rack and grid or a shallow, uncovered pan with a rack for roasting.
• Use a meat thermometer to determine the internal termperature of the meat.
• If the meat is browned to your liking, but is not yet done, a small strip of foil can be placed over the meat to prevent overbrowning.
• Let meat stand covered with foil for 10 to 15 minutes after removing it from the oven.
• Refer to the Meat/Poultry Cooking Chart for recommended rack positions.
Broil

Broil uses intense heat radiated from the upper element.
The Broil mode is best suited for cooking thin, tender cuts of meat (1" or less), poultry and fish. It can also be used to brown breads and casseroles. Always broil with the door closed. The benefits of broiling include:
• Fast and efficient cooking.
• Cooking without the addition of fats or liquids.
Tips:
• Preheat oven 3–4 minutes. Do not preheat for more than 5 minutes.
• Steaks and chops should be at least ¾" thick.
• Brush fish and poultry with butter or oil to prevent sticking.
• Use a broil pan and grid, or a deep pan with a metal rack, for broiling.
• Do not cover the broil grid with foil. It is designed to drain fats and oils away from the cooking surface to prevent smoking and spattering.
• Turn meats (other than fish) once during the recommended cook time. Fish does not need to be turned.
• When top browning casseroles, use only metal or glass ceramic dishes such as CorningWare ®.
• Never use heat-proof glass (Pyrex ®); it cannot tolerate the high temperature.
• For broil times, refer to the Meat/Poultry Cooking Chart.
Convection Broil

Convection Broil is similar to Broil. It combines intense heat from the upper element with heat circulated by a convection fan.
The Convection Broil mode is well suited for cooking thick, tender cuts of meat, poultry and fish. Convection Broil is not recommended for browning breads, casseroles and other foods. Always use convection broil with the door closed.
In addition to the benefits of standard broiling, convection broiling is faster.
Tips:
• Preheat oven 3–4 minutes. Do not preheat for more than 5 minutes.
• Steaks and chops should be at least 1 1/2" thick.
• Use a broil pan and grid, or a deep pan with a metal rack, for broiling.
• Do not cover the broil grid with foil. It is designed to drain fats and oils away from the cooking surface to prevent smoking and spattering.
• Turn meats (other than fish) once during the recommended cook time. Fish does not need to be turned.
• Never use heat-proof glass (Pyrex ®); it cannot tolerate the high temperature.
• For Convection Broil times, refer to the Meat/Poultry Cooking Chart.
Proof

In Proof, the oven uses the lower element to maintain a low temperature to proof bread or other yeast doughs.
• No preheat is necessary.
• Proofing is the rising of yeast dough.
• The Proof Dough mode temperature range is 85° F to 125° F.
• The default temperature in the Proof Dough mode is 100° F.
• Loosely cover the bowl or pan and use any rack that accommodates the size of the container.
• Keep the oven door closed and use the oven light to check the rising of the dough.
Warm

In Warm, the upper and lower elements maintain a low temperature in the oven cavity in order to keep food at serving temperature.
• Use the Warm mode to keep cooked foods hot until ready to serve for up to one hour.
• Warm mode temperatures are 150° F to 225° F.
• The default temperature in the Warm mode is 170° F.
• Foods that must be kept moist should be covered with a lid or aluminum foil.
CAUTION
When using Warm mode, follow these guidelines:
• Do not use the Warm mode to heat cold food.
• Be sure to maintain proper food temperature. The USDA recommends holding hot food at 140° F or warmer.
• DO NOT warm food longer than one hour.
Getting the Most Out of Your Warming Drawer
About the Appliance
The warming drawer will keep hot, cooked foods at serving temperature. Always start with hot food. DO NOT use to heat cold food other than crisping crackers, chips, dry cereal,warming breads and biscuits, or warming dishes or plates.
The warming drawer has a push-to-open feature. Push in the front of the drawer to activate opening.
General Tips
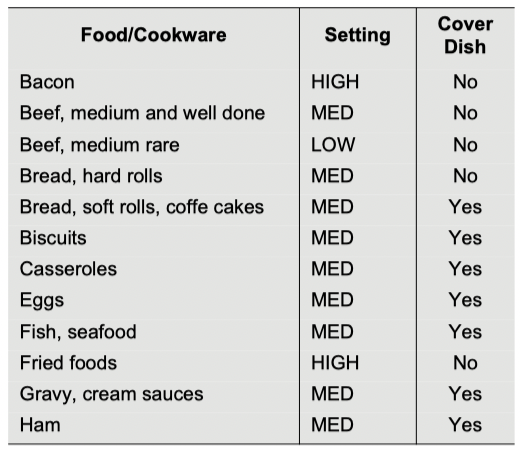
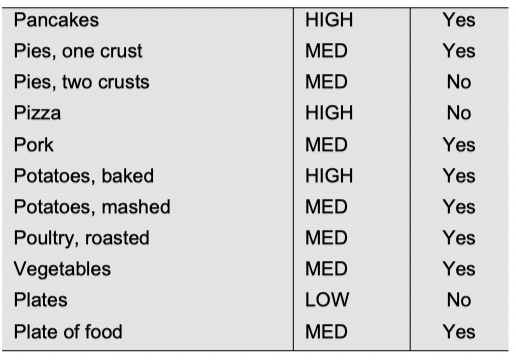
Refer to the Warming Drawer Chart for recommended settings.
• To keep several different foods hot, set the temperature for the food needing the highest setting.
• Place items needing the highest setting toward the side of the drawer and items needing less heat in the center of the drawer.
• Food should be at serving temperature (above 140° F) before being placed in the warming drawer. DO NOT use to heat cold food other than crisping crackers, chips, and dry cereal, or warming dishes or plates.
• Preheat empty serving dish while preheating drawer if desired.
• Place cooked, hot food in warming drawer in its original cooking container or in a heat-safe serving dish.
• Aluminum foil may be used to cover food; However, DO NOT line the warming drawer with aluminum foil.
• Do not use the warming drawer for storage.
Use of Your Appliance
CAUTION
To maintain food safety, do not leave food in the oven for more than one hour before or after cooking.
IMPORTANT:
Plastic containers or plastic wrap can melt if in direct contact with the drawer or a hot utensil. If it melts onto the drawer, it may not be removable.
Note:
Use heat-safe dishes only.
Preheating the Warming Drawer
Preheat the warming drawer when warming food. For best results, preheat for the following times:
Warming Food
1. Preheat warming drawer.
2. Place cooked, hot food in the drawer.
It is okay to leave food in the cookware it was prepared. Alternatively, you can transfer food to a heat-safe serving dish before placing it in the warming drawer.
Aluminum foil or lid may be used to cover food.
Warming Plates and Bowls
Use only heat-safe dishes. Place empty dishes or plates in a cold warming drawer. No need to preheat.
Select LOW.
Temperature Recommendations
Crisping Stale Items
Place food in low sided dishes or pans.
1. Press LOW. Select LOW.
2. Preheat for 10 minutes, then place dish in drawer.
3. Set the warming timer.
4. Check crispness after 45 minutes. Add time as needed.
Cleaning and Maintenance
Cooktop
Daily Cleaning
The entire Cooktop can be safely cleaned by wiping with a soapy sponge, then rinsing and drying. If stubborn soil remains, follow the recommended cleaning methods below.
• Always use the mildest cleaner that will do the job. Use clean, soft cloths, sponges or paper towels.
• Rub stainless steel finishes in the direction of the grain. Wipe area dry to avoid water marks.
• Before cleaning, be certain the burners are turned off and the grates and burners are cool.
• Do not clean removable cooktop parts in any self-cleaning oven.
• After cleaning, place all parts in their proper positions before using cooktop.
• For proper burner performance, keep igniters clean and dry.
• Keep the ignitor ports clean for proper lighting performance of the burners. It is necessary to clean these when there is a boilover or when the burner does not light even though the electronic ignitors click.
• Do not use flammable cleansers such as lighter fluid or WD-40.
CAUTION
All igniters spark when any single burner is turned on. Do not touch any of the burners when the cooktop is in use.
Cleaning Guidelines
The cleaners recommended below and on the following page indicate a type and do not constitute an endorsement of a particular brand. Use all products according to package directions.
Cooktop Cleaning Chart
|
Cooktop Part / Material
|
Suggested Cleaners
|
Important Reminders
|
|
Burner Base Aluminum Alloy
|
• Detergent and hot water; rinse and dry.
• Stiff nylon bristle toothbrush to clean port openings.
• Abrasive Cleansers: Brillo® or S.O.S.® pads. Rinse and dry.
|
• Do not scratch or gouge the port openings.
• Clean ports with a wire or straightened paper clip.
• Do not use a toothpick that may break off.
|
|
Burner Cap Porcelain Enamel
|
• Hot sudsy water; rinse and dry thoroughly.
• Nonabrasive Cleansers:
Ammonia, Fantastic®, Formula 409®.
• Mild Abrasive Cleansers: Bon Ami®, Ajax®, Comet®.
• Liquid cleaners: Kleen King®, Soft Scrub®.
• For food stains, use an abrasive cleanser such as, Zud® or Bar Keepers Friend®.
• Reassemble. Make sure that the cap is seated on the base.
|
• Acidic and sugar-laden spills deteriorate the porcelain enamel. Remove soil immediately.
• Do not use wet sponge or towel on hot porcelain.
• Do not soak burner caps.
• Always apply minimal pressure with abrasive cleaners.
• Dry thoroughly after cleaning.
|
|
Exterior Finish
Stainless Steel
|
• Nonabrasive Cleaners: Hot water and detergent, Fantastic®, Formula 409®. Rinse and dry immediately.
• Cleaner Polish: Stainless Steel Magic® to protect the finish from staining and pitting; enhances appearance.
• Hard water spots: Household white vinegar.
• Mild Abrasive Cleaners: Kleen King Stainless Steel liquid cleaner, Bon Ami®.
• Heat discoloration: Bar Keepers Friend®.
|
• Do not use steel wool pads. They will scratch the surface.
• Stainless steel resists most food stains and pit marks providing the surface is kept clean and protected.
• Never allow food stains or salt to remain on stainless steel for any length of time.
• Rub lightly in the direction of the grain.
• Chlorine or chlorine compounds in some cleaners are corrosive to stainless steel. Check ingredients on label before using.
|
|
Grates Porcelain Enamel on Cast Iron
|
• Nonabrasive cleaners: Hot water and detergent, Fantastic®, Formula 409®. Rinse and dry immediately.
• Mild abrasive cleaners: Bon Ami® and Soft Scrub®.
• Abrasive cleaners for stubborn stains: soap-filled steel wool pad.
|
• The grates are heavy; use care when lifting. Place on a protected surface for cleaning.
• Blisters/ crazing/ chips are common due to the extreme temperatures on grate fingers and rapid temperature changes.
• Acidic and sugar-laden spills deteriorate the enamel. Remove soil immediately.
• Abrasive cleaners, used too vigorously or too often, can eventually mar the enamel.
• Do not clean in a self-clean oven.
|
|
Igniters
Ceramic
|
• Carefully wipe with a cotton swab dampened with water, ammonia or Formula 409®.
• Gently scrape soil off with a toothpick.
|
• Avoid excess water on the igniter.
A damp igniter will prevent burner from lighting.
• Remove any lint that may remain after cleaning.
|
Cleaning the Oven
WARNING
Children should not be left alone or unattended in an area where appliances are in use. During the selfclean cycle, parts of the appliance may become potentially harmful to persons who lack adult knowledge of appliances and adult reactions to potentially harmful conditions.
During the elimination of soil during self-cleaning, small amounts of carbon monoxide can be created. Fiberglass insulation could give off very small amounts of formaldehyde during the first several cleansing cycles. To minimize exposure to these substances, provide good ventilation with an open window, or use a ventilation fan or hood.
Self Clean
During self-clean, the oven is heated to a very high temperature. Soil is burned off at this temperature.
NOTICE:
Wipe out excessive spillage before self-cleaning the oven.
NOTICE:
Do not clean parts or accessories in the Self-Clean oven. Remove all baking dishes and oven racks from the oven prior to running Self-Clean.
To set the self-clean mode:
1. Remove all accessories and racks from the oven.
2. If there is a cooking mode on, press Oven Clear/Off to end the running mode.
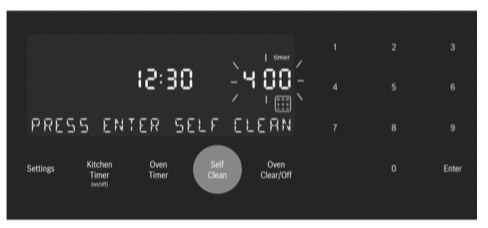
3. Press the Self Clean touchpad below the display.
The self-clean icon  appears in the display. The selfclean timer default (4:00) hours blinks to indicate it can be accepted or changed.
To accept the 4:00 hour default self-clean time, press Enter on the numeric keypad.
To enter a different number of hours use the numeric keypad. The value entered must be within the range of 2:00 to 4:00 hours. Entering a value less than 2:00 or greater than 4:00 results in an error tone and message. Use a longer setting for a heavily soiled oven.
4. When the desired self-clean time is displayed, press Enter on the numeric keypad.
The oven door locks prior to starting Self Clean.
The door lock symbol  is displayed and blinks while the door is being locked. Once locked, the door lock symbol is continuously illuminated (not blinking).
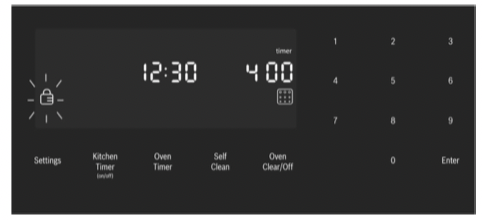
The door lock symbol remains illuminated as long as the self-clean mode is running.
Note: The door remains locked until the oven has cooled down after self-cleaning. The door can be opened again only after “Self Clean” disappears from the display.
5. Self Clean starts and the oven self-clean timer begins its countdown.
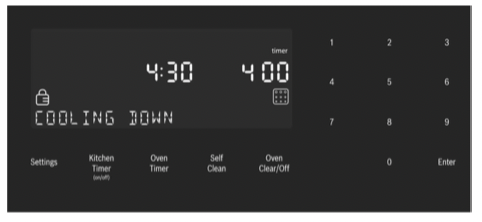
To Cancel Self Clean Press the Oven Clear/Off touchpad to cancel SelfClean.
When the self-clean timer ends, for safety the unit must cool down before the door can unlock. During this period the message “COOLING DOWN” is displayed.
6. When the cool down is complete, the message “SELF CLEAN FINISHED” is displayed. Continue to use caution when opening the oven door.
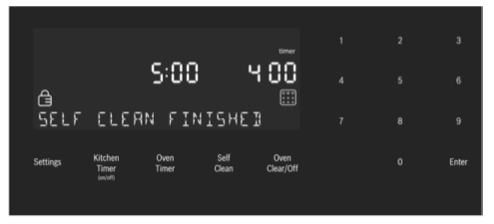
7. Press Oven Clear/Off to clear the display when selfclean is finished.
8. After the oven has cooled down and the door is unlocked, wipe remaining ash from the oven using a moist cloth.
Note:
• The oven light cannot be turned on during self-cleaning.
• The special heat-resistant enamel and the polished components in the oven can become discolored over time. This is normal and does not affect operation. Do not use scouring pads or abrasive cleaners to treat discolorations.
Avoid These Cleaners
Do not use commercial oven cleaners such as Easy Off®. They may damage the oven finish or parts.
Chlorine or chlorine compounds in some cleansers are corrosive to stainless steel. Check ingredients on label.
Never use scouring pads or abrasive cleaners.
Oven Cleaning Guide
|
Part
|
Recommendations
|
|
Flat Rack
|
Wash with hot soapy water. Rinse thoroughly and dry, or gently rub with cleansing powder or soap-filled pads as directed. DO NOT clean the rack in the self-cleaning oven.
If flat racks are cleaned in the oven during the self-clean mode, they will loose their shiny finish and may not glide smoothly. If this happens wipe the rack edges with a small amount of vegetable oil. Then wipe off excess.
|
|
Telescopic Rack
|
Wash with soapy water. Rinse thoroughly and dry, or gently rub with cleansing powder or soap-filled pads as directed. Avoid getting cleansing powder in the telescopic slides. Re-lubrication may become necessary. Use only high- temperature food-grade lubricants to re-lubricate slides.
DO NOT clean the rack in the self- cleaning oven. DO NOT leave the rack in the oven during self-clean.
If the telescopic rack is cleaned in the oven during the self-clean mode it will loose its shiny finish and will not glide smoothly.
|
|
Fiberglass Gasket
|
DO NOT CLEAN GASKET.
|
|
Glass
|
Wash with soap and water or glass cleaner. Use Fantastik® or Formula 409® to remove grease spatters and stubborn stains.
|
|
Painted Surfaces
|
Clean with hot soapy water or apply Fantastik® or Formula 409® to a clean sponge or paper towel and wipe clean. Avoid using powder cleaning agents, steel wool pads and oven cleaners.
|
|
Porcelain Surfaces
|
Immediately wipe up acid spills like fruit juice, milk and tomatoes with a dry cloth. Do not use a moistened sponge/cloth on hot porcelain. When cool, clean with hot soapy water or apply Bon-Ami® or Soft Scrub® to a damp sponge. Rinse and dry. For stubborn stains, use soap-filled pads. It is normal for porcelain to show fine lines with age due to exposure to heat and food soil.
|
|
Stainless Steel Surfaces
|
Never allow food stains or salt to remain on stainless steel for any length of time. Always wipe or rub in the direction of the grain. Clean with a soapy sponge, then rinse and dry, or wipe with Fantastik® or Formula 409® sprayed on a paper towel. Protect and polish with Stainless Steel Magic® and a soft cloth. Remove water spots with a cloth dampened with white vinegar. Use Bar Keeper's Friend® to remove heat discoloration. Chlorine or chlorine compounds in some cleansers are corrosive to stainless steel. Check ingredients on label.
|
|
Plastic & Controls
|
When cool, clean with soapy water, rinse and dry.
|
|
Probe
|
Wipe with soapy water. Do not submerge. Do not wash in the dishwasher.
|
|
Printed Areas (Words and Numbers)
|
Do not use abrasive cleansers.
|
Cleaning the Warming Drawer
|
Part
|
Recommendations
|
|
Drawer interior (polished stainless steel)
|
Use dish detergent. Wash, rinse well and dry. For hard water spots or scale, use white vinegar. Apply with a sponge or cloth, rinse, and dry.
|
|
Painted surfaces
|
Use hot soapy water or mild cleaners such as Fantastik or Formula 409Wash, rinse well and dry. Avoid using abrasive cleaning agents, steel wool pads and oven cleaners.
|
|
Drawer exterior frame (brushed stainless steel)
|
Always wipe or rub in the direction of the grain. Clean with a soapy sponge, then rinse and dry, or wipe with Fantastik® or Formula 409® sprayed on a paper towel. Protect and polish with Stainless Steel Magic® and a soft cloth. Remove water spots with a cloth dampened with white vinegar. Use Bar Keeper's Friend® to remove heat discoloration.
|
Maintenance
Cooktop Maintenance
The appliance requires only regular cleaning for proper operation. No other maintenance is required.
Oven Maintenance
Replacing an Oven Light
WARNING
• Make sure the appliance and lights are cool and power to the appliance has been turned off before replacing the light bulb(s). Failure to do so could result in electrical shock or burns.
• The lenses must be in place when using the appliance.
• The lenses serve to protect the light bulb from breaking.
• The lenses are made of glass. Handle carefully to avoid breaking. Broken glass could cause an injury.
• Light socket is live when door is open.
Bulb specifications:
40 watt, appliance bulb, standard Edison base

To change the bulb:
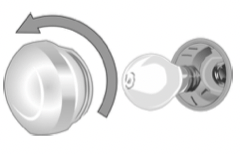
1. Turn off power to the oven at the main power supply (fuse or breaker box).
2. Remove the glass cover by unscrewing it. Turn the glass counterclockwise to remove it.
3. Remove the bulb. The bulb unscrews counterclockwise.
4. Grasp the new bulb with a clean, dry cloth to prevent depositing skin oils on the glass which could lead to premature bulb failure. Replace the bulb by screwing it in turning the bulb clockwise.
5. Screw the glass cover back on.
6. Turn power back on at the main power supply (fuse or breaker box).
Removing the Oven Door
WARNING
When removing the door:
• Make sure oven is cool and power to the oven has been turned off before removing the door. Failure to do so could result in electrical shock or burns.
• The oven door is heavy and parts of it are fragile. Use both hands to remove the oven door. The door front is glass. Handle carefully to avoid breakage.
• Grasp only the sides of the oven door. Do not grasp the handle as it may swing in your hand and cause damage or injury.
• Failure to grasp the oven door firmly and properly could result in personal injury or product damage.
• To avoid injury from hinge bracket snapping closed, be sure that both levers are securely in place before removing the door. Also, do not force door open or closed—the hinge could be damaged and injury could result.
• Do not lay removed door on sharp or pointed objects as this could break the glass. Lay on a flat, smooth surface, positioned so that the door cannot fall over.
To remove the oven door:
To help avoid injury or damage be sure to read the above WARNING before attempting to remove the oven door.
1. Open the oven door to its fully open, horizontal position.
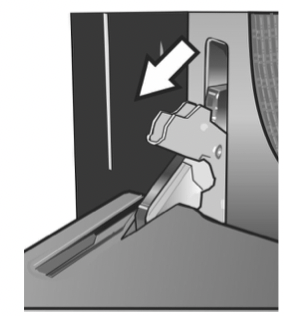
2. Flip levers on hinges toward you.
Note: It may be necessary to use a tool, such as a screwdriver, to gently pry the upper part of the lever away from the housing. Take care to avoid scratching the housing.
3. Bring both door hinge levers to their fullest down position as shown in the illustration. The left and right door hinges may differ slightly but operate in the same manner.
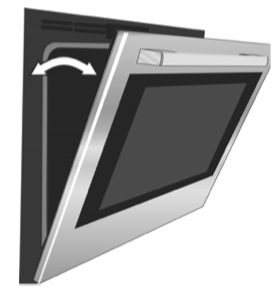
4. Close the oven door until it catches on the hinge stop levers, locking the hinges at the proper angle for door removal. The door will be open about 7 inches at the top. This takes the spring tension off the hinges so the door can be easily lifted out.
5. The door is heavy. Use both hands to firmly grip it by the sides. Do not grip the door by the handle. Maintaining the door angle, lift the door straight up approximately 3/4" to unhook the hinges from the slots and then pull it out towards you until the hinges are clear of the oven housing.
6. Place the door in a convenient and stable location for cleaning.
To replace the oven door:
1. Holding the door firmly in both hands, grip it on either side, not by the handle.
2. Tilt the door back slightly towards you until it opens about 7" at the top.
3. Slide the hinges into the slots as far as they will go and then lower the door straight down. The angle of the door may need to be adjusted slightly to allow the hinges to engage properly and the door to lower into place. The door should lower about 3/4" and stop. If not, the hinges have not engaged properly and the door could fall if it is released.
4. Once both hinges are fully engaged as described in Step 3, gently open the door until it is fully open.
5. Push the levers on both the hinges up and forward until they are locked into the slot, flush with the front of the oven body.
6. Close and open door slowly to be sure it is correctly and securely in place.
Warming Drawer Maintenance
Removing the Drawer
CAUTION
To prevent burns, do not remove drawer while hot. Be sure drawer is empty before removing.
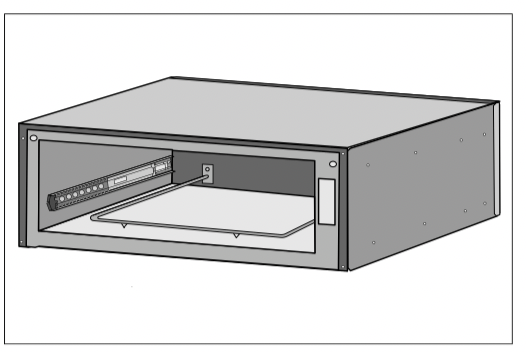
Removing Drawer from Housing
NOTICE: The following is the manufacturer’s recommendations for removing and installing the drawer to minimize the risk of damage to the PTO mechanism.
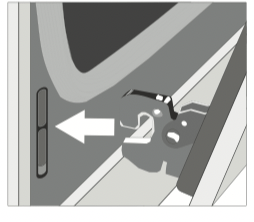
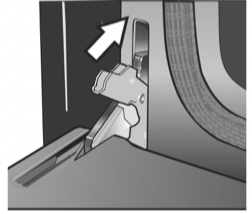
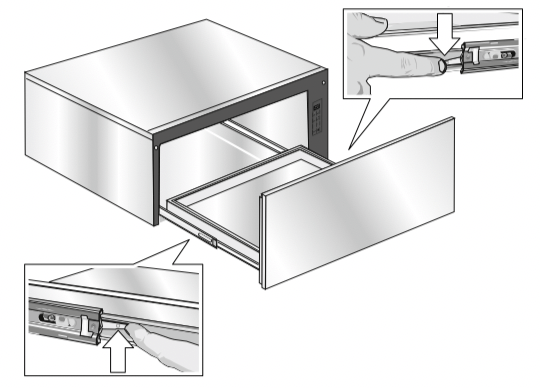
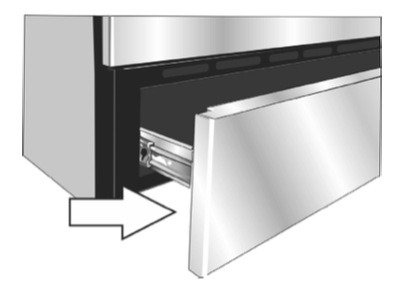
1. Remove the drawer from the drawer housing.
- Pull drawer to fully open position.
- Press down right drawer release lever.
- Lift up left drawer release lever.
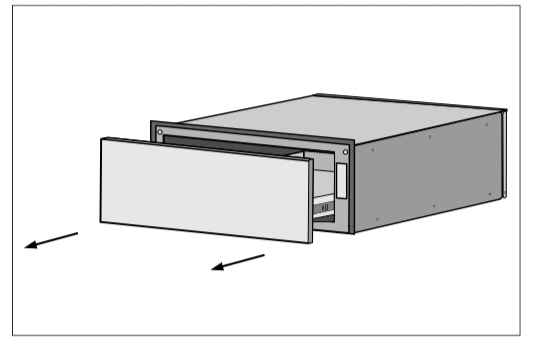
- Firmly pull the drawer straight out.
- Retract cabinet rails while drawer is removed.
2. Grasp both sides of the drawer and pulling straight and level, carefully remove the drawer housing. This step may require light to moderate force to completely remove drawer.
3. Install or service (clean) housing with drawer removed.
Installing Drawer to Housing
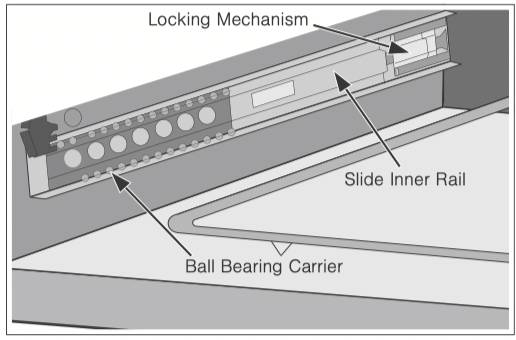
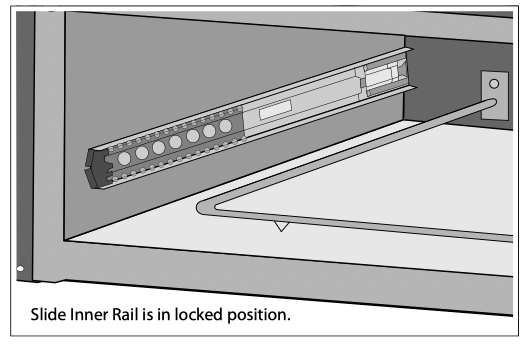
The slides mounted to each side of the housing wall have two moving components, an inner rail and a ball bearing carrier which need to be in the proper orientation for accurate installation and alignment.
There is also a visible locking mechanism located at the rear of each slide.
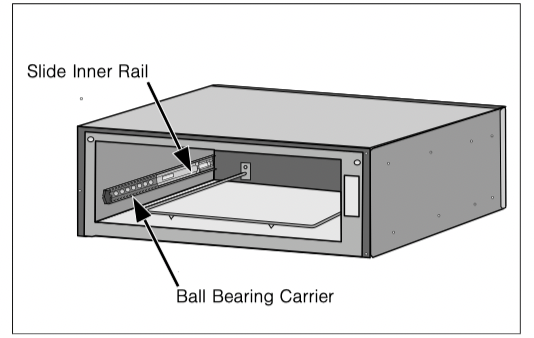
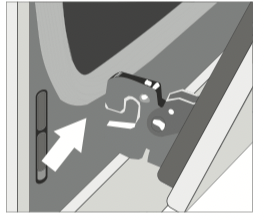
Note: The housing of your warming drawer should match the image below identically before starting your installation. The ball bearing carrier should be locked in to the inner rail’s black plastic rail tip at the front of the inner rail.
1. With the drawer removed, set the slide inner rail to the drawer locked position by pushing the slide inner rail toward the rear of the housing until it locks in place.
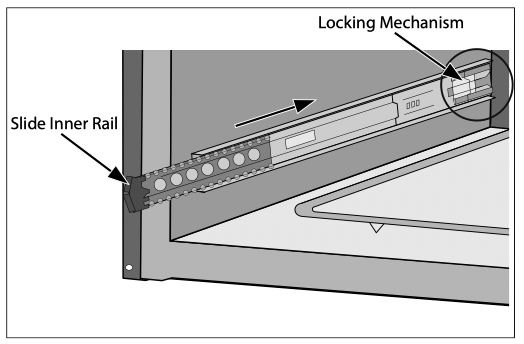
Note: A moderate force pushing on the black plastic ball carrier locking mechanism is required to set the slide to the drawer locked position. The drawer is locked when it remains in place and does not spring back to the open position.
2. Position the drawer assembly in front of the housing assembly and align the rail (plastic rail tip) to the slide ball carrier assembly. Keeping the drawer assembly level and square to the housing, gently insert the drawer to the housing assembly.
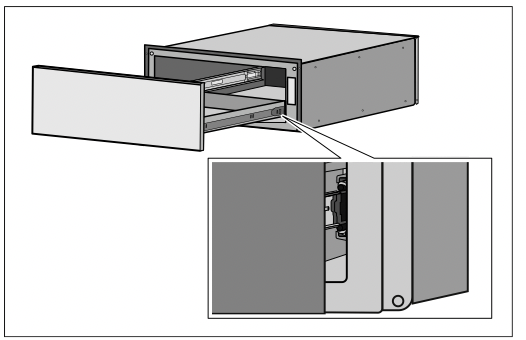
Notes
- A slight side-to-side wiggle motion may be required to properly get the ball bearings to accurately align.
- Remember: You are attempting to align two sets of ball bearings at this point. If more than a moderate force is required to insert the drawer at this time, remove the drawer and repeat the installation procedure to this point.
3. Continue to insert the drawer keeping the drawer level and square to the housing until a slight increase in resistance is felt at the approximate position shown below.
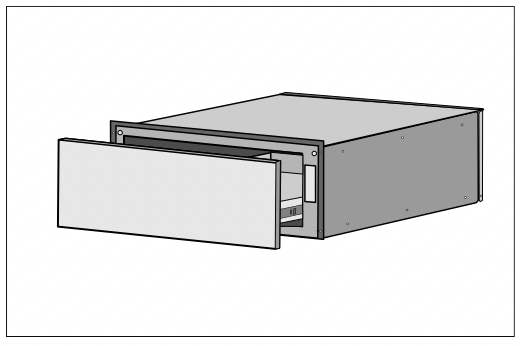
NOTICES
- At this position, a slight increase in closure force is required with several small increments of force applied to the drawer to accurately align and set the drawer for proper operation.
- An audible “click” should be heard when the drawer is properly closed causing the drawer to lock in the closed position.
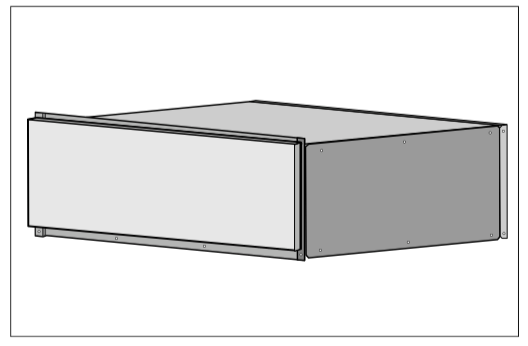
4. Test the operation of the PTO drawer by pushing on the center lower portion of the drawer front (optimum location for function).
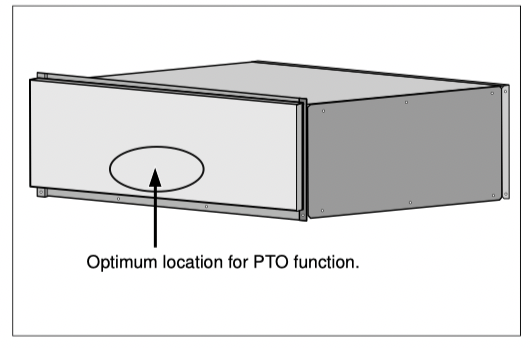
Note: It should be noted the recommended and optimum location for opening the drawer is the lower center front. The drawer will operate with an opening force applied to any location on the drawer front, however a slight increase in opening force may be required.
Service
How to Obtain Service or Parts
To reach a service representative, see the contact information at the front of the manual. Please be prepared with the information printed on your product rating label when calling.
Rating Label
The rating label shows the model and serial number. Refer to the rating label on the appliance when requesting service. The rating label is located on the back side of the drawer front. Open the drawer to view it.
Self Help
Cooktop Troubleshooting
Use these suggestions before calling for service to avoid service charges.
|
Cooktop Problem
|
Possible Causes and Suggested Solutions
|
|
Burner(s) do not light / Ignitors do not spark
|
• Make sure that the gas shut off valve is in the ON position and the gas supply to the house is not shut off.
• Make sure the burner caps are properly positioned and the burner ports are not clogged. Clear ports with a wire or straightened paper clip if clogged.
• Make sure the igniters are clean and dry.
• Check the power supply. It should be properly grounded with the correct polarity. Make sure the unit is plugged in and the circuit breaker is not tripped.
|
|
Burner flame goes out unexpectedly
|
• Make sure that there is no draft in the room.
|
|
Ignitors spark even though knobs are in the off position
|
• When the electrical power connection has been activated at the first power up or reconnected after an outage, the igniters may spark once or twice even though all burner knobs are in the off position.
|
|
Cooking results are not what was expected
|
• The cooktop is not level.
• Cooking pan does not fit the surface being used.
• Cookware is not the type or size recommended.
|
|
Water takes too long to boil
|
Time to boil can vary greatly depending on environmental conditions. See “Boiling Water” in this manual for tips to decrease time to boil.
|
Oven Troubleshooting
Use these suggestions before calling for service to avoid service charges.
|
Oven Problem
|
Possible Causes and Suggested Solutions
|
|
The oven mode or temperature selected or the numbers selected do not appear in the display
|
Review manual instructions when setting clock, timer, or Self-Clean.
|
|
Oven door is locked and will not release, even after cooling
|
Turn the oven off at the circuit breaker and wait 5 minutes. Turn breaker back on. The oven should reset itself and will be operable.
|
|
Oven is not heating
|
Check circuit breaker or fuse box to your house. Make sure there is proper electrical power to the oven. Be sure oven temperature has been selected.
|
|
Oven is not cooking evenly
|
Adjust oven calibration if necessary (see “Oven Temperature Offset” on page 19). Refer to cooking charts for recommended rack position.
|
|
Baking results are not as expected
|
Refer to cooking charts for recommended rack position. Check “Getting the Most Out of Your Oven” on page 23 for tips and suggestions. Adjust oven calibration if necessary (see “Oven Temperature Offset” on page 19).
|
|
Food takes longer to cook than expected
|
The oven is carefully calibrated to provide accurate results. However, the temperature can be offset if food is consistently too brown or too light. See “Oven Temperature Offset” on page 19.
|
|
Food is overcooked
|
The oven is carefully calibrated to provide accurate results. However, the temperature can be offset if food is consistently too brown or too light. See “Oven Temperature Offset” on page 19.
|
|
Convection Bake or Convection Mulit- Rack results are not as Expected
|
If the Automatic Convection Conversion Feature is turned off, the temperature must be manually reduced by 25°F. If the feature is active, the temperature is automatically adjusted. See “Turn Automatic Convection Conversion ON or OFF” for more information. Refer to cooking charts and tips for rack positions, cooking times and pan selection. Adjust oven calibration if necessary. See “Oven Temperature Offset” on page 19.
|
|
Oven temperature is too hot or too cold
|
The oven thermostat needs adjustment. See “Oven Temperature Offset” on page 19.
|
|
Oven light is not working properly
|
Replace or reinsert the light bulb if loose or defective. Touching the bulb with fingers may cause the bulb to burn out.
|
|
Oven light will not turn off
|
Check for obstruction in oven door. Check to see if hinge is bent. When the Sabbath feature is activated, the oven light will stay on or off (as selected during set-up) during the entire Sabbath mode.
|
|
Cannot remove lens cover on light
|
There may be soil build-up around the lens cover. Wipe lens cover area with a clean dry towel prior to attempting to remove the lens cover.
|
|
Oven will not Self-Clean properly
|
Allow the oven to cool before running Self-Clean. Always wipe out loose soils or heavy spillovers before running Self-Clean. If oven is badly soiled, set oven for a five-hour Self-Clean. See Preparing the Oven to Self-Clean.
|
|
Clock and timer are not working properly
|
Make sure there is electrical power to oven. See Clock and Timer sections.
|
|
Porcelain chips
|
When oven racks are removed and replaced, always tilt racks upward and do not force them to avoid chipping the porcelain.
|
|
“F” and a number appears in display and control beeps
|
This is a fault code. Press Off to clear the display and stop beeping. Reset oven if necessary. If fault code remains and beep continues, record fault code, cancel oven and call authorized service technician.
|
|
With a new range there is a strong odor when oven is turned on
|
This is normal with a new range and will disappear after a few uses. Operating the self-clean cycle will also “burn-off” the smell more quickly.
|
|
Control does not react when the pad is touched
|
Be sure that pad is clean. Touch the center of the touchpad. Use the flat part of your finger.
|
|
Fan is running during modes that don’t use convection
|
On some models, the convection fan will run while the oven is preheating for the bake mode. This is normal.
Slide-in models also have a cooling fan that runs during every cooking mode.
|
|
Warm air or steam escapes from oven vent
|
It is normal to see or feel steam or warm air escaping from the oven vent. Do not block the vent.
|
|
Cooling fan runs after oven is turned off (Slide-in ranges only)
|
This is normal. When the oven has cooled to a pre-determined temperature, the cooling fan turns off.
|
|
The cooktop does not operate during Self- Clean
|
This is normal for some models. Operation will return once Self-Clean is complete.
|