INSTRUCTION MANUAL for Gas Hob
- Pan supports
- Control knobs
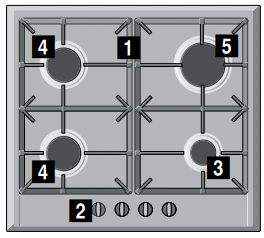
- Economy burner with an output of up to 1 kW
- Standard-output burner with an output of up to 1.75 kW
- High-output burner with an output of up to 3 kW
- Mini wok burner up to 3.5 kW
- Wok burner with an output of up to 4 kW
- Dual-wok burner with an output of up to 5 kW
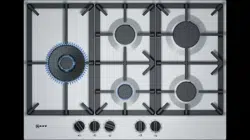
Getting to know your appliance
You can find your appliance and the burner powers in the model overview.  Page 2
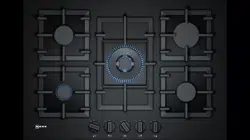
Controls and burners
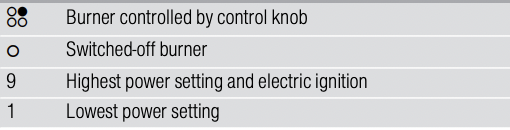
Each control knob is marked with the burner it controls. You can use the control knobs to set the output required in each case to various positions between the maximum and the minimum settings. Never try to switch directly from position 0 to position 1 or from position 1 to position 0.
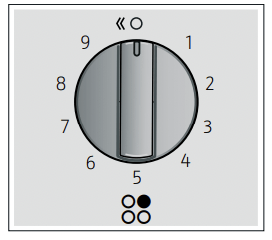
Indicators
For dual double-flame burners, the inner and outer flames can be controlled separately. The available power levels are as follows:
 Inner and outer flame on full power.
 Outer flame on low power, inner flame on full power.
 Inner flame on full power.
 Inner flame on low power.
It is essential to ensure that all the burner parts and pan supports are correctly installed for the appliance to work correctly. Do not swap the burner caps around.
Always remove the pan supports carefully. When moving a pan support, the pan supports next to it may also move.
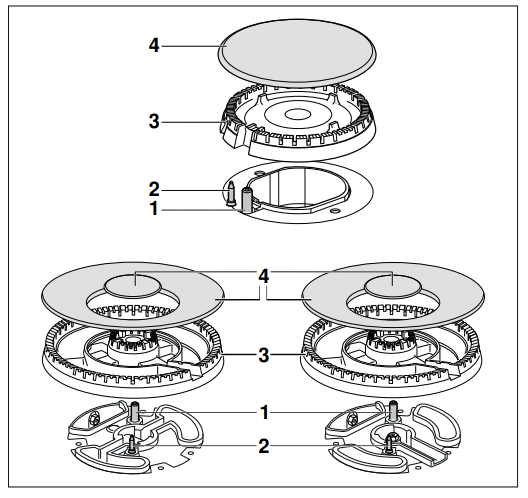
Burner parts
- Ignition plug
- Thermocouple
- Burner cup
- Burner cap
Accessories
Depending on the model, the hob may include the following accessories. These can also be acquired from the Technical Assistance Service.
Additional wok grid
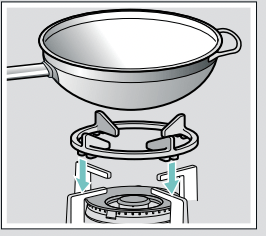
Only suitable for use on wok burners. Use cookware with a rounded base.
To extend the service life of the appliance, we recommend using the additional wok grid.
Additional espresso maker grid
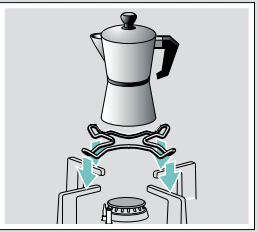
Only suitable for use on the smallest burner. Use cookware with a diameter of less than 12 cm.
Code
Z32SW11X0 Additional wok grid: Cast iron (4-5 kW)
Z32SW10X0 Additional wok grid: Cast iron (mini wok burner)
Z32SE10X0 Additional espresso maker grid
The manufacturer accepts no liability if these accessories are not used or are used incorrectly.
Gas burners
Switching on manually
1. Press the control knob for the selected burner and turn it anticlockwise to the highest power setting.
2. Hold an igniter or a naked flame (such as a lighter or a match) against the burner.
Automatic ignition
If the hob has automatic ignition (ignition plugs):
1. Press the control knob for the selected burner and turn it anticlockwise to the highest power level. While the control knob is held down, all the burners will generate sparks. The flame ignites. Wait a few seconds.
2. Release the control knob.
3. Turn the control knob to the required position.
If the burner does not ignite, switch it off and repeat the steps described above. This time, hold the control knob down for longer (up to 10 seconds).
Warning – Risk of deflagration!
If the flame does not ignite after 15 seconds, switch off the burner and open a window or the door to the room. Wait at least one minute before switching the burner on again.
Note: It is important to keep the appliance clean. If the ignition plugs are dirty, this may cause ignition problems. Clean the ignition plugs regularly with a small, non-metallic brush. Take care to prevent the ignition plugs from suffering any heavy knocks.
Safety system
Your hob is equipped with a safety system (thermocouple) that cuts off the gas when the burners are accidentally switched off.
To ensure that this device is active:
1. Switch on the burner as usual.
2. Without releasing the control knob, press and hold it down firmly for 4 seconds after lighting the flame.
Switching off a burner
Turn the corresponding control knob clockwise to the 0 setting.
A few seconds after the burner is switched off, a sound (thud) will be produced. This is not a fault - this means that the safety device is no longer operating.
Warnings
It is normal to hear a soft whistling noise while the burner is operating.
When first used, it is normal for the burner to give off odours. This does not pose any risk and does not indicate a malfunction. They will disappear in time.
An orange-coloured flame is normal. This is caused by the presence of dust in the atmosphere, spilt liquids, etc.
In the event of the burner flames being accidentally extinguished, turn off the burner control and do not attempt to re-ignite the burner for at least one minute.
Settings table and tips
Suitable pans
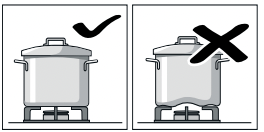
The cookware must not overhang the edge of the hob.
You should only use cookware with a domed base if your cooktop features a wok burner and the additional wok grid. The additional wok grid must be correctly positioned.
Instructions for use
Note: When using certain pots or pans, a slight and temporary deformation of the steel cooking surface may occur. This is normal and does not affect the functionality of the appliance.
The following recommendations can help you save energy and avoid damaging your cookware:
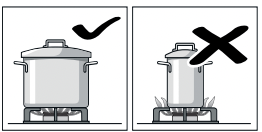
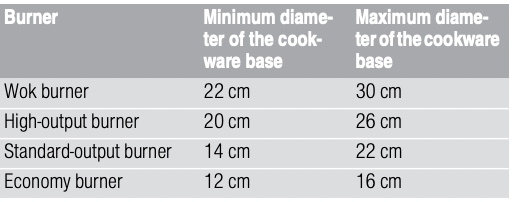
Use pans which are the right size for each burner. Do not use small pans on large burners. The flame must not touch the sides of the pan.
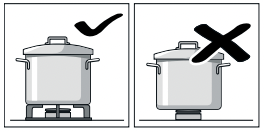
Do not use damaged pans, which do not sit evenly on the hob. Pans may tip over. Only use pans with a thick, flat base.
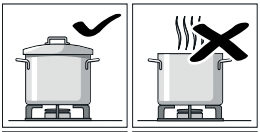
Do not cook without using a lid and make sure the lid is properly fitted. This wastes energy.
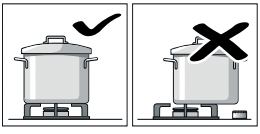
Always centre the pan over the burner, not to one side. Otherwise it could tip over. Do not place large pans on the burners near the control knobs. These may be damaged by the very high temperatures.
Place the pans on the pan supports, never directly on the burner.
Make sure that the pan supports and burner caps are correctly positioned before using the appliance. Pans should be placed on the hob carefully.
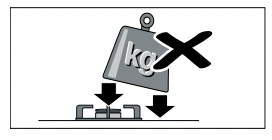
Do not strike the hob and do not place excessive weight on it.
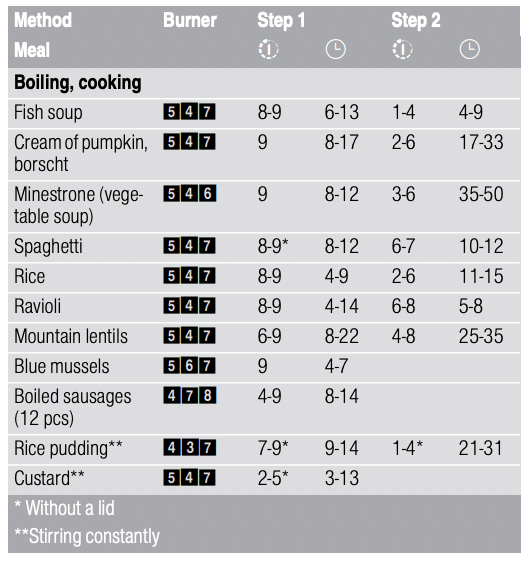
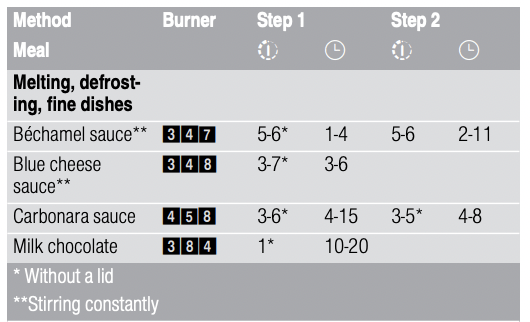
Table of cooking times
The table below lists the optimal heat settings and cooking times for various types of food. The information given applies when cooking four portions.
The cooking times and heat settings may vary depending on the type of food, its weight and quality, on the type of gas used, and on the material from which the cookware is made. To prepare this dish, stainless steel cookware was mainly used.
Always use cookware that is the right size and place it in the centre of the burner. You can find information about the diameter of the cookware under "Suitable pans"
Information on the table
Each type of food can be prepared in one or two steps. Each step includes the following information:
 Cooking position
 Cooking time in minutes
In the table, you will find information on how to cook food on different burners. We recommend using the first burner. The model overview describes all the burners on the hob.Page 2
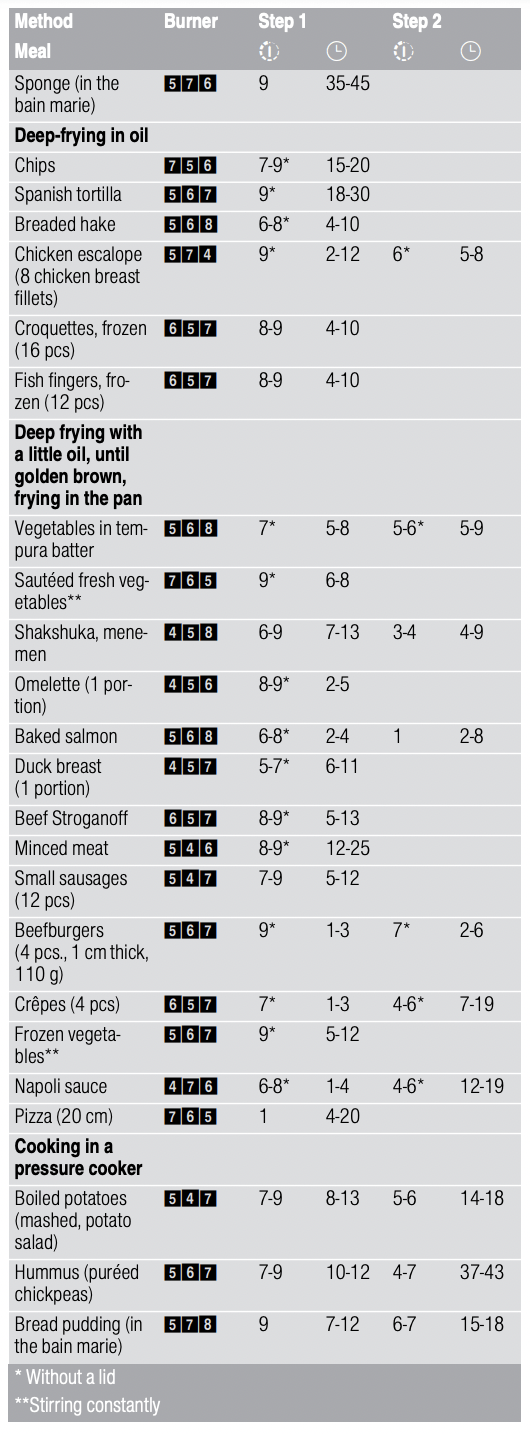
Cooking tips
■ Use a pressure cooker to cook creamy soups and pulses. This significantly reduces the cooking time. If you are using a pressure cooker, follow the manufacturer's instructions. Add all of the ingredients at the start.
■ Always use a lid when cooking potatoes and rice. This significantly reduces the cooking time. The water must be boiling before you add pasta, rice or potatoes. Then adjust the heat setting to continue boiling.
■ For pan-cooked dishes, heat the oil up first. As soon as you have started the frying, keep the pan at a constant temperature by adjusting the heating setting as required. When preparing several portions, wait until the relevant temperature has been reached again. Turn the food regularly.
■ When cooking soups, cream, lentils or chickpeas, add all of the ingredients to the cookware at the same time.
Cleaning and maintenance
Cleaning
Once the appliance is cool, use a sponge to clean it with soap and water.
After each use, clean the surface of the respective burner parts once they have cooled down. If any residue is left (baked-on food, drops of grease etc.), however little, it will become stuck to the surface and more difficult to remove later. The holes and grooves must be clean for the flame to ignite properly.
The movement of some pans may leave metal residue on the pan supports.
Clean the burners and pan supports using soapy water and scrub with a non-wire brush.
If the pan supports are fitted with rubber rests, ensure that these are also cleaned. The rests may come loose and the pan support may scratch the hob.
Always dry the burners and pan supports completely. Water droplets or damp patches on the hob at the start of cooking may damage the enamel.
After cleaning and drying the burners, make sure the burner caps are correctly positioned on the diffuser.
Caution!
■ Do not remove the control knobs when cleaning the appliance. The appliance may be damaged if moisture finds its way inside.
■ Do not use steam cleaners. This could damage the hob.
■ If your hob is fitted with a glass or aluminium panel, never use a knife, scraper or similar implement to clean the point where it joins the metal.
■ Do not put the burner components in the dishwasher.
Maintenance
Always clean off any liquid as soon as it is spilt. This will prevent food remains from sticking to the hob surface and you will save yourself any unnecessary effort.
Due to the high temperatures endured, the wok burner and the stainless steel zones (grease drip tray, burner outline, etc.) can change colour. This is normal. After each use, clean these areas with a product that is suitable for stainless steel.
It is recommended that the cleaning product available from our Technical Assistance Service (code 311499) is used regularly.
Caution!
The stainless steel cleaner must not be used in the area around the controls. The (printed) symbols may be wiped off.
Do not leave acidic liquids (e.g. lemon juice, vinegar, etc.) on the hob.
Trouble shooting
Sometimes certain faults detected can be easily resolved. Before calling the Technical Assistance Service, bear in mind the following advice:
|
Fault
|
Possible cause
|
Solution
|
|
The general electrical system is malfunctioning.
|
Defective fuse.
|
Check the fuse in the main fuse box and change it if it is damaged.
|
|
The automatic safety switch or circuit breaker has tripped.
|
Check the main control panel to see if the automatic safety switch or circuit breaker has tripped.
|
|
The automatic switching on function does not work.
|
There may be food or cleaning products stuck between the ignition sparkers and the burners.
|
The space between the ignition sparker and the burner must be clean.
|
|
The burners are wet.
|
Dry the burner caps carefully.
|
|
The burner caps are not correctly positioned.
|
Check that the burner caps are correctly positioned.
|
|
The appliance is not earthed, is poorly connected or the earthing is faulty.
|
Contact the installation technician.
|
|
The burner flame is not uni- form.
|
The burner components are not correctly positioned.
|
Correctly place the parts on the appropriate burner.
|
|
The grooves on the burner are dirty.
|
Clean the grooves on the burner.
|
|
The gas flow is not normal or there is no gas.
|
The gas supply is blocked by gas taps.
|
Open all gas taps.
|
|
If the gas is supplied from a gas cylinder, check that it is not empty.
|
Change the gas cylinder.
|
|
The kitchen smells of gas.
|
A gas tap has been left on.
|
Turn off the taps.
|
|
Incorrect coupling of gas cylinder.
|
Check that the coupling is sound.
|
|
Possible gas leak.
|
Shut off the gas supply, ventilate the premises and imme- diately notify an authorised installation technician to check and certify the installation. Do not use the appliance until ensuring that there is no gas leak in the installation or appliance itself.
|
|
The burner immediately switches off after releasing the control knob.
|
The control knob was not held down for long enough.
|
Once the burner is on, hold the control knob down a few seconds longer.
|
|
The grooves on the burner are dirty.
|
Clean the grooves on the burner.
|