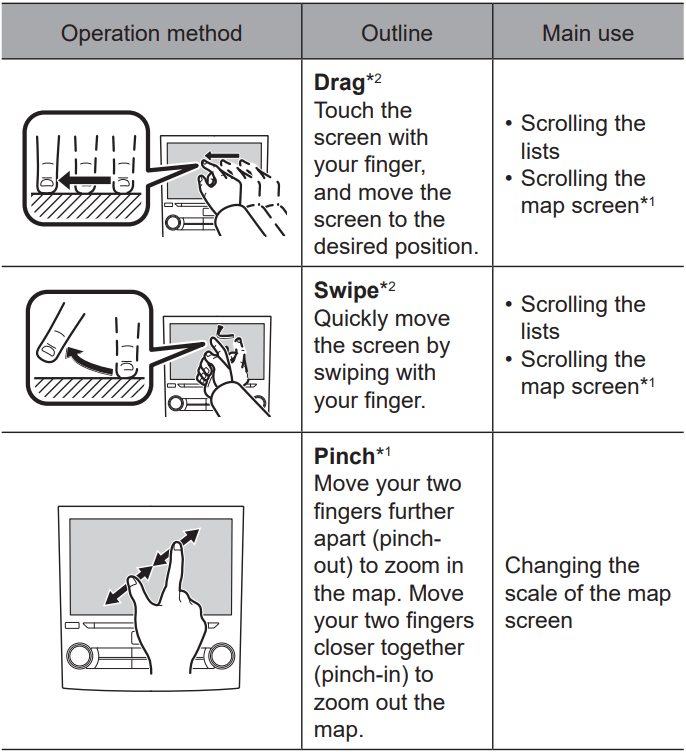
NOTE l Swipe operations may not be performed smoothly in high altitudes.
TOUCH SCREEN OPERATION
This system is operated mainly by the buttons on the screen. (Referred to as screen buttons in this manual.)
● When a screen button is touched, a beep sounds. The beep sound can be turned on/off.
CAUTION
To prevent damaging the screen, lightly touch the screen buttons with your finger.
Do not use objects other than your finger to touch the screen.
Wipe off fingerprints using a glass cleaning cloth. Do not use chemical cleaners to clean the screen, as they may damage the touch screen.
NOTE
If the system does not respond to touching a screen button, move your finger away from the screen and then touch it again.
Dimmed screen buttons cannot be operated.
The displayed image may become darker and moving images may be slightly distorted when the screen is cold.
In extremely cold conditions, the map may not be displayed and the data input by a user may be deleted. Also, the screen buttons may be harder than usual to depress.
SCREEN ADJUSTMENT
ADJUSTING BRIGHTNESS
The brightness of the screen can be adjusted.
CHANGING BETWEEN DAY AND NIGHT MODE (8-inch with Navi system only)
By setting “Map Display” to auto on the navigation settings screen, the map screen will change between day and night mode depending on the position of the headlight switch or illumination control dial and the surrounding brightness.
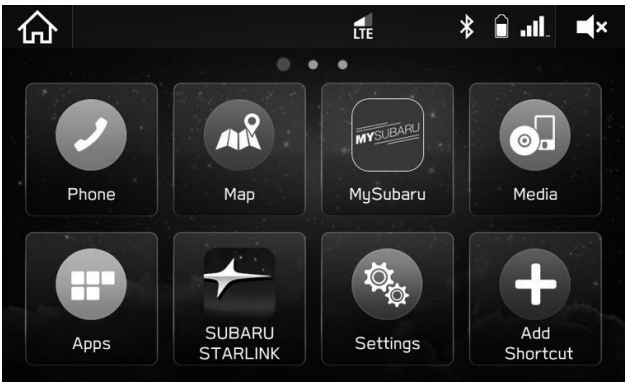
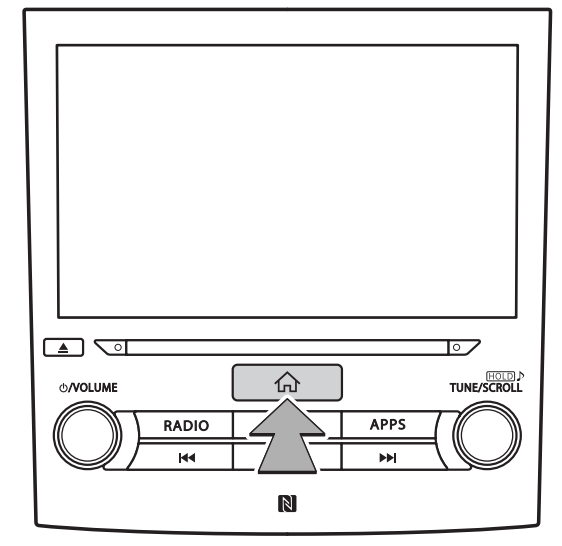
HOME SCREEN OPERATION
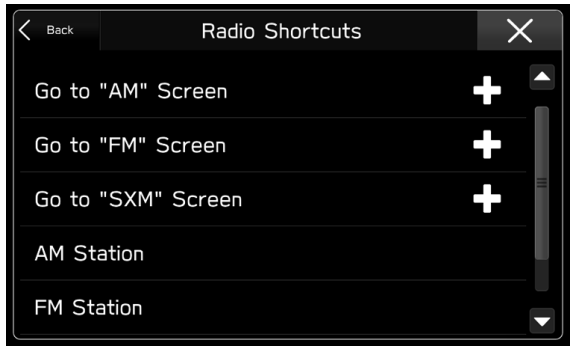
ADDING SHORTCUT ICONS TO THE HOME SCREEN
1. Press
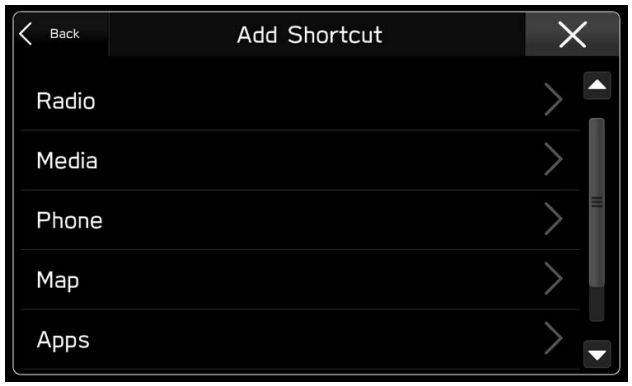
2. Select (Add Shortcut).
3. Select the desired function
4. Select the desired shortcut function.
● Depending on the function, select other items and enter necessary information.
5. Check that the shortcut icon is displayed on the home screen.
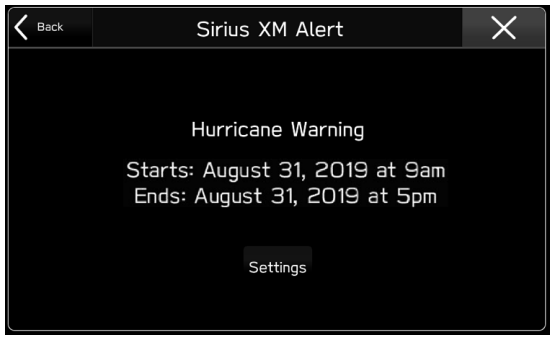
Sirius XM WEATHER ALERT (8-inch with Navi system only)
When a Sirius XM alert is received, a pop-up screen is displayed.
● Settings (Settings): Select to set the Sirius XM alert display conditions.
● To receive Sirius XM alerts, a subscription to the SiriusXM® Satellite Radio Service is necessary following a free trial.
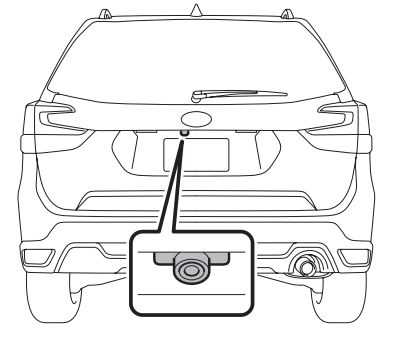
REAR VIEW CAMERA
A rear view camera is attached to the rear gate.
When the ignition switch is “ON” and the select lever is set to “R”, the rear view camera automatically displays the rear view image behind the vehicle. The rear view camera image is displayed on this system.
WARNING
Since the rear view camera uses a wide-angle lens, the image on the monitor is different from the actual view in terms of distance.
Since the range of the image on the monitor is limited, you should always check the rear view and the surrounding area with your eyes and mirrors, and move backward at a slow speed. Moving backward only by checking the rear view image from the camera could cause an accident.
Do not disassemble or modify the camera, switch or wiring. If smoke comes out or you smell a strange odor, stop using the rear view camera immediately. Contact your SUBARU dealer for an inspection. Continued use may result in accident, fire or electric shock.
Do not remove the SUBARU genuine navigation and/or audio system. If the SUBARU genuine navigation and/or audio system is removed, the rear view camera image and help lines (distance marker, dynamic guidelines and vehicle width lines) will no longer be displayed.
CAUTION
If your vehicle is washed with a high-pressure washer, do not allow water to contact the camera directly. Water entering the camera may cause condensation on the inside of the camera lens, damage and malfunction of the camera. l Since the camera is a precision device, do not subject it to strong impacts. Otherwise, malfunction, fire or electric shock may occur.
If mud or snow sticks to the camera, or it freezes up, you must be very careful when removing it. Pour water or lukewarm water over the camera to remove mud and ice, and wipe it with a soft, dry cloth.
Do not try to melt snow or ice off of the camera using heat. Otherwise, damage to the camera may occur. l When replacing the fuse, be sure to use a fuse with the specified rating. Using a fuse with a different rating may result in a malfunction.
If the rear view camera is used for a long time while the engine is not operated, the battery may become completely discharged.
NOTE
Do not wipe the camera with alcohol, benzine or paint thinner. Otherwise, discoloration may occur. To remove contamination, wipe the camera with a cloth moistened with a diluted neutral detergent and then wipe it with a soft, dry cloth.
When waxing the vehicle, be careful not to apply the wax to the camera. If it comes in contact with the camera, moisten a clean cloth with a diluted neutral detergent to remove the wax.
he camera lens has a hard coating to help prevent scratches. However, when washing the vehicle or cleaning the camera lens, be careful not to scratch the camera lens. Do not use a washing brush directly on the camera lens. The image quality of the rear view camera may deteriorate.
Strong light shined on the camera lens may develop vertical lines around the light source. This is not a malfunction.
Under fluorescent light, the display may flicker. However, this is not a malfunction.
The image of the rear view camera may be slightly different from the actual color of the objects.
HOW TO USE THE REAR VIEW CAMERA
When the select lever is set to “R”, the rear view camera automatically displays the rear view image from the vehicle.
When the lever is set to other positions, the image before setting to “R” is displayed.
Set the ignition switch to “ON”.
Set the select lever to “R”.
NOTE
8-inch with Navi system only: While the navigation system is activated, the image of the rear view camera will not be displayed. However, the image of the rear view camera has priority over other screen displays.
The image of the rear view camera is horizontally reversed as is the case with the vehicle rearview mirror or the side view mirror.
It may be difficult to see the image of the rear view camera in the following cases. This is not a malfunction of the camera.
The vehicle is in a dark place (at night, in a tunnel, etc.).
The vehicle is in an extremely hot or cold place.
An object (such as raindrops, snow, dirt, etc.) that disturbs the view of the rear view camera sticks to the lens of the camera.
Strong light shined directly on the camera lens (occasionally, there are vertical lines on the screen).
The vehicle is used for towing or a trailer hitch is installed.
SETTING THE CAMERA IMAGE DISPLAY TIME
The length of time that the camera image remains displayed when the select lever is shifted from “R” to “D” can be set
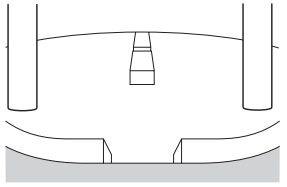
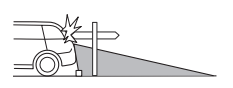
VIEWING RANGE ON THE SCREEN
Range of view
Image from camera
The area above the camera cannot be viewed. If there is an object that has a wide projection on its upper part such as a sign pole behind the vehicle, the projection cannot be seen on the screen.
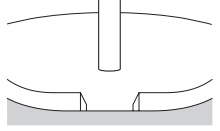
Range of view
Image from camera
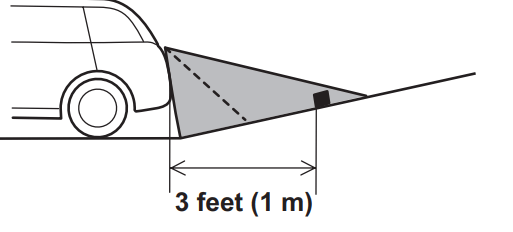
DIFFERENCE BETWEEN SCREEN IMAGE AND ACTUAL ROAD
The distance markers show the distance for a level road when the vehicle is not loaded. It may be different from the actual distance depending on the loading conditions or road conditions.
When there is an upward slope at the back
● The distance on the screen looks farther than the actual distance.
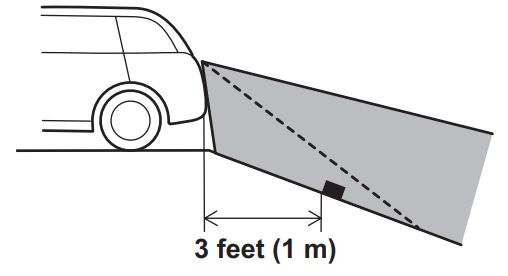
When there is a downward slope at the back
● The distance on the screen looks nearer than the actual distance.
NOTE l When cargo is loaded, the rear view distance on the screen looks farther than the actual distance as in an upward slope.
BLUETOOTH® SETTING
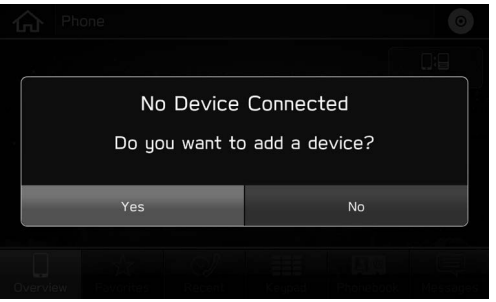
REGISTERING A Bluetooth PHONE/ DEVICE FOR THE FIRST TIME
1. Turn the Bluetooth connection setting of your Bluetooth phone/device on. ● This function is not available when the Bluetooth connection setting of your Bluetooth phone/device is set to off. 2. Display the phone screen. 3. Select Yes (Yes) to register a Bluetooth phone/device.
PROFILES
This system supports the following services.
NOTE
If your cellular phone does not support HFP, registering the Bluetooth phone or using PBAP, MAP or SPP profiles individually will not be possible.
If the connected Bluetooth phone/device version is older than recommended or incompatible, the Bluetooth phone/device function may not work properly.
If the application is not running smoothly or is unstable, disconnect and reconnect the Bluetooth phone/device via Bluetooth and/ or USB cable. If the problem continues, reboot the Bluetooth phone/device.
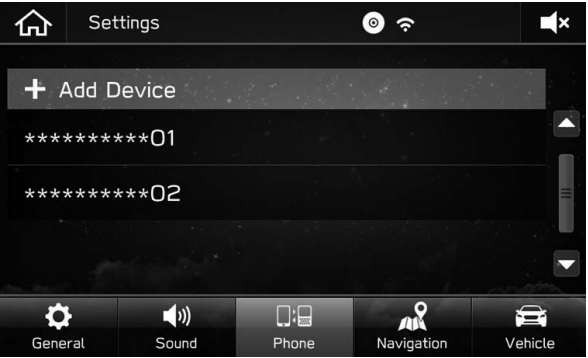
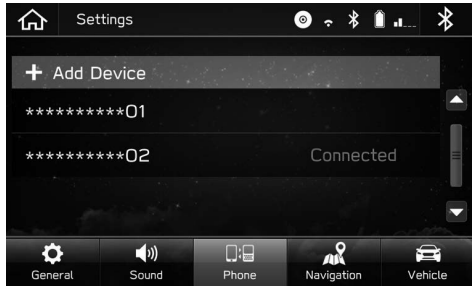
Bluetooth SETTINGS
1. Press
2. Select Settings (Settings).
3. Select Phone (Phone).
When registering a Bluetooth phone/device
4. Select (Add Device)
When setting the Bluetooth phone/device
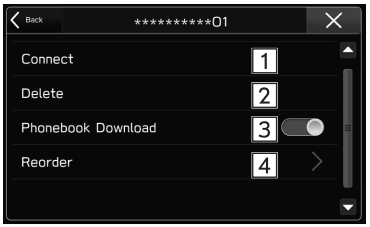
4. Select the desired Bluetooth phone/device.
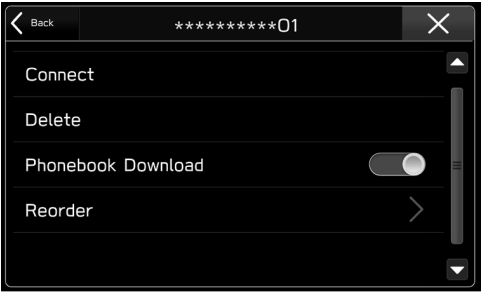
5. Select the item to be set.
CONNECTING OR DISCONNECTING Bluetooth PHONE/DEVICE
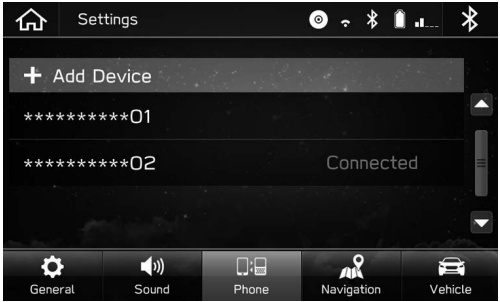
Up to 5 Bluetooth phones/devices (Phones (HFP) and devices (AVP)) can be registered. If more than 1 Bluetooth phone/device has been registered, select which Bluetooth phone/device to connect to.
1. Display the phone settings screen
2. Select the Bluetooth phone/device to be connected or disconnected.
● “Connected” is displayed next to the currently connected Bluetooth phone/device. ● If the desired Bluetooth phone/device is not on the list, select (Add Device) to register the Bluetooth phone/device.
3. Select (Connect) or (Disconnect).
4. Check that “Connected” is displayed next to the Bluetooth phone/device when the connection is complete.
● If an error message appears, follow the guidance on the screen to try again.
NOTE l It may take time if the Bluetooth phone/device connection is carried out during Bluetooth audio playback.
● Depending on the type of Bluetooth phone/device being connected, it may be necessary to perform additional steps on the Bluetooth phone/device.
SETTING PHONEBOOK DOWNLOAD
When this function is activated, the phonebook data of the connected phone will be downloaded automatically.
1. Display the phone settings screen.
2. Select the Bluetooth phone to be set
3. Select to turn “Phonebook Download” on/off.
NOTE
The profile version of the connected Bluetooth phone may not be compatible with transferring phonebook data. For details, contact your SUBARU dealer.
The notification setting on the Bluetooth phone may need to be activated in order to download the phonebook. For details, check the instructions for the connected Bluetooth phone. When the system’s clock settings are set to auto, the auto-adjustment function and message function will not function properly if the phonebook is not downloaded.
The Bluetooth phone’s favorite list will not be downloaded automatically even after the phonebook data has been downloaded from the Bluetooth phone. This system does not currently support transfer of data from the Bluetooth phone favorites list. To add the Bluetooth phone’s favorites list to the system’s favorites list, you need to register it through the system phonebook contacts list.
PHONE OPERATION
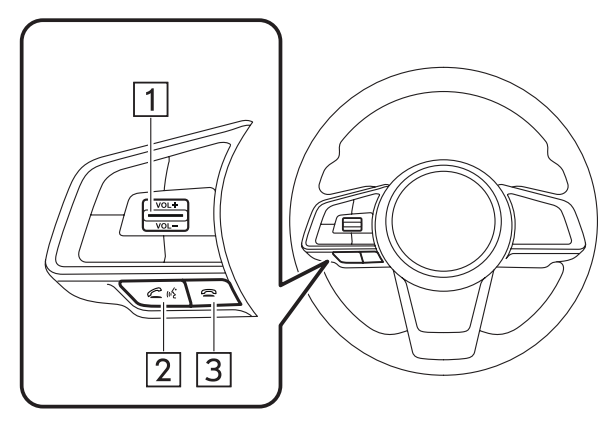
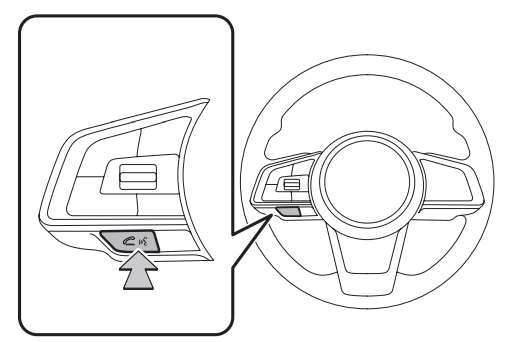
USING THE PHONE SWITCH/MICROPHONE
Steering switch
By pressing the phone switch, a call can be received or ended without taking your hands off the steering wheel.
1 Volume control switch
● Press the switch upwards to increase the volume.
● Press the switch downwards to decrease the volume.
2 Off hook switch
3 On hook switch
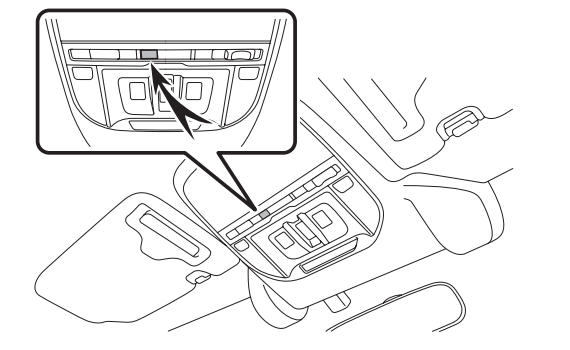
Microphone The microphone is used when talking on the phone.
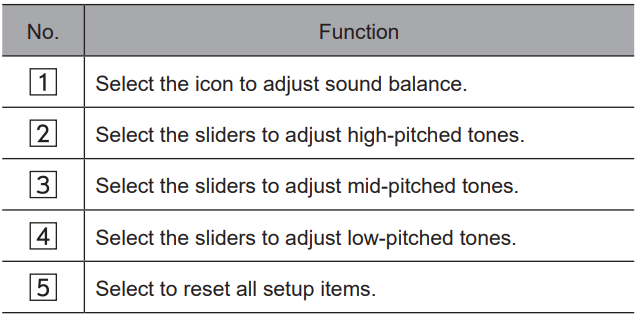
VOICE RECOGNITION SYSTEM
Press this switch to operate the voice recognition system.
● The voice recognition system and its list of commands can be operated.
ABOUT THE CONTACTS IN THE CONTACT LIST
● The following data is stored for every registered phone. When another phone is connected, the following registered data cannot be read:
• Contact data
• Call history data
• Favorites data
• All phone settings
NOTE When a phone’s registration is deleted, the above-mentioned data is also deleted.
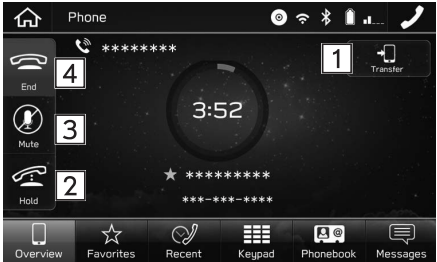
TALKING ON THE Bluetooth PHONE
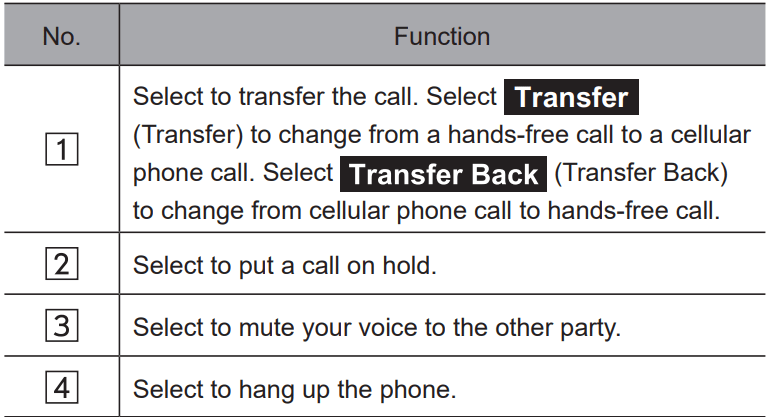
While talking on the phone, this screen is displayed. The operations outlined below can be performed on this screen.
NOTE
Changing between cellular phone call and hands-free call can be performed by operating the cellular phone directly.
Transferring methods and operations will be different depending on the type of cellular phone you have. l For the operation of the cellular phone, see the manual that comes with it.
Turn the “ ” knob, or use the volume control switch on the steering wheel to adjust the volume of the other party’s voice.
Bluetooth PHONE MESSAGE FUNCTION
Received messages can be forwarded from the connected Bluetooth phone, enabling checking and replying using the system.
Depending on the type of Bluetooth phone connected, received messages may not be transferred to the message inbox.
If the phone does not support the message function, this function cannot be used.
Depending on the Bluetooth phone type, the screen display may differ, and it may not be possible to use certain functions. To use this function, it is necessary to set the phonebook download function to on.
NOTE
Depending on the model of your Bluetooth phone, the setting of the connected phone may need to be changed. (ex: For iOS or other models, the notification setting may need to be activated.) For details, check the instructions for the connected Bluetooth phone.
1. Press
2. Select Phone (Phone).
3. Select (Messages).
● 8-inch system/6.5-inch system only: The phone screen can be displayed by pressing
SUBARU STARLINK
BEFORE USING APPLICATIONS
The SUBARU STARLINK function allows the system to link with a smartphone either by Bluetooth or USB connection.
When connecting iPhone or Android devices with the SUBARU STARLINK application installed, you can control SUBARU STARLINK content through the system.
To use the SUBARU STARLINK application, connect your iPhone to the USB port or via Bluetooth, or connect your Android device via Bluetooth.
8-inch system/6.5-inch system only: It is necessary to pair your smartphone via Bluetooth, set the phonebook download function to on, and then adjust the time so that it is the same at both your smartphone and the system.
NOTE
SUBARU STARLINK may not be able to be used when connecting to an external Wi-Fi source from this system if the source IP address is 192.168.1.x.
DISPLAYING SUBARU STARLINK INFORMATION
1. Run the SUBARU STARLINK application on your smartphone.
2. Connect the iPhone to the USB port, or connect your iPhone or Android device by utilizing the Bluetooth connection.
● For details on connecting your iPhone to the USB port:
3 Select SUBARU STARLINK (SUBARU STARLINK) on the “Apps” screen.
NOTE There may be times when SUBARU STARLINK (SUBARU STARLINK) does not appear immediately when the ignition switch is set in the “ACC” or “ON” position. If so, please wait.
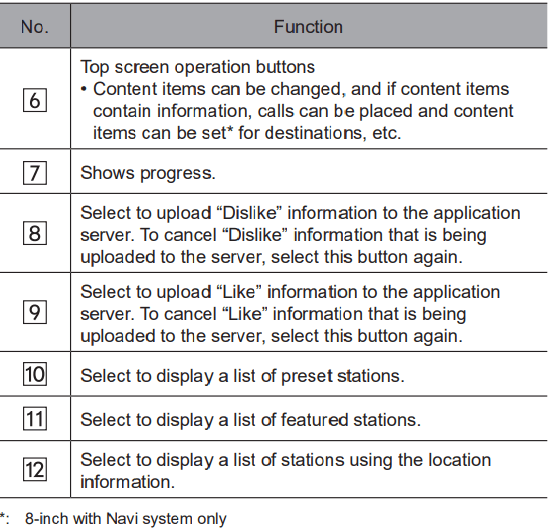
aha™ by HARMAN
aha is a cloud-based application that connects to the system and gives you access to your favorite web content safely and easily. There are several tens of thousands of stations spanning internet radio, personalized music, audiobooks, Facebook, Twitter, restaurant and hotel searches, weather and more. For more about aha, go to the aha site (http://www.aharadio.com).
When connecting iPhone or Android devices with the aha application installed, you can control, view, and hear aha content through the system. To use the aha application, connect your iPhone or Android device via Bluetooth.
With navigation function: You may also display POI information from the aha application on the map screen and route to these POIs.
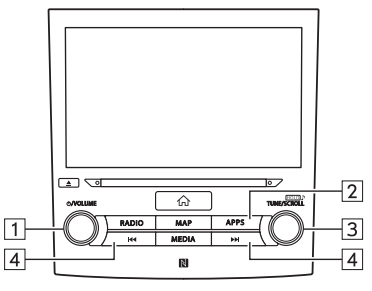
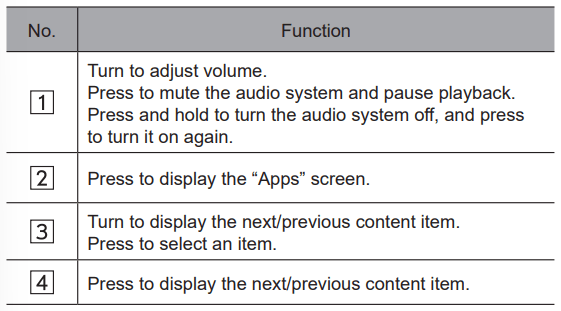
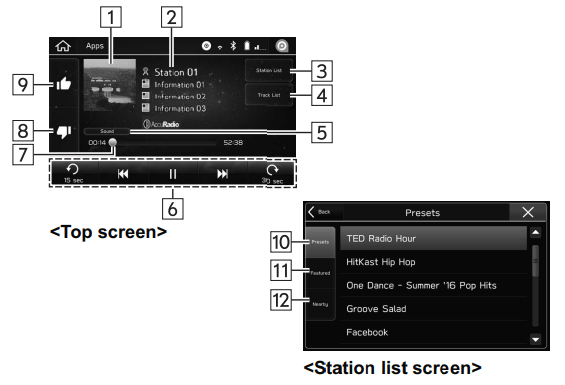
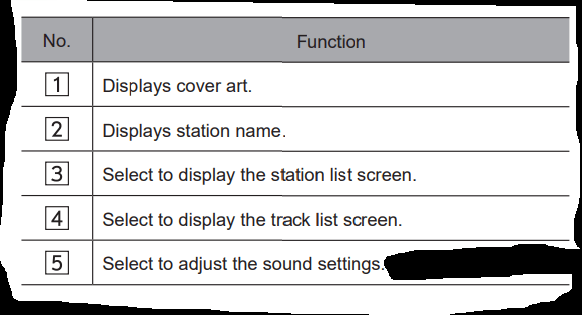
Control panel
Control screen
NOTE
When you switch to other modes with the aha application activated and then turn the system Off/On with the smartphone device still connected, the home screen will display.
Top 35 entries in the preset station list on the smartphone are displayed. When there are more than 35 entries in the preset station list, change the order of the entries in the list on the smartphone. You can change the priority of your preset stations within the aha application (after disconnected from this system) to modify the station list shown on the screen. Please see your smartphone aha application “Edit Presets” to modify this list.
If there are multiple audio files stored on your iPhone, it may take some time until playback starts.
Playback may be intermittent when you switch to streaming
Bluetooth audio from aha on your smartphone device. l The following operations are not available on this system.
Perform these operations on the smartphone.
Add/Reorder/Delete stations
Log in to Facebook/Twitter (When not logged in, login will be required by the station. It is necessary to do so when the device is disconnected from the system.)
For the aha function, the following touch screen gestures are not available.
Double touch with one finger
Double touch with two fingers
The audio system will turn off when the aha application is closed on the iPhone and/or Android device.
Use this system to play music with the aha application. If the station or settings are changed frequently via both the audio system and the smartphone, the aha application may not function. Restarting the application from the smartphone may be needed.
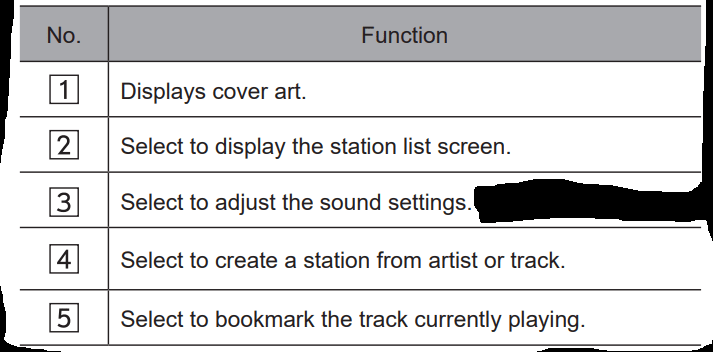
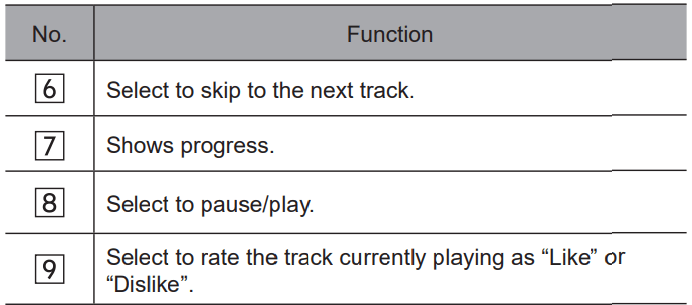
Pandora®
Pandora is free personalized radio that offers effortless and endless music enjoyment and discovery.
To use the Pandora application, connect your iPhone or Android device via Bluetooth.
Depending on differences between models or software version etc., some models might be incompatible with this system.
The Pandora application must be installed on your smartphone.
Control panel
Control screen
NOTE
Use this system to play music with the Pandora application. If the station or settings are changed frequently via both the audio system and the smartphone, the Pandora application may not function. Restarting the application from the smartphone may be needed.
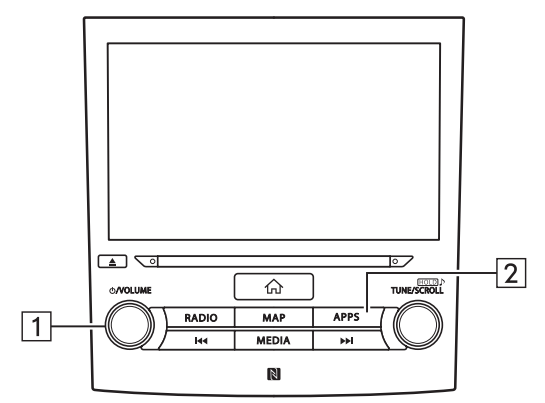
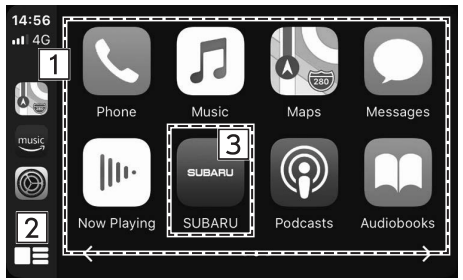
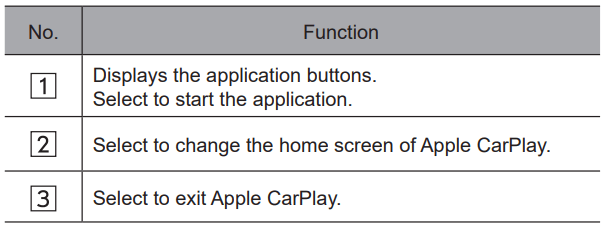
Apple CarPlay
CarPlay can be used to view iPhone maps, play music, and place calls by connecting your iPhone to the system.
Supported applications can also be run.
To use the Apple CarPlay application, connect your iPhone to the USB port.
NOTE
Use an undamaged genuine cable when using this function.
Turn on Apple CarPlay on your iPhone’s Restrictions settings when using this function.
While using Apple CarPlay, some functions of this system may not operate.
Control panel
Control screen
AUDIO
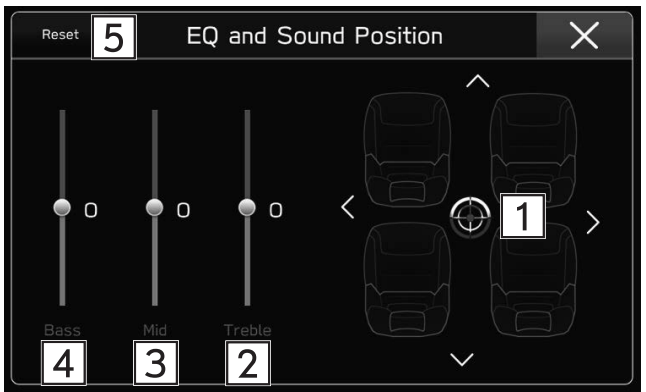
SOUND SETTINGS
The following sound quality can be adjusted.
TONE:
How good an audio program sounds is largely determined by the mix of the treble, mid and bass levels. In fact, different kinds of music and vocal programs usually sound better with different mixes of treble, mid and bass.
BALANCE:
A good balance of the left and right stereo channels and of the front and rear sound levels is also important.
Keep in mind that when listening to a stereo recording or broadcast, changing the right/left balance will increase the volume of 1 group of sounds while decreasing the volume of another.
1. Press 2. Select Settings (Settings). 3. Select Sound (Sound). 4. Select (EQ and Sound Position). 5. Set the desired item
VOICE RECOGNITION SYSTEM
1. Press this switch to operate the voice recognition system.
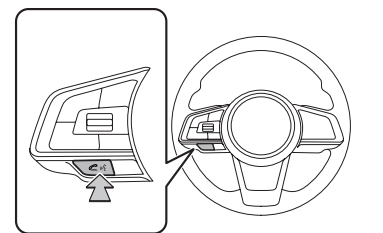
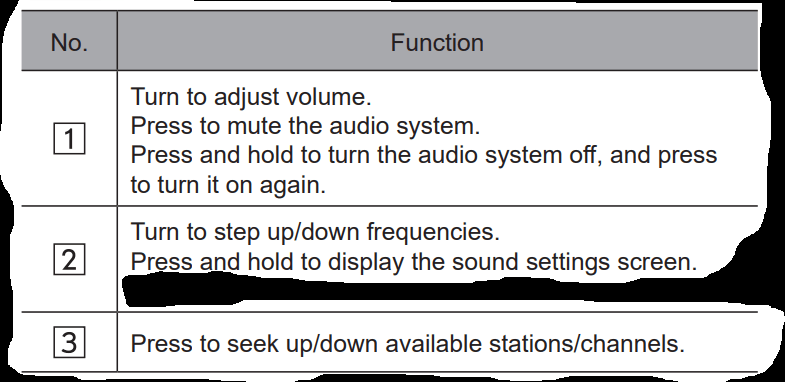
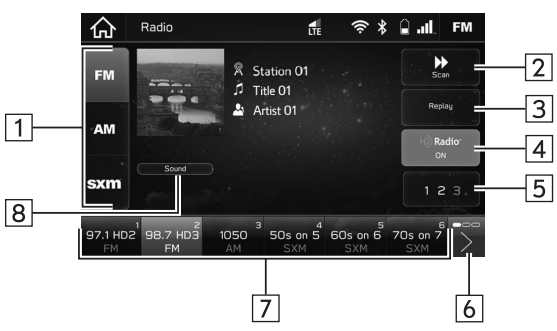
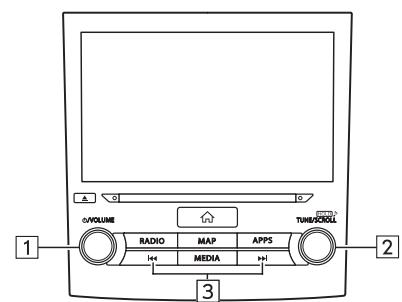
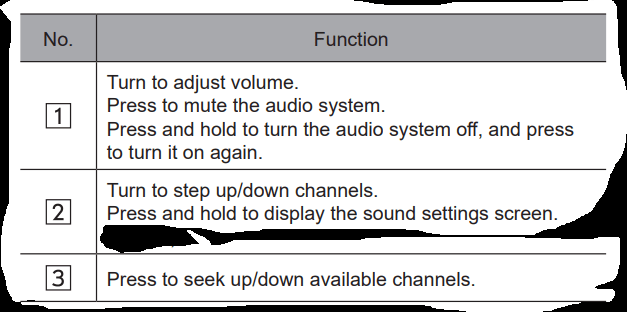
AM/FM RADIO
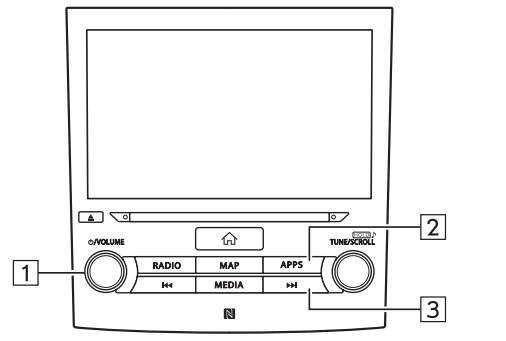
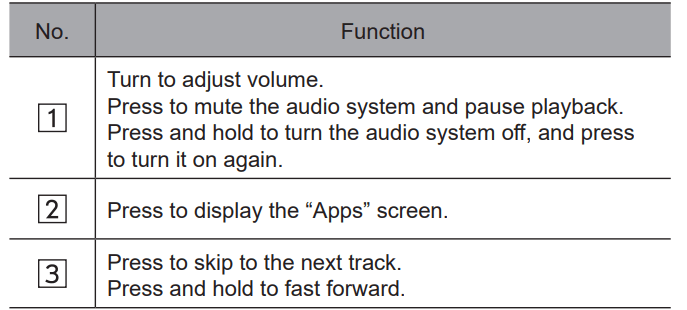
Control panel
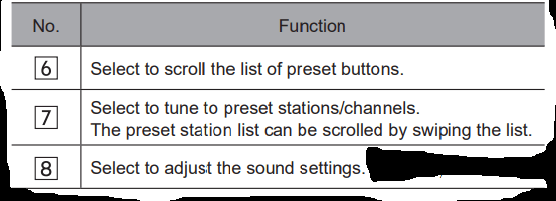
Control screen
NOTE
The radio automatically changes to stereo reception when a stereo broadcast is received.
The radio automatically tunes to an HD Radio signal in AM or FM where available.
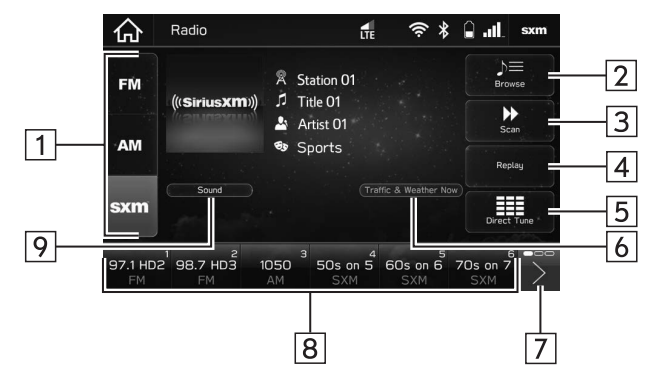
SiriusXM® Satellite Radio
Control panel
Control screen
HOW TO SUBSCRIBE TO SiriusXM® Satellite Radio
To listen to a satellite radio broadcast in the vehicle, a subscription to the SiriusXM® Satellite Radio service is necessary following a free trial. A SiriusXM® Satellite Radio is a tuner designed exclusively to receive broadcasts provided under a separate subscription.
NAVIGATION
TYPICAL VOICE GUIDANCE PROMPTS
As the vehicle approaches an intersection, or point, where maneuvering the vehicle is necessary, the system’s voice guidance will provide various messages.
WARNING
Be sure to obey the traffic regulations and keep the road condition in mind especially when you are driving on IPD roads. The route guidance may not have the updated information such as the direction of a one way street.
NOTE
Turn the knob, or use the volume control switch on the steering wheel to adjust the voice guidance volume.
The voice guidance volume can also be adjust from the sound settings screen.
Voice guidance may be made early or late.
If the system cannot determine the current position correctly, you may not hear voice guidance or may not see the magnified intersection on the screen.
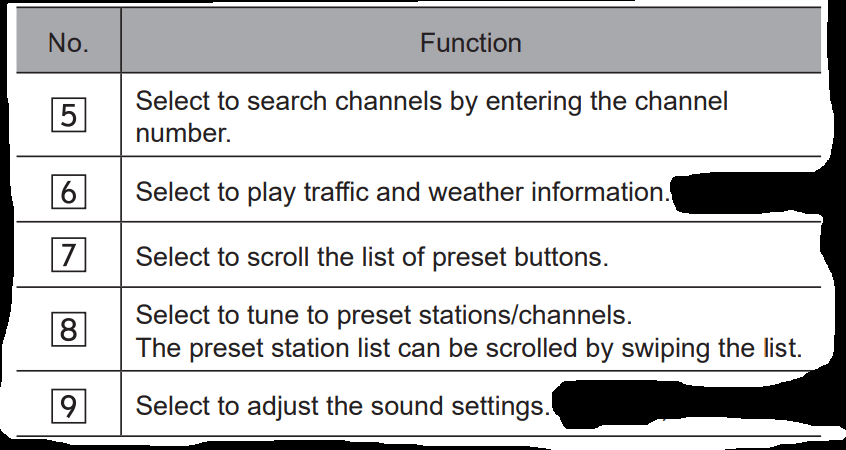
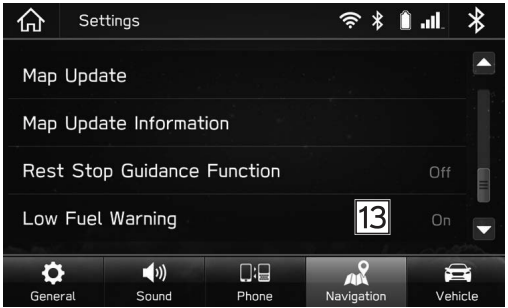
NAVIGATION SETTINGS
1. Press .
2. Select Settings (Settings).
3. Select (Navigation).
4. Select the desired item to be set.
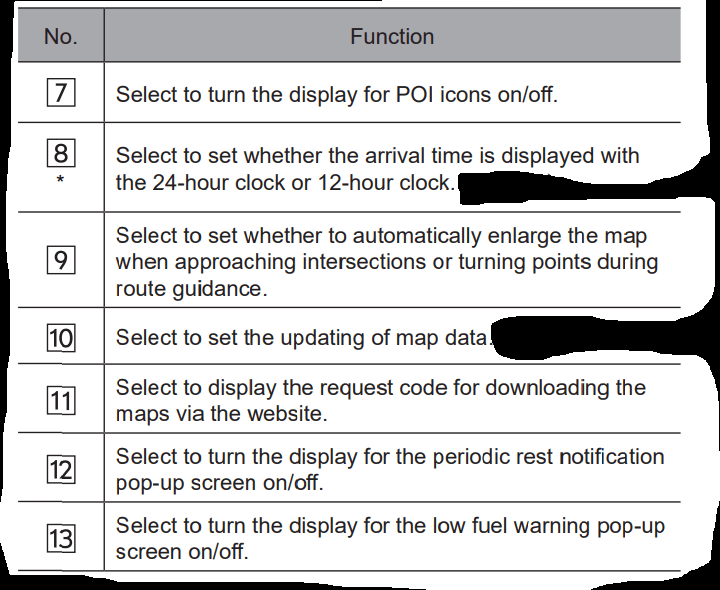
NAVIGATION SETTINGS SCREEN
GPS (GLOBAL POSITIONING SYSTEM)
REGARDING ERRORS IN CURRENT POSITION DISPLAY
The system displays the vehicle current position based on GPS information and data from various sensors and road maps. However, when the radiowave signals from GPS satellites are weak or when signals are received from only two satellites or less, errors may occur in the position. Modifying or adjusting the system will not prevent these errors.
LIMITATIONS OF THE NAVIGATION SYSTEM
This navigation system calculates the current position using satellite signals, various vehicle signals, map data, etc. However, an accurate position may not be shown depending on satellite conditions, road configuration, vehicle condition or other circumstances. The Global Positioning System (GPS) developed and operated by the U.S. Department of Defense provides an accurate current position, normally using 4 or more satellites, and in some case 3 satellites. The GPS system has a certain level of inaccuracy. While the navigation system compensates for this most of the time, occasional positioning errors of up to 300 feet (100 m) can and should be expected. Generally, position errors will be corrected within a few seconds.
The GPS signal may be physically obstructed, leading to inaccurate vehicle position on the map screen. Tunnels, tall buildings, trucks, or even the placement of objects on the instrument panel may obstruct the GPS signals.
The GPS satellites may not send signals due to repairs or improvements being made to them.
Even when the navigation system is receiving clear GPS signals, the vehicle position may not be shown accurately or inappropriate route guidance may occur in some cases.
CAUTION
The installation of window tinting may obstruct the GPS signals. Most window tinting contains some metallic content that will interfere with GPS signal reception of the antenna in the instrument panel. We advise against the use of window tinting on vehicles equipped with navigation systems.
Accurate current position may not be shown in the following cases:
When driving on a small angled Y-shaped road.
When driving on a winding road.
When driving on a slippery road such as in sand, gravel, snow, etc.
When driving on a long straight road.
When freeway and surface streets run in parallel.
After moving by ferry or vehicle carrier.
When a long route is searched during high speed driving.
After repeating a change of direction by going forward and backward, or turning on a turntable in a parking lot.
When leaving a covered parking lot or parking garage.
When a roof carrier is installed.
When driving with tire chains installed.
When the tires are worn.
After replacing a tire or tires.
When using tires that are smaller or larger than the factory specifications.
When the tire pressure in any of the 4 tires is not correct.
Inappropriate route guidance may occur in the following cases:
When turning at an intersection off the designated route guidance.
If you set more than 1 destination but skip any of them, auto reroute will display a route returning to the destination on the previous route.
When turning at an intersection for which there is no route guidance.
When passing through an intersection for which there is no route guidance.
During auto reroute, the route guidance may not be available for the next turn to the right or left.
During high speed driving, it may take a long time for auto reroute to operate. In auto reroute, a detour route may be shown.
After auto reroute, the route may not be changed.
If an unnecessary U-turn is shown or announced.
If a location has multiple names and the system announces 1 or more of them.
When a route cannot be searched.
If the route to your destination includes gravel, unpaved roads or alleys, the route guidance may not be shown.
Your destination point might be shown on the opposite side of the street.
When a portion of the route has regulations prohibiting the entry of the vehicle that vary by time or season or other reasons.
The road and map data stored in the navigation system may not be complete or may not be the latest version.
TROUBLESHOOTING
TROUBLESHOOTING ISSUES COMMON TO THIS SYSTEM
Symptom
Cause
Action
The touch screen becomes unresponsive during operation.
An error has occurred in the system. Press and hold the “ ” knob for 10 seconds or longer to reset the system. The sound suddenly stops working.
Only the background is displayed on the screen and no icons appear.
An error has occurred in the system.
Press and hold the “” knob for 10 seconds or longer to reset the system.
SUBARU STARLINK
8-inch system/6.5-inch system only
Symptom
Cause
Action
SUBARU STARLINK does not start.
The time does not match.
Connect your smartphone
Set the phonebook download function to on
RADIO OPERATION
Symptom
Cause
Action
Mismatch of time alignment- a user may hear a short period of programming replayed or an echo, stutter or skip.
The radio stations analog and digital volume is not properly aligned or the station is in ballgame mode.
None, radio broadcast issue. A user can contact the radio station.
Sound fades, blending in and out.
Radio is shifting between analog and digital audio.
Reception issue, may clear-up as the vehicle continues to be driven. Turning the indicator of the HD Radio button off can force radio in an analog audio.
Audio mute condition when an HD2/HD3 multicast channel had been playing.
The radio does not have access to digital signals at the moment.
This is normal behavior, wait until the digital signal returns. If out of the coverage area, seek a new station.
Audio mute delay when selecting an HD2/ HD3 multicast channel preset.
The digital multicast content is not available until HD Radio™ broadcast can be decoded and make the audio available. This takes up to 7 seconds.
This is normal behavior, wait for the audio to become available.
Text information does not match the present song audio.
Data service issue by the radio broadcaster.
Broadcaster should be notified
No text information shown for the present selected frequency.
Data service issue by the radio broadcaster.
Broadcaster should be notified
PHONE
Symptom
Cause
Action
The hands-free system or Bluetooth phone does not work.
The connected Bluetooth phone may not be a compatible Bluetooth cellular phone.
For a list of specific Bluetooth phones which operation has been confirmed on this system. For USA customers, please visit www.subaru.com for details. Outside of the USA customers, contact your local dealer to arrange a demonstration in order to confirm whether or not the phone can be paired with the vehicle.
The Bluetooth version of the connected cellular phone may be older than the specified version.
Use a cellular phone with Bluetooth version 1.1 or higher. Recommended: Ver. 3.0 +EDR or higher
When registering/connecting a cellular phone
Symptom
Cause
Action
A cellular p
An incorrect passcode was entered on the cellular phone.
Enter the correct passcode on the cellular phone.
The registration operation has not been completed on the cellular phone side.
Complete the registration operation on the cellular phone (approve registration on the phone).
Old registration information remains on either this system or the cellular phone.
Delete the existing registration information from both this system and the cellular phone, then register the cellular phone you wish to connect to this system.
A Bluetooth connection cannot be made.
Another Bluetooth phone is already connected.
Manually connect the cellular phone you wish to use to this system.
Bluetooth function is not enabled on the cellular phone.
Enable the Bluetooth function on the cellular phone.
When making/receiving a call
Symptom
Cause
Action
A call cannot be made/received.
Your vehicle is in a “No Service” area.
Move into the service area
When using the phonebook
Symptom
Cause
Action
Phonebook data cannot be transferred automatically.
The profile version of the connected cellular phone may not be compatible with transferring phonebook data.
For a list of specific Bluetooth phones which operation has been confirmed on this system. For USA customers, please visit www.subaru.com for details. Outside of the USA customers, contact your local dealer to arrange a demonstration in order to confirm whether or not the phone can be paired with the vehicle.
Automatic contact transfer function on this system is set to off.
Set automatic contact transfer function on this system to on.
When using the Bluetooth message function
Symptom
Cause
Action
Messages cannot be viewed.
Message transfer is not enabled on the cellular phone.
Enable message transfer on the cellular phone (approve message transfer on the phone).
In other situations
Symptom
Cause
Action
Even though all conceivable measures have been taken, the symptom status does not change.
The cellular phone is not close enough to this system.
Bring the cellular phone closer to this system.
The cellular phone is the most likely cause of the symptom
Turn the cellular phone off, remove and reinstall the battery pack, and then restart the cellular phone
Enable the cellular phone’s Bluetooth connection.
Stop the cellular phone’s security software and close all applications
Before using an application installed on the cellular phone, carefully check its source and how its operation might affect this system.
UPDATING THE SYSTEM
Symptom
Cause
Action
Cannot connect to Wi-Fi network
Attempted to connect to Wi-Fi network device with wrong device name (SSID)
Check the settings and operation of the Wi-Fi network device.
Incorrect Wi-Fi password entered.
Max number of devices connected already connected to desired Wi-Fi network device.
Wi-Fi signal is weak.
Vehicle is out of range of Wi-Fi network device.
Wi-Fi network device service contract has expired.
Symptom
Cause
Action
“Connect To Wi-Fi” is displayed when (Check for Updates) is selected.
System is not connected to Wi-Fi network device.
Connect system to Wi-Fi network device.
Wi-Fi network device does not have internet access.
Check Wi-Fi network device.
System is not connected to or has connection problem with Wi-Fi network device
On the “Wi-Fi” screen, turn the Wi-Fi setting off and then back on. (→P.65) If the symptom reoccurs, perform the following procedure: 1) Select the desired Wi-Fi network device (SSID) on the “Wi-Fi Settings” screen. (→P.71) 2) Select (Forget This Network). 3) Select the desired Wi-Fi network device (SSID) again and input the password to connect the device.
“Software download failed. Do you want to retry?” is displayed when (Check for Updates) is selected.
System may not have been able to receive clock information correctly
8-inch with Navi system: Move the vehicle to where GPS signals can be received. 8-inch system: Connect a smartphone to the system using Bluetooth and transfer the phonebook data.
Wi-Fi network device service contract has expired.
Check the settings and operation of the Wi-Fi network device.
Communication problem with Aha app.
If updating using the Aha smartphone app, force close and restart the Aha app, then try again.
Symptom
Cause
Action
Download progress bar is not displayed.
Download of update to smartphone has not completed.
Check the download progress on Aha app of the smartphone. When download of the update to the smartphone has completed, it will transfer the data to the system and the system will then display the download progress. If using the iOS Aha app, the download progress will not be displayed on the app. Wait until download has competed. The download time may vary depending on the size of the update data and communication status.
Download progress stops for a long time.
Communication problem with Aha app.
If updating using the Aha smartphone app, force close and restart the Aha app, then try again.
Communication problem with smartphone.
If updating using the Aha smartphone app, disconnect the smartphone from the system, close the Aha smartphone app, connect it again using Bluetooth/USB and then start Aha app again.
Cannot resume install after selecting Cancel (Cancel) on “Software Update Ready To Install” pop-up screen.
-
Check the Wi-Fi network connection. Check the connection of the smartphone (Bluetooth connection and Aha smartphone app status).
Downloads cannot be resumed if canceled, perform update procedure again.
Symptom
Cause
Action
Installation does not complete (system restarts continuously).
-
Wait until the home screen is displayed. • Depending on the software version you are updating from, updating may be performed in multiple steps and the system may restart multiple times. This is not a malfunction.
Software update install failed” is displayed.
The system software has been corrupted.
Have the software updated by your SUBARU dealer immediately. In this case, none of the system functions, other than the rear camera, will operate. When using the rear camera, only the camera image will be displayed, guide lines, etc. will not be displayed. If this message is displayed, the system will restart every 180 seconds. In this situation, turn the ignition switch to the “LOCK”/“OFF” position, open and close the driver’s side door and check that the system is off. If any door is open when the ignition switch is turned to the “LOCK”/“OFF” position, the system may not turn off.
MAP UPDATE (8-inch with Navi system only)
Error code
Cause
Action
101
The update package received is not valid for this device.
Update the map data using a USB memory device. (→P.204) Then, perform the following procedure: Turn the ignition switch to the “LOCK”/“OFF” position → Open the driver’s side door → Close the door → Wait for 3 minutes or more → Start the engine. If the update cannot be completed successfully, contact your SUBARU dealer.
103
There is not enough space for the update package
Perform a factory reset to free up space (→P.65) and perform the update again. (→P.203) Then, perform the following procedure: Turn the ignition switch to the “LOCK”/“OFF” position → Open the driver’s side door → Close the door → Wait for 3 minutes or more → Start the engine. If the update cannot be completed successfully, contact your SUBARU dealer.
CAUTION: When a factory reset is performed, various settings (driver profile, paired Bluetooth devices, radio presets, audio settings, etc.) will be reset.
104
The update package is older than the current package on the device.
The system map data is the latest version. Update is not necessary
106
Compatibility error with map data and navigation system
Update the map data using a USB memory device. (→P.204) Then, perform the following procedure: Turn the ignition switch to the “LOCK”/“OFF” position → Open the driver’s side door → Close the door → Wait for 3 minutes or more → Start the engine. If the update cannot be completed successfully, contact your SUBARU dealer.
107
Connection Error Wi-Fi/Hotspot internet connection not available or internet not reachable.
Check the Wi-Fi network signal. If possible, move the vehicle to an area where the signal is better and communication is possible.
Attempt the update again.
If the update cannot be performed, perform the following: Turn the ignition switch to the “LOCK”/“OFF” position → Open the driver’s side door → Close the door → Wait for 3 minutes or more → Start the engine.
Attempt the update again.
If the update cannot be performed, update the map data via USB memory.
Repeat “STEP 3”.
If the update cannot be completed successfully, contact your SUBARU dealer.
108
Aha Phone App error Service Not Authenticated
Update the map data using a USB memory device or Wi-Fi network.
Then, perform the following procedure or contact your SUBARU dealer. Turn the ignition switch to the “LOCK”/“OFF” position → Open the driver’s side door → Close the door → Wait for 3 minutes or more → Start the engine.
109
Aha Phone App error Service Not Enabled
110
Aha Phone App error Unknown Error
Turn the ignition switch to the “LOCK”/“OFF” position → Open the driver’s side door → Close the door → Wait for 3 minutes or more → Start the engine.
Attempt the update again.
If the update cannot be performed, update the map data using a USB memory device or Wi-Fi network.
Repeat “STEP 1”.
If the update cannot be completed successfully, contact your SUBARU dealer.
111
Aha Phone App error Server Error
112
Aha Phone App error Timeout
Check the network signal.If possible, move the vehicle to an area where the signal may be better and communication is possible.
Attempt the update again.
If the update cannot be performed, perform the following procedure: Turn the ignition switch to the “LOCK”/“OFF” position → Open the driver’s side door → Close the door → Wait for 3 minutes or more → Start the engine.
Attempt the update again.
If the update cannot be performed, update the map data using a USB memory device or Wi-Fi network.
Repeat “STEP 3”.
If the update cannot be completed successfully, contact your SUBARU dealer.
113
Aha Phone App error Invalid Respons
114
Not enough space on phone
Free up sufficient space on the smartphone and attempt to download the map update data again (→P.206), or update the map data using a USB memory device or Wi-Fi network. Then, perform the following procedure: Turn the ignition switch to the “LOCK”/“OFF” position → Open the driver’s side door → Close the door → Wait for 3 minutes or more → Start the engine.
115
Data size restriction on phone Reached data restriction on the mobile phone.
The connected smartphone has exceeded it’s data plan limit. Update the map data using a USB memory device or Wi-Fi network. Then, perform the following procedure: Turn the ignition switch to the “LOCK”/“OFF” position → Open the driver’s side door → Close the door → Wait for 3 minutes or more → Start the engine.
116
Invalid request data
Perform a factory reset and attempt the update again, or update the map data using a USB memory device or Wi-Fi network. Then, perform the following procedure: Turn the ignition switch to the “LOCK”/“OFF” position → Open the driver’s side door → Close the door → Wait for 3 minutes or more → Start the engine.
CAUTION: When a factory reset is performed, various settings (driver profile, paired Bluetooth devices, radio presets, audio settings, etc.) will be reset.
117
Internal Error
Turn the ignition switch to the “LOCK”/“OFF” position → Open the driver’s side door → Close the door → Wait for 3 minutes or more → Start the engine.
Attempt the update again.
If the update cannot be performed, update the map data using a USB memory device or Wi-Fi network.
Repeat “STEP 1”.
If the update cannot be completed successfully, contact your SUBARU dealer.
128
Installation failed
Perform a factory reset and attempt the update again, or update the map data using a USB memory device or Wi-Fi network. Then, perform the following procedure: Turn the ignition switch to the “LOCK”/“OFF” position → Open the driver’s side door → Close the door → Wait for 3 minutes or more → Start the engine.
CAUTION: When a factory reset is performed, various settings (driver profile, paired Bluetooth devices, radio presets, audio settings, etc.) will be reset.


 ” knob, or use the volume control switch on the steering wheel to adjust the volume of the other party’s voice.


 knob, or use the volume control switch on the steering wheel to adjust the voice guidance volume.
 .
.

 ” knob for 10 seconds or longer to reset the system.