Documents: Go to download!
User Manual
- User Manual - (English, French, Spanish)
- Owner's Manual - (English)
- User Guide - (English)
- Quick Start Guide - (English)
- Dimension Guide - (English)
- Warranty - (English)
- DISHWASHER MAINTENANCE
- DISHWASHER CARE
- DISHWASHER SETTING MENU
- ERROR CODES
- INSTALLATION REQUIREMENTS
- INSTALLATION INSTRUCTIONS
Table of contents
USER MANUAL Dishwasher
DISHWASHER MAINTENANCE
Detergents
- High-quality premeasured tablets and packs are recommended for improved performance.
- Quality tablets and packs have been proven better than powder, liquid, or gel detergents at reducing filming on dishes. Using tablets and packs over time will start to reduce or eliminate white film. They are suitable for all water hardness and soil levels. Also, by using a rinse aid, you can minimize repeat buildup of white film (not all packs and tablets contain rinse aid). Always place premeasured detergents in main compartment and close lid.
NOTE: Follow instructions on the package when using other dishwasher detergent types.
- Use automatic dishwasher detergent only. Add detergent just before starting a cycle.
- Fresh automatic dishwasher detergent results in better cleaning. Store tightly closed detergent container in a cool, dry place.
- Extremely hard water mineral deposits (15 grains per U.S. gallon or more) can cause damage to your dishwasher and make it difficult to achieve good results. A water softener is recommended to avoid damage and achieve good results.
- For more details about powders, liquids, and gels and hard water conditions consult the brand website.
Rinse aid
- Using rinse aid will optimize your drying and wash performance. This dishwasher is specifically designed to be used with rinse aid for improved drying performance and controlling buildup of hard water deposits. Rinse aid needs to be added to the product every 1 to 3 months depending on usage
- Refer to the Quick Start Guide or brand website for information about filling the rinse aid dispenser.
Cycle Selection and Energy
- Efficient dishwashers run longer to save water and energy, just as driving a car slower saves on gas. Typical cycle time is approximately 2 1/2 hours, but can take less or significantly more time depending on your selections and incoming water temperature and amount of food soils on the dishes. For optimum performance the dishwasher should be connected to a 120 F (49° C) hot water supply.
- If you first press the Start button, the main sensor cycle with heated drying will be automatically selected. This cycle senses the soil amount, and toughness of soil, to adjust the cycle for improved cleaning.
Sanitize or Sani
- Sanitizes dishes and glassware in accordance with NSF International NSF/ANSI Standard 184 for Residential Dishwashers. Certified residential dishwashers are not intended for licensed food establishments. Only sanitizing cycles have been designed to meet the requirements of the NSF/ANSI 184 performance standard for soil removal and for sanitization efficacy. There is no intention, either directly or indirectly, that all cycles on a NSF/ANSI 184 certified dishwasher meet the NSF/ANSI 184 performance standard for soil removal and for sanitization efficacy. The Sani Rinse indicator glows at the end of the cycle if the Sani Rinse option was successfully completed. If the indicator does not activate, it is probably due to the cycle being interrupted.
DISHWASHER CARE
Interior Cleaning
- Many detergents may leave white spots or a white residue on dishware and on the interior of the dishwasher. Over time this residue can become unsightly and could affect dishwasher performance. Use of a dishwasher cleaning product such as affresh® Dishwasher Cleaner can help to remove the residue. Monthly use of affresh® Dishwasher Cleaner is recommended to help maintain the dishwasher. Follow package directions.
NOTE: We recommend the use of high-quality, premeasured detergent tablets or packs and the use of rinse aid for dishwasher cleaning and daily care.
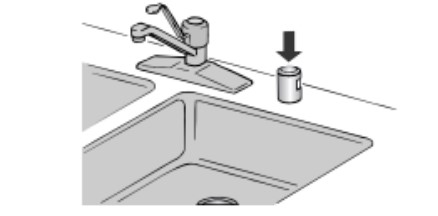
Countertop Air Gap
- If you have a drain air gap, check and clean it if the dishwasher isn't draining well.
Extended Time Without Use
To Reduce Risk of Property Damage During Vacation or Extended Time Without Use
- When you will not be using the dishwasher during the summer months, turn off the water and power supply to the dishwasher.
- Make sure the water supply lines are protected against freezing conditions. Ice formations in the supply lines can increase water pressure and cause damage to your dishwasher or home.
- Damage from freezing is not covered by the warranty.
- When storing your dishwasher in the winter, avoid water damage by having your dishwasher winterized by authorized service personnel.
Exterior Cleaning
- Clean the exterior of dishwasher with a soft, damp cloth and mild detergent. Avoid using abrasive cleaning products on the exterior of the dishwasher. Abrasive cleaning products can damage the finish
Troubleshooting
- The brand website listed on the Quick Start Guide has detailed information to troubleshoot most problems customers encounter. This information may save you the cost of a service call.
Foreign Object Cup
- If the Foreign Object Cup is full the Quick Start Guide or the brand website listed on the Quick Start Guide has detailed information about how to empty it.
DISHWASHER SETTING MENU
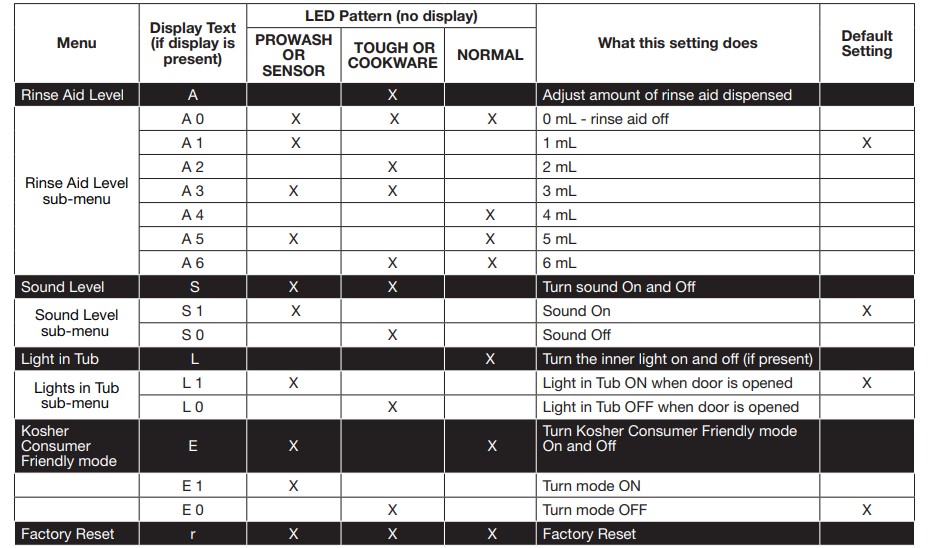
Follow the below instructions to enter into the menu to change your current settings.
1. Press and hold the “Hi Temp” button for 5 seconds until “Hi Temp” and “Dry” lights turn on.
2. Press the “Start/Resume” button within 2 seconds. If you do not press Start within 2 seconds, then the display will turn off and you will need to start over and go back to step 1.
a. For Models with a Display, an “A” will show in the display to indicate Rinse Aid Level.
b.For Non-display models,“Tough or Cookware” light will turn on to indicate Rinse Aid Level.
3. To go to a feature other than Rinse Aid Level, press the “Cycle” button or “Normal” button (depending on model) to move to the feature you would like to change (Sound Level, Light in Tub, Kosher Friendly, Factory Reset, Rinse Aid Level). See the table for what is shown on the display to indicate these features.
4. Press the “Start/Resume” button to select the feature and enter the sub-menu. The display will change to show the current setting of the feature. (For example, if you selected Sound Level and you haven’t changed it before, then S1 will show for display models and sensor will light for non-display models.)
5. Press “Cycle” button or “Normal” button (depending on model) to change the value of the feature setting. (For example, if you want to turn the sound off, then press the “Cycle” or “Normal” button and S0 shows on display models or “pots and pans” lights for nondisplay models.)
6. Press the “Start/Resume” button to confirm the new selection. The feature setting will not be changed until the “Start/Resume” button is pressed.
The dishwasher will return to the Off state when the Start button is pressed.
To exit the customer settings menu at any time, press the “Cancel” button, or wait 30 seconds without pressing any buttons.
NOTE: To see the current setting of a feature, follow steps 1-4. When the “Start/Resume” button is pressed in step 4, the dishwasher will show the current setting. Press the “Cancel” button to exit without making any changes.
NOTE: If you enter into a Feature Setting Page and need to go back to the Main Menu Press “Cancel” and proceed to step 1.
NOTE: To exit “Kosher Consumer Friendly Mode” at any time, press the “Cancel” button or you can wait 72 hours
Kosher Consumer Friendly Mode: When turned on, will disable all of the buttons on the dishwasher except for the cancel key, and disable the light inside the tub (if equipped) for a time period of 75 hours. If this mode is turned on during a cycle, then the status lights at the end of cycle will not turn off when the door is opened and then re-closed. To exit this mode, press the “Cancel” button, or wait 75 hours.
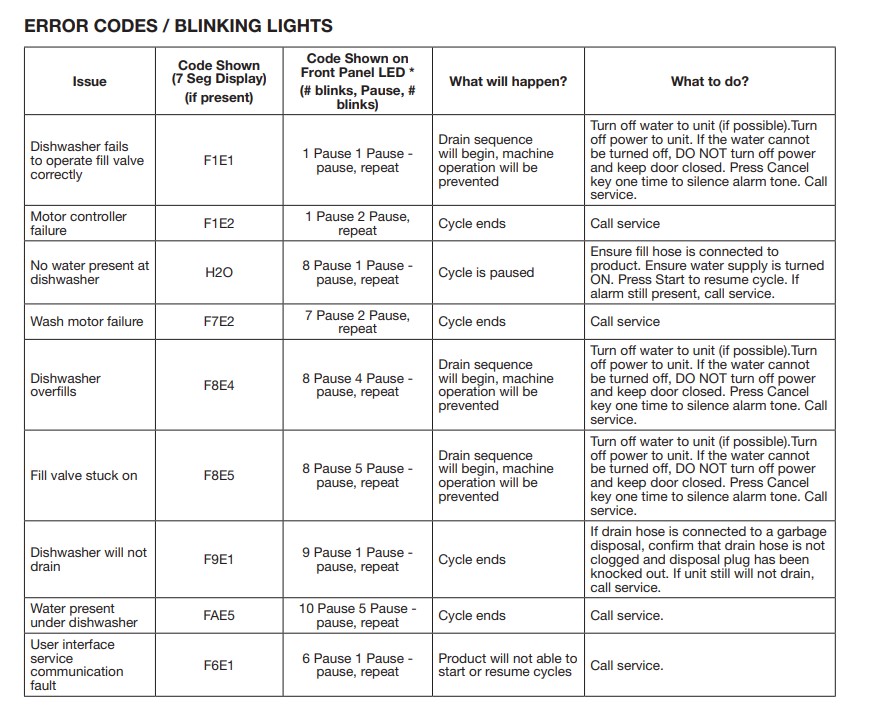
ERROR CODES
INSTALLATION REQUIREMENTS
LOCATION REQUIREMENTS
Dishwasher must be fully enclosed (top, sides, back, and floor) upon installation. A side panel kit is available from your dealer for installing your dishwasher at the end of your cabinetry.
An optional moisture barrier accessory is also available for installing underneath a wooden countertop.
Check location where dishwasher will be installed. The location must provide:
- Convenient access for loading and unloading dishes. Corner locations require a 2" (5.1 cm) minimum clearance between the side of the dishwasher door and the wall or cabinet.
- Easy access to water, electricity, and drain:
- Grounded electrical supply is required.
- This dishwasher has a water heating feature and also requires a connection to a hot water supply line.
- Make sure pipes, wires and drain hose are within the shaded area shown in the “Product and Cabinet Opening Dimensions” section.
- Do not run drain lines, water lines, or electrical wiring where they can interfere with or contact dishwasher motor or legs.
- Shelter dishwasher and water lines leading to dishwasher against freezing. Damage from freezing is not covered by the warranty..
- If installed in new construction, flush the water supply line of debris before connecting it to the fill valve. If it is not flushed, debris from the water supply could plug the fill valve screen.
- A square opening for proper operation and appearance.
- The cabinet front to be perpendicular to floor.
- Level floor.
- The location where the dishwasher will be installed must provide clearance between motor and flooring. Motor should not touch the floor.
- Do not install dishwasher over carpeted flooring.
PRODUCT AND CABINET OPENING DIMENSIONS:
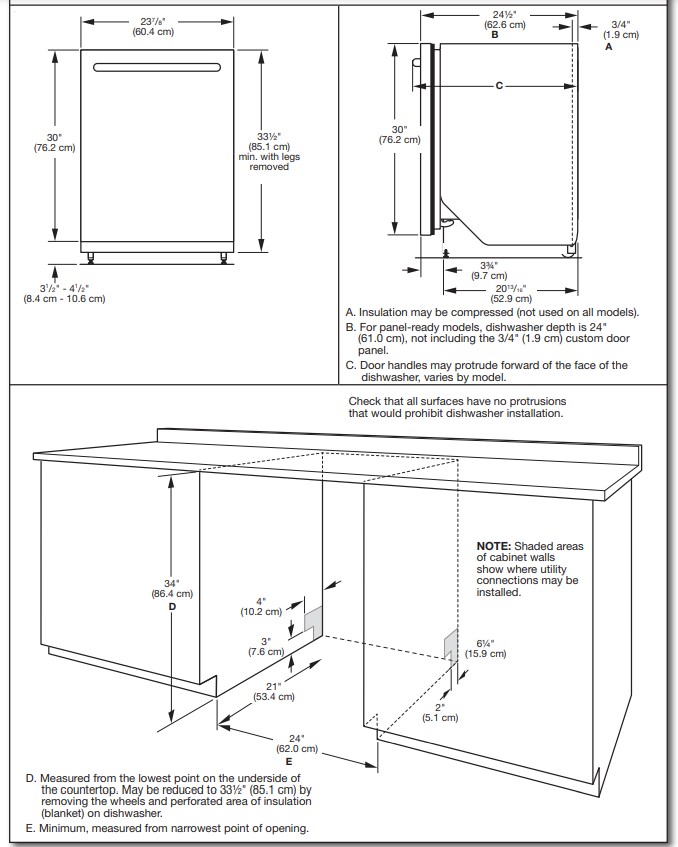
DRAIN REQUIREMENTS
- A new drain hose is supplied with your dishwasher. If drain hose is not long enough, use a new drain hose with a maximum length of 12 ft (3.7 m) that meets all current AHAM/ IAPMO test standards, is resistant to heat and detergent, and fits the 1" (2.5 cm) drain connector of the dishwasher. NOTE: Do not connect multiple drain hoses together.
- Make sure to connect drain hose to waste tee or disposer inlet above drain trap in house plumbing and 20" (50.8 cm) minimum above the floor. It is recommended that the drain hose either be looped up and securely fastened to the underside of the counter or be connected to an air gap.
- Make sure to use an air gap if the drain hose is connected to house plumbing lower than 20" (50.8 cm) above subfloor or floor.
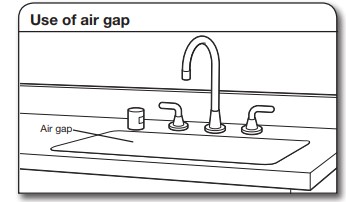
- If required, the air gap should be installed in accordance with the air gap installation instructions. When you are connecting the air gap, a rubber hose (not provided) will be needed to connect to the waste tee or disposer inlet.
- Use 1/2" (1.3 cm) minimum I.D. drain line fittings.
WATER SUPPLY REQUIREMENTS
- This dishwasher has a water heating feature and also requires a connection to a hot water supply line.
- A hot water line with 20 psi to 120 psi (138 kPa to 862 kPa) water pressure can be verified by a licensed plumber.
- 120°F (49°C) water at dishwasher.
- 3/8" (0.95 cm) O.D. copper tubing with compression fitting or flexible braided water supply line
- A 90° elbow with 3/4" (0.95 cm) hose connection with rubber washer.
- Do not solder within 6" (15.2 cm) of the water inlet valve.
- If installed in new construction, make sure the house water supply lines have been flushed prior to connecting the dishwasher to remove any debris that may exist in the supply line.
NOTE: If replacing an existing dishwasher, it is recommended to install a new water line and drain hose (supplied) with the new dishwasher.
ELECTRICAL REQUIREMENTS
You Must Have
- 120 V, 60 Hz, AC only, 15 A or 20 A, fused electrical supply
- Copper wire only
- A maximum of 2 field wiring supply conductors (12 AWG largest size) plus 1 grounding conductor are permitted in the terminal box
We Recommend:
- A time-delay fuse or circuit breaker.
Circuit Requirements:
- The dishwasher may be installed on the same circuit as a garbage disposal providing that the branch circuit cannot exceed rated circuit load and must comply with all governing codes and regulations such as but not limited to National Electrical Code, ANSI/NFPA 70 - latest edition.
- No electrical connections other than the dishwasher power and ground connections can be made inside of the dishwasher terminal box.
If connecting dishwasher with a power supply cord:
- Use UL Listed power cord kit marked for use with dishwasher.
- Plug into a grounded 3 prong outlet. Outlet must meet all local codes and ordinances.

If connecting dishwasher with direct wiring:
- Use flexible, armored, or nonmetallic sheathed copper wire with grounding wire that meets the wiring requirements for your home and local codes and ordinances.
- Use a UL Listed/CSA Approved metallic strain relief.


INSTALLATION INSTRUCTIONS
1. Sand holes smooth
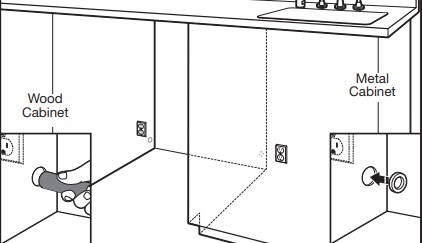
- Wood cabinet: Sand the hole until smooth.
- Metal cabinet: Cover edges of hole with grommet included with power cord kit.
- Helpful Tip: Wiring the dishwasher will be easier if you route the cable into the cabinet opening from the right-hand side.
2. Disconnect power
- Disconnect electrical power at the fuse box or circuit breaker box before installing dishwasher.
3. Shut off water supply
- Shut off the water supply to the dishwasher.
PREPARE CABINET OPENING— NEW UTILITIES
4. Drill hole locations—new construction
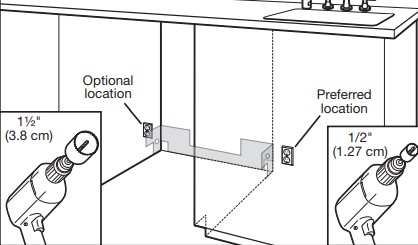
- The power-supply receptacle for the appliance shall be installed in a cabinet or on a wall adjacent to the undercounter space in which the appliance is to be installed.
NOTE: Refer to the “Product and Cabinet Opening Dimensions” section for the correct hole placement and dimensions of the shaded area.
INSTALL OPTIONAL MOISTURE BARRIER - RECOMMENDED FOR WOOD COUNTERTOPS
Moisture barrier/wood shims
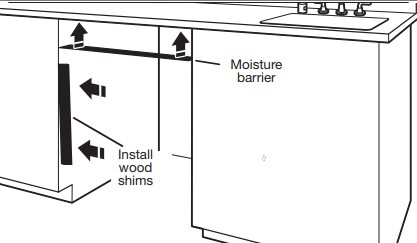
- Make sure the area under the cabinet is clean and dry for installation of the moisture barrier. Remove the backing of the moisture barrier, and apply to underside of the countertop along the front edge of the counter.
NOTE: The use of this moisture barrier is recommended but not required.
NOTE: Install wood shims if side anchoring and the gap between the sides of the cabinet and sides of the dishwasher are greater than 1/2" (1.27 cm) on each side or are greater than the length of the side anchor screws.
5. Built-up floors – add shims as needed
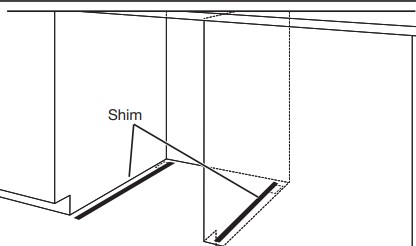
Note: The wood runners that come with the shipping base work well for shims.
- Built-up floors: If the kitchen floor is higher than the cabinet opening’s floor - for example, the kitchen floor tile does not extend into the cabinet opening - add shims, as needed, in the area shown to bring cabinet floor up to same level as the kitchen floor.
NOTE: Shims must be securely attached to floor to avoid movement when the dishwasher is in use.
6. If installing into a 331/2" (85.1 cm) opening
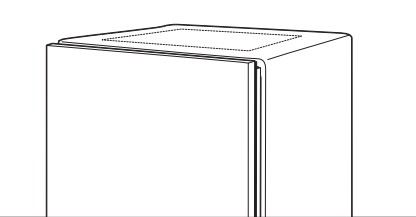
- Cut insulation blanket along perforation for cabinet opening height of 331/2" (85.1 cm). For other cabinet opening heights, do not cut the insulation blanket.
ELECTRICAL CONNECTION
7. Direct wire – route cable
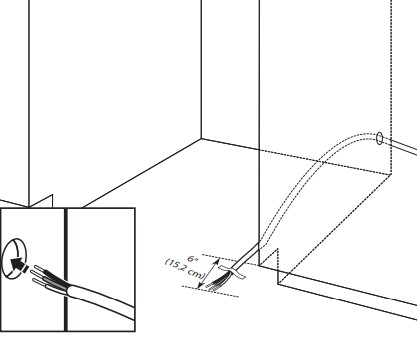
- If installing with direct wire, route the cable as shown. Do not connect the wire to the product at this time. This connection will be made later, after the unit is installed into the cabinet opening.
- Route cable from power supply through cabinet hole. (Cable must extend to the right front side of cabinet opening.) Tape cable to the floor in area shown. This will prohibit cable from moving when dishwasher is moved into cabinet opening.
PREPARE DISHWASHER
8. Put the dishwasher on its back
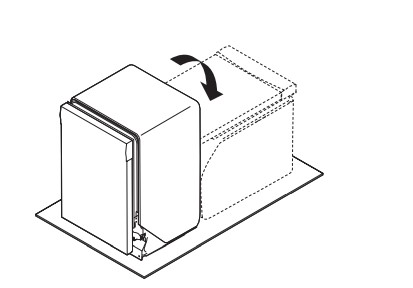
Helpful Tip: Remove all internal shipping material, drain hose, installation kit, and handle (if included,) before laying on it’s back, and not to remove film on the door at this time
- Place cardboard under dishwasher until installed in cabinet opening to avoid damaging floor covering.
- Using two or more people, grasp sides of dishwasher door frame, and place the dishwasher on its back.
- Do not use the door panel as a worktable without first covering it with a towel to avoid scratching the door panel.
REMOVE ACCESS PANEL AND INSULATION
9. Remove access panels
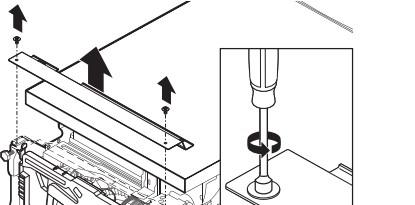
- Using a 5/16" (7.9 mm) nut driver, remove the two screws attaching access panels to dishwasher. Once the screws are removed push the access panel toward the top of the project to unhook it and then remove it.
DISCONNECT AND REMOVE DRIP TRAY ASSEMBLY
10a. Remove drip tray assembly
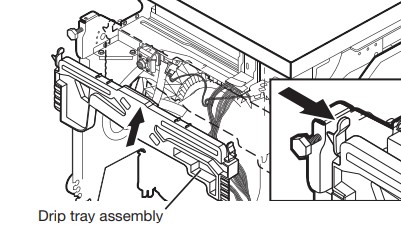
- To remove the drip tray assembly, press the snap at each side of the plastic tray in toward the center of the product and pull toward yourself. Take caution not to pull too far or too hard as the float switch wire is still connected at this time.
10b. Remove float switch wire
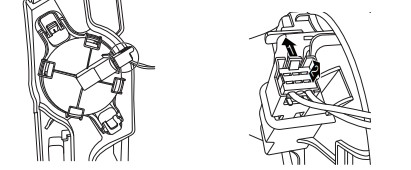
- To remove the float switch wire, gently push the connector latch tab (1) and then pull the connector (2) out of the housing. The float itself should not be removed from the tray.
NOTE: Not to install drip tray until instructed.
11. Measure cabinet opening
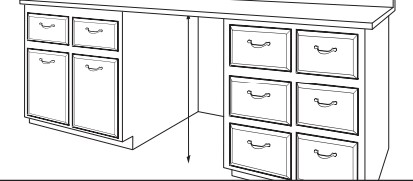
- Measure the height of cabinet opening from the underside of the countertop to the floor where the dishwasher will be installed. Be sure to measure the lowest point on the underside of the countertop and the highest point on the floor.
Leveling leg adjustment
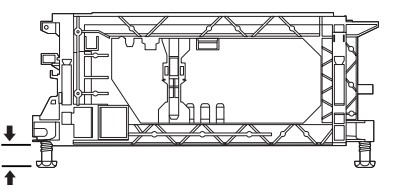
- Use wrench to initially loosen leveling legs if needed.
- Adjust all four leveling legs to the same height by rotating each foot clockwise or counterclockwise as needed
- The unit comes with the legs set for a 331/2" (85.1 cm) height installation. If your opening height is 341/2" (87.6 cm), you would therefore need to lower all four legs by 1" (2.54 cm).
NOTE: Adjust rear leg height first before moving unit into the cut out.
- Legs can be removed if necessary for tight installations.
See other models: ED5FHAXVS WED9500EC MGDZ400TF GR9SHKXMT 2VET20NKJW
