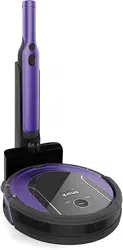
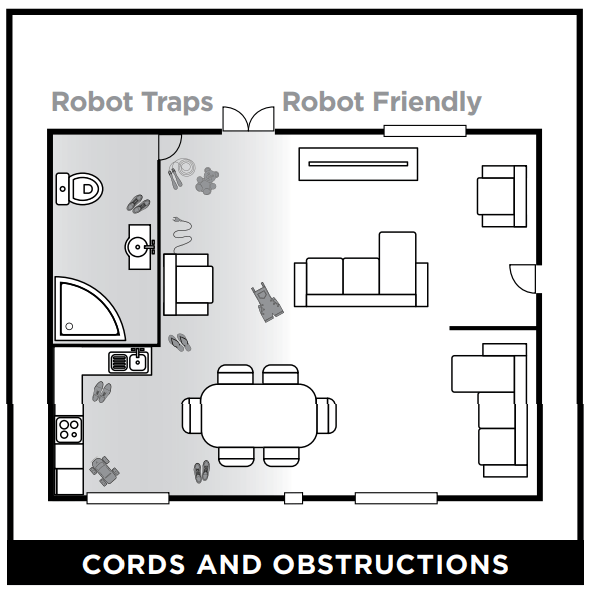
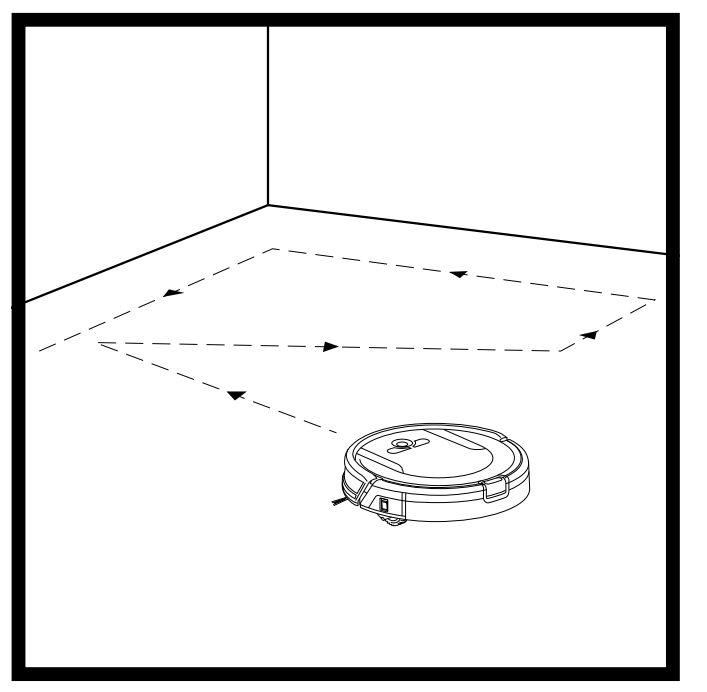
With Smart Sensor Technology, your robot uses an array of sensors to navigate around walls, furniture legs, and other obstacles while it cleans. The robot may gently bump into obstructions or linger in one spot, and it may not cover every area in a single cleaning. For best results, prepare your home as indicated below, and schedule a daily cleaning to ensure all floor areas are regularly maintained.
Before cleaning, clear away cords and other obstructions or block off the area with the included BotBoundary™ Strips.
To prevent your robot from becoming trapped, use furniture risers or BotBoundary strips.
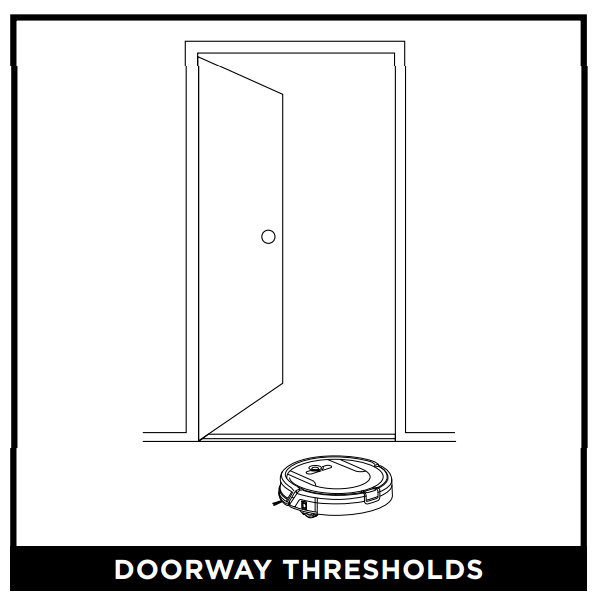
Your robot may have some trouble clearing some high thresholds. Block off high thresholds with BotBoundary strips.
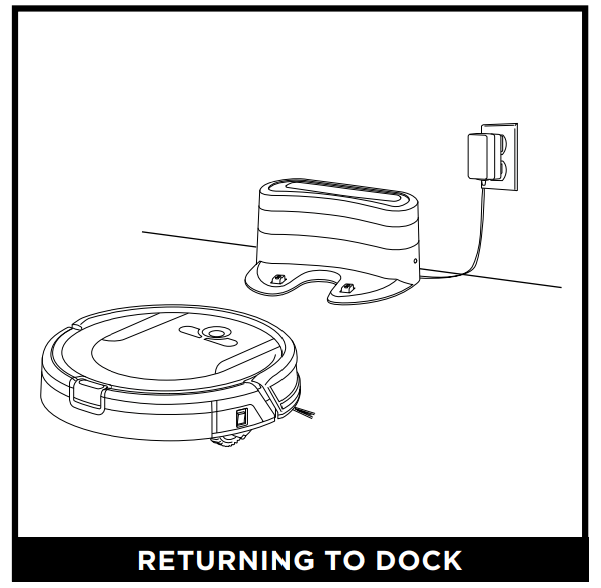
If your robot roams too far, it could have trouble finding the Charging Dock. It may be helpful to block off part of your home with BotBoundary strips, or to add a second dock
PREPARING FOR USE
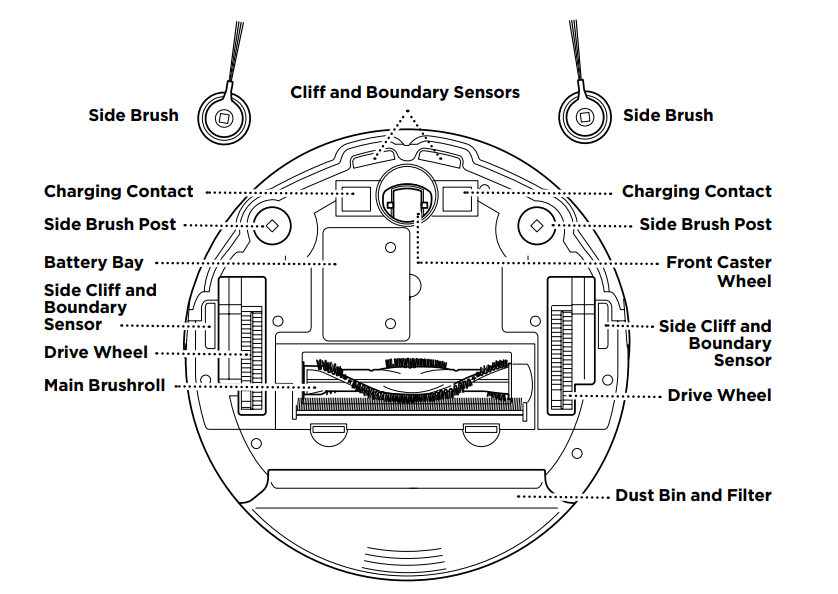
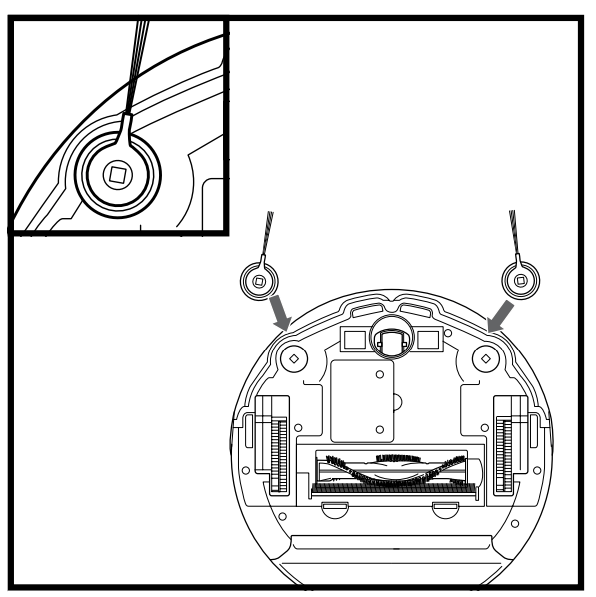
INSTALLING THE SIDE BRUSHES
Snap the 2 included Side Brushes onto the square pegs on the bottom of the robot.
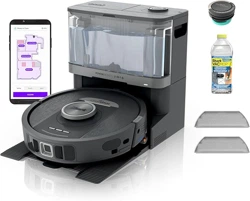
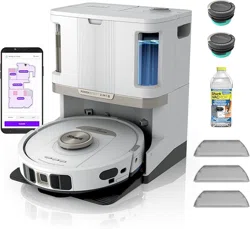
CHARGING DOCK SET-UP
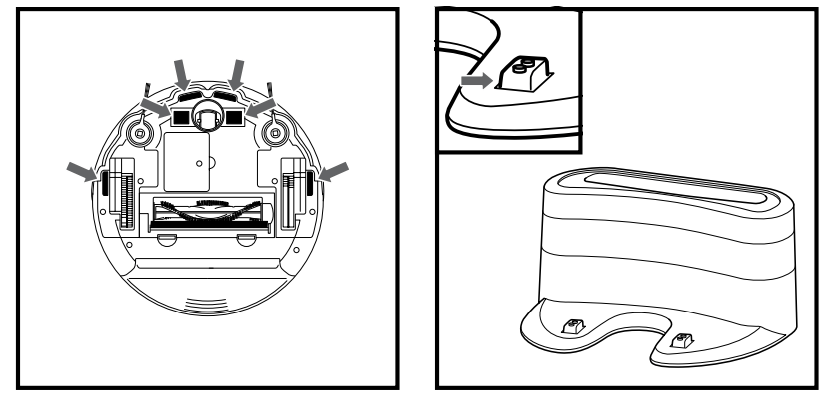
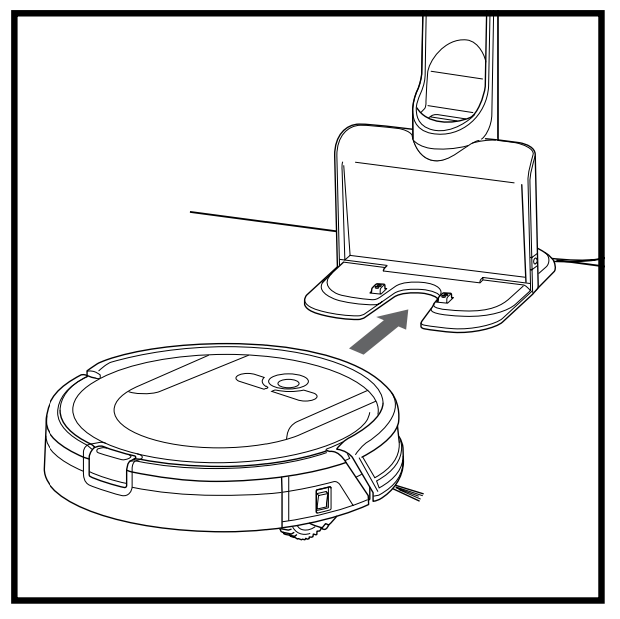
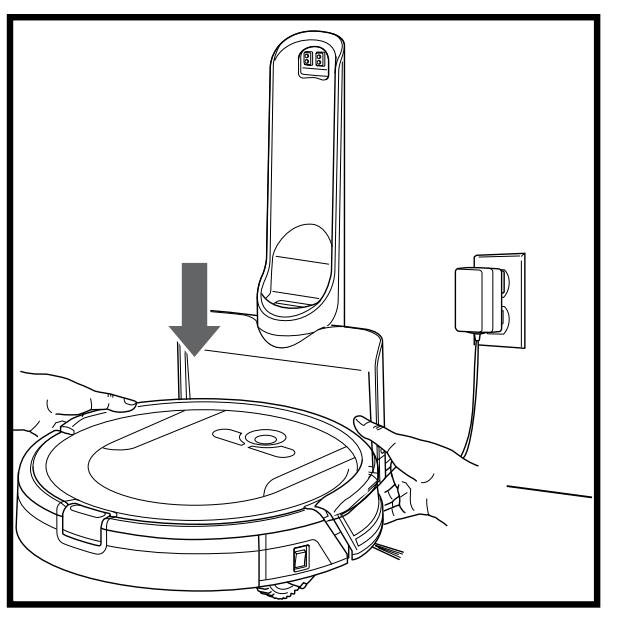
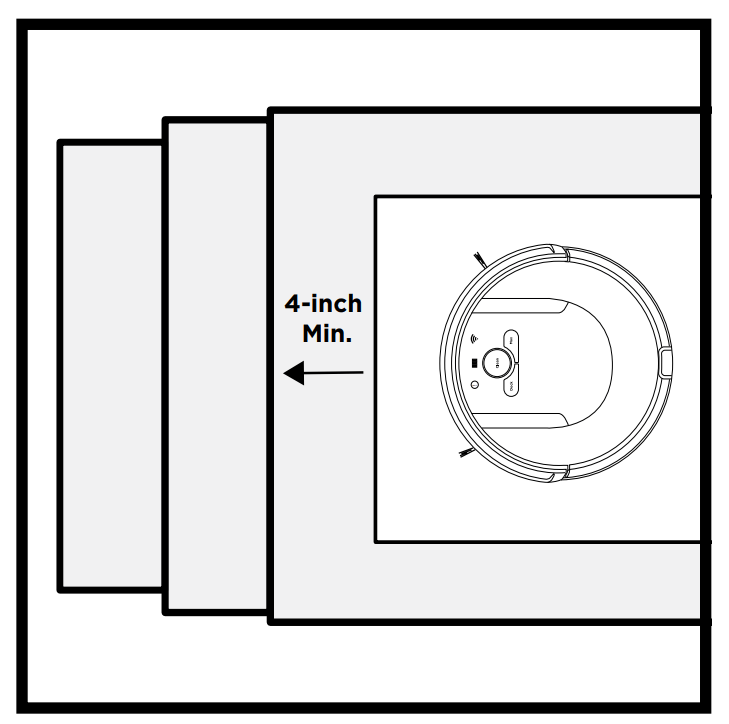
Place the charging dock on a level surface with its back against a wall, in a space without obstructions, that can easily be accessed by your robot. Remove any objects that are closer than 3 feet (1 meter) from either side of the dock, or closer than 5 feet (1.52 meters) from the front of the dock. Plug the Charging Adapter into a wall outlet. The dock must be plugged in continually for the robot to find it. The robot will beep when it starts charging on the dock.
CHARGING THE SHARK ION™ ROBOT
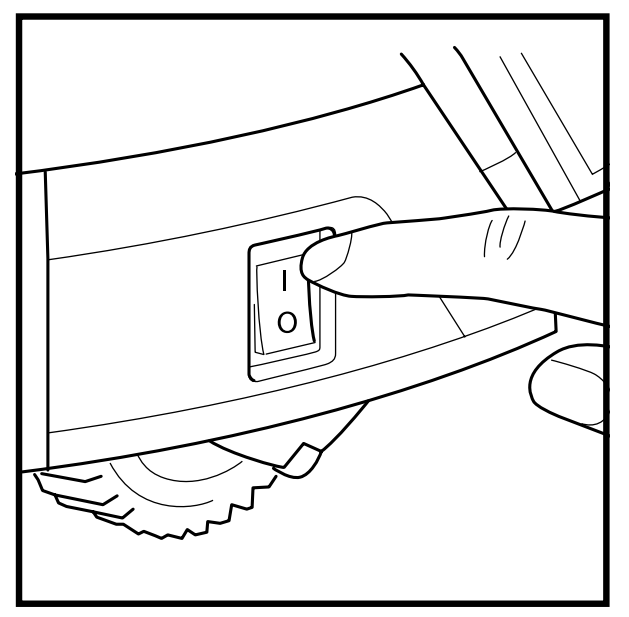
IMPORTANT: The Shark ION Robot has a pre-installed rechargeable battery. Battery must be fully charged before using.
To charge, the Power button on the side of the robot must be in the ON position (I).
When the cleaning cycle is complete, or if the battery is running low, the robot will search for the dock. If your robot doesn’t return to the dock, its charge may have run out
If the robot has no charge and cannot return to the charging dock, place it on the dock manually.
NOTE: When manually placing the robot on the dock, make sure the Charging Contacts on the bottom of the robot are aligned with the dock by leaving a gap of half an inch between the dock face and the front of the robot. To ensure the robot is docked correctly, refer to the Charge Indicator Lights section.
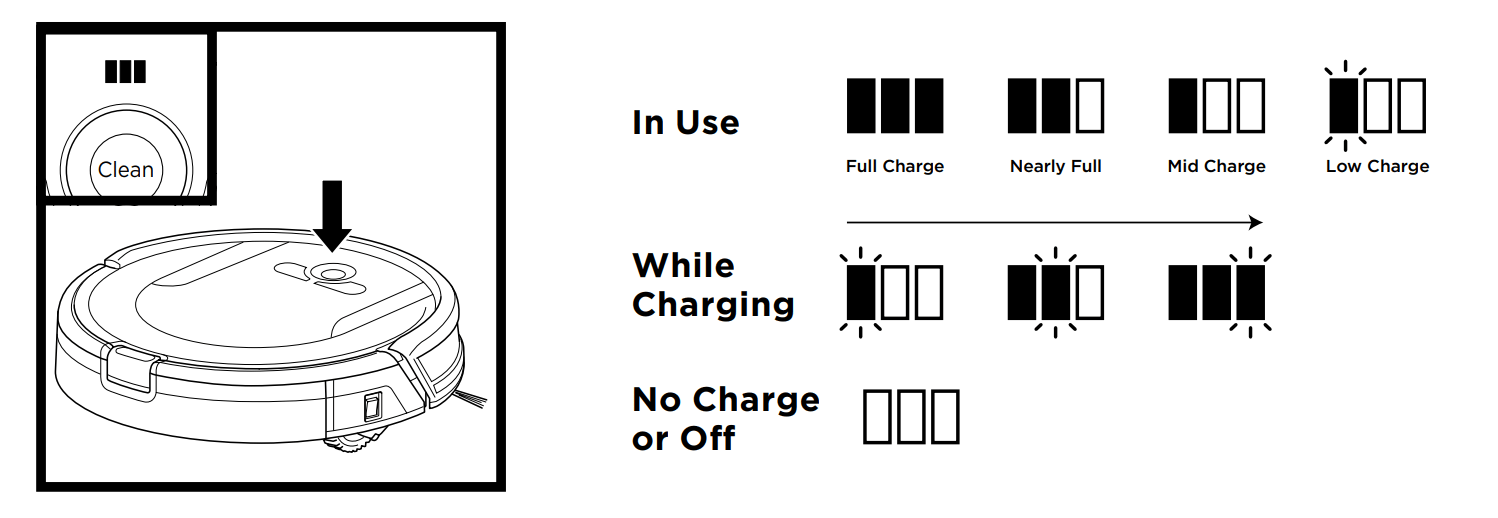
CHARGE INDICATOR LIGHTS
The blue charge indicator lights show how much charge is remaining.
While the robot is charging, all three blue LED lights will cycle. When charging is complete, all three blue lights will illuminate steadily.
If the robot is idle and away from the charging dock for 10 minutes, it will enter Sleep Mode, and the lights will turn off. If all the indicator lights are off, then the robot is in Sleep Mode, the power switch is turned OFF (O) or there is no charge remaining. Turn the power switch ON (I). Press any button to ensure robot is not in Sleep Mode.
If all indicator lights remain off, there is no charge. Place the robot on the dock, leaving a half-inch space between the front of the robot and the face of the dock. When the robot is docked correctly and begins to charge, it will beep and the charge indicator lights will cycle
NOTE: If the low charge light is blinking red, there is not enough charge for the robot to return to the dock. Manually place the robot on the dock, leaving a half-inch space between the front of the robot and the face of the dock.
TIP: To preserve battery life, turn off the power switch if robot will not be used for a long period of time. Unit should be recharged at least once every three months.
USING THE SHARK ION™ ROBOT
MANUAL CLEANING MODE
To manually start a cleaning cycle, press the Clean button on the robot or on the mobile app. To stop the robot before it finishes cleaning and automatically returns to the dock, press the button again.
IMPORTANT: Before cleaning an entire room for the first time, we recommend that you first test your robot on a small section of the floor to ensure there is no scratching.
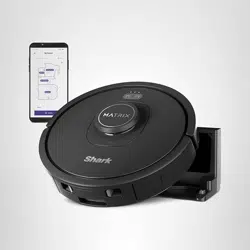
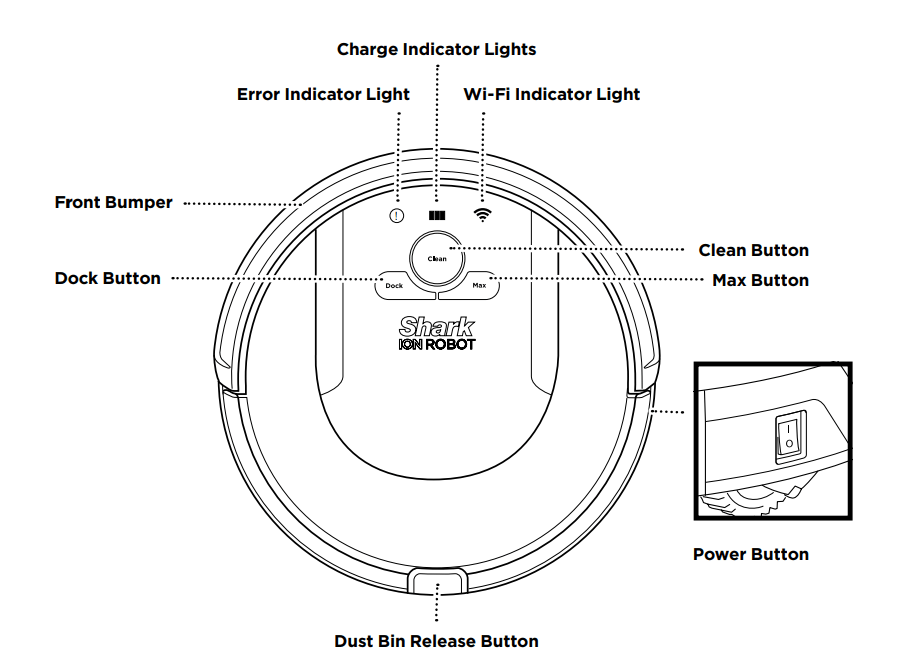
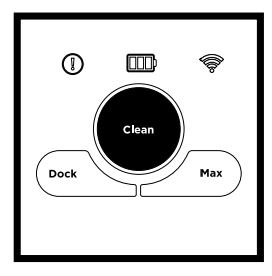
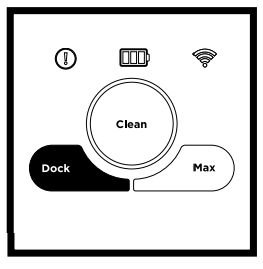
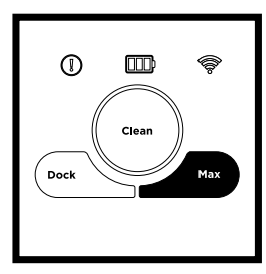
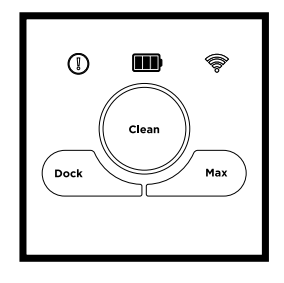
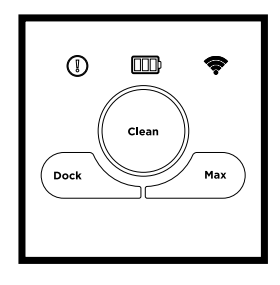
BUTTONS AND INDICATOR LIGHTS
CLEAN BUTTON
Press to begin a long-running cleaning session. Press again to stop.
DOCK BUTTON
Press to stop cleaning and send robot back to the charging dock.
MAX MODE BUTTON
Press for more powerful cleaning.
CHARGE INDICATOR LIGHTS
Display the amount of charge remaining in the battery.
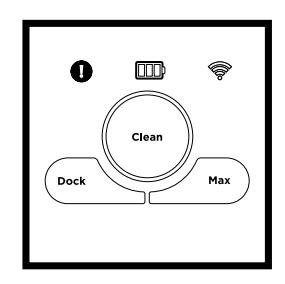
“!” ERROR INDICATOR
See Troubleshooting section for full list of error codes.
WI-FI INDICATOR
Blue light: connected to Wi-Fi.
Red light: not connected.
Flashing blue: setup mode.
No light: not set up yet.
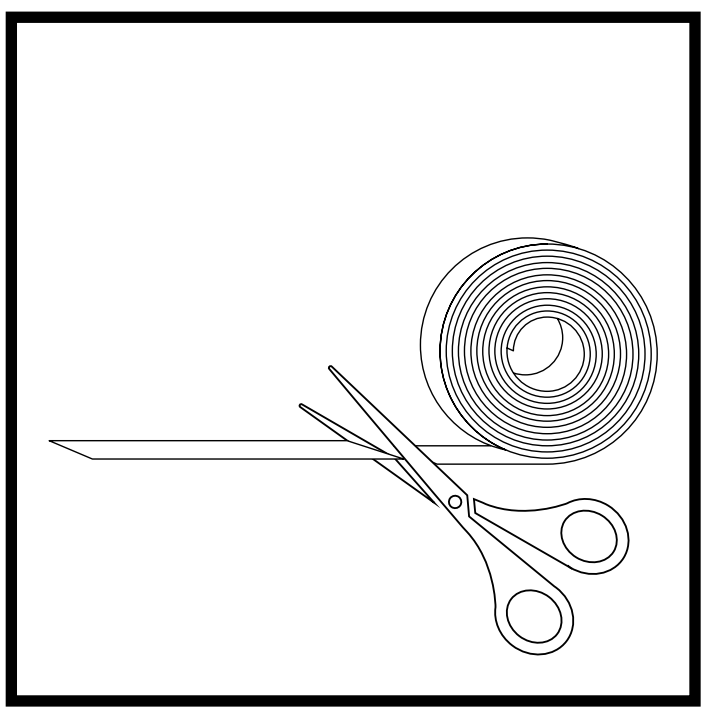
BotBoundary™ strips
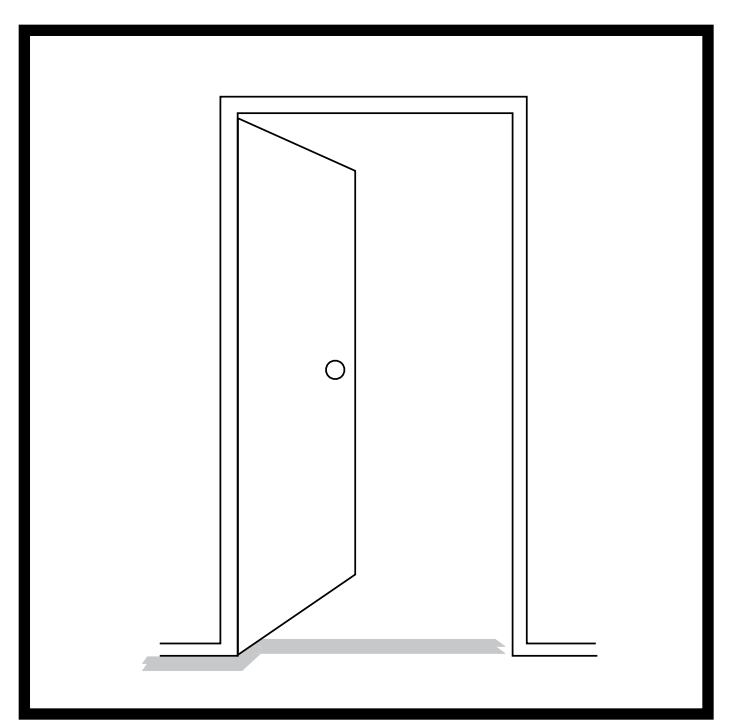
To keep your robot away from certain areas, such as pet bowls, fragile objects, power strips, or doorways, use the BotBoundary strips to quickly and easily create “no-go zones”.
Identify areas or objects you want the robot to avoid.
Cut the BotBoundary strip to the desired length (18˝/45cm minimum) so that it spans the length of the doorway or object you want to block off.
Generally, BotBoundary strips are not needed on stairs because your robot's cliff sensors will prevent it from falling off ledges. For your robot’s cliff sensors to work properly, all runners, rugs, or carpets must be at least 4 inches from any stairs (or extend over the edge of the stairs.) If a runner, rug, or carpet edge is less than 4 inches from the stairs and can’t be moved, use a BotBoundary strip to block off the stairs.
For best results, make sure your BotBoundary strip is completely flat against the floor. Make a closed loop around an object, or place the strips between fixed objects, like door frames or the legs of a couch, to create no-go zones.
NOTE: To prevent bumping, place strips at least 2 inches in front of the object you want to block off.
USING THE SHARK ION ROBOT APP AND VOICE CONTROLS
The Shark ION Robot app will guide you through easy setup of your robot.
Control the unit remotely:
Schedule cleaning times for up to 7 days a week.
Start, stop, or dock your robot from your phone anywhere with Wi-Fi connectivity.
The app will also provide you access to:
Tips, Tricks, and FAQs
Tech Support
Troubleshooting
DOWNLOADING THE SHARK ION ROBOT APP
Follow the steps below or scan the QR code to go directly to the download page.
Tap on the App Store icon
Search the Apple App Store for ”Shark ION Robot”
Tap on the Shark ION Robot app
Tap Install on the next page
Your installation should begin OR
Type this URL into your web browser: bit.ly/shark-ios
Tap on the Google Play Store icon
In the Play Store, search for ”Shark ION Robot”
Tap on the Shark ION Robot app
Tap install on the Shark ION Robot app page
Your installation should begin OR
Type this URL into your web browser: bit.ly/shark-droid
SETTING UP VOICE CONTROL WITH THE GOOGLE ASSISTANT OR AMAZON ALEXA
Visit sharkclean.com/app for setup instructions.
VOICE CONTROL COMMANDS FOR THE GOOGLE ASSISTANT OR AMAZON ALEXA:
Google Assistant:
“OK Google, tell Shark to start cleaning.”
“OK Google, tell Shark to pause my robot.”
“OK Google, tell Shark to send my robot to the dock.”
Amazon Alexa:
“Alexa, tell Shark to start cleaning.”
“Alexa, tell Shark to pause my robot.”
“Alexa, tell Shark to send my robot to the dock”
SETTING UP THE SHARK ION ROBOT APP
To ensure you successfully pair with the robot:
Confirm your Wi-Fi router and/or home network supports a 2.4 GHz network.
Confirm your Wi-Fi network name.
Confirm your Wi-Fi network password.
Reboot your home router.
Confirm you have downloaded the latest version of the robot app from the App Store or Google Play Store.
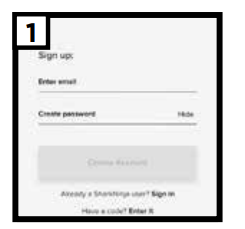
Launch the app. If you have an account, tap Sign In.
To create an account, enter a valid email address and create a password.
A confirmation code will be sent to the email address provided.
Enter confirmation code.
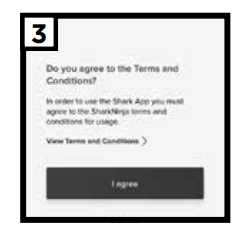
Read and agree to the Terms of Use.
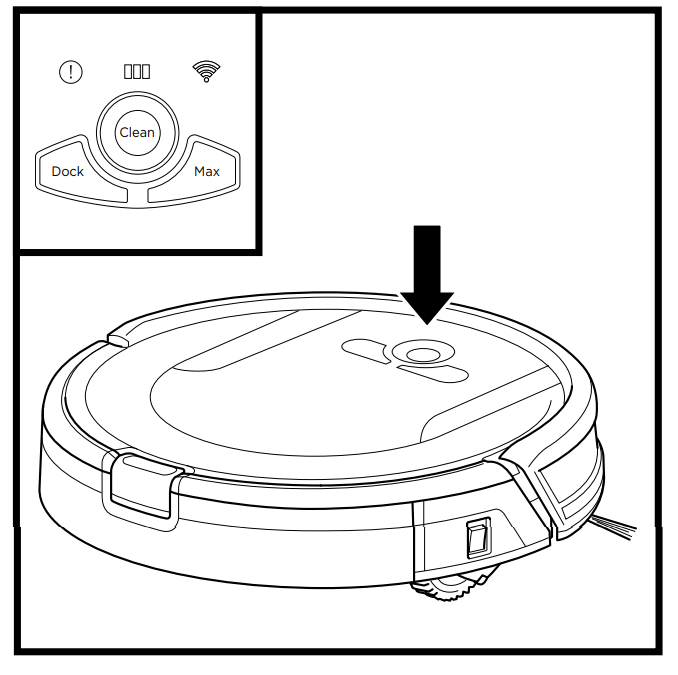
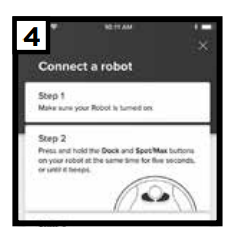
Make sure the robot is on.
Press and hold the Dock and Max buttons at the same time for 5 seconds, or until the robot beeps. The Wi-Fi Indicator light will begin to blink on your robot.
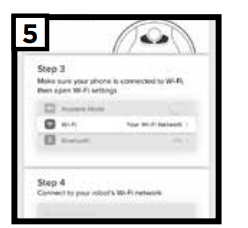
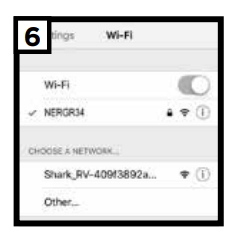
Make sure your phone is connected to the same 2.4GHz Wi-Fi network that your robot will be connected to.
Connect your phone to the robot's Wi-Fi Network.
The network's name will start with SHARK_RV-.
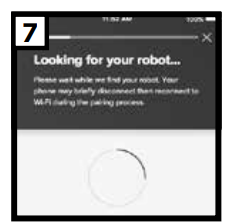
Your phone will pair with your robot.
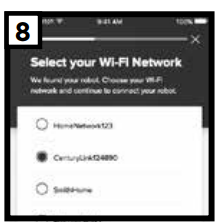
Select your Wi-Fi network and enter your Wi-Fi network password.
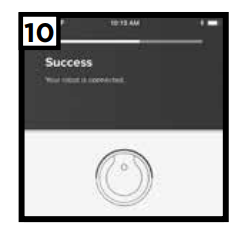
Your robot will connect to the network.
You will be notified when your robot is connected.
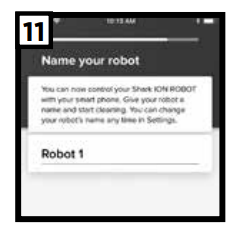
Give your robot a name, then tap Continue button.
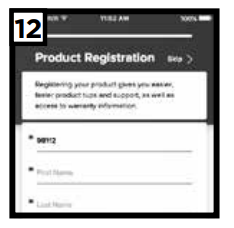
Register your robot. You are now ready to schedule cleaning days and times with the app.
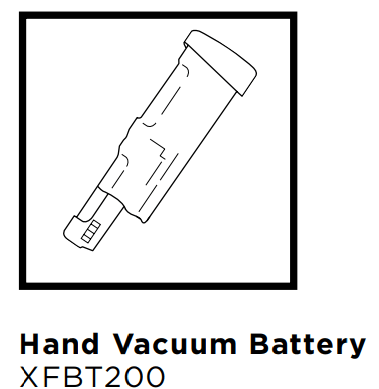
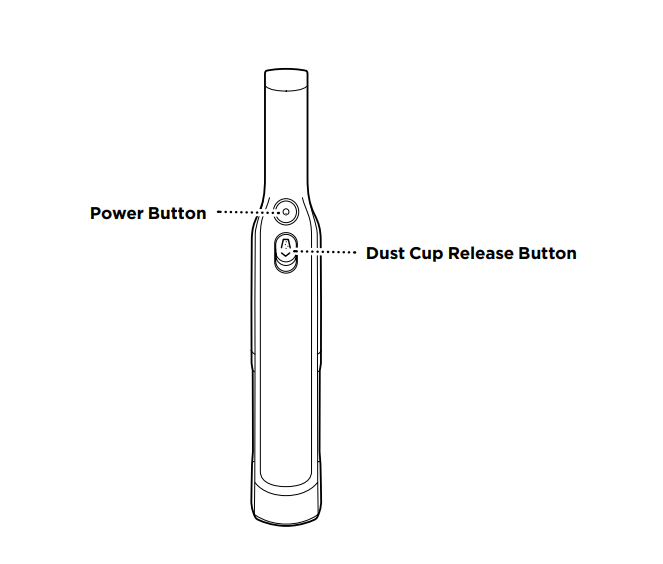
CHARGING THE SHARK ION™ HANDHELD
IMPORTANT: The Shark ION handheld has a pre-installed rechargeable battery. Battery must be fully charged before using.
Prior to first use, the lithium-ion battery must be charged completely, even if it comes with a partial charge.
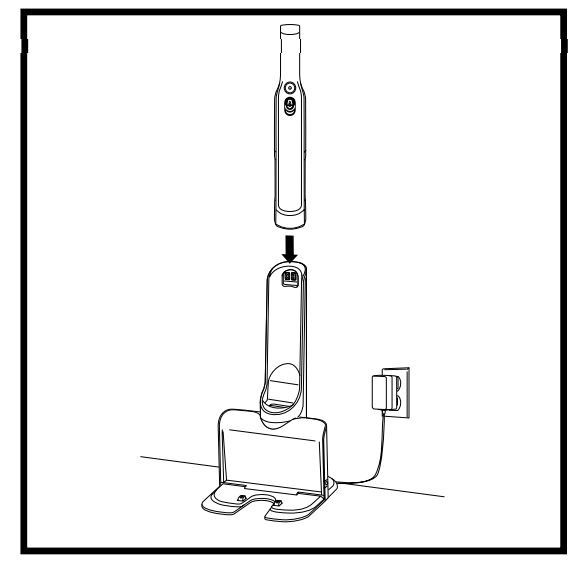
Place the Shark ION Handheld onto the charging dock with the air-intake nozzle in the cradle.
Plug the charging dock into a wall outlet.
CHARGE INDICATOR LIGHTS
NOTE: During first use, discharge fully to properly condition the battery. It takes approximately 2.5 hours to charge completely.
USING THE SHARK ION™ HANDHELD
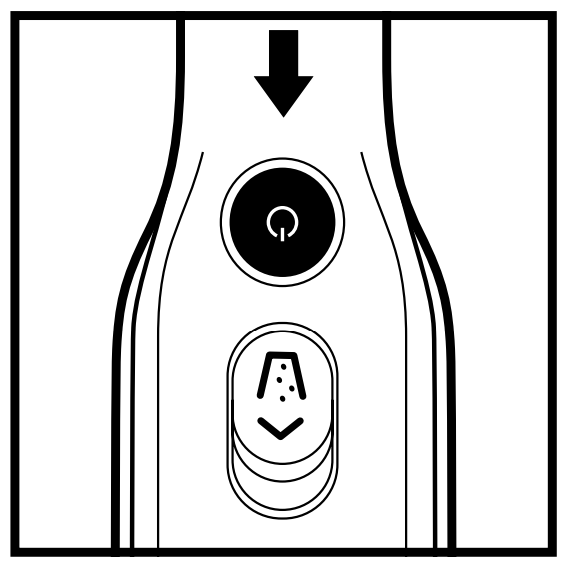
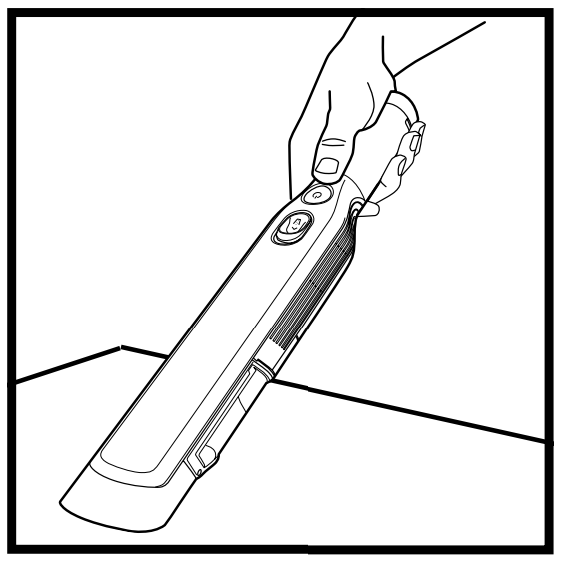
Press Power button.
Run the nozzle over the surface to be cleaned.
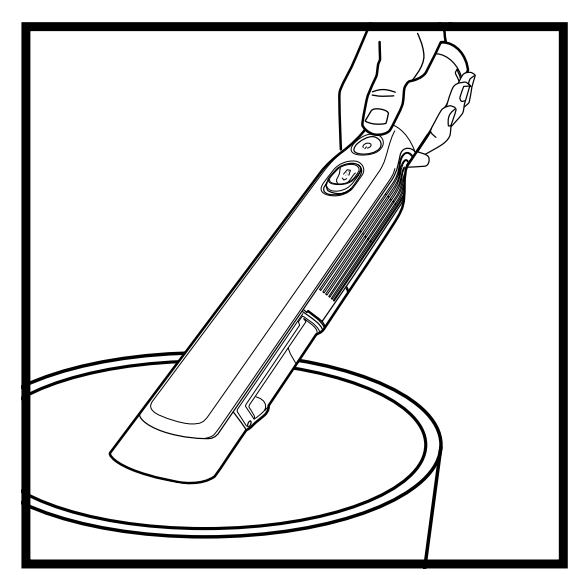
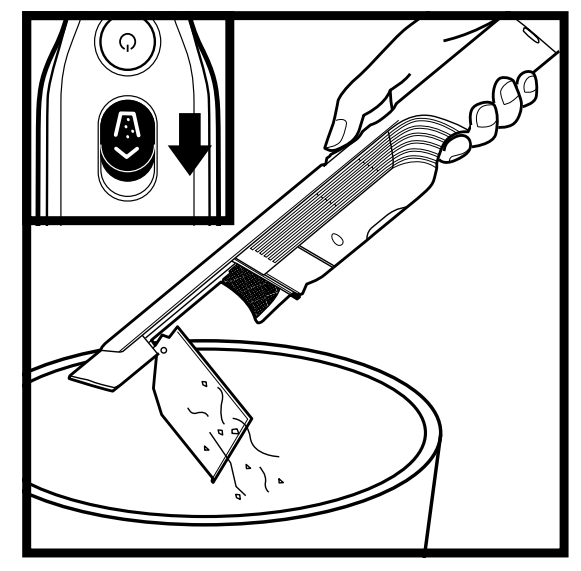
Hold your ION Handheld over the trash.
Slide dust cup button forward to release debris.
MAINTENANCE: ROBOT
CAUTION: Turn off power before performing any maintenance.
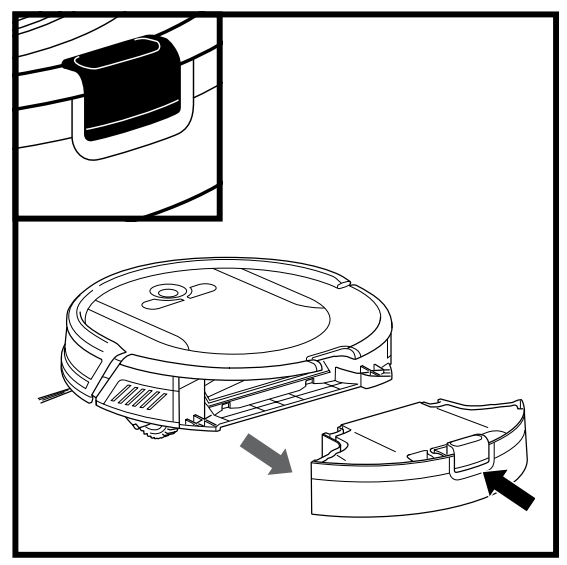
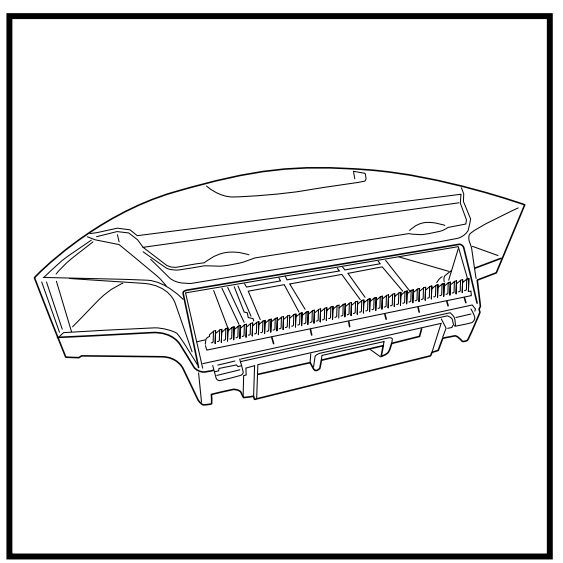
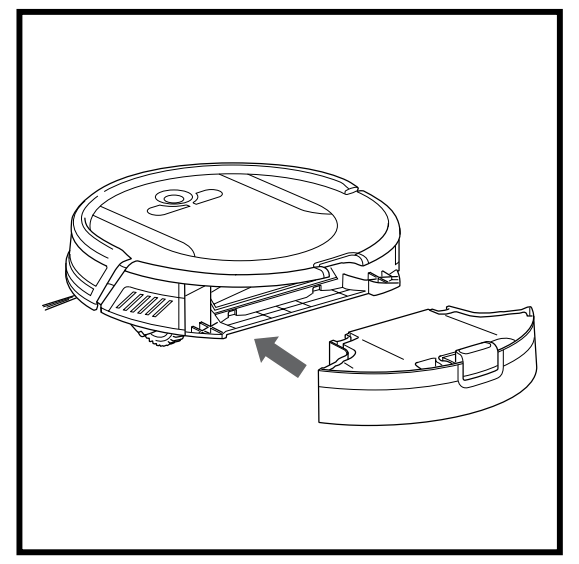
EMPTYING THE DUST BIN
EMPTY DUST BIN AFTER EACH USE.
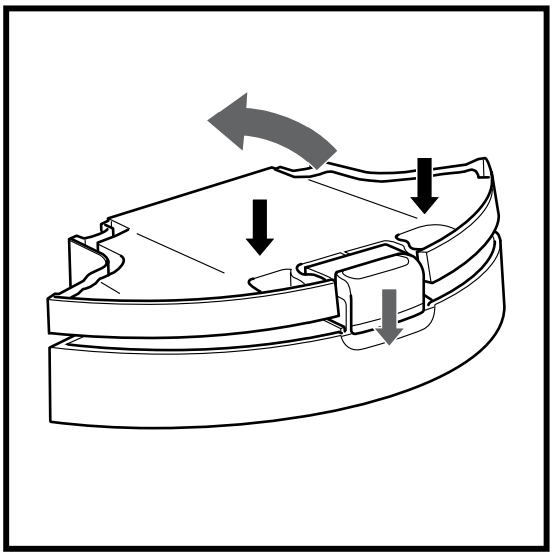
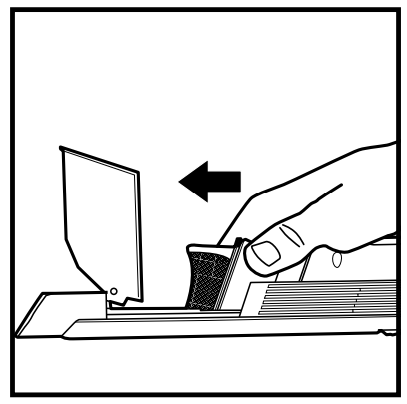
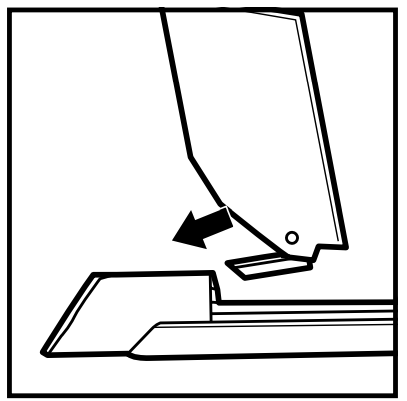
Press the Dust Bin Release Button and slide out the dust bin.
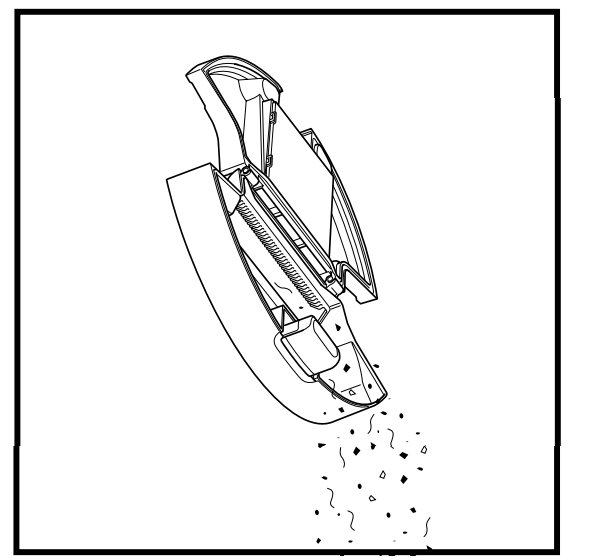
To open the dust bin lid, press and hold the button while lifting the lid, using the finger slots.
Empty debris and dust into trash.
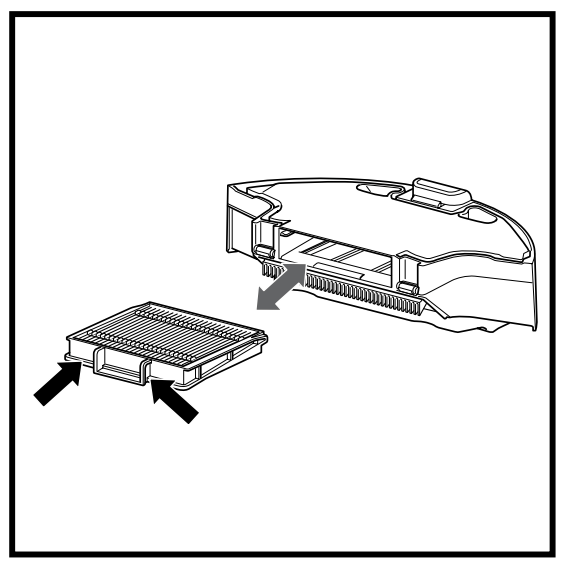
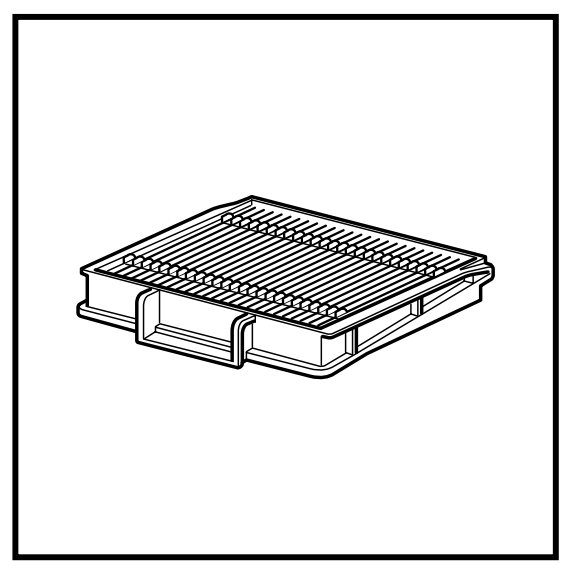
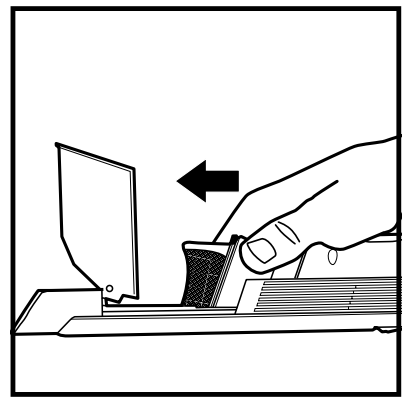
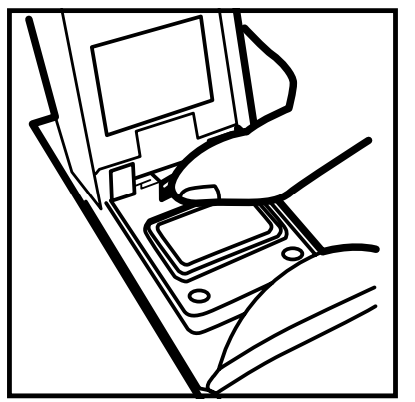
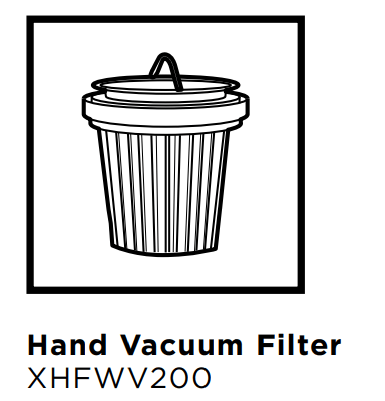
CLEANING THE FILTER
CLEAN FILTER EVERY WEEK. REPLACE FILTER EVERY TWO MONTHS.
Remove and empty the dust bin. Clean any hair or debris off the Anti-Tangle Comb on the back of the dust bin.
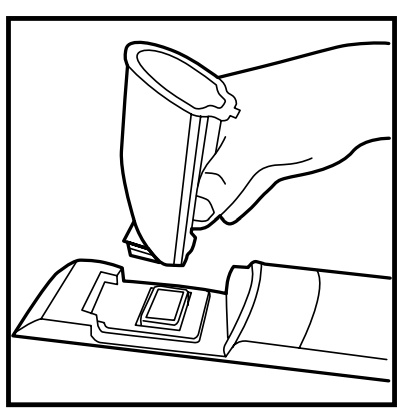
Pull filter out of the dust bin by the tabs.
Lightly tap the filter to remove dust and debris.
Reinsert the filter into the dust bin. Slide the dust bin back into the robot.
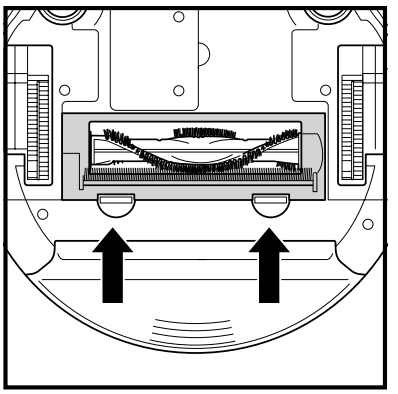
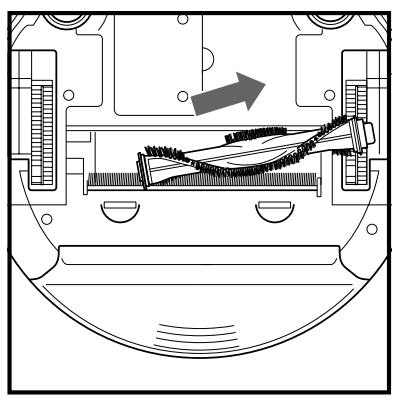
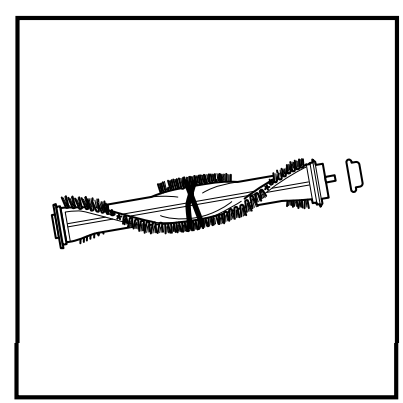
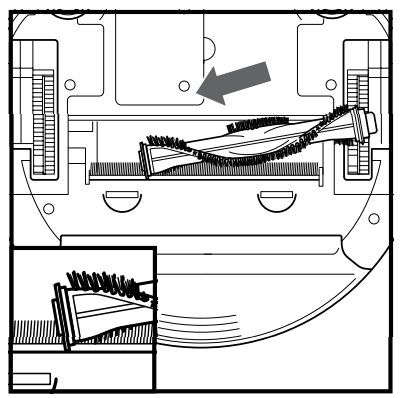
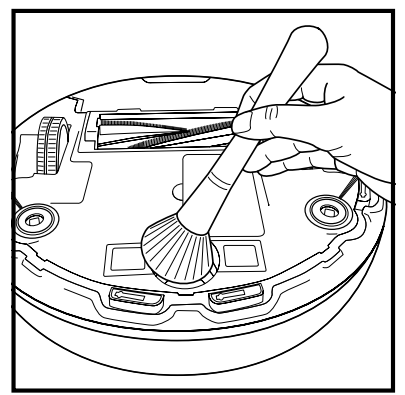
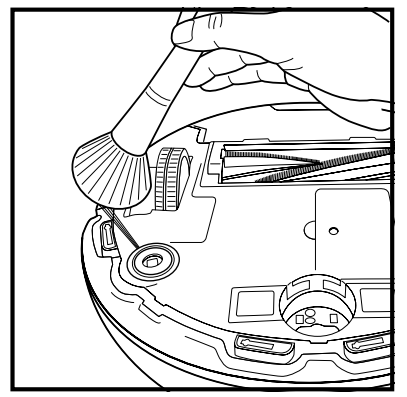
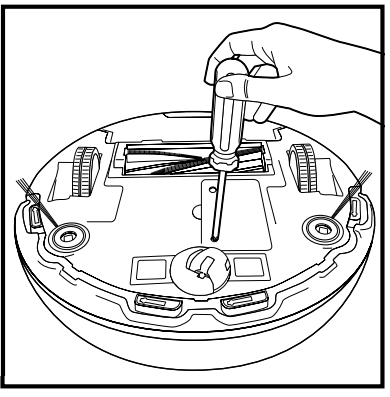
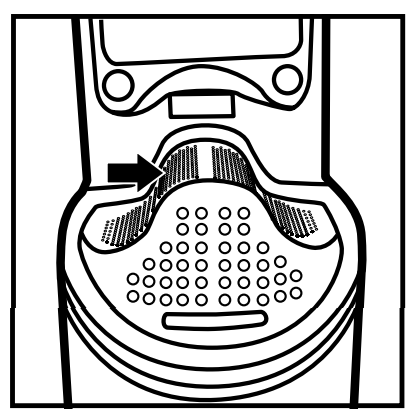
CLEANING THE BRUSHROLL
CLEAN BRUSHROLL EVERY WEEK. REPLACE BRUSHROLL EVERY 6 to 12 MONTHS, OR WHEN VISIBLY WORN.
Push up on the tabs on the brushroll access door, then lift off the door.
Lift out the brushroll.
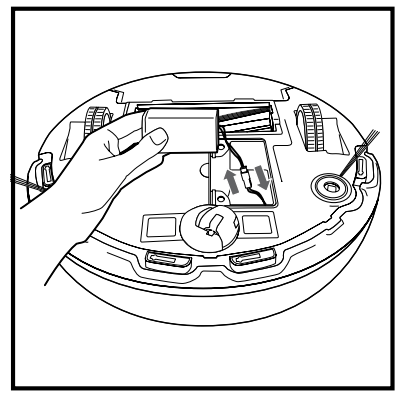
Remove the cap on the end of the brushroll. Clean off any hair or debris, then replace cap. Clean the brushroll periodically and whenever hair appears.
Reinstall the brushroll, inserting the flat end first. Close the brushroll access door and press down until it clicks into place.
NOTE: When removing the brushroll cap, make sure to not let the bushing inside the cap fall out. When cleaning brushroll, be sure to not cut anything other than hair, string, fibers, or other debris
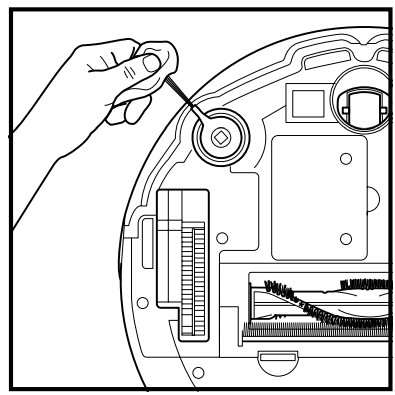
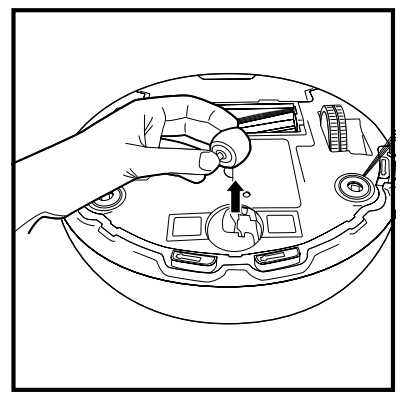
CLEANING SENSORS AND CHARGING PADS
CLEAN SENSORS AND CHARGING PADS PERIODICALLY AS NEEDED. With a dry cloth or cleaning brush, gently dust off the sensors and pads located on the bottom of the robot.
IMPORTANT: The robot uses cliff sensors to avoid stairs and other steep drops. Sensors may work less effectively when they are dirty. For best results, clean sensors regularly.
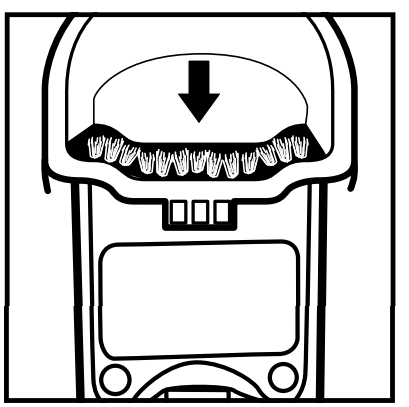
CLEANING SIDE BRUSHES
CLEAN SIDE BRUSHES AS NEEDED. CHECK WEEKLY.
RECOMMENDED REPLACEMENT SCHEDULE: Replace when visibly worn. See sharkaccessories.com for replacement parts.
Carefully unwind and remove any string or hair wrapped around brushes. Gently wipe brushes with a damp cloth. Be sure to let them air-dry completely before reinstalling them.
NOTE: Remove any side brushes that are bent or damaged. To remove a brush, lift it off its peg. See Installing the Side Brushes for instructions on how to attach and remove the brushes.
CLEANING THE WHEELS
REMOVE AND CLEAN FRONT WHEEL EVERY WEEK. REPLACE FRONT WHEEL EVERY 12 MONTHS
Pull the Front Caster Wheel from its housing and remove any debris buildup.
NOTE: Leverage may be required to remove the wheel.
Clean the wheel housing, then reinsert the caster wheel.
Clean the drive wheel housing periodically as needed by rotating the wheel while dusting
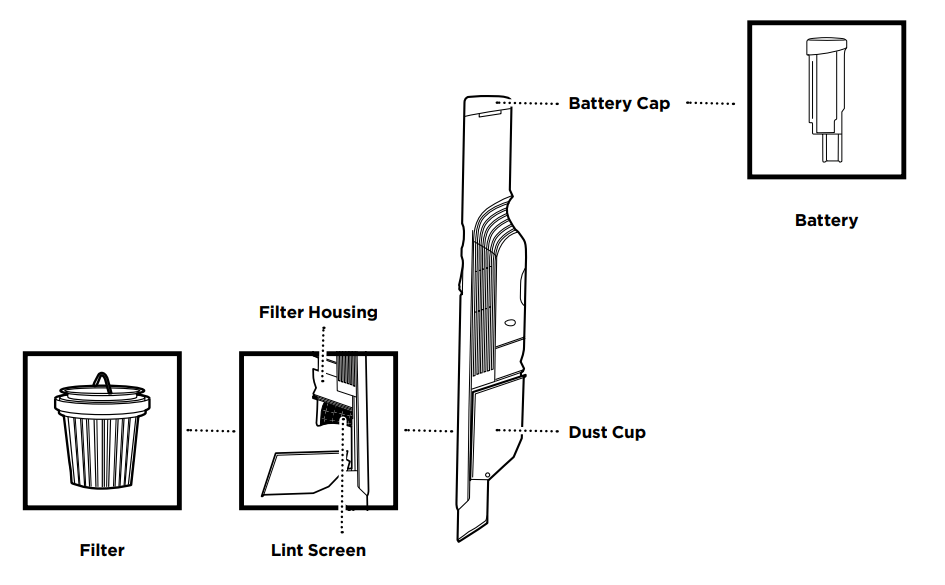
REPLACING THE BATTERY
To remove the battery, turn the unit over and unscrew the battery cover with a Phillips-head screwdriver.
Unplug the old battery from its connector, then plug in the new battery. Replace battery cover and screw it back into place. See Battery Removal and Disposal on back cover.
NOTE: This appliance contains batteries that are only replaceable by skilled persons.
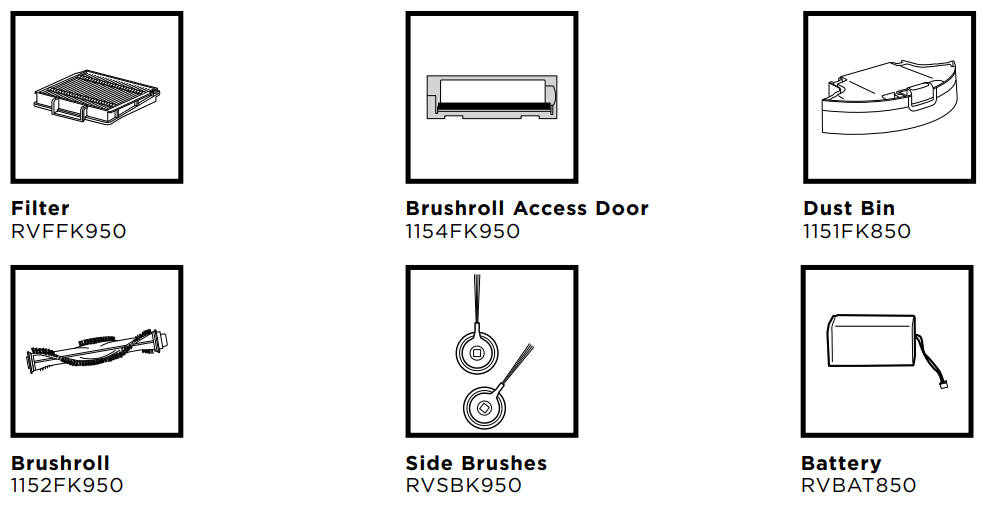
REPLACEMENT PARTS
MAINTENANCE: HANDHELD
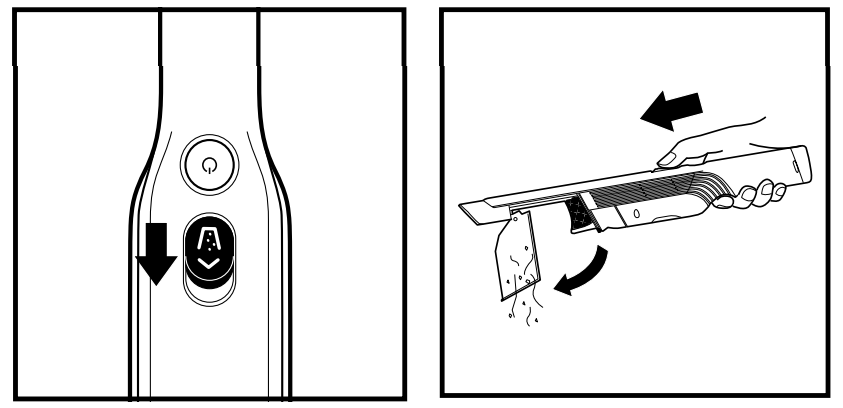
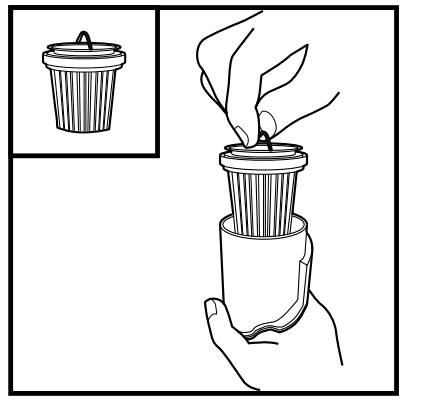
EMPTYING THE DUST CUP
With the power off, slide the Open Dust Cup button forward, and the dust cup will swing open.
Tap dust cup filter screen lightly to knock off dust and debris.
Wipe dust cup bristle lightly with dry cloth to remove dust and dirt.
CLEANING THE FILTERS
To clean the filter, hand-wash only with water and let air-dry for 24 hours before reinstalling. To clean the filter housing, make sure filter is removed, then hand-wash only with soap and water.
With the dust cup open and the power off, slide the filter housing forward to remove.
Lift the filter by the metal ring to remove it from the housing.
CLEANING THE DUST CUP
With the dust cup open and the power off, slide the filter housing forward to remove.
With the dust cup open, push the release tab.
While pressing tab, lift off the dust cup, then hand-wash with soap and water only. Let parts air-dry fully before reinstalling.
To reinstall, slide the tab on the dust cup into the slot on the bottom of the nozzle until it clicks into place.
REPLACEMENT PARTS
NOTE: To order replacement parts and filters.
TROUBLESHOOTING
ROBOT
If any error lights are illuminated or flashing on your Shark ION™ Robot, see the error code chart below:
ERROR CODE
SOLUTION
ALL LED LIGHTS are of
Power may be turned off or battery may need charging. Turn power switch to On position. If no response, place robot on dock to charge.
CLEAN (RED) + ! flashing together
Suction motor failure. Remove blockages and clean filters. Remove dust bin and make sure nothing is blocking suction
CLEAN (RED) flashing
Robot may be stuck on an obstacle. Move robot to a new location on a level surface
MAX flashing
Robot may be stuck on an obstacle. Move robot to a new location on a level surface. Front bumper may be jammed. Check bumper.
DOCK flashing
Your robot’s BotBoundary™ sensors are reporting an error. Please contact Customer Service at 1-800-798-7398.
CLEAN (RED) + DOCK flashing together
Cliff sensors are reporting an error. Wipe cliff sensors with a clean cloth. Robot cannot start due to an error. Turn off the power switch on the side of the robot, wait five seconds, then turn power back on. Ensure your robot is on a level surface with no obstructions.
CLEAN (RED) + MAX flashing together
The dust bin has been removed and needs to be reinserted.
MAX + ! flashing together
A side brush is stuck. Remove debris from side brushes.
CLEAN (RED) + MAX + ! flashing together
A wheel is stuck. Remove debris from wheel.
DOCK + MAX + ! flashing together
Blockage in brushroll. Remove obstruction.
DOCK + ! flashing together
Make sure you are using the dock that came with your robot.
CLEAN (BLUE) + MAX + ! flashing together
The robot is caught in a tight space or on an obstacle. There is something stuck in the robot’s front bumper. Clean any obstructions or debris from the bumper. Gently push the bumper up and down and back and forth, making sure it moves smoothly.
CLEAN + DOCK + MAX + ! flashing together
The robot is caught in a tight space or on an obstacle. There is something stuck in the robot’s front bumper. Clean any obstructions or debris from the bumper. Gently push the bumper up and down and back and forth, making sure it moves smoothly
CLEAN + DOCK + MAX flashing together
Robot is in Find My Robot mode. You can deactivate this mode in the app.
HANDHELD
LIGHT INDICATOR
WHAT IT MEANS
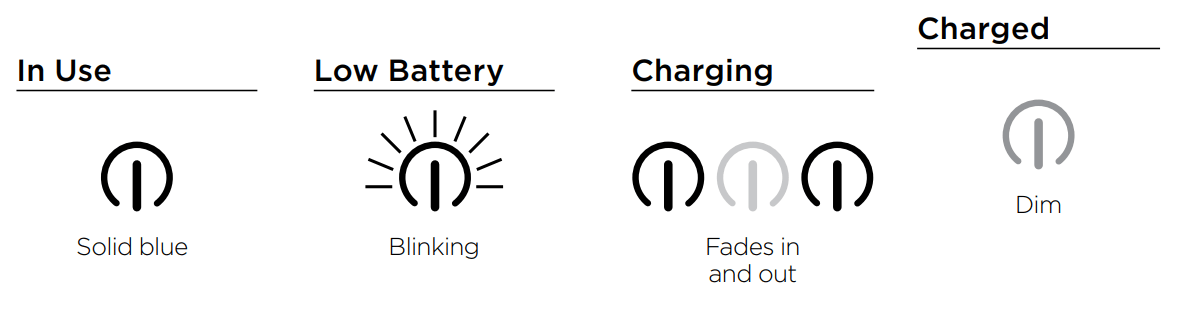
LIGHT BLINKING BLUE
Low battery.
LIGHT BLINKS BLUE TWICE, THEN PAUSE
Blockage. Turn off power and remove blockage, then turn power back on.
SOLID BLUE LIGHT
Power is on.
BLUE LIGHT FADES IN AND OUT STEADILY
Unit is charging.
DIM BLUE LIGHT
Unit is fully charged
NO LIGHT
Power is off, or unit needs recharge.
The Shark ION™ Handheld will not operate.
The battery needs to be recharged.
Try using a different electrical outlet to charge.
The battery is damaged and needs to be replaced.
The Shark ION Handheld will not pick up debris or suction is weak.
The dust cup is full. Empty the dust cup.
The filter needs cleaning or replacement. Clean or replace the filter.
The battery needs to be recharged.
The filter screen is clogged and needs cleaning. Open dust cup and clean filter screen.
Dust is escaping from the Shark ION Handheld.
The filter is not installed correctly. Remove filter, then reinstall.
The dust cup filter has a hole or a puncture and needs to be replaced.
The dust cup is not installed correctly. Remove dust cup, then reinstall.
Attached accessory does not work.
The accessory is blocked. Carefully remove all lint, hair, or other debris.
The accessory won't fit into the Shark ION Handheld. Carefully remove all lint, hair or other debris from the nozzle of the vacuum.


 CAUTION: Turn off power before performing any maintenance.