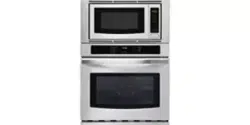
Wall Oven Features
Note: The features of your wall oven will vary according to model.
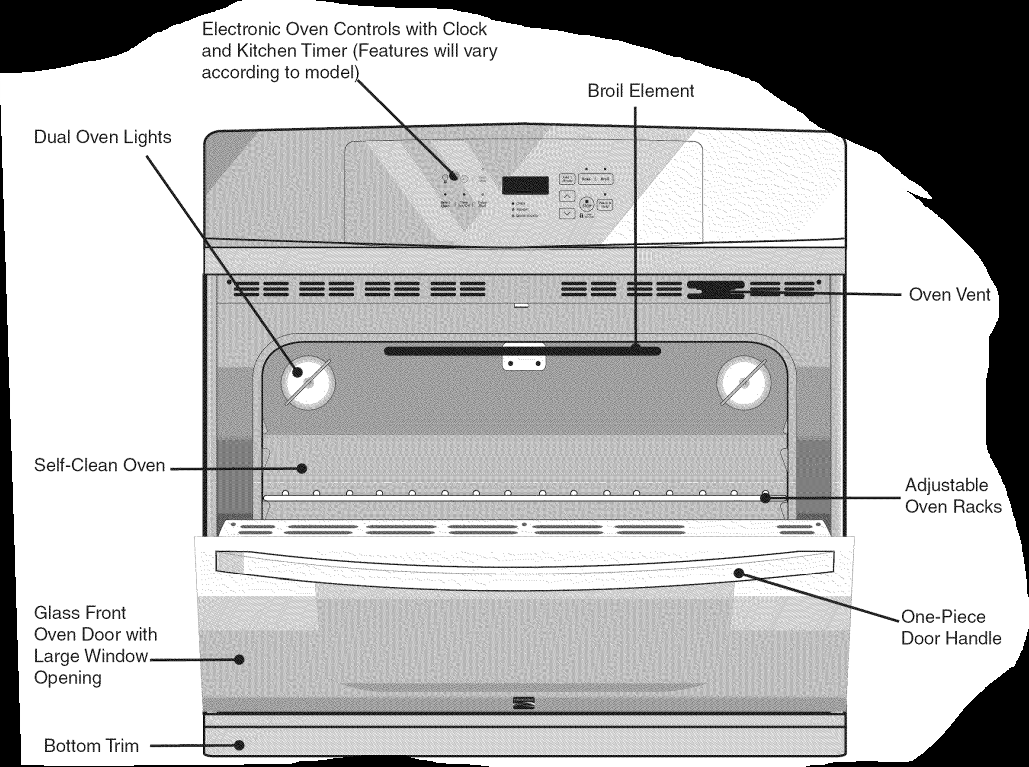
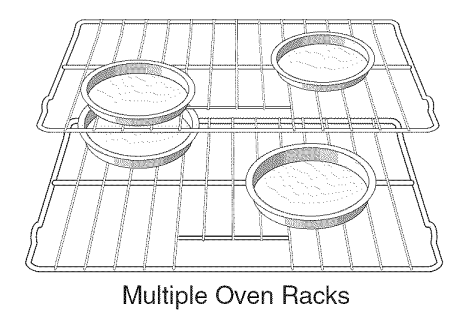
Oven Vent and Racks
CAUTION: Some models are equipped with a blower which runs in baking and self=cleaning mode to keep all internal components at a cool temperature. The blower may keep running even if the oven has been turned off, until the compo-nents have cooled down.
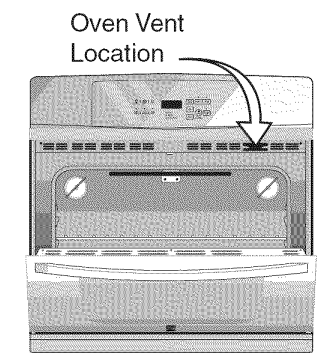
Oven Vent Location
The oven is vented at the center trim. When the oven is on, warm air is released through the vent. This venting is necessary for proper air circulation in the oven and good baking results.
Arranging Oven Racks
ALWAYS ARRANGE OVEN RACKS WHEN THE OVEN !S COOL (PRIOR TO OPERATING THE OVEN), Always use oven mitts when using the oven.
To remove an oven rack, pull the rack forward until it stops. Lift up front of rack and slide out.
To replace an oven rack, fit the rack onto the guides on the oven walls. Tilt the front of the rack upward and slide the rack back into place.
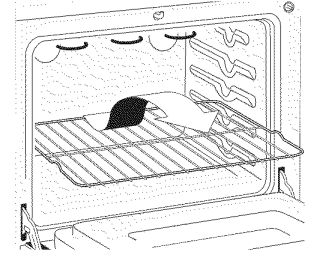
Air Circulation in the Oven
If using 1 rack, place in center of oven. If using multiple racks, stagger cookware as shown.
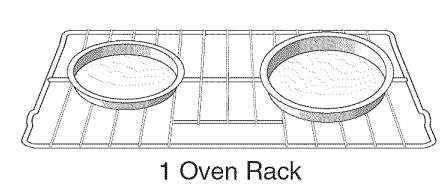
For best air circulation and baking results allow 2"-4" (5.1cm-10.2cm) around the cookware for proper air circulation and be sure pans and cookware do not touch each other, the oven door, sides or back of the oven cavity. The hot air must circulate around the pans and cookware in the oven for even heat to reach around the food.
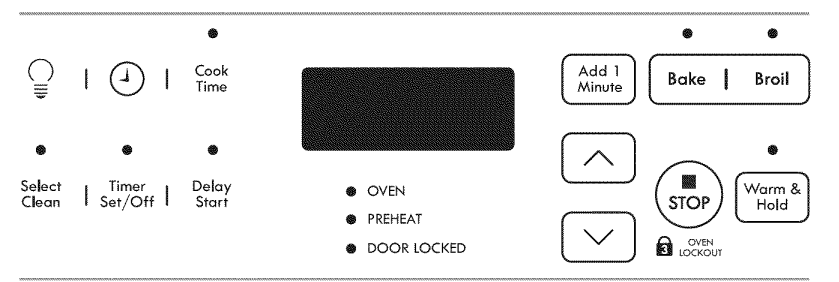
Control Pad Features
Note: The appearance of your oven control may differ slightly from the one illustrated below. However, all functions are the same. Also, push buttons or pads may be shaped differently than those appearing in this Use and Care Guide.
READ THE INSTRUCTIONS CAREFULLY BEFORE USING THE OVEN. For satisfactory use of your oven, become familiar with the various functions of the oven as described below.
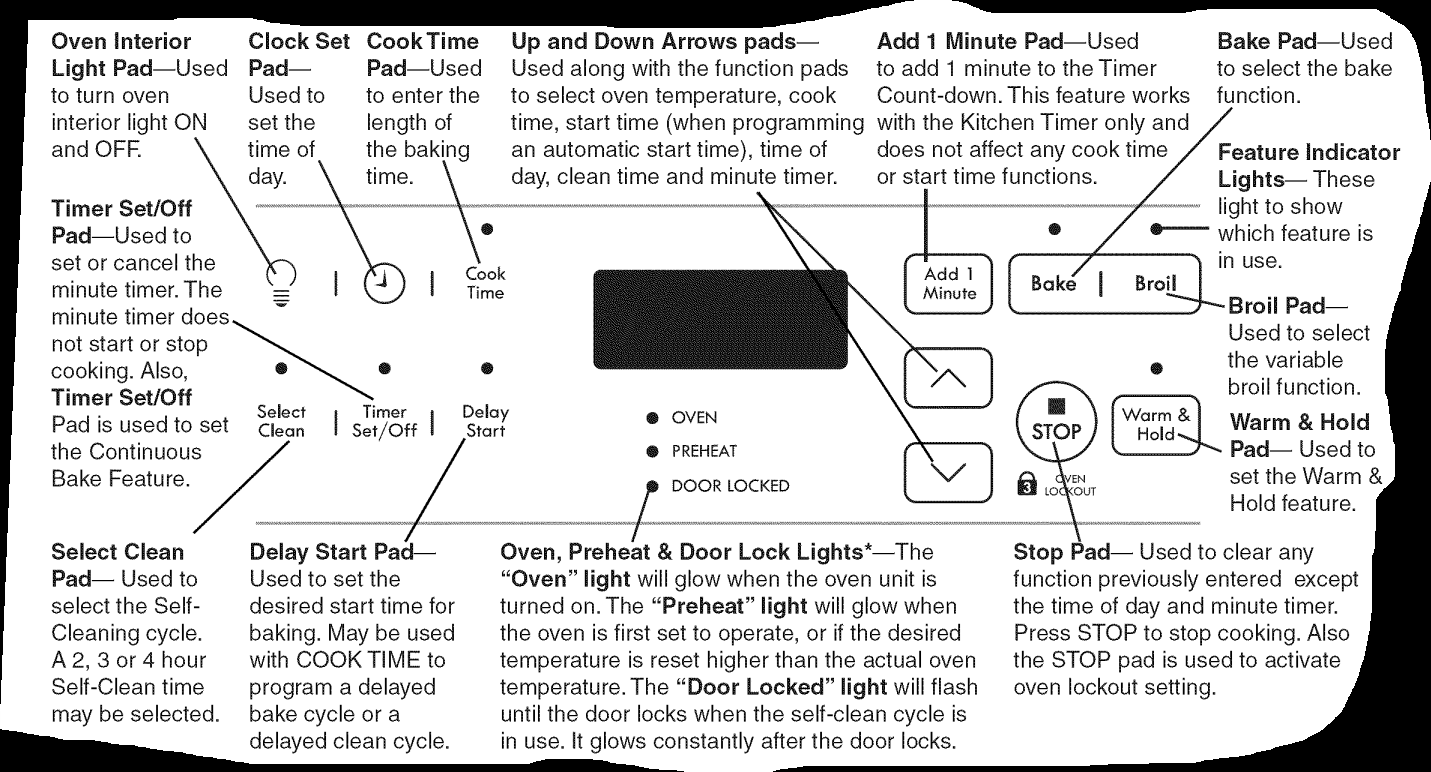
For a silent control panel
When choosing a function, a beep will be heard each time a pad is pressed. If desired, the control can be programmed for silent operation.
- To tell if your oven is set for normal or silent operation press and hold
 for 7 seconds. "= =" or "SP" appears in the display.
 - Within 5 seconds, press the
 or
or  pad to switch between normal sound operation and silent operation mode. The display will show either "= =" or "SP".
 - Wait 5 seconds to return to normal operating mode.
If "SP" appears, the control will operate with normal sounds and beeps. If "- -" appears, the control is in the silent operation mode.
Temperature Conversion (Fahrenheit / Celsius)
The electronic oven control is set to operate in °F (Fahrenheit) when shipped from the factory. The oven can be programmed for any temperature from 170°F to 550°F (77°C to 288°C).
To change the temperature to °C (Celsius) or from °C to °F (control should not be in a Bake or Clean mode):
- Press and hold
 for 7 seconds until °F or °C appears in the display.
 - Press the
 or
or  pad to change °F to °C or °C to °R
 - Wait 5 seconds to accept the changes or press
 to reject the changes.
Setting the Clock
Note: The time of day must first be set in order to operate the oven.
To Set the Clock
When the range is first plugged in, or when the power supply to the appliance has been interrupted, the display will flash "12:00".
- Press
 once (do not hold pad down).
 - Within 5 seconds, press and hold the or until the correct time of day appears in the display.
- Press once to accept the new time of day. If the pad is not pressed, the timer will return automatically to the new time of day after 7 seconds.
Note: The clock cannot be changed during any timed bake, delayed time bake, self-clean cycle or delayed self-clean cycle.
Changing Between 12 or 24 Hour Time of Day Display
- Press and hold After 7 seconds, "12Hr" or "24Hr" will appear in the display and the control will beep once.
- Press or to switch between the 12 and 24 hour time of day display. The display will show either "12Hr" or "24Hr'. /--z--,
- Wait 5 seconds or press
 to return to the time of day display.
 - Reset the correct time as described in To set the Clock above. Please note that if the 24 hour time of day mode was chosen, the clock will now display time from 0:00 through 23:59 hours.
To Set the Minute Timer
- Press

- Press the to increase or to decrease the time in one minute increments. The timer can be set for any amount of time from 1 minute to 11 hours and 59 minutes.
- The display shows the timer countdown in minutes if more than 1 hour remains. When less than 1 hour remains, the display will countdown in seconds.
- When the set time has run out, the timer will beep 3 times. It will continue to beep 3 times every 8 seconds until is pressed.
Note: The indicator light located above the pad will glow while the minute timer is active.
Note: The minute timer does not start or stop cooking. It serves as an extra timer in the kitchen that will beep when the set time has run out. The minute timer can be used alone or during any of the other oven functions. When the minute timer is in use with any other mode, the minute timer will be shown in the display. To view other functions, press the function pad for that mode.
To Cancel the Minute Timer before the set time has run out: Press .
To Set Add 1 Minute Feature
The  pad is used to set the Add 1 Minute feature. When the pad is pressed, 1 minute is added to the Minute Timer feature if this feature is already active. If the Minute Timer feature is not active and the pad is pressed, the Minute Timer feature will become active and will begin counting down from 1 minute.
Setting Oven Controls
Note: The time of day must first be set in order to operate the ove n.
To Set or Change the Temperature for Baking
The oven can be programmed to bake at any temperature from 170°F to 550°F (77°C to 288°C).
To Set the Controls for Normal Baking:
- Press

 appears in the display.
 - Within 5 seconds, press the
 or
or  . The display will show "350°F (177°C). '' By pressing and holding or , the temperature can then be adjusted in 5°F increments (1°C if the control is set to display Celsius).
 - 10 seconds after the or pad is released, the oven will begin heating to the selected temperature. When the displayed temperature reaches the desired baking temperature, the preheat indicator light will turn OFR
- To cancel the baking function, press

To Change the Oven Temperature after Baking has Started: Press the or pad to increase or decrease the set temperature,
To Set Control for Continuous Bake or 12 Hour Energy Saving
The oven control has a built-in 12 Hour Energy Saving feature that will shut off the oven if the control is left on for more than 11 hours and 59 minutes. The oven can be programmed to override this feature for continuous baking.
To set control for continuous baking:
- Press and hold
 down for 7 seconds until tone is heard.
 - Within 5 seconds, press the or pad to switch between Continuous Bake and 12 Hour Energy Saving mode. The display will show either "- - hr" or "12hr". If "- - hr" appears, the oven will be set to continuous baking. If "12hr" appears, the oven is set to 12 hour energy saving mode.
- Wait 5 seconds or press
 to return to normal operating mode.
To Set Control for Oven Lockout
The control can be programmed to lock the oven door (some models) and/or lock the oven control pads (all models).
To Set Control for Oven Lockout feature:
- Press ( and hold for 3 seconds. The "Door Locked" indicator light will glow and the motor driven door lock will begin to close automatically. DO NOT open oven door while the indicator light is flashing. Allow about 15 seconds for the oven door to lock. Once the oven door is locked, "Loc" will appear in display.
- To cancel the Oven Lockout feature, press and hold for 3 seconds. The control will unlock the oven door and resume normal operation.
To Set the Timed Bake and Delay Start Features
The  and
and pads operate the features that will turn the oven ON and OFF at the times you select in advance. The oven can be programmed to start immediately and shut off automatically (Timed Bake) or to begin baking at a later time with a delayed start time (Delay Start). Note: During Timed Bake the preheat indicator light will glow during the preheat operation.
To Program the Oven to Begin Baking Immediately and To Shut Off Automatically (Timed Bake):
- Be sure that the clock shows the correct time of day.
- Place the food in the oven.
- Press

 appears in the display.
 - Within 5 seconds, press the or . The display will show "350°F (177°C) ''. By holding the A or V the temperature can then be adjusted in 5°F increments (1° if the control is set to display Celsius).
- Wait a few seconds for the control to accept the temperature.
- Press
 "0:00" will flash in the display (MIN:SEC) and (HR:MIN) if programmed for more than 60 minutes.
 - Press the or pad until the desired baking time appears in the display.
- The oven will turn ON and begin heating.
Note: When the control is set for this function the oven temperature will be displayed. To see the cook time remaining press and to see the time of day press  .
.
Setting Oven Controls
Oven Baking
For best cooking results, heat the oven before baking cookies, breads, cakes, pies or pastries, etc. There Jsno need to preheat the oven for roasting meat or baking casseroles.
The cooking times and temperatures needed to bake a product may vary slightly from your previously owned appliance.
Baking Problems and Solutions chart | ||
Baking Problems | Causes | Corrections |
Cookies and biscuits burn on the bottom. 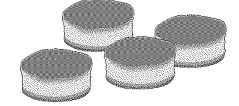 |
|
|
Cakes too dark on top or bottom.  |
|
|
Cakes not done in the center. 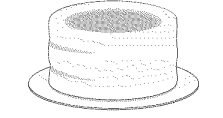 |
|
|
Cakes not level.  |
|
|
Foods not done when cooking time iS Up  |
|
|
Broil
Broiling is a method of cooking tender cuts of meat by direct heat under the broil element of the oven. Be sure you center the broiler pan directly under the broil element for best results.
Arrange oven rack while oven is still cool. Position the rack as needed.
WARNING: Should an oven fire occur, close the oven door and turn off the oven. If the fire continues, throw baking soda on the fire or use a fire extinguisher. DO NOT put water or flour on the fire. Flour may be explosive and water can cause a grease fire to spread and cause personal injury.
To set for broiling:
- Arrange oven rack while oven is still cool.
- Press
 "- -" will appear in the display.
 - Press the
 or
or  pad until the desired broil setting level appears in the display. Press the pad for HI broil or the pad for LO broil. Most foods may be broiled at the HI broil setting. Select the LO broil setting to avoid excess browning or drying of foods that should be cooked to the well-done stage.
 - Place the insert on broiler pan, then place the food on the insert. DO NOT use the pan without the insert or cover the insert with aluminum foil. The exposed grease could ignite.
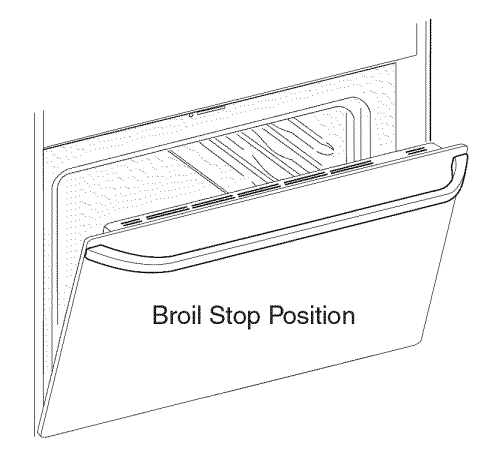
- Place the pan on the oven rack. Open the oven door to the broil stop position when broiling.
- Broil on one side until food is browned. Turn and broil food on 2nd side.
- Note: Always pull the rack out to the stop position before turning or removing food.
- When broiling is finished, press

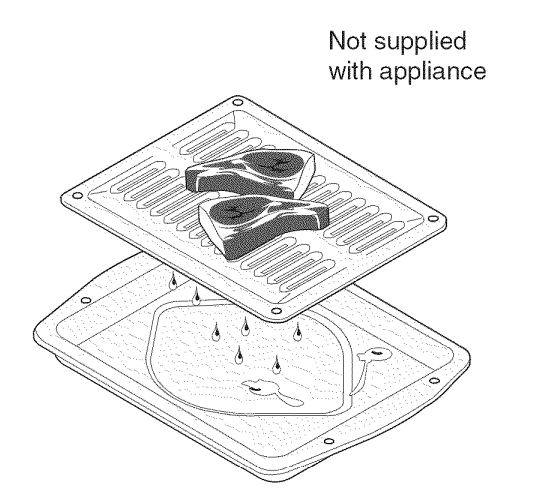
Note: The broiler pan and the insert are available by mail order.
Note: Broiler pan and its insert allow dripping grease to drain and be kept away from the high heat of the broiler. DO NOT use the pan without its insert. DO NOT cover the insert with foil. The exposed grease could ignite.
Preheating
Preheating is suggested when searing rare steaks. (Remove all utensils from the oven before preheating. Foods will stick if placed on hot metal.) To preheat, set the control(s) to BROIL as instructed in the Owner's Guide. Wait for the element to become red-hot, usually about 2 minutes. Preheating is not necessary when broiling meats well-done.
To Broil
Broil on side until the food is browned; turn and cook on the second side. Season and serve. Always pull rack out to the "stop" position before turning or removing food.
Determine Broiling Times
Broiling times vary, so watch the food closely. Time not only depends on the distance from element, but on the thickness and aging of meat, fat content and doneness preferred. The first side usually requires a few minutes longer than second. Frozen meats also require additional time.
Broiler Pan and Insert Clean-Up Tips (not supplied with appliance):
To make cleaning easier, line the bottom of the broiler pan with aluminum foil. DO NOT cover the broiler grid with foil. To prevent grease from baking on, remove the broiler pan from the oven as soon as cooking is completed. Use hot pads because the broiler pan is extremely hot. Pour off grease. Soak the pan in HOT, soapy water. Clean the broiler pan as soon as possible after each use. If necessary, use soap-filled steel wool pads. Heavy scouring may scratch the grid.
Setting the Warm & Hold TM Feature
The  pad turns ON the Serve Warm & Hold feature and will maintain an oven temperature of 170°F (77°C). The Warm & Hold feature will keep oven baked foods warm for serving up to 3 hours after cooking has finished. After 3 hours the Warm & Hold feature will shut the oven OFF automatically. The Warm & Hold feature may be used without any other cooking operations or can be set to turn ON automatically after cooking has finished using TIMED BAKE or DELAY TIMED BAKE.
To set Warm & Hold:
- Arrange interior oven racks and place baked food in oven. If the food is already in the oven go to step 2.
- Press
 "- -" will appear in the display and the Warm & Hold indicator light above the pad will turn ON. Note: If no further pads are touched within 25 seconds the request to turn ON Warm & Hold will be cleared.
 - Press or to start.
- To turn Warm & Hold OFF at any time press
 . The Warm & Hold indicator light above the pad will turn OFF.
To set Warm & Hold to turn ON automatically:
- Arrange interior oven racks and place food in oven. Set the oven properly for Timed Bake or DelayTimed Bake.
- Press
 "- -" will appear in the display and the Warm & Hold indicator light above the pad will turn ON.
 - Press or to start. Warm & Hold is set to turn ON automatically after Timed Bake or Delayed Start Bake has finished.
- To turn Warm & Hold OFF at any time press . The Warm & Hold indicator light above the pad will turn OFF.
To Operate the Oven Light(s)
The interior oven light(s) will automatically turn ON when the oven door is opened. ©\
Press  to turn the interior light(s) ON and OFF whenever the door is closed.
The interior oven light(s) is (are) located at the upper left (and right, some models) rear wall of the oven interior and is covered with a glass shield held by a wire holder. The glass shield must be in place whenever the oven is in use. To change the interior oven light(s), see changing the Oven Light in the General Care & Cleaning section.
Self-Cleaning
CAUTION: During the self=cleaning cy= cle, the outside of the oven can become very hot to the touch. DO NOT leave small children unattended near the appliance.
CAUTION: The health of some birds is extremely sensitive to the fumes given off during the self-clean cycle of any wall oven. Move birds to another well ventilated room.
CAUTION: DO NOT line the oven walls, racks, bottom or any other part of the appliance with aluminum foil. Doing so will destroy heat distribution, produce poor baking results and cause permanent damage to the interior (aluminum foil will melt to the interior surface of the oven).
CAUTION: DO NOT force the oven door open. This can damage the automatic door locking system. Use caution when opening the door after the Self-Cleaning cycle is completed. The oven may still be VERY HOT.
Note: See additional cleaning information for the oven door in the General Care & Cleaning section.
Self-Cleaning Oven
A Self-Cleaning oven cleans itself with high temperatures (well above cooking temperatures) which eliminate soils completely or reduces them to a fine powdered ash you can wipe away with a damp cloth.
Adhere to the following cleaning precautions:
- Allowthe oven to cool before cleaning.
- Wear rubber gloves when cleaning any exterior parts of the oven manually.
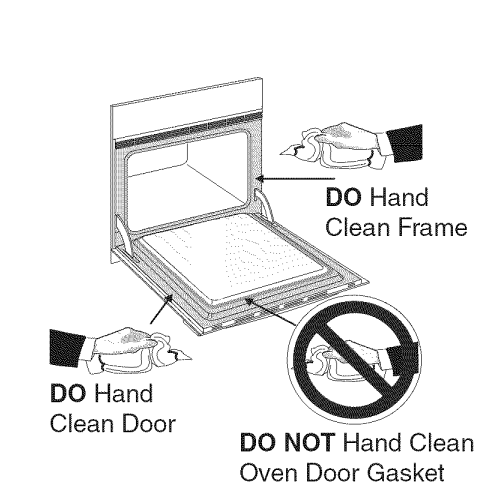
- DO NOT clean the oven door gasket. The woven material of the oven door gasket is essential for a good seal. Care should be taken not to rub, damage or remove the gasket.
- DO NOT use any cleaning materials on the oven door gasket. Doing so could cause damage.
- Remove all utensils and any aluminum foil from the oven. These items cannot withstand high cleaning temperatures
- Oven racks do not have to be removed, but remaining in the oven during the Self-Clean cycle will turn them slightly blue and dull their finish. This oven comes with lubricated porcelain oven racks. Do not clean this vegetable oil lubrication off the racks. It is important that the sides of the oven racks always have a light coating of vegetable oil. To maintain optimal rack performance, re-apply a thin layer of vegetable oil to the sides of the rack after every self-clean cycle or when the rack becomes difficult to slide.
- Remove any excessive spillovers in the oven cavity before starting the Self-Cleaning cycle. To clean, use hot, soapy water and a cloth. Large spillovers can cause heavy smoke or fire when subjected to high temperatures. DO NOT allow food spills with a high sugar or acid content (such as milk, tomatoes, sauerkraut, fruit juices or pie filling) to remain on the surface as they may leave a dull spot even after cleaning.
- Clean any soil from the oven frame, the door liner outside the oven door gasket and the small area at the front center of the oven bottom. These areas heat sufficiently to burn soil on. Clean with soap and water. DO NOT hand clean the oven door gasket.
NOTE: Prior to setting the Self-Clean cycle, any spills remaining on the oven bottom should be removed.
CAUTION: The oven bake and broil elements may appear to have cooled after they have been turned OFR The elements may still be hot and burns may occur if these elements are touched before they have cooled sufficiently.
What to Expect during Cleaning:
While the oven is in operation, the oven heats to temperatures much higher than those used in normal cooking. Sounds of metal expansion and contraction are normal. Odor is also normal as the food soil is being removed. Smoke may appear through the oven vent.
If heavy spillovers are not wiped up before cleaning, they may flame and cause more smoke and odor than usual. This is normal and safe and should not cause alarm. If available, use an exhaust fan during the self-cleaning cycle.
Self-Clean Cycle time length
For satisfactory results, use a 2 hour Self-Clean cycle for light soils and a 3 hour cycle for average or a 4 hour cycle for heavy soils.
NOTE: The kitchen area should be well ventilated using an open window, ventilation fan or exhaust hood during the Self-Clean cycle. This will help eliminate the normal odors associated with the Self-Clean cycle.
CAUTION: To avoid possible burns use care when opening the oven door after the Self-Cleaning cycle. Stand to the side of the oven when opening the door to allow hot air or steam to escape.
To Set the Controls for a Self-Clean Cycle or a Delayed Start Self-Clean Cycle:
(Note: If you do not want to set a Delayed Self-Clean Cycle, skips steps 2 & 3.)
- Be sure the clock shows the correct time of day.
- Press

- Press and hold the
 pad to scroll to the time to start the delayed Self-Clean cycle. Release the pad when the desired time is displayed.
 - Press
 “--” appears tn the dl,splay.
 - Press the or
 once. "3:00 appears in the display for a 3 hour cycle. To change to a 2 hour cycle press . "2:00" appears in the display or to select a 4 hour cycle press . "4:00" appears in the display. As soon as the controls are set, the motor driven lock will begin to close automatically and the "Door Locked" indicator light will flash. DO NOT open the oven door while the light is flashing (it takes about 15 seconds for the oven door to lock).
 - "CLn" will appear in the display during the Self-Clean cycle and the "Door Locked" light will glow until the Self-Cleaning cycle is complete or cancelled and the oven temperature has cooled.
CAUTION: DO NOT force the oven door open. This can damage the automatic door locking system. Use caution and avoid possible burns when opening the door after the Self-Cleaning cycle has completed. The oven may still be VERY HOT.
When the Self-Clean Cycle is Completed:
- The time of day or "End" will appear in the display window and the "Clean" and "Door Lock" light will continue to glow.
- Once the oven has cooled down for about 1 HOUR and the "Door Lock" light has gone out, the oven door can be opened.
- If "End" is in the display and the Select Clean indicator light remains ON, press
 . The time of day will appear in the display.
NOTE: When the oven is cool, wipe away any residue or powdered ash with a damp cloth or paper towel.
General Care & Cleaning
Cleaning Various Parts of Your Oven
Before cleaning any part of the oven, be sure all controls are turned OFF and the oven is COOL. REMOVE SPILLOVERS AND HEAVY SOILING AS SOON AS POSSIBLE. REGULAR CLEANINGS NOW WILL REDUCE THE EXTENT AND DIFFICULTY OF MAJOR CLEANING LATER.
Surfaces | How to clean |
| Aluminum (Trim Pieces) & Vinyl | Use hot, soapy water and a cloth. Dry with a clean cloth. Do not scour or use allpurpose cleaners, ammonia, powdered cleaners or commercial oven cleaner. They can scratch and discolor aluminum. |
| Painted and Plastic Control Panel, Body Parts, and Decorative Trim | For general cleaning, use hot, soapy water and a cloth. For more difficult soils and built-up grease, apply a liquid detergent directly onto the soi!. Leave on soil for 30 to 60 minutes. Rinse with a damp cloth and dry. DO NOT use abrasive cleaners on any of these materials; they can scratch. |
| Stainless Steel, Chrome Control Panel, Decorative trim | Before cleaning the controlpanel, turn all controls to OFE Clean using hot, soapy water and a dishcloth. Rinse with a clean water using a dishcloth. Be sure to squeeze excess water from the cloth before wiping the panel; especially when wiping around the controls. Excess water in or around the controls may cause damage to the appliance. Clean stainless steel with hot, soapy water and a dishcloth. Rinse with clean water and a cloth. Do not use cleaners with high concentrations of chlorides or chlorines. Do not use harsh scrubbing cleaners. Only use kitchen cleaners that are especially made for cleaning stainless steel. Always be sure to rinse the cleaners from the surface as bluish stains may occur during heating that cannot be removed. |
| Porcelain Enamel Broiler Pan and insert (some models), Door Liner, Body Parts | Gentle scouring with a soapy scouring pad will remove most spots. Rinse with a 11 solution of clear water and ammonia. If necessary, cover difficult spots with an ammonia-soaked paper towel for 30 to 40 minutes. Rinse with clean water and a damp cloth, and then scrub with a soap-filled scouring pad. Rinse and wipe dry with a clean cloth. Remove all cleaners or the porcelain may become damaged during future heating. DO NOT use spray oven cleaners on the cooktop. |
Oven Racks  | This oven comes with lubricated porcelain oven racks, which can remain in the oven during the self-clean cycle. Do not clean this vegetable oil lubrication off the racks. It is important that the sides of the oven racks always have a light coating of vegetable oil. To maintain optimal rack performance, re-apply a thin layer of vegetable oil to the sides of the rack after every self-clean cycle or when the rack becomes difficult to slide. |
Oven Door 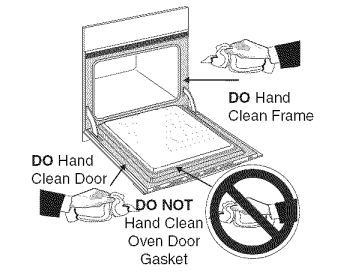 | Use soap & water to thoroughly clean the top, sides and front of the oven door. Rinse well. You may use a glass cleaner on the outside glass of the oven door. DO NOT immerse the door in water. DO NOT spray or allow water or the glass cleaner to enter the door vents. DO NOT use oven cleaners, cleaning powders or any harsh abrasive cleaning materials on the outside of the oven door. DO NOT clean the oven door gasket. The oven door gasket is made of a woven material, on Self-Cleaning models, which is essential for a good seal. Care should ii be taken not to rub, damage or remove this gasket. |
Cleaning the Porcelain Enamel Oven (Manual Clean Oven Only)
Porcelain has a smooth finish and is a type of glass fused to metal. Oven cleaners can be used on all interior oven surfaces.
Adhere to the following cleaning precautions:
- Allow' the oven to cool before cleaning.
- Wear rubber gloves when cleaning the appliance manually
General Cleaning
Remove soils using hot, soapy water. Do not allow food spills with a high sugar or acid content (such as milk, tomatoes, saukerkraut, fruit juices or pie filling) to remain on the surface as they may cause a dull spot even after cleaning.
To Remove Heavy Soil
- Allow a dish of ammonia to sit in the oven overnight or for several hours with the oven door closed. Clean softened spots using hot, soapy water. Rinse well with water and a clean cloth.
- If soil remains, use a soap-filled scouring pad or a nonabrasive cleaner. If necessary, use an oven cleaner following manufacturer's instructions.
CAUTION: DO NOT mix ammonia with other cleaners.
Adhere to the following precautions when using oven cleaners:
- DO NOT spray on the electrical controls or switches because it could cause a short circuit and result in sparking or fire.
- DO NOT allow a film from the cleaner to build up on the temperature sensing bulb; it could cause the oven to heat improperly (The bulb is located in the rear of the oven). Carefully wipe the bulb clean after each oven cleaning, being careful not to move the bulb. A change in its position could affect how the oven bakes. Avoid bending the bulb and capillary tube.
- DO NOT spray any cleaner on the oven door trim or gasket, handles or any exterior surfaces of the appliance, wood or painted surfaces. The cleaner can damage these surfaces.
To Clean the Oven Bottom
Clean using hot, soapy water, a mild abrasive cleanser, a soap-filled abrasive pad or oven cleaner following manufacturer's instructions.
CAUTION: Ammonia must be rinsed from all surfaces before operating the oven. Provide adequate ventilation.
CAUTION: DO NOT line the oven walls, bottom, racks or any other part of the appliance with aluminum foil. Doing so will destroy heat distribution, produce poor baking results and cause permanent damage to the oven interior (aluminum foil will melt to the interior surface of the oven).
Care and Cleaning of Stainless Steel (somemodels)
Some models are equipped with stainless steel exterior parts. Special care and cleaning are required for maintaining the appearance of stainless steel parts. Please refer to the table provided at beginning of the Care & Cleaning section in this Use & Care Manual.
Removing and Replacing the Lift-Off Oven Door
CAUTION: The door is heavy. For safe, temporary storage, lay the door flat with the inside of the door facing down.
To Remove Oven Door:
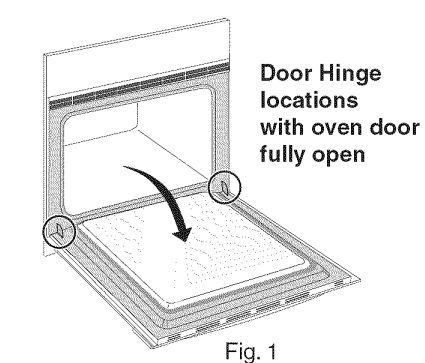
- Open oven door completely (horizontal with floor- See Fig. 1).
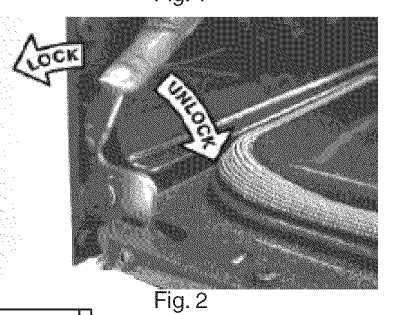
2. Pull the door hinge locks on both left and right door hinges down from the oven frame completely towards the oven door (See Fig. 2). A tool such as a small flat-blade screwdriver may be required.
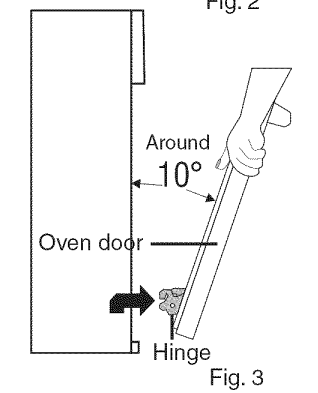
3. Firmly grasp both sides of oven door along the door sides (Do not use the oven door handle- See Fig. 3).
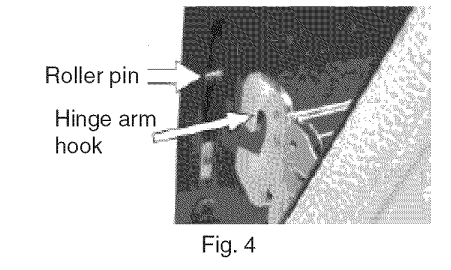
4. Close the door to the broil stop position (the oven door will stop into this position just before fully closing).
5. With the oven door in the broil stop position, lift the oven door hinge arms over the roller pins located on each side of the oven frame (See Fig. 4).
Changing the Oven Light
On some models an interior oven light will turn automatically when the oven door is opened. The oven light may be turned on when the door is closed © by pushing  located on the control panel. On some models, the lamp is covered with a glass shield held in place by a wire holder. THE GLASS SHIELD MUST BE IN PLACE WHENEVER THE OVEN IS IN USE.
To replace the light bulb:
CAUTION: BE SURETHE OVEN IS COOL.
- Turn the power off at the main source.
- Wear a leather-faced glove for protection against possible broken glass.
- Replace bulb with 40-watt appliance bulb only.
- For models with glass shield, press holder on one side to release glass shield, change bulb and be sure to replace the glass shield.
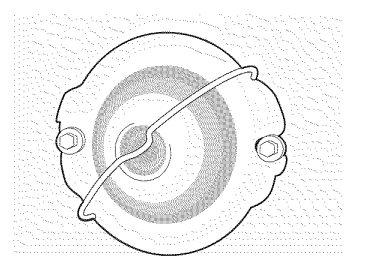
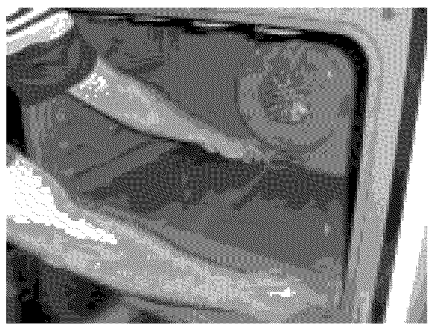
To Remove the "Hidden Bake" Cover (some models)
- In order to remove the "hidden bake" cover, pull the back edge with one hand about 1/2 inch and lift up the "hidden bake" cover with both hands (See picture)
- When reinstalling the "hidden bake" cover, be sure to put it all the way to the back of the oven and lay it down on the 2 shoulder screws. Then push the front edge of the cover in its place below the front bracket.
To have easier access to the "hidden bake" cover, you can remove the oven door by following the instructions on previous page.
IMPORTANT: Always replace the "hidden bake" cover before the next use
Adjusting the Oven Temperature
Your oven thermostat has been precisely set at the factory. This setting may differ from your previous oven, however, so your recipe times may not give you the results you expect. If you think that the oven is cooking too hot or cool for your recipe times, you can adjust the thermostat so that the oven cooks hotter or cooler than the temperature displayed.
To Adjust Oven Temperature:
Adjust Oven Temperature:
- Press and hold
 pad for 8 seconds. The display now indicates the amount of degrees offset between the original factory temperature setting and the current temperature setting. If the oven control has the original factory calibration, the display will read "0".
 - The temperature can now be adjusted up or down 35°F or 19°C, in I°F or 1°C steps by pushing and holding the
 or
or  . Adjust until the desired amount of degrees offset appears in the display. When lowering the oven temperature, a minus sign (-) will appear before the number to indicate that the oven will be cooler by the displayed amount of degrees.
 - When you have made the desired adjustment, wait 5 seconds and the timer will go back to the time of day display
Note: Oven temperature adjustment made will not change the Self-Cleaning feature temperature.
Troubleshooting
Occurrence | Possible Cause/Solution |
| Oven Control Beeps and Displays any F code error (example F11). | Electronic control has detected a fault condition. Press STOP to clear the display and stop the beeping. Reprogram the oven. If a fault reoccurs, record the fault number. Press STOP and call Sears or another qualified servicer. |
| Faulty Installation. |
|
| Oven light does not work. | Burned-out or loose bulb. Follow the instructions under Changing Oven Light to replace or tighten the bulb. |
| Fan noise during cooking operation. | A cooling fan may automatically turn on and off to cool internal parts. This is normal, and the fan may continue to run even after oven is turned off. |
| Entire oven does not operate. |
|
| Oven smokes excessively during broiling |
|
| Poor baking results. | Many factors affect baking results. See Baking for hints, causes and corrections. See Adjusting Oven Temperature. |
| Self-cleaning cycle does not work. |
|
| Soil not completely removed after self-cleaning cycle is completed. |
|
| Flames inside oven or smoke from vent. | Excessive spillovers in oven. This is normal, especially for high oven emperatures, pie spillovers or for large amounts of grease on bottom of oven. Wipe up excessive spillovers. |