Note: Depending on the appliance model, individual details and colours may differ.
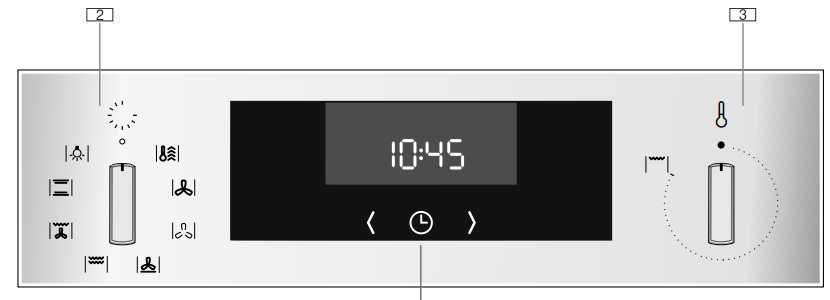
1Buttons and display
The buttons are touch keys with sensors underneath. Simply touch a symbol to select the function. The display shows symbols for active functions and the time-setting options.
2 Function selector
Use the function selector to set the heating function or other functions. You can turn the function selector clockwise or anti-clockwise from the "Off" position.
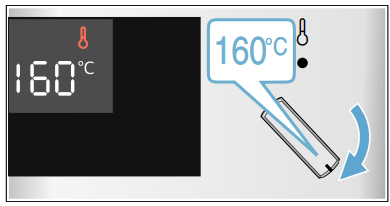
3 Temperature selector
Use the temperature selector to set the temperature for the heating function or select the setting for other functions. You can only turn the temperature selector clockwise from the "Off" position, until it offers resistance. Do not turn the selector beyond this point.
Buttons and display
You can use the buttons to set various additional functions on your appliance. You will be able to see the values for these on the display.
Display
The value that can be set immediately or that is elapsing is shown in large digits in the display. To use the individual time-setting options, tap the v button several times. If there is a red bar above or below a symbol, this means that the value being shown in large digits on the display refers to the function that this symbol represents.
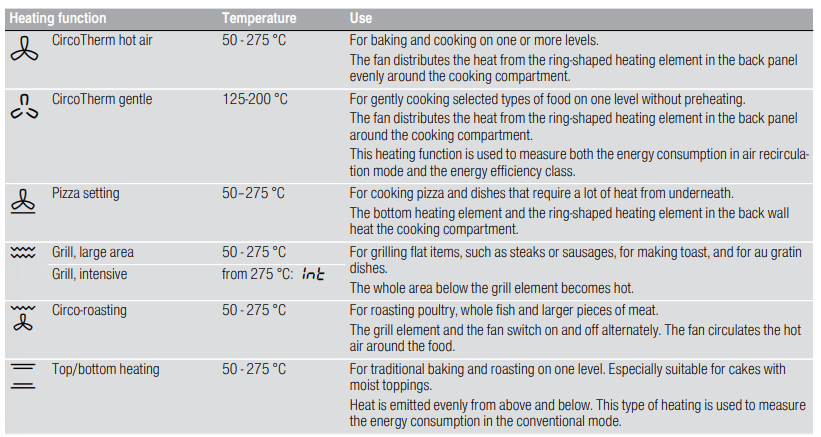
Types of heating and functions
Use the function selector to set the types of heating and other functions.
To make sure you always use the right type of heating to cook your food, we have explained the differences and applications below.
Other functions
Your new oven has yet more functions; see below for a brief description of these.
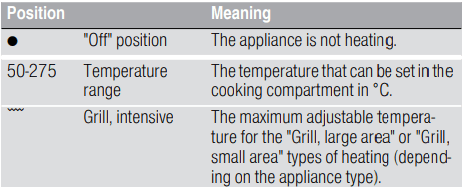
Temperature
Use the temperature selector to set the temperature in the cooking compartment. It can also be used to select the grill and cleaning settings, for example. The settings will appear on the display.
Cooking compartment
Various functions in the cooking compartment make your appliance easier to use. For example, the cooking compartment is well lit and a cooling fan prevents the appliance from overheating.
Opening the appliance door
If you open the appliance door when the appliance is in operation, the appliance will continue to operate as before. Interior lighting With most heating functions and other functions, the interior lighting in the cooking compartment will remain lit while the oven is in operation. When the function selector is turned to bring operation to an end, the lighting will go out. By turning the function selector to the interior lighting setting, you can switch on the lighting without heating the oven. This makes it easier to clean your appliance, for example.
Cooling fan
The cooling fan switches on and off as required. The hot air escapes above the door.
Caution! Do not cover the ventilation slots. Otherwise, the appliance may overheat. So that the cooking compartment cools down more quickly after operation, the cooling fan continues to run for a certain period afterwards.
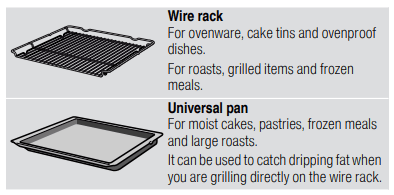
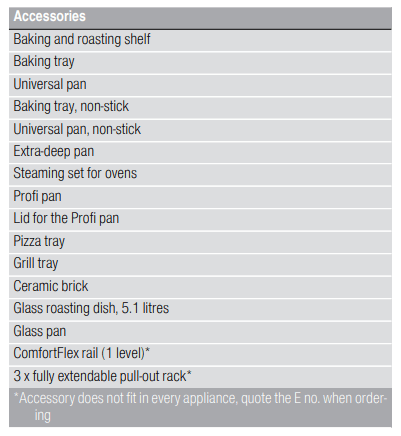
Accessories
Control accessories
Only use original accessories. They are specially adapted for your appliance. You can buy accessories from the after-sales service, from specialist retailers or online.
Note: The accessories may deform when they become hot. This does not affect their function. Once they have cooled down again, they regain their original shape.
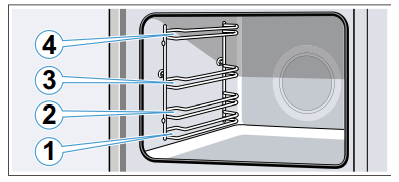
Inserting accessories
The cooking compartment has four shelf positions. The shelf positions are counted from the bottom up.
Always insert accessories between the two guide rods for the shelf position. Accessories can be pulled out approximately halfway without tipping.
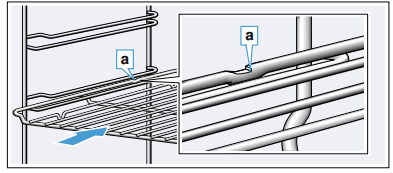
Locking function
The accessories can be pulled out approximately halfway until they lock in place. The locking function prevents the accessories from tilting when they are pulled out. The accessories must be inserted into the cooking compartment correctly for the tilt protection to work properly.
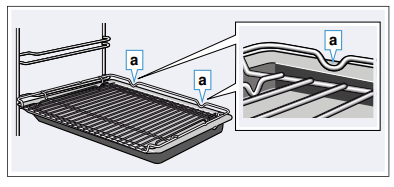
When inserting the wire rack, ensure that lug a ‚ is at the rear and is facing downwards. The open side must be facing the appliance door and the outer rail must be facing downwards .
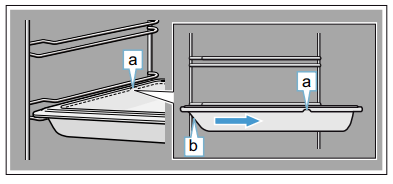
When inserting baking trays, make sure that the recess a ‚ is at the rear and is facing downwards. The sloping edge of the accessory b must be facing towards the appliance door. Example in the picture: Universal pan
Combining accessories
You can insert the wire rack and the universal pan at the same time to catch drops of liquid. When inserting the wire rack, ensure that both spacers a ‚ are at the rear edge. When inserting the universal pan, the wire rack is on top of the upper guide rod of the shelf position.
Example in the picture: Universal pan
Optional accessories
Before using for the first time
Initial use
As soon as the appliance is connected to the power supply, flashes in the display.
Setting the time
Use the < or > buttons to set the current time. After a few seconds, the time that has been set is adopted.
Changing the time
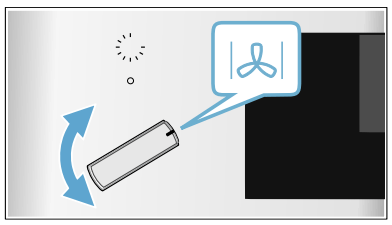
1. Press the button repeatedly until the symbol lights up.
2. Use the < or > button to change the time. After a few seconds, the time that has been set is adopted.
Cleaning the cooking compartment
To eliminate the new-appliance smell, heat up the cooking compartment without anything in it and with the oven door closed.
1. Remove the accessories from the cooking compartment.
2. Remove any leftover packaging, such as polystyrene pellets, from the cooking compartment.
3. Before heating the appliance, wipe the smooth surfaces in the cooking compartment with a soft, damp cloth.
4. Set the specified type of heating and temperature.
5. Keep the kitchen ventilated while the appliance is heating.
6. Switch off the appliance once the specified time has elapsed.
7. Wait for the cooking compartment to cool down.
8. Clean the smooth surfaces with soapy water and a dish cloth.
Cleaning the accessories
Clean the accessories thoroughly using soapy water and a dish cloth or soft brush.
Operating the appliance
Switching the appliance on and off
Use the function selector to switch the appliance on or off. Turning the function selector to any position other than the "Off" position switches on the appliance. To switch off the appliance, always turn the function selector to the "Off" position.
Setting the heating function and temperature
1. Use the function selector to set the heating function.
2. Use the temperature selector to set the temperature or grill setting.
The appliance will start to heat after a few seconds
Notes
If appears on the display, the temperature is too high for the selected heating function. The appliance is not heating.Set a lower temperature.
If flashes on the display, the temperature in the cooking compartment is too high for the selected operating mode. Switch the appliance off, wait until it has cooled down and then switch it back on again
Heating indicator
As soon as the appliance heats up, the symbol appears in the display. When you are preheating the appliance, the optimal time to place your food in the cooking compartment is when the symbol first goes out.
Note: Due to thermal inertia, the temperature that is displayed may be slightly different to the actual temperature inside the cooking compartment.
Rapid heating
With Rapid heating, you can shorten the heat-up time. Only use rapid heating when a temperature of over 100 °C has been selected. To achieve an even cooking result, do not place your food into the cooking compartment until rapid heating is complete.
Set the function selector to .
Use the temperature selector to set a temperature of above 100 °C. The oven starts to heat up after a few seconds. The symbol appears in the display.
Wait until a signal sounds and the symbol goes out. The rapid heating has ended.
Place the meal in the cooking compartment.
Set the type of heating.
Time-setting options
Your appliance has different time-setting options
An audible signal sounds once the cooking time or timer duration has elapsed. You can cancel the audible signal early by pressing the button.
Setting the timer
The timer can be set when the appliance is switched on or off. It has its own audible signal so that you can tell whether it is the timer duration or a cooking time that has elapsed.
Tip: If the set timer duration is the duration for which you want to cook your food, use the cooking time. The appliance then switches off automatically.
1. Press the button repeatedly until the symbol is selected.
2. Use the < and > buttons to set the timer duration.
– Default value for the < button = 5 minutes
– Default value for the > button = 10 minutes
The setting is applied automatically. The timer duration starts to count down after a few seconds.
Setting the cooking time
Once the set cooking time has elapsed, the appliance switches off automatically. The function can only be used in combination with a type of heating.
1. Set the type of heating and temperature.
2. Press the button repeatedly until the x symbol is selected.
3. Use the < and > buttons to set the cooking time.
– Default value for the < button = 10 minutes
– Default value for the > button = 30 minutes The setting is applied automatically. The appliance starts heating after a few seconds. The duration counts down in the display.
Once the cooking time has elapsed, an audible signal sounds and the appliance brings the operating mode to an end automatically. To switch off, turn the function selector back to the "Off" position.
Setting the end time
You can delay the time at which cooking is due to finish. You can, for example, put your food in the cooking compartment in the morning and set the cooking time so that it is ready at lunch time.
Notes: Ensure that food is not left in the cooking compartment for too long as it may spoil. Do not adjust the end time once the appliance is already in operation. Otherwise the cooking result would no longer be satisfactory.
1. Place the food onto the appropriate accessory in the cooking compartment and close the appliance door.
2. Set the type of heating and temperature.
3. Press the button repeatedly until the symbol is selected.
4. Use the < and > buttons to set the cooking time.
5. Press the button repeatedly until the symbol is selected.
6. Use the < and > buttons to set the end time. The appliance applies the settings after a few seconds. The end time is shown in the display. Once the appliance starts, the time begins counting down.
As soon as the end time has been reached, an audible signal sounds and the appliance ends the operation automatically. To switch off, turn the function selector back to the "Off" position.
Setting the time
You can only change the time when no other timesetting option is active and the function selector is at the "Off" position.
1. Press the button repeatedly until the symbol is selected.
2. Use the < or > button to change the time. The appliance applies the time after a few seconds.
Note: You can go to the basic settings to specify whether or not the time should be shown in the display.
Checking, changing or deleting settings
1. Press the button repeatedly until the appropriate symbol is selected.
2. If required, use the < or > button to change the setting. To delete a time-setting option, set The setting is applied automatically
Childproof lock
Automatic childproof lock
The control panel is locked so that the appliance cannot be switched on. To switch it on, the automatic childproof lock must be interrupted. After the appliance operation, the control panel is locked automatically.
To set or interrupt the automatic childproof lock, the function selector must be in the "Off" position.
Ensure that the childproof lock function is set in the basic settings. To do this, set .
1. Press and hold the button for approx. four seconds.
‚ appears in the display.
2. Use the button to change the setting if necessary.
= Child-proof lock deactivated
= Childproof lock activated
3. To confirm, press and hold the button again for approx. four seconds. The basic setting is applied.
Canceling
1. Press and hold the button until the symbol goes out in the display.
2. Set the type of heating and temperature.
Basic settings
List of basic settings
Depending on the features of your appliance, not all basic settings will be available.
Changing the basic settings
The function selector must be set to the "Off" position.
1. Press and hold the button for approx. four seconds. The first basic setting appears in the display, e.g
2. Use the < or > button to change the setting if necessary.
3. Confirm by pressing the button. The next basic setting appears in the display
4. Use the button to continue going through all of the basic settings as described above and to change the settings if necessary using the < or > button.
5. To confirm, press and hold the button again for approx. four seconds.
All basic settings have now been applied.
You can change the basic settings again at any time.
Cleaning agent
Suitable cleaning agents
To ensure that the different surfaces are not damaged by using the wrong cleaning agent, observe the information in the table. Depending on the appliance model, not all of the areas listed may be on/in your appliance.
Caution! Risk of surface damage
Do not use:
Harsh or abrasive cleaning agents,
Cleaning agents with a high alcohol content,
Hard scouring pads or cleaning sponges,
High-pressure cleaners or steam cleaners,
Special cleaners for cleaning the appliance while it is hot.
Wash new sponge cloths thoroughly before use.
Tip: Highly recommended cleaning and care products can be purchased through the after-sales service. Observe the respective manufacturer's instructions.
Warning – Risk of burns! The appliance becomes very hot. Never touch the interior surfaces of the cooking compartment or the heating elements. Always allow the appliance to cool down. Keep children at a safe distance.
Area
Cleaning
Appliance exterior
Stainless steel front
Hot soapy water:
Clean with a dish cloth and then dry with a soft cloth.
Remove flecks of limescale, grease, starch and albumin (e.g. egg white) immediately. Corrosion can form under such flecks.
Special stainless steel cleaning products suitable for hot surfaces are available from our after-sales service or from specialist retailers. Apply a very thin layer of the cleaning product with a soft cloth.
Plastic
Hot soapy water:
Clean with a dish cloth and then dry with a soft cloth.
Do not use glass cleaner or a glass scraper.
Painted surfaces
Hot soapy water:
Clean with a dish cloth and then dry with a soft cloth.
Control panel
Hot soapy water:
Clean with a dish cloth and then dry with a soft cloth.
Do not use glass cleaner or a glass scraper
Door panels
Hot soapy water:
Clean with a dish cloth and then dry with a soft cloth.
Do not use a glass scraper or a stainless steel scouring pad.
Door handle
Hot soapy water:
Clean with a dish cloth and then dry with a soft cloth.
If descaler comes into contact with the door handle, wipe it off immediately. Otherwise, any stains will not be able to be removed.
Appliance interior
Enamel surfaces and self-cleaning surfaces
Observe the instructions for the surfaces of the cooking compartment that follow the table.
Glass cover for the interior lighting
Hot soapy water:
Clean with a dish cloth and then dry with a soft cloth.
If the cooking compartment is heavily soiled, use oven cleaner
Door seal
Do not remove.
Hot soapy water:
Clean with a dishcloth.
Do not scour.
Check the position of the door seal after cleaning it. → "After cleaning"
Door cover
made from stainless steel: Use stainless steel cleaner. Follow the manufacturers' instructions. Do not use stainless steel care products.
made from plastic: Clean using hot soapy water and a dish cloth. Dry with a soft cloth. Do not use glass cleaner or a glass scraper. Remove the door cover for cleaning
Rails
Hot soapy water:
Soak and clean with a dish cloth or brush
Pull-out system
Hot soapy water:
Clean with a dish cloth or a brush. Do not remove the lubricant while the pull-out rails are pulled out – it is best to clean them when they are pushed in. Do not clean in the dishwasher.
Accessories
Hot soapy water:
Soak and clean with a dish cloth or brush. If there are heavy deposits of dirt, use a stainless steel scouring pad.
Notes
Slight differences in colour on the front of the appliance are caused by the use of different materials, such as glass, plastic and metal.
Shadows on the door panels, which look like streaks, are caused by reflections made by the interior lighting.
Enamel is baked on at very high temperatures.This can cause some slight colour variation. This is normal and does not affect operation. The edges of thin trays cannot be completely enamelled. As a result, these edges can be rough. This does not impair the anti-corrosion protection.
Surfaces in the cooking compartment
The back wall in the cooking compartment is selfcleaning.You can tell this from the rough surface. The base, ceiling and side panel are enamelled and have smooth surfaces.
Cleaning enamel surfaces
Clean the smooth enamel surfaces with a dish cloth and hot soapy water or a vinegar solution. Then dry them with a soft cloth. Soften baked-on food remnants with a damp cloth and soapy water. Use stainless steel wire wool or oven cleaner to remove stubborn dirt.
Caution! Never use oven cleaner in the cooking compartment when it is still warm. This may damage the enamel. Remove all food remnants from the cooking compartment and the appliance door before you next heat up the appliance. Leave the cooking compartment open to dry after cleaning it.
Note: Food residues can cause white deposits to form. These are harmless and do not affect how the appliance works. You can remove these residues using lemon juice if required.
Cleaning self-cleaning surfaces
The self-cleaning surfaces are coated with a porous, matte ceramic layer. This coating absorbs and dispels splashes from baking and roasting while the appliance is in operation.
If the self-cleaning surfaces no longer clean themselves sufficiently and dark stains appear, they can be cleaned using targeted heating.
Making settings
Remove the rails, pull-out shelves, accessories and ovenware from the cooking compartment beforehand. Thoroughly clean the smooth enamel surfaces in the cooking compartment, the inside of the appliance door and the glass cover on the interior lighting.
Set the type of heating for baking bread.
Set the maximum temperature.
Start the mode and leave it to run for at least one hour.
The ceramic coating is regenerated. When the cooking compartment has cooled down, remove the brown or white residue with water and a soft sponge.
Note: During operation, reddish spots form on the surfaces. This is not rust, but residues from food. These spots are not harmful and do not restrict the cleaning ability of the self-cleaning surfaces.
Caution! Do not use oven cleaner on the self-cleaning surfaces. This will damage the surfaces.If oven cleaner does get onto these surfaces, dab it off immediately using water and a sponge cloth. Do not rub the surface and do not use abrasive cleaning aids.
After cleaning
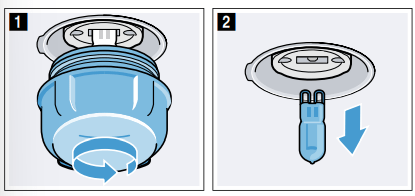
After cleaning the door seal, check whether it is sitting correctly on the left- and right-hand side. (fig. 1).
If the door seal is running over the spacer a, push the door seal inwards so that it now runs beside the spacer a (fig. 2).
Keeping the appliance clean
Always keep the appliance clean and remove dirt immediately so that stubborn deposits of dirt do not build up.
Warning – Risk of fire! Loose food remnants, fat and meat juices may catch fire. Before using the appliance, remove the worst of the food remnants from the cooking compartment, heating elements and accessories.
Tips
Clean the cooking compartment after each use. This will ensure that dirt cannot be baked on.
Always remove flecks of limescale, grease, starch and albumin (e.g. egg white) immediately
Use the universal pan for baking very moist cakes.
Use suitable ovenware for roasting, e.g. a roasting dish.
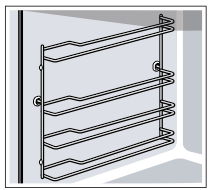
Rails
Detaching and refitting the rails
Warning – Risk of burns! The rails become very hot. Never touch the hot rails. Always allow the appliance to cool down. Keep children away from the appliance.
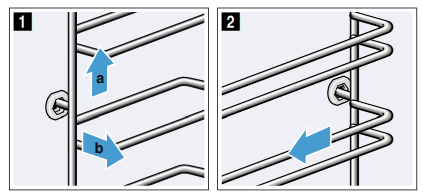
Detaching the rails
1. Lift the rail slightly at the front a and detach it b. (fig. 1)
2. Then pull the whole rail to the front and remove it. (fig. 2)
Clean the rails with cleaning agent and a sponge. For stubborn dirt deposits, use a brush.
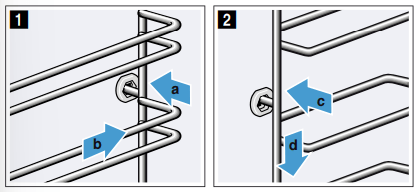
Attaching the rails
The rails only fit on the right or the left side. For both rails, ensure that the curved rods are at the front.
1. First, insert the rail in the middle of the rear socket a until the rail rests against the cooking compartment wall, and push it back b.
2. Then insert the rail into the front socket a, until the rail also rests against the cooking compartment wall here, and press it downwards b
Troubleshooting
Rectifying faults yourself
You can often easily rectify technical faults with the appliance yourself. If a dish does not turn out exactly as you wanted, you can find useful cooking tips and instructions at the end of this instruction manual.
Fault
Possible cause
Notes/remedy
The appliance is not working.
Defective circuit breaker.
Check the circuit breaker in the fuse box.
Power failure
Check whether the kitchen light or other kitchen appliances are working.
The time is flashing on the display
Power failure.
Reset the time.
No settings can be made on the appliance. The symbol lights up in the display
The childproof lock is activated.
Press and hold the button until the symbol goes out in the display. Settings can be made on the appliance. The childproof lock can be deactivated in the basic settings.
Warning – Risk of injury! Incorrect repairs are dangerous. Do not attempt to repair the appliance yourself. Repairs must only be carried out by one of our trained after-sales engineers. If the appliance is defective, call the after-sales service.
Warning – Risk of electric shock! Incorrect repairs are dangerous. Repairs may only be carried out and damaged power cables replaced by one of our trained after-sales technicians. If the appliance is defective, unplug the appliance from the mains or switch off the circuit breaker in the fuse box. Contact the after-sales service.
Error messages on the display
If an error message with appears on the display, e.g. , touch the button. This will reset the error message. Reset the time, if necessary.
If the fault was a one-off, you can continue to use your appliance as normal. If the error message appears again, call our after-sales service and quote the exact error message and the E no. of your appliance.
Replacing the bulb in the top of the cooking compartment
If the cooking compartment light bulb fails, it must be replaced. Heat-resistant, 25 watt, 230 V halogen bulbs are available from the after-sales service or specialist retailers.
When handling the halogen bulb, use a dry cloth. This will increase the service life of the bulb. Only use these bulbs.
Warning – Risk of electric shock! When replacing the cooking compartment bulb, the bulb socket contacts are live. Before replacing the bulb, unplug the appliance from the mains or switch off the circuit breaker in the fuse box.
Warning – Risk of burns! The appliance becomes very hot. Never touch the interior surfaces of the cooking compartment or the heating elements. Always allow the appliance to cool down. Keep children at a safe distance.
1. Place a tea towel in the cold cooking compartment to prevent damage.
2. Turn the glass cover anti-clockwise to remove it.
3. Pull out the bulb – do not turn it.
Insert the new bulb, making sure that the pins are in the correct position. Push the bulb in firmly.
4. Screw the glass cover back on. Depending on the appliance model, the glass cover may have a sealing ring. If the glass cover has a sealing ring, put it back in place before screwing the cover back on.
5. Remove the tea towel and switch on the circuit breaker.


 .
.
 flashes in the display.
 button repeatedly until the
  symbol lights up.
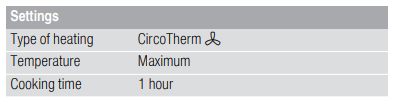
 appears on the display, the temperature is too high for the selected heating function. The appliance is not heating.Set a lower temperature.
 flashes on the display, the temperature in the cooking compartment is too high for the selected operating mode. Switch the appliance off, wait until it has cooled down and then switch it back on again
 symbol appears in the display. When you are preheating the appliance, the optimal time to place your food in the cooking compartment is when the
  symbol first goes out.
  .
. symbol appears in the display.
 symbol goes out. The rapid heating has ended.
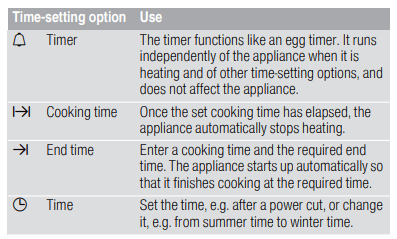
 button.
 button repeatedly until the
  symbol is selected.
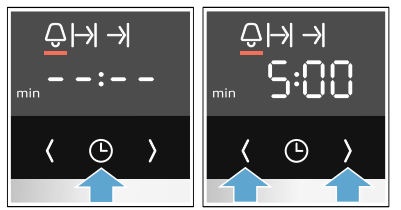
 button repeatedly until the x symbol is selected.
 button repeatedly until the
  symbol is selected.
 button repeatedly until the
  symbol is selected.
 button repeatedly until the
  symbol is selected.
 button repeatedly until the appropriate symbol is selected.
 The setting is applied automatically
 .
. button for approx. four seconds.
  ‚ appears in the display.
 button to change the setting if necessary.
 = Child-proof lock deactivated
 = Childproof lock activated
 button again for approx. four seconds. The basic setting is applied.
 symbol goes out in the display.
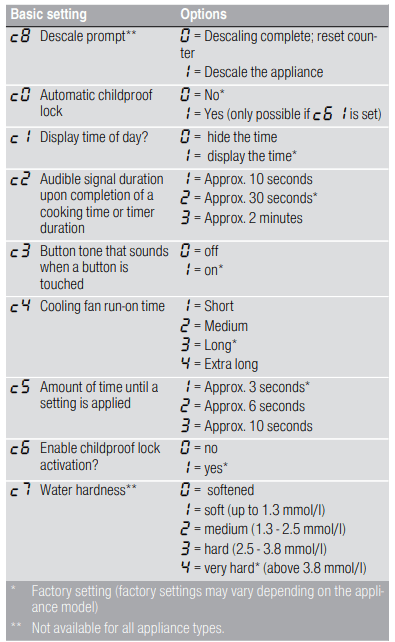
 button for approx. four seconds. The first basic setting appears in the display, e.g
  button again for approx. four seconds.
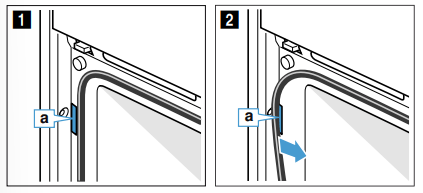
 lights up in the display
 button until the
  appears on the display, e.g.
  , touch the
  button. This will reset the error message. Reset the time, if necessary.