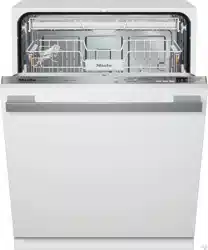
Operating Instructions
Dishwasher
To prevent accidents and machine damage, read these instructions be‐
fore installation or use.
en-US M.-Nr. 10 014 080HG05

Contents
2
IMPORTANT SAFETY INSTRUCTIONS................................................................. 4
Guide to the dishwasher .....................................................................................
13
Appliance overview................................................................................................ 13
Control panel.......................................................................................................... 14
Caring for the environment.................................................................................
15
Disposal of packaging material.............................................................................. 15
Disposal of your old appliance .............................................................................. 15
Energy-saving dishwashing ................................................................................... 15
Before using for the first time.............................................................................
16
Opening the door................................................................................................... 16
Closing the door .................................................................................................... 16
Before using the appliance for the first time, you require:..................................... 17
Rinse aid ................................................................................................................ 17
Adding rinse aid................................................................................................ 17
Rinse aid indicator ............................................................................................ 18
Setting the rinse aid dosage............................................................................. 19
Loading the dishwasher ......................................................................................
20
Tips ........................................................................................................................ 20
Loading examples.................................................................................................. 22
Upper basket ......................................................................................................... 26
Adjusting the upper basket............................................................................... 27
Lower basket ......................................................................................................... 28
Cutlery.................................................................................................................... 29
Cutlery tray (depending on model) ................................................................... 29
Cutlery basket (depending on model)............................................................... 30
Operation ..............................................................................................................
31
Detergent ............................................................................................................... 31
Adding detergent .............................................................................................. 32
Turning on .............................................................................................................. 33
Selecting a program............................................................................................... 33
Starting a program ................................................................................................. 34
Time display........................................................................................................... 34
Energy management.............................................................................................. 35
At the end of the program...................................................................................... 35
Turning off .............................................................................................................. 36
Unloading the dishwasher ..................................................................................... 36
Interrupting a program ........................................................................................... 37
Changing a program .............................................................................................. 37

Contents
3
Options..................................................................................................................
38
Short ................................................................................................................
38
Turning off the refill indicator.................................................................................. 39
Delay Start ............................................................................................................. 40
Buzzer tones .......................................................................................................... 42
Optimize Standby .................................................................................................. 43
Factory default settings.......................................................................................... 44
Program overview................................................................................................
45
Cleaning and care................................................................................................
46
Cleaning the wash cabinet..................................................................................... 46
Cleaning the door and the door seal ..................................................................... 46
Cleaning the control panel..................................................................................... 46
Cleaning the door front.......................................................................................... 47
Filter system........................................................................................................... 48
Cleaning the spray arms ........................................................................................ 50
Frequently Asked Questions...............................................................................
51
Technical problems................................................................................................ 51
Water intake fault ................................................................................................... 53
Water drainage fault............................................................................................... 54
General problems................................................................................................... 55
Noises .................................................................................................................... 56
Poor cleaning results.............................................................................................. 57
Frequently asked questions................................................................................
60
Cleaning the drain pump and non-return valve ..................................................... 60
Customer service.................................................................................................
61
Repairs................................................................................................................... 61
Warranty................................................................................................................. 61
Optional accessories...........................................................................................
62
............................................................................................................................... 64
Installation Instructions.......................................................................................... 65
Electrical connection...........................................................................................
66
Water connection.................................................................................................
68
Water intake ........................................................................................................... 68
Drainage................................................................................................................. 69
Sound emission testing.......................................................................................
70

IMPORTANT SAFETY INSTRUCTIONS
4
This dishwasher complies with current safety requirements. Inap‐
pr
opriate use can, however, lead to personal injury and damage to
property.
To avoid the risk of accidents and damage to the dishwasher,
please
read the installation plan and the operating instructions
carefully before it is installed and used for the first time. They con‐
tain important information on its installation, safety, use and main‐
tenance.
Keep the installation plan and the operating instructions in a safe
place and pass them on to any future owner.
Miele cannot be held liable for damage caused by non-compli‐
ance with this information.

IMPORTANT SAFETY INSTRUCTIONS
5
Correct use
This dishwashe
r is intended for use in domestic households and
similar residential environments.
This dishwasher is not suitable for outdoor use.
It must only be used as specified in these operating instructions
for cleaning domestic dishware and cutlery. Any other usage is not
supported by the manufacturer and could be dangerous.
This applianc
e is not intended for use by persons (including chil‐
dren) with reduced physical, sensory or mental capabilities, or lack
of experience and knowledge.

IMPORTANT SAFETY INSTRUCTIONS
6
Safety with children
Chil
dren must be kept away from the appliance unless they are
constantly supervised.
Chil
dren should be supervised to ensure that they do not play
with the appliance. Keep small children away from the appliance at
all times to avoid the risk of injury. There is the risk that children may
lock themselves in the dishwasher.
If
the automatic door opening mechanism (depending on model)
is active keep young children away from the area in which the door
opens. Danger of injury in the unlikely event of a fault with the open‐
ing mechanism.
Dange
r of suffocation! Ensure that any plastic wrappings, bags,
etc. are disposed of safely and kept out of the reach of children.
K
eep children away from detergents. Dishwasher detergents can
cause burning in the mouth, nose and throat if swallowed, or inhibit
breathing. Keep children away from the dishwasher when the door is
open. There could still be detergent residues in the cabinet. Seek
medical attention immediately if your child has swallowed or inhaled
detergent.

IMPORTANT SAFETY INSTRUCTIONS
7
Technical safety
Installatio
n, repair, and maintenance work should only be per‐
formed by a Miele-authorized service technician. Work by unquali‐
fied persons could be dangerous and may void the warranty.
Befor
e installation, check the dishwasher for visible signs of dam‐
age. Under no circumstances should you use a damaged dishwash‐
er. A damaged dishwasher could be dangerous.
The ele
ctrical safety of this appliance can only be guaranteed
when continuity is complete between it and an effective grounding
system. It is most important that this basic safety requirement is
present and regularly tested and, where there is any doubt, the elec‐
trical system in the house should be checked by a qualified electri‐
cian.
Miele cannot be held liable for the consequences of an inadequate
grounding system (e.g. electric shock).
Reliable
and safe operation of this dishwasher can only be assur‐
ed if it has been connected to the electrical supply.
The dishwasher must on
ly be plugged into the electricity supply
via a suitable switched socket using a 3-pin plug with a grounding
contact (it must not be hard-wired). The electrical socket must be
easily accessible after the dishwasher is installed so that it can be
disconnected from the electricity supply at any time.
Ther
e must be no electrical sockets behind the dishwasher. There
is a danger of overheating and fire risk if the dishwasher is pushed
up against a plug.
The dishwasher must no
t be installed under a cooktop. The high
radiant temperatures which are sometimes generated by a cooktop
could damage the dishwasher. For the same reason, it should not be
installed next to open fires or other appliances which give off heat,
such as heaters, etc.

IMPORTANT SAFETY INSTRUCTIONS
8
T
o avoid the risk of damage to the dishwasher, make sure that the
connection data on the data plate (fuse rating, voltage, and frequen‐
cy) matches the electrical supply before connecting the dishwasher
to the mains. Consult a qualified electrician if in any doubt.
Do not con
nect the dishwasher to the electrical supply until it has
been fully installed and any adjustment has been made to the door
springs.
The dishwasher may on
ly be operated if the door opening mecha‐
nism is working correctly. Otherwise there could be a risk of danger
while the automatic door opening mechanism (depending on model)
is active.
To check that the door opening mechanism is working correctly:
– The door springs must be adjusted equally on both sides. They
ar
e correctly adjusted when the door remains stationary when left
half open (approx. 45° opening angle). It is also important that the
door cannot fall open.
– The door locking pins automatically retract when the door opens
at the end of the dr
ying phase.
Do not connect the appliance to the electrical supply by a multi-
socket adapter or an extension lead. These do not guarantee the re‐
quired safety of the appliance (e.g. danger of overheating).
This applianc
e must not be installed and operated in a non-sta‐
tionary location (e.g., on a ship).
Do not insta
ll the dishwasher in a room where there is a risk of
frost. Frozen hoses may burst or split. The reliability of the electronic
module may be impaired at temperatures below freezing point.
The wat
er pressure (flow pressure at the connection point) must
be between 4.35 - 145 psi.
A d
amaged appliance could be dangerous. If the dishwasher gets
damaged, turn off the electrical supply and contact Miele.

IMPORTANT SAFETY INSTRUCTIONS
9
The manu
facturer's warranty will be invalidated if the appliance is
not repaired by a Miele-authorized service technician.
Defective co
mponents should be replaced by Miele original parts
only. Only with these parts can the manufacturer guarantee the safe‐
ty of the appliance.
During
installation, maintenance and repair work, the appliance
must be disconnected from the electrical supply (turn it off and with‐
draw the plug from the socket).
If
the connection cable is damaged, it must be replaced with a
special cable of the same type (available from Miele) by a Miele-au‐
thorized service technician only.

IMPORTANT SAFETY INSTRUCTIONS
10
Proper installation
The dishwasher must be install
ed and connected in compliance
with the installation plan.
Be car
eful when installing the dishwasher. Wear protective
gloves to avoid injury on any sharp metal components.
The dishwasher must be corr
ectly aligned horizontally to ensure
problem-free operation.
In order to ensure stability, built-under and integrated dishwash‐
ers must only be installed under a continuous counter which is se‐
cured to adjacent cabinetry.
If you want to convert your freestanding dishwasher to a built-un‐
der ("U") model, you will need to order the appropriate conversion
kit. If you remove the existing toe-kick, you must replace it with a U-
model plinth. This is necessary to avoid the risk of injury caused by
protruding metal parts.
The door spring
s must be adjusted equally on both sides. They
are correctly adjusted when the door remains stationary when left
half open (approx. 45° opening angle). It is also important that the
door cannot fall open.
The appliance may only be used with correctly adjusted door
springs.

IMPORTANT SAFETY INSTRUCTIONS
11
Proper use
Do not use sol
vents in the dishwasher. Danger of explosion!
Do not inh
ale or ingest powder detergent. Dishwasher detergents
contain irritant or corrosive ingredients which can cause burning in
the nose, mouth, and throat if swallowed, or inhibit breathing. Seek
medical attention immediately if detergent has been swallowed or in‐
haled.
A
void leaving the door open unnecessarily as someone could trip
over it and be injured by it.
Do not sit or lea
n on the opened door. This could cause the dish‐
washer to tip and be damaged, and you could get injured.
Dishes can
be very hot at the end of a program. Allow them to
cool until they are comfortable enough to handle before unloading.
Only use det
ergent and rinse aid formulated for domestic dish‐
washers. Do not use dishwashing liquid.
Do not use co
mmercial or industrial detergents as these may
cause damage, and there is a risk of a severe explosive chemical re‐
action (such as an explosive oxyhydrogen gas reaction).
Do not fill
the rinse aid reservoir with powder or liquid detergent.
This will cause serious damage to the reservoir.
Inadver
tently filling the salt reservoir with powder or liquid dish‐
washer detergent will damage the water softener. Make sure you
have picked up the correct packet of dishwasher salt before filling
the salt reservoir!
Only use special coa
rse grained dishwasher salt for reactivation.
Do not use other salts such as cooking salt, agricultural grade or
gritting salt. These may contain insoluble additives which can impair
the functioning of the water softener.

IMPORTANT SAFETY INSTRUCTIONS
12
In an app
liance with a cutlery basket (depending on model), cut‐
lery is cleaned and dried more efficiently if placed in the basket with
the handles downwards. However, to avoid the risk of injury, place
knives and forks with the handles upwards.
Plastic it
ems which cannot withstand being washed in hot water,
such as disposable plastic containers or plastic cutlery should not
be cleaned in the dishwasher. The high temperatures in the dish‐
washer may cause them to melt or lose shape.
If
you use the "FlexiTimer/Delay Start" option (depending on mod‐
el), make sure that the dispenser is dry before adding detergent.
Wipe dry if necessary. Detergent will clog if poured into a damp dis‐
penser and may not be thoroughly dispersed.
Please observe the information given in "Technical data" regard‐
ing the capacity of the dishwasher.
Accessories
Use only ge
nuine original Miele parts. If spare parts or accesso‐
ries from other manufacturers are used, the warranty may become
invalid.
Disposal of your old dishwasher
Mak
e the door lock inoperative so that children cannot acciden‐
tally shut themselves in. Remove or destroy the locking bracket of
the door lock, and make appropriate arrangements for the disposal
of the appliance.
SAVE THESE INSTRUCTIONS AND PASS THEM ON TO ANY FUTURE USER
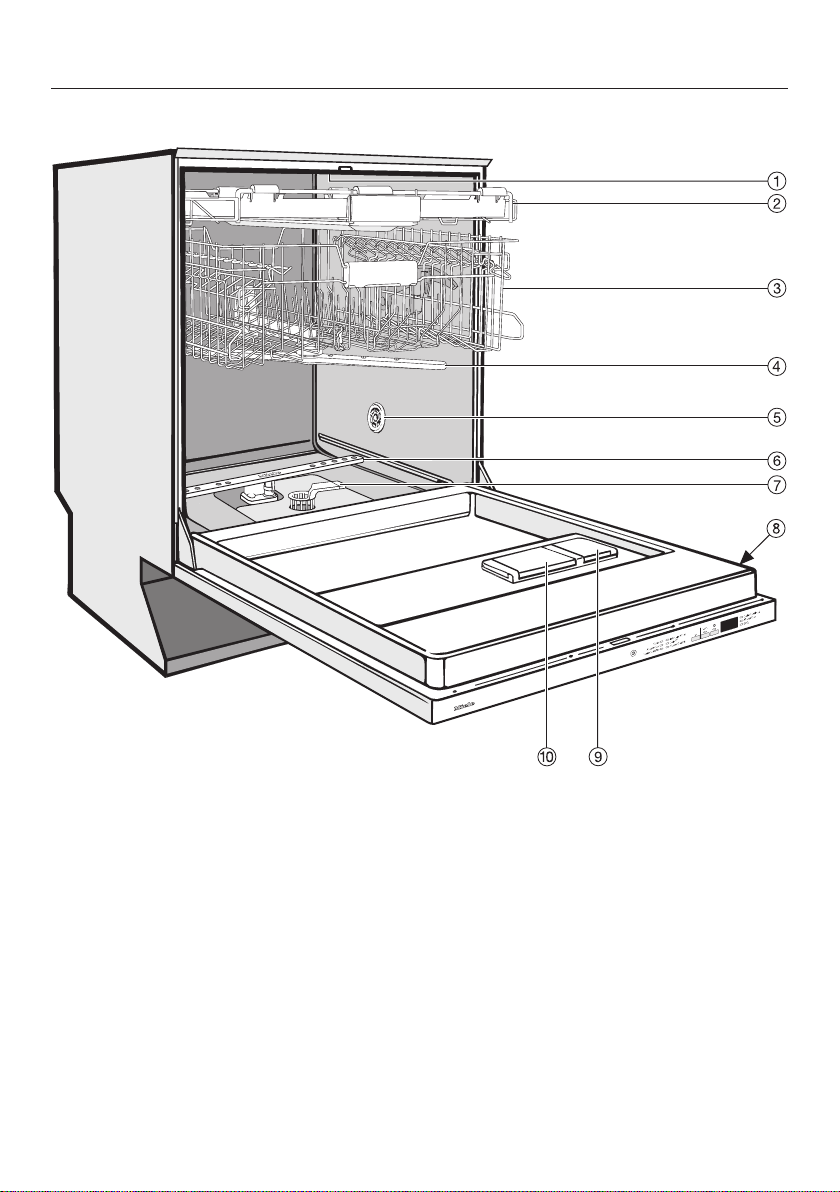
Guide to the dishwasher
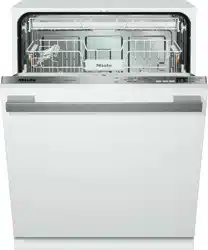
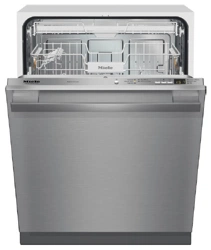
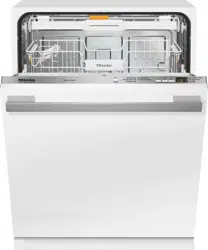
13
Appliance overview
a
Upper spray arm (not visible)
b
Cutlery tray (depending on model)
c
Upper basket
d
Middle spray arm
e
Air intake for drying (depending on
model)
f
Lower spray arm
g
Filter system
h
Data plate
i
Rinse aid reservoir
j
Dual compartment detergent dis‐
penser
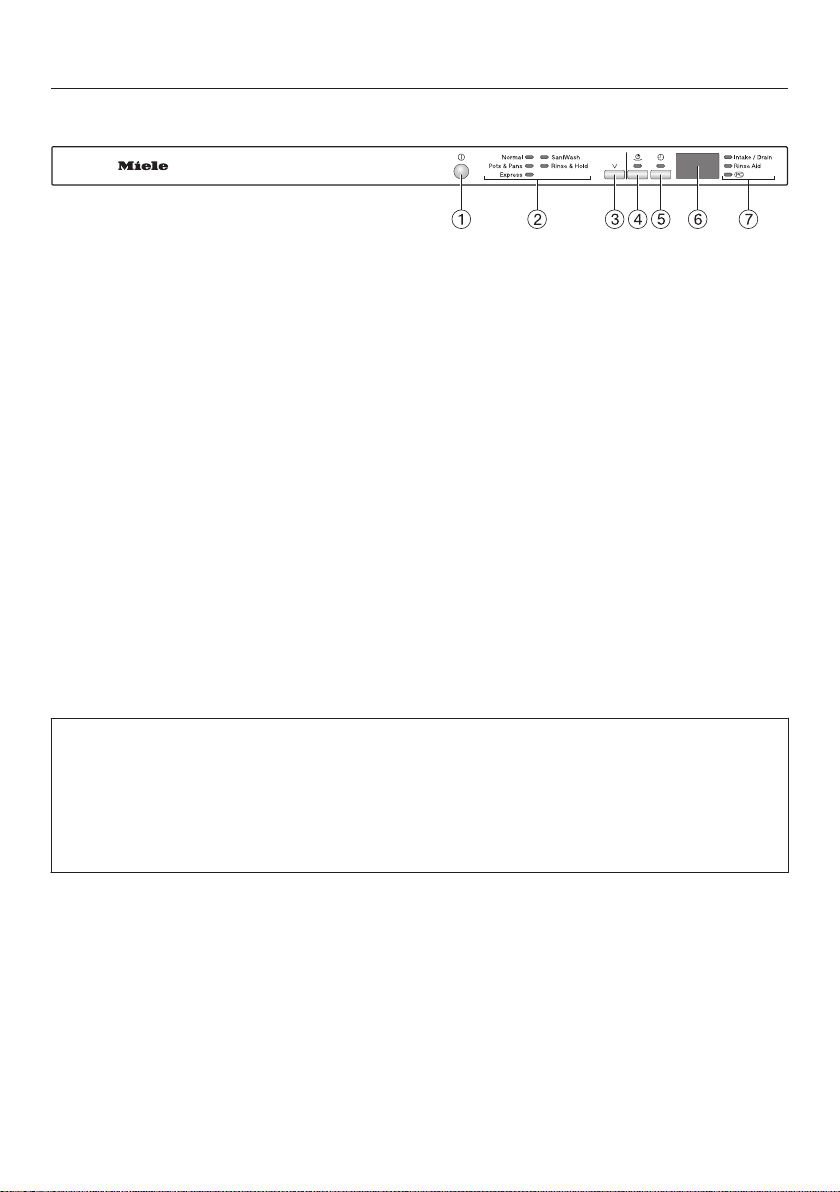
Guide to the dishwasher
14
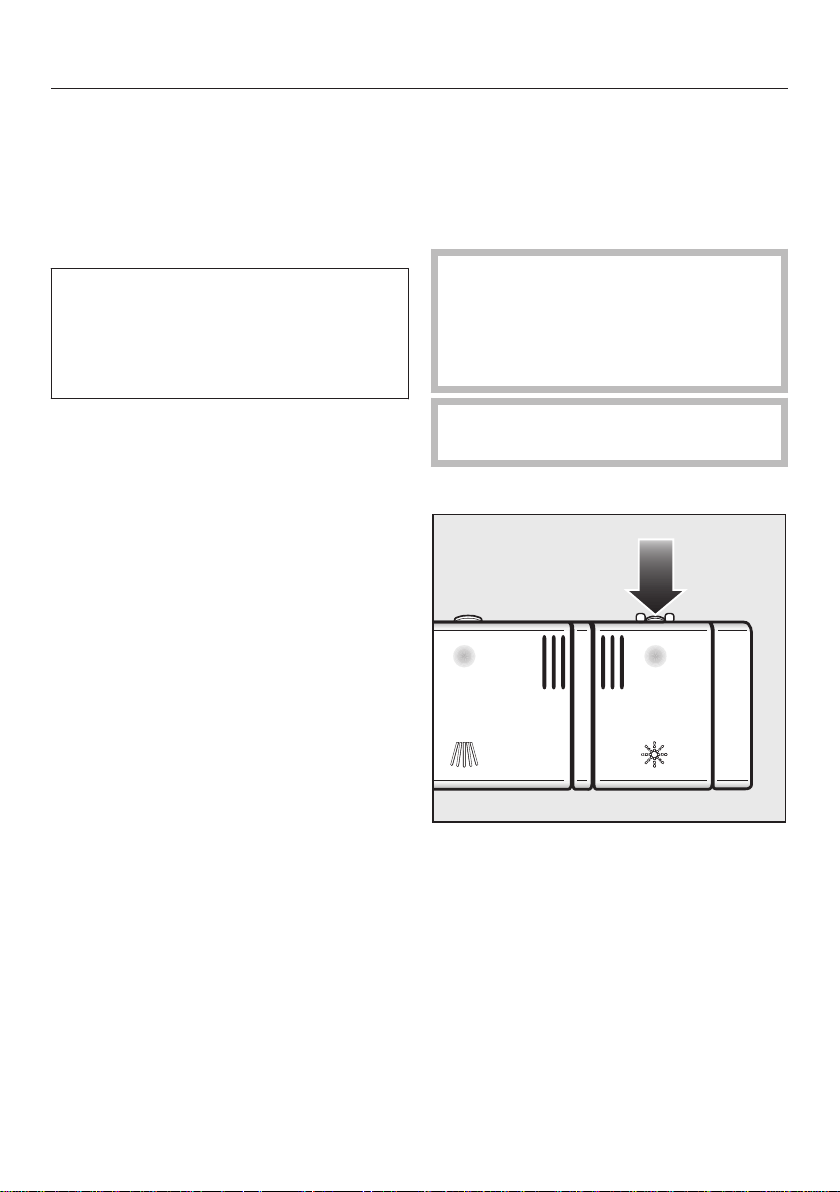
Control panel
a
(O
n/Off) Button
b
Program selection
c
Program selection button
d
Short button with indica
tor light
e
Delay Start button with indicat
or
light
f
Time display
g
Check/Refill indicators
These operating instructions apply to several different dishwasher models with
differ
ent heights.
The specific dishwasher models are referred to as follows:
Standard = 31 11/16" (80.5 cm) high dishwashers (integrated)
and 33 1/4" (84.5 cm) high dishwashers (freestanding)
XXL = 33 1/4" (84.5 cm) high dishwashers (integrated)

Caring for the environment
15
Disposal of packaging material
The cardboard box and packaging pro‐
t
ect the appliance during shipping.
These materials are biodegradable and
recyclable. Please recycle.
Disposal of your old appliance
Old appliances may contain materials
th
at can be recycled. Please contact
your local recycling authority about the
possibility of recycling these materials.
Please be sure that your old appliance
do
es not pose a danger to children
while being stored for disposal.
Energy-saving dishwashing
This dishwasher is economical in the
use of wat
er and electricity. For best re‐
sults follow these tips:
– For most economical dishwashing,
mak
e full use of the baskets without
overloading the dishwasher.
– Choose a program that best suits the
degr
ee of soiling and the type of
dishes being washed.
– Select the Economy pr
ogram (de‐
pending on model) for energy-saving
dishwashing. This program is the
most efficient in terms of its com‐
bined energy and water consumption
at cleaning normally soiled dishware.
– Follow the detergent manufacturer's
r
ecommendations on detergent dos‐
age.
– When using powder or liquid deter‐
gent, you can use
1
/
3
less det
ergent if
baskets are only half full.
– The dishwasher can be connected to
a hot wat
er supply for further econo‐
mies. If the water is heated by for ex‐
ample, solar panels, this would be
energy efficient.
However, if your water is heated by
electricity we would recommend con‐
nection to cold water.
You can find additional tips on energy-
saving dishwashing in "Miele's guide
t
o dishwashing".

Before using for the first time
16
Opening the door
P
ull the handle to open the door.
If the door is opened during operation,
a
ll functions are automatically interrupt‐
ed.
W
ater in the dishwasher may be
hot. Danger of scalding!
Only open the door during operation
if absolu
tely necessary and exercise
extreme caution when doing so.
Closing the door
P
ush the baskets in.
T
hen lift the door upwards and push
until it clicks into position.
Danger of crushing injuries!
Do not put your hand inside the door
as it is closing.
Before using for the first time
17
Before using the appliance for
the first tim
e, you require:
– Domestic dishwasher detergent
– Rinse aid formulated for domestic
dishwashers
Every dishwasher is tested at the fac‐
t
ory. There will be residual water in the
appliance from this test. It is not an in‐
dication that it has been used previ‐
ously.
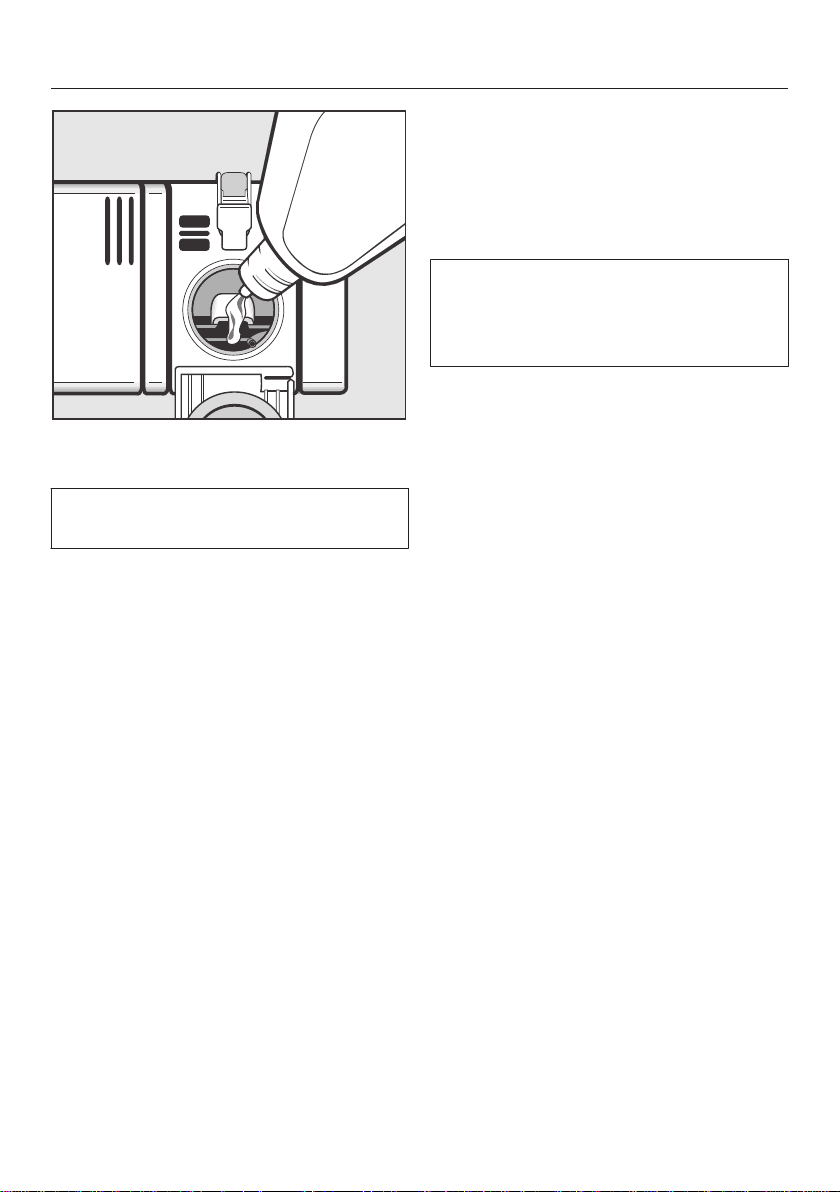
Rinse aid
Rinse aid is needed to prevent spotting
on
dishes and glassware. The rinse aid
is filled in the reservoir and the set
amount will be automatically dosed.
Filli
ng the rinse aid reservoir with
detergent will damage the reservoir.
Only pour rinse aid formulated for
residential dishwashers into the res‐
ervoir.
When using "Tab" detergents rinse
aid is not needed.
Adding rinse aid
P
ress the button on the lid of the
rinse aid reservoir in the direction of
the arrow until the flap springs open.
Before using for the first time
18
Add rinse aid only until it is visible in
the opening.
The rinse aid reservoir holds approx.
3.7 o
z. (110 ml).
Close the flap firmly so that it clicks
int
o place. Otherwise water can enter
the rinse aid reservoir during a pro‐
gram.
W
ipe up any spilled rinse aid. This
prevents over-foaming occurring dur‐
ing the next program.
Rinse aid indicator
When the Rinse aid indicat
or lights up,
the rinse aid reservoir contains suffi‐
cient rinse aid for 2 - 3 programs only.
Add rinse aid.
If you consistently use a "Tab" deter‐
gent, you ca
n deactivate the refill indi‐
cators if you wish (see "Options - Re‐
fill indicators").

Before using for the first time
19
Setting the rinse aid dosage
You can adjust the rinse aid dosage for
best r
esults.
The rinse aid dosage is set in stages
fr
om 0 to 6. It is set to 3 at the factory.
This is the recommended setting.
The dosage can turn out to be higher
than the set valu
e due to the automatic
adjustment of the
Automatic p
rogram.
If spots appear on dishware and glass‐
war
e:
Incr
ease the rinse aid dosage.
If clouding or smearing appears on
dishwar
e and glassware:
Decr
ease the rinse aid dosage.
T
urn the dishwasher off with the
button, if it is turned on.
P
ress the program selection button
, and, simultaneously switch the
dishwasher on using the button.
Keep the program selection button
pressed in for at least four seconds
until the lower right program indicator
light comes on.
If this does not happen, start the proce‐
dur
e from the beginning again.
P
ress the button 3 times.
The
indicator light will flash 3 times
at short intervals.
The set value will appear in the display
aft
er .
The flashing sequence
will appear in
the display.
This indicates a factory default setting
of 3.
Use the pr
ogram selection button
to select the setting required.
Each press of the button moves you
up a level.
The setting is now stored in memory.
T
urn the dishwasher off with the
button.

Loading the dishwasher
20
Tips
Remove coarse food residues from the
dishwar
e.
There is no need to rinse items under
runni
ng water!
Do not wash it
ems soiled with
ash, sand, wax, grease, or paint in
the dishwasher. These will damage
the dishwasher.
Dishware can be loaded anywhere in
the baskets, but the following notes
should be observed:
– Do not place dishes or cutlery inside
other pieces. They will cover each
othe
r.
– Load the dishware so that water can
acce
ss all surfaces. This ensures that
they get properly cleaned.
– Make sure that all items are securely
positioned.
– Hollow items such as cups, glasses,
pans, etc. must b
e inverted in the
basket.
– Tall, narrow, hollow items, e.g.,
champagne glasses, should be
placed in the cen
ter of the basket to
ensure better water coverage.
– Concave items such as mugs or
bowls should be placed at an angle
so that the wat
er can run off.
– The spray arms must not be blocked
by it
ems which are too tall or hang
through the baskets. If in doubt, test
for free movement by manually rotat‐
ing the spray arms.
– Make sure that small items cannot
fall
through the holders in the bas‐
kets.
Small items, e.g., lids, should there‐
fore be placed in the cutlery tray or
cutlery basket (depending on model).
Some foods may contain natural
dyes, e.g.,
carrots, tomatoes or to‐
mato sauce. Plastic items in the
dishwasher may discolor if large
quantities of these foodstuffs find
their way into the dishwasher on the
dishware. The stability of plastic
items is not affected by this discolor‐
ation.
Cleaning silver cutlery in the dish‐
washer may also cause plastic items
to discolor.

Loading the dishwasher
21
Items not recommended for dish‐
washing
– Wooden cutlery, cutting boards and
dishwar
e or items with wooden parts
– Craft items, antiques, valuable vases,
and decor
ative glassware
– Plastic items which are not heat-re‐
sistan
t: the high temperatures in the
dishwasher may cause them to melt
or lose shape.
– Copper, brass, tin and aluminum
it
ems may discolor or become matt.
– Colors painted over a glaze may fade
aft
er a number of washes.
– Delicate glassware and glassware
con
taining lead crystal: clouding may
occur over time.
Please note:
Silverware
previously cleaned with a
silver polish may still be damp or spot‐
ted at the end of a program, where wa‐
ter has not run off smoothly. It may
need to be rubbed dry with a soft cloth.
Silver which has been in contact with
foods contai
ning sulphur can discolor.
These include egg yolk, onions, mayon‐
naise, mustard, fish, and marinades.
Aluminum components (e.g.,
r
ange hood grease filters) must not
be cleaned with a commercial or in‐
dustrial cleaning agent.
These may damage the material.
Tip: When pur
chasing new dishware
and cutlery, make sure they are dish‐
washer-safe.
Glass care
– Clouding may occur on glasses after
fr
equent washing. If delicate glass‐
ware is washed in the dishwasher,
ensure that only very low tempera‐
tures are used (see program chart), or
a special glass-care program is used
(depending on model). This will re‐
duce the risk of clouding.
– Purchase glassware which is dish‐
washer
-safe (e.g., Riedel glassware).
– Use detergents with glass protective
additives (e.g., Miele CareCollection
tabs).
– Visit "http://www.mieleglass‐
car
e.com/international/en/glasscare/
english" for more information on
glass care.
Loading the dishwasher
22
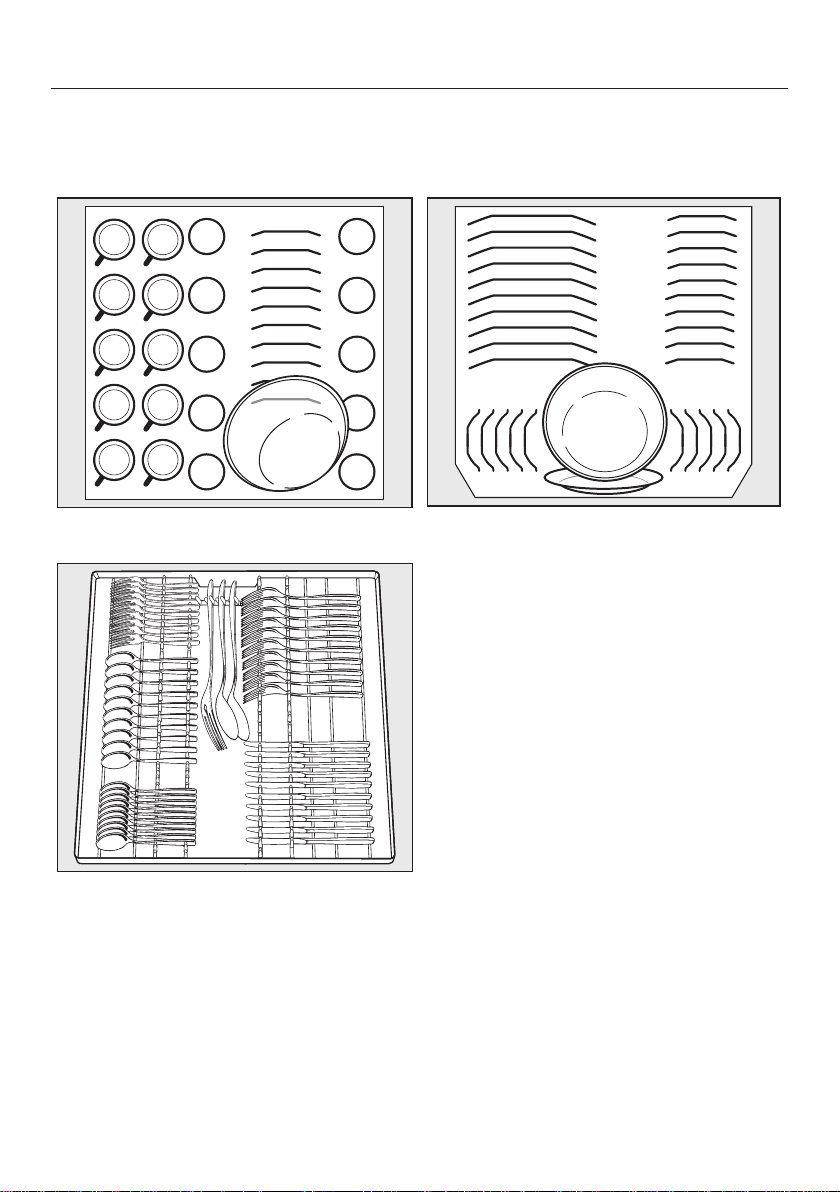
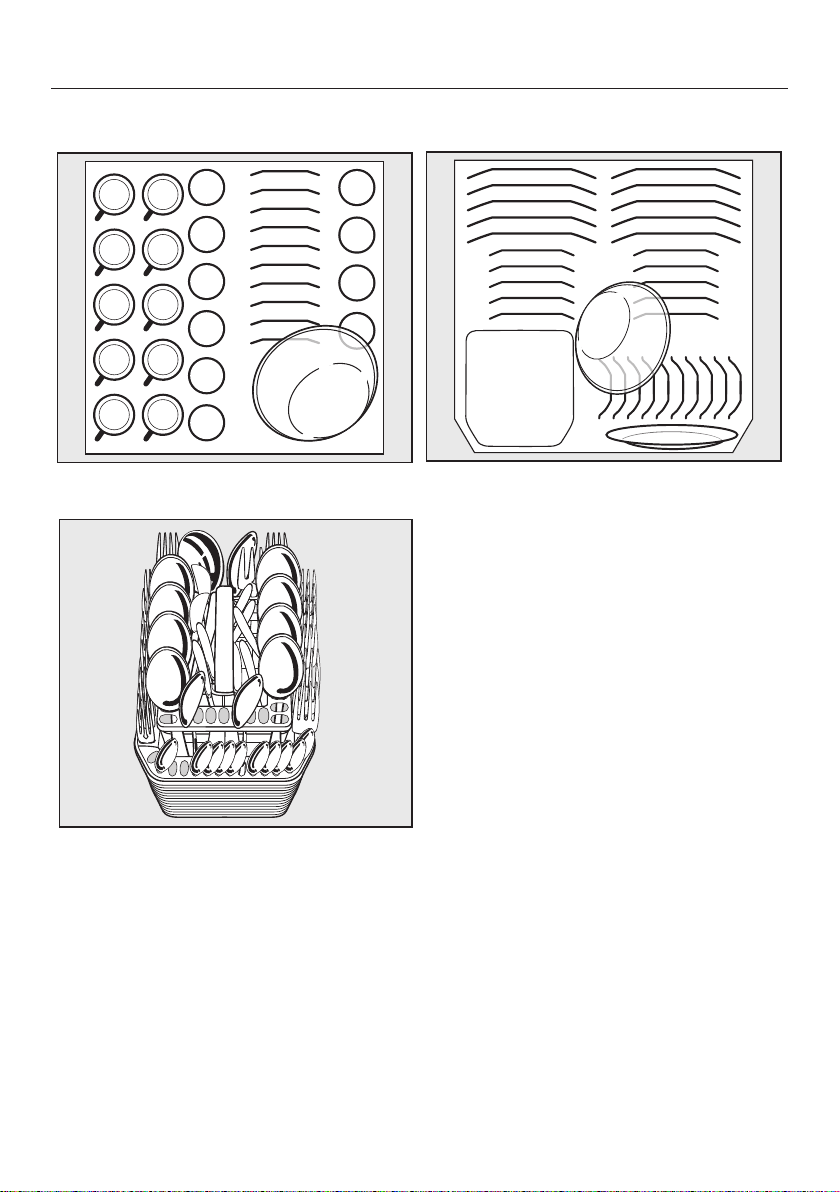
Loading examples
Loading for 10 standard place settings with cutlery tray
Upper basket
Lower basket
Cutlery tray (depending on model)
Loading the dishwasher
23
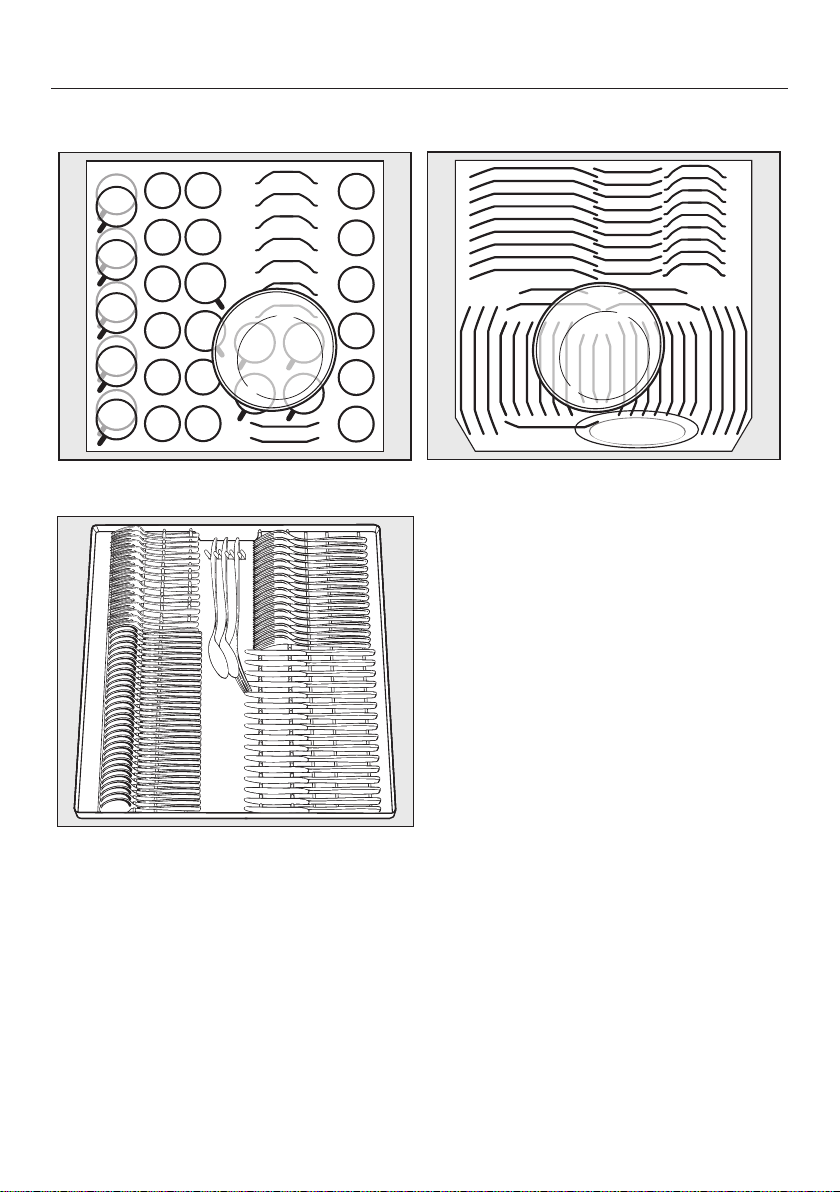
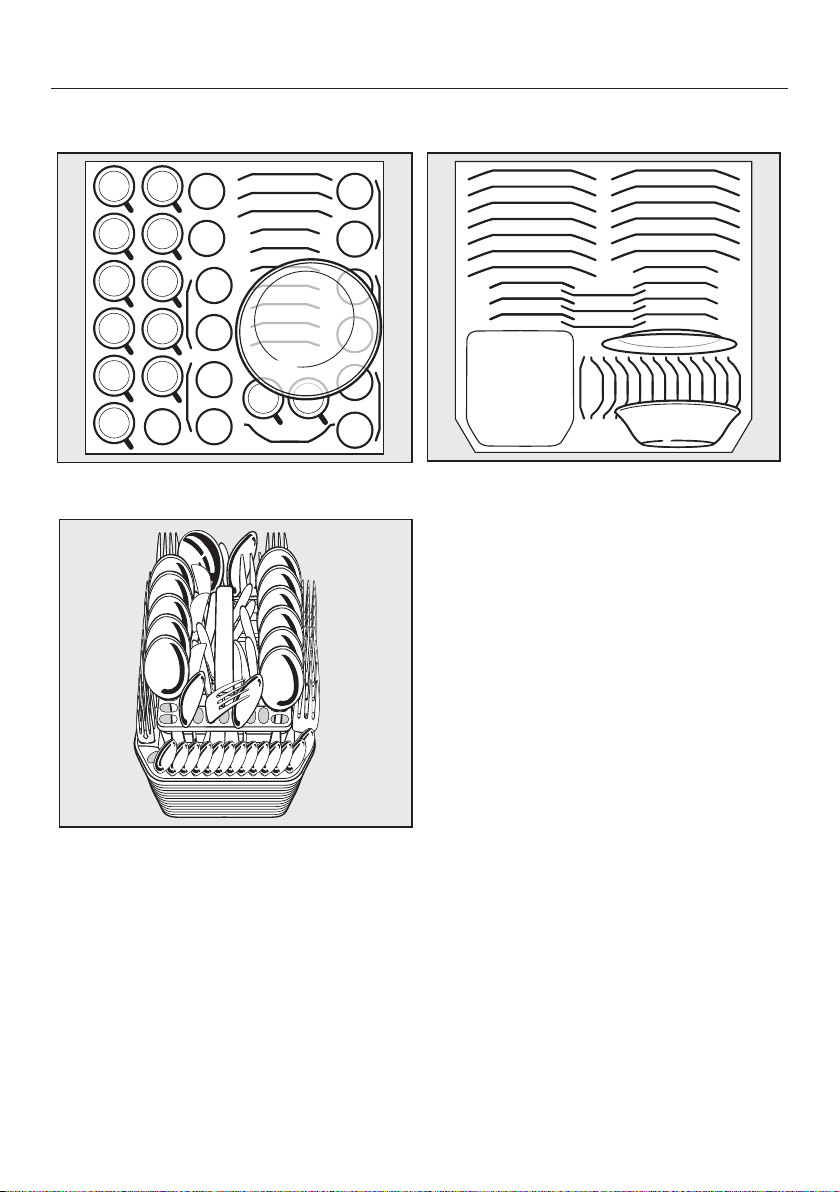
Loading for 16 standard place settings with cutlery tray
Upper basket Lower basket
Cutlery tray (depending on model)
Loading the dishwasher
24
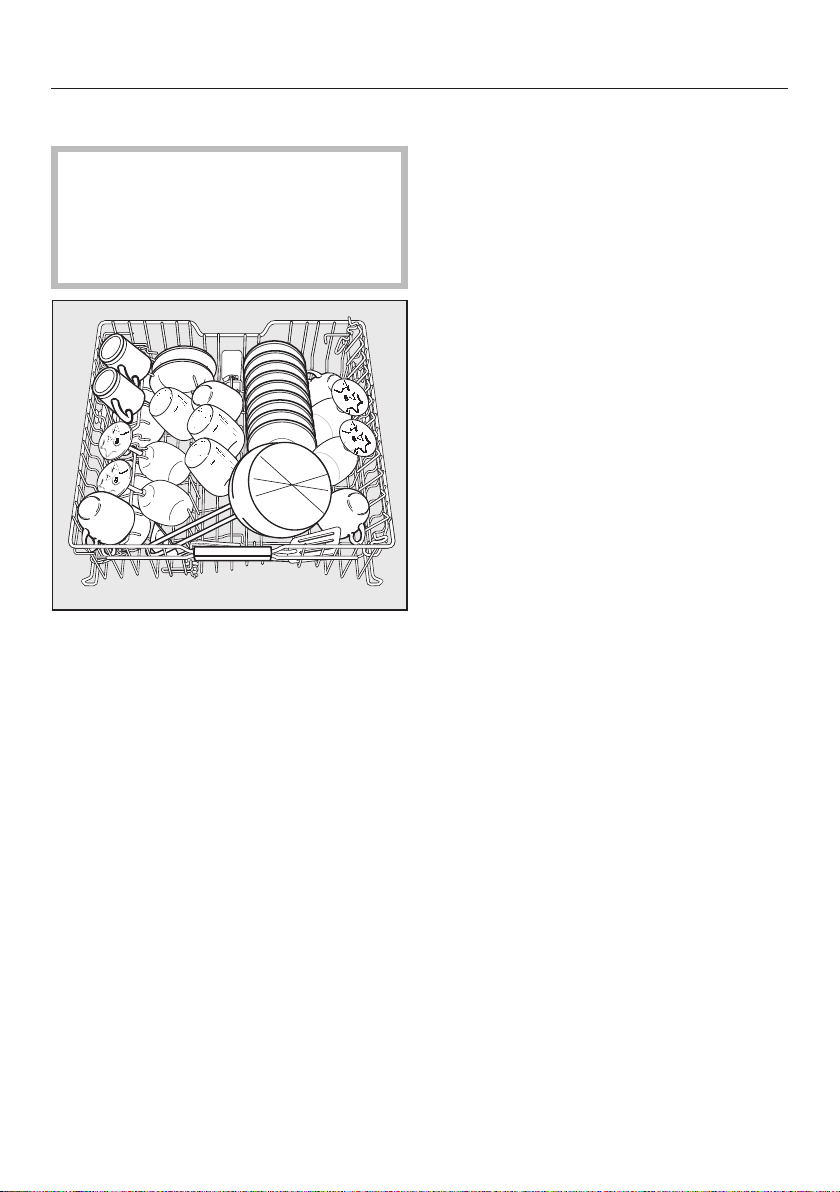
Loading for 10 standard place settings with cutlery basket
Upper basket
Lower basket
Cutlery basket
Loading the dishwasher
25
Loading for 13 standard place settings with cutlery basket
Upper basket
Lower basket
Cutlery basket
Loading the dishwasher
26
Upper basket
F
or safety reasons, do not oper‐
ate the dishwasher without the upper
and lower baskets in place (except
when running the Tall items program,
if available).
Use the upper bask
et for small, light‐
weight and delicate items such as
cups, saucers, glasses, dessert
bowls, etc.
Shallow pans or casserole dishes can
also be placed in the upper basket.
L
ong items such as soup ladles, mix‐
ing spoons, and long knives should
be placed lying down across the front
of the upper basket.
Adjustable cup rack (depending on
model)
Ra
ise the rack to make room for tall
items.
Glasses can be arranged along the po‐
siti
oning rail of the cup rack to give
them some support during the pro‐
gram.
L
ower the cup rack and lean the
glasses against it, or double stack
smaller pieces.
Loading the dishwasher
27
Adjusting the upper basket
In order to gain more space for taller
it
ems the upper basket can be adjusted
on three levels with 3/4" (2 cm) be‐
tween each level.
The upper basket can also be set at an
angle with one side high and the other
side low
. Make sure, however, that the
basket can slide smoothly in and out of
the cabinet.
P
ull the upper basket out.
To raise the upper basket:
Lift the bask
et until it clicks into
place.
To lower the upper basket:
P
ull upwards on the levers at either
side of the upper basket.
Adjust the basket to the desired
height and then push the levers se‐
curely back down into position.
Depending on the setting of the upper
bask
et, the following plate dimensions
can be accommodated.
Dishwashers with cutlery basket
(see data p
late for model number)
Upper
bask
et
adjust‐
ment
Plate
in inches (cm)
Upper basket Lower
basket
Stand‐
ar
d
XXL
Upper 7 7/8"
(20)
9 7/16"
(24)
12 3/16"
(31) 13
3/4" (35*)
Middle 8
11/16"
(22)
10 1/4"
(26)
11 7/16"
(29)
Lower 9 7/16"
(24)
11" (28) 10 5/8"
(27)
Dishwashers with cutlery tray
(see data p
late for model number)
Upper
bask
et
adjust‐
ment
Plate
in inches (cm)
Upper basket Lower
bask
et
Stand‐
ar
d
XXL
Upper 7 7/8"
(15)
7 1/2"
(19)
12 3/16"
(31) 13
3/4" (35*)
Middle 6
11/16"
(17)
8 1/4"
(21)
11 7/16"
(29)
Lower 7 1/2"
(19)
9 1/16"
(23)
10 5/8"
(27)
* When tilted, plates of up to 13 3/4" (35 cm)
can be accomm
odated (see "Lower bas‐
ket").
Depending on the setting of the upper
bask
et, a variety of plate dimensions
can be accommodated.
Loading the dishwasher
28
Lower basket
F
or larger and heavier items such as
plates, serving platters, saucepans,
bowls, etc.
Glasses, cups and small items such
as saucers can also be placed in the
lower basket. Do not place thin, deli‐
cate glassware in the lower basket.
Place
large platters and dishes in the
center of the lower basket.
When tilted, plates up to 13 3/4" (35
cm) in diamet
er can be accommodated.
MultiComfort area
The rear section of the lower basket is
used for washing cu
ps, glasses, plates,
pots and pans.
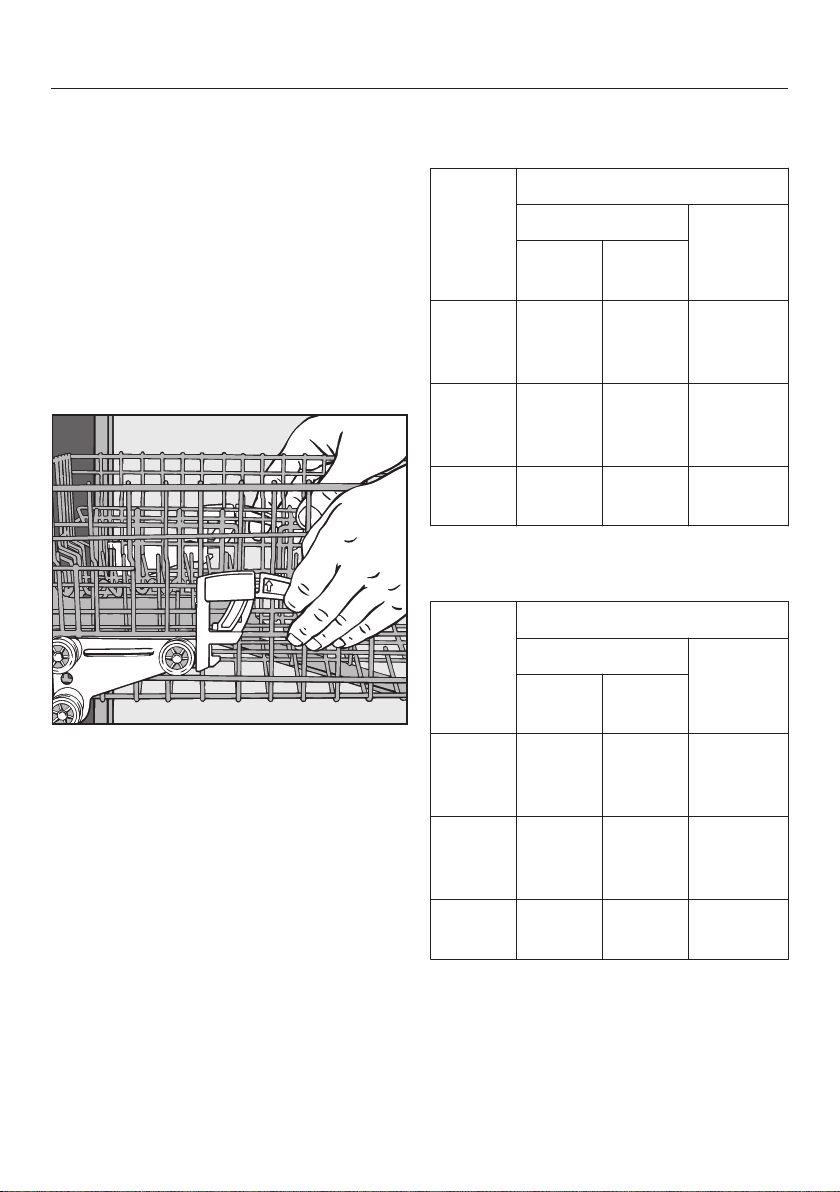
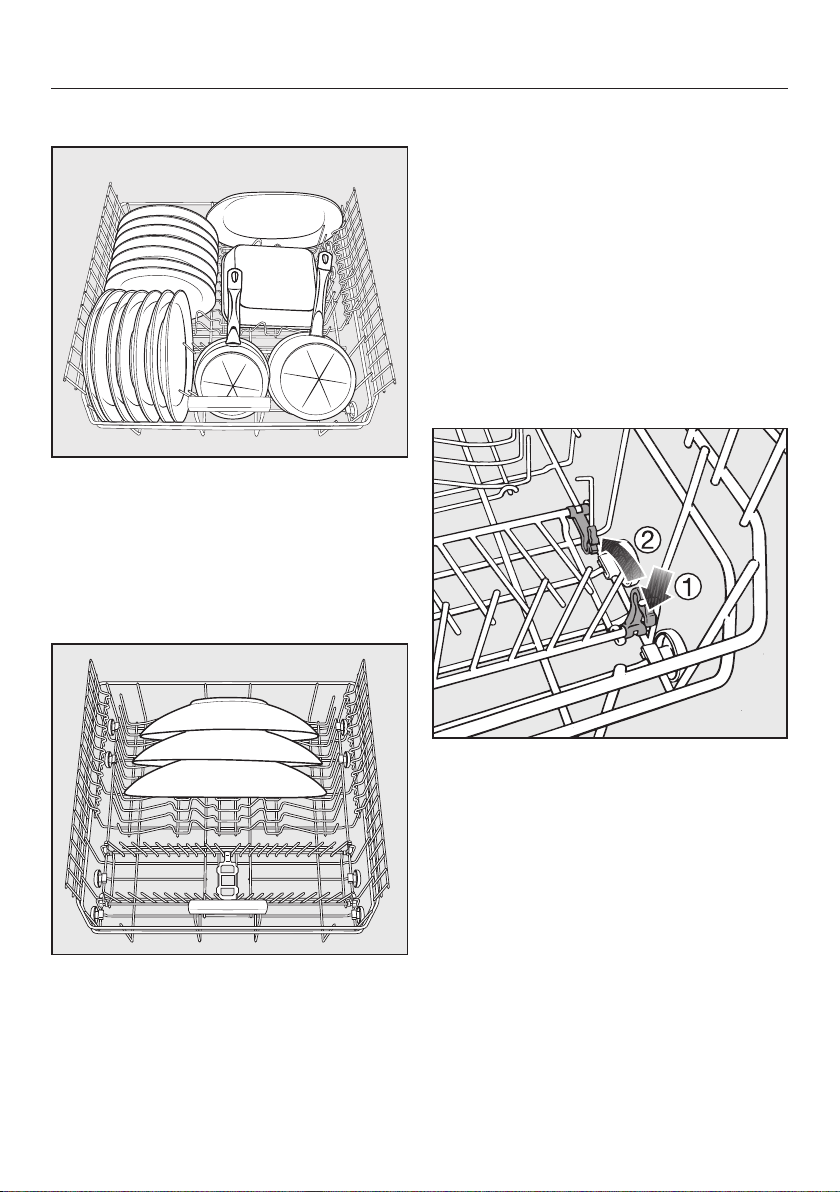
Hinged spikes
The spikes at the front are used for
washing
plates, soup bowls, platters,
dessert bowls, and saucers.
The spikes can be lowered to make
mor
e room for large items, e.g. pots,
pans, and bowls.
P
ress the yellow lever downwards ,
and then lower the spikes .
Loading the dishwasher
29
Cutlery
Cutlery tray (depending on model)
Arr
ange the cutlery in the tray as
shown.
To make unloading much easier, cutlery
shou
ld be grouped in zones, one for
knives, one for forks, one for spoons,
etc.
Spoon heads should be placed in con‐
tact with at least one of the serr
ated re‐
tainers on the base of the cutlery tray to
ensure that water runs off them freely.
The upper spray arm must not be
block
ed by items which are too big.
If spoon handles do not fit between
the holders, lay them the other way
r
ound.
Loading the dishwasher
30
Cutlery basket (depending on model)
The cutlery basket can be placed any‐
wher
e on the front rows of spikes in the
lower basket.
T
o avoid the risk of injury, knives and
forks should be placed with the han‐
dles upwards in the basket. However,
cutlery placed handle down in the
basket will come out cleaner and dri‐
er.
Place
small items of cutlery in the in‐
dividual slots on three sides of the
cutlery basket.
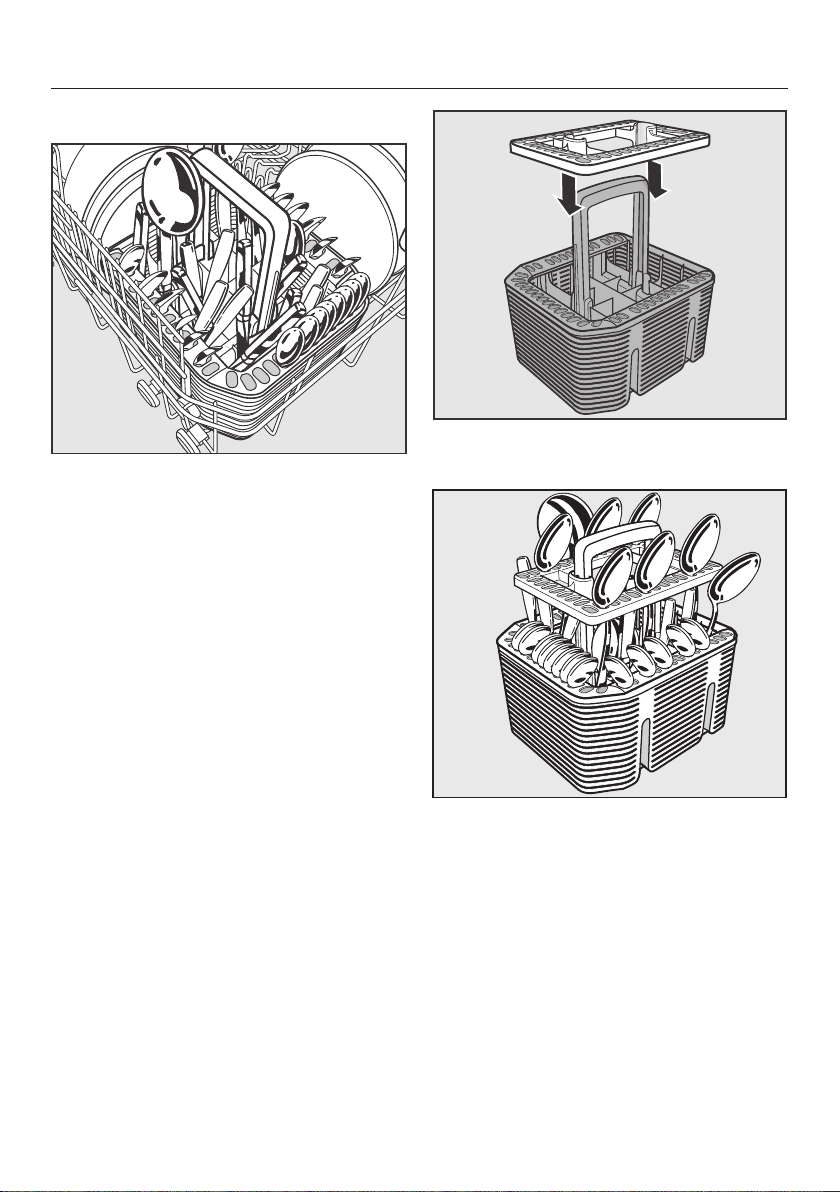
Cutlery insert for the cutlery basket
Use the insert supplied for heavily
soil
ed items of cutlery. The insert sepa‐
rates the items so that they can be
more easily accessed by water.
Fi
t it onto the cutlery basket if re‐
quired.
Inser
t cutlery with the handles facing
downwards.
Distri
bute them evenly along the in‐
sert.

Operation
31
Detergent
O
nly use detergents formulated
for domestic dishwashers.
Refer to the manufacturer's packaging
as t
o whether Tab products are suitable
for the water hardness level in your
area.
Please note that the cleaning and dry‐
ing results of Tab detergents can vary
greatly.
For optimum cleaning and drying re‐
sults, use Miel
e dishwasher detergent
and add Miele salt and Miele rinse aid
separately. See "Optional accesso‐
ries."
Detergent dosage
F
ollow the dosage recommended by
the manufacturer on the packaging.
Unl
ess directed otherwise, use one
detergent tab or add 1 1/4 - 2 table‐
spoons (20 - 30 ml) detergent to
compartment II, depending on the
level of soiling. With very heavy soil‐
ing you can also add a small amount
of detergent to compartment l.
T
abs may not dissolve completely
when the Express program (if availa‐
ble) is used.
Use only the recommended amount
of det
ergent. Continued use of too
much detergent may cause machine
damage.
Dishwasher det
ergents can
cause burning in the nose, mouth,
and throat if swallowed, or inhibit
breathing.
Avoid inhaling or swallowing dish‐
washer det
ergent. Keep children
away from detergent. Keep deter‐
gent out of the reach of children.
Keep children away from the dish‐
washer when the door is open. There
could still be detergent residues in
the dishwasher. Only add detergent
just before starting the program and
lock the door with the child safety
lock (depending on model).
Operation
32
Adding detergent
P
ress the opening catch on the de‐
tergent dispenser. The flap will spring
open.
The flap is always open at the end of a
pr
ogram.
Add the required amount of detergent
and close the flap.
Mak
e sure that the detergent packag‐
ing is properly closed after use to
avoid it getting damp and becoming
lumpy.
Dispensing aid
Compartment I holds a maximum of 2
t
easpoons (10 ml),
Compartment II holds a maximum of
3.5 tablespoons (50 ml) of detergent.
The marks in compartment II indicate
the l
evels of approximately 1 ¼ and 2
tablespoons (20 and 30 ml) respective‐
ly. The marks indicate the approximate
fill level in ml when the door is open in a
horizontal position.

Operation
33
Turning on
T
urn on the water supply if it is turned
off.
Open the door
.
Mak
e sure the spray arms are not ob‐
structed.
Turn the dishwasher on with the
button.
The indicator light next to the program
select
ed will come on.
Selecting a program
Choose your program according to the
type of load and the d
egree of soiling.
The different programs and their uses
ar
e described in the Program Over‐
view chapter.
Use the pr
ogram selection button
to select the program required.
The indicator light for the program se‐
lect
ed will light up.
The program duration will appear in
hours and minutes in the display.
You can now select program options
(see "Options").
If any program options are selected, the
appropriate indicator lights will also
light up.

Operation
34
Starting a program
S
tart the program by closing the door
within four seconds of the last press
of a button.
The program will begin.
If you do not close the door within
four sec
onds, the indicator lights of
the selected program and the time
display will flash.
The program cannot be started until
you press the program selection but‐
ton and close the door within four
seconds.
A program should only be canceled
in
the first few minutes, if at all. Oth‐
erwise important program stages
could be omitted.
Time display
The duration of the program selected
appears in hours and minu
tes in the
display before the program begins. Dur‐
ing the program, the time left until the
end of the program is displayed.
The program duration displayed may
var
y with the same program. It is influ‐
enced by, among other things, the wa‐
ter temperature at each intake, the re‐
activation process, the type of deter‐
gent, the amount of dishware, and the
amount of soiling.
When a program is selected for the first
time, the display shows an aver
age
time for a cold water intake.
The times shown in the program over‐
view r
efer to standard test loads and
temperatures.
Each time a program is run, the elec‐
tr
onic module calculates the program
duration required according to the tem‐
perature of the water taken into the
dishwasher and the amount of dish‐
ware.

Operation
35
Energy management
To save energy, the dishwasher will
switch off aut
omatically 10 minutes af‐
ter the last time a button has been
pressed or 10 minutes after the end of
the program (see "Options - Optimize
Standby").
P
ress the button to switch the
dishwasher back on.
The dishwasher will not turn off while
a pr
ogram is running, during the delay
start period, or if there is a fault.
At the end of the program
A buzz
er will sound at the end of the
program with the door closed.
. will
appear in the time display.
If the program indicator light is still
flash
ing, the program is not yet fin‐
ished.
Close the door again so that the pro‐
gr
am can continue until it has finish‐
ed.
The drying fan may continue to run for
a few minut
es at the end of the pro‐
gram.
Y
ou can now empty the dishwasher.
T
o prevent the risk of steam
damage to the counter edging above
the dishwasher, it is advisable to
leave the door closed until you are
ready to unload the dishware. Alter‐
natively you can open the door fully
until the dishware is cool enough to
unload. Do not leave the door only
partially open.

Operation
36
Turning off
At the end of a program:
Open the door
.
The dishwasher can be switched off
at any time using the
button.
Turning the dishwasher off during a pro‐
gr
am stops the program.
Turning the dishwasher off during the
delay star
t time will also stop the proc‐
ess.
If the dishwasher is not going to be
used for a longer period of time, e.g.,
while
on vacation, the water supply
should be closed.
Unloading the dishwasher
Dishes tend to break and chip more
easi
ly when they are hot. Allow the
dishes to cool until they are comforta‐
ble enough to handle before unloading
them.
The dishes will cool much faster if you
open the door when the pr
ogram has
ended.
First unload the lower basket, then the
upper b
asket, and finally the cutlery
tray (depending on model).
This will prevent water drops from the
upper basket and cutlery tray from fall‐
ing onto the dishes in the lower basket.

Operation
37
Interrupting a program
The program will be interrupted as soon
as you open the door
.
After four seconds, the indicator light of
the selected program and the time dis‐
play will flash.
P
ress the program selection button
and close the door within four sec‐
onds.
The program will continue from the
point at which it was int
errupted.
W
ater in the dishwasher may be
hot. Danger of scalding!
Only open the door if absolutely nec‐
essar
y and exercise extreme caution
when doing so. Before closing the
door again, leave it ajar for approx.
20 seconds. This will enable the tem‐
perature in the wash cabinet to set‐
tle. After that, press the program se‐
lection button and close the door
within four seconds.
Changing a program
If the detergent dispenser flap has
alr
eady opened, do not change the
program.
If a program has already started and
you wish t
o change it, proceed as fol‐
lows:
Open the door
.
T
urn the dishwasher off with the
button.
Turn the dishwasher on again with
the button.
Selec
t the desired program.
S
tart the program by closing the door
within four seconds.

Options
38
Short
The Short option reduces the dura‐
tion of programs in which this option is
available.
In order to achieve optimum cleaning
r
esults, consumption rates are in‐
creased with this option.
Open the door
.
T
urn the dishwasher on with the
button.
Selec
t a program.
P
ress the button.
The
indicator light will light up.
The
program can now be started.
The option selected will remain active
for that par
ticular program until the set‐
ting is changed.

Options
39
Turning off the refill indicator
If you consistently use a Tab detergent,
you can
deactivate the refill indicator if
you wish.
Open the door
.
T
urn the dishwasher off with the
button, if it is turned on.
P
ress the program selection button
, and, simultaneously switch the
dishwasher on using the button.
Keep the program selection button
pressed in for at least four seconds
until the lower right program indicator
light comes on.
If this does not happen, start the proce‐
dur
e from the beginning again.
P
ress the button 9 times.
The
indicator light will flash 9 times
at short intervals.
The flashing sequence in the time dis‐
play will indica
te whether the refill indi‐
cator is switched on or off.
– : Refill in
dicator is turned on.
– : Refill in
dicator is turned off.
P
ress the program selection button
to change the setting.
The setting is now stored in memory.
Turn the dishwasher off with the
button.
If you switch to using detergent that
does not contain salt or rinse aid, it
is impor
tant to remember to add
dishwasher salt and rinse aid and to
turn the indicators back on.

Options
40
Delay Start
You can set the start time for a pro‐
gr
am, e.g., to take advantage of night
time electricity rates. The start time can
be delayed between 30 minutes and 24
hours.
The delay period is shown in 30 mi‐
nutes increments for a delay period be‐
tween 30 minutes and 9 hours 30 mi‐
nutes. It is shown in hours for periods
longer than this.
When using the Delay Start function,
mak
e sure that the detergent com‐
partment is dry before adding deter‐
gent. Wipe dry with a cloth if neces‐
sary. If the compartment is wet,
powder detergent can become lum‐
py and stick to the dispenser, with
the result that it is not fully dis‐
pensed.
Do not use liquid detergent when se‐
lecting Delay Start, as it can run into
the dishwasher before it is required.
Open the door
.
T
urn the dishwasher on with the
button.
Selec
t the desired program.
P
ress the button.
The last delay start time used will ap‐
pear in the time display
. The indica‐
tor light will light up.
Set the r
equired delay start time us‐
ing the button.
If you keep the
button pressed, the
time will increase automatically up to
hours. To get back to . hours,
press the button twice.
Close the door within four seconds.
If you do not close the door within
four sec
onds, the indicator light of
the selected program and the time
display will flash.
The program cannot be started until
you
press the program selection but‐
ton and close the door within four
seconds.

Options
41
Open the door if you need t
o check
how long the delay period has left to
run.
The time up until the program starts will
count down in the display in hours for
dur
ations above 10 hours, and in mi‐
nutes for durations below 10 hours.
When the set time is reached, the pro‐
gr
am selected will start automatically.
The time remaining will appear in the
time display and the indicator light
will go out.
How the Delay Start time is shown in
the display:
up to 59 minutes:
e.g., 30 min
utes = .
1 hour up to 9 hours 30 minutes:
e.g., 5 hours = .
over 10 hours:
e.g., 15 hours =
If you open the door during the delay
star
t time, you must then press the
program selection button and close
the door within four seconds in order
to continue the delay start time.
Starting a program before the delay
star
t time has elapsed:
A program can be started before the
delay star
t period has elapsed.
Proceed as follows:
Open the door
.
T
urn the dishwasher off with the
button.
T
urn the dishwasher on again with
the button.
Select the program you want.
S
tart the program by closing the door
within four seconds.

Options
42
Buzzer tones
A sequence of audible tones will sound
at the end of the pr
ogram or if there is a
fault.
The buzzer at the end of a program and
the warning
buzzer in the event of a
fault will sound 4 times at intervals with
a short pause between each set.
The buzzer tones are activated at the
fact
ory.
You can deactivate the buzzer that
sounds at the end of a program if you
wish. The warning buzzer for faults can‐
not be deactivated.
Open the door
.
T
urn the dishwasher off with the
button, if it is turned on.
P
ress the program selection button
, and, simultaneously switch the
dishwasher on using the button.
Keep the program selection button
pressed in for at least four seconds
until the lower right program indicator
light comes on.
If this does not happen, start the proce‐
dur
e from the beginning again.
P
ress the button 4 times.
The
indicator light will flash 4 times
at short intervals.
The flashing sequence in the time dis‐
play shows whether the buzz
ers at the
end of the program are activated or de‐
activated.
– : Buzzer tones activated
– : Buzzer tones deactivated
P
ress the program selection button
to change the setting.
The setting is now stored in memory.
T
urn the dishwasher off with the
button.

Options
43
Optimize Standby
"Optimize Standby" is activated by de‐
fault.
To save energy, the dishwasher will
switch off aut
omatically a few minutes
after the last time a button has been
pressed or after the end of a program.
The dishwasher will not turn off while
a pr
ogram is running, during the delay
start period, or if there is a fault.
Optimize Standby can be switched off if
you pr
efer. If you do this the duration
before the dishwasher switches off au‐
tomatically increases to 6 hours. Doing
this will increase energy consumption.
Open the door
.
T
urn the dishwasher off with the
button, if it is turned on.
P
ress the program selection button
, and, simultaneously switch the
dishwasher on using the button.
Keep the program selection button
pressed in for at least four seconds
until the lower right program indicator
light comes on.
If this does not happen, start the proce‐
dur
e from the beginning again.
P
ress the button 8 times.
The
indicator light will flash 8 times
at short intervals.
The flashing sequence in the display
shows whether or no
t Optimize Stand‐
by is activated.
– : "O
ptimize Standby" activated
– : "O
ptimize Standby" deactivated
P
ress the program selection button
to change the setting.
The setting is now stored in memory.
Turn the dishwasher off with the
button.

Options
44
Factory default settings
If you have altered any settings from
the fact
ory default, you can reset them
back to the factory default settings as
follows:
Open the door
.
T
urn the dishwasher off with the
button, if it is turned on.
P
ress the program selection button
, and, simultaneously switch the
dishwasher on using the button.
Keep the program selection button
pressed in for at least four seconds
until the lower right program indicator
light comes on.
If this does not happen, start the proce‐
dur
e from the beginning again.
P
ress the button 19 times.
The
indicator light will flash once at
a long interval and then 9 times at short
intervals.
The flashing sequence in the display in‐
dicat
es whether a setting has been
changed from its factory default.
– : All settings are set to factory de‐
fault settings
– : A
t least one setting has been
changed
T
o reset the dishwasher to the factory
default settings, press the program
selection button .
The setting is now stored in memory.
T
urn the dishwasher off with the
button.

Program overview
45
Program When to use Program sequence
Pre-
wash
Main
wash
Interim
rinse
Final
rinse
Drying
Normal Program for regular use to
complet
ely wash a full load
of normally soiled dish‐
ware with the ability to ad‐
just energy and water con‐
sumption based on the soil
load of the dishware.
If re‐
quir
ed
X If re‐
quir
ed
X X
Pots &
Pans
For heavily soiled dishware
and normally soiled pots,
pans and ut
ensils with
dried on residue; use 20%
more detergent than rec‐
ommended.
2X X X X X
Express "Quick program" for lightly
soil
ed dishware, e.g. party
dishware or to remove salt
traces from the wash cabi‐
net after refilling salt; not
suitable for detergent tabs.
X X X X
SaniWash To sanitize dishware, e.g.
baby bottles, cutting
boar
ds and preparation
dishware.
X 2X X X
Pre-wash To rinse dishes when a
complet
e program is not
needed.
X
Consumption: The consumption values refer to a hot-water connection.
Electric power: 0.01 - 1.3 kWh
W
ater: 1.1 - 4.2 gal. (4 - 16 l)

Cleaning and care
46
Check and clean your dishwasher
regularly. This will help avoid prob‐
lems and faults.
All sur
faces are susceptible to
scratching.
Contact with unsuitable cleaning
ag
ents can alter or discolor all surfa‐
ces.
Cleaning the wash cabinet
Generally, the wash cabinet is self
clea
ning if the correct amount of deter‐
gent is used.
If, however, there are lime scale or
gr
ease deposits in the cabinet, these
can be removed with a special dish‐
washer cleaner (see "Optional accesso‐
ries"). Follow the instructions on the
packaging.
If you mainly use low temperature pro‐
gr
ams (< 120°F/50 °C), there is a risk of
bacteria and unpleasant odors building
up in the wash cabinet. To prevent this
happening the dishwasher will automat‐
ically increase the temperature in the fi‐
nal rinse of the selected program after
several programs using low tempera‐
tures have been run.
Clean the filters in the wash cabinet
regularly.
Cleaning the door and the door
seal
Bacteria could build up on the door
seal and the sides of the dishwasher
door as these
surfaces are outside the
wash cabinet and are not accessed and
cleaned by the spray arm jets.
W
ipe the door seals regularly with a
damp cloth to remove food deposits.
W
ipe off any food or drink residues
which may have dripped onto the
sides of the dishwasher door before
closing it.
Cleaning the control panel
The
control panel should only be
wiped with a damp cloth.

Cleaning and care
47
Cleaning the door front
I
f soiling remains longer, it may
happen that the surfaces can be‐
come discolored or changed.
Remove any soiling immediately.
Cle
an the front with a solution of
warm water and a little dishwashing
liquid applied with a soft sponge.
Wipe the surfaces dry using a soft
cloth.
G
lass cleaners may be used to
clean the exterior. However do not
allow them to sit or "puddle", this
can cause damage to the surface.
Remove the cleaner promptly.
To better maintain your appliance
avoid the following:
– Cleaning products containing soda,
ammonia, acid, or chloride
– Descaling agents
– Abrasive cleaning products, such as
scouring powder, scouring liquid, or
pumice stones,
– Cleaners containing solvents
– Stainless steel cleaners
– Dishwasher cleaner
– Oven cleaners
– Glass cleaner
– Hard, abrasive brushes or sponges,
e.g., pot scour
ers, brushes or spong‐
es which have been previously used
with abrasive cleaning agents
– Eraser sponges
– Sharp metal scrapers
– Steel wool
– Steam cleaning appliances
Cleaning and care
48
Filter system
The filter system in the base of the
wash cabinet pr
events food from being
redeposited on dishes. It also protects
the circulation pump from damage
caused by foreign objects.
This dishwasher must not be
u
sed without all the filters in place!
Collection of coarse soil may cause the
filt
ers to clog. The level of soiling and
time it takes before the filters need
cleaning will vary depending on use.
Che
ck the condition of the filters reg‐
ularly and clean them if necessary.
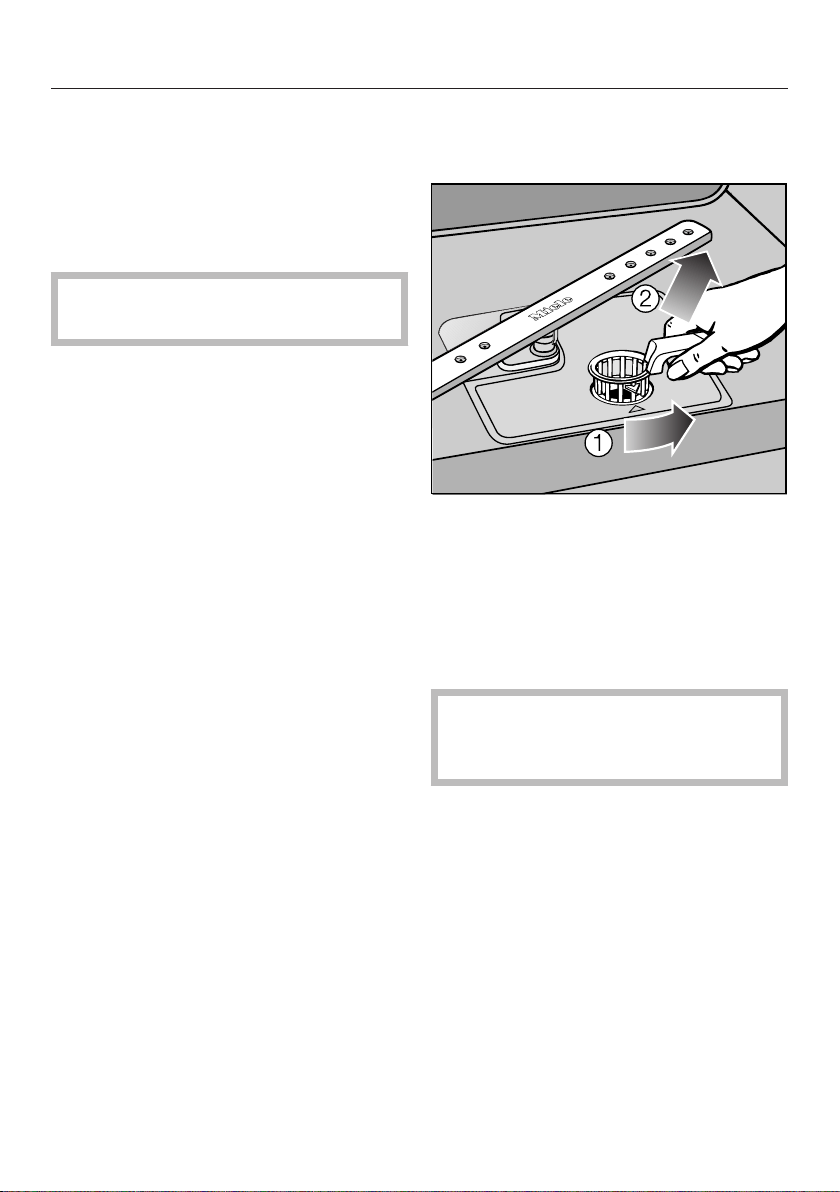
Filter system
T
urn the dishwasher off.
T
urn the handle counter-clockwise to
release the filter system .
Lift the filt
er system out of the dish‐
washer . Remove any coarse parti‐
cles and rinse the filter well under
running water.
Use a nylon brush if necessary.
E
nsure that course soil does not
get into the circulation system and
cause a blockage.
Cleaning and care
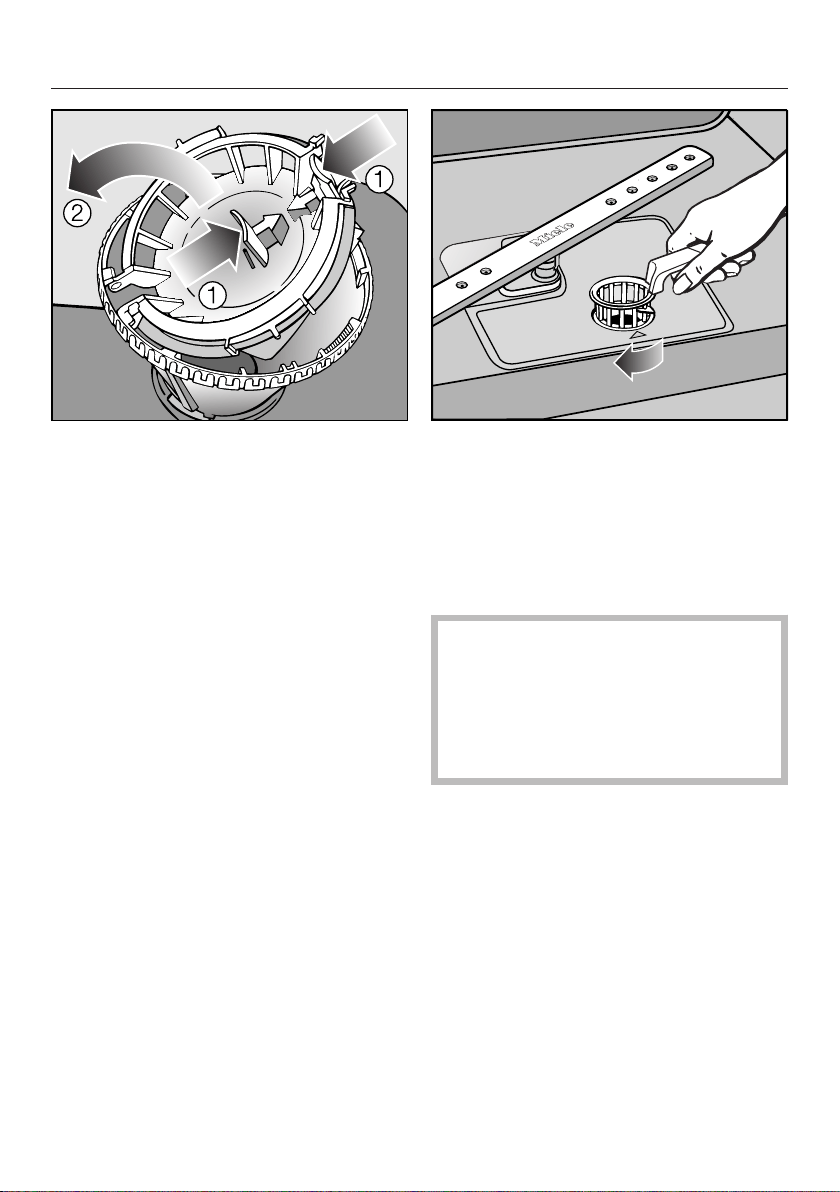
49
To clean the inside of the filter, the flap
must be opened:
P
ress catches together in the di‐
rection of the arrows as shown, and
open the filter .
Rin
se all the filters under running wa‐
ter.
Then close the flap so that the catch
engages.
Replace
the filter system so that it
lies flat in the base of the wash cabi‐
net.
Then turn the handle clockwise until
both arr
ows point towards each oth‐
er. This will lock the filter system in
place.
T
ake care when you are fitting
the filter system that it is secured in
position correctly.
Otherwise coarse soil could get into
the ci
rculation system and cause a
blockage.

Cleaning and care
50
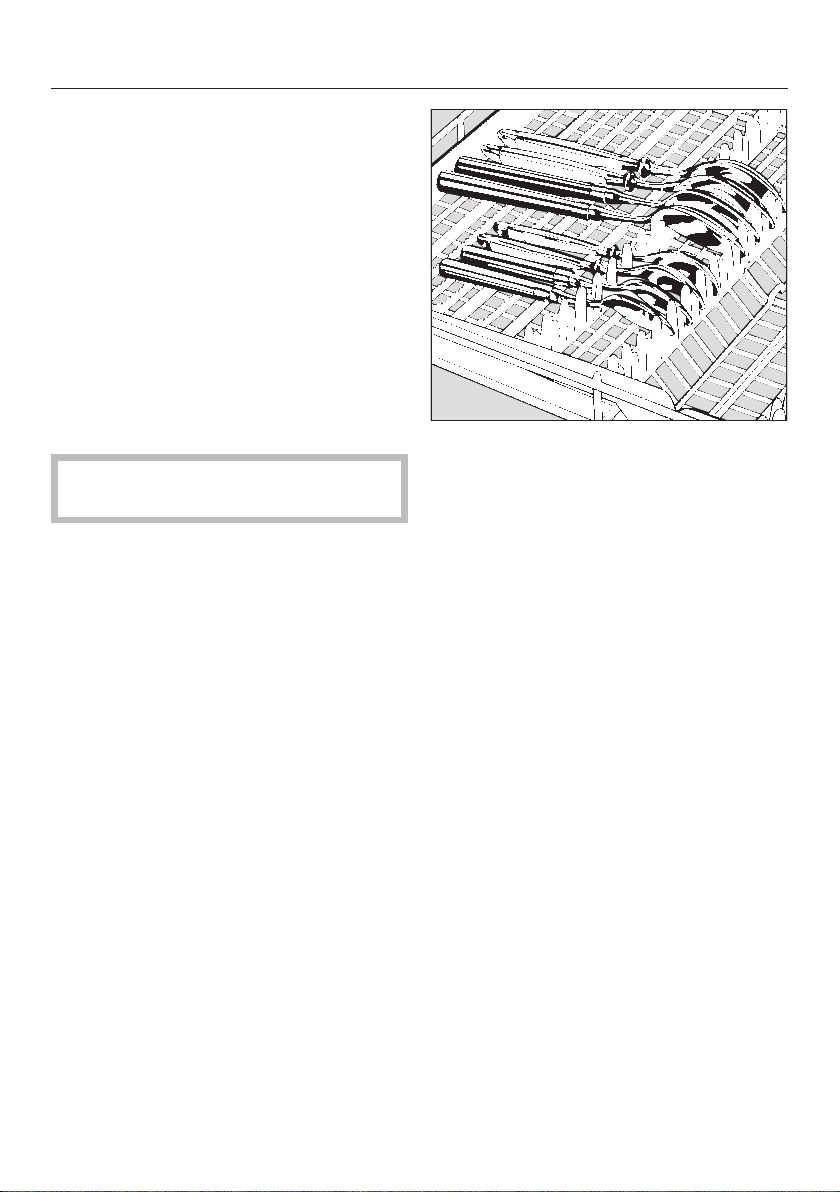
Cleaning the spray arms
Particles of food can get stuck in the
spr
ay arm jets and bearings. The spray
arms should therefore be inspected and
cleaned regularly (approx. every 4 - 6
months).
T
urn the dishwasher off.
Remove the spray arms as follows:
T
ake out the cutlery tray (if your dish‐
washer is fitted with one).
P
ush the top spray arm upwards to
engage the inner ratchet. Then un‐
screw the spray arm.
P
ush the middle spray arm upwards
to engage the ratchet. Then un‐
screw the spray arm .
Remo
ve the lower basket.
P
ull the lower spray arm firmly up‐
wards to remove it.
Use a point
ed object to push the
food particles that are stuck in the
spray arm jets into the spray arm.
Rin
se the spray arms thoroughly un‐
der running water.
Replace the spray arms and check
that they rotate freely.
Frequently Asked Questions
51
With the help of the following guide, minor faults in the performance of the appli‐
ance, some
of which may result from incorrect operation, can be put right without
contacting Miele Service. This will save time and money.
The following guide may help you to find the reason for a fault, and to correct it.
Y
ou should, however, note the following:
Unauthorized or incorrect repairs could cause personal injury or damage to
the appliance.
Repair work to electrical appliances must only be carried out by a suitably
quali
fied and competent person in strict accordance with current local and na‐
tional safety regulations. The manufacturer cannot be held liable for unauthor‐
ized work.
Technical problems
Problem Possible cause and solution
The dishwasher does
n
ot start.
The door is not properly closed.
P
ush the door firmly shut.
The dishwasher is not plugged in.
Inser
t the plug.
The circuit breaker has tripped.
Reset the fuse (see data p
late for the correct fuse
rating).
The dishwasher is not switched on.
T
urn the dishwasher on with the button.
The dishwasher stops
durin
g a program.
The circuit breaker has tripped.
Reset the fuse (see data p
late for the correct fuse
rating).
If
the circuit breaker trips again, contact Miele
Service.

Frequently Asked Questions
52
Problem Possible cause and solution
The warning buzzer is
sounding.
A
ll the program indica‐
tor lights flash when the
door is opened.
Fault code appears
in the time display.
There may be a technical fault.
T
urn the dishwasher off with the button.
T
urn the dishwasher back on after a few seconds.
Sele
ct the desired program.
Cl
ose the door.
If the indicator lights flash again, there is a technical
fault.
Co
ntact Miele Service.
Fault :
The dr
ain pump is still
running, even with the
door open.
The WaterProof System has reacted.
T
urn off the water supply.
Co
ntact Miele Service.
Fault : A fault has occurred in the circulation pump.
T
urn the dishwasher off for at least 30 seconds
with the button.
T
urn the dishwasher back on.
Select the desir
ed program.
Close
the door.
If the fault message appears again, there is a techni‐
cal fault.
Contac
t Miele Service.

Frequently Asked Questions
53
Water intake fault
Problem Possible cause and solution
The dishwasher stop‐
ped working
shortly af‐
ter the program started.
The warning buzzer is
sounding.
The Intake/Drain indica‐
tor light is flashing on
and off.
The water supply is turned off.
T
urn on the water supply all the way.
The dishwasher stops
during a program.
The warning buzzer is
sounding.
The Intake/Drain indica‐
tor light flashes.
Fault code or ap‐
pears in the time dis‐
play.
Before fixing the fault:
T
urn the dishwasher off with the button.
There is a problem with the water intake.
T
urn on the water supply fully and start the pro‐
gram again.
Clean
the water intake filter (see "Frequently asked
questions").
The wat
er pressure at the intake is lower than 4.35
psi.
Contact a plumber.

Frequently Asked Questions
54
Water drainage fault
Problem Possible cause and solution
The dishwasher stops
durin
g a program.
The warning buzzer is
sounding.
The Intake/Drain indica‐
tor light flashes.
Fault code appears
in the time display.
Before fixing the fault:
T
urn the dishwasher off with the button.
There is a problem with the water intake.
Ther
e might be water in the wash cabinet.
Clean
the filter system (see "Cleaning and care -
Filter system").
Clean
the drain pump (see "Frequently asked
questions").
Clean
the non-return valve (see "Frequently asked
questions").
Remove any ki
nk or loop in the drain hose.

Frequently Asked Questions
55
General problems
Problem Possible cause and solution
The warning buzzer is
sounding.
The
indicator light of
the selected program
and the time display
flash.
The dishwasher does
not start or the delay
start time stops run‐
ning.
The safe mode of the dishwasher was activated.
The following takes place:
– If you do not close the door within four seconds
of the last press of a button at program start
– If the door is open for longer than four seconds
during
a program or within the delay start time.
P
ress the program selection button and close the
door within four seconds.
Detergent residue is left
in the dispenser at the
end
of a program.
The dispenser was still damp when detergent was
added.
Mak
e sure the dispenser is dry before adding de‐
tergent.
The dispenser cover
cannot be closed.
Detergent residue is blocking the latch.
Remo
ve the detergent residue.
The inside of the door
and/or the int
erior walls
are wet after a program
has finished.
This is caused by the drying system and does not in‐
dic
ate a fault. The moisture will dissipate after a
while.
Water remains in the
wash cabinet at the end
of a pr
ogram.
Before fixing the fault:
T
urn the dishwasher off with the button.
The filter system in the wash cabinet is clogged.
Clean
the filter system (see "Cleaning and care -
Filter system").
The drain pump or non-return valve is blocked.
Clean
the drain pump or the non-return valve (see
"Frequently asked questions").
The drain hose is kinked.
Remove the kink.

Frequently Asked Questions
56
Noises
Problem Possible cause and solution
There is a knocking
noise in the wash cabi‐
net.
A spray arm is hitting the dishware.
Int
errupt the program, and rearrange the items
which are obstructing the spray arm.
There is a rattling noise
in the wash cabinet.
Dishware is moving around in the wash cabinet.
Int
errupt the program and rearrange loose pieces.
A foreign object (e.g., a cherry pit) has become
lodged in the dr
ain pump.
Remove the for
eign object from the drain pump
(see "Maintenance - Cleaning the drain pump and
non-return valve").
There is a knocking
noi
se from the water
pipe
This may be caused by the installation or the diame‐
t
er of the water pipe.
This has no influence on dishwasher function. If in
doubt,
contact a suitably qualified plumber.

Frequently Asked Questions
57
Poor cleaning results
Problem Possible cause and solution
The dishes are not
clean.
The dishes were not loaded correctly.
See
notes in "Loading the dishwasher".
The program was not powerful enough.
Select a mor
e intensive program (see "Program
overview").
Not enough detergent was dispensed.
Use mor
e detergent, or change your detergent.
Items are blocking the path of the spray arms.
Rearr
ange the items so that the spray arms can
rotate freely.
The filter system in the base of the wash cabinet is
not cle
an or is not correctly fitted.
This may cause the spray arm jets to get blocked.
Clean and/or fit the filter system correctly.
Clean
the spray arm jets if necessary (see "Clean‐
ing and care - Cleaning the spray arms").
The non-return valve is open and blocked. Dirty water
has flowed back int
o the wash cabinet.
Clean
the drain pump and the non-return valve
(see "Frequently asked questions").
Smearing appears on
glass
ware and cutlery.
There is a bluish sheen
on the surface of glass‐
ware; film can be wiped
off.
The rinse aid dosage is set too high.
Decr
ease the dosage (see "Before using for the
first time - Rinse aid").

Frequently Asked Questions
58
Problem Possible cause and solution
Dishware is not dry or
cutler
y and glasses are
spotty.
The rinse aid dosage is set too low or the rinse aid
r
eservoir is empty.
Replenish
the reservoir, increase the dosage, or
change the brand of rinse aid (see "Before using
for the first time - Rinse aid").
Dishware was taken out of the cabinet too soon.
L
eave it in for longer (see "Operation").
Combination tabs have been used which have im‐
pair
ed drying performance.
Chang
e your detergent, or replenish the rinse aid
(see "Before using for the first time - Rinse aid").
Glasses have a brown‐
ish-blu
e discoloration;
the deposit cannot be
wiped off.
Detergent deposits.
Switch
to another detergent.
Glasses are dull and
discolored; the deposit
cannot be wiped off.
The glassware is not dishwasher-safe. The surfaces
are affected.
Ther
e is no remedy.
Purchase glassware which is dishwasher-safe.
Tea or lipstick stains
have not been com‐
p
letely removed.
The wash temperature of the selected program was
t
oo low.
Se
lect a program with a higher wash temperature.
The bleaching effect of the detergent is too low.
Switch t
o another detergent.
Plastic parts are discol‐
or
ed.
Natural dyes, e.g., from carrots, tomatoes, or ketchup
may be the cause. The amo
unt of detergent used or
its bleaching effect was not sufficient to deal with
natural dyes.
Use mor
e detergent (see "Operation - Detergent").
Discoloration is irreversible.
White residue is visible
on
dishware and cut‐
lery, clouding occurs on
glassware; this film can
be wiped off.
The rinse aid dosage is too low.
Incr
ease the dosage (see "Before using for the first
time - Rinse aid").
An unsuitable Tab detergent has been used.
Chang
e your detergent.

Frequently Asked Questions
59
Problem Possible cause and solution
There are rust stains on
the cutler
y.
The affected items are not corrosion resistant.
Ther
e is no remedy.
Purchase cutlery which is dishwasher-safe.
Frequently asked questions
60
Cleaning the drain pump and
non
-return valve
If the water has not been pumped away
at the end of a p
rogram, the drain pump
or the non-return valve might be
blocked. They are, however, easy to
clean.
T
urn off the dishwasher and pull the
plug.
T
ake the filter system out of the wash
cabinet (see "Cleaning and care -
Cleaning the filters").
Scoo
p the water out of the cabinet
using a suitable container or utensil.
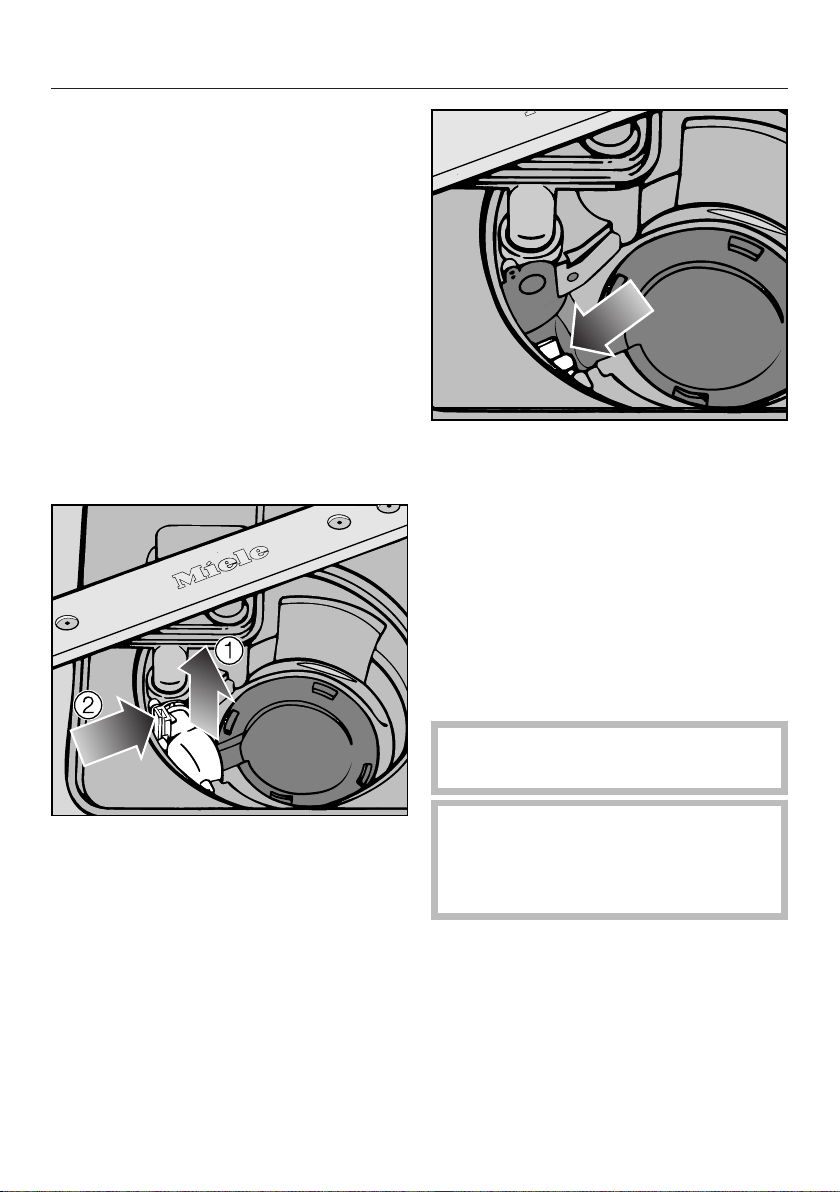
P
ress the catch for the non-return
valve inwards .
Lift the no
n-return valve up and out
and rinse well under running water.
Remo
ve all foreign objects from the
non-return valve.
The drain pump is beneath the non-re‐
turn valve (see arr
ow).
Remo
ve all foreign objects from the
drain pump (glass or bone splinters).
Before returning the non-return
valve, check that the drain pump is
not blocked. Spin the propeller sever‐
al times in both directions to check
for obstructions.
C
arefully reinsert the non-return valve
and secure it with the locking clamp.
Mak
e sure the locking clamp
clicks into place!
Be car
eful not to damage any
delicate components when cleaning
the drain pump and the non-return
valve.

Customer service
61
Repairs
For problems that you cannot resolve
on your own, please contact:
– your Miele dealer or
– Miele Service
The telephone number for Miele is
li
sted at the back of these instruc‐
tions.
In the event of a fault which you cannot
corr
ect yourself please contact the
Miele Service Department at the phone
number on the back of this booklet.
Warranty
For more information, please refer to
the incl
uded warranty.
MieleCare (USA only)
MieleCare, our Ext
ended Service Con‐
tract program, gives you the assurance
of knowing that your appliance invest‐
ment is covered by 5 years of worry
free ownership.
MieleCare is the only Extended Service
Contract in the industry that guarantees
repairs by a Miele Authorized Service
Provider using genuine Miele parts. On‐
ly genuine Miele parts installed by fac‐
tory trained professionals can guaran‐
tee the safety, reliability, and longevity
of your Miele appliance.
Please note that unless expressly ap‐
pr
oved in writing by Miele’s Service de‐
partment, Extended Service Contracts
offered by other providers for Miele
products will not be recognized by
Miele. Our goal is to prevent unauthor‐
ized (and untrained) service personnel
from working on your Miele products,
possibly doing further damage to them,
you and/or your home.
To learn more about MieleC
are Extend‐
ed Service Contracts, please contact
your appliance dealer or visit us online
at:
http://www.mieleusa.com

Optional accessories
62
Dishwasher detergent and rinse aid, as
well as clea
ning and care products, are
available as optional accessories.
All the products are designed for use
with Miele dishwashers.
These and many other useful products
can be or
dered via the Miele website or
from Miele (see end of this manual for
contact details).
Dishwasher detergent, rinse
aid, and salt
When you decided to buy a Miele dish‐
washe
r, you chose excellent quality and
performance. However, ensuring that
your dishwasher always delivers the
best possible results will also depend
on your choice of dishwasher deter‐
gent, rinse aid, and dishwasher salt, as
cleaning results can vary depending on
the brand used.
With Miele CareCollection products,
you can be sure of optimum results as
these products have been specially de‐
signed for Miele dishwashers.
Detergent tabs
– Sparkling results even with stubborn
food deposits
– Combination product with other
components such as rinse aid, salt,
and gla
ss protection additives
– Phosphate-free - safe for the envi‐
r
onment
– Water-soluble wrapping - no need to
unwrap
Powder detergent
– With active oxygen for thorough
cleaning
– With enzymes which are effective
even
in low temperature programs
– With glass protection against corro‐
sion
Rinse aid
– For gleaming glasses
– Helps dishware to dry
– With glass protection against corro‐
sion
– Specially designed cap for precise,
easy dispensing

Optional accessories
63
Dishwasher care products
Miele cleaning and care products pro‐
vide optimum car
e for your dishwasher.
Dishwasher cleaner
– Cleans the dishwasher effectively
and thor
oughly
– Removes grease, bacteria, and un‐
pleasant odors
– Ensures excellent dishwashing re‐
sults
Dishwasher descaler
– Removes heavy lime scale deposits
– Mild and gentle with natural citric
acid
Dishwasher conditioner
– Removes odors, lime scale, and light
deposits
– Maintains the elasticity and leak
tightness of the seals
Dishwasher freshener
– Neutralizes unpleasant odors
– Fresh, pleasant lime and green tea
scent
– Easy to attach to the dishwasher
bask
et
– Very economical, lasts for 60 wash
cycles
Accessories
Some accessories may be supplied as
standar
d, depending on model.
Cappuccinatore insert
The Cappuccinatore insert can be used
for clean
ing the individual parts of the
Miele Cappuccinatore in the dishwash‐
er.
Cutlery basket
The cutlery basket is placed in the low‐
er bask
et and can be used to wash ad‐
ditional items of cutlery.
Glassware rack
This rail is designed to hold glasses
with st
ems securely in the lower basket.

64
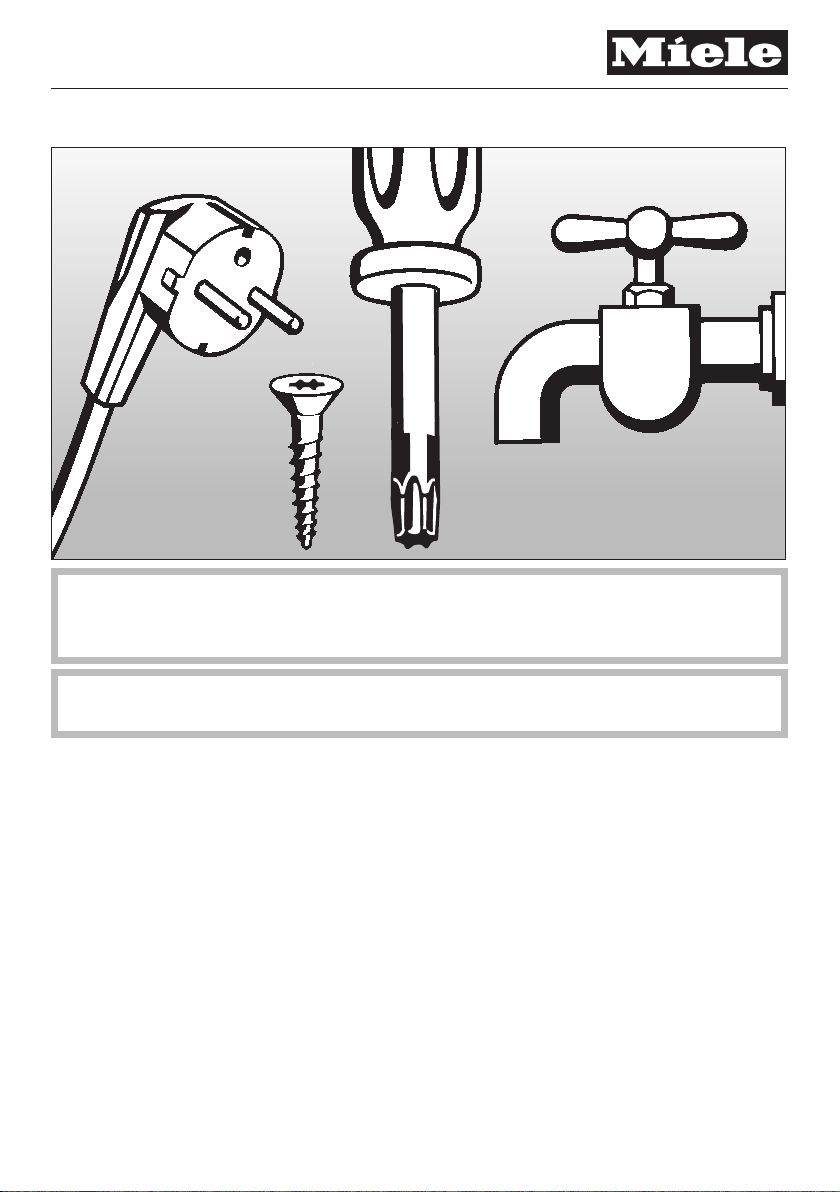
65
Installation Instructions
Please refer to the Installation Diagram supplied with these instructions.
To comply with IEC sound testing protocols, please contact Miele for additional
instructions.
Information is subject to change. Please refer to our website to obtain the most
curr
ent product specification, technical & warranty information.

Electrical connection
66
Installation, repairs and other work
by unqualified persons could be
dange
rous.
Check that the voltage, frequency
and fuse r
ating shown on the data
plate match the household mains
supply.
The power outlet must be accessible
aft
er installation. Do not use an ex‐
tension cord to connect the dish‐
washer to the mains. Danger of over‐
heating! See data plate on the right
side of the door.
A damaged power cord must only be
r
eplaced with a genuine Miele cord
by a Miele service technician.
Grounding instructions
THIS APPLIANCE MUST BE
GROUNDED.
In the event of a malfunction or break‐
down, grounding will reduce the risk of
electric shock by providing a path of
least resistance for the electrical cur‐
rent. This appliance is equipped with a
cord having an equipment grounding
conductor and a grounding plug. The
plug must be plugged into an appropri‐
ate outlet that is installed and grounded
in accordance with all local codes and
ordinances.
Improper connection of the equip‐
ment grounding conductor can result
in electric shock.
Do not modify the plug provided with
the appliance; if it will not fit the out‐
let, have a pr
oper outlet installed by
a qualified electrician.
If there is any question concerning
the pr
oper electrical connection or
grounding of this appliance to the
powersupply, please consult a li‐
censed electrician or call Miele’s
Technical Service Department:
USA: 1-800-999-1360
CDN: 1-800-565-6435
Specifications
The dishwasher comes equipped with a
4 ft (1.2 m)
powercord with a molded
plug for connection to 120 V, 60 Hz,
15 A grounded receptacle.
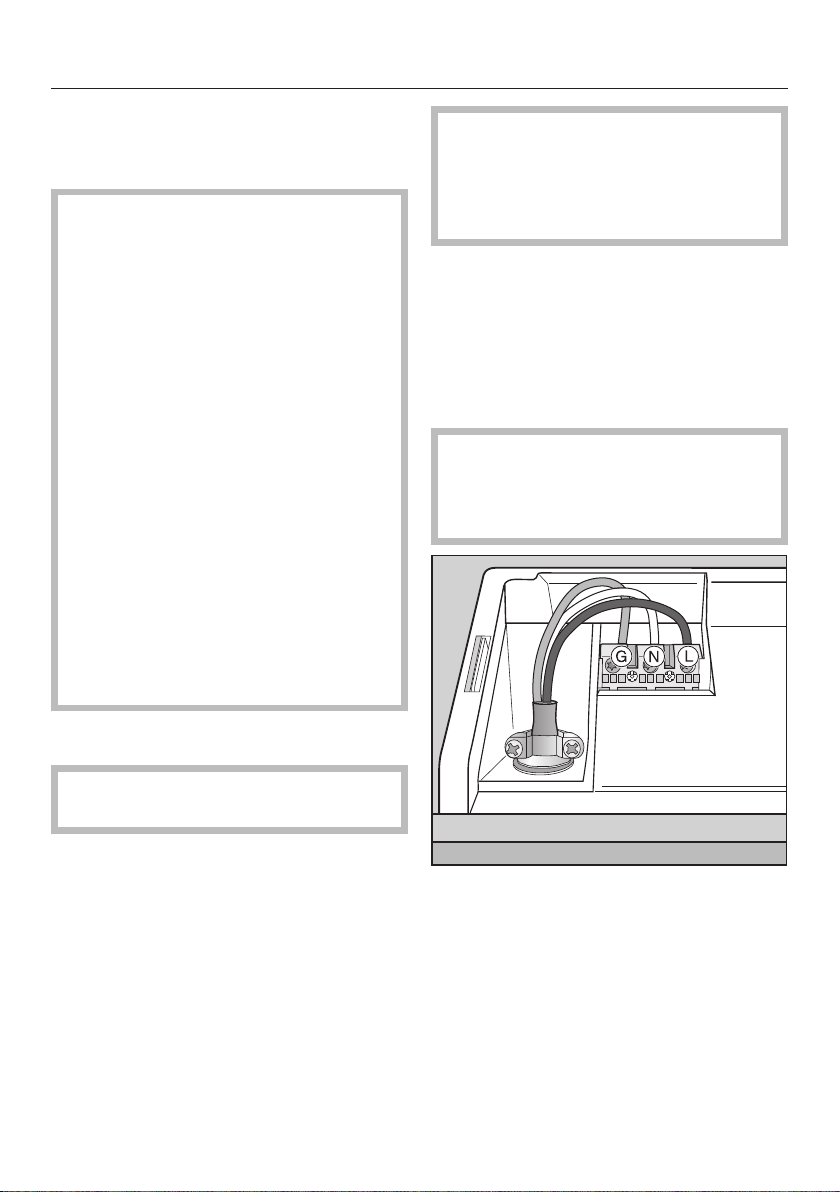
Electrical connection
67
Hardwired electrical connection
It is p
ossible to hardwire this appliance
to an existing power cable.
CAUTION: Before servicing, discon‐
nec
t the power supply by either re‐
moving the fuse, shutting off the
power main or manually "tripping"
the circuit breaker.
Installation work and repairs should
on
ly be performed by a qualified
technician in accordance with all ap‐
plicable codes and standards. Re‐
pairs and service by unqualified per‐
sons could be dangerous and the
manufacturer cannot be held re‐
sponsible.
Before connecting the appliance to
the power supply, mak
e sure that the
voltage and frequency listed on the
data plate correspond with the
household electrical supply. This da‐
ta must correspond to prevent ma‐
chine damage. Consult an electrician
if in doubt.
GROUNDING INSTRUCTIONS
THIS APPLIANCE MUST BE
GROUNDED
.
This appliance must be connected to a
gr
ounded metal, permanent wiring sys‐
tem, or an equipment-grounding con‐
ductor must be run with the circuit con‐
ductors and connected to the equip‐
ment-grounding terminal or lead on the
appliance.
Prior to making a hardwire connec‐
tion to the terminal, remove the pow‐
ercord. Otherwise there will be a risk
of electric shock from the attached
plug.
An existing flexible supply cord or cable
shall have a minimum thickness of
A
WG 14.
120 V, 60 Hz, 15 A fuse rating
Black wire (live): connect to L
White wire (neutral): connect to N
Green wire (ground): connect to
After attaching the permanent power
supply cor
d, check that all screws on
the terminal block and the strain re‐
lief are tightened.

Water connection
68
Water intake
W
ater in the dishwasher must
not be used as drinking water.
– The dishwasher may be connected to
a col
d or hot water supply up to a
maximum of 140°F/60°C.
We would only recommend connec‐
tion to a hot water supply if it is eco‐
nomical, e.g. a solar-powered supply.
When connected to a hot water sup‐
ply, all program stages which would
otherwise be carried out with cold
water will be carried out with hot wa‐
ter.
– The intake hose is approx. 4' 11"/1.5
m long. A 1.5 m long flexible metal
extension hose (pressure tested to
2,030 psi) is available as an optional
accessory, if required.
– A faucet with a 3/8" male thread
must be pr
ovided on site.
– This appliance is constructed to
comply with ANSI/ASSE 1001 //
IEC/EN/DIN 61770
// VDE 0700 Part
600, and may be connected to a suit‐
able supply without an extra non-re‐
turn valve if national regulations per‐
mit.
– The water pressure (flow pressure at
the take-off point) must be between
4.35 - 145 psi. If the water pressure
is too high, a pressure reducer valve
must be fitted.
After connecting the dishwasher to
the wat
er supply, check that the wa‐
ter intake is airtight.
T
o avoid any damage to the ap‐
pliance, the dishwasher must only be
connected to fully vented pipework.
The intak
e hose must not be
shortened or damaged in any way as
it contains electrical components.
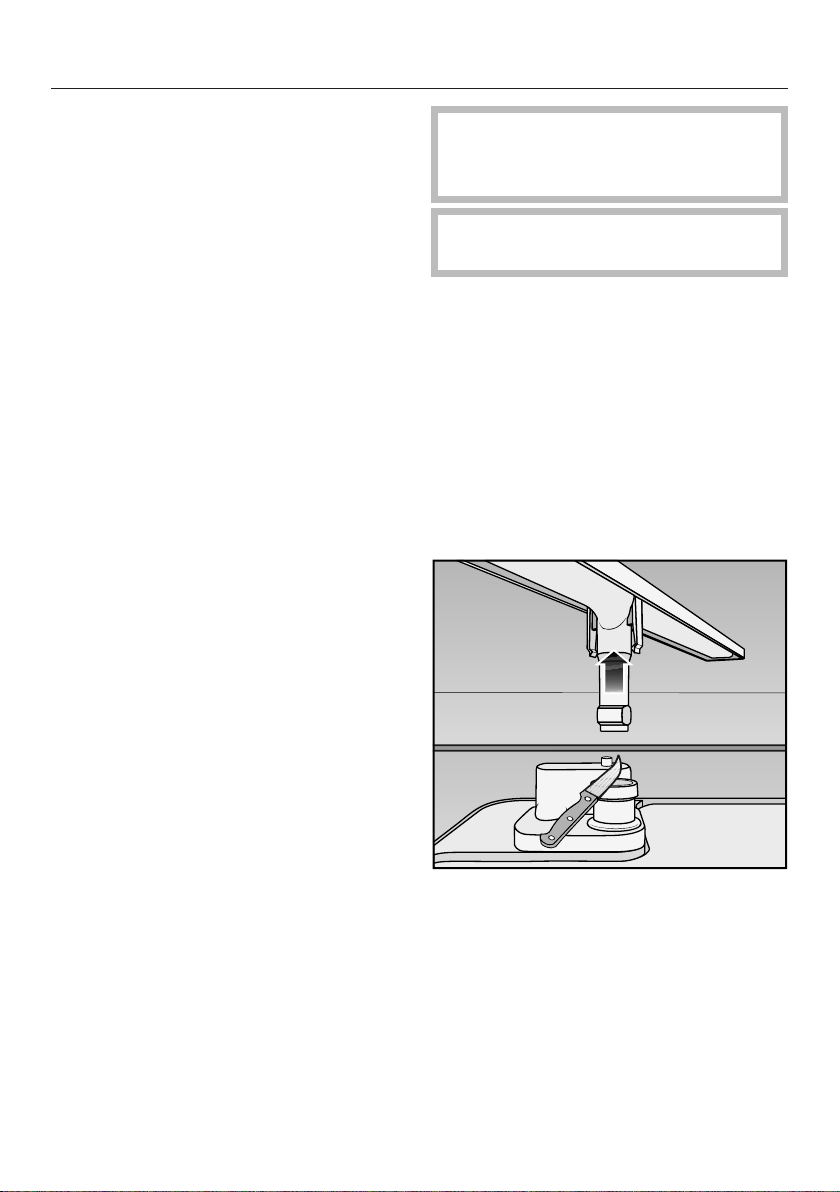
Water connection
69
Drainage
– The machine comes equipped with a
built-
in non-return valve on the dis‐
charge side to prevent waste water
from flowing back into the dishwash‐
er.
– Take the drain line of the dishwasher
and attach the dr
ain line as high as
possible under the counter rim of the
kitchen sink before connecting the
end to the drain. The loop will serve
to prevent a backed up drain or large
volume of water in the sink from si‐
phoning back into the dishwasher.
– The dishwasher is supplied with ap‐
pr
ox. 5' 11" (1.5 m) of flexible drain
hose with an internal diameter of 7/8"
(22 mm).
– The drain hose can be extended us‐
ing
extensions and adapters. The
drainage length must not be longer
than 13' 1 1/2" (4 m) and the delivery
head must not exceed 3' 3 3/8"
(1 m).
– If the hose is to be directly fitted to
the dr
ainage outlet on site, use the
hose clip supplied (see installation di‐
agram).
– The hose can be directed to the left
or the right of the appliance.
– The on-site connector for the drain
ho
se can be adapted to different
widths of hose. If the connector pro‐
trudes too far into the drain hose, it
will need to be shortened. Otherwise
the drain hose may become blocked.
– The drain hose must not be short‐
ened.
Mak
e sure that there are no
kinks in the hose, and that it is not
squashed or stretched.
After servicing the appliance, ensure
that the dr
ain does not leak.
Venting the drain
If the on-site drain connection is situat‐
ed lower than the guide path for the
bott
om basket rollers in the open door,
the drain must be vented. Otherwise a
siphoning effect during a program can
cause the appliance to empty itself of
water.
To vent: open the dishwasher door
fully.
P
ull the lower spray arm firmly up‐
wards to remove it.
Cut off the t
op of the vent valve in the
wash cabinet.
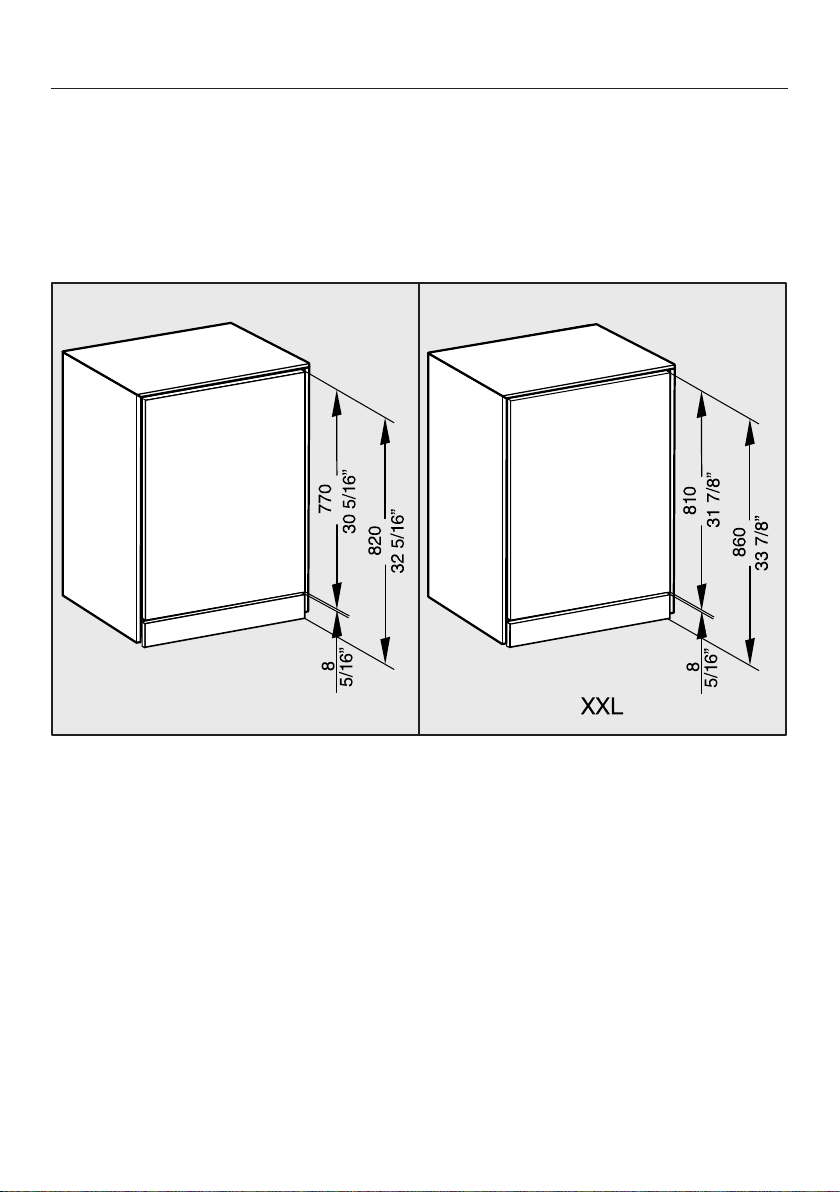
Sound emission testing
70
Prerequisites for sound emission tests
Load the dishwasher with 16 sta
ndard place settings and use the
Normal pr
o‐
gram.
Setup for sound emission tests
The dishwasher must be set up according to the following specifications.
Install the dishwashe
r into an analyzing unit.
Secur
e the front panel.
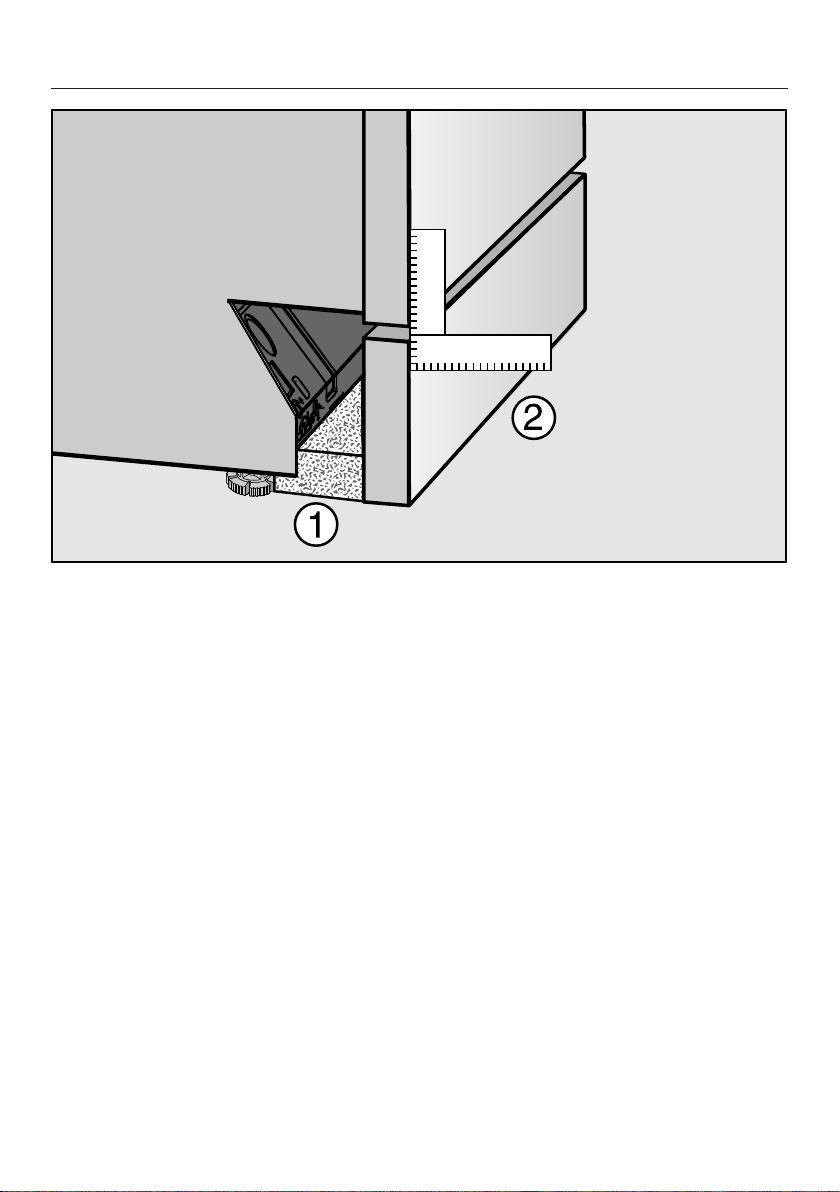
Sound emission testing
71
Push the provided fleece strips (depending on model) under the toe-kick until it
is flush with the appliance feet .
P
ush the toe-kick into place in such a way that it is flush with the door front .
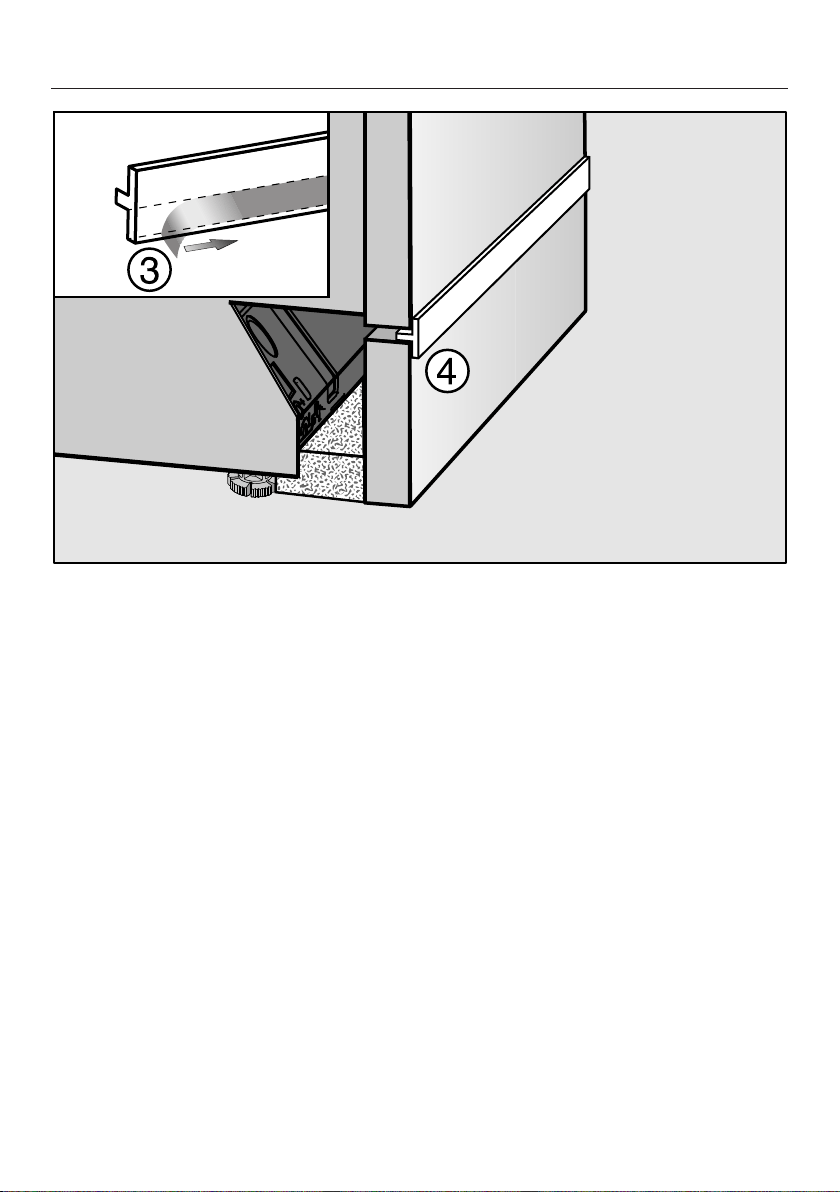
Sound emission testing
72
Remo
ve the protective film from the provided insulating strip (depending on
model) .
P
ush the insulating strip into the front top edge of the toe-kick .


9 Independence Way
Princeton, NJ 08540
Phone:
Fax:
www.mieleusa.com
U.S.A.
Miele, Inc.
National Headquarters
Please have the model and serial number
of your appliance available before
contacting Technical Service.
Canada
Importer
Miele Limited
Headquarters and Miele Centre
800-843-7231
609-419-9898
609-419-4298
Technical Service & Support
Nationwide
Phone:
Fax:
161 Four Valley Drive
Vaughan, ON L4K 4V8
www.miele.ca
800-999-1360
888-586-8056
Customer Care Centre
Phone:
800-565-6435
905-532-2272
Germany
Manufacturer
Miele & Cie. KG
Carl-Miele-Straße 29
33332 Gütersloh
73

M.-Nr. 10 014 080 / 03en-US
G 4970 / G 4975