Model number(s):
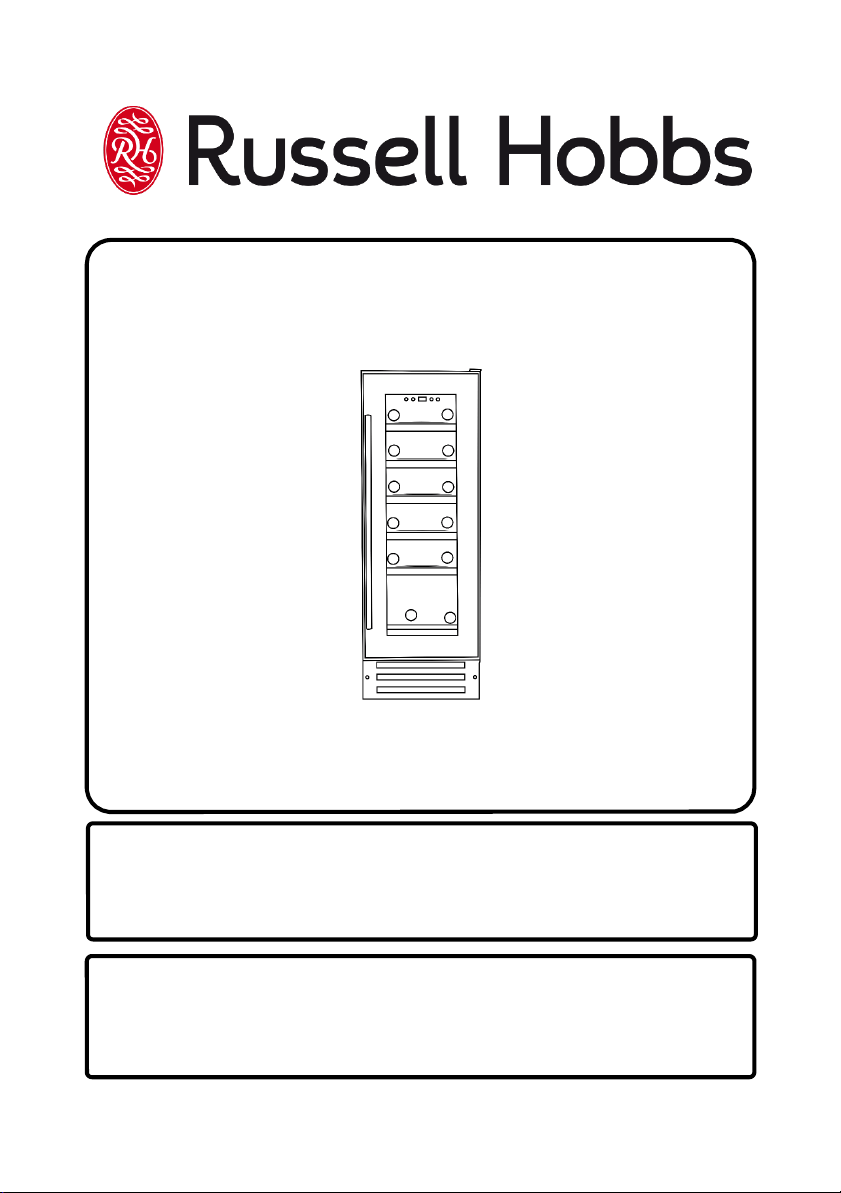
RHBI18WC1 (SS)
For Customer Services & Spare Parts please call 0345 208 8750
or visit us at https://mda.russellhobbs.com
IMPORTANT:
RETAIN FOR FUTURE REFERENCE
18 Bottle Built in Wine Cooler
Instruction Manual
Contents
Safety Instructions ………………………………………. 3-5
Electrical Safety ………………………………………. 5
Transportation & Handling ………………………………………. 5
Installing & Switch on your Appliance ………………………………………. 6
Before Switching On ………………………………………. 7
Product Overview ………………………………………. 8
Unit & Spare Parts ………………………………………. 8
Positioning & Installation ………………………………………. 9-10
Handle Installation ………………………………………. 10
Usage ………………………………………. 11-18
Door Reversal ………………………………………. 19-22
Energy Saving Advice ………………………………………. 23
Maintenance & Cleaning ………………………………………. 24
Internal Cleaning ………………………………………. 24
External Cleaning ………………………………………. 24
When not in Use ………………………………………. 24
Defrosting ………………………………………. 25
Trouble Shooting ………………………………………. 26-28
Connection to the Mains Supply ………………………………………. 29
Guarantee ………………………………………. 30
Technical Specification ………………………………………. 31

Safety Instructions
Important note: Please read this booklet before installing and switching on this
appliance. The manufacturer assumes no responsibility for incorrect installation
and usage as described in this booklet.
Warning: When positioning the appliance, ensure the supply cord is not
trapped or damaged.
Warning: Do not locate multiple portable socket-outlets or portable power
suppliers at the rear of the appliance.
• This model uses natural refrigerant gas as part of its cooling system. This
gas is known as R600a (Isobutene) and is environmentally friendly but can be
combustible. Care should therefore be taken when handling or transporting the
product to ensure that none of the refrigeration circuit components are
damaged,
• Do not obstruct ventilation openings in the appliance
• The appliance must not be placed or rested on its power cord.
• Do not use mechanical devices or other artificial means to accelerate the
defrosting process, such as a heater or a hair dryer.
• Do not use electrical appliances in the refrigerator compartment of the
appliance.
• If this appliance is to replace an old refrigerator with a lock, the lock must be
removed as a safety measure before storing it or disposing of it. This is to
protect children from locking themselves inside the appliance.
• Old refrigerators and freezers contain insulation gases and refrigerant, they
must be disposed of properly. Contact your local authority or your dealer if
you have any questions. Please ensure that you do not damage the scrap unit
prior to being picked-up by the relevant waste disposal service.
• Do not use adaptors or extension leads when connecting the appliance to the
electrical power supply
• Do not plug in damaged plugs.
3
• Do not pull, twist or damage the power cable.
• Do not plug-in or un-plug the appliance with wet hands to prevent electrical
shock.
• This appliance can be used by children aged from 8 years and above and
persons with reduced physical, sensory or mental capabilities or lack of
experience and knowledge if they have been given supervision or instruction
concerning use of the appliance in a safe way and understand the hazards
involved. Children should not play with the appliance.
• Children aged from 3 to 8 years are allowed to load and unload this appliance.
• This appliance is designed to be used by adults, do not allow children to play
with the appliance or let them hang over the door.
• Do not place explosive or flammable material in your appliance for your own
safety.
• Bottles containing a high percentage of alcohol must be sealed well and placed
vertically in the refrigerator.
• Do not cover the body or the top of the appliance
• Fix down the accessories in the appliance during transportation to prevent
damage to them.
• To avoid contamination of food, please respect the following instructions
• Opening the door for long periods can cause a significant increase of
the temperature in the compartments of the appliance.
• Clean regularly surfaces that can come in contact with food and
accessible drainage systems.
• Clean water tanks if they have not been used for 48h; flush the water
system connected to a water supply if water has not been drawn for 5
days.
• Store raw meat and fish in suitable containers in the refrigerator, so
that it is not in contact with or drip onto other food.
• Two-star frozen-food compartments(if they are presented in the
appliance) are suitable for storing pre-frozen food, storing or making
ice-cream and making ice cubes.
4

• One-, two- and three -star compartments (if they are presented in the
appliance) are not suitable for the freezing of fresh food.
• If the appliance is left empty for long periods, switch off, defrost, clean,
dry and leave the door open to prevent mount developing within the
appliance.
Electrical Safety
THIS APPLIANCE MUST BE PLUGGED INTO AN EARTHED SOCKET
• Before switching on, make sure that the voltage of your electricity supply is the
same as that indicated on the rating plate. This product is designed to operate
on 220 – 240V AC; 50Hz. Connection to any other power source may damage
the unit.
• This product may be fitted with a non re-wireable plug. If it is necessary to
change the fuse in the plug, the fuse cover must be refitted. If the fuse cover
becomes lost or damaged, the plug must not be used until a suitable
replacement is obtained.
• If the plug has to be changed because it is not suitable for your socket, or
becomes damaged in any way, it should be cut off and an appropriate plug
fitted following the wiring instructions. This should be carried out by a qualified
electrician. The plug removed must be disposed of safely, as insertion into a 13
Amp socket is likely to cause an electrical hazard.
Transportation and Handling
For safe lifting, tilt the appliance backwards by no more than 45 degrees, hold the
base and rear corners of cabinet. Lift the refrigerator carefully. Never use the door
handles for lifting. To move the refrigerator on a flat level surface, tilt it slightly
backwards and push backwards.
This unit is heavy and could cause injury – ensure there are adequate people
present to move the appliance.
5

Installing and Switching on Your Appliance
• Operating voltage for your appliance is 220-240V at 50Hz.
• Before plugging in the power supply, ensure that the voltage on the rating label
corresponds to the working voltage of your electrical system in your home.
• Insert the plug into an efficient Ground (Earth) connection. If the socket has no
Ground (Earth) contact or the plug does not match, we suggest you call an authorised
electrician for assistance.
• Place your appliance in an area that is not exposed to direct sunlight.
• Your appliance should be placed at least 10cm away from stoves, ovens and other
heating cores.
• This appliance should never be used outdoors or left in the rain.
• When your appliance is placed next to a chest freezer or freezer, there should be at
least 10cms between them to prevent humidity on the outer surface.
• Do not place anything on your appliance and install the unit in a suitable place so that
there is at least 30cm clearance above the appliance.
• If placing your appliance next to kitchen cabinets, leave 5cm between them.
• The rear of the appliance should be at least 6cm away from the back wall.
• The appliance must be used in the vertical position and on a flat surface.
• To level the appliance, use the adjustable feet on the appliance.
• Do not place your appliance on a carpeted surface as this will prevent adequate
ventilation.
• This appliance should only be placed on a flat, firm surface.
• Choose a dry and well-ventilated space.
• The appliance should be positioned so that the plug is easily accessible.
• If you need help or are unsure how to install the unit, please contact Customer
Services on 0345 208 8750 or visit https://mda.russellhobbs.com.
WARNING! During using, service and disposal the appliance,
pease pay attention to symbol similar to one shown, which is located on
rear of appliance (rear panel or compressor) and with a yellow or orange
colour. It’s risk of fire warning symbol. There are flammable
materials in refrigerant pipes and compressor. Please be far away
fire source during using, service and disposal.
6

Before Switching On
• Before using your appliance, add a teaspoon of bicarbonate of soda to warm
water and with a damp cloth wipe down all parts of the new appliance, then
repeat the process with a clean damp cloth and dry (ensure the appliance is not
connected to the power when performing this task).
• Remove all transport tapes and foam protection pieces. Clean the interior with
a cloth dampened in lukewarm soap and water. Wipe with clean water and
wipe dry.
• There may be an odour when you first switch on the appliance, it will disappear
when the appliance starts to cool.
• When the appliance has been positioned, adjust the feet to ensure the unit is
stable. This is essential to ensure quiet running and proper door opening
/closing.
• Connect to the electrical socket but do not switch the power to the cooler on
for at least 3 hours. The coolant within the product needs time to settle after it
has been transported and put in to position, failure to do this will affect the
cooling performance of your appliance.
• Once the appliance has settled turn on the appliance, locate the temperature
controls on the product and set it to the required temperature.
• You may hear faint gurgling or bubbling sounds when the refrigerant is pumped
to the cooling system and through the coils or tubing at the rear of the
appliance. When the compressor is in operation you may hear a slight whirring
sound or pulsating noise. The temperature controls regulate the operation of
the compressor, and you may hear a slight click as it cycles in and out (this is
normal).
• To save energy, you should minimize the frequency and duration of door
opening.
7
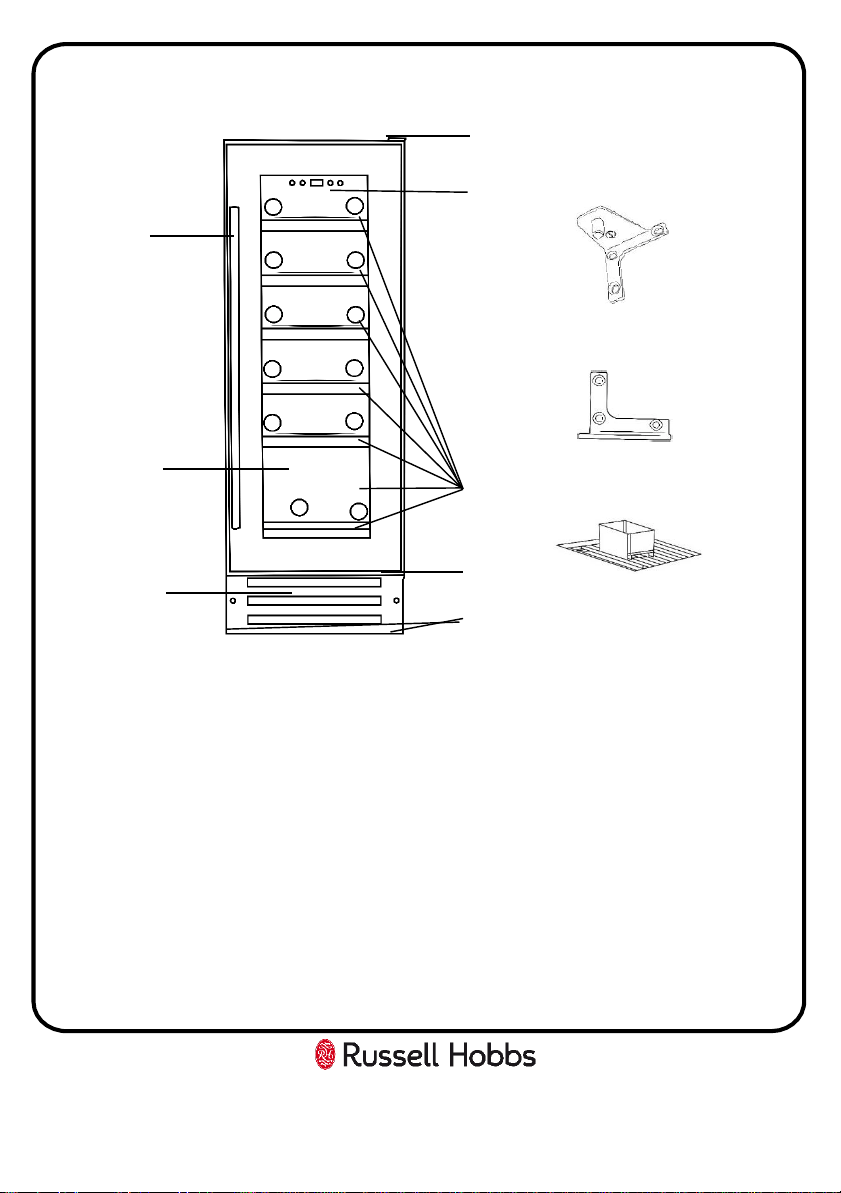
Unit Parts & Spare Parts
Before installation, check that all parts detailed in the product overview are
present. If any parts are missing, please contact the Customer Service team on
0345 208 8750 or visit us at https://mda.russellhobbs.com
8
Product Overview
7
5
4
2
3
6
1
8
1. Upper hinge
2. Controls & display
3. Handle
4. Glass door
5. Bottle racks
6. Lower hinge
7. Adjustable feet
8. Vents
9. Door reversal left top hinge
10. Door reversal left bottom
hinge
11. Humidity reservoir
9
10
11
9
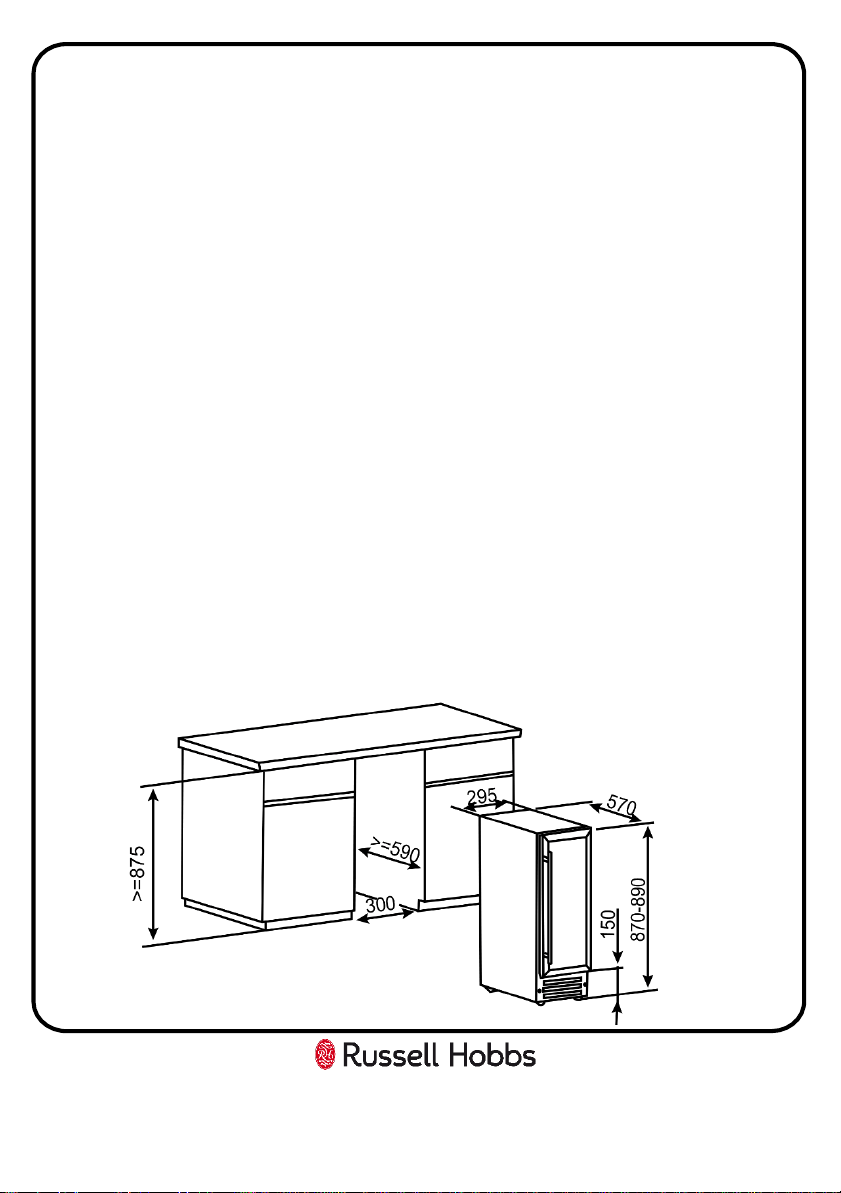
Positioning & Installation
• This appliance can be installed as a freestanding or a built in unit. The
clearances shown in the below drawing should be followed for both types of
installation.
• Avoid damaging the product during installation, positioning of the appliance
requires two people in order to avoid injuries or damage to the appliance.
• Your appliance should not be located in direct sunlight or exposed to
continuous heat or extremes of temperature (e.g. next to a radiator or boiler). If
this is not feasible, then you should install an insulation plate between the
appliance and the adjacent heat source.
• You should check whether there is an electrical socket available, which will be
accessible after your appliance is installed.
• Place the appliance flatly and firmly on a solid base. The appliance is fitted with
adjustable feet, which should be used to level the appliance.
• Be sure to leave enough space for the opening of the door, to avoid damage to
the appliance or personal injury
• If installing as a built in unit the aperture size has to be a minimum of (H)875 x
(W)300 x (D)590mm. The depth dimensions in particular must be observed.
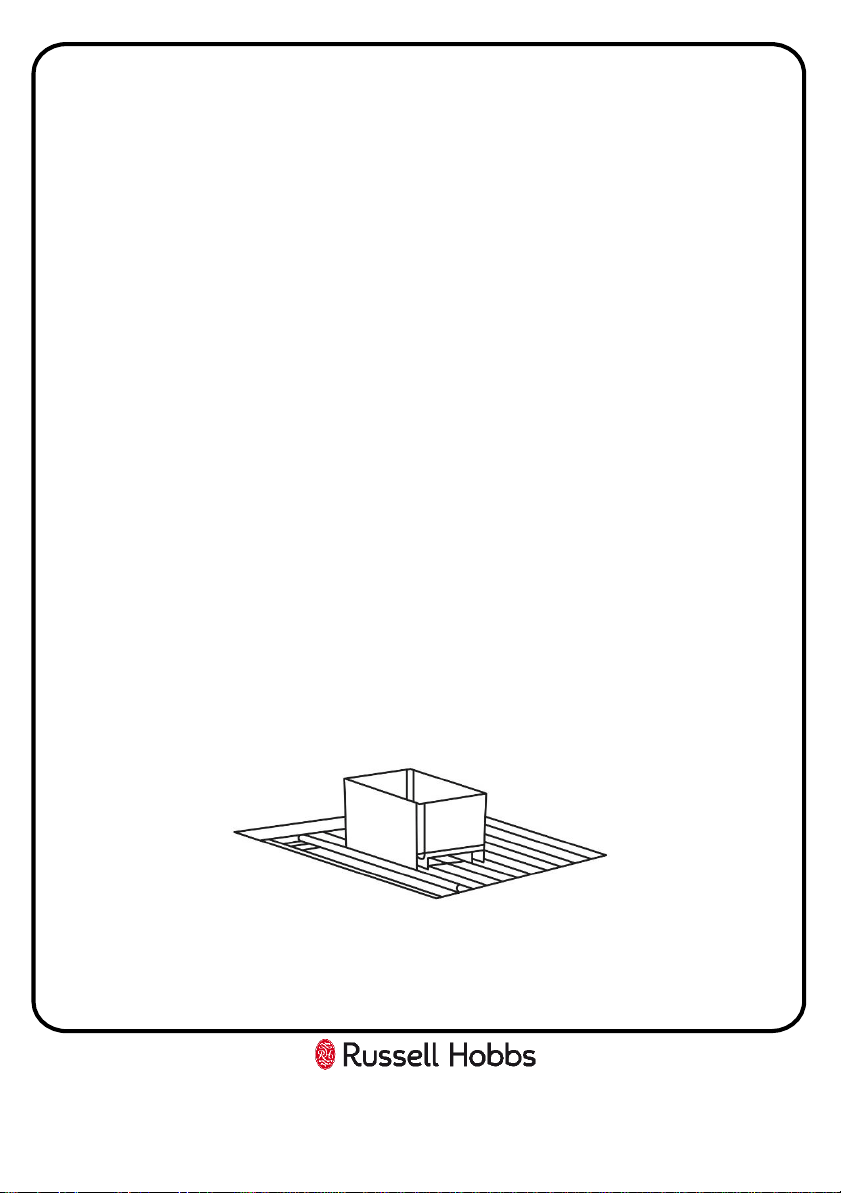
Important: The vent at the base of the appliance is for ventilation. Nothing
should be placed in front of this vent; otherwise your wine cabinet may not
operate properly.
10
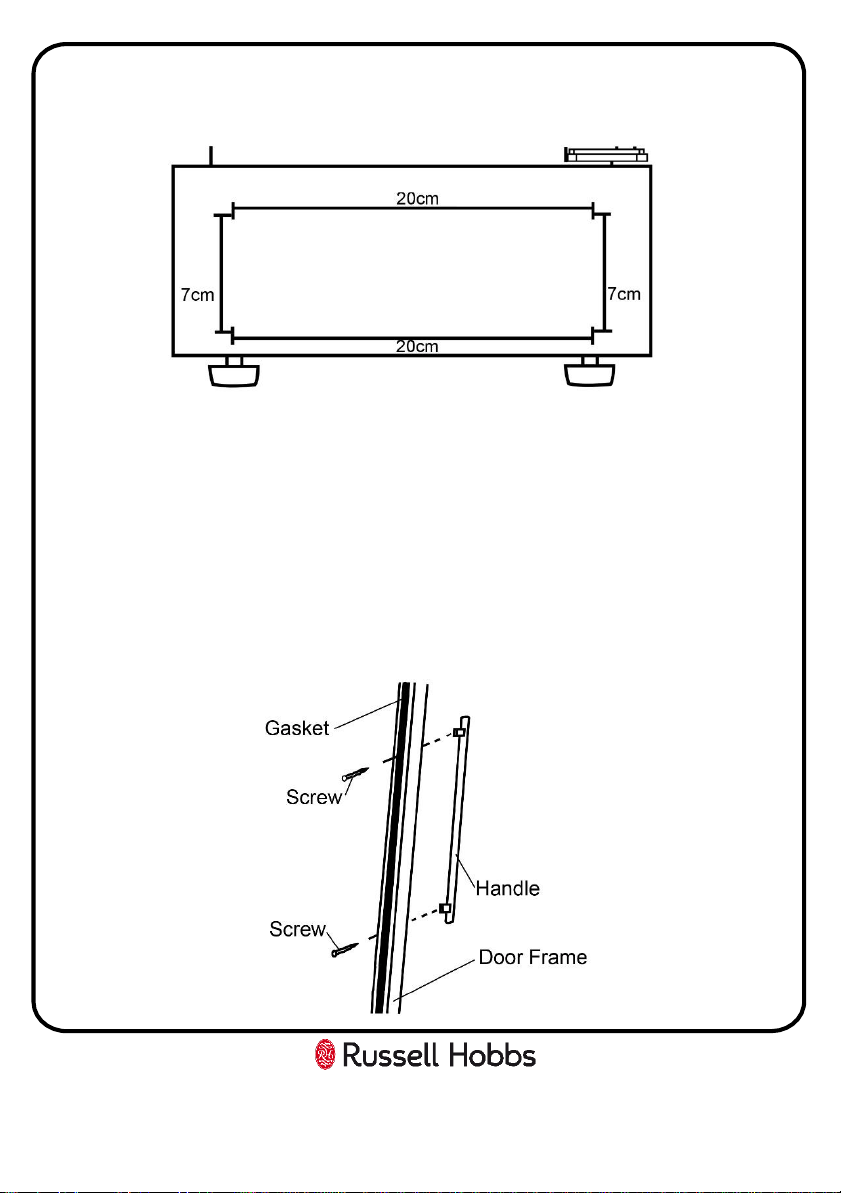
• A decorative plinth can be fitted to the front of the base vent as long as the cut
out shown in the diagram below is made in the plinth. This cut out is required
whether the vent is removed or not.
Handle installation
To install the door handle follow the below steps:
1. Open the door of the appliance and move the door gasket slightly to one side
so that you can see two designated holes for handle installation
2. Install the handle tightly as shown in the diagram above with the two screws
provided.
3. Ensure the door gasket falls back into place and that the door opens and
closes correctly.
11
Usage
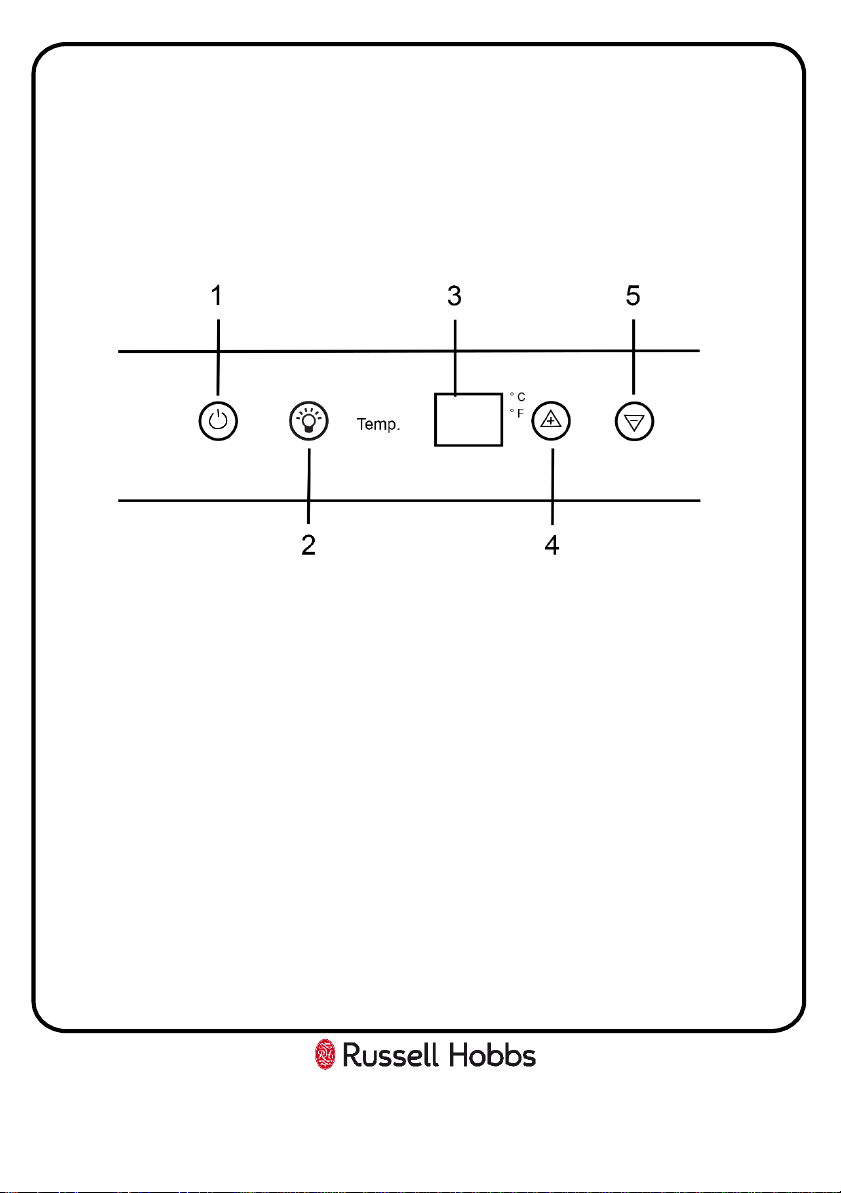
Control panel
The control panel is situated in the middle of the appliances cavity and has a
power, light, temperature up and temperature down touch controls, these
are explained below:
1. Power on/off – press to turn the appliance on and off
2. Light on/off – press to turn the internal light of the appliance on and off
3. Temperature display – displays the internal temperature of the
appliance in Celsius or Fahrenheit
4. Temperature up – press to increase the internal temperature of the
appliance
5. Temperature down – press to decrease the internal temperature of the
appliance
During first use
Important: When you use the wine cooler for the first time or restart the
appliance after it has been turned off for a long time, there could be a few
degrees variance between the temperature you select and the one indicated
on the display. This is normal and it is due to the length of activation time.
Once the wine cabinet has been running for a few hours everything will be
back to normal.
When you first switch on the appliance, the compressor will run continuously
until the wine cabinet reaches a cool enough temperature.
During this period of time, you should try not to open the door frequently or
place bottles inside of the appliance.
If the unit is switched off or unplugged, you must allow at least 5 minutes before
restarting the appliance or reconnecting it to your mains supply.
Switching on the appliance and setting the temperature
Follow the below steps to switch on the appliance and set the required
temperature:
1. Switch the appliance on at the plug, then press and hold the power on/off
control button for at least 5 seconds. The appliance will beep and the
internal temperature of the appliance will be shown on the display.
2. The temperature setting for the appliance is adjustable within the range of
5°C to 22°C or 40°F / 72°F.
3. When you press the temperature up or temperature down controls for the
first time, the LED display will show the factory default temperature setting
of 12°C / 54°F.
4. Use the temperature up and temperature down controls to set the desired
internal temperature.
12
Allow to stand for a minimum of 3 hours before plugging in to the mains
Usage

13
Usage
5. The temperature will increase by 1°C or 1°F if you touch the temperature up
control once and will decrease by the same amount if you press the
temperature down control once.
6. When you set a new temperature, the display will show the previous
temperature for 5 seconds, before showing the actual temperature. During
this time, the cooler temperature will adjust accordingly.
7. To view the set temperature in the wine cooler, press the temperature up) or
temperature down control. The display will flash the temperature for 5
seconds.
Note: We recommend that the door is not opened for a minimum of 4 hours to
allow the appliance to reach the standard operating temperature.
Note: The temperature of the drinks and how often the door is opened
affects the temperature in the cooler. If required, change the temperature
setting.
Note: Cool air falls and warmer air rises, so there will be a slight temperature
variation between the top of the cabinet and the bottom of the cabinet.
Important: When the temperature is changed, the compressor works harder to
reach the required temperature. During this time, the side panels of the wine
cabinet can reach up to 45°C however they will cool down when the set
temperature is reached.
Changing between Fahrenheit and Celsius
You can select whether the temperature display shows Celsius or Fahrenheit:
1. To change the temperature reading from Celsius to Fahrenheit you must press
and hold the light on/off control until the appliance beeps and the °F indicator
is lit.
2. You cannot change the display if you are in the process of adjusting the
temperature of the wine cabinet.
14
Usage
Loading the wine cooler
Important: Your appliance is ideally suited to store 0.75 litre Bordeaux style
wine bottles. While the cabinet can store larger bottles, you must make sure
that they do not prevent the door from shutting properly.
• Always check that you can close the door without it touching on a wine bottle,
before shutting it.
• When loading several bottles of wine at once, it will take longer for the
appliance to cool the individual bottles.
• As many bottles may differ in size and dimensions, the actual number of bottles
you are able to store may vary. The maximum storage number is based on
standard 0.75 litre Bordeaux style wine bottles.
• You can place 18 standard size bottles in your appliance
Storing your wines
The chart below indicates the ideal storage temperatures for different types of
wine:-
Type of wine Examples
Temperature
(Celsius)
Temperature
(Fahrenheit)
Big, oaky, peppery red
Bordeaux, Shiraz Barolo,
Gran Cru Burgundy
18°C 65°F
17°C 63°F
Medium bodied, fruity, elegant
reds
Rioja Reserva, Pinot Noir, Chianti
Classico, Chinon, Port
16°C 61°F
15°C 59°F
14°C 57°F
Light bodied reds or full bodied,
oaky whites
White Burgundy, Lambrusco,
Chablis
13°C 55°F
12°C 54°F
11°C 52°F
Whites, rośes and sweet wines
Chardonnay, Savignon Blanc,
Reisling
10°C 50°F
9°C 48°F
Sparkling wines & champagnes
Vintage Champagnes,
Champagne, Prosecco
8°C 47°F
7°C 45°F
6°C 43°F

15
Usage
• Temperature stability is the most important factor when it comes to storing
wine.
• Exposure to light, vibrations or fluctuations in temperature and humidity can
all cause wine to spoil. When properly stored, wines not only maintain their
quality but many will actually improve in aroma, flavour and complexity as
they mature.
• Wines kept at a higher temperature will age faster. Wine that is exposed to
temperatures that are greater than 21°C (70°F) will suffer from poorer
flavour and aroma.
• If wine is kept at too low a temperature, this can result in the development of
harmful deposits. A humidity of 70% is ideal for keeping corks from shrinking.
• After a bottle of wine has been opened, the wine comes into contact with air.
So it is best to store the remainder of the bottle upright, to minimize the
surface area of the wine that is coming into contact with the air.
• Once opened, wine will remain in a drinkable condition for two days for
delicate whites or three days for rich reds, as long as the bottle has been
resealed. You should make sure that the seal is firm by checking the stopper.
• Special stoppers that keep wine sparkling and Champagne bubbling for one
or two days after opening, can be bought.
• When stored correctly, unopened white wines can keep well for up to two
years. Full bodied reds (unopened) will age well for ten years and dessert
wines (unopened) will age well for up to twenty years.
• When you buy a bottle of wine, you should transfer it to a suitable storage
location immediately (if you are not going to store it in your wine cooler).
• Cheaper bottles of wine will not age as well as more expensive ones.
• To make the most of the bouquet and taste of your wine, never fill more than
half a glass at a time. It will also help if the shape of your wine glass is
appropriate for your wine. The size and shape of your wine glass’s bowl will
determine the intensity and complexity of the bouquet. The stem should be
long enough to allow you to avoid hand contact with the bowl of the glass
and should be tulip-shaped or tapered at the top.

Usage
Wine storage problems
Corking - a tiny percentage of bottled wine (about 1%) will suffer from this. The
cork reacts with the wine and gives it a musty, unpleasant taste. It is the most
common wine storage problem and is caused by harmless bacteria growing on the
cork. As unfortunate as this is, there is nothing to do but to discard all of the wine
in the affected bottle. This is not to be confused with small fragments of cork
floating in the wine itself, which will not impair the flavour.
Oxidisation - when wine has been opened and left for longer than a day; it tends
to lose its aroma and colour, giving an overall flat taste. The only way to avoid this,
it to either drink the wine on the same day it was opened or to use a vacuum
device specially designed for removing oxygen from opened wine bottles. If you
use such a device, the wine should still be consumed shortly afterwards.
Ullage - this is loss of wine from the bottle by evaporation or leakage. Signs of
ullage include wine seeping around the cork, a protruding cork or a stained label. It
can happen if the bottle has been allowed to get too warm. The wine may still be
drinkable, if the leakage was recent; however, you should be aware that if the
wine cools down again, contraction can cause more air to be sucked into the
bottle and result in further deterioration.
Slight effervescence in still wine - this isn’t really a problem with the way the wine
has been stored, but as a result of incomplete malolactic fermentation before the
wine was bottled. A good way to get rid of the effervescence is to let the wine
breathe. Alternatively you can use a bottle vacuum device, after about five
minutes the effervescence will vanish.
Sediment - this is not normally a problem, however both red and white wines can
produce sediment after a number of months in a bottle. The sediment consists of
tartrate crystals and is totally harmless. If anything the building of sediment can be
considered a good sign because it means that the wine was not subjected to much
(if any) filtering, meaning that the flavours and aromas should be preserved
better.
16
17
Usage
A good way to get around sediment (if it is a problem) is to stand the bottle
upright, the day before opening, so that the sediment can settle to the bottom of
the bottle.
You can also decant your wine; decanting will “open up” the flavour of both young
and old wines, but younger wines in particular. To decant, pour the wine slowly
and evenly into your decanter.
Humidity control
Important note: this feature is optional and will only enhance the storage conditions of
the wine within the appliance. If you do not want to use this feature simply remove the
humidity reservoir(s).
The wine cooler is equipped with a system for maintaining the correct level of humidity for
storing wine. There is a humidity reservoir (a small plastic container) installed on the top
shelf. Remove this from the runner on the top shelf/shelves and fill it/them ¾ full with cold
water and reinstall onto the runners.
Note: You must ensure the humidity reservoir is positioned correctly on the runners on
the top shelf to avoid the possibility of water spillage.
Note: Check the water level regularly and refill as necessary.
18
Usage
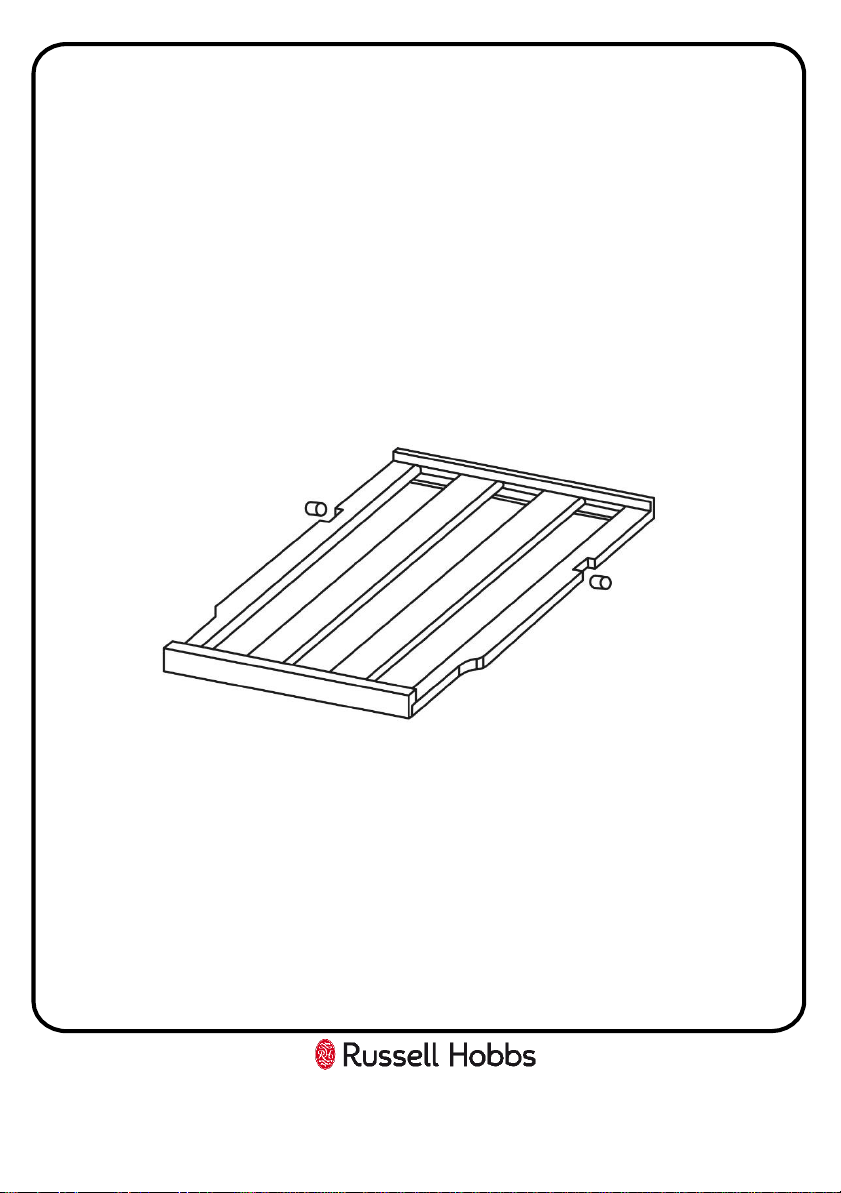
Removing the shelves
For easy access to the bottle stored, pull the shelves out approximately 1/3. The
shelves are designed with an emergency stop to prevent them being removed too
far when loaded.
To prevent damaging the door seal, make sure the door is fully open when
removing shelves. To remove any of the shelves, move the shelf to the position
where the notch/indentation on each side of the wooden shelf is exactly under the
plastic posts. Then simply lift the wooden shelf upwards and remove.
When replacing the shelf you must ensure that you align the notches/indentations
on the wooden shelves with the plastic posts and that wooden shelf is dropped
under the plastic posts.
19
Door Reversal
This appliance has the capability of the door opening from either the left or right
hand side.
Any parts that you remove from the appliance whilst reversing the door, should
be retained for later use.
You will need to tilt the cooler backward to access the lower hinge which holds
screws. Do not tilt more than 45 degrees and do not lay the cooler flat on its side.
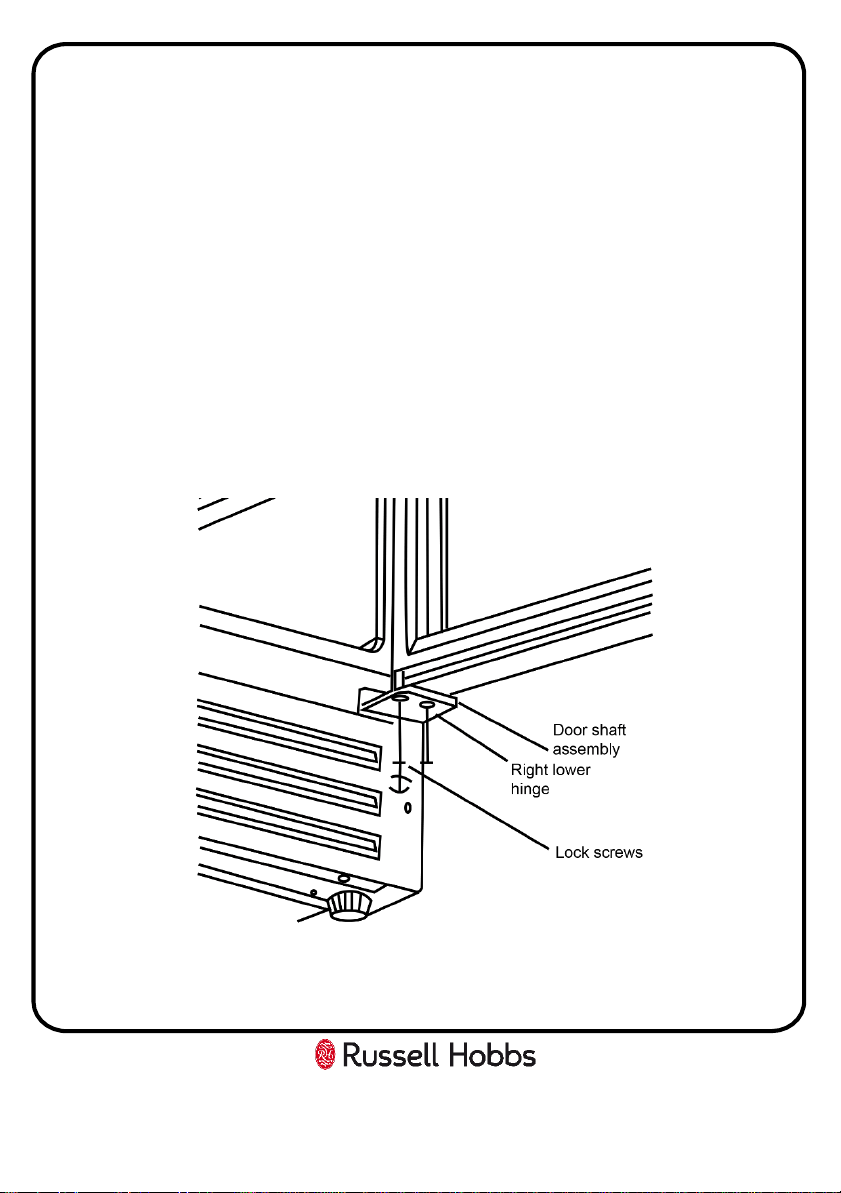
Reversing the door:
1. Open the glass door and remove the two screws under the bottom hinge.
These are used to hold the right lower hinge to the door shaft assembly.
20
Door Reversal
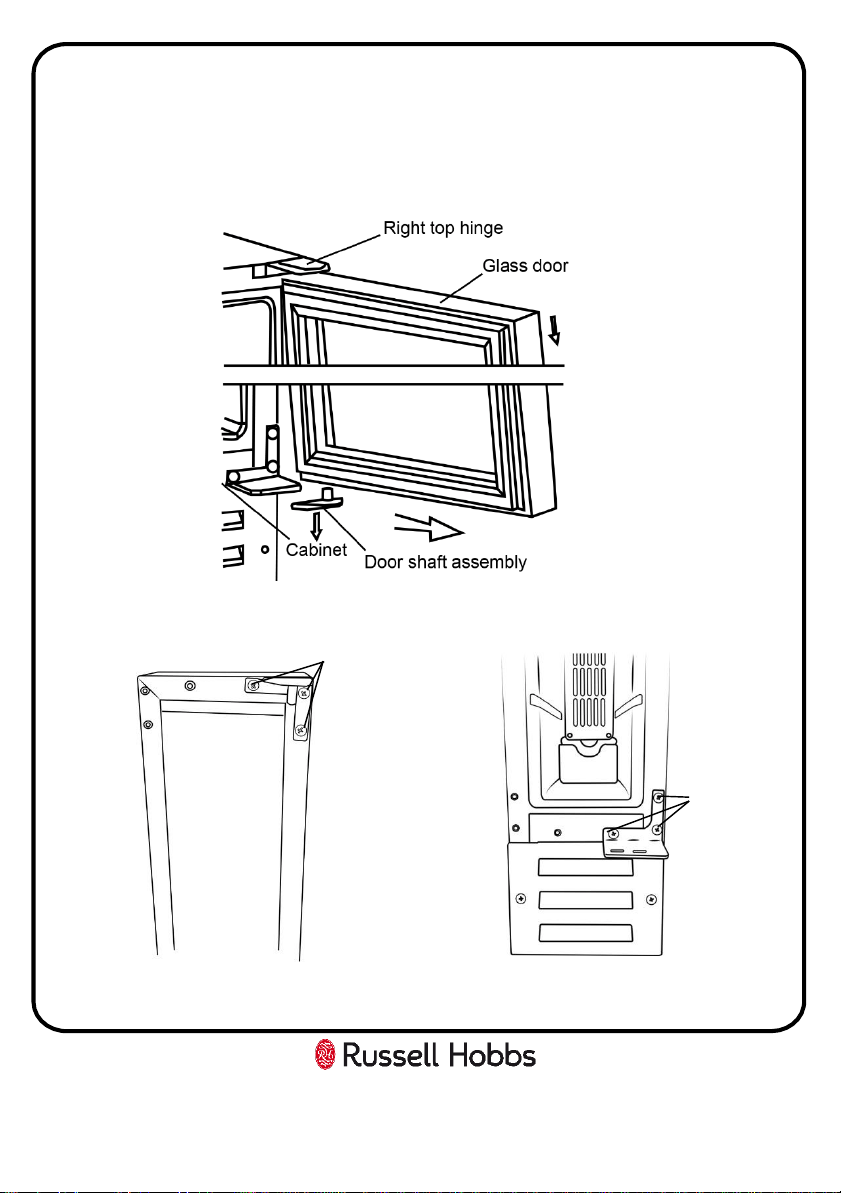
2. Be careful to support the glass door with both hands to prevent it dropping
after removing the screws. Pull down to remove the glass door and place it on
a padded surface to prevent scratching it.
3. Remove the 3 screws from the right top hinge and right lower hinge.
4. Remove the plastic screw covers from the bottom left and top left of the
appliance.
Screws
Screws
Door Reversal
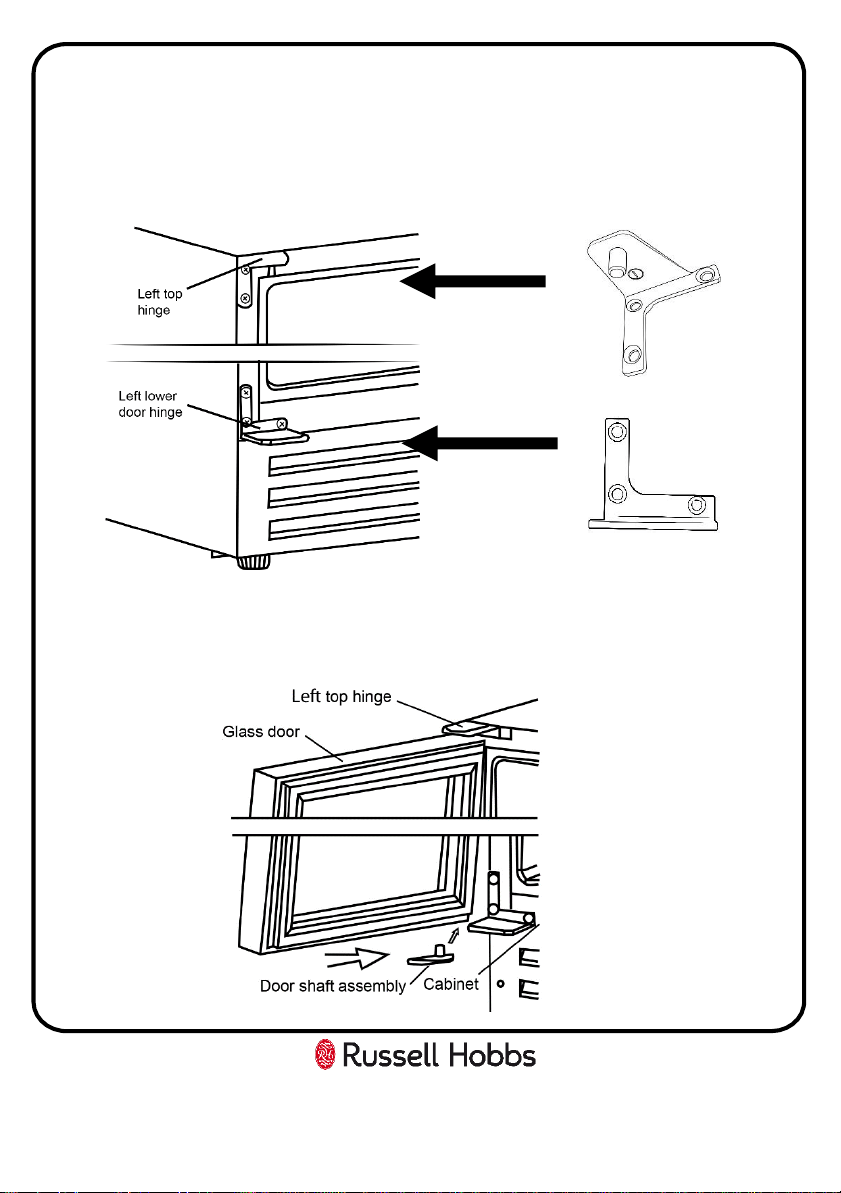
5. Take the left top hinge and left bottom hinge from the plastic bag that
contained the instructional manual then install them in the designated
positions on the left side of the cabinet
6. Turn the glass door around 180°, put the door shaft assembly from step 1 into
the hole on the bottom of the door and reinstall it. Fix the 2 screws into the
bottom hinge and the door shaft assembly
21

22
Door Reversal
7. Replace the plastic screw covers from step 4 on the holes on the right hand side.
Check that the door opens and shuts correctly after you have completed the door
reversal process.
The appliance must now be upright for a minimum of 3 hours before turning it on.

23
Energy Saving Advice
• Do not install the appliance close to sources of heat, such as a cooker,
dishwasher or radiator.
• Locate the appliance in a cool well-ventilated room and make sure that the air
vents are clear.
• Try to avoid keeping the doors open for a long time, warm air will enter the
cabinet and may cause a build-up of ice as well as affecting the energy
consumption. Ensure there are no obstructions preventing the doors from
closing properly.
• Ensure that the door seals are clean and there are no tears or splits.
• Do not overload the appliance; the cooling air that circulates to keep the
appliance cold gets blocked and pockets of warm air form.

24
Maintenance & Cleaning
Disconnect the appliance from the power supply before cleaning.
Internal Cleaning
• Do not pour water over the appliance.
• The cavity should be cleaned periodically using a solution of bicarbonate of
soda and lukewarm water (5ml to 0.5 litre of water)
• Clean the accessories separately with soap and water. Do not put them in the
dishwasher.
• Do not use abrasive products, detergents or soaps.
• After washing, rinse with clean water and dry carefully.
• When you have finished cleaning reconnect the plug with dry hands.
External Cleaning
• Wash the outer cabinet with warm soapy water. Do NOT use abrasive products.
• There are sharp edges on the underside of the product so care should be taken
when cleaning.
• Once or twice a year dust the rear of the appliance and the compressor at the
back of the appliance, with a brush or vacuum cleaner, as an accumulation of
dust will affect the performance of the appliance and cause increased energy
consumption.
When the appliance is not in use
When the appliance is not in use for long periods, disconnect from the electricity
supply, empty all of the food and clean the inside. Leave the door open to prevent
the build-up of odours.

25
Maintenance & Cleaning
Defrosting
• Defrosting occurs automatically inside of the wine cabinet during operation.
The defrost water is collected by the evaporating tray and evaporates
automatically.
• The evaporating tray and defrost water drain hole should be cleaned
periodically. This will prevent water from collecting in the bottom of the wine
cabinet, instead of flowing down the defrost drainage channel and drain hole.
• You can also pour a small amount of water down the drain hole to clean inside
of it.
• You should be careful to make sure that wine bottles do not touch the rear wall
of the appliance, as this can interrupt the automatic defrosting process and
deflect water into the base of your wine cabinet.
Trouble shooting
26
Problem
Solution
The cooler doesn't work
Check that the appliance is switched on.
Check that there has not been a power cut.
Check that the plug is not faulty.
Check that the fuse has not blown.
Check that the voltage is correct for the appliance.
Are there any faults with the socket? For this
purpose, try the plug of your appliance by connecting
it to a socket which you are sure is working.
Temperature inside the
appliance is too warm.
The temperature controls are set too warm. Set the
temperature controls to a cooler setting and allow
several hours for the temperature to stabilise.
The door is being kept open too long or is being
opened too frequently, which is allowing warm air to
enter the appliance.
The door is not closed completely.
The door gasket is not sealing correctly.
The appliance has recently been disconnected from
the mains supply; it will take at least four hours for it
to get down to temperature again.
Temperature inside the
appliance is too cold
The temperature controls are set too cold. Set the
temperature controls to a warmer setting and allow
several hours for the temperature to stabilise.
Trouble shooting
27
Problem
Solution
Vibration
Check to ensure that the appliance is on a level
surface.
The appliance is touching the back wall behind it.
Reposition the appliance and move it from the wall.
If vibration continues to occur, then turn off the
appliance and unplug it from your mains supply.
Then contact the Customer Care Department for
assistance.
Moisture is forming on the
inside of the appliance.
The door is slightly open, causing cold air from inside
the appliance to meet warm, moist air from the
outside.
The door is being kept open too long or is being
opened too frequently. Open the door less often.
The door is not sealed properly.
The inner surfaces of the
appliance are wet
Caused by condensation
- dry the inside of the
appliance.
The outer surfaces of the
appliance are wet
Caused by condensation
- dry the outer of the
appliance carefully.
Smell/odour
Check all the drink that is in the cooler is in date and
correctly packaged. If it isn’t then it should be
removed immediately or repackaged.
Check for spillages on each shelf and rack. Spillages
that have not been cleaned and have been left can
cause smells and unwanted odours.

Trouble shooting
28
Problem
Solution
The doors do not close
properly
Ensure there are no obstructions preventing door
closure.
Check the door compartments and shelves are
correctly in place.
Check the door seal is not warped or torn.
Check the appliance is level.
Moisture is forming on the
inside of the appliance.
The door is slightly open.
Unusual noises
Check that the appliance is on a flat, level surface
and is stable.
Check the spacing's around the appliance and ensure
it is not touching other items.
Bubbling and gurgling sound: This noise is emitted as
the coolant fluid flows through the pipes within the
system. This is normal.
Water flowing sound: This is the normal sound of
water flowing into the drain trough during the
defrosting process.
If the appliance is operating noisily (compressor
noise): This is normal. This noise indicates that the
compressor is operating normally. As the compressor
is being energized, it might run a bit more noisily for
a short period of time.
29
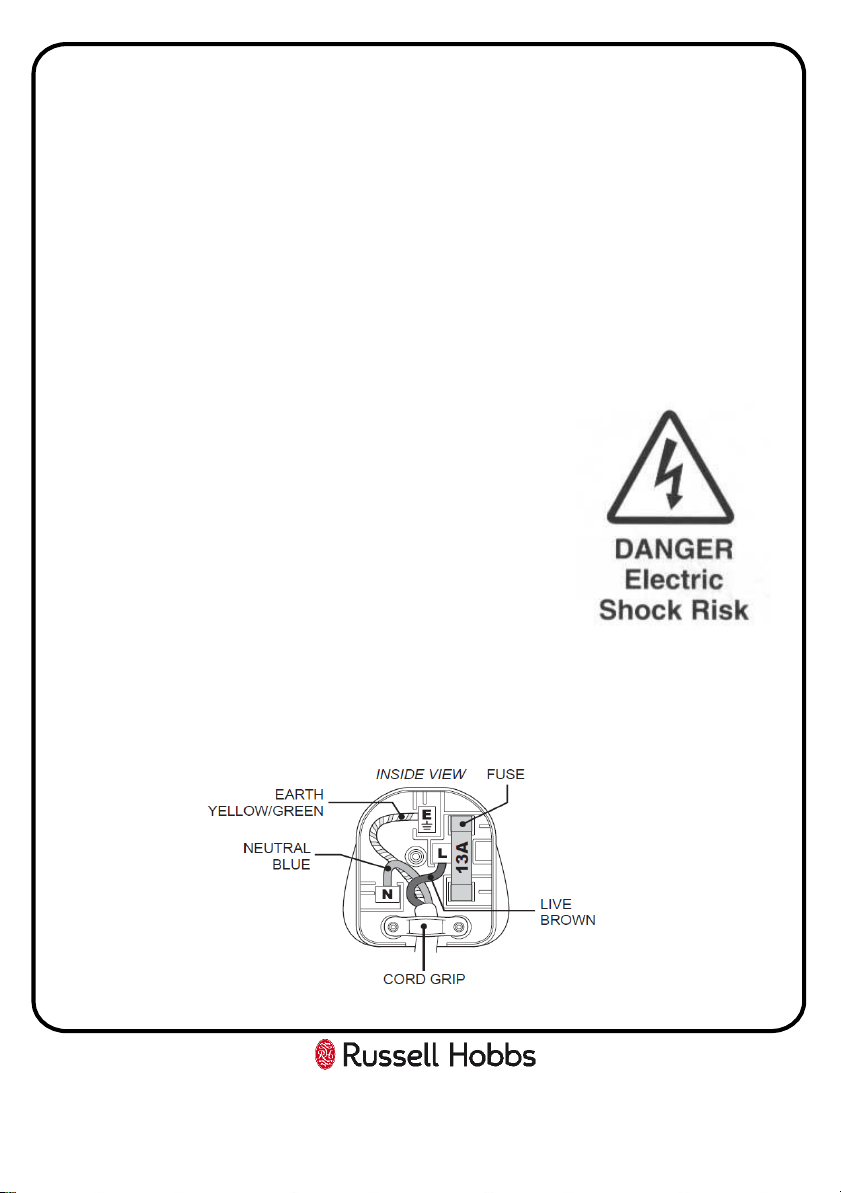
WARNING- THIS APPLIANCE MUST BE EARTHED
This appliance is designed to operate from a mains supply of AC220V - 240V; 50HZ.
Check that the voltage marked on the product corresponds with your supply voltage.
For UK use only – Plug fitting details (where applicable):
As the colours of the wires in the mains lead of this appliance may not correspond
with the coloured markings identifying the terminals in your plug, proceed as follows:
The GREEN/YELLOW wire is the EARTH and must be connected to the terminal which
is marked with the letter E or by the earth symbol or coloured GREEN or
GREEN/YELLOW.
The BLUE wire is the NEUTRAL and must be connected to
the terminal marked with the letter N or coloured BLACK.
The BROWN wire is the LIVE wire and must be connected
to the terminal marked with the letter L or coloured RED.
Always ensure that the plug cord grip is fastened correctly.
If a 13A (BS1363) fused plug is used it must be fitted with a 13amp fuse conforming
to BS1362 and be BSI or ASTA approved.
Connection to the Mains Supply
30
Guarantee
This product is guaranteed for 12 months from the date of the original
purchase. If any defect arises due to faulty materials or workmanship you
must contact Product Care with the original proof of purchase so a
replacement or refund can be arranged.
Refund or replacement is at the discretion of Product Care.
The following conditions apply:
• Product Care will require a valid proof of purchase at the point of
replacement or refund.
• The product must be installed and used in accordance with the
instructions contained in this instruction guide and any other
instructions for use which has been supplied.
• It must be used for domestic purposes only and for its intended use.
• This guarantee does not cover wear and tear, damage, misuse or
consumable parts.
This does not affect your statutory rights.
Imported by
G2S LIMITED
WIGAN
WN2 4AY

31
Technical Specification
Model number RHBI18WC1 (SS)
Rated Voltage 220V – 240V ~ 50Hz
Capacity 18 bottles
External Dimensions(HxWxD) 870 - 890 x 295 x 570mm
This symbol is known as the 'Crossed-out wheelie bin Symbol'. When this
symbol is marked on a product/batteries, it means that the product/batteries
should not be disposed of with your general household waste. Only discard
electrical/electronic/battery items in separate collection schemes, which cater
for the recovery and recycling of materials contained within. Your co-operation
is vital to make sure the success of these schemes and for the protection of the
environment. For your nearest disposal facility, visit www.recycle-more.co.uk
or ask in store for details.
We reserve the right due to possible changes to design to alter the
instruction manual without prior notice.
Revision 4
For Customer Services & Spare
Parts please call 0345 208 8750
or visit us at
https://mda.russellhobbs.com