This leaflet provides you with a brief overview of the important information and improvements that you need to know about your new dryer before using it for the first time.
Residual moisture from the laundry
Warm laundry feels damper than it actually is.
Thanks to the heat pump technology, your laundry is always dried at gentle temperatures in any programme.
However, you must observe the maximum load and type of laundry in order to achieve optimum results.
You must also observe the information in the chapter “Notes on laundry” in the instructions for use.
The laundry feels slightly damper
If you think that the laundry is slightly too damp, use the fine adjustment for the drying result. You can find instructions on how to set required degrees of dryness in the section “Fine adjustment of the drying result” or “Adjust drying level” in your instructions for use.
The laundry is not evenly dry…
If you are drying thin and thick or multi-layered fabrics together, these will dry differently. To ensure that the laundry dries evenly, you must sort it according to the type of fabric and the structure. If required, select a time programme to finish the drying.
The laundry is still noticeably damp…
Take note of whether the drying cycle was interrupted after a service display (for example, Empty the container or Please empty the condensation container, or Clean the fluff filter or Please clean the lint filter), which means that the drying cycle is not yet complete. Correct the fault and continue the programme. See the chapter “What to do if...” in the instructions for use.
After each drying cycle
The fluff filters and condensation containers must always be cleaned or emptied after each drying cycle.
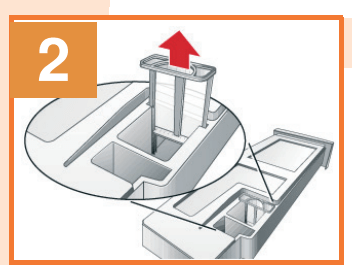
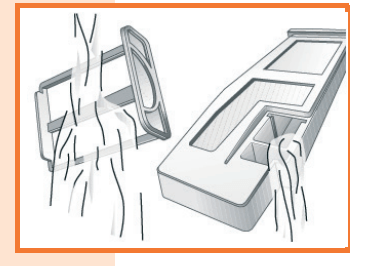
Cleaning the fluff filter
During drying, fluff and hair from the laundry is trapped by the fluff filter.
A blocked or partially cleaned fluff filter reduces the flow of air. This means that the dryer does not reach its maximum performance. The fluff filter must therefore be cleaned after each drying cycle. Rinse the filter regularly under running water and carefully dry it. See also the notes on “Care and cleaning” in the instruction manual.
Emptying the condensation container
After each drying cycle, empty the condensation container because, under certain circumstances, the next drying programme will be cancelled as a result of the condensation container being full. You must also regularly clean the filter in the condensation container under running water or in the dishwasher. See also the information on “Care and cleaning” in the instruction manual
Further important information can be found in your instructions for use and installation manual or care instructions. Pay particular attention to the chapter “What to do if...” and “After-sales service”.
Normal noise during operation
Please note: During drying, the compressor, the pump and the movement of the laundry generate noises which are entirely normal.
Humming noise
The compressor in the dryer generates a humming noise. The volume and pitch of this may vary.
Whirring
From time to time, the compressor in the dryer is cooled by a fan and creathis tes a whirring sound.
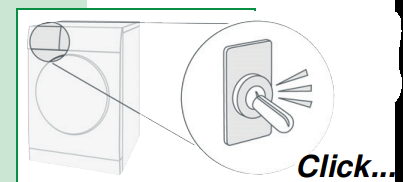
Clicking
The start of the automatic cleaning cycle for the heat exchanger causes a clicking noise.
During the automatic cleaning cycle, “cln” (Clean) or “Heat exchanger is being rinsed” appears in the display
Noise
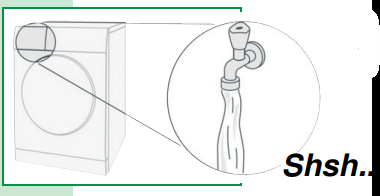
Rushing water can be heard during the automatic cleaning cycle.
During the automatic cleaning cycle, “cln” (Clean) or “Heat exchanger is being rinsed” appears in the display
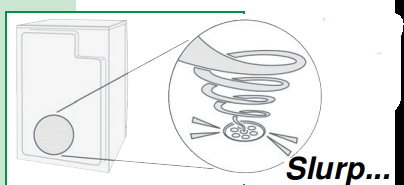
Pumping
The process of pumping the condensation into the condensation container generates pumping noises.
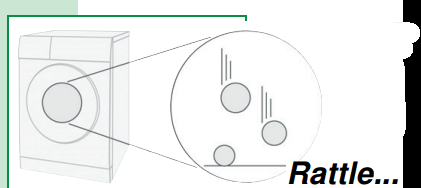
Rattling
Rattling noises may be caused by the laundry moving if hard parts, such as buttons, zips, buckles or similar parts, are part of the laundry
Information
You must pay particular attention to the safety information and the chapter “What to do if...” in the instructions for use.
Removing objects before drying
Before putting your laundry into the dryer, remove all objects (especially lighters, metal parts or similar objects) from pockets. Note the maximum load quantity. You must also observe the information in the chapter “Notes on laundry” in the instruction manual.
Selecting buttons more than once
The buttons are sensitive and it is sufficient to lightly touch them. If you select a button more than once (especially when setting the options), then you must let the button go after each selection in order to activate the sensor. Your selection will be followed by a button acknowledgement.
"Finished in” appears in the display
When a programme is selected, the anticipated drying time for the maximum load is displayed. While drying, the appliance's sensors detect the actual load and its level of moisture, and they correct the programme length. This is shown in the display by jumps in the “Finished in” time.
Interrupting/changing the programme
The drying operation can be paused for a short period to add more laundry, remove laundry or for programme changes. Depending on the model, the display “Finished in” is reset and restarted or stopped. After a while, the display is then corrected. To ensure that the heat exchanger is automatically cleaned, programmes must then always be allowed to continue until they end. Do not cancel a drying cycle before the programme automatically ends
Laundry additives/care and cleaning
Cleaning agents and agents for pretreating laundry (e.g. stain removers, prewash sprays, etc.) must not come into contact with the surfaces of the dryer. If necessary, immediately wipe away spray residue and other residues/droplets with a damp cloth.
You must also observe the information in the chapter “Care and cleaning” in the instruction manual.
Cleaning
Cleaning the dryer and the control panel
Warning
Risk of death
There is a risk of electric shock as the dryer is operated with electricity. Disconnect the dryer from the mains before cleaning.
Clean the dryer using only water and a soft, damp cloth.
Remove all detergent residue, spray residue or other residues immediately. Do not use cleaning agents or agents for pre-treating laundry (e.g. prewash sprays, stain removers). Do not use high-pressure cleaners or steam jet cleaners to clean your appliance.
Cleaning the moisture sensor
Note: The dryer is equipped with a stainless-steel moisture sensor. The moisture sensor measures how damp the laundry is.
After long periods of usage the moisture sensor may become covered by a fine layer of limescale or residues of detergents and care products. Such residues must be removed regularly as the sensor function and in consequence the drying result may be impaired.
Open the door and clean the moisture sensor with a coarse sponge.
Caution! Moisture sensor may be damaged. Do not clean moisture sensors with abrasives and steel wool.
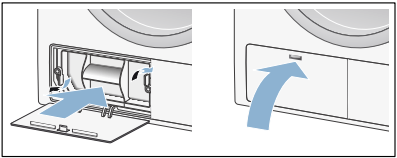
Cleaning the EasyClean filter
When appears in the display panel, clean the EasyClean filter as follows:
1. First clean the fluff filter.
2. Close the door of the dryer.
3. Open the maintenance flap on the heat exchanger.
4. Release the levers on the EasyClean filter.
5. Use the grip handle to pull the EasyClean filter out.
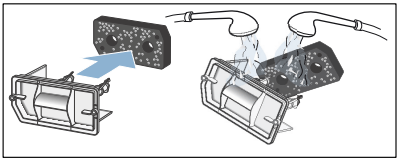
6. Now take off the filter mat.
7. Wash out the filter mat by hand using clean water.
Notes
If the filter mat is covered with stubborn dirt, you can also remove this carefully using a vacuum cleaner.
Do not use cleaning agents.
8. Dry the filter mat by squeezing the water out.
Note: Only use the filter mat if it is clean and dry.
9. Put the filter mat back on.
Note: Ensure that the filter mat is not misshapen, torn or clogged. Position the filter mat as shown above.
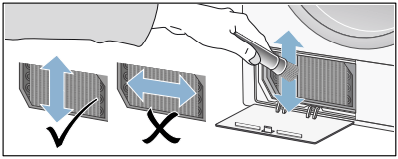
10.Check how dirty the dryer's heat exchanger is before putting the EasyClean filter back in. If it is very dirty, use a vacuum cleaner with a brush attachment to clean it carefully from top to bottom.
Note: Take care not to bend or damage the fins on the heat exchanger when cleaning it.
Caution! Risk of injury. You could cut yourself on the fins of the heat exchanger. Do not touch these with your hands. '
11.Slide the EasyClean filter in and make sure it clicks into place.
12.Close the maintenance flap.
13.Switch the dryer off. You have now cleaned the EasyClean filter
Faults and what to do about them
Faults
Cause/remedy
in the display panel and drying was interrupted.
Empty the condensation container and press the Start button.
If the optional condensation drain has been installed, the drain hose may be blocked or kinked.If the optional condensation drain has been installed, the drain hose may be blocked or kinked. Check the hose for deposits and flush the hose through. Lay the hose without any kinks.
in the display panel.
Clean the fluff filter
Clean the EasyClean filter
The dryer will not start.
Start button selected?
Mains plug plugged in or fuse/circuit breaker checked?
Programme selected? Select a programme.
Dryer door open? Close the door.
Childproof lock activated? Deactivate the childproof lock.
"Ready in" time selected? Programme starts after a delay.
Creasing.
Creasing occurs when you have exceeded the maximum load or selected the wrong programme for the type of fabric. All the required information can be found in the programme table.
Remove clothes immediately after drying; creasing may occur if they are left in the drum.
Water is leaking out.
Not a fault; the dryer may be positioned on an incline. Level the dryer.
Programme duration displayed changes during drying.
Not a fault. The moisture sensors detect the remaining moisture in the load and adjust the programme length accordingly (except timed programmes).
Laundry is not dried correctly or is still too damp.
After the end of the programme, warm laundry feels damper than it actually is. Spread the laundry out and allow the heat to disperse.
Fine tune the dryness level. This extends the drying time but does not increase the temperature. Your laundry will become drier.
Select a programme with a longer drying time or increase the dryness level. This does not increase the temperature.
Select a timed programme to add extra drying time for laundry that is still damp.
If you have exceeded the maximum load for the programme, the laundry may not be dried properly.
Clean the moisture sensor in the drum. The sensor may become covered in a fine layer of limescale or detergent and care product residue, which then impairs its performance. This prevents your laundry from being dried properly.
Drying has stopped as a result of a power cut, because the condensation container is full or because the maximum drying time has been exceeded.
Note: See also the laundry tips
Drying time too long?
The fluff filter or the EasyClean filter may be dirty, which will make the drying time longer. Clean the fluff filter or the EasyClean filter.
If the air inlet on the dryer is blocked or not freely accessible, this may increase the drying time. Make sure that the air inlet remains unobstructed.
The optimum ambient temperature for drying is between 15 °C and 30 °C. Outside of this range, the drying time may increase.
Insufficient air circulation in the room may increase the drying time. Ventilate the room
Display panel goes out and Start button flashes.
Not a fault. Energy saving mode is active
Humidity in the room is increasing.
Not a fault. Make sure the room is adequately ventilated.
Power failure.
The drying programme is stopped. Remove the laundry and spread it out, or restart the programme.
Unusual noises when drying.
Not a fault
The dryer feels cold despite drying.
Not a fault. The dryer can dry effectively at low temperatures using a heat pump.
Note: If you cannot rectify the fault yourself by turning the dryer off and then on again, please contact our after-sales service.
Solve Problems
Error code / error display / signal
The program does not start
Confirmation using the Start button too short or too long
To start the program, you will need to press and hold the Start button slightly longer than with the other options buttons (1-2 seconds). A brief press is not sufficient here. If the Start button is held too long, a double signal is heard and the appliance will not start. This prevents the program from being started through any accidental contact with the button.
E01, E02: Lint filter is blocked and needs to be cleaned
Lint filter is blocked and needs to be cleaned.
Clean the lint filter after each drying cycle. Occasionally rinse out the lint and fluff filter with warm water.
E06 Fault with the heating circuit
Fault detected with the heating circuit.
Faults can only be eliminated by an authorized technician. Contact Bosch Customer Service at 1-800-944-2904 for assistance.
E08, E09, E24,E25, E28, E90 Fault with the electronics
Faults can only be eliminated by an authorized technician. Contact Bosch Customer Service at 1-800-944-2904 for assistance.
Filter / filter display is lit / flashes
Lint filter is blocked and needs to be cleaned.
Clean the lint filter after each drying cycle. Occasionally rinse out the lint and fluff filter with warm water.
Other error message
Switch off and restart appliance. If you still see the error message, contact Bosch Customer Service at 1-800-944-2904 for more assistance.
Home Connect problem
Problem: App - function faulty
Various settings must be checked
Activate the notifications in the settings of the Home Connect app. When the Home Connect app is ended (Task Manager), no push messages are displayed, although if the app is running in the background, notifications will be displayed. If you use additional programs, e.g. Battery Optimiser, System Tools, Software Manager, they may influence the notification function. Please re-install the Home Connect app after a system update of your smartphone/tablet. App hangs / closes itself down
Close app and start again or update or re-install app.
A maximum of 8 iPhones / iPads can be connected with the app via Wi-Fi in the home
Check whether 8 iPhones / iPads are already connected via Wi-Fi in the home
Appliance no longer available in the app
Household appliance deleted from user account. For each appliance there can only be one Administrator account (Super User, who is the user first registered in the appliance) If an appliance is deleted by the Super User from his HC app, the appliance will also be deleted in the app for all users.
Connect the appliance with the app again
Home Connect mails are not received
Restrictions of your mail program
Please check if a forward to a shared inbox is activated or if the mails were delivered to your spam folder.
App is not loading App requires iOS version 8 or higher
Update iOS operating system (under "Settings", select "General", "Software Update"); carefully check the instructions
Home Connect app cannot be found in the App Store
The app is not available in the local App Store, or "Home Connect" is spelt incorrectly. The country settings of your tablet/smartphone are not correct.
Check the country settings of your tablet/smartphone before searching for the app. Check the correct spelling to search for the Home Connect app
Malfunction
Appliance is not warming up
Heat pump dryers and vented dryers operate at a temperature level just above room temperature.
If the laundry is dry, there is nothing wrong with the appliance.
Door is not closing properly
Display flashes "Ready" and door is not closed. Close the door and make sure you hear a click. Too many items in the dryer can also prevent the door from closing.
Check whether laundry is jammed between the door and opening. Restart the program.
Was this information helpful to you?Yes No
No power at the socket.
Check function of the socket, e.g. with a lamp. If the socket does not function, check whether the residual-current-operated circuit-breaker (FI) or the domestic fuse for the electric circuit has tripped. The main fuse and residual-current-operated circuit-breaker (FI) are for your safety and respond if there has been an overload or short-circuit in the electric circuit. Check whether other appliances in the electric circuit have caused an overload. If required, contact an electrician.
The program does not start
Confirmation using the Start button too short or too long
To start the program, you will need to press and hold the Start button slightly longer than with the other options buttons (1-2 seconds). A brief press is not sufficient here. If the Start button is held too long, a double signal is heard and the appliance will not start. This prevents the program from being started through any accidental contact with the button.
Time jumps due to load
Your appliance evaluates information (size of the load and washing type in the program sequence) and specifies the program run duration. This value is adjusted continuously. In doing so, time jumps and different program running times may occur. This is not a fault but helps achieve an optimum washing result.
There is nothing wrong with the appliance Drum not turning Display flashes "Ready" and door is not closed. Close the door and make sure you hear a click. Too many items in the dryer can also prevent the door from closing.
Check whether laundry is jammed between the door and opening. Restart the program.
 Residual moisture from the laundry
 After each drying cycle
 The fluff filters and condensation containers must always be cleaned or emptied after each drying cycle.
 Normal noise during operation
 Please note: During drying, the compressor, the pump and the movement of the laundry generate noises which are entirely normal.
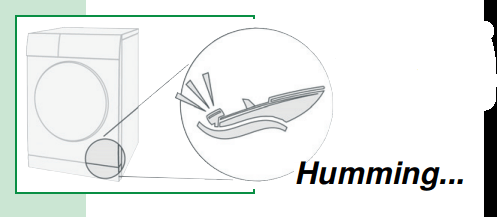

 Information
 Removing objects before drying
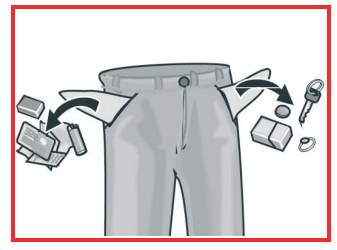
 Selecting buttons more than once
 "Finished in” appears in the display
 Interrupting/changing the programme
 Laundry additives/care and cleaning
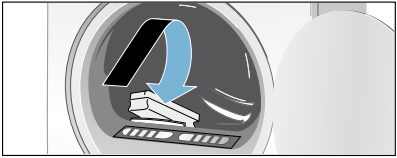
 appears in the display panel, clean the EasyClean filter as follows:
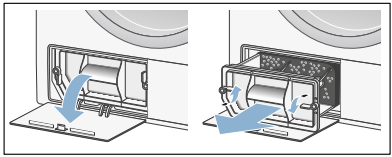

 in the display panel and drying was interrupted.
 in the display panel.