Libretto di Istruzioni (IT)
Instruction booklet (EN)
(AR)
Mode d’emploi (FR)
Bedienungsanleitung (DE)
Instruktionsvejledning (DA)
Manual de instrucciones (ES)
Instrukcja (PL)
Manual de lnstruções (PT)
Instructiehandleiding (NL)
Bruksanvisning (NO)
Руководство по эксплуатации (RU)
Instruktionshandbo (SV)
Ohjekirja (FI)
EN
1
WARNINGS!
INSTALLATION
• Read the instructions closely before installing and/or using the
hood.
• Themanufacturerwillnotbeheldliablefordamagecausedbyinstallation
thatisincorrectornotuptostandard.
• We recommend that all installation and adjustment procedures are
carriedoutbytrainedpersonnel.
• Whenthehoodistakenoutofitspackaginginspectittoensurethatit
isintact.Iftheproductisdamaged,donotuseitandcontacttheSmeg
assistanceservice.
• Before making any connections, make sure that the mains voltage
corresponds to the voltage shown on the label located inside the
appliance.
• ForClassIappliances,checkthatthedomesticpowersupplyguarantees
adequateearthing.
• Theminimumdistancebetweenthehobandthelowerpartofthehood
mustbeatleast750mmforgashobsand650mmforelectrichobs.
• Theextractedairmustnotbeconveyedinaductusedtoconductfumes
fromappliancespoweredbygasorotherfuel.
• Connecttheoutletfortheairextractedbythehoodtofumesdischarge
ductswithasuitableinternaldiameter,andnolessthan120mm.
• Theroommustbeadequatelyventilatedwhenthehoodorgasappliances
areusedsimultaneously.
• Ifthepowercableisdamageditmustbereplacedbythemanufacturer
oritstechnicalassistanceservice,ornonethelessbyanindividualwith
asimilarqualication,soastopreventanyrisk.
• Complywithanylegalregulationsrelativetotheextractionofairwhen
operatingtheextractionhood.
OPERATION
• Donotcookorfryinawaythatcreatesstrongames.Thesecouldbe
drawnintothehoodduringoperationandcauseare.
• Donotambéfoodunderthekitchenhood;Firehazard
• Thehoodcanbeusedbyindividualsundertheageof8andbyindividuals
withphysical,sensorialormentalimpairments,orwithoutexperienceor
therequiredknowledge,aslongastheyareundersupervisionorhave
EN
2
been given instructions on safe use of the appliance and are familiar
withthedangersitentails.
• Childrenmustbesupervised to ensurethat theydo not playwith the
appliance
• “ATTENTION: The accessible parts can become very hot if they are
usedwithcookingequipment."
MAINTENANCE
• Beforecarryingoutanymaintenanceprocedureorcleaning,disconnect
theappliancefromtheelectricitysupply.
• Carryoutthoroughandtimelymaintenanceoftheltersinaccordance
withtheintervalsrecommendedbythemanufacturer.
• Tocleanthehoodsurfaces,useadampclothandamildliquid
detergent.
• Cleaningandmaintenancecarriedoutbytheusermustnotbeperformed
bychildrenwithoutsupervision;
• THE MANUFACTURER DECLINES ALL RESPONSIBILITY IF THE
ABOVEINDICATIONSARENOTFOLLOWED
USE:
• ThisappliancewasdesignedtobeusedasanEXTRACTION(extraction
ofairtotheoutside)orFILTERhood(recirculationofairindoors).
• EXTRACTIONVERSION:Toturnthehoodintotheextractionversion
connectthemotorinlet,bymeansofarigidorexiblepipewithasuitable
internaldiameterandnolessthan120mm,directlytotheexternalvapour
andodourextractionduct.
NB.Removeanyactivecarbonodour-controllters.
• FILTER VERSION: If it is not possible to direct the air outdoors, the
hoodcanbetransformedintothelterversion.Inthisversion,theair
andvapoursarepuriedbyactivecarbonltersandrecirculatedintothe
roomthroughthelateralventilationgrillesoftheue.
Note: using the hood in lter mode can increase the level of noise
perceived.
EN
3
INSTALLATION INSTRUCTIONS:
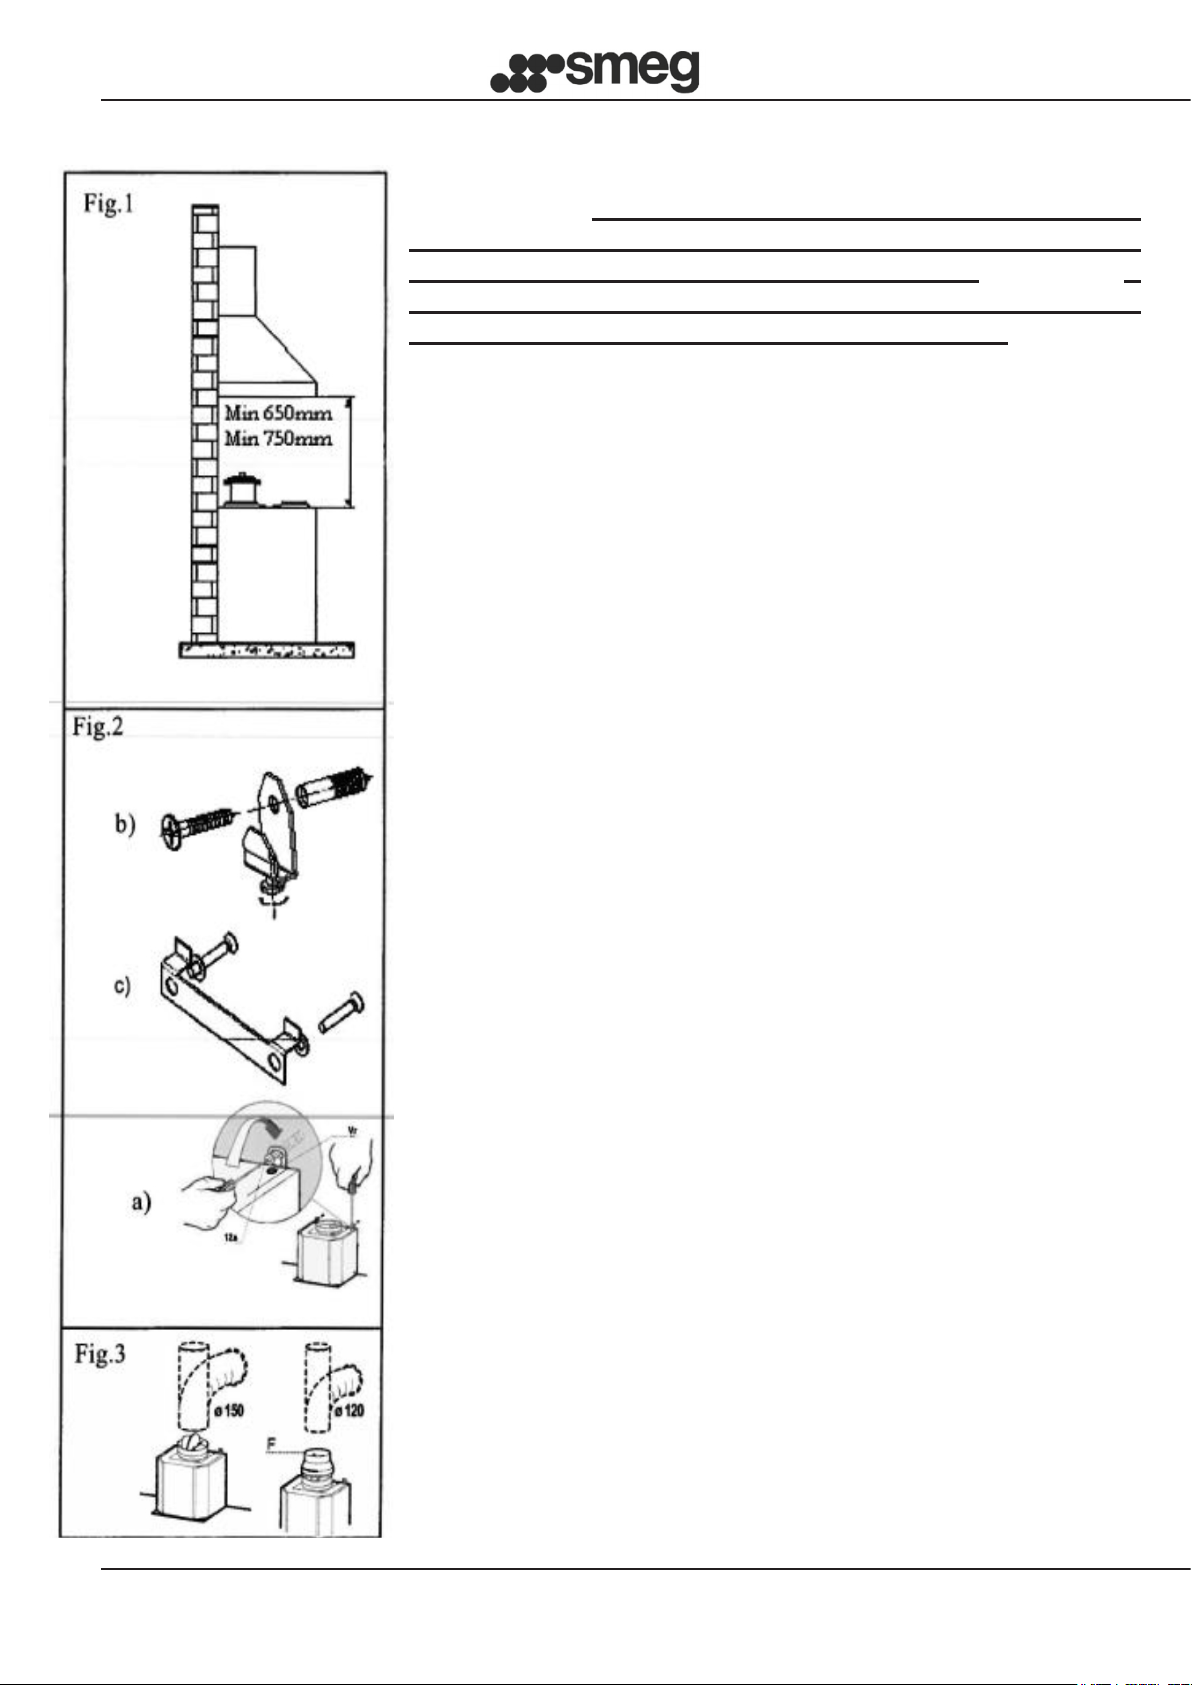
Thehoodissuppliedwithalltheaccessoriesnecessaryfor
itsinstallation.Theminimumdistancebetweenthelower
surfaceofthehoodandthehobmustbeatleast750mm
for gas hobs and 650mm for electric hobs (Fig. 1 ). If
themotorinletis equippedwithanon-return valvefor
fumes,makesureitcanopenandclosefreely.
Foreasyinstallationitisrecommendedtofollowtheprocedures
describedbelow:
1) Thehoodmustbecentredwithrespecttothehobsurface.
2) There are different installation procedures depending on
thehoodmodel.Chooseoneofthefollowingxingsystems
(Fig.2):
a) 2 levelling hooks that fasten on with the supplied
expansionplugs
b) Rearlevellingbracketthatfastensonwiththesupplied
expansionplugs
c) Levellinganchorsonmotorboxthatfastenonwiththe
suppliedexpansionplugs
d) For island models refer to the special installation
attachment.
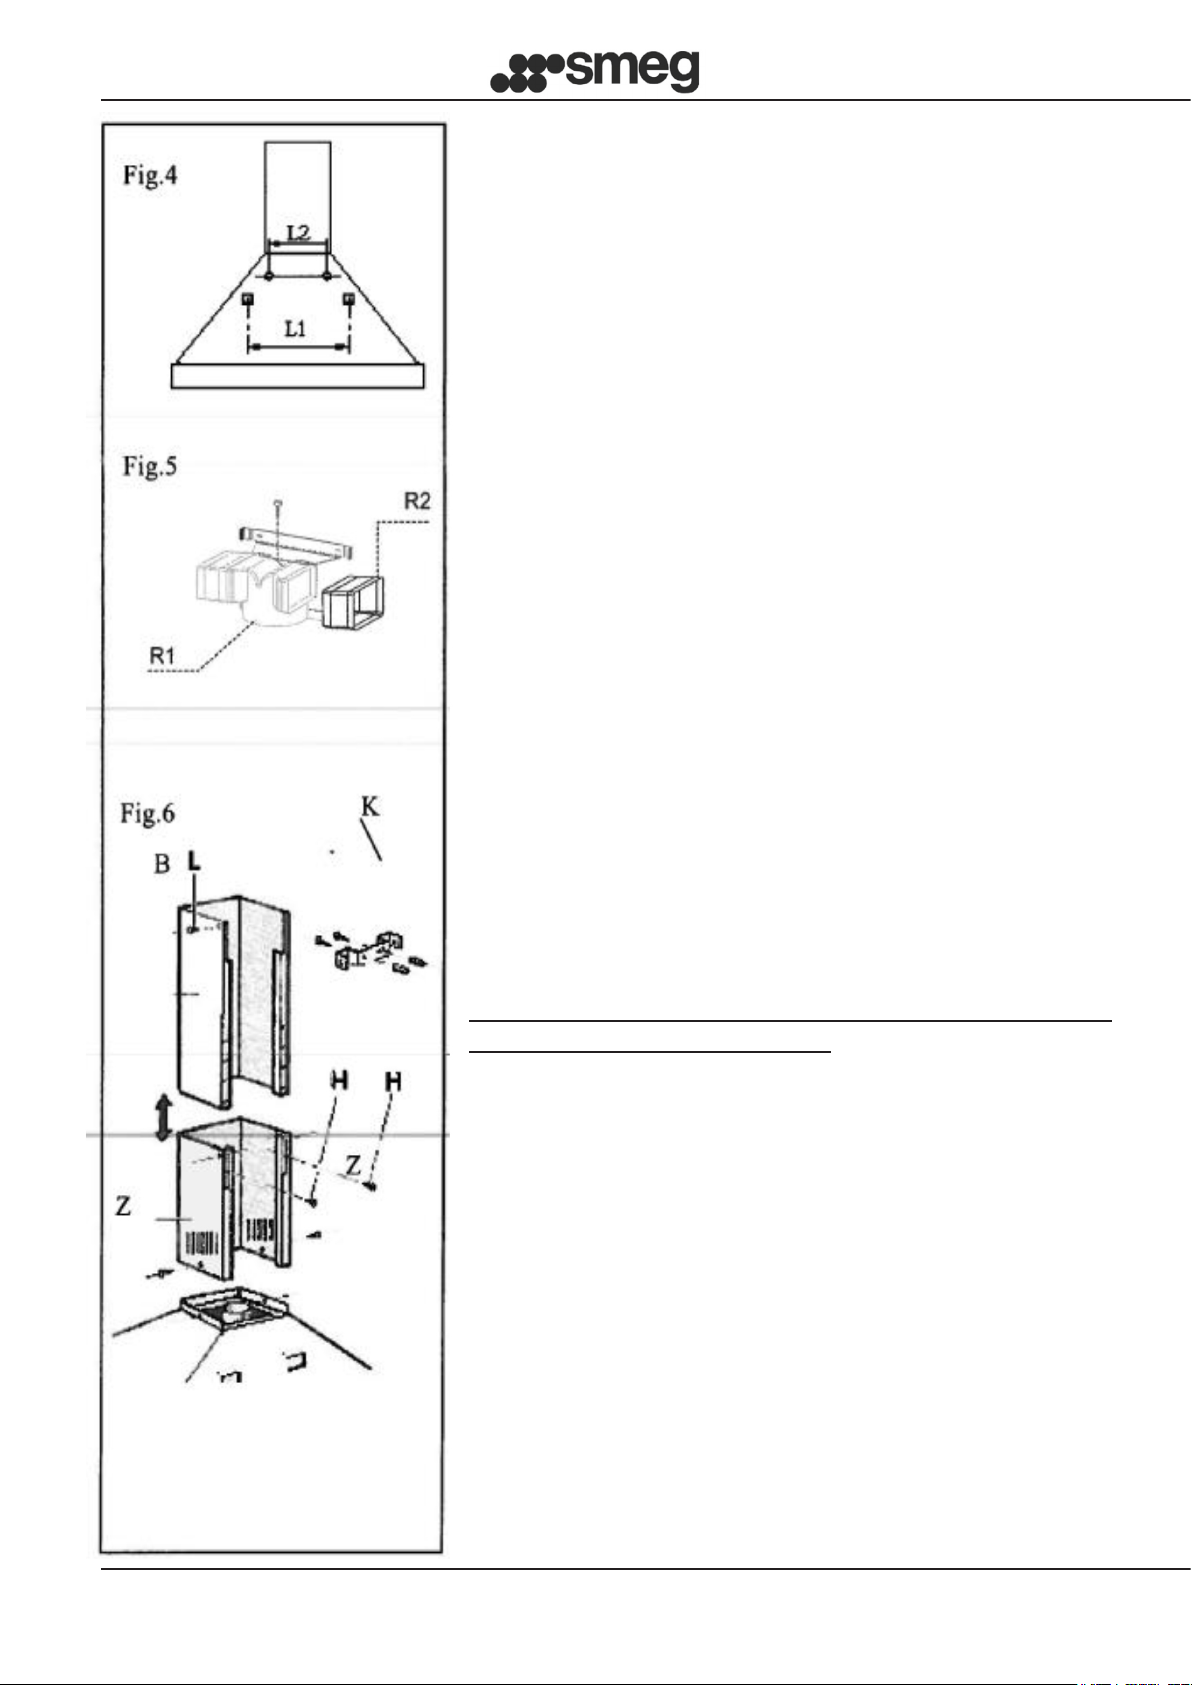
N.B.:Fixingsystemsa)andb)tontothebackofthehood
intheholesL1(Fig.4).
3) Removethegreaseltersandpositionthehoodonthewall
andmarkthereferencepositionfortheholestoanchorthe
relativexingsystem.
4) Drillthe2holespreviouslymarkedafterremovingthehood
fromthewall
5) Anchor the xing system to the wall by tightening the
expansionplug
6) MarkholesL2onthewalltosecuretheplugssafelyinthe
holes.(plugssupplied)
7) Hang the hood on the xing system (g. 2) and level it
usingtheadjustmentscrews(g.2).
8) Securelyxthehoodbyfullytighteningthetwoexpansion
screwsoftheholesL2
AIRCONNECTIONSYSTEMS:
EXTRACTION version: Connect the fume expulsion duct
(insidediameter150mm.)totheexhaustofthemotorinlet.
IftheexpulsionductisD.120mm,usethespecialreduction
ange (F) supplied, where applicable. The expulsion duct
mustnothaveadiameteroflessthan120mm.
Note that if thehood is supplied with an active carbon
lter,thismustberemoved(seepage8)
DeviationforGermany:
Whenthehoodandotherappliancespoweredbyenergyother
thanelectricityaresimultaneouslyON,thenegativepressure
intheroommustnotexceed4Pa(4x10⁻⁵bar).
EN
4
FILTERversion:
Leave the motor inlet free. Install the active carbon
ltersasshownonpage8.
Ifthehoodisnotsuppliedwithanactivecarbonlter
youmustbuyitseparatelyatyournearestauthorised
Smegdealer.
For some models there is a standard set of ttings
(g.5) to be xed to the wall by expansion plugs at
a suitable height in order to channel the airow in
correspondencewiththeueslits.Insertlaterallythe
extensionsR2onthettingR1.ConnectthettingR1
attheoutletofthehoodbodybymeansofatubeof
diameterD.150mm.
• FLUEASSEMBLY(g.6):
Positiontheuebracket(K)totherequiredtoplimit.
Markthetwoholesonthewalltoxthebracket.Drill
andxthebracketwiththesuppliedexpansionplugs.
Carefully position the ue unit on the hood. Fix the
lower ue to the hood by means of the screws Z.
Carefullyextendthetopuetotheupperlimit.
Secure the top ue to the ue bracket K using the
screwsL.
• ELECTRICCONNECTION
Werecommendthatelectricconnectionsarecarried
outbyaprofessionalinstaller.
Inthecaseofadirectelectricconnectiontothemains,
betweentheapplianceandthemains,placeabipolar
switch with a minimum opening of 3mm between
contacts, sized to the load and compliant with the
currentregulations.
EN
5
USER INSTRUCTIONS:
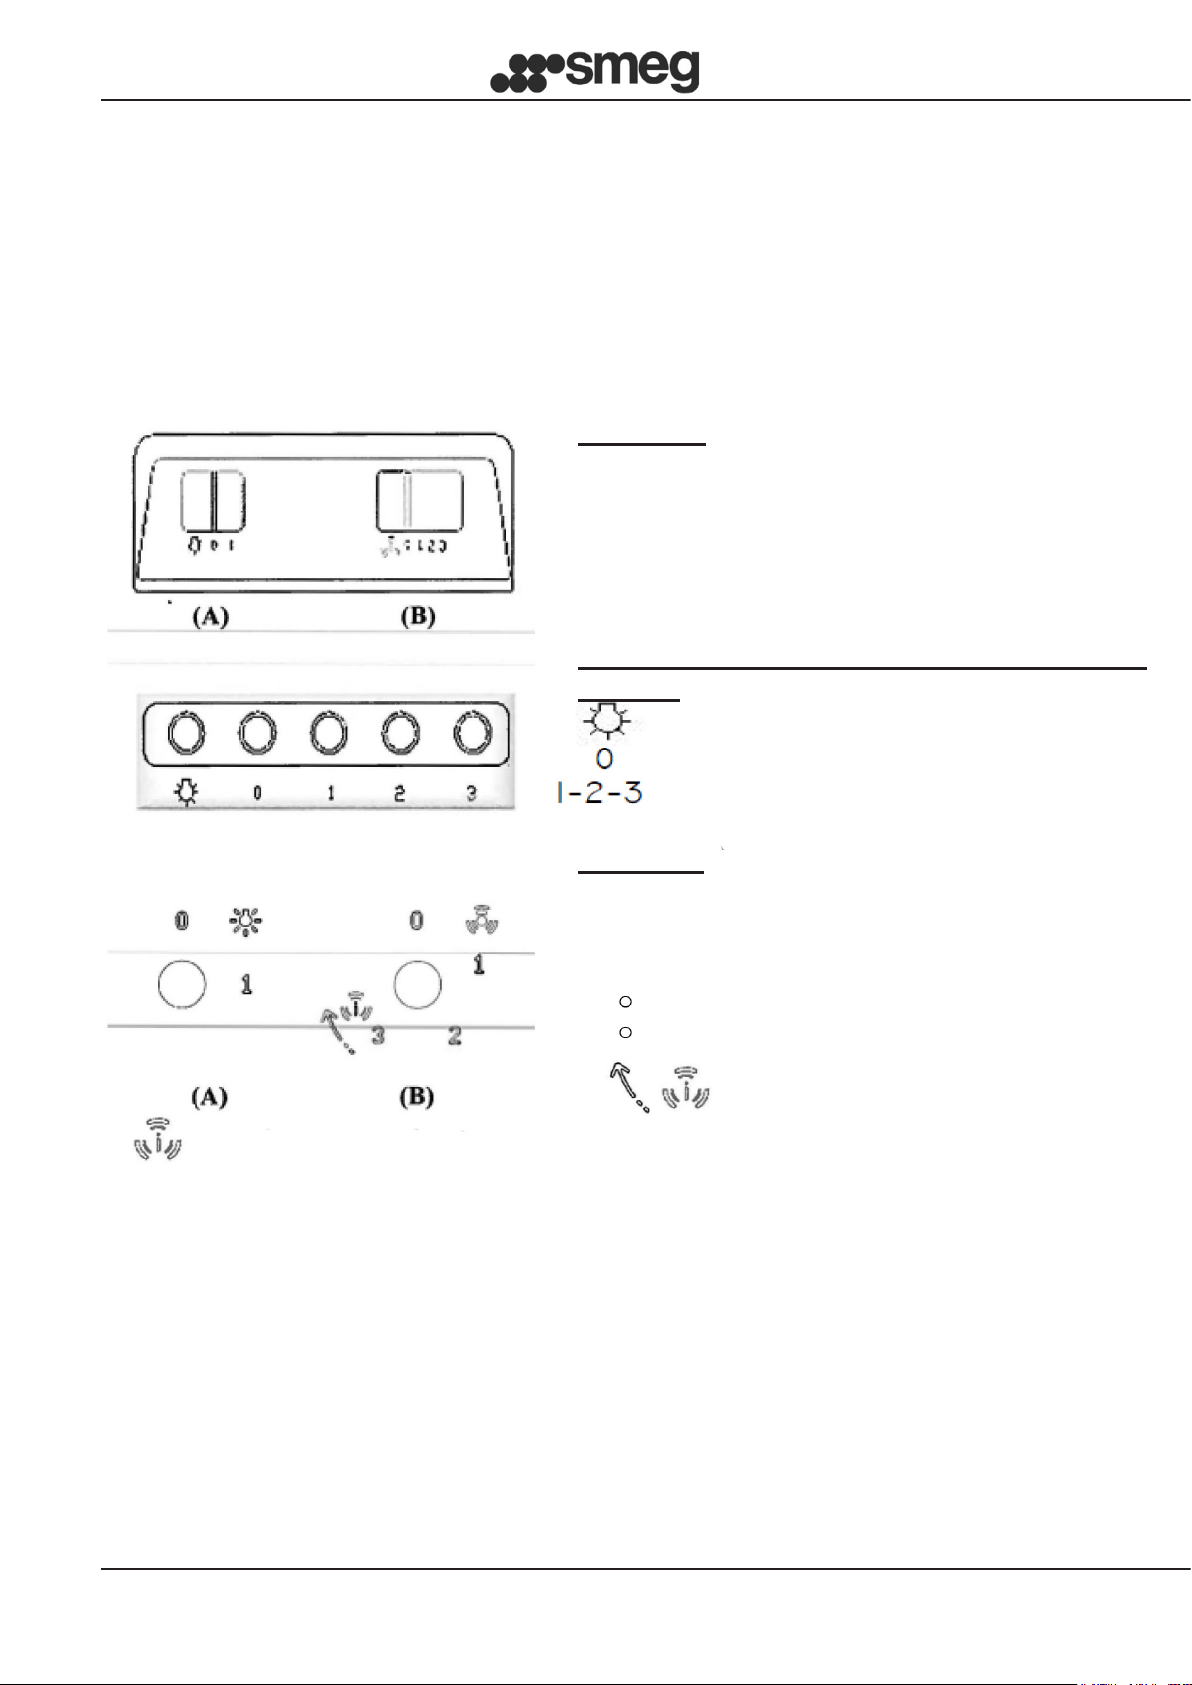
SLIDER:
- Slider(A)lightingON/OFF
- Slider(B)withfourpositions:
Pos.0:MotorOFF
Pos1/2/3:ON/Speedselection
ELECTRO-MECHANICAL PUSHBUTTON
PANEL:
LightsON/OFFkey
MotorOFFkey
Powerkey/hoodspeedselection
KNOBS:
-Knob(A):lightingON/OFF(0-1)
-Knob(B):
0 MotorOFFposition
1-2-3 Hoodspeedselection
Starttimedintensivespeed
• CONTROLSUNIT
Foranoptimalandefcientuseoftheproductitisadvisabletostartthehoodafew
minutesbeforeyoustartcookingandtokeepitonforatleast15minafteryouhave
nishedcookingoruntilsteamandodourshavecompletelydisappeared.Tostartthe
hood,identifythecommandtypeofthehoodandthenfollowtherelativeindications:
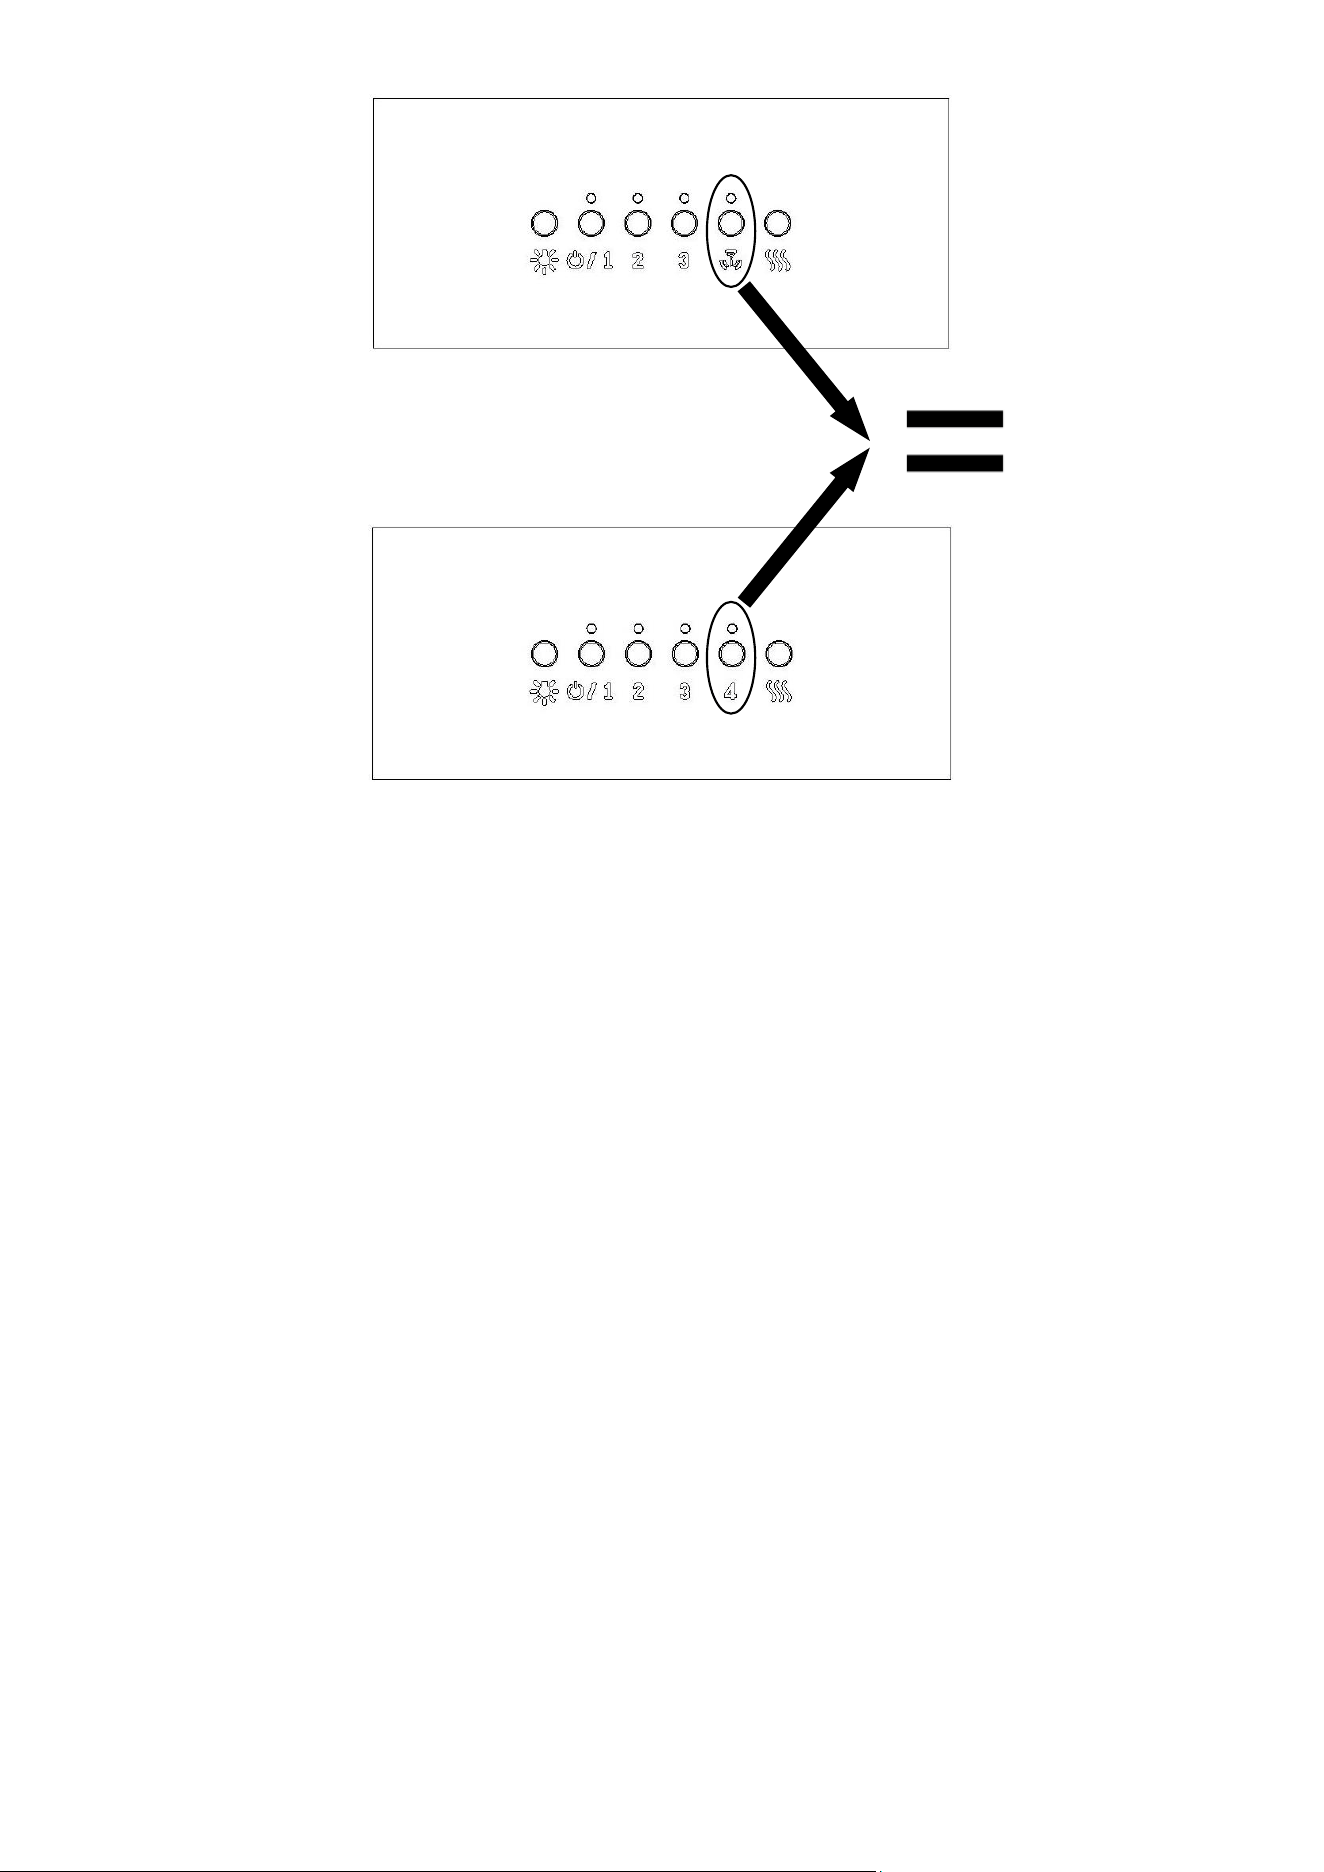
Timedintensivespeed:
Thetimedintensivefunctionisthatmodeofserviceforwhichthehood,foralimited
time,worksatitsmaximumcapacity.Thetimedintensivespeedofthehoodisactivated
by turning the knob(B) clockwisefrom position 3. Once the timedintensive speed
isactivated,theknobautomaticallyturnstoposition3.Theintensivespeedcanbe
switched off by turning the control (B) counter-clockwise again. When the intensive
EN
6
speedtimerhasexpireditreturnstothethirdspeedbydefault.
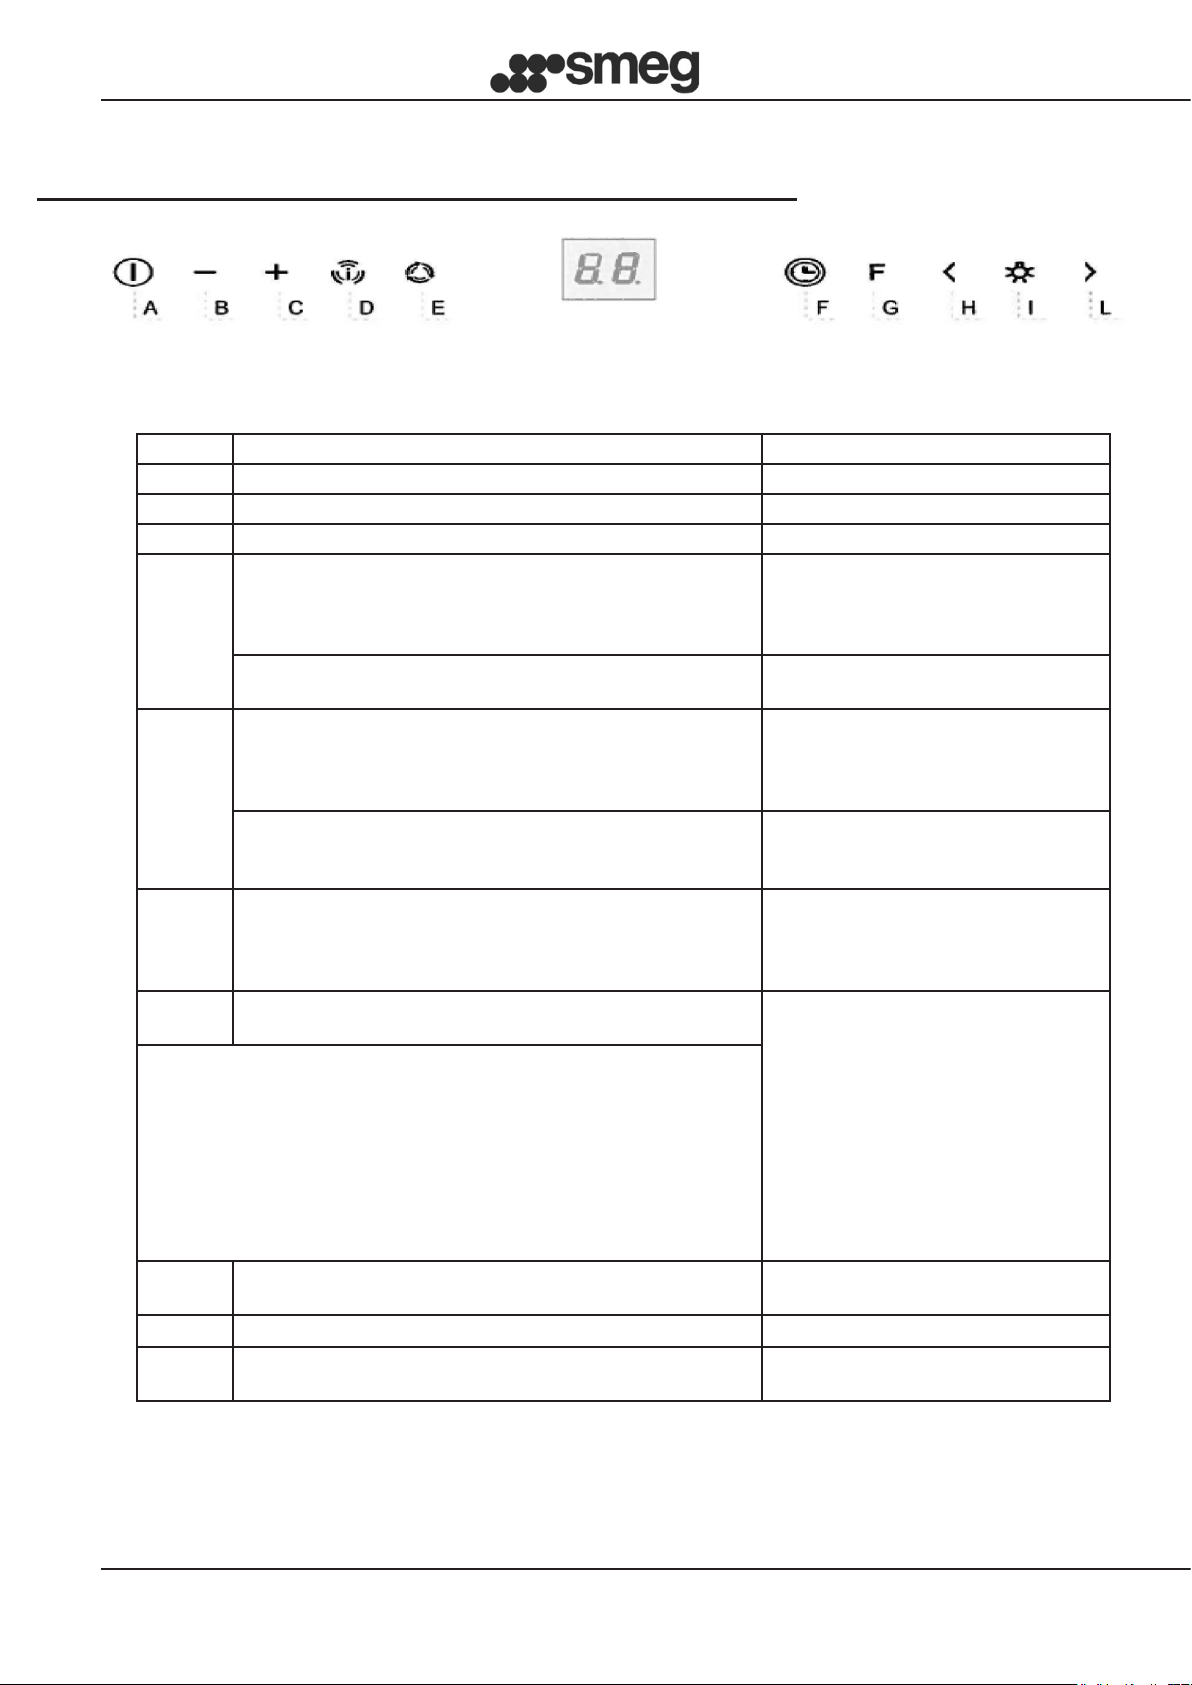
Control panel
2-DIGIT10-KEYCAPACITIVEPUSHBUTTONBOARD:
Key Function Display
A
Turns the suction motor on / off. Displays the set speed
B
Decreases the operation speed. Displays the set speed
C
Increases the operation speed. Displays the set speed
D
Activates the Intensive speed from any speed even with the
motor off, this speed is timed. At the end, the system returns
to the speed previously set. Suitable for dealing with the
maximum emissions of cooking fumes.
Displays alternately HI
Hold the button down for about 5 seconds, when all loads are
off (Motor + Light), to switch the keyboard lock On / Off.
"- -" Keyboard lock On.
E
24 H function
Activates the motor at the rst speed and allows extraction for
10 minutes every hour.
It displays 24 and the point at the bottom
right ashes once a second, while the
motor is in operation. Press the key to
disable it.
Holding the button down for about 5 seconds when all loads
are off (Motor + Light), holding key "B" down during the
animation, the Active Carbon Filters Alarm switches On / Off.
Displays a rotary animation for 5
seconds. "EF" ashes twice in activation.
"EF" ashes once in deactivation.
F
Delay function
Enables the automatic shutdown delay of 30'. Suitable for
removing residual odours. Can be activated from any position.
You disable it by pressing the key or turning the motor off.
Displays the operating speed and the
point on the lower right ashes.
G
With the lter alarm in progress, pressing the key for about 3
seconds resets the alarm.
After the procedure, the signal
previously displayed turns off:
FF signals the need to wash the metallic
grease lters. The alarm comes on after
100 hours of actual operation of the
Hood.
EF signals the need to replace the active
carbon lters and the metallic grease
lters must also be washed. The alarm
comes on after 200 hours of actual
operation of the Hood.
H
Decreases the light intensity at each press of the Key in a cyclic
manner.
1
Turns the lighting system on and off at maximum intensity.
L
Increases the light intensity at each press of the Key in a cyclic
manner.
EN
7
Keyboardlockcommand:youcanlockthekeyboard,forexample,tocleantheglass
surface, when the Hood has the motor and lights switched off. By pressing key D
for about 5seconds, youcan enable ordisable thekeyboard lockwhich is always
conrmedwith:
Thetimedintensivefunctionisthatmodeofserviceforwhichthehood,foralimited
time,worksatitsmaximumcapacity.
ActivatingthefunctionisdisplayedbytheLEDlocatedunderthekeyashing.When
“- -” Keyboard lock On.
CONTROL PANEL
KEY FUNCTION DISPLAY
A SWITCH THE SUCTION MOTOR ON / OFF. DISPLAYS THE SET SPEED
B DECREASE THE OPERATING SPEED DISPLAYS THE SET SPEED
C
INCREASE THE OPERATING SPEED
START TIMED INTENSIVE SPEED
DISPLAYS THE SET SPEED
FLASHING TIMED INTENSIVE SPEED
D TURN THE LIGHTING SYSTEM ON AND OFF
F
ENABLES THE AUTOMATIC SHUTDOWN
DELAY OF 15'
FLASHES
1-DIGITCAPACITIVEPUSHBUTTONBOARD:
SOFTTOUCHELECTRONICPUSHBUTTONBOARD:
LightsON/OFFkey
MotorspeedOFF/1key
Adjustmentkeyhoodspeed
Timedintensivespeedkey
Filtersresetkey

EN
8
theintensivespeedtimerhasexpireditreturnstothethirdspeedbydefault.
Beforeperforminganymaintenanceand/orcleaningalwaysdisconnectthehood
fromthepowersupply
Regularcleaningguaranteesgoodoperationandalongapplianceservicelife.The
greaseltersandlterhoodswithcarbonltersrequirespecialcare.
N.B.Theaccumulationofgreaseinsidethelterpanelsaswellasaffectingthe
performanceoftheextractor,canalsocreatearehazard.
Theexternalandinternalcleaningofthehoodmustbecarriedoutusingadampcloth
and mild liquid detergent. Completely avoid the use of solvents or abrasives. It is
recommendedtousespecicproducts,followingtheinstructionsontheproduct.Itis
advisabletocleanthehoodbyalwaysrubbingthesteelinthedirectionofthesurface
nish.
- TIMEDAUTOPOWEROFF:Bypressingoneofthemotorspeedkeys(2-3),twice,
youwillactivatethefunction"TimedAutoPowerOff"whichturnsoffbothlightsandhood
motorafter10mins.ActivatingthisfunctionisdemonstratedbytheLEDimmediately
abovethepressedbuttonashing.
- FILTERCLEANINGSIGNAL:thesimultaneousashingofthe4LEDs,(programmed
torunevery200hofoperation),istoindicatetheneedtoclean/replacethelters.
BypressingtheResetbutton ,the200htimecanbereset.N.B.Accidentally
pressingtheresetbuttonbeforethe200hoperationcycledoesnotresultinthe
lterbeingresetintheltercleaningmemory.Itisgoodpracticetocleanthe
greaseltersandreplacetheactivecarbonltersevery200hofoperation.
OPTIONALFUNCTIONS:
FUNCTIONSANDMAINTENANCE:
EXTERNALCLEANING:
EN
9
Particular attention should be paid to the metal
greaselterpanels.Theaccumulationofgrease
inside the lter panels as well as affecting the
performance of the extractor, can also create a
rehazard.
Inordertominimisetheriskofre,theltersmust
be cleaned regularly, at least once a month or
withgreaterfrequencyinthecaseofaparticularly
intensiveuseoftheappliance.
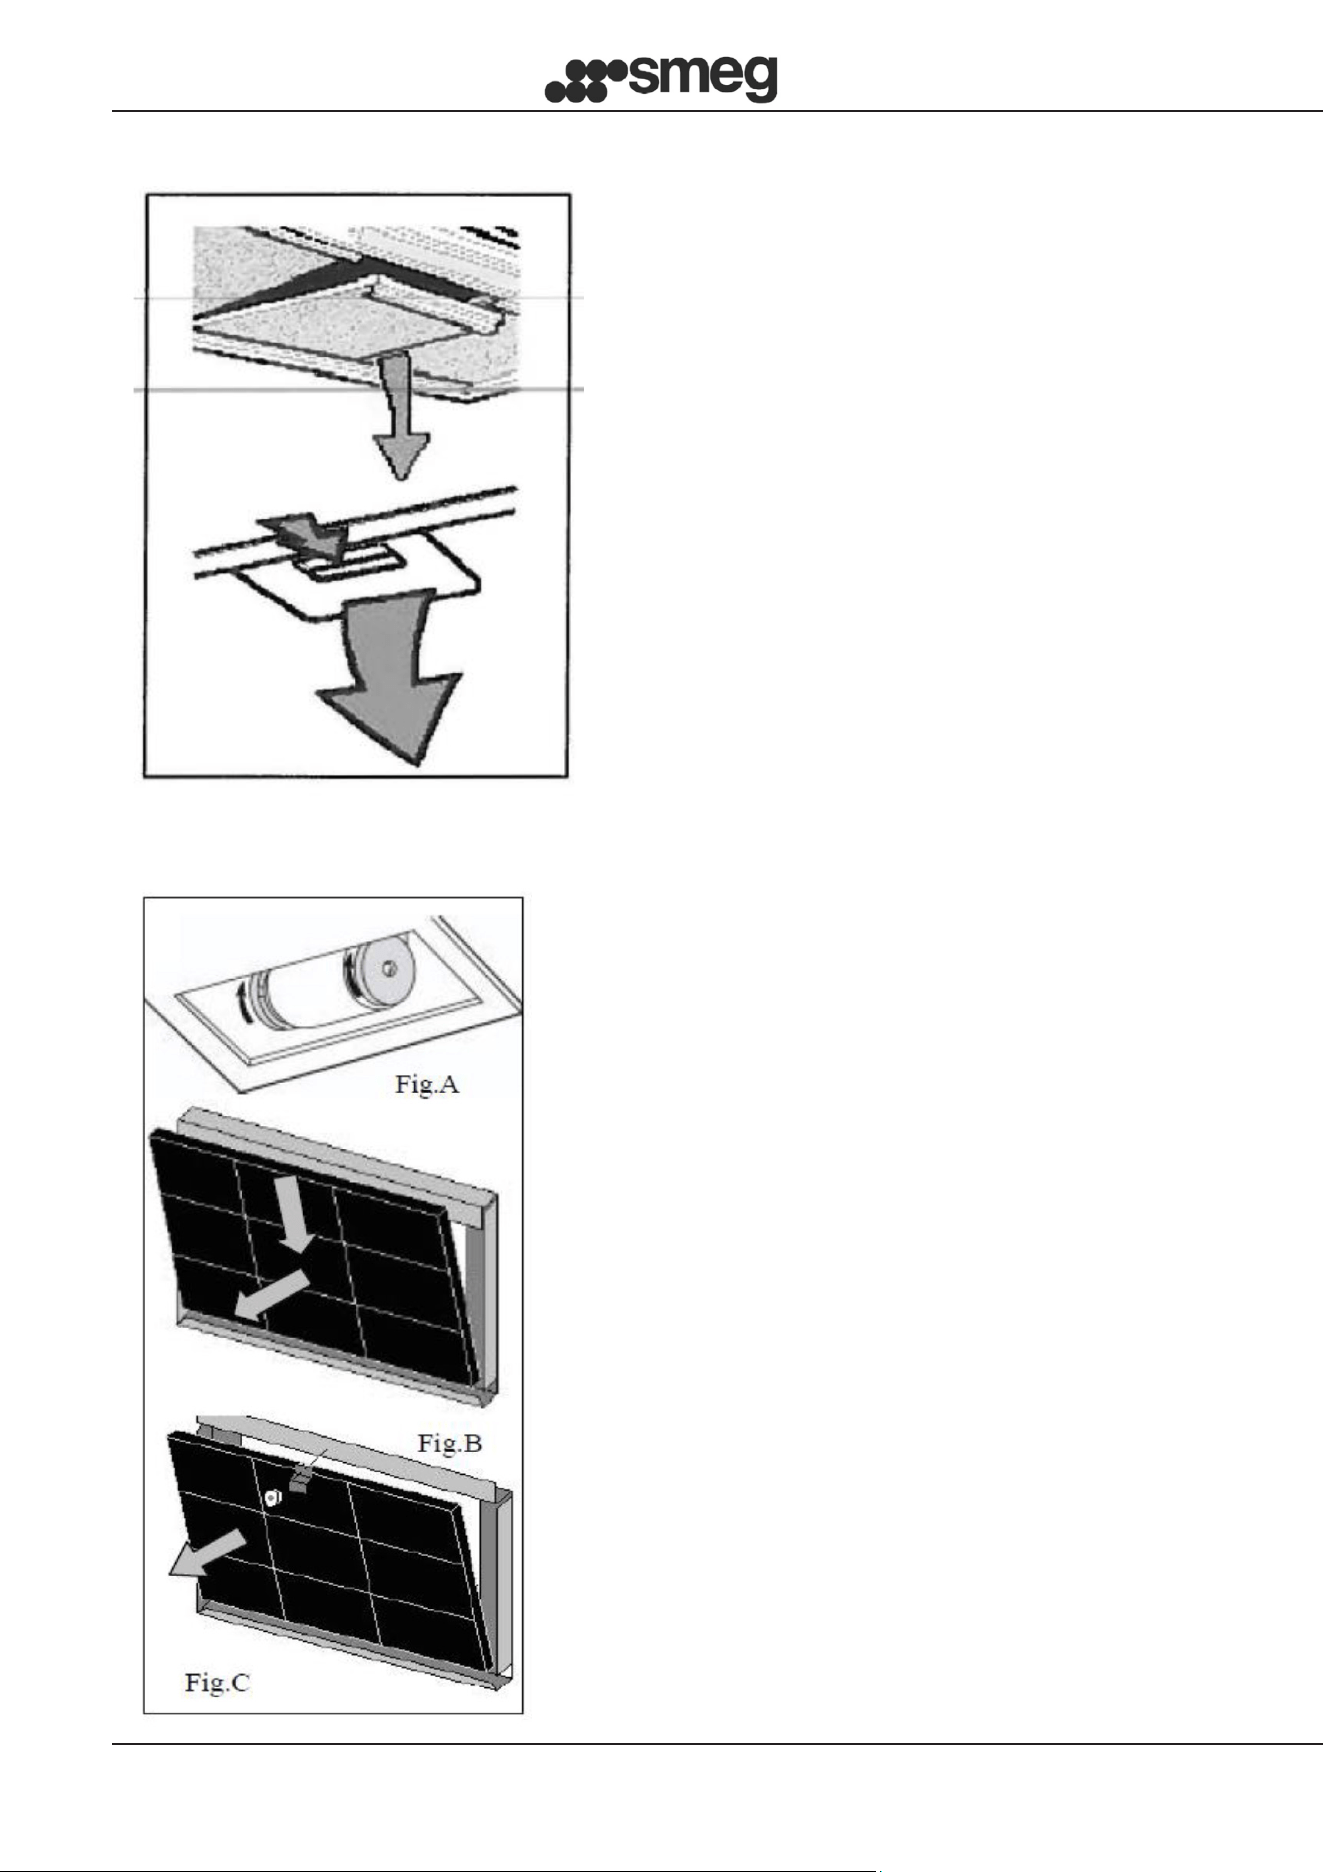
Afteridentifyingyourhoodmodel,removeonelter
atatimeasshowninthenextgure.Thoroughly
washlterswithamilddetergenteitherbyhand
orinthedishwasher.Replacethelters,making
surethatthehandleisontheoutsideofthehood
Thecarbonltersarecapableofretainingodours
untilthecarbonreachessaturationlevel.They
cannot be washed and they are not renewable,
therefore, it is recommendedto replace them at
leasteverysixmonthsormoreoftenifthehoodis
usedoften.
Beforestartingoperationsmakesuretheelectrical
powersupplytothehoodisdisconnected.
Accesstheactivecarbonltersbyremovingthe
metalltersasdescribedabove.Withthehelpof
thegures,identifythecarbonlterskitsupplied
withthehood.
Inthecaseofthedisclter,simplytiltthetwolters
by90°asshownin(g.A)andthenextractthem
fromtheirhousing.
In the case of a cartridge lter attached with
springs, (g.B) exert the pressure required to
counteracttheresistanceofthespringandthen
removethelter
METALFILTERCLEANING:
REPLACINGCARBONFILTERS:(Onlyforthelterversion)
EN
10
Inthecaseofacartridgelterblockedwithabracketandthreadedknob,(g.C),unscrew
theknob,removethelockingbracketandthenremovetheactivecarbonlter.Replacethe
carbonltersandthemetalnon-greaseltersbyperformingtheoperationsininverseorder
Note:onlytheelectronically-controlledhoodcantheltercleaningwarningfunction
beresetbypressingthespeciclterresetbutton
Beforeperforminganymaintenance
and/or cleaning always disconnect
thehoodfromthepowersupply
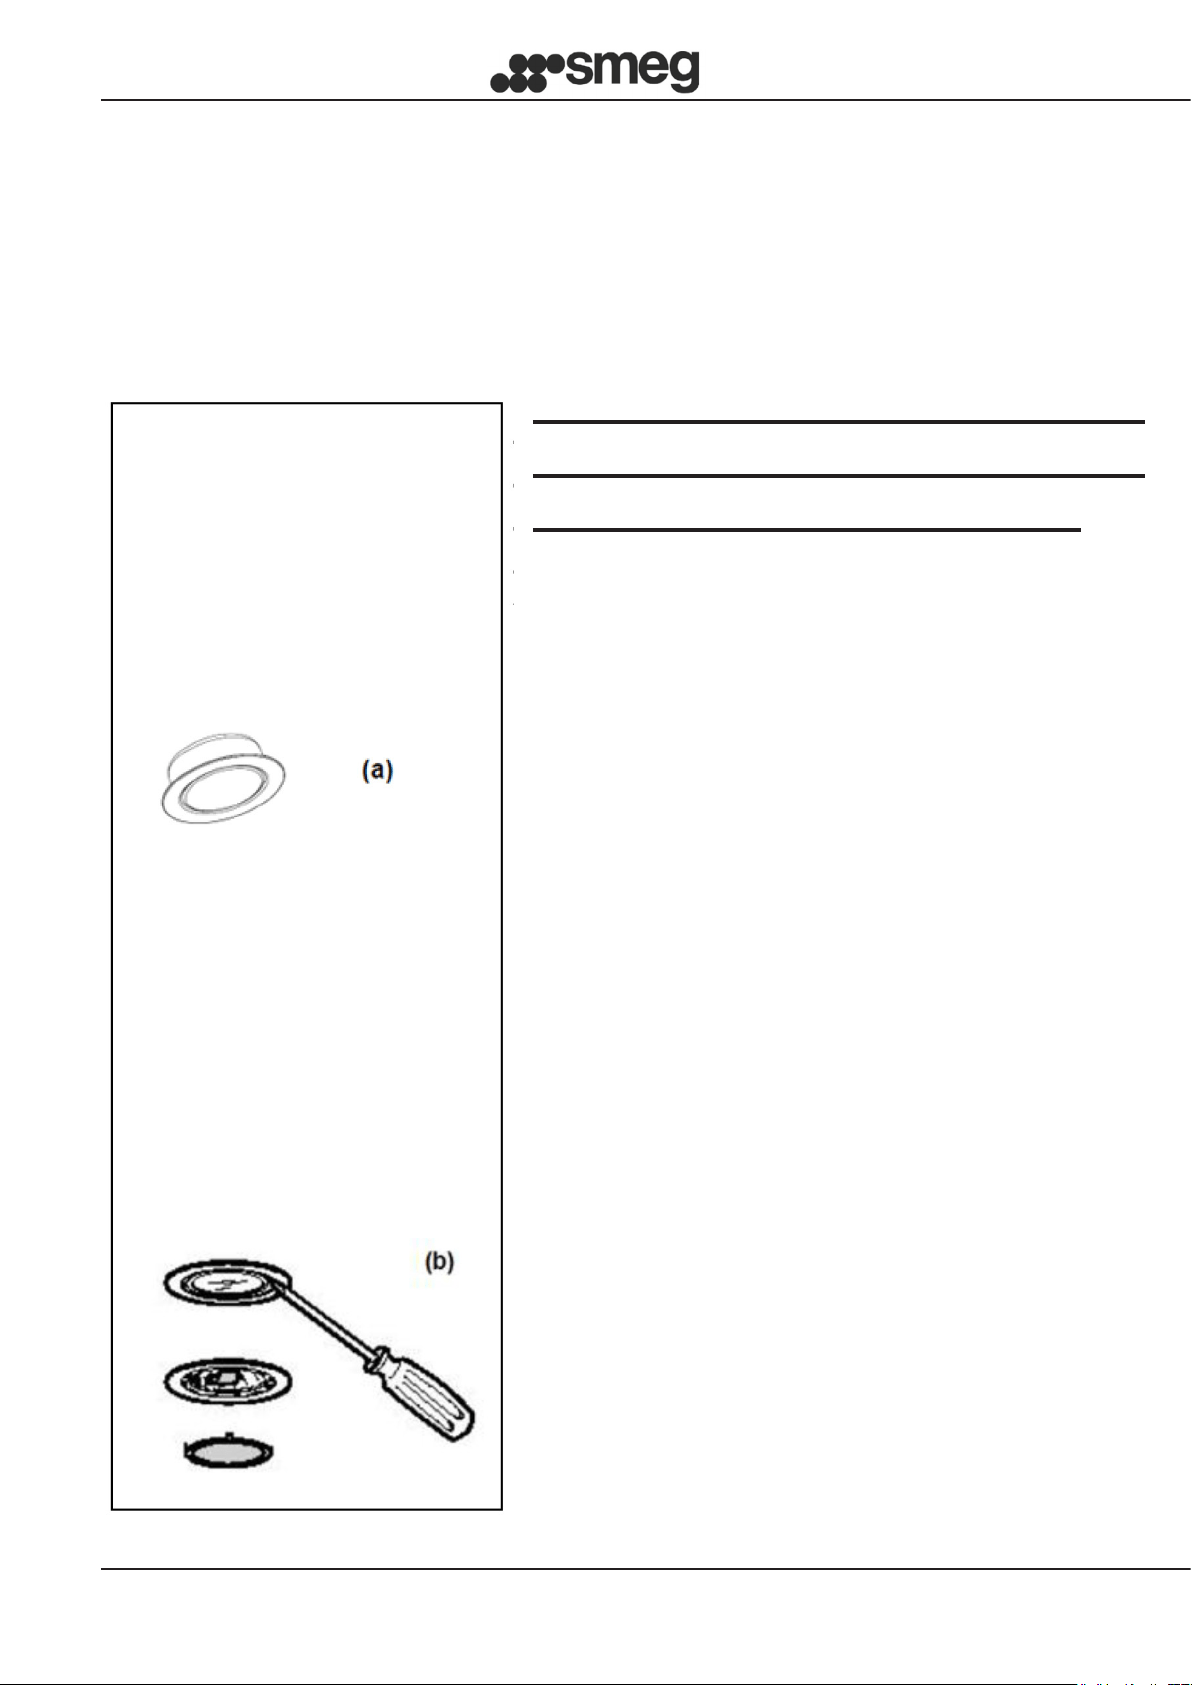
Depending on the model, the hood can be
equippedwithdifferenttypesoflighting,withLED
orhalogenlamps:
a) WITHLEDLIGHTS:TheLEDlightsguarantee
a signicant number of hours of operation.
Shoulditbereplaceduetobeingwornorfaulty,
the entire spotlight must be replaced. In this
case,contactqualiedTechnicalSupport.This
applianceisequippedwithClass1MwhiteLED
light,inaccordancewithENstandard60825-1:
1994+A1:2002+A2:2001;maximumemitted
opticalpower@439nm:7μW.
Do not look directly at the light with optical
instruments(binoculars,magnifyingglass...).
b)Halogen:lampwithG4tting,20Wpowerand
12V voltage. Replace the lamp by removing
the glass support ring of the spotlight with
a screwdriver. Once the glass is removed,
removethefaultylampfromitshousingandt
thenewlamp.Replacetheglassofthespotlight
byblockingitwiththering.
CodeILCOS:HSG/C/UB-20-12-G4
REPLACEMENTLAMPS:
EN
11
Pursuant to art. 26 of the Italian Legislative Decree dated 14 March
2014, no. 49 "Implementation of directive 2012/19/EU on Waste
Electrical and Electronic Equipment (WEEE)"
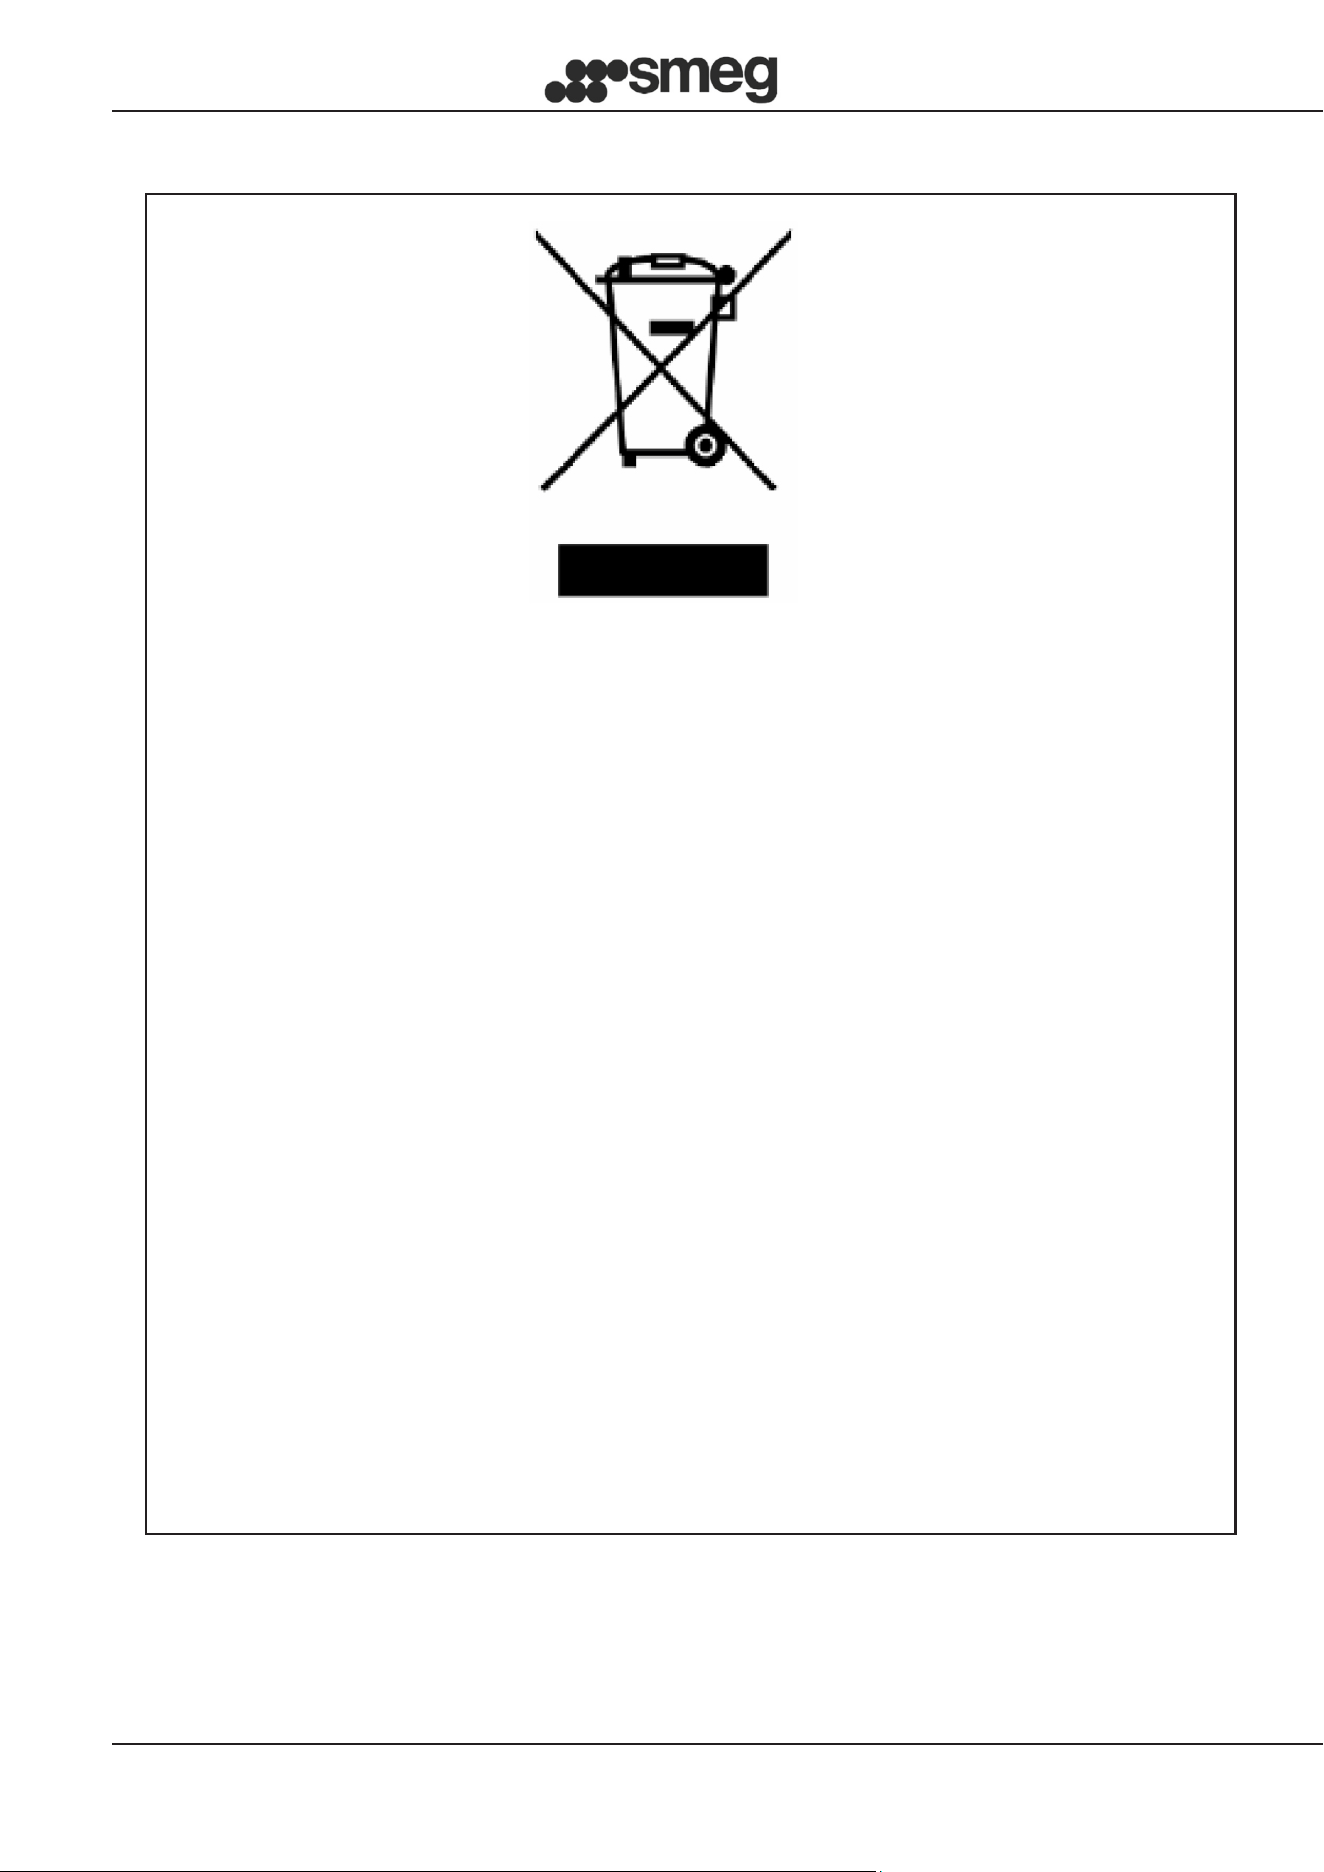
WEEEDISPOSAL:
Thecrossedoutwheeledbinsymbolontheequipmentoritspackaging
indicatesthattheproductattheendofitsusefullifemustbecollected
separatelyfromotherwaste.
Therefore,anyproductsthathavereachedtheendoftheiruseful
lifemustbegiventowastedisposalcentresspecializinginseparate
collectionofwasteelectricalandelectronicequipment.
Asanalternativetoautonomousdisposal,thedeviceyouwantto
disposeofcanbegivenbacktotheretaileratthetimeofpurchasing
newsimilarequipment.
Atelectronicproductretailerswithasalesareaofatleast400m2,itis
possibletoreturn,withoutanyobligationtobuy,electronicproductsto
disposeofwithdimensionsbelow25cmfreeofcharge.
Theseparatecollectionforthedeliveroftheequipmenttorecycling,to
treatmentandenvironmentallycompatibledisposalhelpsavoidpossible
negativeeffectsontheenvironmentandhealthandpromotesthereuse
and/orrecyclingofmaterialsthatmakeuptheequipment.

EN
12