Owner 's Manual for Washer/Dryer
PRODUCT OVERVIEW
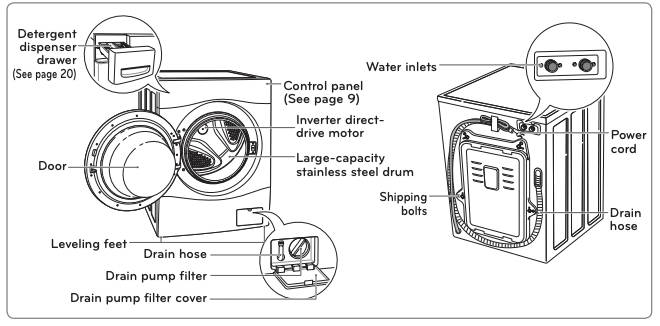
Parts
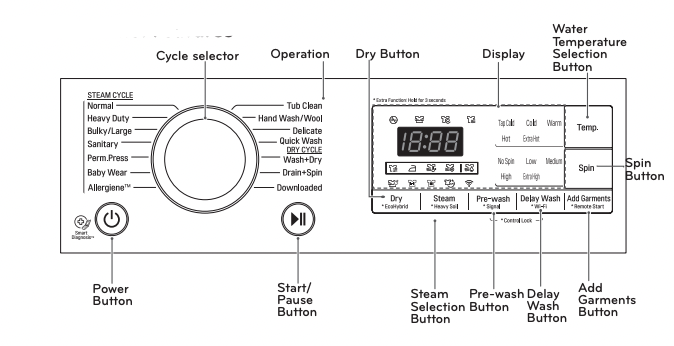
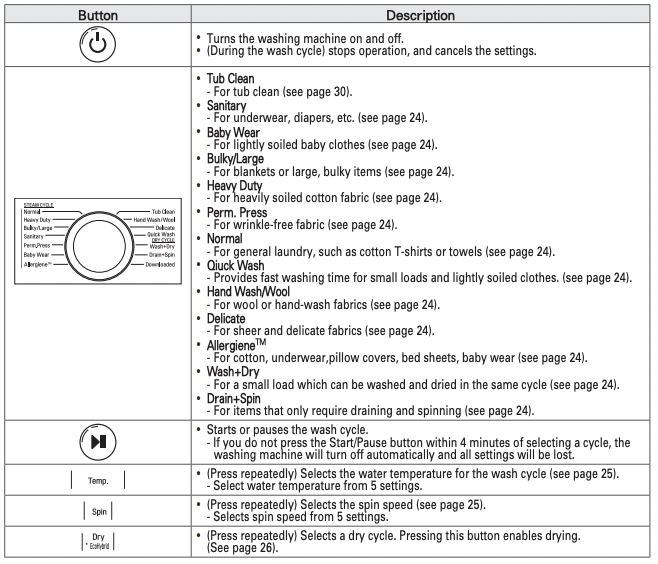
Control Panel Features
Operation
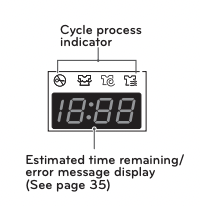
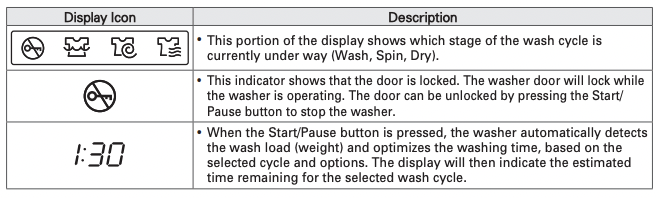
Display
PREPARATION
Sorting Wash Loads
Read and observe the following to prevent shrinkage or damage to clothes.
◆ Check all pockets to make sure that they are empty. -Items such as clips, matches, pens, coins, and keys can damage both your washer and your clothes.
◆ Close zippers, hooks, and drawstrings to prevent these items from snagging or tangling on other clothes.
◆ Pretreat heavily stained areas before washing. - Doing so will produce clean, stain-free results.
◆ Combine large and small items in a load. Load large items first.
◆ Large items should not be more than half of the total washload.
◆ The washer can be fully loaded, but the drum should not be tightly packed with items. -The door of the washer should close easily.
◆ Do not wash single items, except for bulky items such as blankets. Make sure to wash laundry in similar types of loads. - Washing a single small item may result in the tub becoming unbalanced, vibrating and making a noise.
◆ Do not wash waterproof clothes. - This may cause abnormal vibration, or may cause the load to bounce, which could damage the tub.
◆ Check if there are any foreign objects in the door seal and take extra care that clothes do not get caught there. - Foreign objects in the door seal may stain clothes, and water may leak if clothes get caught in the door seal.
◆ Wash underwear or small, light items in a laundry net (mesh bag). - Small, light items may get caught in the door seal, and a brassiere hook may damage other items or the tub.
◆ Brush heavy soil, dust, or hair off fabrics before washing. - Laundry may not wash clean if there is dirt or sand on the fabrics, or items may be damaged due to particles rubbing against sheer fabrics.
◆ Wash blankets individually. - Washing more than one blanket in a load may produce inferior results due to tangling or an unbalanced load.
◆ Always separate fabrics according to their colors and wash them separately to prevent colors from running. - Fabrics may be damaged or become stained due to fabric dyes running, or due to foreign objects transferring from one fabric to another.
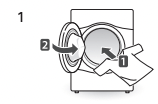
◆ For best performance, load clothes as shown.
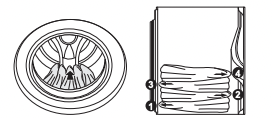
- Load clothes loosely, and do not overfill the drum. Clothes need room to circulate in order to get clean.
- Do not press down on items while stacking them in the drum
Fabric Care Labels
Most articles of clothing feature fabric care labels that include instructions for proper care.

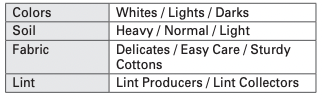
Sorting Laundry
Sort laundry into similar loads that are washable in the same cycle. Refer to the following chart for sorting clothes.
Using Detergent/Fabric Softener
Recommended Detergent
Make sure to use HE (High-Efficiency) detergent for front-loading washing machines. HE detergents dissolve more efficiently and produce fewer suds to ensure efficient washing and rinsing. Use the correct amount of detergent as indicated on the detergent packaging.
 Specially designed to use only HE (High-Efficiency) detergent
NOTE
- Only use HE detergents, because using a regular detergent may produce excessive suds.
- HE detergents produce fewer suds, dissolve more efficiently to improve washing and rinsing performance, and help to keep the interior of your washer clean.
- Use less detergent for soft water.
- Wipe up any spills immediately, as liquids could damage the finish and the control panel of the washing machine.
- Using too much detergent can cause a buildup in the tub resulting in unsatisfactory performance and machine malfunction.
- If you use a detergent that does not dissolve easily or a detergent with high viscosity, it will leave a residue on the tub, which may not rinse properly
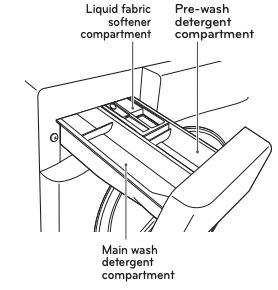
Loading the Dispenser
The detergent dispenser drawer of the washing machine has a dispenser compartment for each detergent type. Add each detergent to its appropriate compartment.
- Pull out the detergent dispenser drawer.
- Add each detergent to its appropriate compartment.
3 Close the detergent dispenser drawer slowly.
- Slamming the detergent dispenser drawer may result in the detergent overflowing into another compartment or pouring into the tub earlier than programmed.
NOTE
- It is normal for a small amount of water to remain in the dispenser compartments at the end of the cycle.
Pre-wash Detergent Compartment
Add liquid or powdered detergent to this compartment when using the Pre-Wash option.
Always use HE (High-Efficiency) detergent with your washing machine.
NOTE
- The amount of detergent added for the Prewash option is 1/2 the amount recommended for the main wash cycle. For example, if the main wash cycle requires one measure of detergent, add 1/2 measure for the Pre-Wash option.
Main Wash Detergent Compartment
This compartment holds laundry detergent for the main wash cycle, which is added to the load at the beginning of the cycle. Always use HE (High-Efficiency) detergent with your washing machine.
Never exceed the manufacturer’s recommendations when adding detergent. Using too much detergent can result in detergent buildup on clothing and the washer. Either powdered or liquid detergent may be used.
NOTE
- Liquid or powdered color-safe bleach may be added to the main wash compartment with detergent of the same type.
Fabric Softener Compartment
This compartment holds liquid fabric softener, which will be automatically dispensed during the final rinse cycle.
NOTE
- Always follow the manufacturer’s recommendations when adding fabric softener.
- Do not exceed the maximum fill line. Using too much fabric softener may result in stained clothes.
- Dilute concentrated fabric softeners with warm water. Do not exceed the maximum fill line. y Never pour fabric softener directly onto the load or into the drum.
OPERATION
Using the Washer
Load the laundry into the washing machine and close the door.

Press the Power button.
- The lights around the cycle selector knob will illuminate and a chime will sound.
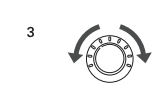
Turn the cycle selector knob in either direction to select the desired cycle.
- The proper default option is automatically set according to the wash cycle. See page 23, Cycle Guide, for more detailed default options for each cycle.
- See page 24, Wash Cycles, for details on the wash cycles.
- To change the options, press the option button and select the desired option. See page 25, Setting Options Before Cycle, for more details on options.
- Skip to step 4 to use the default setting without changing the options.
Add the proper amount of detergent and additions (bleach, softener) into the detergent dispenser drawer.
- See page 20, Using Detergent/Fabric Softener, for more details on using detergent.

Press the Start/Pause button.
- The washing machine will start.
When the melody plays, the wash cycle is finished.
- When the washing cycle is finished, the door will unlock. Open the door and remove the laundry immediately.
- Make sure to check around the door seal when taking out the finished load. Small items may be caught in the door seal.
WARNING
- To reduce the risk of fire, electric shock, or injury to persons, read the IMPORTANT SAFETY INSTRUCTIONS before operating this appliance.
NOTE
- The front-load washing machine rotates the laundry in a way that allows it to use less water while still fully saturating your clothing. It is normal to not be able to see water during the wash cycle.
- If the temperature or the water level inside the machine is too high, the door locks and cannot be opened.
- If drying items, make sure the drum is no more than half full before beginning the dry cycle.
Cycle Guide
The cycle guide below shows the options and recommended fabric types for each cycle. = Available option
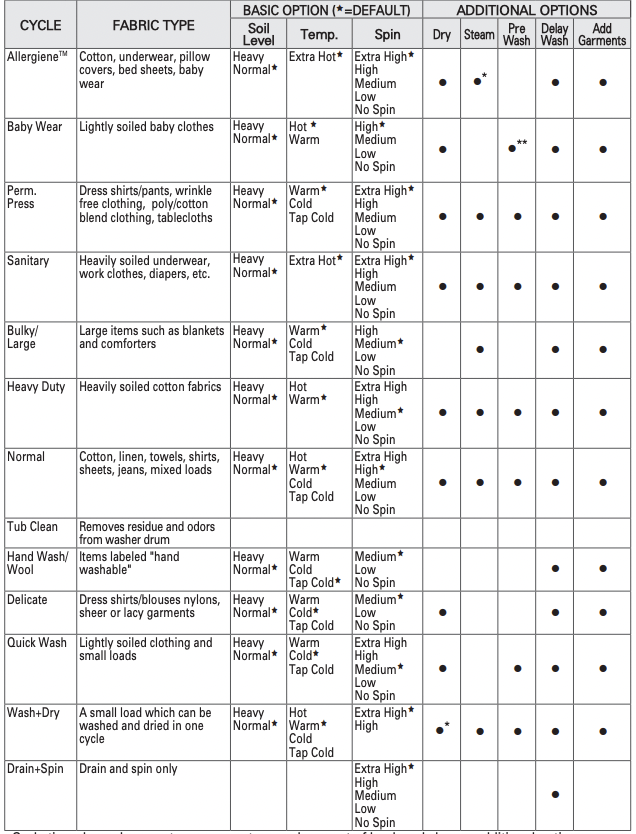
- Cycle time depends on water pressure, type and amount of load, and chosen additional options.
- To protect your garments, not every wash/rinse temperature, spin speed, soil level, or option is available with every cycle.
* : This option is automatically included in the cycle and can not be deleted.
**: This option is automatically included in the cycle and can be deleted.
Wash Cycles
You can wash laundry items more thoroughly by selecting the wash cycle that best suits the type of items to be washed. Turn the cycle selector knob in either direction to select the desired cycle. When you select a wash cycle, the light for the corresponding wash cycle will turn on. See page 22 Using the Washer, for more details on operating methods.
Sanitary: Reducing Laundry Bacteria
This wash cycle helps to remove heavy soil on laundry through high temperature.
Baby Wear: Lightly Soiled Baby Clothes
This cycle helps remove food stains from baby clothes using a powerful rinse.
Bulky/Large: Blankets or Bulky Items
This cycle is for washing blankets or bulky items.
Heavy Duty: Heavily Soiled Items
This cycle is for washing heavily soiled laundry through more powerful drum rotation.
Perm. Press: Wrinkle-Free Items
This cycle is for washing items such as wrinkle-free clothes or tablecloths to minimize wrinkles.
Normal: Normal Items
Use this cycle to wash all normal items, except delicate fabrics such as wool or silk.
NOTE
- If you press the Power button and the Start/ Pause button without selecting another cycle, the washing machine defaults to the Cotton/ Normal cycle.
AllergieneTM: Help Prevent Allergens
This cycle helps to remove allergens such as house mites, pollen, and cat hair.
Hand Wash/Wool: Items Labeled Wool or Hand-Wash
This cycle is for washing shrinkable woolen or hand-washable items requiring delicate care. Only wash woolen items that are labeled machine washable or hand-washable.
NOTE
- Laundry weight should be less than 8 pound kg) to prevent damage to the fabric.
- Use only natural or wool-safe detergent harmless to fabrics and load 1/2 of the normal amount of detergent.
- The Hand Wash/Wool cycle uses a gentle tumble rotation angle and low speed spin for the ultimate fabric care.
Delicate: Sheer Items
This cycle is for washing lingerie or sheer and lacy clothes which can easily be damaged.
Quick Wash: Washing Quickly
Use the Quick Wash cycle to quickly wash lightly soiled clothing and small loads. For high wash and rinse efficiency, wash small loads of 2-3 lightly soiled garments
NOTE
- Use very little detergent in this cycle. For additional rinsing, add an extra rinse using the option button.
Wash+Dry: A Small Load Which Can Be Tumble Dried
This cycle washes and dries clothing in one continuous cycle.
Drain+Spin: Drain and Spin Only
This cycle is for draining and spinning without the wash and rinse cycle, or for removing the load from the washing machine in the middle of the cycle.
Cycle Modifier Buttons
Each cycle has preset settings that are selected automatically. You may also customize the settings using the cycle modifier buttons. Press the button for that option to view and select other settings. The washer automatically adjusts the water level for the type and size of wash load for best results and maximum efficiency. It may seem there is no water inside the drum in some cycles, but this is normal.
NOTE
- To protect your garments, not every wash/ rinse temperature, spin speed, soil level, or option is available with every cycle. See the Cycle Guide for details
Setting Options Before Cycle
You can select and add the desired optional functions before you start the washing machine.
Temp.
Set the water temperature for the wash cycle. Set the appropriate temperature, as specified in the fabric care label.
- Press the Power button and turn the cycle selector knob in either direction to select the desired cycle.
- Press the Wash Temp button repeatedly to select the desired water temperature: When you press the button, an indicator light for the corresponding selection will turn on in the display.
- You can now modify other cycle settings and add options (see pages 25-28), or proceed to step 4 to begin the cycle.
- Press the Start/Pause button.
NOTE
- Cold rinses use less energy.
- Your washer features a heating element to boost the hot water temperature for Extra Hot settings. This provides improved wash performance at normal water heater settings.
- Select the water temperature suitable for the type of load you are washing. Follow the fabric care label for best results.
Spin
You can set the desired spin speed. Use this feature properly according to the characteristics of the load.
- Press the Power button and turn the cycle selector knob in either direction to select the desired cycle.
- Press the Spin Speed button repeatedly to select the desired spin speed. When you press the button, an indicator light for the corresponding selection will turn on in the display.
- You can now modify other cycle settings and add options (see pages 25-28), or proceed to step 4 to begin the cycle.
- Press the Start/Pause button.
NOTE
- The Spin Speed button also activates the Drain & Spin cycle to drain the tub and spin clothes; for example, if you want to remove clothes before the cycle has ended.
Dry ( )
)
Press the Dry button to select drying options.
- For consistently dry loads, all articles in the load should be similar in material and thickness.
- Do not overload the drum. Items must have room to tumble freely.
- Press Start/Pause to remove items before the dry cycle has finished.
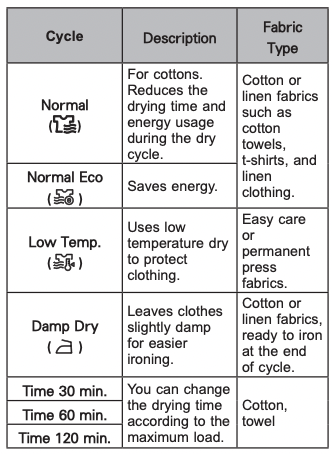
Press the Dry button repeatedly to toggle through the selections:
By pressing the Dry button, you can select:
- Low Temp. - For delicate fabrics
- Damp Dry - For damp drying fabrics
- Normal - For general drying
- Normal Eco - For heavier fabrics
- Time 30/60/120 - For timed drying
NOTE
- The capacity of the machine for washing clothes is twice as much as when drying clothes. If the machine is to be used to dry a load, then the wash load must be reduced by half for effective drying performance. If a full load is washed, remove half the clothes prior to starting the dry cycle.
Drying Guide–Automatic Dry
Electronic sensors measure the temperature of the exhaust to increase or decrease the drying temperature for faster reaction time and tighter temperature control. Recommended DRY settings by fabric type:
a) Perm. Press – Low Temp.
b) If clothes are to be ironed – Damp Dry
c) Cotton/Towels – Normal
d) Diapers – Normal Eco
NOTE
- On Automatic Dry settings, the estimated drying time may vary from the actual drying time. The type of fabric, size of the load, and the selected dryness level affect drying time.
Drying Guide–Timed Dry
- Press the Dry button repeatedly to select the drying time in 30 minute increments: 30/60/120 minutes.
- Timed dry can last up to 120 min. When selecting Dry only, drying will start after the final Spin cycle.
- The time required to dry a load can vary greatly depending on dampness, room temperature, and type of fabric. You may need to add additional time. Your own experience will be your best guide.
Dry Only Cycle
- Press Power. Do not turn the cycle selector knob.
- Press Dry repeatedly to select the desired dry cycle.
- Press Start.
NOTE
- If you turn the cycle selector knob, you will be unable to select a Dry Only cycle. If this occurs, press Power twice to cycle the machine off and back on.
- All Dry Only cycles begin with a brief spin cycle to extract as much moisture as possible from the load before drying.
Drying Tips
Woolen Articles
Do not tumble dry woolen articles. Block them pull them to their original shape) and dry them flat.
Woven and Loopknit Materials
- Some woven and loopknit materials may shrink when dried.
- Always stretch them out immediately after drying.
Permanent Press and Synthetics
- Do not overload the dryer.
- To reduce wrinkles, take out permanent press articles as soon as the dryer stops.
Fiber or Leather Materials
- Always check the manufacturer’s instructions.
Baby Clothes and Night Gowns
- Always check the manufacturer’s instructions.
Rubber and Plastics
Do not dry any items made from or containing rubber or plastics, such as:
a) Aprons, bibs, chair covers
b) Curtains and tablecloths
c) Bathmats
Fiberglass
Do not dry fiberglass articles in the dryer. Glass particles left in the washer could be picked up by clothes in the next load and irritate skin.
Dry Cycles
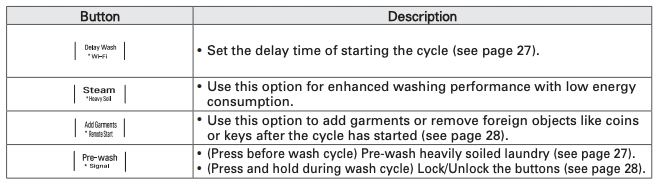
Delay Wash
Set the desired start time for the cycle.
1. Press the Power button and turn the cycle selector knob in either direction to select the desired cycle.
2. Modify the cycle settings and add other options (see pages 25-28), if desired.
3. Press the Delay Wash button repeatedly to select the desired start time.
- The Delay Wash indicator light will turn on.
- The set start time appears on the display panel.
- Each press of the button increases the delay time by 1 hour, from 3 hours up to 19 hours.
4. Press the Start/Pause button.
Steam ( )
)
Steam Wash features enhanced washing performance with low energy consumption.
- Press the Power button.
- Select a compatible wash cycle (see Cycle Guide).
- Press the Steam button.
- Press the Start/Pause button.
Wi-Fi ( )
)
Set the Wi-Fi connection. When Wi-Fi is connected, the Wi-Fi icon on the control panel is lit.
Pre-wash ( )
)
Pre-wash for 17 minutes when clothes are covered in dirt or dust. This feature is suitable for heavily soiled items.
- Press the Power button and turn the cycle selector knob in either direction to select the desired cycle.
- Press the Pre-wash button. The indicator light will turn on.
- You can now modify other cycle settings and add options (see pages 25-28), or proceed to step 4 to begin the cycle.
- Press the Start/Pause button.
Signal On/Off
The washing machine plays a melody when the wash cycle is finished. The buttons make a sound each time a button is pressed.
- Press the Power button and turn the cycle selector knob in either direction to select the desired cycle.
- Press and hold the Pre-wash button for 3 seconds.
- Press the Start/Pause button.
Setting Options During Cycle
You can add the desired options during the wash cycle.
Control Lock
You can lock the washing machine to prevent children or others from changing the cycle settings by pressing the buttons during the cycle.
Enabling Control Lock
Press and hold the Pre-wash and Delay Wash buttons for 3 seconds during the wash cycle.
- When the Control Lock is enabled, a message and the remaining wash time are displayed, in turn, on the display panel of the washing machine.
Disabling Control Lock
(When the Control Lock is activated.)
Press and hold the Pre-wash and Delay Wash buttons for 3 seconds during the wash cycle.
NOTE
- Control Lock lasts after the end of the cycle. If you want to deactivate this function, press and hold the Pre-wash and Delay Wash buttons for seconds.
EcoHybrid (  )
)
Use for air co ndensing dry without water consumption used for condensing.
- Press the Power button.
- Select a dry cycle.
- Press the Eco Hybrid button for 3 seconds.
- Press the Start/Pause button
NOTE
- Available with the Normal Dry or Damp Dry cycles.
Heavy Soil ( )
)
Select this option to wash heavily soiled laundry with more power than the standard cycle. Press and hold the Steam button for 3 seconds to select the option.
Add Garments (  )
)
Garments can be added or removed after the cycle is started.
- Press the Add Garments button.
- The door lock is released to open the door.
- Add or remove laundry.
- To continue the cycle, press the Start/Pause button again. The cycle continues automatically.
NOTE
- For safety reasons, the door remains locked when the water level or temperature is high. It is not possible to add laundry during this time.
MAINTENANCE
Regular Cleaning
Care After Wash
After the cycle is finished, wipe the door and the inside of the door seal to remove any moisture. Leave the door open to dry the washer tub interior. Wipe the body of the washing machine with a dry cloth to remove any moisture.
WARNING
- Unplug the washer before cleaning to avoid the risk of electric shock. Failure to follow this warning can cause serious injury, fire, electric shock or death.
- Never use harsh chemicals, abrasive cleaners, or solvents to clean the washer. They will damage the finish.
- Do not use volatile substances (benzene, paint thinner, alcohol, acetone, etc.) or detergents with strong chemical components when cleaning the washing machine. Doing so may cause discoloration or damage to the machine, or it may cause a fire.
- Certain internal parts are intentionally not grounded and may present a risk of electric shock only during servicing. Service personnel - Do not contact the following parts while the appliance is energized: pump, valve, motor, control board.
Care in Cold Climates
Long-Term Storage
Follow these instructions when storing the washer for an extended period where it might be exposed to freezing temperatures.
- Turn off the faucets connected with the water lines.
- Unscrew the water lines from the back of the washer.
3. Empty any water out of the water lines.
4. Press the Power button.
5. Open the door and add 1 gallon (3.8 L) of nontoxic recreational vehicle (RV) antifreeze to the empty washer tub. DO NOT use automotive anti-freeze. Close the door.
6. Press the Spin Speed button for draining and spinning.
7. Press the Start/Pause button. - Drain the water from the washing machine for 1 minute. Not all of the RV antifreeze will be expelled.
8. Press the Power button to turn off the washing machine and pull out the power plug.
9. Dry the interior of the washer tub with a soft cloth, and close the door.
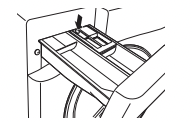
10. Press down hard on the disengage button and pull out the detergent dispenser drawer.
11. Drain the water from the detergent dispenser drawer and dry out each compartment.
12. Store the washing machine in an upright position.
NOTE
- To remove the antifreeze after storing the washing machine, add detergent to the dispenser, and run one cycle. Do not load any laundry at this time.
Thawing Frozen Water Lines
- Turn off the faucets connected with the water lines.
- Pour hot water on the frozen faucets to thaw the water lines and pull them out.
- Immerse the water lines in hot water to thaw them.
- Connect the water lines with the water inlets of the washing machine and faucets.
-See page 14, Connecting the water lines for details.
5. Turn on the faucets.
6. Press the Power button.
7. Press the Rinse+Spin button.
8. Press the Start/Pause button.
- Verify the water fills properly.
Thawing a Frozen Drain Line
1. Pour hot water in the washer tub and close the door.
- Leave it for 10 minutes.
2. Press the Power button after 10 minutes.
3. Press the Spin Speed button for draining and spinning.
4. Press the Start/Pause button.
- Check if the water drains.
Cleaning
Periodically clean the washing machine to help maintain its performance and to minimize the chance of malfunction.
Tub Clean
Improper installation or use of the washing machine in a humid space for a long period of time could lead to a buildup of detergent residue in the washing machine that may produce mildew or musty smells. If you clean the washer tub regularly on a monthly basis using Tub Clean it will minimize the possibility that detergent residue will build up and mildew or musty smells may occur.
- Add liquid chlorine bleach or tub cleaner to the detergent compartment. Some powder or tablet tub cleaners which are manufactured for this purpose can be used. (Do not add any laundry detergent or fabric softener to the drawer when using Tub Clean.)
- If using powder cleaner
Add powder cleaner to the main wash compartment of the drawer.
- If using tablet cleaner
Add tablet cleaner to the wash drum directly. (Do not add tablet cleaner to the drawer.)
2. Press the Power button.
3. Turn the cycle selector knob to select Tub Clean. -tcL- message appears in the display.
- The indicator light for Tub Clean turns on.
4. Press the Start/Pause button.
NOTE
- Never load laundry while using Tub Clean. The laundry may be damaged. Make sure to clean the washer tub when it is empty.
- Leave the door open after finishing the laundry to help keep the tub clean.
- Repeat the Tub Clean cycle monthly.
- If you notice mildew or musty smells, run Tub Clean once a week for three consecutive weeks.
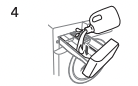
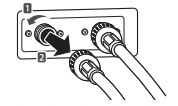
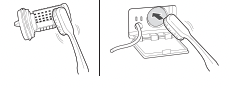
Cleaning the Water Inlet Filters
Clean the water inlet filters periodically to prevent clogging. Take extra care to clean the water inlet filters in areas using hard water. Water may not be supplied if there are foreign objects, such as rust, sand, or stones in the water inlet filters.
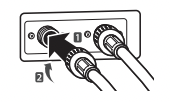
- Press the Power button to turn off the washing machine and pull out the plug.
- Turn off the faucets connected with the water inlets.
- Remove the water inlets.
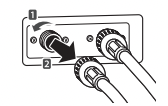
4 Pull out the water inlet filter.
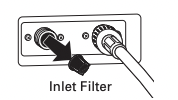
5 Remove foreign objects from the water filter inlet.
- Soak the water filter inlets in white vinegar or a lime scale remover or use a toothbrush to remove foreign objects and rinse thoroughly.
6 Press the water filter inlets back into place.
7 Reattach the water lines to the washing machine.
WARNING
- Unplug the power cord and turn off the faucets before cleaning. Failure to do so may cause electric shock.
- Do not use the washing machine without the inlet filters. If you use the washing machine without the inlet filters it will cause leaks and malfunction.
- If you use the washing machine in an area with hard water, the inlet filter may clog due to lime buildup. Contact your nearest LG customer service center if the inlet filter cannot be cleaned or is missing.
NOTE
- I E message will blink on the display when the water pressure in the detergent drawer is weak or an inlet filter is clogged with dirt. Clean the inlet filter.
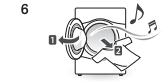
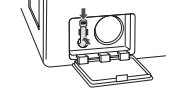
Cleaning the Drain Pump Filter
The washing machine fails to drain if the drain pump filter is clogged. Periodically clean the drain filter to prevent clogging with foreign objects.
1 Press the Power button to turn off the washing machine and pull out the plug.
2 Open the drain pump filter cover.
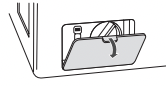
3 Unclip the drain hose and remove the plug from the drain hose to drain the remaining water.
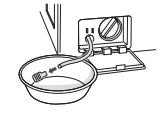
4 Twist the pump filter counterclockwise to remove it.
5 Clean the pump filter and opening.
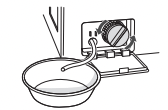
6 Recap the plug onto the drain hose and reattach the drain hose.
7 Insert the drain pump filter.
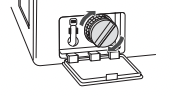
8 Close the drain pump filter cover.
WARNING
- Make sure to pull out the plug before cleaning. Failure to do so may cause electric shock.
- Opening the drain filter will result in water overflowing if there is water in the washer tub. Make sure to check if the water is completely drained before opening the drain filter.
- If you use the washing machine with the drain filter reassembled incorrectly after cleaning it, or if you use the machine without the filter, it may cause leaks or malfunction of the washing machine.
NOTE
- OE message will blink when the drain pump filter is clogged with dirt. Clean the drain pump filter.
Cleaning the Door Seal
Clean the door seal once a month to prevent buildup of dirt in the door seal.
- Wear rubber gloves and protective goggles.
- Dilute 3/4 cup (177 ml) of liquid chlorine bleach in 1 gallon (3.8 L) of water.
- Soak a sponge or a soft cloth in this diluted solution and wipe down all around the door seal.
- Wipe any moisture with a dry towel or cloth after cleaning.
- Leave the door open to allow the door seal to dry completely.
CAUTION
- Cleaning the door seal with undiluted liquid chlorine bleach may cause malfunction of the door seal and washing machine parts.
TROUBLESHOOTING
Checking Error Messages
If the following message appears on the display, check the following and take the appropriate corrective action.
| Message |
Possible Causes |
Solutions |
| UE |
Item of clothing has gathered on one side of the tub.
- There are not enough items in the machine.
- Have your items gathered in one area, or is the load too small?
- Did you wash a stuffed animal, a mat, or knitwear?
- Did you wash two different blankets together?
|
- Rearrange items to help balance the load.
- Stuffed animals or mats can become unbalanced during spinning and the washing machine may fail to drain. Rearrange the knitwear to help balance the load and drain it again.
- Put one blanket in at a time.
|
IE
|
Water is not supplied or the water pressure is low
- Is the faucet turned off?
- Is the water supply stopped or the faucet frozen?
- Is the water pressure low or is an inlet filter clogged?
- Is the water line properly connected with the cold water inlet?
- Is the water line pinched or bent?
|
- Turn on the faucets.
- If a faucet is frozen, thaw it with warm water.
- If the inlet filter is clogged, clean it. (see page 32)
- Connect the water line properly with the cold water inlet. (see page 14)
- Check that the water lines are not pinched or bent. Take extra care that water lines are not twisted or pinched by other objects.
|
|
Water line leaks in connection
- Are the water lines connected with the faucets properly?
|
- Connect the water lines properly with the faucets. (see page 14)
|
|
dE
dE1
dE2
|
The tub does not rotate
|
- Close and secure the door. If the message keeps appearing, unplug the power and contact your nearest LG service center.
|
| OE |
The washing machine drains slowly or not at all
- Is the drain hose installed over 3 1/4 feet (1 m) beyond the end of the elbow bracket?
- Is the drain hose pinched or clogged inside?
- Is the drain hose frozen?
- Is the drain hose clogged with foreign objects?
|
- Lower the drain hose within 3 feet below the end of the elbow bracket.
- Place the drain hose on a smooth surface to prevent bending.
- If the drain hoses are frozen, thaw them in warm water.
- Open the drain pump plug cap and remove the dirt.
|
| PF |
A power failure has occurred. |
- Press the Power button to turn off the washing machine and press it again to turn it on.
|
| tE |
Control Error. |
- Unplug the power cord and contact your nearest LG service center.
|
| FE |
The water supply does not stop
- Do the water supply and the drain keep repeating in turn?
|
- Unplug the power cord and contact your nearest LG service center
|
| PE |
The water level is not controlled
- Is the water level too low or high compared with the size of the load?
|
- The water level sensor is not working correctly.
- Unplug the power cord and contact your nearest LG service center.
|
| d HE |
Check water supply. |
- Turn the faucet on. If “ dHE” error code persists, unplug power plug and call for service.
|
| LE |
The tub does not rotate
- Is the washing machine overloaded?
|
- Rearrange the load size and restart the washing machine.
- If the load size is big, the tub may not rotate due to an overheated motor. Allow the washing machine to stand for a while and restart the cycle. Unplug the power cord and contact your nearest LG service center if the same error message appears
|
| tcL |
- To clean up the tub, please run the TUB CLEAN cycle.
|
- Please empty the tub and insert bleach into the detergent dispenser and select the Tub Clean cycle.
- If you want to skip the Tub Clean, turn the CYCLE SELECTOR KNOB or push the option buttons to select a cycle. The message will keep appearing until a few wash cycles have been completed, then it will disappear until the next scheduled time to clean the tub.
|
| FF |
- Water lines are frozen.
- Drain line or pump is frozen.
|
- Unfreeze the water outlet hose and drain pump by pouring hot water into the washer. Close the door/lid and wait for 1-2 hours.
- Unfreeze the water inlet line by wetting a towel in warm water and wrapping it around the frozen faucet.
- See Care in Cold Climates for further information.
|
Before Calling for Service
Check the following before calling for service.
| Problem |
Possible Causes |
Solutions |
| Clicking sound |
Do you hear a sound when you close or lock and unlock the door? |
This sound is normal and occurs when the door is closed, locked or unlocked. |
| Spraying or hissing sound |
Is water spraying in the tub? |
This sound is normal as water is spraying or circulating during the cycle. |
| Buzzing or gushing sound |
Is the washing machine draining water? |
This sound is normal as the drain pump drains water from the washing machine after the cycle. |
| Splashing sound |
Is the washing machine washing a load of laundry? |
This sound is normal as the load is moving up and down during the wash and rinse cycles. |
| Rattling and clanking noise |
Are there any foreign objects such as keys, coins, or safety pins in the tub or drain filter? |
- Check if there are any foreign objects in the tub and drain the filter after stopping the cycle.
- Unplug the power cord and contact your nearest LG service center if the noise persists.
|
| Thumping sound |
- Is the washing machine overloaded?
- Is the load out of balance?
|
This sound is normal and occurs when the load is out of balance. Stop the cycle and rearrange the load for balancing. |
| Vibrating noise |
- Are the shipping bolts removed?
- Is the load evenly distributed in the tub?
- Is the washing machine level balanced?
- Is the washing machine installed on a solid and smooth surface?
|
- See page 13, Unpacking and Removing Shipping Bolts, to remove the shipping bolts.
- Stop the cycle and rearrange the load for balancing.
- See page 16, Leveling the Washer, to level the washing machine.
- Check if the floor is solid and level.
|
| Water leaking around washer |
- Is water leaking from a faucet or a water line?
- Is a drain pipe or a drain hose clogged?
|
- Check the faucets or water lines.
- If the water lines are loosely connected, see page 14, Connecting Water Lines, to connect them properly.
- Unclog the drain pipe or drain hose. Contact a plumber if necessary.
|
| Excessive suds or failure to rinse |
- Did you use more than the recommended amount of detergent?
- Is the soil level higher than the size of the load?
|
- Use the recommended amount of detergent for the load.
- If the soil level is low, reduce the detergent quantity to less than the recommended level.
Only use detergent with the HE (High-Efficiency) logo.
|
| Staining |
- Did you add detergent directly to the tub?
- Did you remove the load immediately after it finished?
- Did you sort and wash the clothes by color or soil?
|
- Make sure to load detergent into the detergent dispenser drawer.
- Remove the load immediately after it finishes.
- Sort and separate dark colors from light or white ones, and heavily soiled items from lightly soiled ones. See page 19, Sorting Laundry, for details
|
| Wrinkling |
- Did you remove the load immediately after it finished?
- Did you overload the tub?
- Did you reverse the hot and cold water inlets?
|
- Remove the load immediately after it finishes.
- Do not overload the tub.
- Hot water rinse can cause garments to wrinkle. Check the inlet hose connections.
|
| Power will not turn on |
- Is the power cord plugged in properly?
- Has a house fuse blown, a circuit breaker tripped, or a power outage occurred?
|
- Make sure that the plug is secured in a grounded 3-prong, 120 V (60 Hz) outlet.
- Reset the circuit breaker or replace the fuse. Do not increase the fuse capacity. If the problem is a circuit overload, have it corrected by a qualified electrician.
|
| The door does not open when the cycle pauses or finishes |
- Is the temperature in the tub too high?
- Is the water level in the washer high?
|
- The washing machine has a safety lock built into the door to prevent burning. Leave the door closed and wait until the door lock icon disappears from the display.
- Allow the washer to complete the programmed cycle, or press the SPIN button.
|
| The wash cycle time is longer than usual |
- Is the washing machine overloaded? Are other options added to the wash cycle?
|
- This is normal. The washing machine automatically adjusts the cycle time for the amount of laundry, water pressure, water temperature, and other operating conditions.
|
| It is musty or moldy in the tub |
- Has the incorrect detergent been used?
- Did you clean the tub periodically?
|
- Use only HE (High-Efficiency) detergent recommended for a frontloading washing machine.
- See page 30, clean the inside and outside of the washing machine periodically.
|
| Banging noise when washer is filling with water (Water Hammer) |
- Plumbing in the home moves or flexes when the water valves in the washer shut off.
- Household water supply pressure is very high.
|
- Water hammer is not caused by a defect in the washer. Install water hammer arrestors (purchased separately at hardware or home improvement store) between the fill hose and the washer for best results.
- Adjust household water supply regulator to a lower pressure or contact a plumber to have a regulator installed
|
| Strange odors coming from washer |
- Heater in dryer.
- First time using washer
- Buildup of dirt on gasket or drum, dirty or clogged drain pump filter, kinked or clogged drain hose
|
- During the initial phase of operation, lint from laundry can settle on the heater and cause odors. This is normal and will not affect performance.
- Smell comes from the rubber attached to the washer door. It will eventually dissipate after first couple of wash cycles.
- Periodically clean the gasket. Mold and foreign substances inside the gasket may produce mildew or musty smells.
- Clean the drain pump filter regularly. Foreign substances on the drain pump filter may produce mildew or musty smells.
- If the drain hose is not installed properly, the odor may be emitted because of a backflow of drainage into the tub. Make sure that the drain hose is not kinked or clogged.
|
| Odor |
- This odor is caused by the rubber attached to the washing machine.
- If the rubber door gasket and door seal area are not cleaned regularly, odors can occur from mold or foreign substances.
- Odors can occur if foreign substances are left in the drainage pump filter.
- Odors can occur if the drainage hose is not properly installed, causing siphoning (water flowing back inside the washing machine).
- Using the dry function, odors can occur from lint and other laundry matter sticking to the heater. (Dryer model only)
- A particular odor can occur from drying wet clothes with hot air. (Dryer model only)
|
- It is the normal odor of new rubber and will disappear after the machine has been run a few times.
- Be sure to clean the gasket and door seal regularly and check under the door seal for small items when unloading the washer.
- Be sure to clean the drainage pump filter regularly. y When installing the drainage hose, be sure that it doesn’t become kinked or blocked.
- This is not a malfunction.
- The odor will disappear after a short while.
|
Your home appliance and smartphone is not connected to the Wi-Fi network.
|
The password for the Wi-Fi that you are trying to connect to is incorrect |
Find the Wi-Fi network connected to your smartphone and remove it, then register your appliance on LG SmartThinQ. |
| Mobile data for your smartphone is turned on. |
Turn off the Mobile data of your smartphone and register the appliance using the Wi-Fi network. |
| The wireless network name (SSID) is set incorrectly |
The wireless network name (SSID) should be a combination of English letters and numbers. (Do not use special characters.) |
| The router frequency is not 2.4 GHz. |
Only a 2.4 GHz router frequency is supported. Set the wireless router to 2.4 GHz and connect the appliance to the wireless router. To check the router frequency, check with your Internet service provider or the router manufacturer |
| The distance between the appliance and the router is too far. |
If the distance between the appliance and the router is too far, the signal may be weak and the connection may not be configured correctly. Move the location of the router so that it is closer to the appliance. |