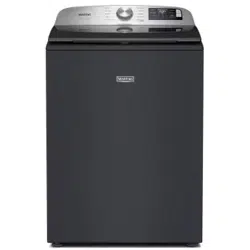
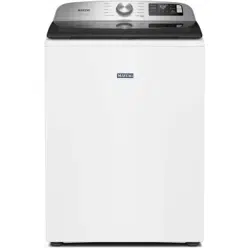
CONTROL PANEL AND FEATURES
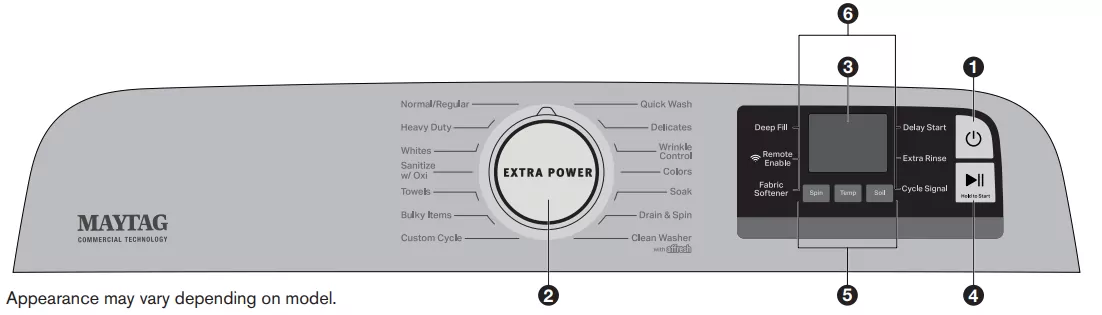
Appearance may vary depending on model.
- POWER
POWER Touch to turn on/off or to stop/cancel a cycle. - CYCLE KNOB
Turn knob to select desired cycle.
EXTRA POWER
Press to boost stain fighting on selected cycle. - DISPLAY LCD
The display shows the time required for the cycle to complete. Factors such as load size and water pressure may affect the time shown in the display. Tightly packed loads, unbalanced loads, or excessive suds may cause the washer to adjust cycle time as well.
ADD GARMENT
When Add Garment is lit, you may open the lid, which automatically pauses the cycle, and add items. To resume, close the lid and hold the START/PAUSE button to start the washer again. - START/PAUSE
Touch and hold the START/PAUSE button to start cycle. Touch during a cycle to pause cycle and unlock lid. NOTE: If machine is spinning it may take longer to unlock lid. - CYCLE MODIFIERS (Not all modifiers are available on all cycles)
SPIN
Touch to modify the cycle's available spin speeds (Off, Medium, Fast).
TEMP
Touch to modify the cycle's available temperatures (Tap Cold, Cold, Cool, Warm, Hot).
SOIL
Touch to modify the cycle's available soil levels. Increase soil level for heavily soiled items and decrease soil level for lightly soiled items (Extra Light, Light, Normal, Heavy, Extra Heavy). - CYCLE OPTIONS (Not all options are available on all cycles).
DEEP FILL
Touch to add more water to the washer from the cycle's auto sensed level (Auto, Medium, High, Max Fill).
REMOTE ENABLE
Touch each time you want to remotely control via the Maytag™ app. Follow the instructions in the "GET THE MAYTAG™ APP AND GET CONNECTED" section below for more details. Opening the lid cancels "Remote Enable".
FABRIC SOFTENER
Touch to let the machine know when you have added fabric softener to the dispenser drawer.
DELAY START
Touch to delay the start of the wash cycle for up to 12 hours.
EXTRA RINSE
Touch to automatically add a second rinse available on most cycles.
CYCLE SIGNAL
Touch to turn the end of cycle signal on/off and adjust the tone volume when a button is touched.
Warning! Fire Hazard
Never place items in the washer that are dampened with gasoline or other flammable fluids.
No washer can completely remove oil.
Do not dry anything that has ever had any type of oil on it (including cooking oils).
Doing so can result in death, explosion, or fire.
*NOTE: Not all cycles, settings or options are available with all models.
- SORT & LOAD LAUNDRY
See Loading Recommendation section below. - ADD HE DETERGENT & LAUNDRY PRODUCTS TO DISPENSERS*
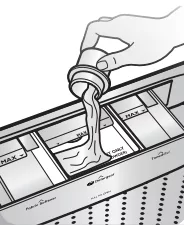
Remove inside tray for powder HE detergent.

Follow manufacturer’s instructions to determine amount of laundry products to use.

- TOUCH POWER TO TURN ON THE WASHER

- SELCT THE DESIRED CYCLE FOR YOUR LOAD*

- ADJUST CYCLE SETTINGS, IF DESIRED*

- SELECT ADDITIONAL OPTIONS*

- TOUCH AND HOLD START/PAUSE TO BEGIN CYCLE

Loading Recommendation
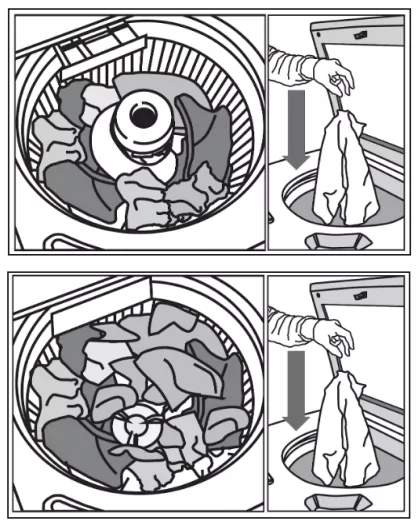
For best performance, it is recommended to load items by dropping them in loose heaps evenly around the washplate and agitator. Do not lay items length- wise around the washplate or agitator.
More Water When You Want It
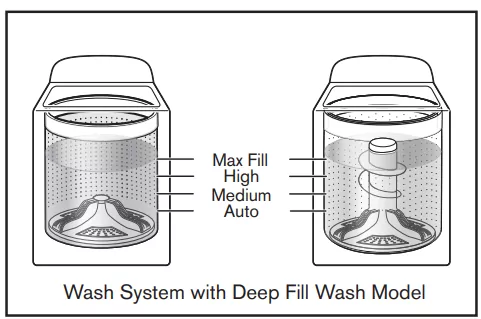
AUTO SENSING & DEEP FILL
- The washer will adjust the water level to the optimal amount for a High Efficiency wash of the detected load size.
- Touch “DEEP FILL” to add more water to the wash load.
- There are four levels of deep water “Auto”, “Medium”, “High”, “Max Fill”.
- Not all levels available on all cycles.
Cleaning with Less Water
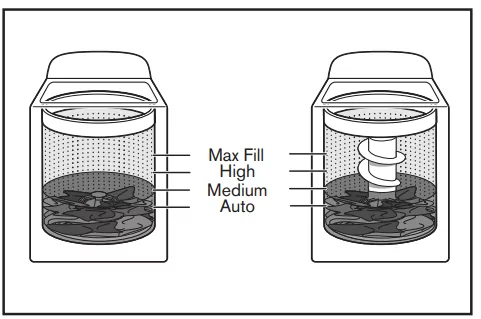
As the washer dampens and moves the load, the level of the items will settle in the basket. This is normal, and does not indicate that more items should be added.
IMPORTANT: You will not see a washer basket full of water as with your past agitator-style washer. It is normal for some of the load to be above the water line.
Boost Stain Fighting (on selected cycles)

EXTRA POWER Option
- Press the knob to select EXTRA POWER.
- When Extra Power is active the cycle control knob will illuminate.
- Extra Power will increase cleaning power in the cycle selected.
Rinsing Before Running a Wash Cycle
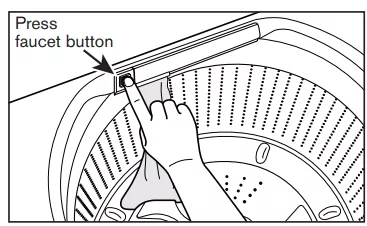
WATER FAUCET OPERATION
- Press the faucet button once to turn on.
- To turn the faucet off press the button again.
- Faucet will automatically shut off after 10 minutes or when max water level is reached.
- Water will automatically drain if water level becomes too high or if the lid is left open for 10 minutes.
CYCLE GUIDE
Settings shown are selectable for that cycle. Factory default settings are shown in Bold. Once you select a cycle, the default modifiers or the previous set modifiers for that cycle will be shown in the Display LCD. For best fabric care, choose the cycle that best fits the load being washed. Not all cycles and options are available on all models. Please refer to garment label instructions for best care.
| Items to wash: | Cycle: | Temperature*: | SoilLevel: | Spin Speed: | Water Level: | Cycle Details: |
|---|---|---|---|---|---|---|
| Overly soiled garments, items that need additional cleaning effort | Heavy Duty | Hot Warm Cool Cold Tap Cold |
ExtraHeavy Heavy Normal Light Extra Light |
Fast Medium Off | Max Fill High Medium Auto | Use this cycle for heavily soiled or sturdy items. Water Level Sensing process may take longer for some items than others because they will absorb more water than other fabric types. |
| Bright or darkly colored, casual and mixed loads | Colors | Hot Warm Cool Cold Tap Cold |
Extra Heavy Heavy Normal Light Extra Light |
Fast Medium Off | Max Fill High Medium Auto | Use this cycle to wash darks and colors, including mixed loads and active wear. |
| Large items such as sheets, sleeping bags, small comforters, jackets, small washable rugs | Bulky Items | Hot Warm Cool Cold Tap Cold |
Extra Heavy Heavy Normal Light Extra Light |
Fast Medium Off | Max Fill | Use this cycle to wash large items such as jackets and small comforters. The washer will fill with enough water to wet down the load before the wash portion of the cycle begins, and uses a higher water level than other cycles. |
| Heavily soiled, colorfast fabrics | Sanitize with Oxi | Hot | Extra Heavy | Fast Medium Off | Max Fill High Medium Auto | Use this cycle to eliminate 99.9% of bacteria when used in conjunction with Oxi additives. Preset cycle settings must be used to achieve proper sanitization. Be sure to add an Oxi product to the basket before starting cycle. |
| Swimsuits and items requiring rinsing without detergent | Drain & Spin / Rinse & Spin | N/A | N/A | Fast Medium Off | N/A | Combines a high speed spin with the option of a rinse only cycle for loads requiring an additional spin-out to reduce drying times or an additional rinse cycle to refresh a load or complete a cycle after power interruption. If you wish to run only the Drain & Spin Cycle, select the DRAIN & SPIN cycle. If you wish to run a Rinse & Spin, select the DRAIN & SPIN cycle, and then select EXTRA RINSE. |
| Cottons, linens, and mixed garment loads | Normal/Regular | Hot Warm Cool Cold Tap Cold |
Extra Heavy Heavy Normal Light Extra Light |
Fast Off |
High Medium Auto | Use this cycle for normally soiled cottons and mixed fabric loads. |
| No-iron fabrics, perm press, synthetics | Wrinkle Control | Hot Warm Cool Cold Tap Cold |
Extra Heavy Heavy Normal Light Extra Light |
Fast Medium Off | Max Fill High Medium Auto | Use this cycle to wash loads of no-iron fabrics such as sports shirts, blouses, casual business clothes, perm press, and blends. |
| Machine-wash silks, handwash fabrics | Delicates | Hot Warm Cool Cold Tap Cold |
ExtraHeavy Heavy Normal Light Extra Light |
Fast Medium Off | Max Fill High Medium Auto | Use this cycle to wash lightly soiled items indicating “Machine Washable Silks” or “Gentle” cycle on the care label. Place small items in mesh garment bags before washing. This cycle uses a higher pre-set water level. |
| Lightly soiled, small-sized mixed garment loads | Quick Wash | Hot Warm Cool Cold Tap Cold |
ExtraHeavy Heavy Normal Light Extra Light |
Fast Medium Off | Max Fill High Medium Auto | Use this cycle to quickly wash lightly soiled garments and small loads. The Quick Wash cycle uses shorter periods of more intense washing to clean items quickly. |
| No clothes in washer | Clean Washer with affresh* | N/A | N/A | N/A | N/A | Use this cycle every 30 washes to keep the inside of your washer fresh and clean. This cycle uses a higher water level. Use with affresh* Washer Cleaner tablet or liquid chlorine bleach to thoroughly clean the inside of your washer. This cycle should not be interrupted. See “Washer Care”. IMPORTANT: Do not place garments or other items in the washer during the Clean Washer with affresh* cycle. Use this cycle with an empty basket. |
| Towels, jeans, casual, and mixed loads. Sturdy fabrics |
Towels | Hot Warm Cool Cold Tap Cold |
Extra Heavy Heavy Normal Light Extra Light |
Fast Medium Off | Max Fill High Medium Auto | Provides additional water and alternating wash action for heavily soiled mixed loads. |
| Heavily soiled white fabrics |
Whites | Hot Warm Cool Cold Tap Cold |
Extra Heavy Heavy Normal Light Extra Light |
Fast Medium Off | Max Fill High Medium Auto | This cycle, when used with chlorine bleach, improves whitening of soiled white fabrics. |
| Heavily soiled fabrics |
Soak | Hot Warm Cool Cold Tap Cold |
Extra Heavy Heavy Normal Light Extra Light |
Off | Max Fill High Medium Auto | Use this cycle to soak small spots of set- in stains on fabrics. The washer will use intermittent agitation and soaking. After time has expired, water will drain, but the washer will not spin. Cycle is complete. |
GET THE MAYTAG™ APP AND GET CONNECTED
With your mobile device download the Maytag™ app. You can get subscription and connectivity instructions, terms or use, and privacy policy at www.maytag.com/connect or in Canada www.maytag.ca/connect.
Once installed, launch the app and you will be guided through the steps to subscribe and create your user account to connect to your appliance. If you have any problems or questions, call Maytag® Connected Appliances at 1-866-333-4591.
-
CONNECTING UNIT TO INTERNET

To connect your unit to the internet please download the Maytag™ App and press REMOTE ENABLE. -
ALLOWING REMOTE CONTROL AND INTERACTION

User must press REMOTE ENABLE when connected in order to allow remote control and interaction.
WASHER ICONS
| Image | Description | Status |
|---|---|---|
 |
Door Locked | Alert State |
 |
Remote Enable | On |
 |
Delay Start | On |
 |
Deep Fill | On - Auto |
 |
On - Auto Medium | |
 |
On - Auto High | |
|
On - Max Fill | |
 |
Fabric Softener | On |
 |
Extra Rinse | On |
 |
Smartgrid, Peak rates in effect | On |
 |
Smart Delay | |
 |
Smart Pause | |
 |
WiFi Status Indicator Note: When the WiFi is disconnected, the priority goes to the first, then as other options added, it goes to the least again. |
Connected |
 |
Disconnected | |
 |
Fabric Softener | Off |
 |
Extra Rinse | Off |
 |
Custom Cycle | |
 |
Download & Go Cycle | |
 |
Cycle Signal | Off |
 |
Low | |
 |
Medium | |
 |
High | |
 |
Clean Washer | |
 |
Remote Enable | Off |
 |
Faucet | On |
 |
Off |
NOTE: Not all features and options are available on all models.
INSTALLATION REQUIREMENTS
Tools and Parts
Gather required tools and parts before starting installation.
Tools needed
-893964.png)
Parts supplied:
NOTE: All parts supplied for installation are in cardboard insert in the top of the washer.
-678976.png)
Parts needed (Not supplied with washer):
-807115.png)
Location Requirement
Select proper location for your washer to improve performance and minimize noise and possible “washer walk”. Install your washer in a basement, laundry room, closet, or recessed area.
Recessed area or closet installation
-754909.png)
Dimensions show recommended spacing allowed, except for closet door ventilation openings which are minimum required. This washer has been tested for installation with spacing of 0" (0 mm) clearance on the sides. Consider allowing more space for ease of installation and servicing, and spacing for companion appliances and clearances for walls, doors, and floor moldings. Add spacing of 1" (25 mm) on all sides of washer to reduce noise transfer. If a closet door or louvered door is installed, top and bottom air openings in door are required.
Drain System
Drain system can be installed using a floor drain, wall standpipe, floor standpipe, or laundry tub. Select method you need.
Floor standpipe drain system
-534844.png)
Minimum diameter for a standpipe drain: 2" (51 mm). Minimum carry-away capacity: 17 gal. (64 L) per minute. Top of standpipe must be at least 39" (990 mm) high; install no higher than 96" (2.44 m) from bottom of washer. If you must install higher than 96" (2.44 m), you will need a sump pump system.
Wall standpipe drain system
-266806.png)
See requirements for floor standpipe drain system.
Floor drain system
-71838.png)
Floor drain system requires a Siphon Break Kit (Part Number 285834), 2 Connector Kits (Part Number 285835), and an Extension Drain Hose (Part Number 285863) that may be purchased separately. To order, please see toll-free phone numbers in “Assistance or Service” section. Minimum siphon break: 28" (710 mm) from bottom of washer. (Additional hoses may be needed.)
Laundry tub drain system
-346369.png)
Minimum capacity: 20 gal. (76 L). Top of laundry tub must be at least 39" (990 mm) above floor; install no higher than 96" (2.44 m) from bottom of washer.
IMPORTANT: To avoid siphoning, no more than 4.5" (114 mm) of drain hose should be inside standpipe or below the top of wash tub. Secure drain hose with cable tie.
Electrical Requirements
-871306.png)
- A 120 V, 60 Hz., AC only, 15 or 20 A, fused electrical supply is required. A time-delay fuse or circuit breaker is recommended. It is recommended that a separate circuit breaker serving only this appliance be provided.
- This washer is equipped with a power supply cord having a 3 prong grounding plug.
- To minimize possible shock hazard, the cord must be plugged into a mating, 3 prong, grounding-type outlet, grounded in accordance with local codes and ordinances. If a mating outlet is not available, it is the personal responsibility and obligation of the customer to have the properly grounded outlet installed by a qualified electrician.
- If codes permit and a separate ground wire is used, it is recommended that a qualified electrician determine that the ground path is adequate.
- Do not ground to a gas pipe.
- Check with a qualified electrician if you are not sure the washer is properly grounded.
- Do not have a fuse in the neutral or ground circuit.
INSTALLATION INSTRUCTIONS
-702864.png)
Before you start: Remove shipping materials.
It is necessary to remove all shipping materials for proper operation and to avoid excessive noise from washer.
-937174.png)
Move washer to within 4 ft. (1.2 m) of its final location; it must be in a fully upright position.
NOTE: To avoid floor damage, set washer onto cardboard before moving it and make sure lid is taped shut.
-628630.png)
To avoid damaging floor, place cardboard supports from shipping carton on floor behind washer. Tip washer back and place on cardboard supports. Remove shipping base. Set washer upright.
IMPORTANT: Removing shipping base is necessary for proper operation. If your washer includes a sound shield, please refer to the instructions included with the sound shield to install it at this time.
-732776.png)
Remove tape from washer lid, open lid, and remove cardboard packing tray from tub. Remove all other packaging materials from washer tub. Be sure to remove all parts from tray.
NOTE: Keep tray in case you need to move washer later.
-422085.png)
Firmly grasp power cord plug and pull to free from rear panel. Gently place power cord over console to allow free access to back of washer.
Connect Drain Hose
-156548.png)
Remove the red plastic plug from the black drain port on the back of the washer.
If clamp is not already in place on elbow end of drain hose, slide it over end as shown. Squeeze clamp with pliers and slide black elbow end of drain hose onto black drain port and secure with clamp.
For a laundry tub or standpipe drain, go to step 6.
For a floor drain, remove the preinstalled drain hose form as shown in Step 7. You may need additional parts with separate directions. See the “Tools and Parts” section.
-53900.png)
Place hose into standpipe (shown in picture) or over side of laundry tub.
IMPORTANT: 4.5" (114 mm) of drain hose should be inside standpipe; do not force excess hose into standpipe or lay on bottom of laundry tub. Drain hose form must be used.
-280054.png)
For floor drain installations, you will need to remove the drain hose form from the end of the drain hose. You may need additional parts with separate directions. See the “Tools and Parts” section.
Connect Inlet Hoses
Washer must be connected to water faucets with new inlet hoses with flat washers (not provided). Do not use old hoses.
NOTE: Both hoses must be attached and have water flowing to inlet valves. If you are only connecting to a cold water faucet, you must use a Y-adapter (not provided).
-313984.png)
Attach hose to hot water faucet. Screw on coupling by hand until it is seated on washer. Use pliers to tighten couplings an additional two-thirds turn. Repeat this step with second hose for cold water faucet.
IMPORTANT: Do not overtighten or use tape or sealants on valve when attaching to faucets or washer. Damage can result.
-913811.png)
Run water for a few seconds through hoses into a laundry tub, drainpipe, or bucket to avoid clogs. Water should run until clear. Make note of which hose is connected to hot water to help in attaching hoses to washer correctly.
-375147.png)
Attach hot water hose to hot water inlet valve marked with a red ring. Screw coupling by hand until it is snug. Use pliers to tighten couplings an additional two-thirds turn. Repeat with cold water inlet valve.
IMPORTANT: To reduce risk of hose failure, replace the hoses every five years. Record hose installation or replacement dates for future reference.
- Periodically inspect and replace hoses if bulges, kinks, cuts, wear, or leaks are found.
-914692.png)
Turn on water faucets to check for leaks. A small amount of water may enter washer. It will drain later.
-688045.png)
Secure drain hose to laundry tub leg, drain standpipe, or inlet hoses for wall standpipe with cable tie.
Level Washer
IMPORTANT: Level washer properly to reduce excess noise and vibration.
-418475.png)
Move the washer to its final location. Place a level on top edges of washer. Use side seam as a guide to check levelness of sides. Check levelness of front using lid, as shown. Rock washer back and forth to make sure all four feet make solid contact with floor. If washer is level, skip to step 15.
-621320.png)
-166602.png)
If washer is not level:
Use adjustable pliers to turn the plastic leveling foot counterclockwise to lower the washer or clockwise to raise the washer. On all models, recheck levelness of washer and repeat as needed.
HELPFUL TIPS:
- You may need to adjust two different feet to level your unit. Ensure each foot remains secured to the washer’s base.
- You may want to prop up the front of the washer about 4" (102 mm) with a wood block or similar object that will support the weight of the washer when making the adjustments.
-265653.png)
Complete Installation Checklist
- Check electrical requirements. Be sure you have correct electrical supply and recommended grounding method.
- Check that all parts are now installed. If there is an extra part, go back through steps to see what was skipped.
- Check that you have all of your tools.
- Check that shipping materials were completely removed from washer.
- Check that the washer is level.
- Check that water faucets are on.
- Check for leaks around faucets and inlet hoses.
- Remove protective film from console and any tape remaining on washer.
- Check that washer is plugged into a grounded 3 prong outlet.
- Dispose of/recycle all packaging materials.
- Read the “Washer Care” section in this book.
- To test and clean your washer, measure 1/2 of normal recommended amount of powdered or liquid detergent and pour it into washer basket or detergent dispenser (on some models). Close lid. Select any cycle. Start washer and allow to complete full cycle.
WASHER MAINTENANCE AND CARE
WATER INLET HOSES
Replace inlet hoses after 5 years of use to reduce the risk of hose failure. Periodically inspect and replace inlet hoses if bulges, kinks, cuts, wear, or leaks are found. When replacing your inlet hoses, mark the date of replacement on the label with a permanent marker.
NOTE: This washer does not include inlet hoses. See the “Installation & Care Instructions Manual” for more information.
WASHER CARE
Recommendations to Help Keep Your Washer Clean and Performing at its Best
- Always use High Efficiency (HE) detergents and follow the HE detergent manufacturer’s instructions regarding the amount of HE detergent to use. Never use more than the recommended amount because that may increase the rate at which detergent and soil residue accumulate inside your washer, which in turn may result in undesirable odor.
- Use warm and hot wash water settings sometimes (not exclusively cold water washes), because they do a better job of controlling the rate at which soils and detergent accumulate.
- Always leave the washer lid open between uses to help dry out the washer and prevent the buildup of odor-causing residue.
Cleaning Your Top Loading Washer
Read these instructions completely before beginning the routine cleaning processes recommended below. This Washer Maintenance Procedure should be performed, at a minimum, once per month or every 30 wash cycles, whichever occurs sooner, to control the rate at which soils and detergent may otherwise accumulate in your washer.
Cleaning the Inside of the Washer
To keep your washer odor-free, follow the usage instructions provided above, and use this recommended monthly cleaning procedure:
Clean Washer Cycle
This washer has a special cycle that uses higher water volumes in combination with affresh® Washer Cleaner or liquid chlorine bleach to clean the inside of the washer
Begin procedure
1. affresh® Washer Cleaner Cycle Procedure (Recommended for Best Performance):
- Open the washer lid and remove any clothing or items.
- Place an affresh® Washer Cleaner tablet in the bottom of the washer basket.
- Do not place an affresh® Washer Cleaner tablet in the detergent dispenser.
- Do not add any detergent or other chemical to the washer when following this procedure.
- Close the washer lid.
- Select the CLEAN WASHER cycle.
- Touch and hold the START/PAUSE button to begin the cycle. The Clean Washer Cycle Operation is described below.
NOTE: For best results, do not interrupt cycle. If cycle must be interrupted, touch POWER. After the Clean Washer cycle has stopped, run a RINSE & SPIN cycle to rinse cleaner from washer.
2. Chlorine Bleach Procedure (Alternative):
- Open the washer lid and remove any clothing or items.
- Add 1 cup (236 mL) of liquid chlorine bleach to the bleach compartment.
- NOTE: Use of more liquid chlorine bleach than is recommended above could cause washer damage over time.
- Close the washer lid.
- Do not add any detergent or other chemical to the washer when following this procedure. e. Select the CLEAN WASHER cycle.
- Touch and hold the START/PAUSE button to begin the cycle. The Clean Washer Cycle Operation is described below.
- NOTE: For best results, do not interrupt cycle. If cycle must be interrupted, touch POWER. After the Clean Washer cycle has stopped, run a RINSE & SPIN cycle to rinse cleaner from washer
Description of Clean Washer Cycle Operation:
- This cycle will fill to a water level higher than in normal wash cycles to provide rinsing at a level above the water line for normal wash cycle.
- During this cycle, there will be some agitation and spinning to increase the removal of soils.
After this cycle is complete, leave the lid open to allow for better ventilation and drying of the washer interior.
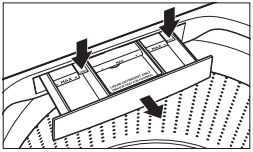
Cleaning the Dispensers
After a period of using your washer, you may find some residue buildup in the washer’s dispensers. To remove residue from the dispensers, wipe them with a damp cloth and towel dry. Do not attempt to remove the dispensers or trim for cleaning. The dispensers and trim are not removable. If your model has a dispenser drawer, however, remove the drawer and clean it before or after you run the Clean Washer cycle. Use an all purpose surface cleaner, if needed.
Cleaning the Outside of the Washer
Use a soft, damp cloth or sponge to wipe away any spills. Use only mild soaps or cleaners when cleaning external washer surfaces.
IMPORTANT: To avoid damaging the washer’s finish, do not use abrasive products.
NON-USE AND VACATION CARE
Operate your washer only when you are home. If moving, or not using your washer for a period of time, follow these steps:
- Unplug or disconnect power to washer.
- Turn off water supply to washer, to avoid flooding due to water pressure surge.
CLEANING YOUR DISPENSER (*Varies according to model)
You may find laundry product residue leftover in your dispenser drawer or in bulk dispenser. To remove residue, follow below recommended cleaning procedures:
Dispenser Drawer
- Pull drawer out until you feel resistance.
- Push 2 tabs downward, and then continue pulling out.
- 3Wash in warm, soapy water, using a mild detergent.
- Rinse with warm water.
- Air dry, or dry with a towel, then place back into slot.
IMPORTANT: Dispenser drawer and tray are not dishwasher safe.
Bulk Dispenser
- Pull drawer completely out.
- Open dispenser lid.
- Rinse with warm water.
- Air dry or dry with a towel, then place back into slot.
-804502.png)
IMPORTANT: Bulk dispenser and tray are not dishwasher safe.
WINTER STORAGE CARE
IMPORTANT: To avoid damage, install and store washer where it will not freeze. Because some water may stay in hoses, freezing can damage washer. If storing or moving during freezing weather, winterize your washer.
To winterize washer:
- Shut off both water faucets; disconnect and drain water inlet hoses.
- Put 1 qt. (1 L) of R/V/-type antifreeze into empty basket.
- Unplug washer or disconnect power.
TRANSPORTING YOUR WASHER
- Shut off both water faucets. Disconnect and drain water inlet hoses.
- If washer will be moved during freezing weather, follow WINTER STORAGE CARE directions before moving.
- Disconnect drain hose from drain system and drain any remaining water into a pan or bucket. Disconnect drain hose from back of washer.
- Unplug power cord.
- Place inlet hoses and drain hose inside washer basket.
- Drape power cord over edge and into washer basket.
- Place packing tray from original shipping materials back inside washer. If you do not have packing tray, place heavy blankets or towels into basket opening. Close lid and place tape over lid and down front of washer. Keep lid taped until washer is placed in new location. Transport washer in upright position
REINSTALLING/USING WASHER AGAIN
To reinstall washer after non-use, vacation, winter storage, or moving:
- Refer to “Installation & Care Instructions Manual” to locate, level, and connect washer.
- Before using again, run washer through the following recommended procedure:
To use washer again:
- Flush water pipes and hoses. Reconnect water inlet hoses. Turn on both water faucets.
- Plug in washer or reconnect power.
- Run washer through BEDDING cycle to clean washer and remove antifreeze, if used. Use only HE (High Efficiency) detergent. Use ½ the manufacturer’s recommended amount for a medium-size load.