
1
54
2
6
3
7
SAVE THESE INSTRUCTIONS
For Household Use Only
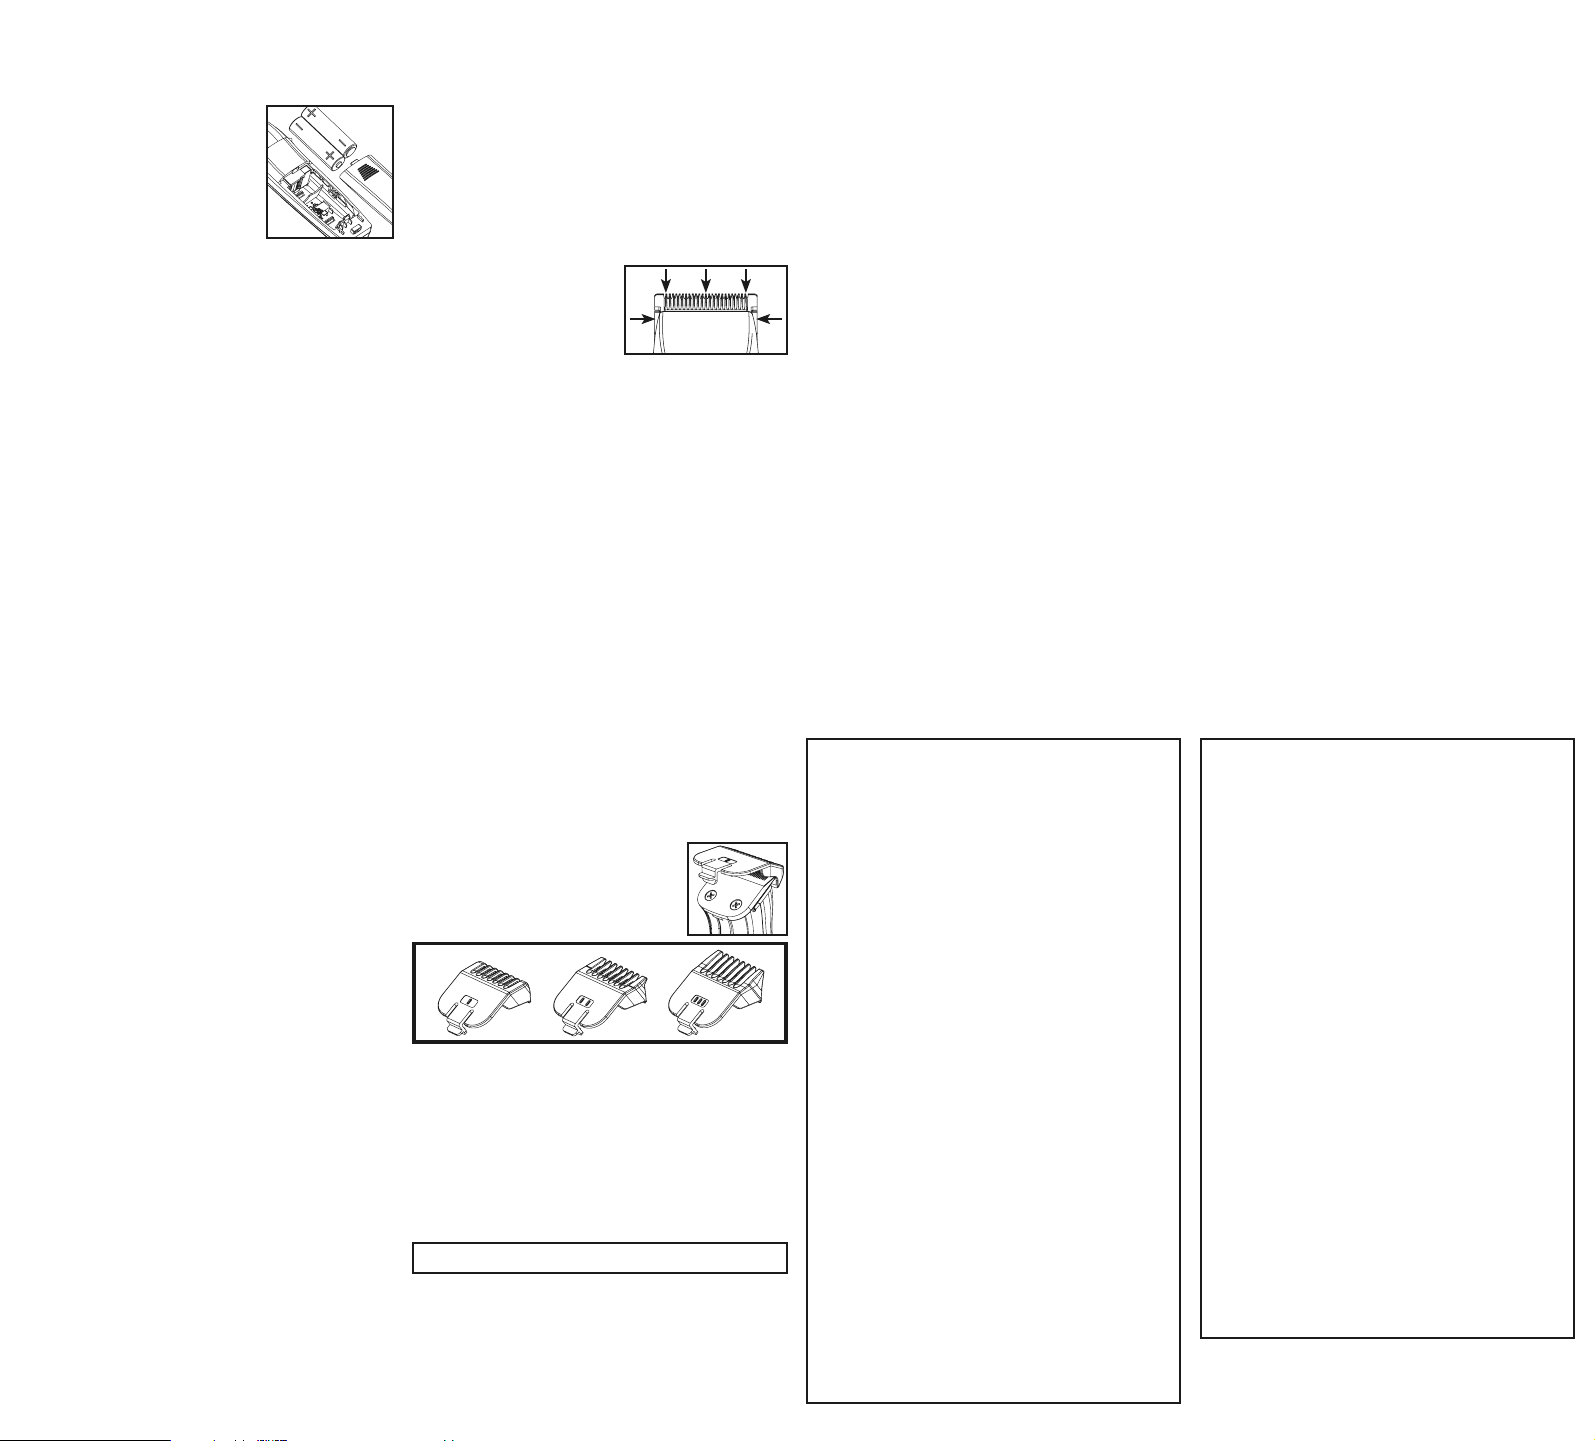
BATTERY INSTALLATION/ REPLACEMENT
1. Remove battery cover from trimmer by pushing in and back on
the plastic door in the direction of the arrow.
2. Insert two AA batteries as indicated by molded outline in
trimmer.
IMPORTANT: Be sure to insert the negative (-) end of each
battery first, so that it depresses the spring at the bottom of the
battery compartment. Then slide the positive (+) end into position.
Do not allow the negative terminal clips to bend and cut the casing
of the batteries.
Carbon or alkaline batteries may be used with your Wahl trimmer.
Alkaline batteries will provide the longest operating time before
battery replacement is needed. Trimmer should run approximately
three hours on alkaline batteries.
3. Replace battery cover to its original
position.
4. Move switch to “ON” position to use.
5. To maximize battery life, trimmer should
be shut “OFF” immediately after using.
6. To replace batteries, complete Step 1,
remove batteries one at a time.
TROUBLESHOOTING
If your trimmer fails to operate when switched “ON,” check your
batteries to see if they are properly installed. Positive end (center
post) should be located as shown in battery housing. Make sure
the switch is in the “ON” position and check to be sure blades
are free to move. If blades become clogged with debris, manually
pushing the blades back and forth a few times while unit is turned
“OFF” may help free the blades and allow the trimmer to operate.
If it still does not operate, your batteries have probably exceeded
their useful life. To maximize battery life, replace all batteries at the
same time.
CARING FOR YOUR TRIMMER
OILING BLADES
For best results, use Wahl Clipper Oil on the blades only when
necessary, or approximately once a month. Motor bearings are
permanently lubricated—do not attempt to oil.
When oiling your trimmer, turn the trimmer “ON - I,” hold the unit
with the blades facing DOWN and
squeeze three drops across the front
of the blade and one drop on each
side on the heel of the blade. Wipe off
excess oil with soft cloth.
NOTICE—DO NOT OVER OIL!
Excessive oiling or application of liquids will cause damage if
allowed to seep back into motor.
BLADE CARE
Trimmer blades have precision-hardened, ground and lapped
cutting teeth. Blades should be handled carefully and never bumped
or used to cut dirty or abrasive material. Never rinse the blades with
water, or the blades may rust. Clean with the included brush.
SHARPENING
Trimmer blades have precision-ground cutting teeth. Blades should
be handled carefully and never bumped. To keep blades sharp, cut
only clean hair and avoid cutting into dirt or abrasive particles.
Blades should be sharpened or changed in sets only. To remove
blades for sharpening or replacement, loosen and remove two
screws on bottom blade. Replace same and tighten. To have blades
sharpened, return blades (only) along with a check or money
order for $6.95 (includes shipping back to you) to: Wahl Clipper
Corporation, Attn: Repair Department, 3001 Locust Street, Sterling,
IL 61081.
New replacement blades may be acquired from a Wahl Authorized
Service Center. For products purchased outside of the United
States, please contact your distributor.
5-Position Guide makes achieving a consistent trim easy,
every time. The guide can be removed (providing a sixth cutting
position) and reattached without changing the preset cutting length,
so once you have found the perfect length, there’s no guesswork
in achieving it every trim. To attach the guide, simply slide it on at
a slight angle and press the release tab down to secure in position.
To remove the guide, gently push up on the release tab and slide
the assembly away from the trimmer. Adjust the trimming length
by pressing on the thumb lever and moving the comb forward or
backward to the desired setting.
GROWING A BEARD
There are three key factors that will determine which beard style is
best for you:
1. The shape and dimensions of your face.
2. The natural growth of your beard.
3. The thickness of your beard. If you are unsure about the type of
beard that would most suit your face, speak with a professional
hair stylist or go to: WahlUSA.com.
TRIMMING AND EDGING YOUR BEARD
The following are suggested trimming steps and trimmer positions.
You may find different procedures work better for you.
1. Comb your beard in the direction that it grows to help reveal
stray hairs that may be longer than the others.
2. Attach the 5-position trimming guide to trim and taper your
beard. With the blades pointing toward you, begin with the
trimming guide attachment set at a long trimming length.
For best results, start at each sideburn and stroke downward
toward your neck. Trim toward your chin in smooth, overlapping
strokes, following the lay of your beard. If you trim against the
way your beard naturally lays, the trimmer will cut the hair
much shorter and the result may be patchy.
Adjust the trimming guide to progressively shorter settings until
you reach the desired length of beard. You may wish to set the
trimming guide attachment to cut closer near the ear and down
under the chin, changing to a longer setting toward the front
of the face and point of your chin. When the trimming guide is
removed, it will remain at its last length setting until you change
it.
Always be sure the trimming guide is snapped solidly into the
desired position before you start to trim.
3. Remove the trimming guide and cut the outline of your beard.
Rotate the trimmer so that the blades are pointing toward you.
Starting under your chin and working back toward your jawbone
and ears, cut the outer perimeter of your beard underneath
the jawbone. Continue the line all the way up to the ears and
hairline.
4. Accentuate your beard line by using the trimmer in a downward
motion. Start at the line you’ve created and, working from the
chin back toward the ears, trim the area right under your beard
line.
5. Define the upper part of your beard using the same technique.
TRIMMING YOUR MUSTACHE
1. Comb your mustache.
2. Hold the trimmer in a vertical position with the blades pointing
toward you in order to define the line of your mustache.
3. With the attachment set at a fairly long trimming length, begin
trimming your mustache, starting at the top and working down
to your upper lip. Use progressively closer settings to get the
look and length you desire.
4. For tapering the mustache, set the 5-position trimming guide
at a medium length. Starting in the middle of your mustache,
follow the lip line and taper with short upward strokes of the
trimmer, working out toward the corners until a gentle shape is
created on the bottom of your mustache.
5. As a finishing step, remove the trimming guide and, using only
the bare blades, make a definitive line at the bottom of your
mustache.
TRIMMING WITH ATTACHMENT COMBS
Your trimmer includes three trimming attachments; stubble,
medium and long. The stubble guide has 1 bar, the medium-cut
attachment has two bars and the long-cut attachment has three
bars. These attachments are ideal for blending,
tapering and defining beards, as well as for
achieving a “close trim” stubble look around the
face. To use the attachments, go with the hair
direction. To achieve closer looks, go against the
hair direction.
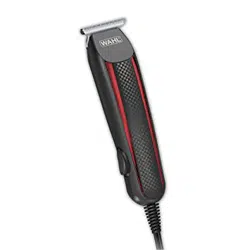
TRIMMER
Operating Instructions for Cordless
Battery Trimmer
Instrucciones de Operación
para Su Recortadora de Pilas
BEARD
WahlUSA.com
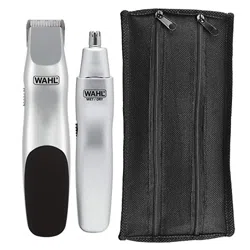
BONUS PERSONAL TRIMMER OPERATING INSTRUCTIONS
BATTERY INSTALLATION/REPLACEMENT
1. Holding the trimmer with the switch facing away from you, place
your thumb on the arrow molded into the battery compartment
cover, press lightly and slide the cover downward to remove it.
2. Insert one AA alkaline battery, positive end up, toward the
cutting head.
3. Replace the battery compartment cover.
4. To maximize battery life, turn the trimmer “OFF” immediately
after each use.
5. Replace the battery as soon as you notice the trimmer running
slower than normal, to avoid pulling of hairs.
BEFORE TRIMMING
Remove the protective head cap and turn trimmer “ON” (push the
slide switch up). Now you’re ready to trim.
TRIMMING EYEBROWS
Move the cutting head slowly to trim stray eyebrow hairs. For
precise, even trimming of the entire eyebrow, move the trimmer
closer or farther away to achieve the desired length.
TRIMMING HAIR FROM NOSE
Make sure the nasal passages are clean. Slowly move the trimmer
in and out of each nostril, no more than 1/4”. Keep the side of the
cutting head firmly against the skin to prevent a tickling sensation.
TRIMMING HAIR FROM EARS
Make sure the outer areas of the ears do not contain any wax. Hold
the ear flat with one hand and carefully insert the cutting head no
more than 1/4” into the outer ear.
CAUTION: Do not insert the cutting head or any other foreign
object into the inner ear.
For hair growing on the outside of the ear, simply move the
trimmer slowly along the edges of the ear.
CLEANING YOUR TRIMMER
Periodically after use, turn the trimmer “OFF” and rinse cutting
head under warm, running water. Take care not to get water in the
battery compartment.
For more thorough cleaning, remove the cutting head assembly
(unscrew in counterclockwise direction) and rinse under running
water to remove hairs from inside of assembly.
After cleaning, return cutting head assembly to its original position
(turn clockwise) and wipe entire trimmer dry with soft cloth.
Always replace protective head cap before storing trimmer.
© 2018 Wahl Clipper Corporation
Part No. 1000432
Printed in Vietnam
For more information or Product Registration, visit WahlUSA.com
3-YEAR LIMITED WARRANTY
Valid in U.S.A. Only
If your Wahl product fails to operate satisfactorily within three (3)
years from the date of original purchase or receipt as a gift, Wahl
will, at our option, repair or replace the product and return it to
you FREE OF CHARGE. Do not return this product to store where
purchased. Products needing repair under this warranty should
be returned with postage pre-paid to the following address or call
1-800-767-9245 for assistance:
Wahl Clipper Corp.
Attn: Repair Department
3001 Locust Street
Sterling, Illinois 61081
When mailing, please include a note describing the defect and
the date of original purchase or receipt as a gift. Products out of
warranty will be repaired at our standard repair charges.
This warranty does not cover products damaged by:
1. Modification or repair by anyone other than Wahl Clipper
Corporation or a Wahl authorized service center;
2. Commercial (non-consumer) use or unreasonable use.
This warranty gives you specific legal rights, and you may also
have other rights which vary from state to state. No other written
express warranty is given. No responsibility is assumed for
incidental or consequential damages of any type or for the use
of unauthorized attachments. Some states may not allow the
exclusion or limitation of incidental or consequential damages, so
the limitation may not apply to you. Warranty valid in U.S.A. only.
Outside U.S.A., check with store for Wahl authorized distributor’s
warranty.
SERVICE AND REPAIR
If you have problems with your trimmer, send it prepaid with a note
explaining the problem to:
Wahl Clipper Corporation
Attn: Repair Department
3001 Locust Street
Sterling, IL 61081
Telephone (800) 767-9245
For products purchased outside the United States, contact your distributor.
If for any reason within 60 days of purchase of your Wahl
®
trimmer you are not satisfied with your trimmer and would like a
refund, just return your trimmer, together with the sales receipt, to
the retailer from whom you purchased it. Wahl will reimburse all
retailers who accept trimmers within 60 days of purchase. If you
have any questions regarding this money-back guarantee, please
call 1-800-767-9245 in the United States.
60 Day Money Back Guarantee!
1/16” 1/8” 3/16”
1
54
2
6
3
7
las hojas puedan moverse libremente. Si las hojas se atascan con
residuos, empujando manualmente las hojas unas cuantas veces
hacia atrás y hacia adelante con la unidad apagada se pueden
desatascar las hojas y hacer que funcione la recortadora. Si sigue
sin funcionar, es probable que las pilas hayan excedido su vida útil.
Para optimizar la duración de las pilas, reemplaza todas las pilas AA
al mismo tiempo.
CUIDADO DE LA RECORTADORA
LUBRICACIÓN DE LAS HOJAS
Para lograr resultados óptimos, use aceite para cortadora de Wahl
en las cuchillas solo cuando sea necesario o aproximadamente
una vez al mes. Los cojinetes del motor están lubricados
permanentemente. No trate de
lubricarlos.
Cuando lubrique su recortadora,
colóquela en posición de encendido
(“ON – I”), sostenga la unidad con
las cuchillas mirando hacia ABAJO y
escurra tres gotas por la parte delantera de las cuchillas y una en
cada lado de la parte plana de la cuchilla. Limpie el exceso de aceite
con un paño suave.
AVISO: ¡NO LUBRIQUE EXCESIVAMENTE!
La lubricación o aplicación de líquidos excesiva causará daños si se
deja que se filtre y llegue al motor.
CUIDADO DE LAS HOJAS
Las hojas de la recortadora tienen dientes de corte endurecidos
con precisión, rectificados y pulidos. Las hojas deben manipularse
con cuidado y no golpearse nunca ni usarse para cortar materiales
sucios o abrasivos. No enjuagar la cuchilla con agua, o las hojas se
pueden oxidar. Limpiar con el cepillo incluido.
AFILADO
Las hojas afiladas tienen unos dientes de corte pulido de precisión.
Las hojas deben ser manejadas cuidadosamente y nunca deben de
golpearse. Para mantener las hojas afiladas corte solamente pelo
limpio y evite cortar sobre suciedad o partículas abrasivas.
Solamente puede afilar o cambiar los juegos completos de hojas.
Para remover las hojas, ya sea para afilarlas o reemplazarlas, afloje
y quite los dos tornillos de la hoja inferior. Coloquelas del mismo
modo y asegúrelas. Para afilar las hojas, regreselas (solamente)
con un cheque o una orden de pago por U$6.95 (incluye el envio
de regreso) a: Wahl Clipper Corporation, Attn: Repair Department,
3001 Locust Street, Sterling, IL 61081.
Los reemplazos nuevos de hojas se encuentran disponibles en su
tienda favorita más cercana, o bien en Wahl Clipper Corporation.
Para productos comprados fuera de Estados Unidos, comuníquese
con su distribuidor.
Guía de 5 posiciones que hace que siempre se
logre con facilidad un recorte uniforme. La guía puede quitarse
(proporcionando una séptima posición de corte) y volverse a
conectar sin cambiar la longitud de corte prefijada, de modo
que una vez que haya encontrado la longitud perfecta, no tenga
que adivinar cuál es en cada recorte. La guía de recorte es un
conjunto de dos piezas compuesto por una base y un peine. No
debe desmontarse. Para conectar la guía, deslícela simplemente
formando un ligero ángulo y pulse la lengüeta de desenganche
hacia abajo para sujetar en posición. Para quitar la guía, empuje
suavemente hacia arriba la lengüeta de desenganche y deslice el
conjunto alejándolo de la recortadora. Ajuste la longitud de recorte
haciendo fuerza hacia abajo sobre la palanca y moviendo el peine
hacia adelante o hacia atrás hasta el ajuste deseado.
DEJARSE CRECER EL BIGOTE
Hay tres factores a tener en cuenta para determinar que estilo de
bigote es el adecuado para usted:
1. La forma y las dimensiones de su cara.
2. El crecimiento natural de su bigote.
3. El grueso de su bigote. Si no está seguro cual es el tipo de
bigote que más se adecua a su rostro, consulte a su estilista de
confianza o vaya al: WahlUSA.com.
RECORTE DEL BIGOTE
1. Péinese el bigote.
2. Sujete la recortadora en posición vertical, con el interruptor
apuntando hacia usted. Asegúrese de que la cabeza esté girada
de modo que las hojas estén apuntando hacia usted a fin de
definir el perfil del bigote.
3. Con el accesorio a una longitud de corte bastante larga, empiece
a recortar su bigote, empezando en la parte superior y llevando
la recortadora abajo, hacia el labio superior. Use ajuste de
corte progresivamente más cercanos a la piel para conseguir el
aspecto y la longitud deseados.
4. Para escalonar al bigote, gire la cabeza de modo que el
interruptor y las hojas apunten en sentido contrario a usted. Fije
la guía de recorte de 6 posiciones en una longitud intermedia.
Empezando por la parte media del bigote, siga el perfil del labio
y escalone al bigote con pasadas ascendentes cortas de la
recortadora, moviendo el aparato hacia las esquinas hasta que
se consiga una ligera forma en la parte inferior del bigote.
5. Como paso final, quite la guía de recorte y, usando sólo las
hojas al descubierto, trace un perfil definido en la parte inferior
del bigote.
GUARDE ESTAS INSTRUCCIONES
Solamente Para Uso Residencial
INSTALACION Y REEMPLAZO DE LAS PILAS
1. Quite la tapa de las pilas de la
recortadora empujando hacia adentro y
hacia atrás la puerta de plástico en el sen
tido de la flecha.
2. Introduzca dos pilas AA según viene
indicado por el contorno moldeado de la
recortadora.
IMPORTANTE: Asegúrese de introducir
primero el extremo negativo (-) de cada pila, de modo que
comprima el resorte de la parte inferior del compartimiento de las
pilas. Deslice después el extremo positivo (+) hasta colocarlo. No
deje que se doblen los contactos de los terminales negativos y
corten el recubrimiento de las pilas.
Se pueden usar pilas de carbón o alcalinas con la recortadora Wahl.
Las pilas alcalinas proporcionarán el máximo tiempo de operación
antes de que sea necesario reemplazarlas. La recortadora debe
funcionar aproximadamente
tres horas con pilas alcalinas.
3. Vuelva a poner la tapa de las pilas en su posición original.
4. Ponga el interruptor en la posición de encendido para usar la
recortadora.
5. Para prolongar al máximo la duración de las pilas, la recortadora
debe apagarse inmediatamente después de utilizarse.
6. Para reemplazar las pilas, complete el Paso 1, quitando las pilas
de una en una.
LOCALIZACIÓN Y REPARACION DE FALLAS
Si la recortadora no funciona con el interruptor en la posición de
encendido, compruebe las pilas para ver si están bien instaladas.
El extremo positivo (saliente central) debe estar colocado según se
indica en la caja de las pilas. Asegúrese de que el interruptor esté
en la posición de encendido y compruebe para asegurarse de que
RECORTE Y BORDEADO DE LA BARBA
Se sugieren los siguientes pasos de recorte y posiciones de la
recortadora. Tal vez pueda encontrar distintos procedimientos que
le den mejor resultado.
1. Péinese la barba en el sentido de crecimiento para dejar al
descubierto los pelos que sean más largos que los demás.
2. Conecte la guía de recorte de 6 posiciones para recortar y dar
forma a la barba. Con las hojas apuntando hacia usted y el
interruptor apuntando en sentido contrario a usted, empiece con
el accesorio de guía de recorte fijado a una longitud de recorte
larga. Para obtener los mejores resultados, empiece en cada
patilla y efectúe pasadas con el aparato moviéndolo hacia abajo,
en dirección al cuello. Recorte hacia la barbilla con pasadas
suaves superpuestas, siguiendo los contornos de la barba. Si
recorta contra el sentido natural de los contornos de la barba, la
recortadora cortará el pelo mucho más corto y el resultado será
irregular.
Ajuste la guía de recorte en posiciones progresivamente más
cortas hasta que consiga la longitud deseada de la barba. Puede
fijar el accesorio de guía de recorte para cortar más próximo a
la piel junto a la oreja y debajo de la barbilla. Cuando se quite
la guía de recorte, permanecerá en su último ajuste de longitud
hasta que se cambie.
Asegúrese siempre de que la guía de recorte esté firmemente
encajada en la posición deseada antes de empezar a recortar.
3. Quite la guía de recorte y corte el perfil de la barba. Gire la
cabeza de recorte de modo que las hojas y el interruptor estén
apuntando hacia usted. Empezando debajo de la barbilla y yendo
hacia la mandíbula y orejas, corte el perímetro exterior de la
barba por debajo de la mandíbula. Siga la línea completamente
hacia arriba hasta las orejas y el perfil del cuero cabelludo.
4. Acentúe el perfil de la barba moviendo la recortadora
con un movimiento descendente. Empiece en el perfil que
haya creado y, yendo de la barbilla hacia atrás, hacia las orejas,
recorte el área justo debajo del perfil de la barba.
5. Defina la parte superior de la barba usando la misma técnica.
RECORTE CON 3 ACCESORIOS
Su recortadora incluyen tres cabezales para su bigote (mediano
y largo) y una guía para la barba. El accesorio de corte medio
tiene dos barras y el accesorio de corte corto tiene una barra.
El igualador tiene dientes más largos que los accesorios de la
recortadora media y corta y también puede
usarse como accesorio para el recorte de barba.
Estos accesorios son ideales para igualar,
escalonar y definir bigotes. Para usar los
accesorios, siga las instrucciones dadas para el
adaptador de la mandíbula.
RECORTADORA PERSONAL
INSTRUCCIONES DE FUNCIONAMIENTO
INSTALACIÓN DE BATERÍA-REEMPLAZO
1. Sujete la cortadora con el conmutador de encendido mirando hacia
abajo, deslice su dedo por la flecha que aparece en la cobertura
del compartimento de la batería, presione suavemente y deslice la
cobertura hacia abajo para abrirla.
2. Inserte una batería alcalina tipo AA con el polo positivo mirando
hacia la cabeza cortadora.
3. Vuelva a colocar la cobertura del compartimento de la batería
4. Para maximizar la duración de la batería, apague la cortadora
inmediatamente después de cada uso
5. Sustituya la batería tan pronto como usted empiece a notar que su
cortadora está funcionando a una velocidad más lenta de la normal,
para evitar tirones de pelo.
ANTES DE EMPEZAR A CORTAR: Retire la tapa protectora de la cabeza
cortadora y encienda la cortadora (deslizando el botón de encendido
hacia arriba. En este momento, ya está usted preparado para cortar.
CORTE Y PERFILACIÓN DE LAS CEJAS: Mueva la cabeza cortadora
lentamente para cortar los pelos rectos que hay en las cejas. Para
mayor precisión e igualado o incluso el corte de la ceja entera, mueva
la cortadora más cerca o más lejos de la ceja, para conseguir el largo
deseado.
CORTE DEL VELLO NASAL: Asegúrese de que las fosas nasales están
limpias. Lentamente, mueva la cortadora hacia adentro y hacia fuera
en cada fosa nasal pero no más de 1/4”. Mantenga el lado de la cabeza
cortadora firmemente contra la piel, para prevenir la sensación de picor
o cosquillas.
CORTE DEL VELLO EN LA OREJA: Asegúrese de que el oído está libre
de cera. Sujete la oreja con una mano de una forma plana e inserte
cuidadosamente la cabeza cortadora no más de 1/4”, en el oído.
PRECAUCIÓN: No inserte la cabeza cortadora ni ningún otro objeto en
el oído interno. Para el pelo que crezca fuera del oído, simplemente
mueva la cortadora lentamente a lo largo de los extremos de la oreja.
LIMPIEZA DE SU CORTADORA: Periódicamente, después de su
uso, apague la cortadora y enjuague la cabeza cortadora bajo un
chorro de agua templada. Asegúrese de que el agua no entre en el
compartimento de la batería.
Para una limpieza más profunda, desmonte la cabeza cortadora
(desatornillando en el sentido de las agujas del reloj), y enjuague
bajo un chorro de agua templada para eliminar pelos del interior
del ensamblaje. Después de la limpieza, vuelva a colocar la cabeza
cortadora en su posición original (atornille otra vez ) y seque la
cortadora completamentecon un paño suave. Ponga siempre la tapa
protectora de la cabeza cortadora, antes de guardar la cortadora.
Para mas informacion o Registracion de Producto
visite WahlUSA.com
GARANTÍA LIMITADA DE 3 AÑOS
Válida en EE. UU. Solamente
Si su producto Wahl no funciona de forma satisfactoria durante
un período de tres (3) años contados a partir de la fecha
original de compra o de recibirlo como regalo, Wahl reparará
o reemplazará el producto a su criterio y se lo devolverá SIN
CARGO. No devuelva este producto a la tienda donde fue
adquirido. Los productos que necesiten ser reparados conforme
a esta garantía deben enviarse con franqueo pagado a la siguiente
dirección o llame al
1-800-767-9245 para obtener asistencia:
Wahl Clipper Corp.
Attn: Repair Department
3001 Locust Street
Sterling, Illinois 61081
Cuando envíe un correo, incluya una nota que describa el defecto
y la fecha original en que se compró o se recibió como regalo.
Los productos fuera de garantía se repararán aplicando nuestros
cargos de reparación estándar.
Esta garantía no cubre los productos dañados por las siguientes
causas:
1. Modificación o reparación efectuada por otra persona que
no pertenezca a Wahl Clipper Corporation ni a un centro de
servicio autorizado por Wahl;
2. Uso comercial (no de consumidor) o no razonable.
Esta garantía le otorga derechos legales específicos y usted
también puede tener otros derechos que varían en cada estado.
No se otorga ninguna otra garantía explícita por escrito. No
se asume responsabilidad alguna por daños indirectos o
consecuentes de cualquier tipo, ni por el uso de accesorios no
autorizados. Algunos estados pueden prohibir la exclusión o la
limitación de daños indirectos o consecuentes, de modo que esta
limitación puede no aplicarse a su caso. Garantía sólo válida en
EE. UU. Fuera de EE. UU., consulte en la tienda sobre la garantía
del distribuidor autorizado de Wahl.
SERVICIO Y REPARACIÓN
Si tiene problemas con la recortadora, envíela con franqueo
prepagado y una nota explicando el problema a:
Wahl Clipper Corporation
Attn: Repair Department
3001 Locust Street • P.O. Box 578
Sterling, IL 61081
Teléfono (800) 767-9245
Para productos comprados fuera de Estados Unidos, póngase en
contacto con su distribuidor.
Si por cualquier razón entre los 60 días de la compra de su
recortadora de Wahl no esta satisfecho con su compra y desea
una devolución de su dinero, regrese la recortadora junto con su
recibo de compras a la tienda donde lo compro. Wahl reembolsara
a las tiendas quienes acepta las recortadoras entre los 60 días de
su compra. Si tiene preguntas tocantes esta Garantía, por favor
llamanos al 1-800-767-9245 en los Estados Unidos.
GARNATÍA 60 DIAS PARA DEVOLUCIÓN DE SU DINERO
1/16” 1/8” 3/16”