
www.lg.com
LED MONITOR MODEL
32MA68HY
Please read this manual carefully before operating
your set and retain it for future reference.
Owner's Manual
LED MONITOR
(LED MONITOR*)
*LG LED Monitors are LCD Monitors with LED Backlighting.

2
ENGLISH
TABLE OF CONTENTS
CONTENTS
3 LICENSE
4 ASSEMBLINGANDPREPAR-
ING
4 Unpacking
5 SupportedDriversandSoftware
6 Partsandbuttons
6 - HowtoUsetheJoystickButton
7 - InputConnector
8 MovingandLiftingtheMonitor
9 SettinguptheMonitorset
9 - AttachingtheStandBase
10 - DetachingtheStandBase
11 - Mountingonatable
12 - Usingthecableholder
13 - Installingthewallmount
14 - Mountingonawall
15 USINGTHEMONITORSET
15 ConnectingtoaPC
15 - D-SUBconnection
15 - HDMIconnection
16 - DisplayPortconnection
16 ConnectingtoAVDevices
16 - HDMIconnection
17 ConnectingPeripherals
17 - USBCableconnection-PC
17 ConnectingtoExternalDevices
17 - Peripheraldeviceconnection
18 CUSTOMIZINGSETTINGS
19 Customizingsettings
19 - MenuSettings
19 - -QuickSettings
20 - -Picture
23 - -General
24 - -AutoConfiguration
25 - -Reset
26 - -Picturemode
27 TROUBLESHOOTING
29 SPECIFICATIONS
30 PresetModes(Resolution)
30 Indicator

3
ENG
ENGLISH
LICENSE
LICENSE
Eachmodelhasdifferentlicenses.Visitwww.lg.comformoreinformationonthelicense.
ThetermsHDMIandHDMIHigh-DefinitionMultimediaInterface,andthe
HDMIlogoaretrademarksorregisteredtrademarksofHDMILicensingLLC
intheUnitedStatesandothercountries.
ThefollowingcontentisonlyappliedtothemonitorwhichissoldinEuropemarketandwhichneedsto
meettheErPDirective:
*Thismonitorissettobeturnedoffautomaticallyin4hoursafteryouturnedondisplayifthereisno
adjustmenttodisplay.
*Tomakethissettingbedisabled,changetheoptionto‘Off’inOSDmenuof“AutomaticStandby”.
4
ENG
ENGLISH
ASSEMBLING AND PREPARING
ASSEMBLINGANDPREPARING
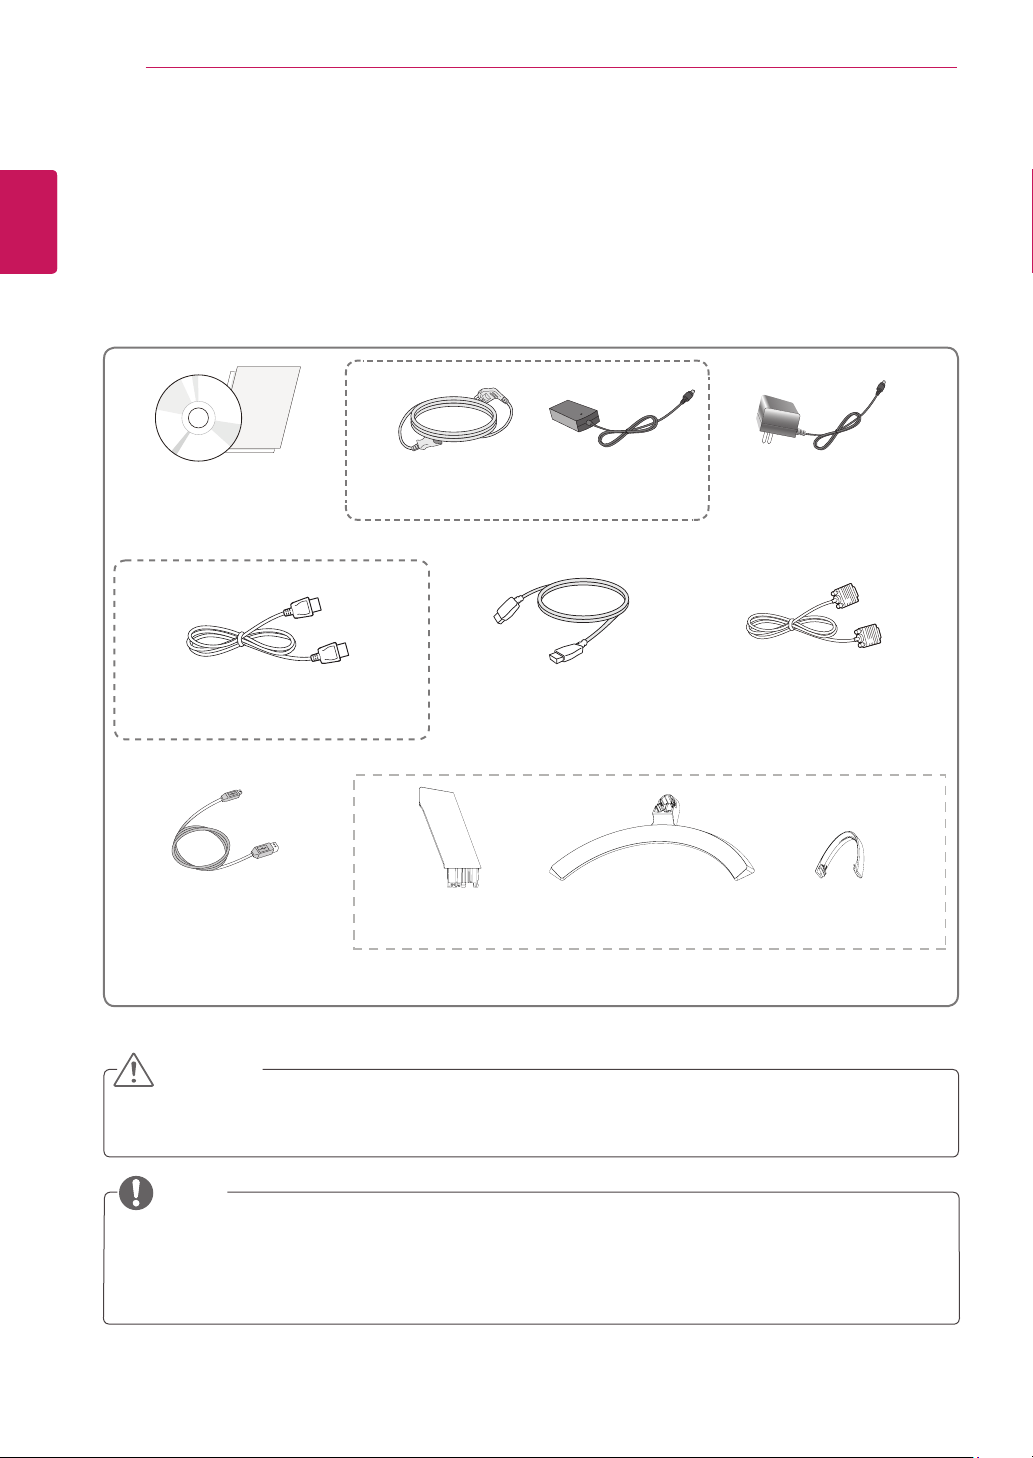
Unpacking
Checkyourproductboxforthefollowingitems.Ifthereareanymissingaccessories,contactthelocal
dealerwhereyoupurchasedyourproduct.Theillustrationsinthismanualmaydifferfromtheactualproduct
andaccessories.
Donotuseanyunapprovedaccessoriestoensurethesafetyandproductlifespan.
Anydamagesorinjuriesbyusingunapprovedaccessoriesarenotcoveredbythewarranty.
Theaccessoriessuppliedwithyourproductmayvarydependingonthemodel.
Productspecificationsorcontentsinthismanualmaybechangedwithoutpriornoticeduetoupgrade
ofproductfunctions.
CAUTION
NOTE
CD(Owner'sManual)/
Card
(Dependingonthecountry)
(Dependingonthecountry)
PowerCord
AC-DCAdapter
AC-DCAdapter
or
D-SUBCable
(Thiscableisnotincluded
inallcountries.)
USBCable
(Thiscableisnotincluded
inallcountries.)
StandBody StandBase
HDMICable
(Thiscableisnotincludedin
allcountries.)
CableHolder
OPTIONALACCESSORIES
DisplayPortCable
(Thiscableisnotincludedinallcountries.)

5
ENG
ENGLISH
ASSEMBLING AND PREPARING
SupportedDriversandSoftware
CheckthedriversandsoftwaresupportedbyyourproductandrefertothemanualsontheCDenclosedin
theproductpackage.
RequiredandRecommended:YoucandownloadandinstallthelatestversionfromtheenclosedCD
orfromtheLGEwebsite
(www.lg.com)
.
DriversandSoftware InstallationPriority 32MA68HY
MonitorDriver Recommended O
OnScreenControl Recommended O
6
ENG
ENGLISH
ASSEMBLING AND PREPARING
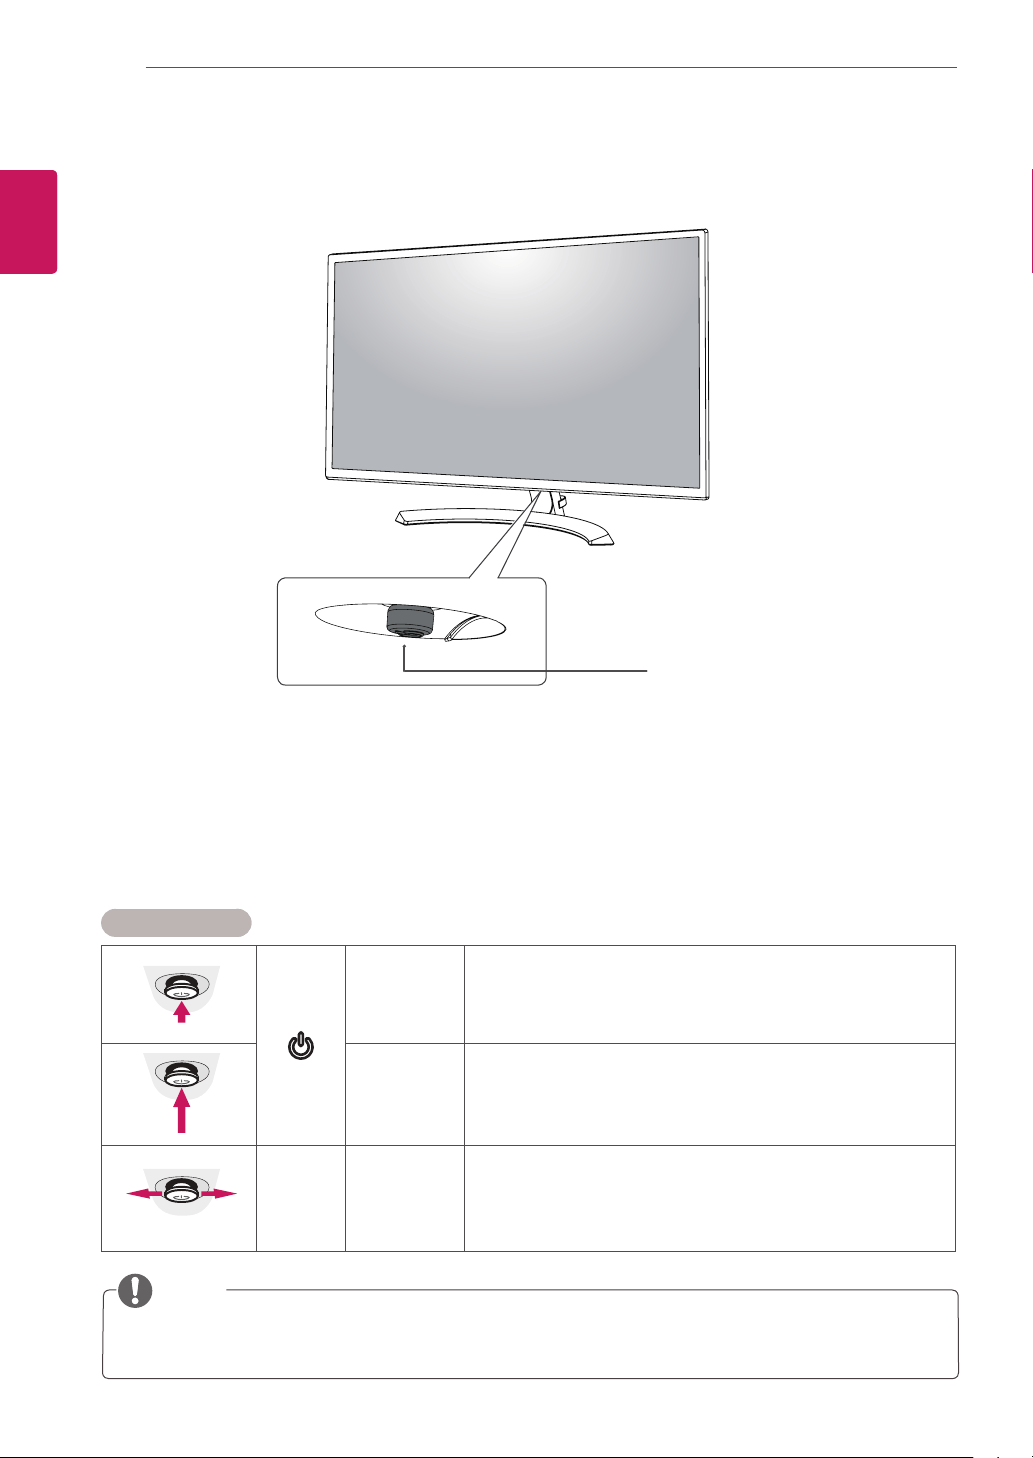
Partsandbuttons
JoystickButton/
PowerIndicator
On:powerison
Off:powerisoff
Thejoystickbuttonislocatedatthebottomofthemonitor.
NOTE
HowtoUsetheJoystickButton
Youcaneasilycontrolthefunctionsofthemonitorbypressingthejoystickbuttonormovingitleft/rightwith
yourfinger.
BasicFunctions
Poweron
Pressthejoystickbuttononcewithyourfingertoturnonthe
monitor.
Poweroff
Pressandholdthejoystickbuttononcewithyourfingertoturnoff
themonitor.
◄/►
Volume
Control
Youcancontrolthevolumebymovingthejoystickbuttonleft/right.
7
ENG
ENGLISH
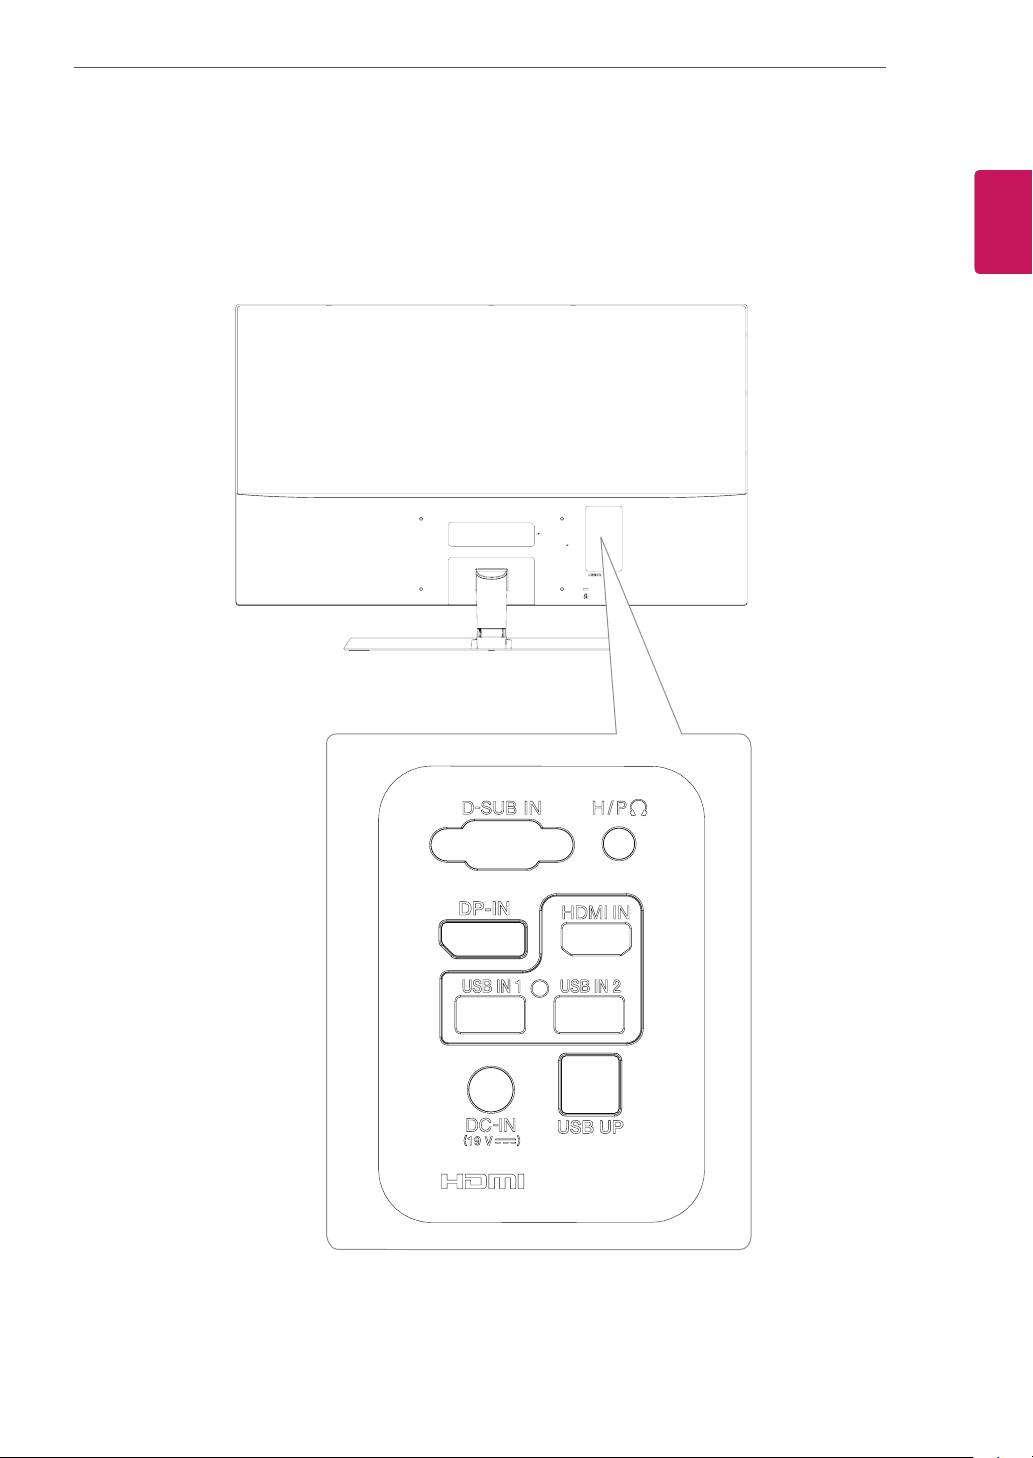
ASSEMBLING AND PREPARING
Partsandbuttons
InputConnector
8
ENG
ENGLISH
ASSEMBLING AND PREPARING
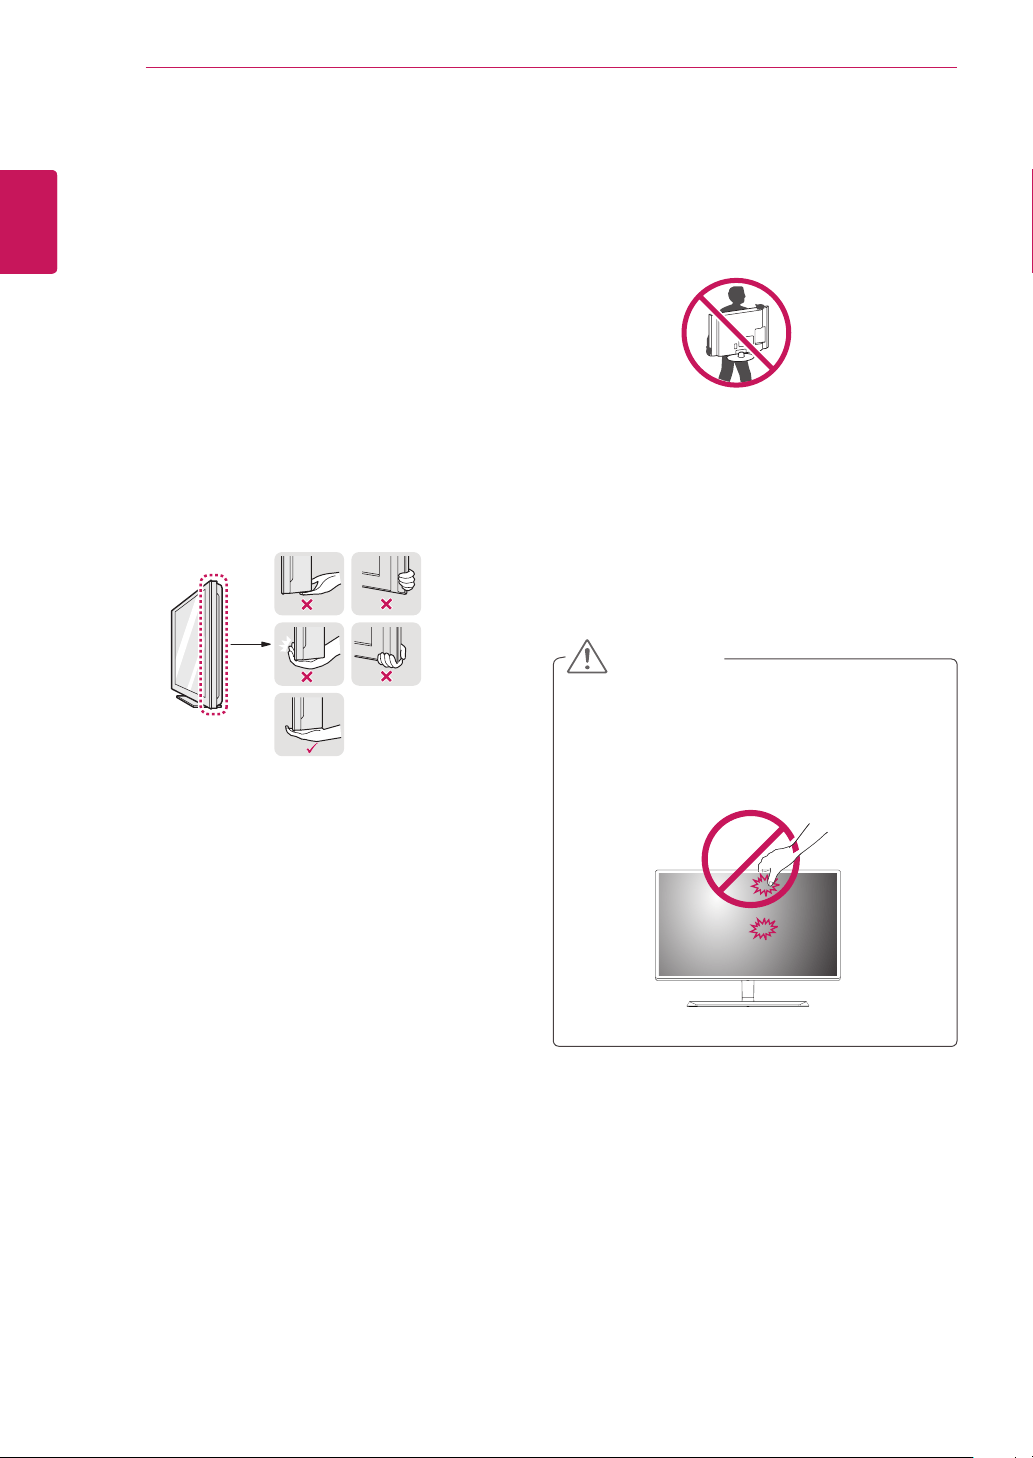
MovingandLiftingtheMonitor
Whenmovingorliftingthemonitor,followthese
instructionstopreventthemonitorfrombeing
scratchedordamagedandtoensuresafetrans-
portationregardlessofitsshapeorsize.
Asfaraspossible,avoidtouchingthemoni-
torscreen.Thismayresultindamagetothe
screenorsomeofthepixelsusedtocreate
images.
Itisadvisabletoplacethemonitorinthe
originalboxorpackingmaterialbeforeat-
temptingtomoveit.
Beforemovingorliftingthemonitor,discon-
nectthepowercordandallcables.
Holdthetopandbottomofthemonitorframe
firmly.Donotholdthepanelitself.
Whenholdingthemonitor,thescreenshould
faceawayfromyoutopreventitbeing
scratched.
Whenmovingthemonitor,avoidanystrong
shockorvibrationstotheproduct.
Whenmovingthemonitor,keepitupright,
neverturnthemonitoronitssideortiltit
sideways.
CAUTION
8
9
ENG
ENGLISH
ASSEMBLING AND PREPARING
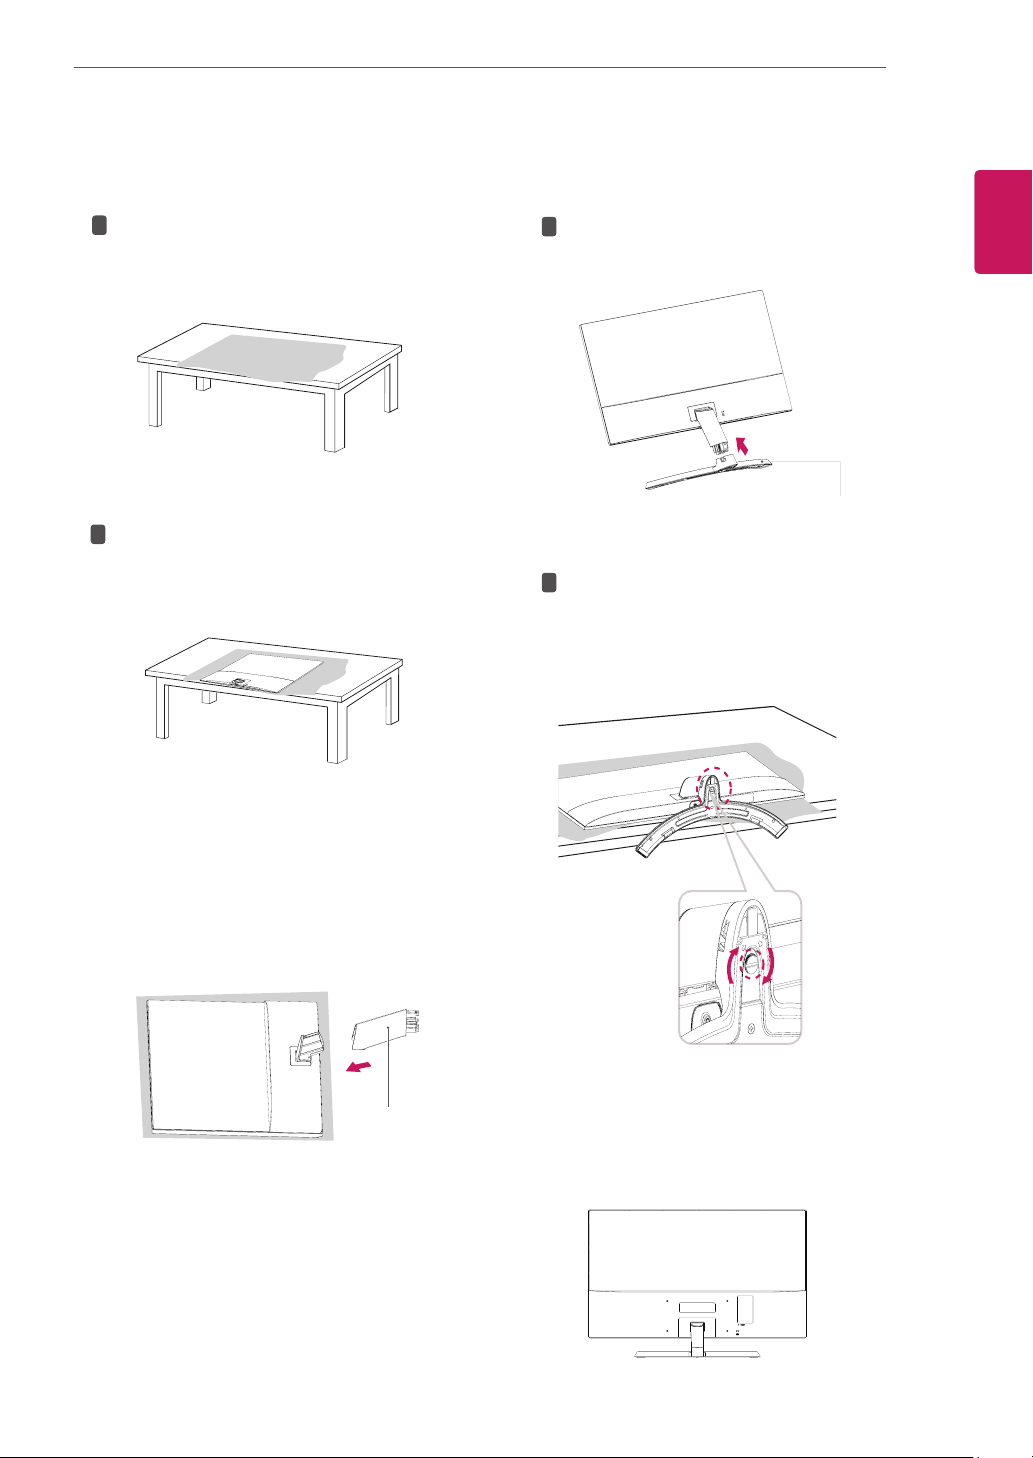
SettinguptheMonitorset
AttachingtheStandBase
1
Pleaseputasoftclothonalowtableorbox
toprotectthescreenofthemonitor.
Pleaseputthemonitoronthesoftclothwith
thescreenfacingdown.
2
Pleasegrabthe
Standbody
inonehand,and
pushitinthedirectionofthearrowto
hinge
body
.Afterassembling,youmustcheckifthe
Standbody
latchedinornot.
3
Pleasepushthe
StandBase
inthedirection
ofthearrowasshownbelowandassemble
together.
Pleaseuseadriver(-)orcointoinsertthumb
screwandturnrightarrowdirectionlock.
*Itisnecessarytothoroughlytightenitwith
ThumbScrew
,orthemonitorwillshake.
4
PleasesettheMonitorupright,andinstallthe
necessarycable.
*Mustuseonetypeinputcable.Don'tuse
morethantwotypescabletogether.
1
2
1
2
Standbody
StandBase
10
ENG
ENGLISH
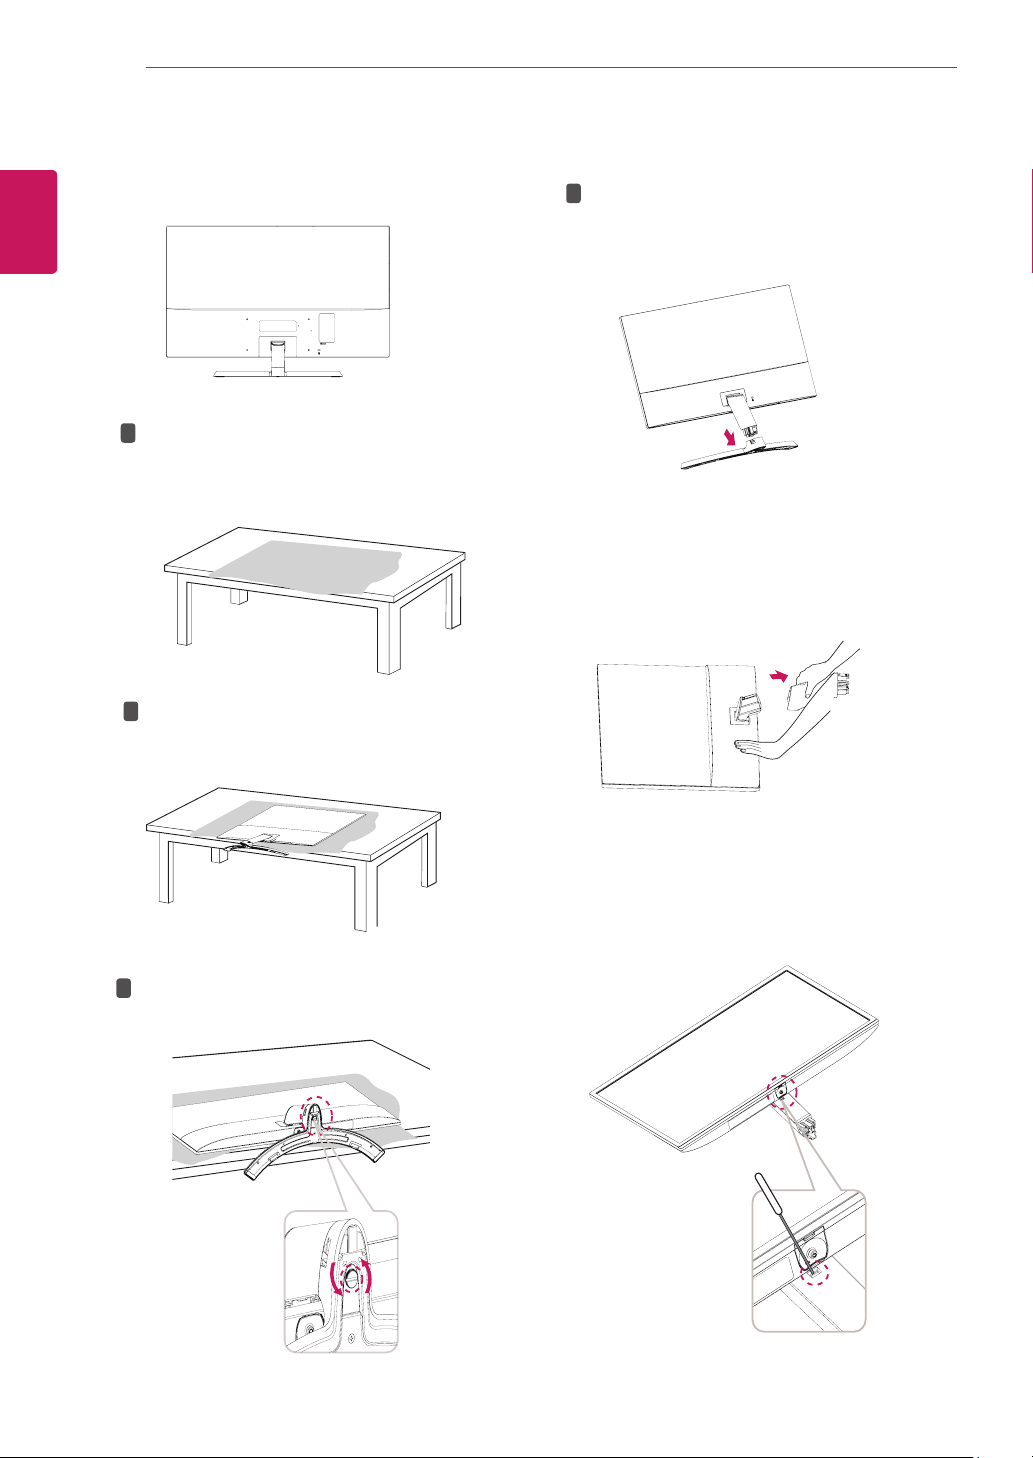
ASSEMBLING AND PREPARING
1
Pleaseremovethecableinstalledtothemonitor.
2
Pleaseputasoftclothonalowtableorboxto
protectthescreenofthemonitor.
Pleaseputthemonitoronthesoftclothwith
thescreenfacingdown.
3
Pleaseusethedriver(-)orcoininsertthumb
screwandturnleftarrowdirectionunlock.
Pleasepullthe
StandBase
inthedirectionof
thearrowasshownbelowanddisassemble
asshownbelow.
4
Afterfixingthemonitorinonehand,removethe
Standbody
bypullingitstronglyinthedirection
ofthearrowasshownbelow.
1
2
1
2
*
Ifitisdifficulttoremove,youcanpushthe
Latchwithasmallflat-headscrewdriverora
flat-headedtoolanddisassembleasshown
below.
DetachingtheStandBase
11
ENG
ENGLISH
ASSEMBLING AND PREPARING
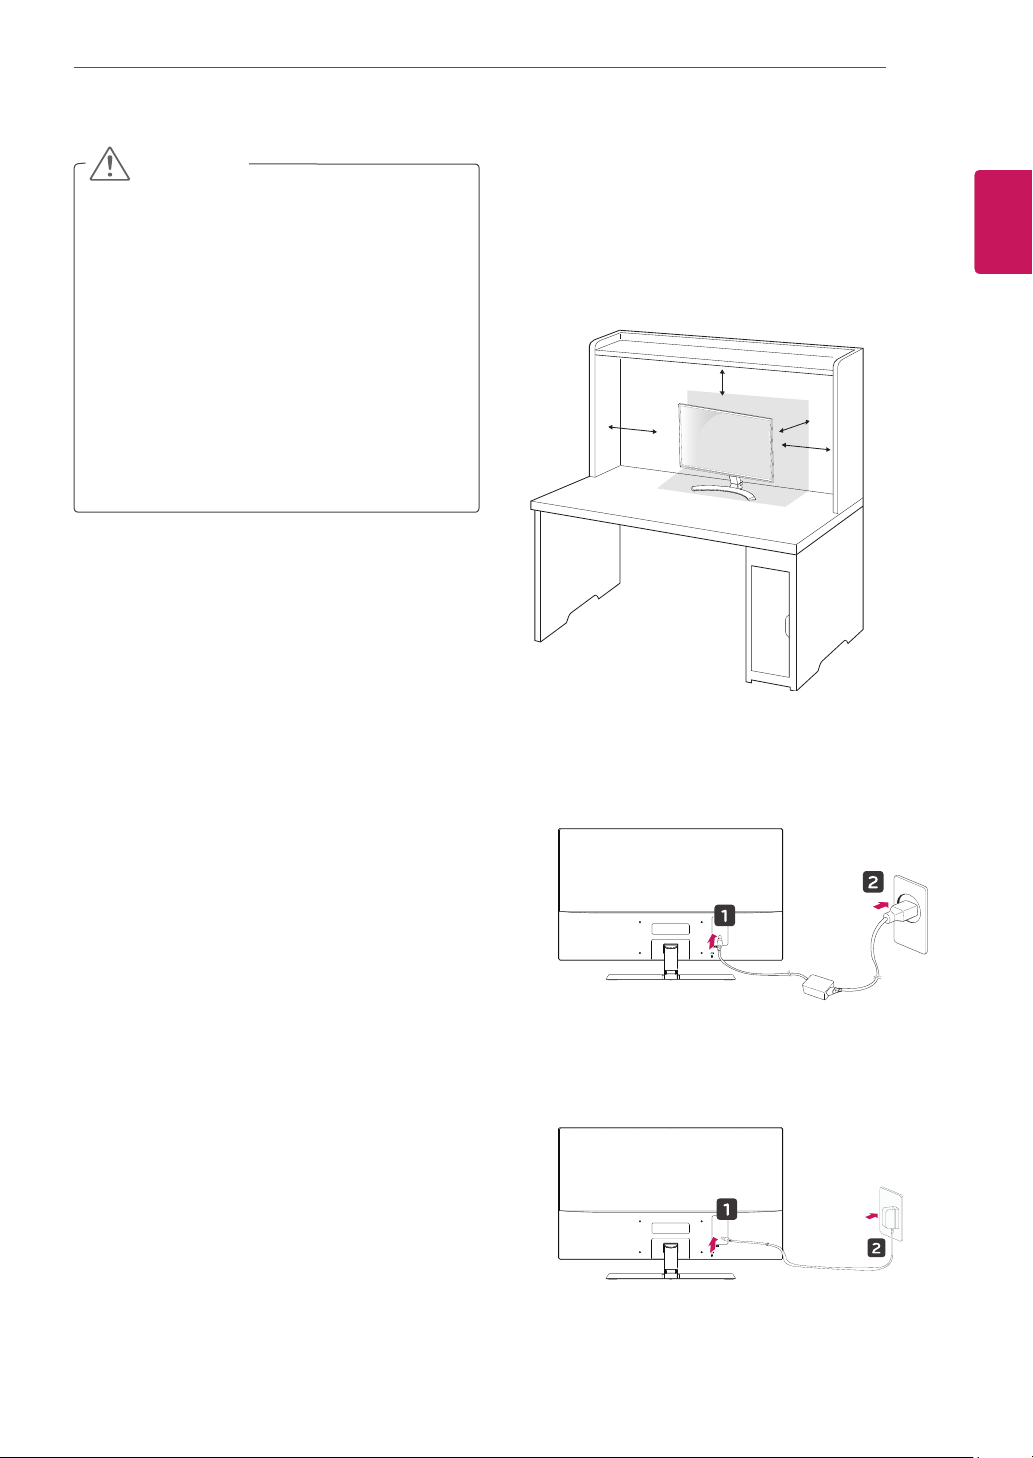
Mountingonatable
1
LiftandtilttheMonitorsetintoitsupright
positiononatable.
Leavea10cm(minimum)spacefromthewall
forproperventilation.
2
ConnecttheAC-DCAdapterandPowerCord
toawalloutlet.
10 cm
10 cm
10 cm
10 cm
or
Illustrationsinthisdocumentrepresenttypicalpro-
cedures,sotheymaylookdifferentfromtheactual
product.
Donotcarrythemonitorupsidedownbyjusthold-
ingthestandbase.Thismaycausethemonitorto
falloffthestandandcouldresultinpersonalinjury.
Whenliftingormovingthemonitor,donottouch
themonitorscreen.Theforceappliedtothemoni-
torscreenmaycausedamagetoit.
Ifyouusethemonitorpanelwithoutthestand
base,itsjoystickbuttonmaycausethemoni-torto
becomeunstableandfall,resultingindamageto
themonitororhumaninjury.Inaddition,thismay
causethejoystickbuttontomalfunction.
CAUTION
12
ENG
ENGLISH
ASSEMBLING AND PREPARING
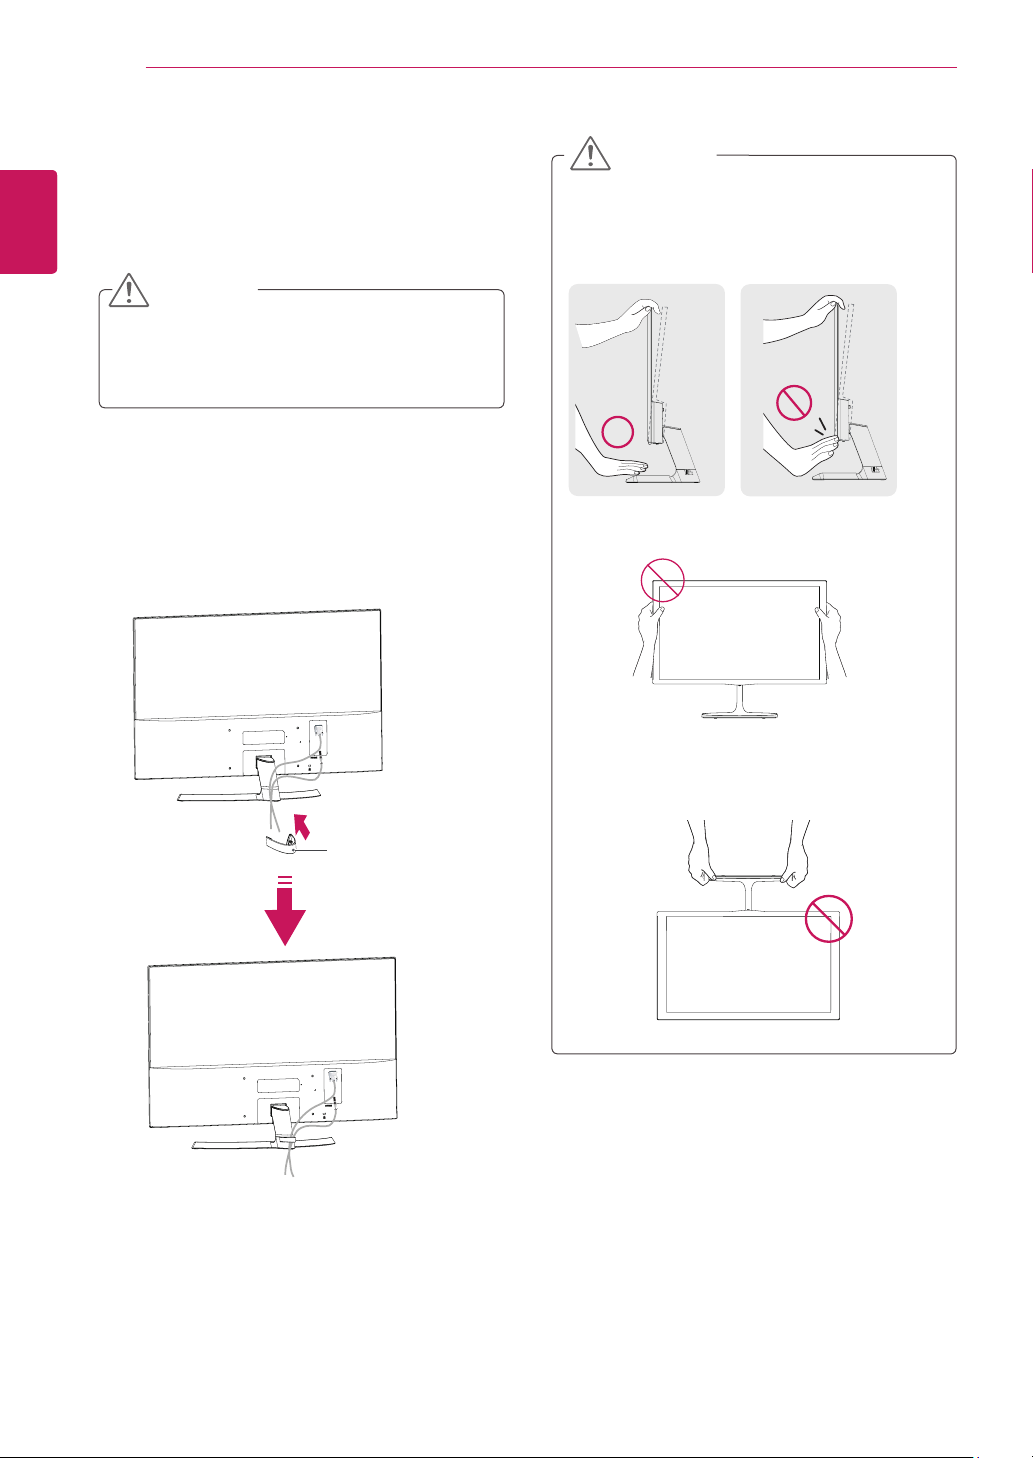
Usingthecableholder
3
Pressthejoystickbuttononthebottomofthe
monitortoturnonthemonitor.
Unplugthepowercordbeforemovingthe
Monitortoanotherlocation.Otherwiseelectric
shockmayoccur.
CAUTION
Cableholder
Whenyouadjusttheangle,donotholdthe
bottomoftheMonitorsetframeasshownon
thefollowingillustration,asmayinjureyour
fingers.
Donottouchorpressthescreenwhen
adjustingtheangleofthemonitor.
Donotholdthissetlikebelowpicture.Monitor
screencandetachfromstandbaseandinjure
yourbody.
WARNING
13
ENG
ENGLISH
ASSEMBLING AND PREPARING
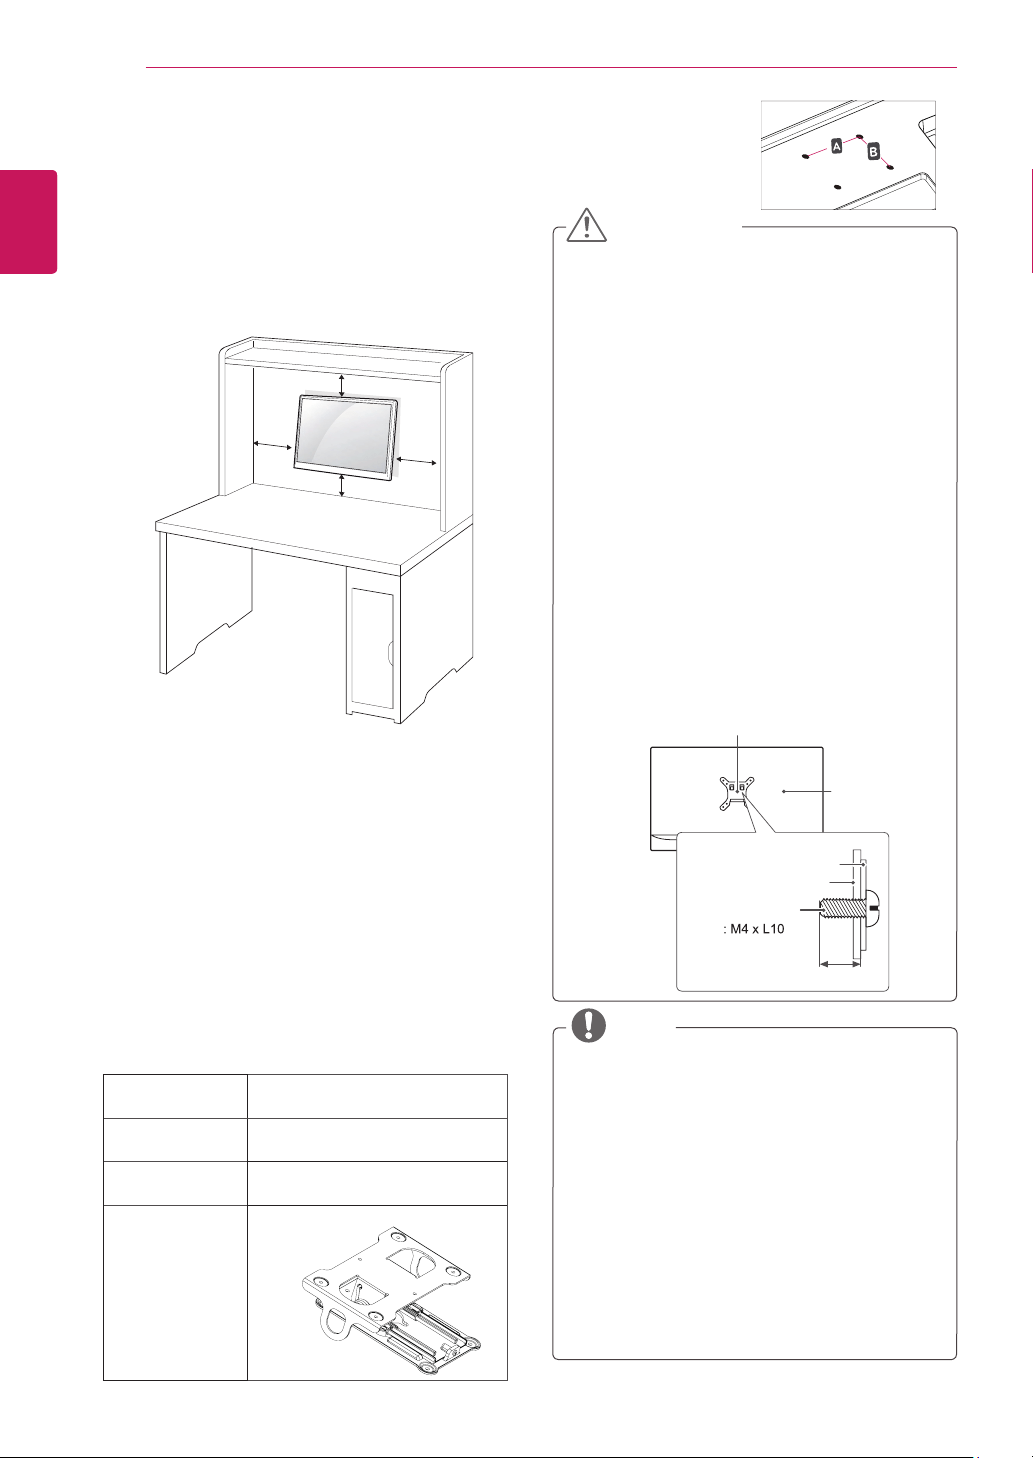
Installingthewallmount
1
Placethescreenfacedown.Toprotectthe
screenfromscratches,coverthesurfacewitha
softcloth.
2
Detachthescrewcoverasbelow.
3
Removethescrewsandseparatethestand
hinge.
UsingtheKensingtonsecuritysystem
TheKensingtonsecuritysystemconnectoris
locatedatthebackoftheMonitorset.Formore
informationofinstallationandusing,refertothe
manualsuppliedwiththeKensingtonsecurity
systemorvisit
http://www.kensington.com
.
ConnecttheKensingtonsecuritysystemcable
betweentheMonitorsetandatable.
Beforeinstallingthewallmount,pleaseseparate
thestandhingefirstasbelow.
TheKensingtonsecuritysystemisoptional.
Youcanobtainitfrommostelectronicsstores.
NOTE
Tiltfrom+10to-5degreesupordowntoadjust
theangleoftheMonitorsettosuityourview.
NOTE
Front Rear
14
ENG
ENGLISH
ASSEMBLING AND PREPARING
WallMount
(AXB)
200x100
Standard
screw
M4xL10
Numberof
screws
4
WallMount
Plate
(Optional)
RW240
(M4xL25)
Forproperventilation,allowaclearanceof10cm
oneachsideandfromthewall.Detailed
instructionsareavailablefromyourdealer,seethe
optionalTiltWallMountingBracketInstallationand
SetupGuide.
WallmountPad
WallmountPad
Standardscrew
BackCover
BackCover
Max.8mm
IfyouintendtomounttheMonitorsettoawall,
attachWallmountinginterface(optionalparts)to
thebackoftheset.
WhenyouinstalltheMonitorsetusingawall
mountinginterface(optionalparts),attachit
carefullysoitwillnotdrop.
1Ifyouusescrewlongerthanstandard,themoni-
tormightbedamagedinternally.
2Ifyouuseimproperscrew,theproductmightbe
damagedanddropfrommountedposition.
Inthiscase,LGElectronicsisnotresponsible
forit.
WallMount(AXB)
Disconnectthepowercordfirst,andthen
moveorinstalltheMonitorset.Otherwise
electricshockmayoccur.
IfyouinstalltheMonitorsetonaceilingor
slantedwall,itmayfallandresultinsevere
injury.
UseonlyanauthorizedLGwallmount
andcontactthelocaldealerorqualified
personnel.
Donotovertightenthescrewsasthismay
causedamagetotheMonitorsetandvoid
yourwarranty.
Useonlyscrewsandwallmountsthatmeet
theVESAstandard.Anydamagesorinjuries
bymisuseorusinganimproperaccessory
arenotcoveredbythewarranty.
Screwlengthfromoutersurfaceofback
covershouldbeunder8mm.
UsethescrewsthatarelistedontheVESA
standardscrewspecifications.
Thewallmountkitwillincludeaninstallation
manualandnecessaryparts.
Thewallmountbracketisoptional.Youcan
obtainadditionalaccessoriesfromyourlocal
dealer.
Thelengthofscrewsmaydifferdepending
onthewallmount.Besuretousetheproper
length.
Formoreinformation,refertotheinstructions
suppliedwiththewallmount.
NOTE
Mountingonawall
CAUTION
10 cm
10 cm
10 cm
10 cm
15
ENG
ENGLISH
USING THE MONITOR SET
USINGTHEMONITORSET
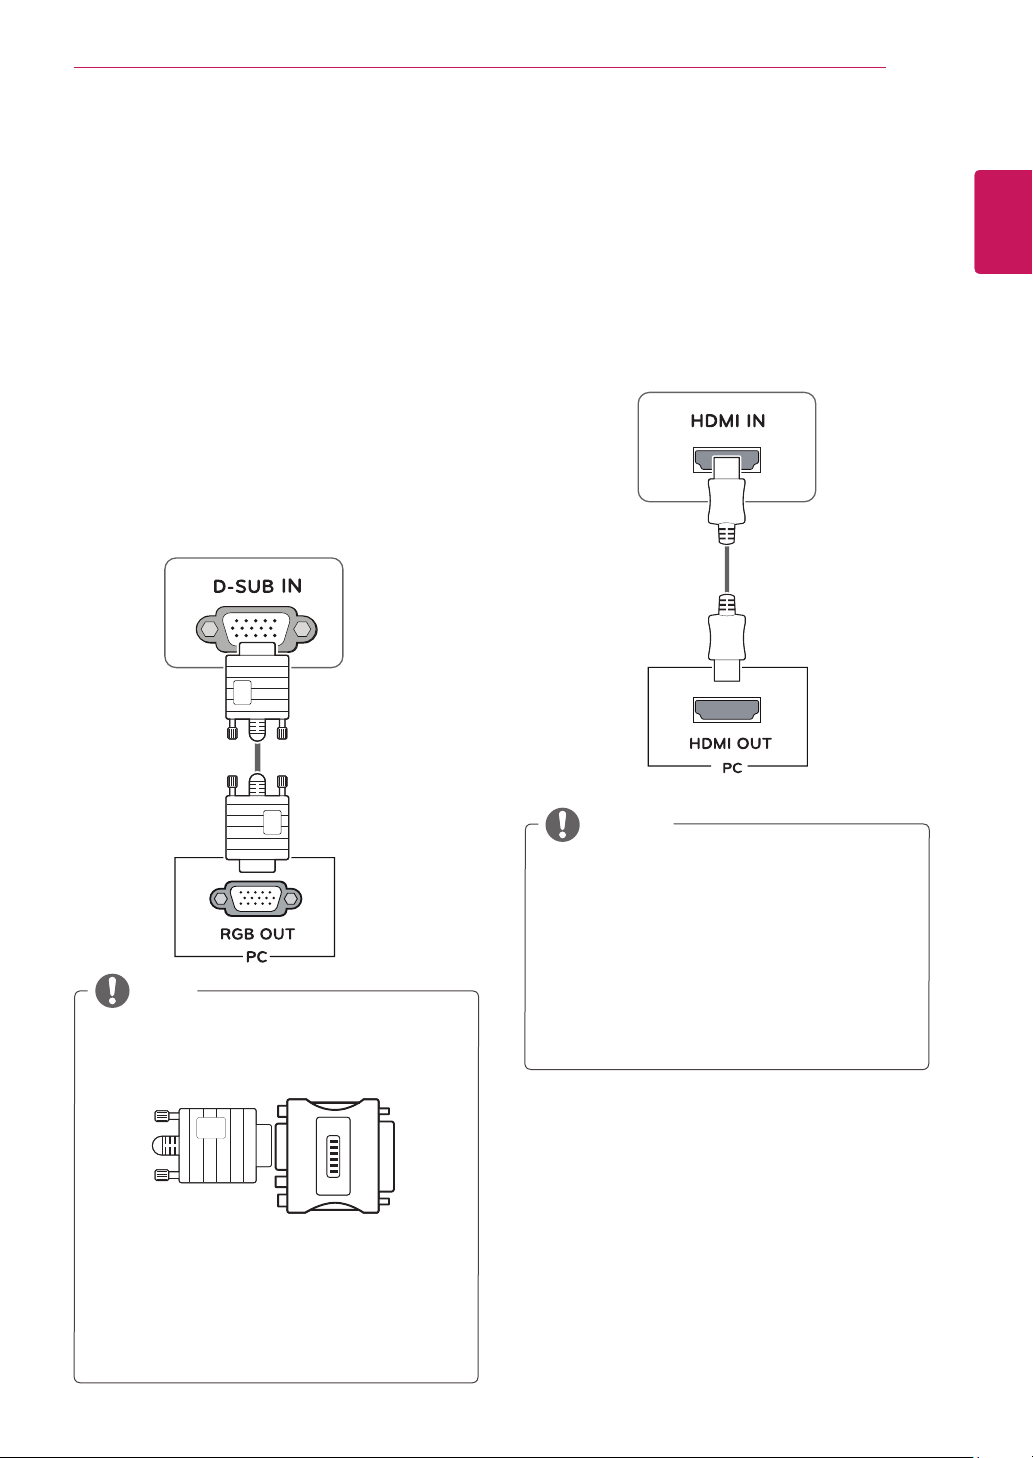
ConnectingtoaPC
YourMonitorsetsupportsPlug&Play*.
*Plug&Play:APCrecognizesaconnected
devicethatusersconnecttoaPCandturn
on,withoutdeviceconfigurationoruser
intervention.
D-SUBconnection
TransmitsanalogvideofromyourPCtothe
Monitorset.ConnectthePCandtheMonitorset
withthesuppliedD-sub15pinsignalcableas
showninthefollowingillustrations.
Macadapter
ForAppleMacintoshuse,aseparateplug
adapterisneededtochangethe15pin
highdensity(3row)D-SUBVGAconnector
onthesuppliedcabletoa15pin2row
connector.
WhenusingaD-Subsignalinputcable
connectorforMacintosh
NOTE
HDMIconnection
Transmitsthedigitalvideoandaudiosignalsfrom
yourPCtotheMonitorset.ConnectthePCand
theMonitorsetwiththeHDMIcableasshownin
thefollowingillustrations.
IfyouuseHDMIPC,itcancausecompatibility
problem.
UseacertifiedcablewiththeHDMIlogo
attached.IfyoudonotuseacertifiedHDMI
cable,thescreenmaynotdisplayora
connectionerrormayoccur.
RecommendedHDMIcabletypes
-High-SpeedHDMI
®
/
TM
Cable
-High-SpeedHDMI
®
/
TM
CablewithEthernet
NOTE
16
ENGLISH
USING THE MONITOR SET
Connectthesignalinputcable
andtightenitbyturningthe
screwsclockwise.
Donotpressthescreenwith
yourfingerforalongtimeasthismay
resultintemporarydistortiononthescreen.
Avoiddisplayingafixedimageonthe
screenforalongperiodoftimetoprevent
imageburn.Useascreensaverifpossible.
CAUTION
WhenyouwanttousetwoPCinourMonitor,
pleaseconnectthesignalcable(D-SUB/
HDMI/DP)respectivelyinMonitorset.
IfyouturntheMonitorsetonwhileitiscold,
thescreenmayflicker.Thisisnormal.
Somered,green,orbluespotsmayappear
onthescreen.Thisisnormal.
NOTE
ConnectingtoAVDevices
HDMIconnection
Transmitsthedigitalvideoandaudiosignalsfrom
yourAVdevicestothemonitor.ConnectyourAV
devicetothemonitorwiththeHDMIcableasil-
lustratedbelow.
IfyouuseHDMIPC,itcancausecompatibility
problem.
UseacertifiedcablewiththeHDMIlogo
attached.IfyoudonotuseacertifiedHDMI
cable,thescreenmaynotdisplayora
connectionerrormayoccur.
RecommendedHDMIcabletypes
-High-SpeedHDMI
®
/
TM
Cable
-High-SpeedHDMI
®
/
TM
CablewithEthernet
NOTE
Theremaybenovideooraudiooutput
dependingontheDPversionofthePC.
Ifyouusegenericcablesnotcertifiedby
LG,thescreenmaynotdisplayortheremay
beimagenoises.
DisplayPortconnection
Transmitsthedigitalvideoandaudiosignalsfrom
yourPCtothemonitor.ConnectyourPCtothe
monitorusingthedisplayportcableasillustrated
below.
Pressthemenubuttonandthenselecttheinput
optionfromtheinputmenu.
NOTE
17
ENG
ENGLISH
USING THE MONITOR SET
ConnectingtoExternalDevices
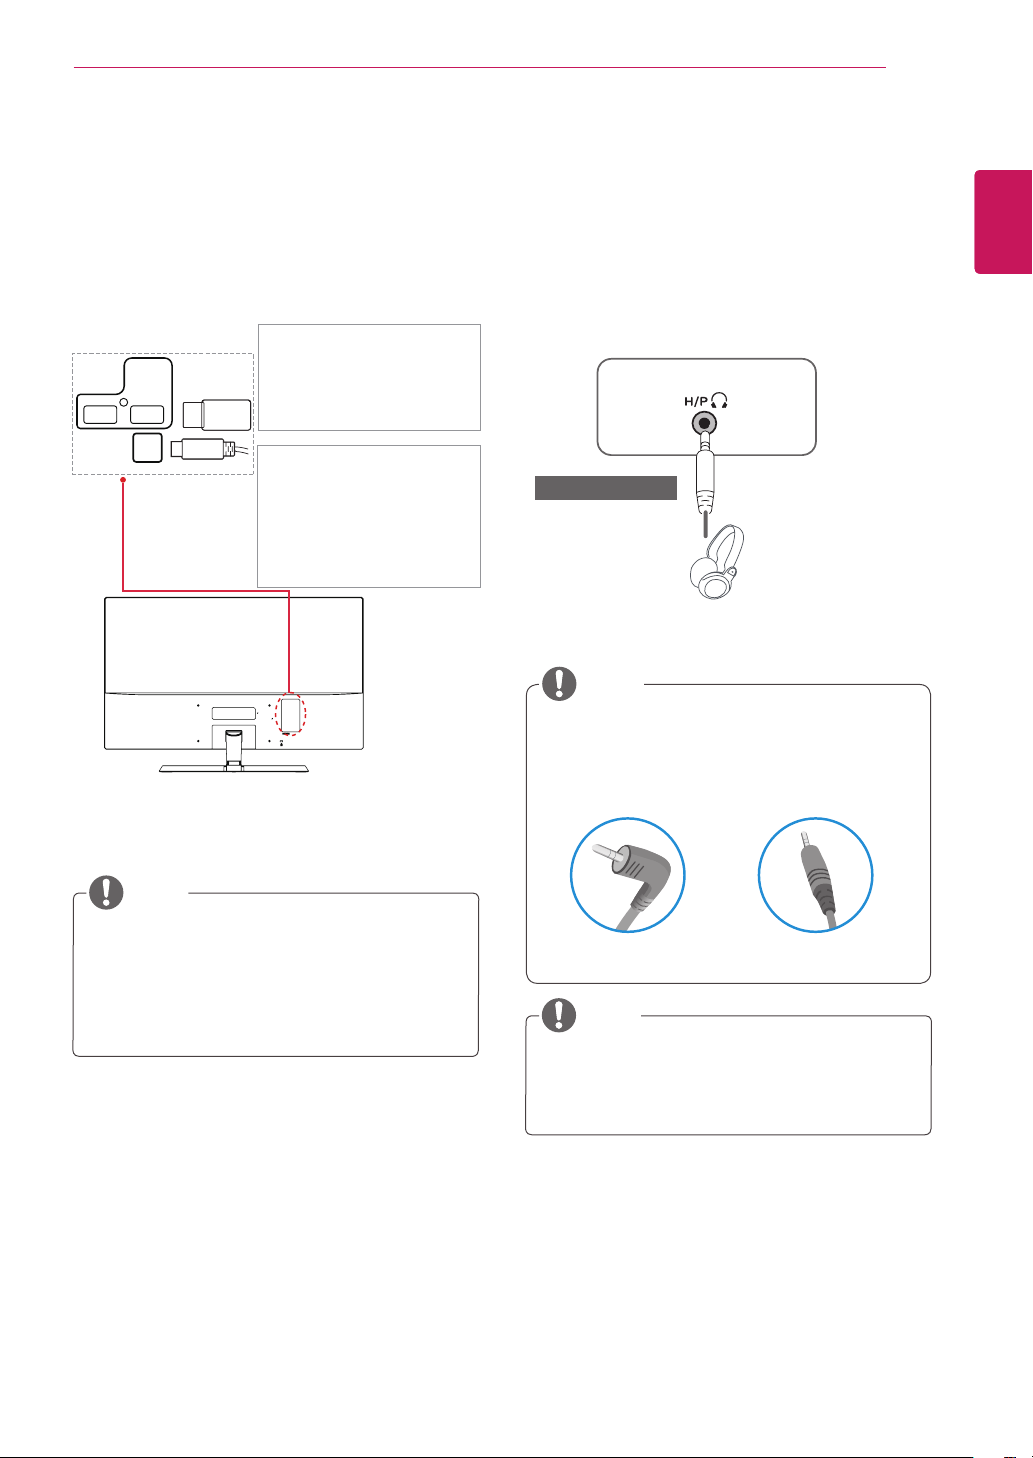
Peripheraldeviceconnection
Connectperipheraldevicestothemonitorusing
headphoneports.
Peripheraldevicesaresoldseparately.
Cableswithangledplugsmayhaveclear-
anceissues,usestraightplugswhenpos-
sible.
AngleType StraightType
NOTE
NOTE
Headphonesorspeakersmaynotworknor-
mally,dependingontheserverPCsettings.
(soldseparately)
ConnectingPeripherals
USBCableconnection-PC
TheUSBportontheproductfunctionsasaUSB
hub.
USB IN 1
USB IN 2
USB UP
NOTE
Themonitor'sUSBterminalsupportsUSB
2.0andhighspeedcables.
DP=DisplayPort
Thecableis
Separatepurchase
.
TwoUSBDownstreamports
Connecttheseportsto
amouse,USBkeyboard,
memorystickwithcurrent
specunder100mA.
OneUSBUpstreamport
Connectthisporttothe
downstreamportofacom-
puter,laptoporUSBmoni-
tor(YourcomputerorUSB
monitormustsupportUSB
andhaveUSBports).
18
ENG
ENGLISH
CUSTOMIZING SETTINGS
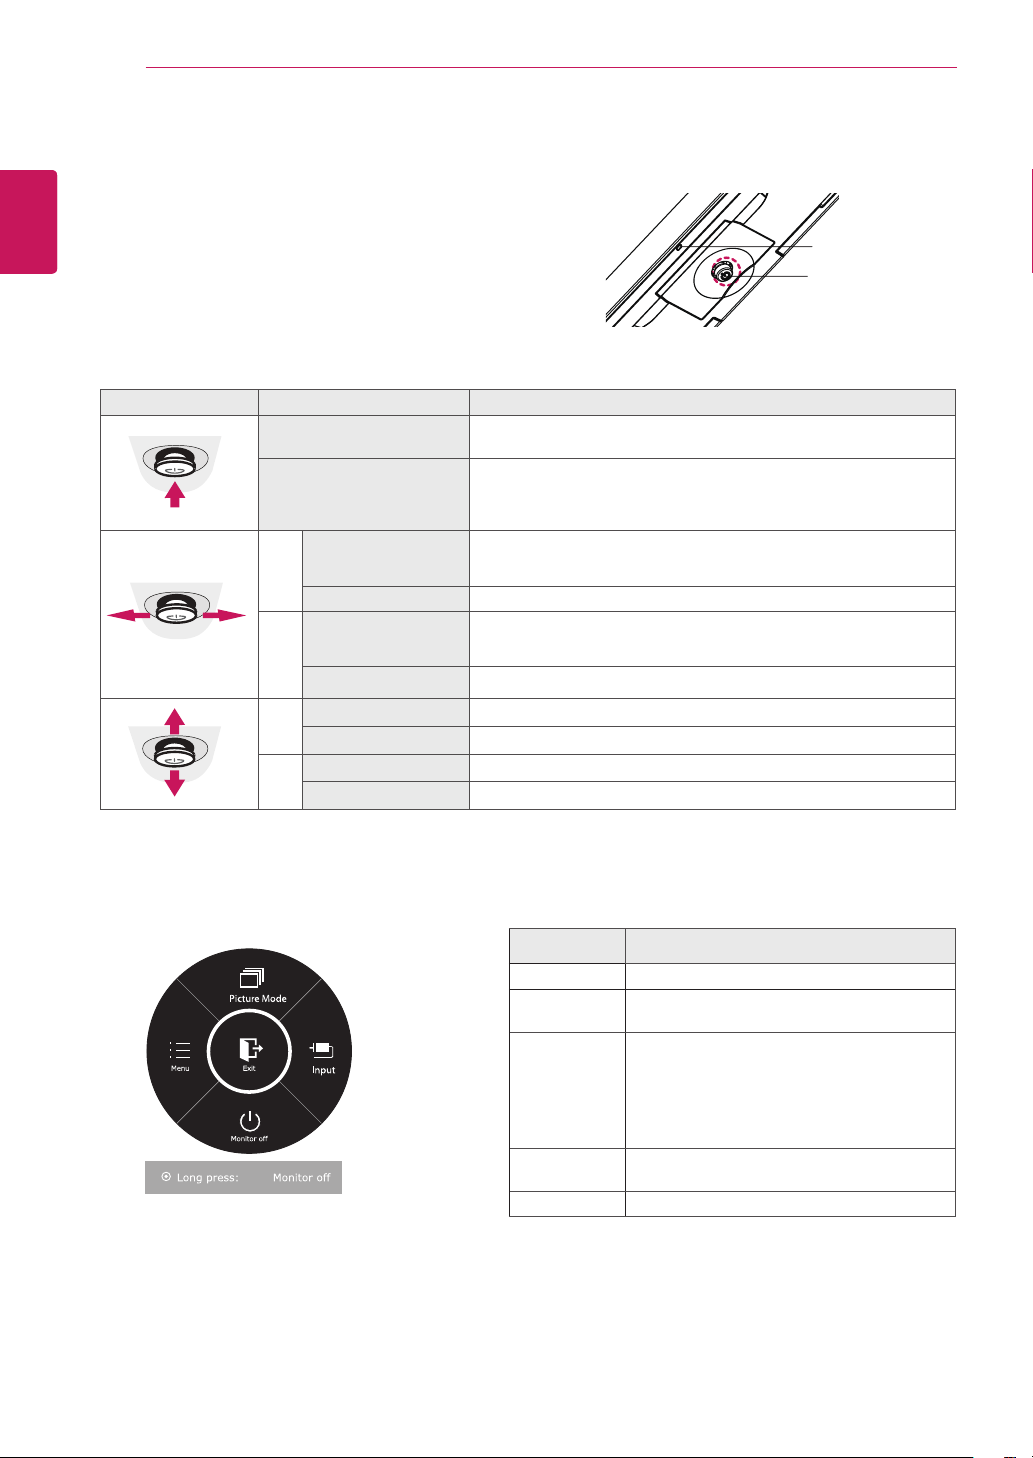
ActivatingtheMainMenu
Button MenuStatus Description
Mainmenudisabled
Enablesthemainmenu.
Mainmenuenabled
Exitsthemainmenu.
(Holdingdownthebuttontoturnoffthemonitor:Youcanturnoff
themonitorthiswayatanytime,includingwhentheOSDison.)
◄
Mainmenudisabled
Adjuststhemonitorvolumelevel.
Enablesthemainmenu.
Mainmenuenabled
Entersthemenufeatures.
►
Mainmenudisabled
Adjuststhemonitorvolumelevel.
Enablesthemainmenu.
Mainmenuenabled
OperatestheInputchange.
▲
Mainmenudisabled
Enablesthemainmenu.
Mainmenuenabled
Entersthepicturemodefeature.
▼
Mainmenudisabled
Enablesthemainmenu.
Mainmenuenabled
Turnsoffthemonitor.
MainMenuFeatures
MainMenu Description
Menu
Configuresthescreensettings.
PictureMode
Selectpicturemodetoachievethebest
displayeffect.
Input
Youcanoperatethechangeofinputsignals.
•Whentwoinputsignalsoverareconnectedand
selecttheinputmenu,inputsignal(D-SUB/HDMI/
DP)willbechangedsequentially.
•Whenonlyonesignalisconnected,itisauto-
maticallydetected.ThedefaultsettingisD-SUB.
Monitoroff
Turnsoffthemonitor.
Exit
Exitsthemainmenu.
CUSTOMIZINGSETTINGS
JoystickButton
PowerIndicator
1
Pressthejoystickbuttononthebottomofthemonitor.
2
Movethejoystickup/down(▲/▼)andleft/right(◄/►)to
settheoptions.
3
Pressthejoystickbuttononcemoretoexitthemain
menu.

19
ENG
ENGLISH
CUSTOMIZING SETTINGS
Eachoptionisdescribedbelow.
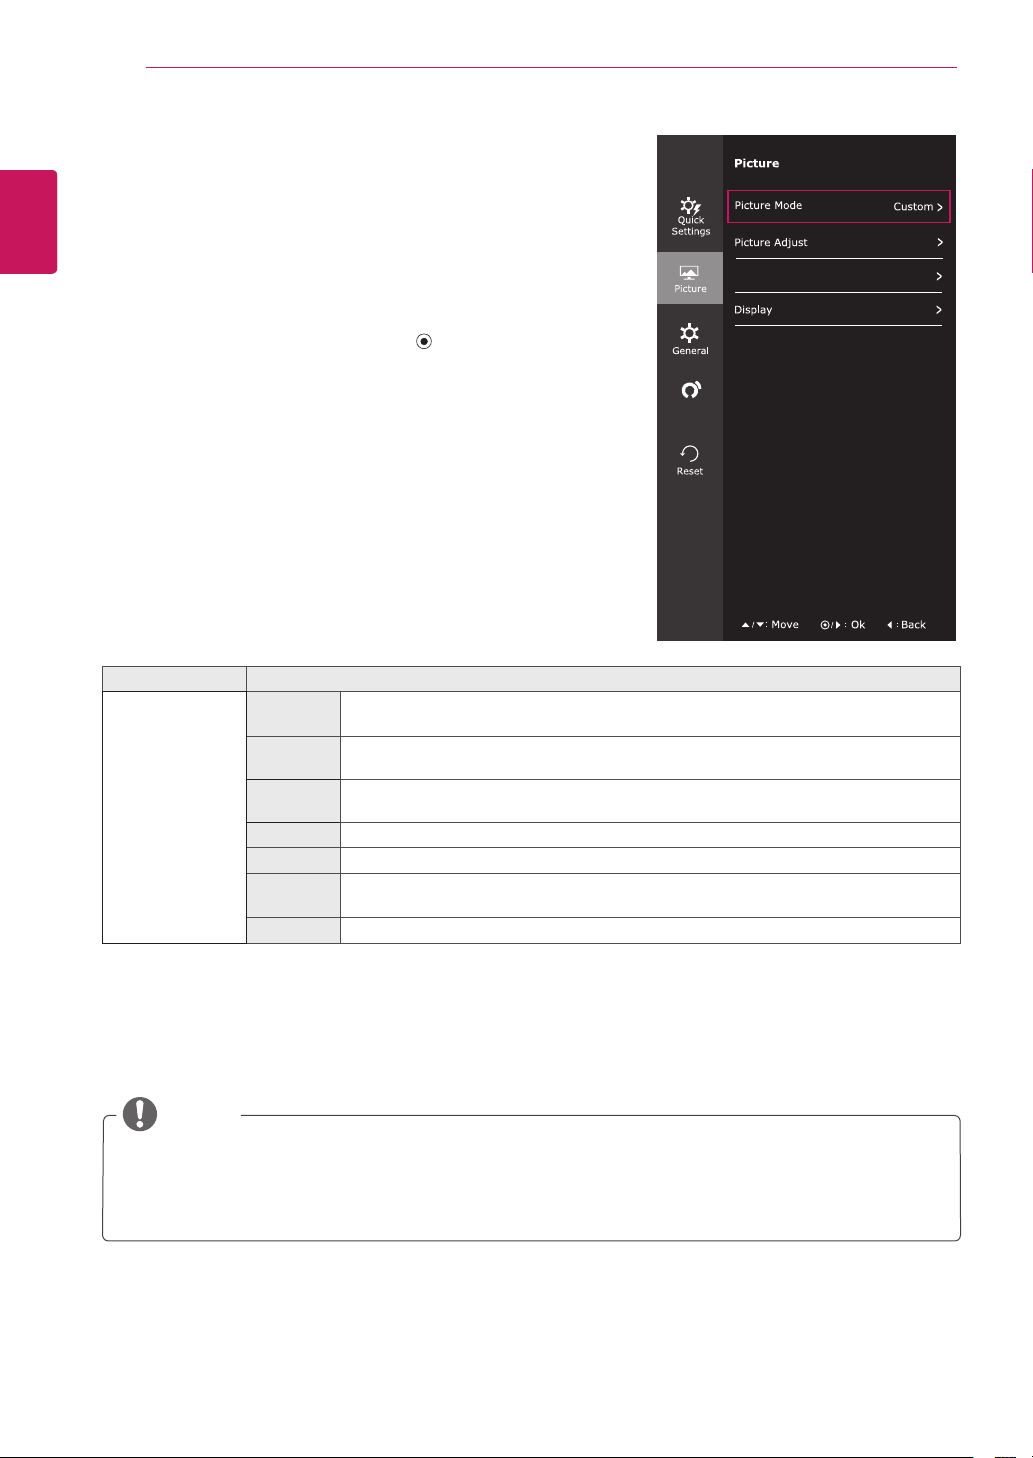
Customizingsettings
MenuSettings
-QuickSettings
1
Toviewthe
OSDmenu
,pressthe
joystickbutton
atthe
bottomofthemonitorandthenenterthe
Menu
.
2
Goto
QuickSettings>
Brightness
bymovingthejoystick.
3
Configuretheoptionsfollowingtheinstructionsthatappearinthe
bottomrightcorner.
4
Toreturntotheuppermenuorsetothermenuitems,movethe
joystickto◄orpressing( /OK)it.
5
IfyouwanttoexittheOSDmenu,movethejoystickto◄untilyou
exit.
Menu>QuickSettings Description
Brightness
Adjuststhecolorcontrastandbrightnessofthescreen.
Contrast
Volume Adjuststhevolume.
NOTE
Jogjoystickbuttondown(
)intheVolumemenuwill
enable/disabletheMutefunction.
Ratio Adjuststhescreenratio.
Wide Displaysthevideoinwide-screen,regardlessofthevideosignalinput.
Original Displaysavideoaccordingtotheinputvideosignalaspectratio.
SMARTENERGY
SAVING
High
EnablesSMARTENERGYSAVINGyoucansaveenergywiththisenergy-highefficient
function.
Low
EnablesSMARTENERGYSAVINGyoucansaveenergywiththisenergy-low
efficientfunction.
Off DisablesSMARTENERGYSAVING.
NOTE
ThedisplaymaylookthesameforWide,Originaloptionsattherecommendedresolution(1920x1080).
Theratioisdisabledintheinterlacedsignal.
Color Adjust
Auto
Configuration
*SMARTENERGYSAVING:Conserveenergybyusingluminancecompensationalgorithm.
SavingDatadependsonthePanel.So,thosevaluesshouldbedifferentfromeachpanelandpanel
vendor.IfoptionofSMARTENERGYSAVINGisHighorLow,monitorluminancebecomehigheror
lowerdependonsource.
NOTE
20
ENG
ENGLISH
CUSTOMIZING SETTINGS
Eachoptionisdescribedbelow.
-Picture
1
Toviewthe
OSDmenu
,pressthe
joystickbutton
at
thebottomofthemonitorandthenenterthe
Menu
.
2
Goto
Picture
bymovingthejoystick.
3
Configuretheoptionsfollowingtheinstructionsthat
appearinthebottomrightcorner.
4
Toreturntotheuppermenuorsetothermenuitems,
movethejoystickto◄orpressing( /OK)it.
5
IfyouwanttoexittheOSDmenu,movethejoystick
to◄untilyouexit.
Menu>Picture Description
PictureMode Custom Allowstheusertoadjusteachelement.Thecolormodeofthemainmenucanbead-
justed.
Reader1 Itisamodethatthescreenisadjustedtothebestforthenewspaper.Ifyouwant
screenmorebright,youcancontrolbrightnessinMenuOSD.
Reader2 Itisamodethatthescreenisadjustedtothebestforthecartoon.Ifyouwantscreen
morebright,youcancontrolbrightnessinMenuOSD.
Photo Optimizesthescreentoviewphotos.
Cinema Optimizesthescreentoimprovethevisualeffectsofavideo.
Color
weakness
Thismodeisforuserswhocannotdistinguishbetweenredandgreen.Itenablesusers
withcolorweaknesstoeasilydistinguishbetweenthetwocolors.
Game Optimizesthescreenforgameplay.
Color Adjust
Auto
Configuration
NOTE
Thisissubsidiaryforcolorweaknessuser.Thereforeifyoufeeluncomfortablewiththescreen,
pleaseturnoffthisfunction.
Thisfunctioncan’tdistinguishsomecolorsinsomeimages.
21
ENG
ENGLISH
CUSTOMIZING SETTINGS
PictureAdjust SUPERRESOLU-
TION+
High Optimizedpicturequalityisdisplayedwhenauser
wantscrystalclearimages.Itiseffectiveforhighquality
videoorgame.
Middle Theoptimizedpicturequalityisdisplayedwhena
userwantsimagesbetweenlowandhighmodesfor
comfortableviewing.ItiseffectiveforUCCorSD
video.
Low Theoptimizedpicturequalityisdisplayedwhenauser
wantssmoothandnaturalimages.Itiseffectivefor
slow-movingpicturesorstillimages.
Off Selectthisoptionforeverydayviewing.SUPER
RESOLUTION+isturnedoffinthismode.
Sharpness Adjuststhesharpnessofthescreen.
BlackLevel Setstheoffsetlevel(forHDMIonly).
Offset:
asareferenceforavideosignal,thisisthedarkestcolor
themonitorcandisplay.
High Keepsthecurrentcontrastratioofthescreen.
Low Lowerstheblacklevelsraisesthewritelevelsfrom
thecurrentcontrastratioofthescreen.
ResponseTime Setsaresponsetimefordisplayedpicturesbasedonthespeedof
thescreen.Foranormalenvironment,itisrecommendedthatyou
useNormal.Forafast-movingpicture,itisrecommendedthatyou
useHigh.
SettingtoHighmaycauseimagesticking.
High SetstheresponsetimetoHigh.
Middle SetstheresponsetimetoMiddle.
Low SetstheresponsetimetoLow.
Off SetstheresponsetimetoOff.
DFC Adjuststhebrightnessautomaticallyaccordingtothescreen.
BlackStabilizer BlackStabilizer
:Youcancontroltheblackcontrasttohavebettervisibilityindark
scenes.
IncreasingtheBlackStabilizervaluebrightensthelowgraylevel
areaonthescreen.(Youcaneasilydistinguishobjectsondark
gamescreens.)
ReducingtheBlackStabilizervaluedarkensthelowgraylevelarea
andincreasesthedynamiccontrastonthescreen.
22
ENG
ENGLISH
CUSTOMIZING SETTINGS
ColorAdjust Gamma Thehigherthegammavalue,thedarkertheimagebecomes.
Likewise,thelowerthegammavalue,thelightertheimage
becomes.Ifyoudonotneedtoadjustthegammasettings,select
Off.
ColorTemp Selectsthefactorydefaultpicturecolor.
Warm:
Setsthescreencolortoareddishtone.
Medium:
Setsthescreencolorbetweenaredandbluetone.
Cool:
Setsthescreencolortoabluishtone.
Custom
Red
Green
Blue
YoucancustomizethepicturecolorusingRed,
Green,andBluecolors.
SixColor Meetstheuserrequirementsforcolorsthroughadjustingthecolor
andsaturationofthesixcolors(
Red_Hue,Red_Saturation,Green_
Hue,Green_Saturation,Blue_Hue,Blue_Saturation,Cyan_Hue,
Cyan_Saturation,Magenta_Hue,Magenta_Saturation,Yellow_
Hue,Yellow_Saturation
)andsavingthesettings.
*Hue:Adjuststoneofthescreen.
*Saturation:Adjuststhesaturationofthescreencolors.Thelower
thevalue,lesssaturatedandbrightthecolorsbecome.Thehigher
thevalue,themoresaturatedanddarkthecolorsbecome.
Reset Returnsthecolorsettingstothedefaultsettings.
Display Horizontal Tomoveimageleftandright.
Vertical Tomoveimageupanddown.
Clock Tominimizeanyverticalbarsorstripesvisibleonthescreen
background.Thehorizontalscreensizewillalsochange.
Phase Toadjustthefocusofthedisplay.Thisitemallowsyoutoremove
anyhorizontalnoiseandclearorsharpentheimageofcharacters.
23
ENG
ENGLISH
CUSTOMIZING SETTINGS
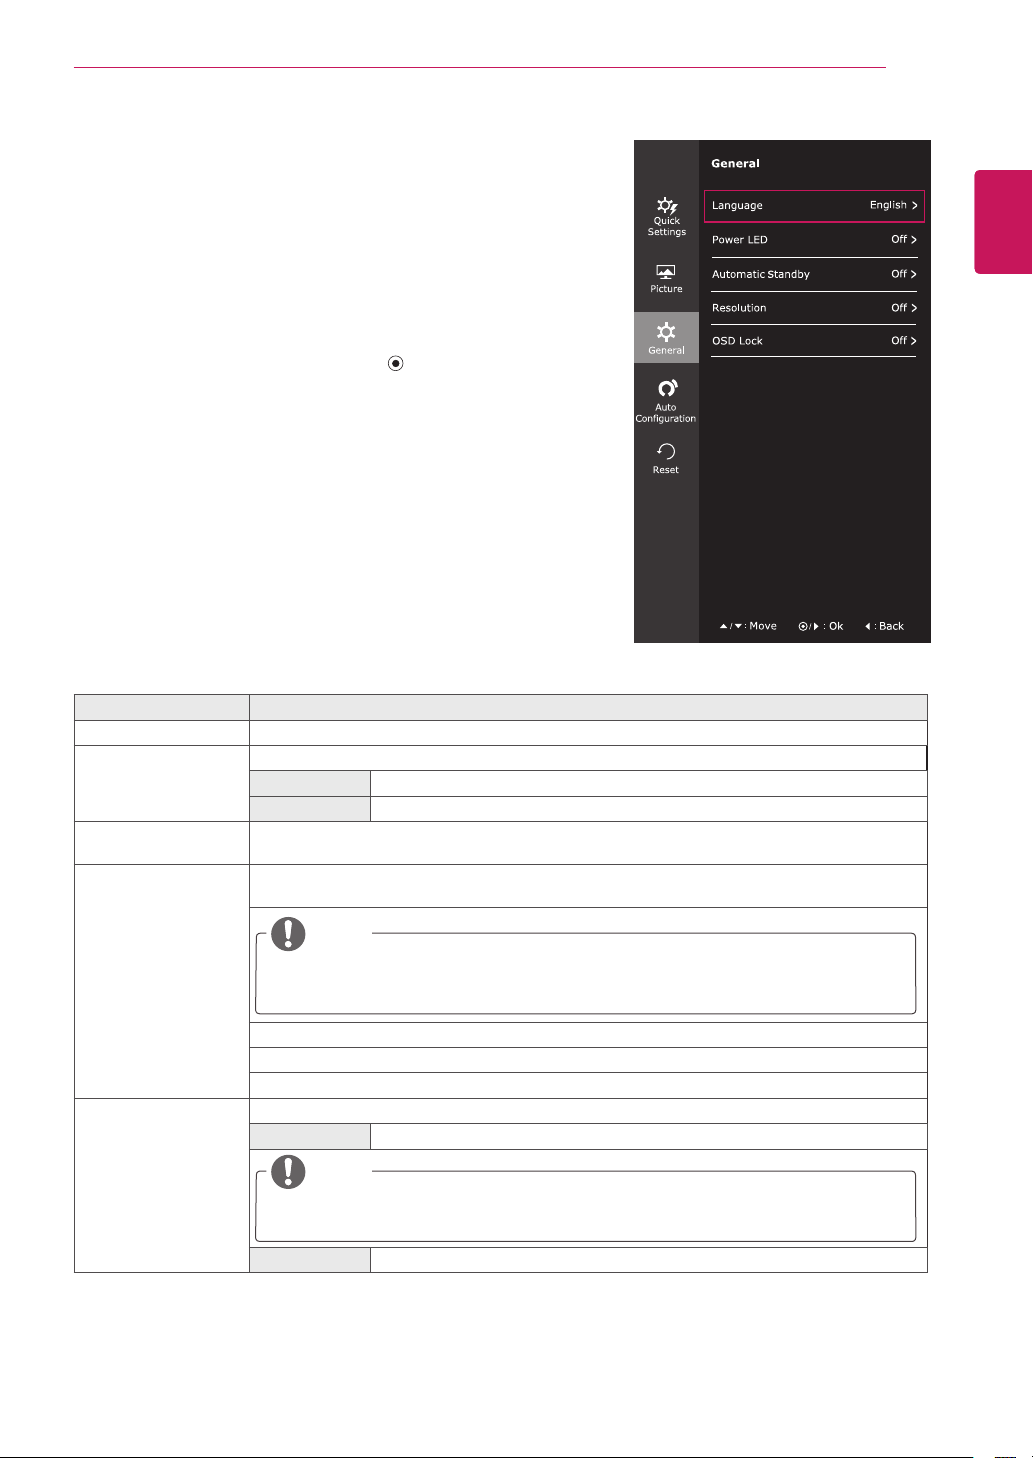
Menu>General Description
Language Tochoosethelanguageinwhichthecontrolnamesaredisplayed.
PowerLED Turnsthepowerindicatoronthefrontsideofthemonitoron/off.
On Thepowerindicatorisautomaticallyturnedon.
Off Thepowerindicatoristurnedoff.
AutomaticStandby Featurethatautomaticallyturnsoffthemonitorwhenthereisnomovementonthescreenfor
aperiodoftime.Youcansetatimerfortheauto-offfunction.(Off,4H,6H,and8H)
Resolution Usercansetthedesiredresolution.Thisoptionisenabledonlywhenthescreenresolutionon
yourcomputerissettothefollowing(D-SUBonly).
NOTE
Thefunctionisenabledonlywhenthescreenresolutiononyourcomputerissettothe
following,exceptthatthePCoutputwrongresolution.
1024x768,1280x768,1360x768,1366x768,Off
1280x960,1600x900,Off
1440x900,1600x900,Off
OSDLock Preventsincorrectkeyinput.
On Keyinputisdisabled.
NOTE
AllfunctionsexceptfortheOSDLockmodeandtheExitbuttonforBrightness,Con-
trast,Volume,Input,andGeneralaredisabled.
Off Keyinputisenabled.
-General
1
Toviewthe
OSDmenu
,pressthe
joystickbut-
ton
atthebottomofthemonitorandthenenterthe
Menu
.
2
Goto
General
bymovingthejoystick.
3
Configuretheoptionsfollowingtheinstructionsthat
appearinthebottomrightcorner.
4
Toreturntotheuppermenuorsetothermenuitems,
movethejoystickto◄orpressing( /OK)it.
5
IfyouwanttoexittheOSDmenu,movethejoystick
to◄untilyouexit.
Color Adjust
Auto
Configuration
Eachoptionisdescribedbelow.
24
ENG
ENGLISH
CUSTOMIZING SETTINGS
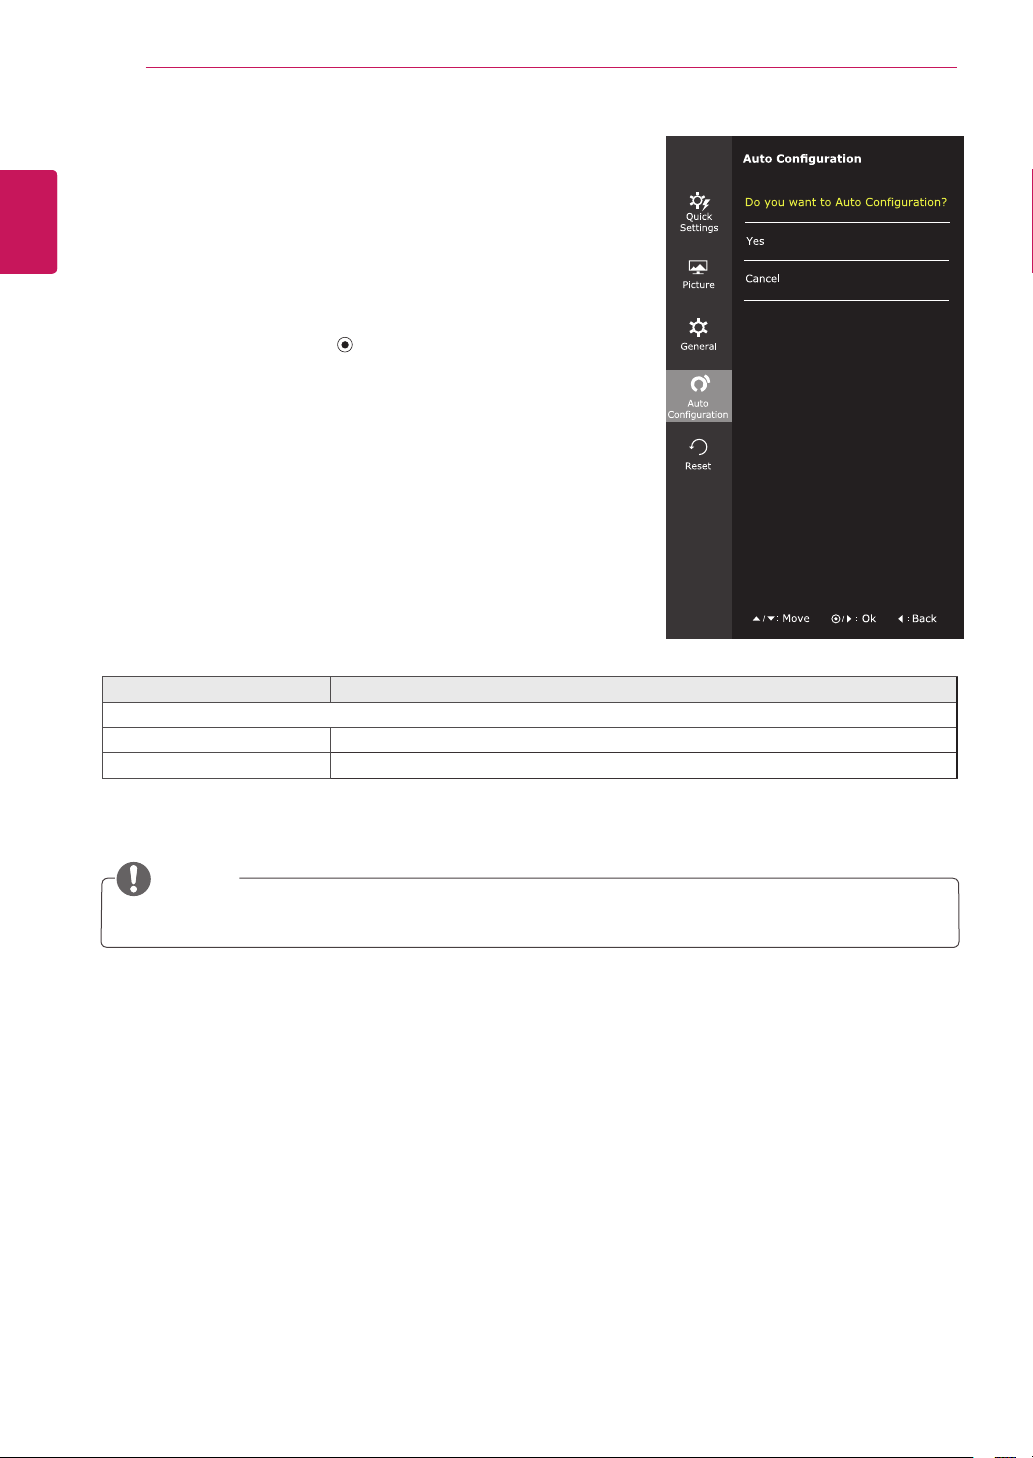
-AutoConfiguration
1
Toviewthe
OSDmenu
,pressthe
joystickbutton
atthe
bottomofthemonitorandthenenterthe
Menu
.
2
Goto
AutoConfiguration
bymovingthejoystick.
3
Configuretheoptionsfollowingtheinstructionsthatappearinthe
bottomrightcorner.
4
Toreturntotheuppermenuorsetothermenuitems,movethe
joystickto◄orpressing( /OK)it.
5
IfyouwanttoexittheOSDmenu,movethejoystickto◄until
youexit.
Eachoptionisdescribedbelow.
Menu>AutoConfiguration Description
DoyouwanttoAutoConfiguration?
Yes OperatetheAutoconfigurationforoptimaldisplayinD-SUB.
Cancel Canceltheselect.
Color Adjust
Auto
Configuration
NOTE
Thisfunctionwillbeenableonlyinanaloginput.
25
ENG
ENGLISH
CUSTOMIZING SETTINGS
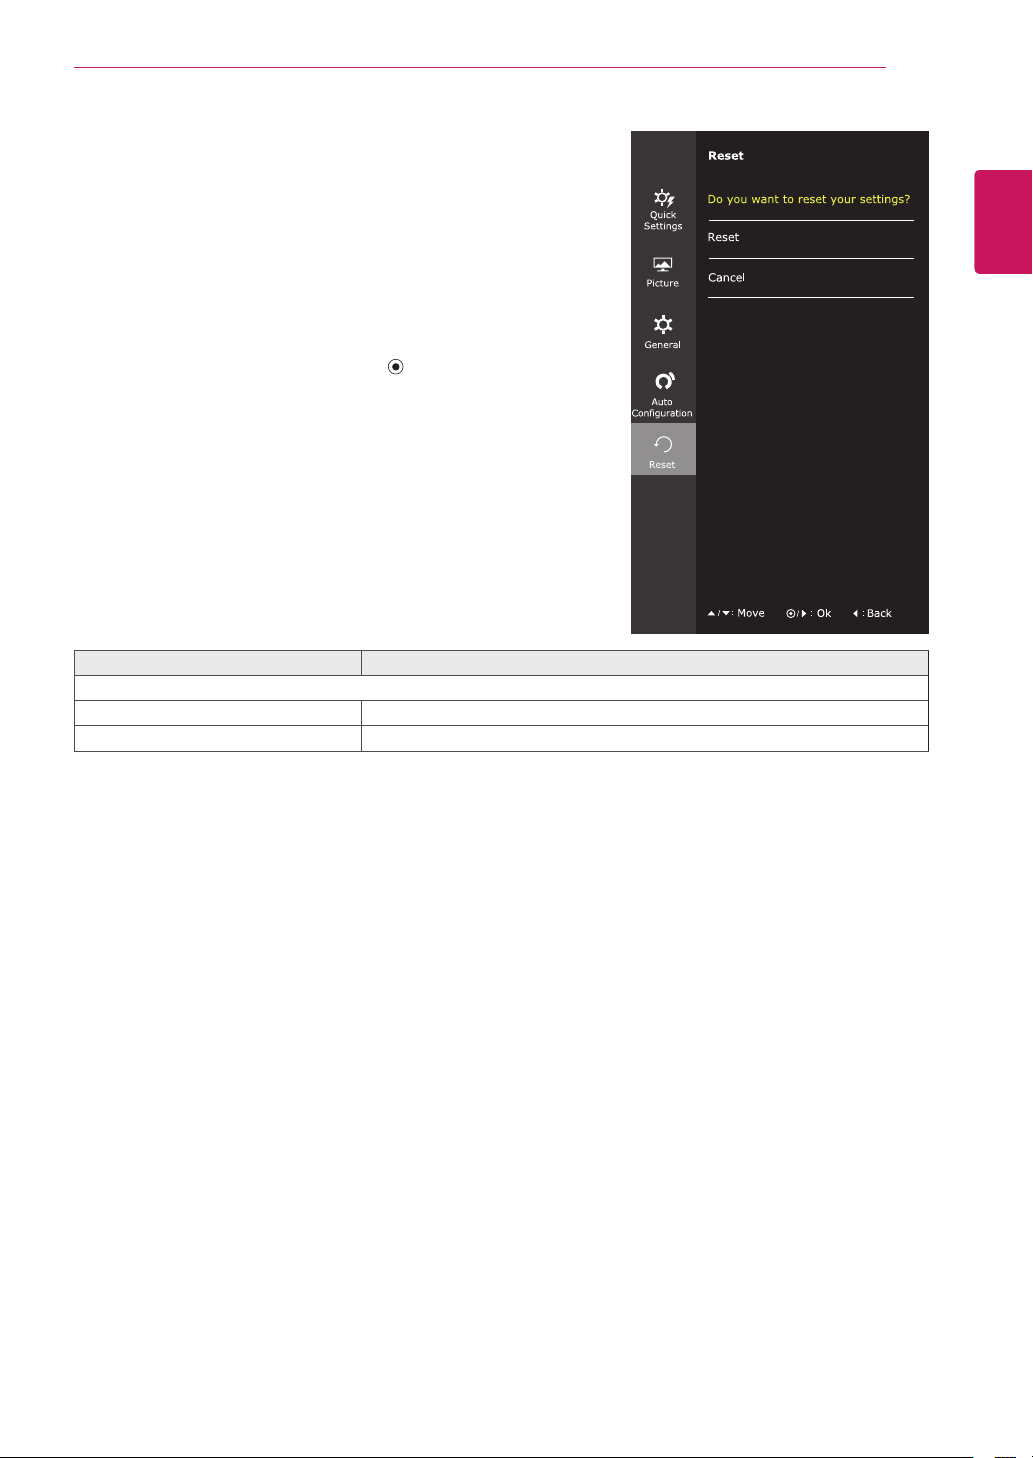
-Reset
1
Toviewthe
OSDmenu
,pressthe
joystickbut-
ton
atthebottomofthemonitorandthenenterthe
Menu
.
2
Goto
Reset
bymovingthejoystick.
3
Configuretheoptionsfollowingtheinstructionsthat
appearinthebottomrightcorner.
4
Toreturntotheuppermenuorsetothermenuitems,
movethejoystickto◄orpressing( /OK)it.
5
IfyouwanttoexittheOSDmenu,movethejoystick
to◄untilyouexit.
Eachoptionisdescribedbelow.
Menu>Reset Description
Doyouwanttoresetyoursettings?
Reset Returnstothedefaultsettings.
Cancel Canceltheselect.
Color Adjust
Auto
Configuration
26
ENG
ENGLISH
CUSTOMIZING SETTINGS
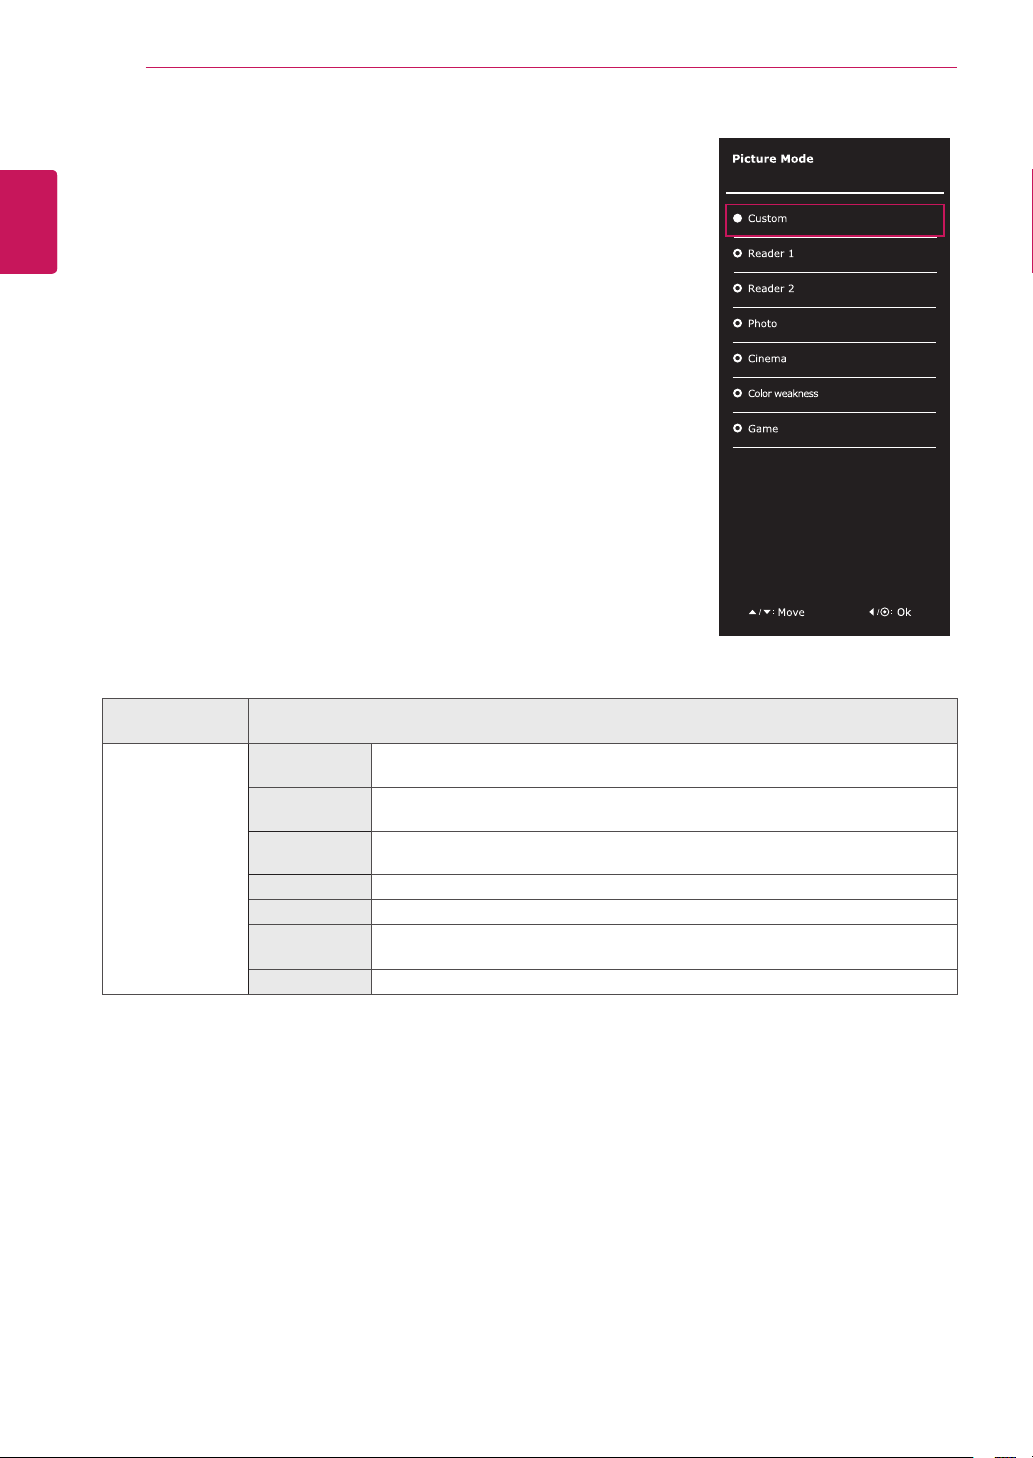
-Picturemode
1
Pressthejoystickbuttononthebottomofthemonitor.
2
Goto
Picturemode
bymovingthejoystickbuttonto▲.
3
Configuretheoptionsfollowingtheinstructionsthatappearinthe
bottom.
JoystickButton>
PictureMode
Description
PictureMode Custom Allowstheusertoadjusteachelement.Thecolormodeofthemainmenucanbe
adjusted.
Reader1 Itisamodethatthescreenisadjustedtothebestforthenewspaper.Ifyouwant
screenmorebright,youcancontrolbrightnessinMenuOSD.
Reader2 Itisamodethatthescreenisadjustedtothebestforthecartoon.Ifyouwant
screenmorebright,youcancontrolbrightnessinMenuOSD.
Photo Optimizesthescreentoviewphotos.
Cinema Optimizesthescreentoimprovethevisualeffectsofavideo.
Colorweak-
ness
Thismodeisforuserswhocannotdistinguishbetweenredandgreen.Itenables
userswithcolorweaknesstoeasilydistinguishbetweenthetwocolors.
Game Optimizesthescreenforgameplay.
Eachoptionisdescribedbelow.
Color Adjust
Auto
Configuration
27
ENG
ENGLISH
TROUBLESHOOTING
TROUBLESHOOTING
Checkthefollowingbeforecallingforservice.
Noimageappears
Isthepowercordofthedisplay
connected?
Checkandseeifthepowercordisconnectedproperlytothepower
outlet.
Isthepowerindicatorlighton?
PressthePowerbutton.
Isthepowerindicatorflickering?
Ifthedisplayisinpowersavingmode,trymovingthemouseor
pressinganykeyonthekeyboardtobringupthescreen.
TrytoturnonthePC.
Doyouseean"OUTOFRANGE"
messageonthescreen?
ThismessageappearswhenthesignalfromthePC(videocard)is
outofhorizontalorverticalfrequencyrangeofthedisplay.Seethe
'Specifications'sectionofthismanualandconfigureyourdisplay
again.
Doyouseea"NOSIGNAL"
messageonthescreen?
Afterthemonitorison"NOSIGNAL",themonitorgoestoDPMmode.
ThisisdisplayedwhenthesignalcablebetweenthePCandthe
monitorismissingordisconnected.Checkthecableandreconnectit.
Can'tyoucontrolsomefunctionsinOSD?
Can'tyouselectsomemenuin
OSD?
YoucanunlocktheOSDcontrolsatanytimebyenteringtheOSD
lockmenuandchangingitemstooff.
Displayimageisincorrect
DisplayPositionisincorrect.
EntertheAutoConfigurationfunctionandselectthe"Yes"itemto
automaticallyadjustyourdisplayimagetotheidealsetting.
Onthescreenbackground,vertical
barsorstripesarevisible.
EntertheAutoConfigurationfunctionandselectthe"Yes"itemto
automaticallyadjustyourdisplayimagetotheidealsetting.
Anyhorizontalnoiseappearingin
anyimageorcharactersarenot
clearlyportrayed.
EntertheAutoConfigurationfunctionandselectthe"Yes"itemto
automaticallyadjustyourdisplayimagetotheidealsetting.
CheckControlPanel►Display►Settingsandadjustthedisplayto
therecommendedresolutionoradjustthedisplayimagetotheideal
setting.Setthecolorsettinghigherthan24bits(truecolor).
28
ENG
ENGLISH
TROUBLESHOOTING
Check
ControlPanel►Display►Settings
andseeifthefrequencyortheresolutionwere
changed.Ifyes,readjustthevideocardtotherecommendresolution.
Iftherecommendedresolution(optimalresolution)isnotselected,lettersmaybeblurredandthe
screenmaybedimmed,truncatedorbiased.Makesuretoselecttherecommendresolution.
ThesettingmethodcandifferbycomputerandO/S(OperationSystem),andresolutionmentioned
abovemaynotbesupportedbythevideocardperformance.Inthiscase,pleaseasktothecomputer
orthevideocardmanufacturer.
CAUTION
Displayimageisincorrect
Thescreencolorismonoor
abnormal.
Checkifthesignalcableisproperlyconnectedanduseascrewdriver
tofastenifnecessary.
Makesurethevideocardisproperlyinsertedintheslot.
Setthecolorsettinghigherthan24bits(truecolor)at
ControlPanel
►
Settings
.
Thescreenblinks.
Checkifthescreenissettointerlacemodeandifyes,changeittothe
recommendresolution.
Doyouseean"Unrecognizedmonitor,Plug&Play(VESADDC)monitorfound"message?
Haveyouinstalledthedisplay
driver?
BesuretoinstallthedisplaydriverfromthedisplaydriverCD(or
diskette)thatcomeswithyourdisplay.Or,youcanalsodownloadthe
driverfromourwebsite:http://www.lg.com.
MakesuretocheckifthevideocardsupportsPlug&Playfunction.
Thescreenisflickering.
Didyouselecttherecommended
resolution?
IftheselectedresolutionisHDMI
1080i
60/50Hz,thescreenmay
beflickering.Changetheresolutiontotherecommendedresolution
1080P
.
29
ENG
ENGLISH
SPECIFICATIONS
SPECIFICATIONS
Display Screen Type Flat Panel Active matrix-TFT LCD
Anti-Glare coating
Pixel Pitch 0.36375 mm x 0.36375 mm (Pixel Pitch)
Resolution Max 1920 x 1080 @ 60 Hz
Recommend VESA 1920 x 1080 @ 60 Hz
Power
Consumption
On Mode : 27.7 W Typ. (ENERGY STAR® standard) *
37.6 W Typ. (Outgoing condition) **
Sleep Mode ≤ 0.3 W
Off Mode ≤ 0.3 W
Power Input 19 V
2.0 A
AC-DC Adapter
Type ADS-45SN-19-3 19040G, manufactured by SHENZHEN HONOR ELECTRONIC
or Type LCAP21C, manufactured by LIEN CHANG ELECTRONIC ENTERPRISE
or Type LCAP26B-E, manufactured by LIEN CHANG ELECTRONIC ENTERPRISE
OUTPUT: 19 V
2.1 A
Dimensions
(Width x Height x
Depth)
With Stand 726.6 mm x 491.9 mm x 204.8 mm
Without Stand 726.6 mm x 430.1 mm x 94.1 mm
Weight 6.5 kg
Tilt Range -5° to 10°
Environmental
conditions
Operating Temperature
Operating Humidity
0 °C to 40 °C
≤ 80 %
Storage Temperature
Storage Humidity
-20 °C to 60 °C
≤ 85 %
Sync Input Horizontal Frequency 30 kHz to 83 kHz (Automatic)
Vertical Frequency 47 Hz to 63 Hz(D-SUB)
47 Hz to 63 Hz(HDMI)
47 Hz to 63 Hz(DP)
Input Form Separate Sync.
Digital
Video Input Signal Input 15 pin D-SUB Connector,HDMI Connector
Input Form RGB Analog (0.7 Vp-p/ 75 ohm),Digital
Plug & Play DDC 2B(Analog),DDC 2B(HDMI),DDC 2B(DP)
Product specifications shown above may be changed without prior notice due to upgrade of product
functions.
* The power consumption level can be different by operating condition and monitor setting.
* The On mode power consumption is measured with ENERGY STAR® test standard.
** The On mode power consumption is measured with LGE test standard (Full White pattern , Maximum
resolution).
32MA68HY
30
ENG
ENGLISH
SPECIFICATIONS
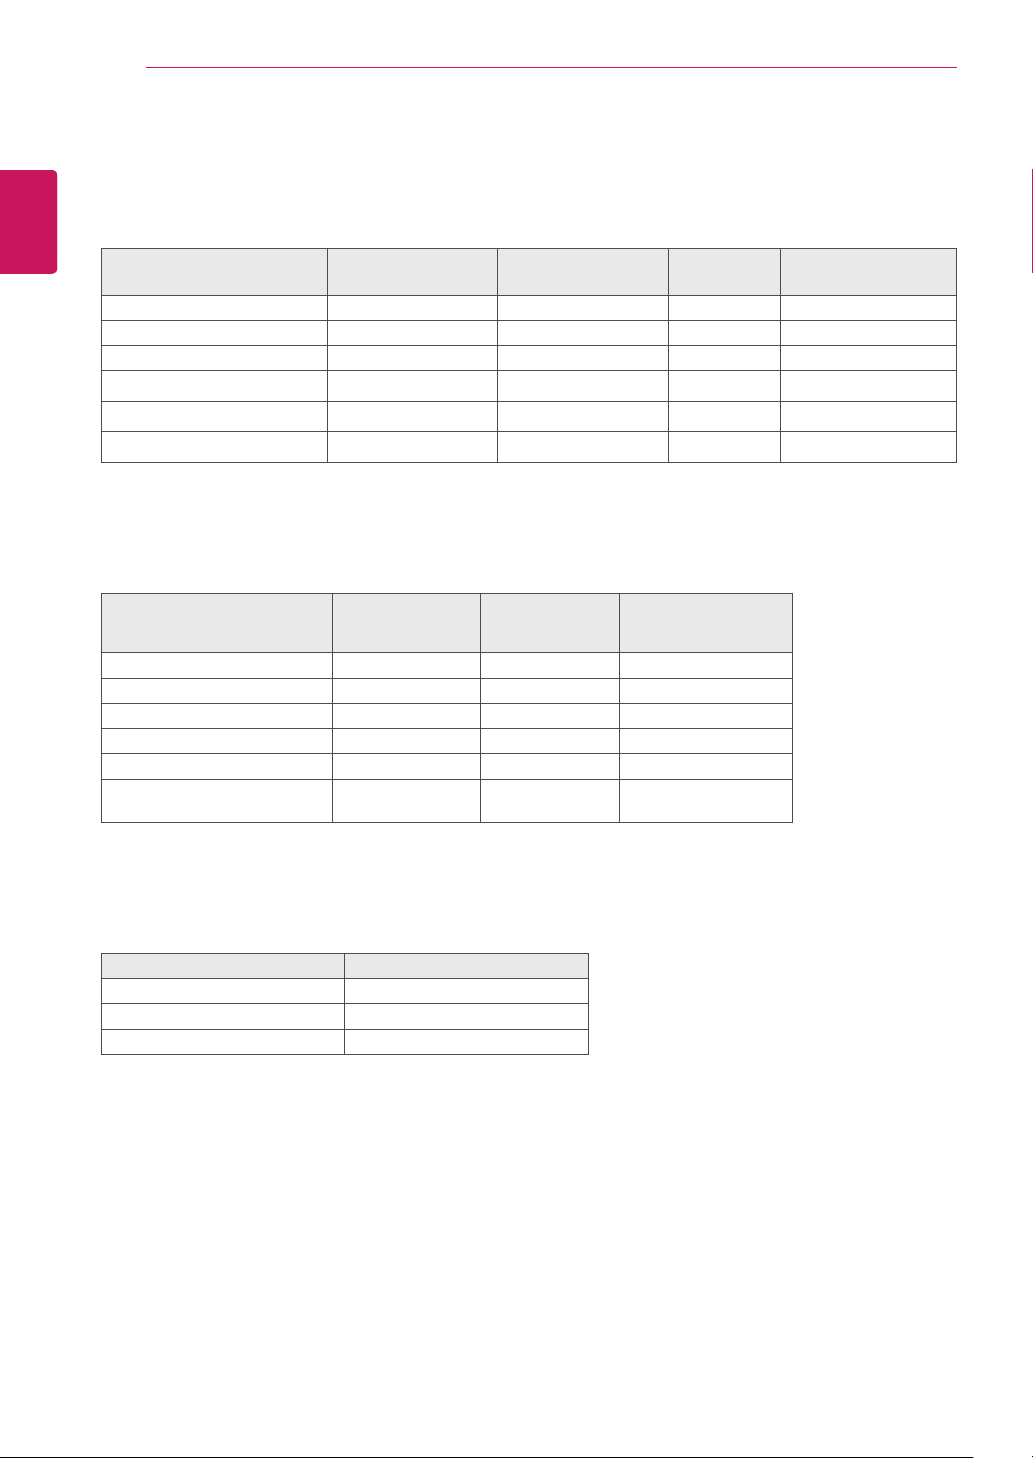
PresetModes(Resolution)
D-SUB/HDMI/DisplayPort
DisplayModes(Resolution)
Horizontal
Frequency(kHz)
Vertical
Frequency(Hz)
Polarity(H/V)
640x480 31.469 60 -/-
800x600 37.879 60 +/+
1024x768 48.363 60 -/-
1280x1024 63.981 60 +/+
1680x1050 65.290 60 -/+
1920x1080 67.5 60 +/+ RecommendMode
HDMI/DPTiming(Video)
Factorysupportmode
(PresetMode)
Horizontal
Frequency(kHz)
Vertical
Frequency(Hz)
HDMI
480P 31.50 60 O
576P 31.25 50 O
720P 37.50 50 O
720P 45.00 60 O
1080P 56.25 50 O
1080P 67.50 60
O
RecommendMode
Indicator
Mode LEDColor
OnMode White
SleepMode BlinkingWhite
OffMode Off

Make sure to read the Safety Precautions before
using the product.
Keep the Owner’s Manual (CD) in an accessible
place for future reference.
The model and serial number of the SET is
located on the back and one side of the SET.
Record it below should you ever need service.
MODEL
SERIAL
As an ENERGY STAR® Partner LGE
U. S. A., Inc. has determined that this
product meets the ENERGY STAR®
guidelines for energy efficiency.
ENERGY STAR® is a set of power-saving
guidelines issued by the U.S.Environmental
Protection Agency (EPA).
Refer to ENERGYSTAR.gov for more information
on the ENERGY STAR® program.