User manual Range
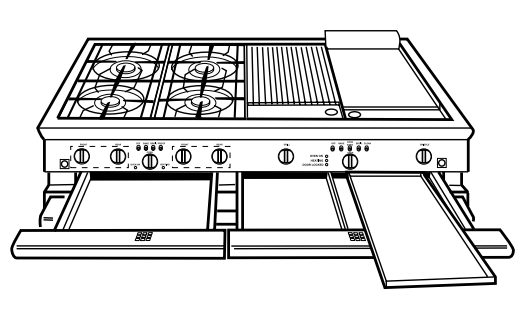
Features of Your Range
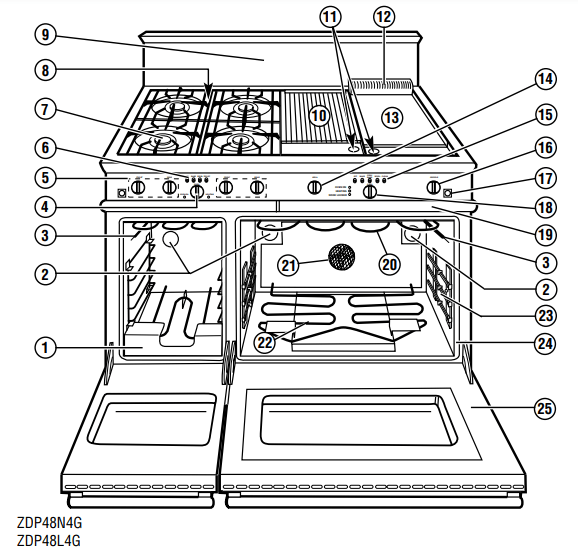


Surface Cooking
Control knobs
The control knobs are in front of the burner, grille or griddle they control. The oven and griddle controls are placed slightly lower than the surface burner control knobs.
The surface burners have an infinite number of heat settings as there are no fixed positions between HI and LO.
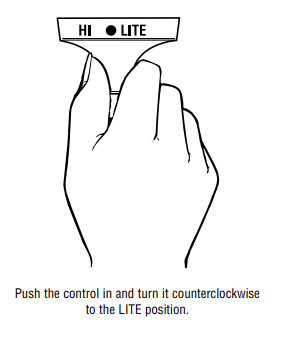
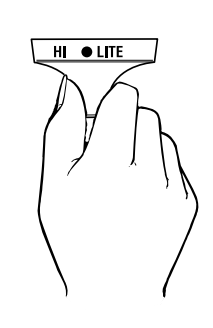
To turn ON a surface burner, push the control in, then turn it counterclockwise to the LITE position.
Check to be sure the burner you turned on is the one you want to use.
You will hear the ignitor click. When the gas is ignited all around the burner and into the central simmer burner below the simmer cap, turn the knob back to the desired setting.
When using the simmer burner, always ensure that it lights from the main burner.
Burners

Your new professional gas range is equipped with burners typical of those used in restaurants. These burners are designed in two pieces for easy cleaning and control.
The center, smaller cap covers and protects the simmer burner from boilovers that could put the flame out. This cap also spreads the simmer burner heat out to avoid too much heat being concentrated on the center of the pan.
The simmer burner is always on when the burner is in use. The burner should never be operated if the simmer cap is not in place.
The outer cap/port ring constitute the main burner and are in operation between the HI and LO settings.
The burners have electronic spark ignition to eliminate continuously burning pilots. When the outer cap/port ring is on and the flame is blown out, it will relight. The burners are rated at 15,000 BTU around the outer cap/port ring.
When turned to the simmer setting, only the center of the burner is lit, and it is rated at 500 BTU.
Electronic ignitors
NOTE: Keep the ignitor, ignitor cap and burner ports clean.
If a burner does not ignite, listen for the clicking sound. If the ignitor is not clicking, turn off the burner. Check the circuit breaker for a blown fuse or a tripped circuit breaker.
If the ignitor still fails to operate, check the Problem Solver in the back of this manual or the Power Failure information in this section.
NOTE: If you are using propane gas, a slight pop or flash may occur at the burner ports a few seconds after the burner has been turned off. This “extinction pop” is normal for propane gas.

Simmering
Your new professional gas range has exceptionally low simmering capabilities. The center simmer cap serves as a heat diffuser to spread out the heat to avoid having a center hot spot. Keep in mind that because of the high heat capacity of the outer burner, and the mass of the cast iron burner grates (they retain heat longer than lighter, conventional grates), some foods may continue to cook by retained heat after the burner has been turned off.
The simmer burner is lit from the outside burner flame.
The flame travels through the simmer ignition channels and crosses over onto the simmer burner located just beneath the simmer cap. When lighting only the simmer burner, always light the main burner first. This will in turn provide the ignition source for the simmer burner. Ensure that the simmer ports are lit before turning the control knob down to the simmer position. Should a strong draft or boilover extinguish the simmer flame, it will not relight automatically as the outer burner would.
Burner efficiency and flame characteristics
The burner flame should burn completely around and within the burner with no excessive noise or lifting. The flame should be blue in color and stable with no yellow tips.
An improper air-gas mixture may cause either a burner flutter or a yellow-tipped flame. A technician should adjust the flame.
During initial use, foreign particles in the gas line, or dust in the air or around the appliance may cause an orange flame. This will disappear with use.
Flame height
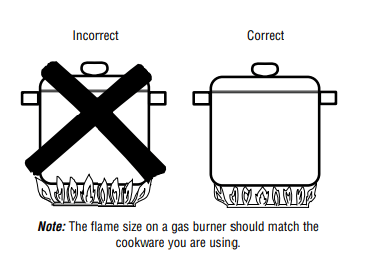
The correct height of the flame mainly depends on the size of the bottom of the cooking utensil, the material of the cooking utensil, the amount and type of food and the amount of liquid in the utensil.
For safe handling of cookware, never let the flame extend up the sides of the cookware. Any flame larger than the bottom of the cookware is wasted heat and only serves to heat the handle.
Watch the flame, not the knob, as you reduce heat.
- For safety reasons the flame must never extend beyond the bottom of the cooking utensil. Never allow flames to curl up the side of the pan.
- Be very careful if the pans have plastic handles, as these large professional-size burners can flame up on the outside of the pan and melt or bubble the handles.
- Utensils which conduct heat slowly (such as glass-ceramic) should be used with medium to low flames. If you are cooking with a large amount of liquid a slightly larger flame can be used.
Power failure
The electric ignition that lights the surface burners will not operate during a power failure.
To light the surface burners during a power failure, turn the control knob for the burner you want to light to LITE while holding a lighted match to the outer ring. After the flame is burning all the way around the burner, adjust the flame.
It is necessary to light each burner separately each time you want to use it during a power failure.
The grille or griddle (on some models), or oven sections can not be used during a power failure.
Cookware
Do not operate a burner for an extended period of time without cookware on the grate. The finish on the grate may chip without cookware to absorb the heat.
Aluminum: Medium-weight cookware is recommended because it heats quickly and evenly. Most foods brown evenly in an aluminum skillet. Use saucepans with tightfitting lids for cooking with minimum amounts of water.
Cast Iron: If heated slowly, most skillets will give satisfactory results.
Enamelware: Under some conditions, the enamel of some cookware may melt. Follow cookware manufacturer’s recommendations for cooking methods.
Glass: There are two types of glass cookware— those for oven use only and those for surface cooking (saucepans, coffee and teapots). Glass conducts heat very slowly.
Heatproof Glass-Ceramic: Can be used for either surface or oven cooking. It conducts heat very slowly and cools very slowly. Check cookware manufacturer’s directions to be sure it can be used on gas cooktops.
Stainless Steel: This metal alone has poor heating properties, and is usually combined with copper, aluminum or other metals for improved heat distribution. Combination metal skillets generally work satisfactorily if they are used at medium heat as the manufacturer recommends.
Wok: A large, professional-sized wok and wok ring, specially designed for use on this range, is available from your dealer. Ask for model ZXWK22Y.
Using the grille (on some models)
Before starting to cook on the grille, be sure the drip tray and liners are in place and that you have the grille racks turned to the side you want for cooking.
Preheat the grille for 15 minutes with the control knob set on HI. When the grille is preheated, place the food on the grille. Cook it to the desired doneness.
NOTE: The longer you preheat the grille, the darker the grille marks will be on your food.
During cooking it may be necessary to adjust the heat setting. The control knob may be set to any position between HI and LO.
For proper searing and browning the grille requires high heat.
With large pieces of meat or poultry you will need to turn the heat to a lower heat setting after the food has been seared. This lower heat setting will allow the food to cook through without burning the outside.
Marinades and barbecue sauce should be added toward the end of cooking time. The heat should be turned to low when sauces are added.
Do not leave the grille unattended while it is on.
When you are finished cooking, allow the grille and the drip trays to cool before cleaning them. They should be cleaned each time they are used
Excessive grille flareups and flaming
Occasionally grease drippings ignite. These drippings will create minor puffs of flame for a second or two. This is normal when cooking on a barbecue. You may find it handy to have a spray bottle filled with water to lightly spray the flare-up.
If the flame becomes excessive, remove the food from the grille. Lower the heat setting. Replace the food when the flare-up subsides.
To prevent flare-ups from happening, trim the fat from around the edges of steaks and chops, use hamburger that is lean, remove the fat from poultry, etc.
When turning any kind of meat or poultry, the melting fat will drop onto the briquettes and it may create a flare-up. If this happens, use a long-handled spatula to move the food to another area.
Before using the griddle (on some models)
The built-in griddle is made from Type 304 stainless steel, highly polished to provide a smooth cooking surface. It is normal for it to darken with use as oils cook onto the surface to provide a stick-resistant base or “seasoning.”
Since the griddle is made from stainless steel, the surface will not rust.
The griddle is thermostatically controlled and cycles on and off to maintain the set temperature.
The “HEATING” light indicates that the burner is on.
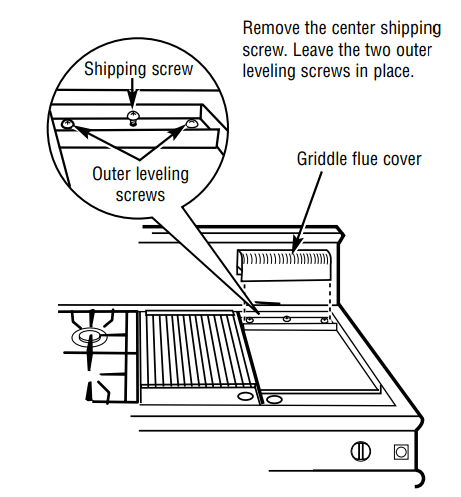
The griddle assembly is not to be removed for cleaning and is held in place by three rear screws. These screws keep the griddle from shifting in transit, and are also used for positioning to avoid breaking ignition components.
Once the unit is in position, the rear center shipping screw can be removed. It is located beneath the griddle flue cover. Remove the flue cover by lifting it straight up. Be careful not to scratch the backguard during removal of the flue cover.
The two outer screws are leveling screws. Do not remove these two screws. They can be turned to level the griddle or to provide a forward slope to help grease and oils to drain away from the food being cooked. After using the griddle a few times you will be able to judge the slope best for the foods you are cooking and your personal preference.
When replacing the griddle flue cover, ensure that the cover slips to the outside of the front and back metal flanges of the fixed griddle assembly.
This will ensure a tight fit of the flue cover.
Using the Oven
Oven shelves
To avoid possible burns, place the shelves in the correct position before you turn the oven on.
The correct shelf position depends on the kind of food and the browning desired.
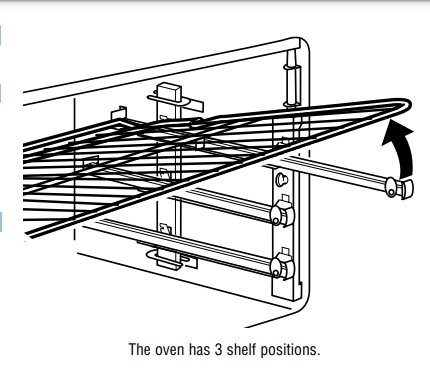
The shelves have stop-locks, so that when placed correctly on the supports, they will stop before coming completely out, and will not tilt.
When placing and removing cookware, pull the shelf out to the bump on the shelf support.
To remove a shelf, pull it toward you, tilt the front end up and pull it out.
To replace, place the end of the shelf (stoplocks) on the support, tilt up the front and push the shelf in.
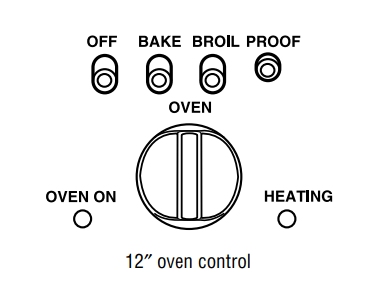
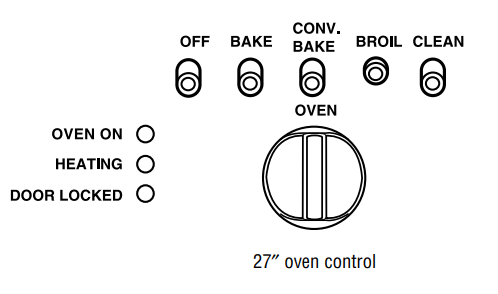
How to set the ovens for baking or roasting
- Push in the BAKE selector button on the side of the control panel above the oven you wish to use.
- Using the thermostat dial, set the desired temperature.
- The OVEN ON light turns on and remains on until the OFF selector button has been pushed or the thermostat dial has been turned to the OFF position.
- The HEATING light turns on. Once the HEATING light initially cycles off, the oven is preheated.
- Check the food for doneness at the minimum time on the recipe. Cook longer if necessary.
- Push in the OFF selector button on the side of the control panel above the oven you are using when baking is finished.
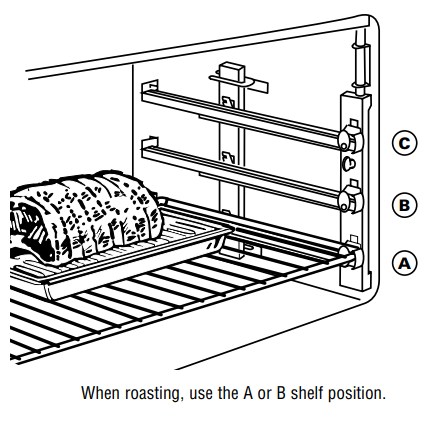
NOTE: When roasting, check the weight of the meat. Place the meat fat side up, or for poultry, breast side up, on the roasting grid in a shallow pan. The melting fat will baste the meat. Select a pan as close to the size of the meat as possible. (The broiler pan with grid is a good pan for this.)
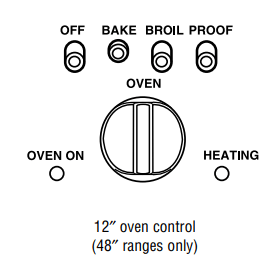
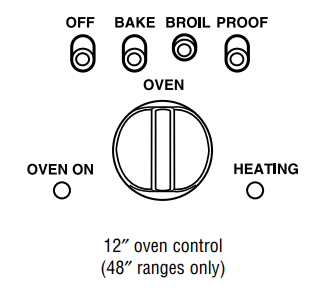
How to set the 12 ″ oven for proofing (48″ ranges only)
The proofing feature maintains a warm, non-drafty environment useful for proofing yeast-leavened products.
- Place the dough in a dish in the small oven.
- Push in the PROOF selector button on the left hand side of the control panel above the thermostat dial.
- The OVEN ON light and oven interior light turn on.
- The HEATING light will not turn on.
- The thermostat dial does not affect the proof temperature.
- Set a minute timer for the minimum proof time. When proofing is finished, push the OFF selector button.
- To avoid lowering the oven temperature and lengthening proofing time, do not open the oven door unnecessarily.
Proofing time may be decreased when you use the large oven at the same time you are proofing.
Check bread products early to avoid overproofing.
For optimum results, if you are using the large oven for extended periods of time, it is recommended that you complete the proofing before turning the large oven on.
NOTE: Do not use the proofing mode for warming food or keeping food hot. The proofing oven temperature is not hot enough to hold foods at safe temperatures (above 140°F.).
Baking pans/sheets
Use the proper baking pan. The type of finish on the pan determines the amount of browning that will occur.
- Dark, rough or dull pans absorb heat resulting in a browner, crisper crust. Use this type for pies.
- Shiny, bright and smooth pans reflect heat, resulting in a lighter, more delicate browning. Cakes and cookies require this type of pan or sheet.
- Glass baking dishes also absorb heat. When baking in glass baking dishes, the temperature may need to be reduced by 25°F.
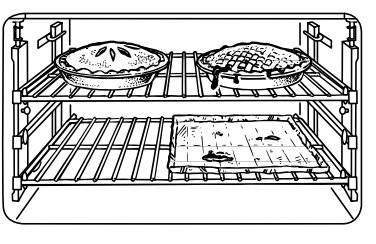
Pan placement
For even cooking and proper browning, there must be enough room for air circulation in the oven. Baking results will be better if baking pans are centered as much as possible rather than being placed to the front or to the back of the oven.
Pans should not touch each other or the walls of the oven. Allow 1- to 11 space between pans as well as from the back of the oven, the door and the sides.
If you need to use two shelves, stagger the pans so one is not directly above the other. Check the food on the bottom shelf sooner than the minimum time. The food on the lower shelf may cook slightly faster than the food on the upper shelf.
Preheating
Preheat the oven if the recipe calls for it. To preheat, set the oven at the correct temperature—selecting a higher temperature does not shorten preheat time.
Preheating is necessary for good results when baking cakes, cookies, pastry and breads
Aluminum foil
Never entirely cover a shelf with aluminum foil. This will disturb the heat circulation and result in poor baking. A smaller sheet of foil may be used to catch a spillover by placing it on a lower shelf several inches below the food.
What is convection cooking?
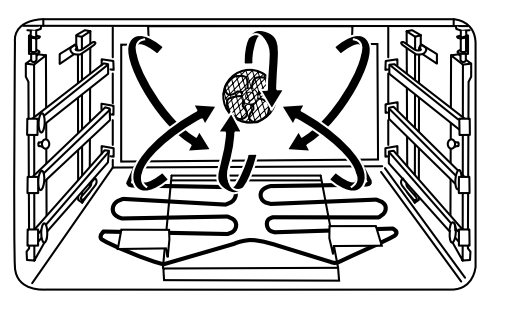
In a convection oven, a fan circulates the heated air evenly, over and around the food.
This circulating hot air is evenly distributed throughout the oven cavity. As a result, foods are evenly cooked and browned—often in less time with convection heat. Preheating is not necessary with foods having a bake time of over 15 minutes.
- Food is heated faster in a convection oven.
- When using the convection feature, many types of food can be cooked at lower temperatures than those suggested for regular ovens.
- Good for large quantities of baked foods.
- Good results with cookies, biscuits, brownies, cream puffs, sweet rolls, angel food cake and bread.
- Ideal for baked foods cooked on two or three shelves. Because heated air is circulated evenly throughout the oven, foods can be baked with excellent results on two or three shelves at a time. Multi-shelf baking may increase cook times slightly for some foods, but the overall result is time saved. Multi-shelf baking provides very good results with cookies, biscuits and other quickbreads.
- Recipe books often give times and temperatures for cooking in regular ovens. Convection ovens make it possible to reduce the temperature by 25°F.
- Check foods for doneness at the minimum suggested cooking time.
- Some package instructions for frozen casseroles or main dishes have been developed using commercial convection ovens. For best results in this oven, preheat the oven and use the temperature on the package.
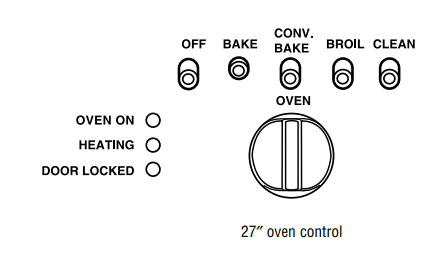
How to set the 27 ″ oven for convection baking
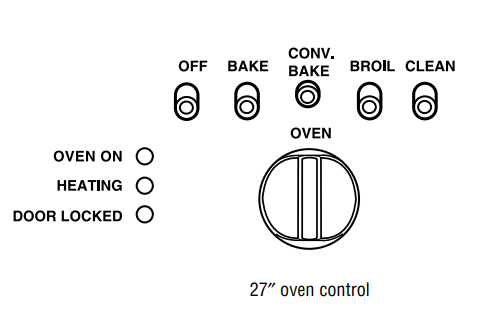
- Push in the CONV. BAKE selector button on the right hand side of the control panel above the thermostat dial (close to the center on 36″ ranges).
- Using the thermostat dial, set the desired temperature.
- The OVEN ON light turns on and remains on until the OFF selector button has been pushed or the thermostat dial has been turned to the OFF position.
- The HEATING light turns on. Once the HEATING light initially cycles off, the oven is preheated.
- Check the food for doneness at the minimum time on the recipe. Cook longer if necessary.
- Push in the OFF selector button on the right hand side of the control panel above the thermostat dial when convection baking is finished.
Convection cookware
Before using your convection oven, check to see if your cookware leaves room for air circulation in the oven. If you are baking with several pans, leave space between them. Also, be sure the pans do not touch each other or the walls of the oven. Use the pan size recommended in the recipe.
When baking cookies, you will get the best results if you use a flat cookie sheet instead of a pan with low sides.
For recipes like oven-baked chicken, you should use a pan with low sides. Hot air cannot circulate well around food in a pan with high sides.
Metal and Glass
Any type of cookware will work in your convection oven. However, metal pans heat the fastest and are recommended for convection baking.
- Darkened or matte-finished pans will bake faster than shiny pans.
- Glass or ceramic pans cook more slowly.
Paper and Plastic
Heat-resistant paper and plastic containers that are recommended for use in regular ovens can be used in convection ovens. Plastic cookware that is heat-resistant to temperatures of 400°F. can also be used.
How to set the ovens for broiling
- If the meat has fat or gristle around the edge, cut vertical slashes through both about 2″ apart. If desired, the fat may be trimmed, leaving a layer about 1/8″ thick.
- Place the meat or fish on the broiler grid in the broiler pan. Always use the grid so that any fat will drip into the broiler pan; otherwise the juices may become hot enough to catch on fire.
- Position a shelf on the recommended shelf position as suggested in the Broiling Guide.
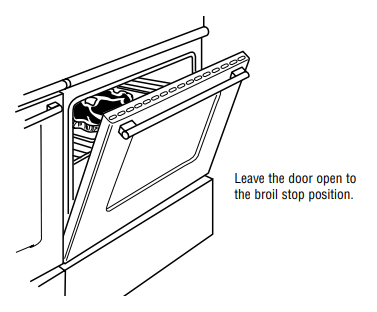
- Leave the door open to the broil stop position. The door stays open by itself, yet the proper temperature is maintained in the oven.
- Push in the BROIL selector button on the side of the control panel above the oven you wish to use.
- NOTE: A cooling fan will be activated when the
- Turn the control knob below the selector button to BROIL.
- The broiler does not need to be preheated for most broiling. However, foods that cook quickly, such as thin strips of meat or fish may require a short preheating period of 2 to 3 minutes to allow the food surface to brown in the same time the food takes to be cooked throughout.
- Turn the food only once during broiling. Time the foods for the first side according to the Broiling Guide.
- When broiling is finished, push in the OFF selector button.
Aluminum foil
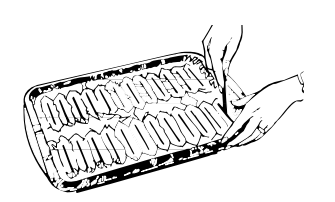
You can use aluminum foil to line the broiler pan and broiler grid. However, you must mold the foil tightly to the grid and cut slits in it just like the grid.
Oven
Before a clean cycle
NOTE: When the 27″ oven is set for selfcleaning, only the surface burners may be used. The 12″ oven, the griddle and/or the grille cannot be used.
The range must be completely cool in order to set the self-clean cycle.
We recommend venting with an open window or using a ventilation fan or hood during the first self-clean cycle.
Remove all cookware and any aluminum foil from the oven.
Remove the oven shelves and shelf slide assembly.
Make sure the oven light bulb cover is in place and the oven light is off.
Do not use commercial oven cleaners or oven protectors in or near the self-cleaning oven.
Oven shelf slide assembly
An interlock system has been designed so that the self-clean cycle will not start until the shelf slide assemblies have been removed.
The roller-assisted shelf supports are designed to withstand standard baking temperatures.
They will not withstand the extreme temperatures of self-cleaning.
To remove the slide assemblies:
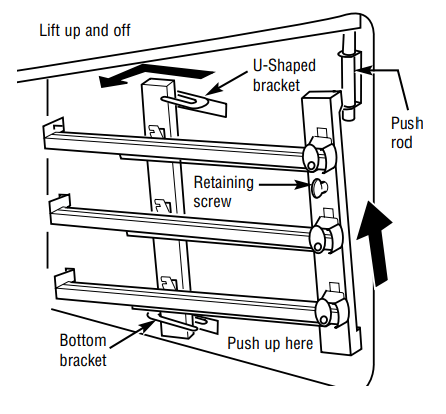
- Loosen the retaining screws on both sides of the oven.
- Lift up slightly and pull the entire assembly out. Set aside.
To replace the slide assemblies:

When self-cleaning is finished, and the oven has cooled, replace the assemblies and retaining screws.
- Guide the rear of the shelf slide assembly into the bottom rear bracket.
- Guide the top rear of the shelf slide assembly into the top “U”-shaped bracket.
- Lift up the push rod so that it rests on the ledge of the side support of the assembly.
- Reattach the assembly securely to the oven with the retaining screw. Repeat for the other side of the oven.
After a clean cycle
If white spots remain, remove them with warm sudsy water and rinse thoroughly with a vinegar and water mixture. These deposits are usually a salt residue that cannot be removed by the clean cycle.
If the oven is not clean after one clean cycle, repeat the cycle.
You may notice some white ash in the oven. Wipe it up with a damp cloth after the oven cools.
Control panel and knobs
Clean up spatters with a damp cloth. Remove heavier soil with warm, soapy water.

Do not use abrasives of any kind on the control panel.
The control knobs may be removed for easier cleaning. To remove a knob, pull it straight off the stem. Wash the knobs in soap and water but do not soak.
Oven heating elements
Do not clean the bake elements or the broil elements. Any soil will burn off when the elements are heated.
The bake elements can be lifted gently to clean the oven floor. If spillovers, residue or ash accumulate around the bake elements, gently wipe around the element with warm water.
Oven shelves
Clean the shelves with an abrasive cleanser or steel wool. After cleaning, rinse the shelves with clean water and dry with a clean cloth.
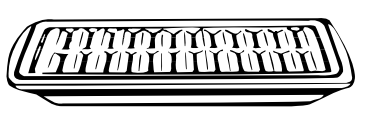
Ceramic briquettes
The layer of ceramic briquettes, under the grille racks, will last for many years with proper care.
Burned-on food particles and ash can be emptied off the radiant tray when cool by shaking over a waste receptacle.
Chipping or cracking of the briquettes may occur as they may get brittle with age, depending on the frequency of use. This is normal and does not affect the performance.
Do not replace the radiant tray/briquettes with alternates.
Stainless steel
Do not use a steel-wool pad; it will scratch the surface.
To clean the stainless steel surface, use a hot, damp cloth with a mild detergent suitable for stainless steel surfaces. Use a clean, hot, damp cloth to remove soap. Dry with a dry, clean cloth.
If food soil remains, try a general kitchen cleaner, such as Fantastik®, Simple Green® or Formula 409®.
For hard-to-clean soil, use a standard stainless steel cleaner, such as Bon-Ami® or Cameo®.
Apply cleaner with a damp sponge. Use a clean, hot, damp cloth to remove cleaner. Dry with a dry, clean cloth. Always scrub lightly in the direction of the grain.
After cleaning, use a stainless steel polish such as Stainless Steel Magic®, Revere Copper and Stainless Steel Cleaner®, or Wenol All Purpose Metal Polish®. Follow the product instructions for cleaning the stainless steel surface.
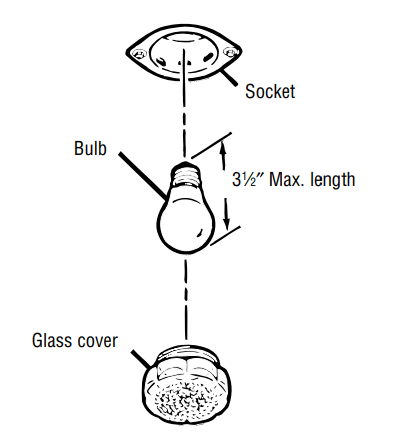
Oven light
NOTE: The glass cover should be removed only when cold. Wearing latex gloves may offer a better grip.
The light bulb is located on the back of the oven. Before replacing the bulb, disconnect electrical power to the range at the main fuse or circuit breaker panel.
Let the bulb cool completely before removing it. For your safety, do not touch a hot bulb with a damp cloth. If you do, the bulb will break.
To remove:
Turn to remove the cover, then remove the bulb.
To replace:
Put in a new 40-watt appliance bulb. A 40-watt appliance bulb is smaller than a standard 40-watt household bulb.
Install and tighten the cover.
Reconnect electrical power to the range.
Broiler pan and grid
After broiling, remove the broiler pan from the oven. Remove the grid from the pan. Carefully pour out the grease from the pan into a proper container. Wash and rinse the broiler pan and grid in hot water with a soap-filled or plastic scouring pad.
If food has burned on, sprinkle the grid with detergent while hot and cover with wet paper towels or a dishcloth. Soaking the pan will remove burned-on foods.
The broiler pan may be cleaned with a commercial oven cleaner. The grid is chrome; do not use an oven cleaner to clean it.
Both the broiler pan and grid can also be cleaned in the dishwasher.
Do not store a soiled broiler pan and grid anywhere in the range.
Drip trays, drip tray liners and drain tubes
Located beneath the cooktop are one or two drip trays. If you have a griddle or a grille there will also be a tray liner. The drip trays and liners are made of stainless steel. The drip trays are on rollers so they are easy to remove and replace.

To remove the drip tray, pull it forward. If something has spilled into the tray, it should be cleaned up as soon as possible to prevent baked on” food soil.
Grease from the griddle or the grille drains through the drain tubes into the tray and into the liner below.
Do not allow the grease to accumulate in the drip tray or liner as it can be a fire hazard. Clean the drip tray and liner as soon as they are cool. Clean with hot soapy water.
To clean the drain tube use a soapy bottle brush. A mild abrasive cleaner such as Bon-Ami® or Soft Scrub® can be used. For stubborn stains, use a soap-filled steel wool pad or a harsh abrasive cleaner such as Comet® or Ajax® rubbing lightly. Rinse all parts thoroughly
Griddle (on some models)
Thoroughly clean the griddle of grease and food particles, using a square-edged spatula, while it is still hot.
Wipe the griddle with a dry, heavy, coarse cloth to remove any remaining residue and food particles.
Wash with hot soapy water, rinse and dry.
Once the griddle has cooled, rub the surface lightly with vegetable oil. Do not use corn oil or cooking sprays as they get sticky.
If the griddle is cleaned with anything other than a dry, heavy, coarse cloth, it will need to be reseasoned.
Never flood the hot griddle with cold water.
This could cause the griddle to crack or warp.

Clean the grille immediately after cooking. Turn off the burner. To protect your hand from steam and heat, wear a barbecue mitt. Scrub the grille by dipping a brass bristle barbecue brush frequently into a bowl of water.
The steam created softens the food particles and assists the cleaning process. The food particles will drop into the drip tray or into the radiant tray holding the ceramic briquettes. Be sure to clean the drain tube, drip tray and liner after they have cooled
The Problem Solver
PROBLEM | POSSIBLE CAUSE |
| SURFACE BURNERS DO NOT LIGHT | • Burners assembled incorrectly after cleaning. Make sure the burner assembly is put together correctly and that the outer caps/burner ports are aligned. • Ports blocked in the outer cap near the ignitor. Clean and reassemble. See “Burner assembly” in the Care and Cleaning section. • Inspect the manual cut-off valve to insure that it is not closed. • Make sure the electrical plug is plugged into a live power outlet. • Check for a power outage. |
| SURFACE BURNER FLAMES VERY LARGE OR YELLOW | • Improper air/gas ratio in burners. Call for service. |
| TICKING SOUND OF AFTER SURFACE BURNER LIGHTS | • The spark ignitor is not deactivated. Turn the burner OFF and SPARK IGNITOR relight. Some ticking is normal. If ticking is excessive, call for service. |
| STRONG ODOR FROM SURFACE BURNERS | • Improper air/gas ratio in surface burners. Call for service. |
| OVEN LIGHT DOES NOT WORK | • The light bulb is loose or defective. Tighten or replace the bulb. • The switch operating light is broken. Call for service. |
| FOOD DOES NOT BAKE OR ROAST PROPERLY | • The oven controls are improperly set. See the “How to set your oven for baking or roasting” section. • Incorrect cookware or cookware of improper size being used. See the “How to set your oven for baking or roasting” section. • Use a foil tent to slow down browning during roasting. |
| FOOD DOES NOT BROIL PROPERLY | • The oven control is not set at BROIL. Push in the BROIL selector button for the oven you want to use. • The oven door is not open to the broil stop position as recommended. • Improper shelf position being used. See the Broiling Guide. • Food is being cooked in a hot pan. • Cookware is not suited for broiling. Use the broiling pan and grid that came with your range. • Aluminum foil used on the broiling pan and grid has not been fitted properly and slit as recommended. • In some areas the power (voltage) may be low. Preheat the broil element for 10 minutes. Broil for the longest period of time recommended in the Broiling Guide. |
| OVEN WILL NOT WORK | • Plug on the range is not completely inserted in the electrical outlet. • A fuse in your home may be blown or the circuit breaker tripped. • The oven controls are not properly set. • The oven controls are set for cleaning. If necessary, allow the oven to cool then open the door. |
| OVEN WILL NOT SELF-CLEAN | • The oven temperature is too high to set a self-clean operation. Allow the range to cool to room temperature and reset the controls. • The controls are not properly set. • The self-clean cycle will not start until the shelf slide assemblies have been removed. |
| UNABLE TO USE THE 12″ OVEN, GRIDDLE AND/OR GRILLE WHEN SELF-CLEANING | • When the 27″ (large) oven is set for cleaning, only the surface burners may be used. The 12″ (small) oven, the griddle and/or the grille cannot be used. |
| “CRACKING” OR “POPPING” SOUND DURING CLEANING | • This is normal. This is the sound of the metal heating and cooling during both the cooking and cleaning functions. |
| EXCESSIVE SMOKING OCCURS DURING DOOR LOCKED CLEANING | • Excessive soil. Press the OFF selector button. Open the windows to rid the room of smoke. Wait until the light goes off. Wipe up excess soil and reset the clean cycle. |
| STRONG ODOR FROM SELF-CLEAN CYCLE | • An odor from the insulation around the inside of the oven is normal for the first few times the oven is used. This is temporary. |
| OVEN NOT CLEAN AFTER A CLEAN CYCLE | • The oven was heavily soiled. Clean up heavy spillovers before starting the clean cycle. Heavily soiled ovens may need to self-clean again. • The oven controls are not properly set. See the Self-Cleaning section. |
