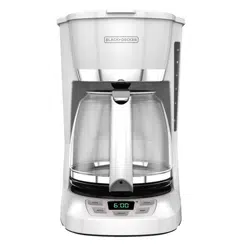
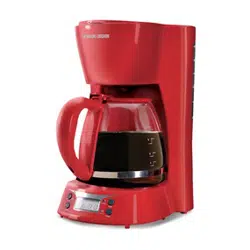
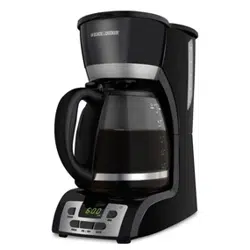
DuralifeTM glass carafeBlack (Part# CM1100B-02) White (Part# CM1100W-02) Gray (Part# CM1100G-02) Red (Part# CM1100R-02)
“Keep Hot” carafe plate
Control panel
Water reservoir with cup levelmarkings
Sneak-A-CupTM feature
Cord storage (inside of unit)
Brew indicator light
GETTING STARTED
Remove all packing material, any stickers, and the plastic band around the power plug.
Wash removable parts as instructed in CARE AND CLEANING.
Pour fresh cold water up to 12 MAX mark.
Place basket-style paper filter into removable brew basket. Place basket into brew basket holder.
Plug cord into standard electrical outlet.
Brew water through appliance without adding coffee grounds. This removes any dust or residue that may remain in the system during the manufacturing process.
Discard water and paper filter.
Turn off appliance, unplug and allow to cool down.
SETTING THE CLOCK
Plug appliance into standard electrical outlet.
The digital clock display flashes 12:00 A.M.
To set the time: Press HOUR button until correct hour appears on display. Small dot in top left corner of digital display indicates P.M. when lit.
Press MIN button to select minutes.
Note: If unit is unplugged or power is interrupted even momentarily, the time will need to be reset.
BREWING COFFEE
1. Open one-piece cover. Fill water reservoir with cold tap water. Use lines on side of reservoir as a guide. Do not fill past “MAX/12” line. Important: If too much water is added it will leak from the back of the coffeemaker.
2. Place paper filter into brew basket. Add ground coffee (we suggest 1 heaping tablespoon per cup). Place brew basket in place.
3. Close one-piece cover securely.
4. Place brew-thru lid on empty carafe, making sure it is in the down position. Then set carafe on carafe plate. Note: Coffee may overflow if brew-thru lid is not properly aligned.
5. Plug cord into an outlet. Press ON/OFF button (indicator light to the left of the HOUR button will illuminate) and brewing begins. The “Keep Hot” carafe plate will keep the coffee warm for two hours or until the ON/Off button is pressed.
6. When coffee grounds are cool, carefully remove and discard used grounds and filter.
7. To turn off coffeemaker at any time press ON/OFF button (indicator light to the left of the HOUR button will turn off).
8. Unplug appliance when not in use.
9. Press tab on carafe lid to pour coffee.
SNEAK-A-CUP FEATURE
Remove the carafe and brewing is paused. The carafe must be placed back on the carafe plate in 30 seconds to prevent overflow. Brewing begins again.
SETTING AUTO BREW TIME
Press PROG button. The AUTO light (small dot in bottom left corner of digital display) flashes several times. Digital clock displays 12:00.
Quickly press HOUR button then MIN button to select the time you would like automatic brewing to begin (for example, 7:15 A.M. Make sure the P.M. light is not on.)
Press AUTO button, holding it down until the AUTO light stops flashing. The digital display changes to time of day.
To check preset auto time, press PROG button and preset auto time is displayed. Press AUTO button to reactivate the timer. The AUTO light will turn on.
To cancel Auto Brew function, press the AUTO button. The AUTO light will turn off.
CARE AND CLEANING
This product contains no user serviceable parts. Refer service to qualified service personnel.
CLEANING
Make sure your coffeemaker is unplugged and cool.
Remove brew basket. Discard used paper filter and coffee grounds.
Wash brew basket and carafe in dishwasher (top-rack) or by hand in hot, soapy water.
Wipe outside of coffeemaker, control panel and carafe plate with a soft, damp cloth. Note: Do not use abrasive cleansers or scouring pads. Never immerse the coffeemaker in water.
To clean the inside of the cover, open the cover and leave in the open position; wipe with a damp cloth.
COFFEEMAKER PART
CLEANING INSTRUCTIONS
Housing
Carafe Plate
Power Cord
Wipe with a soft, damp cloth.
Carafe Lid
Brew Basket
Glass Carafe
Wash by hand in warm soapy water, or in the dishwasher (top rack only).
CLEANING WITH VINEGAR
Note: With regular use, minerals and hard water can clog your coffeemaker.
A full cleaning with vinegar is recommended once a month.
Pour white vinegar into water reservoir up to the 6-cup mark on the water window. Add cold water up to the 12-cup mark.
Put a paper filter in brew basket and close cover. Set empty carafe on the carafe plate.
Turn on coffeemaker. Let half the cleaning mixture brew into carafe (until level is around 5). Turn off coffeemaker and let it soak for at least 15 minutes
Turn on coffeemaker again and brew remaining cleaning mixture into carafe. Turn off coffeemaker; empty carafe and discard paper filter.
Fill reservoir with cold water to 12-cup mark; replace carafe on carafe plate and then turn on coffeemaker for a complete brewing cycle to flush out remaining cleaning mixture. You may want to repeat this step to completely remove the vinegar smell/taste.
Wash brew basket and carafe as instructed in CLEANING.
TROUBLESHOOTING
PROBLEM
POSSIBLE CAUSE
SOLUTION
Coffeemaker does not turn on.
Coffeemaker is not plugged in.
Make sure appliance is plugged into a working outlet.
Coffeemaker is leaking.
Water reservoir may be overfilled.
Make sure water reservoir has not been filled beyond the 12-cup line.
Cover may not be correctly placed on carafe.
Make sure cover is correctly placed and tightened on carafe
Carafe may not be correctly placed on the carafe plate.
Make sure carafe is placed securely onto the carafe plate.
The brew basket overflows.
The carafe has been removed for longer than 30 seconds when using the Sneak-A Cup™ feature.
Make sure to replace the carafe within 30 seconds during the brewing cycle.
Excessive amount of coffee is used.
Reduce the amount of coffee used.
Coffee sediment in brewed cup of coffee.
The paper filter and/or the brew basket are not properly placed.
Insert basket-shaped paper filter into brew basket and insert basket properly into holder.
The coffeemaker brews slowly.
The coffeemaker needs cleaning.
Follow the instructions in the “Cleaning with Vinegar” section.
We at Spectrum Home Appliances understand that there have been various reports and articles in recent months and years that raise concerns about Bisphenol A (BPA) in consumer products and the impact of such reports and articles on the purchase of certain products by consumers.
In such reports and articles, the clear focus is on the potential hazards posed by the migration of BPA from food and beverage containers into food and beverages consumed by humans and by direct ingestion or mouthing of plastic items by infants and children. Specifically and by example, the draft NTP Brief on Bisphenol A (BPA) released by the National Toxicology Program of the National Institutes of Health report states, "the vast majority of bisphenol A exposure is through the diet ~ 99%"
For products that specifically claim to be BPA-Free, the plastics and resin that comes into direct contact with food and beverage are made of Polypropylene material, silicone or other plastic materials, all of which are BPA free. Other parts of the product which do not come into contact with food or beverage may contain BPA in some of the plastics and resins that are used. For products that do not claim to be BPA-Free, we have insufficient information to support a BPA-Free claim at this time.
#2 How do you remove carafe cover in order to wash in dishwasher
The lid for the carafe should not be removed for cleaning. I do apologize for any inconvenience that this may cause you.