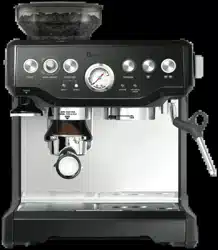
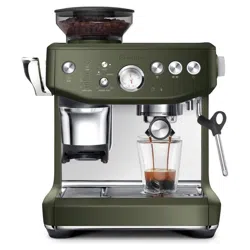
Stainless steel conical burrs maximise ground coffee surface area for a full espresso flavour.
Adjustable Grind Size
18 grind settings (fine, 1–16, coarse) from coarse to fine for optimal espresso extraction.
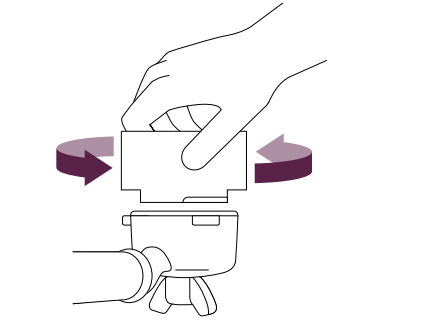
Hands Free Direct Grinding into Portafilter
Auto stop for hands free grinding direct into portafilter.
AUTOMATIC DOSING
Dispenses the required amount of coffee for a single or double cup dose.
GRIND Amount Dial
Adjusts dose to suit fineness or coarseness of grind.
DOSE TRIMMING TOOL
For precise dose control.
Electronic PID Temperature Control
For increased temperature stability.
Auto Purge
Automatically adjusts water temperature after steam for optimal coffee extraction.
ADJUSTABLE TEMPERATURE CONTROL
For optimum coffee flavour.
Thermocoil Heating System
Integrated stainless steel water coil accurately controls water temperature.
Low Pressure Pre-infusion
Gradually increases pressure at the start for an even extraction.
Espresso Pressure Gauge
Measures the water pressure through the ground coffee in the portafilter during extraction.
Dry Puck Feature
Releases water pressure from the ground coffee in the filter basket for easy disposal of the coffee puck.
1700W High Power
For faster heat up and high pressure steam.
Instant Hot Water
Dedicated hot water outlet for making long blacks and pre-heating cups.
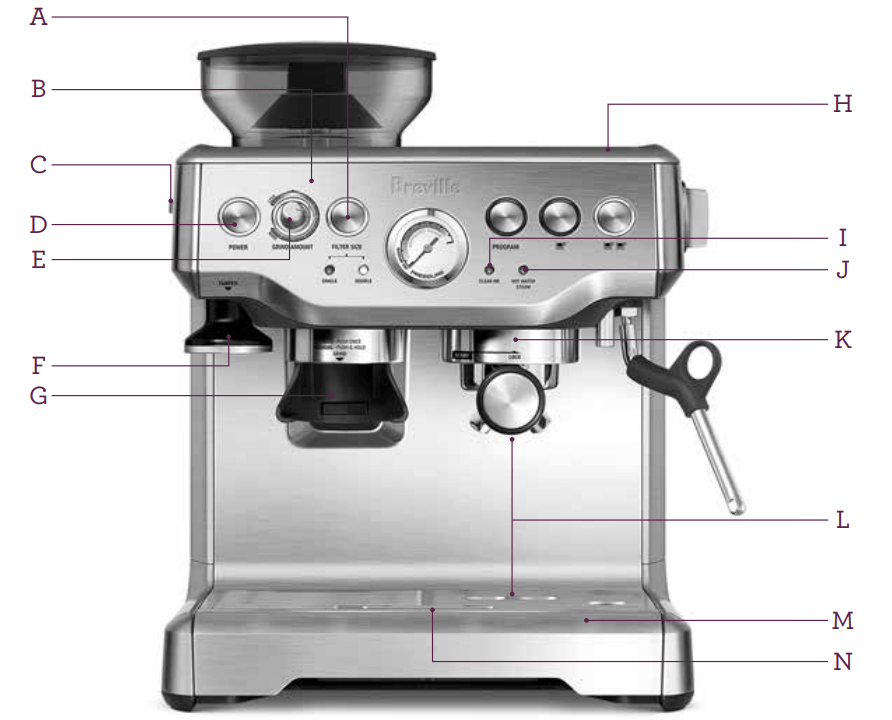
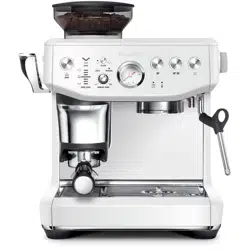
A. Automatic Dosing
Select between single or double filter basket.
B. Mechanical Clutch Protection
C. Grind Size Selector
18 grind settings from fine to coarse.
D. POWER
Button Surround illuminates when machine is switched on.
E. Grind Amount Dial
Controls the amount of fresh ground coffee dosed into the filter basket.
F. Integrated Removable Tamper
For consistent tamping control.
G. Grinding Cradle
For directly dosing into portafilter.
H. Cup Warming Tray
I. CLEAN ME Light
Indicates when a cleaning cycle is required.
J. Steam Light /Hot Water
Illuminates to indicate that the steam or hot water function is selected.
K. Group Head
L. Extra-Tall Cup Height For Coffee Mugs
M. Removable Wet And Dry Coffee Separator Drip Tray
N. Drip Tray Full Indicator
O. 250g Bean Hopper Capacity
P. Integrated Conical Burr Grinder
Stainless steel conical burrs maximise ground coffee surface area for full espresso flavour.
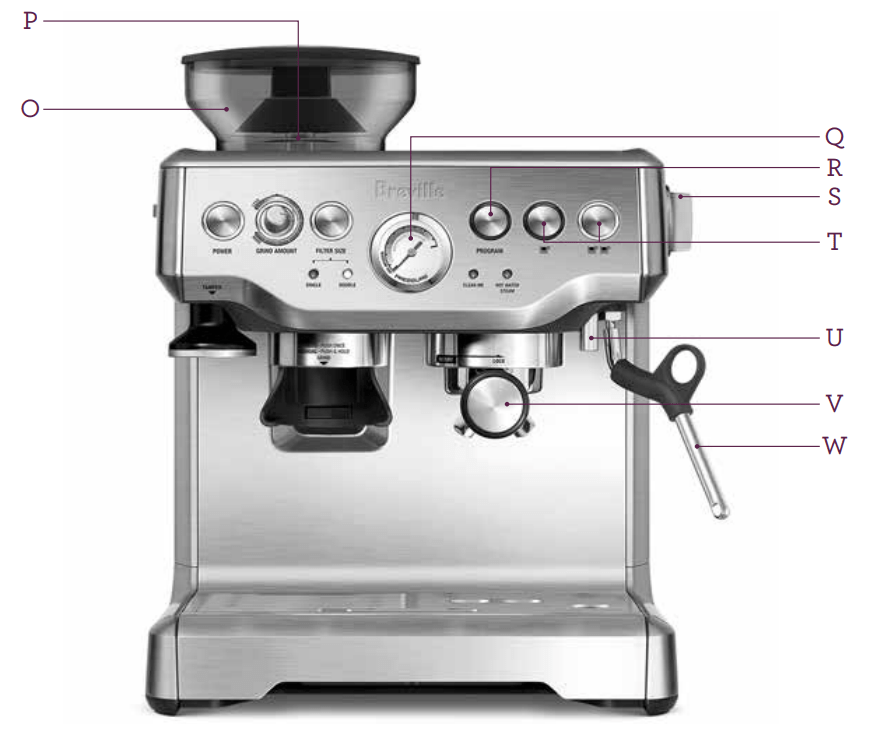
Q. Pressure Gauge
Monitors espresso extraction pressure.
R. PROGRAM Button
Personalise your espresso shot volumes & also accesses Advanced Temperature functions.
S. STEAM Dial /Hot Water Dial
Selector control for steam and hot water.
T. Programmable
1 CUP and 2 CUP button.
U. Instant Hot Water
Dedicated hot water outlet for making long blacks and pre-heating cups.
V. Stainless Steel Portafilter
With commercial style spouts.
W. 360° Swivel Action Steam Wand
Easily adjusts to perfect position for texturing
Custom designed accessories
1. Dose trimming tool
2. Single wall filter baskets for freshly ground coffee.
3. 480ml stainless steel jug
Cleaning accessories
Cleaning tool/brush
Cleaning tablets
Cleaning cycle disc
Allen key
NOT SHOWN
PID Temperature Control
For increased temperature stability.
Adjustable Temperature Control
For optimum coffee flavour.
Low Pressure Pre-infusion
Gradually increases pressure at the start for an even extraction.
1700W High Power
For fast heat up and high pressure steam.
Water Filter
Located inside the water tank.
Removable 2 Litre Water Tank
Filled from the top with integrated water filtration.
Storage Tray
Located behind the drip tray for storage of accessories.
Cord Storage
Located under the water tank.
OPERATING
Before First Use
Machine Preparation
Remove and discard all labeling and packaging materials attached to your espresso machine. Ensure you have removed all parts and accessories before discarding the packaging.
Clean parts and accessories (water tank, portafilter, filter baskets and jug) using warm water and a gentle dish washing liquid and rinse well. Wipe the outer housing, bean hopper and drip tray with a soft damp cloth and dry thoroughly. Do not immerse the outer housing, power cord or power plug in water or any other liquid.
The water filter located inside the water tank will need to be removed before washing the water tank.
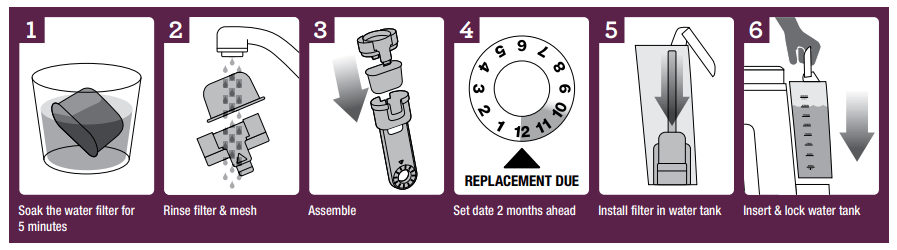
Conditioning the Water Filter
Remove filter from the plastic bag and soak in a cup of water for 5 minutes.
Rinse filter under cold running water.
Wash the stainless steel mesh in the plastic filter compartment with cold water.
Insert the filter into the filter holder.
Set the dial date 2 months ahead.
To install filter, push down to lock into place.
Slide the water tank into position and lock into place.
Filling the Water Tank
Ensure the water filter is securely fitted inside the tank.
Fill the water tank with cold tap water to the maximum mark on the side of the tank and slide the water tank back into position at the back of the machine. •
Plug the power cord into power outlet and switch On at power point.
Press the POWER button. The POWER button surround will flash while the machine is heating. When the correct temperature has been reached, all the button surrounds on the control panel will illuminate.
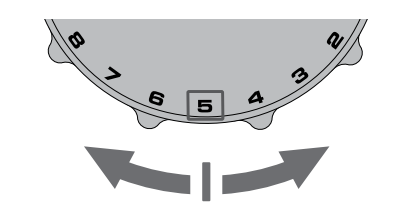
Setting the Grind Size
The grind size will affect the rate of water flow through the coffee in the filter basket and the flavour of the espresso. When setting the grind size, it should be fine but not too fine and powdery.
There are 18 settings on the GRIND SIZE select dial - The smaller the number, the finer the grind size. The larger the number, the coarser the grind size. We recommend you start at the No. 5 setting and adjust as required.
Grinding the Coffee
Fill the hopper with fresh coffee beans.
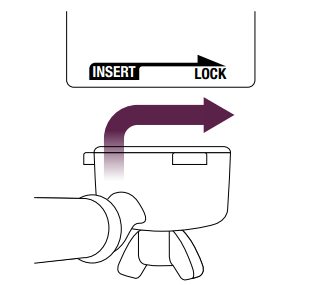
Place the portafilter into the grinding cradle.
Insert filter basket required into the porta-filter.
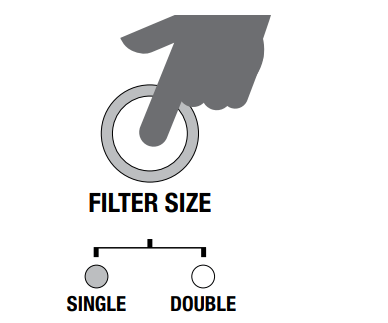
Press the FILTER SIZE button to select your filter size (single or double).
AUTOMATIC DOSING
Push and release the portafilter to activate the grinding switch, then allow the portafilter to be dosed with fresh ground coffee.
To stop the grinding function during single or double dose, simply press the filter size button.
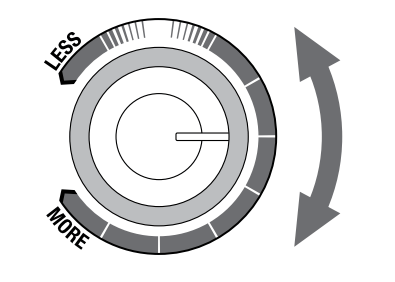
Adjusting the Grind Amount
Set the GRIND AMOUNT dial to the 3 o’clock position as a starting point for dose amount. Adjust towards LESS or MORE as required to adjust the dose amount so the cap on the supplied tamper is level with the top edge of the filter basket rim, AFTER tamping.
MANUAL DOSING
With the portafilter inserted, push and hold the micro switch down until the desired amount of ground coffee has been dosed.
To stop the function during a manual grind function, simply release the portafilter. This will release the activation switch to stop the grind function.
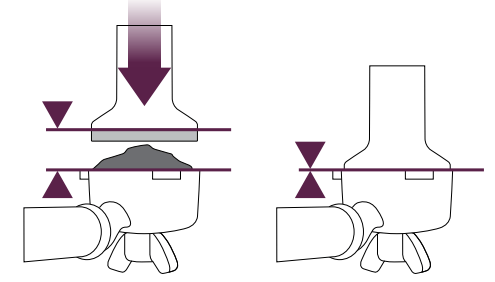
Tamping the Ground Coffee
Once the grind function has been completed, carefully withdraw the portafilter from the grinding cradle, being careful not to spill any ground coffee, tap down to collapse and using the integrated tamper, tamp down firmly (approx. 15–20 kg of pressure)
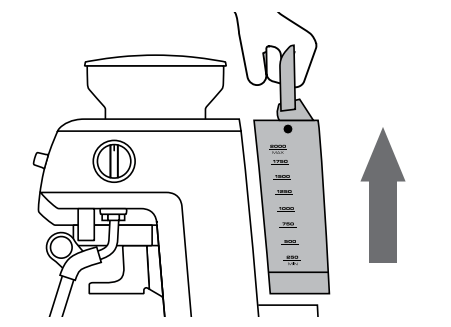
TRIMMING THE DOSE
The Razor™ precision dose trimming tool allows you to trim the puck to the right level for a consistent extraction.
Insert the Razor™ into the coffee basket until the shoulders of the tool rest on the rim of the filter basket. The blade of the dosing tool should penetrate the surface of the tamped coffee.
Rotate the Razor™ dosing tool back and forth while holding the portafilter on an angle over the knock box to trim off excess coffee.
Your coffee filter basket is now dosed with the correct amount of coffee.
Insert portafilter into group head to extract coffee
PRE-PROGRAMMED SHOT VOLUME – 1 CUP
Press the 1 CUP once. A preset single espresso volume of approximately 30ml will be extracted. The machine will automatically stop once the preset volume has been extracted.
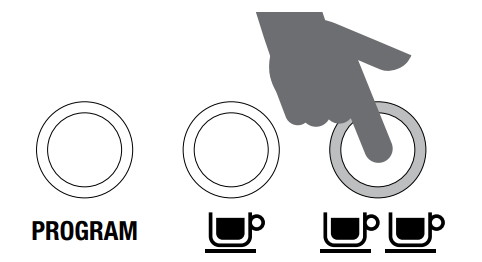
PRE-PROGRAMMED SHOT VOLUME – 2 CUP
Press the 2 CUP button once. A preset double espresso volume of approx. 60ml will be extracted. The machine will automatically stop once the preset volume has been extracted.
PROGRAMMING SINGLE ESPRESSO
To begin programming, press the PROGRAM button once. The machine will beep once and the program button will begin to flash. This indicates the machine is in programming mode.
Press 1 CUP button to start espresso extraction. Press 1 CUP again once desired volume of espresso has been extracted. The machine will beep twice to indicate the new 1 CUP volume has been set.
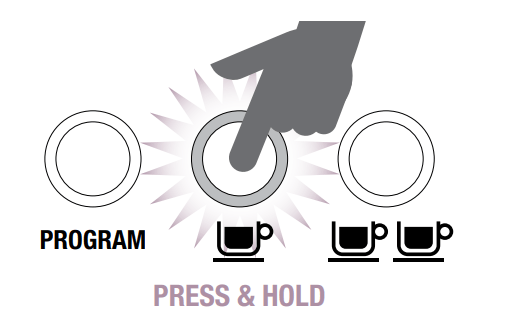
PROGRAMMING DOUBLE ESPRESSO
To begin programming, press the PROGRAM button once. The machine will beep once and the program button will begin to flash. This indicates the machine is in programming mode.
Press 2 CUP button to start espresso extraction. Press 2 CUP again once desired volume of espresso has been extracted. The machine will beep twice to indicate the new 2 CUP volume has been set.
RESETTING DEFAULT VOLUMES
To reset the machine to the default 1 CUP and 2 CUP shot volumes and espresso water temperature press and hold the PROGRAM button until the machine beeps three times. Release the PROGRAM button. The machine will return to its original default setting.
MANUAL ESPRESSO VOLUME
Press and hold the 1 CUP or 2 CUP button. Release the button once sufficient pre-infusion time has elapsed & full pump pressure will be applied. Press either the 1 CUP or 2 CUP button when sufficient espresso volume has been extracted
CARE & CLEANING
INSTALLING/REPLACING THE FILTER IN THE WATER TANK
The water filter provided helps to prevent scale build up which over time can affect the performance of your machine, potentially causing blockages and heating, problems
Replacing the water filter every two months will reduce the need to de-scale the machine.
If you live in a hard water area, we recommend you change the water filter more frequently
Replacing The Water Filter
Remove the filter from the plastic bag, and soak in a cup of water for 5 minutes
Rinse the filter under cold running water for 5 seconds
Wash the stainless steel mesh in the plastic filter compartment with water and assemble
Set the date dial 2 months ahead
To install, push down to lock into place
The water filter can be removed from the water tank during operation if not required.
PORTAFILTER CLEANING
Periodically run water through the machine with the portafilter in place, but without any ground coffee, to rinse out any residual coffee particles.
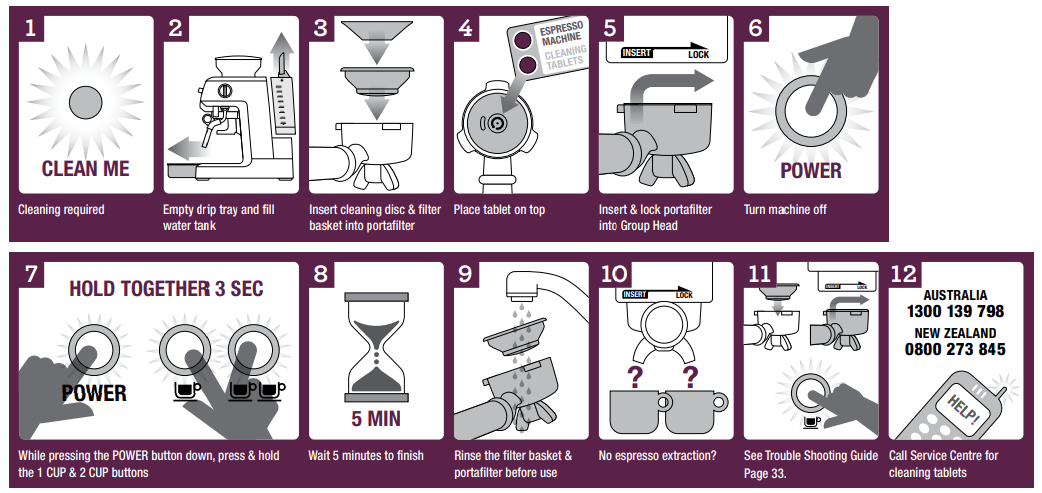
CLEANING CYCLE
The espresso machine features an in-built cleaning cycle which should be carried out periodically. The CLEAN ME light will automatically illuminate to indicate when a cleaning cycle is required.
CLEANING CYCLE PROCESS GUIDE
If cleaning is required, simply follow the steps below and refer to the Machine Cleaning Cycle guide.
Insert the cleaning disk into the one or two cup filter disc.
Place the filter basket into the portafilter.
Put 1 cleaning tablet into the filter.
Lock the portafilter into the group head.
Turn the machine OFF.
Simultaneously press and hold the 1 CUP, 2 CUP and POWER button for 3 seconds.
The cleaning cycle will commence and last for approximately 5 minutes. Once complete, 3 beeps will sound. Remove the portafilter and ensure the tablet has completely dissolved.
If the tablet has not dissolved, repeat steps 5 to 7 until tablet has dissolved.
DECALCIFYING
After regular use, hard water can cause mineral build up in and on many of the inner functioning components, reducing the brewing flow, power of the machine, and affecting the quality of coffee.
We advise decalcifying the machine on a regular basis (every 2–3 months) using a mixture of white vinegar and water.
Follow the instructions provided, or use the following as a guide:
Solution for decalcifying
Diluted Solution (for softer water)
1 part white vinegar
2 parts cold tap water
Concentrated Solution (for harder water)
1 part white vinegar
1 part cold tap water
DECALCIFYING THE MACHINE
Remove the portafilter and frothing attachment. Pour the mixture of white vinegar and water into the water tank.
Plug the machine into the power outlet and switch On.
Press the POWER button to the On position.
Place a large container under the group head and steam wand.
When the brewing temperature has been reached all the button surrounds on the control panel will illuminate. Press and hold the 1 CUP or 2 CUP button to commence manual pour. Release the button once half the mixture of white vinegar and water has run through the group head.
Set the steam dial to the STEAM position and allow steam to run through the Steam Wand for approximately 2 minutes. Return the steam dial back to the STANDBY position.
After decalcifying, remove the water tank and rinse thoroughly then refill with fresh cold water. To rinse the machine, repeat previous steps.
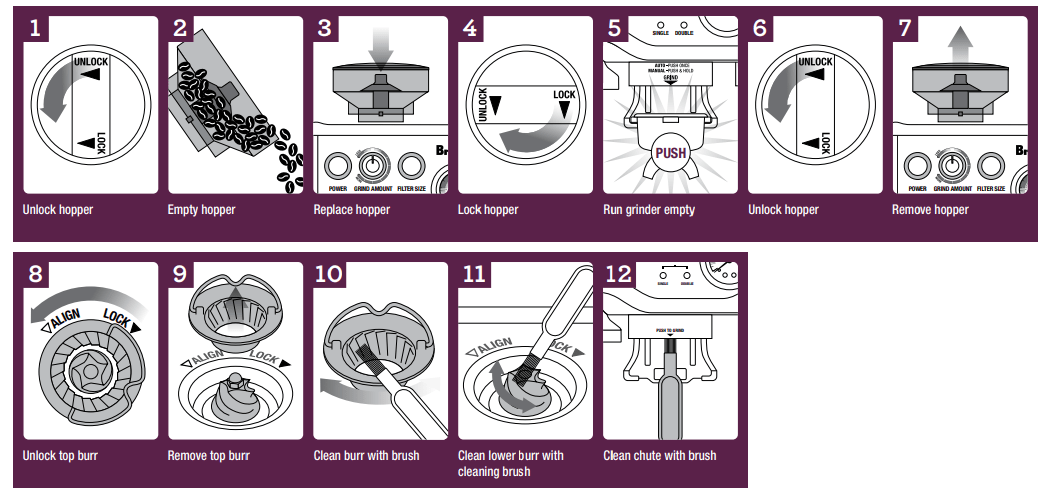
CLEANING THE CONICAL BURR GRINDER
This grinder cleaning cycle removes oil build-up on the burrs which can impede performance.
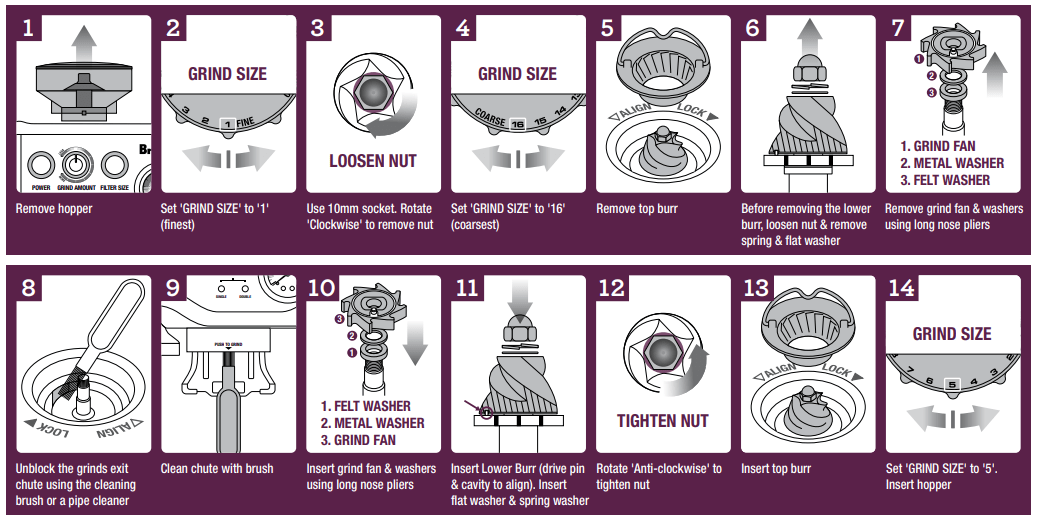
ADVANCED CLEANING FOR THE CONICAL BURR GRINDER
This step is only required if there’s a blockage between the grinding burrs and the grinder outlet.
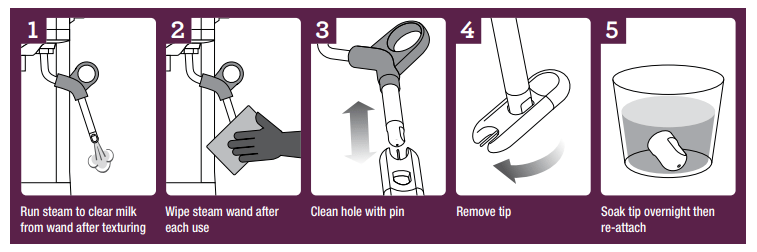
CLEANING THE STEAM WAND
The steam wand should always be cleaned after texturing milk.
Wipe the steam wand with a damp cloth, and then with the steam wand directed back into the drip tray, briefly set the steam dial to the STEAM position. This will clear any remaining milk from inside the steam wand.
Ensure the steam dial is in the STANDBY position. Press the POWER button to Off and allow the machine to cool.
If the steam wand remains blocked, use the pin on the cleaning tool to clear the opening.
If the steam wand continues to be blocked, the tip of the steam wand can be removed by using the spanner in the middle of the cleaning tool.
Unscrew the tip with the cleaning tool.
Soak the tip in hot water before using the pin on the cleaning tool to unblock. Replace the tip back onto the steam wand and secure with the cleaning tool.
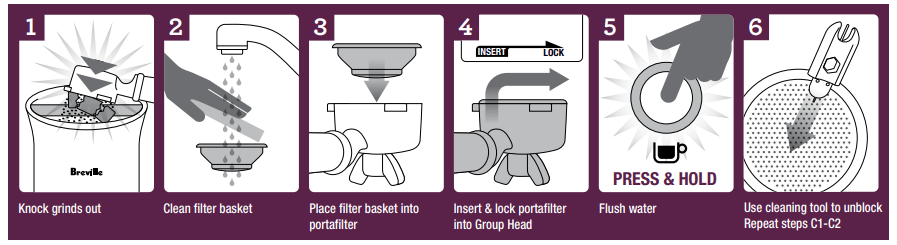
CLEANING / UNBLOCKING THE FILTERS, PORTAFILTER AND GROUP HEAD
Periodically run water through the machine with the portafilter in place, but without any ground coffee, to rinse out any residual coffee particles.
Should the fine holes in the filters become blocked follow the following steps:
Place the filter into the portafilter. Run water through the machine with the filter and portafilter, without any ground coffee, in place.
The fine pin on the cleaning tool can be used to clear the filter basket holes.
To clean the Single Wall filters simply run water through the portafilter using the manual pour function by holding down the 1 CUP button.
For a thorough clean of the filters, run a cleaning cycle of the machine with the portafilter and filter in place.
CLEANING THE OUTER HOUSING / CUP WARMING PLATE
The outer housing and tray warming plate can be cleaned with a soft, damp cloth. Then polish with a soft, dry cloth.
Do not use abrasive cleansers, pads or cloths which can scratch the surface.
CLEANING THE DRIP TRAY
The drip tray should be removed, emptied and cleaned at regular intervals, particularly when the drip tray full indicator is showing EMPTY ME!.
Remove grid, compartments and EMPTY ME! indicator from the drip tray. Dispose of the grounds from the dry compartment into the bin. Wash the drip tray with warm soapy water, using a non-abrasive washing liquid, rinse and dry thoroughly. The EMPTY ME! indicator can be removed from the drip tray by pulling upwards to release the side latches.
The drip tray base and cover are dishwasher safe.
CLEANING THE STORAGE TRAY
The storage tray is located behind the drip tray and is pulled forward when you slide the drip tray out. Clean the tray with a soft, damp cloth (do not use abrasive cleansers, pads or cloths which can scratch the surface).
STORING YOUR MACHINE
Before storing, press the POWER button to off, turn the steam dial to STANDBY switch Off at the power outlet and unplug.
Remove unused beans from the hopper, clean the grinder (see page 29), empty the water tank and the drip tray.
Ensure the machine is cool, clean and dry. Insert all accessories into position or into the storage tray.
Store upright. Do not place anything on top.
TROUBLESHOOTING
Problem
POSSIBLE CAUSES
WHAT TO DO
When the machine is switched On, the steam lights is flashing.
Steam dial is not in STANDBY position
Turn the Steam dial to ‘STANDBY’ position. Machine will commence normal heat up procedure.
Coffee does not run through
Machine is not turned On or plugged in
Ensure the machine is plugged in, switched On at the power outlet and the POWER button is pressed On.
Water tank is empty
Refer to ‘Filling The Water Tank’, page 12.
Coffee grind is too fine
Ensure you use a suitable espresso grind. Refer to ‘Setting the Grind Size’ on page 12 and 21.
Too much coffee in the filter
Refer to ‘Adjusting the Grind Amount’, page 13 and 22.
Coffee tamped too firmly
Refer to ‘Coffee Dose and Tamping’ on page 13 and 22.
The filter is blocked
Clean the filters. Refer to ‘Cleaning The Filters’, page 30.
Coffee runs out too quickly
The coffee grind is too coarse
Ensure you use a suitable espresso grind. Refer to ‘Setting the Grind Size’ on page 12 and 21.
Not enough ground coffee in the filter
Refer to ‘Adjusting the Grind Amount’, page 13 and 22.
Ground coffee not tamped firmly enough
Refer to ‘Coffee Dose and Tamping’, page 13 and 22.
Coffee is too cold
Cups not preheated
Preheat cups. Refer to ‘Pre-Warming The Cups’, page 21.
Milk not heated enough (if making a cappuccino or latté)
When the base of the jug becomes too hot to touch this is when the milk is heated at the correct temperature. Refer to ‘Texturing Milk’, page 23.
No crema
Coffee is not tamped firmly enough
Refer to ‘Coffee Dose and Tamping’, page 13 and 22.
Coffee grind is too coarse
Ensure you use a suitable espresso grind. Refer to ‘Setting The Grind Size’ on page 12 and 21.
Ground coffee is not fresh
Change old beans with fresh roasted or preground. Ground coffee should not be kept for longer than a week.
Filter holes are blocked
Use the fine pin on the cleaning tool to clear the holes. Refer to ‘Cleaning The Filters’, page 30.
Machine is making pulsing/pumping sound while extracting coffee or steaming milk
The machine is carrying out the normal operation of the 15 bar pump
No action require as this is the normal operation of the machine.
Coffee runs out around the edge of the filter holder
Filter holder is not inserted in the group head properly
Refer to ‘Inserting The Portafilter’, page 23.
There are coffee grounds around the filter rim
Clean any excess ground coffee from the rim of the filter holder to ensure a proper fit into the brew head.
Too much ground coffee in the filter
Refer to ‘Adjusting the Grind Amount’, page 13 and 22.
Ground coffee has been tamped too firmly
Refer to ‘Coffee Dose and Tampering’, page 13 and 22.
Incorrect filter for amount of ground coffee used
Ensure you use the small filter for 1 cup of coffee and the larger filter for 2 cups of coffee.
Coffee extracts as drops from the portafilter
The water tank is empty or low
Refer to ‘Filling The Water Tank’, page 12.
Coffee grind is too fine
Ensure you use a suitable espresso grind. Refer to ‘Setting The Grind Size’ on page 12 and 21.
Machine is blocked by mineral deposits
Decalcify the machine. Refer to ‘Decalcifying’, page 27.
Grinder safety clutch has activated
Overfilled filter basket causing the chute to backfill.
Clean and clear grinder and chamber
Machine is making a loud and continuous pumping noise
Water tank is empty
Refer to ‘Filling The Water Tank’, page 12 .
Water tank is not securely in place
Refer to ‘Filling The Water Tank’, page 12 .
No steam is generated
Machine is not turned On
Ensure the machine is plugged in, switched On at the power outlet and the POWER button is pressed On.
Water tank is empty
Refer to ‘Filling The Water Tank’, page 12.
Steam Dial is not in STEAM position
Turn the steam dial to the STEAM position.
Steam Wand is blocked
Use the pin on the cleaning tool to clear the opening. If the steam wand continues to be blocked remove the tip of the steam wand using the spanner in the middle of the cleaning tool. Refer to ‘Care and Cleaning’, page 30.
Milk is not creamy after texturing
Not enough steam Steam wand may be blocked.
Refer to ‘Care and Cleaning’, page 30. Use cold fresh milk. Refer to ‘Texturing Milk’, page 23.
Machine is not working
The safety thermal-cut may have activated due to the pump or grinder overheating.
Turn the machine off and allow to cool for about 30–60 minutes.
No ground coffee coming from grinder
No coffee beans in hopper
Fill hopper
Blocked grinder chute
Clean and clear grinder chamber and chute. Refer to ‘Advanced Grinder Cleaning’, page 29
Water / moisture in grinder chamber and chute
Clean and clear grinder chamber and chute. Refer to ‘Advanced Grinder Cleaning’, page 29
Grinder does not start when micro switch is pressed.
Bean Hopper safety interlock is open FILTER SIZE LEDs are both flashing (hopper is not correctly in place)
Remove hopper, check for debris and then replace the hopper into the correct location
Too much/too little ground coffee is being delivered to the filter basket
Grind amount settings are incorrect for particular grind size
Use the grind amount dial to increase or decrease the grind amount
Too much/too little espresso is being delivered to the cup
Grind amount settings and or grind size require changing
Reset the machine to defaults or re-program new coffee dose settings
Grinder is making a loud ‘ratchet’ noise
Blockage or foreign object in grinder
Switch the grinder Off immediately. Remove hopper & clear blockage in the chute. Remove Upper Burr and clear Lower Burr. Refer to ‘Cleaning of Conical Burrs’ on page 29