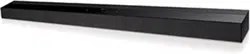
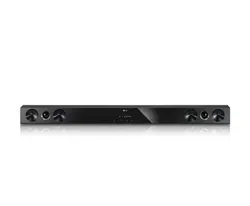
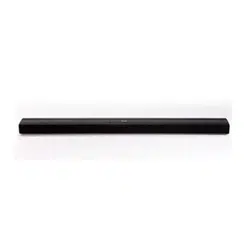
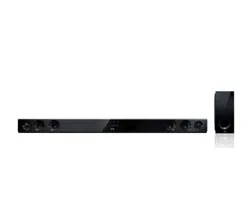
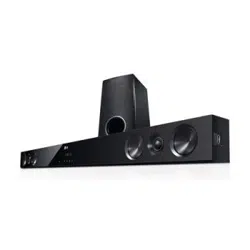
User manual Sound Bar
Getting Started
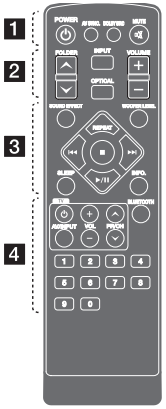
Remote control
Battery Installation
Remove the battery cover on the rear of the Remote Control, and insert two R03 (size AAA) battery with  and
and  matched correctly

 POWER: Switches the unit ON or OFF.
- AV SYNC: Synchronizes the audio and video.
- DOLBY DRC: Sets the Dobly DRC.
 MUTE: Mutes the sound.

- FOLDER: Searches for a folder of MP3/ WMA files. When a USB containing MP3/ WMA files in several folders is being played, press FOLDER to select the folder you want to play.
- INPUT: Changes input sources.
- OPTICAL: Changes input source to optical directly.
- VOLUME: Adjusts speaker volume.

- SOUND EFFECT: Selects a sound effect mode.
- WOOFER LEVEL: Sets the sound level of woofer.
- REPEAT: Listens to your files repeatedly or randomly.
 : Goes to next or previous file.
 : Stops playback.
 : Starts playback. / Pauses playback.
- SLEEP: Sets the system to turn off automatically at a specified time.
- INFO.: Displays the file or input source information.

- TV Control buttons: See page 21
- BLUETOOTH: Pairing, connecting and disconnecting your unit and Bluetooth device in function other than the Bluetooth.
- 0 to 9 numerical buttons: Selects numbered numbered files. Enters the PIN code.
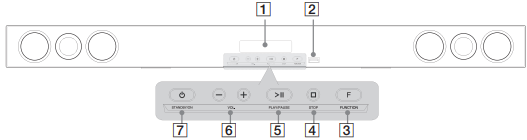
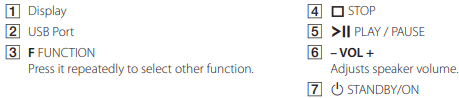
Front panel
Rear panel


Connecting
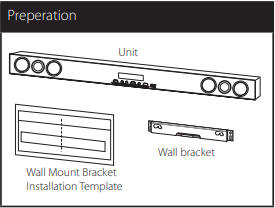
Mounting the main unit on a wall
You can mount the main unit on a wall. Prepare screws and brackets.
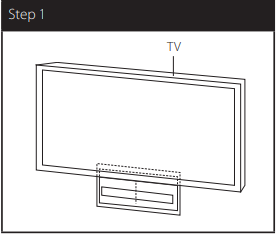
1. Match the TV’s BOTTOM EDGE of Wall Mount Bracket Installation Template with the bottom of TV and attach to the position.
2. When you mount it on a wall (concrete), use the wall plugs (Not supplied). You should drill some holes. A guide sheet (Wall Mount Bracket Installation Template) is supplied to drill. Use the sheet to check the point to drill.
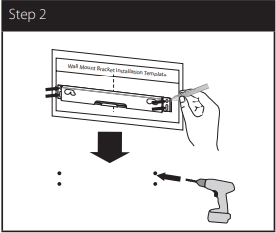
Note Screws and Wall Plugs are not supplied for mounting the unit. We recommend the Hilti (HUD-1 6 x 30) for the mounting. Please purchase it.
3. Remove the Wall Mount Bracket Installation Template.
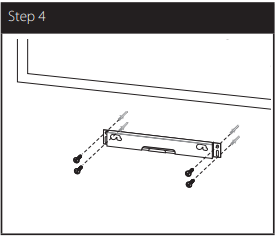
4. Fix it with screws (not supplied) as shown in the illustration below.
Note Detach the unit from the bracket as shown below.

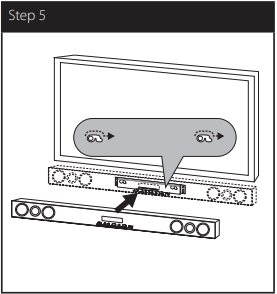
5. Hang the main unit onto the bracket as shown below.
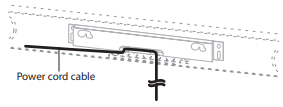
Note You can arrange power cord cable with the bracket as shown below.
Caution
- Do not hang onto the installed unit and avoid any impact to the unit.
- Secure the unit firmly to the wall so that it does not fall off. If the unit falls off, it may result in an injury or damage to the product.
- When the unit is installed on a wall, please make sure that a child does not pull any of connecting cables, as it may cause it to fall.
Setting up
Pairing wireless subwoofer
LED indicator of wireless subwoofer
| LED Color |
Status |
| Blue or yellow |
The wireless subwoofer is receiving the signal of the unit. |
| Blue or yellow (blink) |
The wireless subwoofer is trying to connect. |
| Red |
The Wireless subwoofer is in standby mode. |
| Off (No display) |
The Wireless subwoofer is turned of |
Setting up the wireless subwoofer for the first time
- Connect the power cord of the Wireless subwoofer to the outlet.
- Turn on the main unit : The main unit and wireless subwoofer will be automatically connected.
Manually pairing wireless subwoofer
When your connection is not completed, you can see the red LED on the woofer and woofer is not made sound. To solve the problem, follow the below steps.
1. Press and hold  STOP button on the unit and MUTE button on the remote control simultaneously.
2. Press PAIRING on back of the woofer.
- The blue or yellow LED will flicker
3. Turn off and on the unit.
- If you see “blue or yellow” LED, it’s successful.
4. If you don’t see “blue or yellow” LED, try again Step 1 - Step 3.
Note
- If you operate main unit then wireless subwoofer (rear speakers) sound within a few seconds in standby mode.
- Set the distance between this unit and subwoofer Receiver within 10 m (32 ft.).
- Optimum performance can be implemented only when the unit and the Wireless subwoofer within distance of 2 m (6 ft.) to 10 m (32 ft.) is used since communication failure may occur if longer distance is used.
- It takes a few seconds (and may take longer) for the Wireless Transmitter and subwoofer to communicate with each other.
Optional Equipment Connection
AUDIO (PORT. IN) In Connection

Listening to music from your portable player
The unit can be used to play the music from many types of portable player or external devices.
- Connect the portable player to the AUDIO (PORT. IN) IN connector of the unit.
- Turn the power on by pressing 1 POWER.
- Select the PORTABLE function by pressing INPUT.
- Turn on the portable player or external device and start playing it.
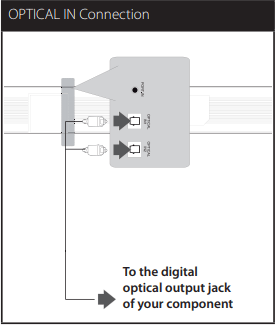
OPTICAL In connection
Connect an optical output of Unit (or Digital Device etc) to the OPTICAL IN 1/ 2 connector.
Speaker ez (easy) setup
Listens to sound from TV or DVD or Digital Device with 2.1 or 2ch mode.
- Connect the unit’s OPTICAL IN 1/ 2 jack to jack on optical out of your TV (or Digital Device etc.).
- Select the OPTICAL 1/ 2 by using the OPTICAL. To select the OPTICAL 1/ 2 directly
- Listen to sound with 2.1 or 2ch speaker.
- Press OPTICAL to exit from OPTICAL 1/ 2. Function is retuned to previous one.
USB Playback
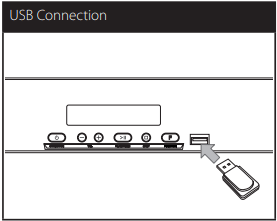
Insert USB memory device to the USB port on the front of the unit.
Removing the USB Device from the unit.
- Choose a different function mode or press STOP twice in a row.
- Remove the USB device from the unit.
Compatible USB Devices
- MP3 Player : Flash type MP3 player.
- USB Flash Drive : Devices that support USB2.0 or USB1.1.
- The USB function of this unit does not support some USB devices.
USB device requirement
- Devices which require additional program installation connected to a computer, are not supported.
- Do not extract the USB device while in operation.
- For a large capacity USB, it may take longer than a few minutes to be searched.
- To prevent data loss, back up all data.
- If you use a USB extension cable or USB hub, the USB device is not recognized.
- Using NTFS file system is not supported. (Only FAT(16/32) file system is supported.)
- This unit is not supported when the total number of files is 1 000 or more.
- External HDD, Card readers, Locked devices, or hard type USB devices are not supported.
- The unit’s USB Port cannot be connected to PC. The unit can not be used as a storage device.
Basic Operations
USB Operation
- Connect the USB device to the USB port.
- Select the USB function by pressing INPUT.
- Select a file you want to play by pressing
 .
.
Other Operations
DOLBY DRC (Dynamic Range Control)
Make the sound clear when the volume is turned down (Dolby Digital only). Set to [DRC ON] by using DOLBY DRC.
AV Sync
When receiving audio signals from TV, sound and images may not be matched. In the case, this function can adjust the delay time.
- Press AV SYNC.
- Use
 to scroll up and down through the delay amount, which you can set at anything between 0 and 300m/sec.
Sleep Timer Setting
Press SLEEP one or more times to select delay time between 10 and 180 minutes, after the unit will turn off.
To check the remaining time, press SLEEP.
To cancel the sleep function, press SLEEP repeatedly until“SLEEP 10” appears, and then press SLEEP once again while “SLEEP 10”is displayed.
Note
- You can check the remaining time before the Unit turns off.
- Press SLEEP The remaining time appears in the display window.
Dimmer
Press SLEEP once. The display window will be darken by half. To cancel it, press SLEEP repeatedly until dim off.
Turn off the sound temporarily
Press MUTE to mute your unit.
You can mute your unit in order, for example, to answer the telephone, appearing the  in the display window.
Adjust the woofer level settings
You can adjust the sound level of woofer.
- Press WOOFER LEVEL.
- Press VOLUME -/+ to adjust the sound level of the woofer.
Displaying file and input source
You can display various information on the USB and OPTICAL IN 1/ 2 mode by pressing INFO..
USB : MP3/ WMA containing file information
OPTICAL IN 1/ 2 : Audio format, Audio channel
Sound adjustment
Setting the surround mode
This system has a number of pre-set surround sound fields. You can select a desired sound mode by using SOUND EFFECT.
The displayed items for the equalizer may be different depending on sound sources and effects.
| On Display |
Description |
| NATURAL |
You can enjoy comfortable and natural sound. |
| BYPASS |
You can enjoy the sound without equalizer effect. |
| BASS |
The BASS is Bass Blast. During playback, reinforce the treble, bass and surround sound effect. |
| CLRVOICE |
The CLRVOICE is Clear Voice. This program make voice sound clear, improving the quality of voice sound. (We encourage to use this EQ when you watch the movie of 5.1 channel.) |
| VIRTUAL |
The VIRTUAL is VSM Plus. You can enjoy more virtual surround sound. |
| GAME |
The GAME is Game Equalizer. You can enjoy more virtual sound while playing video games. |
| NIGHT |
The NIGHT is Night Mode. This may be useful when you want to watch movies at low volume late at night. |
| UPSCALER |
The UPSCALER is MP3 UpScaling. When listening to MP3 files or other compressed music, you can enhance the sound. This mode is available only to 2 channel sources. |
| LOUDNESS |
Improves the bass and treble sound. |
Note
- In some of surround modes, some speakers, there’s no sound or low sound. It depends on the mode of surround and the source of audio, it is not defective.
- You may need to reset the surround mode, after switching the input, sometimes even after the sound file changed.
Using Bluetooth technology
About Bluetooth
Bluetooth® is wireless communication technology for short range connection.
The available range is within 10 meters.
(The sound may be interrupted when the connection interfered by the other electronic wave or you connect the bluetooth in the other rooms.) Connecting individual devices under Bluetooth® wireless technology does not incur any charges. A mobile phone with Bluetooth® wireless technology can be operated via the Cascade if the connection was made via Bluetooth® wireless technology.
Available Devices : Mobile phone, MP3, Laptop, PDA (This units be supported the Stereo Headset.)
Bluetooth Profiles
In order to use Bluetooth wireless technology, devices must be able to interpret certain profiles. This unit is compatible with following profile. A2DP (Advanced Audio Distribution Profile) AVRCP (Audio/ Video Distribution Remote Control Profile)
Listening to music stored on the Bluetooth devices
Pairing your unit and Bluetooth device
Before you start the pairing procedure, make sure the Bluetooth feature is turned on in to your Bluetooth device. Refer to your Bluetooth device’s user guide. Once a pairing operation is performed, it does not need to be performed again.
1. Select the Bluetooth function by using the INPUT. Appears“BT” and then“BT READY”in display window.
2. Operate the Bluetooth device and perform the pairing operation. When searching for this unit with the Bluetooth device, a list of the devices found may appear in the Bluetooth device display depending on the type of Bluetooth device.Your unit appears as“LG AUDIO”.
3. Enter the PIN code. PIN code : 0000
4. When this unit successfully paired with your Bluetooth device, Bluetooth LED of this unit lights up and appears“PAIRED”.
Note
- Depending on the Bluetooth device type, some device have a different pairing way.
- This function is recommended to use to listening to music. While using Bluetooth headset, sound and images may not be matched depending on the wireless environment or the connection conditions.
5. Listen to music. To play a music stored on your Bluetooth device, refer to your Bluetooth device’s user guide.
Note
- If you change the function of the unit, the Bluetooth function is disconnected, operate pairing again. (Bluetooth Function other than the Bluetooth)
- AVRCP is not supported in this mode.
Listening to sound through the Bluetooth devices
Pairing your unit and Bluetooth device
Before you start the pairing procedure, make sure the Bluetooth feature is turned on in to your Bluetooth device. Refer to your Bluetooth device’s user guide. Once a pairing operation is performed, it does not need to be performed again.
1. Select a function other than the Bluetooth function by using the INPUT.
2. Place the Bluetooth device to be connected to this unit within 3 feet of the unit.
3. Put the Bluetooth device in pairing mode. Refer to your Bluetooth device’s user guide.
4. Press and hold BLUETOOTH. Appears“INQUIRY”. If searched Bluetooth is only one, pairing the unit. Refer the step 7.
5. Appears depending on type of Bluetooth devices in display window .
6. Select a Bluetooth device you want to connect by using  FOLDER and press (STOP).
7. Enter the PIN code by using numberical buttons. PIN code : 0000
8. Press (STOP) to confirm. When this unit successfully paired with your Bluetooth device, Bluetooth icon of this unit lights up and appears“BT SRC”. You can listen to music played on this unit using your Bluetooth device. Sound output from the speakers is stopped.
Note You cannot use VOL (volume), SOUND EFFECT, WOOFER LEVEL buttons on the remote control or the unit in this mode.
Operating with Bluetooth device
You can operate a unit by connecting a Bluetooth device using AVRCP. For details about operation, refer to the Bluetooth device’s User Guide.
Note These operations may not be vailable for certain Bluetooth device. In addition, the actual operations may differ depending on the connected Bluetooth device.
Connecting and disconnecting with a Bluetooth device
This function is operated after pairing.
Press BLUETOOTH to connect or disconnect with a Bluetooth device.
Appears in as below display window.
Connection : BT CONN
Disconnection : DISCONN
Note If you change the function of the unit, the Bluetooth function is disconnected, press BLUETOOTH pairing again. (Bluetooth <-> Function other than the Bluetooth)
Checking the information of connected Bluetooth device
This function is operated after pairing. You can check the Bluetooth information.
Press and hold INFO. repeatedly. Bluetooth information is changed as follows.
Local Bluetooth Device Address -> Device Name -> None -> ...
Note
- This units does not be supported the Mono Headset Profile (Hands Free Profile)
- The sound may be interrupted when the connection interfered by the other electronic wave.
- You cannot control the Bluetooth device with this unit.
- Pairing is limited one Bluetooth device per one unit and multi-pairing is not supported.
- Although the distance between your Bluetooth and the set is less than 10m, there are obstacles between both, your Bluetooth device cannot be connected.
- Depending on the type of the device, you may not be able to use the Bluetooth function.
- You can enjoy wireless system using phone, MP3, Notebook, headset, etc..
- When not connected the Bluetooth,“BT READY” appears on the display window.
- The Electrical malfunction due to devices using same frequency such as Medical equipment, Microwaves or wireless LAN devices, the connection will be disconnected.
- When someone stands and interrupts communication between Bluetooth device and the player, the connection will be disconnected.
- If the gotten away of the distance between Bluetooth and the unit, the sound quality is lower and lower the connection will disconnect when the space between the Bluetooth and the unit gets out of the operating range of Bluetooth.
- The device with Bluetooth wireless technology is disconnected, if you turn off the main unit or put the device away from the main unit more than 10m.
Controlling a TV with the Supplied Remote Control
You can control your TV using the buttons below.
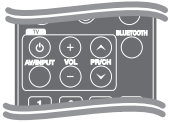
| Button |
Operation |
| (TV POWER) |
Turn the TV on or off. |
| AV/INPUT |
Switch the TV’s input source between the TV and other input sources. |
| VOL +/– |
Adjust the volume of the TV. |
PR/CH  |
Scan up or down through memorized channels. |
Note Depending on the unit being connected, you may not be able to control your TV using some of the buttons.
Setting up the remote to control your TV
You can operate your TV with the supplied remote control.
If your TV is listed in the table below, set the appropriate manufacturer code.
1. While holding down (TV POWER) button, and press the manufacturer code for your TV with the numerical buttons (see the table below).
| Manufacturer |
Code Number |
| LG |
1(Default), 2 |
| Zenith |
1, 3, 4 |
| GoldStar |
1, 2 |
| Samsung |
6, 7 |
| Sony |
8, 9 |
| Hitachi |
4 |
2. Release the (TV POWER) button to complete setting.
Depending on your TV, some or all buttons may not function on the TV, even after entering the correct manufacturer code. When you replace the batteries of the remote, the code number you have set may be reset to the default setting. Set the appropriate code number again.
Troubleshooting
| PROBLEM |
CORRECTION |
| No Power |
Plug in the power cord. |
| Check the condition by operating other electronic devices. |
| No sound |
Press FUNCTION and check the selected function.
The power cord of woofer is not connected. Plug the power cord into the wall outlet securely.
Pairing between the unit and woofer gets disconnected. Connect the unit and woofer. (Refer to the page 12)
|
| The remote control does not work properly. |
The remote control is too far from the unit.
Operate the remote control within about 23 ft (7m).
|
|
There is an obstacle in the path of the remote control and the unit.
Remove the obstacle.
|
|
The battery in the remote control is exhausted.
Replace the battery with new one.
|
Appendix
Maintenance
Handling the Unit
When shipping the unit
Please save the original shipping carton and packing materials. If you need to ship the unit, for maximum protection, re-pack the unit as it was originally packed at the factory.
Keeping the exterior surfaces clean
- Do not use volatile liquids such as insecticide spray near the unit.
- Wiping with strong pressure may damage the surface.
- Do not leave rubber or plastic products in contact with the unit for a long period of time.
Cleaning the unit
To clean the player, use a soft, dry cloth. If the surfaces are extremely dirty, use a soft cloth lightly moistened with a mild detergent solution. Do not use strong solvents such as alcohol, benzine, or thinner, as these might damage the surface of the unit.

 twice briefly to step back to the previous file.