All products are wiped clean with solvents at the factory to remove any visible signs of dirt, oil, and grease which may have remained from the manufacturing process.
All models include:
Automatically electric spark ignition/re-ignition burners light at any position on the knob and re-light if extinguished.
Removable knobs, grates, burner ports/caps.
Permanently sealed burners—spills cannot enter burner box
Cookware
Each cook has his or her own preference for the particular cooking vessels that are most appropriate for the type of cooking being done. Any and all cookware is suitable for use. This is a matter of personal choice. As with any cookware, yours should be in good condition and free from excessive dents on the bottom to provide maximum performance and convenience.
Note: When using big pots and/or high flames, it is recommended to use the center burner. There is more room in the center of the unit and potential cleanup at rear of appliance due to staining or discoloration will be minimized. When using small pans on large burners, adjust surface burner flame so that it does not extend beyond the bottom edge of the pan. An excessive flame is hazardous and could create hot surfaces resulting in burns
Cooktop Features
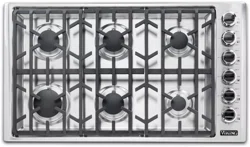
30”W. Five Burner
9,100 Nat./8,500 LP (BTU) burner
17,000 Nat./13,000 LP (BTU) burner
5,000 Nat./5,000 LP (BTU) burner
12,000 Nat./10,000 LP (BTU) burner
9,100 Nat./8,500 LP (BTU) burner
Left front burner control knob
Left rear burner control knob
Center burner control knob
Right rear burner control knob
Right front burner control knob
36”W. Five Burner
9,100 Nat./8,500 LP (BTU) burner
17,000 Nat./13,000 LP (BTU) burner
5,000 Nat./5,000 LP (BTU) burner
12,000 Nat./10,000 LP (BTU) burner
9,100 Nat./8,500 LP (BTU) burner
Left front burner control knob
Left rear burner control knob
Center burner control knob
Right rear burner control knob
Right front burner control knob
Operation
Surface Operation
Lighting Burners
All burners are ignited by electric ignition. There are no open-flame, “standing” pilots.
Surface Burners-Automatic Reignition
To light the surface burners, push and turn the appropriate control knob counterclockwise to any position. This control is both a gas valve and an electric switch. Burners will ignite at any “ON” position with the automatic re-ignition system. If the flame goes out for any reason, the burners will automatically reignite if the gas is still flowing. When gas is permitted to flow to the burners, the electric igniters start sparking. On all surface igniters you should hear a “clicking” sound. If you do not, turn off the control and check that the unit is plugged in and that the fuse or circuit breaker is not blown or tripped.
Note: When opening or closing cabinet drawers or doors near the cooktop there may be a disturbance in the air supply causing the burner flame to extinguish momentarily. The burner will relight with the automatic re-ignition system once the air supply stabilizes, normally within a few seconds. This is not a safety or performance concern.
Rear, Center, and Front Burners
Push in and turn the control knob counter-clockwise to the desired setting. The control knobs can be turned to any desired setting as the knobs do not have fixed positions between “Hi” and “Simmer”.
Within a few moments, enough gas will have traveled to the burner to light. When the burner lights, turn the burner control to any position to adjust the flame size. Setting the proper flame height for the desired cooking process and selecting the correct cooking vessel will result in superior cooking performance, while also saving time and energy.
Note: The igniters may click a number of times before the burner ignites. This is normal. All igniters will spark regardless of which burner is being operated.
Surface Operation Operation Surface Cooking Tips
The simmer line on the control panel is the beginning of the variable simmer setting and produces a high simmer setting. Turn the knob slowly towards “OFF” and the flame will adjust to a lower simmer setting.
Use low or medium flame heights when cooking in cookware that are poor conductors of heat, such as glass, and ceramic. Reduce the flame height until it covers approximately 1/3 of the cookware diameter. This will ensure more even heating within the cookware and reduce the likelihood of burning or scorching the food.
Reduce the flame if it is extended beyond the bottom of the cookware. A flame that extends along the sides of the cookware is potentially dangerous, heats the cookware handle and kitchen instead of the food, and wastes energy.
Reduce the flame height to the minimum level necessary to perform the desired cooking process. Remember that food cooks just as quickly at a gentle boil as it does at a rolling boil. Maintaining a higher boil than is necessary causes a loss in food flavor and nutrients.
Surface Heat Settings*
Heat Setting
Use
Simmer
Melting small quantities
Steaming rice
Simmering sauces
Low
Melting large quantities
Med Low
Low-temperature frying (eggs, etc.)
Simmering large quantities
Heating milk, cream sauces, gravies, and puddings
Med
Sautéing and browning, braising, and pan-frying Maintaining slow boil on large quantities
Med High
High-temperature frying
Pan broiling
Maintaining fast boil on large quantities
High
Boiling water quickly
Deep-fat frying in large cookware
*Note: The above information is given as a guide only. You may need to vary the heat settings to suit your personal requirements.
Cleaning and Maintenance
WARNING - BURN OR ELECTRICAL SHOCK HAZARD: Make sure all controls are OFF and cooktop is COOL before cleaning. Failure to do so can result in burns or electrical shock.
Any piece of equipment works better and lasts longer when maintained properly and kept clean. Cooking equipment is no exception. Your cooktop must be kept clean and maintained properly. Before cleaning, make sure all controls are in the “OFF” position.
Surface Burners
*Note: When replacing burner head, carefully align the tab underneath the cap with the slot in the burner base.
Wipe up spill-overs as soon as possible after they occur and before they get a chance to burn in and cook solid.
In the event of a spill-over, follow these steps:
Allow the burner and grate to cool to a safe temperature level.
Lift off the burner grate. Wash in warm soapy water.
Remove the burner cap and burner head and clean.
Burner Caps
The surface burner caps should be routinely removed and cleaned. ALWAYS clean the burner caps after a spill-over. Keeping the burner caps clean will prevent improper ignition and uneven flames. To clean, pull burner cap straight up from the burner base. Wipe off surface burner caps with warm, soapy water and a soft cloth after each use. Use a non-abrasive cleanser such as Bon Ami™ and a soft brush or soft Scotch Brite™ pad for cooked-on foods. Dry thoroughly after cleaning. For best cleaning and to avoid possible rusting, DO NOT clean in dishwasher or self-cleaning oven.
Burner Head
If ports on burner head are clogged, clean with a straight pin. DO NOT enlarge or distort the ports. DO NOT use a toothpick to clean the ports. When replacing burner head, carefully align the 2 tabs underneath the burner head with the outside edge of burner base. Make sure the tabs are not aligned with the igniter and the burner cap is level.
Note: For stubborn stains, use a non abrasive cleanser such as Bon Ami™ and a soft brush or soft Scotch Brite™ pad.
Cleaning Tip: For difficult to clean burner caps and heads, place parts in a zip seal bag with ammonia.
Burner Base
The base should be wiped regularly with hot soapy water at the end of each cooling period. DO NOT use steel wool, abrasive cloths, cleanser, or powders. To remove encrusted materials, soak the area with a hot towel to loosen the material, then use a wooden nylon spatula. DO NOT use a metal knife, spatula, or any other metal tool to scrape the aluminum base.
Wipe up any spills which remain on the sealed top surface.
Replace burner cap, burner head, and grates after drying thoroughly.
Cooktop Surfaces
Several different finishes have been used in your cooktop. Cleaning instructions for each surface are given below. NEVER USE AMMONIA, STEEL WOOL PADS OR ANY ABRASIVE CLOTHS AND MATERIALS SUCH AS CLEANSERS, OVEN CLEANERS, OR ABRASIVE POWDERS. THEY CAN PERMANENTLY DAMAGE YOUR COOKTOP
Control Panel
DO NOT use any cleaners containing ammonia, abrasives, or stainless steel cleaners on any surface that contains graphics. They could remove the graphics from the control panel. Use hot, soapy water and a soft clean cloth. DO NOT spray liquids directly onto control panel.
Control Knobs
MAKE SURE ALL THE CONTROL KNOBS POINT TO THE “OFF” POSITION BEFORE REMOVING. Pull the knobs straight off. Wash in detergent and warm water. Dry completely and replace by pushing firmly onto stem. DO NOT use any cleaners containing ammonia or abrasives.
Stainless Steel Parts
All stainless steel body parts should be wiped regularly with hot soapy water at the end of each cooling period and with a liquid cleaner designed for that material when soapy water will not do the job. DO NOT use steel wool, abrasive cloths, cleansers, or powders. If necessary, scrape stainless steel to remove encrusted materials, soak the area with hot towels to loosen the material, then use a wooden or nylon spatula or scraper. DO NOT use a metal knife, spatula, or any other metal tool to scrape stainless steel. DO NOT permit citrus or tomato juice to remain on stainless steel surface, as citric acid will permanently discolor stainless steel. Wipe up any spills immediately.
Troubleshooting
Problem
Possible Cause and/or Remedy
Igniters will not work
Circuit is tripped.
Fuse is blown.
Cooktop is not connected to power.
Igniters sparking but no flame ignition.
Gas supply valve is in “OFF” position.
Gas supply is interrupted.
Igniters sparking continuously after flame ignition.
Power supply is not grounded.
Power supply polarity is reversed.
Igniters are wet or dirty.
Burner ignites but flame is large, distorted, or yellow.