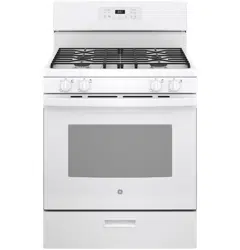
Documents: Go to download!
- Owner's manual - (English, Spanish)
- USING THE RANGE
- CARE AND CLEANING
- TROUBLESHOOTING TIPS
Table of contents
OWNER’S MANUAL Single Oven Gas RANGES
USING THE RANGE
Surface Burners
Selecting a Flame Size
Watch the flame, not the knob, as you adjust heat. When rapid heating is desired, the flame size should match the size of the cookware you are using. Flames larger than the bottom of the cookware will not heat faster and may be hazardous
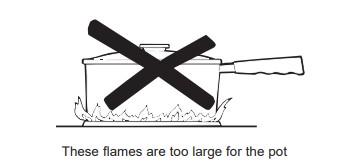
Using the Surface Burners
Your rangetop offers convenience, cleanability and flexibility for a wide range of cooking applications.
The smallest burner is the simmer burner. A simmer burner turned down to LO provides precise cooking performance for foods such as delicate sauces that require low heat for a long cooking time.
Types of Surface Burners

Top-of-Range Cookware.
Stainless Steel: This metal alone has poor heating properties and is usually combined with copper, aluminum or other metals for improved heat distribution. Combination metal skillets usually work satisfactorily if they are used with medium heat or as the manufacturer recommends.
Cast-Iron: If heated slowly, most skillets will give satisfactory results.
Heatproof Glass Ceramic: Can be used for either surface or oven cooking. It conducts heat very slowly and cools very slowly. Check the cookware manufacturer’s directions to be sure it can be used on gas ranges.
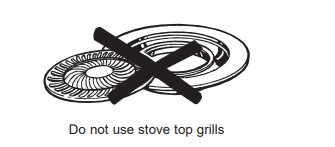
Stove Top Grills
Do not use an after-market stove top grill on your gas surface burners. A stove top grill will cause incomplete combustion resulting in carbon monoxide levels above allowable standards. This could be hazardous to your health.
Oven Controls
Non Convection
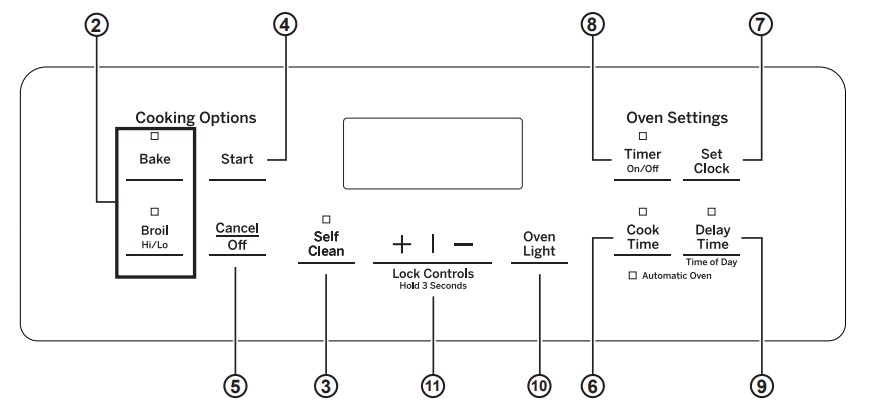
Convection
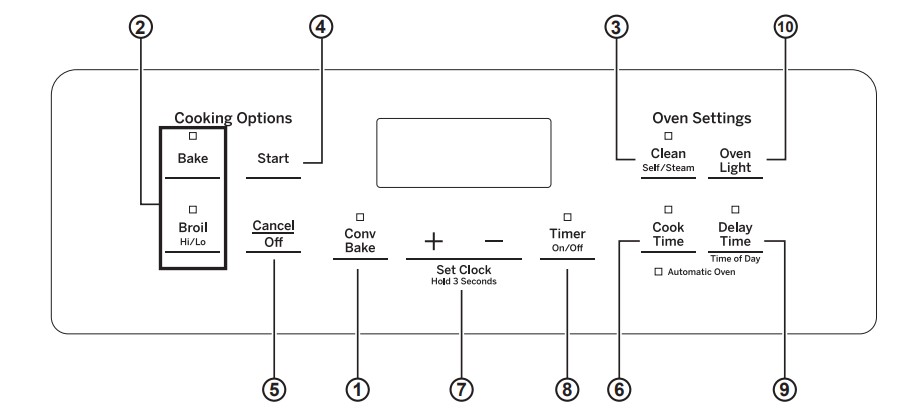
1. Convection Bake (on some models): Convection cooking uses increased air circulation to improve performance when baking on multiple racks. See the Cooking Modes section for more information.
2. Traditional Cooking Modes: Your oven has the following traditional cooking modes: Bake, Broil Hi and Broil Lo. See the Cooking Modes section for more information.
3. Clean (on some models): There are two cleaning modes: Self Clean and Steam Clean. See the Cleaning the Oven section for important information about using these modes.
4. Start: Must be pressed to start any cooking, cleaning or timed function.
5. Cancel/Off: Cancels ALL oven operations except the clock and timer.
6. Cook Time: Counts down cooking time and turns off the oven when the cooking time is complete. Program the desired cooking mode and temperature and press Start. Then. press the Cook Time pad and use the number pads to program a cooking time in hours and minutes. Then. press Start again. This can only be used with Traditional Bake and Convection Bake.
7. Clock: Sets the oven clock time and clock display (on some models). To set the clock display (on/off). press the Set Clock pad (on some models) once. If your model does not have a Set Clock pad. see the Special Features section for instructions on how to adjust the clock display. To set the clock time. press both the + and - pads and hold for 3 seconds or press the Set Clock pad until the display is flashing. Use the + and - pads to adjust the clock. Press Start to save the time.
8. Timer: Works as a countdown timer. Press the Timer pad and the + and - pads to program the time in hours and minutes. Press the Start pad. The oven will continue to operate when the timer countdown is complete. To turn the timer off. press the Timer pad.
9. Delay Time: Delays when the oven will turn on. Use this to set a time when you want the oven to start. Press the Delay Time pad. and use the + and pads to program the time of day for the oven to turn on. Then press the desired cooking mode pad. use the + and - pads to adjust the temperature. then press Start. After Start has been pressed. a cook time may also be programmed if desired. Once the Delay Time has been programmed. the start time set for the oven will be displayed until that time is reached. Then. either the cook time (if programmed) or the temperature will be displayed. Delay Time can only be used with Traditional Bake. Convection Bake. and the Clean modes (on some models).
NOTE: When using the delay time feature. foods that spoil easily—such as milk. eggs. fish. stuffings. poultry. and pork—should not be allowed to sit at room temperature for more than 1 hour before or after cooking. as this may promote the growth of harmful bacteria. Be sure that the oven light is off. because heat from the bulb will speed harmful bacteria growth.
10. Oven Light (on some models): Turns the oven light on or off.
11. Lock Controls (on some models): Locks out the control so that pressing the pads does not activate the controls. Press and both the + and pads and hold for 3 seconds to lock or unlock the control. Cancel/Off is always active. even when the control is locked.
Cooking Modes
Your new oven has a variety of cooking modes to help you get the best results. These modes are described below. Refer to the Cooking Guide section for recommendations for specific foods. Remember, your new oven may perform differently than the oven it is replacing.
Bake
The bake mode is for baking and roasting. This mode uses heat only from the lower burner. When preparing baked goods such as cakes, cookies and pastries, always preheat the oven first. To use this mode, press the Bake pad, use the + and - pads to adjust the temperature, then press Start.
Broiling Modes
Always broil with the oven door and drawer closed. Monitor food closely while broiling. Use caution when broiling on the upper rack positions as placing food closer to the broil burner increases smoking. spattering. and the possibility of fats igniting.
Try broiling foods that you would normally grill. Adjust rack positions to adjust the intensity of the heat to the food. Place foods closer to the broil burner when a seared surface and rare interior is desired. Thicker foods and foods that need to be cooked through should be broiled on a lower rack position or by using the Broil Lo mode.
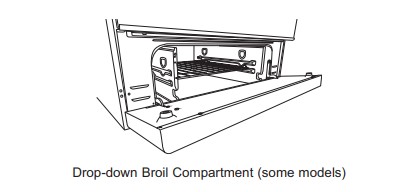
Broil Compartment (on some models)
For better searing use the rack position that places food closest to the broil heater. Move food down for more donenessiless searing. Take care not to touch the inner door when placing and removing food in broil compartment.
See other models: GZS22DSJSS JN327HWW JGBS61DPBB GIE22JTNRBB GZS22IYNFS
Broil Hi
The Broil Hi mode uses intense heat from the upper burner to sear foods. Use Broil Hi for thinner cuts of meat and/or when you would like to have a seared surface and rare interior. To use this mode press the Broil pad once and then press Start. It is not necessary to preheat when using this mode.
Broil Lo
The Broil Lo mode uses less intense heat from the upper burner to cook food thoroughly while also browning the surface. Use Broil Lo for thicker cuts of meat and/or foods that you would like cooked all the way through. To use this mode press the Broil pad twice and then press Start. It is not necessary to preheat when using this mode.
Convection Bake (on some models)
The Convection Bake mode is intended for baking on multiple racks at the same time. This mode uses air movement from the convection fan to enhance cooking evenness. Your oven is equipped with Auto Recipe Conversion, so it is not necessary to adjust the temperature when using this mode. Always preheat when using this mode. Baking times may be slightly longer for multiple racks than what would be expected for a single rack. To use this mode press the Conv Bake pad, use the + and - pads to adjust the temperature, and then press Start. Always preheat when using this mode.
CARE AND CLEANING
Burner Grates
Manual Cleaning
Grates should be washed in hot, soapy water and rinsed with clean water. To soften burned-on food, place grates in a solution containing ¼-cup of household ammonia for several hours. Afterward, scrub grates with a plastic scouring pad soaked in hot, soapy water. Rinse well and dry.
Self Clean Mode (on some models)
If your grates do not have rubber bumpers on their bottom surface, they may be cleaned in the oven using the self-clean cycle. Do not attempt to clean your grates in the oven if your grates have rubber bumpers. Doing so will destroy the rubber bumpers and may affect the function of your surface burners.
Nickel-plated racks should not remain in the oven during the self clean cycle. Doing so will tarnish the racks. If either type of rack is left in the oven during a self-clean cycle, the rack may become difficult to slide.
NOTE: When placing or removing grates from the oven, do not slide the grates on the racks or oven bottom. Doing so could damage the enamel on the racks or oven bottom.
Door and Drawer
Cleaning the Oven Door
Cleaning the Door Interior
Do not allow excess water to run into any holes or slots in the door
Wipe dish soap over any baked-on spatters on the glass. Use a wipe over the glass with a soapy cloth to remove any residue and dry off.
The area outside the gasket can be cleaned with a soapfilled plastic scouring pad. Do not rub or clean the door gasket - it has an extremely low resistance to abrasion.
If you notice the gasket becoming worn, frayed or damaged in any way or if it has become displaced on the door, you should have it replaced.
Cleaning the Door Exterior
If a stain on the door vent trim is persistent, use a mild abrasive cleaner and a sponge-scrubber for best results. Do not use this method on any other surface.
Stainless Steel Surfaces (on some models)
Do not use a steel wool pad; it will scratch the surface.
To clean the stainless steel surface, use warm sudsy water or a stainless steel cleaner or polish. Always wipe the surface in the direction of the grain. Follow the cleaner instructions for cleaning the stainless steel surface.
To inquire about purchasing cleaning products including stainless steel appliance cleaner or polish, see the Accessories and Consumer Support sections at the end of this manual.
Removable Storage Drawer (on some models)
The storage drawer is a good place to store cookware and bakeware. Do not store plastics or flammable material in the drawer.
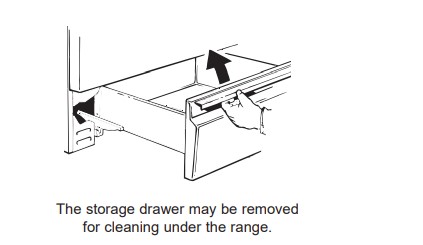
The storage drawer may be removed for cleaning under the range. Clean the storage drawer with a damp cloth or sponge. Never use harsh abrasives or scouring pads.
Removing the Storage Drawer:
- Pull drawer straight out until it stops
- Tilt the front of the drawer upward and pull the drawer free of the range.
Replacing the Storage Drawer:
- Rest the drawer slides on the range stops.
- Push directly backward until the drawer drops into place.
- Slide the drawer all the way into the oven.
Oven Door
The door is very heavy. Be careful when removing and lifting the door. Do not lift door by the handle.
| Removing the Door: | ||
|
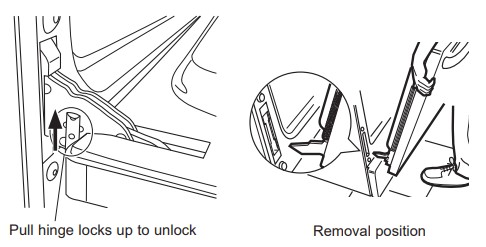 |
| Replacing the Door: |
|
|
|
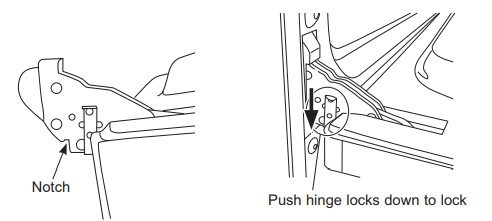 |
TROUBLESHOOTING TIPS
| Problem | Possible Cause | What To Do |
|---|---|---|
| My new oven doesn't cook like my old one. Is something wrong with the temperature settings? | Your new oven has a different cooking system from your old oven and therefore may cook differently than your old oven. | For the first few uses, follow your recipe times and temperatures carefully and use rack positions recommended in the Cooking Guide. If you still think your new oven is too hot or too cold, you can adjust the temperature yourself to meet your specific cooking preference. See the Oven Controls section. |
| Food does not bake properly | Oven controls improperly set. | See the Cooking Modes section. |
| Rack position is incorrect or rack is not level. | See the Cooking Modes section and Cooking Guide. | |
| Incorrect cookware or cookware of improper size being used. | See the Cookware section. | |
| Oven temperature needs adjustment. | See the Oven Controls section. | |
| Food does not broil properly | Oven controls improperly set. | Make sure you select the appropriate broil mode. |
| Improper rack position being used. | See Cooking Guide for rack location suggestions. | |
| Cookware not suited for broiling. | Use a pan specifically designed for broiling | |
| Aluminum foil on the broil pan has not been fitted properly or slit to drain grease. | If using aluminum foil on broil pan, wrap tightly and add slits conforming to those in the pan to allow grease to drain. | |
| Oven temperature too hot or too cold | Oven temperature needs adjustment. | See the Oven Controls section. |
| Oven and/or display appears not to work | A fuse in your home may be blown or the circuit breaker tripped. | Replace the fuse or reset the circuit breaker. |
| Oven controls improperly set. | See the using the oven section | |
| A single bracket "]" shows in the display. | Press Bake and Broil pads at the same time and hold for three second. " SF " is appear in h edisplay. Press the Set Clock pad or the Cook Time pad until "On" appears in the display and then press Start. The display will change from a single bracket "]" to the time of day. | |
| The clock is turned off. | See the Oven Controls or Special Features section. | |
| “Crackling” or “popping” sound | This is the sound of the metal heating and cooling during both the cooking and cleaning functions. | This is normal. |
| Why is my range making a "clicking" noise when using my oven? | Your range has been designed to maintain a tighter control over your oven's temperature. You may hear your oven's heating elements "click" on and off more frequently than in older ovens to achieve better results during baking, broiling, and self-clean cycles. | This is normal. |
| Clock and timer do not work | A fuse in your home may be blown or the circuit breaker tripped. | Replace the fuse or reset the circuit breaker. |
| Sometimes the oven takes longer to preheat to the same temperature | Cookware, food, and/or number of racks in oven. | Cookware, food, and racks in the oven will cause differences in preheat times. Remove excess items to reduce preheat time. |
| Oven light does not work | Light bulb is loose or defective. | Tighten or replace bulb. See the Maintenance section for instructions on how to replace the bulb. |
| Oven will not selfclean | The temperature is too high to set a self-clean operation. | Allow the oven to cool and reset the controls. |
| Oven controls improperly set. | See the Care and Cleaning section. | |
| Excessive smoking during clean cycle | Excessive soil or grease. | Turn the Oven Temperature Knob to OFF. Wait until the Oven cools below the unlocking temperature. Open the windows to rid the room of smoke. Wipe up the excess soil and reset the clean cycle. |
| Oven not clean after a clean cycle | Oven controls improperly set. | See the Care and Cleaning section. |
| Oven was heavily soiled. | Clean up heavy spillovers before starting the clean cycle. Heavily soiled ovens may need to self-clean again. | |
| Strong “burning” or “oily” odor emitting from the vent | This is normal in a new oven and will disappear in time. | To speed the process, set a self-clean cycle. See the Care and Cleaning section. This is temporary. |
| Excessive smoking during broiling | Food too close to burner element. | Lower the rack position of the food. |
| Oven door will not open when you want to cook. | The oven door is locked because the temperature inside the oven has not dropped below the locking temperature. | Allow the oven to cool below the locking temperature. |
| "LOCK DOOR" flashes in the display | The self-clean or steam-clean cycle has been selected but the door is not locked. | Lock the oven door. |
| “F— and a number or letter” flash in the display | You have a function error code. | Press the Cancel/Off pad. Allow the oven to cool for one hour. Put the oven back into operation. If the function code repeats. disconnect all power to the oven for at least 30 seconds and then reconnect power. If the function error code repeats again. call for service. |
| Clock flashes due to a power outage | Power outage or surge | Reset the clock. If the oven was in use, you must reset it by pressing the Cancel/Off pad, setting the clock and resetting any cooking function. |
| Lock Controls or Control Lockout feature is activated | If LOC ON appears in the display, the range control is locked. Turn this feature off to use the range. See the Oven Controls section. | |
| Burners do not light | Plug on range is not completely inserted in the electrical outlet. | Make sure electrical plug is plugged into a live, properly grounded outlet. |
| Gas supply not connected or turned on. | See the Installation Instructions that came with your range. | |
| A fuse in your home may be blown or the circuit breaker tripped. | Replace the fuse or reset the circuit breaker. | |
| Burner parts not replaced correctly. | See the Care and Cleaning of the range section. | |
| Burner slots near the electrode, or the round lighter port on the oval burner, may be clogged. | Remove the burners and clean them. Check the electrode area for burned-on food or grease. See the Care and Cleaning of the range section. | |
| Food residue on electrode | Lightly polish flat tip of electrode with nail file or sandpaper until shiny. | |
| Top burners do not burn evenly | Improper burner assembly. | Make sure the burner caps are seated correctly. See the Care and Cleaning of the range section. |
| Burner slots on the side of the burner may be clogged. | Remove the burners for cleaning. See the Care and Cleaning of the range section. | |
| Burner flames are very large or yellow | Improper air to gas ratio. | If range is connected to propane gas, contact the technician who installed your range or made the conversion. |
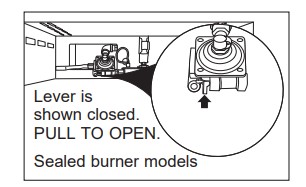
| Surface burners light but bake and broil burners do not. | Gas to the oven burners may have been shut off. |
The oven gas shut-off is located on the gas regulator near the gas line attachment to your range. Locate it and flip the lever.
|
| My oven door glass appears to be "tinted" or have a "rainbow" color. | The inner oven glass is coated with a heat barrier to reflect the heat back into the oven to prevent heat loss and keep the outer door cool while baking. | This is normal. Under certain lights or angles, you may see this tint or rainbow color. |
| Drawer does not slide smoothly or drags | The drawer is out of alignment. | Fully extend the drawer and push it all the way in. See the Care and Cleaning of the range section |
| Drawer is over-loaded or load is unbalanced. | Reduce weight or redistribute drawer contents. |
