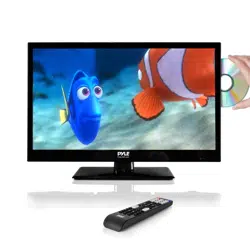
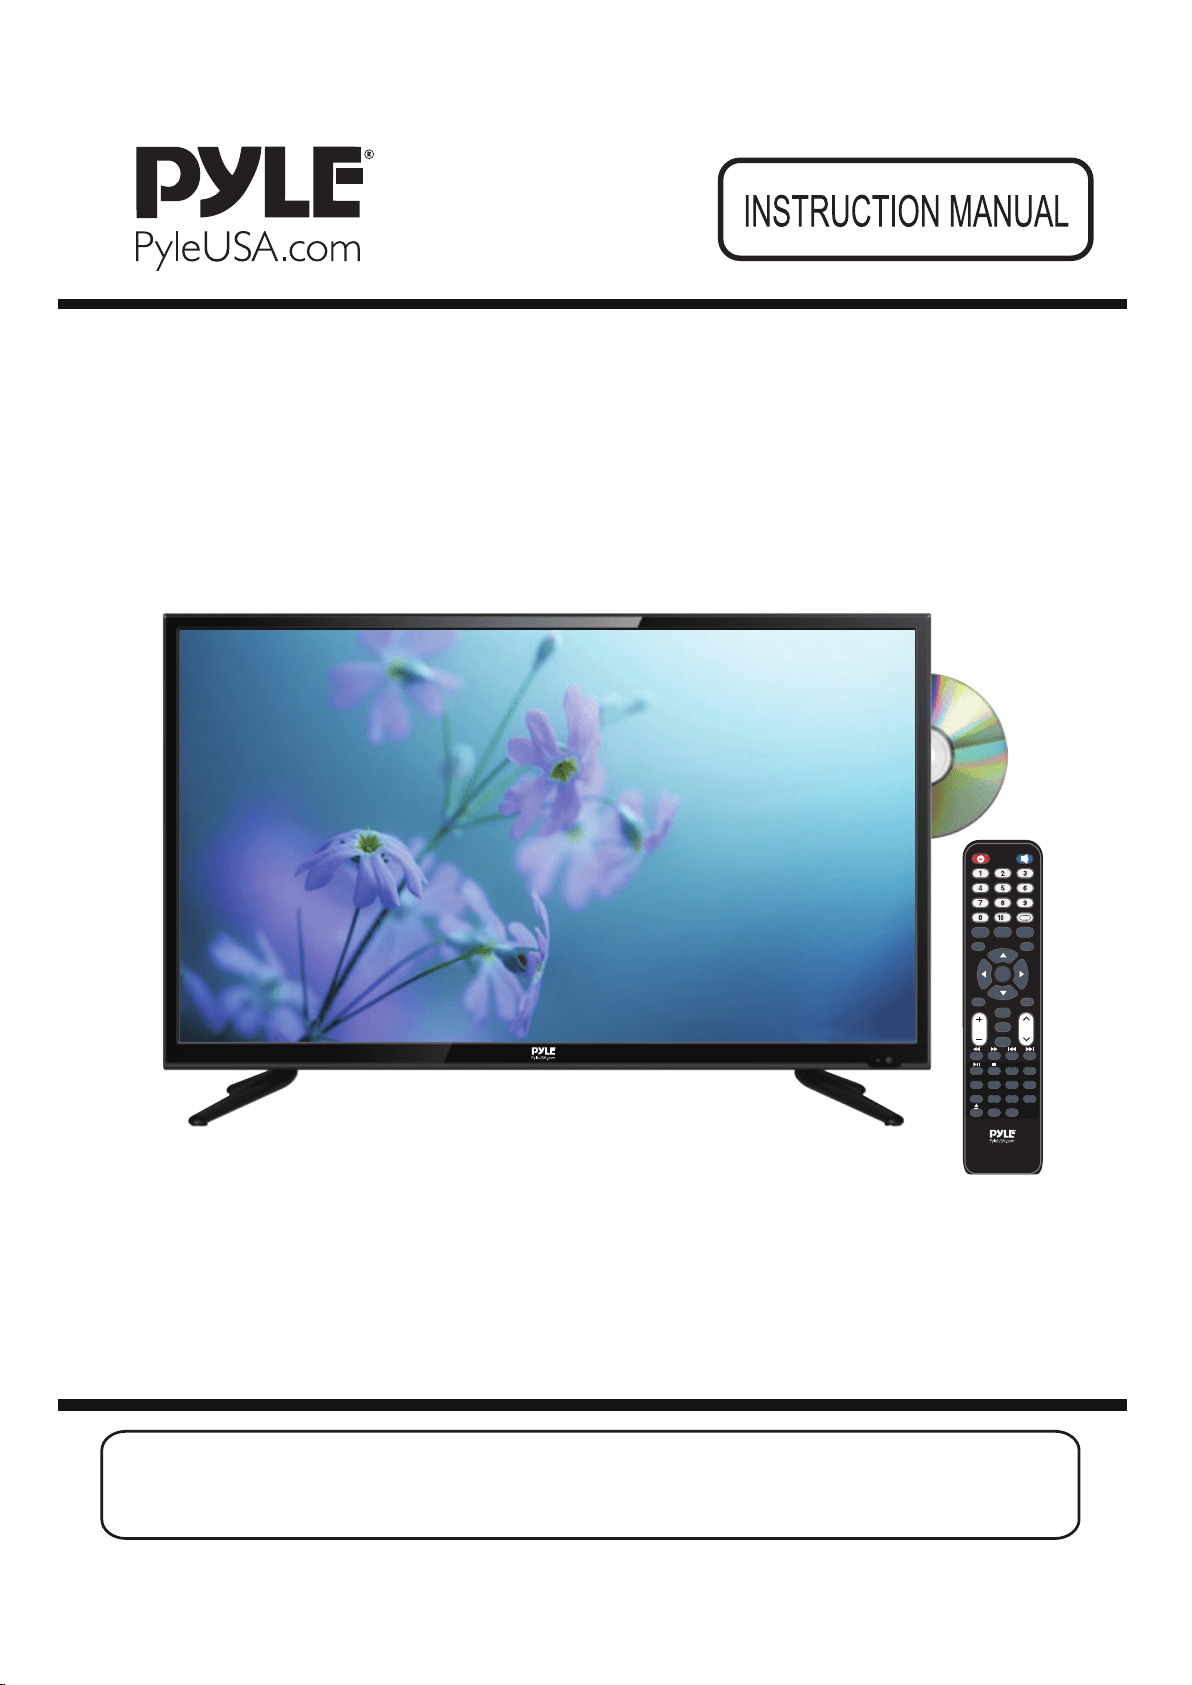
Modelnr:PTVDLED32 Modelnr:PTVDLED40
NTSC,ATSC
Statement:This document is reference manual,please confirm
with the specifically software if need translate or batch print
CCD
ZOOM
SLEEP
VOL
FAV
GOTO ANGLE
SLOW
S
TEP
FAV-
FAV+ REPEAT
SUB-T A-B PROG
DVD
MENU
DVD
SETUP
TITLE
CH
AUTO
DISPLAY
POWER
S.MODE
TV MEN
U
ENTER
MTS EX
IT
P.MODE
+
EPG
SOURCE
MUTE

2
Contents
Caution ....................................................................................... 3
Safety Information ..................................................................... 3-5
Product Introduction ................................................................. 6
Technical Specification ............................................................................ 5
Simple Troubleshooting
Connections ............................................................................... 7
R
Setup Wizard
Select Input Source
Main Menu
e
Picture Menu
mote Control .......................................................................... 8-9
10-11
12
12
..................................................................... ..13-14
Lock Menu
......................................................................... ..21-24
.......................................................... 25
Soud Menu .............................................................................15-16
Time Menu .................................................................................17
Setup Menu ................................................................................19-21
Close Caption ............................................................................18
Channel Menu..............................................................................25-26
PC Menu.......................................................................................27-28
DVD Operation.............................................................................29-33
SPECIFICACIONES......................................................................34
..............................................................................
3
4
5
6
7
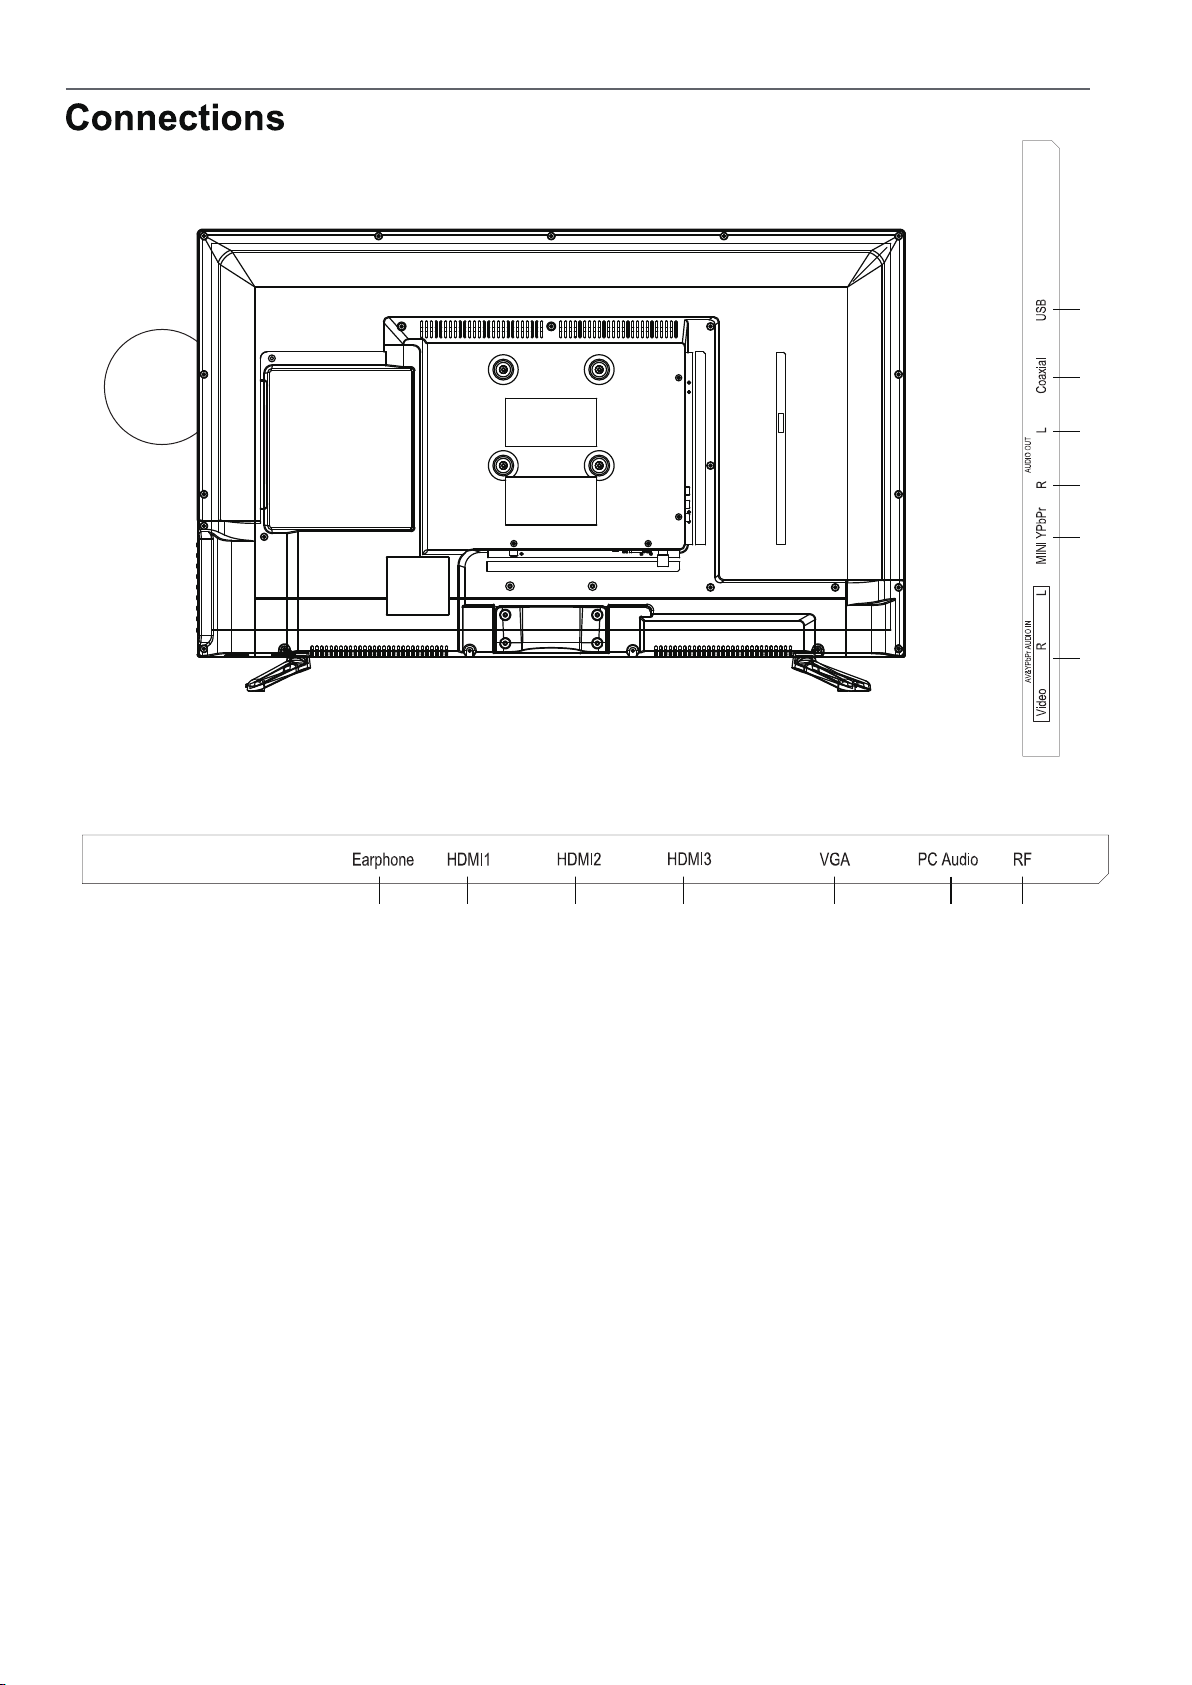
1. Connect a stereo headphone (3.5mm) for private listening.
2/3/4. Connect it to the HDMI of DVD or other equipment.
5. Connect an optional VGA cable from your personal computer.
6. Connect an optional 3.5mm audio cable for sound when using VGA.
7. Connect antenna or cable for television reception.Note: Use an
8. Connect to an AV device that features compo-nent
video and audio output jacks.
9.Connect to an YPbPr device that features compo-nent
video and audio output jacks.
10/11. Audio output to connect power amplifier stereo equipment.
12. Connect an optional coaxial digital cable through a compatible
amp/receiver to enjoy superior audio sound.
13. For service technician use only.
1 2 3 4 5 6 7
8 9 10 11 12 13
RF L R
Video/Y
Pb
Pr
R
AUDIO OUT
L
8
CCD
ZOOM SLEEP
VOL
FAV
GOTO ANGLE
S
LOW
S
TEP
FAV- FAV+ REPEAT
SUB-T A-B PROG
DVD
MENU
DVD
SETUP
TITLE
CH
AUTO
DISPLAY
POWER
S.MODE
TV MENU
ENTER
MTS EXIT
P.MODE
+
EPG
SOURCE
MUTE
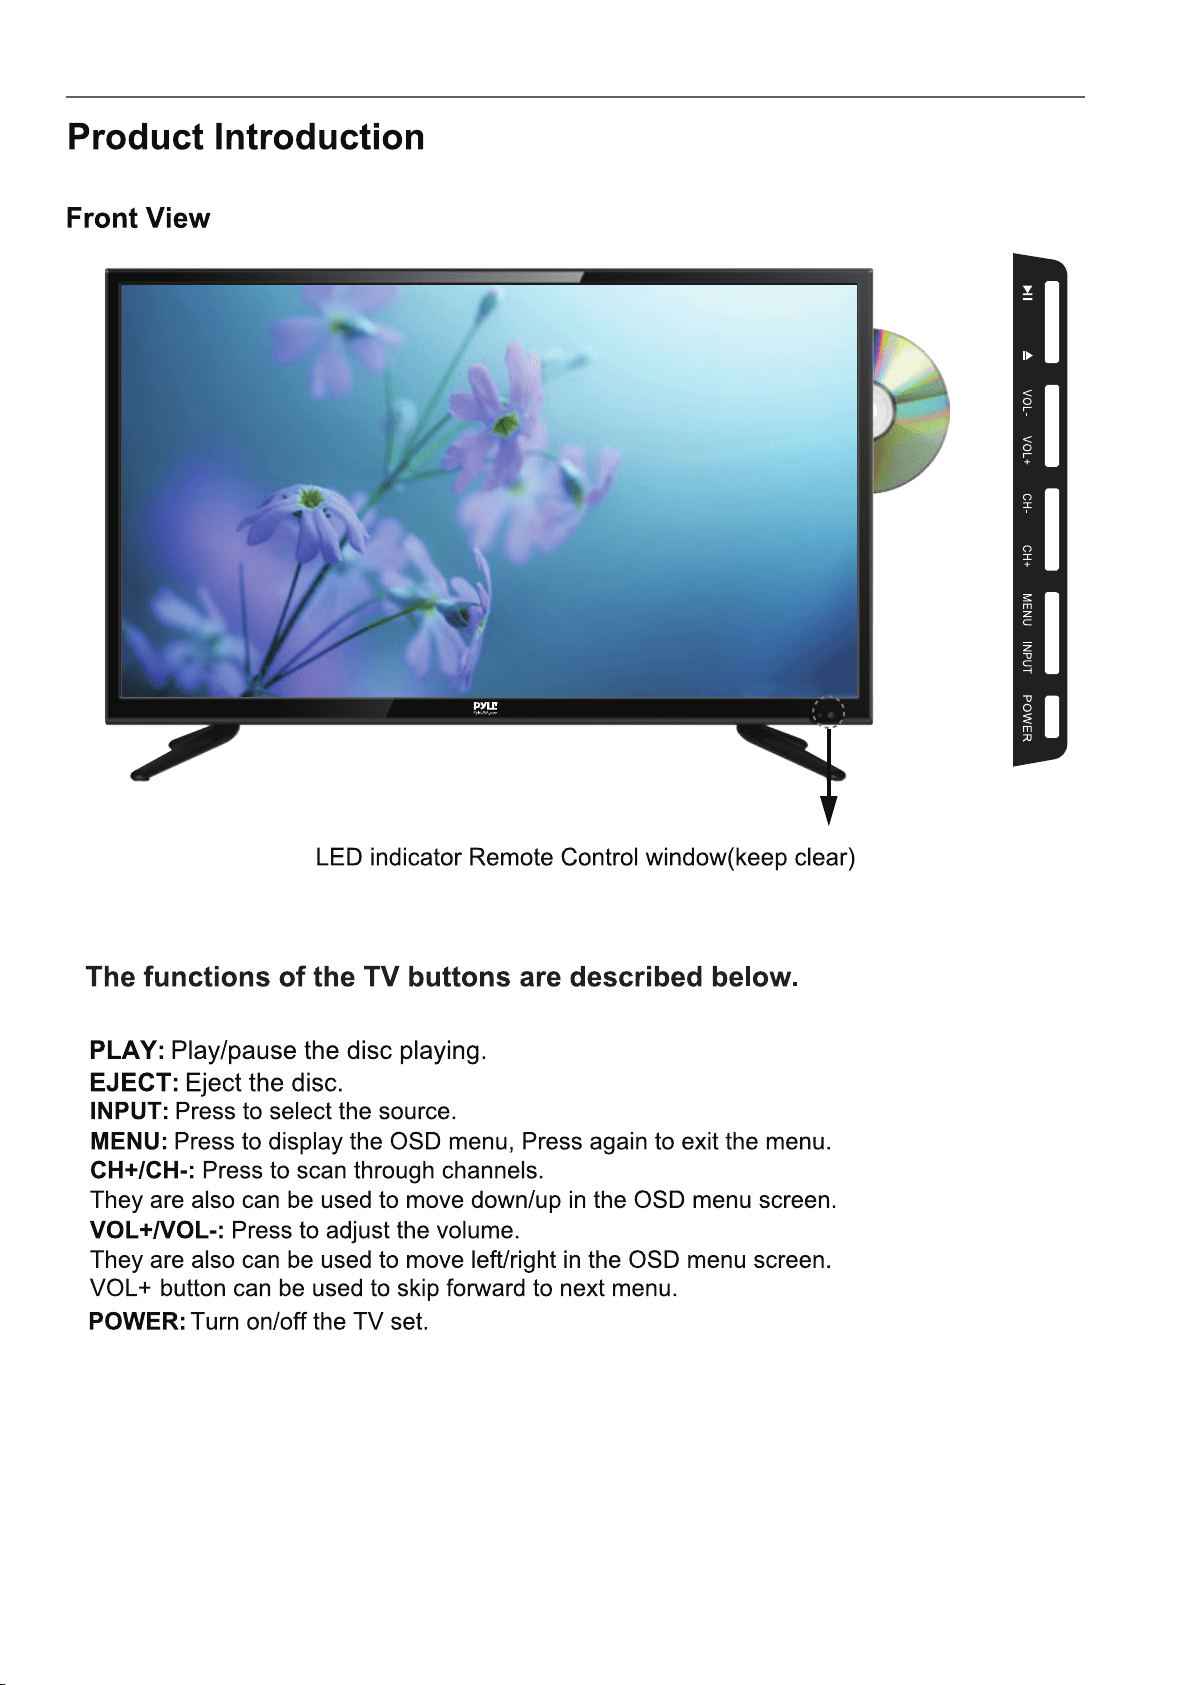
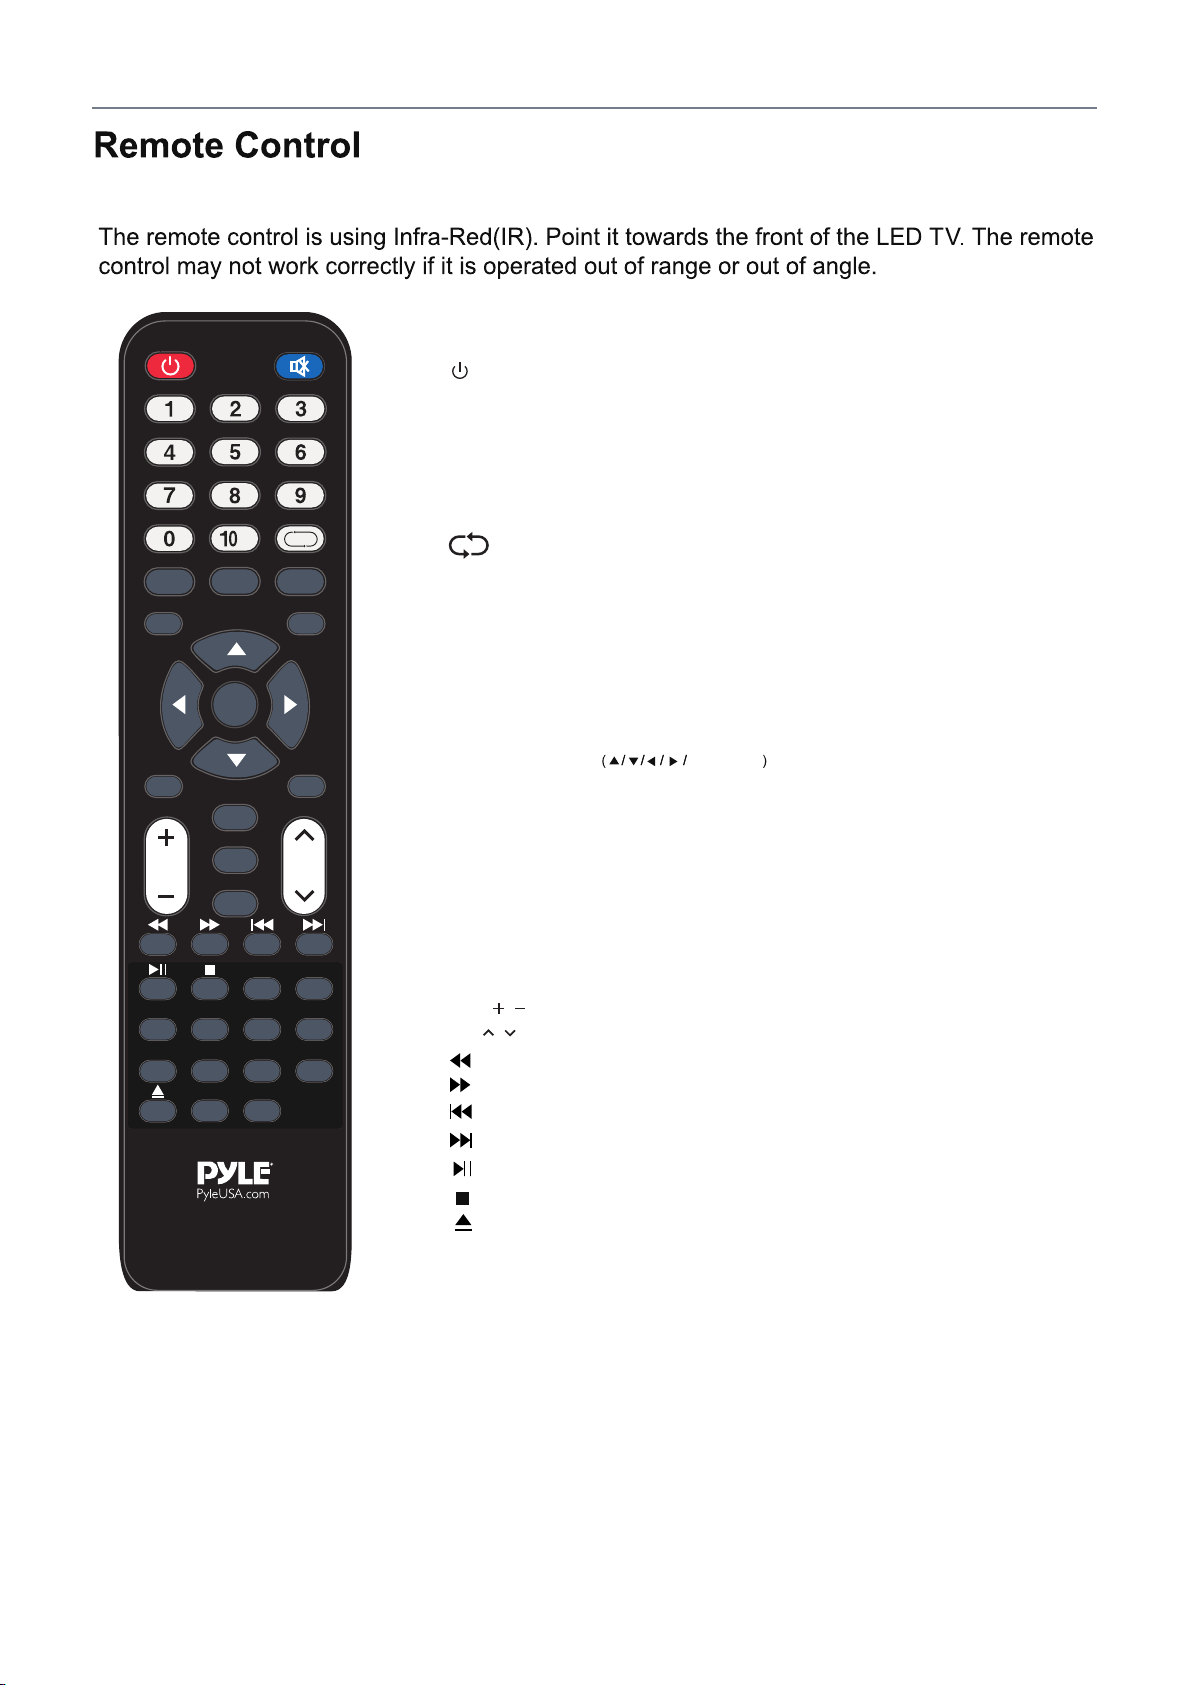
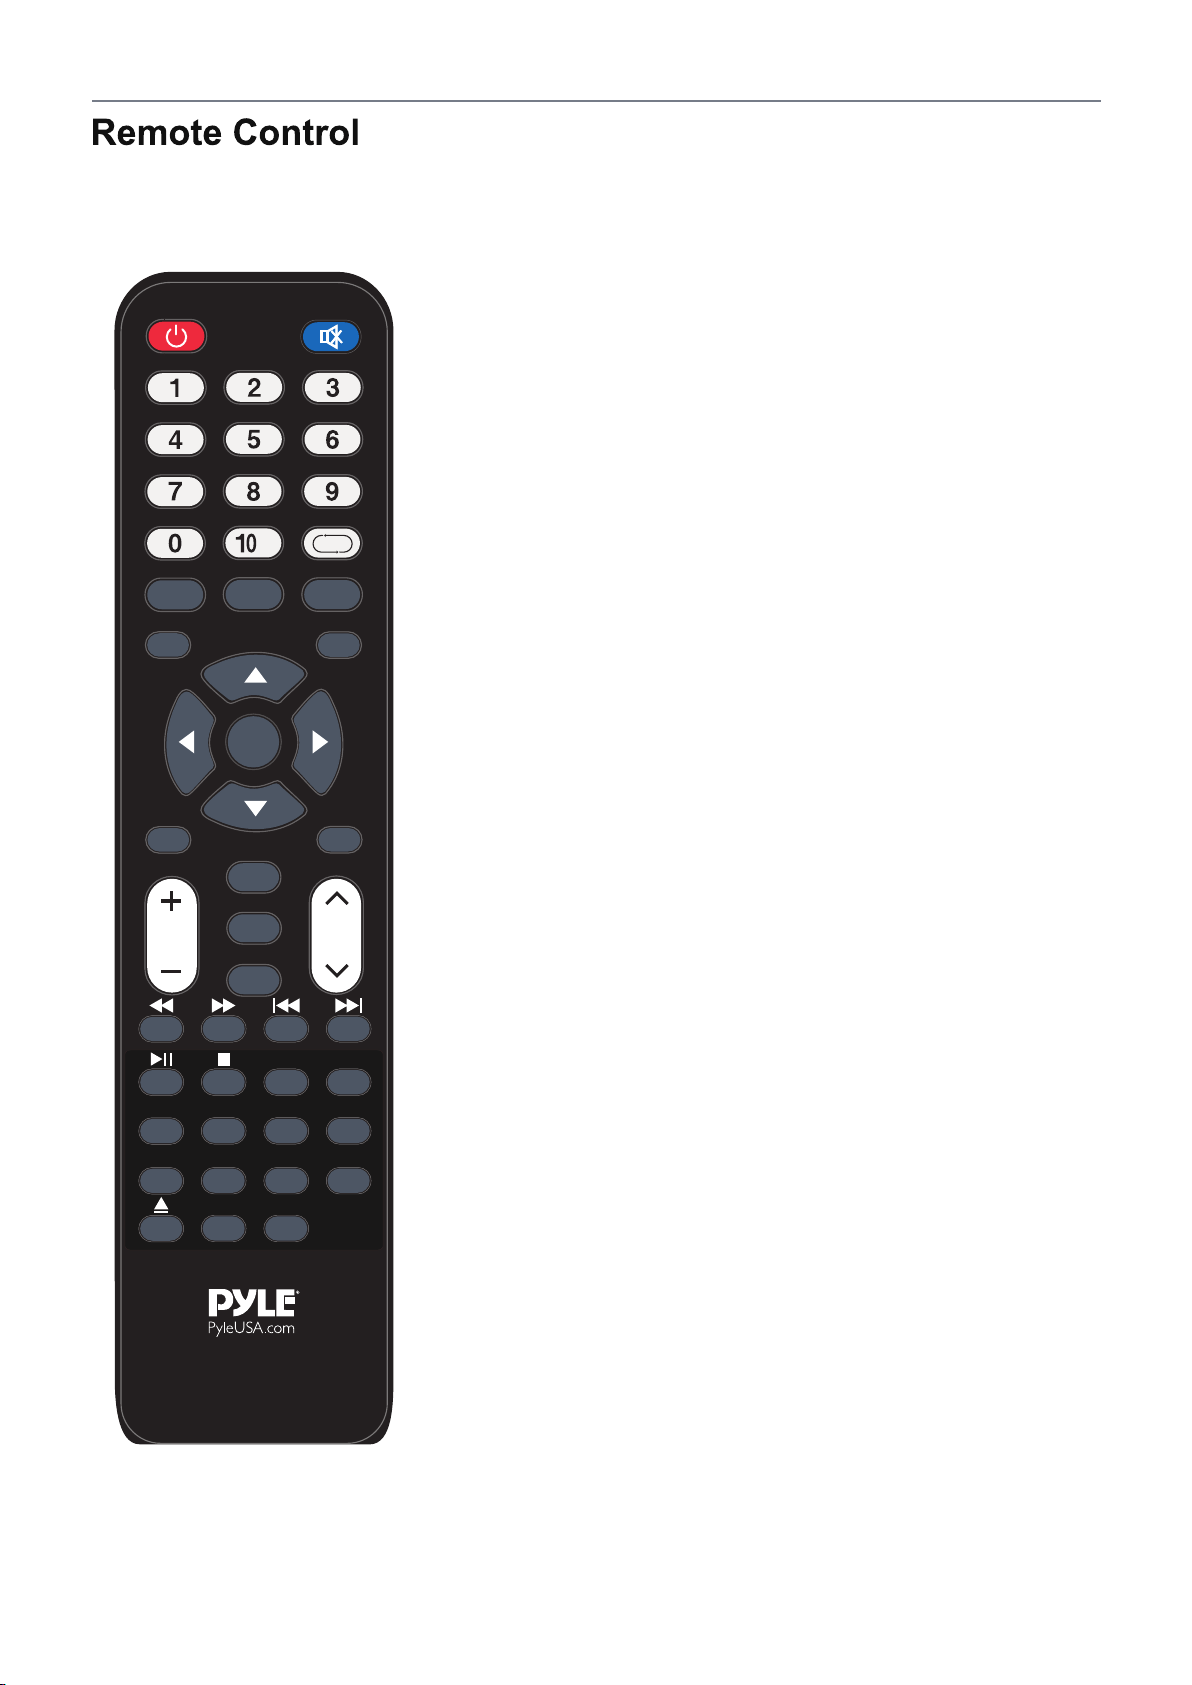
POWER: Turn the TV on/standby.
MUTE
S.MODE: Select the sound mode.
P.MODE: Select the picture mode.
EPG:
To show the Electronic Program Guide during no-menu
state only in DTV mode.
TV MENU:
System setup menu.
SOURCE:
Press to display the input source menu.
MTS: Press to select an alternate audio language (if applicable).
EXIT: Exit the OSD menu.
AUTO:
When you connect the TV with a PC through VGA input, press to
adjust the screen resolution automatically.
DISPLAY: Provides information on the currently viewed program.
CCD: Select closed caption subtitles (if available) OFF > ON > CC on
Mute (pg. 22)
: Press to mute the sound, press again or press
VOL+ to unmute.
CURSOR KEYS ENTER
Allows you to navigate the on-screen menus and adjust the
system settings to your preference.
NUMBER BUTTONS:
Press0-9 to select a TV channel directly when you
are watching TV.
Return to the previous channel viewed.
CH / : Scan through channels.
: Load/eject DVD disc.
: Fast reverse.
: Fast forward.
: Previous chapter.
: Next chapter.
: Pause program.
: Play program.
VOL / : Adjust the volume.
9
CCD
ZOOM SLEEP
VOL
FAV
GOTO ANGLE
SLOW
S
TEP
FAV- FAV+ REPEAT
SUB-T A-B PROG
DVD
MENU
DVD
SETUP
TITLE
CH
AUTO
DISPLAY
POWER
S.MODE
TV MENU
ENTER
MTS EXIT
P.MODE
+
EPG
SOURCE
MUTE
ZOOM: Select viewable display options:
Normal > Wide > Zoom > Cinema. (pg. 27)
SLEEP: Press to activate the Sleep function to turn off the TV automatically;
5 Min > 10 Min > 15 Min > 30 Min > 45 Min > 60 Min > 90 Min >
120 Min > 180 Min > 240 Min > OFF.
FAV:
Press to display a list of favorite TV channels you have added. (pg. 26)
FAV-:
Press to scan to a lower channel from your list of favorites.
FAV+:
Press to scan to a higher channel from your list of favorites.
REPEAT:
Repeat playing the title or chapter
SUB-T:
Turn on/off the subtitle display in DTV mode
and DVD mode.
A-B: Select and play the preferable paragraph of DVD program
by pressing this key twice at the beginning and end of it.
PROG: The track programming
DVD MENU: DVD to return to menu
TITLE: DVD title.
DVD SETUP: DVD menu Settings
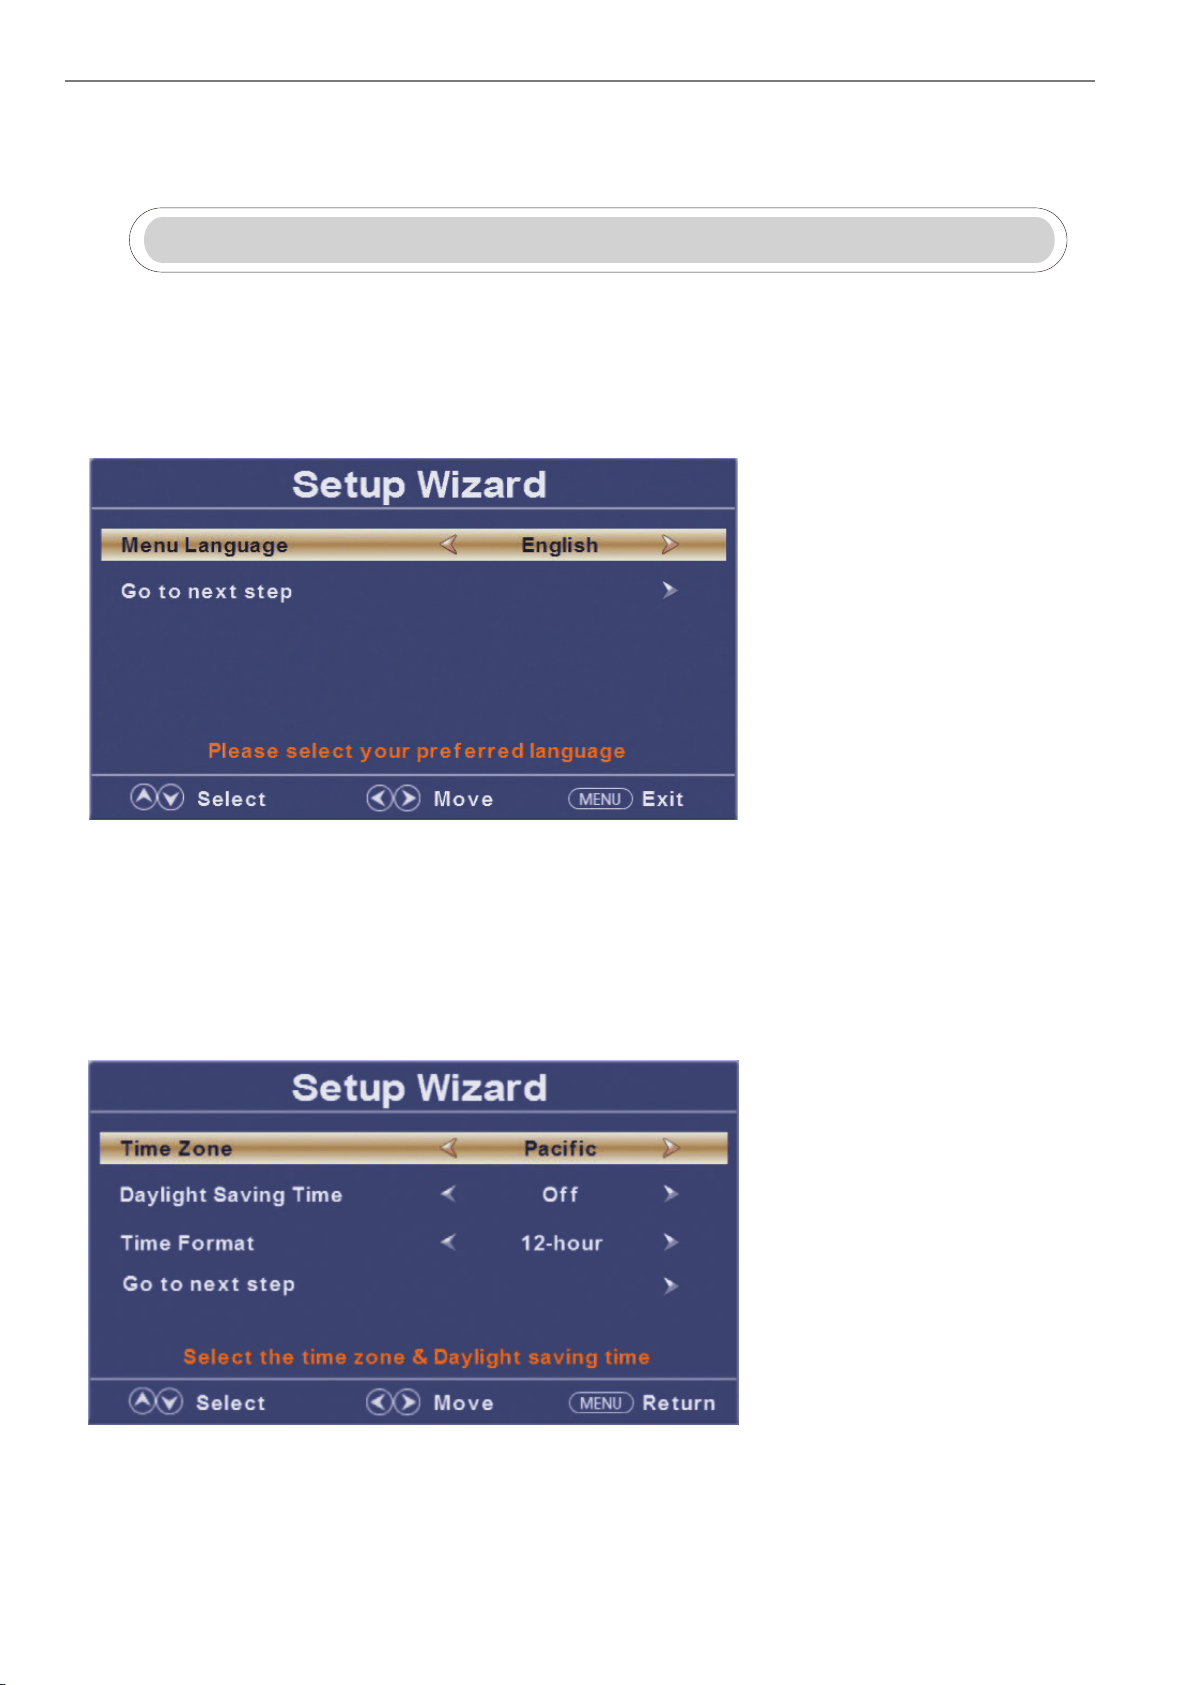
Setup Wizard
Connect an RF cable from the TV’s input called “RF-In” and to your TV Aerial socket.
Select Language
Press ◄ / ► button to select the language to be used for menus and message.
Press ▼ / ▲ button to select go to next step and press ENTER/► button to go.
Select Time
Press ▼ / ▲ button to select the time zone, daylight saving time and time format you want to.
Press ◄ / ► button on the remote control to adjust.
Press ▼ / ▲ button on the remote control to select go to next step and press ENTER/► button to go.
10
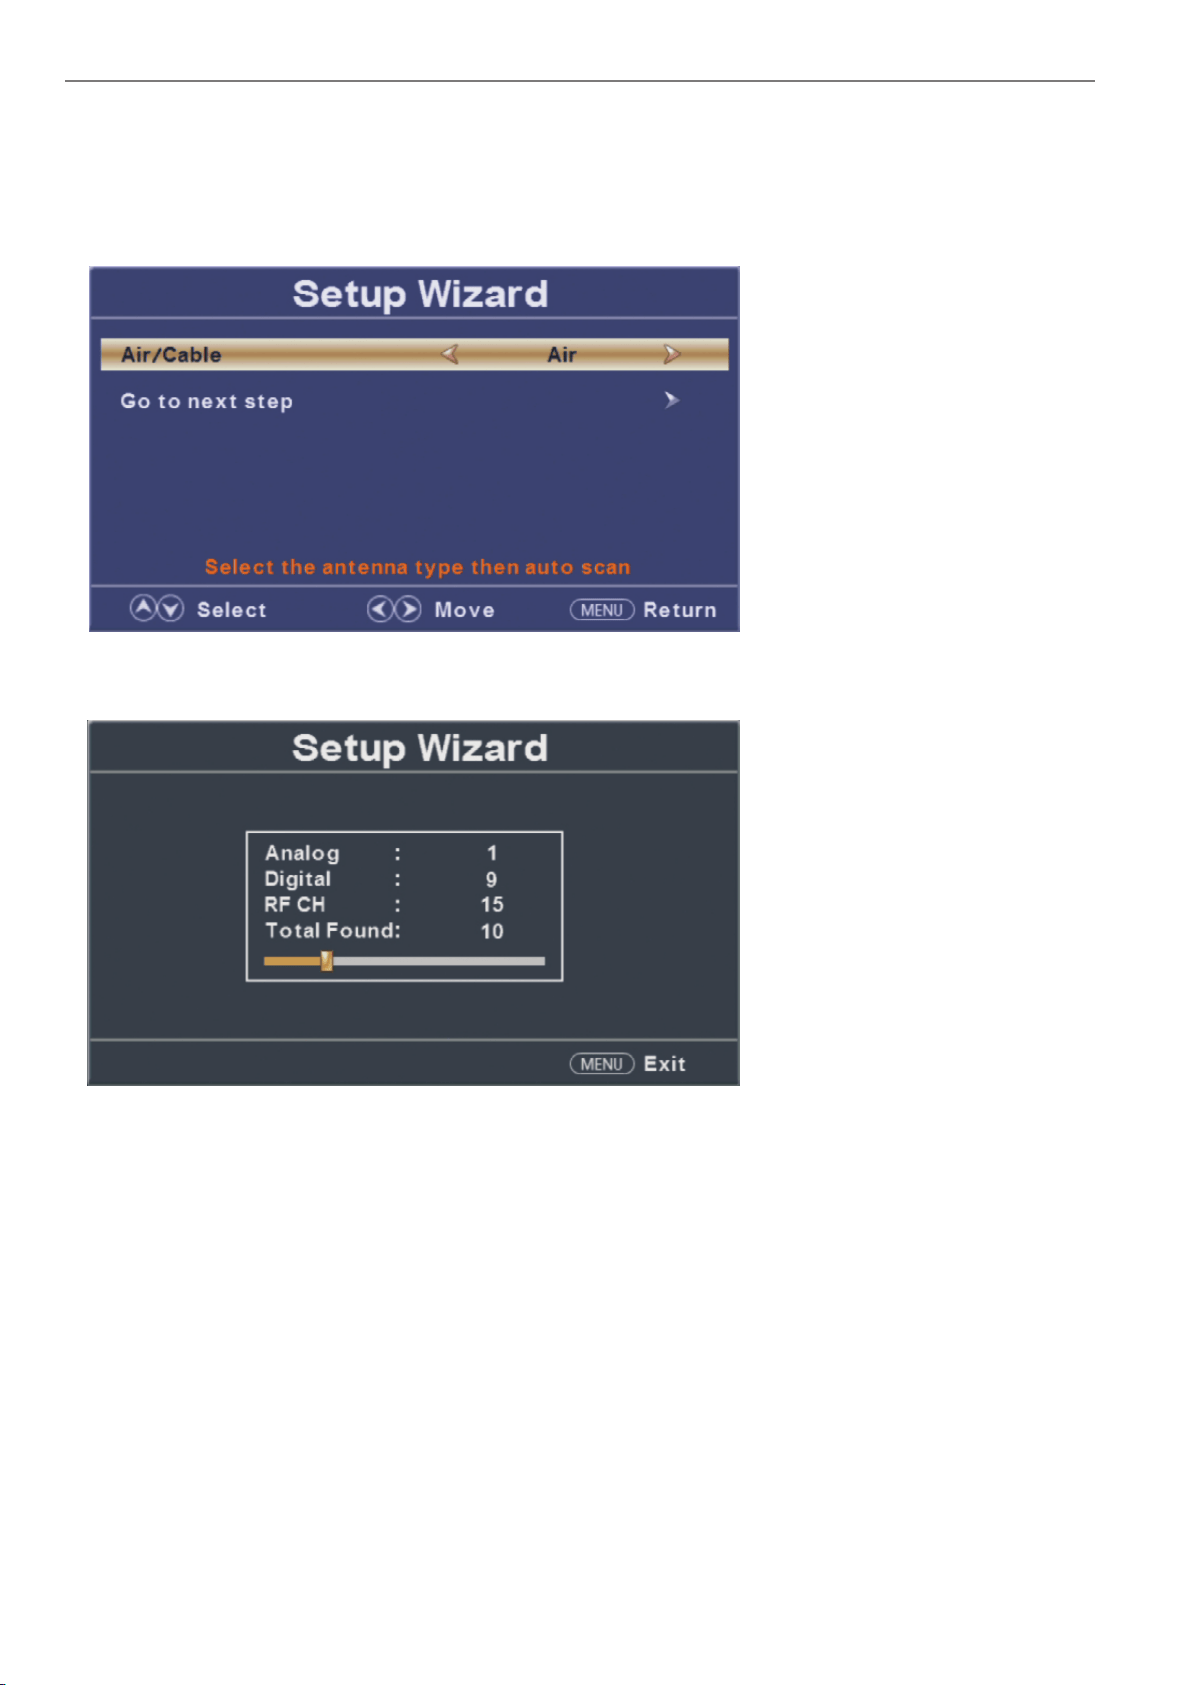
Auto Scan
Press ◄ / ► button to select the antenna type.
Press ▼ / ▲ button to select go to next step and press ENTER/► button to start auto scan.
11
12
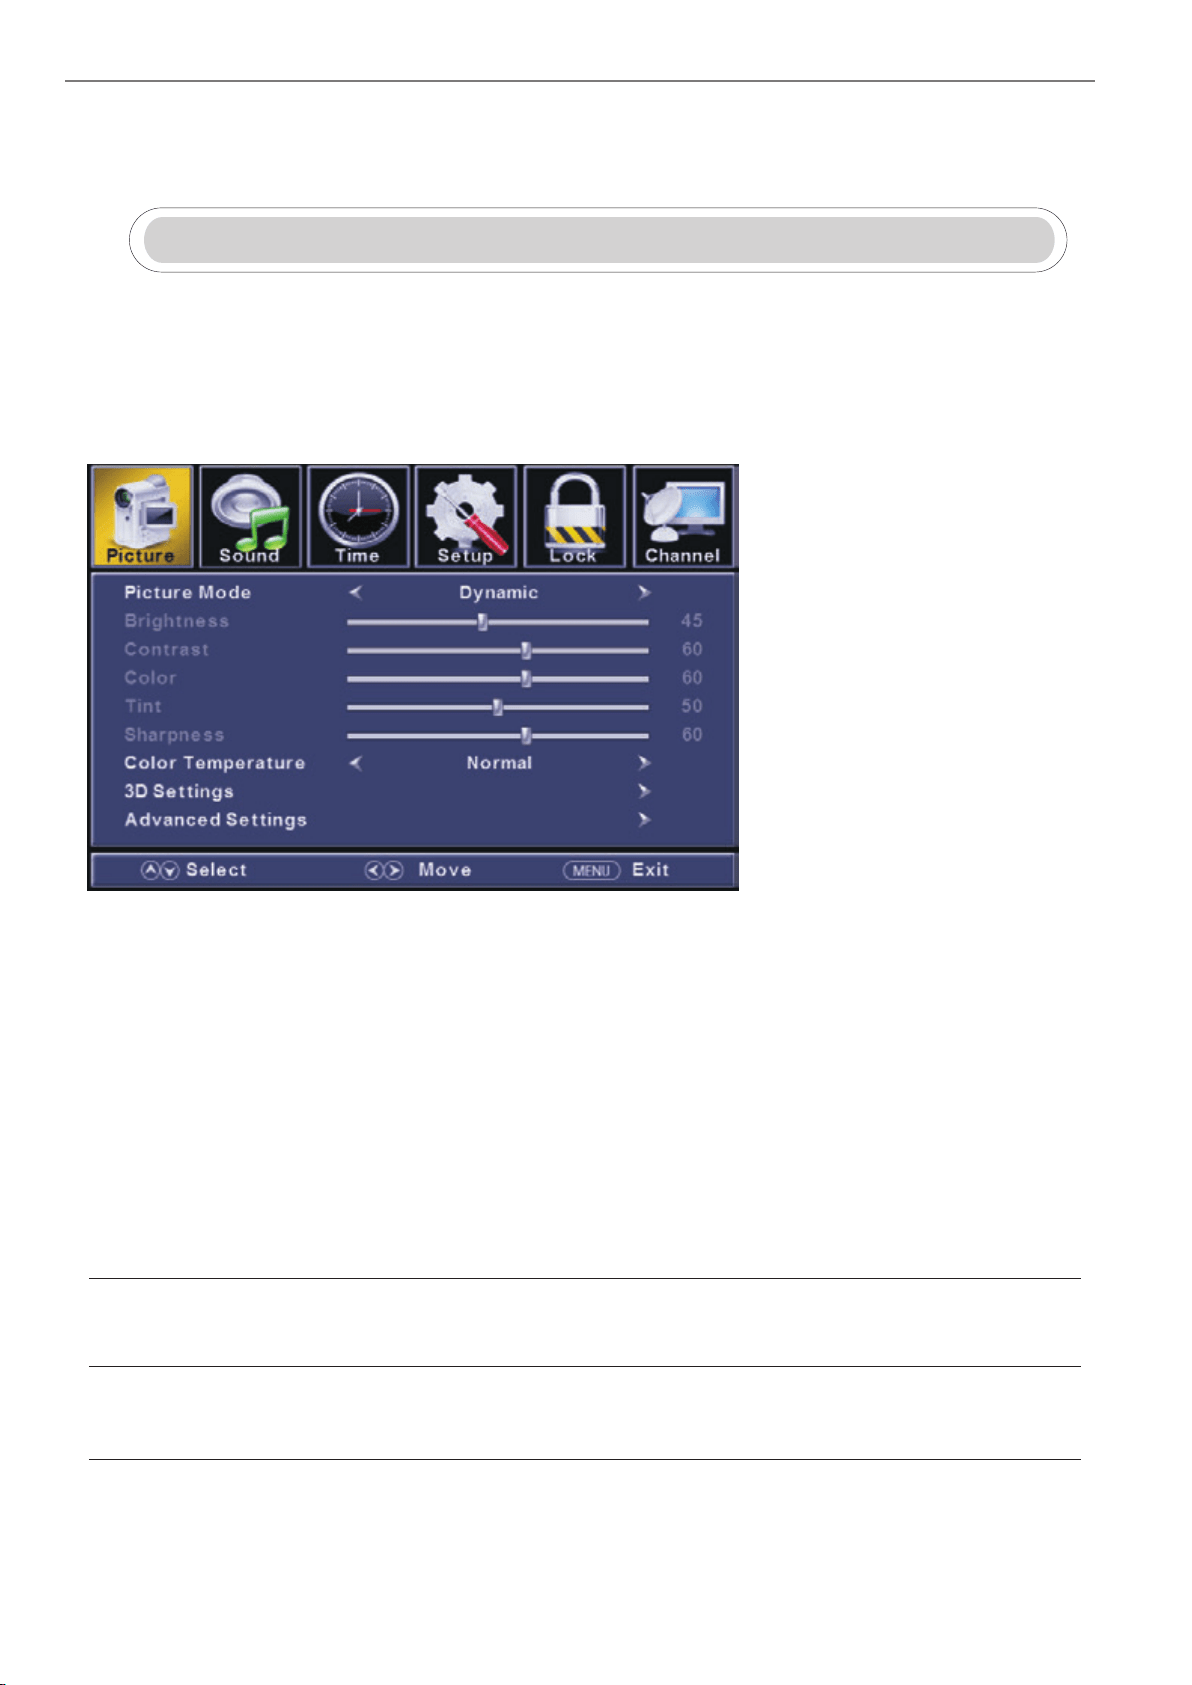
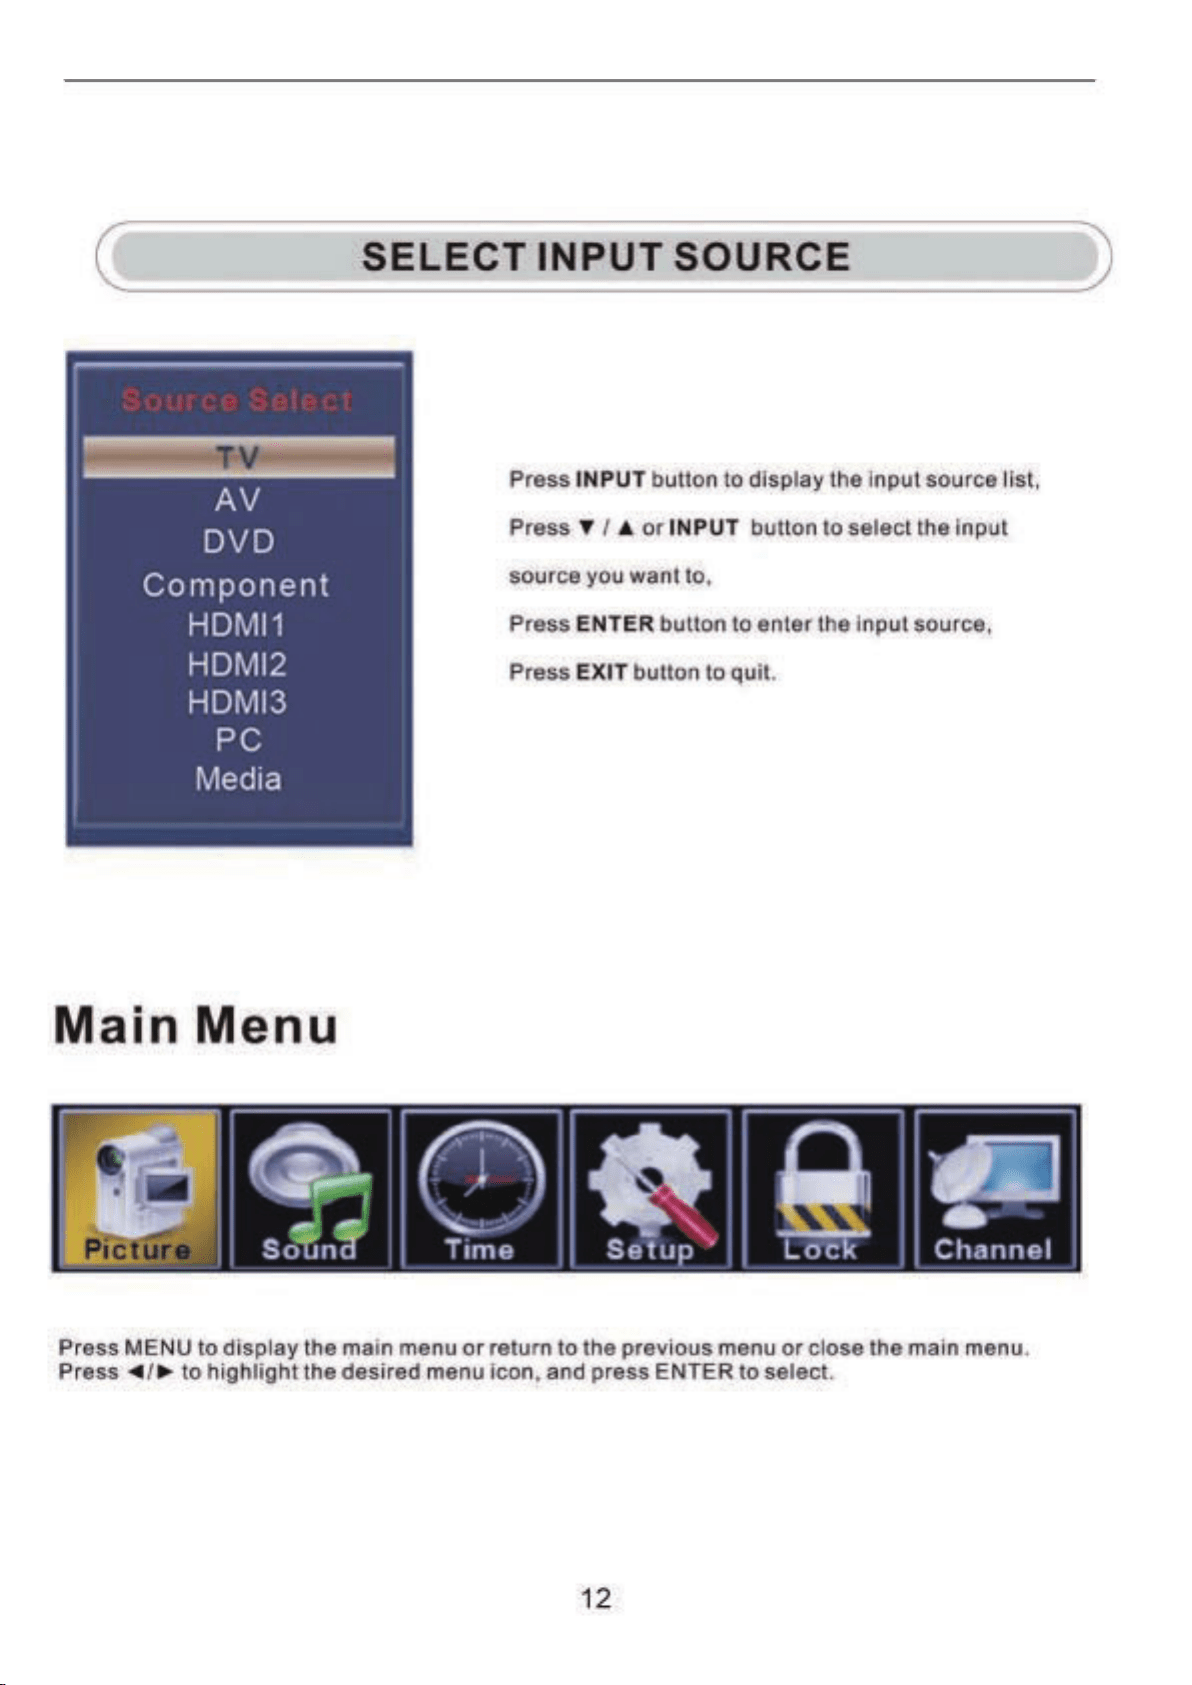
Main Menu Operation
Picture Menu
ENU to enter the main menu, Press button to select.
Press to enter.
ENU again to exit or back to parent menu.
button to select among Picture Mode /Brightness/ Contrast / Color / Tint / Sharpness / Color Temperature/
3D Settings/Advanced Settings.
Press to enter.
Press button to adjust.
ENU again or back to parent menu.
Press
Press
Press
Press
M ◄ / ►
ENTER / ▼
M
▼ / ▲
ENTER / ▼
◄ / ►
M
【Picture Mode】
Adjust picture mode to change picture appearance.
Press button to select(Standard / Dynamic / Soft / User).
【Brightness】
Press button to adjust.
【Contrast】
Press button to adjust.
◄ / ►
Adjust the visual perception output of the entire picture, it will effect the iuminousness of the picture.
◄ / ►
Adjust the highlight intensity of the picture, but the shadow of the picture is invariable.
◄ / ►
Note:The brightness,contrast,color, tint and sharpness are only available in User mode,you can adjust as you like.
Standard Produces a highly defined image in a normally lit roo
m.
Dynamic Produces a highly defined image in a brightly lit room.
Soft Produces a highly defined image in a soft lit room.
User Select to customize picture settings.
13
【 Color】
【 Tint】
Adjust the hue(Red,Green,Blue) of the picture.
Press button to adjust.
【 Sharpness】
Press button to adjust.
【 Color Temperature】
【 Advanced Settings】
Adjust advanced video features to fine tune the picture.
Press button to enter .
【 Aspect Ratio】
Adjust how the picture fills the screen.
【 Noise Reduction】
Set options to reduce video noise.
Adjust the saturation of the color based on your own like.
◄ / ►
◄ / ►
Adjust the peaking in the detail of the picture.
◄ / ►
Increase or reduce warm color of the picture personally(red),and t
he cool color personally(blue) according to your like.
► sub-menu.
Press button to adjust.
Normal
Normal Automatically adjust Aspect Ratio based on TV size and TV program.
Wide Use to watch wide screen(16:9) content.
Zoom Expands image to fill screen. Top and button maybe cut off.
Cinema Stretches image at edges but keeps a clear image in the center.
Off Select to turn off video noise detection.
Low Detect and reduce low video noise.
Medium Detect and reduce moderate video noise.
High Detect and reduce enhanced video noise.
Auto Detect and reduce video noise aut
omatically.
Increase the sex-linked colors for the white.
Warm Increase the red color for the white.
Cool Increase the blue tone for the white.
【MDMI Mode】
Only available in HDMI input.
【Dynamic Contrast】
Automatically adjust picture detail and brightness.
Press button to select (Off/On).
Press button to select (Video/Graphic).
◄ / ►
◄ / ►
【MDMI Mode】
Only available in HDMI input.
【Dynamic Contrast】
Automatically adjust picture detail and brightness.
Press button to select (Off/On).
Press button to select (Video/Graphic).
◄ / ►
◄ / ►
14
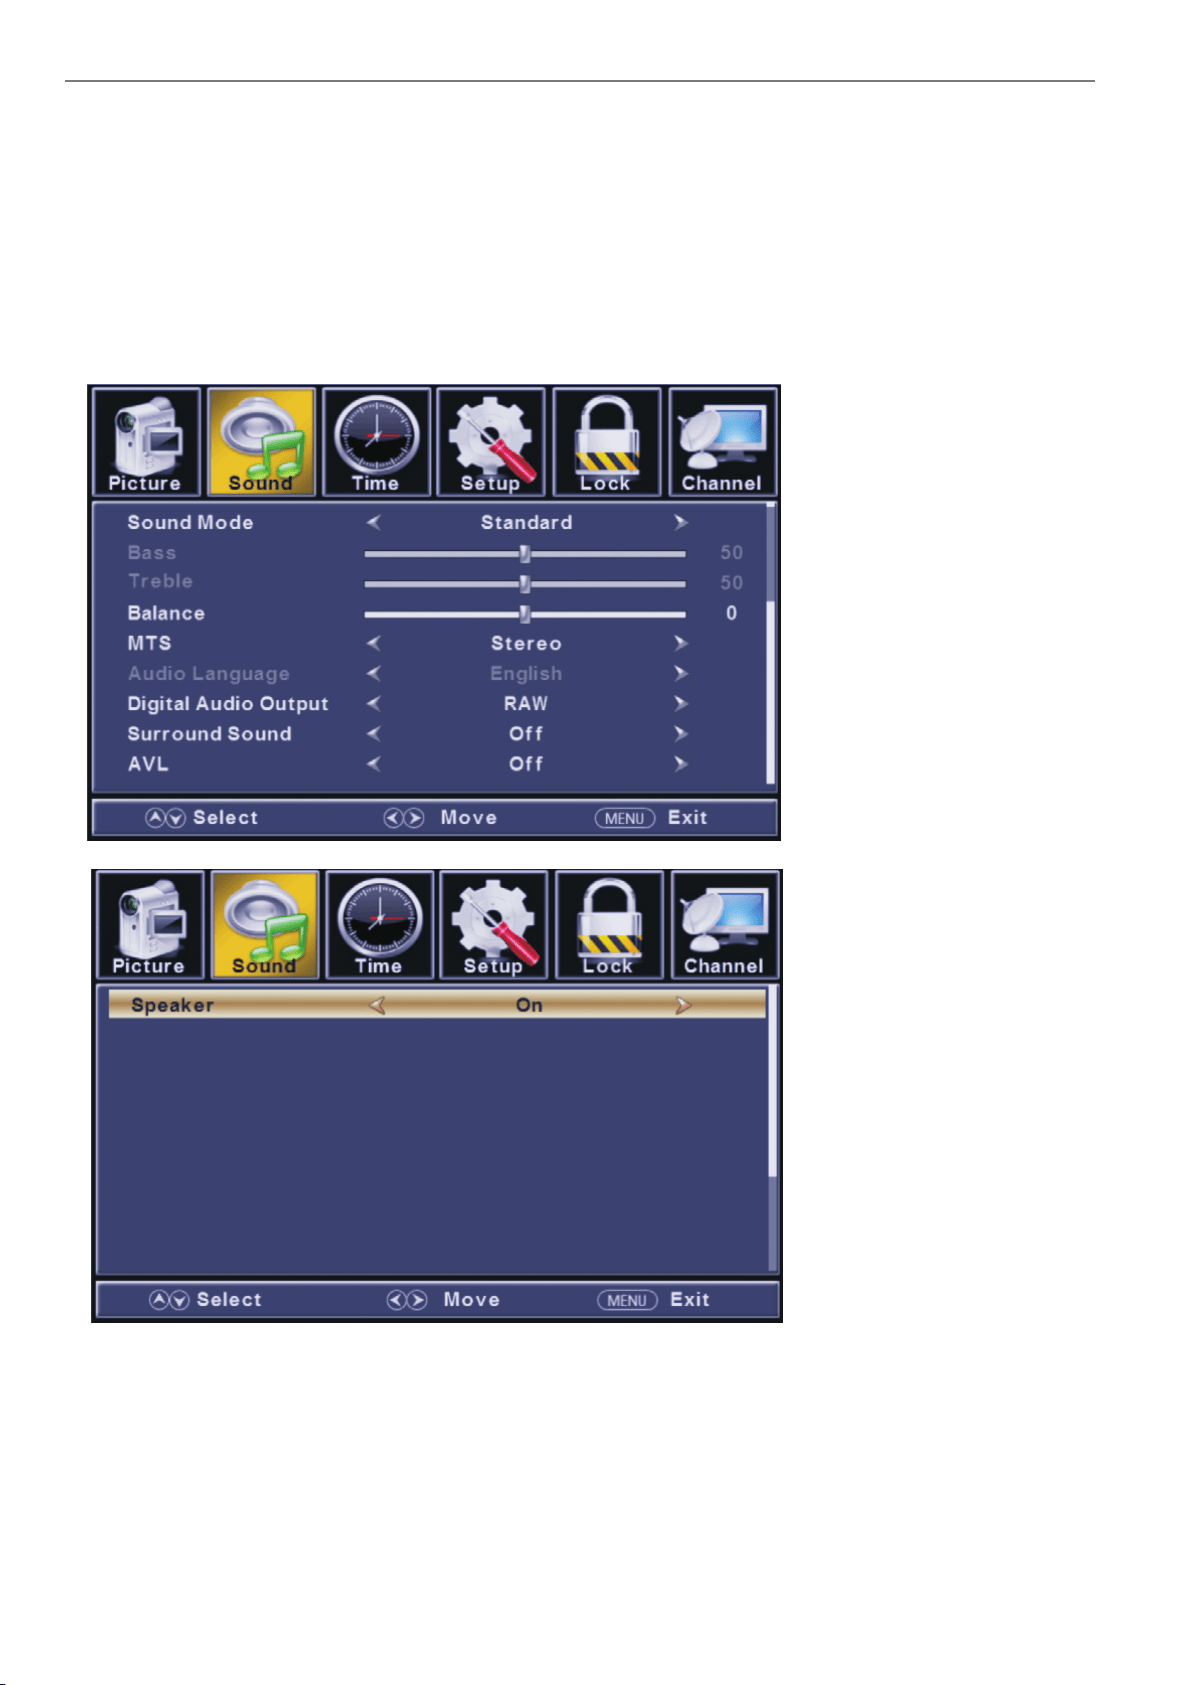
Sound Menu
ENU to enter the main menu, Press button to select.
Press to enter.
ENU again to exit or back to parent menu.
button to select among Equalizer / Bass / Treble / Balance /MTS/ Audio Language /Digital Audio Output/
AVL .
Press to enter.
Press button to adjust.
ENU again or back to parent menu.
Press
Press
Press
Press
M ◄ / ►
ENTER / ▼
M
▼ / ▲
ENTER / ▼
◄ / ►
M
15

【 Sound Mode】
Select a sound mode to achieve ideal sound.
Press button to select(Standard / Music / Movie / Sports / User).
【 Bass】
【 Treble】
【 Balance】
【 MTS】
It is only available in ATV.
Press button to select(Mono/Stereo/SAP).
【Audio Language】
. It is only available in DTV.
Press button to select(English / / ).
【 Digital Audio Output】
Send digital audio to external audio system.
Press button to select.
【 Surround Sound】
Surround Sound
select(On / Off).
【 AVL】
se
lect(On / Off).
◄ / ►
Adjust the bass effect.Increases or decreases lower-pitched sounds.
◄ / ►
Adjust the treble effect.Increases or decreases high-pitched sounds.
◄ / ►
Adjust the balance between left and right speakers to adapt to your listening position.
◄ / ►
◄ / ►
◄ / ►
◄ / ►
Note:The bass and treble are only available in Us er mode,you can adjust as you like.
Standard Produces a balanced sound in all environments.
Music Preserves the original sound. Good for musical programs.
Movie Enhances treble and bass for a rich sound experience.
Sports Enhances vocals for TV audio.
User Select to customize audio settings.
Mono Sets the sound to mono.
Stereo Sets the sound to stereo when stereo is not available, the sound is automatically switched to mono.
SAP Sets the sound to the second audio program.
PCM Select to output audio in 2-channel stereo.
Raw Original image coded date.
Off Set digital audio output off.
Press button to adjust.
Press button to adjust.
Press button to adjust.
Configures the multi-track sound.
Set the .
Press ◄ / ► button to
Set the auto volume control.
Press ◄ / ► button to
Select the l
anguage supported by the chosen digital channel
French Spanish
N O T E :
B a l a n c e :
This item can adjust the speaker’s output, it enables you to listen to best at your position.
AV L :
This item uses for reducing the difference between channel and program’s
volume automatically.
it made the overall water to be even. This function will also reduce the fluctuation of the sound.
【 S p e a k e r】
select(On / Off).
Set the Speaker.
Press ◄ / ► button to
16
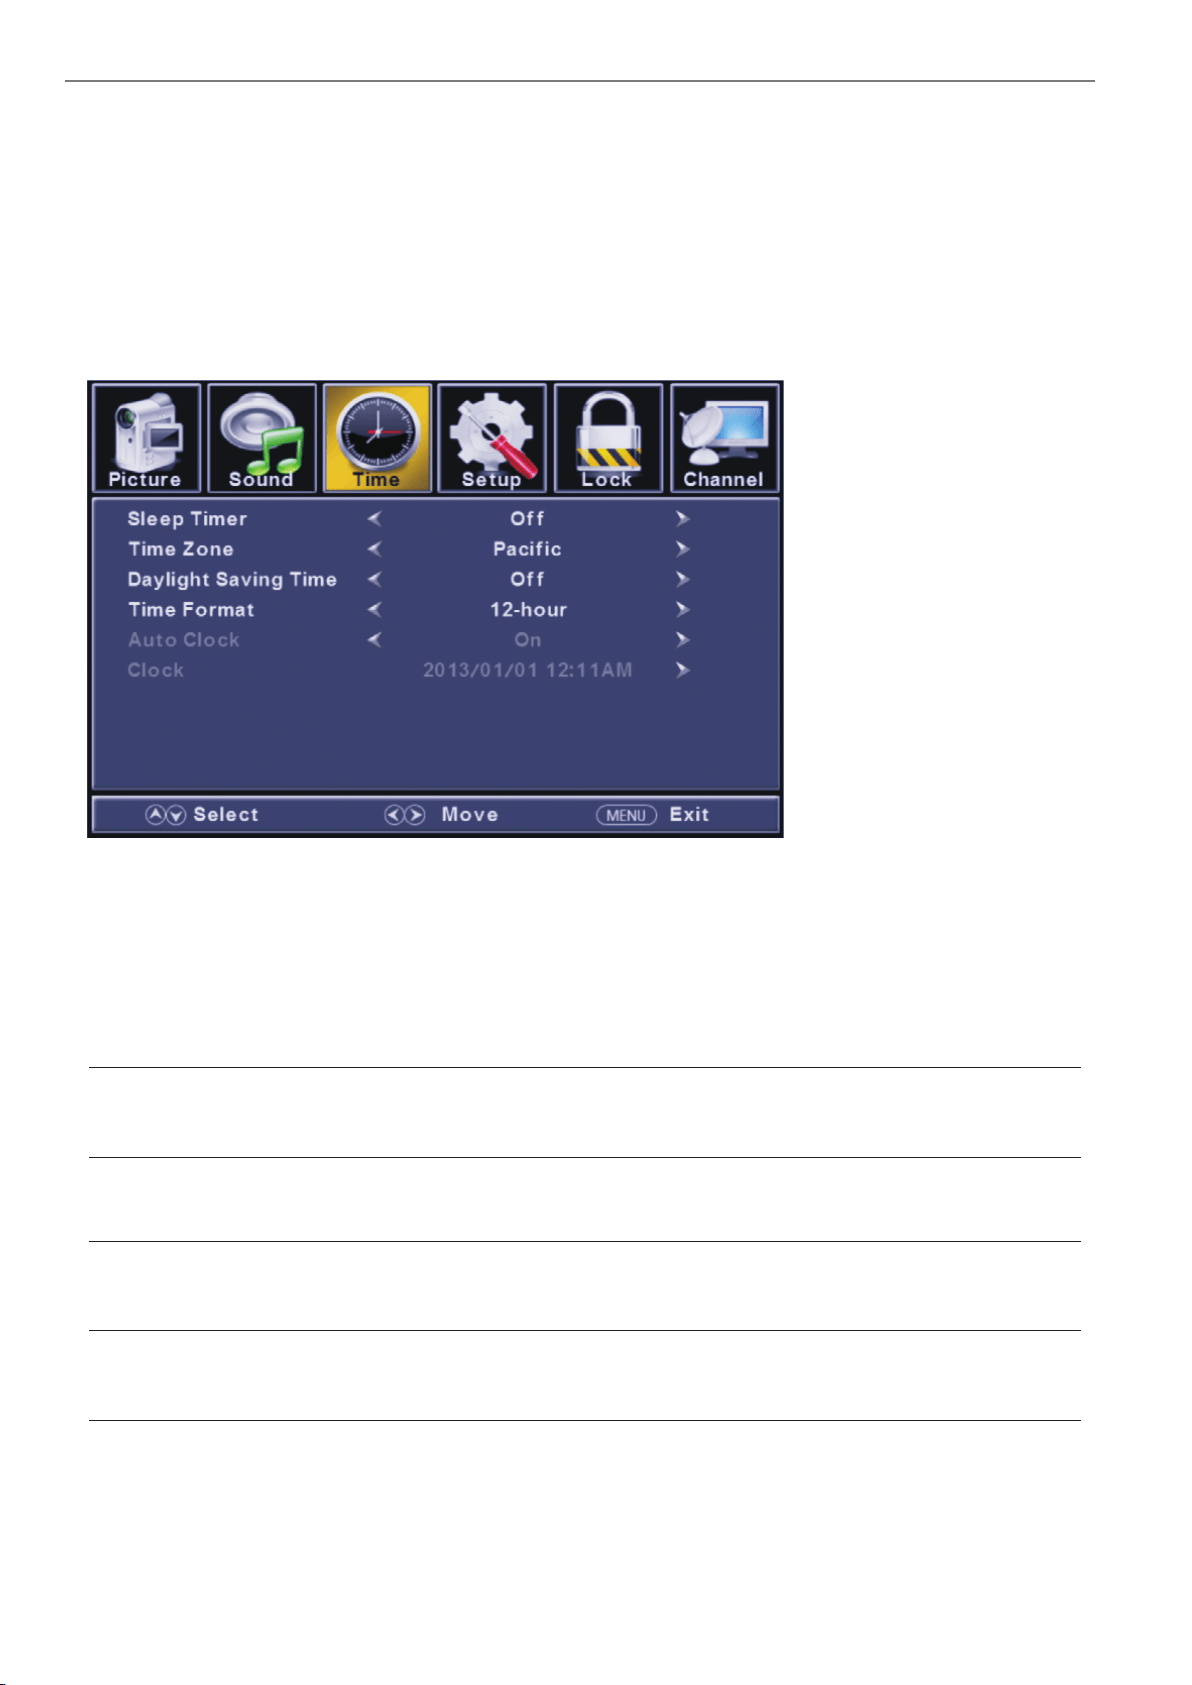
Time Menu
ENU to enter the main menu, Press button to select.
Press to enter.
ENU again to exit or back to parent menu.
button to select among Sleep Timer / Time Zone / Daylight Saving Time / Time Format / Auto Clock / Clock.
Press to enter.
Press button to adjust.
ENU again or back to parent menu.
Press
Press
Press
Press
M ◄ / ►
ENTER / ▼
M
▼ / ▲
ENTER / ▼
◄ / ►
M
【Sleep Timer】
Set a timer for the TV to turn off automatically.
Press button to select(Off / 5min/10min /15min/ 30min / 60min / 90min / 120min/180min/240min).
【 】
Select your time zone.
Press button to select(Eastern / Central / Mountain / Pacific / Alaska / Hawaii /Samoa/ Newfoundland / Atlantic).
【 】
Set the daylight saving time for your area.
Press button to select(On / Off).
【 】
Select your time format.
Press button to select(12-hour / 24-hour).
【 】
It is only available in DTV.
Press button to select(On / Off).
◄ / ►
◄ / ►
◄ / ►
◄ / ►
◄ / ►
Time Zone
Daylight Saving Time
Time Format
Auto Clock
Use to synchronize the display automatically.
17

Close Caption
【 】
Turn Closed Captioning on/off.
Press button to select(CC Off / CC On / CC OnMute).
【 】
Set Closed Captioning for standard(analog) program.
Press button to select(CC1 / CC2 / CC3 / CC4 / TEXT1 / TEXT2 / TEXT3 / TEXT4).
【 】
Set Closed Captioning for digital program.
Press button to select(Off / Service1 / Service2 / Service3 / Service4 / Service5 / Service6).
【 ption】
Adjust the digital Closed Captioning setting.
Press button to enter.
【 】
Set the look of digital Closed Captioning. Automatic uses broadcaster’s style.
Press button to select(Default / Custom).
【 】
Select from 8 font styles.
Press button to select(Default / Font 0 / Font 1 / Font 2 / Font 3 / Font 4 / Font 5 / Font 6 / Font 7).
【 】
Adjust the size of the digital Closed Captioning font.
Pressvbutton to select(Default /Normal / Large / Small).
【 】
Adjust the edge of the digital Closed Captioning box.
Press button to select(Default / None / Raised / Depressed / Uniform / Left Shadow / Right Shadow).
【 】
Adjust the color of the digital Closed Captioning box.
Press button to select(Default/ Black / White / Red / Green / Blue / Yellow / Magenta / Cyan).
【 】
Adjust the color of the digital Closed Captioning font.
Press button to select(Default/ Black / White / Red / Green / Blue / Yellow / Magenta / Cyan).
【BG 】
Adjust the digital Closed Captioning background color.
Press button to select(Default/ Black / White / Red / Green / Blue / Yellow / Magenta / Cyan).
【 】
Adjust the transparency of the digital Closed Captioning font.
Press button to select(Default / Solid / Flashing / Translucent).
【BG 】
Adjust the digital Closed Captioning background transparency.
Press button to select(Default / Solid / Flashing / Translucent).
CC Mode
Analog CC
Digital CC
O
Mode
Font Style
Font Size
Font Edge Style
Font Edge Color
FG Color
Color
FG Opacity
Opacity
◄ / ►
◄ / ►
◄ / ►
►
◄ / ►
◄ / ►
◄ / ►
◄ / ►
◄ / ►
◄ / ►
◄ / ►
◄ / ►
18
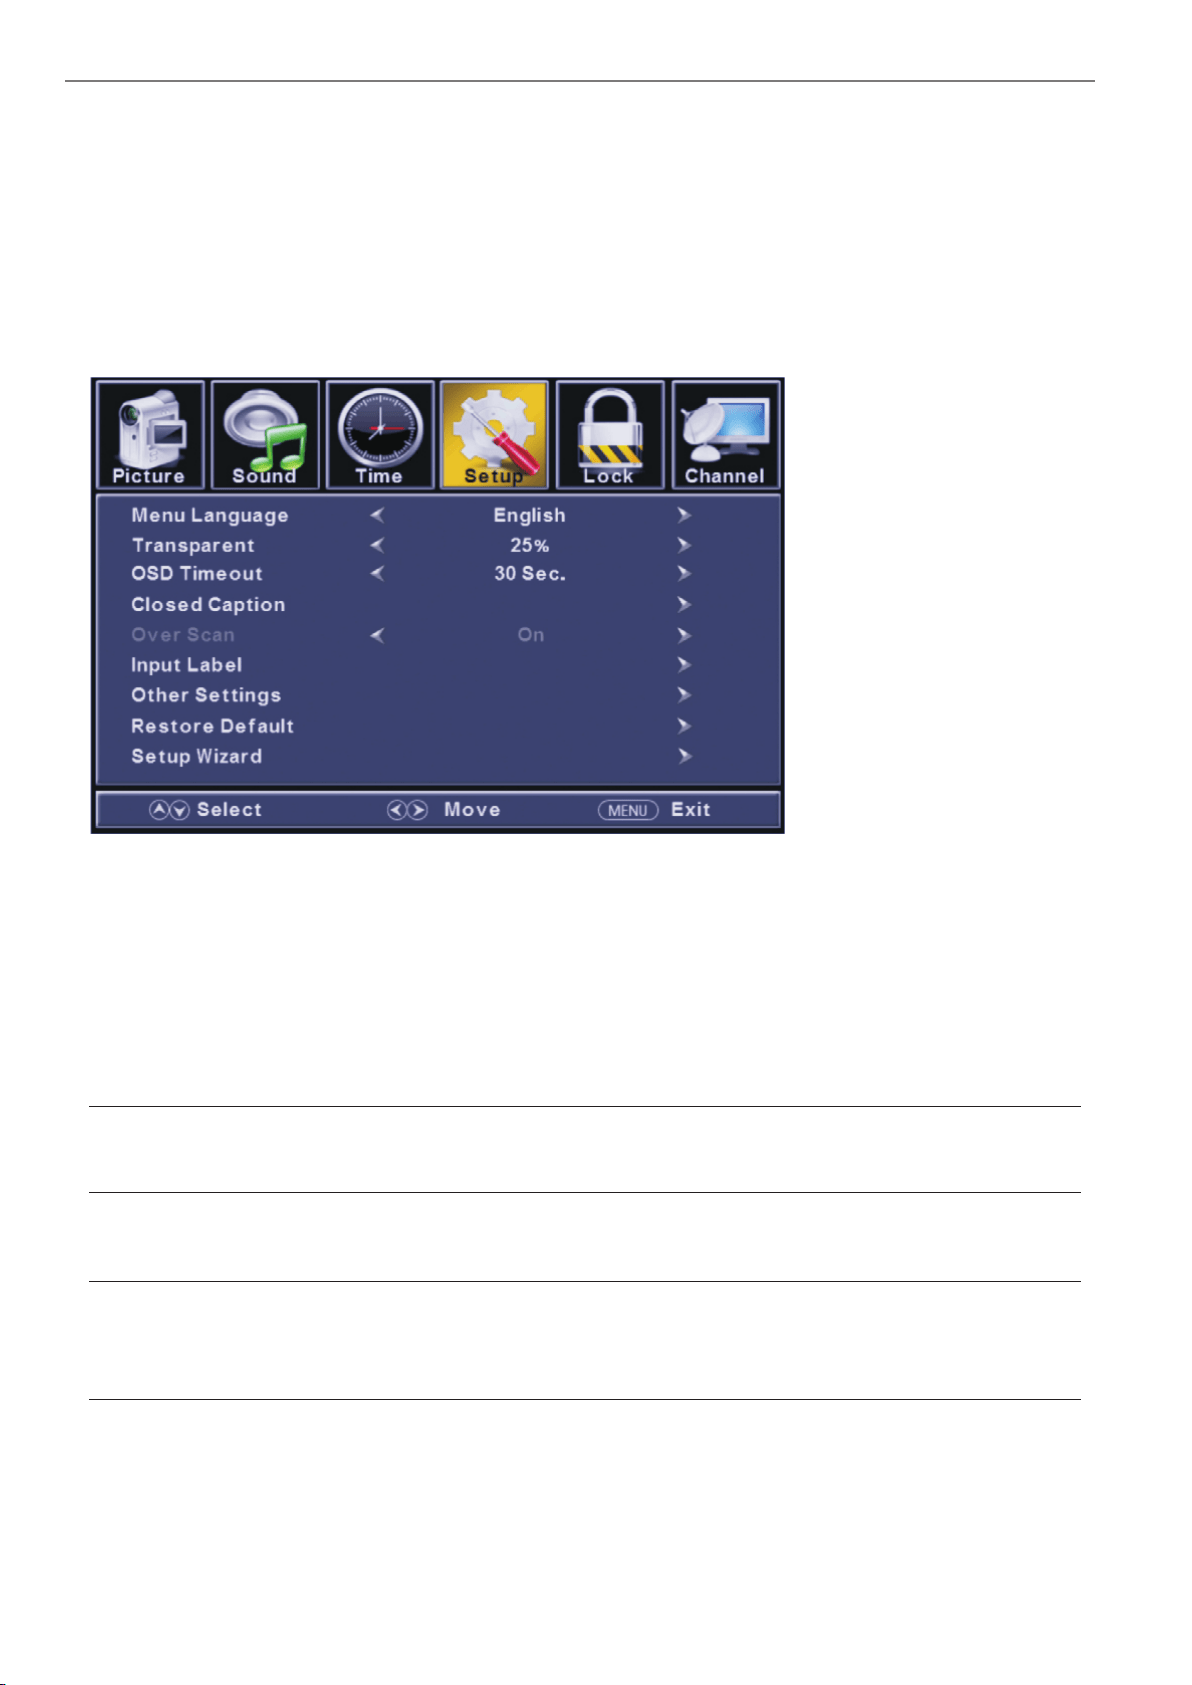
Setup Menu
ENU to enter the main menu, Press button to select.
Press to enter.
ENU again to exit or back to parent menu.
button to select among Menu Language / Transparent / OSD Timeout / Closed Caption /Over Scan/ Input Label /
Other settings / Restore Default / Setup Wizard.
Press to enter.
Press button to adjust.
ENU again or back to parent menu.
Press
Press
Press
Press
M ◄ / ►
ENTER / ▼
M
▼ / ▲
ENTER / ▼
◄ / ►
M
【Menu language】
Press button to select language(English / Français / Español).
【Transparent】
Adjust the transparency of the OSD (on screen display) menu.
Press button to select.(0%,25%,50%,75%,100%)
【OSD Time out】
Adjust the duration of the OSD (on screen display) menu.
Press button to select.(5 Sec.,15Sec.,30Sec.,45Sec.,60Sec.
【Closed Caption】
Adjust Closed Captioning settings. Only available under TV and AV source.
Press ENTER / button to enter.
For detail please refer to page 12.
Select an OSD menu language can be displayed.Default English is selected as menu language.
◄ / ►
◄ / ►
◄ / ►
►
19
【Over Scan】
Press button to select(On / Off).
It is only available to enter 1080i/720p/1080p in DTV/Component/HDMI.Default is On.
It fixed set to be On in ATV/AV. It fixed set to be Off in PC/USB.
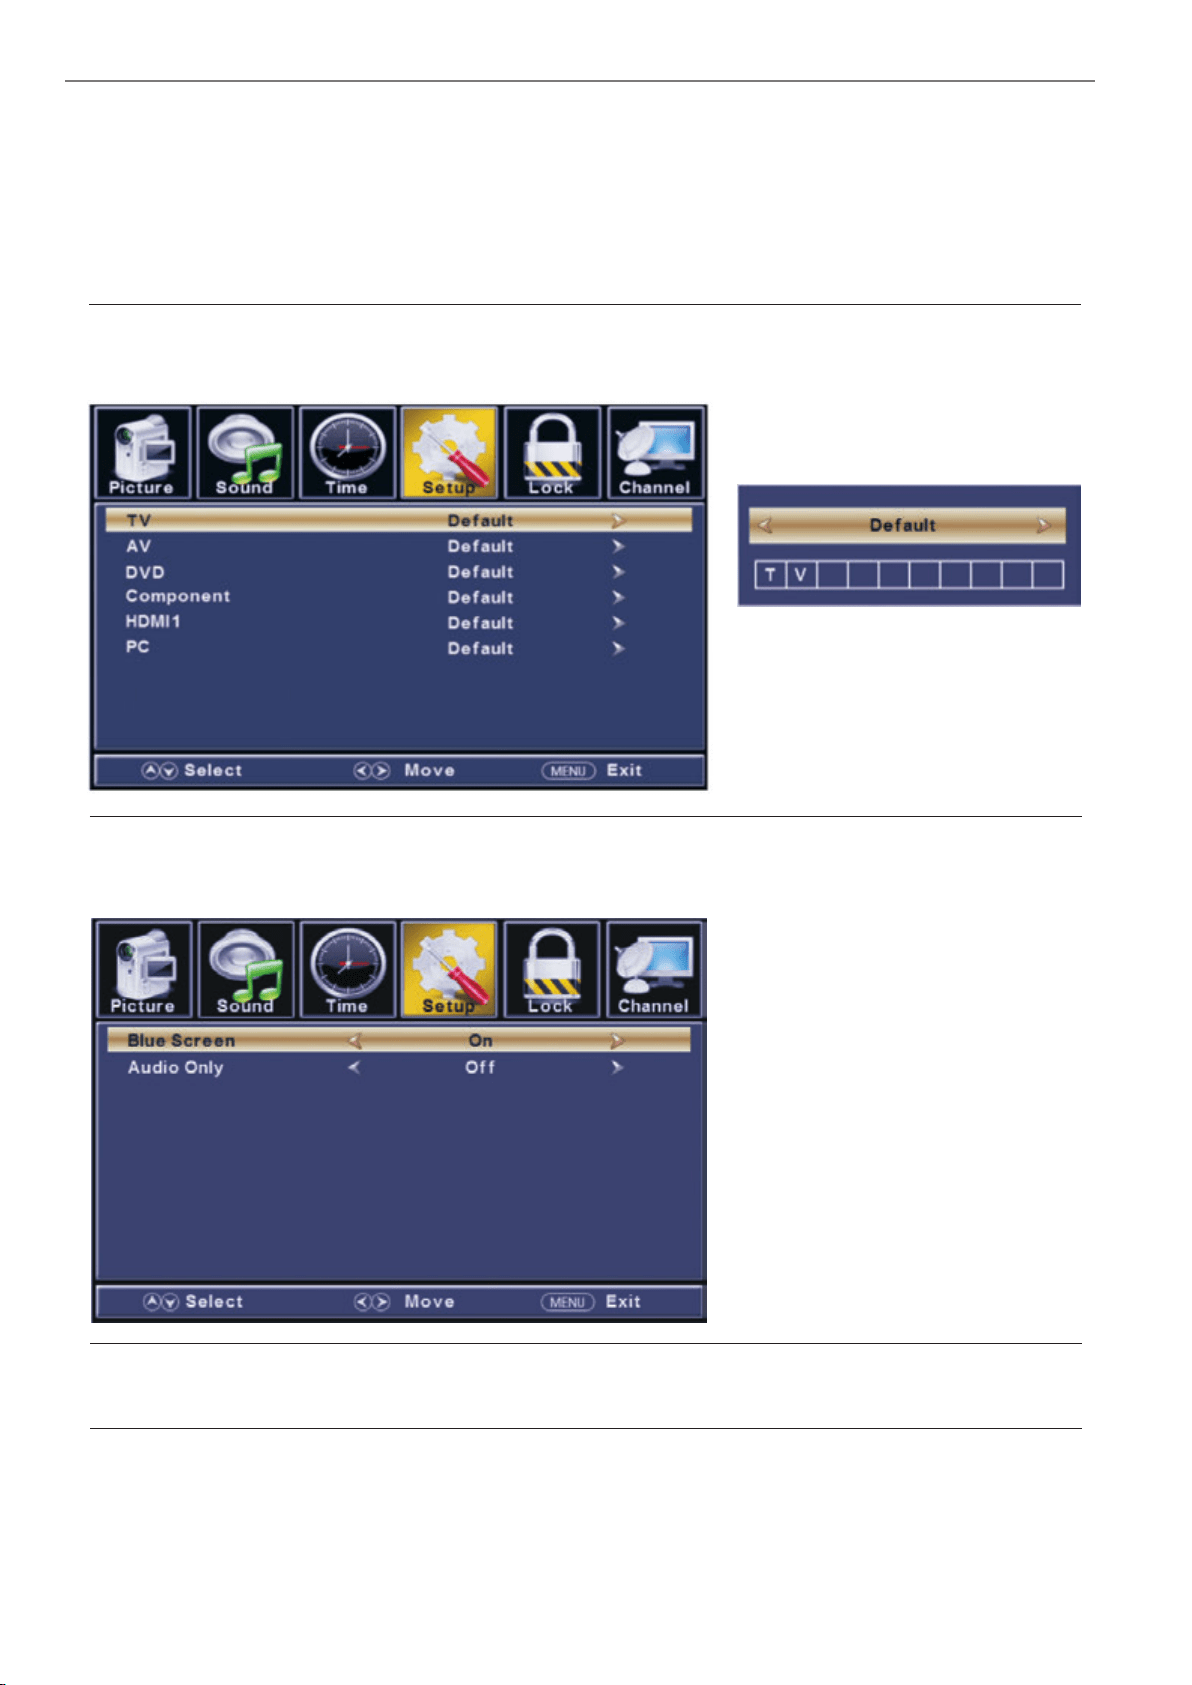
【Input Labels】
Create labels for the devices connected to your TV.
Press ENTER / button to enter.
【Other Settings】
Set the parameter of audio only, no signal power off and no operation power off.
Press ENTER / button to enter.
【Blue Screen】
To select the transition type required while changing from one channel to another
Press button to select(On / Off).
【Audio Only】
Play the audio with the picture turned off. When you turn the Audio Only on and exit the OSD menu,
the panel will be dark; and then press any key to exit the Audio Only status.
Press button to select(On / Off).
◄ / ►
►
►
◄ / ►
◄ / ►
20

【Restore Default】
Change power on options or reset TV to factory default.
Press ENTER / button to enter.
【Setup Wizard】
Set the first time installation.
Press ENTER / button to enter.
For detail please refer to page 1~2.
►
►
Lock Menu
ENU to enter the main menu, Press button to select.
Press to enter.
ENU again to exit or back to parent menu.
Press
Press
M ◄ / ►
ENTER / ▼
M
21
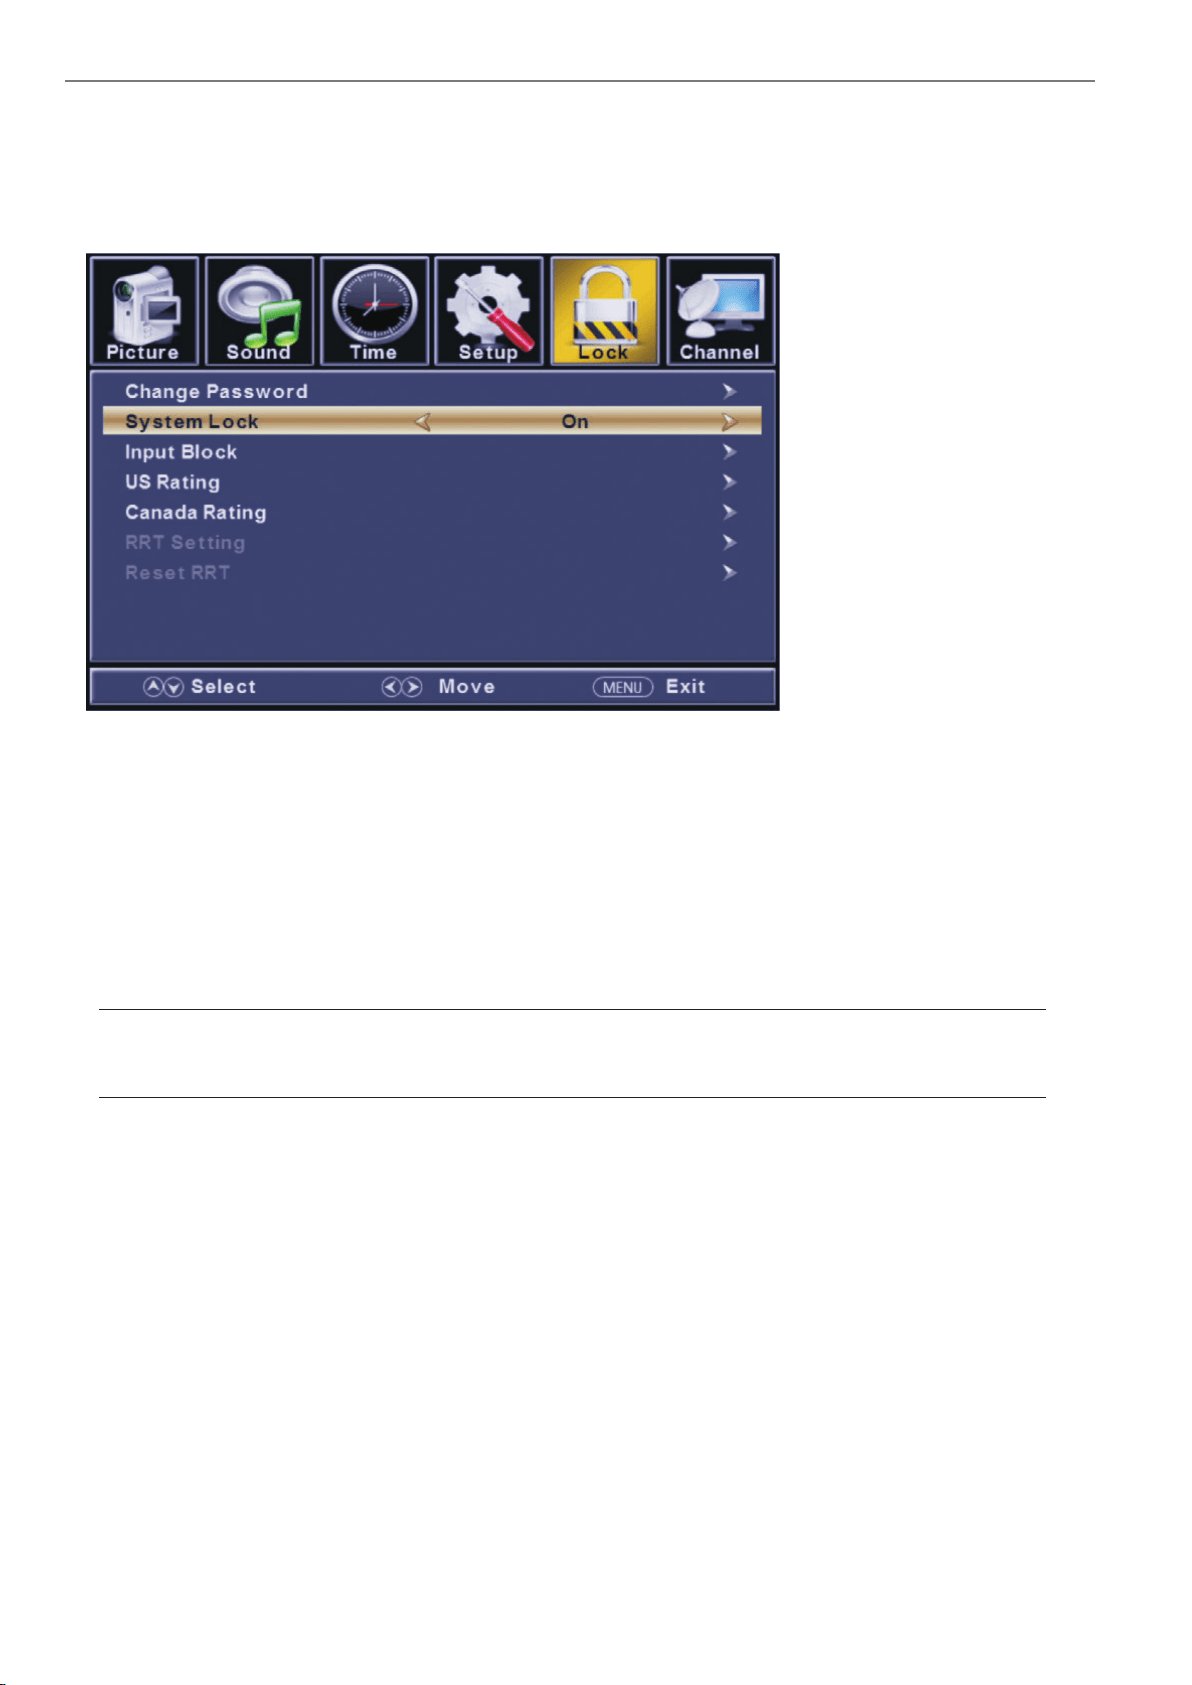
button to select among Change Password / System Lock / Input Block / US Rating / Canada Rating /
RRT Setting / Reset RRT.
Press to enter.
Press button to adjust.
ENU again or back to parent menu.
Enter your 4- digital password. Default password is 0000,
Press
Press
▼ / ▲
ENTER / ▼
◄ / ►
M
and if forget what you set, please call the service center.
【 Change Password】
Enter a new 4-digital password then re-enter it to confirm.
Press button to enter.
【 System Lock】
Lock or unlock the buttons on the TV.
Press button to select(Off / On).
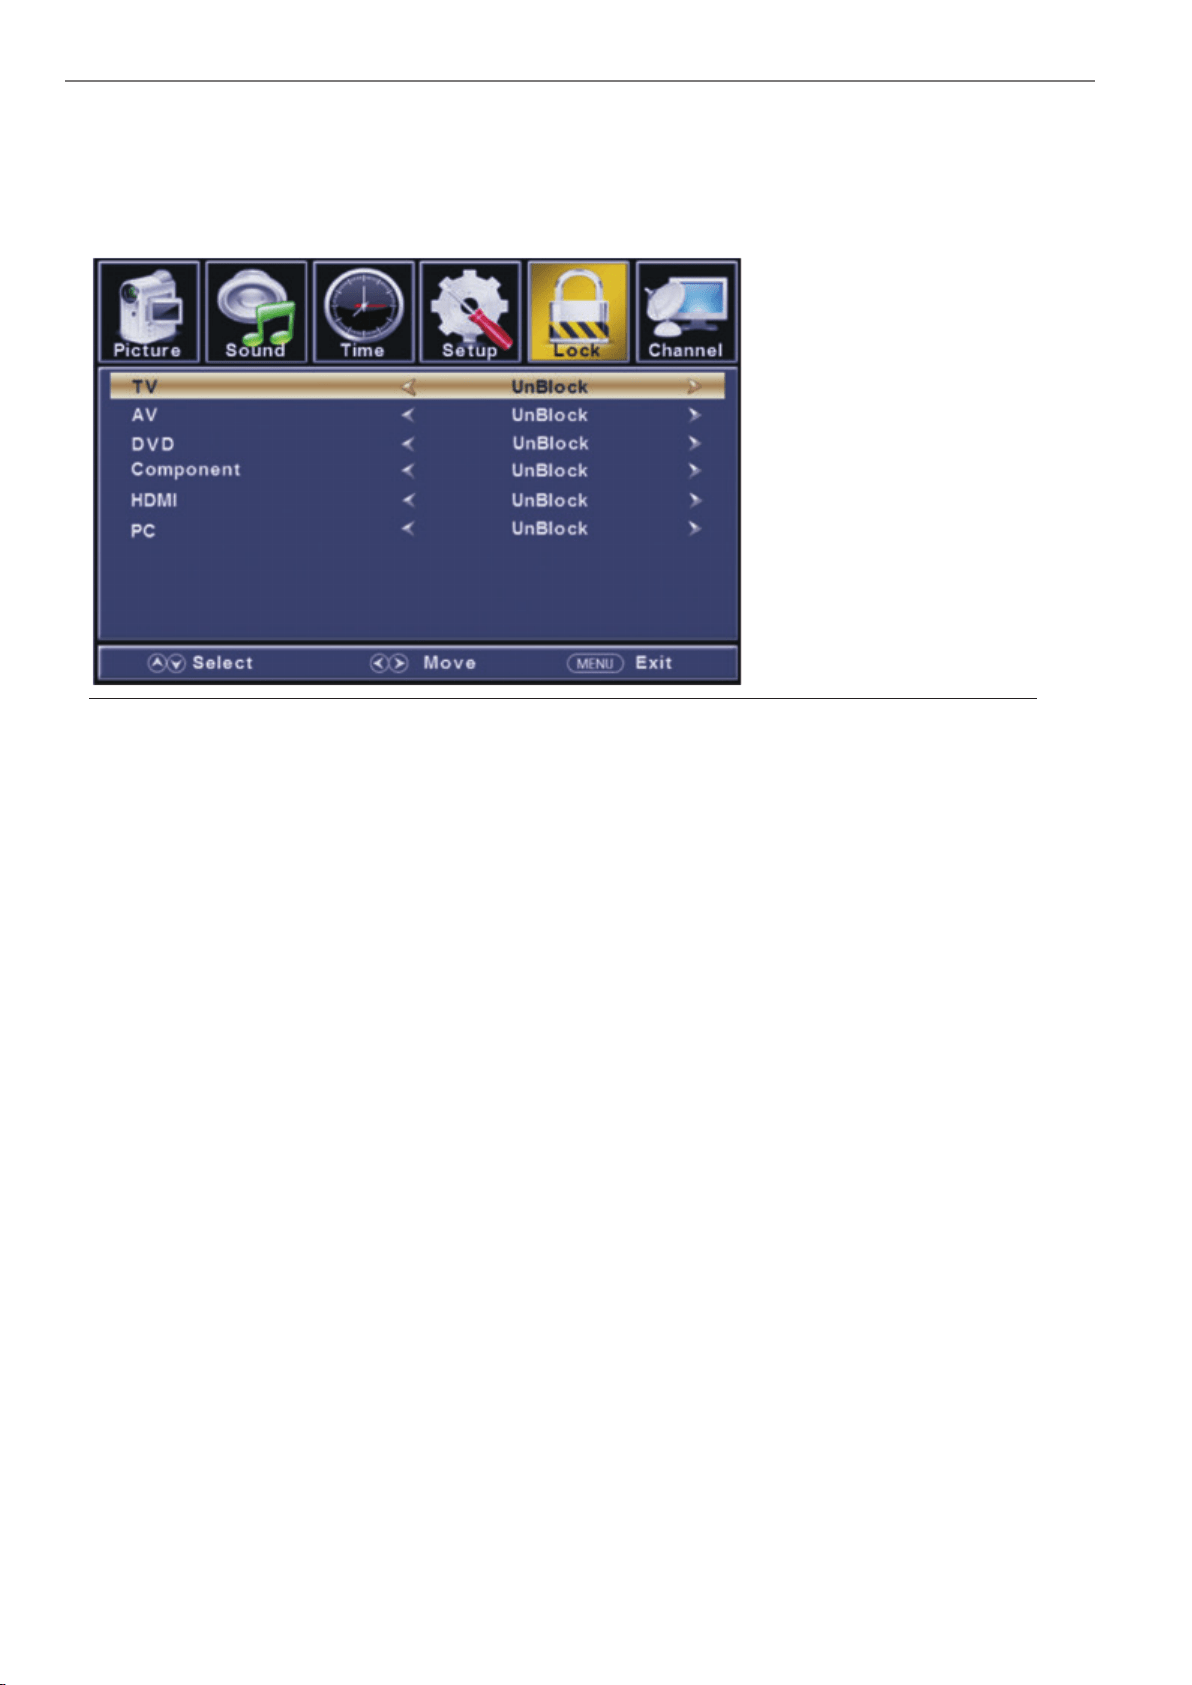
【 Input Block】
Block or unblock the input sources.
Press button to enter.
Press button to select(Unblock / Block).
►
◄ / ►
►
◄ / ►
22
【
Restrict movie and TV programs by US Ratings.
Only available when "System Lock" is "on".
Press button to enter.
For detail please refer to page 16~17.
【
Restrict movie and TV programs by Canadian Rating
s..
Only available when "System Lock" is "on".
Press button to enter.
For detail please refer to page 17.
【 RRT Setting】
Display an advance V-Chip rating table for digital channels.
The item is available only When current stream has downloadable rating data.
【 Reset RRT】
Reset the RRT to default.
The item is available only When cu
rrent stream has downloadable rating data.
►
►
US Rating】
Canada Rating】
23
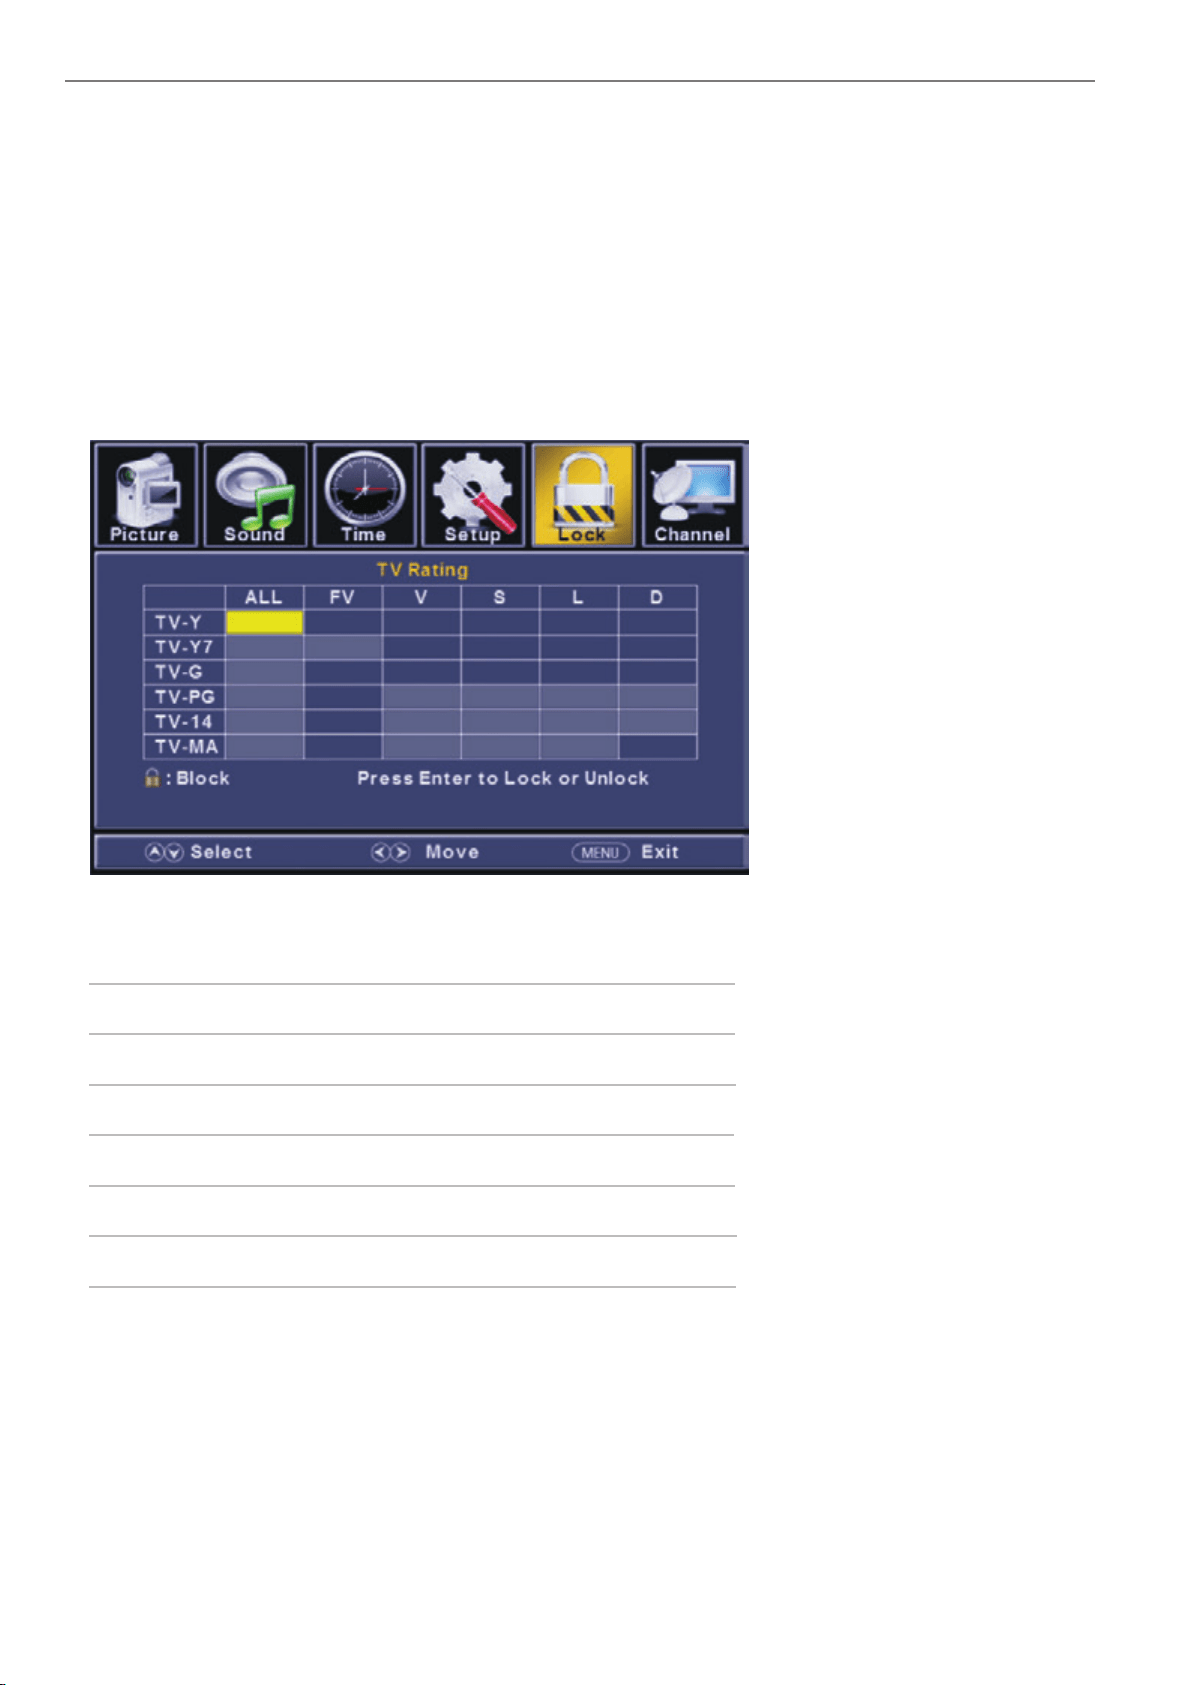
Age
Define
TV-Y
TV-Y7
TV-G
TV-PG
TV-14
TV-MA
General audience
Parental guidance suggested
Parents strongly cautioned
Retricted
No one 17 and under admitted
Adult audience only
*Note:
The content ratings will increase depending on the level of the age-based rating.
For example, a program with a TV-PG V(violence) rating may contain moderate violence, while a
TV-14 V(violence) rating may contain intense violence. So locking a higher level option will
automatically cause locking the options that has more sensitive level.
TV
The TV rating compose of two aspects: age-based and content-based.
US Rating
For the United States, the rating setting basically include the following options: TV, MPAA.
24
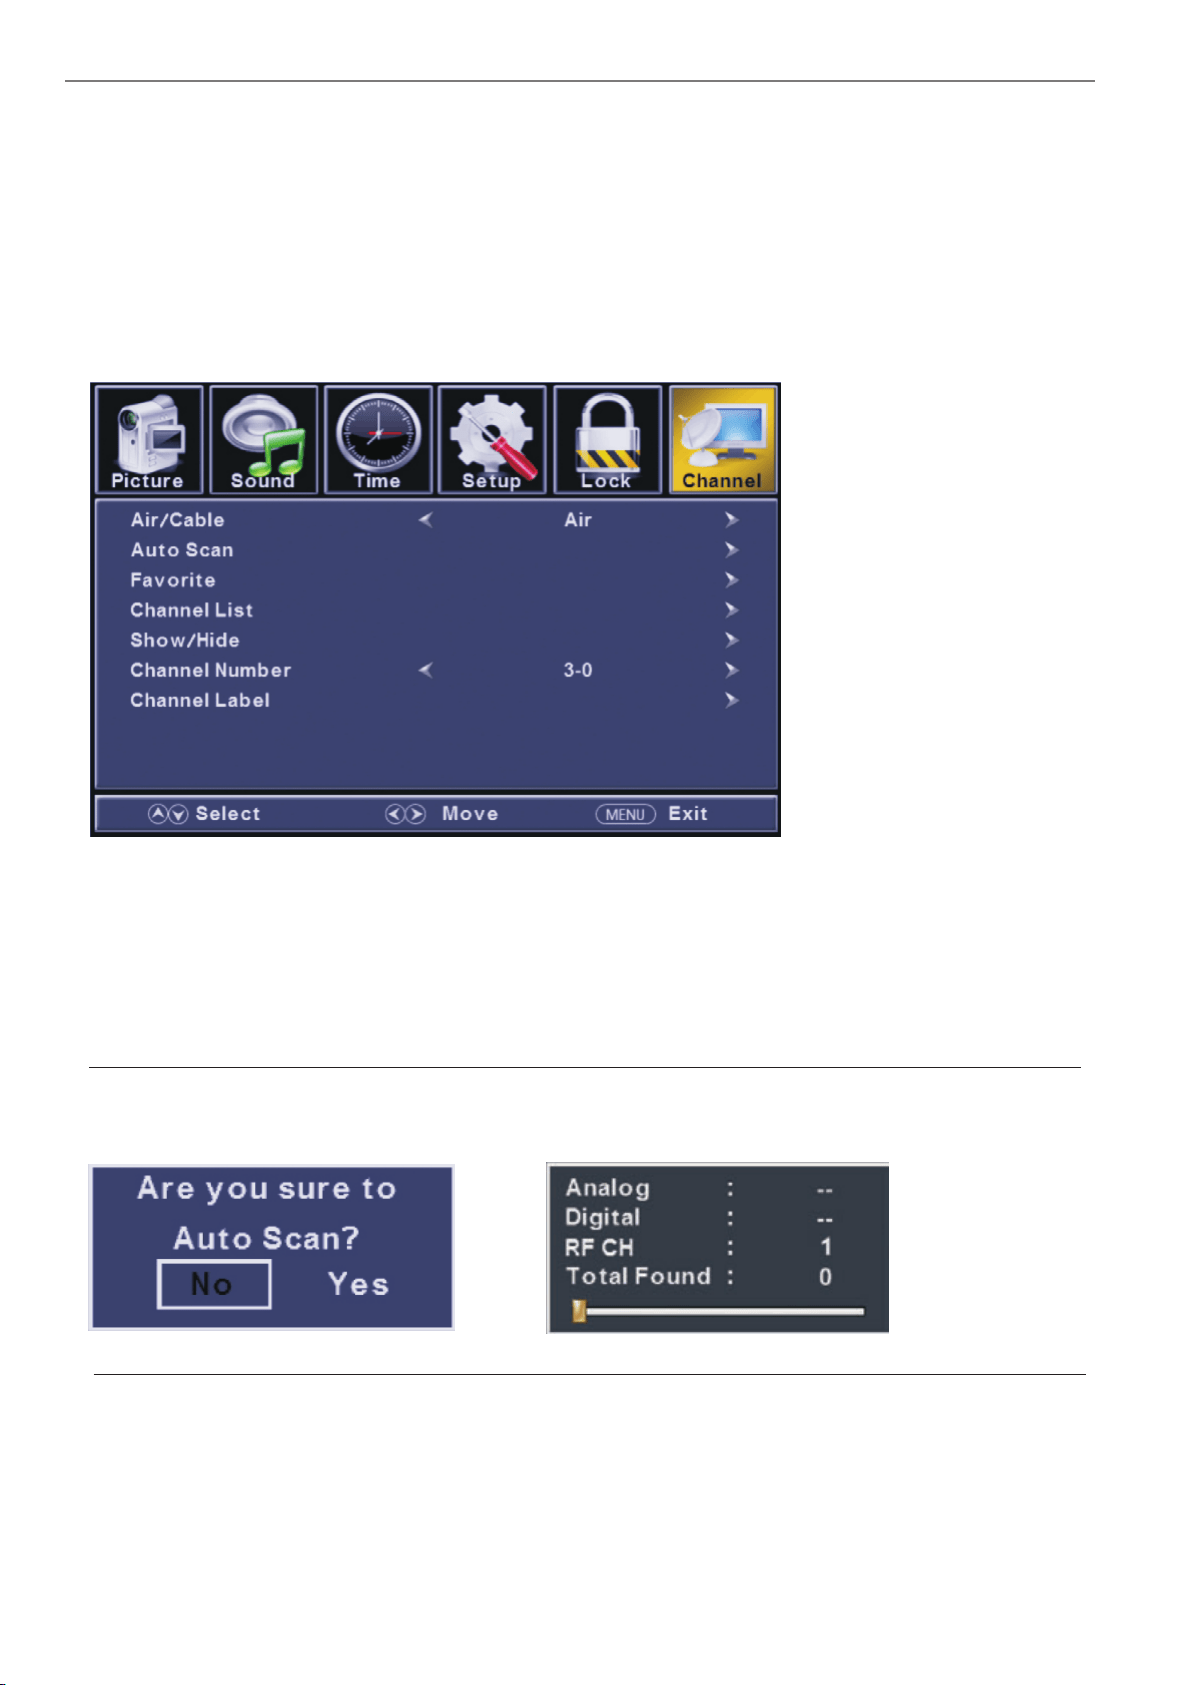
Channel Menu
ENU to enter the main menu, Press button to select.
Press to enter.
ENU again to exit or back to parent menu.
button to select among Air/Cable / Auto Scan / Favorite / Show/Hide / Channel Number / Channel Label .
Press to enter.
Press button to adjust.
ENU again or back to parent menu.
Press
Press
Press
Press
M ◄ / ►
ENTER / ▼
M
▼ / ▲
ENTER / ▼
◄ / ►
M
【Air/Cable】
.
Press button to select(Air/Cable).
【Auto Scan】
Automatically search for channels.
Press ENTER / button to enter.
Select signal type
◄ / ►
►
25
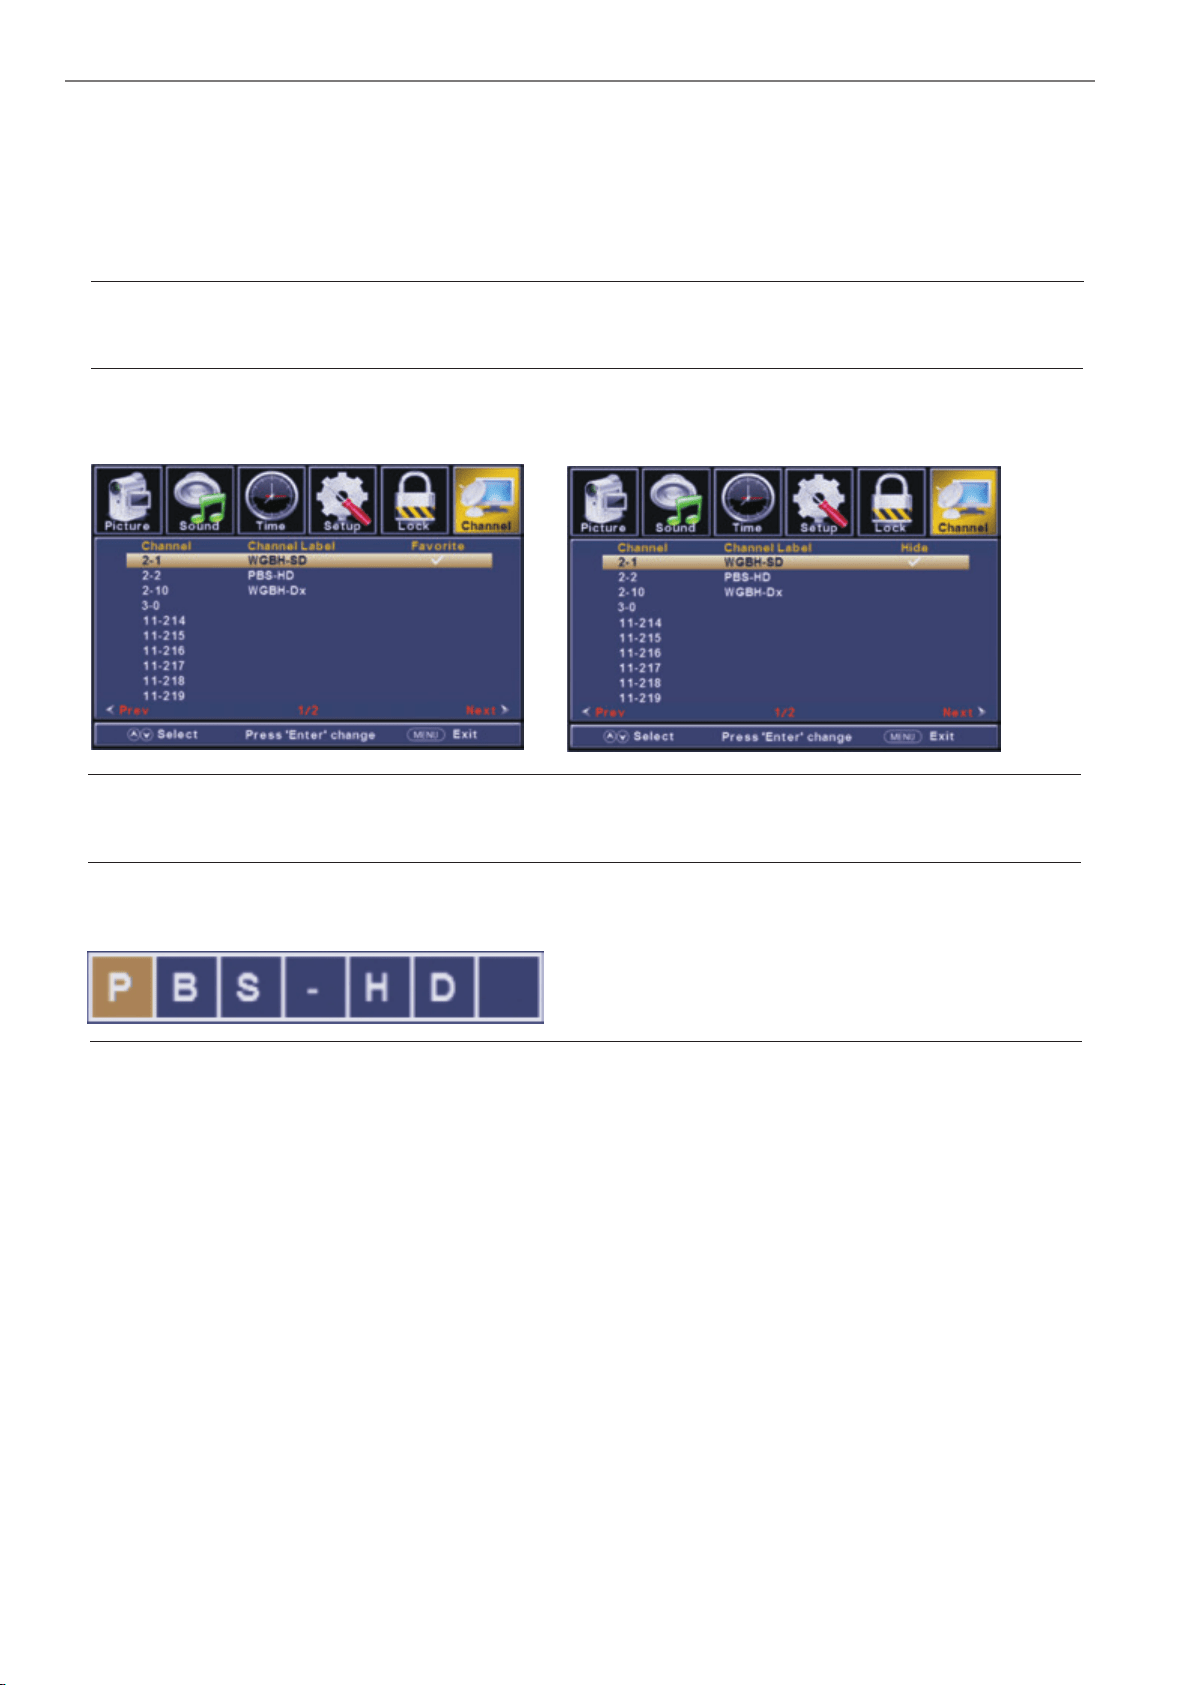
【Favorites】
Add channels to create a favorite list.
Press button to enter.
【Channel Number】
.
Press button to adjust.
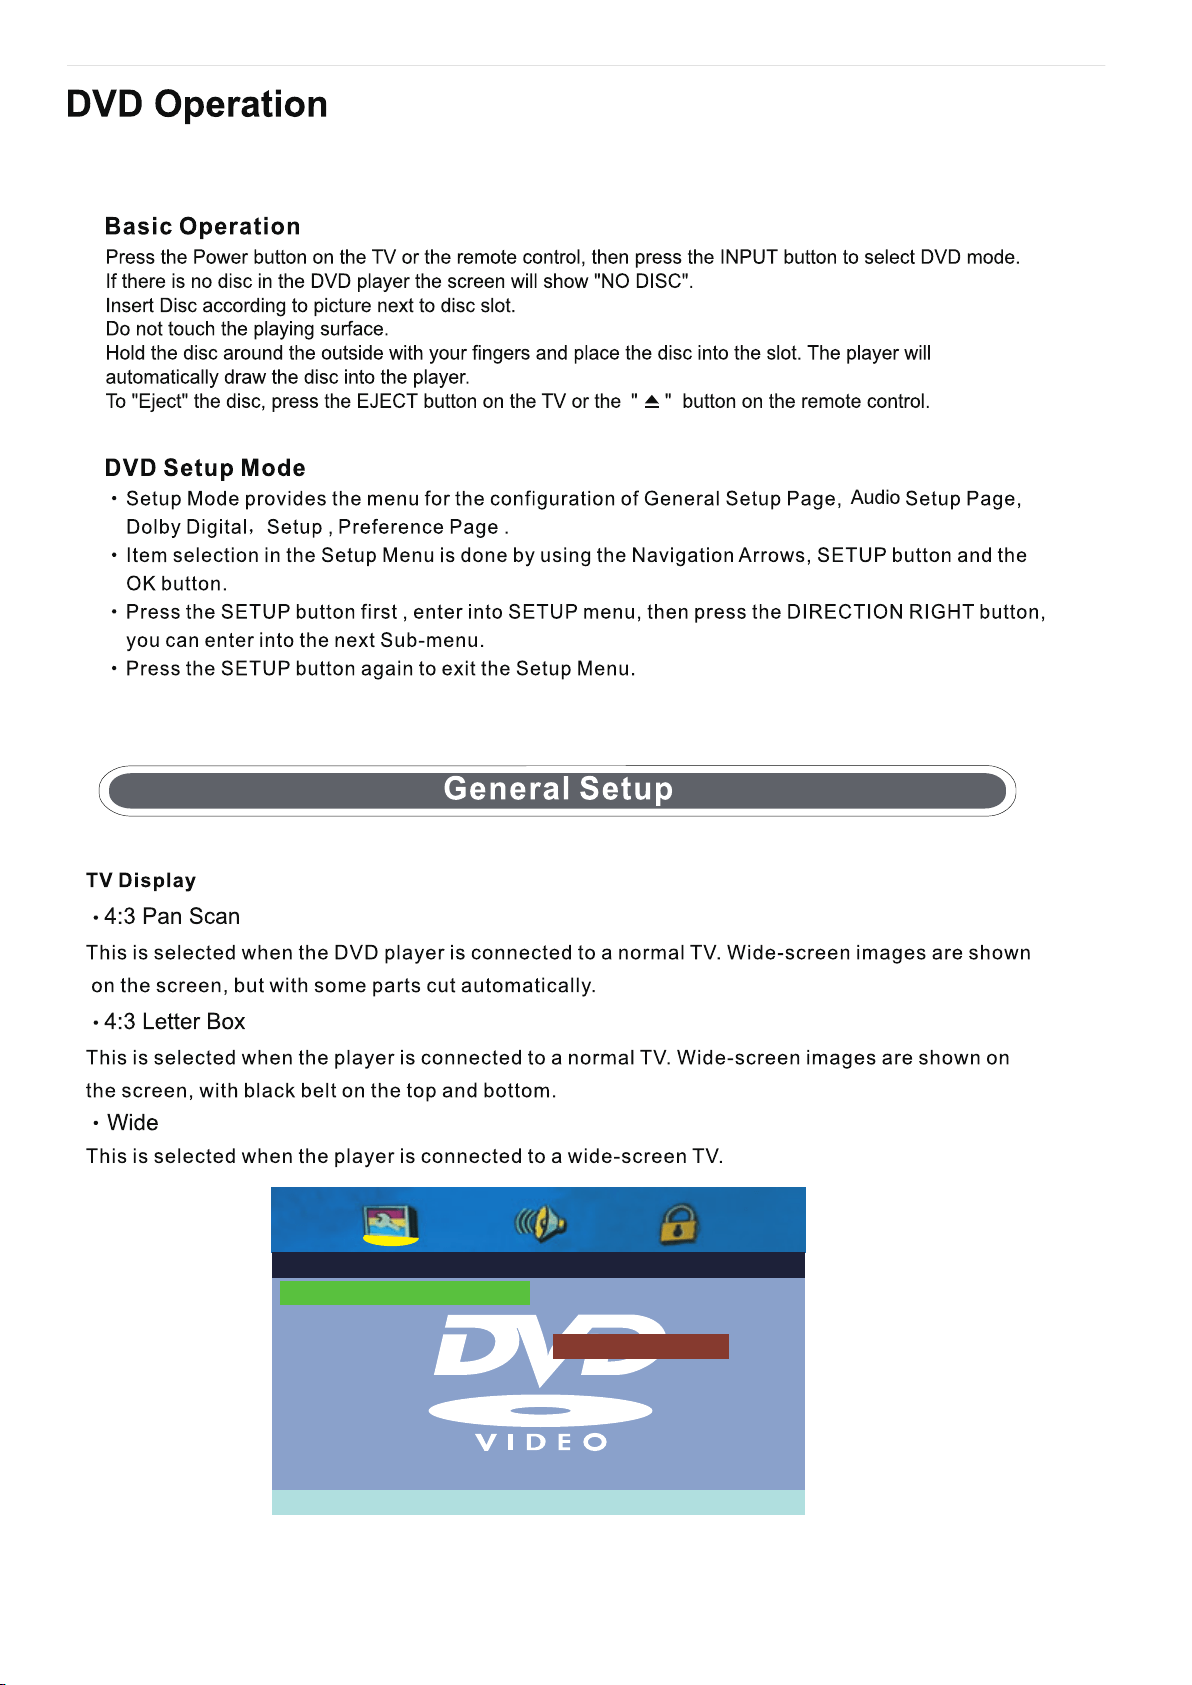
【Channel Label】
.
Press button to adjust.
►
►
►
◄ / ►
◄ / ►
【Channel List】
Display your program list.
Press button to enter.
【Show/Hide】
Show or hide the channels in your program list.
Press button to enter.
Show the channel number
Create labels for channels ,up to 7 characters
26

PC Menu
to select PC source.
ENU to enter the main menu, Press button to select Setup menu.
Press to select PC Settings.
button to select among H-Pos / V-Pos / Clock / Phase / Auto.
Press to enter.
Press button to adjust.
ENU again or back to parent menu.
Press
Press
Press
Press
INPUT
M ◄ / ►
▼
▼ / ▲
ENTER / ▼
◄ / ►
M
27

【H-Pos】
Adjust the horizontal position of the picture.
Press button to adjust.
【V-Pos】
Adjust the vertical position of the picture.
Press button to adjust.
【Clock】
Adjust the vertical position of the picture.
Press button to adjust.
【Phase】
Adjust the horizontal interfering lines.
Press button to adjust.
【Auto】
Press button to enter.
◄ / ►
◄ / ►
◄ / ►
◄ / ►
►
Adjust to the screen automatically to the optimal position of the picture.
*Notes:
1. Color,Tint,Sharpness,Noise Reduction,Dynamic Contrast and HDMI Mode in
PICTURE are invalid.
2. MTS and Audio Language in SOUND menu are invalid.
3. Auto Clock in TIME menu is invalid.
4.Close Caption in SETUP menu is invalid.
5.US Rating, Canada Rating, RRT Setting and Reset RRT in LOCK menu are invalid.
6. mode has no CHANNEL menu. PC
28
- - General Serup Page - -
Set TV Display Mode
Screen Saver On
Last Memory Off
Wide
4:3 Letter Box
4:3 Pan Scan
OSD Lang Eng
TV Display Wide
29
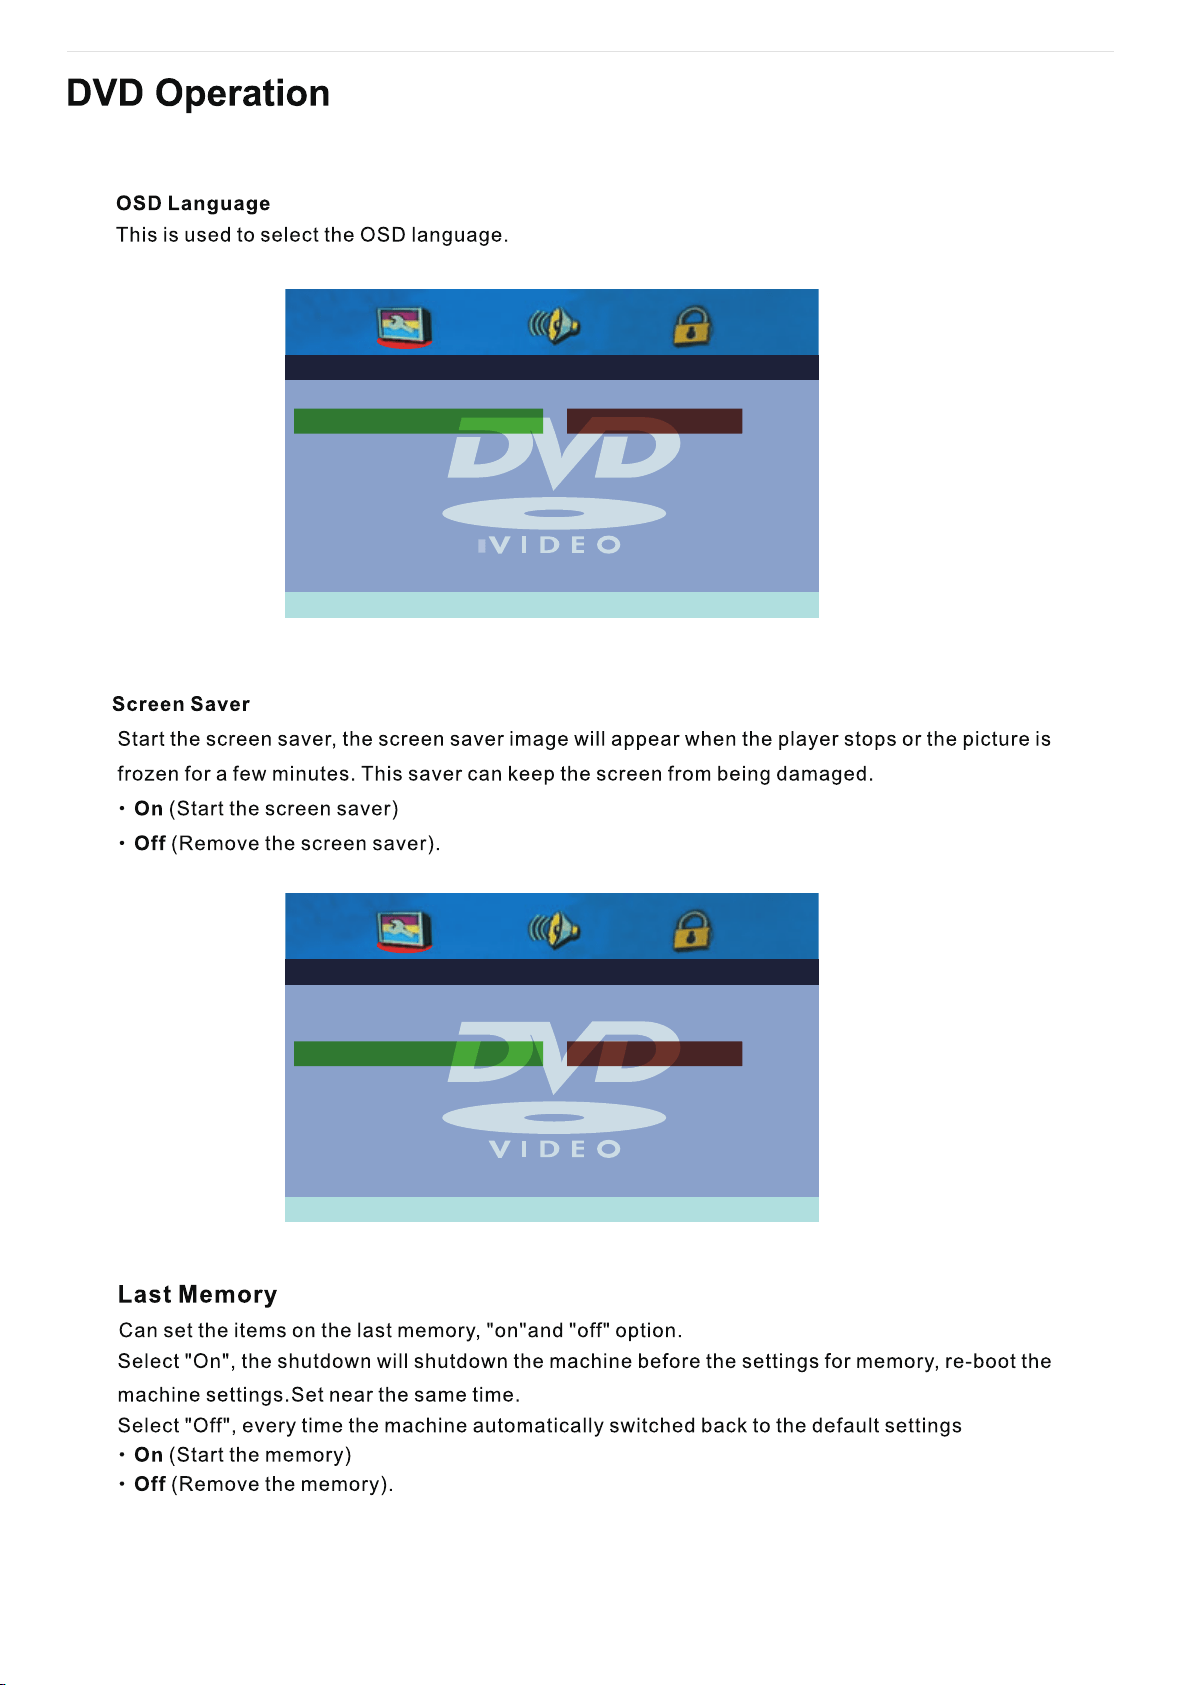
- - General Serup Page - -
Set OSD Language
TV Display Wide
Screen Saver On
Last Memory Off
French
Italian
Spanish
Portuguese
German
EnglishOSD Lang Eng
- - General Serup Page - -
Screen Saver
TV Display Wide
Screen Saver On
Last Memory Off
On
Off
EnglishOSD Lang Eng
30
- - General Serup Page - -
Set Last Memory State
TV Display Wide
Screen Saver On
Last Memory Off
French
Off
On
EnglishOSD Lang Eng
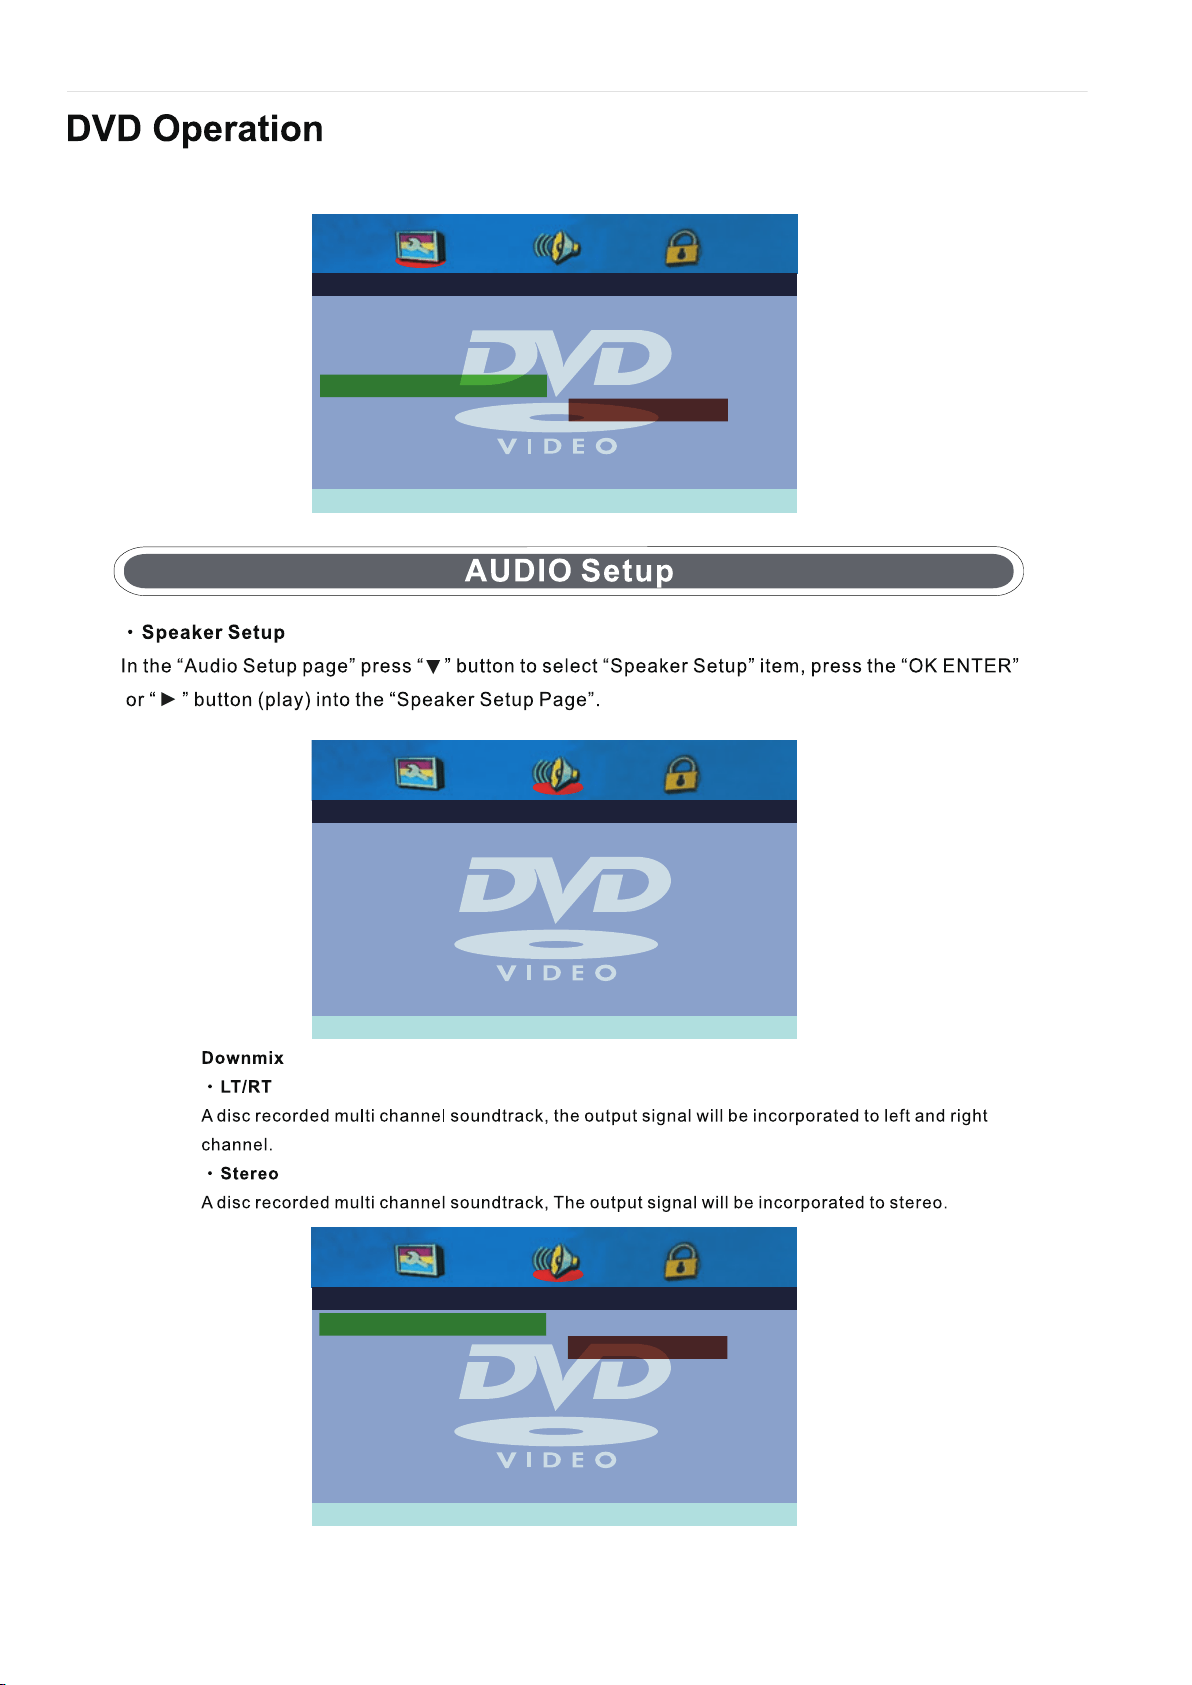
- - Speaker Setup Page - -
Go To Speaker Setup Page
Downmix STR
- - Speaker Setup Page - -
Set Downmix Mode
Downmix STR LT/PT
Stereo
31
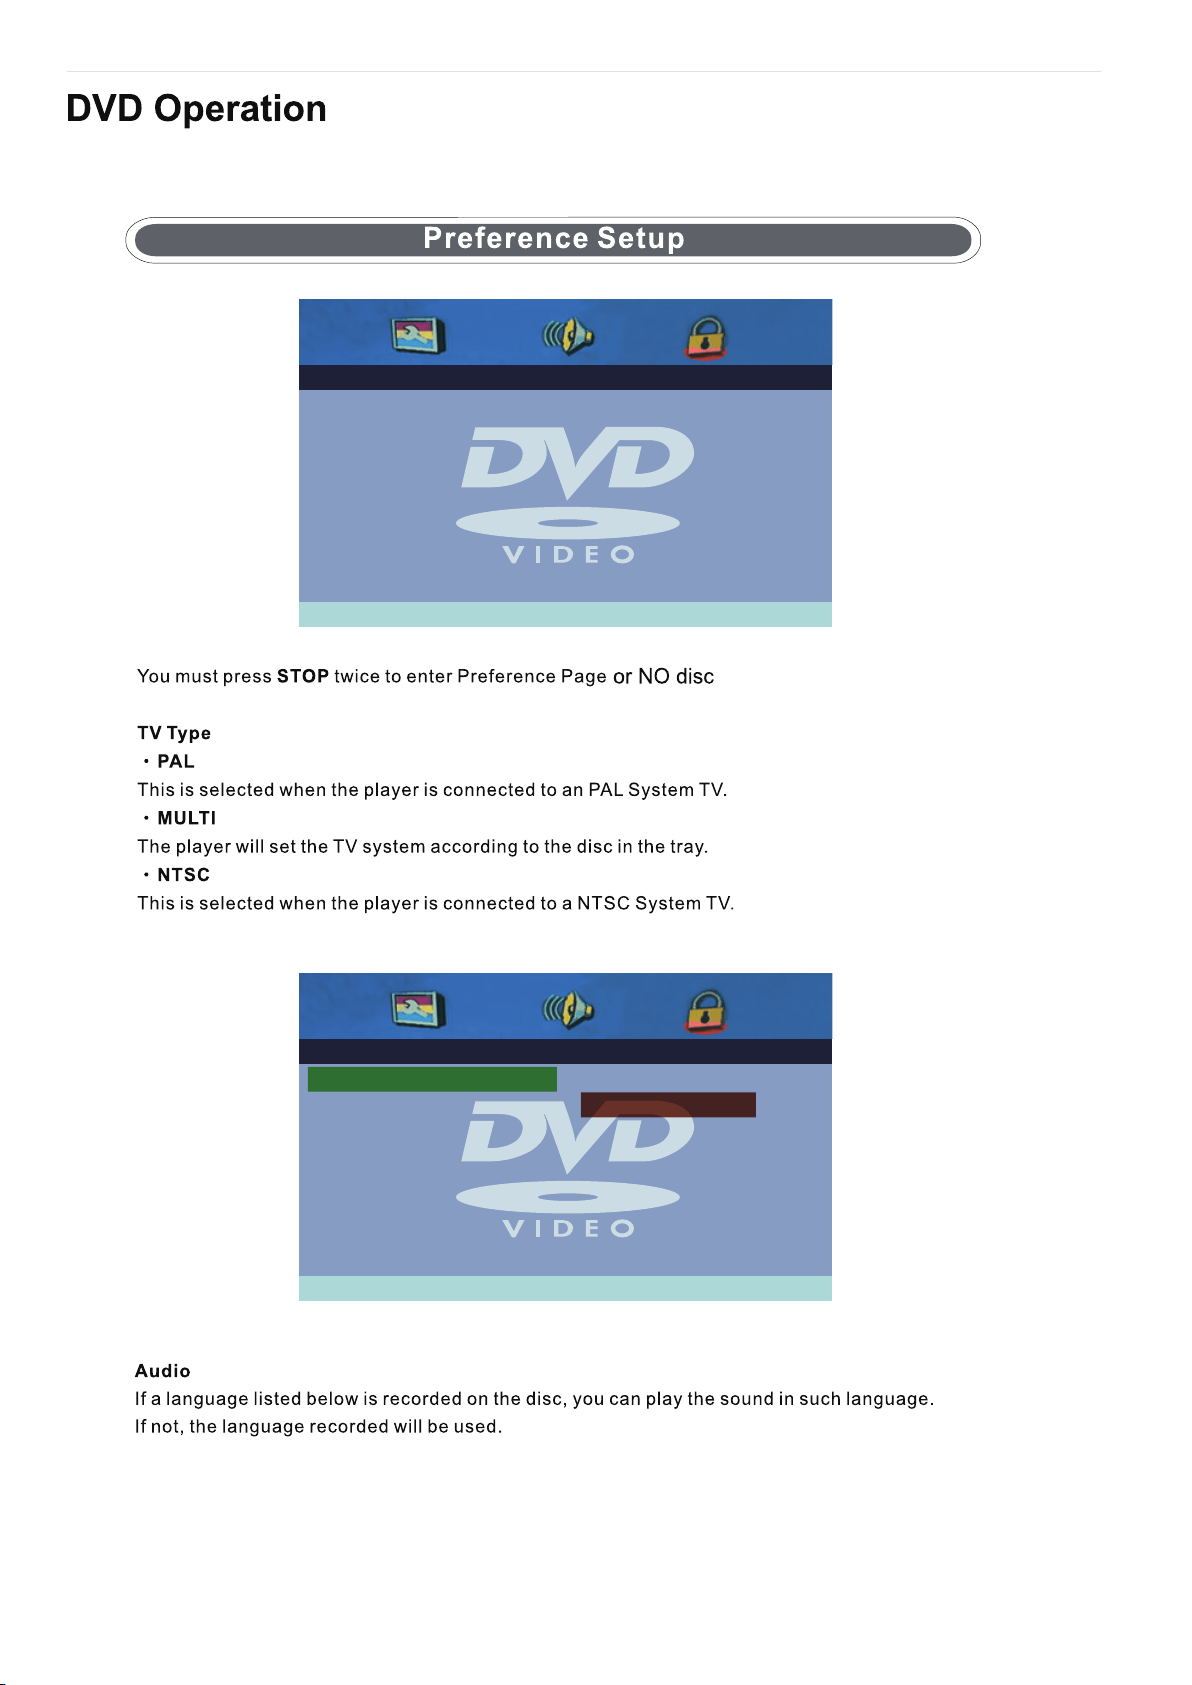
- - Preference Page - -
Go To Preference Page
TV Type Auto
Subtitle Eng
Eng
Parental
Password
Default
Disc Menu
Audio Eng
- - Preference Page - -
Set TV Standard
TV Type Auto
Subtitle Eng
Eng
Parental
Password
Default
Disc Menu
NTSC
PAL
AutoAudio Eng
32
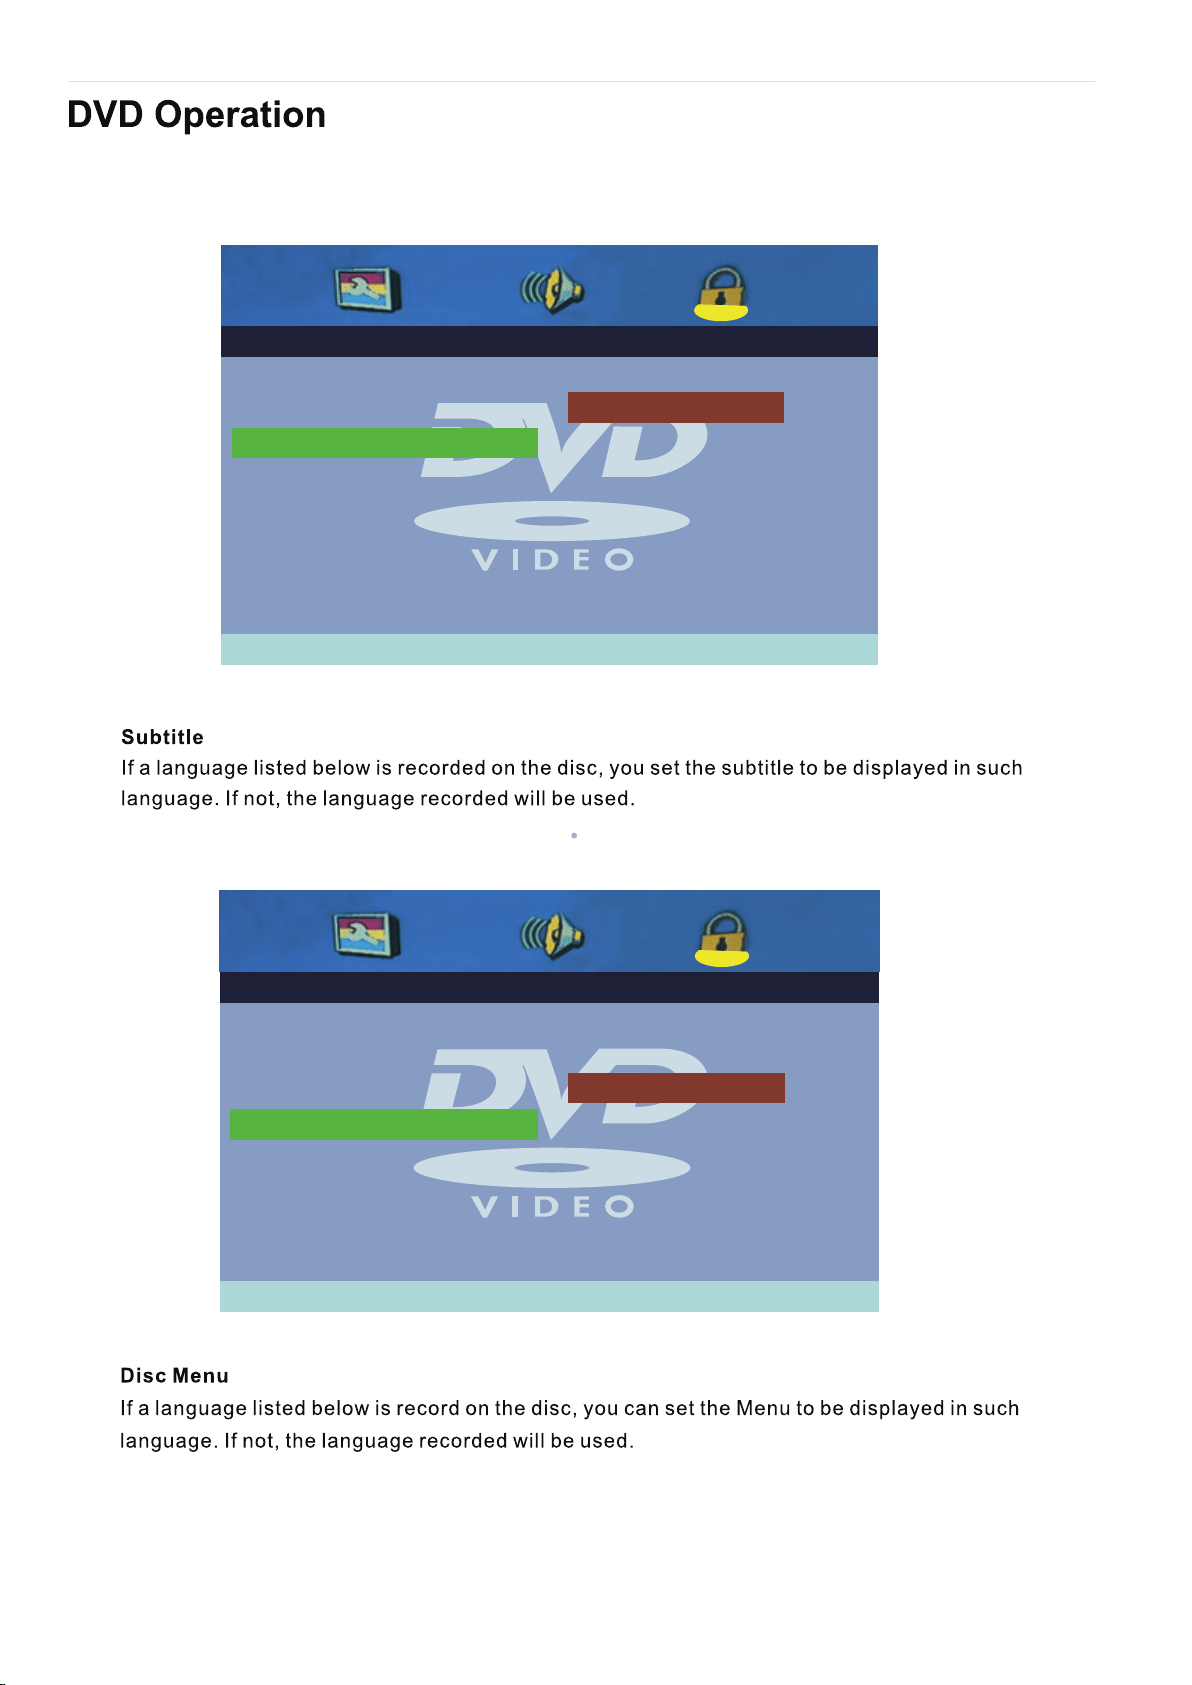
- - Preference Page - -
Preferred Audio Language
TV Type Auto
Subtitle Eng
Eng
Parental
Password
Default
Disc Menu
French
German
Italian
Spanish
Off
Portuguese
EnglishAudio Eng
- - Preference Page - -
Preferred Audio Language
TV Type Auto
Subtitle Eng
Eng
Parental
Password
Default
Disc Menu French
German
Italian
Spanish
Portuguese
English
Audio Eng
33
34
Technical Specifications
ygolonhcet yalpsiD
elbisiv ,ezis neercS
9:61 tamrof neercS
noituloseR
4000:1/5000:1 oitar tsartnoc
²m/dc002 ssenthgirb muminiM
16.7M colors sroloc yalpsiD
elgna gniweiv muminiM
<20ms/6ms emit esnopser
zH06/05 etar noititeper erutciP
NTSC smetsys roloc oediV
M/MTS dradnatS VT
CATV (optional)
CABLE( CH1~CH135) /AIR( CH2~CH69)
TV Functions
CC 608CC
DC 12 Volt INPUT No
Only for the use of upgrade BSU
1DVD
IMDH
3
NI OIDUA CP
1
AGV
AV-IN
1
YPBPR-IN
1
COAXIAL OUTPUT
1
Connections
EARPHONE OUTPUT
1
1
h/French/Spanish/PortuguesesilgnEegaugnal DSO
ttaW 8x2 tuptuo oiduA
AC110~240V tnemeriuqer rewoP
60W/70W mumixam noitpmusnoc rewoP
%57< % ni oitar ecnanimul kaeP
Power consumption in stand-by mode 0.5W
Mercury content in mg / contains lead 0,00 mg / Yes
ASEV
1366*768/1920*1080
100mmx100mm/200mmx200mm
178°H/178°V/176°H/176°V
32/40