Documents: Go to download!
User Manual
- User Manual - (English, French, Spanish)
- Dimension Guide - (English)
- Wiring Sheet - (English)
- Feature Sheet - (English)
- WINE CELLAR USE
- WINE CELLAR CARE
- TROUBLESHOOTING
Table of contents
User Guide WINE CELLAR
WINE CELLAR USE
Normal Sounds
Your new wine cellar may make sounds that your old one didn’t make. Because the sounds are new to you, you might be concerned about them. Most of the new sounds are normal. Hard surfaces, such as the flooring and surrounding structures, can make the sounds seem louder. The following describes the kinds of sounds and what may be making them.
- Your wine cellar is designed to run more efficiently to keep your wine at the desired temperatures and to minimize energy usage. The high efficiency compressor and fans may cause your wine cellar to run longer than your old one. You may also hear a pulsating or high-pitched sound from the compressor or fans adjusting to optimize performance.
- Rattling noises may come from the flow of refrigerant or items stored inside the wine cellar.
- As each cycle ends, you may hear a gurgling sound due to the refrigerant flowing in your wine cellar.
- You may hear water running into the drain pan when the wine cellar is defrosting.
- You may hear clicking sounds when the wine cellar starts or stops running.
Using the Control
For Style 1 and Style 2 models, the control for this models is located at the top front of the wine cellar compartment. Default temperatures are in °F.

A. Power
B. Light
C. Compartment display
D. Decrease temperature
E. Increase temperature
Controls
For your convenience, your wine cellar control is preset at the factory.
For single-compartment models (WUW35X15DS, WUW35X24DS, WUW55X15DS), the preset temperature is 54°F (12°C). For the two-compartment model (WUW55X24DS), the preset temperature for the upper compartment is 45°F (7°C) and the preset temperature for the lower compartment is 54°(12°C).
- When the power is on, the temperature display shows the set point temperature of the compartment(s).
- Wait 24 hours for your wine cellar to cool completely before adding wine.
NOTE: Adjusting the wine cellar temperature control to a colder than the recommended setting will not cool the compartments any faster.
Turn Wine Cellar On/Off:
- Press the Power button/touch pad on your wine cellar for 3 seconds to turn On the wine cellar cooling system.
- Press and hold the Power button/touch pad again to turn Off the wine cellar cooling system. A 3-second countdown will show in the compartment display. The Light button/touch pad will operate to turn the light on and off within the wine cellar compartment.
Increasing and Decreasing Compartment Temperature:
- Press the Increase Temperature button/touch pad until the desired temperature is reached in the desired compartment, displayed in the compartment display(s).
- Press the Decrease Temperature button/touch pad until the desired temperature is reached in the desired compartment, displayed in the compartment display(s).
Turn Light On/Off:
- Press Light button/touch pad to turn the light on and off within wine cellar compartment. The wine cellar will remain illuminated for 10 minutes (even when door is closed) when the Light is turned on. When the Light is turned off, the wine cellar compartment will be illuminated when the door is open. The light will turn off when the door is closed.
Change Temperature Setting (on some models):
- For models with °F/°C control button/touch pad, press the °F/ °C Control button/touch pad to switch from Fahrenheit to Celsius or Celsius to Fahrenheit. The °F or °C on the Temperature Indicator touch pad will illuminate to indicate which temperature setting is currently in use.
- For models without °F/°C control button/touch pad, press and hold the Decrease Temperature and Increase Temperature buttons/touch pads for 3 seconds. A 3-second countdown will display.
Using Eco Mode (on some models):
When Eco mode is activated, the compartment display light will turn off when the door is closed. When the wine cellar door is opened, the light will stay on until the door is closed. The Light button/touch pad and °F/°C control button/touch pad will operate normally.
- To activate Eco mode, press and hold the Eco mode button for 3 seconds. A 3-second countdown will display.
- To deactivate Eco mode, press and hold the Eco mode button for 3 seconds. A 3-second countdown will display and the wine cellar will return to normal operation.
Adjusting the Control:
If you need to adjust the temperature, wait at least 24 hours between adjustments and then recheck the temperature.
To make the wine cellar colder, adjust the setting to a lower temperature. To make the wine cellar less cold, adjust the setting to a higher temperature.
NOTE: On some models, adjusting the temperature control raises or lowers the temperature in the corresponding compartments, but not both compartments.
Temperature Separator (Temperature Display) (on some models)
The temperature separator displays the current temperatures (Fahrenheit or Celsius) for the upper and lower compartments of the wine cellar. To adjust the temperature settings, see “Adjusting the Control” earlier in this section.
Recommended Storing Locations (on some models)
For best storing and serving temperatures for your bottle of wine, use the wine producer's recommended temperature setting. See the wine’s label for details. It is recommended to store wine for short-term (few months) at 55°F (13°C).

Wine Racks
Remove and Replace the Top and Middle Racks
To Remove Racks:
- Pull the rack forward until it stops.
- Lift up on both sides of the rack to clear the shelf brackets from the bracket support pins.
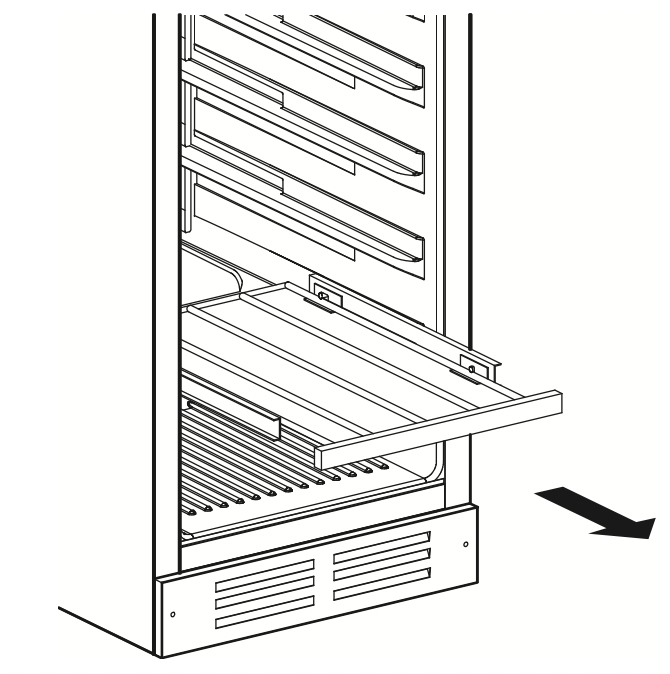
- Pull the rack forward and out of the rack supports.
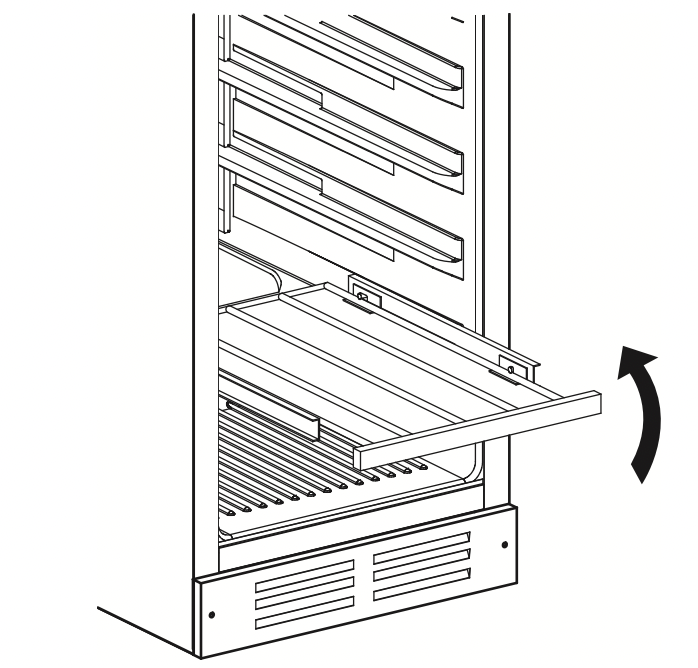
To Replace Racks:
- Insert the rack into the compartment and slide it toward the rear of the wine cellar.
- Align the bracket support pins with the holes in the shelf brackets, and then place the shelf into the rack supports until properly in place.
Stocking the Wine Cellar
NOTE: For optimum wine storage, place white wines at the top of the wine cellar, light red wines in the center and red wines at the bottom.
To Stock the Wine Cellar
- Start stocking the wine cellar with the bottom display rack.
- Starting on the left-hand side, place the first bottle in the rack on its side with the neck of the bottle facing the front of the wine cellar.
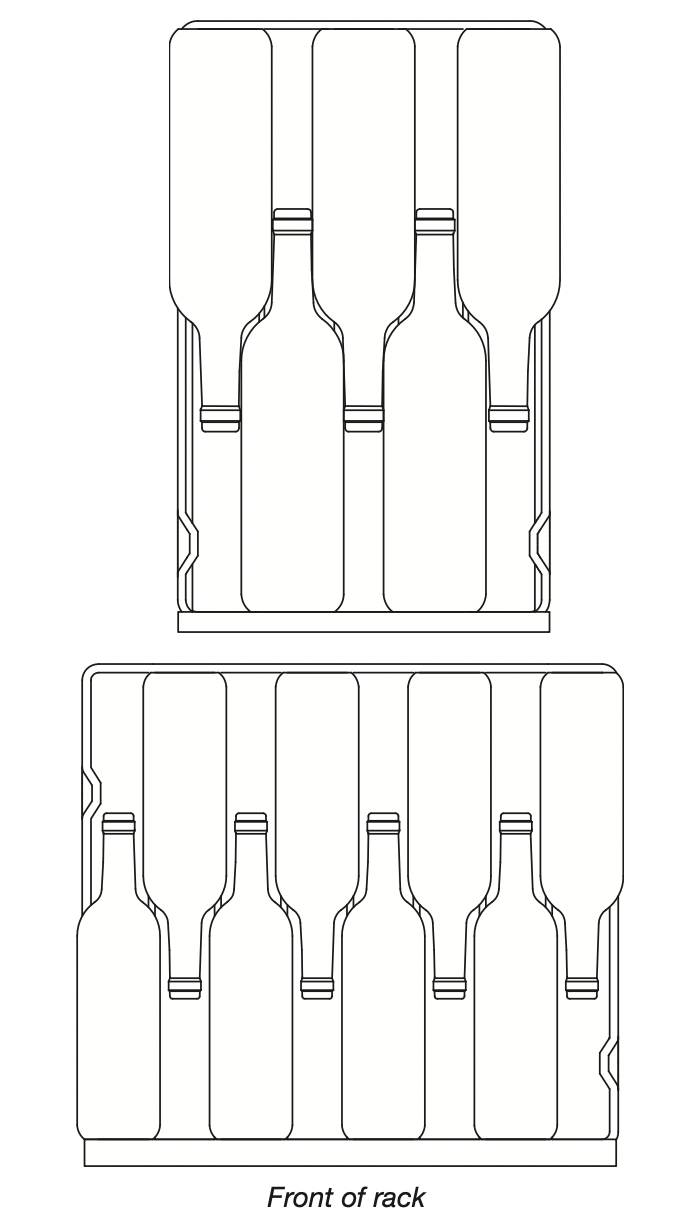
- Place the next bottle on its side with the neck of the bottle facing the back of the wine cellar.
- Alternate in this manner until the display rack is full.
- Push the rack all the way in before pulling the next one forward.
- Pull the next rack forward and repeat steps 2 through 4; repeat for remaining racks.
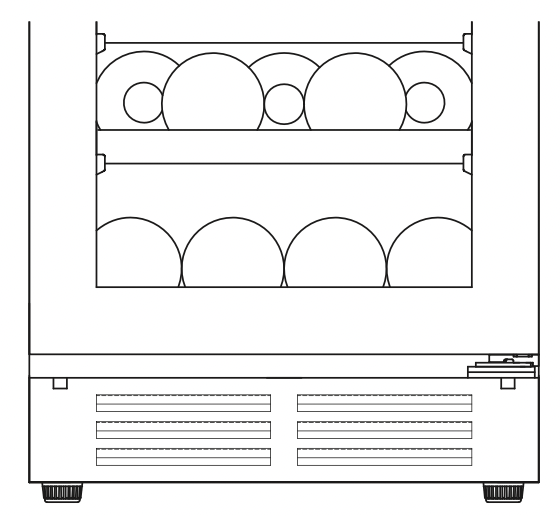
- To stock the bottom of the wine cellar, place bottles in the grooves on the bottom of the wine cellar with the necks of the bottles facing the back of the wine cellar.
Lighting the Wine Cellar
The refrigerator has an interior light that comes on any time the door is opened. Refer to the “Using the Controls” section for options on controlling the interior light.
NOTE: The light is an LED which does not need to be replaced. If the LED does not illuminate when the door is opened, call Service to replace the light. See Assistance or Service for contact information.
WINE CELLAR CARE
Cleaning
WARNING - Explosion Hazard
- Use nonflammable cleaner.
- Failure to do so can result in death, explosion, or fire.
Clean the wine cellar about once a month to avoid buildup of odors. Wipe up spills immediately.
To Clean Your Wine Cellar:
1. Unplug wine cellar or disconnect power.
2. Remove all racks from inside the wine cellar.
3. Clean the interior.
Style 1 - Models with stainless steel trim
Using a clean sponge or soft cloth and a mild detergent dissolved in warm water, hand wash and rinse thoroughly the removable parts and interior surfaces. Dry with a soft cloth.
Style 2 - Models with wooden trim
IMPORTANT: To avoid damaging wooden trim pieces, wipe the trim with a clean sponge or soft cloth and warm water. Do not use detergent or immerse the entire rack into water when cleaning.
Using a clean sponge or soft cloth and a mild detergent dissolved in warm water, hand wash and rinse thoroughly the removable parts and interior surfaces. Dry with a soft cloth.
- Do not use abrasive or harsh cleaners such as window sprays, scouring cleansers, flammable fluids, cleaning waxes, concentrated detergents, bleaches or cleansers containing petroleum products on plastic parts, interior and door liners or gaskets. Do not use paper towels, scouring pads, or other harsh cleaning tools. These can scratch or damage materials.
- To help remove odors, you can wash interior walls with a mixture of warm water and baking soda (2 tbs to 1 qt [26 g to 0.95 L] of water).
4. Wash stainless steel and painted metal exteriors with a clean sponge or soft cloth and a mild detergent in warm water. Do not use abrasive or harsh cleaners, or cleaners containing chlorine. These can scratch or damage materials. Dry thoroughly with a soft cloth.
NOTE: To keep your stainless steel wine cellar looking like new and to remove minor scuffs or marks, it is suggested that you use the manufacturer’s approved Stainless Steel Cleaner and Polish. To order the cleaner, see “Accessories.”
IMPORTANT: This cleaner is for stainless steel parts only. Do not allow the Stainless Steel Cleaner and Polish to come into contact with any plastic parts such as the trim pieces, dispenser covers or door gaskets. If unintentional contact does occur, clean plastic part with a sponge and mild detergent in warm water. Dry thoroughly with a soft cloth.
5. Replace the racks.
6. Clean the condenser coils regularly. They are located behind the base grille. Coils may need to be cleaned as often as every other month. This may help save energy.
- Remove the base grille. See “Base Grille.”
- Use a vacuum cleaner with an extended attachment to clean the condenser coils when they are dusty or dirty.
- Replace the base grille.
7. Plug in wine cellar or reconnect power.
Vacation and Moving Care
Vacations
If you choose to turn the wine cellar off before you leave, follow these steps.
- Remove all wine bottles from the wine cellar.
- Unplug the wine cellar.
- Clean the wine cellar. See “Cleaning.”
- Tape a rubber or wood block to the top of the door to prop it open far enough for air to get in. This stops odor and mold from building up.
Moving
When you are moving your wine cellar to a new home, follow these steps to prepare it for the move.
- Remove all wine bottles from the wine cellar.
- Unplug the wine cellar.
- Clean, wipe, and dry it thoroughly.
- Take out all removable parts, wrap them well, and tape them together so they don’t shift and rattle during the move.
- Tape the doors shut and tape the power cord to the wine cellar.
When you get to your new home, put everything back and refer to the “Installation Instructions” section for preparation instructions.
TROUBLESHOOTING
Try the solutions suggested here first in order to avoid the cost of an unnecessary service call.
Your wine cellar will not operate
WARNING - Electrical Shock Hazard
Plug into a grounded 3 prong outlet.
Do not remove ground prong.
Do not use an adapter.
Do not use an extension cord.
Failure to follow these instructions can result in death, fire, or electrical shock.
- Is the power supply cord unplugged?
Plug into a grounded 3 prong outlet. - Has a household fuse blown, or has a circuit breaker tripped?
Replace the fuse or reset the circuit. - Is the Wine Cellar Control turned to the OFF position?
See “Using the Control.”
The lights do not work
- Is the power supply cord unplugged?
Plug into a grounded 3 prong outlet. - Your wine cellar is equipped with LED lighting which does not need to be replaced. If there is power to the wine cellar and the lights do not illuminate when the door is opened, call for service or assistance.
The motor seems to run too much
- Is the temperature outside hotter than normal?
Expect the motor to run longer under warm conditions. At normal temperatures, expect your motor to run about 40% to 80% of the time. Under warmer conditions, expect it to run even more of the time. - Is the door opened often?
Expect the motor to run longer when this occurs. In order to conserve energy, try to get everything you need out of the wine cellar at once, keep wine bottles positioned label side up so that they are easy to find, and close the door as soon as the wine is removed. - Is the control set correctly for the surrounding conditions?
See “Using the Control.” - Is the door closed completely?
Push the door firmly shut. If it will not shut all the way, see “The door will not close completely” later in this section. - Are the condenser coils dirty?
This obstructs air transfer and makes the motor work harder. Clean the condenser coils. See “Cleaning.”
Temperature is too warm
- Is the door opened often?
Be aware that the wine cellar will warm when this occurs. In order to keep the wine cellar cool, try to get everything you need out of the wine cellar at once, keep wine bottles positioned label side up so that they are easy to find, and close the door as soon as the wine is removed. - Is the control set correctly for the surrounding conditions?
See “Using the Control.” - Is the base grille blocked?
For best performance, do not install the wine cellar behind a cabinet door or block the base grille.
There is interior moisture buildup
- Is the door opened often?
To avoid humidity buildup, try to get everything you need out of the wine cellar at once, keep wine bottles positioned label side up so that they are easy to find, and close the door as soon as the wine is removed. When the door is opened, humidity from the room air enters the wine cellar. The more often the door is opened, the faster humidity builds up, especially when the room itself is very humid. - Is it humid?
It is normal for moisture to build up inside the wine cellar when the air is humid. - Is the control set correctly for the surrounding conditions?
See “Using the Control.”
The door is difficult to open
WARNING - Explosion Hazard
Use nonflammable cleaner.
Failure to do so can result in death, explosion, or fire.
- Is the gasket dirty or sticky?
Clean the gasket and the surface that it touches. Rub a thin coat of paraffin wax on the gasket following cleaning.
The door will not close completely
- Are the racks out of position?
Put the racks back into their correct positions. See “Wine Cellar Use” for more information.
WARNING - Explosion Hazard
Use nonflammable cleaner.
Failure to do so can result in death, explosion, or fire.
- Is the gasket sticking?
Clean the gasket and the surface that it touches. Rub a thin coat of paraffin wax on the gasket following cleaning. - Is the door installed properly?
If the door was reversed improperly, re-installation may be required. See “Reverse Door Swing.”
See other models: WRT318FMDM WRT518SZFG WRT138FZDM WRR56X18FW WZF79R20DW

