Ford 2020 Explorer ST SUV
Product's Documents
Below are documents related to this product, you can read online or download:
- Owner's manual - (English) Read Online | Download pdf
Exterior
Interior
Chassis
Powertrain
This device complies with Part 15 of the FCC Rules and with Industry Canada license-exempt RSS standard(s). Operation is subject to the following two conditions: (1) This device may not cause harmful interference, and (2) This device must accept any interference received, including interference that may cause undesired operation.
WARNING: Changes or modifications not expressively approved by the party responsible for compliance could void the user's authority to operate the equipment. The term "IC:" before the radio certification number only signifies that Industry Canada technical specifications were met.
The typical operating range for your transmitter is approximately 33 ft (10 m). Vehicles with the remote start feature will have a greater range.
One of the following could cause a decrease in operating range:
The radio frequency used by your remote control can also be used by other radio transmitters, for example amateur radios, medical equipment, wireless headphones, wireless remote controls, cell phones, battery chargers and alarm systems. If the frequencies are jammed, you will not be able to use your remote control. You can lock and unlock the doors with the key.
Note: Make sure to lock your vehicle before leaving it unattended.
Note: If you are in range, the remote control will operate if you press any button unintentionally.
Note: The remote control contains sensitive electrical components. Exposure to moisture or impact may cause permanent damage.
Intelligent Access (If Equipped)
The system uses a radio frequency signal to communicate with your vehicle and authorize your vehicle to unlock when one of the following conditions are met:
If excessive radio frequency interference is present in the area or if the transmitter battery is low, you may need to mechanically unlock your door. You can use the mechanical key blade in your intelligent access key to open the driver door in this situation. See Remote Control (page 57).
Integrated Keyhead Transmitter
Use the key blade to start your vehicle and unlock or lock the driver door from outside your vehicle. The integrated keyhead transmitter functions as a programmed ignition key that operates all the locks and starts your vehicle, as well as a remote control.
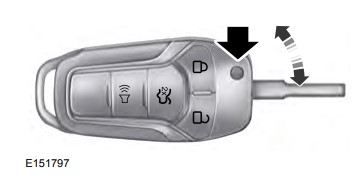
Press the button to release the key blade. Press and hold the button to fold the key blade back in when not in use.
Note: Your vehicle keys came with a security label that provides important key cut information. Keep the label in a safe place for future reference.
Intelligent Access Key (If Equipped)
Note: You may not be able to shift out of park (P) unless the intelligent access key is inside your vehicle.
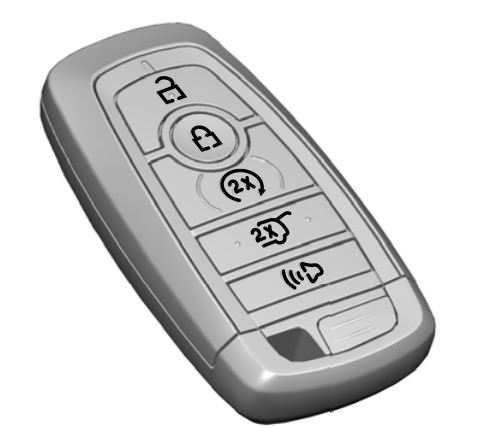
Your remote control operates the power locks and the remote start system. The key must be in your vehicle to use the push button start.
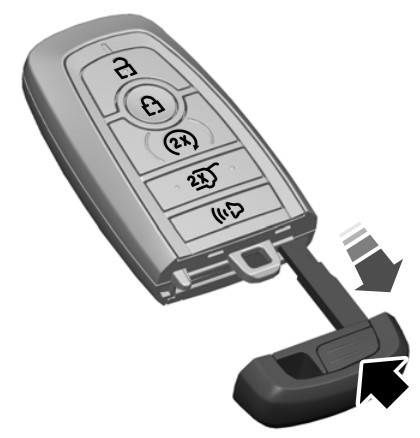
Removable Key Blade
Your remote control also contains a removable key blade that you can use to unlock your vehicle.
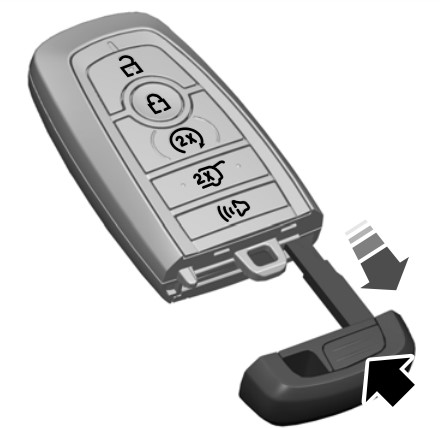
Press the release button and pull the key blade out.
Note: Your vehicle keys came with a security label that provides important key cut information. Keep the label in a safe place for future reference.
Replacing the Battery
Note: Refer to local regulations when disposing of transmitter batteries.
Note: Do not wipe off any grease on the battery terminals or on the back surface of the circuit board.
Note: Replacing the battery does not erase the programmed key from your vehicle. Your remote control should operate normally.
A message appears in the information display when the remote control battery is low. See Information Messages (page 120).
Integrated Keyhead Transmitter
The remote control uses one coin-type three-volt lithium battery.
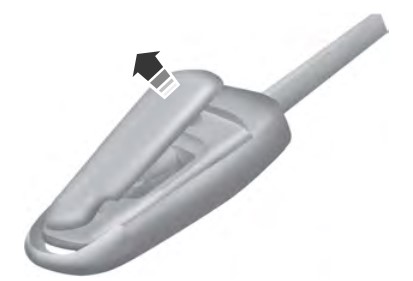
Press the button to release the key blade before beginning the procedure.
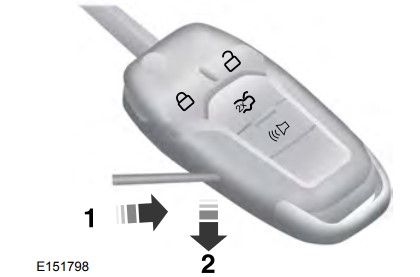
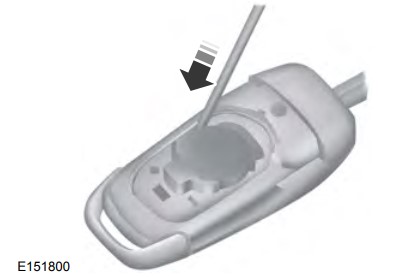
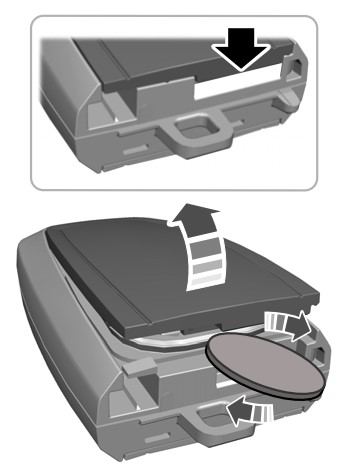
Insert the screwdriver as shown to release the battery.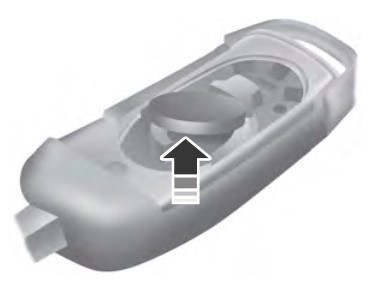
Remove the battery.
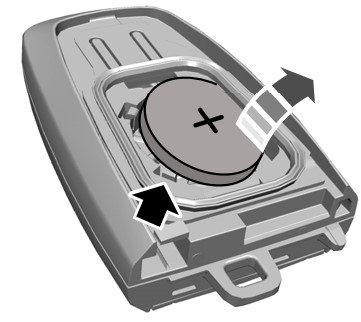
Install a new battery with the + facing upward.
Reinstall the battery cover.
Intelligent Access Key
The remote control uses one coin-type three-volt lithium battery.
Memory Feature (If Equipped)
You can use the remote control to recall memory positions.
If programmed to a pre-set position, the remote control recalls memory positions when you unlock your vehicle. If you have the easy entry and exit feature enabled and the ignition is off, the seat moves to the easy entry position. The seat moves to the driver memory position when you switch the ignition on.
Linking a Preset Position to Your Remote Control or Intelligent Access Key
See Memory Function (page 150).
Car Finder

Press the button twice within three seconds. The horn sounds and the direction indicators flash. We recommend you use this method to locate your vehicle, rather than using the panic alarm.
Sounding the Panic Alarm
Note: The panic alarm only operates when the ignition is off.

Press the button to sound the panic alarm. Press the button again or switch the ignition on to turn it off.
Remote Start (If Equipped)
WARNING: To avoid exhaust fumes, do not use remote start if your vehicle is parked indoors or in areas that are not well ventilated.
Note: Do not use remote start if your fuel level is low.

The remote start button is on the remote control.
This feature allows you to start your vehicle from the outside. Your remote control has an extended operating range.
If your vehicle has automatic climate control, you can configure it to operate when you remote start your vehicle. See
Climate Control (page 137). A manual climate control system runs at the setting it was set to when you switched your vehicle off.
Many states and provinces have restrictions for the use of remote start.
Check your local and state or provincial laws for specific requirements regarding remote start systems.
The system does not work if:
Remote Control Feedback (If Equipped)
An LED on the remote control provides status feedback of remote start or stop commands.
| LED | Status |
| Solid green | Remote start successful |
| Solid red | Remote stop successful |
| Blinking red | Request failed or status not received |
| Blinking green | Status incomplete |
Remote Starting Your Vehicle
Note: You must press each button within three seconds of each other. If you do not follow this sequence, your vehicle does not start remotely, the direction indicators do not flash twice and the horn does not sound
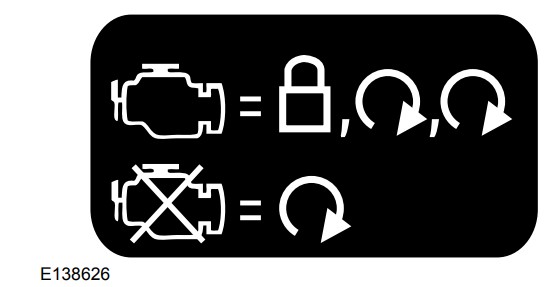
To remote start your vehicle:
The horn sounds if the system fails to start, unless quiet start is on. Quiet start runs the blower fan at a slower speed to reduce noise. You can switch it on or off in the information display.
Note: If you have remote started your vehicle with an integrated keyhead transmitter, you must switch on the ignition before driving your vehicle. With an intelligent access transmitter, you must press the brake pedal before driving your vehicle.
The power windows do not work during remote start and the radio does not turn on automatically.
The parking lamps remain on and your vehicle will run for 5, 10 or 15 minutes, depending on the setting.
Extending the Engine Running Time
Repeat Steps 1 and 2 with the vehicle still running to extend the run time for another remote start period. If you have the duration set to 15 minutes, the duration extends by another 15 minutes. For example, if the vehicle has run from the first remote start for five minutes, the vehicle continues to run now for a total of minutes. You can extend the remote start up to a maximum of 35 minutes.
Wait at least five seconds before remote starting after the engine stops running.
Turning Your Vehicle Off After Remote Starting
Press the button once. Your vehicle and the parking lamps turn off.
You may have to be closer to your vehicle than when starting due to ground reflection and the added noise of your running vehicle.
You can switch this feature on or off in the information display.
REPLACING A LOST KEY OR REMOTE CONTROL
Replacement keys or remote controls can be purchased from an authorized dealer.
Authorized dealers can program remote controls for your vehicle.
GENERAL INFORMATION
Your dealer has many quality products available to clean your vehicle and protect its finishes.
CLEANING PRODUCTS
Materials
For best results, use the following products or products of equivalent quality:
For additional information and assistance, we recommend that you contact an authorized dealer.
| Name | Specification |
| Motorcraft® Bug and Tar Remover, ZC-42 (U.S. & Canada) | |
| Motorcraft® Custom Bright Metal Cleaner, ZC-15 (U.S. & Canada) | ESR-M5B194-B |
| Motorcraft® Detail Wash, ZC-3-A (U.S. & Canada) | ESR-M14P4-A |
| Motorcraft® Engine Shampoo and Degreaser, ZC-20 (U.S.) | ESR-M14P3-A |
| Motorcraft® Engine Shampoo, CXC-66-A (Canada) | |
| Motorcraft® Premium Leather and Vinyl Cleaner, ZC-56 (U.S. & Canada) | |
| Motorcraft® Multi-Purpose Cleaner, CXC-101 (Canada) | |
| Motorcraft® Premium Windshield Wash Concentrate with Bitterant, ZC-32-B2 (U.S.) | WSS-M14P19-A |
| Motorcraft® Premium Quality Windshield Washer Fluid, CXC-37- A/B/D/F (Canada) | WSS-M14P19-A |
| Motorcraft® Professional Strength Carpet & Upholstery Cleaner, ZC-54 (U.S. & Canada) | |
| Motorcraft® Premium Glass Cleaner, CXC-100 (Canada) | ESR-M14P5-A |
| Motorcraft® Spot and Stain Remover, ZC-14 (U.S.) | |
| Motorcraft® Ultra-Clear Spray Glass Cleaner, ZC-23 (U.S.) | ESR-M14P5-A |
| Motorcraft® Wheel and Tire Cleaner, ZC-37-A (U.S. & Canada) |
Wash your vehicle regularly with cool or lukewarm water and a neutral pH shampoo, we recommend Motorcraft Detail Wash.
Note: Suntan lotions and insect repellents can damage painted surfaces. If these substances come in contact with your vehicle, wash the affected area as soon as possible.
Cleaning the Headlamps
Note: Do not scrape the headlamp lenses or use abrasives, alcoholic solvents or chemical solvents to clean them.
Note: Do not wipe the headlamps when they are dry.
Exterior Chrome Parts
Note: Never use abrasive materials, for example steel wool or plastic pads as they can scratch the chrome surface.
Note: Do not use chrome cleaner, metal cleaner or polish on wheels or wheel covers.
Exterior Plastic Parts
For routine cleaning we recommend Motorcraft Detail Wash. If tar or grease spots are present, we recommend Motorcraft Bug and Tar Remover.
Stripes or Graphics (If Equipped)
Hand washing your vehicle is preferred however, pressure washing may be used under the following conditions:
Note: Holding the pressure washer nozzle at an angle to the vehicle's surface may damage graphics and cause the edges to peel away from the vehicle's surface.
Underbody
Regularly clean the underside of your vehicle using water. Keep body and door drain holes free of debris or foreign material.
Under Hood
For removing black rubber marks from under the hood we recommend Motorcraft Wheel and Tire Cleaner or Motorcraft Bug and Tar Remover.
Regular waxing is necessary to protect your car's paint from the elements. We recommend that you wash and wax the painted surface once or twice a year.
When washing and waxing, park your vehicle in a shaded area out of direct sunlight. Always wash your vehicle before applying wax.
Engines are more efficient when they are clean because grease and dirt buildup keep the engine warmer than normal.
When washing:
Note: If your vehicle has an engine cover remove the cover before application of Motorcraft Engine Shampoo and Degreaser. Immediately rinse away any over spray.
Car wash chemicals and environmental fallout can result in windshield and wiper blade contamination. Dirty windshield and wipers will result in poor windshield wiper operation. Keep the windshield and wiper blades clean to maintain windshield wiper performance.
To clean the windshield and wiper blades:
Note: Do not use razor blades or other sharp objects to clean or remove decals from the inside of the heated rear window. The vehicle warranty does not cover damage caused to the heated rear window grid lines.
WARNING: Do not use cleaning solvents, bleach or dye on the vehicle's seatbelts, as these actions may weaken the belt webbing.
WARNING: On vehicles equipped with seat-mounted airbags, do not use chemical solvents or strong detergents. Such products could contaminate the side airbag system and affect performance of the side airbag in a crash.
For fabric, carpets, cloth seats and seats equipped with side airbags:
Mirrors
Do not clean the housing or glass of any mirror with harsh abrasives, fuel or other petroleum or ammonia-based cleaning products.
WARNING: Do not use chemical solvents or strong detergents when cleaning the steering wheel or instrument panel to avoid contamination of the airbag system.
Note: Follow the same procedure as cleaning leather seats for cleaning leather instrument panels and leather interior trim surfaces. See Cleaning Leather Seats page 349).
Clean the instrument panel and cluster lens with a clean, damp and soft cloth, then use a clean, dry and soft cloth to dry these areas.
If a staining liquid like coffee or juice has been spilled on the instrument panel or on interior trim surfaces:
Note: Follow the same procedure as cleaning leather seats for cleaning leather instrument panels and leather interior trim surfaces.
For routine cleaning, wipe the surface with a soft, damp cloth and a mild soap and water solution. Dry the area with a clean, soft cloth.
For cleaning and removing stains such as dye transfer, use Motorcraft Premium Leather and Vinyl Cleaner or a commercially available leather cleaning product for automotive interiors.
Note: Test any cleaner or stain remover on an inconspicuous area.
You should:
Do not use the following products as these may damage the leather:
Authorized dealers have touch-up paint to match your vehicle’s color. Your vehicle color code is printed on a sticker on the front, left-hand side door jamb. Take your color code to your authorized dealer to make sure you get the correct color.
Before repairing minor paint damage, use a cleaner such as Motorcraft Bug and Tar
Remover to remove particles such as bird droppings, tree sap, insect deposits, tar spots, road salt and industrial fallout.
Read the instructions before using cleaning products.
CLEANING THE WHEELS
If you intend on parking your vehicle for an extended period after cleaning the wheels with a wheel cleaner, drive your vehicle for a few minutes before doing so. This reduces the risk of corrosion of the brake discs, brake pads and linings. Do not clean the wheels when they are hot.
Note: Some car washes could damage wheel rims and covers.
Note: Using non-recommended cleaners, harsh cleaning products, chrome wheel cleaners or abrasive materials could damage wheel rims and covers.
If you plan on storing your vehicle for 30 days or more, read the following maintenance recommendations to make sure your vehicle stays in good operating condition.
We engineer and test all motor vehicles and their components for reliable, regular driving. Under various conditions, long-term storage may lead to degraded engine performance or failure unless you use specific precautions to preserve engine components.
General
Body
Engine
Fuel system
Cooling system
Disconnecting Your 12 Volt Battery
Note: It is necessary to reset memory features if you disconnect the battery cables.
Plugging in Your HYBRID
We recommend the following options for your plug-in vehicle (PHEV) :
Brakes
Tires
Miscellaneous
Removing Vehicle From Storage
When your vehicle is ready to come out of storage, do the following:
Contact an authorized dealer if you have any concerns or issues.