User Manual Ranges
PARTS AND FEATURES
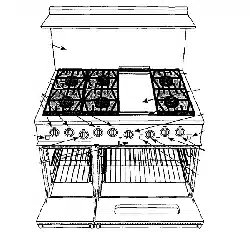
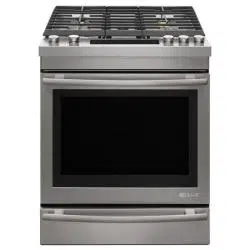
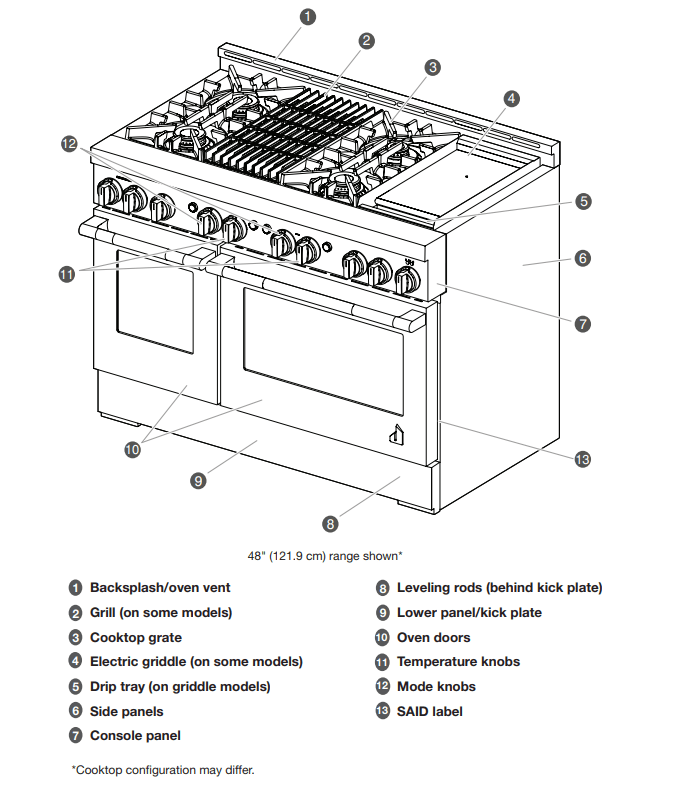
RANGE
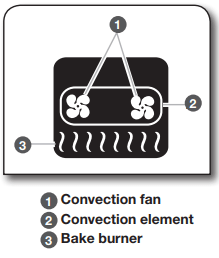
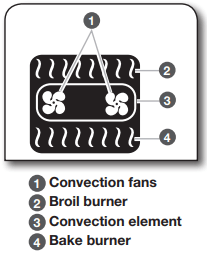
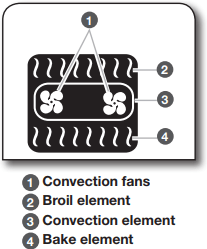
OVEN INTERIOR
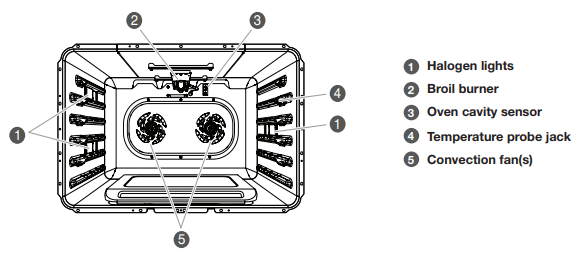
NOTE: Some models have an 18" (45.7 cm) cavity which contains one convection fan.
CONTROL KNOBS
The oven and cooktop features are accessed through the cooktop knobs.
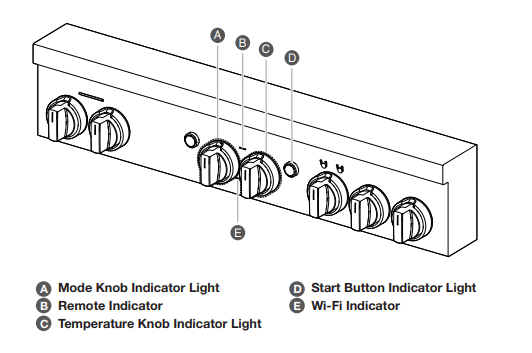
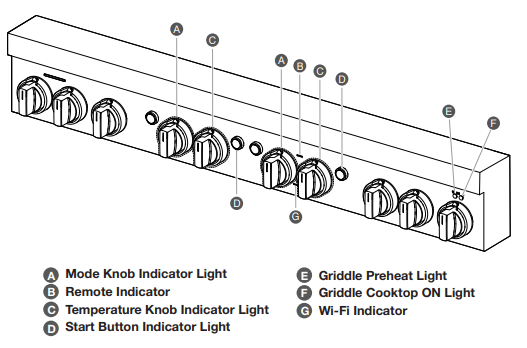
Indicator Lights

36" (91.4 CM)
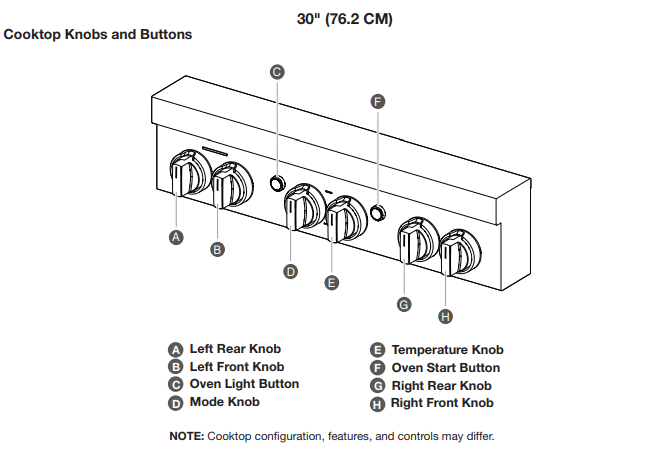
Cooktop Knobs and Buttons
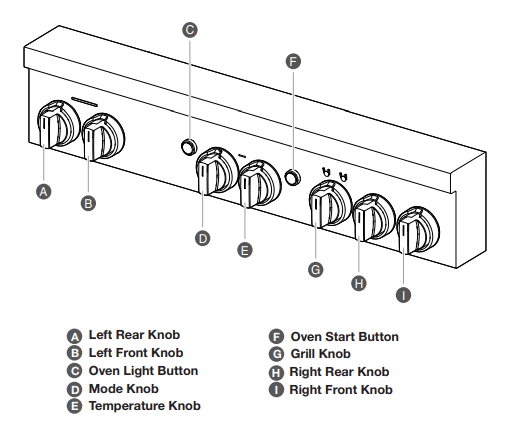
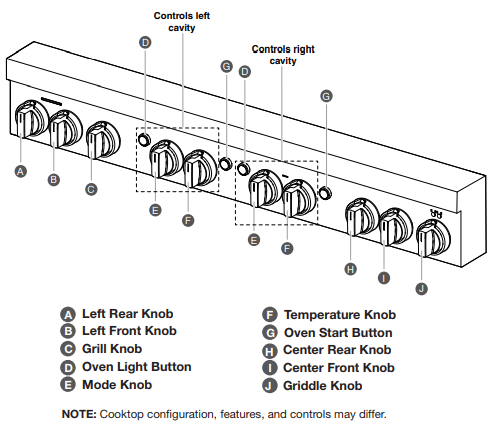
NOTE: Cooktop configuration, features, and controls may differ.
Indicator Lights
48" (121.9 CM)
Cooktop Knobs and Buttons
Indicator Lights
| FEATURE |
DESCRIPTION/BEHAVIOR |
INSTRUCTIONS |
| Mode Knob |
■ BAKE
■ CONVECT BAKE
■ CONVECT POULTRY (left cavity only)
■ CONVECT ROAST
■ CONVECT PASTRY
■ BROIL (right cavity only)
■ Wi-Fi
■ CLEAN |
Turn the knob to select the desired cooking mode.
NOTE: When the unit is on, mode can be changed between Bake, Convect Bake, Convect Roast, and Broil/Convect Broil. Press the Start button to confirm mode change.
|
| Mode Knob Indicator Light |
When a cooking mode is selected, and the Temperature Knob is in a valid position, the Temperature and Mode indicator lights will light white.
When the Start button has been pressed, the knob indicator lights will continue to blink white until preheat has completed. The light will turn solid white and a tone will sound when preheat is complete.
If there is no preheat for a cycle, the preheat completes immediately and the light turns solid white.
NOTE: If an invalid mode and temperature combination have been selected, the knob lights will blink and a tone will sound prompting the user to select a valid combination. The indicator light will continue to blink and a tone will sound every 30 seconds until the error is fixed or timeout after 2 minutes of inactivity
|
|
| Temperature Knob |
■ OFF
■ PROOF
■ KEEP WARM
■ BROIL LOW (right cavity only)
■ BROIL HIGH (right cavity only)
■ SLOW BAKE LOW (left cavity only)
■ SLOW BAKE HIGH (left cavity only)
■ Wi-Fi
■ CLEAN
|
Turn the knob to select the desired cooking temperature or setting. |
| Temperature Knob Indicator Light |
When a temperature or setting is selected, and the mode is valid, the Temperature and Mode indicator lights will light white.
When the Start button has been pressed, the knob indicator light will continue to blink white until preheat has completed. The light will turn solid white and a tone will sound when preheat is complete.
If there is no preheat for a cycle, the preheat completes immediately and the light turns solid white.
NOTE: If an invalid mode and temperature combination has been selected, the knob light will blink and a tone will sound prompting the user to select a valid combination. The indicator light will continue to blink and a tone will sound every 30 seconds until the error is fixed or timeout after 2 minutes of inactivity.
The temperature knob will blink red if the oven is too hot to proof or if a 100+ degree decrease in temperature is in progress. I.e. changing from Bake 450ºF to Bake 350ºF (177ºC to 232ºC).
|
|
| Start Button |
Start an oven function once a valid mode and temperature have been selected. |
1. Choose an oven function by turning the Mode Knob and Temperature Knob to desired selections.
NOTE: The Start button will flash white to prompt the user to press the Start button.
NOTE: When the unit is on, mode can be changed between Bake, Convect Bake, Convect Roast, and Broil/Convect Broil. Press the Start button to confirm mode change.
2. Press the Start button to begin oven function.
|
| Start Button Indicator Light |
The Start button indicator light will flash white to prompt the user to press the Start button. |
|
| Oven Light Button |
Turn the oven light on and off. |
Press the Oven Light button to toggle the light on and off. The button turns the light on and off regardless of whether the door is open. |
| Wi-Fi Indicator Light |
The Wi-Fi indicator light illuminates white when the unit is Wi-Fi enabled. |
All lights will turn off in Idle mode. |
| Remote Indicator Light |
The Remote indicator light illuminates white when the unit is remote enabled. |
All lights will turn off in Idle mode. |
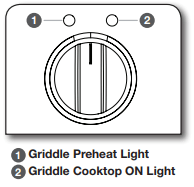
| Griddle Cooktop ON Light |
Right Griddle indicator light - The Griddle Cooktop On light illuminates blue when the griddle knob is powered on. |
|
| Griddle Preheat Light |
Left Griddle indicator light - The griddle Preheat light flashes blue while the griddle is preheating. Once preheat temperature has been reached, the indicator light turns solid blue. |
|
COOKTOP FEATURES
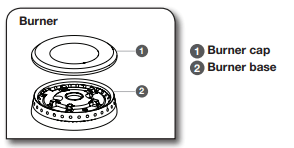
BURNERS
| WARNING |
|
Fire Hazard Do not let the burner flame extend beyond the edge of the pan.
Turn off all controls when not cooking.
Failure to follow these instructions can result in death or fire.
|
| BTU/hr |
BURNER APPEARANCE |
APPEARANCE FEATURES |
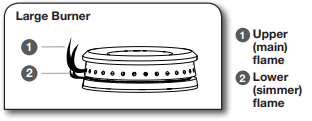
| Large stacked burner |
 |
This burner has an upper and lower level of flame. The Hi setting uses both flame levels at full power to provide the highest heat. It is ideal for cooking large quantities of food or liquid and using large pots and pans. The Simmer Hi and Lo settings use the lower flame only. |
| Griddle Preheat Light |
 |
This burner is ideal for cooking smaller quantities of food and melting chocolate or butter. |
Igniting Burners:
■ Electric igniters automatically light the surface burners when burner knobs are turned to IGNITE.
■ Before setting a burner knob, place filled cookware on the grate. Do not operate a burner using empty cookware or without any cookware on the grate.
■ Visually check that the burner has lit. If the burner does not ignite, listen for the clicking sound. If you do not hear the igniter click, turn off the burner. Check for a tripped circuit breaker or blown fuse.
■ Check that the burner knob is pressed completely down on the valve shaft. If the spark igniter still does not operate, call a trained repair specialist.
■ When the burner knob for the desired burner is turned to the IGNITE position, the burner will click independent of the other burners
REMEMBER: When range is in use or during the SelfCleaning cycle, the entire cooktop area may become hot.
Flame-Sensing™ Reignition Feature
During cooktop use, if one or more burners are extinguished due to external causes (such as a water spill, wind, or ventilation draft), the ignition system will turn on to reignite the flame. When the flame comes back on, the system will stop sparking. If the draft in the room is not removed, occasional sparking may continue. Sparking may also occasionally occur when using the low setting on a burner.
To Set a Burner:
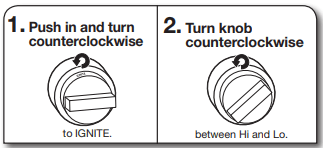
Turn knob counterclockwise further for Simmer Hi and Simmer Lo.
In Case of Power
Failure Hold a lit match near a burner and turn knob counterclockwise to Hi. After burner lights, turn knob to desired setting.
SEALED SURFACE BURNERS
Sealed surface burners are designed to minimize gaps and seams that can allow liquids and spills to get under the cooktop. This design makes cleanup quick and easy.
IMPORTANT: Do not obstruct the flow of combustion and ventilation air around the burner grate edges.
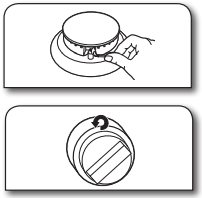
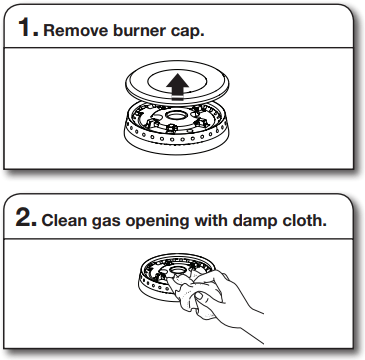
Burner cap: Always keep the burner cap in place when using a surface burner. A clean burner cap will help avoid poor ignition and uneven flames. Always clean the burner cap after a spillover, and routinely remove and clean the caps according to the “Care and Cleaning” section.
Gas opening: Gas must flow freely throughout the gas opening for the burner to light properly. Keep this area free of soil and do not allow spills, food, cleaning agents, or any other material to enter the gas opening. Keep spillovers out of the gas opening by always using a burner cap.
Burner Ports:
Check burner flames occasionally for proper size and shape as shown above. A good flame is blue in color, not yellow. Keep this area free of soil and do not allow spills, food, cleaning agents, or any other material to enter the burner ports.
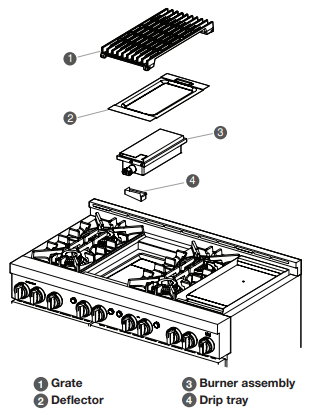
GRILL (on some models)
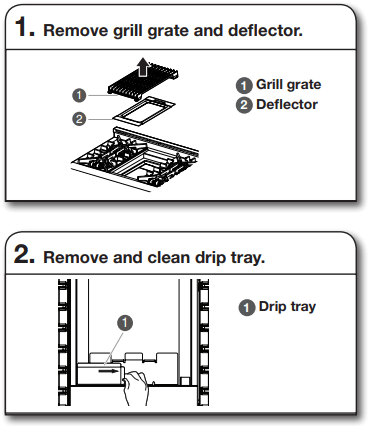
The grill module consists of a cast-iron grate, a burner assembly, deflector and a drip tray. NOTE: The burner assembly is not removable and should not be removed except by a qualified service technician.
When using the grill, follow the guidelines below:
■ Trim excess fat to reduce spattering. Slit the remaining fat on the edges to avoid curling.
■ Allow space between food on the grill. Crowding food will result in uneven cooking.
■ For most even results, center foods on the grate directly over the heat source.
■ Use a metal spatula or tongs to turn food.
■ For even cooking, foods such as chicken quarters should be turned several times.
■ To check for doneness of meats and poultry, use an instant read thermometer or make a small cut in the center of the food.
■ Do not leave the grill unattended while cooking.
■ To avoid damage to the grill, do not use aluminum foil, charcoal or wood chips.
■ To avoid damage to cookware, do not place cookware on the grill when in use. Food should be cooked directly on the grill grate.
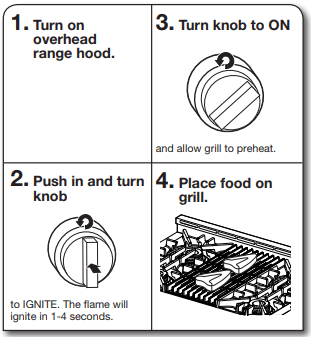
To Use:
CHROME ELECTRIC GRIDDLE (on some models)
The chrome electric griddle provides the perfect cooking surface for grilled sandwiches, pancakes, eggs, burgers, sautéed vegetables, and many more family favorites. The attractive low-stick surface is designed to make cleanup easy.
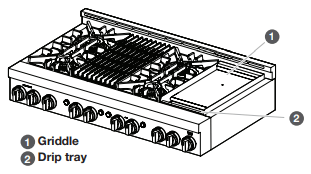
The chrome electric griddle system provides a convenient cooking surface.
■ Be sure plastic film has been removed and wash with hot water before first use.
■ To avoid scratching the griddle, do not place any pots or pans on the griddle. Use only heat-resistant plastic or wooden utensils.
■ The griddle surface is ready to use and does not need to be seasoned.
■ Pouring cold water on a hot griddle may warp the griddle, resulting in an uneven cooking surface.
To Use:
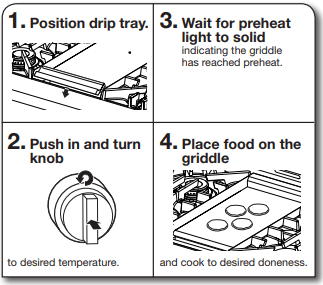
The left griddle indicator light shows that there is power applied to the griddle. The right griddle indicator light blinks to show that the griddle is preheating. When preheat is complete, the right griddle indicator lights solid.
Cooking Chart
The settings and times are guidelines only and may need to be adjusted for individual tastes.
| FOOD ITEM |
TEMPERATURE |
COOK TIME (IN MINUTES) |
| Toast/Pancakes |
350ºF (175ºC) |
4-10 |
| Eggs |
250ºF (120ºC) |
7-10 |
| Meats |
350ºF (175ºC) |
10-20 |
| Potatoes |
350-450ºF (175-230ºC) |
10-20 |
| Fish |
250-350ºF (120-175ºC) 8 |
8-15 |
USING YOUR OVEN
OVEN CONTROL KNOBS
To Use:
-
Select desired function on the Mode Knob.
- Select desired temperature on the Temperature Knob.
- To turn off the unit, the temperature knob needs to be turned to OFF.
Knob Combinations
The following tables show valid and invalid knob combinations for the temperature and mode knobs.
| MODE KNOB |
TEMPERATURE KNOB |
| PROOF |
KEEP WARM |
TEMP RANGE 107-260oC (225-500oF) |
BROIL LOW |
BROIL HIGH |
SLOW BAKE L 93oC (200oF) |
SLOW BAKE H 135oC (275oF) |
CLEAN |
Wi-Fi |
| Bake |
Valid |
Valid |
Valid |
Invalid |
Invalid |
Valid |
Valid |
Invalid |
Invalid |
| Convect Bake |
Invalid |
Invalid |
Valid |
Invalid |
Invalid |
Valid |
Valid |
Invalid |
Invalid |
| Convect Roast |
Invalid |
Invalid |
Valid |
Invalid |
Invalid |
Valid |
Valid |
Invalid |
Invalid |
| Convect Pastry |
Invalid |
Invalid |
Valid |
Invalid |
Invalid |
Valid |
Valid |
Invalid |
Invalid |
| Convect Poultry (18" cavity only) |
Invalid |
Invalid |
Valid |
N/A |
N/A |
Valid |
Valid |
|
|
| Broil/Convect Broil (30" & 36" cavity only) |
Invalid |
Invalid |
Invalid |
Valid |
Valid |
N/A |
N/A |
Invalid |
Invalid |
| Self Clean |
Invalid |
Invalid |
Invalid |
Invalid |
Invalid |
Invalid |
Invalid |
Valid |
Invalid |
| Wi-Fi |
Invalid |
Invalid |
Invalid |
Invalid |
Invalid |
Invalid |
Invalid |
Invalid |
Valid |
INDICATOR LIGHTS
The indicator lights illuminate and blink to show the status of the unit.
| BEHAVIOR |
DESCRIPTION/EXAMPLES |
EXAMPLES |
| Light Pulsing/Blinking |
Light pulsing is used on the Mode Knob, Temperature Knob, and Start button as a way to prompt for action.
When an action is prompted to be completed, the associated indicator light feature will blink.
Examples:
Occurrence: Prompt for action, press the START button Result: Start button indicator light quickly blinks
Occurrence: 100ºF (38ºC) decrease in temperature required or oven too hot for Proof Result: Knob indicator lights will slowly blink until the oven is at the correct proof temperature
|
There are two types of pulsing:
1. Start Button
Quick Blink: prompting for action.
2. Mode/Temperature Knob
White slow blink: preheating Amber slow blink: unit is above target temperature.
When a cycle requiring preheat starts, slow blink will begin. When preheat temperature has been reached, the blinking will stop and the mode/temp indicator lights will be solid.
|
| Mode and Temperature Knob Indicator - Slow Blink |
The Mode and Temperature knob indicators will slowly blink to indicate that the feature is in use. |
A slow blink indicates that a feature is being used and no further action is required i.e. unit is preheating. |
| START Button - Invalid Selection (Quick Blink) |
If an invalid knob combination has been chosen and the Start Button is pressed, the Start Button Indicator Light will quickly blink and a tone will sound to indicate that the chosen selection is invalid.
See “Knob Combinations” table for examples.
|
Bake on the Mode Knob and Wi-Fi on the Temperature Knob. |
| Temperature/Mode Knob - Invalid Selection (Quick Blink) |
If an invalid knob combination has been chosen, the Mode Knob Indicator Light and Temperature Knob Indicator Light will quickly blink white. The indicator light will continue to quickly blink and a tone will sound every 30 seconds until the error is fixed or timeout after 2 minutes of inactivity.
See “Knob Combinations” table for examples.
|
Bake on the Mode Knob and Wi-Fi on the Temperature Knob. |
| Prompt for Action - Inactivity (Quick Blink) |
When a valid knob combination has been made, the Start button indicator light will quickly blink to prompt for the Start button to be pressed.
If no action is taken after 2 minutes, a tone will sound and the unit will timeout and return to idle mode.
To exit the unit from idle mode, reselect a Mode and Temperature Knob selection before pressing the Start button.
|
A quick blink indicates that a valid combination has been selected and is prompting for an action to be taken i.e. Mode is in Bake and temperature is at 350oF (177oC), but the Start button has not been pressed yet. |
| Validity Check Delay |
The unit goes through a validity check to verify that the selected Mode and Temperature combination is valid.
If a valid combination has been selected, the Mode/Temperature Knob indicator lights will show white and the Start button will begin to blink prompting for action.
If an invalid combination has been selected, the knob indicator lights will blink to show that the selected Mode and Temperature combination is invalid.
|
Refer to “Knob Combinations” section for more information.
If Start Button is pressed too quickly in the validity check, the Start Button indicator light will display an invalid quick blink.
|
| Invalid Temperature Selection Made During A Cycle |
If the Temperature Knob is changed during a cycle to a selection that is invalid and the unit was in a previous cycle, the unit will remain in the previous cycle until corrected.
he knob indicator lights will blink to show an invalid selection has been made and will continue to light until corrected.
|
Mode is in bake, temp is at 350oF (177oC), Start button is pressed and cycle is running. Then temp is moved to clean. Unit will continue to bake at 350oF (177oC) |
| Changing Mode Selections During A Cycle |
If the Mode Knob is changed during a cycle to a selection that is valid, the Start button will blink to indicate prompt for action. Press the Start Button to begin new Mode selection. |
If the Mode Knob is moved from Bake to Convect Bake, the Start button will blink as a prompt for action. |
| Changing Temperature Selections During A Cycle |
If the Temperature Knob is changed during a cycle to a selection that is valid, the temperature will automatically change. |
If the temperature during a Bake cycle is moved from 350oF to 450oF (177oC to 232oC), the unit will bake at 450oF (232oC). |
A tone will sound when:
■ the unit is powered on
■ the unit switches to Off mode
■ a valid Mode and Temperature selection has been made and the Start button is pressed to begin a cycle
■ an invalid Start button selection is made
■ there is an error with the unit
■ preheating has been completed
■ the timer from the app has ended (the tone will sound every five minutes until the timer is stopped)
■ a Wi-Fi event is occurring
■ the Meat probe connects/disconnects.
Sabbath Mode
■ Sabbath Mode is used to configure the oven system so that certain features and modes are disabled or deactivated.
■ The Sabbath Mode sets the oven to remain ON in a bake setting until turned off.
■ When a button is pressed, no tones will sound.
■ All alerts and tones are disabled during Sabbath Mode. All lights stay in the mode of when Sabbath Mode was enabled. For example, if the oven light was on when the user enabled Sabbath Mode, the light would remain on during the entire Sabbath Mode period.
■ When the oven door is opened or closed, the oven light will not turn on or off and the heating elements will not turn on or off immediately.
■ If a power failure occurs when the Sabbath Mode is set, the oven will remain in Sabbath Mode but will no longer be actively cooking.
■ The Sabbath Mode must be entered each time it is used.
■ Sabbath Mode disables the 12-hour shutoff. All lights and displays are disabled so that no visible activity takes place when the oven door is opened.
To Enter Sabbath Mode:
■ Turn the Mode knob(s) to the Bake position. The Temperature knob(s) stays in the OFF position.
NOTE: Valid only in the Bake mode position.
■ Press the Start button seven times within ten seconds.
NOTE: If there are double ovens, both ovens will enter into Sabbath Mode.
■ The Start button for both ovens will light until Sabbath Mode is exited.
Using Sabbath Bake Mode:
■ Bake mode is the only mode valid for Sabbath Mode. Select the desired temperature for each available oven and press the Start button.
NOTE: The temperature can be changed while in Sabbath Mode.
■ If Sabbath Bake mode is disabled in one oven, the other oven will still remain Sabbath enabled.
■ Once an oven has been disabled by turning the temperature knob to OFF, it cannot be turned back on.
NOTE: Before utilizing Sabbath Mode after successfully connecting to Wi-Fi, verify the app is turned off.
To Exit Sabbath Mode:
■ Turn either Temperature knob to the OFF position. The Mode knob stays in the BAKE position.
■ Press the Start button seven times within ten seconds. Within a few seconds, the Start light indicators will turn off.
■ If you exit Sabbath Mode in one oven, the other oven will also exit Sabbath Mode.
Wi-Fi Connectivity and Remote Operation
Models are provided with a Wi-Fi module that allows the unit to be remotely operated. The control is capable of monitoring and performing the following remote operations once the remote enabling function sequence is properly initiated at the appliance.
See the “Remote Enable” section for more information.
Press the Start button once your appliance is Remote Enabled.
Download the App
The first step to get your appliance connected is to download the app on your mobile device. The app will be your guide and walk you through all of the steps. Download the app by visiting iTunes®§ or Google Play®‡.
To connect your appliance:
1. Download the JennAir® app from Google Play® or iTunes®.
2. Follow the prompts in the app to create an account.
Add Appliance
1. Turn the Mode Knob and Temperature Knob to the Wi-Fi position.
2. Look for the SAID code on your appliance. The SAID can be scanned or manually added.
NOTE: The SAID label is located on the lower right of the front side panel.
3. Follow the prompts in the app.
Remote Enable
Once the appliance is connected, use the Remote Enable feature
to control features of the appliance from the app such as:
■ Access the oven from any mobile device
■ Set and preheat the oven from any location
■ Monitor progress of cooking cycle
■ Adjust cook time and temperature
A cooking cycle does not stop when the oven door is opened. Remote enable will stay enabled.
NOTE: The app overrides any knob selections that have been made while Remote Enable is enabled. If the Mode and Temperature Knobs are set and the appliance is remote enabled, the app will control the oven functions.
Reference the “Internet Connectivity Guide” for more information.
§iTunes® is a registered trademark of Apple Inc.
‡Google Play® is a registered trademark of Google Inc.
App Features
The JennAir® app puts complete control of your Connected
Appliance at your fingertips.
■ Access JennAir® Culinary Center
■ Adjust cooking temperatures and times
Preheat, check cooking status, and configure oven features remotely by using the JennAir® app, available for either iOS or Android®‡ devices.
Home/Away Assist & JennAir
Automatically alert users of oven activity when the home is set “Away.” If the oven is active when the home is set “Away,” the app will alert the user and give the option to turn the oven off.
OVEN USE
Odors and smoke are normal when the oven is used the first few times, or when it is heavily soiled.
During oven use, the heating elements will not remain on, but will cycle on and off throughout oven operation.
IMPORTANT: The health of some birds is extremely sensitive to the fumes given off. Exposure to the fumes may result in death to certain birds. Always move birds to another closed and wellventilated room.
Aluminum Foil
IMPORTANT: To avoid permanent damage to the oven bottom finish, do not line the oven bottom with any type of foil or liner.
■ For best cooking results, do not cover rack with foil because air must be able to move freely.
■ To catch spills, place foil on rack below dish. Make sure foil is at least 1/2" (1.3 cm) larger than the dish and that it is turned up at the edges.
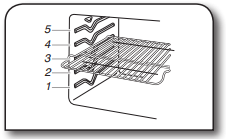
Positioning Racks and Bakeware
IMPORTANT: To avoid permanent damage to the porcelain finish, do not place food or bakeware directly on the oven door or bottom.
Racks
■ Position racks before turning on the oven.
■ Do not position racks with bakeware on them.
■ Make sure racks are level.
■ When installing racks in adjacent rack levels, begin by installing the lower rack first.
Bakeware
To cook foods evenly, center the dish under the broil element and allow 2" (5.0 cm) of space around pan and the oven wall to ensure adequate air circulation.
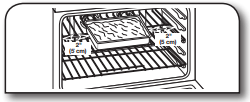
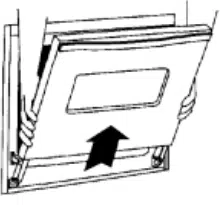
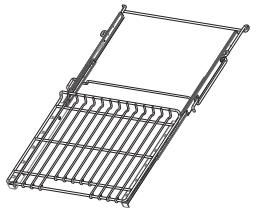
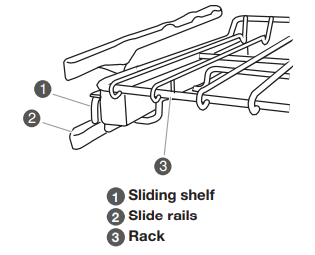
Roll-Out Rack
NOTE: Not available in select models.
The roll-out rack allows easy access to position and remove food
in the oven. The roll-out rack will fit in all positions.
Open Position
Closed and Engaged Position
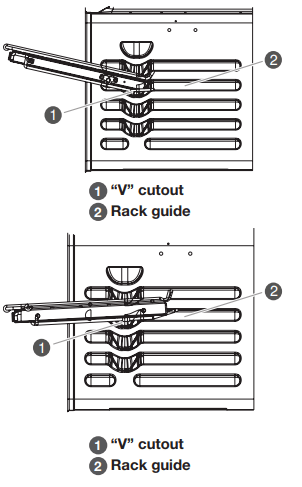
To Insert Roll-Out Rack
1. Angle the rack assembly up and insert the back edge into the “V” cutout in the rack guides of the oven cavity.
2. Keep the rack lifted at an angle and push in until the back edge of the sliding rails (A) bypass the lower “V” cutout.
3. Angle the rack downward and continue to gently slide the assembly in until the center brace (C) bypasses the “V” cutout.
4. Raise rack assembly to flat position and gently push to the back of the oven until the back edge of the sliding rail drops.
5. When placing racks in adjacent positions, start by loading the lower rack positions first and then install the rack in the position above it.
6. Pull the rack assembly slightly forward until the front edge drops and the sliding rails are on the rack guide.
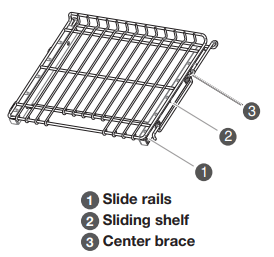
To Remove Roll-Out Rack
1. Push the sliding shelf in completely so that it is closed and engaged with the slide rails.
2. Using 2 hands, lift up on the front edge of the rack assembly. Slowly push the rack assembly to the back wall of the oven so the front edge of the sliding shelf sits on the rack guides on the side of the oven cavity. The front edge of the rack should be higher than the back edge.
3. Using 2 hands, lift up the back of the rack assembly so that the front and back are level on the rack guides.
4. Pull the rack assembly out.
To avoid damage to the sliding shelves, do not place more than 25 lbs (11.4 kg) on the rack.
Do not clean the roll-out rack in a dishwasher. It may remove the rack’s lubricant and affect its ability to slide.
See the “General Cleaning” section for more information. When placing racks in adjacent positions, start by loading the lower rack positions first and then installing the rack in the position immediately above it.
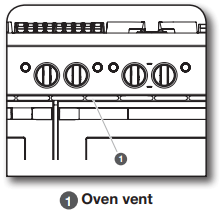
Oven Vent
The oven vent should not be blocked or covered since it allows the release of hot air and moisture from the oven. Blocking or covering the vent will cause poor air circulation, affecting cooking and cleaning results. Do not set plastics, paper, or other items that could melt or burn near the oven vent.
Cooling Fan
The oven has a dual speed cooling fan motor. When the oven temperature is in the Self-Cleaning cycle, the fan will operate at its highest speed to increase airflow and better exhaust the hotter air through the oven vent(s). An increase in noise may be noticeable until the oven cools.
NOTE: Cooling fan may continue to run after the oven has been turned off.
COOKING MODES
(BAKE, CONVECT BAKE, CONVECT ROAST, CONVECT POULTRY, CONVECT PASTRY, AND BROIL)
Choose an Oven Function
1. Choose an oven function by turning the Mode Knob and Temperature Knob to desired selections.
NOTE: The Start button will flash white to prompt the user to press the Start button.
2. Press the Start button to begin oven function.
When a knob selection is made, and after some time of inactivity, the Start Button Indicator Light will quickly blink to prompt for the Start button to be pressed.
If no action is taken after 2 minutes, a tone will sound and the unit will timeout and return to idle mode.
To exit the unit from idle mode, reselect a mode and Temperature Knob selection before pressing the Start button.
NOTE: The unit goes through a validity check to verify that the selected mode and temperature combination is valid.
If a valid combination has been selected, the knob light and the Start button indicator light will be on. The Start button will begin to blink prompting for action.
If an invalid combination has been selected, the knob indicator lights will blink to show that the selected mode and temperature combination is invalid and a invalid tone will sound.
Changing a Mode, Temperature, while Oven is Active
If the Mode Knob is changed during a cycle to a selection that is valid, the Start button will blink and must be pressed in order to change the mode.
NOTE: The unit will not change modes until the Start button has been pressed.
If the Temperature Knob is changed during a cycle to a selection that is valid, the temperature will automatically change.
If the Mode/Temperature Knob is changed during a cycle to a selection that is invalid and the unit was in a previous cycle, the unit will remain in the previous cycle until corrected.
The knob indicator lights will illuminate to show an invalid selection has been made and will continue to light until corrected.
To Turn Off Oven:
Turn the Temperature Knob to the OFF position.
| BAKED GOODS |
RECOMMENDED MODE(S) |
RECOMMENDED RACK POSITION(S) |
TIPS |
| Cakes |
Bake |
Two racks — 2 and 4
One rack — 3
|
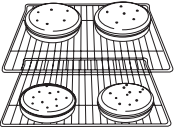
For best results when baking cakes on 2 racks, place the cakes on the racks as shown.
|
| Cookies |
Convect Bake |
Three racks — 1, 3, and 5
Two racks — 2 and 4
One rack — 3 |
|
| Casseroles |
Bake |
One rack — 3 |
|
| Chicken (whole) |
Convect Roast |
One rack — 2 |
|
| Meats (thinner cuts and pieces)* |
Broil |
One rack — 4 |
|
| Meats (thicker cuts and whole poultry) |
Broil |
One rack — 3 |
|
| Turkey (whole) |
Bake |
One rack — 1 |
|
*For hamburger patties to have a well-seared exterior and a rare interior, preheat the broiler for 5 minutes and place the rack in position 4. Side 1 should cook for approximately 3-4 minutes. Side 2 should cook for approximately 6-7 minutes. Expect a moderate degree of smoke when broiling.
BAKE
The Bake mode relies primarily on heat from the lower bake element and radiant heat from the oven cavity to produce the perfect conditions for cakes, cookies, quick breads, yeast breads, meatloaf, and baked desserts. This mode is perfect for foods that require both upper and lower browning.
Know Your Bake Mode
■ During baking, the appropriate heating burner and fan(s) will cycle on and off in intervals to maintain the oven temperature.
■ Bake is used to cook up to 2 racks of food.
■ For best results, allow the oven to preheat prior to placing food in the oven.
■ If the oven door is opened during baking, the bake burner will turn off approximately 30 seconds after the door is opened. It will turn on again approximately 30 seconds after the door is closed.
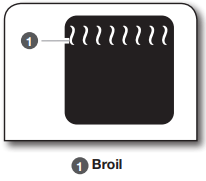
BROIL
The Broil mode uses intense heat from above to cook foods quickly and is ideal when you want rich, flavorful browning of exterior surfaces. Use for steak, chicken, pork, fish, or vegetables like onions and peppers. This mode can also brown and crisp desserts or casserole toppings.
Know Your Broil Mode
NOTE: This feature is not available on the left oven on 48" (121.9 cm) models.
■ Broiling uses direct radiant heat to cook food.
■ The broil burner cycles on and off in intervals to maintain the oven temperature.
■ If the oven door is opened during broiling, the broil burner will turn off in approximately 30 seconds. When the oven door is closed, the
burner will come back on approximately 30 seconds after the door is closed.
■ For best results, use a broiler pan and grid. It is designed to drain juices and help avoid spatter and smoke.
■ For proper draining, do not cover the grid with foil. The bottom of the broiler pan may be lined with aluminum foil for easier cleaning.
■ Trim excess fat to reduce spattering. Slit the remaining fat on the edges to avoid curling.
■ When broiling, changing the temperature allows more precise control. Lowering the temperature causes food to cook slower. Thicker cuts and unevenly shaped pieces of meat, fish, and poultry may cook better at lower broiling temperatures.
■ Pull out oven rack to stop position before turning or removing food. Use tongs to turn food to avoid the loss of juices. Very thin cuts of fish, poultry, or meat may not need to be turned.
■ After broiling, remove the pan of food from the oven. Drippings will bake on the pan if left in the heated oven, making cleaning more difficult.
To Use Broil:
For best results, preheat oven for 5 minutes. Position food on the grid on the broiler pan, then place pan in the center of the oven rack and center your pan under the broil element.
Keep Warm™ Option
The Keep Warm™ option allows hot cooked foods to stay at serving temperature. It can also be used at the end of a timed cook.
| WARNING |
Food Poisoning Hazard
Do not let food sit in oven more than one hour before
or after cooking.
Doing so can result in food poisoning or sickness. |
IMPORTANT: Food must be at serving temperature before placing it in the warmed oven. Food may be held up to 1 hour; however, it is recommended that foods be covered with aluminum foil to help retain moisture and avoid becoming dry during holding.
To Use Keep Warm
1. Turn the Mode Knob to the Bake position.
2. Turn the Temperature Knob to the Warm position.
3. Press the Start button.
NOTE: Keep Warm defaults to 170ºF (77ºC).
CONVECTION COOKING
Convection cooking can cook foods more evenly and faster than regular cooking.
The convection elements are located in the rear of the oven cavity. They are assisted by the convection fans to provide balanced, efficient heating.
NOTE: The left oven cavity on 48" (121.9 cm) models has only one convection fan and no convection element.
CONVECT BAKE
The Convection Bake mode uses multiple elements/burners and a fan to circulate hot air throughout the oven, resulting in baking 10–20% faster than traditional baking.
Know Your Convect Bake Mode
■ When cooking an oven meal with several different types of foods, be sure to select recipes that require similar temperatures. Cookware should sit in the oven with at least 2" (5.1 cm) of space between the cookware and the sides of the oven.
■ If the oven door is opened during convection baking, the fans turn off immediately when the door is opened and turn on immediately when the door is closed. Convection, bake, and broil elements/burners will turn off approximately 30 seconds after the door is opened. They will turn on again approximately 30 seconds after the door is closed.
■ Check food at shortest recommended package or recipe time. Allow more time for baking when using multiple racks.
■ Use cookie sheets with no sides to allow air to move freely around the food.
AUTO CONVECT CONVERSION
Convection modes use additional elements/burners and fans to distribute temperatures evenly throughout the cavity. As a result, baking temperatures and/or times may differ from traditional recipes and packaged goods instructions. Auto Convect Conversion automatically converts your recipe for convect cooking by reducing the traditional time and/or temperature you enter.
CONVECT ROAST
Convect roast can be used for roasting meats, poultry and vegetables. During convect roast, the broil, convect, and bake elements/ burners will cycle on and off in intervals to maintain oven temperature, while the fan circulates the hot air. It is not necessary to reduce oven temperature when using the Convect Roast mode.
If the oven door is opened during convection roasting, the fans turn off immediately and turn on immediately when the door is closed. Bake, broil, and convect elements/burners will turn off approximately 30 seconds after the door is opened. They will turn on again approximately 30 seconds after the door is closed.
■ The cook time should be reduced 15-30%; however, food should be checked early to avoid over-cooking.
■ For best results, use a broiler pan and grid designed to drain juices and help avoid spatter and smoke.
If you would like to purchase a Broiler Pan Kit, it may be ordered. See “Assistance or Service” section to order.
To Use Convect Roast:
Before using convect roast, see the “Positioning Racks and Bakeware” section. It is not necessary to wait for the oven to preheat before putting food in, unless recommended in the recipe.
1. Place food in oven.
2. Turn the Mode Knob to Convect Roast.
3. Turn the Temperature Knob to the desired cooking temperature.
4. Press the Start Button to begin cooking.
5. Turn the Temperature Knob to the OFF position to turn off the oven.
CONVECT SLOW ROAST
The Convect Slow Roast modes uses low temperature to help retain moisture for longer cooking time, resulting in more tender meat. Convect Slow Roast is particularly good for medium to large cuts of beef, poultry and pork as well as less-tender cuts of meat. Food can be cooked up to 11 hours 59 minutes. The recipe temperature does not need to be reduced for this mod
■ Food should be completely thawed before cooking.
■ Cover foods with aluminum foil to help retain moisture.
■ Prior to slow roasting, meat can be pan-seared or broiled
on all sides to enhance browning and flavor.
CONVECT PASTRY
This mode promotes maximum rise of flaky, delicate dough and finishing with the right balance of heat to promote golden browning. Convect pastry is ideal for single or multi-rack baking of cream puffs, turnovers and croissants.
CONVECT POULTRY
This mode uses intense heat to optimize browning and help retain moisture when cooking chicken, turkey or other poultry. The cycle utilizes multiple elements and the convect fan for improved heat distribution. It is not necessary to reduce the oven temperature when using Convect Poultry mode.
If the oven door is opened during operation, the fans will turn off immediately and turn on immediately when the door is closed.
■ For best results use a broil pan or place food on a rack in a low-sided baking pan to allow fat and juices to drain while helping contain spatter and smoke.
■ High-temperature roasting may shorten cook times; check your food early to avoid over-cooking.
PROOF
The Proof cycle prepares dough for baking by activating the yeast. Follow recipe or package for number of times to proof dough.
RAPID PROOF
Rapid proof is used to proof commercially prepared frozen doughs.
Know Your Proof Mode
The proofing process is temperature sensitive, it is recommended that Proof be started when the oven is cool.
Before Using Proof:
1. Place dough in a lightly greased bowl. Place bowl on rack position 2.
2. Close the door.
To Use Proof:
1. Turn the Mode Knob to the Bake position.
2. Turn the Temperature Knob to the Proof position.
3. Press the Start button.
4. When the cycle is complete, turn the Temperature Knob to the OFF position to end the cycle.
CULINARY CENTER
The Culinary Center is full of information to assist in baking and cooking a wide variety of foods. As you program this mode, you will make selections such as type of meat, vegetable, preferred doneness level, and pan type depending on the food. There are helpful tips and hints as you progress through the menu. The Culinary Center will make adjustments based on the doneness and pan you select. All of the selections cycle the appropriate elements and fans for the programmed food.
NOTE: Culinary Center can be accessed through the app.
NOTE: Some Culinary Center cycles require the use of the temperature probe provided with your oven. See Probe Operation for more information.
SPECIAL MODES
COOK TIMER (App Only)
The Cook Timer allows the oven to cook for a programmed length of time. The Cook Timer can be accessed through the app.
Follow the prompts in the app to use Cook Timer.
Know Your Cook Timer
The Cook Timer countdown is started several ways:
■ If the cycle does not require preheat, the Cook Time starts immediately as the cycle begins.
■ If a cycle requires preheat, the Cook Time can only be started through the app when the start button is pressed.
TEMPERATURE PROBE (App Only)
The temperature probe is a tool to assist with evaluating the finish temperatures of meat, poultry and casseroles. It can be used during Bake, Convect Bake, and Convect Roast. The oven will beep when the food has reached the target temperature.
Know Your Temperature Probe
■ Always unplug and remove the temperature probe from the oven when removing food.
Before Using Temperature Probe:
■ Remove any racks above the food that are not in use.
■ Insert the probe into the food item. For meats, the probe tip should be located in the center of the thickest part of the meat and not into the fat or touching a bone.
■ For the most accurate temperature readings, insert as much of the probe shaft as possible into the food. Temperatures will be most accurate when more of the probe is inserted in the food.
■ Place food in oven and connect the temperature probe to the jack.
■ Keep probe as far away from heat source as possible.
Close oven door.
DELAY START (App Only)
| WARNING |
Food Poisoning Hazard
Do not let food sit in oven more than one hour before
or after cooking.
Doing so can result in food poisoning or sickness. |
Delay Start allows the oven(s) to be set to turn on at a certain time of day and cook for a set length of time.
Delay Start should not be used for food such as breads and cakes because they may not bake properly.
Delay Start is available with any cycle that has a Delay Start option. The Delay Start can be accessed through the app.
Follow the prompts in the app to use Delay Start.
NOTE: Do not use Delay Start for items that require a preheated oven, such as cakes, cookies and breads. If food is in the oven during preheat, it may become overcooked.
CARE AND CLEANING
COOKTOP SURFACE
IMPORTANT:
■ Before cleaning, make sure all cooktop knobs are OFF and the oven and cooktop are cool. Do not use oven cleaners, bleach, or rust removers.
■ Soap, water, and a soft cloth or sponge are suggested first unless otherwise noted.
After Each Use:
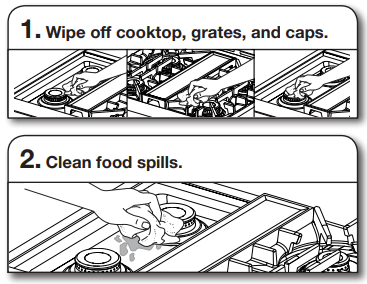
To preserve the finish, clean food spills containing acids, such as vinegar and tomato, as soon as the entire appliance is cool.
SEALED SURFACE BURNERS
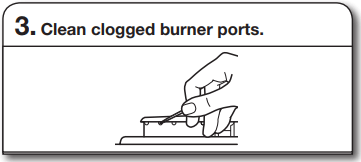
Use a straight pin. Do not enlarge or distort the port. Do not use a wooden toothpick. If the burner needs to be adjusted, contact a trained repair specialist.
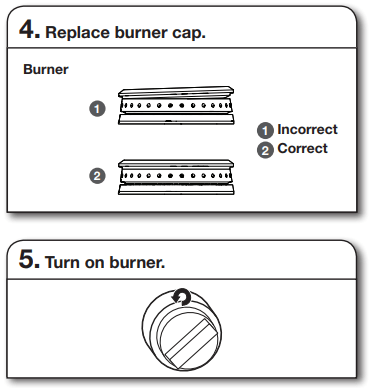
If the burner does not light, check cap alignment. If the burner still does not light, do not service the sealed burner yourself. Contact a trained repair specialist.
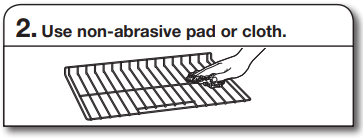
PORCELAIN-COATED GRATES AND CAPS
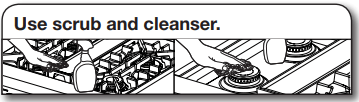
Clean with a nonabrasive nylon scrub pad and mildly abrasive cleanser.
Know Your Grates and Caps
■ Food spills containing acids, such as vinegar and tomato, should be cleaned as soon as the cooktop, grates, and caps are cool. These spills may affect the finish.
■ To avoid chipping, do not bang grates and caps against each other or hard surfaces such as cast iron cookware.
■ Do not reassemble caps on burners while wet.
■ Do not clean in the Self-Cleaning cycle.
■ Do not clean in dishwasher.
GRILL
To Remove for Cleaning:
Before removing or replacing grill components, make sure the control knobs are turned to OFF. Allow the grill to cool completely before handling.
To Clean:
Do not use oven cleaners, metal brushes, abrasive scouring pads or other scrubbers made to clean grill components.
Grate:
■ Do not clean grill grate in dishwasher.
■ Do not clean in a self-cleaning oven.
|
1. Scrub with brush while grate is still warm.
Use a soft-bristle brush. Oven mitts may be worn while cleaning.
|
|
2. Soak in warm, soapy water for 30 minutes.
After soaking, scrub with nonabrasive pad.
|
Deflector:
Soak in warm, soapy water to loosen soil. After soaking, scrub with non-abrasive pad.
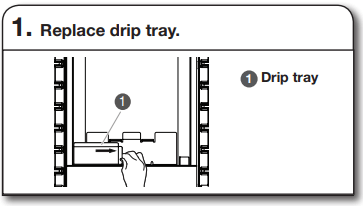
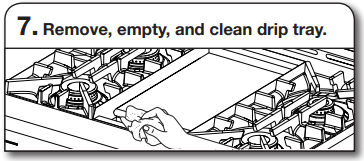
Drip Tray:
■ Allow cooktop to cool before cleaning.
Wipe with warm, soapy water or non-abrasive cleanser. Use damp cloth or non-abrasive pad.
Module Basin:
|
1. Wipe with warm, soapy water or non-abrasive cleanser.
Use damp cloth or non-abrasive pad.
|
|
2. For heavy soil, soak with paper towels.
Soak paper towels in household cleanser and lay them on the soil for at least 30 minutes. After soaking, scrub with a nonabrasive pad.
|
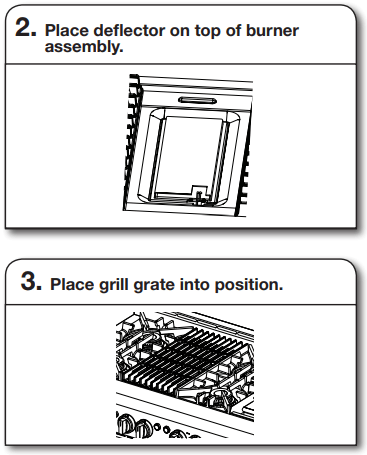
To Replace:
Slide drip tray into opening on the left front side of the grill basin.
GRIDDLE
Tips:
■ Prior to cleaning the griddle, make sure that all cooktop burners and oven controls have been turned off.
■ For best results, clean the griddle shortly after removing the food.
Do Not Use:
■ Soap
■ Abrasive materials
■ Cleaning materials, including stainless steel cleaner
After Each Use:
Wait until preheat is complete before cleaning.
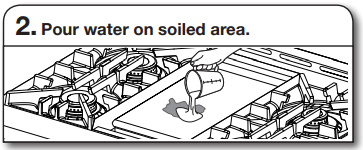
Using a measuring cup, pour up to 1 cup (236.6 mL) tap water over the soiled area. Start at the back, allowing the water to run toward the drip tray in the front. Allow the water to bubble on the griddle for 3–4 seconds.
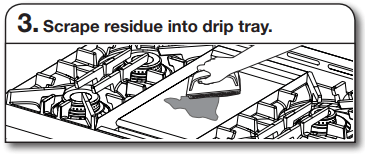
Use a pad holder or wooden spoon with a non-abrasive pad or cloth. Use pressure on soiled areas. Repeat if needed for heavy soils
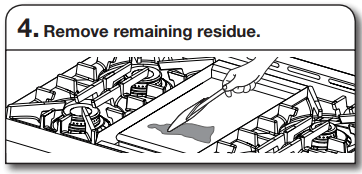
Fold a damp towel and, with the pad holder or wooden spoon, go over the griddle to remove remaining residue.
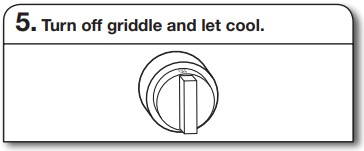
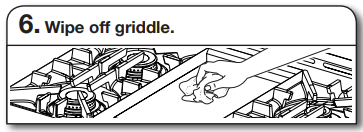
Once cool, wipe the griddle with a clean, damp terry cloth towel. Then buff with a microfiber cloth. If streaking, rainbowing, or ghosting occurs, use a mixture of 1 part white vinegar to 2 parts water on a towel to wipe the griddle.
COOKTOP CONTROLS
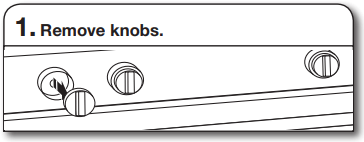
Pull the knobs straight away from the control panel to remove.
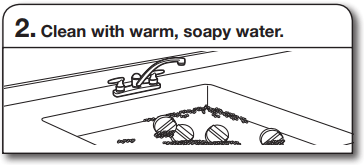
Know Your Cooktop Controls
■ To avoid damage to the cooktop controls, do not use steel wool, abrasive cleansers, or an oven cleaner.
■ To avoid damage, do not soak knobs.
■ When replacing knobs, make sure knobs are in the Off position.
■ When replacing knobs after cleaning either the surface burner controls or the griddle module control, make sure the knobs are replaced to the correct location. See the “Knob Variations” section for reference.
STAINLESS STEEL

Use affresh® Stainless Steel Cleaner or affresh® Stainless Steel Cleaning Wipes (not included). Rub in direction of grain to avoid possible damage to the steel surface.
Do Not Use:
■ Soap-filled scouring pads
■ Abrasive cleaners
■ Cooktop polishing creme
■ Steel-wool pads
■ Gritty washcloths
■ Abrasive paper towels
DOOR EXTERIOR
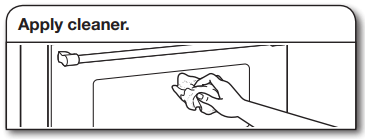
Apply glass cleaner to a soft cloth or sponge, not directly on the glass, or use affresh® Kitchen and Appliance Cleaner (not included).
DOOR INTERIOR

Use a damp sponge.
OVEN RACKS
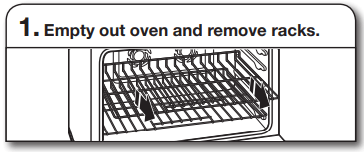
IMPORTANT: Remove racks before the Self-Cleaning cycle to avoid discoloring and difficulty sliding.
OVEN CAVITY
■ Do not use oven cleaners.
■ Food spills should be cleaned when oven cools. At high temperatures, foods react with porcelain. Staining, etching, pitting, or faint white spots can result.
SELF-CLEANING THE OVEN
| WARNING |
Burn Hazard
Do not touch the oven during the Self-Cleaning cycle.
Keep children away from oven during
Self-Cleaning cycle.
Failure to follow these instructions can result in burns. |
IMPORTANT:
■ The health of some birds is extremely sensitive to the fumes given off during the Self-Cleaning cycle. Exposure to the fumes may result in death to certain birds. Always move birds to another closed and well-ventilated room.
■ Self-clean the oven before it becomes heavily soiled. Heavy soil results in longer cleaning and more smoke.
■ Remove broiler pan, grid, cookware, and bakeware and, the meat probe from the oven.
■ Keep the kitchen well-ventilated during the Self-Cleaning cycle to help get rid of heat, odors, and smoke.
■ Do not block the oven vent(s) during the Self-Cleaning cycle. Air must be able to move freely. See “Oven Vent” in the “Know Your Oven” section.
■ Do not clean, rub, damage, or move the oven door gasket. The door gasket is essential for a good seal.
To Prepare Oven:
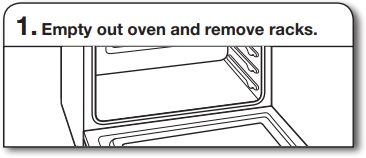
Remove broiler pan, grid, cookware and bakeware, and the meat probe from the oven.
IMPORTANT: Remove racks before the Self-Cleaning cycle to avoid discoloring and difficulty sliding.
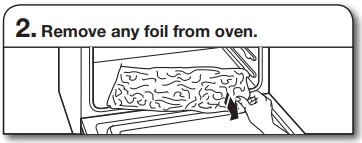
Foil may burn or melt, damaging the oven.
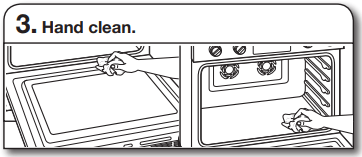
With a damp cloth, hand clean the inside door edge and 1½" (3.8 cm) of the area around the inside oven cavity frame. Be certain not to move or bend the gasket. This area does not get hot enough during self-cleaning to remove soil. Do not let water, cleaners, etc., enter the slots on the door frame.
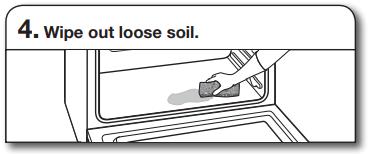
Wiping out soil reduces smoke and avoids damage. At high temperatures, foods react with porcelain. Staining, etching, pitting, or faint white spots can result. This will not affect cooking performance.
To Prepare Cooktop:
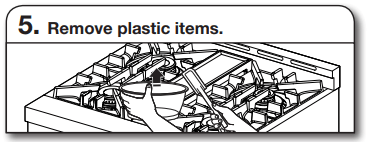
Plastic items may melt.
How the Cycle Works
IMPORTANT:
■ The heating and cooling of porcelain on steel in the oven may result in discoloring, loss of gloss, hairline cracks, and popping sounds.
■ The Self-Cleaning cycle uses very high temperatures, burning soil to a powdery ash.
■ Heavy soil accumulations may require multiple cleaning cycles.
■ The oven is preset for a 3 hour 30 minute Self-Cleaning cycle. The oven will cool for an additional 30 minutes after cleaning is completed.
To Use Self-Clean:
Turn the Mode and Temperature Knobs to the Clean position.
The knob indicator lights will illuminate to show that a selection has been made.
The Start button indicator light will blink to prompt for action.
Press the Start button to begin the cleaning cycle.
The door(s) will lock.
NOTE: The oven will cool for an additional 30 minutes after cleaning is completed.
To Start Self-Clean:
1. Turn the Mode Knob to the Clean position.
2. Turn the Temperature Knob to the Clean position.
3. Press the Start Button.
NOTE: All operations must be completed within 30 seconds.
REMEMBER: When range is in use or during the SelfCleaning cycle, the entire cooktop area may become hot.
To Stop Self-Clean Any Time:
Move the Temperature Knob to OFF position to stop self-clean.
If the oven temperature is too high, the door will remain locked. It will not unlock until the oven cools.
Once the oven has completely cooled:
■ Remove ash with a damp cloth.
■ If soil remains after wiping, that means the length of the SelfCleaning cycle was not long enough for the amount of soil in the oven. Repeat the Self-Cleaning cycle if desired or the soil will be removed during the next Self-Cleaning cycle.
■ To avoid breaking the glass, do not apply a cool damp cloth to the inner door glass before it has completely cooled.
■ The oven lights will not light during the Self-Cleaning cycle.
■ On 48" (121.9 cm) ranges, only one oven can self-clean at a time. If one oven is self-cleaning, the other oven cannot be set or turned on.
NOTE: The oven has a dual speed cooling fan motor. During selfcleaning, the fan(s) will operate at their highest speed to increase airflow to better exhaust the hotter air through the oven vent(s). An increase of noise may be noticeable during and after the SelfCleaning cycle until the oven cools.
OVEN LIGHTS
The oven lights are 120 V, 25 W maximum halogen bulbs. They will come on when the oven door is opened.
To Replace:
Before replacing the bulb, make sure the oven is OFF and cool.
Disconnect power.
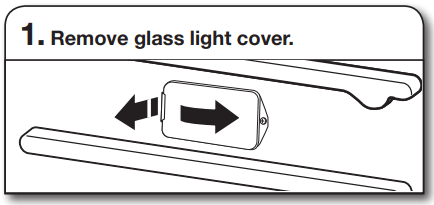
Grasp the front edge, and pull away from the oven.

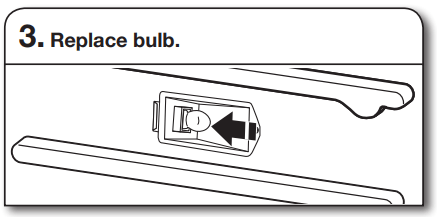
Use a tissue or wear cotton gloves to handle the bulb. To avoid damage or decreasing the life of the new bulb, do not touch bulb with bare fingers.
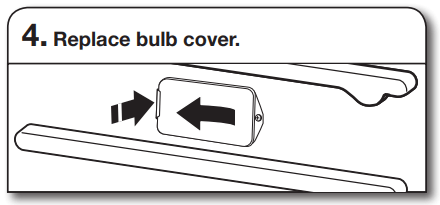
Snap back into the wall.
Reconnect power.
TROUBLESHOOTING
First try the solutions suggested here. If you need further assistance or more recommendations that may help you avoid a service call, refer to the “Warranty,”
| IF YOU EXPERIENCE |
POSSIBLE CAUSES |
SOLUTION |
| Nothing will operate. |
A household fuse has blown or a circuit breaker has tripped. |
Replace the fuse or reset the circuit breaker. If the problem continues, call an electrician. |
| Surface burners will not operate. |
This is the first time the surface burners have been used. |
Turn on any one of the surface burner knobs to release air from the gas lines. |
| The control knob is not set correctly. |
Push in knob before turning to a setting. |
| The burner ports are clogged. |
Clean clogged burner ports with a straight pin. |
| A tone sounds or indicator light flashes from the unit. |
An invalid mode and temperature selection has been made. |
Make sure that a valid mode and temperature selection has been made according to the “Knob Combinations” chart. |
| An invalid Start button selection is made. |
If an invalid knob combination has been chosen and the Start button is pressed, the indicator light will quickly blink and a tone will sound to indicate that the chosen selection is invalid. See the “Knob Combinations” chart for valid knob combinations. |
| The timer from the app has ended. |
The tone will sound every five minutes until the timer is stopped on the app. |
| The Meat probe has been disconnected. |
Reconnect the meat probe. |
| Surface burner flames are uneven, yellow, and/ or noisy. |
The burner ports are clogged. |
Clean clogged burner ports with a straight pin. |
| The burner caps are not positioned properly. |
Make sure cap is properly aligned with the burner. |
| Propane gas is being used. |
The range may have been converted improperly. Contact a trained repair specialist. |
| Surface burner makes popping noises. |
The burner is wet. |
Let it dry. |
| Burner sparks but does not light. |
There is continuous sparking, but the burner does not light. |
Make sure cap is properly aligned with burner. If sparking continues, discontinue use of the surface burner and contact a service technician. |
| Excessive heat around cookware on cooktop. |
The cookware is not the proper size.
|
Use cookware about the same size as the surface cooking area or surface burner. Cookware should not extend more than 1/2" (1.3 cm) outside the cooking area. |
| Cooktop cooking results not what expected. |
The proper cookware is not being used. |
Use medium-to-heavy cookware made of the material that cooks food the way you want. The best cookware should have a flat bottom, straight sides, and a well-fitting lid. |
| The control knob is not set to the proper heat level. |
Set the Cooktop Control to HI, MED, or LO, depending upon the type of cooking you want to do. |
| The range is not level. |
The range must be level for the griddle to operate properly. See the Installation Instructions for leveling instructions. |
| Oven will not operate. |
The oven control is not set correctly. |
Make sure you have followed the instructions for the function you want to perform. |
| A Delay Start has been set via the App. |
This will cause the oven to start at a later time. |
| On some models, the Sabbath Mode is set. |
This mode allows oven operation in keeping with the Jewish Sabbath. See Sabbath Mode section for disabling. |
| The temperature knob is not set to a proper temperature setting. |
Push in knob before turning to a setting and verify that the knob is located on a setting. |
| The start button is not properly operating. |
Allow the start button to blink before pressing start. |
| The updated cooking mode selected is not working properly. |
Moving too quickly between cooking modes can cause issues with getting the desired mode started. |
| Cooling fan runs during baking, broiling, or cleaning. |
|
It is normal for the fan to automatically run while the oven is in use or for some time after the oven is shut off to cool the electronic control. |
| Self-Cleaning cycle will not operate. |
The oven door is open. |
Close the oven door all the way. |
| The function has not been entered. |
Make sure you have properly followed the Self-Cleaning cycle instructions. |
| A second self-cleaning cycle is run in the same cavity within 12 hours. |
Allow more than 12 hours between self-cleaning cycles. |
| On 48" (121.9 cm) ranges, one oven is self-cleaning. |
When one oven is self-cleaning, the other oven cannot be set to self-clean. |
| Oven cooking results not what expected. |
The set temperature did not perform as expected. |
Double-check the recipe in a reliable cookbook. |
| The oven was not preheated. |
If the proper steps are followed when setting the desired function, the oven will preheat before cooking. |
| The proper bakeware is not being used. |
Make sure the bakeware used is appropriate for the food being cooked. |
| The racks are not positioned properly. |
Place racks so there is adequate space above each food item. |
| There is not proper air circulation around bakeware. |
Allow 2" (5.0 cm) of space around bakeware and oven walls. |
| The batter is not evenly distributed in the pan. |
Make sure your unit and racks are level, and check that batter is level in the pan. |
| The proper length of time is not being used. |
Adjust cooking time. |
| The oven door has been opened while cooking. |
Oven peeking releases oven heat and can result in longer cooking times. |
| Baked items are too brown on the top or bottom. |
Move rack to a lower location to reduce top browning or to a higher location to reduce bottom browning in the oven. |
| Pie crust edges are browning early. |
Use aluminum foil to cover the edge of the crust and/or reduce baking temperature. |
| Racks are difficult to install in adjacent positions. |
Install the bottom rack first and then install the rack above it. |