user manual
e:line built in ovens
(EOEM61CS, EOEE62CS, EOEE62CK,
EOEE63CS, EPEE63CS, EPEE63CK,
EUEE63CS, EUEE63CK, EDEE63CS)
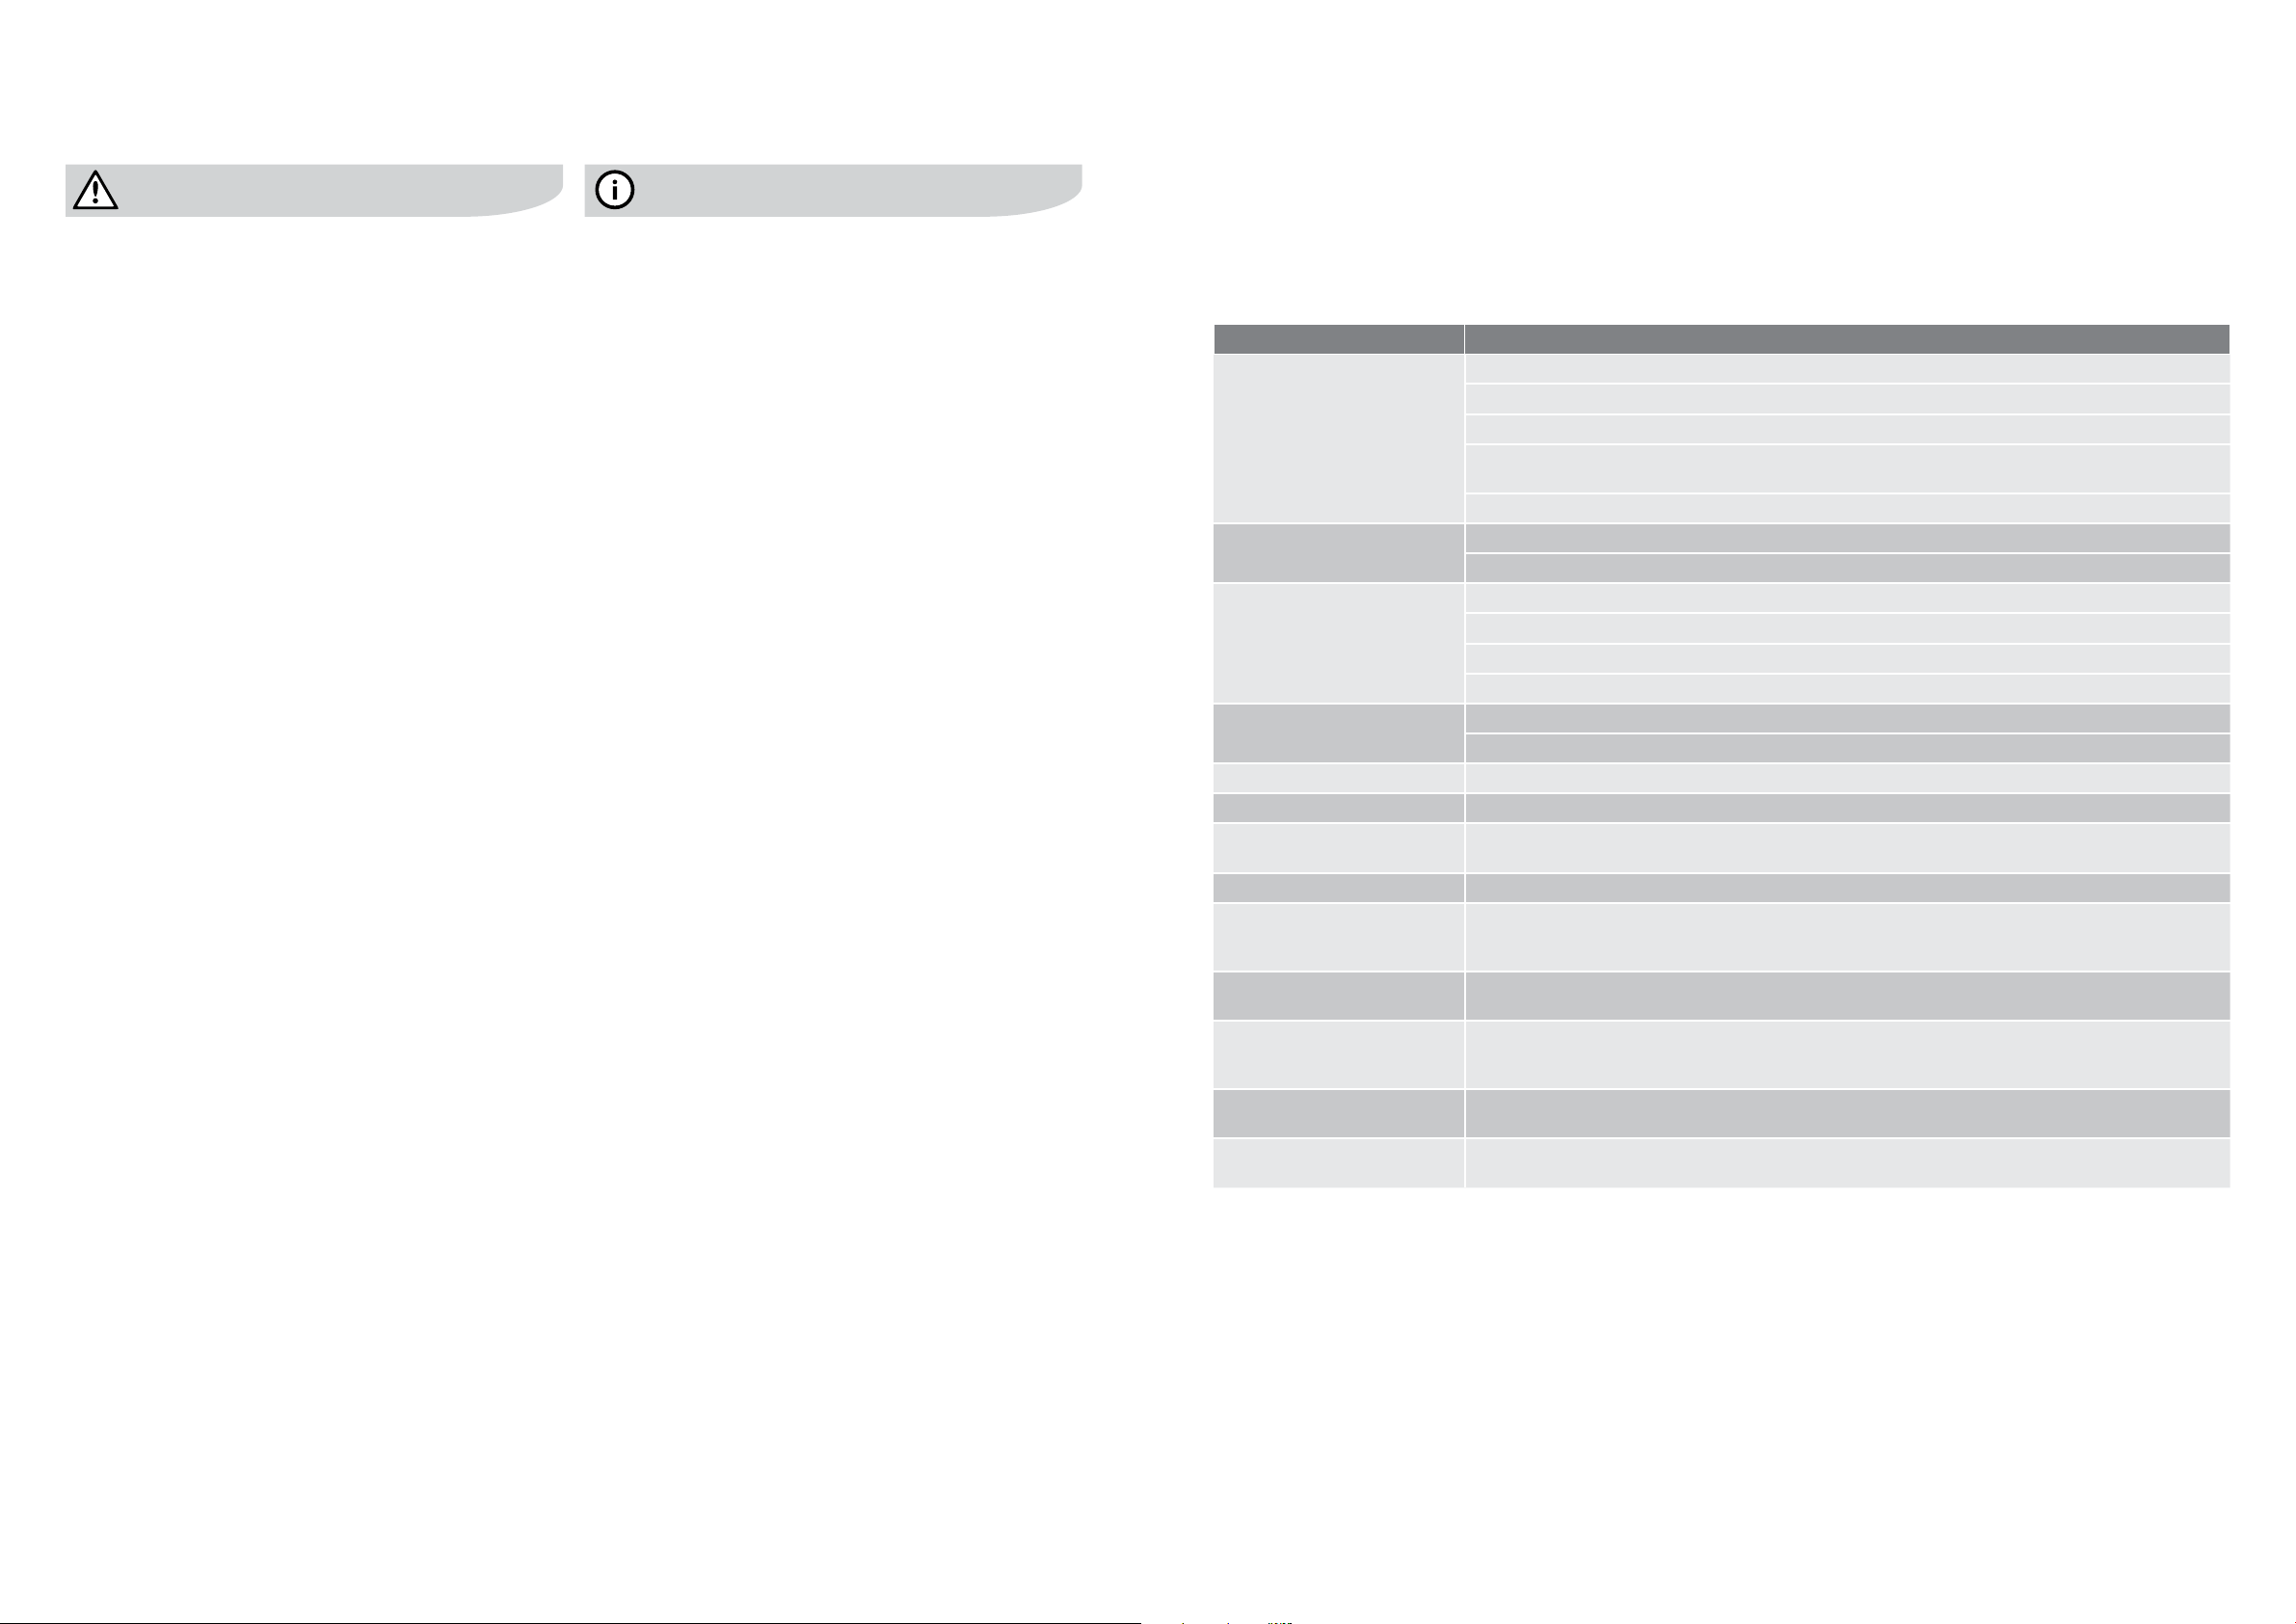
2 contents electrolux e:line ovens
These warnings have been provided in the interest of
safety. You MUST read them carefully before installing or
using the appliance.
The symbols you will see in this booklet have these meanings:
warning
This symbol indicates information concerning your
personal safety
This symbol indicates tips and information about use
of the oven
environmental tip
This symbol indicates tips and information about
economical and ecological use of the oven
Installation, cleaning and servicing
of Compliance to be retained)
materials are removed from the appliance.
installation instructions must be followed.
not blocked.
material must be capable of withstanding 70°C.
from vinyl wrap supplier.
or replacing parts.
scrapers to clean the oven door glass since they can
scratch the surface, and may result in shattering of the
glass.
• Thisappliancemustbeearthed.
warning
Child safety
(including children) with reduced physical, sensory
or mental capabilities, or lack of experience and
knowledge, unless they have been given supervision or
instruction concerning use of the appliance by a person
responsible for their safety.
not play with the appliance.
Congratulations
electrolux e:line ovens important safety instructions 3
be taken to avoid touching hot surfaces, e.g. oven door,
heating elements.
To avoid burns and scalds children should be kept away.
warning
General warnings
and vents kept unobstructed.
during operation.
appliance, e.g. aerosols.
the oven.
Grill
inserted into the appliance in accordance with the
instructions.
Foods may curl, catch and ignite.
Children should be kept away.
Oven
taken to avoid touching the hot surfaces inside the oven.
glass for globe replacement.
accordance with the instructions.
warning
To maintain safe operation, it is recommended that
the product be inspected every five years by an
authorisedserviceperson.
environmental tip
To save energy and to help protect the environment,
we recommend these hints:
at the same time.
– Cook 2 trays of scones, small cakes or sausage rolls
at the same time.
& EUEE63CK) in preference to the main oven cavity.
tips and information
Congratulations and thank you for choosing our built in
read through the whole user manual, which provides the
description of the built in oven and its functions.
To avoid the risks that are always present when you use an
electric appliance, it is important that the oven is installed
correctly and that you read the safety instructions carefully
reference and pass it on to any future owners.
your local Electrolux Customer Care Centre.
This appliance is intended to be used in household and
similar applications such as:
working environments
type environments
Contents
•Importantsafetyinstructions 3
•Rotarycontroloven 4
•Electroniccontroloven 4
•Electronictouchcontroloven 4
•Rotarycontrolpanel 5
•Electroniccontrolpanel 5
•Electronictouchcontrolpanel 5
•Beforeusingyourrotarycontroloven 6
•Cookingfunctions– rotary control oven 7
•Operatingsequence– rotary control oven 8
•Cookingwiththetimer– rotary control oven 9
•Beforeusingyourelectroniccontroloven 10
•Cookingfunctions– electronic oven & touch control 12
•Operatingsequence– electronic control oven 14
•Cookingwiththetimer– electronic control oven 15
•Additionalfunctionality – electronic control oven 16
•Cookingguide 17
•Grillingguide 19
•Dealingwithcookingproblems 20
•Gettoknowyouroven 21
•Maintenanceandcleaning 22
•Cleaningyouraccessories 22
•Replacingtheoventoplight
– EPEE63CK, EPEE63CS 23
•Catalyticselfcleaningpanels 24
•Ovendoorremoval&cleaning 25
•Cleaningthepyrolyticoven 28
•Cleaningthepyrolyticovendoor 29
•Operatingconditions/energytips/inclusions 30
•Troubleshooting 31
•Installation 32
•Technicalspecications 34
•Hardwiringdetails 35
•Warranty 37
environmental tip
of those materials through your local recycling depot or
by placing them in appropriate collection containers.
authorities and ask for the correct method of disposal.
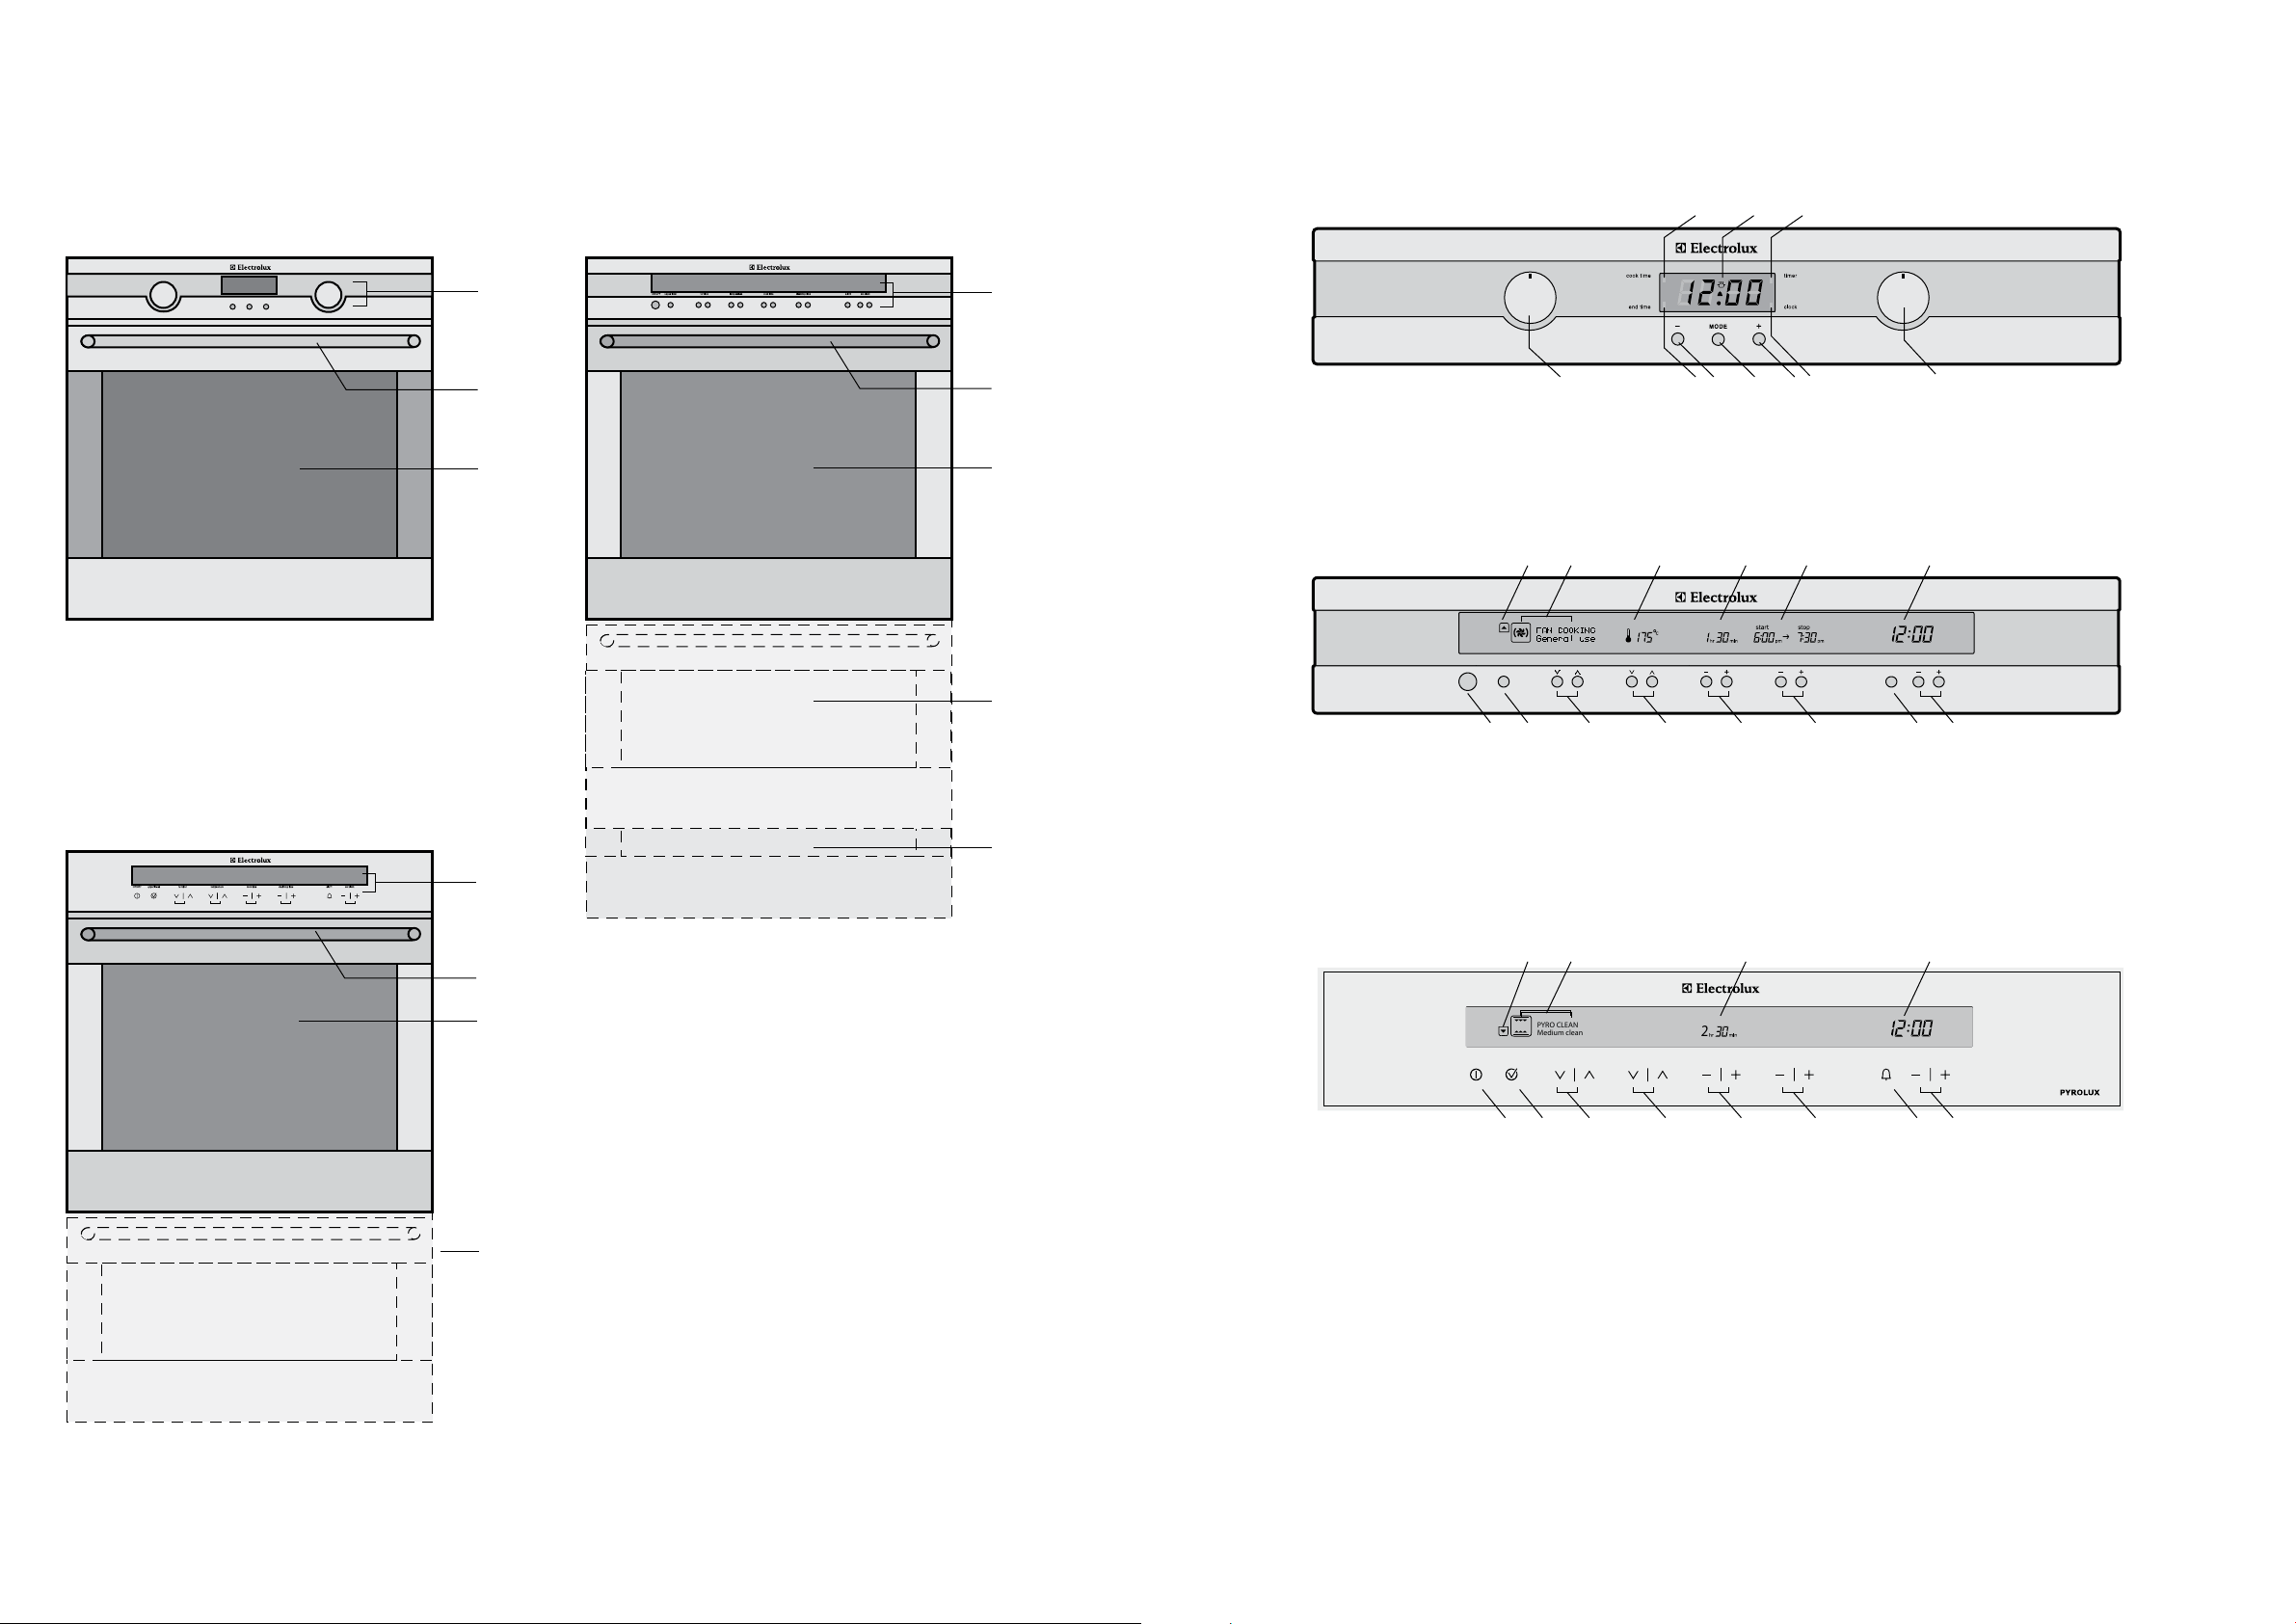
electrolux e:line ovens4 oven controls electrolux e:line ovens
Rotary control ovens
(EOEM61CS)
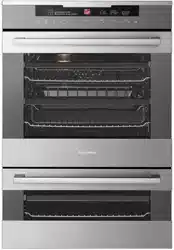
Electronic touch control ovens
(EOEE62CK, EPEE63CK, EUEE63CK)
1
2
3
1 Rotary control panel
2 Oven handle
3 Oven door
9 Electronic control panel
10 Oven handle
11 Oven door
12 Duo oven (EUEE63CK only)
4
5
6
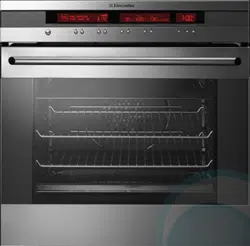
4 Electronic control panel
5 Oven handle
6 Oven door
7 Duo oven (EUEE63CS Only)
8 Double oven (EDEE63CS Only)
7
8
Electronic control ovens
(EOEE62CS, EOEE63CS, EPEE63CS, EUEE63CS, EDEE63CS)
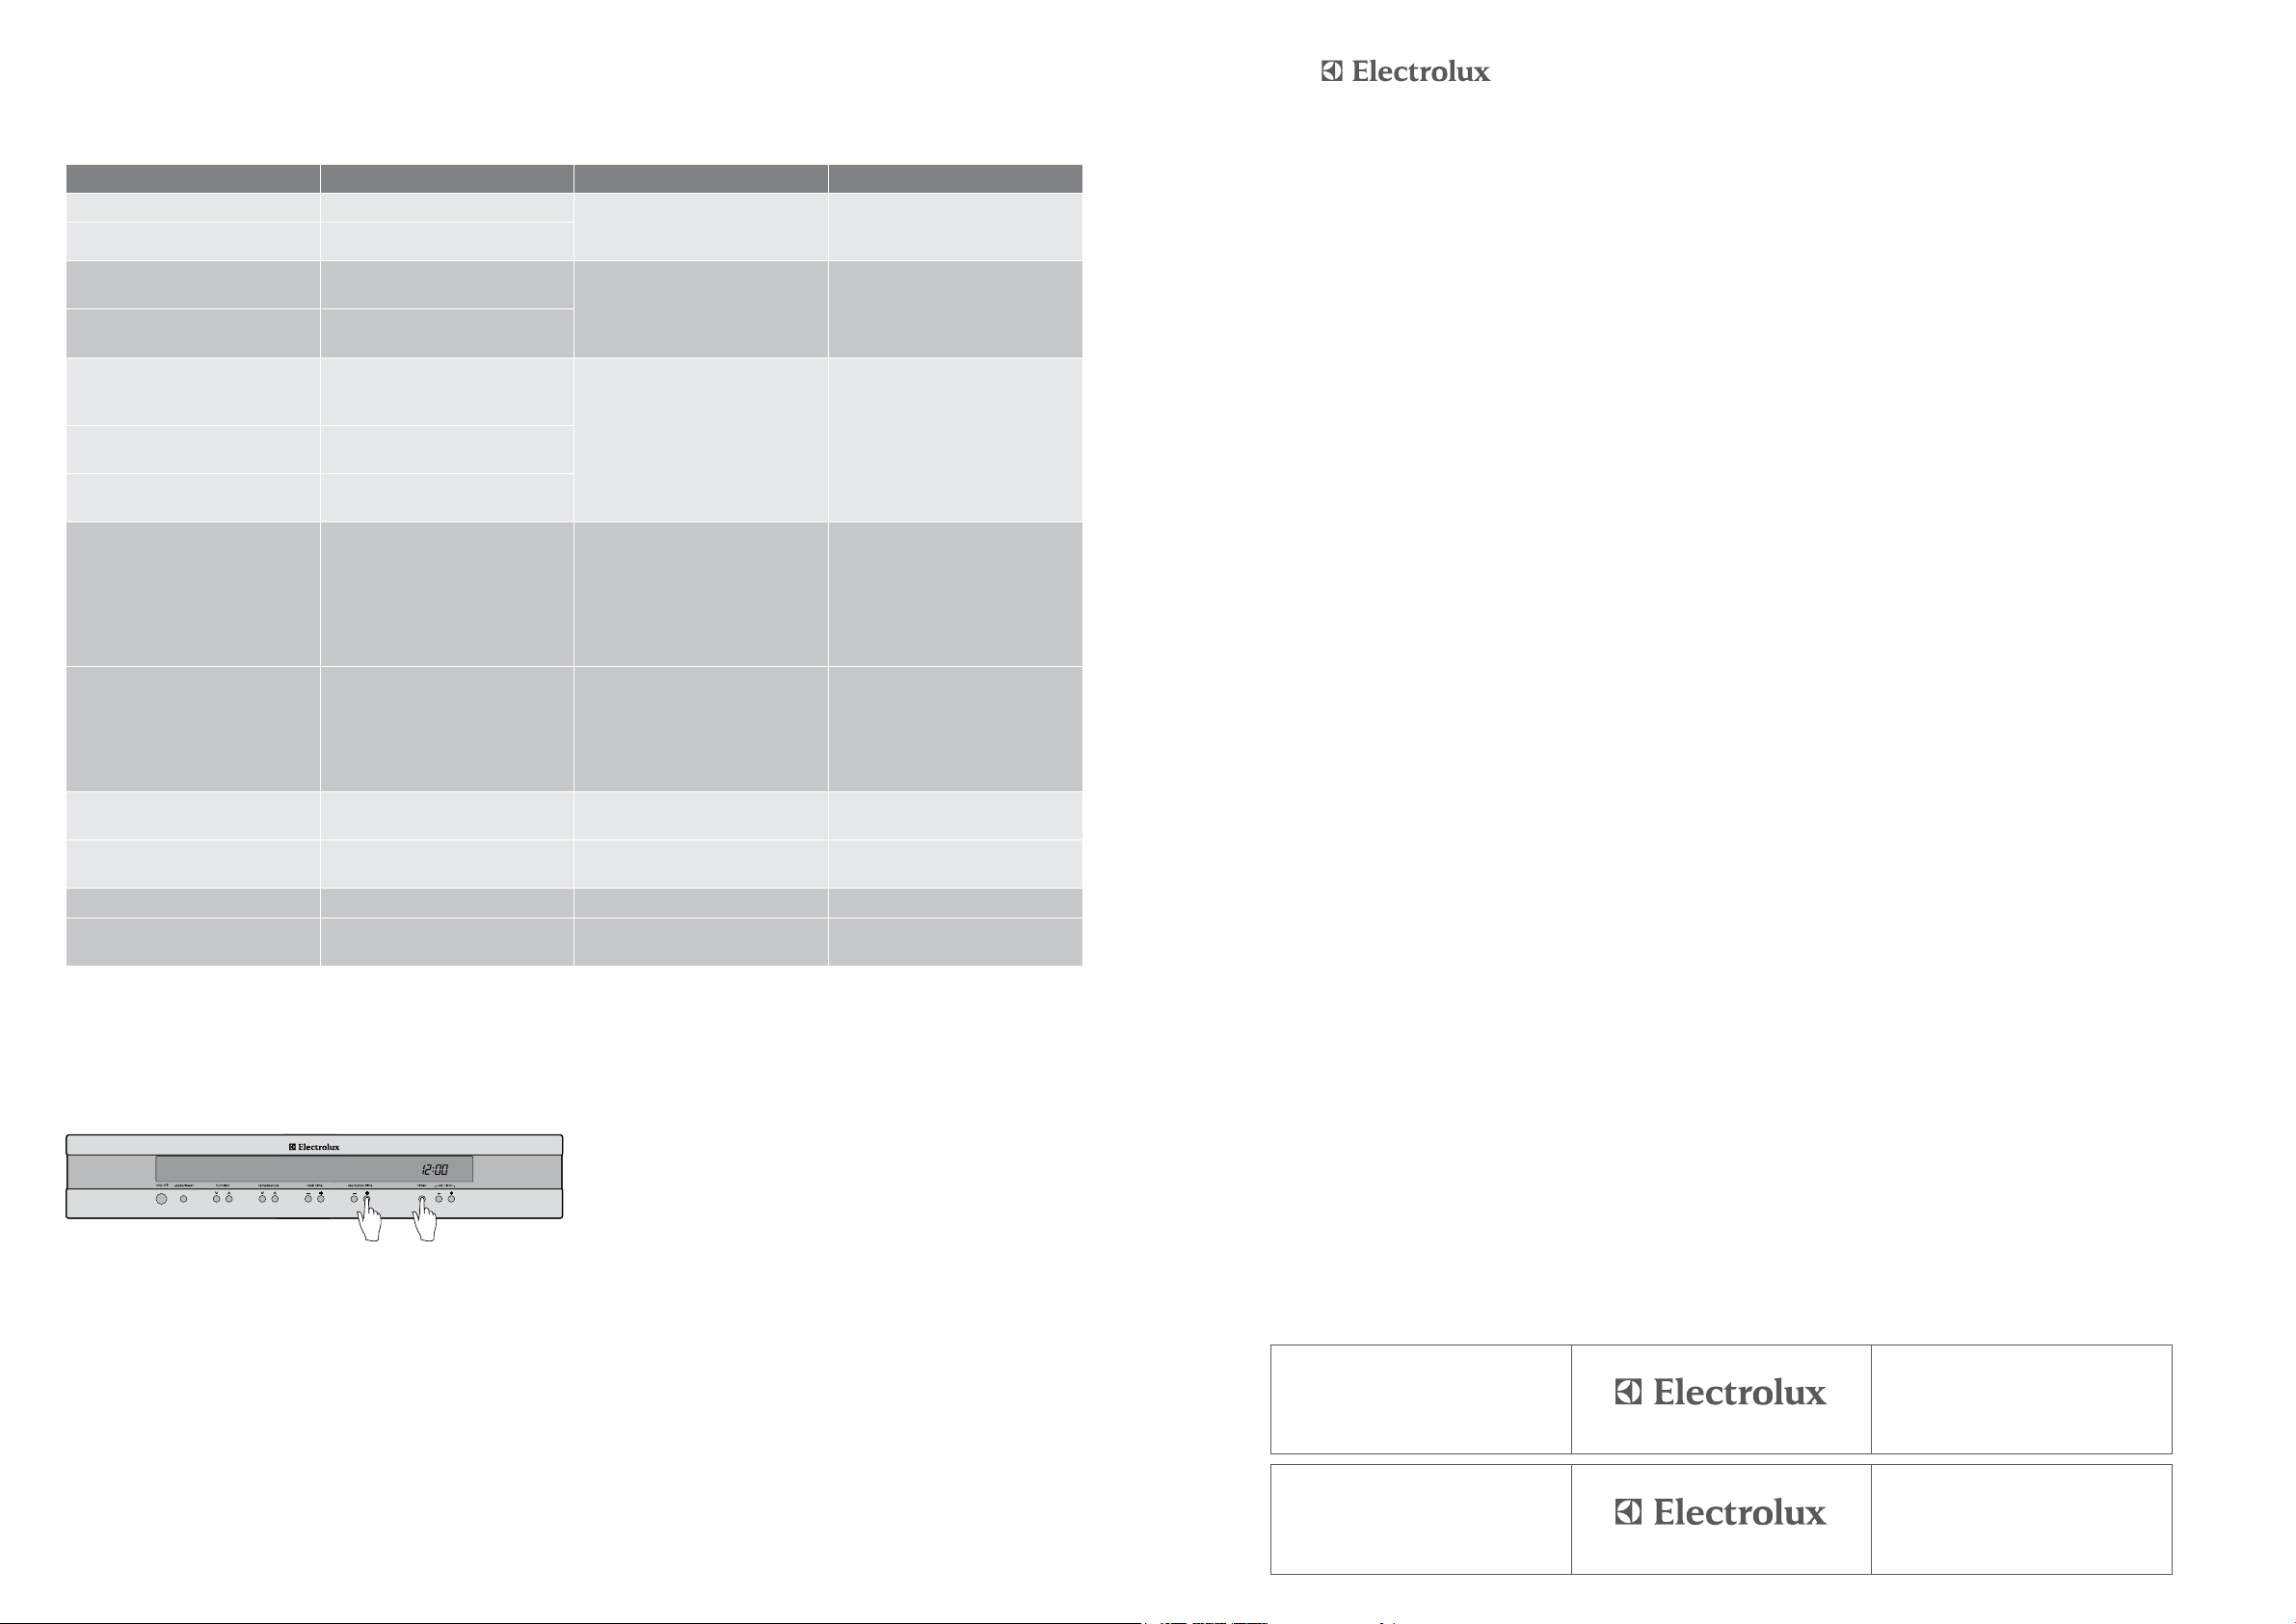
Rotary control panel (EOEM61CS)
Electronic control panel (EOEE62CS, EOEE63CS, EPEE63CS, EUEE63CS, EDEE63CS)
Electronic touch control panel (EOEE62CK, EPEE63CK, EUEE63CK)
11
12
(EUEE63CS & EDEE63CS)
Pyro accept button
(EPEE63CS only)
13 Cooking function selectors
14 Temperature selectors
15 Cook time selectors
16
17 Timer button
18 Set clock buttons
19 Upper or lower oven display
20 Cooking function display
21 Temperature display
22 Cook time display
23
24 Clock
25
26
(EUEE63CK only)
Pyro accept button
(EPEE63CK only)
27 Cooking function selectors
28 Temperature selectors
29
30
31 Timer button
32 Set clock buttons
33 Pyro accept indicator
(EPEE63CK only)
34 Cooking function display
35 Cook time display
36 Clock
1 27 4 3 5 9
6 10 8
1 Oven function selector
2
3 Mode selector
4 Decrease time
5
6 Cook time indicator
7 End time indicator
8 Timer indicator
9 Clock indicator
10 Display
19 20 21 22 23 24
11 12 13 14 15 16 17 18
PYRO CLEAN
Medium clean
pyro accept
2
E
33 34 35 36
25 26 27 28 29 30 31 32
9
10
11
12
PROLUXE
with the closed oven door.
• Fatlter
1. Locate the mounting slots in the fan cover and the
tags pointing down.
tips and information
cooking results.
6 before using your rotary control oven electrolux e:line ovens electrolux e:line ovens cooking functions – rotary control oven 7
function description
Rapid
heat
Heat comes from the element surrounding the fan
as well as the smaller element above the food. This
allows you to preheat your oven 30% quicker than
pies. Simply place the food in the oven straight from
oven for best results.
Fancook
Heat comes from the element surrounding the fan.
This fan circulates the hot air around the oven cavity
so that you can put your food in different places in the
oven and still cook them at the same time. You can use
will cook at a lower temperature and be faster than
baking. Please note that some variation in browning
is normal.
Bake/
pizza
Heat comes from two elements, one above and one
below the food. The bottom element is a clean heat
elements are controlled by the thermostat and will turn
on and off to maintain set temperature. You can use
puddings, roasts and delicate egg dishes.
Pastry
Heat comes from the clean heat element below the
food. The element is controlled by the thermostat and
will turn on and off to maintain the set temperature.
Cook in the lower half of the oven when you are using
only one shelf.
Defrost
is circulated by the fan. You can defrost (thaw) your
to raise your yeast dough and to dry fruit, vegetables
and herbs.
Fangrill
on and off to maintain set temperature while the fan
circulates the heated air. The oven door remains
cuts of meat, which gives you a result that is similar to
the second lowest shelf position. Put you grill dish on
cooking cycle. Set temperature to 180°C.
Grill
upper element onto the food. You can use the
cooking foods. Grill with the oven door closed.
Preheat your grill for 3 minutes to get the best results.
into either of the 2 spaces within the uppers pairs of
support rails.
Maxigrill
function for tender cuts of meat, steak, chops,
cooking foods. Grill with the oven door closed. ‘Maxi
best results it is recommended to preheat your grill
grill dish into either of the 2 spaces within the upper
pairs of support rails.
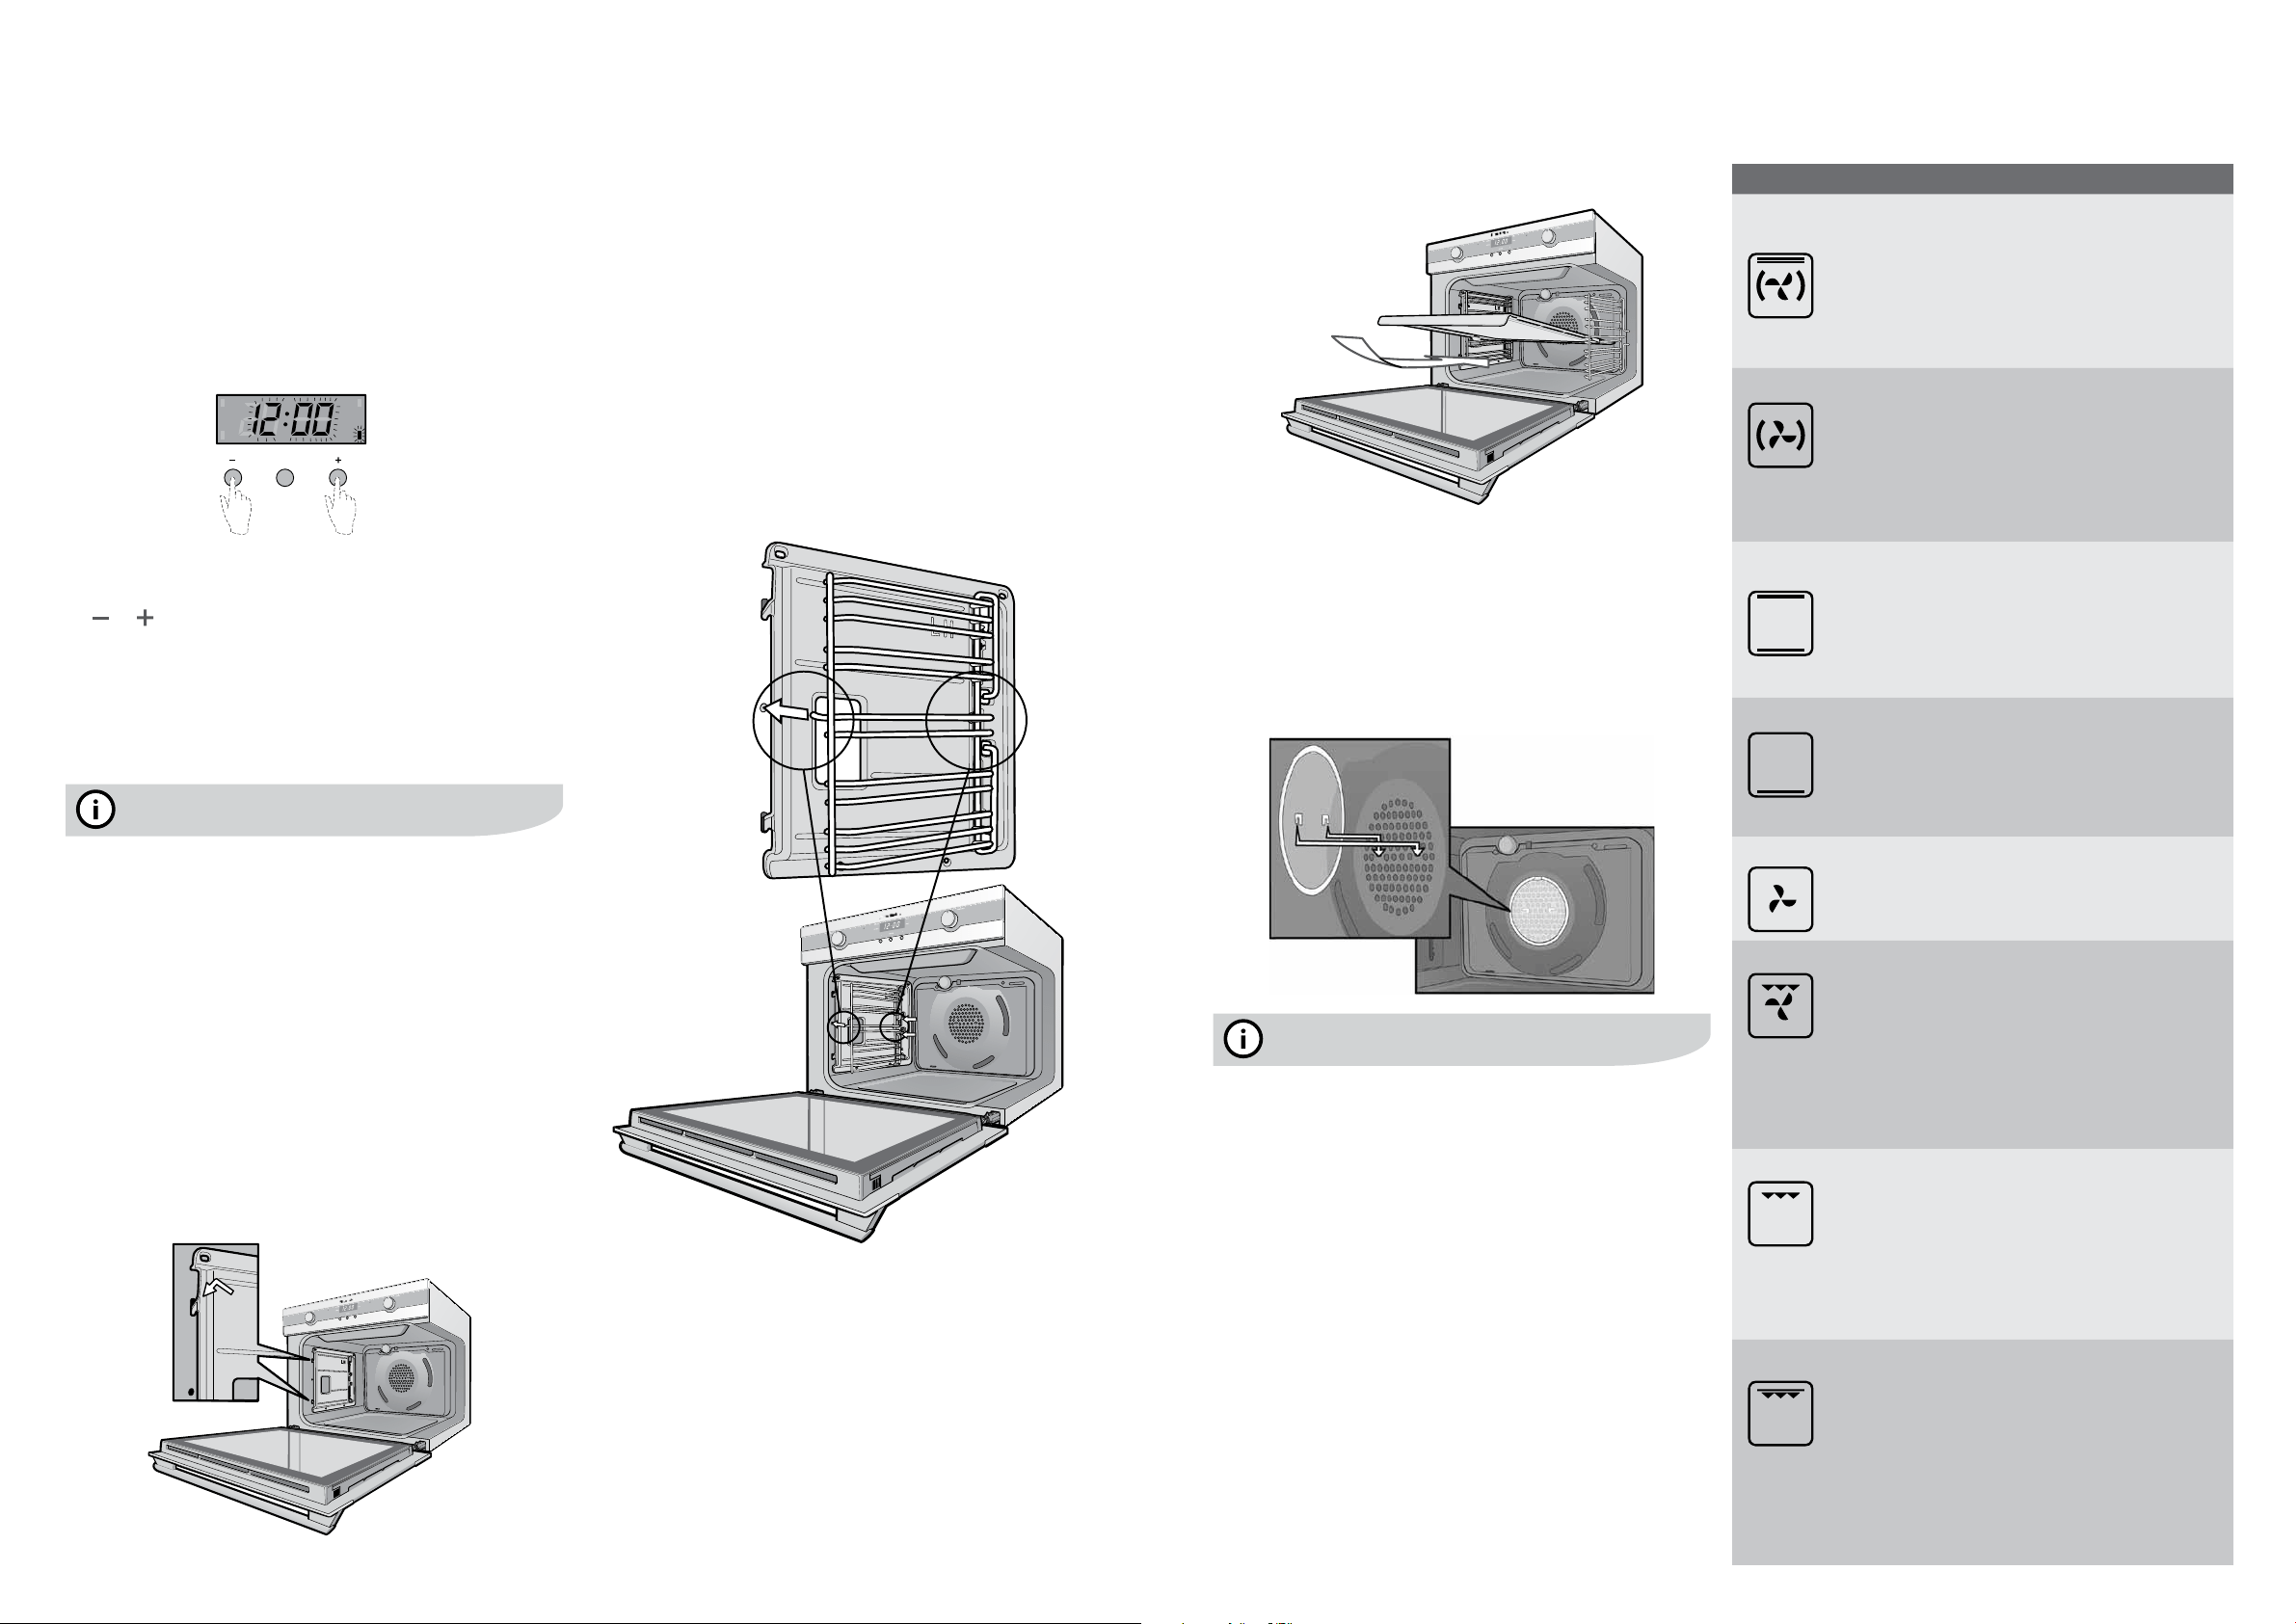
Preparing your oven
2. Please wipe out the oven interior prior to operation with
warm soapy water and polish dry with a soft clean cloth.
Do not close the oven door until the oven is completely dry.
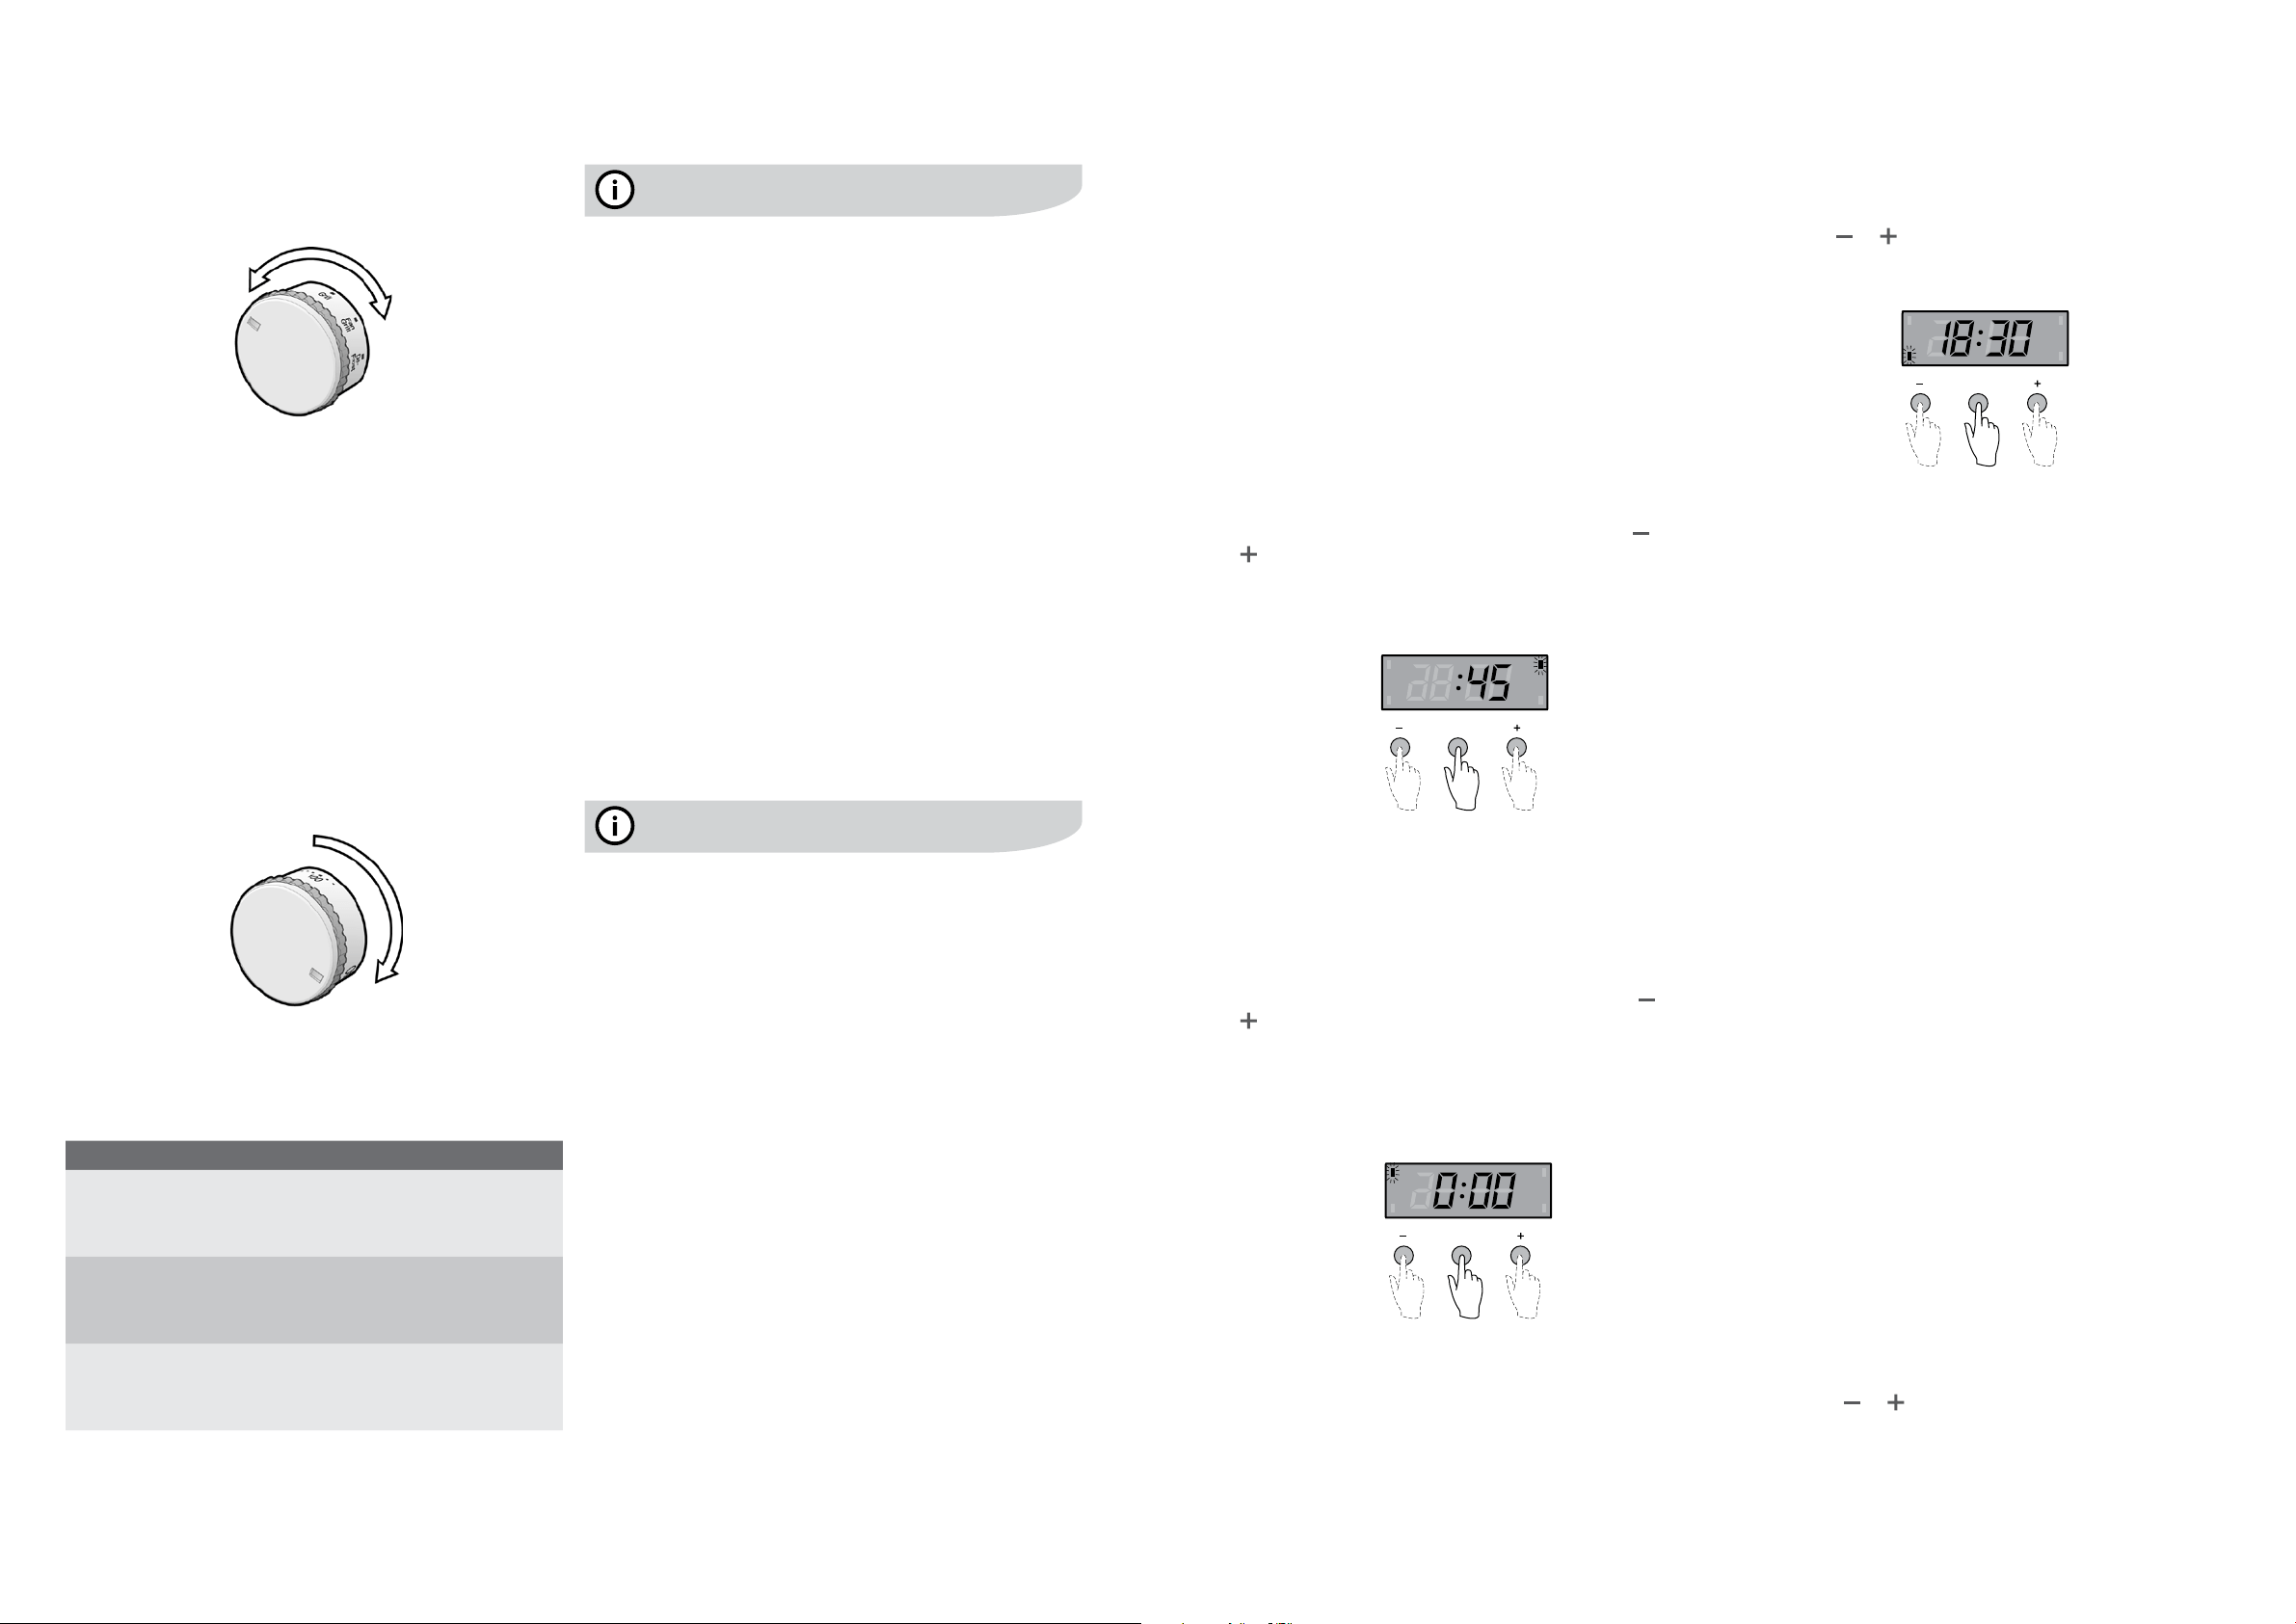
Setting the time
the time of day before you can operate your oven.
or buttons.
has been entered, the clock advances minute by minute.
Note:
tips and information
operating sequence). Please ensure the room is well
ventilated during this process.
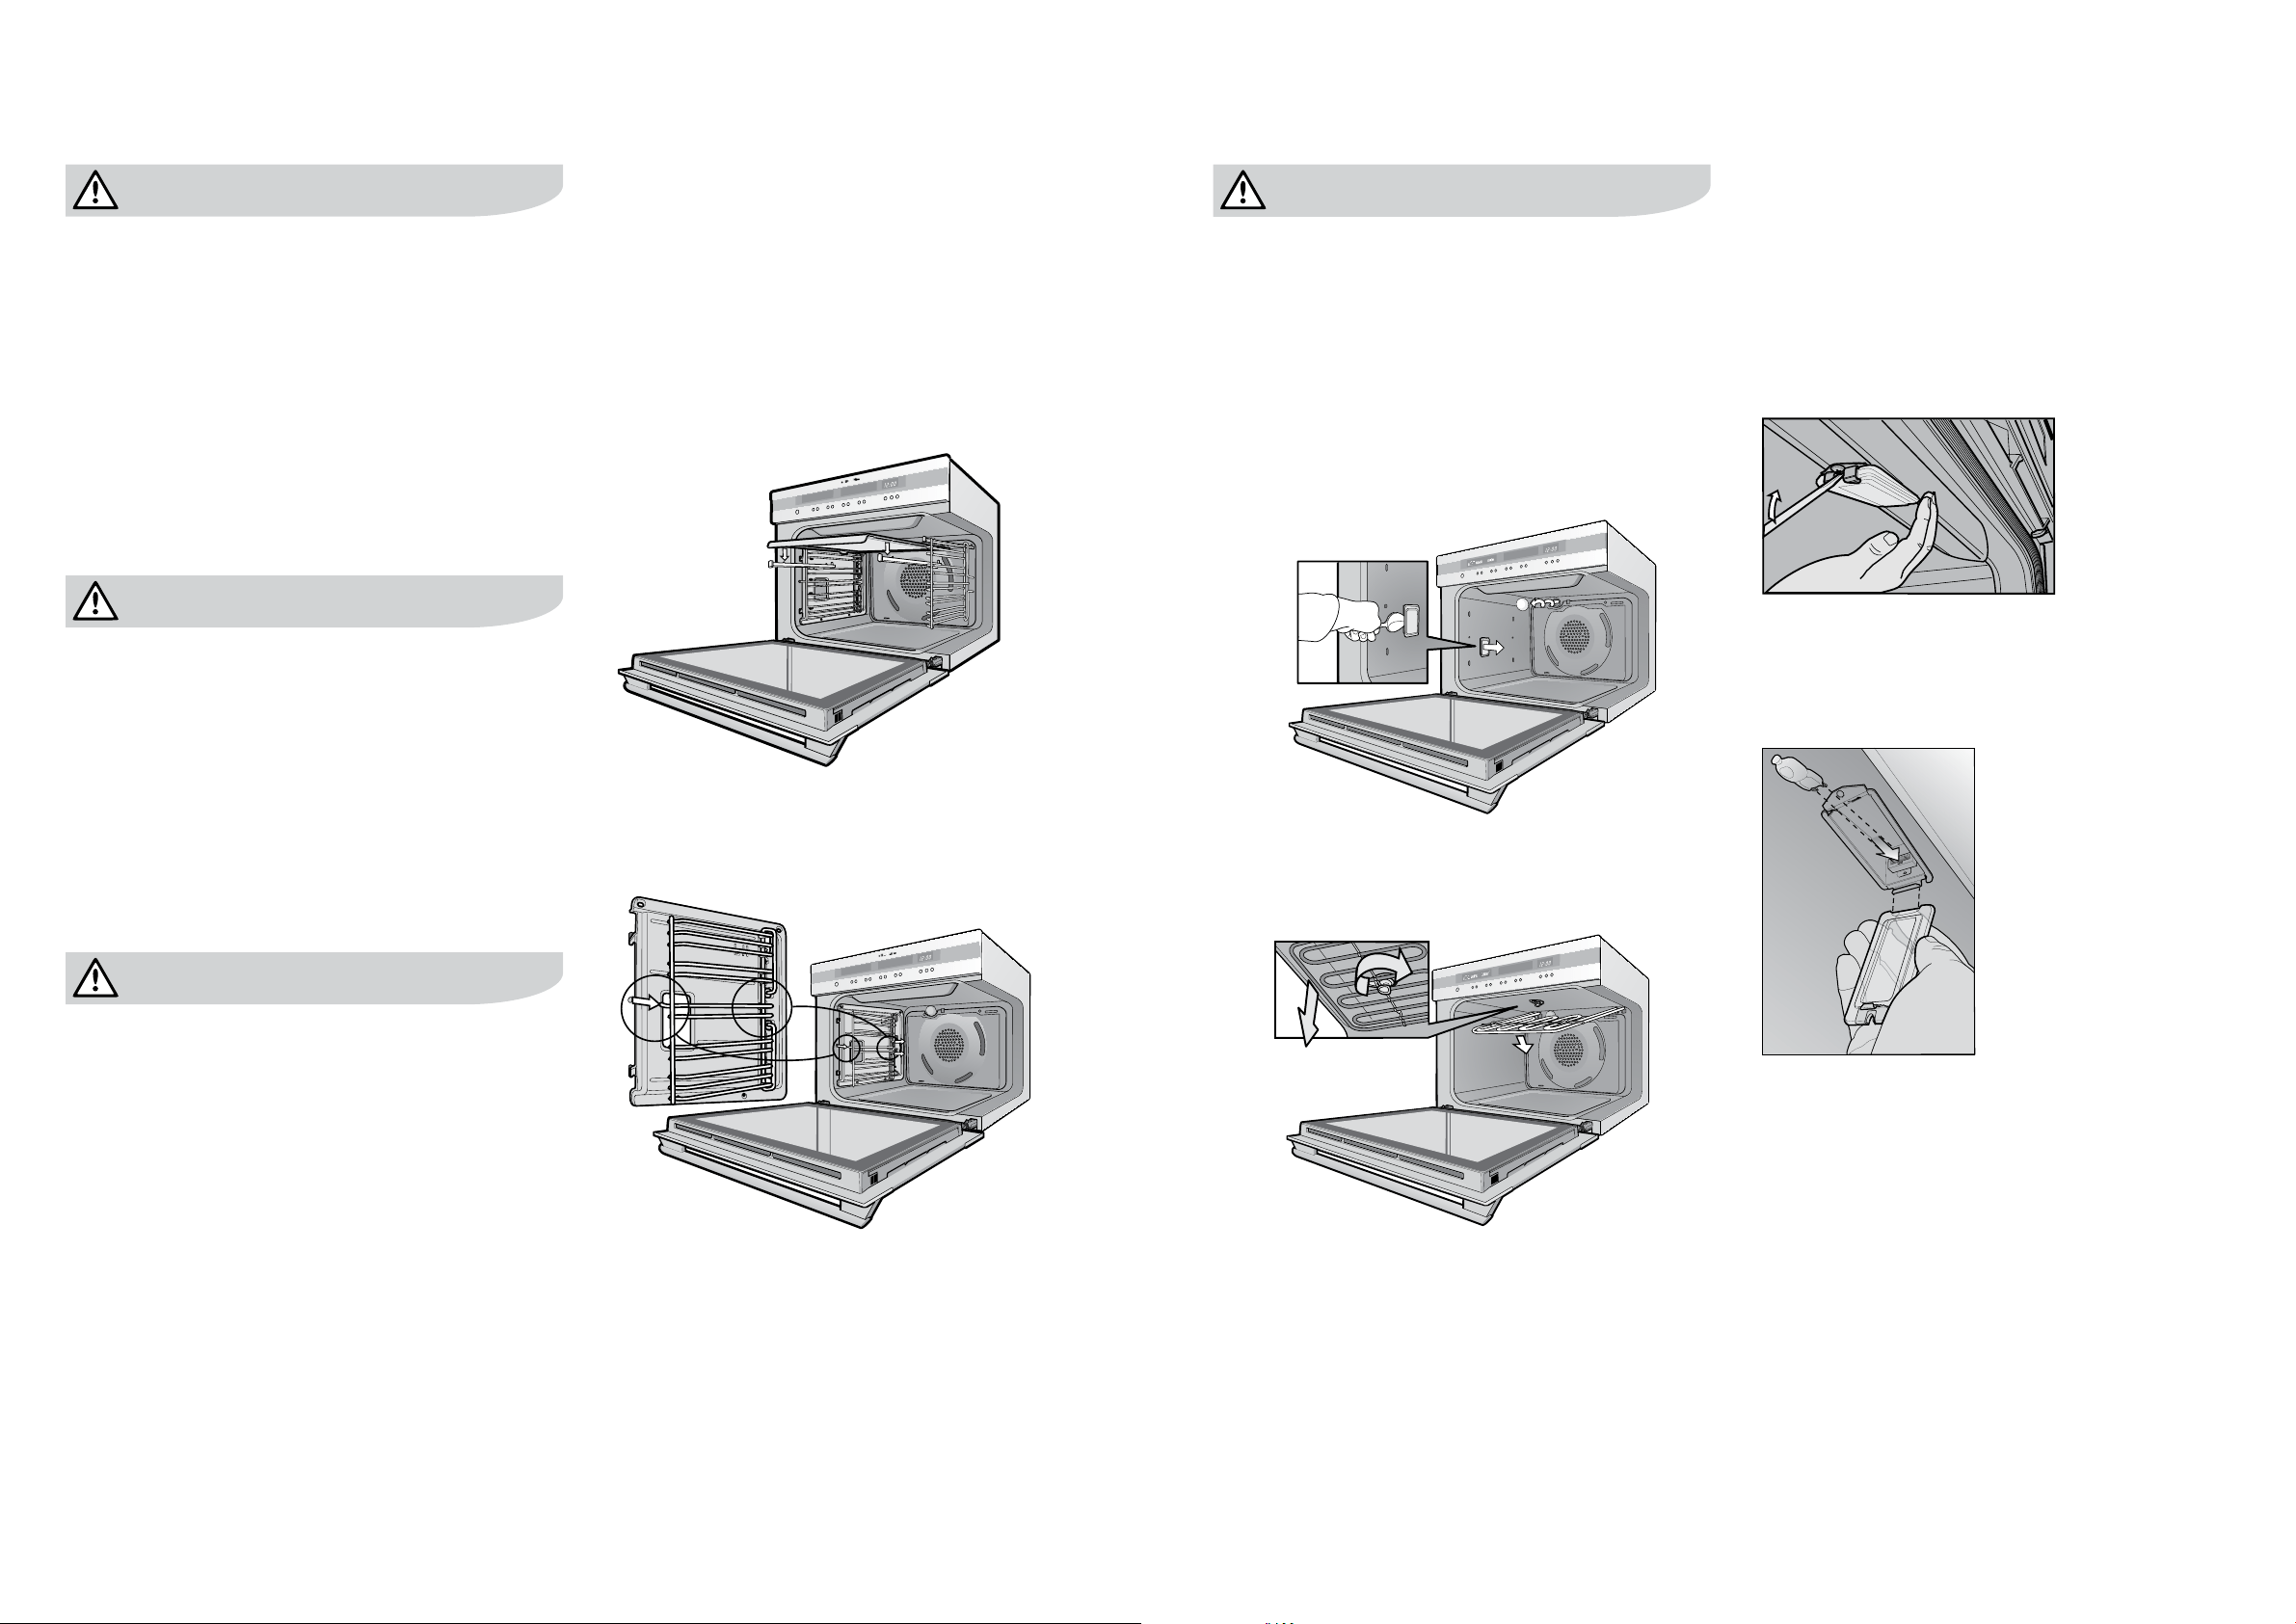
Installing your oven accessories
• Catalyticliners
on but you can omit them, if you wish, with no effect to
cooking performance. Their sole purpose is to make
oven cleaning easier. Of course, you can add them at
any time by removing the side racks (see page 22).
The catalytic liners will attach to each side of the oven.
There will be a left hand and a right hand version.
shiny side of the liner should be facing the oven wall,
shows the left hand liner. The right hand side will be
a mirror image of this.
2. Line the hooks up with the slots provided in the oven
wall, push them in and then allow the liner to slide
All 4 hooks MUST be
engaged in slots.
3. The access hole for the side racks should be visible
when the liner is correctly positioned – see diagram.
• Sideracks
holes provided, ensuring pegs are fully inserted.
2. Then locate the front peg into the front access hole
• Shelvesandtrays
The shelves are designed so that they have maximum
extension but cannot be accidentally pulled right out.
The trays are designed the same way and slot straight
into the side racks.
Totashelfortraytosideracks:
2 guide rails of the side rack – see diagram. Ensure
the same rail positions on both sides of the oven are
being engaged.
the oven.
3. Once the detents have passed the front edge of the
side rack, the shelf can be pushed completely in.
touch oven
cook time
end time
MODE
timer
clock
Cooking functions – rotary control oven
8 operating sequence – rotary control oven electrolux e:line ovens electrolux e:line ovens cooking with the timer – rotary control oven 9
Selectthecookingfunction
cooking function. The oven cavity light will come on.
Select the temperature
light above the temperature selector will come on.
the oven temperature falls below the desired setting,
the heating source switches on and the indicator light
comes on again.
round in a clockwise direction as this will result in
damage to the thermostat.
Not e:
Temperature estimations
temperatures, use the following table to determine the
temperature (°C).
oven temperature°C temperature°F
Lowheat
Cool
Slow
80
Moderateheat
Moderately slow
Moderate
Moderately hot
Highheat
Hot
Extremely hot
Operating sequence –
rotary control oven
tips and information
Pre-heating
your food at the correct temperature for the entire cook time.
1.With‘RapidHeat’function
This function allows your oven to reach preset temperature
quicker than any other cooking function. Turn the function
by rotating your oven temperature selector.
goes out, the oven has reached the desired temperature.
Select the oven function you require for cooking and place
the food in the oven.
2.Withotherovenfunctions
Set the desired temperature by rotating your oven temperature
reached the desired preset temperature, place your food in
the oven, close the door and set the timer if you desire.
3.With‘Grill’function
tips and information
Cooling/Ventfan
prevents your kitchen cabinet from overheating and
whenever you are using your oven and blow warm air
across the top of the oven door.
Condensation
happen when you are cooking large quantities of food
from a cold start. You can minimise condensation by:
– Keeping the amount of water used whilst cooking to
a minimum.
than the water container.
– Cooking casseroles with the lid on.
Your oven is equipped with a 3 button timer that has the
following features:
when the set time has elapsed.
count down the preset cooking time, beep when the
time has elapsed and turn the appliance off.
reached the timer will beep and turn the appliance off.
cooking time and end cooking time to switch oven on
Selecting the timer
and
in minutes.
Settingthecookingduration
will come on.
and
buttons. Five seconds after the last change the cook
be displayed.
Note:
Settingthecookingendtime
1. Check that the clock displays the correct time of day.
2. Select the desired oven function and temperature.
The oven indicator light will glow and the heating
source will come on.
Cooking with the timer –
rotary control oven
pressing or buttons. Five seconds after the last
the current time of day will be displayed.
Settingthedelayedstartcookingtime
previous sections.
Tocheckorcancelsettings
MODE button until the
to the mode (cook time, end time etc) that is currently
on display.
MODE button until
button until the clock no longer reverses (you will hear
MODE button until
button until the clock no longer reverses (at 0:00 you will
the oven will continue to heat until you manually turn it
off.
Oncompletionofcooking
still retain substantial heat. This will continue to cook the
do not plan on being present when the oven turns off,
you should take this extra heating time into account.
position.
Adjustingtheclock
or buttons to change the time of day.
cook time
end time
MODE
timer
clock
cook time
end time
MODE
timer
clock
cook time
end time
MODE
timer
clock
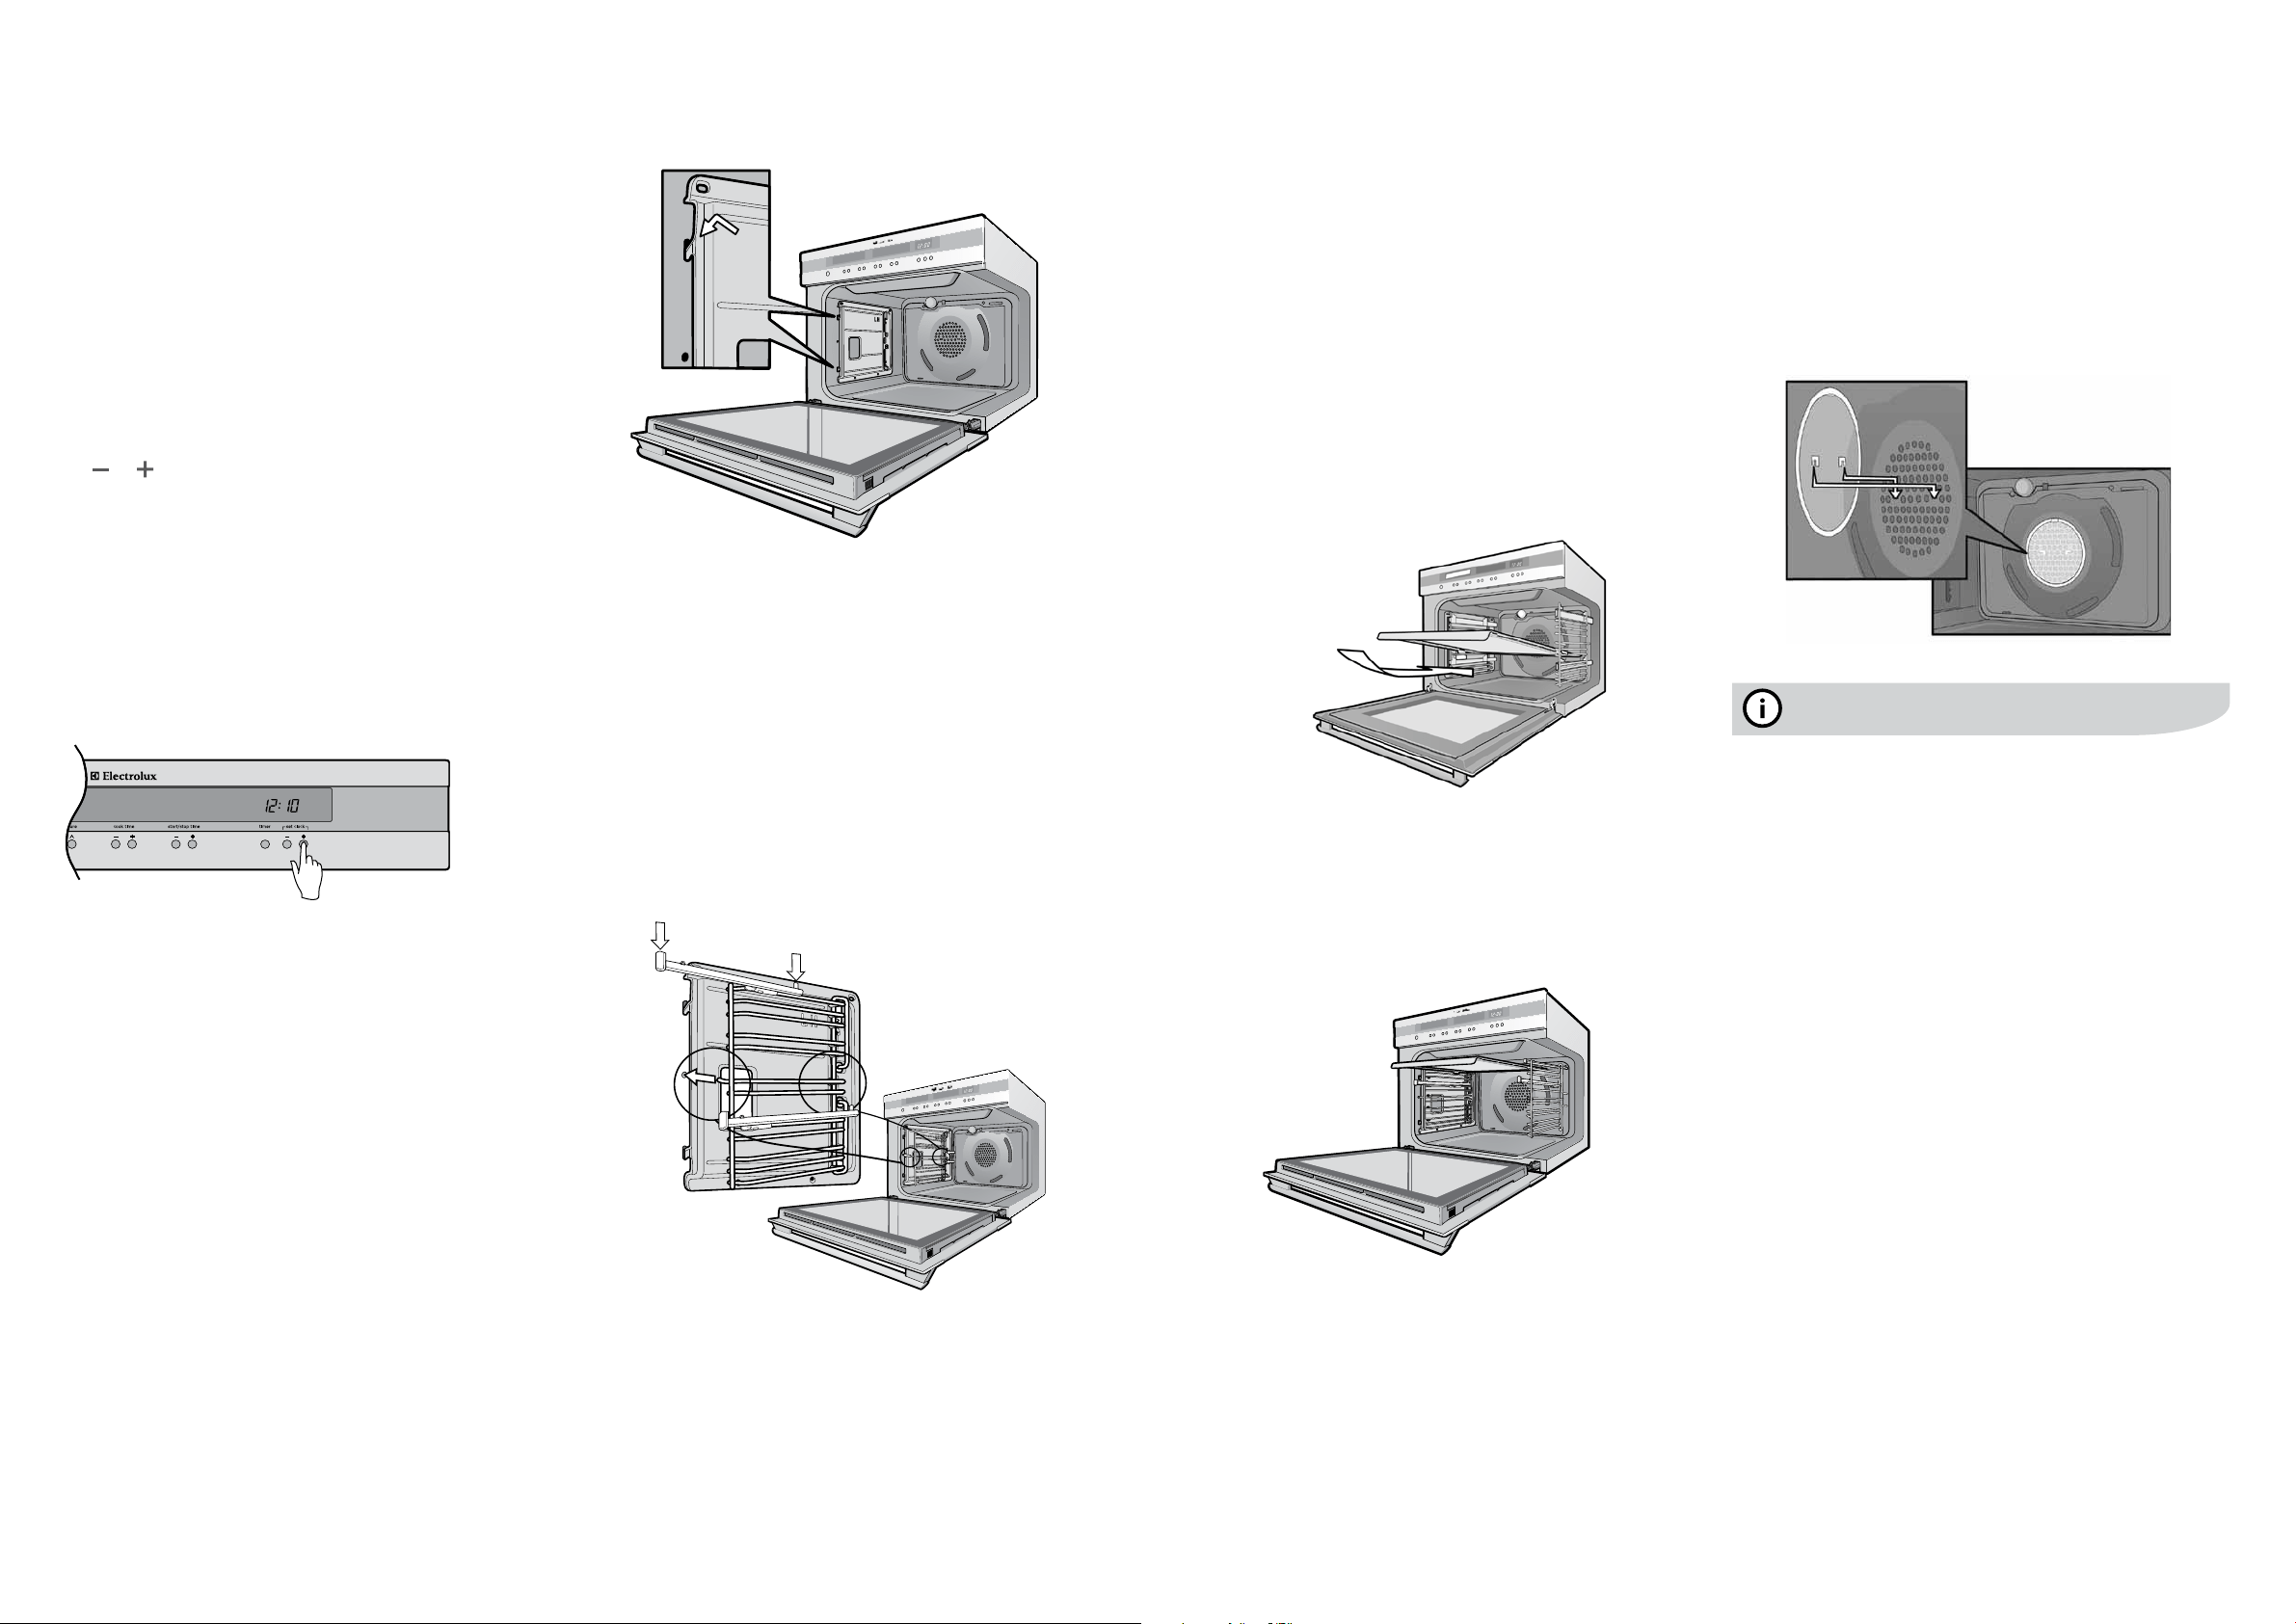
Preparing your oven
2. Please wipe out the oven interior prior to operation with
warm soapy water and polish dry with a soft clean cloth.
Do not close the oven door until the oven is completely dry.
Setting the time
time of day before you can operate your oven.
2. To set the time of day in hours and minutes, press the
or
3. 8 seconds after the last change the time will stop
time has been entered, the clock advances minute
by minute.
Note:
Installing your oven accessories
• Catalyticliners(ifsupplied)
racks on but you can omit them, if you wish, with no
effect to cooking performance. Their sole purpose is
to make oven cleaning easier. Of course, you can
add them at any time by removing the side racks
(see page 22).
The catalytic liners will attach to each side of the oven.
There will be a left hand and a right hand version.
shiny side of the liner should be facing the oven wall,
shows the left hand liner. The right hand side will be
a mirror image of this.
2. Line the hooks up with the slots provided in the
oven wall, push them in and then allow the liner to
All4hooksMUST
be engaged in slots.
3. The access hole for the side racks should be visible
when the liner is correctly positioned – see diagram.
touch control oven
Note:
• Sideracks
holes provided, ensuring pegs are fully inserted.
2. Then locate the front peg into the front access hole
Note:
10 before using your electronic control oven electrolux e:line ovens electrolux e:line ovens before using your electronic control oven 11
• Shelvesandtrays
The shelves are designed so that they have maximum
extension but cannot be accidentally pulled right out.
The trays are designed the same way and slot straight
into the side racks.
Totashelfortraytosideracks:
guide rails of the side rack – see diagram. Ensure
the same rail positions on both sides of the oven are
being engaged.
the oven.
3. Once the detents have passed the front edge of the
side rack, the shelf can be pushed completely in.
with the closed oven door.
To fit a shelf or tray to telescopic slides:
along the top of the slide until it hits the back post.
2. Drop the front of the shelf or tray onto the slide
ensuring it sits behind the front post of the slide.
with the closed oven door.
• Fatlter(ifsupplied)
1. Locate the mounting slots in the fan cover and the
tags pointing down.
tips and information
cooking results.

function Symbol description
Cookfromfrozen
frozenprecookedfoods such as
from the element surrounding the fan as well as a smaller element above the food.
half of the oven for best results.
Fancooking
Heat comes from the element surrounding the fan. This fan circulates the hot air around
the oven cavity so that you can put your food in different places in the oven and still
multi-shelf
cooking,reheatingcookedfoods,pastriesandcompleteovenmeals
at a lower temperature and be faster than baking. Please note that some variation in
browning is normal.
Traditionalbake
Heat comes from two elements, one above and one below the food. The bottoms
controlled by the thermostat and will turn on and off to maintain set temperature. You
singleshelfcooking,singletraysof
biscuits,scones,mufns,cakes,slices,casseroles,bakedpuddings,roasts
and delicate egg dishes. This is a general function that can be used for most cooking.
Pastry
the bases of pastries and pies
choose the default setting, the oven will heat up to 230°C in order to brown the food.
You should then drop the temperature to what the recipe required. Cook in the lower
half of the oven when you are using only one shelf.
Fanassistbake
Heat comes from two elements, one above and one below the food. The fan circulates
the hot air around the oven cavity so that you can put the food in different places in
the oven and still cook them at the same time. You should only use a maximum of two
Pizza
pizzas,quiches,
meat pies and fruit pies. Simply place the food in the middle of the oven and set the
desired temperature.
Defrost
raise your
yeast dough and to dry fruit, vegetables and herbs
not have a suggested temperature but uses the ambient heat in the oven cavity.
Fangrill
The grill element turns on and off to maintain set temperature while the fan circulates the
large cuts of meat
your food on a shelf in the second lowest shelf position. Put the grill dish on the lowest
food over during the cooking cycle. Set temperature to 180°C.
Halfgrill
of heat is needed.
Cooking functions – electronic control and touch control oven
Yourovenwillhaveaselectionofthefollowingfunctionsasillustratedbythesymbolsanddescriptionsbelow.
12 cooking functions – electronic touch control and control oven electrolux e:line ovens electrolux e:line ovens cooking functions – electronic touch control and control oven 13
function control oven description
Fullgrill
tendercutsofmeat,steak,chops,sausages,sh,
cheesetoastiesandotherquickcookingfoods
You can slide your grill dish into either of the two spaces within the upper pairs of support
Keep warm
food at a perfect eating temperature without cooking it further. Heat comes from the
your food warm while you prepare the rest of the meal or afterwards while you wait for the
late arrival.
Roast
This function starts at a higher temperature to seal the meat. The oven will then
automatically reduce to the selected temperature to cook the meat for as long as desired.
lower to 200°C.
Pyrolytic cleaning
off the spatters and accumulated dirt and grease from the oven liner, at high temperature.
This process produces ash which can be wiped out of the oven cavity.
14 operating sequence – electronic control oven electrolux e:line ovens electrolux e:line ovens
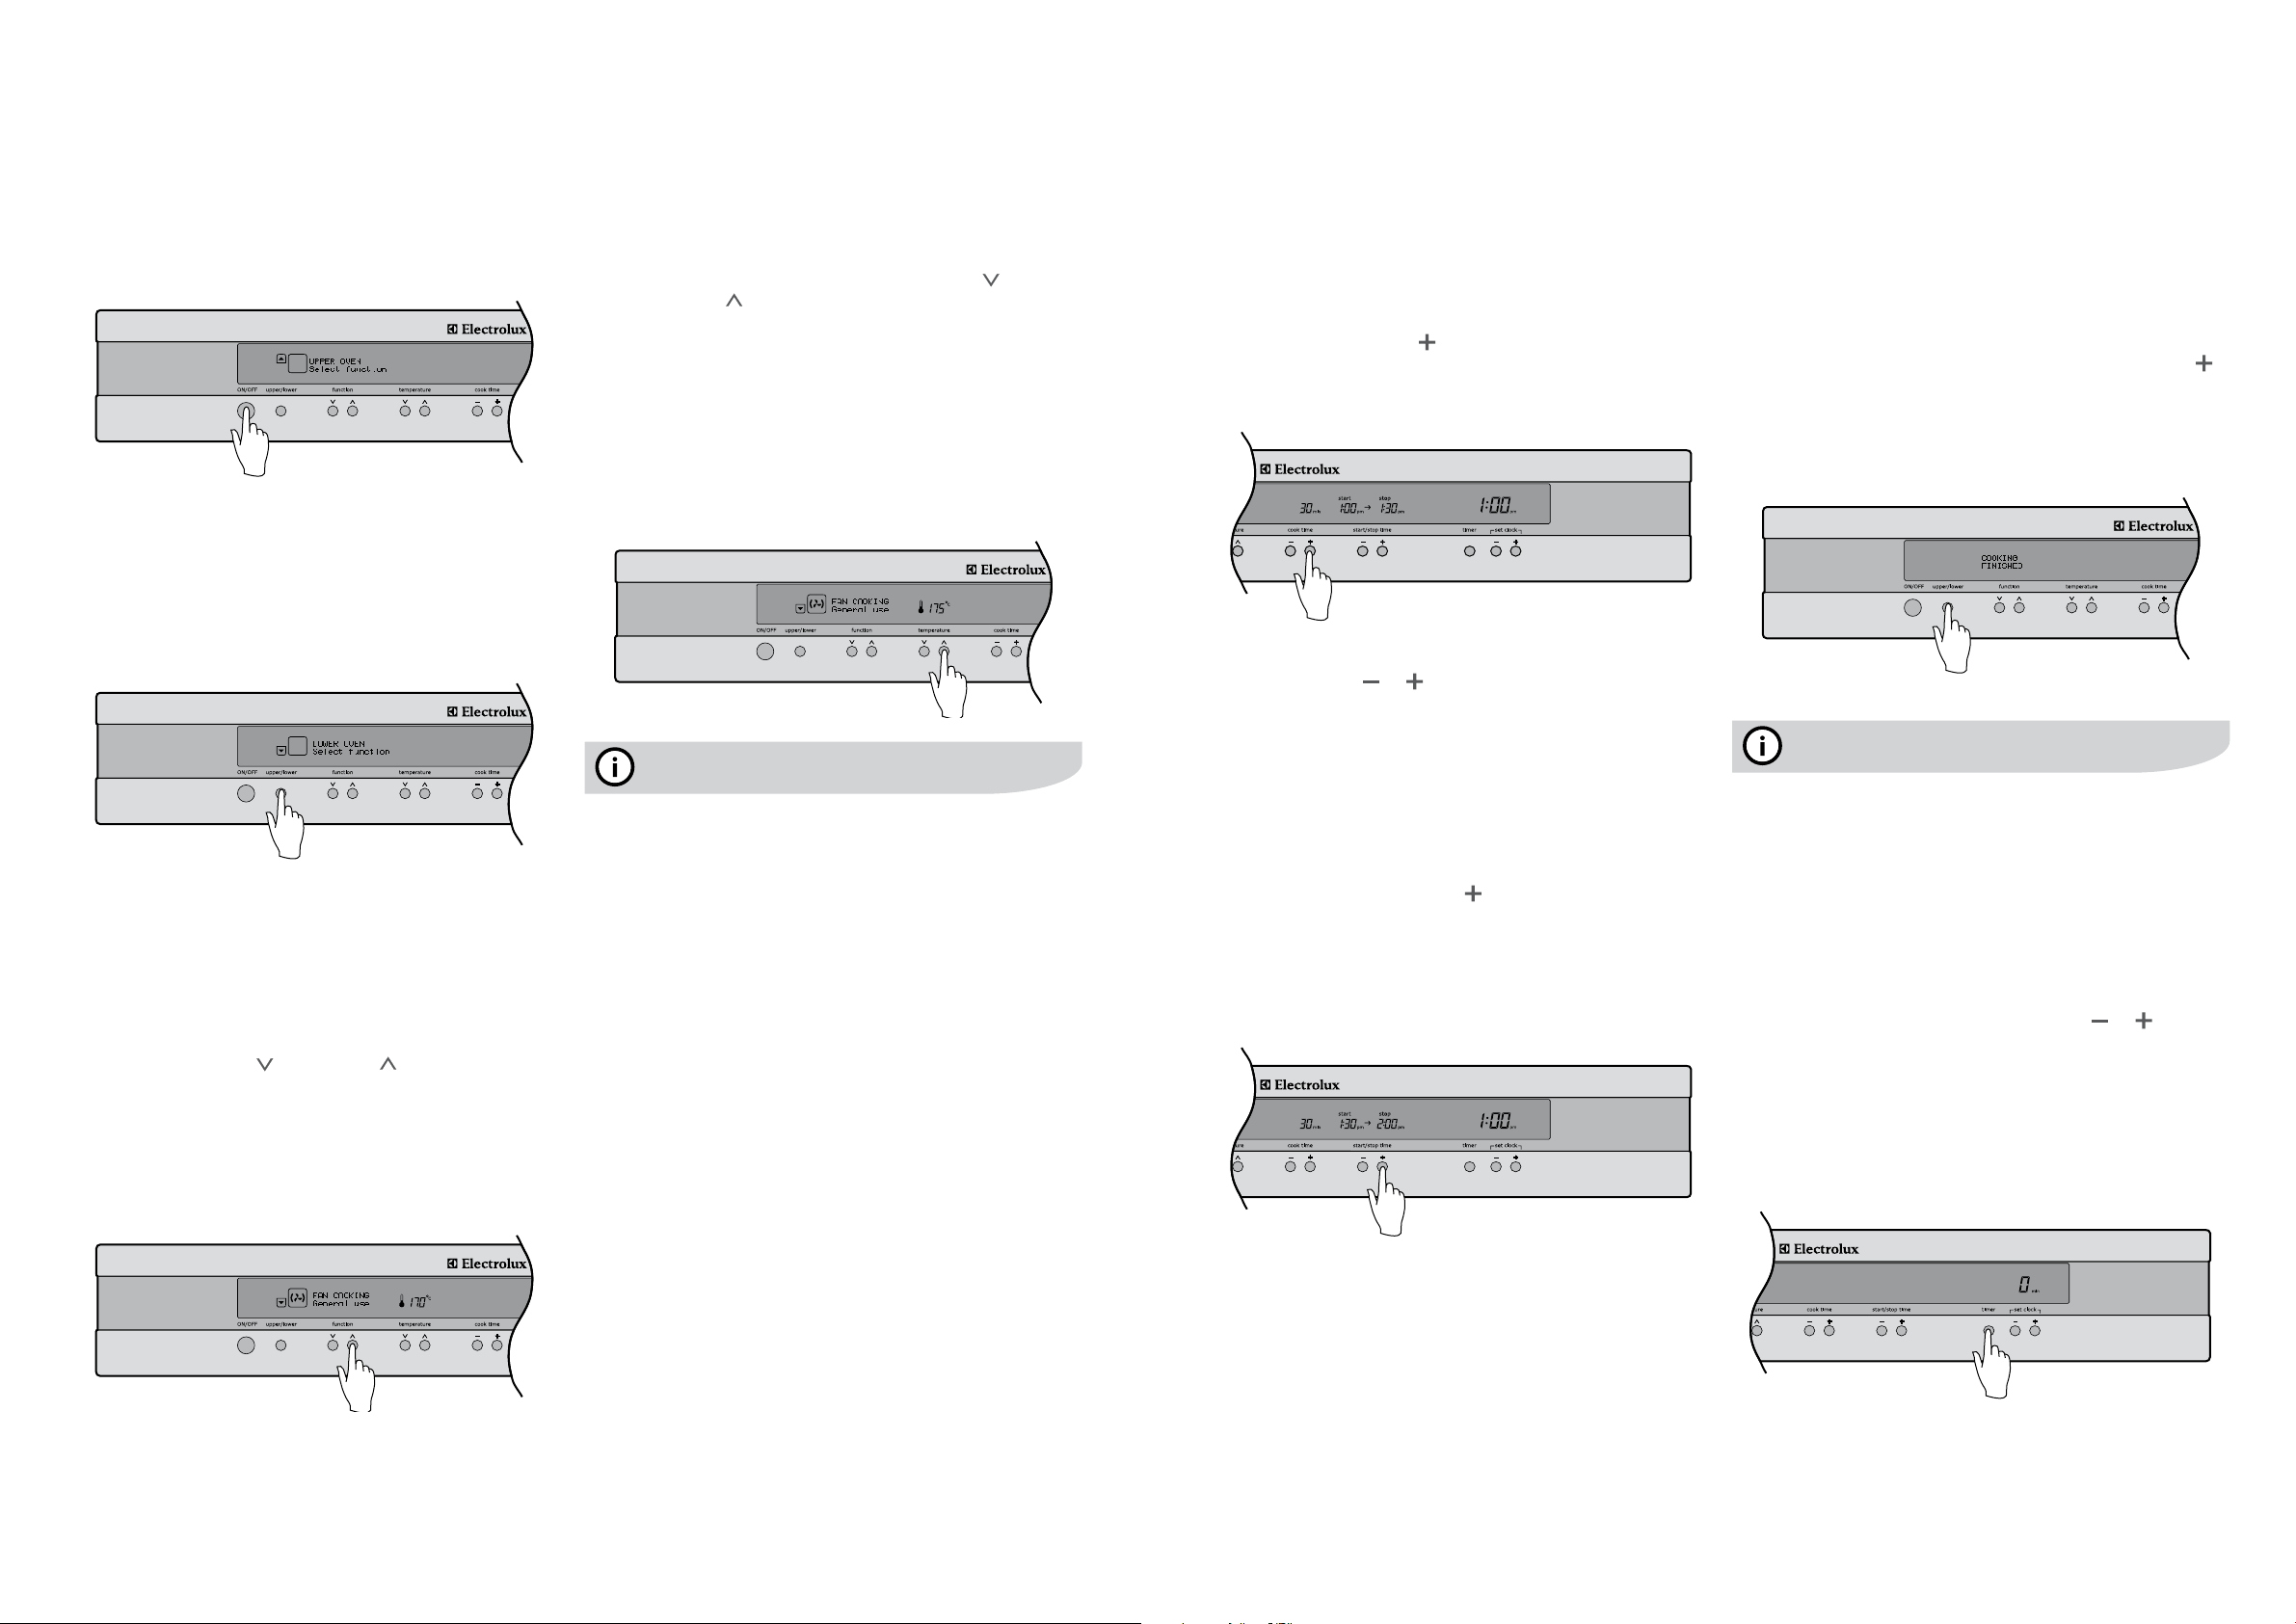
Turning the oven on
The LCD control panel will come on and inform you that
you need to select a cooking function.
will turn off.
SelectingtheUpperorLoweroven
(EDEE63CS, EUEE63CS & EUEE63CK only)
Your model may be equipped with two ovens. On these
models, use the oven selector button to toggle between the
upper and lower ovens.
button. The oven cavity icon on the LCD control panel
will tell you which oven is currently active.
Not e:
Selectacookingfunction
Your oven will have a selection of functions. Refer to the
are available to you.
times as necessary until the desired function appears.
name and suggested cooking temperatures will appear
above the temperature selector.
oven will switch on and begin to heat up to the
displayed temperature.
Operating sequence –
electronic control oven
Selecting a temperature
The temperature in your appliance is electronically
controlled.
oven begins to heat. The heating indicators above the
temperature selector will come on and start to rise
slowly, indicating the degree to which the oven
is currently being heated.
below the desired setting, the heating source switches
back on.
tips and information
well as cook your food at the correct temperature for the
entire cook time.
The programmable controller models are equipped with
comes from the element surrounding the fan as well as
the smaller element above the food. This combination will
heat up your oven 30% quicker than it would on standard
function once the preset temperature is reached.
Turning the oven off
Single cavity models:
1. Press the button to switch off the oven.
Dual cavity models:
the desired oven.
2. Press the button to switch off the desired oven.
oven is now switched off.
control panel will automatically revert to show the setting
of that oven.
4. To turn off both ovens at once, press and hold the
and the LCD control panel will then switch off at the
same time.
Your oven is equipped with a programmable controller that
can be used to turn on and off the oven automatically.
The cook time is used to automatically turn the oven off
after a set amount of time.
Settingthecooktime
1. Select the desired oven function and cooking
temperature.
until the desired cook time has been set.
will be programmed and will start cooking.
Note:
Settingthestart/stoptime
1. Check the clock displays the correct time of day.
2. Select the desired oven function and cooking
temperature.
3. Set the required cook time.
button to move the start
and stop time forward.
programmed.
The oven will start cooking when the time of day reaches
the set start time.
Cooking with the timer –
electronic control oven
Oncompletionofcooking
will sound for 10 seconds, the oven will switch off and
of the display. On the right hand side of the display, the
the cooking start and stop time.
the control panel.
button for each additional minute you require. The oven
automatically reverts to the function and temperature
automatically switches off.
tips and information
Even though the heating element turns off the oven will still
retain substantial heat. This will continue to cook the food
plan on being present when the oven turns off, you should
take this extra heating time into account.
Setting the timer
The timer can be used independently of the oven for setting
an audible signal sounds.
1. Press the timer button.
2. Set the desired length of time using the or buttons
timer will start to count down.
4. To stop the signal, press any of the 3 buttons below the
Note:
16 additional functionality – electronic control oven electrolux e:line ovens cooking guide electrolux e:line ovens 17
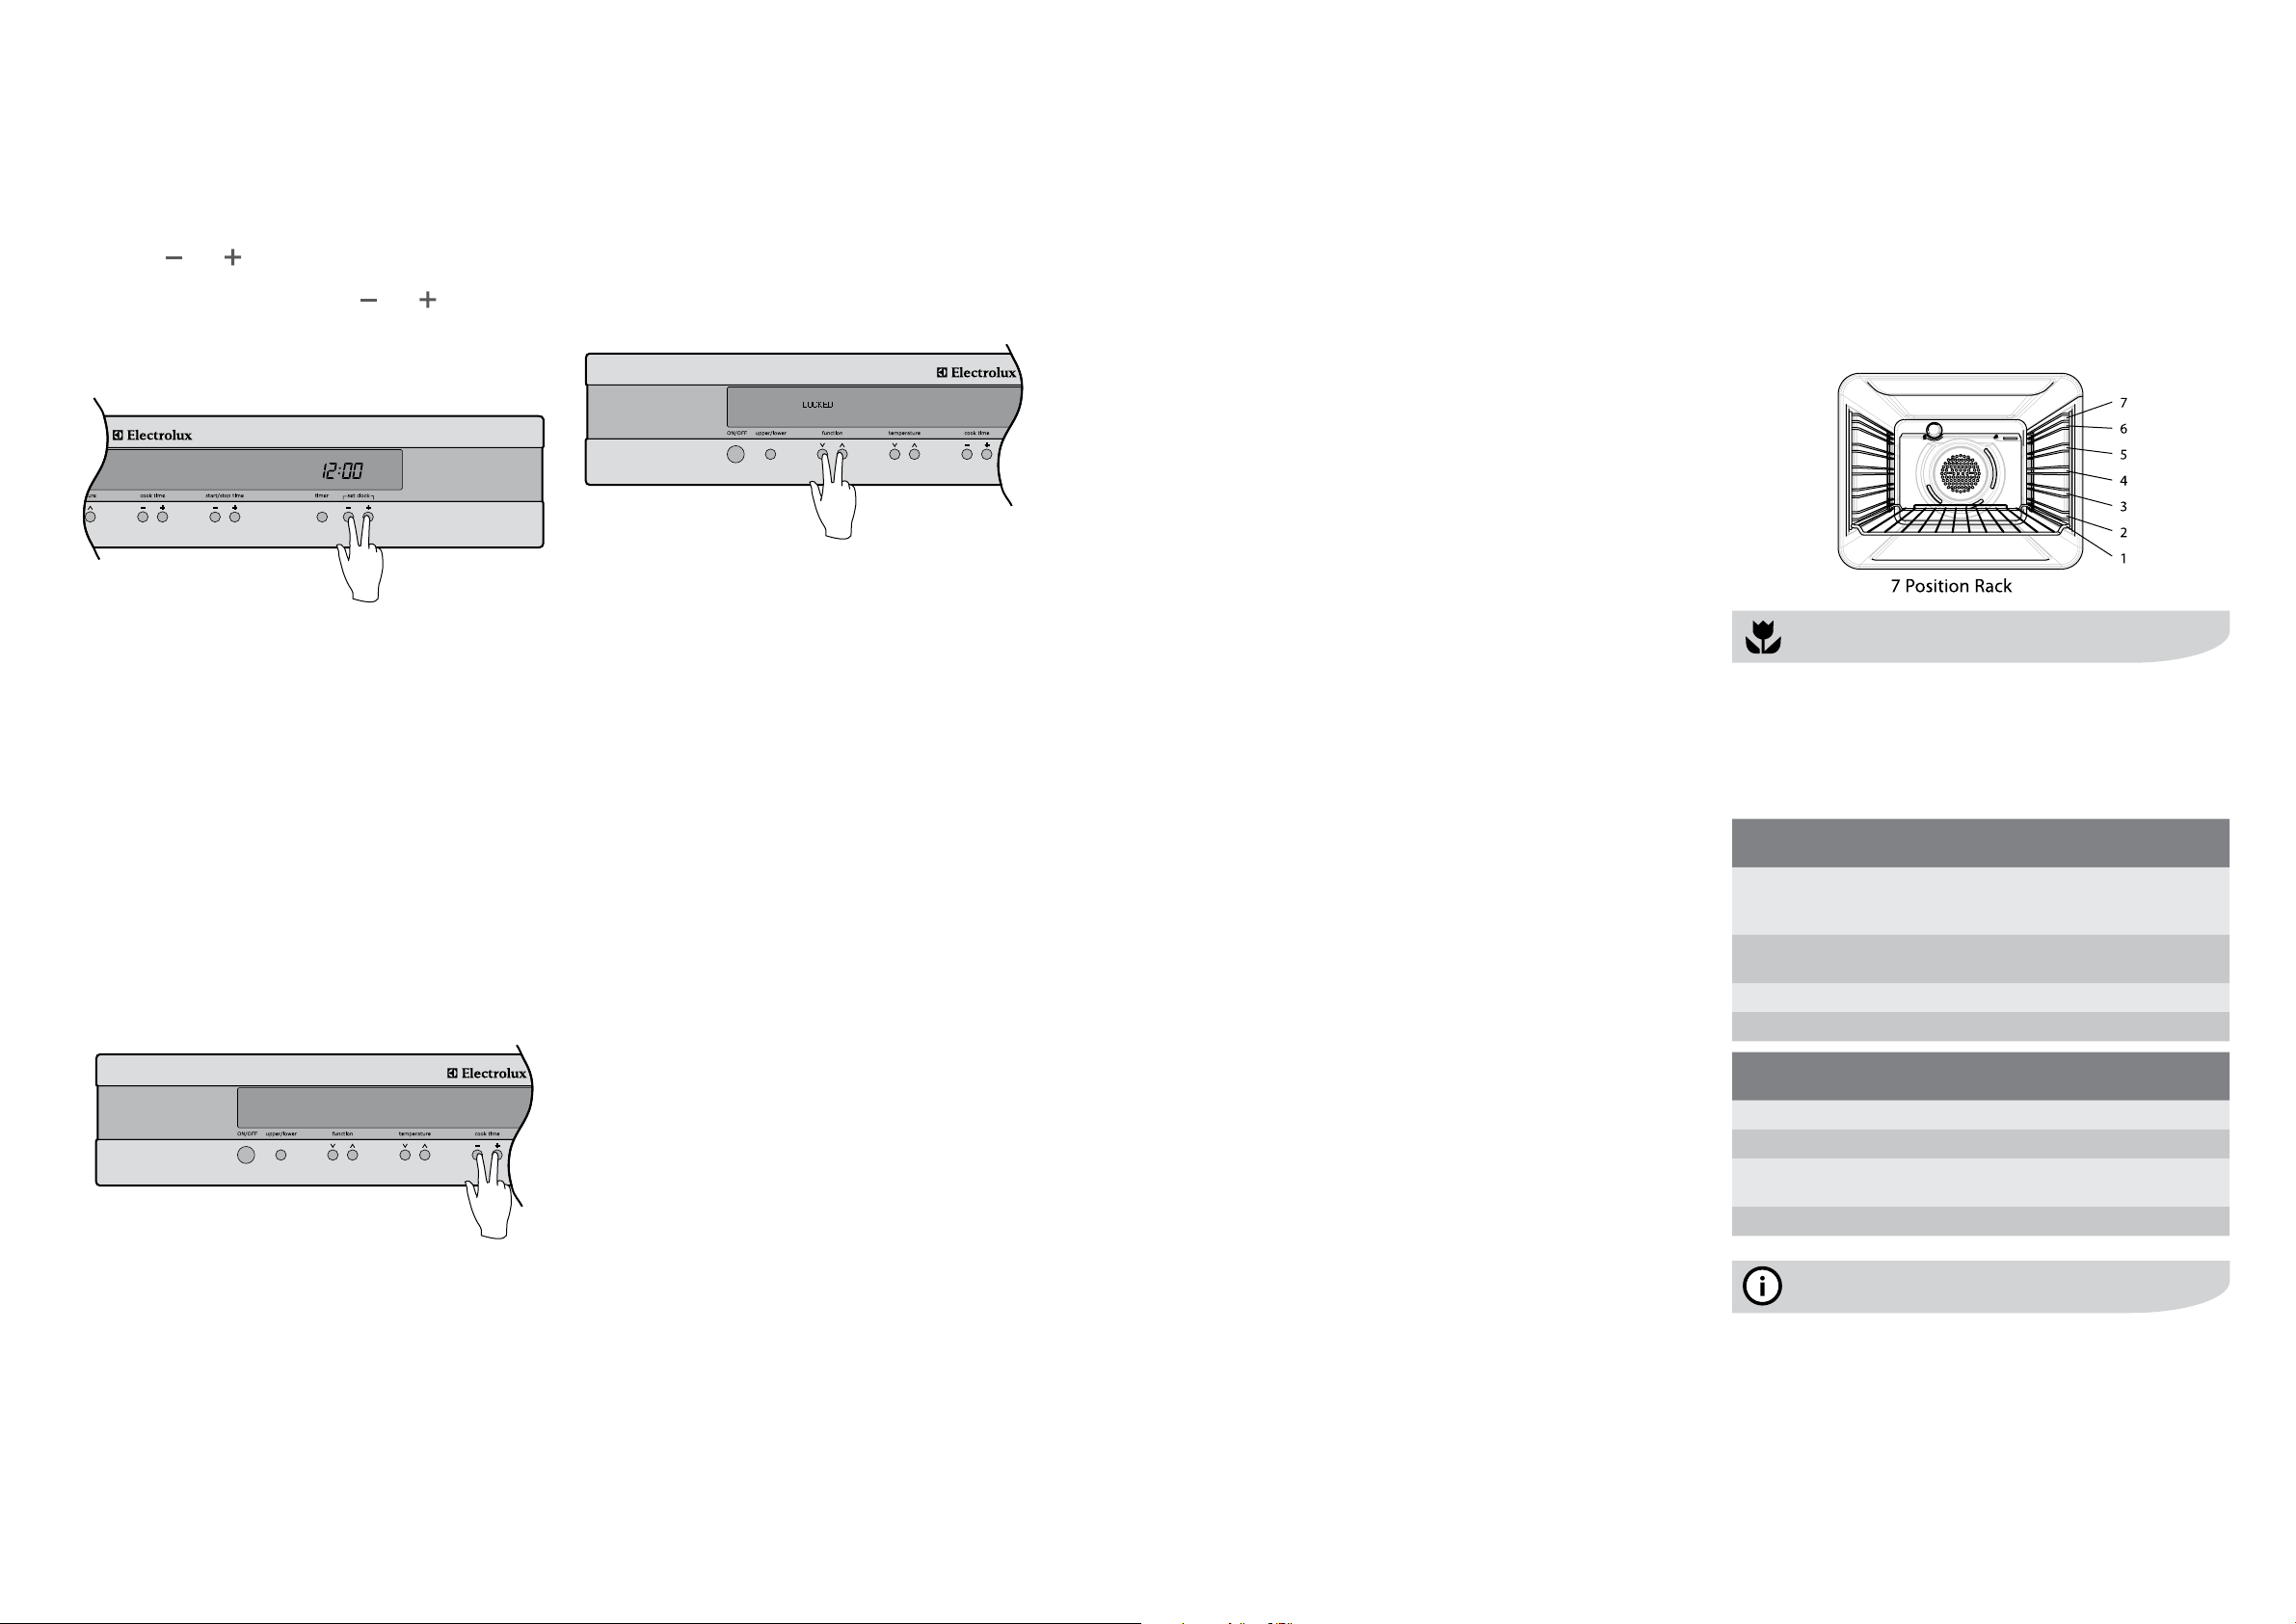
Adjustingtheclock
The time of day is independent of the oven and can be
1. To set the time of day in hours and minutes press and
hold the
and buttons simultaneously for 1 second
and buttons.
DemoMode
This mode is intended to be used in retail shops to
demonstrate the oven functionality without any power
consumption except to the oven lamps.
buttons simultaneously, hold until the words ‘Demo
the operation.
ReleasingDemoMode
cooktime buttons simultaneously, hold until the words
Activatingthechildlock
switched on.
2. Press the function buttons simultaneously, hold until the
words LOCKED are displayed, a single beep will sound
Note:
Releasingthechildlock
Press the function buttons at the same time, hold until the
word LOCKED is cleared from the display. The child lock is
now released and the oven is ready to use.
Beepontouch
The beep sound can be activated anytime a button is
pressed.
1. Ensure the oven is off by pressing the button.
2. Press the temperature buttons simultaneously for
operation. Repeat the above procedure to reset the
touch mode is off.
Maximumoperationtimesforsafety
The oven automatically switches itself off if the temperature
electronic control oven
it on.
40mm from the side of the oven. This allows free
circulation of heat and ensures even cooking.
other foods. This will cause food to steam and
not brown.
prevent splattering oil on the sides of the oven and the
oven door.
place the cooking dish on a scone tray in the desired
shelf position.
Condensation
Excess condensation may fog the oven door. This may
happen when you are cooking large quantities of food from
a cold start. You can minimise condensation by:
a minimum.
than the water container.
and may condense outside your appliance. This is not
a problem or fault with your oven.
Roastingmeat(useroastingtray&insert)
your meats in an oven roasting bag or foil to prevent fats
and oils from splattering. This will make it easier to clean
your oven.)
the meat on the insert.
oven, wrap in aluminium foil and leave to stand for
the meat is carved. The table in the next column shows
temperatures and cooking times for different kinds of
meat. These may vary depending on the thickness and
bone content of the meat.
Roastingpoultryandsh
temperature of 180°C.
of the cooking time The table shows the temperatures
poultry. These may vary depending on the thickness
and bone content of the meat.
Cooking guide
Oven shelf location
Your oven has 7 positions for shelves (as shown in the
(selected models).
To give maximum space above and below the shelves,
load them in this way:
Refer to cooking guide.
environmental tip
the same time. For example:
or vegetables.
Cookingguide
meat recommended
temperature°C
minutesperkilogram
200
Lamb 200 Medium 40
180
Pork 200
poultry and
fish
recommended
temperature°C
minutesperkilogram
Chicken 180
Duck
Turkey 180
Fish 180 20
tips and information
Cooling/Ventfan
your kitchen cabinet from overheating and reduces the
condensation inside the oven.
warm air across the top of the oven door.
18 cooking guide electrolux e:line ovens grilling guide electrolux e:line ovens 19
tips and information
The following tables are intended as a guide and experience
may show some variation in cooking times necessary to
meet individual requirements.
Temperature estimations
oven temperature°C temperature°F
Lowheat
Cool
Slow
80
Moderateheat
Moderately slow
Moderate
Moderately hot
Highheat
Hot
Extremely hot
TraditionalBake
food temperature°C oven shelf
position*
time in minutes
Scones Plain or fruit 220 2
Rolled
Spooned
Shortbread biscuits
170
190
160
2
2
1 or 2
Meringues Hard – individual
Soft – individual
Pavlova – 6 eggs
110
180
110
2
2
1
90
Cakes Patty cakes
Sponge – 4 eggs
Shallow butter cake
Rich fruit cake
190
180
180
140
3
2
2
2
180
Pastry – Shortcrust Cornish pasties
Custard tart
200
2
1
Pastry – choux Cream puffs 210 2
Yeast goods 210 1
*Counting from the bottom shelf up
Fancooking
food temperature°C oven shelf
position*
time in minutes
Scones Plain or fruit 210
Rolled
Spooned
Shortbread biscuits
180
Meringues Hard – individual
Soft – individual
Pavlova – 6 egg
100
100
90
Cakes Patty cakes
Sponge – 4 egg
Shallow butter cake
Rich fruit cake
180
170
170
130
180
Pastry – Shortcrust Cornish pasties
Custard tart
180
Pastry – choux Cream puffs 200
Yeast goods 200
*Counting from the bottom shelf up
tips and information
your food at the correct temperature for the entire cook time.
For best baking results preheat oven for 30 minutes.
Grilling hints
meat.
This table shows how to grill different types of meat:
food grilling method
with oil or melted butter, especially if the meat is
very lean.
Lamb You can use the loin chops, shortloin chops,
chump chops and forequarter chops. Remove
with oil or melted butter.
Sausages Prick sausages to stop skin from bursting.
Poultry
Fish
warning
Not e:
Guide to better grilling
These times should only be used as a guide and remember
to turn the food over half way through the cooking process.
food time in minutes
Steak
Chops
Fish
For better grilling results, follow these easy instructions:
40mm thick, the outside may burn whilst the inside
remains raw.
fats and oils from draining away, which could result in
or marinade. Grilled food is better if marinated
before cooking.
Grilling guide
Fangrill
The Fan grill function will assist the grilling process
by circulating the heat evenly around the food. The
recommended temperature setting is 180°C for all fan
grilling functions.
fan grilling.
for best results.
is still warm.
at the same time which means the food is succulent.
20 dealing with cooking problems electrolux e:line ovens electrolux e:line ovens get to know your oven 21
problem causes remedies
Uneven cooking Select shelf that puts the food in the centre of
the oven
Oven tray too large Experiment with other trays or dishes
Trays not centralised Centre trays
Rotate food during cooking
Grill dish affecting thermostat Remove grill dish from oven on bake modes
Oven not preheated Preheat oven
Stagger baking tins at least 3cm between tins
and oven walls
evenly over trays
Lower the temperature
bottom
Change to shiny, light tins or lower the temp
by 10°C
Food too low in the oven Cook one shelf higher
Oven door opened too frequently during
baking
cooking time has passed
Lower the temperature
Grill dish affecting thermostat Remove grill dish from oven and bake on
modes
Cakes have a cracked thin crust Lower the temperature
Food too high in oven Cook one shelf lower
Cake batter over mixed
Pan too deep
Change to shiny pans
undercooked
Raise the temperature
Food too low in oven Cook one shelf higher
Cakes fallen in the centre Raise the temperature
Proportions of ingredients incorrect in the recipe Check recipe
Open door too early in baking Do not open door until the last quarter of
cooking time
Roast meat, potatoes not
browning in fan oven
Poor air circulation Elevate food onto a rack to allow air circulation
Grill dish affecting thermostat Remove grill dish from oven on bake modes
Juices running out of meat Do not pierce meat with a fork
Turn with tongs
Grilled meats outside is
overcooked and centre is raw
Grill at lower insert position
Grilled chops and steaks curling Cut into fat every 2cm
Dealing with cooking problems Get to know your oven
Gettoknowyournewovenwiththis
‘SimpleTestCake’
possible that there will be some variation in colour when
baking. Therefore, we suggest this simple, easy and
delicious to make Simple Test Cake, it can help you
your eye as you may require to rotate during baking.
‘SimpleTestCake’
1 cup caster sugar
1 teaspoon pure vanilla essence
4 large eggs
pinch of salt
Method:
round or square cake pans. Then line the base with
grease proof or baking paper.
and ensure oven shelf is in the centre position of oven.
3. Cream softened butter and sugar until light in colour.
addition.
well combined.
8. Spoon mixture equally between prepared cake pans.
comes out clean or the edges of the cakes have come
away slightly from the sides of the cake pans.
minutes before removing from cake pans.
Cool completely.
conserve, and dust top with pure icing sugar.
22 electrolux e:line ovens maintenance and cleaning removing and replacing the oven top light (EPEE63CS & EPEE63CK models only) electrolux e:line ovens 23
warning
• Donotusesteamcleaners.
• Donotlinethebottomoftheovenwithfoil
orcookware.
Stainless steel
greasy. You must clean these areas regularly by following
the procedures below, if you want your appliance to look
its best, perform well and have a long life.
steel edges, they can be sharp!
with stainless steel cleaners if it becomes soiled or
discoloured.
Customer Care Centres.
caution
only be cleaned with warm water and a mild detergent.
or harsh solvents.
Note:
Glass
cleaned immediately after soiling.
and stains.
warning
durable material that withstands heating and cooling
without breaking. However, it must be remembered that
have any questions about the glass in your new appliance,
please contact the customer care centre by dialling
1300 363 640.
scrapers to clean the oven door since they can scratch
the surface, which may result in shattering of the glass.
Oven
do not accumulate around elements, burners or fans.
Not e:
Grill
Maintenance and cleaning
Removingthetraysandshelvesfromyourappliance
the front stop.
taking care not to spill the contents.
back again.
– Pull tray towards you until it stops.
– Lift the tray clear.
Removingthesideracks
1. Grasp the middle wire at the front.
Cleaning your accessories
warning
IMPORTANT:Makesuretheapplianceisturnedoff
before you remove or replace parts, to avoid the
possibilityofelectricshock.
Removingandreplacingtheovenbacklightand
side light
globe replacement.
and lever off. Replace globe and snap glass cover back
into position.
used. This can be purchased from Electrolux Customer
Care Centre.
Releasingthegrillelement
to help you reach your oven roof for cleaning.
top of the oven.
from the oven and the top element dropped down.
the two metal clips on the left hand side, as shown in
the diagram.
driver in and moving it upwards, whilst holding the glass
cover may fall and break).
its holder.
side of housing; push up opposite end of glass cover
until it snaps into position.
Replacing the oven top light
(EPEE63CS & EPEE63CK models only)
24 electrolux e:line ovens catalytic self cleaning panels oven door removal & cleaning electrolux e:line ovens
Operation
Catalytic self clean panels are coated with a specially
formulated enamel coating, over a base of regular enamel.
This enamel coating has a rough surface which is also
porous. During normal cooking, fats and other food splatter
is partially absorbed into the surface and then oxidises
away.
This oxidisation of the fat works best if the oven is set at
temperature baking, say around the normal 180°C,
then the cleaning process may not be complete. Every
around one hour to completely remove the soil.
Cleaning
Should the panels become heavily soiled, they will need to
be taken out of the oven and cleaned by hand. They should
be soaked in warm, soapy water for at least 2 hours and
then wiped clean with a soft cloth.
Not e:
caution
Solid cleaning powders, creamy cleansers, caustic oven
cleaners, steel wool or other scourers will ruin the catalytic
Removingcatalyticliners
the centre of the oven.
Removingandreplacingthecatalyticfanbafe
– Remove the 2 retaining screws on the top edge of the
– Pull the top edge towards you and then disengage to
bottom tabs from the oven back.
their corresponding slots in the oven back.
appropriate holes.
Itiscriticalthatthefanbafeisreplacedafter
cleaning,beforetheovenisoperatedagain.
FatFilter(see page 11)
oily food has been cooked.
warning
IMPORTANT:TheovenMUSTbeswitchedoffbefore
removingthebafe
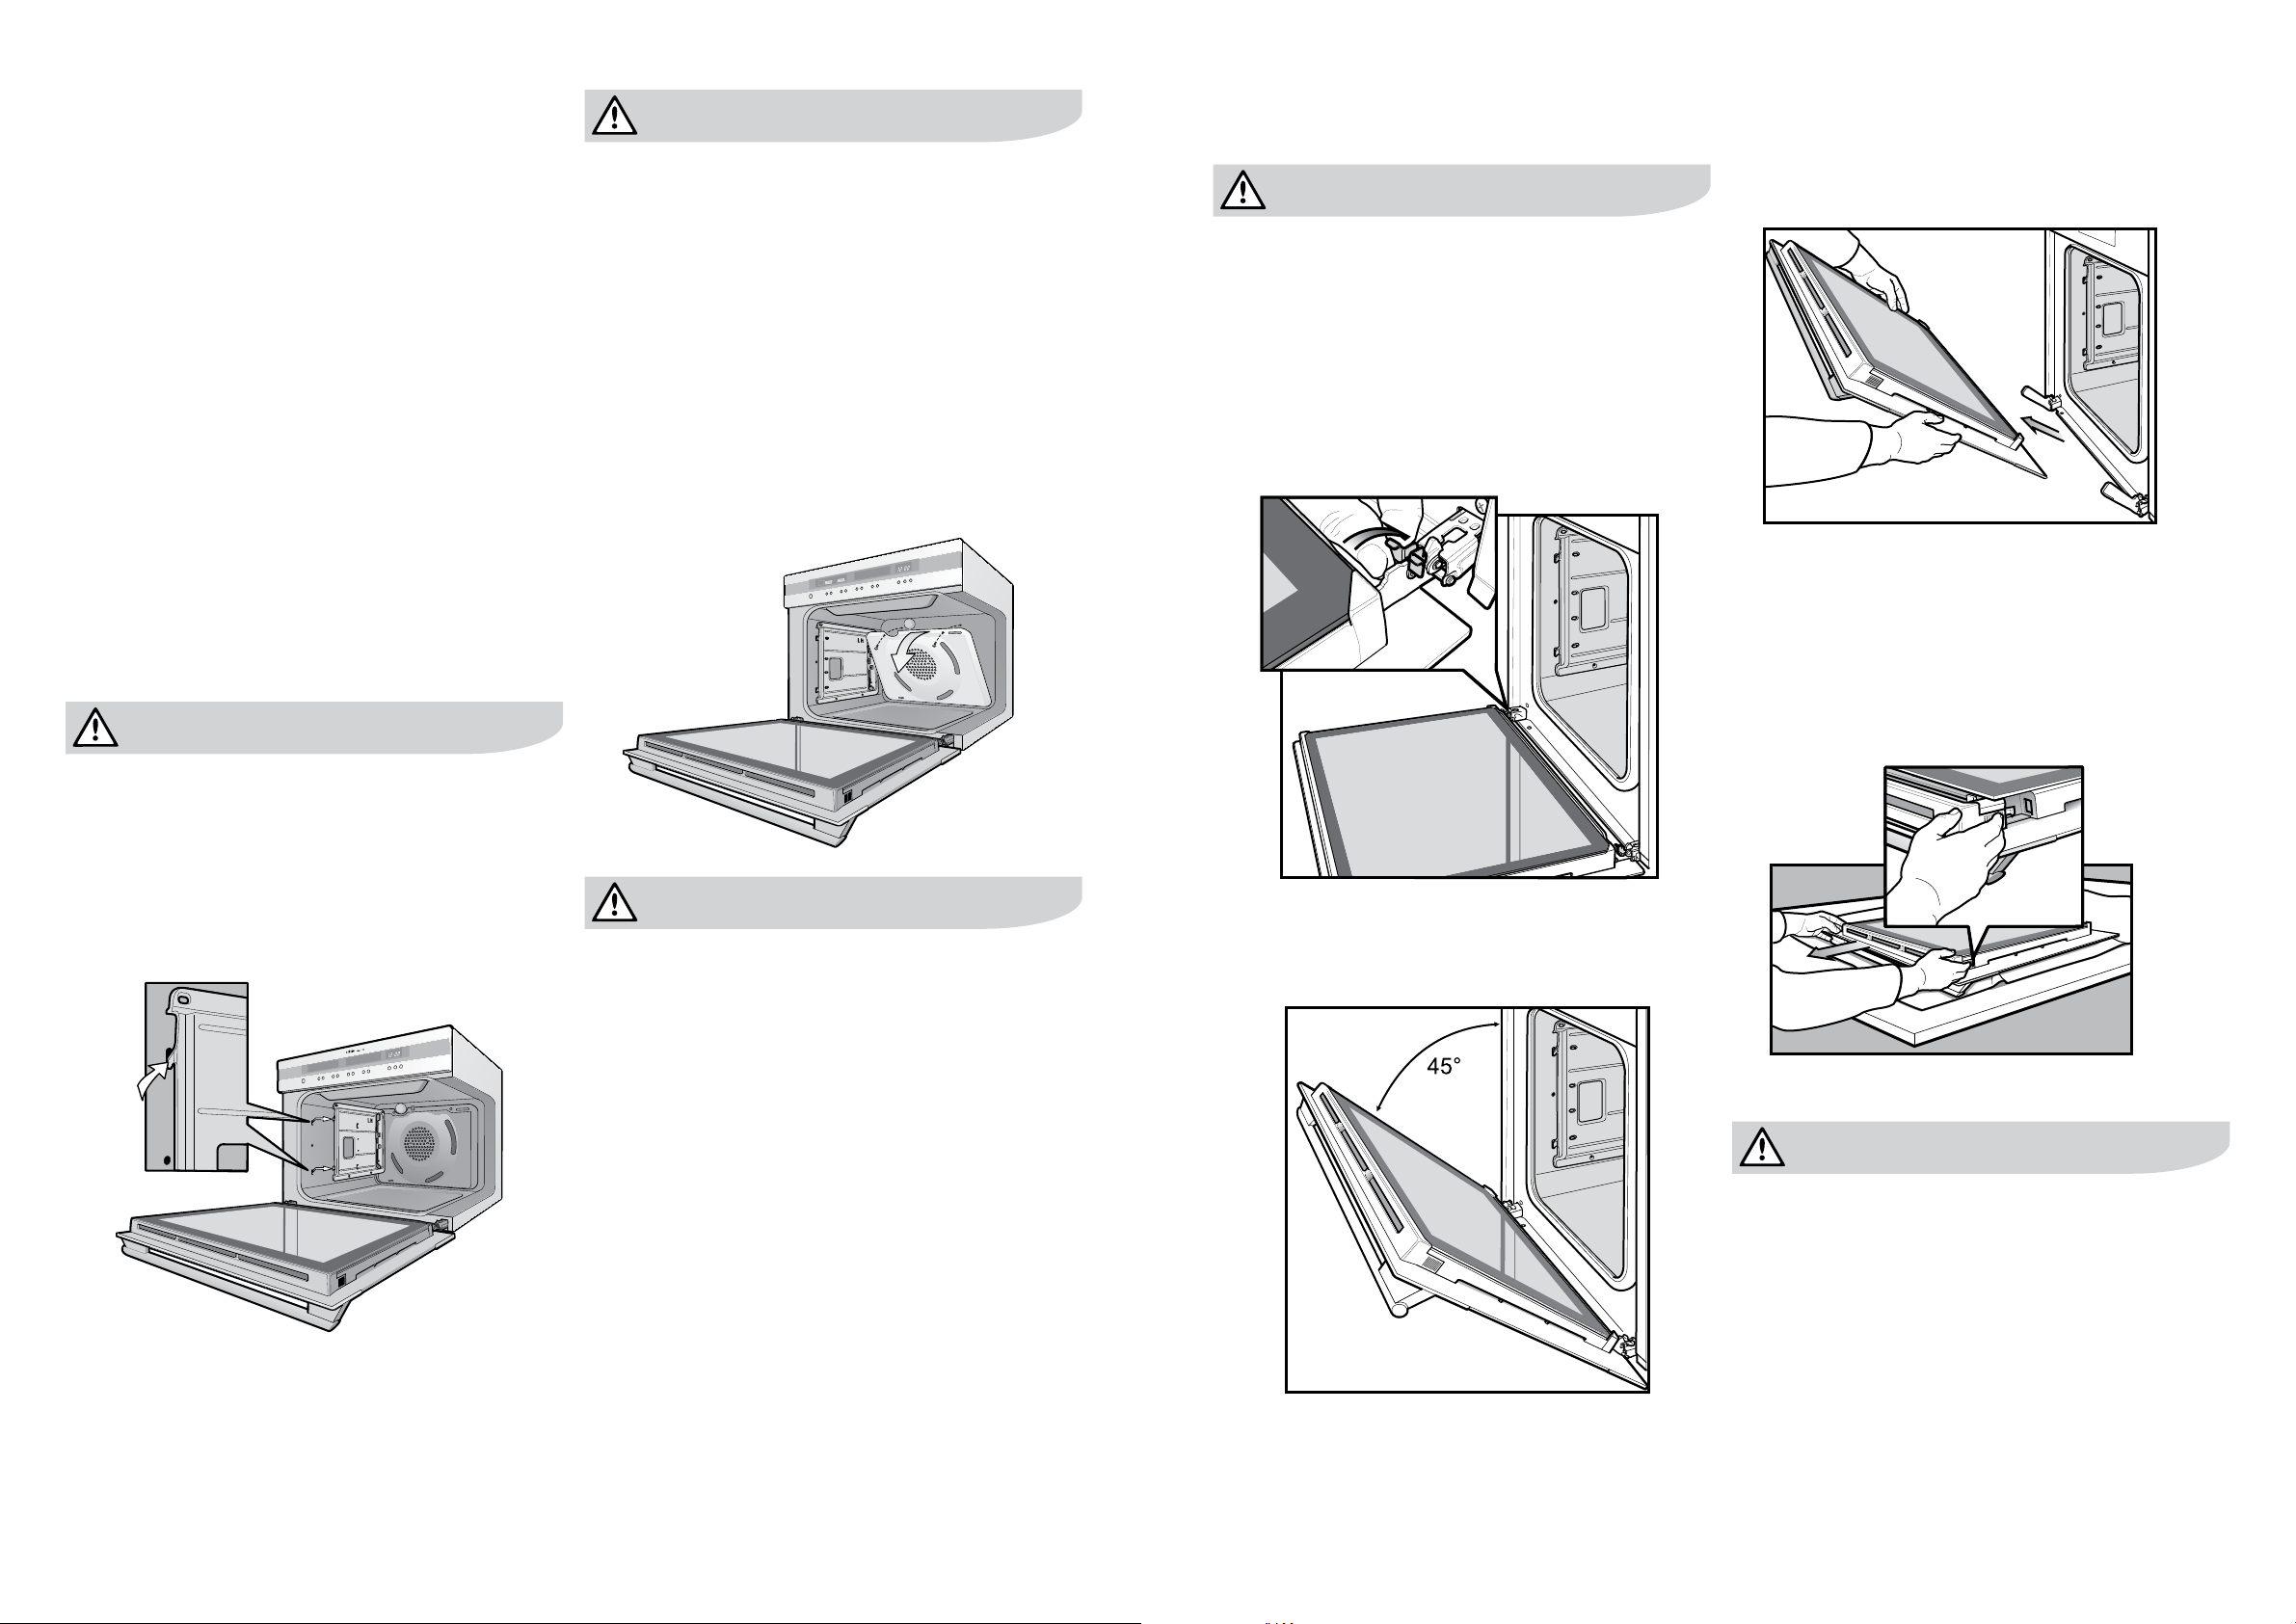
warning
warning
Do not lift the door by the handle. Rough handling will
cause glass to break.
Removingtheovendoor(exceptEPEE63CS&
EPEE63CKmodels)
Your oven is equipped with a door that can be
disassembled in order to clean all the panes of glass.
Remove the door before cleaning.
towards the oven.
O
).
and remove it from the oven by pulling it towards you.
kitchen table) to prevent scratches.
Removingovendoortoptrim
trim at each end and press inwards to release the clips.
Remove the door trim by pulling it towards you.
Removingdoorglasspanels
warning
Rough handling, especially around the edges can cause
the glass to break.
Oven door removal & cleaning
(Except for EPEE63CS & EPEE63CK models)
oven door removal & cleaning electrolux e:line ovens 2726 electrolux e:line ovens oven door removal & cleaning
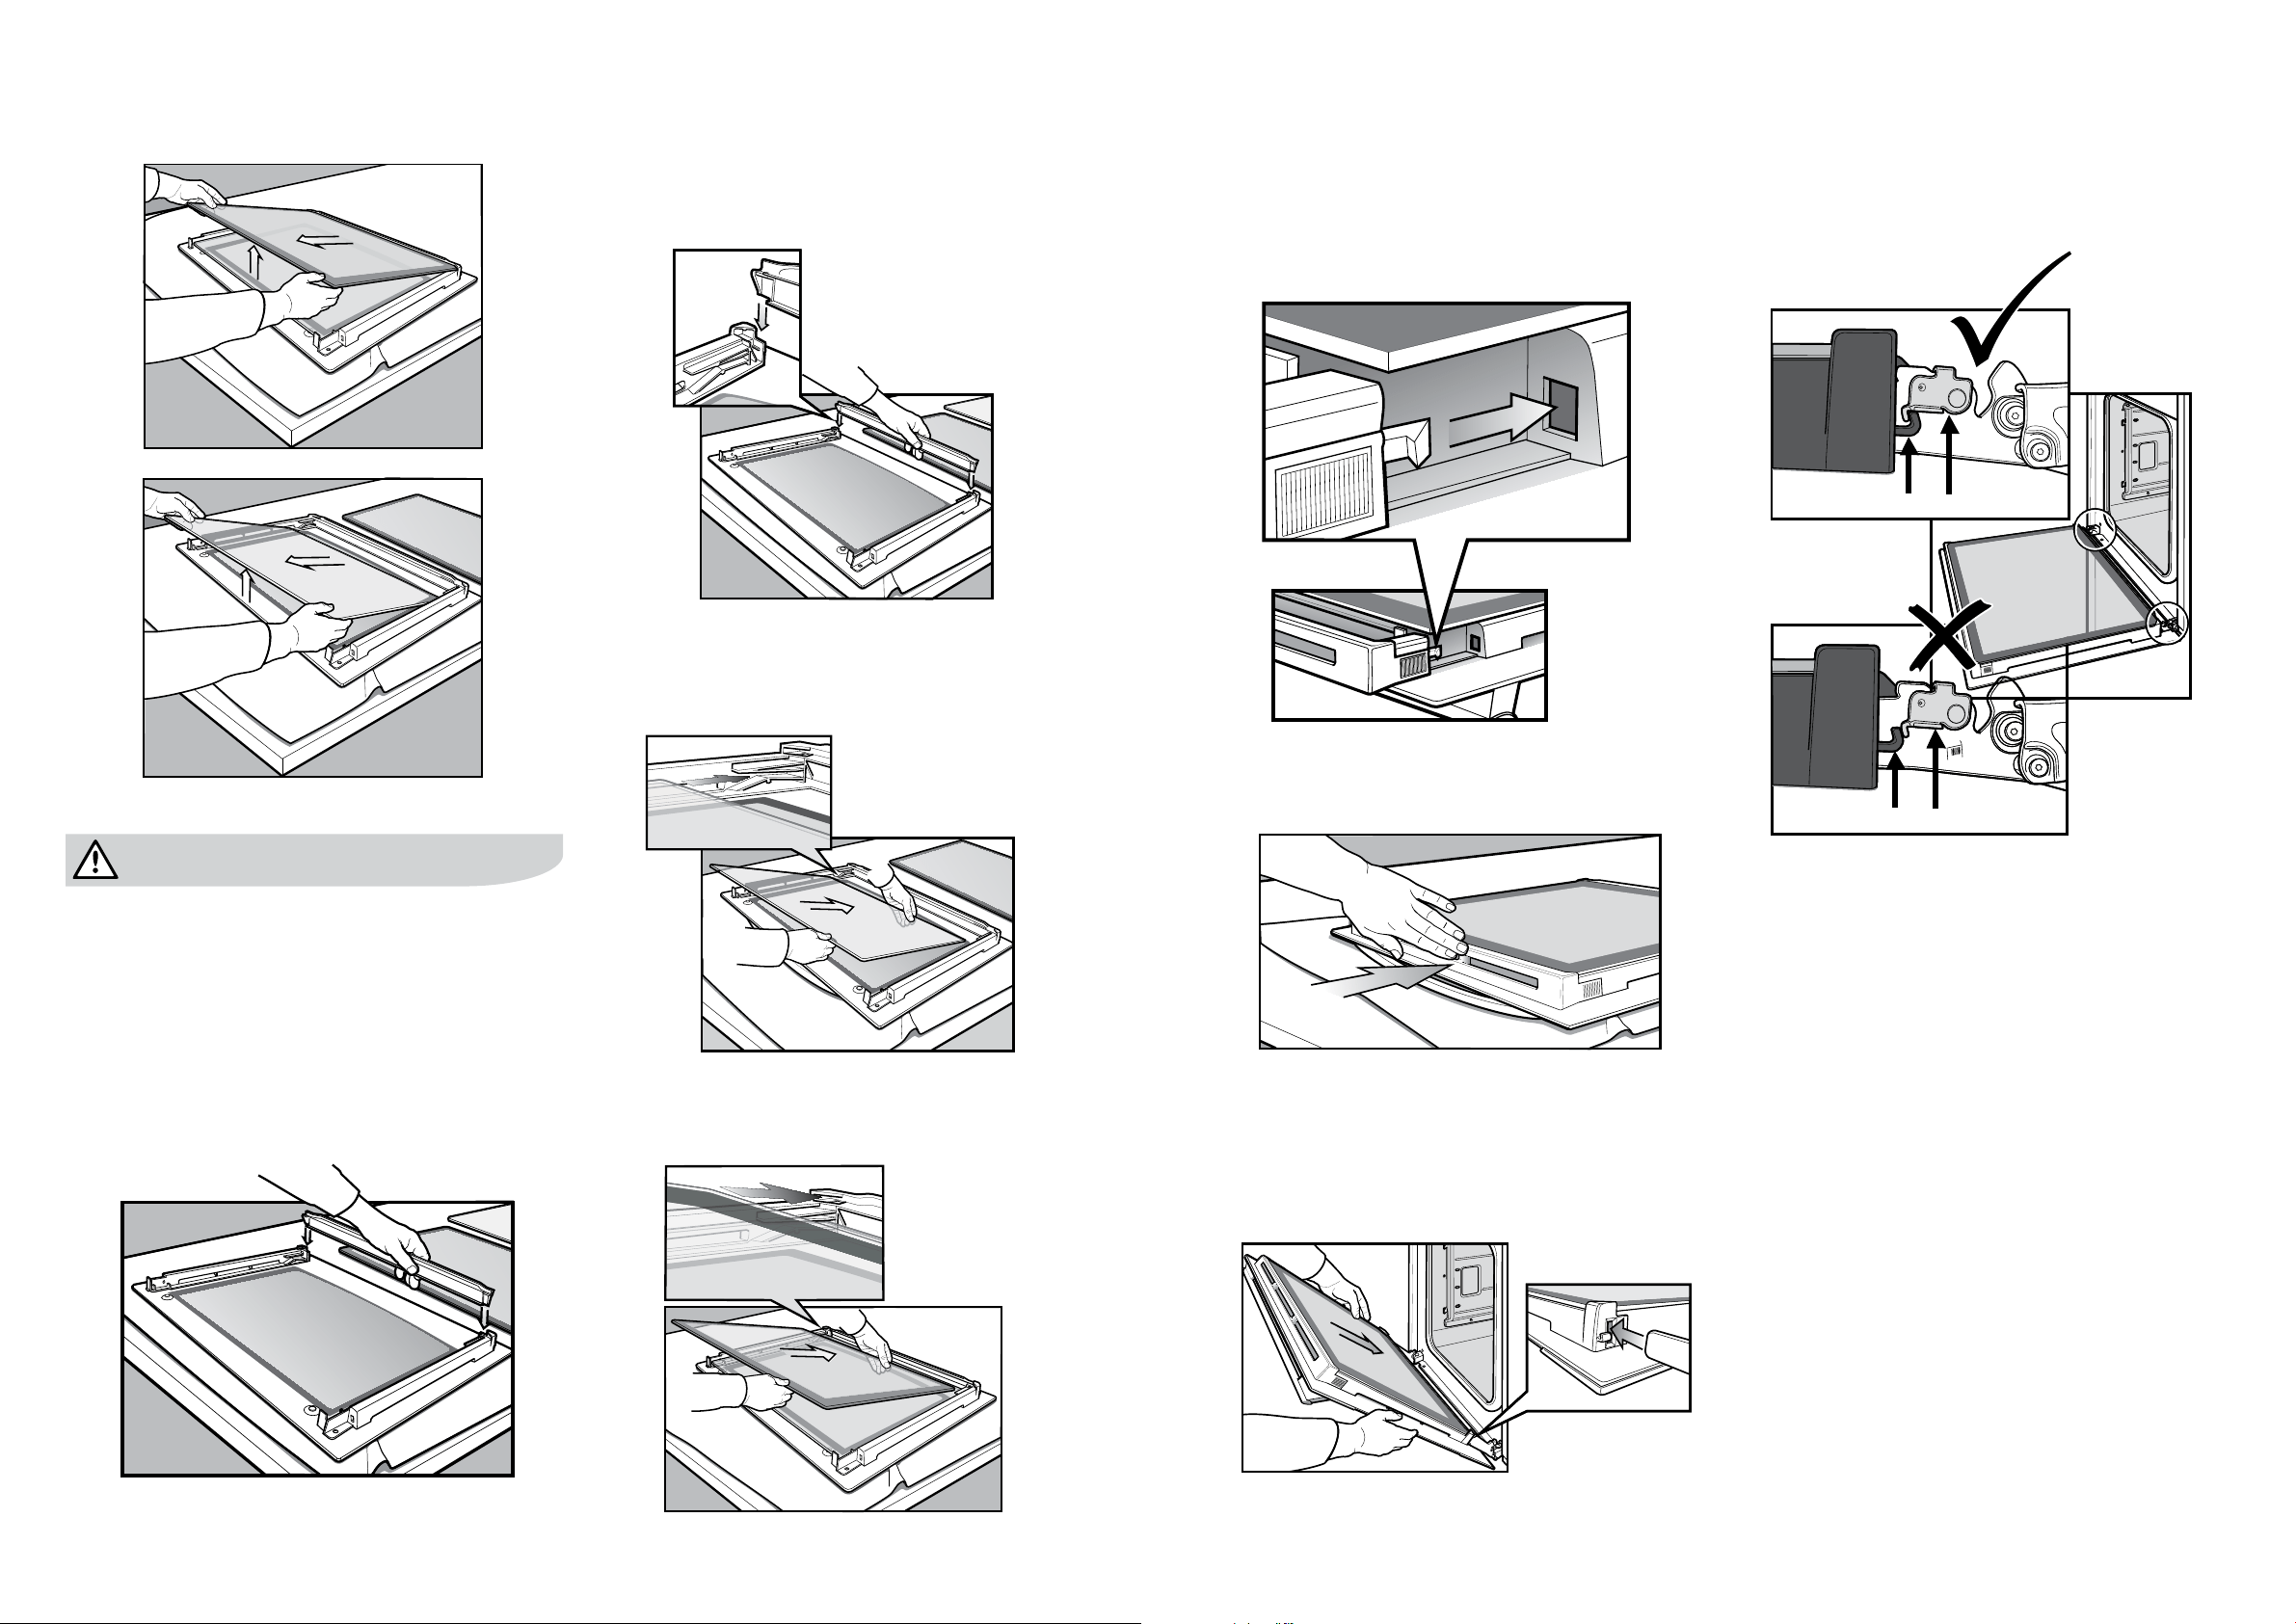
Cleaning door glass panels
warning
of the oven
polish with a soft cloth and ensure the glass is dry
before reassembly.
Bottomtrim(onselectedmodels)
snapping out and lifting away from the glass.
Re-assemblingbottomtrim
door columns.
Re-assemblingdoorglasspanels
painted surface is facing to the downside.
Re-assemblingtopdoortrim
it to the inside edge of the glass.
until the clip snaps in on each side of the trim.
Fittingtheovendoor
recesses at the bottom of the door onto the hinge arms
of the oven. Let the door slide down the hinge arms as
far as it will go.
into the hook. The oven door may now be closed.
Hook Stirrup
Hook
Stirrup
cleaning the pyrolytic oven door (EPEE63CS & EPEE63CK models only) electrolux e:line ovens 2928 pyrolytic cleaning of the oven cavity (EPEE63CS & EPEE63CK models only) electrolux e:line ovens
Operation
by burning off the spatters and accumulated dirt and
grease from the oven liner, at high temperature. This
process produces ash which can then be wiped out
of the oven cavity.
During the pyrolytic cleaning process the oven becomes
door must be kept clear of any obstruction (eg bulky
tea towels).
keep the oven in its best condition.
(eg cookware).
BeforecarryingoutthePyrofunction,
This includes shelves, trays and side racks.
Clean large pieces of dirt or grease from the oven liner.
Note:
Thereare3Pyrocleaningcyclesyoucanuse.
Soiling Duration
Light Clean 2hrs 00min
Medium clean 2hrs 30min
Heavy clean 3hrs 00min
• Lightclean
This is an energy saving cycle that can be used on a
regular basis if your oven is lightly soiled. Possibly after
every 2nd or 3rd time you roast meat.
• Mediumclean
Use this as your regular cycle about once every
• Heavyclean
to clean it thoroughly. This cycle will clean the dirtiest
of ovens.
caution
Selecting the Pyro clean function
Select Pyro clean by using the function button.
PYRO CLEAN
pyro accept
Selectingtherequiredcleaningcycle
Select Light, Medium or Heavy depending on the soiling of
the oven. This is done by pushing the cook time button to
the appropriate time.
PYRO CLEAN
Medium clean
2
pyro accept
Selecting Pyro accept
accept button and the function will then start automatically.
The oven light will then go out and the Pyro function
will start.
PYRO CLEAN
Medium clean
2
pyro accept
tips and information
During Pyro cleaning the door will automatically lock when
symbol will appear on the display.)
The door will only unlock when the oven has cooled to a
safe temperature. Turning the function off will not unlock
the door. This will only happen when safe temperatures
are reached.
Not e:
AfterPyrocleaning
with a soft damp cloth and warm water.
use a damp cloth with vinegar and detergent.
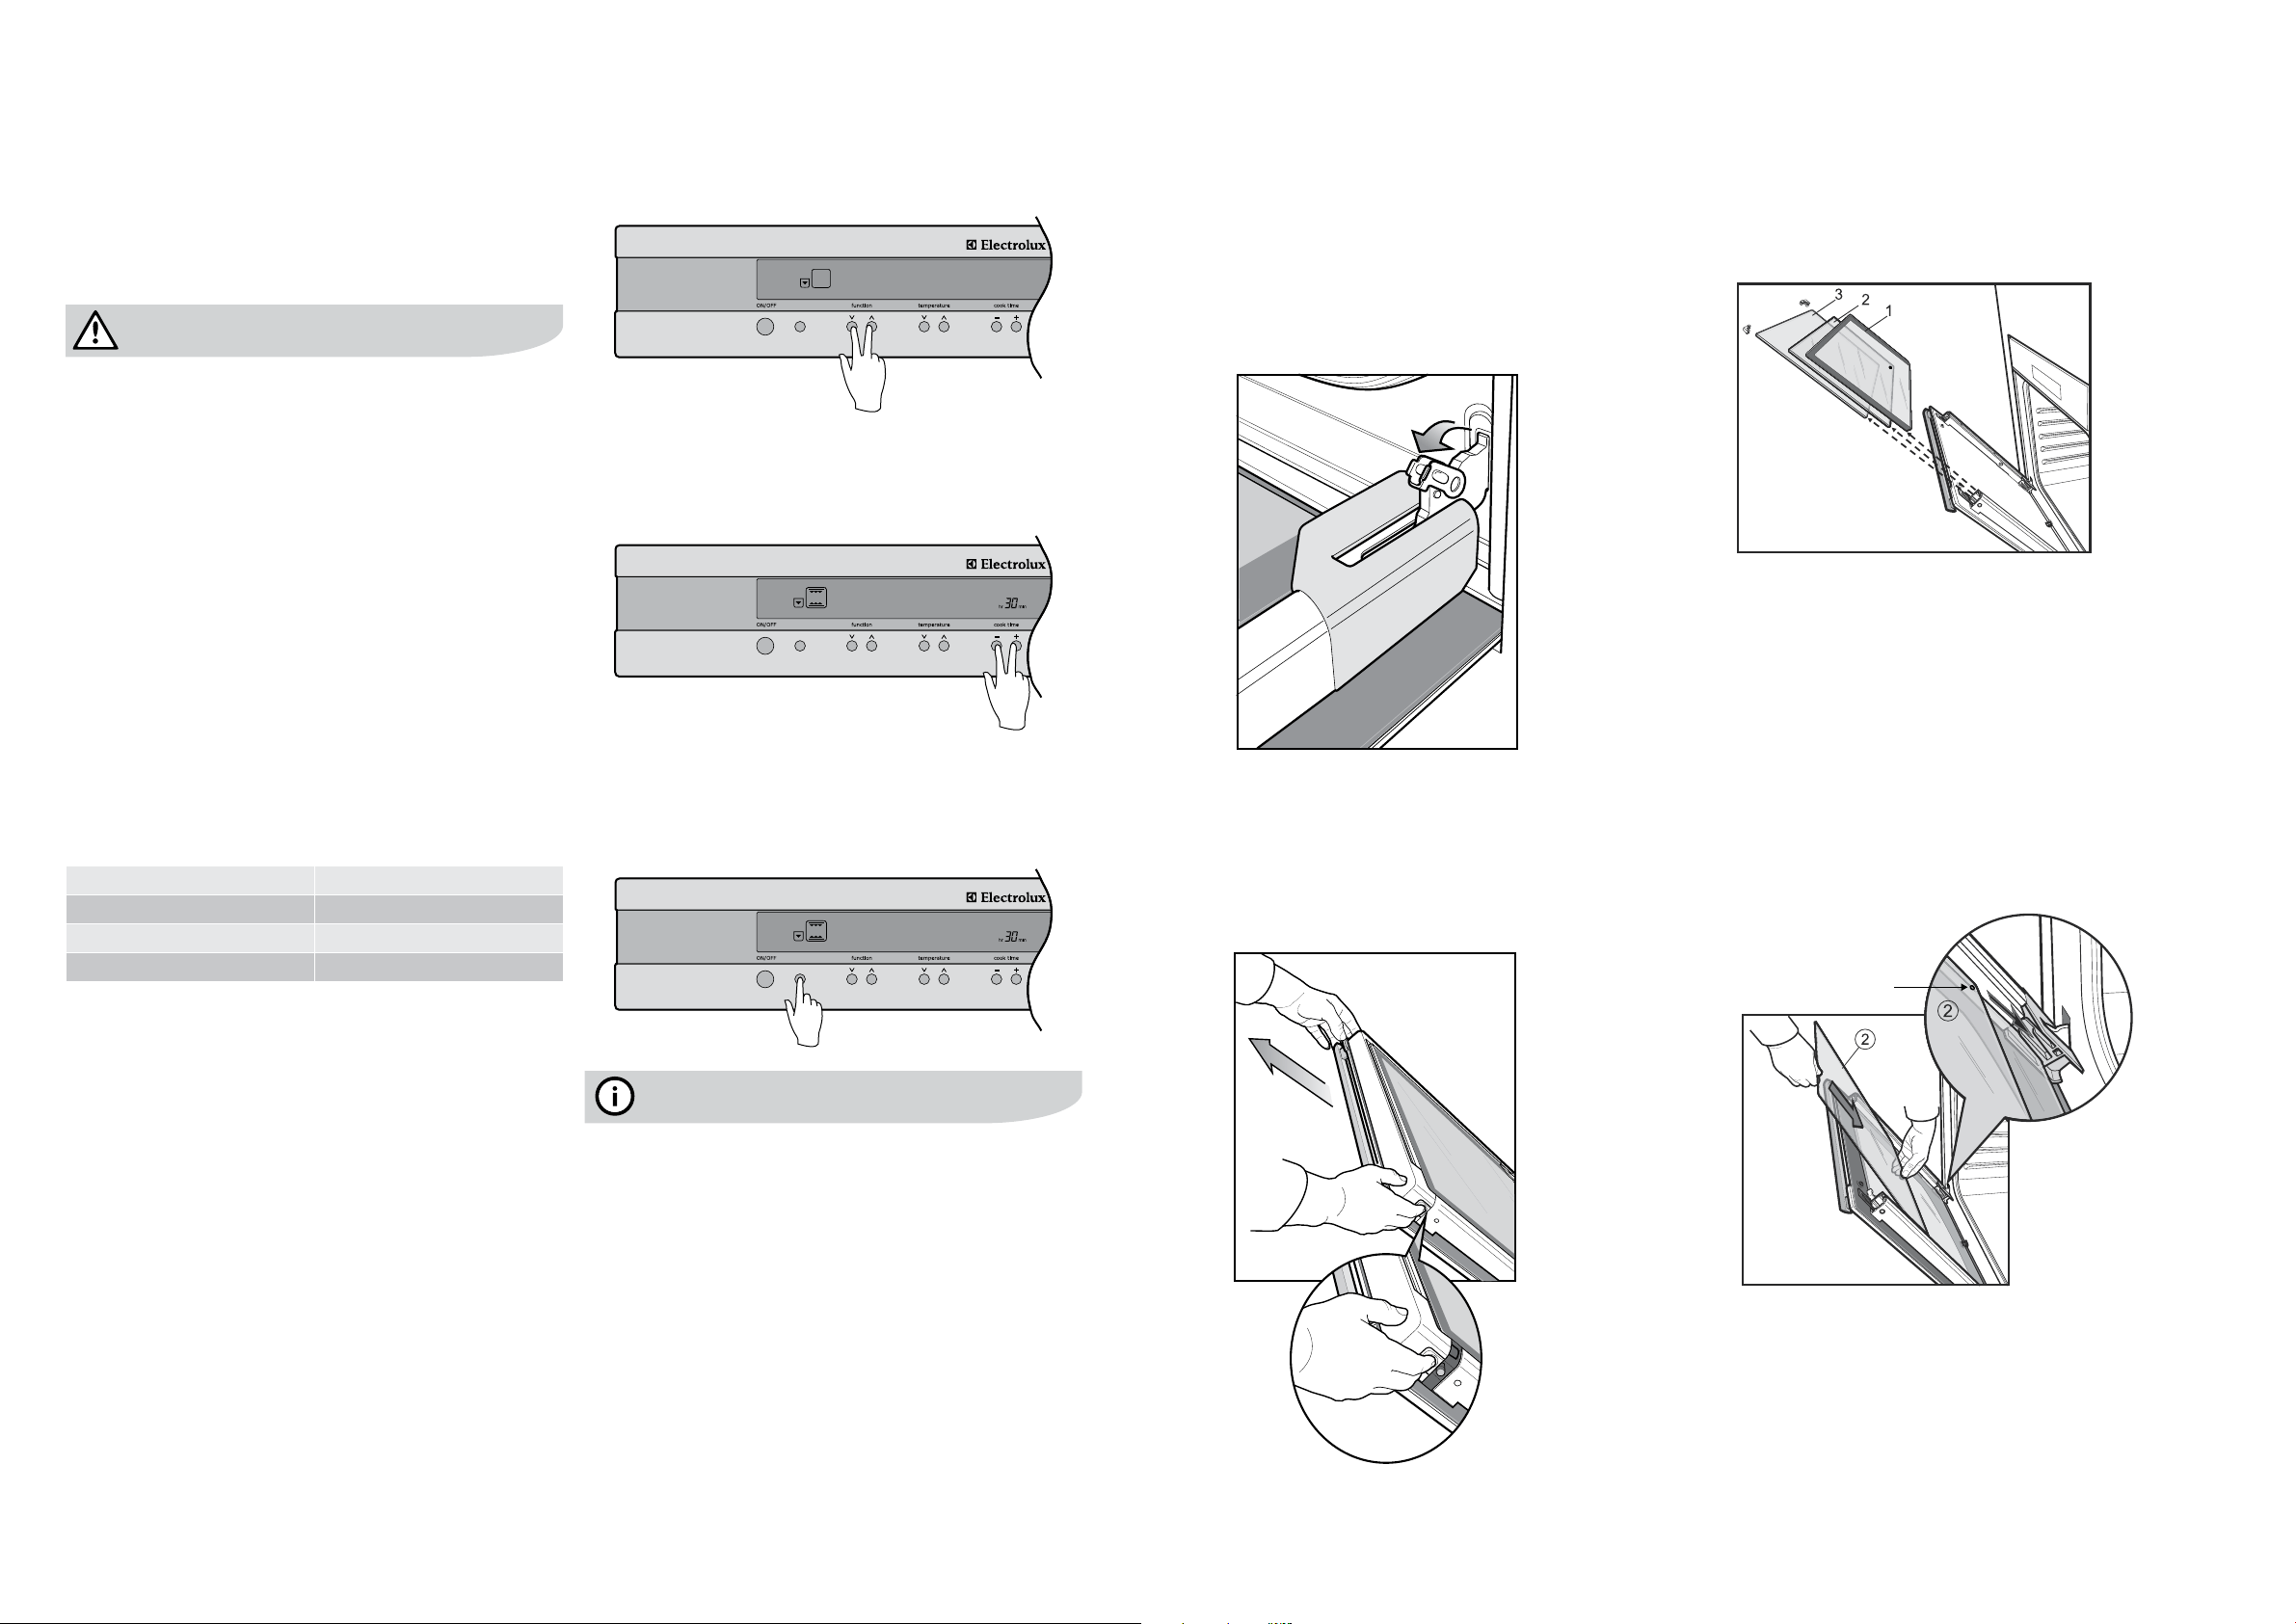
Pyrolytic cleaning of the oven cavity
(EPEE63CS & EPEE63CK models only)
Your pyrolytic oven is equipped with an oven door that can
be disassembled in order to clean all the panes of glass.
Positioning the door for dismantling
The door needs to be positioned at an angle to aid in the
disassembly of the panes.
tab to the open position.
the oven door until it stops on the locating tab. The door
is now ready for dismantling.
Removingthetopdoortrim
Removingtheglasspanes
supports are removed before cleaning.
Donotmisplacethem!
Cleaning the glass panes
Clean with a damp cloth.
Do not use scouring agents or abrasive sponges as these
Dry thoroughly before reassembly.
Replacingtheglasspanes
pane 3.
the 2 rubber supports are in place.
this pane. This coating is indicated by a circle printed on
its surface. Ensure this circle is in the same corner as
pictured below.
Circle in this corner
inwards towards the oven.
Replacingthetopdoortrim
Replace the trim ensuring the clips snap into the 2 location
holes. Flip the hinge locating tab back into its original
position and close the door.
cause overheating and damage to both appliances.
Cleaning the pyrolytic oven door
(EPEE63CS & EPEE63CK models only)
electrolux e:line ovens electrolux e:line ovens troubleshooting 31
Faults
Not e:
problem possible cause
Oven or grill not working Time of day is not set
Power is not turned on
Controls are incorrectly set
Service Centre)
Oven light not working Lamp blown or loose socket
Oven not heating enough Foil trays on bottom of oven
Power failure or interruption
Reset time of day and any cooking functions you were using. (Refer to CLOCK operating instructions)
Protective oils being removed (see page 6)
Condensation build up Reduce the amount of water used in cooking. (Sometimes condensation is normal)
Door cannot be replaced
after removal
Stirrup not engaged properly
Pyrolytic cycle not working page 28
Functions and
temperature
appear
on display but oven
does not work
stops (underbench only)
This is a function of the power board to help reduce the blast of air the customer receives when
opening the door
selected the fan starts
Most oven modes have a fast heat up function that uses the fan, fan element and top (boost)
the function to start, then increasing the temperature to the desired level.
The light stays on when the
door is closed
The oven temperature selector is on
The light does not turn when
the door is opened
The oven must be turned on, or the door switch is not activating due to restricted travel or broken
actuator.
Dataplate
Customer Care Centre
Troubleshooting
warning
IMPORTANT:Donotturnoffthemainspowersupply
totheovenduringthepyrolyticcycle.Apower
failure could cause a temperature increase of the
surround or cabinet.
UsingtheOven
Donot
using the door handle, until it is fully open.
Donot lean on an open oven door, or place heavy
items on it. This could damage the appliance. Take care
in the region of the hinges.
Condensation and Steam
Hot steam may be produced when using some cooking
modes. Take care when opening the oven door and always
use oven mitts or pot holders to handle hot cooking utensils.
This oven is supplied with an exclusive system which
produces a natural circulation of air and the constant
recycling of steam.
This steam makes it possible to cook in a steamy
environment and keep the dishes soft inside and
crusty outside. Moreover, the cooking time and energy
consumption are reduced to a minimum. During cooking
steam may be produced which can be released when
opening the oven door. This is absolutely normal.
Alwaysstandbackfromtheovenwhenopeningthe
ovendoorduringcookingorattheendofittoallow
anybuildupofsteamorheattobereleased.
with the oven door glass, it will condense and produce
water droplets. To reduce condensation, ensure the oven
is well heated before placing food in the oven cavity.
Oven preheating will be necessary before any cooking.
after each use of the oven.
tips and information
Donotplacecookwaredirectlyontheovenbase.
any part of the oven with aluminium foil while cooking, as
baking results and damage the oven enamel.
Theeffectsofdishesoncookingresults
Dishes and tins vary in their thickness, conductivity, colour
etc. which affects the way they transmit heat to the food
inside them.
shiny utensils reduce cooking and base browning.
heavy utensils increase cooking and base browning.
The middle shelf position allows for the best heat distribution.
To increase base browning simply lower the shelf position.
To increase top browning, raise the shelf position.
even browning.
Donot place dishes, tins or baking trays directly on the
oven base as it becomes very hot and damage will occur.
Single level cooking gives best results in conventional
fan cooking function.
installation electrolux e:line ovens 3332 electrolux e:line ovens installation
warning
Please follow the points below when installing the appliance
Useanauthorisedperson
other relevant statutory regulations:
local authority.
plate is positioned behind the bottom of the oven door.
The circuit diagram is positioned on the top panel of
the appliance.
disconnect functional switch should be provided near
warning
Thisappliancemustbeproperlyearthed.
measurements. (See diagrams)
your oven into the cupboard by fastening through the
2 holes to the front panel.
may result in deterioration of the low temperature
coating by discolouring or bubbling.
wrapped surfaces, use an installation kit available from
for damage caused by installation into low temperature
tolerant cabinets.
operates correctly before handing it over to the
customer.
warning
To avoid any potential hazard, you must follow our
instructionswhenyouinstallyourappliance.Failure
to install the appliance correctly could invalidate any
warrantyorliabilityclaimsandleadtoprosecution.
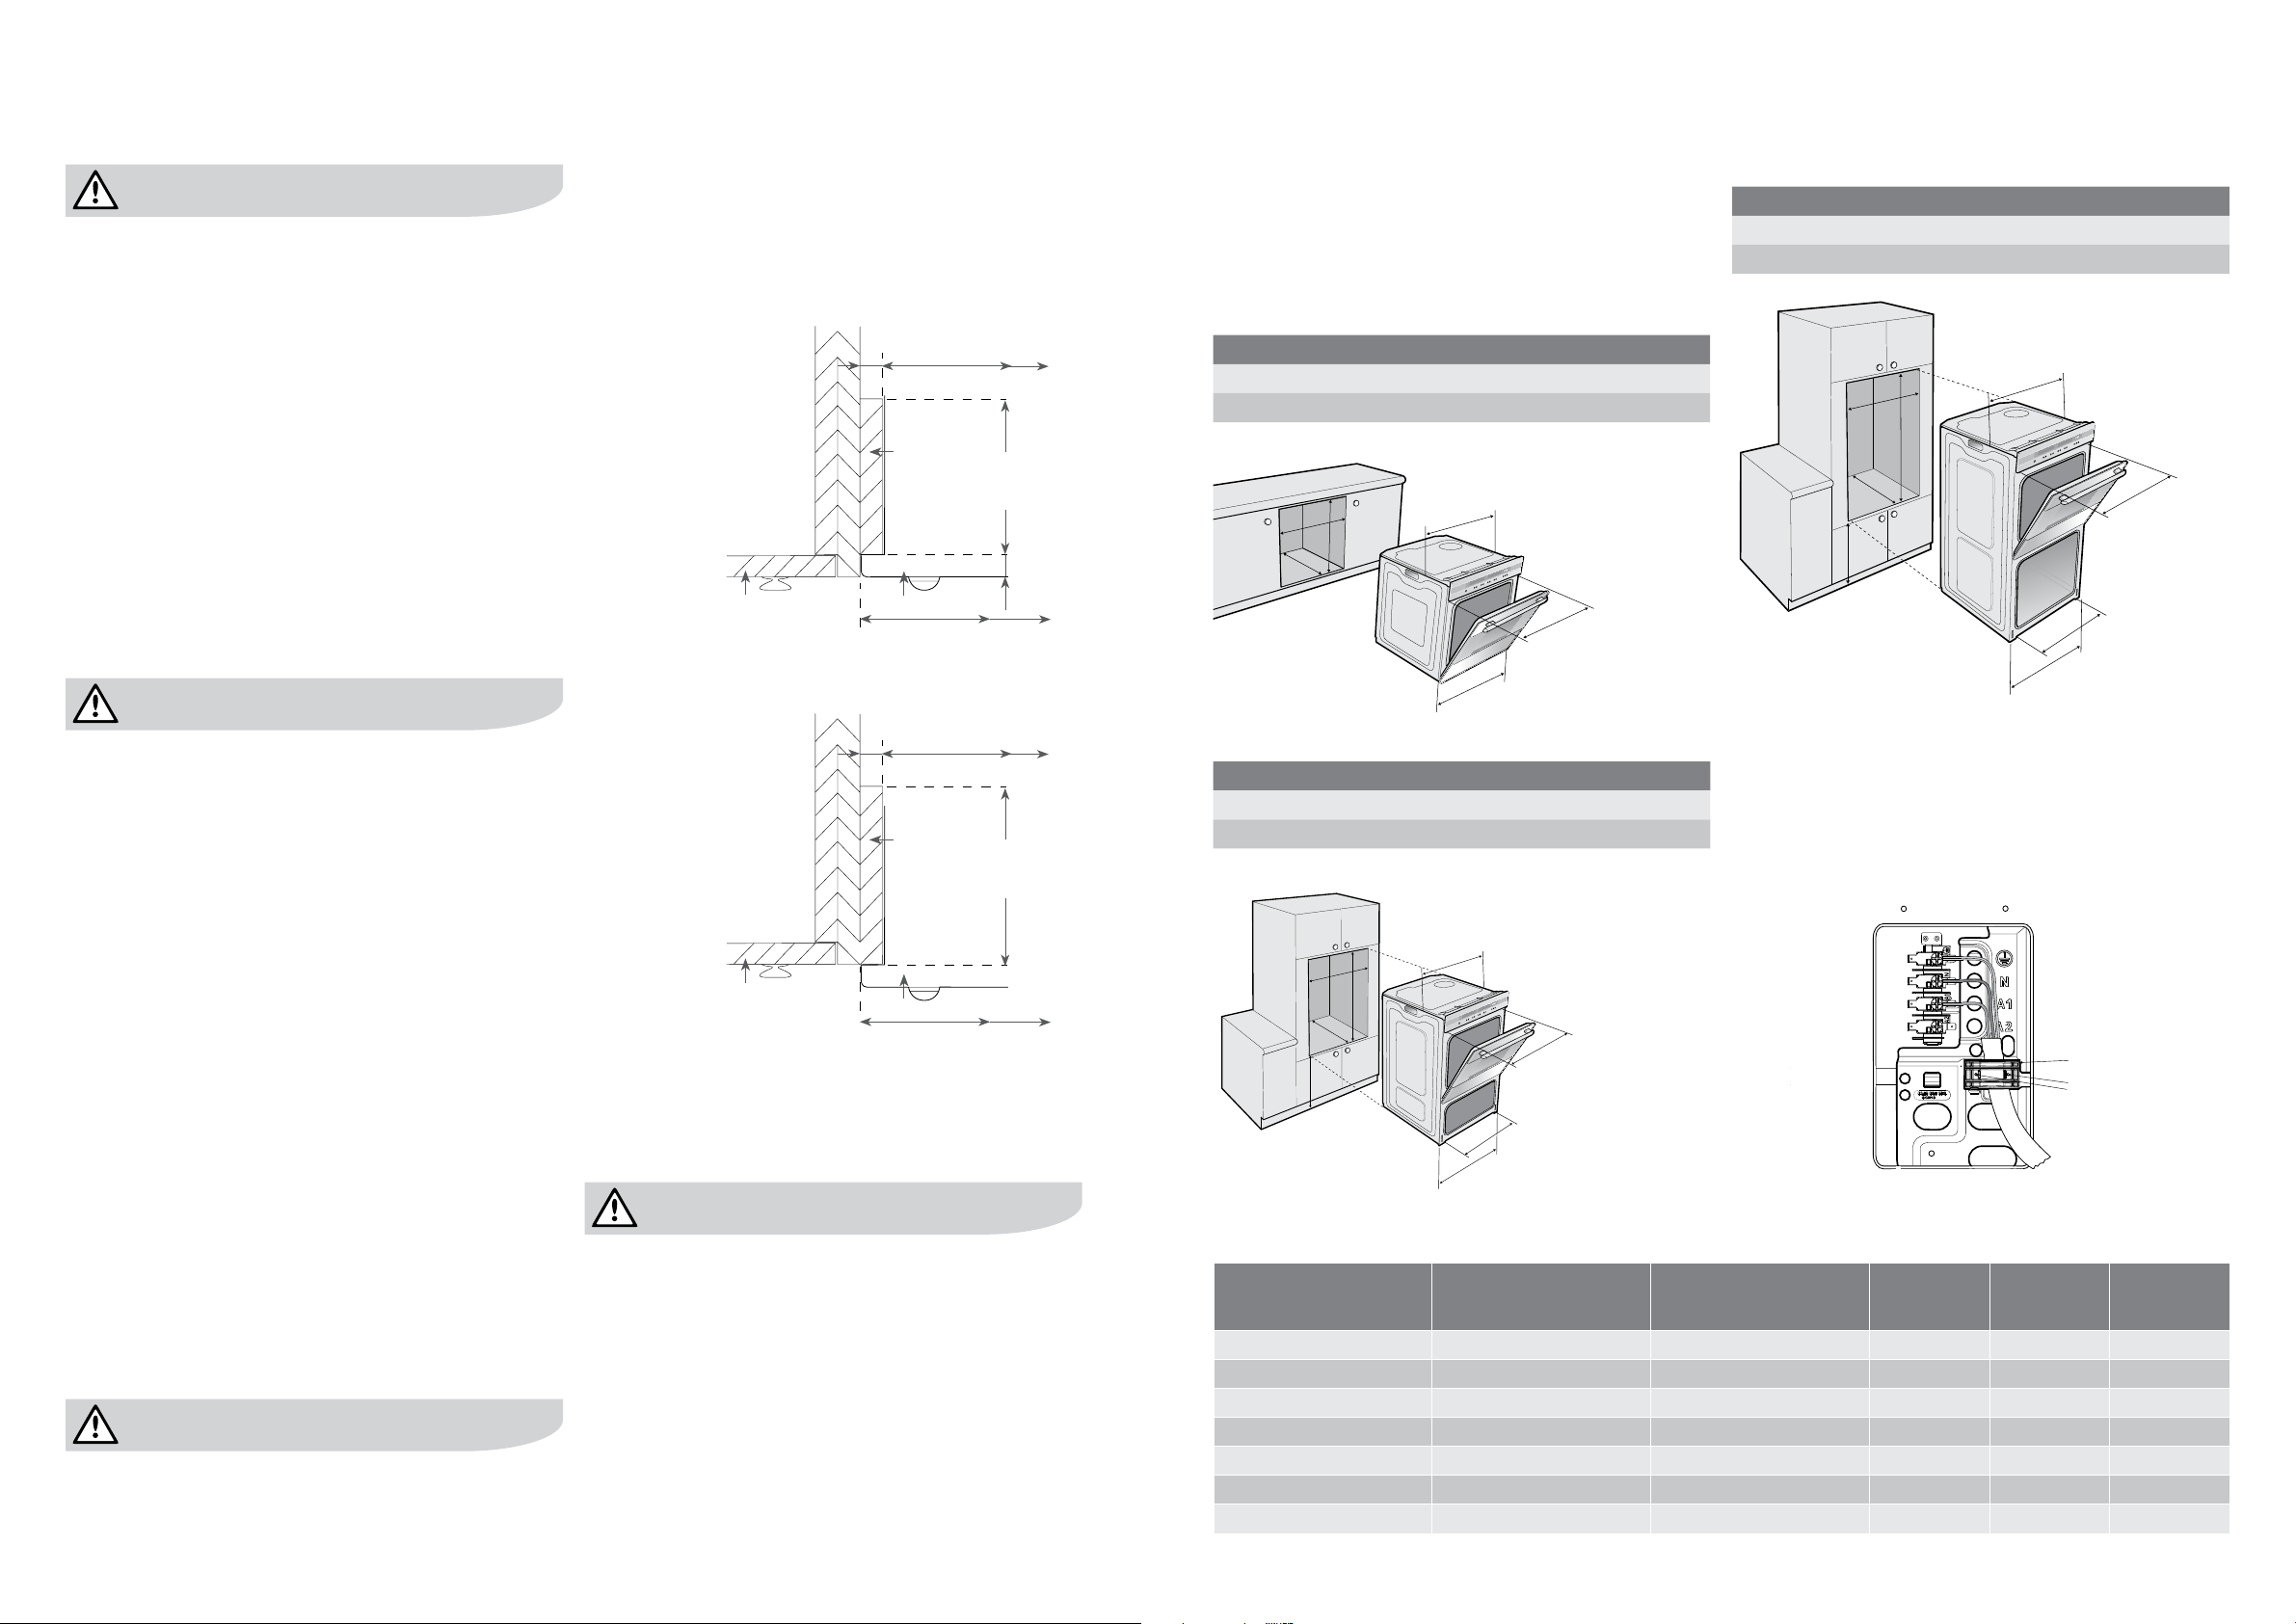
Cabinet construction for your appliance
For the best integration within a kitchen, install this appliance
FlushFit
16mm
600mm
20mm
panel
Cupboard
door
Oven
100mm
max for
Pyro oven
ProudFit
16mm
600mm
panel
Cupboard
door
Oven
100mm
max for
Pyro oven
Note:
warning
IMPORTANT:TheinllpanelMUSTnotexceed
100mminlengthtoensurea16mmgapis
maintained
Underbenchoven
Your underbench oven looks best when the control panel
be added if the cooktop placed above the benchtop is too
deep. Refer to cooktop installation instructions for required
clearance between cooktop and oven.
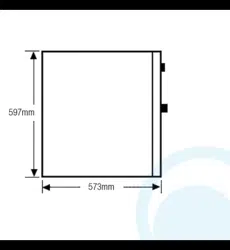
Cut-out dimensions
type of fit A(width) B(height) C(depth)
600 600
A
C
B
561mm
mounting holes
583mm
596mm
DuoovenCut-outdimensions
type of fit A(width) B(height) C(depth)
600 893
DoubleovenCut-outdimensions
type of fit A(width) B(height) C(depth)
600 1086
1078
min. 650mm
561mm
mounting
holes
A
B
C
mounting holes
596mm
456mm
model product dimensions
(hxwxd)mm
electrical connection min.fuse
rating
max.power
rating
max.
current
rating
EOEM61CS
EOEE62CS
EOEE62CK
EOEE63CS
EUEE63CS, EUEE63CK
EDEE63CS
EPEE63CS, EPEE63CK
min. 650mm
A
561mm
mounting
holes
mounting holes
596mm
456mm
B
C
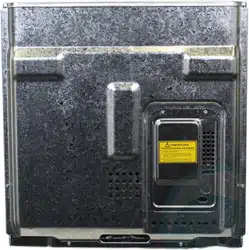
Hard wiring details
1. Remove terminal cover plate from rear panel of appliance.
2. Fit wires through hole in cover plate and make
connections to terminals.
3. Engage wires into plastic clip. Secure plastic clip with
two long silver screws (supplied in separate bag).
4. Replace cover plate onto rear panel.
Note:
Plastic clips
Plastic clip
securing points
electrolux e:line ovens
error code description comment fix
F01 or 01 Door lock sensor alarm This relates to a door lock
failure which is only associated
with the Pyro product
replace door lock
F02 or 02 Door lock actuator alarm
F04 or 04
range alarm
This relates to the temperature
sensing probe which may be
short circuit connections
Replace probe
temperature alarm
alarm
This relates to the temperature
Cooling fan not working
or replace powerboard
26
6
F08 or 08 Communication alarm This relates to an error in
communication between
controller. This can occur if
while the powerboard is
energised
Reset power. (Minimum of
20 sec.) or check or replace
data cable
F09 or 09 Software compatibility code
alarm
This relates to a mismatch
powerboard
Replace Powerboard
C1 Only applies to Pyro product Remove both side racks and
C3 Door open Only applies to Pyro product Close door and restart pyro
cycle
F03 or 03 EEPROM check sum alarm Relates to the controller Replace Controller
F14 or 14 EEPROM compatibility code
alarm
Relates to the controller Replace Controller
TestMode
^
door lock test (Pyro only) individual element and light, cooking fan, cooling fan and temperature probe etc. functions.
This document sets out the terms and conditions of the product
warranties for Electrolux Appliances. It is an important document.
Please keep it with your proof of purchase documents in a safe place
for future reference should you require service for your Appliance.
1. Inthiswarranty
(a) ‘acceptablequality’asreferredtoinclause10ofthiswarrantyhas
thesamemeaningreferredtointheACL;
(b) ‘ACL’meansTradePracticesAmendment(AustralianConsumer
Law)Act(No.2)2010;
(c) ‘Appliance’meansanyElectroluxproductpurchasedbyyou
accompaniedbythisdocument;
(d) ‘ASC’meansElectrolux’authorisedservicedcentres;
(e) ‘Electrolux’meansElectroluxHomeProductsPtyLtdof163
O’RiordanStreet,Mascot,NSW2020,ABN51004762341in
respectofAppliancespurchasedinAustraliaandElectrolux(NZ)
Limitedof3-5NiallBurgessRoad,MountWellington,inrespect
ofAppliancespurchasedinNewZealand;
(f) ‘majorfailure’asreferredtoinclause10ofthiswarrantyhasthe
samemeaningreferredtointheACLandincludesasituationwhen
anAppliancecannotberepairedoritisuneconomicforElectrolux,at
itsdiscretion,torepairanApplianceduringtheWarrantyPeriod;
(g) ‘WarrantyPeriod’means:
(i) wheretheApplianceisusedforpersonal,domesticorhousehold
use(i.e.normalsinglefamilyuse)assetoutintheinstruction
manual,theApplianceiswarrantedagainstmanufacturing
defectsinAustraliafor24monthsandinNewZealandfor24
months,followingthedateoforiginal
purchaseoftheAppliance;
(ii) wheretheApplianceisusedforcommercialpurposes(including
beingusedtodirectlyassistabusinessorwheretheApplianceis
usedinamulti-familycommunalorsharetypeenvironment),the
Appliancewillthenbewarrantedagainstmanufacturingdefects
inAustraliafor3monthsandinNewZealandfor3months,
followingthedateoforiginalpurchaseoftheAppliance.
(h) ‘you’meansthepurchaseroftheAppliancenothavingpurchased
theApplianceforre-sale,and‘your’hasacorrespondingmeaning.
2. ThiswarrantyonlyappliestoAppliancespurchasedandusedinAustralia
orNewZealandandisinadditionto(anddoesnotexclude,restrict,or
modifyinanyway)anynon-excludablestatutorywarrantiesinAustralia
orNewZealand.
3. DuringtheWarrantyPeriodElectroluxoritsASCwill,atnoextracharge
ifyourApplianceisreadilyaccessibleforservice,withoutspecial
equipmentandsubjecttothesetermsandconditions,repairorreplace
anypartswhichitconsiderstobedefective.ElectroluxoritsASCmay
useremanufacturedpartstorepairyourAppliance.Youagreethat
anyreplacedAppliancesorpartsbecomethepropertyofElectrolux.
Thiswarrantydoesnotapplytolightglobes,batteries,
ltersorsimilar
perishableparts.
4. PartsandAppliancesnotsuppliedbyElectroluxarenotcoveredby
thiswarranty.
5. Youwillbearthecostoftransportation,travelanddeliveryofthe
AppliancetoandfromElectroluxoritsASC.Ifyouresideoutsideofthe
servicearea,youwillbearthecostof:
(a) travelofanauthorisedrepresentative;
(b) transportationanddeliveryoftheAppliancetoandfrom Electroluxor
itsASC,
Inallinstances,unlesstheApplianceistransportedbyElectroluxoran
Electroluxauthorisedrepresentative,theApplianceistransportedatthe
owner’scostandriskwhileintransittoandfromElectroluxoritsASC.
6. Proofofpurchaseisrequiredbeforeyoucanmakeaclaimunder
thiswarranty.
7. Youmaynotmakeaclaimunderthiswarrantyunlessthedefectclaimed
isduetofaultyordefectivepartsorworkmanship.Electroluxisnotliable
inthefollowingsituations(whicharenotexhaustive):
(a) theApplianceisdamagedby:
(i) accident
(ii) misuseorabuse,includingfailuretoproperlymaintainorservice
(iii) normalwearandtear
(iv) powersurges,electricalstormdamageorincorrectpowersupply
(v) incompleteorimproperinstallation
(vi) incorrect,improperorinappropriateoperation
(vii)insectorvermininfestation
(viii)failuretocomplywithanyadditionalinstructions
suppliedwith
theAppliance;
(b) theApplianceismodiedwithoutauthorityfromElectroluxinwriting;
(c) theAppliance’sserialnumberorwarrantysealhasbeenremoved
ordefaced;
(d) theAppliancewasservicedorrepairedbyanyoneotherthan
Electrolux,anauthorisedrepairerorASC.
8. Thiswarranty,thecontracttowhichitrelatesandtherelationship
betweenyouandElectroluxaregovernedbythelawapplicablewhere
theAppliancewaspurchased.WheretheAppliancewaspurchasedin
NewZealandforbusinesspurposestheConsumerGuaranteeActdoes
notapply.
9. To theextentpermittedbylaw,Electroluxexcludesallwarrantiesand
liabilities(otherthanascontainedinthisdocument)includingliabilityfor
anylossordamagewhetherdirectorindirectarisingfromyourpurchase,
useornonuseoftheAppliance.
10.ForAppliancesandservicesprovidedbyElectroluxinAustralia,
theAppliancescomewithaguaranteebyElectroluxthatcannotbe
excludedundertheAustralianConsumerLaw.Youareentitledtoa
replacementorrefundforamajorfailureandforcompensationforany
otherreasonablyforeseeablelossordamage.Youarealsoentitledto
havetheAppliancerepairedorreplacediftheAppliancefailstobeof
acceptablequalityandthe
failuredoesnotamounttoamajorfailure.
Thebenetstoyougivenbythiswarrantyareinadditiontoyourother
rightsandremediesunderalawinrelationtotheAppliancesorservices
towhichthewarrantyrelates.
11.AtalltimesduringtheWarrantyPeriod,Electroluxshall,atitsdiscretion,
determinewhetherrepair,replacementorrefundwillapplyifan
Appliancehasavalidwarrantyclaimapplicabletoit.
12.ForAppliancesandservicesprovidedbyElectroluxinNewZealand,
theAppliancescomewithaguaranteebyElectroluxpursuanttothe
provisionsoftheConsumerGuaranteesAct,theSaleofGoodsActand
theFairTradingAct.
13.Toenquireaboutclaimingunderthiswarranty,pleasefollowthesesteps:
(a) carefullychecktheoperatinginstructions,usermanualandtheterms
ofthiswarranty;
(b) havethemodelandserialnumberoftheApplianceavailable;
(c) havetheproofofpurchase(eganinvoice)available;
(d) telephonethenumbersshownbelow.
14.Youacceptthatifyoumakeawarrantyclaim,ElectroluxanditsASC
mayexchangeinformationinrelationtoyoutoenableElectroluxtomeet
itsobligationsunderthiswarranty.
Warranty
FORSALESINAUSTRALIAANDNEWZEALAND
APPLIANCE:BUILT-INOVEN,COOKTOP
ANDFREESTANDINGCOOKER
Important Notice
Beforecallingforservice,pleaseensurethatthestepslistedinpoint13abovehavebeenfollowed.
FOR SERVICE
ortondtheaddressofyournearest
stateservicecentreinAustralia
PLEASE CALL 13 13 49
Forthecostofalocalcall(Australiaonly)
SERVICE AUSTRALIA
ELECTROLUXHOMEPRODUCTS
www.electrolux.com.au
FOR SPARE PARTS
ortondtheaddressofyournearest
statesparepartscentreinAustralia
PLEASE CALL 13 13 50
Forthecostofalocalcall(Australiaonly)
FOR SERVICE
ortondtheaddressofyournearest
authorisedservicecentreinNewZealand
FREE CALL 0800 10 66 10
(NewZealandonly)
SERVICE NEW ZEALAND
ELECTROLUXHOMEPRODUCTS
www.electrolux.co.nz
FOR SPARE PARTS
ortondtheaddressofyournearest
statesparepartscentreinNewZealand
FREE CALL 0800 10 66 20
(NewZealandonly)
GOV_Warr_Apr11
ElectroluxHomeProductsAustralia
telephone: 1300 363 640
email: customercare@electrolux.com.au
web: www.electrolux.com.au
P/No.0342001570ECN11A086E
© 2011 Electrolux Home Products Pty Ltd
TheThoughtfulDesignInnovator.
Do you remember the last time you opened a gift that made you say,
feeling that we at Electrolux seek to evoke in everyone who chooses or uses
to anticipating and creating the kind of appliances that our customers really
need and want.
perform, freeing our customers to experience the ultimate 21st century
luxury: ease of mind. Our aim is to make this ease of mind more available to
more people in more parts of their everyday lives, all over the world.
appliances safe for the environment – now and for future generations.
Electrolux.Thinkingofyou.
Share more of our thinking at www.electrolux.com.au