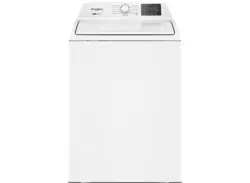
Water Inlet Hose - RED fittings (Hot Water) - BLUE fittings (Cold Water)
Mains Cable
Outlet Hose/Drain Hose (See installation instructions to fit & position drain hose)
Back Feet
Bleach Dispenser,See Page 21
Detergent Dispenser Drawer See Page 19
Wash Bowl
Cap Agitator
Frame Filter
Lint Filter See page 24
Agitator
ABOUT YOUR WASHING MACHINE
Out of Balance Interruption
The out of balance has 2 level which are low level and high level.
The high level: Machine will be stopped, caused by an uneven distribution of clothes in the wash bowl. To rectify the out of balance condition, open the lid and redistribute the clothes evenly in the wash bowl. Closing the spin stage of the wash.
The low level: The washing machine try to optimize by reduce spin speed to avoid out of balance to finish the cycle.
If you have frequent out of balance interruptions, it may be due to your washing machine not standing firm and level on the floor. This can be corrected by adjust the washing machine legs as described in the Installation Instructions supplied with your machines.
Touchpad Response and Lights Always press touchpads gently.
Watch the lights on the control panel to see the effect pressing a touchpad or turning a program selector knob has, and listen for “BEEPS”.
When you press a touchpad you will get a short “BEEP” to acknowledge the entry. If the option is not available at the time, the machine will not allow you to select it. After the machine has started, the entire wash option touchpad will be disabled and machine will give three short beeps to indicate the touchpad is disabled. The Star/Pause To Pause touchpad is still active but you need to press and hold the touchpad for minimum 1.2 seconds to pause machine. This is to confirm that you really want to pause the machine.
Wash Operation
Water at 35 C is combined with detergent to dissolve and activate it. Depending on model, this concentrated solution is then circulated or showered over the clothes in combination with unique bowl and agitator rotations to provide wash action at the selected wash temperature.
Agitation
After the wash operation is completed, the bowl is filled with more water. The low profile agitator or agitator then moves in an energy efficient mode, generating additional mechanical actions.
Auto Water Level Feature
Your washing machine has selectable “Auto” sensing water level option as well as allowing you to choose a manual water level if you wish. We recommend you to use the Auto water level option to ensure there is just the right amount of water for the wash load in the machine. In other words, it will usually give you the best wash while also being the most efficient in terms of water usage.
SAVING WATER AND ENERGY
This washing machine features water and energy saving options.
To save energy, the wash time can be shortened for a load of less dirty clothes by selecting the appropriate wash program e.g. Fast Wash. The washing machine is energy efficient and most water efficient when used with a full load of clothes and with Eco Rinse selected. You should use Eco Rinse (where available) instead of Deep Rinse to reduce the amount of water used for rinsing clothes.
Your machine is most water efficient when Eco Rinse is used as the rinse option.
Each time you switch on your washing machine the machine will select most suitable rinse option for the selected program. You can change rinse option if you wish. The difference between Deep rinse and Eco rinse is explained on the page 13.
POWER FAILURE RECOVERY
When there is power failure while machine is washing or rinsing or spinning. The machine tries to save the settings at which stage the machine is doing and then when the power returns back the machine will starts washing from the stage where it is left off
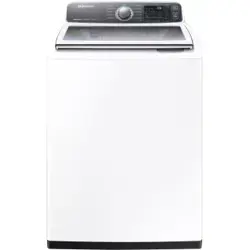
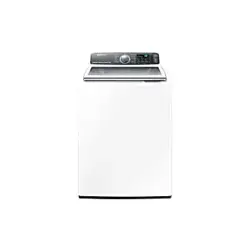
CONTROL PANEL
8 Kg. SWT8043
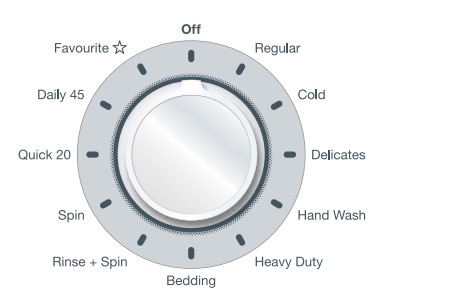
PROGRAM SELECTOR KNOB
Turn the Program Selector knob to choose the wash program you want. The table “Your Program Guide” shown on page 16 will help you in selecting the right program.
The Program Selector knob is not a timer. Once you select a wash program, the Program Selector knob will stay at that position for the whole wash cycle.
WATER TEMPERATURES BUTTON
For each wash program your washing machine automatically selects a suitable fill water temperature. If you want to use a different wash water temperature, press the Temperature button repeatedly.
The water temp lights will tell you the temperature for each press of the button.
You have four temperatures to choose from Very Hot, Hot, Warm and Cold.
The temperature of warm water will depend on the temperature and pressure of your hot and cold water supplies. The recommended temperature for warm is 35°C. You can adjust the flow rate of the water supplies to adjust the Warm temperature. All rinse water temperatures are cold.
Always check your label for the washing temperature symbols which the International Care Labelling Code now uses
NOTE
If you have a cold water connection ONLY and the hot inlet valve is capped off (refer installation instructions) you must select Cold washes only. To fill detergent, you must follow steps as below:
Measure the correct amount of powder detergent by following the recommendations on the package.
Mix powder detergent in one litre of hot or warm water.
Add the pre-mixed detergent to the wash load.
Water Temperatures
Flood diagnostic is explained on page 32. You should refer to this if you have water pouring onto the floorThe display will show “E30 ” and you will hear rapid short beep continuously to remind you about this problem.
WATER LEVEL BUTTON
Choose the water level by pressing Water Level button. Use only the amount of water you need for the wash load.
CHOOSE THE WATER LEVEL
1.Choose the water level by pressing Water Level touchpad.
You can select:
Auto, Full, Medium and Low
(Auto level: the exact water level required to wash your clothes effectively is determined and set for you automatically, ensuring no water is wasted.)
2. Use only the amount of water you need for the wash load.
CHOOSE THE SPIN
TOUCH THE OPTIONS BUTTON TO SELECT THE SPIN OPTION. Regular, Cold, Bedding,Heavy Duty,Rinse+Spin,Spin,Quick 20, Daily 45,Heavy Duty,Denim(*SWT1023A),Hand Wash, Sportswear (*SWT1023A) : Can select all spin options Delicates : Can select Medium, Low and No Spin
Note: No spin is effect only to final spin by spin at gentle speed 1 minute only to prevent water drop to floor when moving the clothes out of the drum.
RINSE OPTION BUTTON
Pressing the “Rinse Option” touchpad allows you to change the rinse type. For most washes the machine automatically selects “Deep Rinse” for you
There are four rinses to choose from... Fast rinse, Eco rinse, Deep rinse and Extra rinse.
Extra : Extra rinse, the machine fills twice, giving you two deep rinses.
Deep : Deep rinse the machine fills once, giving you one deep rinse.
Eco : Eco rinse is a spray rinse giving you maximum water saving.
Fast : Fast rinse uses less time then Eco rinse by performing only 3 Eco sprays but the amount of water in each spray is increased.
How does Eco Rinse work ?
When Eco rinse is used, rinse water is sprayed into the washbowl in pulses. After each pulse the washbowl will spin to remove detergent laden water from the clothes.
The machine will go through a series of maximum four pulses spray and short spin cycles in this manner, depending on program selection, followed by a final long spin that removes the water from the clothes to complete the full wash program.
NOTE
Compare this with Deep rinse where much more water is used.
Deep rinse, water enters the machine filling up to the wash water level selected. The washer agitates and finally empties the rinse water through the drain hose.
Extra rinse, this is special option for those people who suffer from allergies, this extra rinse will provide two deep rinses to ensure all detergent residue has been removed.
Eco Rinse and Fast Rinse CANNOT be selected with Bedding program.
We strongly recommend you use Eco rinse for your washes whenever you can. There is considerable saving of water when Eco is used instead of Deep or Extra to rinse clothes.
Eco and Fast rinse is not designed to be used with fabric softener. Select Deep or Extra rinse if you are going to use fabric softener. Deep rinse ensures the fabric softener is correctly dispensed and thoroughly removed from your clothes during rinsing.
Daily program rinse is fixed with Deep rinse only
Quick20 program rinse is fixed with Fast rinse only
DISPLAY
The display shows the following information:
User needs to touch [Start / Pause] button once to pause the appliance.
Under the remaining time is show text < PAUSE >
The Start/Pause button LED will blink.
After selecting a program, the duration is displayed in hours and minutes (for example 2:34 which means 2 hour and 34 minutes)
The duration is calculated automatically on the basis of the maximum recommended load for each type of fabric
After the program has started, the time remaining is updated every minute.
The Start/Pause button LED will always light (not blink) to indicate that now machine is in executing mode.
When the wash program is completed, the display shows text<FINISH> or <END>.
The Start/Pause button LED will turn Off.
LID LOCK FEATURE
This is a safety feature so as to prevent anyone from opening the door lid when the drum is spinning.
To unlock the lid, user needs to tap [Start / Pause] button once to pause the appliance and the display will turn Off the lid lock icon.
The mechanical lock unlocks when the drum stops spinning.
The Lid Lock indicator will light up when the feature activate
ENABLING/DISABLING END OF WASH BEEP
User can also disable the buzzer by pressing the [Water Level] button + [Spin] button down for 3 sec and release.
it will disable power on sound also.
The volume level is set in the factory and cannot be adjusted by the user.
START/PAUSE BUTTON
TO START THE WASH CYCLE / PROGRAM
Press the Start/Pause button to Pause.
Start/Pause to Pause is used to Start, Stop and Continue the wash.
If you have started your wash and you wish to stop it for some reason, press the Start/PauseTo Pause touchpad and hold it for 1.2 secounds to enter pause mode.
FAVOURITE , CHILD LOCK , TIME ADJUST , DELAY END BUTTON
The favourite function is the ability to tailor individual wash features and save them as a custom programme until the next time.
FIG A : Select the Favourite 1 or 2, choose wash method, spin , temperature ,Rinse, then touch and hold the Favourite button for >1.5 seconds .“Beep sound”is activated and the programme is stored for later use with a single button press.
FIG B : Select the Save Favourite, choose wash method, spin , temperature ,Rinse, then touch and hold the Favourite button for >1.5 seconds .“Beep sound”is activated and the programme is stored for later use with select Favourite program on Knob Dial.
The Favourite indicator will light up when this feature is activated.
Your appliance is provided with CHILD SAFETY LOCK which permits you to leave the appliance unsupervised with the door closed without having to worry that children might be injured by or cause damage to the appliance.
To Activate the child lock :
FIG A : Hold down the “Spin” and “Rinse” at the same time for 3 seconds.
FIG B : Hold down the “Lock” for 3 seconds. The child lock indicator will light up when this feature is activated.
To Deactivate the child lock :
FIG A : Hold down the “Spin” and “Rinse” at the same time for 3 seconds.
FIG B : Hold down the “Lock” for 3 seconds, The child lock indicator will disappear when this feature is deactivated.
TIME ADJUST
This option allows you to increase/decrease washing time by changing the 3 different levels. : medium > maximum > minimum
DELAY END
You can set your washing machine to finish your wash at a later time you specify, choosing a delay of between 1 to 19 hours in 1-hour increments. The hour displayed indicates the time when the cycle will finish. After selecting the wash program, tapping on either the [-] or [+] button once will start the delay end and set the 1-19 hours of the end time of the entire wash cycle.
Tapping [+] button increases the end time.
Tapping [-] button decreases the end time.
Press the Start / Pause button
The Delay end indicator will light up and the clock will begin counting down until it reaches the set time
YOUR PROGRAM GUIDE (KNOB DIAL)
DAILY USE
STARTING YOUR WASHING MACHINE
Connect the mains plug to the mains socket.
Turn the water tap on.
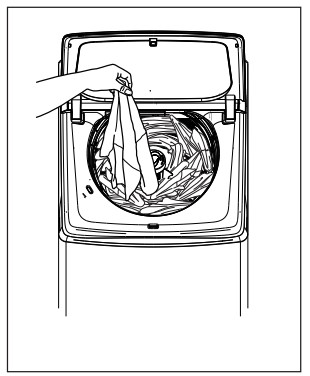
LOAD THE WASHING MACHINE
When loading the clothes into your washing machine, there are four things to remember:
1. Clothes must be loaded evenly around the agitator
For best result load small items first, followed by large items.
For example, a typical load should be loaded using the following sequence : handkerchiefs, wash cloths, undershorts, pillow cases, T-shirts, business shirts, tablecloths, sheets, bath towels.
2. Clothes must not be wrapped around the agitator.
3. The washing machine must not be overloaded. Clothes must be able to move during wash.
4. The load should contain only three or four large items, for example sheets. The rest of the load should be small items. A mixed load of large and small items will wash cleaner than a load of all large items.
ADD THE DETERGENT
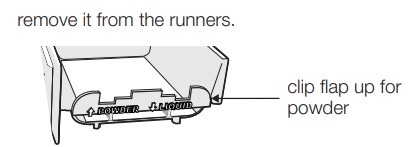
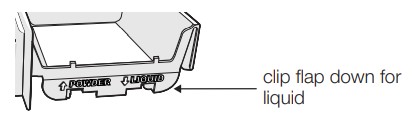
When using the washing machine for the first time,check that the dispenser is set for the type of detergent you will use. To do this, proceed as follows:
1. Pull the dispenser drawer forward until it stops.
2. Lift the front of the drawer up and forward to
3. Check the position of the flap at the rear of the detergent compartment in the dispenser drawer. (Factory setting is flap up for powder.)
4. Clip the flap down if you intend to use liquid detergent.
5. Refit the dispenser back into its runners.
Remember: If you change the type of detergent you use, the position of the flap will need changing. See picture.
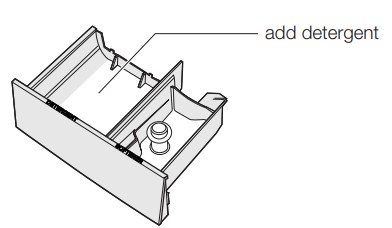
6. You are now ready to add detergent. Measure the amount required and pour it into the detergent compartment of the dispenser drawer.
When using liquid detergent, some may leadk out of the dispenser into the wash load earlier than expected through small openings in the back of the dispenser.
The openings are to help flushing out of detergent.
7. If you want to use fabric softener, see “Add fabric softener”.
8. Close the drawer by pushing it backwards into the top panel of the washing machine when you have finished adding detergent.
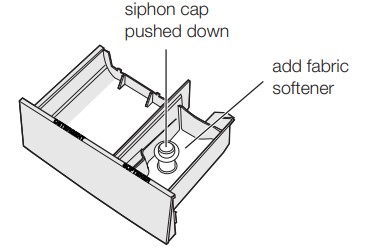
ADD FABRIC SOFTENER
Before adding softener to the dispenser, make sure the siphon cap is pushed firmly down onto the spigot in the drawer.
The softener will not siphon out if the cap is incorrectly fitted, is missing or blocked with residue. You are now ready to add fabric softener.
Measure the correct amount as recommended on the softener package into a cup and then pour it into the softener compartment of the dispenser drawer.
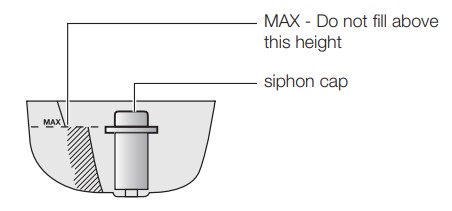
Caution: Do not overfill the fabric softener dispenser.
Overfilling and then siphoning out too early can cause softener and detergent to mix resulting in staining problems.
The softener dispenser holds 90ml when filled up to the MAX marker. Any level lower than MAX will function correctly.
Caution: Only use the detergent compartment for detergent and the fabric softener compartment for fabric softener.
SETTING A PROGRAM
1. Turn the program selector to the required program.
Your washing machine is now in STAND-BY-MODE and ready to wash your clothes.
Press the ON/OFF button (SWT1023A)
The relevant light will light up.
The buzzer will sound.
The selector dial can be turned either clockwise or anticlockwise.
Once you selected a program, the program selected will stay at that position for the whole of the cycle.
The display shows the program duration.
If the settings shown on the control panel are what you want to use, press the Start/Pause button to start your wash.
2. If you want your laundry to be washed with functions different from the one proposed by the machine, press Temperature, Water Level, Spin Time and Rinse Option buttons.
3. If you want to define the end of the washing program, press the “Delay End” button repeatedly to choose your machine end time.
STARTING A PROGRAM
To start a program, press the Start/Pause button, a default program duration will be displayed on the screen.
NOTE
When you select the Drain+Spin program, there will be a delay of at least 2 minutes before the washing machine starts to spin. This delay is a pump out (Drain) period to ensure the bowl is empty of water, which is necessary before spin commences. Even though you may have only put wet clothes into an empty bowl, the delay before spin will still occur to be safe and to protect your washing machine.
INTERRUPTION OF A PROGRAM
If you have started your wash and you wish to stop it for some reason, press the Start/Pause button to enter PAUSE mode. The time remaining is shown then “ PAUSE ”.
Press the Start/Pause again. The program will continue.
CHANGING A PROGRAM
You can turn the Program Selector Knob to a new program position at any time. If you do move the Program Selector Knob the effect will be different depending on the status of the machine at the time you do this, as follows:
When the machine is in PAUSE mode, moving the Knob to a new position 3 short beeps to remind you that cannot change the program in pause mode.
When the machine is running, moving the Knob to a new position will result in the machine continuing the wash and 3 beeps to remind you that this option is not allowed.
AT THE END OF THE PROGRAM
The appliance stops automatically.
The display will show
SWT1023A : “ FINISHED ”
SWT1043 / SWT9043 / SWT8043 SWT9043A : “ END ” and with End sound every 15 second in 2 minutes.
Turn the Program Selector knob to the position “ Off ” or Press the ON/OFF button (SWT1023A)
Remove the laundry from the appliance. Make sure that the washing tub is empty.
Keep the lid ajar, to prevent the mildew and odours.
Turn off the water tap.
AUTO OFF
After 5 min without any user interaction with the appliance, during the machine is in stand by or after the end of the cycle, the appliance receives no further instructions, it will automatically turned Off
(for energy savings in conformity with the standards on energy consumption).
All the settings are stored so that when the appliance is turned back on, the program is ready or if the auto-off mode was triggered after the end of the cycle, the user can see that the cycle ended normally, and can restart it.
CARING FOR YOUR WASHING MACHINE
Your washing machine will give you long and trouble-free service, if you follow the instructions in this section. These instructions show you how to care for your washing machine.
WHAT TO DO AFTER YOU HAVE FINISHED YOUR WASHING.
Turn the Program Selector knob to the position “Off”.
Switch off the electricity at the power point.
Turn off the water taps. This will extend the life of the inlet hoses.
Leave lid open for a while. This allows time for moisture inside the washing machine to evaporate and for any odours to disperse.
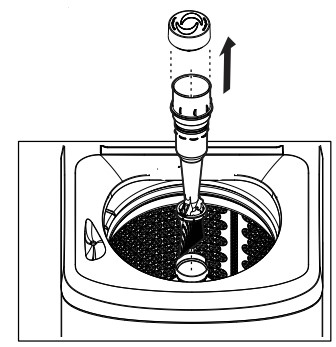
CLEANING THE LINT FILTER
Lint is a collection of threads and fluff which comes off your clothes during washing. Your washing machine collects this lint in the lint filter. It is important to clean out this lint filter preferably after each wash.
How to clean the lint filter: (SWT8043 , SWT9043 , SWT1043)
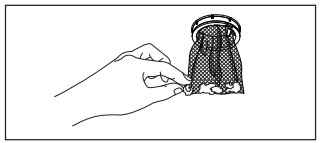
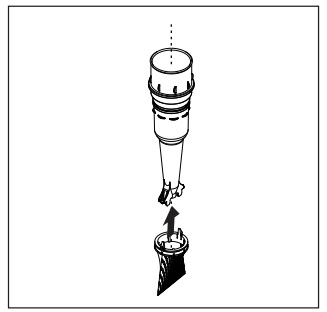
1. Remove the Cap Agitator and filter column from the centre of the agitator.
2. Unclip the filter bag from the column.
3. Turn the bag inside out and remove the lint.
4. Wash the filter bag and dispenser cup in hot water.
5. Reassemble the filter to the column and place it back in the centre of the agitator.
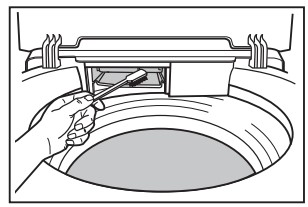
CLEANING THE DISPENSER
The dispenser needs to be cleaned regularly, preferably after each wash. Inspect the dispenser after each wash to see if there is any residue of detergent.
To do this proceed as follows:
Pull the dispenser drawer forward until it stops.
Lift the front of the drawer up and forward to remove it from the runners.
Clean the dispenser drawer with hot water and a brush, eg. an old toothbrush.
Dry the drawer.
Before replacing the dispenser back in its recess, clean the inside of the drawer with an old toothbrush.
Put the dispenser back into its runners and close the drawer.
TROUBLE SHOOTING
DO NOT call for service until you have checked the points listed below.
If you call for service and there is nothing wrong with your washing machine, you will have to pay for the service call.
You will have to pay even when your washing machine is under warranty. Before you call for service, check the points in the table below.
Problem
Display Code
Possible Causes
What to do
Machine not working
Power not switched on.
Switch on power point.
No electricity supply through the power point.
Check power point with another appliance.
Machine not switched on.
Press power switch on at the back of a washing machine.
Water taps not turned on.
Turn on taps.
Out of balance switch off.
Open lid, redistribute load and close lid.
Lid not fully closed.
Close lid.
Machine has washed load but will not spin. Water in washbowl.
Out of balance.
Open lid, redistribute load, close lid.
Too much suds causing motor temperature overload.
Wait a short while, the wash will continue.
In future, reduce detergent dose or use low sudsing (front load) detergent.
Lid not fully closed.
Close lid.
Drain hose blocked.
Check drain hose for blockage.
Will not fill with water.
Water taps not turned on Inlet hoses blocked.
Turn taps on.
Clean tap filters/washers.
Water flowing into washbowl indefinitely.
Drain hose too low.
Raise drain hose or fit a syphon break.
Refer to installation instructions for correct positioning of hose.
Machine goes out of balance or vibrates excessively when spinning.
Machine not level.
Make the machine level.
Levelling feet not adjusted.
Adjust feet to touch the floor.
Clothes not evenly distributed.
Redistribute clothes evenly.
Too much water for load size.
Water on floor.
Loose inlet hose connections.
Check connections at taps and rear of machine.
Incorrect water level for size of load.
Use low water level.
Condensation from hot water.
Clothes still dirty after wash program.
Not enough or no detergent.
Check detergent use and rewash clothes.
Too many clothes in load.
Remove some clothes and rewash.
Incorrect wash program or temperature selected.
Reselect program or temperature and rewash.
Incorrect water level selected.
Use a higher water level.
Scraping noise on spin.
Bra wire or other thin items caught between inner and outer washbowls.
If the item is visible, remove it with pliers.
Use a wash bag in future
Humming, clicking and other noises.
Bowl rotation at start of wash.
Normal noise.
Brake activation when stopping after spin.
Normal noise.
Detergent residue.
Overloaded laundry.
Put appropriate load in washer.
Cold water temperature less than 20°C.
Correct supply water temperature.
Detergent overdosage.
Check detergent use and rewash clothes.
Bad smell or mold on clothes.
Lint filter not cleaned.
Clean lint filter.
OTHER DIAGNOSTIC HELP AND A GUIDE FOR WHEN YOU SHOULD CALL FOR SERVICE
Description
Display Code
Customer action (Summary)
Not filling with water.
Make sure both wall taps are on and hose filters are not blocked.
Raise drain hose if water is flowing out of drain hose.
Press Start/Hold To Pause to re-start wash. If problem remains, call Service.
Flood.
If the water is pouring onto the floor, turn OFF both wall taps.
Wait a few minutes to see if the fault is corrected.If not, call Service.
Draining problem.
Wait a few minutes to see if the fault is corrected. If not, press the Start/Hold To Pause touchpad and hold it for 1.2 second to enter pause mode then check the drain hose for blockage.
Press Start/Hold To Pause to continue the wash. If problem remains, call Service.
Loss of water, while washing.
If water level in wash bowl is low and water is flooding the floor, turn Program Selector Knob to Drain & Spin position, then press Start/Hold To Pause.
Should this make things worse, press the power button off (some models) and call Service.
Otherwise, press Start/Hold To Pause to continue the wash.
Water level problem.
Wait, this fault may clear itself.
If not, turn Program Selector Knob to Drain & Spin position, then press Start/Hold To Pause to drain the wash bowl.
If this problem is repeated, call Service.
Motor fault.
Wait, this fault may clear itself.
If not, turn Program Selector Knob to Drain & Spin position to drain the wash bowl.


 will light up when the feature activate

 will light up when this feature is activated.
 will light up when this feature is activated.

 will light up and the clock will begin counting down until it reaches the set time