Loading ...
Loading ...
Loading ...
○○○○○○○○○○○○○○○○○○○○○○○○○○○○○○○○○○○○○○○○○○○○○○○○○○○○○○○○○○○○○○○○○○○○○○○○○○○○○○○○○○○○○○○○○○○○○○○○
26
STRAIGHT AND ZIGZAG STITCHING
POINTS DROITS ET POINTS ZIGZAG
PUNTADAS RECTAS Y ZIGZAG
PONTOS RETO E ZIG-ZAG
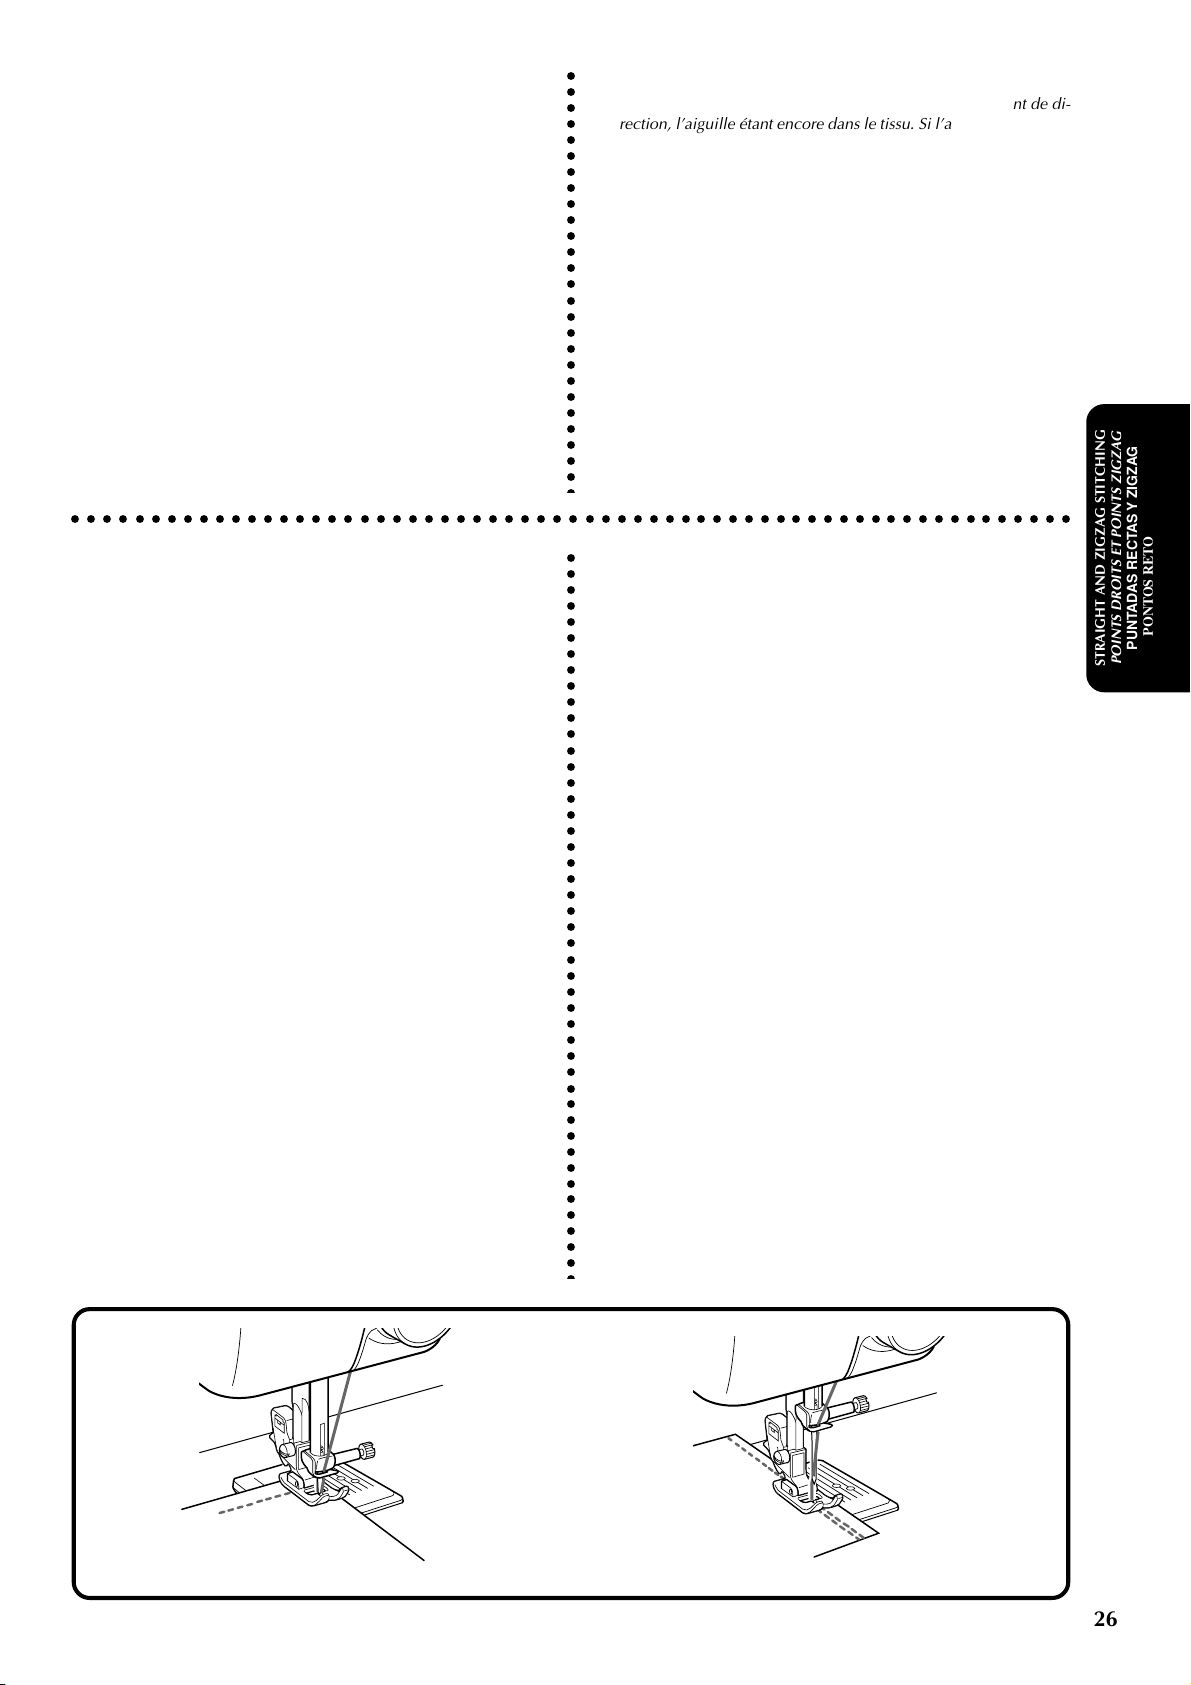
Changing Sewing Directions (fig. A)
1. Stop the machine at the point where you wish to change directions
with the needle still in the fabric. If the needle ends in the up
position turn the balance wheel toward you (counterclockwise) until
the needle enters the fabric.
2. Raise the presser foot and turn the fabric to line up its new direc-
tion using the needle as a pivot point.
3. Lower the presser foot and start sewing in the new direction.
NOTE:
For twin needle sewing, raise the needle when changing the sewing
direction.
Finishing Sewing (fig. B)
Reverse stitching is used to lock the threads at the end of the seam or
wherever reinforcement is needed.
1. Stitch to the end of the seam and stop.
2. Press the reverse sewing lever down and lightly touch the foot con-
troller to stitch backwards for 1 cm (3/8") from the end of the fabric
over the top of the existing stitch.
AB
○○○○○○○○○○○○○○○○○○○○○○○○○○○○○○○○○○○○○○○○○○○○○○○○○○○○○○○○○○○○○○○
Changer le sens de la couture (fig. A)
1. Arrêter la machine à l’endroit souhaité pour le changement de di-
rection, l’aiguille étant encore dans le tissu. Si l’aiguille est remon-
tée, tourner le volant vers soi (dans le sens contraire des aiguilles
d’une montre) jusqu’à ce que l’aiguille pique le tissu.
2. Remonter le pied-de-biche et faire pivoter le tissu autour de l’aiguille
pour l’orienter dans la nouvelle direction.
3. Abaisser le pied-de-biche et commencer à coudre dans la nouvelle
direction.
REMARQUE :
Lorsque l’aiguille jumelée est utilisée, remonter l’aiguille lors du chan-
gement de direction.
Terminer la couture (fig. B)
Utiliser la couture en marche arrière pour faire un noeud à la fin d’une
couture ou consolider des points.
1. Piquer jusqu’à la fin de la couture puis arrêter.
2. Abaisser le levier de couture en marche arrière et appuyer légère-
ment sur la pédale pour effectuer une couture en arrière de 1 cm à
partir du bord du tissu au dessus du point actuel.
Cambio de sentido de costura (fig. A)
1. Pare la máquina con la aguja picada en el tejido donde quiera
cambiar de sentido. Si la aguja queda en la posición levantada,
gire la ruedecilla hacia usted (en el sentido contrario al de las
manecillas de un reloj) hasta que penetre el tejido.
2. Levante el prensatelas y gire el tejido en la dirección que debe
seguir usando la aguja como punto de giro.
3. Baje el prensatelas y empiece a coser en la nueva dirección.
NOTA:
Al coser con una aguja doble, debe levantar la aguja para cambiar
de sentido de costura
Para terminar las costuras (fig. B)
La puntada de retroceso se usa para trabar los hilos al final de una
costura o en cualquier punto donde sea necesario reforzarla.
1. Cosa hasta el final de la costura y pare.
2. Apriete el pulsador de retroceso y presione ligeramente el pedal
para coser hacia atrás hasta 1 cm (3/8") de la orilla del tejido
sobre las puntadas existentes.
Mudança da Direção de Costura (fig. A)
1. Pare a máquina no ponto onde queira alterar as direções, com a agulha
ainda no tecido. Se a agulha terminar em posição elevada, gire o volante
em direção a você (sentido anti-horário), até que a agulhe entre no teci-
do.
2. Levante o pé calcador e gire o tecido para determinar a sua nova direção,
usando a agulha como um pivô de rotação.
3. Abaixe o pé calcador e comece a costura na nova direção.
NOTA:
Para costuras com agulha dupla, eleve a agulha quando mudar a direção da
costura.
Acabamento da Costura (fig. B)
O ponto em retrocesso é usado para prender as linhas no final da costura ou
sempre que um reforço for necessário.
1. Vá até o final da costura e pare.
2. Pressione a alavanca de costura em retrocesso e toque levemente no
reostato para costurar para trás por 1 cm (3/8") da extremidade do teci-
do até o topo do ponto existente.
Loading ...
Loading ...
Loading ...