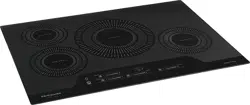
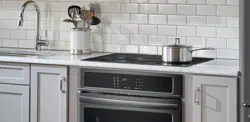
User Manual Induction Cooktop
BEFORE SETTING SURFACE CONTROLS
What is Electromagnetic Induction?
Induction cooking uses electromagnets to create heat in compatible cookware. Below each cooking zone on an induction cooktop, there is a copper coil.
When the cooking zone is turned on, the electricity turns the coil into a type of magnet that heats metal cookware in the cooking zone.
Induction Features
Because heat starts in the cookware instead of the cooktop, induction offers several advantages.
- Fast Heating: Cookware will heat up faster than on a conventional electric cooktop. Pay close attention to avoid scorching food when starting to cook. You may need to use a lower setting for cooking food than you are used to.
- Precise Control: The heat going into the cookware will change immediately when you change the setting of the cooking zone.
- Even Heating: Cookware will typically heat more evenly on an induction cooktop, so you are less likely to have hot or cool spots in the cookware.
- Cooler Cooktop: An induction cooktop will be cooler when you remove the cookware than a conventional electric cooktop would be. Because the cooktop doesn’t get as hot, you are not as likely to get burned. Spills are also less likely to cook onto the surface, making clean-up easier.
- Energy Efficiency: Induction cooking wastes less energy than a conventional cooktop, so it uses less electricity
Preparation
Before using your cooktop for the first time, apply a ceramic cooktop cleaning cream (available in most hardware, grocery, and department stores) to the ceramic surface. Clean and buff with a clean paper towel. Cooktop cleaning creams leave a protective finish on the glass that will make cleaning easier when the cooktop is soiled from cooking and help prevent scratches and abrasions.
 CAUTION
Although induction cooking zones do not produce heat, they can become hot from contact with hot cookware. Burns may occur if a cooking zone or the surrounding area is touched before it has cooled to a safe temperature.
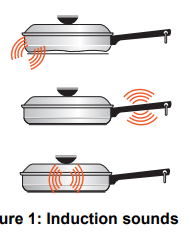
Sounds
The magnetic field over the induction cooking zone may cause cookware to vibrate, creating a buzzing or humming noise. These sounds are not unusual, especially at high settings.
Cookware that is not perfectly flat on the bottom may vibrate slightly against the cooktop. A loose handle may vibrate in its socket. Multi-material cookware may allow small vibrations in its structure.
Sounds are less likely to occur with heavier, higher quality cookware. An induction cooktop may also produce faint clicking sounds from the electronic switches that maintain the desired cooking temperature. You may also hear a fan that cools the electronics inside the cooktop.
 NOTE
NOTE
Be sure to read detailed instructions for induction cooktop cleaning in the “Care and Cleaning” section and “Before You Call” checklist section of this Use and Care Guide
BEFORE SETTING SURFACE CONTROLS
Using Proper Cookware
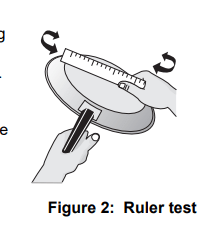
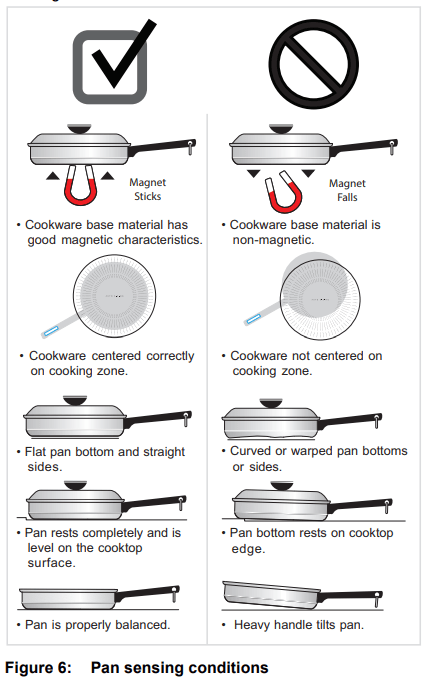
The size and type of cookware used will influence the heat setting needed for best cooking results. Be sure to follow the recommendations for using proper cookware as illustrated in Figure 2 and Figure 4.
Check for flatness by rotating a ruler across the bottom of the cookware (see Figure 2). Cookware should have flat bottoms that make good contact with the entire surface of the cooking zone (see Figure 6 on page 10)
Cookware Material
Cookware material is especially important when using an induction cooktop. The cookware must contain magnetic iron or steel to work on an induction cooktop. Common materials for induction cookware include the following:
- Stainless Steel - Slow heat conductor with uneven cooking results. Durable, easy to clean, and resists staining. Some types of stainless steel will not work on an induction cooktop. Use the magnet test (Figure 4) to check stainless steel cookware.
- Cast Iron - A slow heat conductor that retains heat very well. Cooks evenly once cooking temperature is reached.
- Porcelain-enamel on metal - Heating characteristics will vary depending on the base material. Porcelainenamel on a compatible metal will work on an induction cooktop. Use the magnet test (Figure 4) to check porcelain-enamel cookware
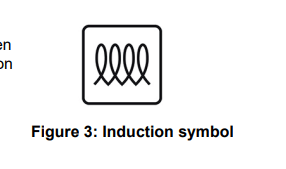
Cookware sold as induction-ready will often have a symbol printed on the bottom by the manufacturer
The Magnet Test
To see if a piece of cookware will work on your induction cooktop, try to stick a magnet to it (see Figure 4).
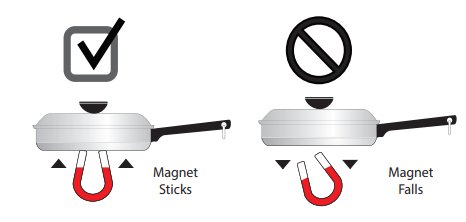
If the magnet clings firmly to the bottom of the cookware, it will work on your induction cooktop. If the magnet clings weakly or not at all, the cookware will not heat up on your induction cooktop.
CAUTION
Proper cookware on an operating induction cooking zone will heat up very quickly. If an empty piece of cookware is left on an operating induction cooking zone, the rapid change in temperature may warp or damage the cookware.
Pan Sensing
Sensors beneath the cooktop surface require that certain cookware conditions be met before an induction cooking zone will operate. If a cooking zone is turned on and conditions are wrong, the setting in the zone display will flash.

Figure 6 shows conditions that can generate a flashing message.
Minimum and Maximum Pan Size
Induction cooking zones require pans of proper size in order to activate. The cooktop graphics are guides to minimum and maximum pan size for each cooking zone.
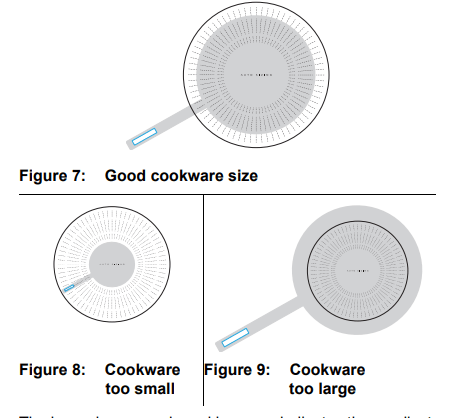
The inner ring on each cooking zone indicates the smallest pan size for the zone (Figure 8). If cookware is too small, the display will flash and the pan will not heat. Select a larger pan or use a different cooking zone.
The outer ring on the cooktop graphic indicates the largest pan size for that zone (Figure 9). Do not use pans with bottoms that extend beyond the outer circle of a cooking zone, as doing so may cause food to heat unevenly
Correcting Pan Sensing Errors
It is recommended that you lower the requested power level setting before correcting a pan sensing error, then reset the zone to the desired power level.
If conditions preventing operation are not corrected, the cooking zone will automatically turn off after two minutes.
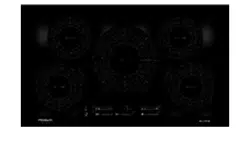
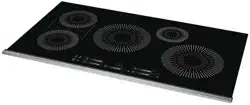
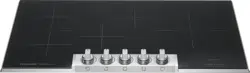
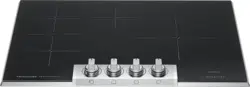
Induction Controls
When turned on, an induction cooking zone will not get hot. The induction cooking zone creates heat in the cookware, not in the cooktop. Heat is not created unless there is an iron or steel object on the cooking zone.
Cooking Zone Setting Display
The setting display will show the setting for the cook zone.
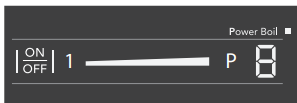
Figure 10: Setting displays (left) If there is no cookware in the cook zone, the setting indicator will flash, and the magnet will not turn on. The indicator will also flash if the cookware in the zone is the wrong size, off-center, or non-magnetic.
Hot Surface Indicator
If the cooking zone becomes hot during cooking, the setting indicator will show a Hot Surface warning (H) when the zone is turned off. This warning will show until the cooking zone cools.

Figure 11: Hot surface indicator
CAUTION
- Although induction cooking zones do not directly generate heat, they can become hot from contact with hot cookware. Burns may occur if a cooking zone or the surrounding area is touched before it has cooled to a safe temperature.
- Do not place flammable items such as plastic salt and pepper shakers, spoon holders, or plastic wrapping on top of the range when it is in use. Heat radiating from cookware could cause these items to melt or ignite. Potholders, towels, or wooden spoons could catch fire if placed too close to hot cookware.
- Do not use aluminum foil to line any part of the cooktop. Improper installation of these liners may result in risk of electric shock or fire. If these items melt on the cooktop, they will damage the cooktop.
 IMPORTANT
- Do not leave empty cookware on an operating cooking zone. Cookware will heat very quickly and may be damaged or warped if left on the cooking zone empty.
- NEVER place or straddle a cooking utensil over two different surface cooking areas at the same time. Incorrect use may damage the cooktop.
SETTING SURFACE CONTROLS
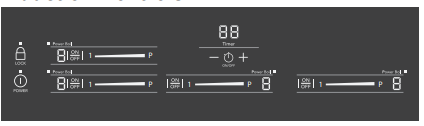
Cooktop Controls

- Lock: Lock the cooktop controls to prevent accidental activation of cooking zones.
- Power: Press to turn on or turn off the cooktop.
- Cooking Zone Power Boil Indicator: Lights when the Power Boil feature is in use on the cooking zone.
- Cooking Zone Setting Indicator: Shows the setting of the Cooking Zone when it is running. Flashes when the Cooking Zone does not detect proper cookware. Shows a Hot Cooktop message (H) when the Cooking Zone is off but still hot.
- Cooking Zone On/Off: Activates the cooking zone when the cooktop is on.
- Cooking Zone Minimum (1): Sets the cooking zone to the minimum power level.
- Cooking Zone Set: Press or slide your finger on the wedge to select the desired cooking zone setting.
- Cooking Zone Maximum (P): Sets the cooking zone to Power Boil.
- Timer Indicator: Shows the time currently left on the timer.
- Reduce Time (-): Reduce the amount of time on the timer.
- Timer On/Off: Turn the countdown timer on or off.
- Increase Time (+): Increase the amount of time on the timer.
Induction surface cooking zones
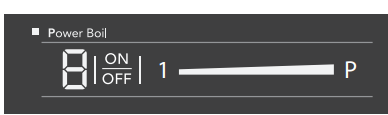
Figure 12: Induction cooking zone control
To operate an induction cooking zone:
1. Place correctly sized cookware on the cooking zone.
2. Activate the cooking zone.
- If the cooktop is not on, press the Main Power key.
- Press the On/Off key for the desired cooking zone. If you just turned the cooktop on, this step can be skipped.
3. Set the cooking zone to the desired level (refer to the “Suggested induction cooking zone settings” in Table 1).
- Place your finger on the control and slide until the desired setting is indicated.
- Press P to set the zone to Power Boil.
- Press 1 to set the zone to its lowest setting.
4. When cooking is complete, turn the induction cooking zone OFF by pressing its On/Off key or the Main Power key before removing the cookware. If all of the zones are off, the cooktop will automatically power off in 20 seconds.
IMPORTANT Do not leave empty cookware on an operating cooking zone. Cookware will heat very quickly and may be damaged or warped if left on the cooking zone empty.
NOTE The cooktop has a sensor to detect cookware in the cooking zone. The cooking zone will not become active without proper cookware in position. See “Pan Sensing” on page 10.
Suggested induction cooking zone settings
Start most cooking operations on a higher setting and then turn to a lower setting to finish cooking.
The suggested settings found in Table 1 below are based on cooking with medium-weight stainless steel pans with lids. Settings may vary when using other types of pans.
Frigidaire Induction Recommendations
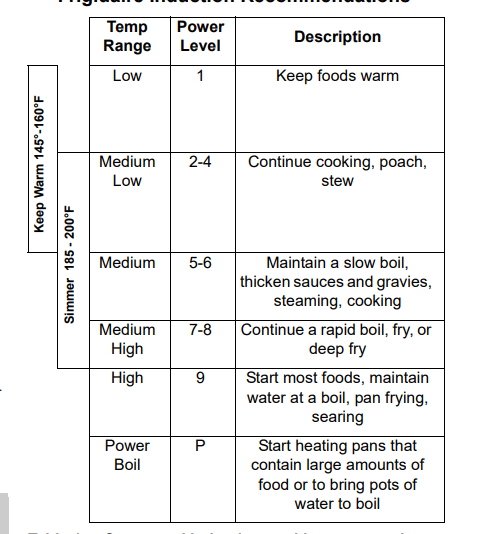
Table 1: Suggested induction cooking zone settings
NOTE:
- The Power Boil (P) setting is available after activating a cooking zone by pressing the P key. The cooktop will remain in Power Boil for up to 10 minutes. After 10 minutes, the cooking zone will automatically change to the High (9) setting.
- The size and type of the utensil used and the amount and type of food being cooked will influence the setting needed for best cooking results.
- The Hot Surface indicator (H) will show in the setting indicator when heat is detected in a cook zone that has been turned off. The indicator will remain on until the heated surface area has cooled sufficiently
CAUTION
- Although induction cooking zones do not directly generate heat, they can become hot from contact with hot cookware. Burns may occur if a cooking zone or the surrounding area is touched before it has cooled to a safe temperature.
- Do not place flammable items such as plastic salt and pepper shakers, spoon holders, or plastic wrapping on the cooktop when it is in use. Heat radiating from cookware could cause these items to melt or ignite. Potholders, towels, or wooden spoons could catch fire if placed too close to hot cookware.
- Do not use aluminum foil to line any part of the cooktop. Improper installation of these liners may result in risk of electric shock or fire. If these items melt on the cooktop, they will damage the cooktop.
Moving Cookware on a Smooth Cooktop
Always lift cookware before moving on the ceramic glass cooktop. Cookware that has a rough or dirty bottom can mark and scratch the ceramic glass surface. Always start with clean cookware.
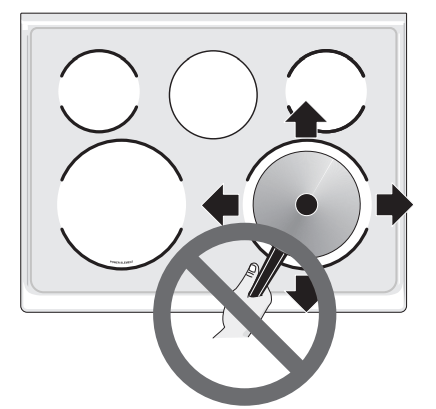
Figure 13: Do not slide cookware on cooktop
Power Management
Your induction cooktop has 2 or 3 generators and 4 or 5 cooking zones, depending on the model. A generator may power 1 or 2 cooking zones. If you use more than one cooking zone on high power at the same time and they are on the same generator, the cooktop may need to manage power to the two cooking zones.
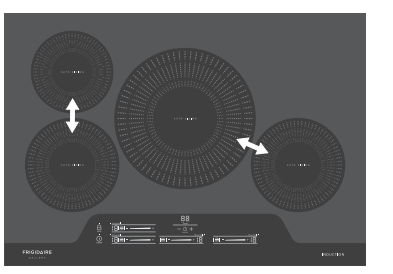
Figure 14: Power management (30” cooktop)
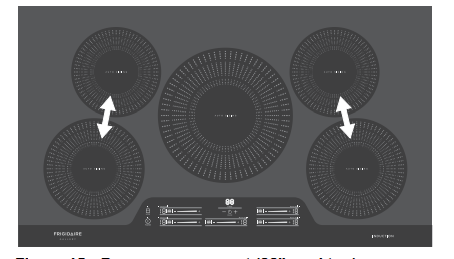
Figure 15: Power management (36” cooktop)
To get the best performance from your cooktop, start cooking on only one cooking zone. After the first piece of cookware has reached cooking temperature, then start cooking on the second cooking zone.
Setting the Timer
The cooktop has a timer function to remind you when food has been cooking for a specified amount of time.
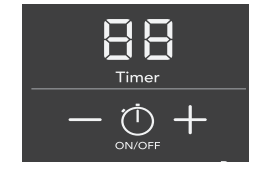
Figure 16:Cooktop Timer
To set the timer:
- Press the Timer On/Off key to activate the timer. The timer will show “00” flashing.
- Press + and - to set the desired number of minutes. The flashing will stop. You can press and hold the + or - key to change the number of minutes faster.
The timer will start counting down, and a tone will sound when the specified time has elapsed. Press the +, the -, or the Timer On/Off key to stop the signal.
At any time, you can adjust the remaining time with the + and - keys. At any time, you can deactivate the timer by pressing the Timer On/Off key.
Important: When the timer stops or the tone sounds, the cooking zones will continue to operate. The timer does not affect the cooking zone settings in any way.
Lock or Unlock the Cooktop
The lock function deactivates most of the controls on the cooktop to keep cooking zones from being changed by accident or to keep children from activating the cooktop
To lock the controls while cooking:
- Set the cooking zones to the desired settings.
- Press the Lock key.
To unlock the controls, press the Lock key again.
Even while the controls are locked, you can turn a cooking zone off using its On/Off key.
To set the lock for child safety:
- Press the Power key to turn the cooktop on.
- Press the Lock key and hold it for 4 seconds. The lock will activate, and L will display in all of the cook zone setting indicators.
- Press the Power key to turn the cooktop off.
When the cooktop is locked for child safety, two options are available to unlock it.
Complete unlock:
- Press the Power key to turn the cooktop on.
- Press the Lock key and hold it for 4 seconds. The lock will deactivate.
- Press the Power key to turn the cooktop off.
Temporary unlock:
- Press the Power key to turn the cooktop on
- Hold the lock key for 4 seconds.
- Set the cooking zones.
- When the cooking process is finished and the cooktop is turned off, the Lock function will be still active.
Key-Stuck Function
The cooktop has an automatic switch-off function to prevent unintended operation that could cause the cooktop to increase zone settings or activate zones unattended.
Examples could include a child playing with the controls, a pet stepping on the control, or an object like a spoon left on the control. If a control key is held for more than 10 seconds, the cooktop will sound an alert of 5 tones. If the key is still held after the alert sound, the cooktop will switch off. This function will also activate if the a zone slider is continually held or adjusted for 10 seconds.
Home Canning
Be sure to read and observe all the following points when home canning with your appliance. Check with the USDA (United States Department of Agriculture) Web site and be sure to read all the information they have available as well as follow their recommendations for home canning procedures.
- Use only a completely flat bottom canner with no ridges that radiate from the bottom center when home canning. Heat is spread more evenly when the bottom surface is flat. Use a straight-edge to check the canner bottom.
- Make sure the diameter of the canner does not exceed 1 inch beyond the cooking zone markings or burner.
- It is recommended to use smaller diameter canners on electric coil and ceramic glass cooktops and to center canners on the burner grates.
- Start with hot tap water to bring water to boil more quickly.
- Use the highest heat setting when first bringing the water to a boil. Once boiling is achieved, reduce heat to lowest possible setting to maintain that boil.
- Use tested recipes and follow instructions carefully. Check with your local Cooperative Agricultural Extension Service or a manufacturer of glass jars for the latest canning information.
- It is best to can small amounts and light loads.
- Do not leave water bath or pressure canners on high heat for an extended amount of time.
CARE AND CLEANING
Cooktop Maintenance
Consistent and proper cleaning is essential to maintaining your ceramic glass cooktop.
Prior to using your cooktop for the first time, apply a ceramic cooktop cleaning cream (available in most hardware, grocery, and department stores) to the ceramic surface. Clean and buff with a clean paper towel. This will make cleaning easier when soiled from cooking. Cooktop cleaning creams leave a protective finish on the glass to help prevent scratches and abrasions.
Sliding pans on the cooktop can cause metal markings on the cooktop surface. These marks should be removed immediately after the cooktop has cooled using cooktop cleaning cream. Metal marks can become permanent if not removed prior to future use.
Cookware with rough bottoms can mark or scratch the cooktop surface.
Do not:
- Slide anything metal or glass across the cooktop.
- Use cookware with dirt or dirt build up on the bottom; always use clean cookware.
- Use your cooktop as a cutting board or work surface in the kitchen.
- Drop heavy or hard objects on the ceramic glass cooktop; they may cause it to crack.
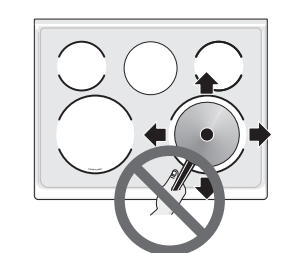
Figure 1: Cooktop care
CAUTION
- Before cleaning any part of the appliance, be sure all controls are turned off and the appliance is cool.
- If ammonia or appliance cleaners are used, they must be removed and the appliance must be thoroughly rinsed before operating. Follow manufacturer's instructions and provide adequate ventilation.
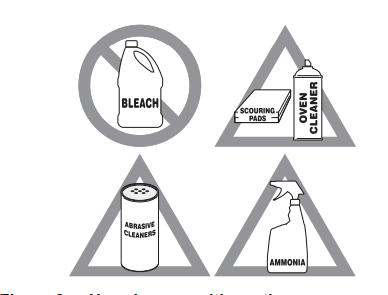
Figure 2: Use cleaners with caution
IMPORTANT
Damage to the ceramic glass cooktop may occur if you use an abrasive type cleaning pad. Only use cleaning products that have been specifically designed for ceramic glass cooktops.
Cooktop Cleaning
WARNING
Do not use a cooktop cleaner on a hot cooktop. The fumes can be hazardous to your health, and can chemically damage the ceramic-glass surface.
CAUTION
Before cleaning the cooktop, be sure the controls are turned to OFF and the cooktop is cool. The glass surface could be hot from contact with hot cookware, and burns may occur if the glass surface is touched before it has cooled sufficiently.
For light to moderate soil:
For light to moderate soil: Apply a few drops of cooktop cleaning cream directly to the cooktop. Use a clean paper towel to clean the entire cooktop surface. Make sure the cooktop is cleaned thoroughly, leaving no residue. Do not use the towel yosu use to clean the cooktop for any other purpose.
Aluminum Foil and Utensils
WARNING Never cover any slots, holes, or passages with materials such as aluminum foil. Aluminum foil linings may trap heat, causing a fire hazard.
For heavy soil:
Apply a few drops of cooktop cleaning cream directly to the soiled area. Rub the soiled area using a non-abrasive cleaning tool, applying pressure as needed. Do not use the pad you use to clean the cooktop for any other purpose. If soils remain, carefully scrape soils with a metal razor blade scraper, holding scraper at a 30 degree angle to the surface. Remove loosened soils with cooktop cleaning cream and buff the surface clean.
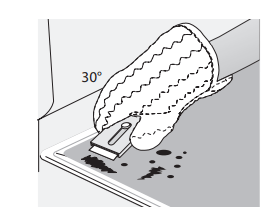
Figure 3: Cooktop cleaning
IMPORTANT Aluminum foil - Use of aluminum foil on a hot cooktop can damage the cooktop. Do not use thin aluminum cooking utensils or allow aluminum foil to touch the cooking zones under any circumstances.
BEFORE YOU CALL
Solutions to Common Problems:
Before you call for service, review the following list. It may save you time and expense. Possible solutions are provided with the problem listed.
Problem & Cause / Solution
1. Entire appliance does not operate.
- Power is not connected. Check your fuse box or breaker box to make sure the circuit is active. Wiring is not complete. Contact installer or dealer. Electrical power outage.
- Check house lights to be sure.
- Call your local electric company for service outage information.
2. Cookware in the cooking zone is too hot or not hot enough.
- Incorrect surface control setting. Adjust power level setting.
3. Cooking zone does not heat cookware.
- Be sure the correct surface control is turned on for the element needed. Incorrect cookware used.
- See “Using Proper Cookware” on page 9.
- Cookware is the wrong size or incorrectly positioned in the cooking zone. See “Pan Sensing” on page 10
4. Cooking zone does not heat evenly.
- Cookware is warped. Use only flat, evenly balanced cookware. Flat pans heat better than warped pans.
- Cookware materials and weight of the material affect heating. Heavy and mediumweight pans heat evenly. Because lightweight pans heat unevenly, foods may burn easily.
5. Cooking zone control does not work More than one control was pressed at once.
- Make sure that when trying to set the control, nothing is touching another control. Water or soil on the control panel. Clean the control panel
6. Areas of discoloration with metallic sheen on cooktop surface.
- Mineral deposits from water and food. Remove them using cooktop cleaning creme applied to the ceramic surface. Buff with a non-abrasive cloth or sponge.
7. Scratches or abrasions on cooktop surface.
- Coarse particles such as salt or hardened soils between cooktop and cookware can cause scratches. Be sure the cooktop surface and bottoms of cookware are clean before use. Small scratches do not affect cooking and will become less visible with time.
- Cleaning materials not recommended for ceramic-glass cooktop have been used. Apply cooktop cleaning creme to the ceramic surface. Buff with a non-abrasive cloth or sponge.
- Cookware with a rough bottom was used. Use smooth, flat-bottomed cookware.
8. Metal marks on the cooktop.
- Sliding or scraping of metal utensils on cooktop surface. Do not slide metal utensils on the cooktop surface. Apply cooktop cleaning creme to the ceramic surface. Buff with a non-abrasive cloth or sponge. For more information, see “Cooktop Cleaning” on page 18.
9. Brown streaks or specks on cooktop surface.
- Boil overs stuck on the surface. When cooktop is cool, use a razor blade scraper to remove soil. For more information see “Cooktop Cleaning” on page 18.
10. The number in the setting indicator is flashing.
- Incorrect cookware used. See “Using Proper Cookware” on page 9.
- Cookware is the wrong size or incorrectly positioned in the cooking zone. See “Pan Sensing” on page 10.
11. The letter E appears in a setting indicator
- An error has occurred. This may happen because cookware has boiled dry. Remove cookware and turn off the cooktop. After 30 seconds, turn on the cooktop. If the cookware was the problem, E will no longer display.
- An error may occur because of water, oil, or food on the controls. Clean the control panel.
- Disconnect the power to the cooktop for a minute, then reconnect it. If the error still occurs, call an authorized dealer or service technician.
12. The letter L appears in the setting indicators.
- The cooktop is locked. See “Lock or Unlock the Cooktop” on page 15.
13. The cooktop deactivates A signal sounds when the cooktop is not operating
- There is an object on the controls. Remove the object. See “Key-Stuck Function” on page 16.
14. The Hot Cooktop warning did not come on
- The cooktop did not get hot enough to activate the warning.
- If the cooktop was running long enough for the surface to get hot, call an authorized dealer or service technician.
15. The control area becomes hot
- The cookware is too large or too close to the controls. Put large cookware on a rear zone if possible.
16. A dash (-) shows in the setting indicator
- Turn the cooktop off, then turn it back on.
INDUCTION COOKTOP INSTALLATION INSTRUCTIONS
IMPORTANT INSTALLATION INFORMATION
- All electric cooktops run off a single phase, three-wire or four-wire cable, 240/208 volt, 60 hertz, AC only electrical supply with ground.
- Minimum distance between cooktop and overhead cabinetry is 30" (76.2 cm).
* 30" (76.2 cm) min. for unprotected cabinet and 24" (61 cm) min. for cabinet with protected bottom surface
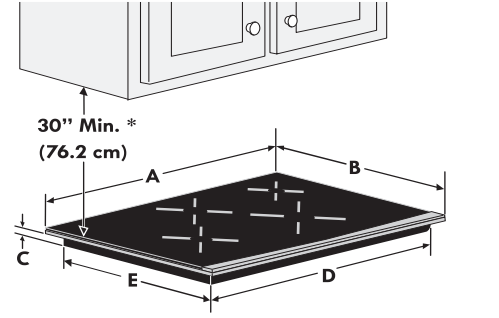
Cooktop Dimensions
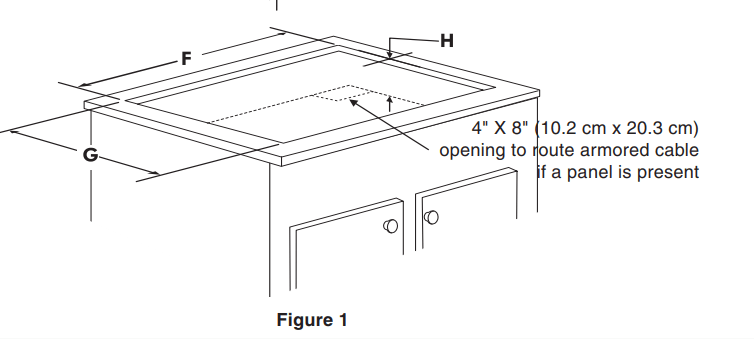
Cooktop Cutout Dimensions

- All dimensions are stated in inches and (cm).
- Allow 2" (5 cm) space below the armored cable opening to clear the electric cable and allow space for installation of the junction box on the wall at the back of the cooktop.
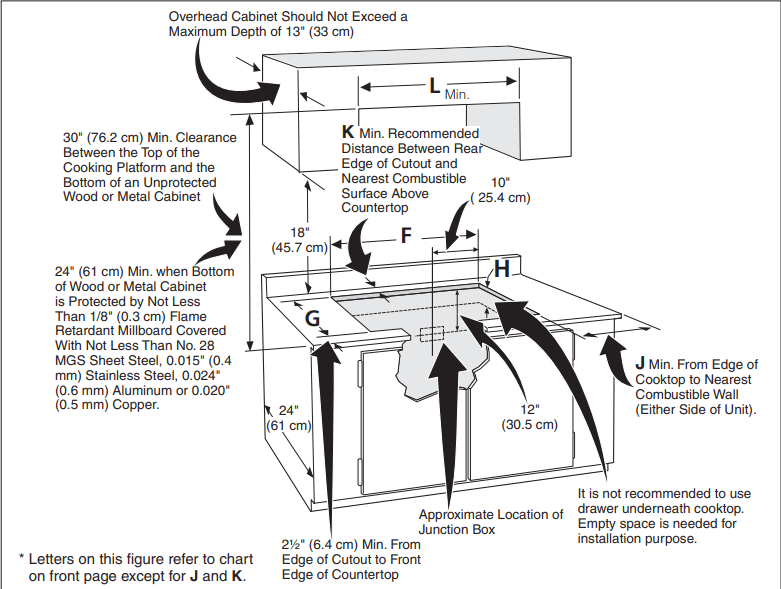
CAUTION To eliminate the risk of burns or fire by reaching over heated surfaces, cabinet storage space located above the cooktop should be avoided. If cabinet storage is provided, risk can be reduced by installing a range hood that projects horizontally a minimum of 5" (12.7 cm) beyond the bottom of the cabinets.

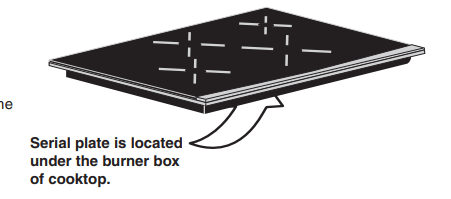
Model and Serial Number Location
The serial plate is located under the cooktop. When ordering parts for or making inquires about your cooktop, always be sure to include the model and serial numbers and a lot number or letter from the serial plate on your cooktop.
Important Notes to the Installer
- Read all instructions contained in these installation instructions before installing the cooktop.
- Remove all packing material before connecting the electrical supply to the cooktop.
- Observe all governing codes and ordinances.
- Be sure to leave these instructions with the consumer.
- Only certain cooktop models may be installed over certain built-in electric oven models. Approved cooktops and built-in ovens are listed by the MFG ID number and product code.
Important Note to the Consumer
Keep these instructions with your Use and Care Guide for future reference.
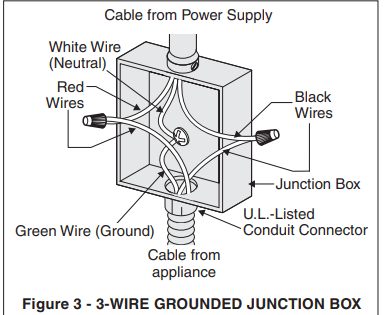
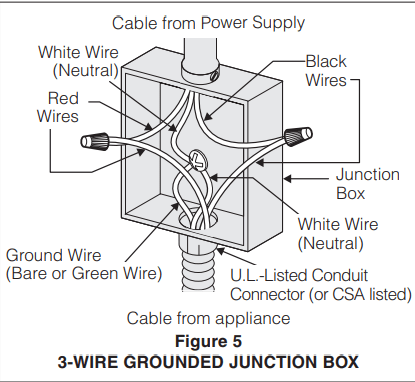
If the cable from appliance is equipped with 3 wires:
Where local codes permit connecting the appliance-grounding conductor to the neutral (white) wire (see figure 3):
- Disconnect the power supply.
- In the circuit breaker, fuse box or junction box, connect appliance and power supply cable wires as shown in figure 3.
 You may not ground the cooktop through the neutral (white) wire if cooktop is used in a new branch circuit installation (1996 NEC), mobile home, recreational vehicle, or where local codes do not permit grounding to the neutral (white) wire.
When grounding to the neutral (white) wire is prohibited, you must use a 4-wire power supply cable. See Figure 4. Failure to heed this warning may result in electrocution or other serious personal injury.
If cooktop is used in a new branch circuit installation (1996 NEC), mobile home, recreational vehicle, or where local codes DO NOT permit grounding to the neutral (white) wire (see figure 4):
- Disconnect the power supply.
- In the circuit breaker, fuse box or junction box, connect appliance and power supply cable wires as shown in figure 4.
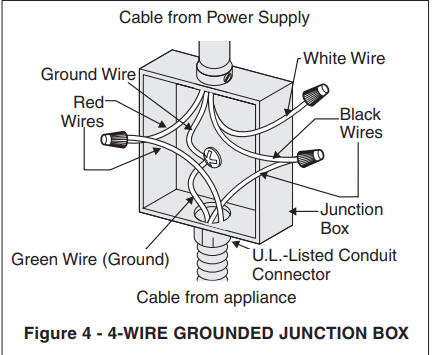
If connecting to a 4-wire power supply cable electrical system, the appliance frame connected ground wire MUST NOT be connected to the neutral wire of the 4-wire electrical system.
NOTE TO ELECTRICIAN: The armored cable leads supplied with the appliance are UL-listed for connection to larger gauge household wiring. The insulation of the leads is rated at temperatures much higher than temperature rating of household wiring. The current carrying capacity of the conductor wire is governed by the temperature rating of the insulation around the wire, rather than the wire gauge alone.
If the cable from appliance is equipped with 4 wires:
Where local codes permit connecting the appliance-grounding conductor (wire) to the neutral (white) wire (see figure 5):
- Disconnect the power supply.
- In the circuit breaker, fuse box or junction box, connect appliance and power supply cable wires as shown in figure 5.
This appliance is manufactured with a white neutral power supply and a frame connected copper wire. The frame is grounded by connection of grounding lead to neutral lead at the termination of the conduit, if used in USA, in a new branch circuit installation (1996 NEC), mobile home, recreational vehicles, where local code do not permit grounding trough the neutral (white) wire or in Canada, disconnect the white and green lead from each other and use ground lead to ground unit in accordance with local codes, connect neutral lead to branch circuit-neutral conductor in usual manner see Figure 6. If your appliance is to be connected to a 3 wire grounded junction box (US only), where local code permit connecting the appliance-grounding conductor to the neutral (white) see Figure 5.
If cooktop is used in a new branch circuit installation (1996 NEC), mobile home, recreational vehicle, or where local codes
DO NOT permit grounding through the neutral (white) wire (see figure 6):
- Disconnect the power supply.
- Separate the green (or bare copper) and white appliance cable wires.
- In the circuit breaker, fuse box or junction box: connect appliance and power supply cable wires as shown in figure 6.
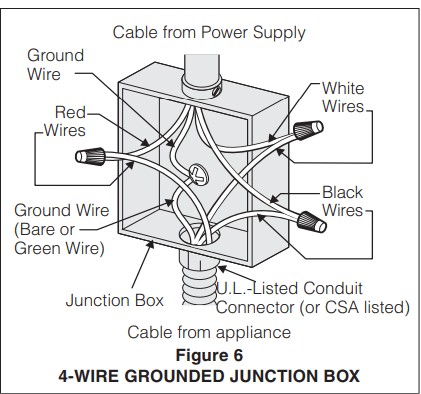
If connecting to a 4-wire power supply cable electrical system, the appliance frame connected ground wire MUST NOT be connected to the neutral wire of the 4-wire electrical system.
NOTE TO ELECTRICIAN: The armored cable leads supplied with the appliance are UL and CSA-recognized for connection to larger gauge household wiring. The insulation of the leads is rated at temperatures much higher than temperature rating of household wiring. The current carrying capacity of the conductor is governed by the temperature rating of the insulation around the wire, rather than the wire gauge alone.
Cooktop Installation
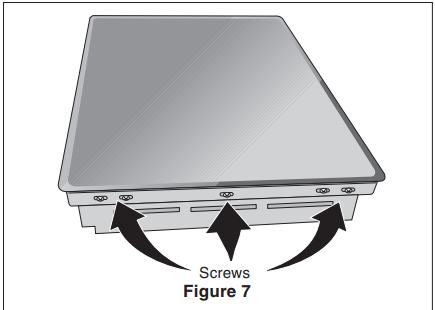
1. Visually inspect the cooktop for damage. Also make sure all cooktop screws are tight (see Figure 7).
2. Install the retainer brackets. See Figure 8.
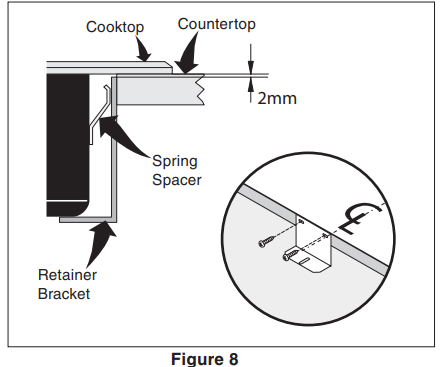
The retainer brackets MUST be installed, to meet local codes or, in their absence, with the National Electrical Code ANSI/NFPA No. 70—latest edition (see Figure 8).
3. Set the cooktop into the countertop cutout.
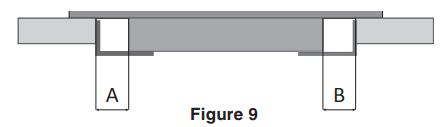
During the installation with a wide cutout make sure the cooktop is centered. A and B gap should have the same dimensions. The elongated holes on the bottom of the installation brackets are made to fit every cutout.
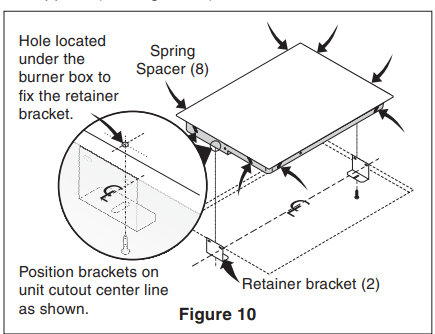
Do not remove the spring spacers on the edges of the cooktop. These spacers center the cooktop in the space provided. The cooktop must be centered to prevent excess heat buildup that may result in heat damage or fire (see Figure 10)
4. Fix the cooktop to the bracket using the screws supplied (see Figure 10).

* If no cooktop is installed directly over the oven unit, 5” (12.7 cm) maximum is allowed above the floor.
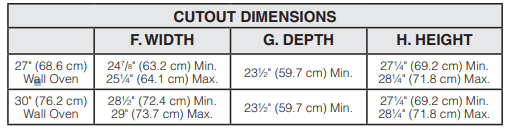
Figure 10- TYPICAL UNDER COUNTER INSTALLATION OF A SINGLE ELECTRIC BUILT-IN OVEN WITH AN ELECTRIC COOKTOP MOUNTED ABOVE