We know you are eager to start cooking, but before you do, please take some time to read this use & care guide. Whether you are an occasional cook or an expert chef, it will be to your benefit to familiarize yourself with the safety practices, features, operation and care recommendations of your Wolf drawer microwave oven.
Clean the oven thoroughly with hot water and mild detergent. Rinse and dry with a soft cloth to remove any residual oil and grease left from the manufacturing process. Refer to care recommendations on page 13.
MICROWAVE OVEN OPERATION
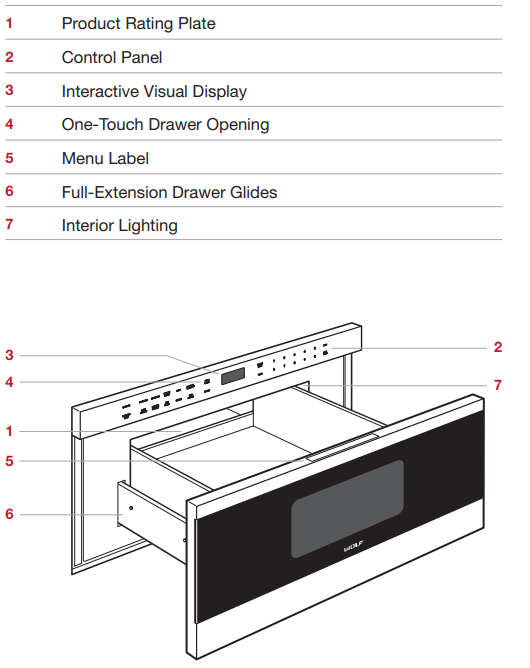
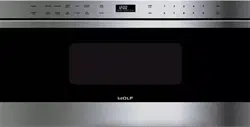
Control Panel
The control panel features touch controls and an interactive visual display. Refer to the illustration below.
CONTROL LOCK
The control lock feature prevents unwanted microwave oven operation.
To lock:
Touch CONTROL LOCK, then touch START. ‘LOCK ON’ will appear on the control panel display.
To unlock:
Touch CONTROL LOCK, then touch START. ‘LOCK OFF’ will appear on the control panel display.
OPEN / CLOSE
To open or close the drawer, touch OPEN/CLOSE. DO not push or pull the drawer by hand, except in an emergency.
Oven Operation
CLOCK
The clock must be set prior to use and after a power outage.
Setting clock:
Touch CLOCK.
Use number pads to enter the time of day, then touch CLOCK.
TIME
The timer can be set for a maximum of 99 minutes and 99 seconds. Once a time is set, the countdown will appear on the control panel display. Oven will chime and ‘END’ will appear on the display when complete.
Setting timer:
Touch TIMER.
Use number pads to enter timer duration.
Touch TIMER to begin.
Touch STOP/CLEAR to cancel.
Settings
The settings feature allows the user to select individual preferences. Preferences must be reset after a power outage.
AUDIBLE SIGNAL
An audible signal will chime with every touch and upon cook time and timer completion.
To eliminate signal:
Touch SETTINGS twice.
Touch START. ‘SOUND OFF’ will appear on the control panel display.
To restore signal:
Touch SETTINGS twice.
Touch START. ‘SOUND ON’ will appear on the control panel display.
COOK TIME COMPLETION REMINDER
Upon completion, the microwave oven will chime every ten seconds for the first minute; then every three minutes (for one hour) until STOP/CLEAR is touched.
To eliminate reminder:
Touch SETTINGS three times.
Touch START. ‘REMIND SIGNAL OFF’ will appear on the control panel display.
To restore reminder:
Touch SETTINGS three times.
Touch START. ‘REMIND SIGNAL ON’ will appear on the control panel display.
DEMONSTRATION MODE
Demonstration mode allows operation to be demonstrated without power to the microwave oven.
To enter demonstration mode:
Touch SETTINGS five times.
Touch START. ‘DEMO ON’ will appear on the control panel display.
To exit demonstration mode:
Touch SETTINGS five times.
Touch START. ‘DEMO OFF’ will appear on the control panel display.
SLEEP MODE
The microwave is shipped in sleep mode which disables the clock approximately 15 minutes after the oven is inactive. The clock will illuminate after any touch of the controls or use.
To exit sleep mode:
Touch SETTINGS six times.
Touch START. ‘SLEEP MODE OFF’ will appear on the control panel display.
To enter sleep mode:
Touch SETTINGS six times.
Touch START. ‘SLEEP MODE ON’ will appear on the control panel display.
Manual Cooking
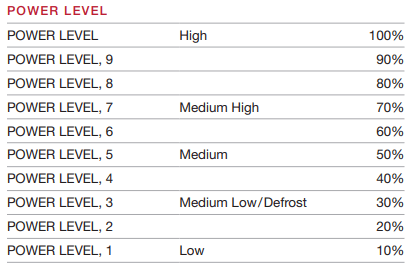
POWER LEVEL
The microwave oven has ten preset power levels.
To cook manually at 100% power:
Use number pads to enter desired cook time.
Touch START.
Oven will chime and ‘END’ will appear on the control panel display when complete.
To cook manually at a power level less than 100%, touch POWER LEVEL, then use number pads to select desired power level. Refer to the chart below.
MULTIPLE SEQUENCE COOKING
The microwave oven can be programmed for up to four automatic cooking sequences, switching from one power level to another automatically.
To use multiple sequence cooking (e.g. start at 100%, then switch to 50% power):
Touch POWER LEVEL twice, then use number pads to enter desired cook time.
Touch POWER LEVEL, then touch 5, then use number pads to enter a second cook time.
Touch START.
AUTO START
The microwave oven can be programmed to begin cooking automatically at a designated time of day. The clock must be set to the correct time for auto start to function properly.
To use auto start:
Touch SETTINGS four times.
Touch START.
Use number pads to enter start time.
Touch CLOCK.
Use number pads to enter cook time. Adjust power level if necessary.
Touch START.
Manual Cooking
ADD MINUTE
The add minute feature cooks for one minute at 100% by touching ADD MINUTE. Touch multiple times to increase cook time. Each touch increases time by one minute. This feature can cannot be used with sensor cooking settings.
KEEP WARM
The keep warm feature will keep food warm for up to 90 minutes.
To use keep warm:
Touch KEEP WARM.
Use number pads to enter desired keep warm time.
Touch START.
Touch STOP/CLEAR to cancel.
POPCORN
The popcorn feature has two options. Follow directions on the control panel display to select the desired option. Use only popcorn packaged for microwave ovens.
To use popcorn:
Touch POPCORN once for regular size or twice for snack size packages.
Touch START.
MELT
The melt feature will melt butter or chocolate.
To use melt:
Touch MELT.
For butter: Touch 1 once for 2 tablespoons or twice for 1/2 cup. For chocolate: Touch 2 once for 1 cup or twice for 1 square.
Touch START.
SOFTEN
The soften feature will soften ice cream or cream cheese.
To use soften:
Touch SOFTEN.
For ice cream: Touch 1 once for 1 pint or twice for 1/2 gallon. For cream cheese: Touch 2 once for 3 ounces or twice for 8 ounces.
Touch START.
BEVERAGE
The beverage feature will reheat a beverage or prepare hot water for coffee or tea.
To use beverage:
Touch BEVERAGE.
To reheat beverage: Touch 1 multiple times to select amount in 1/2 cup increments, up to 2 cups. For hot water: Touch 2 multiple times to select amount in 1 cup increments, up to 6 cups.
Touch START.
Sensor Cooking
WOLF GOURMET
The Wolf gourmet feature detects moisture and humidity from food as it heats and automatically adjusts cook time and power level. Fresh vegetables and poultry have two options. Follow directions on the control panel display to select the desired option. Refer to the Wolf gourmet guide on page 12.
To select Wolf gourmet:
Touch WOLF GOURMET, then use number pads to select desired food (e.g. 5 for baked potatoes).
Touch START.
SENSOR REHEAT
The sensor reheat feature detects moisture and humidity from food as it reheats, and automatically adjusts cook time and power level.
To select sensor reheat:
Touch SENSOR REHEAT.
Touch START.
TIME ADJUSTMENT
The time adjustment feature increases or decreases cook time for sensor cooking settings.
To adjust time:
Touch POWER LEVEL once for ‘MORE’ or twice for ‘LESS’ time.
Defrost
AUTO DEFROST
The auto defrost feature uses preset settings to defrost select food items. Refer to the auto defrost guide on page 13. For foods not listed, refer to manual defrost.
To select auto defrost:
Touch AUTO DEFROST, then use number pads to select desired food (e.g. 3 for boneless poultry).
Use number pads to enter weight.
Touch START. After a period of time, microwave oven will stop so food can be checked.
Open drawer and turn food over.
Repeat until defrost is complete.
MANUAL DEFROST
The manual defrost feature automatically defrosts at 30% power. Food should be turned throughout the process to ensure even defrosting. To defrost at another power level, refer to power level on page 9.
To defrost manually:
Touch manual defrost.
Use number pads to enter desired time.
Touch START.
Care Recommendations
CLEANING
Stainless steel
Use a nonabrasive stainless steel cleaner and apply with a soft lint-free cloth. To bring out the natural luster, lightly wipe surface with a water-dampened microfiber cloth followed by a dry polishing chamois. Always follow the grain of stainless steel.
Drawer front
Spray glass cleaner on a cloth to clean.
Drawer guides
Remove the food crumbs from the drawer guides. Wipe with a soft dry cloth.
control panel
Use a spray degreaser to remove fingerprints and food soil. Spray on a cloth before wiping panel. IMPORTANT NOTE: Do not spray cleaners directly on the control panel.
To lock the control panel before cleaning, refer to page 7.
interior
Wipe with a soft damp cloth. Do not use abrasive or harsh cleaners or scouring pads. For heavier soil, use baking soda or a mild soap; rinse thoroughly with hot water. Do not use chemical oven cleaners.
Waveguide cover
Located on the inside top of the microwave interior. Carefully wipe with a soft damp cloth. Do not remove the waveguide cover.
Troubleshooting
Microwave oven does not operate.
Verify power is on.
Verify electrical power to microwave oven and home circuit breaker is on.
Food in microwave oven is not heating.
Check controls to verify proper setting.
Microwave oven is in demonstration mode. Refer to page 8 to cancel.
Time on the display counts down very rapidly.
Microwave oven is in demonstration mode. Refer to page 8 to cancel.
Interior light does not work.
Light bulb is loose or burned out. Contact Wolf factory certified service.
Touch controls will not operate.
Control panel lock is on. Refer to page 7 to unlock.
Display flashes.
Power outage. Touch STOP/CLEAR and reset clock. If microwave oven was in use, reset cooking function.
Radio or TV interference caused by microwave oven.
Verify microwave oven is on a different electrical circuit, relocate radio or TV as far away from microwave oven as possible or check position and signal of antenna.
SERVICE
• Maintain the quality built into your product by contacting Wolf factory certified service. For the name of the nearest Wolf factory certified service, check the contact & support section of our website, wolfappliance.com or call Wolf customer care at 800-222-7820.
• When contacting service, you will need the model and serial number of your product. Both numbers are listed on the product rating plate. Refer to page 6 for rating plate location.
• For warranty purposes, you will also need the date of installation and name of your authorized Wolf dealer. This information should be recorded on page 2 of this guide.