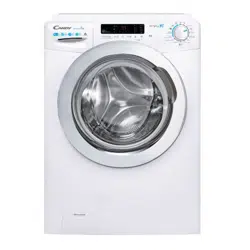
Candy CBWM 816D-80 Washing Machine
Product's Documents
Below are documents related to this product, you can read online or download:
- Owner's manual - (English) Read Online | Download pdf
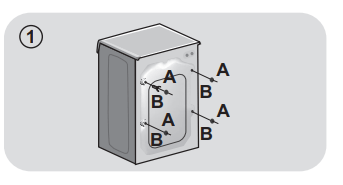
 WARNING: keep packaging materials away from children.
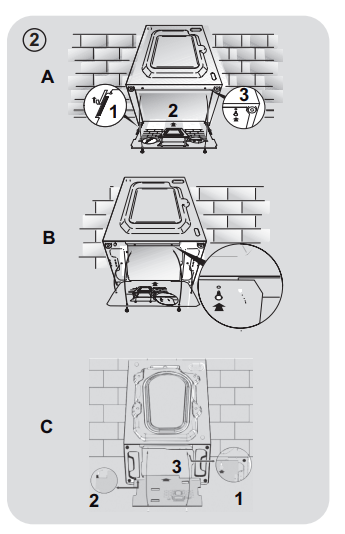
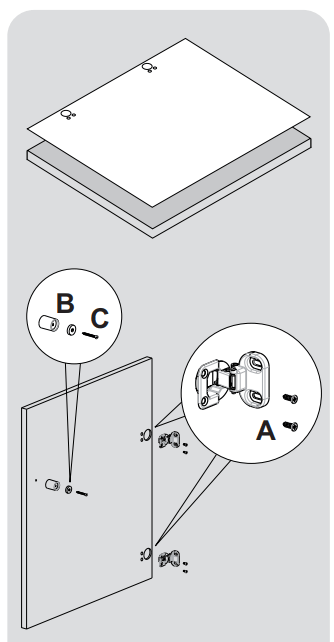
Place the corrugated plastic sheet, found on top of the appliance during the unpacking process, into the base of the appliance as shown in figure 2 (according to the model, consider version A, B or C).
Instructions for mounting the furniture door
Position the template onto the reverse of the furniture door. It is possible to mount the hinges and closure magnet on the right or left-hand side depending on your requirements. Mark the screw hole positions, then drill out these positions.
Fix the hinges in place with the 4 screws provided (A).
Fix the magnet (B) in place using screw (C).
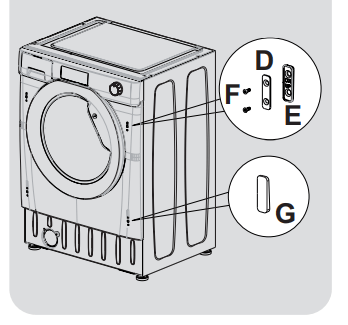
Mount the plate (D) on the right or left-hand side, depending on your installation requirements. Place the plastic support (E) under the plate and fix it in position with screw (F).
Snap mount cap (G) in the lower position. A D E G F B C Instructions for mounting the furniture door 8
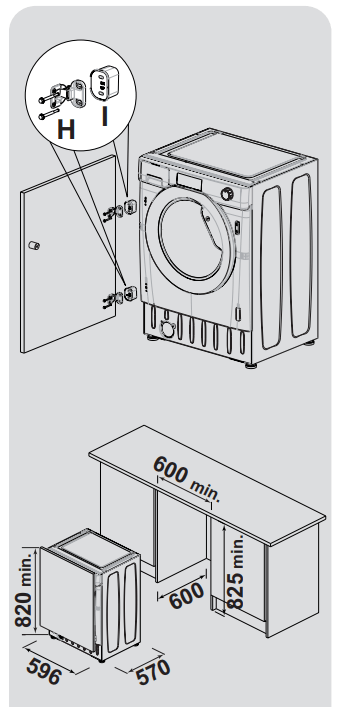
Mount the furniture door to the front of the washer using the hinges. Place the spacers under the hinges (I) and then fix in position with screw (H).
We suggest mounting the furniture door so that it opens towards the left, which is the same direction as the porthole door. This will leave more space when you are loading washing into the appliance.
Slide the washer into an opening of the size indicated in the diagram opposite. A furniture plinth may be run across the front of the appliance, but its height will be dictated by the height the washer is set at.
The 4 adjustable feet allow the height of the washer to be adjusted from 820 mm to a maximum of 840 mm. To adjust the height, you should remove the nuts fitted to each foot and replace these with the 5 mm nuts supplied. Raise the feet to your desired height and then fully tighten the lock nut to the base of the washer.
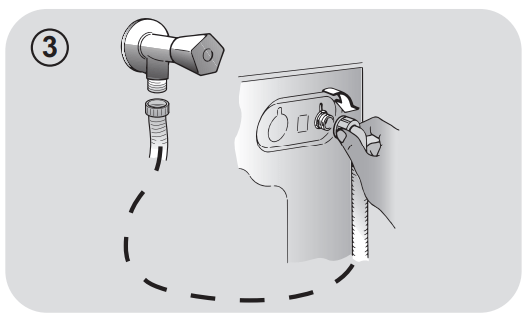
Hydraulic connections
Connect the water hose to the water supply tap (fig. 3) only using the hose supplied with the appliance (do not reuse old hose-sets).
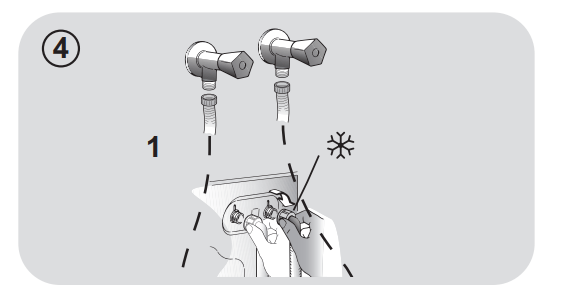
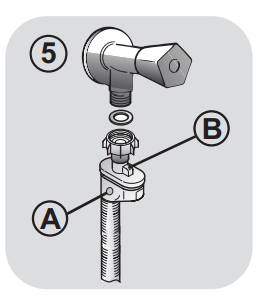
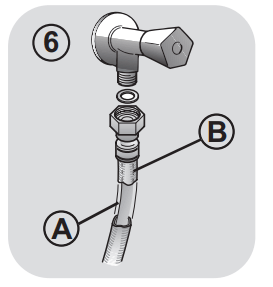
Some models may include one or more of the following features:
HOT&COLD (fig. 4): water mains connection settings with hot and cold water for higher energy savings. Connect the grey tube to the cold water tap and the red one to the hot water tap. The machine can be connected to the cold water tap only: in this case, some programs may start a few minutes later.
AQUASTOP (fig. 5): a device located on the supply tube that stops water flow if the tube deteriorates; in this case, a red mark will appear in the window “A” and the tube must be replaced. To unscrew the nut, press the one-way lock device "B".
AQUAPROTECT – SUPPLY TUBE WITH GUARD (fig. 6): Should water leak from the primary internal tube "A", the transparent containment sheath "B" will contain water to permit the washing cycle to complete. At the end of the cycle, contact the Customer Service Centre to replace the supply tube
Setting
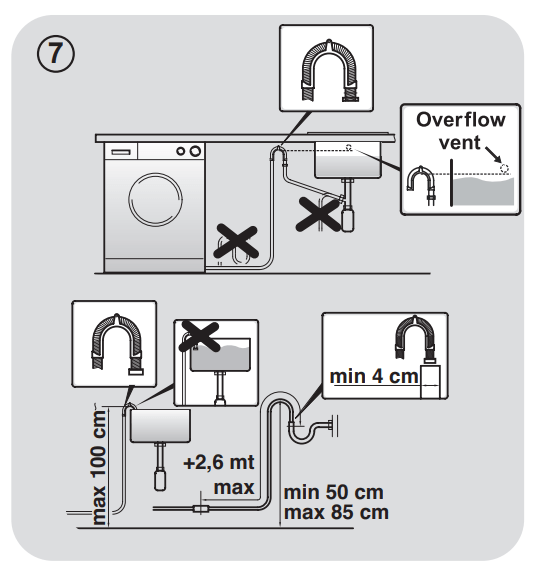
The washing machine should be installed in its final position such that the water fill hose is not kinked or trapped. The corrugated drain hose should be inserted into suitable drain pipe of between 50 cm and 85 cm height above the floor using the curved drain hose support. If an under sink connection is used the drain hose must be routed above the sink overfill opening to prevent back siphoning. Care must be taken to avoid kinking or trapping the drain hose (fig. 7).
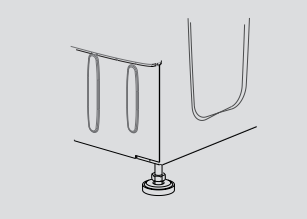
Level the appliance using the feet as illustrated in figure 8:

Plug in the appliance.
 WARNING: contact the Customer Service Centre should the power cord need replacement.
Detergent drawer
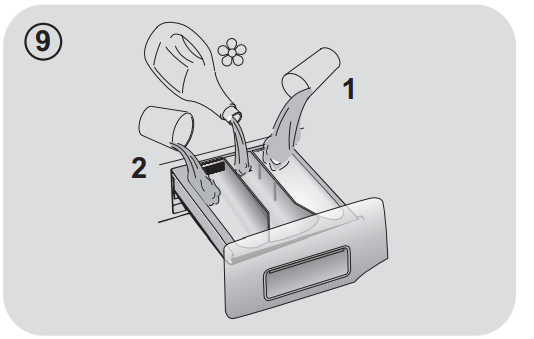
The detergent draw is split into 3 compartments as illustrated in figure 9:
 WARNING:only use liquid products; the washing machine is set to automatically dose additives at each cycle during the last rinse.
compartment "2": for washing detergent.
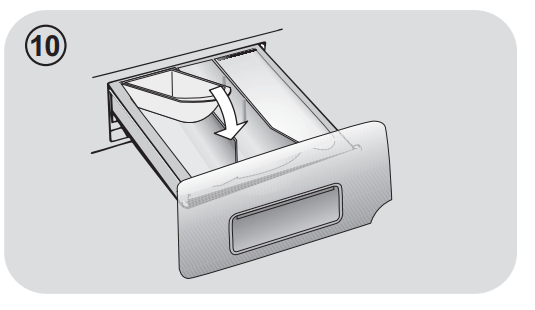
A liquid detergent cup is also included IN SOME MODELS (fig. 10). To use it, place it in compartment "2". This way, liquid detergent will only enter the drum at the right time. The cup can also be used for bleach when the “Rinse” program is selected.
 WARNING:
some detergents are not designed for use in the dispenser drawer but are supplied with their own dispenser that is placed in the drum directly.
installation faults are not covered by the manufacturers warranty.
Load tips
WARNING: when sorting laundry, make sure:
- have eliminated metallic objects such as hair clips, pins, coins, from laundry;
- to have buttoned pillow cases, closed zips, tied loose belts and long robe ribbons;
- to have removed rollers, hooks or clips from curtains;
- to have carefully read clothing washing labels;
- to have removed any persistent stains using specific detergents.
Helpful suggestions for the user
A guide environmentally friendly and economic use of your appliance.
Maximise The Load Size
Do you need to pre-wash?
Is a hot wash required?
Following is a quick guide with tips and recommendations on detergent use at the various temperatures. In any case, always read the instructions on the detergent for correct use and doses.
When washing heavily soiled whites, we recommend using cotton programs of 60°C or above and a normal washing powder (heavy duty) that contains bleaching agents that at medium/high temperatures provide excellent results.
For washes between 40°C and 60°C the type of detergent used needs to be appropriate for the type of fabric and level of soiling. Normal powders are suitable for “white” or colour fast fabrics with high soiling, while liquid detergents or “colour protecting” powders are suitable for coloured fabrics with light levels of soiling.
For washing at temperatures below 40°C we recommend the use of liquid detergents or detergents specifically labeled as suitable for low temperature washing.
For washing wool or silk, only use detergents specifically formulated for these fabrics.
To clean the washing machine exterior, use a damp cloth, avoiding abrasives, alcohol and/or solvents. To maintain a good wash performance we recommend that the soap drawer and pump filters are regularly cleaned. A monthly service wash, using a proprietary cleaner is also recommended.
Drawer cleaning
Filter cleaning
Suggestions for moves or prolonged disuse
The manufacturers warranty only covers faults within the product of a mechanical or electrical nature. Faults caused by handling, installation or miss use are not covered and may incur a charge for any repair visit to resolve.
This washing machine automatically adjusts the level of the water to the type and quantity of washing. This system gives a reduction in energy consumption and a saving in washing times.
Program selection
Should power go out when the washing machine is running, a special memory saves the settings and, when power returns, the machine resumes the cycle from where it left off.
Wait until the door locked light turns off: about 2 minutes after the program ends.
For any type of wash, see the program table and follow the operating sequence as indicated.
Technical data
Water pressure:
min 0.05 Mpa / max 0.8 Mpa (0.05 MPa dispenses approximately 1 litre of water in 10 seconds)
Spin r.p.m.: See rating plate.
Power input / Power current fuse amp / Supply voltage: See rating plate.
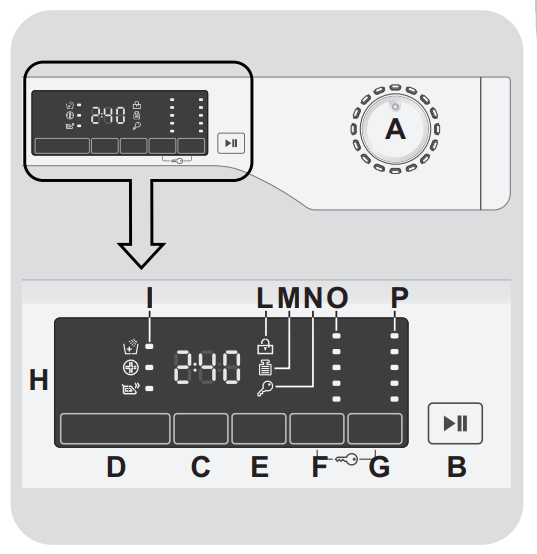
A. Programme selector with OFF position
B. START/PAUSE button
C. DELAY START button
D. OPTIONS button
E. RAPID / STAIN LEVEL button
F. TEMPERATURE SELECTION button
G. SPIN SPEED button F+G KEY LOCK
H. Digital display
I. OPTIONS indicator lights
L. DOOR LOCKED indicator light
M. KG DETECTOR indicator light
N. KEY LOCK indicator light
O. TEMPERATURE SELECTION indicator lights
P. SPIN SPEED indicator lights
Opening the door
A special safety device prevents the door from being opened immediately after the end of the cycle. Wait for 2 minutes after the wash cycle has finished and the "Door Security" light has gone out before opening the door.
PROGRAMME selector with OFF position
When the programme selector is turned the display lights up to show the settings for the programme selected. For energy saving, at the end of the cycle or with an inactivity period, the display level contrast will decrease.
N.B.: To switch the machine off, turn the programme selector to the OFF position.
The programme selector must be returned to the OFF position at the end of each cycle or when starting a subsequent wash cycle prior to the next programme being selected and started.
START/PAUSE button
Close the door BEFORE selecting the button START/PAUSE.
When the START/PAUSE button has been pressed, the appliance can take few seconds before it starts working.
ADD OR REMOVE ITEMS AFTER THE PROGRAMMES HAS STARTED (PAUSE)
Before you open the door, please check water level is below the door opening to avoid flooding
CANCELLING THE PROGRAMME
If you believe the washing machine is not working correctly, consult the quick guide provided below which includes some practical tips on how to fix the most common problems.
FOR SMART TOUCH MODELS
The Candy simply-Fi app has a Smart Check-up function that allows you to confirm the functionality and status of the product at any time. To use the Candy simply-Fi app you will need an Android smartphone with NFC technology. More info can be found on the App.
If the display of the machine is showing an error (by a code or blinking LEDs), you should turn on the App on your Android smartphone, with NFC on. Place your smart phone against the Smart Touch logo on the control panel. You should now be able to read the fault directory to solve the issue.
ERROR CODE FORMAT
| Error shown | Possible causes and practical solutions |
| E2 (with display) 2 flashes of the LEDs (without display) | The machine cannot load water. |
| Make sure the water supply tap is open | |
| Make sure the water supply hose isn’t bent, kinked or trapped. | |
| Make sure the drain pipe is at the proper height (see installation section). | |
| Close the water supply tap, unscrew the filler hose from the back of the washing machine and make sure the “anti-sand” filter is clean and not blocked. | |
| E3 (with display) 3 flashes of the LEDs (without display) | The washing machine does not drain water. |
| Make sure the filter is not clogged. | |
| Make sure the drain hose isn’t bent, kinked or trapped. | |
| Make sure the home drainage system is not blocked and is allowing water to flow through without obstruction. Try to drain the water in the sink | |
| E4 (with display) 4 flashes of the LEDs (without display) | There is too much foam and/or water. |
| Ensure the correct amount of detergent is being used and the detergent is designed for use in a washing machine. | |
| E7 (with display) 7 flashes of the LEDs (without display) | Door problem |
Make sure the door is correctly closed. Make sure the clothes inside the drum are not preventing the door from closing fully. | |
| If the door is locked, turn off and unplug the washing machine from the electrical supply socket, wait 2-3 minutes and reopen the door. | |
| Any other code | Turn off and unplug the washing machine, wait a minute. Turn on the machine and restart a program. If the error occurs again contact an Authorised Customer Service Centre directly. |
| The washing machine does not work / start | Make sure the product is plugged into a working supply socket. |
| Make sure power is on | |
| Make sure the wall socket is working, testing it with another appliance such as a lamp. | |
| The door may not be correctly closed: open and close it again. | |
| Check whether the required program was correctly selected and the start button pressed. | |
| Make sure the washing machine is not in pause or time delay mode. | |
| Water leaked on the floor near the washing machine | This may be due to a leak from the seal between the tap, supply hose and fill valve; in this case, replace it and tighten the hose connections correctly |
| Make sure the front filter is correctly closed. | |
| The washing machine does not spin | The machine is fitted with a detection system that protects the load and product from damage if the load is not balanced before spinning. This may result in:- • The machine attempts to balance the load, increasing the time of spin. • Reduction of the speed of spin to decrease vibrations and noise. • The spin cycle aborting to protect the machine and load. If this is experienced remove the load de-tangle it, reload it and restart the spin program. |
| This could be due to the fact that water has not been completely drained: wait a few minutes. If the problem persists, see Error 3 section | |
| Some models include a "no spin" function: make sure it is not selected | |
| Check which options are selected and their effect on the spin cycle. | |
| Excessive detergent can impede the spin cycle, ensure the correct amount of detergent is being used. | |
| Strong vibrations / noises are heard during the spin cycle | The washing machine may not be fully levelled: if necessary, adjust the feet as indicated in the specific section. |
| Make sure transport screws, rubber bungs and spacer tubes were removed. | |
| Make sure there are no foreign objects inside the drum (coins, hinges, buttons, etc…). |
The standard manufacturer warranty covers faults caused by electrical or mechanical faults in the product due to an act or omission of the manufacturer. If a fault is found to be caused by factors outside the product supplied, miss-use or as a result of the instructions on use not being followed, a charge may be applied.
The use of ecological detergents without phosphates may cause the following effects:
- cloudier rinse drain water: This effect is tied to the suspended zeolites which do not have negative effects on rinse efficiency.
- white powder (zeolites) on laundry at the end of the wash: this is normal, the powder is not absorbed by fabric and does not change its colour. To remove the zeolites, select a rinse programme. In the future consider using slightly less detergent.
- foam in the water at last rinse: this does not necessary indicate poor rinsing. Consider using less detergent in future washes.
- abundant foam: This is often due to the anionic surfactants found in the detergents which are hard to eliminate from laundry. In this case, do not re-rinse to eliminate these effects: it will not help at all. We suggest conducting a maintenance wash using a proprietary cleaner.
If the problem persists or if you suspect a malfunction, immediately contact an Authorised Customer Service Centre.
It is always recommended to use original spare parts, that are available at our Authorised Customer Service Centres.
Warranty
The product is guaranteed under the terms and conditions stated on the certificate included with the product. The warranty certificate must be duly filled in and stored, so as to be shown to the Authorised Customer Service Centre in case of need. Proof of purchase must be made available at the time of any warranty related repair.